LF will be replaced by CRLF
Git can auto-converting CRLF line endings into LF when you add a file to the index. Turn on this functionality with the core.autocrlf setting.
If you’re on a Windows machine, set it to true – this converts LF endings into CRLF when you check out code:
git config --global core.autocrlf true
git config --global core.autocrlf false
Although most developers use the command line when working with version control systems, there are many GUI clients available that can potentially simplify the process.
GUI clients might be especially helpful when you’re trying to see what has changed in a file since the GUI can quickly
Follow a typical workflow with a GitHub project
In this tutorial, you’ll use GitHub Desktop to manage the Git workflow.
Rather than working in a GitHub wiki (as you did in the previous GitHub tutorial), you’ll work in a regular Git repository.
This is because GitHub wikis have some limitations when it comes to making pull requests.
To set up your Git repo using the GitHub Desktop client:
First, download and install GitHub Desktop.
Launch the app and sign in.
(You should already have a GitHub account from previous tutorials, but if not, create one.)
Go to Github.com and browse to the repository you created in the GitHub tutorial, but not the wiki.
Just go to the main repo.
(If you didn’t do the previous activity, just create a new repository.)
While viewing your GitHub repo in the browser, click Clone or download and select Open in Desktop.
Open in GitHub Desktop
Open GitHub Desktop client and go to File > Clone Repository.
In the confirmation dialog, select Open GitHub Desktop.app.
GitHub Desktop should launch with a “Clone a Repository” dialog box about where to clone the repository.
If desired, you can change the Local Path.
Click the URL tab, and then paste in the clone URL.
In the Local Path field, select where you want the repo cloned.
For example:
Selecting paths for the repo in GitHub Desktop
Click Clone.
Go into the repository where GitHub Desktop cloned the repo (use your Finder or browse the folders with Finder or Explorer) and either add a simple text file with some content or make a change to an existing file.
Go back to GitHub Desktop.
You’ll see the new file you added in the list of uncommitted changes on the left.
Uncommitted changes shown
In the list of changed files, the green + means you’ve added a new file.
A yellow circle means you’ve modified an existing file.
In the lower-left corner of the GitHub Desktop client (where it says “Summary” and “Description”), type a commit message, and then click Commit to master.
When you commit the changes, the left pane no longer shows the list of uncommitted changes.
However, you’ve committed the changes only locally.
You still have to push the commit to the remote (origin) repository.
(“origin” is the alias name that refers to the remote repository.)
Click Push origin at the top.
You’ll see GitHub Desktop show that it’s “Pushing to origin.”
If you view your repository online, you’ll see that the change you made has been pushed to the master branch on origin.
You can also click the History tab in the GitHub Desktop client (instead of the Changes tab), or go to View > Show History to see the changes you previously committed.
Although I prefer to use the terminal instead of the GitHub Desktop GUI, the GUI gives you an easier visual experience to see the changes made to a repository.
You can use both the command line and Desktop client in combination, if you want.
Create a branch
Now let’s create a branch, make some changes, and see how the changes are specific to that branch.
In the GitHub Desktop client, go to Branch > New Branch and create a new branch.
Call it “development” branch, and click Create Branch.
Creating a new branch
When you create the branch, you’ll see the Current branch drop-down menu indicate that you’re working in that branch.
Creating a branch copies the existing content (from the branch you’re currently in, master) into the new branch (development).
Working in a branch
Using Finder or Explorer, browse to the file you created earlier and make a change to it, such as adding a new line with some text.
Save the changes.
Return to GitHub Desktop and notice that on the Changes tab, you have new modified files.
New files modified
The file changes show deleted lines in red and new lines in green.
The colors help you see what changed.
Commit the changes using the options in the lower-left corner, and click Commit to development.
Click Publish branch (on the top of the GitHub Desktop window) to make the local branch also available on origin (GitHub).
(Remember, there are usually two versions of a branch — the local version and the remote version.)
Switch back to your master branch (using the Branch drop-down option at the top of the GitHub Desktop client).
Then look at your file (in your text editor, such as Sublime text).
Note how the file changes you made while editing in the development branch don’t appear in your master branch.
You usually create a new branch when you’re making extensive changes to your content.
For example, suppose you want to revamp a section (“Section X”) in your docs.
However, you might want to publish other updates before publishing the extensive changes in Section X.
If you were working in the same branch, it would be difficult to selectively push updates on a few files outside of Section X without pushing updates you’ve made to files in Section X as well.
Through branching, you can confine your changes to a specific version that you don’t push live until you’re ready to merge the changes into your master branch.
Merge the development branch into master
Now let’s merge the development branch into the master branch.
In the GitHub Desktop client, switch to the branch you want to merge the development branch into.
From the branch selector, select the master branch.
Go to Branch > Merge into Current Branch.
In the merge window, select the development branch, and then click Merge development into master.
Merging into master
If you look at your changed file, you should see the changes in the master branch.
Then click Push origin to push the changes to origin.
You will now see the changes reflected on the file on GitHub.
Merge the branch through a pull request
Now let’s merge the development branch into the master using a pull request workflow.
We’ll pretend that we’ve cloned a repo managed by engineers, and we want to have the engineers merge in the development branch.
(In other words, we might not have rights to merge branches into the master.) To do this, we’ll create a pull request.
Just as you did in the previous section, switch to the development branch, make some updates to the content in a file, and then save and commit the changes.
After committing the changes, click Push origin to push your changes to the remote version of the development branch on GitHub.
In the GitHub Desktop client, while you have development branch selected, go to Branch > Create Pull Request.
GitHub opens in the browser with the Pull Request form opened.
Pull request
The left-facing arrow (pointing from the development branch towards the master) indicates that the pull request (“PR”) wants to merge the development branch into the master branch.
Describe the pull request, and then click Create pull request.
At this point, engineers would get an email request asking for them to merge in the edits.
Play the part of the engineer by going to the Pull requests tab (on GitHub) to examine and confirm the merge request.
As long as the merge request doesn’t pose any conflicts, you’ll see a Merge pull request button.
Confirm merge request
To see what changes you’re merging into master, you can click the Files changed tab (which appears on the secondary navigation bar near the top).
Then click Merge pull request to merge in the branch, and click Confirm merge to complete the merge.
Now let’s get the updates you merged into the masterbranch online into your local copy.
In your GitHub Desktop GUI client, select the master branch, and then click the Fetch origin button.
Fetch gets the latest updates from origin but doesn’t update your local working copy with the changes.
After you click Fetch origin, the button changes to Pull Origin.
Click Pull Origin to update your local working copy with the fetched updates.
Now check your files and notice that the updates that were originally in the development branch now appear in master.
For a more detailed tutorial in making pull requests using the GitHub interface, see Pull request workflows through GitHub.
I include an extensive tutorial with pull requests because it will likely be a common workflow if you are contributing to an open-source project.
Managing merge conflicts
Suppose you make a change on your local copy of a file in the repository, and someone else changes the same file using the online GitHub.com browser interface.
The changes conflict with each other.
What happens?
When you click Push origin from the GitHub Desktop client, you’ll see a message saying that the repository has been updated since you last pulled:
“The repository has been updated since you last pulled.
Try pulling before pushing.”
The button that previously said “Push origin” now says “Pull origin.” Click Pull origin.
You now get another error message that says,
“We found some conflicts while trying to merge.
Please resolve the conflicts and commit the changes.”
If you decide to commit your changes, you’ll see a message that says:
“Please resolve all conflicted files, commit, and then try syncing again.”
The GitHub Desktop client displays an exclamation mark next to files with merge conflicts.
Open up a conflict file and look for the conflict markers (<<<<<<< and >>>>>>>).
For example, you might see this:
<<<<<<< HEAD
This is an edit I made locally.
=======
This is an edit I made from the browser.
>>>>>>> c163ead57f6793678dd41b5efeef372d9bd81035
(From the command line, you can also run git status to see which files have conflicts.) The content in HEAD shows your local changes.
The content below the ======= shows changes made by elsewhere.
Fix all the conflicts by adjusting the content between the content markers and then deleting the content markers.
For example, update the content to this:
This is an edit I made locally.
Now you need to re-add the file to Git again.
In the GitHub Desktop client, commit your changes to the updated files.
Then click Push origin.
The updates on your local get pushed to the remote without any more conflicts.
Conclusion
The more you use GitHub, the more familiar you’ll become with the workflows you need.
Git is a robust, powerful collaboration platform, and there are many commands and workflows and features that you could adopt for a variety of scenarios.
Despite Git’s variety of commands and workflows, most likely the scenarios you’ll actually use are somewhat limited in scope and learnable without too much effort.
Pretty soon, these workflows will become automatic.
Although we’ve been using the GitHub Desktop client for this exercise, you can do all of this through the command line, and you’ll probably find it preferable that way.
However, the GitHub Desktop client can be a good starting point as you transition into becoming more of a Git power user.
“Please make sure you have the correct access rights and the repository exists”
reason: git URL might have changed.
action:
# View existing remotes
git remote -v
# Change the 'origin' remote's URL
git remote set-url origin https://github.com/williamkpchan/williamkpchan.github.io
update an existing github repo from a different computer
Run
git clone https://github.com/your/repo
to clone your project on your computer.
It will create a new folder containing your Android project
Copy your changed files in this new folder
You can now commit your changes from this folder
If it is your repository
If the repository belongs to you, you can start committing changes on the new computer and then pushing them to master:
git push -u origin master
The origin is the name of the remote directory.
If you use the clone command on your own repository the origin of the cloned repository will automatically be your github repository.
It is essential that if you clone a repository so that it is on two different computers, you use the pull command (see below) before you start working. Otherwise, you will put one of your repositories out of synch with the “master” repository and you will need to use the “merge” command, which can be rather tedious.
GitHub Actions
usage: git [--version] [--help] [-C <path>] [-c name=value]
[--exec-path[=<path>]] [--html-path] [--man-path] [--info-path]
[-p | --paginate | --no-pager] [--no-replace-objects] [--bare]
[--git-dir=<path>] [--work-tree=<path>] [--namespace=<name>]
<command> [<args>]
These are common Git commands used in various situations:
start a working area (see also: git help tutorial)
clone Clone a repository into a new directory
init Create an empty Git repository or reinitialize an existing one
work on the current change (see also: git help everyday)
add Add file contents to the index
mv Move or rename a file, a directory, or a symlink
reset Reset current HEAD to the specified state
rm Remove files from the working tree and from the index
examine the history and state (see also: git help revisions)
bisect Use binary search to find the commit that introduced a bug
grep Print lines matching a pattern
log Show commit logs
show Show various types of objects
status Show the working tree status
grow, mark and tweak your common history
branch List, create, or delete branches
checkout Switch branches or restore working tree files
commit Record changes to the repository
diff Show changes between commits, commit and working tree, etc
merge Join two or more development histories together
rebase Reapply commits on top of another base tip
tag Create, list, delete or verify a tag object signed with GPG
collaborate (see also: git help workflows)
fetch Download objects and refs from another repository
pull Fetch from and integrate with another repository or a local branch
push Update remote refs along with associated objects
'git help -a' and 'git help -g' list available subcommands and some
concept guides. See 'git help <command>' or 'git help <concept>'
to read about a specific subcommand or concept.
batch file push to github with username and password
Two approaches can be used.
SSH keys are a way to identify trusted computers, without involving passwords.
One needs to generate an SSH key and add the public key to your GitHub account.
A guide on how to set up SSH key can be found here
But this is not the main focus for this article.
The key question remains:
Is there a way to skip typing my username and/password when using HTTPS in GitHub?
The answer is yes.
This is done by using credential helpers.
And this is the second approach.
Credential helpers basically tells Git to remember your GitHub username and password every time it talks to GitHub.
The syntax is given by:
git config credential.https://example.com.username myusername
git config credential.helper “$helper $options”
Therefore, credential helpers are external programs from which Git can request both usernames and passwords.
Credential helpers are in two forms: cache which caches credentials in memory for a short period of time, and store which basically stores credentials indefinitely on disk.
Once you have selected the helper, you can tell Git to use it by putting its name into the credential.helper variable.
Find a helper:
git help -a | grep credential-credential-foo
2. Read its description.
git help credential-foo
3. Tell Git to use it.
git config — global credential.helper foo
Assuming you have a remote with the following URL https://github.com/adambajumba/MestEIT, update the Git configuration to use the helper whenever it needs authentication steps:
$ git config --global \credential.https://github.com/myusername/mysecretproject.username \your_github_account_name$ git config --global \credential.https://github.com/adambajumba/MestEIT.adambajumba \IsaacJumba
Note that the remote URL is appended with a trailing .username fragment which becomes the key and the GitHub username becomes the value.Once the username is set, map the helper: And you are done! That easy, right?
$ git config --global core.askpass ~/.git_credential_helper.rb
An example of how it works would be:
$ git config credential.helper store
$ git push http://example.com/repo.git
Username: <type your username>
Password: <type your password>[several days later]
$ git push http://example.com/repo.git
[your credentials are used automatically]
In conclusion, the credential helper does not work in all versions of git but from version 1.8 and above.
Working with SSH key passphrases
Git Tools - Credential Storage
If you use the SSH transport for connecting to remotes, it’s possible for you to have a key without a passphrase, which allows you to securely transfer data without typing in your username and password.
However, this isn’t possible with the HTTP protocols – every connection needs a username and password.
This gets even harder for systems with two-factor authentication, where the token you use for a password is randomly generated and unpronounceable.
Fortunately, Git has a credentials system that can help with this.
Git has a few options provided in the box:
The default is not to cache at all.
Every connection will prompt you for your username and password.
The “cache” mode keeps credentials in memory for a certain period of time.
None of the passwords are ever stored on disk, and they are purged from the cache after 15 minutes.
The “store” mode saves the credentials to a plain-text file on disk, and they never expire.
This means that until you change your password for the Git host, you won’t ever have to type in your credentials again.
The downside of this approach is that your passwords are stored in cleartext in a plain file in your home directory.
If you’re using a Mac, Git comes with an “osxkeychain” mode, which caches credentials in the secure keychain that’s attached to your system account.
This method stores the credentials on disk, and they never expire, but they’re encrypted with the same system that stores HTTPS certificates and Safari auto-fills.
If you’re using Windows, you can install a helper called “Git Credential Manager for Windows.”
This is similar to the “osxkeychain” helper described above, but uses the Windows Credential Store to control sensitive information.
It can be found at https://github.com/Microsoft/Git-Credential-Manager-for-Windows.
You can choose one of these methods by setting a Git configuration value:
$ git config --global credential.helper cache
Some of these helpers have options.
The “store” helper can take a --file <path> argument, which customizes where the plain-text file is saved (the default is ~/.git-credentials).
The “cache” helper accepts the --timeout <seconds> option, which changes the amount of time its daemon is kept running (the default is “900”, or 15 minutes).
Here’s an example of how you’d configure the “store” helper with a custom file name:
$ git config --global credential.helper 'store --file ~/.my-credentials'
Git even allows you to configure several helpers.
When looking for credentials for a particular host, Git will query them in order, and stop after the first answer is provided.
When saving credentials, Git will send the username and password to all of the helpers in the list, and they can choose what to do with them.
Here’s what a .gitconfig would look like if you had a credentials file on a thumb drive, but wanted to use the in-memory cache to save some typing if the drive isn’t plugged in:
[credential]
helper = store --file /mnt/thumbdrive/.git-credentials
helper = cache --timeout 30000
Under the Hood
How does this all work?
Git’s root command for the credential-helper system is git credential, which takes a command as an argument, and then more input through stdin.
This might be easier to understand with an example.
Let’s say that a credential helper has been configured, and the helper has stored credentials for mygithost.
Here’s a session that uses the “fill” command, which is invoked when Git is trying to find credentials for a host:
$ git credential fill (1)
protocol=https (2)
host=mygithost
(3)
protocol=https (4)
host=mygithost
username=bob
password=s3cre7
$ git credential fill (5)
protocol=https
host=unknownhost
Username for 'https://unknownhost': bob
Password for 'https://bob@unknownhost':
protocol=https
host=unknownhost
username=bob
password=s3cre7
This is the command line that initiates the interaction.
Git-credential is then waiting for input on stdin.
We provide it with the things we know: the protocol and hostname.
A blank line indicates that the input is complete, and the credential system should answer with what it knows.
Git-credential then takes over, and writes to stdout with the bits of information it found.
If credentials are not found, Git asks the user for the username and password, and provides them back to the invoking stdout (here they’re attached to the same console).
The credential system is actually invoking a program that’s separate from Git itself; which one and how depends on the credential.helper configuration value.
There are several forms it can take:
Configuration Value
Behavior
foo
Runs git-credential-foo
foo -a --opt=bcd
Runs git-credential-foo -a --opt=bcd
/absolute/path/foo -xyz
Runs /absolute/path/foo -xyz
!f() { echo "password=s3cre7"; }; f
Code after ! evaluated in shell
So the helpers described above are actually named git-credential-cache, git-credential-store, and so on, and we can configure them to take command-line arguments.
The general form for this is “git-credential-foo [args] <action>.”
The stdin/stdout protocol is the same as git-credential, but they use a slightly different set of actions:
get is a request for a username/password pair.
store is a request to save a set of credentials in this helper’s memory.
erase purge the credentials for the given properties from this helper’s memory.
For the store and erase actions, no response is required (Git ignores it anyway).
For the get action, however, Git is very interested in what the helper has to say.
If the helper doesn’t know anything useful, it can simply exit with no output, but if it does know, it should augment the provided information with the information it has stored.
The output is treated like a series of assignment statements; anything provided will replace what Git already knows.
Here’s the same example from above, but skipping git-credential and going straight for git-credential-store:
$ git credential-store --file ~/git.store store (1)

protocol=https
host=mygithost
username=bob
password=s3cre7
$ git credential-store --file ~/git.store get (2)
protocol=https
host=mygithost
username=bob (3)
password=s3cre7
Here we tell git-credential-store to save some credentials: the username “bob” and the password “s3cre7” are to be used when https://mygithost is accessed.
Now we’ll retrieve those credentials.
We provide the parts of the connection we already know (https://mygithost), and an empty line.
git-credential-store replies with the username and password we stored above.
Here’s what the ~/git.store file looks like:
https://bob:s3cre7@mygithost
It’s just a series of lines, each of which contains a credential-decorated URL.
The osxkeychain and wincred helpers use the native format of their backing stores, while cache uses its own in-memory format (which no other process can read).
A Custom Credential Cache
Given that git-credential-store and friends are separate programs from Git, it’s not much of a leap to realize that any program can be a Git credential helper.
The helpers provided by Git cover many common use cases, but not all.
For example, let’s say your team has some credentials that are shared with the entire team, perhaps for deployment.
These are stored in a shared directory, but you don’t want to copy them to your own credential store, because they change often.
None of the existing helpers cover this case; let’s see what it would take to write our own.
There are several key features this program needs to have:
The only action we need to pay attention to is get; store and erase are write operations, so we’ll just exit cleanly when they’re received.
The file format of the shared-credential file is the same as that used by git-credential-store.
The location of that file is fairly standard, but we should allow the user to pass a custom path just in case.
Once again, we’ll write this extension in Ruby, but any language will work so long as Git can execute the finished product.
Here’s the full source code of our new credential helper:
#!/usr/bin/env ruby
require 'optparse'
path = File.expand_path '~/.git-credentials' # (1)

OptionParser.new do |opts|
    opts.banner = 'USAGE: git-credential-read-only [options] <action>'
    opts.on('-f', '--file PATH', 'Specify path for backing store') do |argpath|
        path = File.expand_path argpath
    end
end.parse!
exit(0) unless ARGV[0].downcase == 'get' # (2)
exit(0) unless File.exists? path

known = {} # (3)
while line = STDIN.gets
    break if line.strip == ''
    k,v = line.strip.split '=', 2
    known[k] = v
end
File.readlines(path).each do |fileline| # (4)
    prot,user,pass,host = fileline.scan(/^(.*?):\/\/(.*?):(.*?)@(.*)$/).first

    if prot == known['protocol'] and host == known['host'] and user == known['username'] then
        puts "protocol=#{prot}"
        puts "host=#{host}"
        puts "username=#{user}"
        puts "password=#{pass}"
        exit(0)
    end
end
Here we parse the command-line options, allowing the user to specify the input file.
The default is ~/.git-credentials.
This program only responds if the action is get and the backing-store file exists.
This loop reads from stdin until the first blank line is reached.
The inputs are stored in the known hash for later reference.
This loop reads the contents of the storage file, looking for matches.
If the protocol, host, and username from known match this line, the program prints the results to stdout and exits.
We’ll save our helper as git-credential-read-only, put it somewhere in our PATH and mark it executable.
Here’s what an interactive session looks like:
$ git credential-read-only --file=/mnt/shared/creds get
protocol=https
host=mygithost
username=bob
protocol=https
host=mygithost
username=bob
password=s3cre7
Since its name starts with “git-”, we can use the simple syntax for the configuration value:
$ git config --global credential.helper 'read-only --file /mnt/shared/creds'
As you can see, extending this system is pretty straightforward, and can solve some common problems for you and your team.
use a github repo from a same account but different computers
supplying --force as an argument to the git push command
first fetch those changes from the remote, and then pull them into your local repository on computer 1.
$ git fetch origin
$ git pull origin master
In these commands, origin is the name of your github remote and master is the name of the branch you are currently tracking.
These names can be changed, but these are the defaults which appear to be the names in your case.
Note, you will likely need to revert the new changes you made to computer 1.
Git will have a hard time trying to merge the changes from computer 2 with the changes you made to computer 1 when you were trying to commit the second time.
pull is fetch + merge.
If you've already run fetch, there's no need to run pull, merge should be enough.
Or just run pull without fetching first, as it fetches on its own.
Multiple Github Accounts on a single Machine
Let suppose I have two github accounts, https://github.com/rahul-office and https://github.com/rahul-personal. Now i want to setup my mac to easily talk to both the github accounts.
NOTE: This logic can be extended to more than two accounts also. :)
The setup can be done in 5 easy steps:
Step 1: Create SSH keys for all accounts
Step 2: Add SSH keys to SSH Agent
Step 3: Add SSH public key to the Github
Step 4: Create a Config File and Make Host Entries
Step 5: Cloning GitHub repositories using different accounts
Create SSH keys for all accounts
First make sure your current directory is your .ssh folder.
$ cd ~/.ssh
Syntax for generating unique ssh key for ann account is:
ssh-keygen -t rsa -C "your-email-address" -f "github-username"
here,
-C stands for comment to help identify your ssh key
-f stands for the file name where your ssh key get saved
Now generating SSH keys for my two accounts
ssh-keygen -t rsa -C "my_office_email@gmail.com" -f "github-rahul-office"
ssh-keygen -t rsa -C "my_personal_email@gmail.com" -f "github-rahul-personal"
Notice here rahul-office and rahul-work are the username of my github accounts corresponding to my_office_email@gmail.com and my_personal_email@gmail.com email ids respectively.
After entering the command the terminal will ask for passphrase, leave it empty and proceed.
Now after adding keys , in your .ssh folder, a public key and a private will get generated.
The public key will have an extention .pub and private key will be there without any extention both having same name which you have passed after -f option in the above command. (in my case github-rahul-office and github-rahu-personal)
Add SSH keys to SSH Agent
Now we have the keys but it cannot be used until we add them to the SSH Agent.
ssh-add -K ~/.ssh/github-rahul-office
ssh-add -K ~/.ssh/github-rahul-personal
You can read more about adding keys to SSH Agent here.
Add SSH public key to the Github
For the next step we need to add our public key (that we have generated in our previous step) and add it to corresponding github accounts.
For doing this we need to:
1. Copy the public key We can copy the public key either by opening the github-rahul-office.pub file in vim and then copying the content of it.
vim ~/.ssh/github-rahul-office.pub
vim ~/.ssh/github-rahul-personal.pub
OR
We can directly copy the content of the public key file in the clipboard.
pbcopy < ~/.ssh/github-rahul-office.pub
pbcopy < ~/.ssh/github-rahul-personal.pub
2. Paste the public key on Github
Sign in to Github Account
Goto Settings > SSH and GPG keys > New SSH Key
Paste your copied public key and give it a Title of your choice.
The ~/.ssh/config file allows us specify many config options for SSH.
If config file not already exists then create one (make sure you are in ~/.ssh directory)
touch config
The commands below opens config in your default editor....Likely TextEdit, VS Code.
open config
Now we need to add these lines to the file, each block corresponding to each account we created earlier.
#rahul-office account
Host github.com-rahul-office
HostName github.com
User git
IdentityFile ~/.ssh/github-rahul-office
#rahul-personal account
Host github.com-rahul-personal
HostName github.com
User git
IdentityFile ~/.ssh/github-rahul-personal
Cloning GitHub repositories using different accounts
So we are done with our setups and now its time to see it in action. We will clone a repository using one of the account we have added.
Make a new project folder where you want to clone your repository and go to that directory from your terminal.
For Example:
I am making a repository on my personal github account and naming it TestRepo
Now for cloning the repo use the below command:
git clone git@github.com-{your-username}:{owner-user-name}/{the-repo-name}.git
[e.g.] git clone git@github.com-rahul-personal:rahul-personal/TestRepo.git
Finally
From now on, to ensure that our commits and pushes from each repository on the system uses the correct GitHub user — we will have to configure user.email and user.name in every repository freshly cloned or existing before.
To do this use the following commands.
git config user.email "my_office_email@gmail.com"
git config user.name "Rahul Pandey"
git config user.email "my-personal-email@gmail.com"
git config user.name "Rahul Pandey"
Pick the correct pair for your repository accordingly.
To push or pull to the correct account we need to add the remote origin to the project
git remote add origin git@github.com-rahul-personal:rahul-personal
git remote add origin git@github.com-rahul-office:rahul-office
Now you can use:
git push
git pull
P.S: If this gist has been helpful to you, kindly consider leaving a star.
If you'd like, let's connect on LinkedIn and build a supportive community together.
Use Multiple GitHub Accounts With One Computer
How to set up and change SSH keys to use multiple GitHub accounts on one machine
I currently have two GitHub accounts: a personal and a work one.
Obviously, my work computer is set up with my work account.
I wanted to figure out how to push to GitHub with my personal account whenever I’m working on side projects via my work computer.
At first glance, for the seemingly simple task of switching between two accounts, the process seemed a little involved.
But once you break things down into steps, it’s less daunting.
Quick Note on SSH
SSH(or secure shell) is a network protocol which, among other things, allows one computer to communicate with another over an unsecured network like the internet.
Without encryption, data travels over the web in plain text form.
Consequently, it would be easy for someone to intercept valuable data, like user names or passwords, for wicked intent.SSH allows encryption of your data by way of a tunnel, which permits your computer to securely connect to another.
This is done via the use of SSH keys and public-key cryptography (aka asymmetric cryptography) which are used for authentication purposes between said computers, in order to decrypt the information being shared.
Here’s a great video explaining the concept of asymmetric cryptography further.SSH is commonly implemented using the client-server model.
Client-server model with asymmetric cryptography
When running any remote commands from our computer(e.g., git push or git pull) to a remote repository (GitHub), it’s this protocol that enables us to do so without having to supply a password and username each time.
Let’s now look at the configuration for it.
Configuration
The configuration can essentially be broken down into four steps:
Generate an SSH key for the new account.
Attach this new key to your GitHub account.
Register the new key with the SSH agent.
Create an SSH config file.
Step 1. Generate an SSH key for the new account
Using the SSH protocol, we’ll have to generate a key for any new account we’d like to use.
Hop onto your terminal, run the following command, and attach your GitHub email address:$ ssh-keygen -t rsa -C "uremail@gmail.com" A new key pair will be generated.
At this point, you want to be careful not to overwrite your existing key pair, which would look like the following:({your home Directory}/.ssh/id_rsa):Instead, you can copy the directory and modify the file name to include your account name, as in the screenshot below:
You will then be prompted to enter a passphrase.
Your new SSH key will be found at a directory similar to this:{your home Directory}/.ssh/id_rsa_uraccount
Step 2. Attach the new key to your GitHub account
We’ve just created a public key, and now we need to allow our GitHub account to trust it.
This allows you to not have to authenticate every time you run a remote command (git push, git pull).
Copy the public key via the following command pbcopy < ~/.ssh/id_rsa.pub and then log in to your personal GitHub account:
Go to Settings.
From the left side navigation, click SSH and GPG keys.
Click on New SSH key, name it (it's a good idea to name it after the computer you’re using it in), and paste the key you previously copied.
Click Add key.
Step 3. Register the new key with the SSH agent
We now need to register our key with the SSH agent.
The SSH agent keeps track of user identity keys and passphrases and works as an additional layer of security.
In your terminal, write the command ssh-add and add the path to the files containing your keys.
As shown below, we are adding keys for our main account and the second account we just created.ssh-add ~/.ssh/id_rsassh-add ~/.ssh/id_rsa_uraccount
Step 4. Create an SSH config file
The SSH config file allows us to set configuration rules that will specify when we want to push to our work account versus our personal account.
This is done by defining which identity file to use ( the ones we’ve added to our SSH agent ) on which domain.
If the file has already been created, it should be at ~/.ssh/config.
But by default, it will not exist, so we’ll need to create it by running the command touch ~/.ssh/config.
You can use any text editor or IDE to open and edit the file.
I went with the terminal’s text editor vim.
I don’t use it frequently, and it does have a bit of a learning curve, so I tend to use a cheat sheet to navigate through it.
To open the file, use vim config.# Account 1 (work or personal) - the default configHost github.com HostName github.com User git IdentityFile ~/.ssh/id_rsa # Account 2 (work or personal) - the config we are addingHost github-uraccount HostName github.com User git IdentityFile ~/.ssh/id_rsa_uraccountThe top part is the default configuration.
It comprises the following:
the host(github.com)
Its host name (github.com)
a user ID (git)
its identity file (~/.ssh/id_rsa)
We can basically duplicate the default configuration; we’ll only need to changes two things: the host (github-uraccount) and the identity file (to the key we created earlier, ~/.ssh/id_rsa_uraccount).
And that should do it.
Save and close the file using :wq (if you are using vim).
Create a new repository
Now that we’re done with the configuration, let’s push to GitHub with our new account.
In your project’s working directory, start by initializing git using git init then go to GitHub and create a new repository.
When you get to the instructions under Existing Git Repo, you’d normally just copy and paste the commands to your terminal to add the repo as the remote to your local repo, but for this case, we need to replace “github.com” with the host we set up in our config file earlier.
So instead of the default host git@github.com, we use git@github-uraccount.git remote add origin git@github-uraccount:uraccount/repo_name.gitNow you can push to GitHub using, for example, the following:git add .git commit -m "Initial commit"git push -u origin master
Associate your commits with a particular username
For a single repository, if you’d like to change the name associated with your commits, you’ll also need to change your user name and email to reflect the GitHub account you want the repository to be associated with by using git config as shown below (to do it globally, add the flag -g before user).git config user.name "uraccount"git config user.email "uraccount@gmail.com"
Quickstart for Codespaces
In this guide, you'll create a codespace from a template repository and explore some of the essential features available to you within the codespace.
From this quickstart, you will learn how to create a codespace, connect to a forwarded port to view your running application, use version control in a codespace, and personalize your setup with extensions.
For more information on exactly how Codespaces works, see the companion guide "Deep dive into Codespaces."
Creating your codespace
Navigate to the template repository and select Use this template.
Name your repository, select your preferred privacy setting, and click Create repository from this template.
Navigate to the main page of the newly created repository.
Under the repository name, use the Code drop-down menu, and in the Codespaces tab, click New codespace.
Running the application
Once your codespace is created, your repository will be automatically cloned into it.
Now you can run the application and launch it in a browser.
Since this example uses a Node.js project, start the application by entering npm run dev in the terminal.
This command executes the dev script in the package.json file and starts up the web application defined in the sample repository.
If you're following along with a different application type, enter the corresponding start command for that project.
When your application starts, the codespace recognizes the port the application is running on and displays a prompt to forward that port so you can connect to it.
Click Open in Browser to view your running application in a new tab.
Edit the application and view changes
Switch back to your codespace and open the haikus.json file by double-clicking it in the File Explorer.
Edit the text field of the first haiku to personalize the application with your own haiku.
Go back to the running application tab in your browser and refresh to see your changes.
If you've closed the tab, open the Ports panel and click the Open in browser icon for the running port.
Committing and pushing your changes
Now that you've made a few changes, you can use the integrated terminal or the source view to commit and push the changes back to the remote.
In the Activity Bar, click the Source Control view.
To stage your changes, click + next to the file you've changed, or next to Changes if you've changed multiple files and you want to stage them all.
Type a commit message describing the change you've made.
To commit your staged changes, click the check mark at the top the source control side bar.
You can push the changes you've made.
This applies those changes to the upstream branch on the remote repository.
You might want to do this if you're not yet ready to create a pull request, or if you prefer to create a pull request on GitHub.
At the top of the side bar, click the ellipsis (...).
In the drop-down menu, click Push.
Personalizing with an extension
Within a codespace, you have access to the Visual Studio Code Marketplace.
For this example, you'll install an extension that alters the theme, but you can install any extension that is useful for your workflow.
In the left sidebar, click the Extensions icon.
In the search bar, enter fairyfloss and install the fairyfloss extension.
Select the fairyfloss theme by selecting it from the list.
Changes you make to your editor setup in the current codespace, such as theme and keyboard bindings, are synced automatically via Settings Sync to any other codespaces you open and any instances of Visual Studio Code that are signed into your GitHub account.
Next Steps
You've successfully created, personalized, and run your first application within a codespace but there's so much more to explore! Here are some helpful resources for taking your next steps with Codespaces.
Deep dive: This quickstart presented some of the features of Codespaces.
The deep dive looks at these areas from a technical standpoint.
Setting up your project for Codespaces: These guides provide information on setting up your project to use Codespaces with specific languages
Configuring Codespaces for your project: This guide provides details on creating a custom configuration for Codespaces for your project.
Understand how Codespaces works.
Codespaces is an instant, cloud-based development environment that uses a container to provide you with common languages, tools, and utilities for development.
Codespaces is also configurable, allowing you to create a customized development environment for your project.
By configuring a custom development environment for your project, you can have a repeatable codespace configuration for all users of your project.
Creating your codespace
There are a number of entry points to create a codespace.
From your repository for new feature work.
From an open pull request to explore work-in-progress.
From a commit in the repository's history to investigate a bug at a specific point in time.
From Visual Studio Code.
Your codespace can be ephemeral if you need to test something or you can return to the same codespace to work on long-running feature work.
For more information, see "Creating a codespace."
Once you've selected the option to create a new codespace, some steps happen in the background before the codespace is available to you.
Step 1: VM and storage are assigned to your codespace
When you create a codespace, a shallow clone of your repository is made on a Linux virtual machine that is both dedicated and private to you.
Having a dedicated VM ensures that you have the entire set of compute resources from that machine available to you.
If necessary, this also allows you to have full root access to your container.
Step 2: Container is created
Codespaces uses a container as the development environment.
This container is created based on the configurations that you can define in a devcontainer.json file and/or Dockerfile in your repository.
If you don't configure a container, Codespaces uses a default image, which has many languages and runtimes available.
For information on what the default image contains, see the vscode-dev-containers repository.
Note: If you want to use Git hooks in your codespace and apply anything in the git template directory to your codespace, then you must set up hooks during step 4 after the container is created.
Since your repository is cloned onto the host VM before the container is created, anything in the git template directory will not apply in your codespace unless you set up hooks in your devcontainer.json configuration file using the postCreateCommand in step 4.
For more information, see "Step 4: Post-creation setup."
Step 3: Connecting to the codespace
When your container has been created and any other initialization has run, you'll be connected to your codespace.
You can connect to it through the web or via Visual Studio Code, or both, if needed.
Step 4: Post-creation setup
Once you are connected to your codespace, your automated setup may continue to build based on the configuration you specified in your devcontainer.json file.
You may see postCreateCommand and postAttachCommand run.
If you want to use Git hooks in your codespace, set up hooks using the devcontainer.json lifecycle scripts, such as postCreateCommand.
For more information, see the devcontainer.json reference in the Visual Studio Code documentation.
If you have a public dotfiles repository for Codespaces, you can enable it for use with new codespaces.
When enabled, your dotfiles will be cloned to the container and the install script will be invoked.
For more information, see "Personalizing Codespaces for your account."
Finally, the entire history of the repository is copied down with a full clone.
During post-creation setup you'll still be able to use the integrated terminal and make edits to your files, but take care to avoid any race conditions between your work and the commands that are running.
Codespaces lifecycle
Saving files in your codespace
As you develop in your codespace, it will save any changes to your files every few seconds.
Your codespace will keep running for 30 minutes after the last activity.
After that time it will stop running but you can restart it from either from the existing browser tab or the list of existing codespaces.
File changes from the editor and terminal output are counted as activity and so your codespace will not stop if terminal output is continuing.
Note: Changes in a codespace in Visual Studio Code are not saved automatically, unless you have enabled Auto Save.
Closing or stopping your codespace
To stop your codespace you can use the VS Code Command Palette (Shift + Command + P (Mac) / Ctrl + Shift + P (Windows)).
If you exit your codespace without running the stop command (for example, closing the browser tab), or if you leave the codespace running without interaction, the codespace and its running processes will continue until a window of inactivity occurs, after which the codespace will stop.
By default, the window of inactivity is 30 minutes.
When you close or stop your codespace, all uncommitted changes are preserved until you connect to the codespace again.
Running your application
Port forwarding gives you access to TCP ports running within your codespace.
For example, if you're running a web application on port 4000 within your codespace, you can automatically forward that port to make the application accessible from your browser.
Port forwarding determines which ports are made accessible to you from the remote machine.
Even if you do not forward a port, that port is still accessible to other processes running inside the codespace itself.
When an application running inside Codespaces outputs a port to the console, Codespaces detects the localhost URL pattern and automatically forwards the port.
You can click on the URL in the terminal or in the toast message to open the port in a browser.
By default, Codespaces forwards the port using HTTP.
For more information on port forwarding, see "Forwarding ports in your codespace."
While ports can be forwarded automatically, they are not publicly accessible to the internet.
By default, all ports are private, but you can manually make a port available to your organization or public, and then share access through a URL.
For more information, see "Sharing a port."
Running your application when you first land in your codespace can make for a fast inner dev loop.
As you edit, your changes are automatically saved and available on your forwarded port.
To view changes, go back to the running application tab in your browser and refresh it.
Committing and pushing your changes
Git is available by default in your codespace and so you can rely on your existing Git workflow.
You can work with Git in your codespace either via the Terminal or by using Visual Studio Code's source control UI.
For more information, see "Using source control in your codespace"
You can create a codespace from any branch, commit, or pull request in your project, or you can switch to a new or existing branch from within your active codespace.
Because Codespaces is designed to be ephemeral, you can use it as an isolated environment to experiment, check a teammate's pull request, or fix merge conflicts.
You can create more than one codespace per repository or even per branch.
However, each user account has a limit of 10 codespaces.
If you've reached the limit and want to create a new codespace, you must delete a codespace first.
Note: Commits from your codespace will be attributed to the name and public email configured at https://github.com/settings/profile.
A token scoped to the repository, included in the environment as GITHUB_TOKEN, and your GitHub credentials will be used to authenticate.
Personalizing your codespace with extensions
Using Visual Studio Code in your codespace gives you access to the Visual Studio Code Marketplace so that you can add any extensions you need.
For information on how extensions run in Codespaces, see Supporting Remote Development and GitHub Codespaces in the Visual Studio Code docs.
If you already use Visual Studio Code, you can use Settings Sync to automatically sync extensions, settings, themes, and keyboard shortcuts between your local instance and any Codespaces you create.
Usage: git config -global user.name "[name]"
Usage: git config -global user.email "[email address]"
This command sets the author name and email address respectively to be used with your commits.
git init
Usage: git init [repository name]
This command is used to start a new repository.
git clone
Usage: git clone [url]
This command is used to obtain a repository from an existing URL.
git add
Usage: git add [file]
This command adds a file to the staging area.
Usage: git add *
This command adds one or more to the staging area.
git commit
Usage: git commit -m "[ Type in the commit message]"
This command records or snapshots the file permanently in the version history.
Usage: git commit -a
This command commits any files you’ve added with the git add command and also commits any files you’ve changed since then.
git diff
Usage: git diff
This command shows the file differences which are not yet staged.
Usage: git diff -staged
This command shows the differences between the files in the staging area and the latest version present.
Usage: git diff [first branch] [second branch]
This command shows the differences between the two branches mentioned.
Git Commands With Examples
git reset
Usage: git reset [file]
This command unstages the file, but it preserves the file contents.
Usage: git reset [commit]
This command undoes all the commits after the specified commit and preserves the changes locally.
Usage: git reset -hard [commit]
This command discards all history and goes back to the specified commit.
git status
Usage: git status
This command lists all the files that have to be committed.
git rm
Usage: git rm [file]
This command deletes the file from your working directory and stages the deletion.
git log
Usage: git log
This command is used to list the version history for the current branch.
Usage: git log -follow[file]
This command lists version history for a file, including the renaming of files also.
git show
Usage: git show [commit]
This command shows the metadata and content changes of the specified commit.
git tag
Usage: git tag [commitID]
This command is used to give tags to the specified commit.
git branch
Usage: git branch
This command lists all the local branches in the current repository.
Usage: git branch [branch name]
This command creates a new branch.
Usage: git branch -d [branch name]
This command deletes the feature branch.
git checkout
Usage: git checkout [branch name]
This command is used to switch from one branch to another.
Usage: git checkout -b [branch name]
This command creates a new branch and also switches to it.
git merge
Usage: git merge [branch name]
This command merges the specified branch’s history into the current branch.
git remote
Usage: git remote add [variable name] [Remote Server Link]
This command is used to connect your local repository to the remote server.
git push
Usage: git push [variable name] master
This command sends the committed changes of master branch to your remote repository.
Usage: git push [variable name] [branch]
This command sends the branch commits to your remote repository.
Usage: git push -all [variable name]
This command pushes all branches to your remote repository.
Usage: git push [variable name] :[branch name]
This command deletes a branch on your remote repository.
git pull
Usage: git pull [Repository Link]
This command fetches and merges changes on the remote server to your working directory.
git stash
Usage: git stash save
This command temporarily stores all the modified tracked files.
Usage: git stash pop
This command restores the most recently stashed files.
Usage: git stash list
This command lists all stashed changesets.
Usage: git stash drop
This command discards the most recently stashed changeset.
create a new directory, open it and perform a
git init
to create a new git repository.
checkout a repository
create a working copy of a local repository by running the command
git clone /path/to/repository
when using a remote server, your command will be
git clone username@host:/path/to/repository
workflow
your local repository consists of three "trees" maintained by git.
the first one is your Working Directory which holds the actual files.
the second one is the Index which acts as a staging area and
finally the HEAD which points to the last commit you've made.
add & commit
You can propose changes (add it to the Index) using
git add <filename>git add *
This is the first step in the basic git workflow. To actually commit these changes use
git commit -m "Commit message"
Now the file is committed to the HEAD, but not in your remote repository yet.
pushing changes
Your changes are now in the HEAD of your local working copy. To send those changes to your remote repository, execute
git push origin master
Change master to whatever branch you want to push your changes to.
If you have not cloned an existing repository and want to connect your repository to a remote server, you need to add it with
git remote add origin <server>
Now you are able to push your changes to the selected remote server
branching
Branches are used to develop features isolated from each other. The master branch is the "default" branch when you create a repository. Use other branches for development and merge them back to the master branch upon completion.
create a new branch named "feature_x" and switch to it using
git checkout -b feature_x
switch back to master
git checkout master
and delete the branch again
git branch -d feature_x
a branch is not available to others unless you push the branch to your remote repository
git push origin <branch>
update & merge
to update your local repository to the newest commit, execute
git pull
in your working directory to fetch and merge remote changes.
to merge another branch into your active branch (e.g. master), use
git merge <branch>
in both cases git tries to auto-merge changes. Unfortunately, this is not always possible and results in conflicts.
You are responsible to merge those conflicts
manually by editing the files shown by git. After changing, you need to mark them as merged with
git add <filename>
before merging changes, you can also preview them by using
git diff <source_branch> <target_branch>
tagging
it's recommended to create tags for software releases. this is a known concept, which also exists in SVN. You can create a new tag named 1.0.0 by executing
git tag 1.0.0 1b2e1d63ff
the 1b2e1d63ff stands for the first 10 characters of the commit id you want to reference with your tag. You can get the commit id by looking at the...
log
in its simplest form, you can study repository history using..
git log
You can add a lot of parameters to make the log look like what you want. To see only the commits of a certain author:
git log --author=bob
To see a very compressed log where each commit is one line:
git log --pretty=oneline
Or maybe you want to see an ASCII art tree of all the branches, decorated with the names of tags and branches:
git log --graph --oneline --decorate --all
See only which files have changed:
git log --name-status
These are just a few of the possible parameters you can use. For more, see
git log --help
replace local changes
In case you did something wrong, which for sure never happens ;), you can replace local changes using the command
git checkout -- <filename>
this replaces the changes in your working tree with the last content in HEAD. Changes already added to the index, as well as new files, will be kept.
If you instead want to drop all your local changes and commits, fetch the latest history from the server and point your local master branch at it like this
git fetch origingit reset --hard origin/master
useful hints
built-in git GUI
gitk
use colorful git output
git config color.ui true
show log on just one line per commit
git config format.pretty oneline
use interactive adding
git add -i
Git Bash is an application that provides Git command line experience on the Operating System.
It is a command-line shell for enabling git with the command line in the system.
A shell is a terminal application used to interface with an operating system through written commands.
Git Bash is a package that installs Bash, some common bash utilities, and Git on a Windows operating system.
In Git Bash the user interacts with the repository and git elements through the commands.
What is Git?
Git is version-control system for tracking changes in source code during software development.
It is designed for coordinating work among programmers, but it can be used to track changes in any set of files.
Its goal is to increase efficiency, speed and easily manage large projects through version controlling.
Every git working directory is a full-fledged repository with complete history and full version-tracking capabilities, independent of network access or a central server.
Git helps the team cope up with the confusion that tends to happen when multiple people are editing the same files.
Installing Git Bash
Follow the steps given below to install Git Bash on Windows:
Step 1: The .exe file installer for Git Bash can be downloaded from https://gitforwindows.org/
Once downloaded execute that installer, following window will occur:-
Step 2: Select the components that you need to install and click on the Next button.
Step 3: Select how to use the Git from command-line and click on Next to begin the installation process.
Step 4: Let the installation process finish to begin using Git Bash.
To open Git Bash navigate to the folder where you have installed the git otherwise just simply search in your OS for git bash.
Navigate in Git Bash
cd command
cd command refers to change directory and is used to get into the desired directory.To navigate between the folders the cd command is used
Syntax:
cd folder_name
ls command
ls command is used to list all the files and folders in the current directory.
Syntax:
ls
Set your global username/email configuration
Open Git Bash and begin creating a username and email for working on Git Bash.Set your username:
git config --global user.name "FIRST_NAME LAST_NAME"
Set your email address:
git config --global user.email "MY_NAME@example.com"
Initializing a Local repository
Follow the steps given below to initialize your Local Repository with Git:
Step 1: Make a repository on Github
Step 2: Give a suitable name of your repository and create the repository
Note: You can choose to initialize your git repository with a README file, and further, you can mention your project details in it.
It helps people know what this repository is about.
However, it’s absolutely not necessary.
But if you do initialize your repo with a README file using interface provided by GitHub, then your local repository won’t have this README file.
So to avoid running into a snag while trying to push your files (as in step 3 of next section), after step 5 (where you initialize your local folder as your git repository), do following to pull that file to your local folder:
git pull
Step 3: The following will appear after creating the repository
Step 4: Open Git Bash and change the current working directory to your local project by use of cd command.
Step 5: Initialize the local directory as a Git repository.
git init
Step 6: Stage the files for the first commit by adding them to the local repository
git add .
Step 7: By “git status” you can see the staged files
Step 8: Commit the files that you’ve staged in your local repository.
git commit -m "First commit"
Now After “git status” command it can be seen that nothing to commit is left, Hence all files have been committed.
Push files to your Git repository
Step 1: Go to Github repository and in code section copy the URL.
Step 2: In the Command prompt, add the URL for your repository where your local repository will be pushed.
git remote add origin repository_URL
Step 3: Push the changes in your local repository to GitHub.
git push origin master
Here the files have been pushed to the master branch of your repository.
Now in the GitHub repository, the pushed files can be seen.
Saving changes to local repository
Suppose the files are being changed and new files are added to local repository.
To save the changes in the git repository:
Step 1: Changes have to be staged for the commit.
git add .
or
git add file_name
Step 2: Now commit the staged files.
git commit -m "commit_name"
Step 3: Push the changes.
git push origin master
New changes can be seen
Branching through Git Bash
Branching in Github
Suppose if a team is working on a project and a branch is created for every member working on the project.
Hence every member will work on their branches hence every time the best branch is merged to the master branch of the project.
The branches make it version controlling system and makes it very easy to maintain a project source code.Syntax:List all of the branches in your repository.
git branch
Create a new branch
git branch branch_name
Safe Delete the specified branch
git branch -d branch_name
Force delete the specified branch
git branch -D branch_name
Navigating between Branches
To navigate between the branches git checkout is used.To create create a new branch and switch on it:
git checkout -b new_branch_name
To simply switch to a branch
git checkout branch_name
After checkout to branch you can see a * on the current branch
Now the same commit add and commit actions can be performed on this branch also.
Merge any two branches
To merge a branch in any branch:First reach to the target branch
git checkout branch_name
Merge the branch to target branch
git merge new_branch
Cloning Repository to system
Cloning is used to get a copy of the existing git repository.
When you run the git clone command it makes the zip folder saved in your default location
git clone url
This command saves the directory as the default directory name of the git repository
To save directory name as your custom name an additional argument is to be passed for your custom name of directory
git clone url custom_name
Undoing commits
When there is a situation when you forget to add some files to commit and want to undo any commit, it can be commit again using --ammendSyntax:
git commit --amend
Conclusion
To conclude it can be said that git bash is a command line platform which helps in enabling git and its elements in your system.
There are a bunch of commands which are used in git bash.
Git Bash is very easy to use and makes it easy to work on repositories and projects.
What is Git Bash?
Before you look at what Git Bash is, let's go over what Git is.
Git is a version control system for controlling changes in software development.
Like macOS and Linux, operating systems already have a command-line terminal where you can run Git and Linux commands directly.
But for Windows, you have the Windows command prompt, which is a non-Unix terminal.
How can you run Git and Linux commands in Windows? Git Bash will do the trick.
Git Bash is an emulator that provides an emulation layer for Git to run Linux commands on Windows PCs.
An emulator enables one specific system to behave like another computer system.
Downloading and Installing Git (Bash)
Now that you know a little about Git Bash let's see how you can download and install it.
There are three different ways of downloading the Git software for Windows OS, as shown below.
Through Git's official website
Through a separate project on GitHub called Git for Windows.
Through a software package manager like Chocolatey
Download Git with any of the three ways you prefer, but this tutorial will use the official website.
After downloading Git, let's start installing it on your Windows PC.
1. Launch the installer you downloaded and click Next through the steps until you get to the Select Components screen.
2. Now, check the boxes of additional components you want to include in the installation.
Leave the ones selected by default, as shown below, and click Next.
Selecting Additional Components To Install
3. Leave the default for creating a shortcut in the start menu folder, and click Next.
Selecting Start menu folder name
4. Select Use Notepad as Git's default editor from the drop-down list as a default editor to use with Git, and click Next.
Now Git files like ~./gitconfig will open in Notepad by default.
Selecting Git's Default Editor
5. Select the Override the default branch name for new repositories option as the default branch name (main) for Git to use.
When you initialize a Git repository, Git will use this branch name by default.
The default branch name used to be “master” for Git repositories.
But many people found “master” an offensive word.
So GitHub followed the Software Freedom Conservancy's suggestion and provided an option to override the default branch name when initializing a Git repository.
Selecting Default Branch Name
6. Now, select Git from the command line and also from 3rd-party software option so that Git command can be executed from different tools.
Some of those tools are Command Prompt, PowerShell or any other 3rd party software tools, along with the Git Bash console.
Selecting a Console Where Git Commands Can Run
7. Select the Use the OpenSSL library option to let Git validate certificates with OpenSSL, and click Next.
OpenSSL is a cryptographic library that contains open-source implementation of SSL and TLS protocols.
If you are using Git in an organization with enterprise-managed certificates, select the User the native Windows Secure Channel library option instead.
Selecting SSL/TLS library for HTTPS connections
8. Leave the default Checkout Windows-style, commit Unix-style line endings option selected, and click Next.
If you configure “Windows-style” line ending conversions, when you hit return on your keyboard after executing a Git command, Git will insert an invisible character called line ending.
When different contributors make changes from different operating systems, Git might produce unexpected results.
Selecting line endings option
9. Select the Use Mintty (the default terminal of MSYS2) option as the default terminal emulator to run commands, and click Next.
Mintty is the default terminal of MSYS2.
MSYS2 is a collection of tools and libraries that provides a Unix-like environment for software distribution and a building platform for Windows.
Selecting a default terminal emulator
10. Select the Default (fast-forward or merge) option below as git pull command's default behavior.
The git pull command is the shorthand for git fetch and git merge, which fetches and incorporates changes from a remote repository into the current branch.
Perhaps you want to merge a new branch to the master.
If so, Git would directly merge using fast-forward without going through git fetch and git merge commands.
The merge is only possible if there are no commits on master from when you've created the new branch.
Selecting Default Behavior for git pull Command
11. Select the Git Credential Manager Core as the default Git credential helper, and click Next.
Git credential helpers are external programs that Git can prompt for input data, like usernames and passwords.
These input data can be stored in memory for a limited time or stored on the disk.
Git Credential Manager Core is based on the .NET framework and will provide multi-factor HTTPS authentication with Git.
Selecting Default Credential Manager
12. Leave the extra features on default, as shown below, and click Next.
The Enable file system caching option is checked to provide quick results when executing Git commands.
Enabling extra options
13. Ensure to leave both options below at default (pseudo console and built-in file system monitor) as they are still in an experimental stage, and click Install.
Experimental options support
14. Complete the installation and close the installation wizard by clicking on Finish.
Git setup wizard complete screen
15. Finally, right-click on your desktop and select Git Bash Here from the context menu, as shown below, to launch Git Bash terminal.
Launching Git Bash from your desktop is one of the quickest ways to do so, but the same process goes when you right-click on a folder.
Launching Git Bash from Desktop Context Menu
16. Run the git command below to verify Git Bash is installed and its current version (--version).
git --version
You can see below the current Git version in this tutorial is version 2.32.0.windows.2.
Verifying Git Bash installation
Running Git Commands in Different Terminals
Now that you have Git Bash on your PC, it's time to learn some Git commands.
Running Git commands isn't limited to Git Bash console only.
Did you know you can run Git commands in the command prompt too? Yes!
Let's run Git commands both on Git Bash console and command prompt to declare variables accessible in both terminals.
1. Launch Git Bash console by clicking on the Start button, type git, and click on Git Bash.
Launching Git Bash from Start Button
2. Run the below git config command to add your name (YourName) as your git username (user.name).
The git config command administers configuration variables that control how Git looks and operates.
Pass the --global option to the git config command to define the configuration variable (YourName) in the ~/.gitconfig file specifically.
git config --global user.name "YourName"
3. Now open the command prompt and run the below git config command to add your email ("[email protected]") as your git user email (--global user.email) in the ~/.gitconfig file.
git config --global user.email "[email protected]"
4. In the same command prompt window, run the below git config command to list (--list) all the configuration variables in Git.
git config --list
You can see below that even though you've added variables in the ~/.gitconfig file via different consoles, the variables are accessible and displayed in the command prompt.
Viewing Global Variables Added via Different Consoles
Running Linux Commands in Git Bash
As you can tell, all Git commands work in both Git Bash and the command prompt.
And since Git is delivered as a Unix-style command-line environment, let's try running a Linux command on the Git Bash console!
Run the ls command both in Git Bash console and command prompt to list the files and folders in the working directory.
In the screenshots below, you can see that the Git Bash console returns an output, while the command prompt throws an error, saying the ‘ls' command is not recognized.
Running Linux Command in Git Bash Returns a Result
Running Linux Command in Command Prompt Returns an Error
You can run Linux commands on the command prompt so long as you change the directory to C:\Program Files\Git\usr\bin first.
In the command prompt, run the commands below to change the working directory to C:\Program Files\Git\usr\bin and run the ls command.
cd C:\Program Files\Git\usr\bin # Change directory to where Linux utilities are stored
ls # Linux command that lists all files and folders in the working directory
Below, you can see that you didn't get an error after running the ls command this time, but the command returned results instead.
Running Linux Commands in Command Prompt
Git Viewing the Commit History
$ git log
to exit git log or git diff
Type q to exit this screen.
Type h to get help.
Actually, there are three ways to do it, precisely.
:q
:z or
Ctrl + z
Reverting a commit that has been pushed to the remote
git checkout [commit ID] filename
git push --set-upstream origin branch
If you do not have upstream for the current branch, Git changes its behavior on git push, and on other commands as well.
The complete push story here is long and boring.
To shorten it a whole lot, git push was implemented poorly.
What is an upstream?
An upstream is simply another branch name, usually a remote-tracking branch, associated with a (regular, local) branch.
Every branch has the option of having one (1) upstream set.
That is, every branch either has an upstream, or does not have an upstream.
No branch can have more than one upstream.
The upstream should, but does not have to be, a valid branch (whether remote-tracking like origin/B or local like master).
That is, if the current branch B has upstream U, git rev-parse Ushould work.
If it does not work—if it complains that U does not exist—then most of Git acts as though the upstream is not set at all.
A few commands, like git branch -vv, will show the upstream setting but mark it as "gone".
What good is an upstream?
If your push.default is set to simple or upstream, the upstream setting will make git push, used with no additional arguments, just work.
That's it—that's all it does for git push.
But that's fairly significant, since git push is one of the places where a simple typo causes major headaches.
If your push.default is set to nothing, matching, or current, setting an upstream does nothing at all for git push.
(All of this assumes your Git version is at least 2.0.)
The upstream affects git fetch
If you run git fetch with no additional arguments, Git figures out which remote to fetch from by consulting the current branch's upstream.
If the upstream is a remote-tracking branch, Git fetches from that remote.
(If the upstream is not set or is a local branch, Git tries fetching origin.)
The upstream affects git merge and git rebase too
If you run git merge or git rebase with no additional arguments, Git uses the current branch's upstream.
So it shortens the use of these two commands.
The upstream affects git pull
You should never
2. use git pull anyway, but if you do, git pull uses the upstream setting to figure out which remote to fetch from, and then which branch to merge or rebase with.
That is, git pull does the same thing as git fetch—because it actually runsgit fetch—and then does the same thing as git merge or git rebase, because it actually runsgit merge or git rebase.
(You should usually just do these two steps manually, at least until you know Git well enough that when either step fails, which they will eventually, you recognize what went wrong and know what to do about it.)
The upstream affects git status
This may actually be the most important.
Once you have an upstream set, git status can report the difference between your current branch and its upstream, in terms of commits.
If, as is the normal case, you are on branch B with its upstream set to origin/B, and you run git status, you will immediately see whether you have commits you can push, and/or commits you can merge or rebase onto.
This is because git status runs:
git rev-list --count @{u}..HEAD: how many commits do you have on B that are not on origin/B?
git rev-list --count HEAD..@{u}: how many commits do you have on origin/B that are not on B?
Setting an upstream gives you all of these things.
How come master already has an upstream set?
When you first clone from some remote, using:
$ git clone git://some.host/path/to/repo.git
or similar, the last step Git does is, essentially, git checkout master.
This checks out your local branch master—only you don't have a local branch master.
On the other hand, you do have a remote-tracking branch named origin/master, because you just cloned it.
Git guesses that you must have meant: "make me a new local master that points to the same commit as remote-tracking origin/master, and, while you're at it, set the upstream for master to origin/master."
This happens for every branch you git checkout that you do not already have.
Git creates the branch and makes it "track" (have as an upstream) the corresponding remote-tracking branch.
But this doesn't work for new branches, i.e., branches with no remote-tracking branch yet.
If you create a new branch:
$ git checkout -b solaris
there is, as yet, no origin/solaris.
Your local solariscannot track remote-tracking branch origin/solaris because it does not exist.
When you first push the new branch:
$ git push origin solaris
that createssolaris on origin, and hence also creates origin/solaris in your own Git repository.
But it's too late: you already have a local solaris that has no upstream.
3.
Shouldn't Git just set that, now, as the upstream automatically?
Probably.
See "implemented poorly" and footnote 1.
It's hard to change now: There are millions
4. of scripts that use Git and some may well depend on its current behavior.
Changing the behavior requires a new major release, nag-ware to force you to set some configuration field, and so on.
In short, Git is a victim of its own success: whatever mistakes it has in it, today, can only be fixed if the change is either mostly invisible, clearly-much-better, or done slowly over time.
The fact is, it doesn't today, unless you use --set-upstream or -u during the git push.
That's what the message is telling you.
You don't have to do it like that.
Well, as we noted above, you don't have to do it at all, but let's say you want an upstream.
You have already created branch solaris on origin, through an earlier push, and as your git branch output shows, you already haveorigin/solaris in your local repository.
You just don't have it set as the upstream for solaris.
To set it now, rather than during the first push, use git branch --set-upstream-to.
The --set-upstream-to sub-command takes the name of any existing branch, such as origin/solaris, and sets the current branch's upstream to that other branch.
That's it—that's all it does—but it has all those implications noted above.
It means you can just run git fetch, then look around, then run git merge or git rebase as appropriate, then make new commits and run git push, without a bunch of additional fussing-around.
1.To be fair, it was not clear back then that the initial implementation was error-prone.
That only became clear when every new user made the same mistakes every time.
It's now "less poor", which is not to say "great".
2."Never" is a bit strong, but I find that Git newbies understand things a lot better when I separate out the steps, especially when I can show them what git fetch actually did, and they can then see what git merge or git rebase will do next.
3.If you run your firstgit push as git push -u origin solaris—i.e., if you add the -u flag—Git will set origin/solaris as the upstream for your current branch if (and only if) the push succeeds.
So you should supply -u on the first push.
In fact, you can supply it on any later push, and it will set or change the upstream at that point.
But I think git branch --set-upstream-to is easier, if you forgot.
4.Measured by the Austin Powers / Dr Evil method of simply saying "one MILLLL-YUN", anyway.
Push to github without typing user name / password
1. Using SSH
If you need to do a push without username and password prompt, but you are always prompted, then your origin remote is pointing at the https url rather than the ssh url.
A way to skip typing my username/password when using https://github, is by changing the HTTPs origin remote which pointing to an HTTP url into an SSH url.
For example,
https url: https://github.com/<Username>/<Project>.git
ssh url: git@github.com:<Username>/<Project>.git
You can do:
git remote set-url origin git@github.com:<Username>/<Project>.git
to change the url.
Switching remote URLs from HTTPS to SSH
Open Terminal (for Mac and Linux users) or the command prompt (for Windows).
Change the current working directory to your local project.
List your existing remotes in order to get the name of the remote you want to change.
git remote -v
$ origin https://github.com/USERNAME/REPOSITORY.git (fetch)
$ origin https://github.com/USERNAME/REPOSITORY.git (push)
Change your remote’s URL from HTTPS to SSH with the git remote set-url command.
git remote set-url origin git@github.com:USERNAME/OTHERREPOSITORY.git
Verify that the remote URL has changed.
git remote -v
$ Verify new remote URL
$ origin git@github.com:USERNAME/OTHERREPOSITORY.git (fetch)
$ origin git@github.com:USERNAME/OTHERREPOSITORY.git (push)
2. Using Static configuration
Static configuration of usernames for a given authentication context.
It is generally configured by adding this to your config:
[credential “https://example.com"] username = me
The password was not declared because of security reasons. It is not advisable to store your password on an unsecure storage.
3. Credential helpers to cache or store passwords, or to interact with a system password wallet or keychain.
These are external programs from which Git can request both usernames and passwords
To use a helper, you must first select one to use. Git currently includes the following helpers:
cache: Cache credentials in memory for a short period of time.
store: Store credentials indefinitely on disk.
Steps:
a.Find a helper.
$ git help -a | grep credential-credential-foo
b.Read its description.
$ git help credential-foo
c.Tell Git to use it.
$ git config — global credential.helper foo
There are times where you might be working from a particular git branch and need to quickly jump over to a different branch to do some urgent work.
Typically you would need to first git stash anything you were working on (as it's unlikely to be in a state where it can be committed), and then you'd have to leave your current branch to create a new branch from master and thus begin working on your new urgent task.
This is a fairly straightforward workflow, but there is a mild annoyance which is that I happen to git stasha lot and I find when jumping over to a new branch to do some urgent work that I might end up git stash‘ing a few more times along the way.
Ultimately, when I'm done with my urgent task and ready to go back to my other branch, I then have to sift through my stash to find the relevant one I want to pop.
OK so not that tragic considering git stash list will indicate the branch on which the stash was taken (which helps), but I do then need to Google what the syntax is for popping a specific stash (e.g.
it's git stash apply stash@{n} where n is the index you want to apply.)
Note: for the life of me I wish I could remember the syntax but it just eludes me every time.
Oh, and then you have to think about whether you actually want to use apply, which leaves the stashed changes in the stack, or if you meant to actually pop the stashed content (git stash pop stash@{n}) so it's properly removed from the stack.
This is where I was recently introduced to a concept in git referred to as a ‘worktree' (thanks Kiran).
Worktree
Git offers a feature referred to as a worktree, and what it does is allow you to have multiple branches running at the same time.
It does this by creating a new directory for you with a copy of your git repository that is synced between the two directories where they are stored.
This is different to manually creating a new directory and git cloning your repo down, because with the worktree model the two sub directories are aware of each other.
Note: as you'll see, although this workflow is pretty cool, you could argue that git stash is just plain simpler and easier for a human mind to reason about.
I'll leave that up to the reader to decide.
Example
In the following example I'm going to create a new git repo.
I'll make a change in master, then create a new branch for doing some work.
We'll then imagine that I have been given an urgent task that I must complete now and yet my current non-master branch is in such a state that I want to avoid just stashing everything.
Note: I use tmux to split my terminal into multiple windows, and this demonstration will require two windows (or two separate terminal instances if you're not using a screen multiplexer) for the sake of demonstration.
git checkout -b foo_contents
echo 123 > foo
git add -u
git commit -m "added content to foo"
Now I'll create a new file and stage it for committing, but I won't commit it (this is where we pretend my branch is in some hideously complex state).
Create new worktree branch
git worktree add ../foo_hotfix
Note: you'll want to create the new worktree in a directory outside of your current repo's directory (just so there's a clear distinction).
At this point you'll find your current terminal is still in the same foo_contents, but there is now a new directory called foo_hotfix outside your current repo's directory.
Make changes in new worktree branch
Open up a new terminal (or split window) and run through the following steps:
cd ./foo_hotfix (or cd ../foo_hotfix if your new terminal is currently set to your main git repo directory)
git log
OK, so if you do a git log you'll find that the worktree has a branch automatically created and named after the worktree (so the branch is called foo_hotfix in my case).
The important thing to realize is that git worktree add is a bit like git branch in that it creates the new worktree from the current branch you're in.
Meaning that my foo_hotfix branch has the "added content to foo" commit from the foo_contents branch as that's where I ran the git worktree add command from.
This is what git log looks like for me in this new worktree:
* d374dcb (Integralist) - (HEAD -> foo_hotfix, foo_contents) added content to foo (2 minutes ago)
* 9ae3a7f (Integralist) - (master) created foo file (3 minutes ago)
don't want the commit d374dcb in there as it's coming from a branch (foo_contents) that's still in progress, and so I'll need to rebase out that commit:
git rebase -i 9ae3a7f
Note: the rebase editor opens and I change pick to drop to get rid of the commit.
Now at this point I have a new working directory that I can work in:
echo hotfix > baz
git add baz
git commit -m "some hotfix"
Merge my hotfix back into master
I'm going to change into my master branch, but remember I'm still in the foo_hotfix directory, so my main repo directory foo_project (open in another terminal window) is still in the foo_contents branch).
git checkout master
git merge foo_hotfix
Removing the worktree
OK, so at this point we've merged our hotfix into master.
I want to go back to my original repo directory and make sure I have the latest master rebased in before continuing on with my foo_contents work.
To remove the worktree you can either remove it using the git interface (e.g.
git worktree remove foo_hotfix) or manually remove it (e.g.
cd ../ && rm ./foo_hotfix), where git will, at some point in the future, internally run a prune and remove any references to this orphaned branch/working tree (you could also manually trigger that prune using git worktree prune).
Note: if I do git worktree remove foo_hotfix while currently residing inside the foo_hotfix directory, I'll find that the .git repository is removed from the directory.
Continuing working on my feature branch
Presuming I'm still in the foo_hotfix directory and that's where I ran git worktree remove foo_hotfix:
cd ../foo_project
git rebase master
< whoops! I need to stash my changes first †
git stash pop
† why yes, this does seem a bit strange considering that's what I was trying to avoid in the first place, but in this case it's a single ‘stash' and so a simple git stash pop will suffice to get me back to where I need to be.
I can now continue working on my foo_contents branch.
When you do git init, you initialize a local Git repository.
In general, the purpose is to synchronize this repo with a remote Git repo.
To be able to synchronize code with a remote repo, you need to specify where the remote repo exists.
The first step is to add remote repos to your project.
# Syntax to add a git remote
git remote add REMOTE-ID REMOTE-URL
By convention, the original / primary remote repo is called origin.
Here’s a real example:
# Add remote 1: GitHub.
git remote add origin git@github.com:jigarius/toggl2redmine.git
# Add remote 2: BitBucket.
git remote add upstream git@bitbucket.org:jigarius/toggl2redmine.git
In the above example, we add the remote repository of a project called Toggl 2 Redmine found on GitHub.
Use the above command to add one or more remote Git repos – make sure that each repo has its unique ID, i.e.
origin, upstream in the above example.
Configure primary remote
Though you can add multiple remotes, usually, each branch of your project can be configured to track a single remote branch.
You can setup a branch to track a remote branch as follows:
# Change local branch.
git checkout BRANCH

# Configure local branch to track a remote branch.
git branch -u origin/BRANCH
Here, BRANCH is the name of the remote branch, which is usually the same as your local branch.
Change remote URL
If you want to change the URL associated to a remote that you’ve already added, you can do it with the following command:
# The syntax is: git remote set-url REMOTE-ID REMOTE-URL

git remote set-url upstream git@foobar.com:jigarius/toggl2redmine.git
List all remotes
To see a list of all remotes, simply use the following command:
$git remote -v
origin	    git@github.com:jigarius/toggl2redmine.git (fetch)
origin	    git@github.com:jigarius/toggl2redmine.git (push)
upstream    git@bitbucket.org:jigarius/toggl2redmine.git (fetch)
upstream    git@bitbucket.org:jigarius/toggl2redmine.git (push)
Remove a remote
If you’ve added a remote which you no longer require, you can remove it as follows:
# The syntax is: git remote remove REMOTE-ID
git remote remove upstream
Push to multiple remotes
Now that you have a primary remote repo and other remotes as well, it’s time to configure the push.
The objective is to push to multiple Git remotes with a single git push command.
To do this, choose a remote ID which will refer to all the remotes.
I usually call it all, but there are developers who prefer origin.
The idea is to add all the remote repo URLs as “push URLs” to this remote.
Here’s what you do:
# Create a new remote called "all" with the URL of the primary repo.
git remote add all git@github.com:jigarius/toggl2redmine.git

# Re-register the remote as a push URL.
git remote set-url --add --push all git@github.com:jigarius/toggl2redmine.git
# Add a push URL to a remote.

This means that "git push" will also push to this git URL.
git remote set-url --add --push all git@bitbucket.org:jigarius/toggl2redmine.git
If you don’t want to create an extra remote named all, you can skip the first command and use the remote origin instead of all in the subsequent command(s).
Now, you can push to all remote repositories with a single command!
# Replace BRANCH with the name of the branch you want to push.
git push all BRANCH
Pull from multiple remotes
It is not possible to git pull from multiple repos.
However, you can git fetch from multiple repos with the following command:
git fetch --all
This will fetch information from all remote repos.
You can switch to the latest version of a branch on a particular remote with the command:
# Checkout the branch you want to work with.
git checkout BRANCH
# Reset the branch to match the state as on a specific remote.

git reset --hard REMOTE-ID/BRANCH
Conclusion
It is easy to synchronize code between multiple git repositories, especially, pushing to multiple remotes.
This is helpful when you’re maintaining mirrors / copies of the same repository.
All you need to do is set up multiple push URLs on a remote and then perform git push to that remote as you usually do.
branch operations
rename a branch while pointed to any branch, do:
git branch -m oldname newname
rename the current branch, you can do:
git branch -m newname
push the local branch and reset the upstream branch:
git push origin -u newname
Delete the remote branch:
git push origin --delete oldname
A way to remember this is -m is for "move" (or mv), which is how you rename files.
Adding an alias could also help.
To do so, run the following:
git config --global alias.rename 'branch -m'
If you are on Windows or another case-insensitive filesystem, and there are only capitalization changes in the name, you need to use -M, otherwise, git will throw branch already exists error:
git branch -M newname
Switch to the branch which needs to be renamed
git branch -m new_name
git push origin :old_name
git push origin new_name:refs/heads/new_name
delete a local branch in Git
git branch -d local-branch
To delete a remote branch, you need to use the "git push" command:
git push origin --delete remote-branch-name
(https://github.com/williamkpchan/williamkpchan.github.io.git
?? git@github.com:williamkpchan/williamkpchan.github.io.git
?? git remote add origin git@github.com:williamkpchanHP/williamkpchan.github.io.git
)
git remote add origin git@github.com:williamkpchanHP/newDoc.git
git add *.bat
git push --set-upstream origin master
git branch -d newDoc
git commit -m "update"
git remote -vgit remote add origin git remote set-url origin
git remote -v
git@github.com:williamkpchanHP/newDoc.git
git branch -M main
git remote add origin git@github.com:williamkpchanHP/newDoc.git
git push -u origin main
ssh-keygen
git bash
ssh-keygen -t rsa -C williamkpchanHP@gmail.com
eval "$(ssh-agent -s)"
ssh-add ~/.ssh/id_rsa
to preview HTML files on GitHub is to go to https://htmlpreview.github.io/ or just prepend it to the original URL, i.e.:
https://htmlpreview.github.io/?https://github.com/williamkpchanHP/newDoc/blob/main/inkscapeTutorial.html
Permanently authenticating with Git repositories
https://stackoverflow.com/questions/6565357/git-push-requires-username-and-password
Run the following command to enable credential caching:
git config credential.helper store
git push https://github.com/owner/repo.git
e.g.
git push https://github.com/williamkpchanHP/newDoc.git
if using ssh:
use SSH URL instead of HTTPS one:
ssh://git@github.com/username/repo.git
git push git@github.com:williamkpchanHP/newDoc.git
git config --global credential.helper 'cache --timeout 7200'
After enabling credential caching, it will be cached for 7200 seconds (2 hour).
git error "No such remote 'origin'
You haven't set up the remote repository
You then ran
git remote add origin https://github.com/williamkpchanHP/newDoc.git
After that, your local repository should be able to communicate with the remote repository that resides at the specified URL (https://github.com/williamkpchanHP/newDoc.git)... provided that remote repo actually exists!
Before attempting to push to that remote repository, you need to make sure that the latter actually exists. So go to GitHub and create the remote repo in question. Then and only then will you be able to successfully push with
git push -u origin master
delete branches in Git
Deleting local branches
First, we print out all the branches (local as well as remote), using the git branch command with -a (all) flag.
To delete the local branch, just run the git branch command again, this time with the -d (delete) flag, followed by the name of the branch you want to delete (test branch in this case).
Note: Comments are the output produced as a result of running these git commands
git branch -a
# *master
# test
# remote/origin/master
# remote/origin/test
git branch -d test
# Deleted branch test (was ########).
Note: You can also use the -D flag which is synonymous with --delete --force instead of -d. This will delete the branch regardless of its merge status.
Deleting remote branches
To delete a remote branch, you can’t use the git branch command. Instead, use the git push command with --delete flag, followed by the name of the branch you want to delete. You also need to specify the remote name (origin in this case) after git push.
git branch -a
# *master
# test
# remote/origin/master
# remote/origin/test
git push origin --delete test
# To .git
# - [deleted] test
Delete this branch: remote/devs/JunitTest
git push devs --delete JunitTest
show my global Git configuration
git config --list
or look at your ~/.gitconfig file.
The local configuration will be in your repository's .git/config file.
Use:
git config --list --show-origin
to see where that setting is defined (global, user, repo, etc...)
The shortest,
git config -l
shows all inherited values from: system, global and local
edit my global Git configuration
Short answer:
git config --edit --global
1. System level (applied to every user on the system and all their repositories)
to view, git config --list --system (may need sudo)
to set, git config --system color.ui true
to edit system config file, git config --edit --system
2. Global level (values specific personally to you, the user).
to view, git config --list --global
to set, git config --global user.name xyz
to edit global config file, git config --edit --global
3. Repository level (specific to that single repository)
to view, git config --list --local
to set, git config --local core.ignorecase true (--local optional)
to edit repository config file, git config --edit --local (--local optional)
view all settings
Run git config --list, showing system, global, and (if inside a repository) local configs
Run git config --list --show-origin, also shows the origin file of each config item
read one particular configuration
Run git config user.name to get user.name, for example.
You may also specify options --system, --global, --local to read that value at a particular level.
save username and password in Git
Attention: This method saves the credentials in plaintext on your PC's disk. Everyone on your computer can access it, e.g. malicious NPM modules.
git CLI can store your user name/password in a secure, encrypted store called the Windows Credential Store.
This is what you told git to do when you entered
git config --global credential.helper wincred
You can use the git config to enable credentials storage in Git.
Run
git config --global credential.helper store
then
git pull
provide a username and password and those details will then be remembered later.
The credentials are stored in a file on the disk, with the disk permissions of "just user readable/writable" but still in plaintext.
When running this command,
git config --global credential.helper store
the first time you pull or push from the remote repository, you'll get asked about the username and password.
Afterwards, for consequent communications with the remote repository you don't have to provide the username and password.
The storage format is a .git-credentials file, stored in plaintext.
Also, you can use other helpers for the git config credential.helper, namely memory cache:
git config credential.helper 'cache --timeout=<timeout>'
which takes an optional timeout parameter, determining for how long the credentials will be kept in memory.
Using the helper, the credentials will never touch the disk and will be erased after the specified timeout. The default value is 900 seconds (15 minutes).
If you want to change the password later
git pull
Will fail, because the password is incorrect, git then removes the offending user+password from the ~/.git-credentials file, so now re-run
git pull
to provide a new password so it works as earlier.
Git credential helper - update password
https://stackoverflow.com/questions/25845963/git-credential-helper-update-password
To update your credentials, go to Control Panel → Credential Manager → Generic Credentials.
Find the credentials related to your Git account and edit them to use the updated password.
Note that to use the Windows Credential Manager for Git you need to configure the credential helper like so:
git config --global credential.helper wincred
If you have multiple GitHub accounts that you use for different repositories, then you should configure credentials to use the full repository path (rather than just the domain, which is the default):
git config --global credential.useHttpPath true
git to revert to last version
git checkout master~1 pictList.js
Work With Multiple Github Accounts on a single Machine
Let suppose I have two github accounts, https://github.com/rahul-office and https://github.com/rahul-personal.
Now i want to setup my mac to easily talk to both the github accounts.
NOTE: This logic can be extended to more than two accounts also.
:)
The setup can be done in 5 easy steps:
Step 1: Create SSH keys for all accounts
Step 2: Add SSH keys to SSH Agent
Step 3: Add SSH public key to the Github
Step 4: Create a Config File and Make Host Entries
Step 5: Cloning GitHub repositories using different accounts
Create SSH keys for all accounts
First make sure your current directory is your .ssh folder.
$ cd ~/.ssh
Syntax for generating unique ssh key for ann account is:
ssh-keygen -t rsa -C "your-email-address" -f "github-username"
here,
-C stands for comment to help identify your ssh key
-f stands for the file name where your ssh key get saved
Now generating SSH keys for my two accounts
ssh-keygen -t rsa -C "my_office_email@gmail.com" -f "github-rahul-office"
ssh-keygen -t rsa -C "my_personal_email@gmail.com" -f "github-rahul-personal"
Notice here rahul-office and rahul-work are the username of my github accounts corresponding to my_office_email@gmail.com and my_personal_email@gmail.com email ids respectively.
After entering the command the terminal will ask for passphrase, leave it empty and proceed.
Now after adding keys , in your .ssh folder, a public key and a private will get generated.
The public key will have an extention .pub and private key will be there without any extention both having same name which you have passed after -f option in the above command.
(in my case github-rahul-office and github-rahu-personal)
Add SSH keys to SSH Agent
Now we have the keys but it cannot be used until we add them to the SSH Agent.
ssh-add -K ~/.ssh/github-rahul-office
ssh-add -K ~/.ssh/github-rahul-personal
You can read more about adding keys to SSH Agent here.
Add SSH public key to the Github
For the next step we need to add our public key (that we have generated in our previous step) and add it to corresponding github accounts.
For doing this we need to:
1. Copy the public key We can copy the public key either by opening the github-rahul-office.pub file in vim and then copying the content of it.
vim ~/.ssh/github-rahul-office.pub
vim ~/.ssh/github-rahul-personal.pub
OR
We can directly copy the content of the public key file in the clipboard.
pbcopy < ~/.ssh/github-rahul-office.pub
pbcopy < ~/.ssh/github-rahul-personal.pub
2. Paste the public key on Github
Sign in to Github Account
Goto Settings > SSH and GPG keys > New SSH Key
Paste your copied public key and give it a Title of your choice.
OR
Sign in to Github
Paste this link in your browser (https://github.com/settings/keys) or click here
Click on New SSH Key and paste your copied key.
Create a Config File and Make Host Entries
The ~/.ssh/config file allows us specify many config options for SSH.
If config file not already exists then create one (make sure you are in ~/.ssh directory)
touch config
The commands below opens config in your default editor....Likely TextEdit, VS Code.
open config
Now we need to add these lines to the file, each block corresponding to each account we created earlier.
     #rahul-office account
Host github.com-rahul-office
HostName github.com

User git
IdentityFile ~/.ssh/github-rahul-office
#rahul-personal account

Host github.com-rahul-personal
HostName github.com
User git

IdentityFile ~/.ssh/github-rahul-personal
Cloning GitHub repositories using different accounts
So we are done with our setups and now its time to see it in action.
We will clone a repository using one of the account we have added.
Make a new project folder where you want to clone your repository and go to that directory from your terminal.
For Example:
I am making a repository on my personal github account and naming it TestRepo
Now for cloning the repo use the below command:
    git clone git@github.com-{your-username}:{owner-user-name}/{the-repo-name}.git
[e.g.] git clone git@github.com-rahul-personal:rahul-personal/TestRepo.git
Finally
From now on, to ensure that our commits and pushes from each repository on the system uses the correct GitHub user — we will have to configure user.email and user.name in every repository freshly cloned or existing before.
To do this use the following commands.
     git config user.email "my_office_email@gmail.com"
git config user.name "Rahul Pandey"

git config user.email "my-personal-email@gmail.com"
git config user.name "Rahul Pandey"
Pick the correct pair for your repository accordingly.
To push or pull to the correct account we need to add the remote origin to the project
     git remote add origin git@github.com-rahul-personal:rahul-personal
git remote add origin git@github.com-rahul-office:rahul-office
Now you can use:
     git push
git pull
put multiple projects in a git repository
make two separate local repositories, then push them both to the same remote repository on GitHub.
Solution 1
A single repository can contain multiple independent branches, called orphan branches.
Orphan branches are completely separate from each other; they do not share histories.
git checkout --orphan BRANCHNAME
This creates a new branch, unrelated to your current branch.
Each project should be in its own orphaned branch.
Now for whatever reason, git needs a bit of cleanup after an orphan checkout.
rm .git/index
rm -r *
Make sure everything is committed before deleting
Once the orphan branch is clean, you can use it normally.
Solution 2
Avoid all the hassle of orphan branches.
Create two independent repositories, and push them to the same remote.
Just use different branch names for each repo.
# repo 1
git push origin master:master-1
# repo 2
git push origin master:master-2
Solution 3
This is for using a single directory for multiple projects.
I use this technique for some closely related projects where I often need to pull changes from one project into another.
It's similar to the orphaned branches idea but the branches don't need to be orphaned.
Simply start all the projects from the same empty directory state.
Start all projects from one committed empty directory
here is the plan.
Start as you ought to start any git projects, by committing the empty repository, and then start all your projects from the same empty directory state.
That way you are certain that the two lots of files are fairly independent.
Also, give your branches a proper name and don't lazily just use "master".
Your projects need to be separate so give them appropriate names.
Git commits (and hence tags and branches) basically store the state of a directory and its subdirectories and Git has no idea whether these are parts of the same or different projects so really there is no problem for git storing different projects in the same repository.
The problem is then for you clearing up the untracked files from one project when using another, or separating the projects later.
Create an empty repository
cd some_empty_directory
git init
touch .gitignore
git add .gitignore
git commit -m empty
git tag EMPTY
Start your projects from empty.
whenever you like.
git branch thesis EMPTY
git checkout thesis
echo "the meaning of meaning" > philosophy_doctorate.txt
git add philosophy_doctorate.txt
git commit -m "Ph.D"
Switch back and forth
Go back and forwards between projects whenever you like.
This example goes back to the chess software project.
git checkout software
echo "while not end_of_game do make_move()" >> chess.prog
git add chess.prog
git commit -m "improved chess program"
Untracked files are annoying
You will however be annoyed by untracked files when swapping between projects/branches.
touch untracked_software_file.prog
git checkout thesis
ls
    philosophy_doctorate.txt  untracked_software_file.prog
It's not an insurmountable problem
Sort of by definition, git doesn't really know what to do with untracked files and it's up to you to deal with them.
You can stop untracked files from being carried around from one branch to another as follows.
git checkout EMPTY
ls
    untracked_software_file.prog
rm -r *
    (directory is now really empty, apart from the repository stuff!)
git checkout thesis
ls
    philosophy_doctorate.txt
By ensuring that the directory was empty before checking out our new project we made sure there were no hanging untracked files from another project.
A refinement
$ GIT_AUTHOR_DATE='2001-01-01:T01:01:01' GIT_COMMITTER_DATE='2001-01-01T01:01:01' git commit -m empty
If the same dates are specified whenever committing an empty repository, then independently created empty repository commits can have the same SHA1 code.
This allows two repositories to be created independently and then merged together into a single tree with a common root in one repository later.
Example
# Create thesis repository.
# Merge existing chess repository branch into it
mkdir single_repo_for_thesis_and_chess
cd single_repo_for_thesis_and_chess
git init
touch .gitignore
git add .gitignore
GIT_AUTHOR_DATE='2001-01-01:T01:01:01' GIT_COMMITTER_DATE='2001-01-01:T01:01:01' git commit -m empty
git tag EMPTY
echo "the meaning of meaning" > thesis.txt
git add thesis.txt
git commit -m "Wrote my PH.D"
git branch -m master thesis
# It's as simple as this ...
git remote add chess ../chessrepository/.git
git fetch chess chess:chess
Result
Use subdirectories per project?
It may also help if you keep your projects in subdirectories where possible, e.g.
instead of having files
chess.prog
philosophy_doctorate.txt
have
chess/chess.prog
thesis/philosophy_doctorate.txt
In this case your untracked software file will be chess/untracked_software_file.prog.
When working in the thesis directory you should not be disturbed by untracked chess program files, and you may find occasions when you can work happily without deleting untracked files from other projects.
Also, if you want to remove untracked files from other projects, it will be quicker (and less prone to error) to dump an unwanted directory than to remove unwanted files by selecting each of them.
Branch names can include '/' characters
So you might want to name your branches something like
project1/master
project1/featureABC
project2/master
project2/featureXYZ
steps to add all the projects to one repository
Create a new repository with the main branch (Keep it Empty)
Create a branch from Main (Empty) with the respective project name (Create as many as branches you want with the respective projects you have)
Then Checkout to that branch with the command:
$git checkout -b
If the origin is already there then remove it first then add the newly created remote origin with the following commands:
$ git remote rm origin (To remove remote origin)
$ git remote add origin https://github.com/<USERNAME>/<REPO_NAME>.git
For authorization of the operation you need to use the following command:
$ git remote set-url origin <Access_Token>@github.com/<USERNAME>/<REPO_NAME>.git
Now, you can push the code and files to the branch directly by the following command:
$ git push -u -f origin
If the above command is throwing an error then try first adding the files by the following command and then try step 6 again.
$ git add .
This worked for me, as whenever I want to change/pull something in any project I just clone a specific branch make changes in it and then push the changes to that specific branch only.
This way you can have multiple projects under one repo.
I tried this solution by myself only to bypass the tricky way of Orphan branches or having multiple Repos.
Use a personal access token in place of a password when authenticating to GitHub in the command line or with the API.
Warning: Treat your access tokens like passwords.
For more information, see "Keeping your personal access tokens secure."
About personal access tokens
Personal access tokens are an alternative to using passwords for authentication to GitHub when using the GitHub API or the command line.
Personal access tokens are intended to access GitHub resources on behalf of yourself.
To access resources on behalf of an organization, or for long-lived integrations, you should use a GitHub App.
For more information, see "About apps."
Types of personal access tokens
GitHub currently supports two types of personal access tokens: fine-grained personal access tokens and personal access tokens (classic).
GitHub recommends that you use fine-grained personal access tokens instead of personal access tokens (classic) whenever possible.
Organization owners can set a policy to restrict the access of personal access tokens (classic) to their organization.
For more information, see "Setting a personal access token policy for your organization."
Fine-grained personal access tokens
Fine-grained personal access tokens have several security advantages over personal access tokens (classic):
Each token can only access resources owned by a single user or organization.
Each token can only access specific repositories.
Each token is granted specific permissions, which offer more control than the scopes granted to personal access tokens (classic).
Each token must have an expiration date.
Organization owners can require approval for any fine-grained personal access tokens that can access resources in the organization.
Personal access tokens (classic)
Personal access tokens (classic) are less secure.
However, some features currently will only work with personal access tokens (classic):
Only personal access tokens (classic) have write access for public repositories that are not owned by you or an organization that you are not a member of.
Outside collaborators can only use personal access tokens (classic) to access organization repositories that they are a collaborator on.
Only personal access tokens (classic) can access the GraphQL API.
Some REST API operations are not available to fine-grained personal access tokens.
For a list of REST API operations that are supported for fine-grained personal access tokens, see "Endpoints available for fine-grained personal access tokens".
If you choose to use a personal access token (classic), keep in mind that it will grant access to all repositories within the organizations that you have access to, as well as all personal repositories in your personal account.
As a security precaution, GitHub automatically removes personal access tokens that haven't been used in a year.
To provide additional security, we highly recommend adding an expiration to your personal access tokens.
Keeping your personal access tokens secure
Personal access tokens are like passwords, and they share the same inherent security risks.
Before creating a new personal access token, consider if there is a more secure method of authentication available to you:
To access GitHub from the command line, you can use GitHub CLI or Git Credential Manager instead of creating a personal access token.
When using a personal access token in a GitHub Actions workflow, consider whether you can use the built-in GITHUB_TOKEN instead.
For more information, see "Automatic token authentication."
If these options are not possible, and you must create a personal access token, consider using another service such as the 1Password CLI to store your token securely, or 1Password's GitHub shell plugin to securely authenticate to GitHub CLI.
When using a personal access token in a script, you can store your token as a secret and run your script through GitHub Actions.
For more information, see "Encrypted secrets." You can also store your token as a Codespaces secret and run your script in Codespaces.
For more information, see "Managing encrypted secrets for your codespaces."
Creating a fine-grained personal access token
Note: Fine-grained personal access token are currently in beta and subject to change.
To leave feedback, see the feedback discussion.
Verify your email address, if it hasn't been verified yet.
In the upper-right corner of any page, click your profile photo, then click Settings.
In the left sidebar, click Developer settings.
In the left sidebar, under Personal access tokens, click Fine-grained tokens.
Click Generate new token.
Under Token name, enter a name for the token.
Under Expiration, select an expiration for the token.
Optionally, under Description, add a note to describe the purpose of the token.
Under Resource owner, select a resource owner.
The token will only be able to access resources owned by the selected resource owner.
Organizations that you are a member of will not appear unless the organization opted in to fine-grained personal access tokens.
For more information, see "Setting a personal access token policy for your organization."
Optionally, if the resource owner is an organization that requires approval for fine-grained personal access tokens, below the resource owner, in the box, enter a justification for the request.
Under Repository access, select which repositories you want the token to access.
You should choose the minimal repository access that meets your needs.
Tokens always include read-only access to all public repositories on GitHub.
If you selected Only select repositories in the previous step, under the Selected repositories dropdown, select the repositories that you want the token to access.
Under Permissions, select which permissions to grant the token.
Depending on which resource owner and which repository access you specified, there are repository, organization, and account permissions.
You should choose the minimal permissions necessary for your needs.
For more information about what permissions are required for each REST API operation, see "Permissions required for fine-grained personal access tokens."
Click Generate token.
If you selected an organization as the resource owner and the organization requires approval for fine-grained personal access tokens, then your token will be marked as pending until it is reviewed by an organization administrator.
Your token will only be able to read public resources until it is approved.
If you are an owner of the organization, your request is automatically approved.
For more information, see "Reviewing and revoking personal access tokens in your organization".
Creating a personal access token (classic)
Note: Organization owners can restrict the access of personal access token (classic) to their organization.
If you try to use a personal access token (classic) to access resources in an organization that has disabled personal access token (classic) access, your request will fail with a 403 response.
Instead, you must use a GitHub App, OAuth App, or fine-grained personal access token.
Note: Your personal access token (classic) can access every repository that you can access.
GitHub recommends that you use fine-grained personal access tokens instead, which you can restrict to specific repositories.
Fine-grained personal access tokens also enable you to specify fine-grained permissions instead of broad scopes.
Verify your email address, if it hasn't been verified yet.
In the upper-right corner of any page, click your profile photo, then click Settings.
In the left sidebar, click Developer settings.
In the left sidebar, under Personal access tokens, click Tokens (classic).
Select Generate new token, then click Generate new token (classic).
Give your token a descriptive name.
To give your token an expiration, select the Expiration drop-down menu, then click a default or use the calendar picker.
Select the scopes you'd like to grant this token.
To use your token to access repositories from the command line, select repo.
A token with no assigned scopes can only access public information.
For more information, see "Scopes for OAuth Apps".
Click Generate token.
To use your token to access resources owned by an organization that uses SAML single sign-on, authorize the token.
For more information, see "Authorizing a personal access token for use with SAML single sign-on" in the GitHub Enterprise Cloud documentation.
Using a personal access token on the command line
Once you have a token, you can enter it instead of your password when performing Git operations over HTTPS.
For example, on the command line you would enter the following:
$ git clone https://github.com/USERNAME/REPO.git
Username: YOUR_USERNAME
Password: YOUR_TOKEN
Personal access tokens can only be used for HTTPS Git operations.
If your repository uses an SSH remote URL, you will need to switch the remote from SSH to HTTPS.
If you are not prompted for your username and password, your credentials may be cached on your computer.
You can update your credentials in the Keychain to replace your old password with the token.
Instead of manually entering your personal access token for every HTTPS Git operation, you can cache your personal access token with a Git client.
Git will temporarily store your credentials in memory until an expiry interval has passed.
You can also store the token in a plain text file that Git can read before every request.
For more information, see "Caching your GitHub credentials in Git."
If you're cloning GitHub repositories using HTTPS, we recommend you use GitHub CLI or Git Credential Manager (GCM) to remember your credentials.
Tip: If you clone GitHub repositories using SSH, then you can authenticate using an SSH key instead of using other credentials.
For information about setting up an SSH connection, see "Connecting to GitHub with SSH."
GitHub CLI
GitHub CLI will automatically store your Git credentials for you when you choose HTTPS as your preferred protocol for Git operations and answer "yes" to the prompt asking if you would like to authenticate to Git with your GitHub credentials.
Install GitHub CLI on macOS, Windows, or Linux.
In the command line, enter gh auth login, then follow the prompts.
When prompted for your preferred protocol for Git operations, select HTTPS.
When asked if you would like to authenticate to Git with your GitHub credentials, enter Y.
For more information about authenticating with GitHub CLI, see gh auth login.
Git Credential Manager
Git Credential Manager (GCM) is another way to store your credentials securely and connect to GitHub over HTTPS.
With GCM, you don't have to manually create and store a personal access token, as GCM manages authentication on your behalf, including 2FA (two-factor authentication).
Install Git using Homebrew:
$ brew install git
Install GCM using Homebrew:
$ brew tap microsoft/git
$ brew install --cask git-credential-manager-core
For MacOS, you don't need to run git config because GCM automatically configures Git for you.
The next time you clone an HTTPS URL that requires authentication, Git will prompt you to log in using a browser window.
You may first be asked to authorize an OAuth app.
If your account or organization requires two-factor auth, you'll also need to complete the 2FA challenge.
Once you've authenticated successfully, your credentials are stored in the macOS keychain and will be used every time you clone an HTTPS URL.
Git will not require you to type your credentials in the command line again unless you change your credentials.
Install Git for Windows, which includes GCM.
For more information, see "Git for Windows releases" from its releases page.
We recommend always installing the latest version.
At a minimum, install version 2.29 or higher, which is the first version offering OAuth support for GitHub.
The next time you clone an HTTPS URL that requires authentication, Git will prompt you to log in using a browser window.
You may first be asked to authorize an OAuth app.
If your account or organization requires two-factor auth, you'll also need to complete the 2FA challenge.
Once you've authenticated successfully, your credentials are stored in the Windows credential manager and will be used every time you clone an HTTPS URL.
Git will not require you to type your credentials in the command line again unless you change your credentials.
Warning: Older versions of Git for Windows came with Git Credential Manager for Windows.
This older product is no longer supported and cannot connect to GitHub via OAuth.
We recommend you upgrade to the latest version of Git for Windows.
Warning: If you cached incorrect or outdated credentials in Credential Manager for Windows, Git will fail to access GitHub.
To reset your cached credentials so that Git prompts you to enter your credentials, access the Credential Manager in the Windows Control Panel under User Accounts > Credential Manager.
Look for the GitHub entry and delete it.
For Linux, install Git and GCM, then configure Git to use GCM.
Install Git from your distro's packaging system.
Instructions will vary depending on the flavor of Linux you run.
Install GCM.
See the instructions in the GCM repo, as they'll vary depending on the flavor of Linux you run.
Configure Git to use GCM.
There are several backing stores that you may choose from, so see the GCM docs to complete your setup.
For more information, see "GCM Linux."
The next time you clone an HTTPS URL that requires authentication, Git will prompt you to log in using a browser window.
You may first be asked to authorize an OAuth app.
If your account or organization requires two-factor auth, you'll also need to complete the 2FA challenge.
Once you've authenticated successfully, your credentials are stored on your system and will be used every time you clone an HTTPS URL.
Git will not require you to type your credentials in the command line again unless you change your credentials.
For more options for storing your credentials on Linux, see Credential Storage in Pro Git.
Git allows groups of people to work on the same documents (often code) at the same time, and without stepping on each other's toes.
It's a distributed version control system.
(cribbed from tryGit)
Mac OS 10.9 Mavericks comes with git installed.
To check that git is installed, open a Terminal and run…
which git
git --version
These commands should display something similar to this:
➜ which git
/usr/bin/git
➜ git --version
git version 1.9.3
For all other operating systems, go to the Git downloads web site, and click on the appropriate icon for your operating system.
If on a Mac the official Git package gives you any trouble, use the following instructions to install Git using Homebrew.
Homebrew is the missing package manager for Mac OS X.
To install Homebrew and use brew to install Git, run…
ruby -e "$(curl -fsSL https://raw.github.com/Homebrew/homebrew/go/install)" brew install git
Test that git is installed and working by running…
which git
git --version
Configure git
Git associates your name and e-mail address with each commit, which helps when multiple people collaborate on a project.
To configure your name and e-mail address in git, open the Terminal and run…
git config --global user.name 'Your Name'
git config --global user.email 'your@email.com'
On a Mac, configure git to remember your password.
git config --global credential.helper osxkeychain
Configure RStudio to use git
Open RStudio
Click Tools -> Global Options -> Git/SVN
If Git executable shows (none), click Browse and select the git executable installed on your system
On a Mac, this will likely be one of
/usr/bin/git/usr/local/bin/git/usr/local/git/bin/git
On Windows, git.exe will likely be somewhere in Program Files Click OK
Learn to use git with RStudio
Create a new project
Or if you prefer, see below for instructions to open an existing project.
Open RStudio
Create a new project
Click File -> New Project -> New Directory -> Empty Project
Check Create a git repository for this project
Open an existing project
Open an existing project
Click File -> Open Project
If you already have a tab labeled Git next to the tabs Environment and
History, skip these instructions.
Enable git for this project
Click Tools -> Version Control -> Project Setup
Click the dropdown box Version control system and select Git
If you don't have a Git option go back to Configure RStudio.
Do not pass Go.
Do not collect $200
Create and commit a file
Make your first commit
Click the Git tab
Check Staged next to .gitignore and hello.Rproj
Click Commit
Type a message in Commit message
Click Commit
Create a new Rmd file
Click File -> New File -> R Markdown
Edit the file and change the title
Save the file
Commit the new Rmd file
Check Staged and click Commit
Knit the HTML report
Knit the Rmd file to generate an HTML report
Click Knit HTML
Commit the generated report
Check Staged for the md and html files and the figures directory
Click Commit
Change the plot
Replace the plot with ggplot or qplot and save your changes
Commit the change
Knit the report
Commit all the modified files
Make a change and revert it
Make an erroneous change to the file and save it
Click Diff and then Revert
The erroneous change has been undone and the previous version restored
Delete a file
Create a new file named doomed.md
Enter some text and save it
Delete this doomed file
Under the Files tab check the box next to doomed.md
Click Delete
Under the Git tab, a red D appears next to the deleted file
Stage the change by clicking the checkbox and commit it
Inspect your work
Make a few more changes and commits
Click History under the Git tab to review your day's work
Git has recorded a complete history of your work
In the event of impish gnomes introducing errors into your work, you can browse through your history, find the gnome to blame, and restore your previous good work.
Gnomes be damned.
Use the git command line
There are many graphical interfaces for git—RStudio is one—but there is only one git command line interface, which is the common engine being used behind the scenes.
If your graphical interface ever lets you down, it's useful to peak under the hood.
Click File -> New File -> Text File
Describe your project in this new file
Save this file and name it README.md
Case matters! Name the file README.md and not readme.md or any other variation
Don't be imaginative.
Get used to being pedantic.
Foster your inner OCD
md is the extension of a Markdown file
Note the yellow question marks indicating the new file that's not being tracked by git
Open a shell (also known as a Terminal)
Under the Git tab, click More -> Shell
Stage README.md using the git command line
Run git add README.md
The yellow question mark changes to a green A
Checking the Staged check box in fact runs git add
Unstage README.md
Run git reset README.md
The green A changes back to a yellow question mark
Unchecking the Staged check box in fact runs git reset
Stage and commit README.md
Run…
git add README.md
git commit -m 'Add README.md'
The -m option of git commit specifies the git log message
Browse the git history in RStudio, and inspect this commit
Learn more about the git command line
Go to tryGit and learn more about the git command line!
When developers want to take their local Git repository, use the git remote add origin command.
The git reflog command shows how many commits are in the local repository before the git remote add origin call.
execute the git reflog command
Reflog is an abbreviation of reference logs.
Create the remote origin on GitHub
⇧
After the local repository is validated, the next step is to create a remote repository that the local repository will connect to.
It's easy to create a remote repository.
Log into GitHub and use the "Create a new repository" wizard.
In this example, I named the GitHub repository my-github-repo to clearly differentiate it from the Git repository that is stored locally in a folder named my-local-repo.
Set up the remote origin repository on the GitHub server.
Since you will transfer information to the GitHub repository, do not initialize it with a README, configure a gitignore file or add a license.
All of those things will exist in the local repository and will be subsequently pushed into the remote GitHub one.
If those resources exist in both repositories before the git remote add origin command runs, it will create extra merge and conflict resolution steps that are easily avoided.
Copy and edit GitHub's remote add URL
⇧
When GitHub creates your repository, it presents an HTTP link, which is required as part of the git remote add origin command.
The URL provided that uniquely identifies the GitHub repository I created is:
http://github.com/cameronmcnz/my-github-repo.git
Copy and paste this URL into a text editor and then add your username and password to the start of the URL:
http://cameronmcnz:[email protected]github.com/cameronmcnz/my-github-repo.git
This URL setup lets you authenticate the file without using a credential manager or other password management tool.
Run the git remote add origin command
⇧
With the GitHub URL saved to the clipboard in the folder that contains your local Git repository, open a terminal window and run the following git remote add origin command:
git remote add origin http://cameronmcnz:[email protected]github.com/cameronmcnz/my-github-repo.git
This command will execute, but the system won't provide any feedback to the terminal window.
To verify that the remote repo was added to your configuration, use the git remote –v command.
This command will show that GitHub is the fetch and push targets of the local repository.
Perform a git push to the remote
⇧
Finally, with the GitHub service configured, push all your local code changes, commits and revision history to the remote server with a git push command.
Make sure you specify the --set-upstream option, otherwise the remote server will reject the operation.
Also include the name of the branch to push, which in this case is master.
Push changes to the remote server with the git push command.
git push --set-upstream origin master
As this action completes, the terminal window lists the number of objects pushed to the server and indicates that your local repository is set to track to a branch named master on the GitHub server.
Verify the git remote add push on GitHub
⇧
After the git remote add and push commands complete, go back to the GitHub instance and look at the contents of the recently created repository.
The result of the local git remote add and push command is reflected in the remote GitHub repository.
The remote GitHub repository should contain all the files that make up your local repository and at the same time, maintain a copy of your commit history.
If you look at my GitHub repository, you will see the HelloWorld.java, index.html and style.css files, along with an indication that the repository contains two commits.
These files and commits are consistent with the output from the git reflog command from the start of this tutorial.
Overview of git remote add origin and push steps
⇧
In review, these are the five steps to successfully perform a git remote add origin and push to a remote repository:
Validate the existence of your local Git repository.
Create a new, empty Git repository on your remote server.
Obtain the git remote add URL for the remote repository and add credentials if needed.
Run the git remote add origin command from your local repository with the --set-upstream and the name of the active branch to push.
View the pushed files on the remote Git repository to verify that the git remote add and push commands ran successfully.
Now that the remote and local repositories can interact seamlessly, you can continue to commit code locally, push changes to the remote GitHub server, and begin to manage your source code in a distributed manner.
SSH key pairs allow users to connect to remote accounts without having to use the password of the remote account. This is useful if you'd like to not have to enter the password to an account you own and access frequently, or if you need to connect to a shared account where you are not its owner and do not know its password. You create a pair of files known as "keys", one private and one public, to facilitate this process. The private key stays on the machine you will connect from which is usually the machine where it is created (for example, your laptop). The other key, the public key, is put into the remote account by the owner of that account (which may be you) or by the server administrator. Think of this process as leaving a real key (the public key) in a remote door. The door will only open if you have the associated private key as you approach. This is why you must keep the private key to yourself, otherwise people who have a copy of it can pass through all the doors in which you left your public key.
The most popular Windows SSH client today is Putty which is available from http://www.chiark.greenend.org.uk/~sgtatham/putty. Download the complete Windows installer rather than just the putty.exe file. You may choose to follow the thorough Putty documentation directly on how to create an SSH keypair on Windows. Otherwise see the more brief step-by-step instructions below.
Generating SSH Keys
Start the puttygen.exe program included with the Putty installer.
In the Parameters section choose SSH3 RSA as the key type and press Generate. You will need to move your mouse about in the small window area in order to generate randomness that the process requires.
You may choose to enter a key comment which can be used by you to identify the key (useful when you use several SSH keys).
Type in a passphrase and confirm it. The passphrase is used to protect your key and you will be asked for it when you connect via SSH using public key authentication.
Click Save private key to save your private key. A common name is id_rsa.
Click Save public key to save your public key. A common name is id_rsa.pub.
Uploading and Installing the public key
See the UNIX instructions for these steps above as they are identical.
Using the SSH Key
SSH config file
You can explicitly tell your ssh program to use your ssh key and not your password with `ssh -o preferredauthentications=publickey ...`. Since you may not want to type that every time, you can configure an ssh host alias. Create and/or append to the file ~/.ssh/config on your local computer and enter the following:
Host somename
HostName your.favorite.machine.berkeley.edu
User theuser
PreferredAuthentications publickey
Then you can invoke `ssh somename` and it will pass in all of the above options.
SSH Agent
If you do not want to have to type your key's passphrase every time, you can load the key into your SSH agent once. The ssh-agent is usually automatically started on Linux, and you can load the key into your agent by typing `ssh-add`. If your key is in a non-standard location, you can manually specify it with `ssh-add /path/to/the/ssh/key`. On macOS, your agent uses your keychain, so pass in `-K` to ssh-add, e.g. `ssh-add -K` or `ssh-add -K /path/to/the/ssh/key`.
ed25519 is a relatively new cryptography solution implementing Edwards-curve Digital Signature Algorithm (EdDSA).
I say relatively, because ed25519 is supported by OpenSSH for about 5 years now – so it wouldn’t be considered a cutting edge.
Still, people are such creatures of habits that many IT professionals daily using SSH/SCP haven’t even heard of this key type.
Similarly, not all the software solutions are supporting ed25519 right now – but SSH implementations in most modern Operating Systems certainly support it.
Why ed25519 Key is a Good Idea
Compared to the most common type of SSH key – RSA – ed25519 brings a number of cool improvements:
it’s faster: to generate and to verify
it’s more secure
collision resilience – this means that it’s more resilient against hash-function collision attacks (types of attacks where large numbers of keys are generated with the hope of getting two different keys have matching hashes)
keys are smaller – this, for instance, means that it’s easier to transfer and to copy/paste them
Generate ed25519 SSH Key
Here’s the command to generate an ed25519 SSH key:
$ ssh-keygen -t ed25519 -C "[email@protected]"
Generating public/private ed25519 key pair.
Enter file in which to save the key (/Users/greys/.ssh/id_ed25519):
Enter passphrase (empty for no passphrase):
Enter same passphrase again:
Your identification has been saved in /Users/greys/.ssh/id_ed25519.
Your public key has been saved in /Users/greys/.ssh/id_ed25519.pub.
The key fingerprint is:
SHA256:FHsTyFHNmvNpw4o7+rp+M1yqMyBF8vXSBRkZtkQ0RKY
The key's randomart image is:
+--[ED25519 256]--+
| */Xoo |
| . . .===..o |
| + .Eo+.oo |
| o ..o.+. |
| . .S + . |
| . . . * |
| . . . + o . |
| o O . |
| .*Xo= |
+----[SHA256]-----+
That’s it – this keypair is ready to be deployed to SSH servers, GitHub or any other service that can use them.
Check out how short the public key is:
ssh-ed25519 AAAAC3NzaC1lZDI1NTE5AAAAIK0wmN/Cr3JXqmLW7u+g9pTh+wyqDHpSQEIQczXkVx9q
SSH Keys for GitHub
Objectives
Explain what an SSH key is
Generate your own SSH key pair
Add your SSH key to your GitHub account
Learn how to use your SSH key in your GitHub workflow
Why Use an SSH Key?
When working with a GitHub repository, you'll often need to identify yourself to GitHub using your username and password.
An SSH key is an alternate way to identify yourself that doesn't require you to enter you username and password every time.
SSH keys come in pairs, a public key that gets shared with services like GitHub, and a private key that is stored only on your computer.
If the keys match, you're granted access.
The cryptography behind SSH keys ensures that no one can reverse engineer your private key from the public one.
Generating an SSH key pair
The first step in using SSH authorization with GitHub is to generate your own key pair.
You might already have an SSH key pair on your machine.
You can check to see if one exists by moving to your .ssh directory and listing the contents.
$ cd ~/.ssh
$ ls
If you see id_rsa.pub, you already have a key pair and don't need to create a new one.
If you don't see id_rsa.pub, use the following command to generate a new key pair.
Make sure to replace your@email.com with your own email address.
$ ssh-keygen -o -t rsa -C "your@email.com"
(The -o option was added in 2014; if this command fails for you, just remove the -o and try again)
When asked where to save the new key, hit enter to accept the default location.
Generating public/private rsa key pair.
Enter file in which to save the key (/Users/username/.ssh/id_rsa):
You will then be asked to provide an optional passphrase.
This can be used to make your key even more secure, but for this lesson you can skip it by hitting enter twice.
Enter passphrase (empty for no passphrase):Enter same passphrase again:
When the key generation is complete, you should see the following confirmation:
Your identification has been saved in /Users/username/.ssh/id_rsa.
Your public key has been saved in /Users/username/.ssh/id_rsa.pub.
The key fingerprint is:
01:0f:f4:3b:ca:85:d6:17:a1:7d:f0:68:9d:f0:a2:db your@email.com
The key's randomart image is:
+--[ RSA 2048]----+
|                 |
|                 |
|        . E +    |
|       . o = .   |
|      . S =   o  |
|       o.O . o   |
|       o .+ .    |
|      . o+..     |
|       .+=o      |
+-----------------+
The random art image is an alternate way to match keys but we won't be needing this.
Add your public key to GitHub
We now need to tell GitHub about your public key.
Display the contents of your new public key file with cat:
$ cat ~/.ssh/id_rsa.pub
The output should look something like this:
ssh-rsa AAAAB3NzaC1yc2EAAAABIwAAAQEA879BJGYlPTLIuc9/R5MYiN4yc/YiCLcdBpSdzgK9Dt0Bkfe3rSz5cPm4wmehdE7GkVFXrBJ2YHqPLuM1yx1AUxIebpwlIl9f/aUHOts9eVnVh4NztPy0iSU/Sv0b2ODQQvcy2vYcujlorscl8JjAgfWsO3W4iGEe6QwBpVomcME8IU35v5VbylM9ORQa6wvZMVrPECBvwItTY8cPWH3MGZiK/74eHbSLKA4PY3gM4GHI450Nie16yggEg2aTQfWA1rry9JYWEoHS9pJ1dnLqZU3k/8OWgqJrilwSoC5rGjgp93iu0H8T6+mEHGRQe84Nk1y5lESSWIbn6P636Bl3uQ== your@email.com
Copy the contents of the output to your clipboard.
Login to github.com and bring up your account settings by clicking the tools icon.
Select SSH Keys from the side menu, then click the Add SSH key button.
Name your key something whatever you like, and paste the contents of your clipboard into the Key text box.
Finally, hit Add key to save.
Enter your github password if prompted.
####Using Your SSH Key
Going forward, you can use the SSH clone URL when copying a repo to your local machine.
This will allow you to bypass entering your username and password for future GitHub commands.
Key Points
SSH is a secure alternative to username/password authorization
SSH keys are generated in public / private pairs.
Your public key can be shared with others.
The private keys stays on your machine only.
You can authorize with GitHub through SSH by sharing your public key with GitHub.
Create a directory to contain the project.
Go into the new directory.
Type git init.
Write some code.
Type git add to add the files.
Type git commit.
A new repo from an existing project
Say you've got an existing project that you want to start tracking with git.
Go into the directory containing the project.
Type git init.
Type git add to add all of the relevant files.
You'll probably want to create a .gitignore file right away, to indicate all of the files you don't want to track.
Use git add .gitignore, too.
Type git commit.
git remote add origin https://github.com/williamkpchan/stdrvest.git
git branch -M main
git push -u origin main
Getting Started with GitHub Pages
Connect it to github
You've now got a local git repository.
You can use git locally, like that, if you want.
But if you want the thing to have a home on github, do
the following.
Go to github.
Log in to your account.
Click the new repository button in the top-right.
You'll have an option there to initialize the repository with a README file, but I don't.
Click the “Create repository” button.
Now, follow the second set of instructions, “Push an existing repository…”
$ git remote add origin git@github.com:username/new_repo
$ git push -u origin master
Actually, the first line of the instructions will say
$ git remote add origin https://github.com/username/new_repo
But I use git@github.com:username/new_repo rather than https://github.com/username/new_repo, as the former is for use with
ssh (if you set up ssh as I mentioned in “Your first time”, then you won't have to type your password every time you push things to github).
If you use the latter construction, you'll have to type your github password every time you push to github.
See What Branch You're On
Run this command: git status
List All Branches
NOTE: The current local branch will be marked with an asterisk (*).
To see local branches, run this command: git branch
To see remote branches, run this command: git branch -r
To see all local and remote branches, run this command: git branch -a
Create a New Branch
Run this command (replacing my-branch-name with whatever name you want):
git checkout -b my-branch-name
You're now ready to commit to this branch.
Switch to a Branch In Your Local Repo
Run this command:git checkout my-branch-name
Switch to a Branch That Came From a Remote Repo
To get a list of all branches from the remote, run this command: git pull
Run this command to switch to the branch:
git checkout --track origin/my-branch-name
Push to a Branch
If your local branch does not exist on the remote, run either of these commands:
git push -u origin my-branch-name git push -u origin HEAD NOTE: HEAD is a reference to the top of the current branch, so it's an easy way to push to a branch of the same name on the remote. This saves you from having to type out the exact name of the branch!
If your local branch already exists on the remote, run this command: git push
Merge a Branch
You'll want to make sure your working tree is clean and see what branch you're on. Run this command:
git status
First, you must check out the branch that you want to merge another branch into (changes will be merged into this branch). If you're not already on the desired branch, run this command: git checkout master NOTE: Replace master with another branch name as needed.
Now you can merge another branch into the current branch. Run this command:
git merge my-branch-name NOTE: When you merge, there may be a conflict. Refer to Handling Merge Conflicts (the next exercise) to learn what to do.
Delete Branches
To delete a remote branch, run this command: git push origin --delete my-branch-name
To delete a local branch, run either of these commands:
git branch -d my-branch-name git branch -D my-branch-name NOTE: The -d option only deletes the branch if it has already been merged. The -D option is a shortcut for --delete --force, which deletes the branch irrespective of its merged status.
Remote repositories are versions of your project that are hosted on the Internet or network somewhere.
You can have several of them, each of which generally is either read-only or read/write for you.
Collaborating with others involves managing these remote repositories and pushing and pulling data to and from them when you need to share work.
Managing remote repositories includes knowing how to add remote repositories, remove remotes that are no longer valid, manage various remote branches and define them as being tracked or not, and more.
In this section, we’ll cover some of these remote-management skills.
Note
Remote repositories can be on your local machine.
It is entirely possible that you can be working with a “remote” repository that is, in fact, on the same host you are.
The word “remote” does not necessarily imply that the repository is somewhere else on the network or Internet, only that it is elsewhere.
Working with such a remote repository would still involve all the standard pushing, pulling and fetching operations as with any other remote.
Showing Your Remotes
To see which remote servers you have configured, you can run the git remote command.
It lists the shortnames of each remote handle you’ve specified.
If you’ve cloned your repository, you should at least see origin — that is the default name Git gives to the server you cloned from:
$ git clone https://github.com/schacon/ticgit
Cloning into 'ticgit'...
remote: Reusing existing pack: 1857, done.
remote: Total 1857 (delta 0), reused 0 (delta 0)
Receiving objects: 100% (1857/1857), 374.35 KiB | 268.00 KiB/s, done.
Resolving deltas: 100% (772/772), done.
Checking connectivity...
done.
$ cd ticgit
$ git remote
origin
You can also specify -v, which shows you the URLs that Git has stored for the shortname to be used when reading and writing to that remote:
$ git remote -v
origin https://github.com/schacon/ticgit (fetch)
origin https://github.com/schacon/ticgit (push)
If you have more than one remote, the command lists them all.
For example, a repository with multiple remotes for working with several collaborators might look something like this.
$ cd grit
$ git remote -v
bakkdoor https://github.com/bakkdoor/grit (fetch)
bakkdoor https://github.com/bakkdoor/grit (push)
cho45 https://github.com/cho45/grit (fetch)
cho45 https://github.com/cho45/grit (push)
defunkt https://github.com/defunkt/grit (fetch)
defunkt https://github.com/defunkt/grit (push)
koke git://github.com/koke/grit.git (fetch)
koke git://github.com/koke/grit.git (push)
origin git@github.com:mojombo/grit.git (fetch)
origin git@github.com:mojombo/grit.git (push)
This means we can pull contributions from any of these users pretty easily.
We may additionally have permission to push to one or more of these, though we can’t tell that here.
Notice that these remotes use a variety of protocols; we’ll cover more about this in Getting Git on a Server.
Adding Remote Repositories
We’ve mentioned and given some demonstrations of how the git clone command implicitly adds the origin remote for you.
Here’s how to add a new remote explicitly.
To add a new remote Git repository as a shortname you can reference easily, run git remote add <shortname> <url>:
$ git remote
origin
$ git remote add pb https://github.com/paulboone/ticgit
$ git remote -v
origin https://github.com/schacon/ticgit (fetch)
origin https://github.com/schacon/ticgit (push)
pb https://github.com/paulboone/ticgit (fetch)
pb https://github.com/paulboone/ticgit (push)
Now you can use the string pb on the command line in lieu of the whole URL.
For example, if you want to fetch all the information that Paul has but that you don’t yet have in your repository, you can run git fetch pb:
$ git fetch pb
remote: Counting objects: 43, done.
remote: Compressing objects: 100% (36/36), done.
remote: Total 43 (delta 10), reused 31 (delta 5)
Unpacking objects: 100% (43/43), done.
From https://github.com/paulboone/ticgit
* [new branch] master -> pb/master
* [new branch] ticgit -> pb/ticgit
Paul’s master branch is now accessible locally as pb/master — you can merge it into one of your branches, or you can check out a local branch at that point if you want to inspect it.
We’ll go over what branches are and how to use them in much more detail in Git Branching.
Fetching and Pulling from Your Remotes
As you just saw, to get data from your remote projects, you can run:
$ git fetch <remote>
The command goes out to that remote project and pulls down all the data from that remote project that you don’t have yet.
After you do this, you should have references to all the branches from that remote, which you can merge in or inspect at any time.
If you clone a repository, the command automatically adds that remote repository under the name “origin”.
So, git fetch origin fetches any new work that has been pushed to that server since you cloned (or last fetched from) it.
It’s important to note that the git fetch command only downloads the data to your local repository — it doesn’t automatically merge it with any of your work or modify what you’re currently working on.
You have to merge it manually into your work when you’re ready.
If your current branch is set up to track a remote branch (see the next section and Git Branching for more information), you can use the git pull command to automatically fetch and then merge that remote branch into your current branch.
This may be an easier or more comfortable workflow for you; and by default, the git clone command automatically sets up your local master branch to track the remote master branch (or whatever the default branch is called) on the server you cloned from.
Running git pull generally fetches data from the server you originally cloned from and automatically tries to merge it into the code you’re currently working on.
Note
From Git version 2.27 onward, git pull will give a warning if the pull.rebase variable is not set.
Git will keep warning you until you set the variable.
If you want the default behavior of Git (fast-forward if possible, else create a merge commit):
git config --global pull.rebase "false"
If you want to rebase when pulling:
git config --global pull.rebase "true"
Pushing to Your Remotes
When you have your project at a point that you want to share, you have to push it upstream.
The command for this is simple: git push <remote> <branch>.
If you want to push your master branch to your origin server (again, cloning generally sets up both of those names for you automatically), then you can run this to push any commits you’ve done back up to the server:
$ git push origin master
This command works only if you cloned from a server to which you have write access and if nobody has pushed in the meantime.
If you and someone else clone at the same time and they push upstream and then you push upstream, your push will rightly be rejected.
You’ll have to fetch their work first and incorporate it into yours before you’ll be allowed to push.
See Git Branching for more detailed information on how to push to remote servers.
Inspecting a Remote
If you want to see more information about a particular remote, you can use the git remote show <remote> command.
If you run this command with a particular shortname, such as origin, you get something like this:
$ git remote show origin
* remote origin
Fetch URL: https://github.com/schacon/ticgit
Push URL: https://github.com/schacon/ticgit
HEAD branch: master
Remote branches:
master tracked
dev-branch tracked
Local branch configured for 'git pull':
master merges with remote master
Local ref configured for 'git push':
master pushes to master (up to date)
It lists the URL for the remote repository as well as the tracking branch information.
The command helpfully tells you that if you’re on the master branch and you run git pull, it will automatically merge the remote’s master branch into the local one after it has been fetched.
It also lists all the remote references it has pulled down.
That is a simple example you’re likely to encounter.
When you’re using Git more heavily, however, you may see much more information from git remote show:
$ git remote show origin
* remote origin
URL: https://github.com/my-org/complex-project
Fetch URL: https://github.com/my-org/complex-project
Push URL: https://github.com/my-org/complex-project
HEAD branch: master
Remote branches:
master tracked
dev-branch tracked
markdown-strip tracked
issue-43 new (next fetch will store in remotes/origin)
issue-45 new (next fetch will store in remotes/origin)
refs/remotes/origin/issue-11 stale (use 'git remote prune' to remove)
Local branches configured for 'git pull':
dev-branch merges with remote dev-branch
master merges with remote master
Local refs configured for 'git push':
dev-branch pushes to dev-branch (up to date)
markdown-strip pushes to markdown-strip (up to date)
master pushes to master (up to date)
This command shows which branch is automatically pushed to when you run git push while on certain branches.
It also shows you which remote branches on the server you don’t yet have, which remote branches you have that have been removed from the server, and multiple local branches that are able to merge automatically with their remote-tracking branch when you run git pull.
Renaming and Removing Remotes
You can run git remote rename to change a remote’s shortname.
For instance, if you want to rename pb to paul, you can do so with git remote rename:
$ git remote rename pb paul
$ git remote
origin
paul
It’s worth mentioning that this changes all your remote-tracking branch names, too.
What used to be referenced at pb/master is now at paul/master.
If you want to remove a remote for some reason — you’ve moved the server or are no longer using a particular mirror, or perhaps a contributor isn’t contributing anymore — you can either use git remote remove or git remote rm:
$ git remote remove paul
$ git remote
origin
Once you delete the reference to a remote this way, all remote-tracking branches and configuration settings associated with that remote are also deleted.
Working with two or more Git repositories? No problem! In this tutorial, you’ll first learn to setup multiple Git remotes.
Next, you’ll also learn to perform a “git push” to multiple Git repositories with a single command.
As a programmer, one of the best things that has happened to me is Git! If you don’t know what Git is, you should probably read a paragraph about it before you continue.
Git allows you to synchronize the code on your computer with code on a remote repo shared with other developers – usually team members.
In this tutorial we will learn to configure one or more Git remotes and pushing code to them with a single command.
Two Minute Version
Define a git remote which will point to multiple git remotes.
Say, we call it “all”: git remote add all REMOTE-URL-1.
Register 1st push URL: git remote set-url --add --push all REMOTE-URL-1.
Register 2nd push URL: git remote set-url --add --push all REMOTE-URL-2.
Push a branch to all the remotes with git push all BRANCH – replace BRANCH with a real branch name.
You cannot pull from multiple remotes, but you can fetch updates from multiple remotes with git fetch --all.
Prerequisites
Working knowledge of Git – git init, git pull, git commit and git push.
Have write access to one or more remote Git repositories.
Adding multiple remotes
When you do git init, you initialize a local Git repository.
In general, the purpose is to synchronize this repo with a remote Git repo.
To be able to synchronize code with a remote repo, you need to specify where the remote repo exists.
The first step is to add remote repos to your project.
# Syntax to add a git remote
git remote add REMOTE-ID REMOTE-URL
By convention, the original / primary remote repo is called origin.
Here’s a real example:
# Add remote 1: GitHub.
git remote add origin git@github.com:jigarius/toggl2redmine.git
# Add remote 2: BitBucket.
git remote add upstream git@bitbucket.org:jigarius/toggl2redmine.git
In the above example, we add the remote repository of a project called found on GitHub.
Use the above command to add one or more remote Git repos – make sure that each repo has its unique ID, i.e.
origin, upstream in the above example.
Configure primary remote
Though you can add multiple remotes, usually, each branch of your project can be configured to track a single remote branch.
You can setup a branch to track a remote branch as follows:
# Change local branch.
git checkout BRANCH
# Configure local branch to track a remote branch.
git branch -u origin/BRANCH
Here, BRANCH is the name of the remote branch, which is usually the same as your local branch.
Change remote URL
If you want to change the URL associated to a remote that you’ve already added, you can do it with the following command:
# The syntax is: git remote set-url REMOTE-ID REMOTE-URL
git remote set-url upstream git@foobar.com:jigarius/toggl2redmine.git
List all remotes
To see a list of all remotes, simply use the following command:
$git remote -v
origin git@github.com:jigarius/toggl2redmine.git (fetch)
origin git@github.com:jigarius/toggl2redmine.git (push)
upstream git@bitbucket.org:jigarius/toggl2redmine.git (fetch)
upstream git@bitbucket.org:jigarius/toggl2redmine.git (push)
Remove a remote
If you’ve added a remote which you no longer require, you can remove it as follows:
# The syntax is: git remote remove REMOTE-ID
git remote remove upstream
Push to multiple remotes
Now that you have a primary remote repo and other remotes as well, it’s time to configure the push.
The objective is to push to multiple Git remotes with a single git push command.
To do this, choose a remote ID which will refer to all the remotes.
I usually call it all, but there are developers who prefer origin.
The idea is to add all the remote repo URLs as “push URLs” to this remote.
Here’s what you do:
# Create a new remote called "all" with the URL of the primary repo.
git remote add all git@github.com:jigarius/toggl2redmine.git
# Re-register the remote as a push URL.
git remote set-url --add --push all git@github.com:jigarius/toggl2redmine.git
# Add a push URL to a remote.
This means that "git push" will also push to this git URL.
git remote set-url --add --push all git@bitbucket.org:jigarius/toggl2redmine.git
If you don’t want to create an extra remote named all, you can skip the first command and use the remote origin instead of all in the subsequent command(s).
Now, you can push to all remote repositories with a single command!
# Replace BRANCH with the name of the branch you want to push.
git push all BRANCH
Pull from multiple remotes
It is not possible to git pull from multiple repos.
However, you can git fetch from multiple repos with the following command:
git fetch --all
This will fetch information from all remote repos.
You can switch to the latest version of a branch on a particular remote with the command:
# Checkout the branch you want to work with.
git checkout BRANCH
# Reset the branch to match the state as on a specific remote.
git reset --hard REMOTE-ID/BRANCH
https://github.com/williamkpchan/stdrvest
The "fatal: 'origin' does not appear to be a git repository" error occurs when you try to push code to a remote Git repository without telling Git the location of the remote repository.
To solve this error, use the git remote add command to add a remote to your project.
Manually tell Git where the remote version of our repository exists.
Do this using the git remote add command:
git remote add origin https://github.com/williamkpchan/stdrvest
Let’s try to push our code again:
git push -u origin main
Git Error - Unable to resolve reference refs/remotes/origin/master reference broken
To fix this error, remove the following file YOURPROJECT/.git/refs/remotes/origin/master, and then run git fetch to download it again.
Execute the following command within your project’s directory.
rm .git/refs/remotes/origin/master
git fetch
fatal: the remote end hung up unexpectedly
This is due to git/https buffer settings.
Solution: Navigate to repo.
Run this to increase the buffer to 500MB:
git config http.postBuffer 524288000
Then, run your original command again.
git ls-remote
remote: error: File big.html is 229.72 MB; this exceeds GitHub's file size limit of 100.00 MB
remote: error: GH001: Large files detected.
You may want to try Git Large File Storage - https://git-lfs.github.com.
error: failed to push some refs
Displays references available in a remote repository along with the associated commit IDs
git ls-remote
From https://github.com/williamkpchan/stdrvest
73f683026f1b7eb75f457ee38b0f07d323dec7e5 HEAD
73f683026f1b7eb75f457ee38b0f07d323dec7e5 refs/heads/
git show-ref
Displays references available in a local repository along with the associated commit IDs.
git show-ref
454b0b3be972a18fdeedad5bca50c6b60ace6cd7 refs/heads/main
73f683026f1b7eb75f457ee38b0f07d323dec7e5 refs/remotes/origin/main
把檔案從 Git 裡拔掉
用 filter-branch 指令應該是相對較方便的。
舉例來說,目前的 Commit 紀錄是這樣:
current commits
我想要把所有 Commit 的 config/database.yml 這個檔案刪掉:
git filter-branch --tree-filter "rm -f config/database.yml"
Rewrite 27f6ed6da50dbee5adbb68102266a91dc097ad3f (7/7) (0 seconds passed, remaining 0 predicted)
Ref 'refs/heads/master' was rewritten
這樣看起來好像刪掉了…假的,其實那些東西都還在,隨時都可以取消剛剛這個指令,把剛剛被刪的檔案救回來:
$ git reset refs/original/refs/heads/master --hard
HEAD is now at 27f6ed6 add dog 2
全部斷乾淨!
再重頭來一次:
git filter-branch -f --tree-filter "rm -f config/database.yml"
Rewrite 27f6ed6da50dbee5adbb68102266a91dc097ad3f (7/7) (1 seconds passed, remaining 0 predicted)
Ref 'refs/heads/master' was rewritten
跟前面不太一樣,這次多加了 -f 參數,是因為要強制覆寫 filter-branch 的備份點。
這邊使用 filter-branch 指令把檔案從工作目錄裡移掉,這時候 database.yml 的確已不見,但還有好幾個跟資源回收有關的事情需要處理一下:
$ rm .git/refs/original/refs/heads/master
這個檔案還對剛剛做的 filter-branch 動作念念不忘(也就是備份點啦),隨時可以透過它再跳回去,所以先斷這條線。
再來,念念不忘的還有 Reflog,所以它也要清一下:
$ git reflog expire --all --expire=now
這個指令是要求 Reflog 現在立刻過期(不然預設要等 30 天)。
接著再用 git fsck 指令就可以看到很多 Unreachable 的物件了:
$ git fsck --unreachable
Checking object directories: 100% (256/256), done.
unreachable tree c8da8b6accf7029a2fb89eed130365822692b603
unreachable commit ca40fc9b31c777b1d3434453448c945fa2ffae11
unreachable commit cd82f29acbdce60c7f5f6894619585bd445797b5
unreachable tree 9e941fe91d47bf5174bd5a3d3e73ff257598b0ca
unreachable tree 5e01e02411507c504c77bca53c508a3174c9a06f
unreachable tree 607f055180d1195c81e0534d264d131d5abfdc27
unreachable commit 1de207637a6eed2cc86507dca37a38c7a932e53c
unreachable tree a21100f9f3aae37858cc84fd402663992ccca681
unreachable commit 27f6ed6da50dbee5adbb68102266a91dc097ad3f
unreachable tree a618ce33da8d21bca841f18e6432fcabf15d4477
unreachable commit 2bab3e7aff03a30ed9f53b5a7d3e02e1c0fc8c7c
unreachable tree 70c6b4db190a452b22c28998d7c2487efb8026b2
unreachable commit 382a2a5cec96b94e9c5cb42bf92b4b236f4ad8ac
最後,啟動 Git 的資源回收機制,請垃圾車來立刻把它們載走:
$ git gc --prune=now
Counting objects: 14, done.
Delta compression using up to 4 threads.
Compressing objects: 100% (12/12), done.
Writing objects: 100% (14/14), done.
Total 14 (delta 5), reused 0 (delta 0)
檢查一下:
$ git fsck
Checking object directories: 100% (256/256), done.
Checking objects: 100% (14/14), done.
看來垃圾都載走了。
我們試試看用偷吃步能不能 Reset 得回去:
$ git reset 27f6ed6 --hard
fatal: ambiguous argument '27f6ed6': unknown revision or path not in the working tree.
Use '--' to separate paths from revisions, like this:
'git <command> [<revision>...] -- [<file>...]'
看來不行了,Git 已經找不到原來的那個 SHA-1 值了。
提醒一下,如果這些內容已經推出去的話,別忘了最後再加一步 git push -f 把線上的紀錄蓋掉喔。
小結
檔案進了 Git 就跟得罪方丈一樣,想走沒那麼容易,需要全部都斷乾淨才行。
關於 Git 的資源回收的相關介紹,請參閱
https://stackoverflow.com/questions/31648386/how-to-trash-all-local-git-changes-and-revert-to-old-commit
revert Git LFS file
To revert a file tracked by Git LFS (Large File Storage) back to its original state, you'll need to follow these general steps:
Ensure you have the necessary access and permissions:
Make sure you have write access to the repository and the necessary permissions to modify files.
Determine the original version:
Identify the commit or version of the file that you want to revert to.
You can use Git commands such as git log or a Git client to view the commit history and find the desired version.
Retrieve the original version:
Use Git to retrieve the original version of the file.
You can do this using the git checkout command, specifying the commit or version you want to revert to, and the path to the file.
For example:
applescript
git checkout --
```
Replace `` with the commit hash or the branch/tag name, and `` with the path to the file within the repository.
Note:
This command will update the file in your local working directory to the specified version.
If you want to revert the file for others as well, you'll need to push the changes back to the remote repository.
Stage and commit the changes (optional):
If you want to keep a record of the reversion, you can stage and commit the changes using Git.
This step is optional but can be useful for tracking the history of the file or collaborating with others.
git add
git commit -m "Revert file to original version"
```
Replace `` with the path to the file you reverted.
Push the changes (optional):
If you've made a commit in the previous step and want to share the reversion with others, you need to push the changes to the remote repository using the appropriate Git command (e.g., git push).
By following these steps, you should be able to revert the LFS file back to its original version.
Remember to exercise caution when modifying files, especially if you're working in a collaborative environment.
to revert the LFS file back to the original one
gitattributes
used git lfs pull to download original file then git lfs uninstall, after that removed the .gitattributes file and commit again.
git lfs uninstall
this removes hooks and smudge/clean filter configuration
and this is only the beginning.
git lfs ls-files — view lfs filesfor each file, use globs if you can:
git rm --cached myfile.psd — "remove" the lfs file
git add myfile.psd — add the "normal" file
git commit -m "restore files from lfs"
gitattributes - Defining attributes per path
$GIT_DIR/info/attributes, .gitattributes
DESCRIPTION
A gitattributes file is a simple text file that gives attributes to pathnames.
.gitattributes 是用來告訴 Git 此專案要客製化的部份,為什麼要客製呢,因為 LFS 的使用條件就是你必須要告訴 Git,”這個檔案是 LFS 檔,請用 LFS 的方式處理“,但我們不需要自己設定,透過 git lfs 指令操作即可。
其實不只大型檔案,所有的檔案都可以用 .gitattributes 來告訴 Git 該怎麼處理這個檔案。
Git LFS 原理
Each line in gitattributes file is of form:
pattern attr1 attr2 ...
That is, a pattern followed by an attributes list,
separated by whitespaces.
Leading and trailing whitespaces are ignored.
Lines that begin with # are ignored.
Patterns that begin with a double quote are quoted in C style.
When the pattern matches the path in question, the attributes listed on the line are given to the path.
remote: error:
exceeds GitHub's file size limit of 100.00 MB
git reset --soft HEAD~24
git commit -m "New message for the combined commit"
git push origin master -f
The -f is actually required because of the rebase. Whenever you do a rebase you would need to do a force push because the remote branch cannot be fast-forwarded to your commit.
You can configure Git to ignore files you don't want to check in to GitHub.
Configuring ignored files for a single repository
You can create a .gitignore file in your repository's root directory to tell Git which files and directories to ignore when you make a commit.
To share the ignore rules with other users who clone the repository, commit the .gitignore file in to your repository.
GitHub maintains an official list of recommended .gitignore files for many popular operating systems, environments, and languages in the "github/gitignore" public repository. You can also use gitignore.io to create a .gitignore file for your operating system, programming language, or IDE. For more information, see "github/gitignore" and the "gitignore.io" site.
Open TerminalTerminalGit Bash.
Navigate to the location of your Git repository.
Create a .gitignore file for your repository.
touch .gitignore
If the command succeeds, there will be no output.
For an example .gitignore file, see "Some common .gitignore configurations" in the Octocat repository.
If you want to ignore a file that is already checked in, you must untrack the file before you add a rule to ignore it. From your terminal, untrack the file.
git rm --cached FILENAME
Configuring ignored files for all repositories on your computer
You can tell Git to always ignore certain files or directories when you make a commit in any Git repository on your computer. For example, you could use this feature to ignore any temporary backup files that your text editor creates.
To always ignore a certain file or directory, add it to a file named ignore that's located inside the directory ~/.config/git. By default, Git will ignore any files and directories that are listed in the global configuration file ~/.config/git/ignore. If the git directory and ignore file don't exist yet, you may need to create them.
Excluding local files without creating a .gitignore file
If you don't want to create a .gitignore file to share with others, you can create rules that are not committed with the repository. You can use this technique for locally-generated files that you don't expect other users to generate, such as files created by your editor.
Use your favorite text editor to open the file called .git/info/exclude within the root of your Git repository. Any rule you add here will not be checked in, and will only ignore files for your local repository.
Open TerminalTerminalGit Bash.
Navigate to the location of your Git repository.
Using your favorite text editor, open the file .git/info/exclude.
Updates remote refs using local refs, while sending objects necessary to complete the given refs.
You can make interesting things happen to a repository every time you push into it, by setting up hooks there.
When the command line does not specify where to push with the <repository> argument, branch.*.remote configuration for the current branch is consulted to determine where to push.
If the configuration is missing, it defaults to origin.
When the command line does not specify what to push with <refspec>... arguments or --all, --mirror, --tags options, the command finds the default <refspec> by consulting remote.*.push configuration, and if it is not found, honors push.default configuration to decide what to push (See git-config[1] for the meaning of push.default).
When neither the command-line nor the configuration specifies what to push, the default behavior is used, which corresponds to the simple
value for push.default: the current branch is pushed to the corresponding upstream branch, but as a safety measure, the push is aborted if the upstream branch does not have the same name as the local one.
OPTIONS
<repository>
The "remote" repository that is the destination of a push operation.
This parameter can be either a URL (see the section GIT URLS below) or the name of a remote (see the section REMOTES below).
<refspec>…
Specify what destination ref to update with what source object.
The format of a <refspec> parameter is an optional plus +, followed by the source object <src>, followed by a colon :, followed by the destination ref <dst>.
The <src> is often the name of the branch you would want to push, but it can be any arbitrary "SHA-1 expression", such as master~4 or HEAD (see gitrevisions[7]).
The <dst> tells which ref on the remote side is updated with this push.
Arbitrary expressions cannot be used here, an actual ref must be named.
If git push [<repository>] without any <refspec> argument is set to update some ref at the destination with <src> with remote.<repository>.push configuration variable, :<dst> part can be omitted—such a push will update a ref that <src> normally updates without any <refspec> on the command line.
Otherwise, missing :<dst> means to update the same ref as the <src>.
If <dst> doesn’t start with refs/ (e.g.
refs/heads/master) we will try to infer where in refs/* on the destination <repository> it belongs based on the type of <src> being pushed and whether <dst> is ambiguous.
If <dst> unambiguously refers to a ref on the <repository> remote, then push to that ref.
If <src> resolves to a ref starting with refs/heads/ or refs/tags/, then prepend that to <dst>.
Other ambiguity resolutions might be added in the future, but for now any other cases will error out with an error indicating what we tried, and depending on the advice.pushUnqualifiedRefname
configuration (see git-config[1]) suggest what refs/namespace you may have wanted to push to.
The object referenced by <src> is used to update the <dst> reference on the remote side.
Whether this is allowed depends on where in refs/* the <dst> reference lives as described in detail below, in those sections "update" means any modifications except deletes, which as noted after the next few sections are treated differently.
The refs/heads/* namespace will only accept commit objects, and updates only if they can be fast-forwarded.
The refs/tags/* namespace will accept any kind of object (as commits, trees and blobs can be tagged), and any updates to them will be rejected.
It’s possible to push any type of object to any namespace outside of refs/{tags,heads}/*.
In the case of tags and commits, these will be treated as if they were the commits inside refs/heads/* for the purposes of whether the update is allowed.
I.e. a fast-forward of commits and tags outside refs/{tags,heads}/* is allowed, even in cases where what’s being fast-forwarded is not a commit, but a tag object which happens to point to a new commit which is a fast-forward of the commit the last tag (or commit) it’s replacing.
Replacing a tag with an entirely different tag is also allowed, if it points to the same commit, as well as pushing a peeled tag, i.e. pushing the commit that existing tag object points to, or a new tag object which an existing commit points to.
Tree and blob objects outside of refs/{tags,heads}/* will be treated the same way as if they were inside refs/tags/*, any update of them will be rejected.
All of the rules described above about what’s not allowed as an update can be overridden by adding an the optional leading + to a refspec
(or using --force command line option).
The only exception to this is that no amount of forcing will make the refs/heads/* namespace accept a non-commit object.
Hooks and configuration can also override or amend these rules, see e.g.
receive.denyNonFastForwards in git-config[1] and pre-receive and update in githooks[5].
Pushing an empty <src> allows you to delete the <dst> ref from the remote repository.
Deletions are always accepted without a leading +
in the refspec (or --force), except when forbidden by configuration or hooks.
See receive.denyDeletes in git-config[1] and pre-receive and update in githooks[5].
The special refspec : (or +: to allow non-fast-forward updates)
directs Git to push "matching" branches: for every branch that exists on the local side, the remote side is updated if a branch of the same name already exists on the remote side.
tag <tag> means the same as refs/tags/<tag>:refs/tags/<tag>.
--all
--branches
Push all branches (i.e. refs under refs/heads/); cannot be used with other <refspec>.
--prune
Remove remote branches that don’t have a local counterpart.
For example a remote branch tmp will be removed if a local branch with the same name doesn’t exist any more.
This also respects refspecs, e.g.
git push --prune remote refs/heads/*:refs/tmp/* would make sure that remote refs/tmp/foo will be removed if refs/heads/foo doesn’t exist.
--mirror
Instead of naming each ref to push, specifies that all refs under refs/ (which includes but is not limited to refs/heads/, refs/remotes/, and refs/tags/) be mirrored to the remote repository.
Newly created local refs will be pushed to the remote end, locally updated refs will be force updated on the remote end, and deleted refs will be removed from the remote end.
This is the default if the configuration option remote.<remote>.mirror is set.
-n
--dry-run
Do everything except actually send the updates.
--porcelain
Produce machine-readable output.
The output status line for each ref will be tab-separated and sent to stdout instead of stderr.
The full symbolic names of the refs will be given.
-d
--delete
All listed refs are deleted from the remote repository.
This is the same as prefixing all refs with a colon.
--tags
All refs under refs/tags are pushed, in addition to refspecs explicitly listed on the command line.
--follow-tags
Push all the refs that would be pushed without this option, and also push annotated tags in refs/tags that are missing from the remote but are pointing at commit-ish that are reachable from the refs being pushed.
This can also be specified with configuration variable push.followTags.
For more information, see push.followTags in git-config[1].
--[no-]signed
--signed=(true|false|if-asked)
GPG-sign the push request to update refs on the receiving side, to allow it to be checked by the hooks and/or be logged.
If false or --no-signed, no signing will be attempted.
If true or --signed, the push will fail if the server does not support signed pushes.
If set to if-asked, sign if and only if the server supports signed pushes.
The push will also fail if the actual call to gpg --sign fails.
See git-receive-pack[1] for the details on the receiving end.
--[no-]atomic
Use an atomic transaction on the remote side if available.
Either all refs are updated, or on error, no refs are updated.
If the server does not support atomic pushes the push will fail.
-o <option>
--push-option=<option>
Transmit the given string to the server, which passes them to the pre-receive as well as the post-receive hook.
The given string must not contain a NUL or LF character.
When multiple --push-option=<option> are given, they are all sent to the other side in the order listed on the command line.
When no --push-option=<option> is given from the command line, the values of configuration variable push.pushOption are used instead.
--receive-pack=<git-receive-pack>
--exec=<git-receive-pack>
Path to the git-receive-pack program on the remote end.
Sometimes useful when pushing to a remote repository over ssh, and you do not have the program in a directory on the default $PATH.
--[no-]force-with-lease
--force-with-lease=<refname>
--force-with-lease=<refname>:<expect>
Usually, "git push" refuses to update a remote ref that is not an ancestor of the local ref used to overwrite it.
This option overrides this restriction if the current value of the remote ref is the expected value.
"git push" fails otherwise.
Imagine that you have to rebase what you have already published.
You will have to bypass the "must fast-forward" rule in order to replace the history you originally published with the rebased history.
If somebody else built on top of your original history while you are rebasing, the tip of the branch at the remote may advance with their commit, and blindly pushing with --force will lose their work.
This option allows you to say that you expect the history you are updating is what you rebased and want to replace.
If the remote ref still points at the commit you specified, you can be sure that no other people did anything to the ref.
It is like taking a "lease" on the ref without explicitly locking it, and the remote ref is updated only if the "lease" is still valid.
--force-with-lease alone, without specifying the details, will protect all remote refs that are going to be updated by requiring their current value to be the same as the remote-tracking branch we have for them.
--force-with-lease=<refname>, without specifying the expected value, will protect the named ref (alone), if it is going to be updated, by requiring its current value to be the same as the remote-tracking branch we have for it.
--force-with-lease=<refname>:<expect> will protect the named ref (alone), if it is going to be updated, by requiring its current value to be the same as the specified value <expect> (which is allowed to be different from the remote-tracking branch we have for the refname, or we do not even have to have such a remote-tracking branch when this form is used).
If <expect> is the empty string, then the named ref must not already exist.
Note that all forms other than --force-with-lease=<refname>:<expect>
that specifies the expected current value of the ref explicitly are still experimental and their semantics may change as we gain experience with this feature.
"--no-force-with-lease" will cancel all the previous --force-with-lease on the command line.
A general note on safety: supplying this option without an expected value, i.e.
as --force-with-lease or --force-with-lease=<refname>
interacts very badly with anything that implicitly runs git fetch on the remote to be pushed to in the background, e.g.
git fetch origin on your repository in a cronjob.
The protection it offers over --force is ensuring that subsequent changes your work wasn’t based on aren’t clobbered, but this is trivially defeated if some background process is updating refs in the background.
We don’t have anything except the remote tracking info to go by as a heuristic for refs you’re expected to have seen & are willing to clobber.
If your editor or some other system is running git fetch in the background for you a way to mitigate this is to simply set up another remote:
git remote add origin-push $(git config remote.origin.url)
git fetch origin-push Now when the background process runs git fetch origin the references on origin-push won’t be updated, and thus commands like:
git push --force-with-lease origin-push Will fail unless you manually run git fetch origin-push.
This method is of course entirely defeated by something that runs git fetch
--all, in that case you’d need to either disable it or do something more tedious like:
git fetch # update 'master' from remote git tag base master # mark our base point git rebase -i master # rewrite some commits git push --force-with-lease=master:base master:master I.e.
create a base tag for versions of the upstream code that you’ve seen and are willing to overwrite, then rewrite history, and finally force push changes to master if the remote version is still at base, regardless of what your local remotes/origin/master has been updated to in the background.
Alternatively, specifying --force-if-includes as an ancillary option along with --force-with-lease[=<refname>] (i.e., without saying what exact commit the ref on the remote side must be pointing at, or which refs on the remote side are being protected) at the time of "push" will verify if updates from the remote-tracking refs that may have been implicitly updated in the background are integrated locally before allowing a forced update.
-f
--force
Usually, the command refuses to update a remote ref that is not an ancestor of the local ref used to overwrite it.
Also, when --force-with-lease option is used, the command refuses to update a remote ref whose current value does not match what is expected.
This flag disables these checks, and can cause the remote repository to lose commits; use it with care.
Note that --force applies to all the refs that are pushed, hence using it with push.default set to matching or with multiple push destinations configured with remote.*.push may overwrite refs other than the current branch (including local refs that are strictly behind their remote counterpart).
To force a push to only one branch, use a + in front of the refspec to push (e.g git push origin +master to force a push to the master branch).
See the <refspec>... section above for details.
--[no-]force-if-includes
Force an update only if the tip of the remote-tracking ref has been integrated locally.
This option enables a check that verifies if the tip of the remote-tracking ref is reachable from one of the "reflog" entries of the local branch based in it for a rewrite.
The check ensures that any updates from the remote have been incorporated locally by rejecting the forced update if that is not the case.
If the option is passed without specifying --force-with-lease, or specified along with --force-with-lease=<refname>:<expect>, it is a "no-op".
Specifying --no-force-if-includes disables this behavior.
--repo=<repository>
This option is equivalent to the <repository> argument.
If both are specified, the command-line argument takes precedence.
-u
--set-upstream
For every branch that is up to date or successfully pushed, add upstream (tracking) reference, used by argument-less git-pull[1] and other commands.
For more information, see branch.<name>.merge in git-config[1].
--[no-]thin
These options are passed to git-send-pack[1].
A thin transfer significantly reduces the amount of sent data when the sender and receiver share many of the same objects in common.
The default is --thin.
-q
--quiet
Suppress all output, including the listing of updated refs, unless an error occurs.
Progress is not reported to the standard error stream.
-v
--verbose
Run verbosely.
--progress
Progress status is reported on the standard error stream by default when it is attached to a terminal, unless -q is specified.
This flag forces progress status even if the standard error stream is not directed to a terminal.
--no-recurse-submodules
--recurse-submodules=check|on-demand|only|no
May be used to make sure all submodule commits used by the revisions to be pushed are available on a remote-tracking branch.
If check is used Git will verify that all submodule commits that changed in the revisions to be pushed are available on at least one remote of the submodule.
If any commits are missing the push will be aborted and exit with non-zero status.
If on-demand is used all submodules that changed in the revisions to be pushed will be pushed.
If on-demand was not able to push all necessary revisions it will also be aborted and exit with non-zero status.
If only is used all submodules will be pushed while the superproject is left unpushed.
A value of no or using --no-recurse-submodules can be used to override the push.recurseSubmodules configuration variable when no submodule recursion is required.
When using on-demand or only, if a submodule has a
"push.recurseSubmodules={on-demand,only}" or "submodule.recurse" configuration, further recursion will occur.
In this case, "only" is treated as "on-demand".
--[no-]verify
Toggle the pre-push hook (see githooks[5]).
The default is --verify, giving the hook a chance to prevent the push.
With --no-verify, the hook is bypassed completely.
-4
--ipv4
Use IPv4 addresses only, ignoring IPv6 addresses.
-6
--ipv6
Use IPv6 addresses only, ignoring IPv4 addresses.
GIT URLS
In general, URLs contain information about the transport protocol, the address of the remote server, and the path to the repository.
Depending on the transport protocol, some of this information may be absent.
Git supports ssh, git, http, and https protocols (in addition, ftp and ftps can be used for fetching, but this is inefficient and deprecated; do not use them).
The native transport (i.e.
git:// URL) does no authentication and should be used with caution on unsecured networks.
The following syntaxes may be used with them:
ssh://[<user>@]<host>[:<port>]/<path-to-git-repo>git://<host>[:<port>]/<path-to-git-repo>http[s]://<host>[:<port>]/<path-to-git-repo>ftp[s]://<host>[:<port>]/<path-to-git-repo>
An alternative scp-like syntax may also be used with the ssh protocol:
[<user>@]<host>:/<path-to-git-repo>
This syntax is only recognized if there are no slashes before the first colon.
This helps differentiate a local path that contains a colon.
For example the local path foo:bar could be specified as an absolute path or ./foo:bar to avoid being misinterpreted as an ssh url.
The ssh and git protocols additionally support ~<username> expansion:
ssh://[<user>@]<host>[:<port>]/~<user>/<path-to-git-repo>git://<host>[:<port>]/~<user>/<path-to-git-repo>
[<user>@]<host>:~<user>/<path-to-git-repo>
For local repositories, also supported by Git natively, the following syntaxes may be used:
/path/to/repo.git/file:///path/to/repo.git/
These two syntaxes are mostly equivalent, except when cloning, when the former implies --local option.
See git-clone[1] for details.
git clone, git fetch and git pull, but not git push, will also accept a suitable bundle file.
See git-bundle[1].
When Git doesn’t know how to handle a certain transport protocol, it attempts to use the remote-<transport> remote helper, if one exists.
To explicitly request a remote helper, the following syntax may be used:
<transport>::<address>
where <address> may be a path, a server and path, or an arbitrary URL-like string recognized by the specific remote helper being invoked.
See gitremote-helpers[7] for details.
If there are a large number of similarly-named remote repositories and you want to use a different format for them (such that the URLs you use will be rewritten into URLs that work), you can create a configuration section of the form:
[url "<actual-url-base>"]
insteadOf = <other-url-base>
For example, with this:
[url "git://git.host.xz/"]
insteadOf = host.xz:/path/to/
insteadOf = work:
a URL like "work:repo.git" or like "host.xz:/path/to/repo.git" will be rewritten in any context that takes a URL to be "git://git.host.xz/repo.git".
If you want to rewrite URLs for push only, you can create a configuration section of the form:
[url "<actual-url-base>"]
pushInsteadOf = <other-url-base>
For example, with this:
[url "ssh://example.org/"]
pushInsteadOf = git://example.org/
a URL like "git://example.org/path/to/repo.git" will be rewritten to
"ssh://example.org/path/to/repo.git" for pushes, but pulls will still use the original URL.
REMOTES
The name of one of the following can be used instead of a URL as <repository> argument:
a remote in the Git configuration file: $GIT_DIR/config,
a file in the $GIT_DIR/remotes directory, or
a file in the $GIT_DIR/branches directory.
All of these also allow you to omit the refspec from the command line because they each contain a refspec which git will use by default.
Named remote in configuration file
You can choose to provide the name of a remote which you had previously configured using git-remote[1], git-config[1] or even by a manual edit to the $GIT_DIR/config file.
The URL of this remote will be used to access the repository.
The refspec of this remote will be used by default when you do not provide a refspec on the command line.
The entry in the config file would appear like this:
[remote "<name>"]
url = <URL>
pushurl = <pushurl>
push = <refspec>
fetch = <refspec>
The <pushurl> is used for pushes only.
It is optional and defaults to <URL>.
Pushing to a remote affects all defined pushurls or all defined urls if no pushurls are defined.
Fetch, however, will only fetch from the first defined url if multiple urls are defined.
Named file in $GIT_DIR/remotes
You can choose to provide the name of a file in $GIT_DIR/remotes.
The URL in this file will be used to access the repository.
The refspec in this file will be used as default when you do not provide a refspec on the command line.
This file should have the following format:
URL: one of the above URL formats
Push: <refspec>
Pull: <refspec>
Push: lines are used by git push and Pull: lines are used by git pull and git fetch.
Multiple Push: and Pull: lines may be specified for additional branch mappings.
Named file in $GIT_DIR/branches
You can choose to provide the name of a file in $GIT_DIR/branches.
The URL in this file will be used to access the repository.
This file should have the following format:
<URL>#<head>
<URL> is required; #<head> is optional.
Depending on the operation, git will use one of the following refspecs, if you don’t provide one on the command line.
<branch> is the name of this file in $GIT_DIR/branches and <head> defaults to master.
git fetch uses:
refs/heads/<head>:refs/heads/<branch>
git push uses:
HEAD:refs/heads/<head>
OUTPUT
The output of "git push" depends on the transport method used; this section describes the output when pushing over the Git protocol (either locally or via ssh).
The status of the push is output in tabular form, with each line representing the status of a single ref.
Each line is of the form:
<flag> <summary> <from> -> <to> (<reason>)
If --porcelain is used, then each line of the output is of the form:
<flag> \t <from>:<to> \t <summary> (<reason>)
The status of up-to-date refs is shown only if --porcelain or --verbose option is used.
flag
A single character indicating the status of the ref: (space)
for a successfully pushed fast-forward; +
for a successful forced update; -
for a successfully deleted ref; *
for a successfully pushed new ref; !
for a ref that was rejected or failed to push; and =
for a ref that was up to date and did not need pushing.
summary
For a successfully pushed ref, the summary shows the old and new values of the ref in a form suitable for using as an argument to git log (this is <old>..<new> in most cases, and <old>...<new> for forced non-fast-forward updates).
For a failed update, more details are given:
rejected
Git did not try to send the ref at all, typically because it is not a fast-forward and you did not force the update.
remote rejected
The remote end refused the update.
Usually caused by a hook on the remote side, or because the remote repository has one of the following safety options in effect:
receive.denyCurrentBranch (for pushes to the checked out branch), receive.denyNonFastForwards (for forced non-fast-forward updates), receive.denyDeletes or receive.denyDeleteCurrent.
See git-config[1].
remote failure
The remote end did not report the successful update of the ref, perhaps because of a temporary error on the remote side, a break in the network connection, or other transient error.
from
The name of the local ref being pushed, minus its refs/<type>/ prefix.
In the case of deletion, the name of the local ref is omitted.
to
The name of the remote ref being updated, minus its refs/<type>/ prefix.
reason
A human-readable explanation.
In the case of successfully pushed refs, no explanation is needed.
For a failed ref, the reason for failure is described.
NOTE ABOUT FAST-FORWARDS
When an update changes a branch (or more in general, a ref) that used to point at commit A to point at another commit B, it is called a fast-forward update if and only if B is a descendant of A.
In a fast-forward update from A to B, the set of commits that the original commit A built on top of is a subset of the commits the new commit B builds on top of.
Hence, it does not lose any history.
In contrast, a non-fast-forward update will lose history.
For example, suppose you and somebody else started at the same commit X, and you built a history leading to commit B while the other person built a history leading to commit A.
The history looks like this:
B
/
---X---A Further suppose that the other person already pushed changes leading to A back to the original repository from which you two obtained the original commit X.
The push done by the other person updated the branch that used to point at commit X to point at commit A.
It is a fast-forward.
But if you try to push, you will attempt to update the branch (that now points at A) with commit B.
This does not fast-forward.
If you did so, the changes introduced by commit A will be lost, because everybody will now start building on top of B.
The command by default does not allow an update that is not a fast-forward to prevent such loss of history.
If you do not want to lose your work (history from X to B) or the work by the other person (history from X to A), you would need to first fetch the history from the repository, create a history that contains changes done by both parties, and push the result back.
You can perform "git pull", resolve potential conflicts, and "git push"
the result.
A "git pull" will create a merge commit C between commits A and B.
B---C
/ /
---X---A Updating A with the resulting merge commit will fast-forward and your push will be accepted.
Alternatively, you can rebase your change between X and B on top of A, with "git pull --rebase", and push the result back.
The rebase will create a new commit D that builds the change between X and B on top of A.
B D
/ /
---X---A Again, updating A with this commit will fast-forward and your push will be accepted.
There is another common situation where you may encounter non-fast-forward rejection when you try to push, and it is possible even when you are pushing into a repository nobody else pushes into.
After you push commit A yourself (in the first picture in this section), replace it with "git commit --amend" to produce commit B, and you try to push it out, because forgot that you have pushed A out already.
In such a case, and only if you are certain that nobody in the meantime fetched your earlier commit A
(and started building on top of it), you can run "git push --force" to overwrite it.
In other words, "git push --force" is a method reserved for a case where you do mean to lose history.
EXAMPLES
git push
Works like git push <remote>, where <remote> is the current branch’s remote (or origin, if no remote is configured for the current branch).
git push origin
Without additional configuration, pushes the current branch to the configured upstream (branch.<name>.merge configuration variable) if it has the same name as the current branch, and errors out without pushing otherwise.
The default behavior of this command when no <refspec> is given can be configured by setting the push option of the remote, or the push.default
configuration variable.
For example, to default to pushing only the current branch to origin
use git config remote.origin.push HEAD.
Any valid <refspec> (like the ones in the examples below) can be configured as the default for git push origin.
git push origin :
Push "matching" branches to origin.
See
<refspec> in the OPTIONS section above for a description of "matching" branches.
git push origin master
Find a ref that matches master in the source repository
(most likely, it would find refs/heads/master), and update the same ref (e.g.
refs/heads/master) in origin repository with it.
If master did not exist remotely, it would be created.
git push origin HEAD
A handy way to push the current branch to the same name on the remote.
git push mothership master:satellite/master dev:satellite/dev
Use the source ref that matches master (e.g.
refs/heads/master)
to update the ref that matches satellite/master (most probably refs/remotes/satellite/master) in the mothership repository; do the same for dev and satellite/dev.
See the section describing <refspec>... above for a discussion of the matching semantics.
This is to emulate git fetch run on the mothership using git push that is run in the opposite direction in order to integrate the work done on satellite, and is often necessary when you can only make connection in one way (i.e.
satellite can ssh into mothership but mothership cannot initiate connection to satellite because the latter is behind a firewall or does not run sshd).
After running this git push on the satellite machine, you would ssh into the mothership and run git merge there to complete the emulation of git pull that were run on mothership to pull changes made on satellite.
git push origin HEAD:master
Push the current branch to the remote ref matching master in the origin repository.
This form is convenient to push the current branch without thinking about its local name.
git push origin master:refs/heads/experimental
Create the branch experimental in the origin repository by copying the current master branch.
This form is only needed to create a new branch or tag in the remote repository when the local name and the remote name are different; otherwise, the ref name on its own will work.
git push origin :experimental
Find a ref that matches experimental in the origin repository
(e.g.
refs/heads/experimental), and delete it.
git push origin +dev:master
Update the origin repository’s master branch with the dev branch, allowing non-fast-forward updates.
This can leave unreferenced commits dangling in the origin repository. Consider the following situation, where a fast-forward is not possible:
o---o---o---A---B origin/master
\
X---Y---Z dev The above command would change the origin repository to
A---B (unnamed branch)
/
o---o---o---X---Y---Z master Commits A and B would no longer belong to a branch with a symbolic name, and so would be unreachable.
As such, these commits would be removed by a git gc command on the origin repository.
SECURITY
The fetch and push protocols are not designed to prevent one side from stealing data from the other repository that was not intended to be shared.
If you have private data that you need to protect from a malicious peer, your best option is to store it in another repository.
This applies to both clients and servers.
In particular, namespaces on a server are not effective for read access control; you should only grant read access to a namespace to clients that you would trust with read access to the entire repository.
The known attack vectors are as follows:
The victim sends "have" lines advertising the IDs of objects it has that are not explicitly intended to be shared but can be used to optimize the transfer if the peer also has them.
The attacker chooses an object ID X to steal and sends a ref to X, but isn’t required to send the content of X because the victim already has it.
Now the victim believes that the attacker has X, and it sends the content of X back to the attacker later.
(This attack is most straightforward for a client to perform on a server, by creating a ref to X in the namespace the client has access to and then fetching it.
The most likely way for a server to perform it on a client is to "merge" X into a public branch and hope that the user does additional work on this branch and pushes it back to the server without noticing the merge.)
As in #1, the attacker chooses an object ID X to steal.
The victim sends an object Y that the attacker already has, and the attacker falsely claims to have X and not Y, so the victim sends Y as a delta against X.
The delta reveals regions of X that are similar to Y to the attacker.
CONFIGURATION
Everything below this line in this section is selectively included from the git-config[1] documentation.
The content is the same as what’s found there:
push.autoSetupRemote
If set to "true" assume --set-upstream on default push when no upstream tracking exists for the current branch; this option takes effect with push.default options simple, upstream, and current.
It is useful if by default you want new branches to be pushed to the default remote (like the behavior of push.default=current) and you also want the upstream tracking to be set.
Workflows most likely to benefit from this option are simple central workflows where all branches are expected to have the same name on the remote.
push.default
Defines the action git push should take if no refspec is given (whether from the command-line, config, or elsewhere).
Different values are well-suited for specific workflows; for instance, in a purely central workflow
(i.e.
the fetch source is equal to the push destination),
upstream is probably what you want.
Possible values are:
nothing - do not push anything (error out) unless a refspec is given.
This is primarily meant for people who want to avoid mistakes by always being explicit.
current - push the current branch to update a branch with the same name on the receiving end.
Works in both central and non-central workflows.
upstream - push the current branch back to the branch whose changes are usually integrated into the current branch (which is called @{upstream}).
This mode only makes sense if you are pushing to the same repository you would normally pull from
(i.e.
central workflow).
tracking - This is a deprecated synonym for upstream.
simple - push the current branch with the same name on the remote.
If you are working on a centralized workflow (pushing to the same repository you pull from, which is typically origin), then you need to configure an upstream branch with the same name.
This mode is the default since Git 2.0, and is the safest option suited for beginners.
matching - push all branches having the same name on both ends.
This makes the repository you are pushing to remember the set of branches that will be pushed out (e.g.
if you always push maint
and master there and no other branches, the repository you push to will have these two branches, and your local maint and master will be pushed there).
To use this mode effectively, you have to make sure all the branches you would push out are ready to be pushed out before running git push, as the whole point of this mode is to allow you to push all of the branches in one go.
If you usually finish work on only one branch and push out the result, while other branches are unfinished, this mode is not for you.
Also this mode is not suitable for pushing into a shared central repository, as other people may add new branches there, or update the tip of existing branches outside your control.
This used to be the default, but not since Git 2.0 (simple is the new default).
push.followTags
If set to true, enable --follow-tags option by default.
You may override this configuration at time of push by specifying --no-follow-tags.
push.gpgSign
May be set to a boolean value, or the string if-asked.
A true value causes all pushes to be GPG signed, as if --signed is passed to git-push[1].
The string if-asked causes pushes to be signed if the server supports it, as if --signed=if-asked is passed to git push.
A false value may override a value from a lower-priority config file.
An explicit command-line flag always overrides this config option.
push.pushOption
When no --push-option=<option> argument is given from the command line, git push behaves as if each <value> of this variable is given as --push-option=<value>.
This is a multi-valued variable, and an empty value can be used in a higher priority configuration file (e.g.
.git/config in a repository) to clear the values inherited from a lower priority configuration files (e.g.
$HOME/.gitconfig).
Example:
/etc/gitconfig
push.pushoption = a
push.pushoption = b
~/.gitconfig
push.pushoption = c repo/.git/config
push.pushoption =
push.pushoption = b This will result in only b (a and c are cleared).
push.recurseSubmodules
May be "check", "on-demand", "only", or "no", with the same behavior as that of "push --recurse-submodules".
If not set, no is used by default, unless submodule.recurse is set (in which case a true value means on-demand).
push.useForceIfIncludes
If set to "true", it is equivalent to specifying --force-if-includes as an option to git-push[1]
in the command line.
Adding --no-force-if-includes at the time of push overrides this configuration setting.
push.negotiate
If set to "true", attempt to reduce the size of the packfile sent by rounds of negotiation in which the client and the server attempt to find commits in common.
If "false", Git will rely solely on the server’s ref advertisement to find commits in common.
push.useBitmaps
If set to "false", disable use of bitmaps for "git push" even if pack.useBitmaps is "true", without preventing other git operations from using bitmaps.
Default is true.
https://docs.gitopia.com/gitguides/git-push/index.html
git push is the git command used to upload the contents of a local repository to the corresponding remote repository.
git push updates the remote branch with local commits.
It is one of the four commands in Git that prompts interaction with the remote repository.
Pushing is capable of overwriting changes; caution should be taken when pushing.
git push is most commonly used to publish an upload local changes to a central repository.
After a local repository has been modified a push is executed to share the modifications with remote team members.
remember to commit bufore push or fail
git commit -m "update"
git push origin main
This command creates a new branch and also switches to it.
git checkout -b main // Switched to a new branch 'main'
git push <remote> <branch>: Push the specified branch, along with all of the necessary commits and internal objects.
This creates a local branch in the destination repository.
To prevent you from overwriting commits, Git won’t let you push when it results in a non-fast-forward merge in the destination repository.
Example
git push origin mastergit push <remote> --force : Force a push that would otherwise be blocked, usually because it will delete or overwrite existing commits.
Do not use the --force flag unless you’re absolutely sure you know what you’re doing.
Example
git push origin --forcegit push <remote> --all : Push all of your local branches to the specified remote.
Example
git push origin --allgit push <remote> --tags: Push all local tags that aren't yet in the remote repository
Example
git push origin --tagsgit push <remote> --delete <branch-name> : Delete a specific remote branch
Example
git push origin --delete dev3Output:To gitopia://gitopia147dgrtq5ywww473uz680fx2ucex9fv3qnw94zm/hello-world
- [deleted] dev3
You can learn more about the git push command and its options in git-scm's documentation.
When listing branches in git, it’s important to know the difference between local and remote branches, understand which branch you are currently on, and understand the branch tree. This guide will walk through all the different intricacies of Git branches.
Listing the different types of git branches
List Local Branches: To see a list of your local branches, run:
git branch
This command displays all local branches.
The current branch will be highlighted and marked with an asterisk.
Get current git branch:
To find out which branch you are currently on:
git branch --show-current
Alternatively, use:
git rev-parse --abbrev-ref HEAD
Working with remote branches
List all remote branches: To view branches on your remote repositories:
git branch -r
This shows you all branches that you've fetched from your remote.
Advanced branch listings
Git branch list all: To see both local and remote branches:
git branch -aGit branch tree: While Git does not have a built-in tree view for branches, you can use the git log --graph command to get a tree-like representation of the commit history.
Filtering and formatting branch listings
Git branch list format: Customize the output format of the branch listing using the -format option:
git branch --format="%(refname:short) %(upstream:short) %(contents:subject)"
This example shows the branch name, its upstream branch, and the subject of the latest commit.
Git list branch names: If you're only interested in the names of the branches without any additional info, sticking with git branch or git branch -a for all branches is your best bet.
Git command for branch list with patterns: to list branches that match a certain pattern run:
git branch --list '*pattern*'
The pattern provided will act as a shell wildcard. If multiple are provided, the command will return all branches matching any of the patterns.
Git list all origin branches: In order to specifically list all branches from the origin remote, run:
git branch -r | grep 'origin/'
Troubleshooting
Git branch command not showing all branches: If git branch doesn't show expected branches, ensure you've fetched the latest updates from your remote:
git fetch --allGit branch not showing current branch: Ensure you're in a Git repository and not in a detached HEAD state. Use git branch --show-current to attempt to display the current branch.
Git command get branch name:
git rev-parse --abbrev-ref HEAD
This is a straightforward way to get the current branch name for scripting purposes.
For further reading please see the official git documentation on git branches.
git branch
lists branches in an arbitrary order
uses git log
list output in a tree like fasion
git log --graph --pretty=oneline --abbrev-commit
master
|-- foo
|-- foo1
|-- foo2
|-- bar
|-- bar4
using git log --graph
display the tag name and branch name
git config --global alias.scripts "log --graph
git scripts
当你在一个项目中有多个子模块时,了解这些子模块的状态是非常重要的。
这包括知道它们是否已经初始化,是否有未提交的更改,是否与远程仓库同步等。
git submodule status 命令提供了这些信息,帮助你更好地管理子模块。
git仓库中保存了主仓库和子仓库的对应关系,这些关系往往是非常重要的,不同仓库的版本必须严格对应,使用git submodule status 命令可以快速得知当前主仓库的提交对应哪些子仓库的提交。
 Open in GitHub Desktop
Open GitHub Desktop client and go to File > Clone Repository.
In the confirmation dialog, select Open GitHub Desktop.app.
GitHub Desktop should launch with a “Clone a Repository” dialog box about where to clone the repository.
If desired, you can change the Local Path.
Click the URL tab, and then paste in the clone URL.
In the Local Path field, select where you want the repo cloned.
For example:
Open in GitHub Desktop
Open GitHub Desktop client and go to File > Clone Repository.
In the confirmation dialog, select Open GitHub Desktop.app.
GitHub Desktop should launch with a “Clone a Repository” dialog box about where to clone the repository.
If desired, you can change the Local Path.
Click the URL tab, and then paste in the clone URL.
In the Local Path field, select where you want the repo cloned.
For example:
 Selecting paths for the repo in GitHub Desktop
Click Clone.
Go into the repository where GitHub Desktop cloned the repo (use your Finder or browse the folders with Finder or Explorer) and either add a simple text file with some content or make a change to an existing file.
Go back to GitHub Desktop.
You’ll see the new file you added in the list of uncommitted changes on the left.
Selecting paths for the repo in GitHub Desktop
Click Clone.
Go into the repository where GitHub Desktop cloned the repo (use your Finder or browse the folders with Finder or Explorer) and either add a simple text file with some content or make a change to an existing file.
Go back to GitHub Desktop.
You’ll see the new file you added in the list of uncommitted changes on the left.
 Uncommitted changes shown
In the list of changed files, the green + means you’ve added a new file.
A yellow circle means you’ve modified an existing file.
In the lower-left corner of the GitHub Desktop client (where it says “Summary” and “Description”), type a commit message, and then click Commit to master.
When you commit the changes, the left pane no longer shows the list of uncommitted changes.
However, you’ve committed the changes only locally.
You still have to push the commit to the remote (origin) repository.
(“origin” is the alias name that refers to the remote repository.)
Click Push origin at the top.
You’ll see GitHub Desktop show that it’s “Pushing to origin.”
Uncommitted changes shown
In the list of changed files, the green + means you’ve added a new file.
A yellow circle means you’ve modified an existing file.
In the lower-left corner of the GitHub Desktop client (where it says “Summary” and “Description”), type a commit message, and then click Commit to master.
When you commit the changes, the left pane no longer shows the list of uncommitted changes.
However, you’ve committed the changes only locally.
You still have to push the commit to the remote (origin) repository.
(“origin” is the alias name that refers to the remote repository.)
Click Push origin at the top.
You’ll see GitHub Desktop show that it’s “Pushing to origin.”
 If you view your repository online, you’ll see that the change you made has been pushed to the master branch on origin.
You can also click the History tab in the GitHub Desktop client (instead of the Changes tab), or go to View > Show History to see the changes you previously committed.
Although I prefer to use the terminal instead of the GitHub Desktop GUI, the GUI gives you an easier visual experience to see the changes made to a repository.
You can use both the command line and Desktop client in combination, if you want.
If you view your repository online, you’ll see that the change you made has been pushed to the master branch on origin.
You can also click the History tab in the GitHub Desktop client (instead of the Changes tab), or go to View > Show History to see the changes you previously committed.
Although I prefer to use the terminal instead of the GitHub Desktop GUI, the GUI gives you an easier visual experience to see the changes made to a repository.
You can use both the command line and Desktop client in combination, if you want.
 Creating a new branch
When you create the branch, you’ll see the Current branch drop-down menu indicate that you’re working in that branch.
Creating a branch copies the existing content (from the branch you’re currently in, master) into the new branch (development).
Creating a new branch
When you create the branch, you’ll see the Current branch drop-down menu indicate that you’re working in that branch.
Creating a branch copies the existing content (from the branch you’re currently in, master) into the new branch (development).
 Working in a branch
Using Finder or Explorer, browse to the file you created earlier and make a change to it, such as adding a new line with some text.
Save the changes.
Return to GitHub Desktop and notice that on the Changes tab, you have new modified files.
Working in a branch
Using Finder or Explorer, browse to the file you created earlier and make a change to it, such as adding a new line with some text.
Save the changes.
Return to GitHub Desktop and notice that on the Changes tab, you have new modified files.
 New files modified
The file changes show deleted lines in red and new lines in green.
The colors help you see what changed.
Commit the changes using the options in the lower-left corner, and click Commit to development.
Click Publish branch (on the top of the GitHub Desktop window) to make the local branch also available on origin (GitHub).
(Remember, there are usually two versions of a branch — the local version and the remote version.)
Switch back to your master branch (using the Branch drop-down option at the top of the GitHub Desktop client).
Then look at your file (in your text editor, such as Sublime text).
Note how the file changes you made while editing in the development branch don’t appear in your master branch.
You usually create a new branch when you’re making extensive changes to your content.
For example, suppose you want to revamp a section (“Section X”) in your docs.
However, you might want to publish other updates before publishing the extensive changes in Section X.
If you were working in the same branch, it would be difficult to selectively push updates on a few files outside of Section X without pushing updates you’ve made to files in Section X as well.
Through branching, you can confine your changes to a specific version that you don’t push live until you’re ready to merge the changes into your master branch.
New files modified
The file changes show deleted lines in red and new lines in green.
The colors help you see what changed.
Commit the changes using the options in the lower-left corner, and click Commit to development.
Click Publish branch (on the top of the GitHub Desktop window) to make the local branch also available on origin (GitHub).
(Remember, there are usually two versions of a branch — the local version and the remote version.)
Switch back to your master branch (using the Branch drop-down option at the top of the GitHub Desktop client).
Then look at your file (in your text editor, such as Sublime text).
Note how the file changes you made while editing in the development branch don’t appear in your master branch.
You usually create a new branch when you’re making extensive changes to your content.
For example, suppose you want to revamp a section (“Section X”) in your docs.
However, you might want to publish other updates before publishing the extensive changes in Section X.
If you were working in the same branch, it would be difficult to selectively push updates on a few files outside of Section X without pushing updates you’ve made to files in Section X as well.
Through branching, you can confine your changes to a specific version that you don’t push live until you’re ready to merge the changes into your master branch.
 Merging into master
If you look at your changed file, you should see the changes in the master branch.
Then click Push origin to push the changes to origin.
You will now see the changes reflected on the file on GitHub.
Merging into master
If you look at your changed file, you should see the changes in the master branch.
Then click Push origin to push the changes to origin.
You will now see the changes reflected on the file on GitHub.
 Pull request
The left-facing arrow (pointing from the development branch towards the master) indicates that the pull request (“PR”) wants to merge the development branch into the master branch.
Describe the pull request, and then click Create pull request.
At this point, engineers would get an email request asking for them to merge in the edits.
Play the part of the engineer by going to the Pull requests tab (on GitHub) to examine and confirm the merge request.
As long as the merge request doesn’t pose any conflicts, you’ll see a Merge pull request button.
Pull request
The left-facing arrow (pointing from the development branch towards the master) indicates that the pull request (“PR”) wants to merge the development branch into the master branch.
Describe the pull request, and then click Create pull request.
At this point, engineers would get an email request asking for them to merge in the edits.
Play the part of the engineer by going to the Pull requests tab (on GitHub) to examine and confirm the merge request.
As long as the merge request doesn’t pose any conflicts, you’ll see a Merge pull request button.
 Confirm merge request
To see what changes you’re merging into master, you can click the Files changed tab (which appears on the secondary navigation bar near the top).
Then click Merge pull request to merge in the branch, and click Confirm merge to complete the merge.
Now let’s get the updates you merged into the masterbranch online into your local copy.
In your GitHub Desktop GUI client, select the master branch, and then click the Fetch origin button.
Fetch gets the latest updates from origin but doesn’t update your local working copy with the changes.
After you click Fetch origin, the button changes to Pull Origin.
Click Pull Origin to update your local working copy with the fetched updates.
Now check your files and notice that the updates that were originally in the development branch now appear in master.
For a more detailed tutorial in making pull requests using the GitHub interface, see Pull request workflows through GitHub.
I include an extensive tutorial with pull requests because it will likely be a common workflow if you are contributing to an open-source project.
Confirm merge request
To see what changes you’re merging into master, you can click the Files changed tab (which appears on the secondary navigation bar near the top).
Then click Merge pull request to merge in the branch, and click Confirm merge to complete the merge.
Now let’s get the updates you merged into the masterbranch online into your local copy.
In your GitHub Desktop GUI client, select the master branch, and then click the Fetch origin button.
Fetch gets the latest updates from origin but doesn’t update your local working copy with the changes.
After you click Fetch origin, the button changes to Pull Origin.
Click Pull Origin to update your local working copy with the fetched updates.
Now check your files and notice that the updates that were originally in the development branch now appear in master.
For a more detailed tutorial in making pull requests using the GitHub interface, see Pull request workflows through GitHub.
I include an extensive tutorial with pull requests because it will likely be a common workflow if you are contributing to an open-source project.


 Client-server model with asymmetric cryptography
When running any remote commands from our computer(e.g., git push or git pull) to a remote repository (GitHub), it’s this protocol that enables us to do so without having to supply a password and username each time.
Let’s now look at the configuration for it.
Client-server model with asymmetric cryptography
When running any remote commands from our computer(e.g., git push or git pull) to a remote repository (GitHub), it’s this protocol that enables us to do so without having to supply a password and username each time.
Let’s now look at the configuration for it.
 You will then be prompted to enter a passphrase.
Your new SSH key will be found at a directory similar to this:{your home Directory}/.ssh/id_rsa_uraccount
You will then be prompted to enter a passphrase.
Your new SSH key will be found at a directory similar to this:{your home Directory}/.ssh/id_rsa_uraccount

 When an application running inside Codespaces outputs a port to the console, Codespaces detects the localhost URL pattern and automatically forwards the port.
You can click on the URL in the terminal or in the toast message to open the port in a browser.
By default, Codespaces forwards the port using HTTP.
For more information on port forwarding, see "Forwarding ports in your codespace."
While ports can be forwarded automatically, they are not publicly accessible to the internet.
By default, all ports are private, but you can manually make a port available to your organization or public, and then share access through a URL.
For more information, see "Sharing a port."
Running your application when you first land in your codespace can make for a fast inner dev loop.
As you edit, your changes are automatically saved and available on your forwarded port.
To view changes, go back to the running application tab in your browser and refresh it.
When an application running inside Codespaces outputs a port to the console, Codespaces detects the localhost URL pattern and automatically forwards the port.
You can click on the URL in the terminal or in the toast message to open the port in a browser.
By default, Codespaces forwards the port using HTTP.
For more information on port forwarding, see "Forwarding ports in your codespace."
While ports can be forwarded automatically, they are not publicly accessible to the internet.
By default, all ports are private, but you can manually make a port available to your organization or public, and then share access through a URL.
For more information, see "Sharing a port."
Running your application when you first land in your codespace can make for a fast inner dev loop.
As you edit, your changes are automatically saved and available on your forwarded port.
To view changes, go back to the running application tab in your browser and refresh it.
 You can create a codespace from any branch, commit, or pull request in your project, or you can switch to a new or existing branch from within your active codespace.
Because Codespaces is designed to be ephemeral, you can use it as an isolated environment to experiment, check a teammate's pull request, or fix merge conflicts.
You can create more than one codespace per repository or even per branch.
However, each user account has a limit of 10 codespaces.
If you've reached the limit and want to create a new codespace, you must delete a codespace first.
Note: Commits from your codespace will be attributed to the name and public email configured at https://github.com/settings/profile.
A token scoped to the repository, included in the environment as
You can create a codespace from any branch, commit, or pull request in your project, or you can switch to a new or existing branch from within your active codespace.
Because Codespaces is designed to be ephemeral, you can use it as an isolated environment to experiment, check a teammate's pull request, or fix merge conflicts.
You can create more than one codespace per repository or even per branch.
However, each user account has a limit of 10 codespaces.
If you've reached the limit and want to create a new codespace, you must delete a codespace first.
Note: Commits from your codespace will be attributed to the name and public email configured at https://github.com/settings/profile.
A token scoped to the repository, included in the environment as 


 Usage: git add *
This command adds one or more to the staging area.
Usage: git add *
This command adds one or more to the staging area.

 Usage: git commit -a
This command commits any files you’ve added with the git add command and also commits any files you’ve changed since then.
Usage: git commit -a
This command commits any files you’ve added with the git add command and also commits any files you’ve changed since then.

 Usage: git diff -staged
This command shows the differences between the files in the staging area and the latest version present.
Usage: git diff -staged
This command shows the differences between the files in the staging area and the latest version present.
 Usage: git diff [first branch] [second branch]
This command shows the differences between the two branches mentioned.
Usage: git diff [first branch] [second branch]
This command shows the differences between the two branches mentioned.

 Usage: git reset [commit]
This command undoes all the commits after the specified commit and preserves the changes locally.
Usage: git reset [commit]
This command undoes all the commits after the specified commit and preserves the changes locally.
 Usage: git reset -hard [commit]
This command discards all history and goes back to the specified commit.
Usage: git reset -hard [commit]
This command discards all history and goes back to the specified commit.


 Usage: git log -follow[file]
This command lists version history for a file, including the renaming of files also.
Usage: git log -follow[file]
This command lists version history for a file, including the renaming of files also.


 Usage: git branch [branch name]
This command creates a new branch.
Usage: git branch [branch name]
This command creates a new branch.
 Usage: git branch -d [branch name]
This command deletes the feature branch.
Usage: git branch -d [branch name]
This command deletes the feature branch.

 Usage: git checkout -b [branch name]
This command creates a new branch and also switches to it.
Usage: git checkout -b [branch name]
This command creates a new branch and also switches to it.


 Usage: git push [variable name] [branch]
This command sends the branch commits to your remote repository.
Usage: git push [variable name] [branch]
This command sends the branch commits to your remote repository.
 Usage: git push -all [variable name]
This command pushes all branches to your remote repository.
Usage: git push -all [variable name]
This command pushes all branches to your remote repository.
 Usage: git push [variable name] :[branch name]
This command deletes a branch on your remote repository.
Usage: git push [variable name] :[branch name]
This command deletes a branch on your remote repository.


 Usage: git stash pop
This command restores the most recently stashed files.
Usage: git stash pop
This command restores the most recently stashed files.
 Usage: git stash list
This command lists all stashed changesets.
Usage: git stash list
This command lists all stashed changesets.
 Usage: git stash drop
This command discards the most recently stashed changeset.
Usage: git stash drop
This command discards the most recently stashed changeset.


 create a new branch named "feature_x" and switch to it using
 Step 2: Select the components that you need to install and click on the Next button.
 Step 3: Select how to use the Git from command-line and click on Next to begin the installation process.
 Step 4: Let the installation process finish to begin using Git Bash.
 To open Git Bash navigate to the folder where you have installed the git otherwise just simply search in your OS for git bash.

 Step 2: Give a suitable name of your repository and create the repository
 Note: You can choose to initialize your git repository with a README file, and further, you can mention your project details in it.
It helps people know what this repository is about.
However, it’s absolutely not necessary.
But if you do initialize your repo with a README file using interface provided by GitHub, then your local repository won’t have this README file.
So to avoid running into a snag while trying to push your files (as in step 3 of next section), after step 5 (where you initialize your local folder as your git repository), do following to pull that file to your local folder:
git pull
Note: You can choose to initialize your git repository with a README file, and further, you can mention your project details in it.
It helps people know what this repository is about.
However, it’s absolutely not necessary.
But if you do initialize your repo with a README file using interface provided by GitHub, then your local repository won’t have this README file.
So to avoid running into a snag while trying to push your files (as in step 3 of next section), after step 5 (where you initialize your local folder as your git repository), do following to pull that file to your local folder:
git pull  Step 4: Open Git Bash and change the current working directory to your local project by use of cd command.
 Step 5: Initialize the local directory as a Git repository.
git init
Step 5: Initialize the local directory as a Git repository.
git init
 Step 6: Stage the files for the first commit by adding them to the local repository
git add .
Step 7: By “git status” you can see the staged files
Step 6: Stage the files for the first commit by adding them to the local repository
git add .
Step 7: By “git status” you can see the staged files
 Step 8: Commit the files that you’ve staged in your local repository.
git commit -m "First commit"
Step 8: Commit the files that you’ve staged in your local repository.
git commit -m "First commit"
 Now After “git status” command it can be seen that nothing to commit is left, Hence all files have been committed.
 Step 2: In the Command prompt, add the URL for your repository where your local repository will be pushed.
git remote add origin repository_URL
Step 3: Push the changes in your local repository to GitHub.
git push origin master
Here the files have been pushed to the master branch of your repository.
Step 2: In the Command prompt, add the URL for your repository where your local repository will be pushed.
git remote add origin repository_URL
Step 3: Push the changes in your local repository to GitHub.
git push origin master
Here the files have been pushed to the master branch of your repository.
 Now in the GitHub repository, the pushed files can be seen.

 New changes can be seen

 Now the same


 Selecting Additional Components To Install
3. Leave the default for creating a shortcut in the start menu folder, and click Next.
Selecting Additional Components To Install
3. Leave the default for creating a shortcut in the start menu folder, and click Next.
 Selecting Start menu folder name
4. Select Use Notepad as Git's default editor from the drop-down list as a default editor to use with Git, and click Next.
Now Git files like ~./gitconfig will open in Notepad by default.
Selecting Start menu folder name
4. Select Use Notepad as Git's default editor from the drop-down list as a default editor to use with Git, and click Next.
Now Git files like ~./gitconfig will open in Notepad by default.
 Selecting Git's Default Editor
5. Select the Override the default branch name for new repositories option as the default branch name (main) for Git to use.
When you initialize a Git repository, Git will use this branch name by default.
The default branch name used to be “master” for Git repositories.
But many people found “master” an offensive word.
So GitHub followed the Software Freedom Conservancy's suggestion and provided an option to override the default branch name when initializing a Git repository.
Selecting Git's Default Editor
5. Select the Override the default branch name for new repositories option as the default branch name (main) for Git to use.
When you initialize a Git repository, Git will use this branch name by default.
The default branch name used to be “master” for Git repositories.
But many people found “master” an offensive word.
So GitHub followed the Software Freedom Conservancy's suggestion and provided an option to override the default branch name when initializing a Git repository.
 Selecting Default Branch Name
6. Now, select Git from the command line and also from 3rd-party software option so that Git command can be executed from different tools.
Some of those tools are Command Prompt, PowerShell or any other 3rd party software tools, along with the Git Bash console.
Selecting Default Branch Name
6. Now, select Git from the command line and also from 3rd-party software option so that Git command can be executed from different tools.
Some of those tools are Command Prompt, PowerShell or any other 3rd party software tools, along with the Git Bash console.
 Selecting a Console Where Git Commands Can Run
7. Select the Use the OpenSSL library option to let Git validate certificates with OpenSSL, and click Next.
OpenSSL is a cryptographic library that contains open-source implementation of SSL and TLS protocols.
If you are using Git in an organization with enterprise-managed certificates, select the User the native Windows Secure Channel library option instead.
Selecting a Console Where Git Commands Can Run
7. Select the Use the OpenSSL library option to let Git validate certificates with OpenSSL, and click Next.
OpenSSL is a cryptographic library that contains open-source implementation of SSL and TLS protocols.
If you are using Git in an organization with enterprise-managed certificates, select the User the native Windows Secure Channel library option instead.
 Selecting SSL/TLS library for HTTPS connections
8. Leave the default Checkout Windows-style, commit Unix-style line endings option selected, and click Next.
If you configure “Windows-style” line ending conversions, when you hit return on your keyboard after executing a Git command, Git will insert an invisible character called line ending.
When different contributors make changes from different operating systems, Git might produce unexpected results.
Selecting SSL/TLS library for HTTPS connections
8. Leave the default Checkout Windows-style, commit Unix-style line endings option selected, and click Next.
If you configure “Windows-style” line ending conversions, when you hit return on your keyboard after executing a Git command, Git will insert an invisible character called line ending.
When different contributors make changes from different operating systems, Git might produce unexpected results.
 Selecting line endings option
9. Select the Use Mintty (the default terminal of MSYS2) option as the default terminal emulator to run commands, and click Next.
Mintty is the default terminal of MSYS2.
MSYS2 is a collection of tools and libraries that provides a Unix-like environment for software distribution and a building platform for Windows.
Selecting line endings option
9. Select the Use Mintty (the default terminal of MSYS2) option as the default terminal emulator to run commands, and click Next.
Mintty is the default terminal of MSYS2.
MSYS2 is a collection of tools and libraries that provides a Unix-like environment for software distribution and a building platform for Windows.
 Selecting a default terminal emulator
10. Select the Default (fast-forward or merge) option below as
Selecting a default terminal emulator
10. Select the Default (fast-forward or merge) option below as  Selecting Default Behavior for
  Selecting Default Credential Manager
12. Leave the extra features on default, as shown below, and click Next.
The Enable file system caching option is checked to provide quick results when executing Git commands.
Selecting Default Credential Manager
12. Leave the extra features on default, as shown below, and click Next.
The Enable file system caching option is checked to provide quick results when executing Git commands.
 Enabling extra options
13. Ensure to leave both options below at default (pseudo console and built-in file system monitor) as they are still in an experimental stage, and click Install.
Enabling extra options
13. Ensure to leave both options below at default (pseudo console and built-in file system monitor) as they are still in an experimental stage, and click Install.
 Experimental options support
14. Complete the installation and close the installation wizard by clicking on Finish.
Experimental options support
14. Complete the installation and close the installation wizard by clicking on Finish.
 Git setup wizard complete screen
15. Finally, right-click on your desktop and select Git Bash Here from the context menu, as shown below, to launch Git Bash terminal.
Launching Git Bash from your desktop is one of the quickest ways to do so, but the same process goes when you right-click on a folder.
Git setup wizard complete screen
15. Finally, right-click on your desktop and select Git Bash Here from the context menu, as shown below, to launch Git Bash terminal.
Launching Git Bash from your desktop is one of the quickest ways to do so, but the same process goes when you right-click on a folder.
 Launching Git Bash from Desktop Context Menu
16. Run the
Launching Git Bash from Desktop Context Menu
16. Run the  Verifying Git Bash installation
 Launching Git Bash from Start Button
2. Run the below
Launching Git Bash from Start Button
2. Run the below  Viewing Global Variables Added via Different Consoles
 Running Linux Command in Git Bash Returns a Result
 Running Linux Command in Command Prompt Returns an Error
You can run Linux commands on the command prompt so long as you change the directory to C:\Program Files\Git\usr\bin first.
In the command prompt, run the commands below to change the working directory to
Running Linux Command in Command Prompt Returns an Error
You can run Linux commands on the command prompt so long as you change the directory to C:\Program Files\Git\usr\bin first.
In the command prompt, run the commands below to change the working directory to  Running Linux Commands in Command Prompt
 Now after adding keys , in your .ssh folder, a public key and a private will get generated.
The public key will have an extention .pub and private key will be there without any extention both having same name which you have passed after -f option in the above command.
(in my case github-rahul-office and github-rahu-personal)
Now after adding keys , in your .ssh folder, a public key and a private will get generated.
The public key will have an extention .pub and private key will be there without any extention both having same name which you have passed after -f option in the above command.
(in my case github-rahul-office and github-rahu-personal)


 In the left sidebar, click
  To give your token an expiration, select the
  Select the scopes you'd like to grant this token.
To use your token to access repositories from the command line, select
Select the scopes you'd like to grant this token.
To use your token to access repositories from the command line, select  Click
Click 
 To use your token to access resources owned by an organization that uses SAML single sign-on, authorize the token.
For more information, see "Authorizing a personal access token for use with SAML single sign-on" in the GitHub Enterprise Cloud documentation.
To use your token to access resources owned by an organization that uses SAML single sign-on, authorize the token.
For more information, see "Authorizing a personal access token for use with SAML single sign-on" in the GitHub Enterprise Cloud documentation.
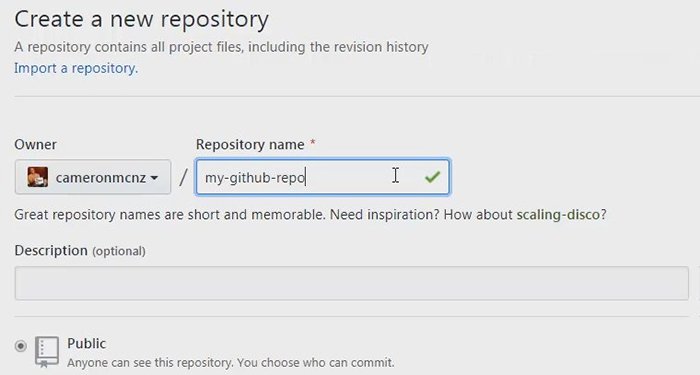 Set up the remote origin repository on the GitHub server.
Since you will transfer information to the GitHub repository, do not initialize it with a README, configure a gitignore file or add a license.
All of those things will exist in the local repository and will be subsequently pushed into the remote GitHub one.
If those resources exist in both repositories before the git remote add origin command runs, it will create extra merge and conflict resolution steps that are easily avoided.
Set up the remote origin repository on the GitHub server.
Since you will transfer information to the GitHub repository, do not initialize it with a README, configure a gitignore file or add a license.
All of those things will exist in the local repository and will be subsequently pushed into the remote GitHub one.
If those resources exist in both repositories before the git remote add origin command runs, it will create extra merge and conflict resolution steps that are easily avoided.
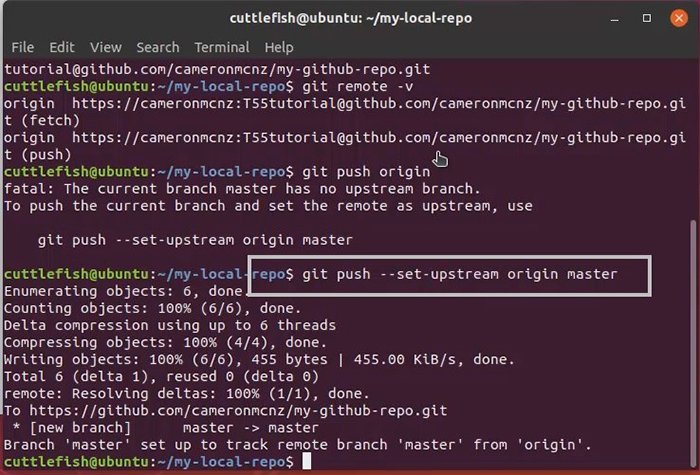 Push changes to the remote server with the git push command.
git push --set-upstream origin master
As this action completes, the terminal window lists the number of objects pushed to the server and indicates that your local repository is set to track to a branch named master on the GitHub server.
Push changes to the remote server with the git push command.
git push --set-upstream origin master
As this action completes, the terminal window lists the number of objects pushed to the server and indicates that your local repository is set to track to a branch named master on the GitHub server.
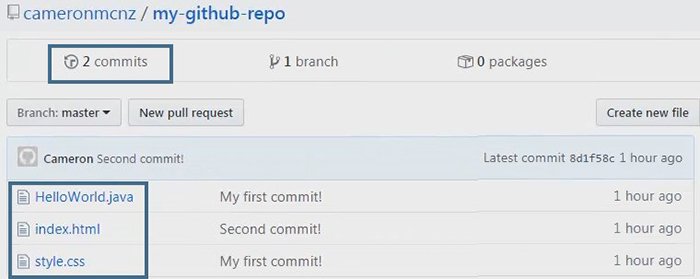 The result of the local git remote add and push command is reflected in the remote GitHub repository.
The remote GitHub repository should contain all the files that make up your local repository and at the same time, maintain a copy of your commit history.
If you look at my GitHub repository, you will see the HelloWorld.java, index.html and style.css files, along with an indication that the repository contains two commits.
These files and commits are consistent with the output from the git reflog command from the start of this tutorial.
The result of the local git remote add and push command is reflected in the remote GitHub repository.
The remote GitHub repository should contain all the files that make up your local repository and at the same time, maintain a copy of your commit history.
If you look at my GitHub repository, you will see the HelloWorld.java, index.html and style.css files, along with an indication that the repository contains two commits.
These files and commits are consistent with the output from the git reflog command from the start of this tutorial.
 Select
 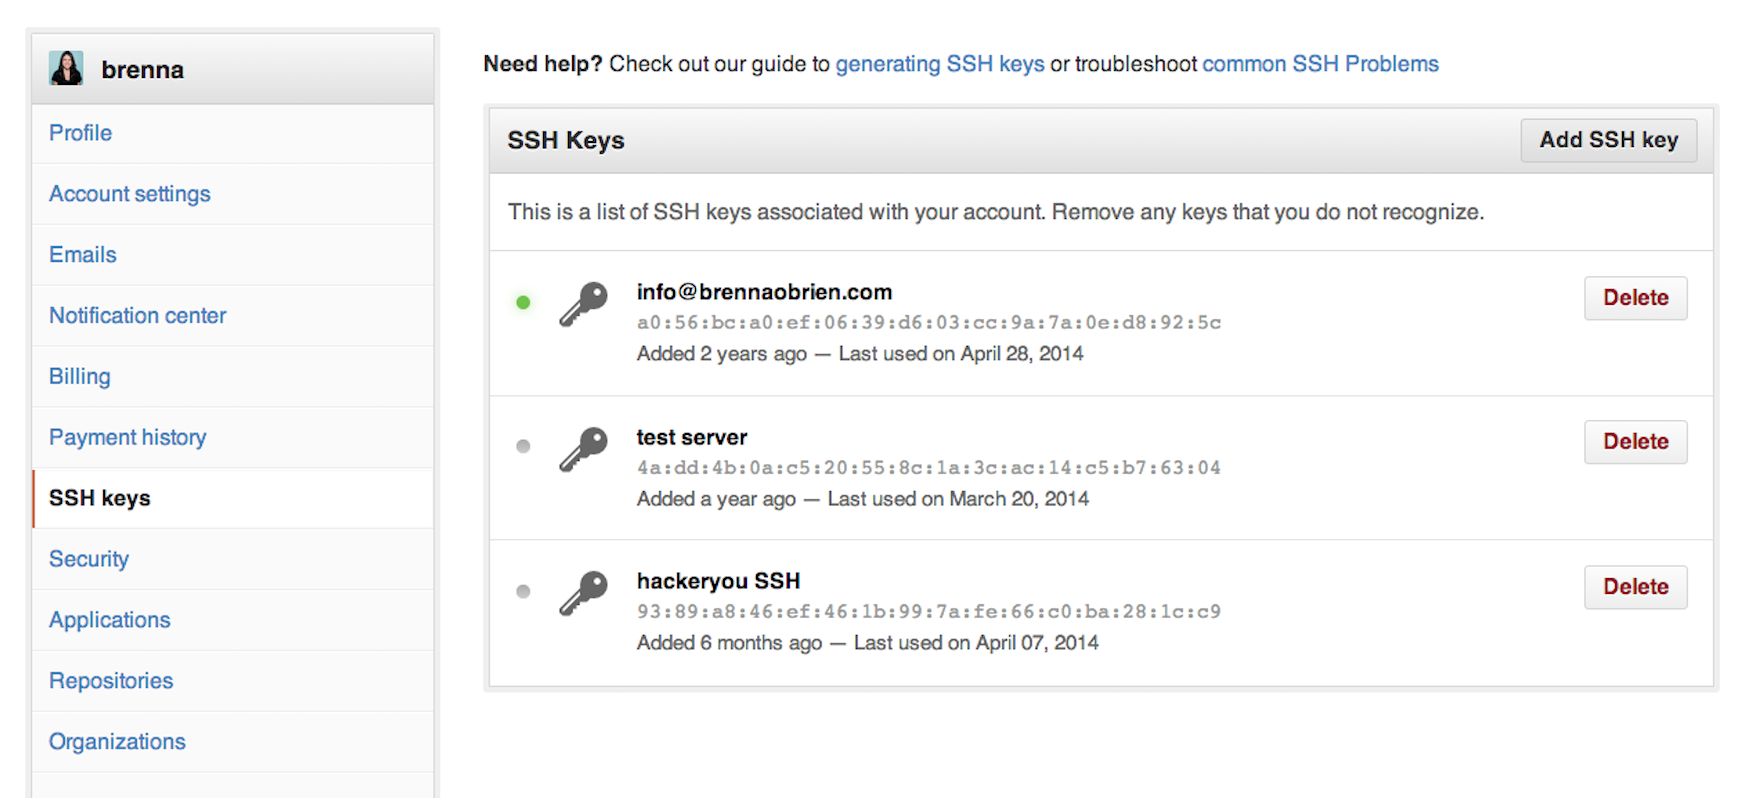 Name your key something whatever you like, and paste the contents of your clipboard into the
  Finally, hit
  This will allow you to bypass entering your username and password for future GitHub commands.