An SSH key is an access credential for the SSH (secure shell) network protocol.
This authenticated and encrypted secure network protocol is used for remote communication between machines on an unsecured open network.
SSH is used for remote file transfer, network management, and remote operating system access.
The SSH acronym is also used to describe a set of tools used to interact with the SSH protocol.
SSH uses a pair of keys to initiate a secure handshake between remote parties.
The key pair contains a public and private key.
The private vs public nomenclature can be confusing as they are both called keys.
It is more helpful to think of the public key as a "lock" and the private key as the "key".
You give the public 'lock' to remote parties to encrypt or 'lock' data.
This data is then opened with the 'private' key which you hold in a secure place.
How to Create an SSH Key
SSH keys are generated through a public key cryptographic algorithm, the most common being RSA or DSA.
At a very high level SSH keys are generated through a mathematical formula that takes 2 prime numbers and a random seed variable to output the public and private key.
This is a one-way formula that ensures the public key can be derived from the private key but the private key cannot be derived from the public key.
SSH keys are created using a key generation tool.
The SSH command line tool suite includes a keygen tool.
Most git hosting providers offer guides on how to create an SSH Key.
Generate an SSH Key on Mac and Linux
Both OsX and Linux operating systems have comprehensive modern terminal applications that ship with the SSH suite installed.
The process for creating an SSH key is the same between them.
1. execute the following to begin the key creation
ssh-keygen -t rsa -b 4096 -C "your_email@example.com"
This command will create a new SSH key using the email as a label
2. You will then be prompted to "Enter a file in which to save the key."
You can specify a file location or press “Enter” to accept the default file location.
> Enter a file in which to save the key (/Users/you/.ssh/id_rsa): [Press enter]
3. The next prompt will ask for a secure passphrase.
A passphrase will add an additional layer of security to the SSH and will be required anytime the SSH key is used.
If someone gains access to the computer that private keys are stored on, they could also gain access to any system that uses that key.
Adding a passphrase to keys will prevent this scenario.
> Enter passphrase (empty for no passphrase): [Type a passphrase]
> Enter same passphrase again: [Type passphrase again]`
At this point, a new SSH key will have been generated at the previously specified file path.
4. Add the new SSH key to the ssh-agent
The ssh-agent is another program that is part of the SSH toolsuite.
The ssh-agent is responsible for holding private keys.
Think of it like a keychain.
In addition to holding private keys it also brokers requests to sign SSH requests with the private keys so that private keys are never passed around unsecurly.
Before adding the new SSH key to the ssh-agent first ensure the ssh-agent is running by executing:
$ eval "$(ssh-agent -s)"
> Agent pid 59566
Once the ssh-agent is running the following command will add the new SSH key to the local SSH agent.
ssh-add -K /Users/you/.ssh/id_rsa
The new SSH key is now registered and ready to use!
Generate an SSH Key on Windows
Windows environments do not have a standard default unix shell.
External shell programs will need to be installed for to have a complete keygen experience.
The most straight forward option is to utilize Git Bash.
Once Git Bash is installed the same steps for Linux and Mac can be followed within the Git Bash shell.
Windows Linux Subsystem
Modern windows environments offer a windows linux subsystem.
The windows linux subsystem offers a full linux shell within a traditional windows environment.
If a linux subsystem is available the same steps previously discussed for Linux and Mac can be followed with in the windows linux subsystem.
Summary
SSH keys are used to authenticate secure connections.
Following this guide, you will be able to create and start using an SSH key.
Git is capable of using SSH keys instead of traditional password authentication when pushing or pulling to remote repositories.
Modern hosted git solutions like Bitbucket support SSH key authentication.
Git Archive: How to export a git project
Sometimes it can be useful to create an archive file of a Git repository.
An archive file combines multiple files into a single file.
An archive file can then be extracted to reproduce the individual files.
Git is incredibly powerful at preserving history and team collaboration; however, archive files remove the overhead of Git's metadata and can be simpler to distribute to other users or preserve in long term cold storage.
What does git archive do?
The git archive command is a Git command line utility that will create an archive file from specified Git Refs like, commits, branches, or trees.
git archive accepts additional arguments that will alter the archive output.
Git export examples
A most basic ~git archive~ example follows
git archive --format=tar HEAD
This command when executed will create an archive from the current HEAD ref of the repository.
By default, git archive will stream the archive output to the ephemeral stdout stream.
You will need to capture this output stream to a permanent file.
You can specify a permanent file by using git archives output option or using the operating systems stdout redirection.
git archive --output=./example_repo_archive.tar --format=tar HEAD
The proceeding example will create a new archive and store it in the exmaple_repo_archive.tar file.
The previous examples have both created uncompressed archive output.
This is denoted by the --format=tar option.
The format option also accepts popular compressed file formats zip and tar.gz.
Passing one of these format options will produce a compressed archive.
If a format value is not passed it will be inferred from any --output option passed.
git archive --output=./example_repo_archive.tar.gz --format=tar HEAD ./build
A partial archives of the repository can be created by passing a path argument.
This example adds a ./build path argument to the archive command.
This command will output an archive containing only files stored under the ./build directory
Options
The previous examples demonstrated some of the most frequently used git-archive use cases.
The following are extended options that can be passed to git-archive.
--prefix=<prefix>/
The prefix options prepends a path to each file in an archive.
This can be helpful to ensure the archive contents get extracted in a unique namespace.
--remote=<repo>
The remote option expects a remote repository URL.
When invoked with the remote option, git-archive will fetch the remote repository and create an archive from the specified ref if it’s available on the remote.
Configuration
There are a few global Git configuration values that ~git archive~ will respect.
These values can be set using the [git config][link to git config] utility.
tar.umask
The unmask configuration option is used to specify unix level permission bit restriction on the output archive file.
tar.<format>.command
This configuration option allows specification of a custom shell command that the git-archive output will be run through.
This is similar to omitting the --output option and piping the stdout stream from ~git archive~ to a custom tool.
This enables fixed custom archive post-processing.
tar.<format>.remote
If enabled this allows remote clients to fetch archives of type format.
Git Archive Summary
Git archive is a helpful utility for creating distributable packages of git repositories.
Git archive can target specific refs of a repository and only package the contents of that ref.
Git archive has several output formats that can utilize added compression.
Is GitOps the next big thing in DevOps?
Many organizations now see DevOps as part of their digital transformation strategy, since it encourages a culture of shared responsibility, transparency, and faster feedback.
Yet as the gap between development and operations teams shrinks, so do the processes.
So it goes with Git, the most widely used version control system in the world today.
As companies embrace DevOps methodologies, so to the tools, which has created an evolution to GitOps, a set of practices that allow developers to perform more IT operations-related tasks.
What is GitOps?
At its core, GitOps is code-based infrastructure and operational procedures that rely on Git as a source control system.
It’s an evolution of Infrastructure as Code (IaC) and a DevOps best practice that leverages Git as the single source of truth, and control mechanism for creating, updating, and deleting system architecture.
More simply, it is the practice of using Git pull requests to verify and automatically deploy system infrastructure modifications.
In addition to Git as a key DevOps mechanism, GitOps is also used to describe tools that augment Gits default functionality.
These tools were primarily used with operating models for Kubernetes-based infrastructure and applications.
There is ongoing development and discussion within the DevOps community to bring GitOps tools to other non-Kubernetes platforms, such as Terraform.
GitOps ensures that a system’s cloud infrastructure is immediately reproducible based on the state of a Git repository.
Pull requests modify the state of the Git repository.
Once approved and merged, the pull requests will automatically reconfigure and sync the live infrastructure to the state of the repository.
This live syncing pull request workflow is the core essence of GitOps.
The history of GitOps
Git is a mission critical tool for software development that enables pull request and code review workflows.
Pull requests promote visibility into incoming changes to a codebase and encourages communication, discussion, and review of changes.
Pull requests are a pivotal feature in collaborative software development and changed the way teams and businesses build software.
Pull requests bring transparency and measurability to a formerly opaque process.
Git pull requests helped enable the evolution of DevOps processes into software development.
System administrators, who typically were hesitant to change, are now embracing new software development practices such as agile and DevOps.
Systems administration as a craft has a sloppy history.
System administrators previously would manage hardware manually by either connecting to and provisioning machines in a physical server rack or over a cloud provisioning API.
In addition to the manual provisioning process, large amounts of manual configuration work was a regular routine.
Administrators would keep custom collections of imperative scripts and configurations, cobble them together, and place them in various places.
These scripts could break at any time or get lost.
Collaboration was challenging as the custom tool chains were not regularly documented or shared.
The DevOps movement arose from this primordial swamp of systems administration.
DevOps borrowed the best ideas from software engineering and applied them to systems administration, where the cobbled-together tools became version-controlled code.
IaC is one of the biggest revelations of DevOps.
Previously system administrators favored custom imperative scripts to configure systems.
Imperative software follows a sequence of steps to achieve a desired state, such as:
Imperative software is often error prone and easy to break by changing the sequence of events.
Modern software development has trended away from imperative patterns and towards declarative software patterns.
Declarative software follows a declaration of an expected state instead of a sequence of commands.
Here’s a comparison of imperative vs declarative devops statements.
While the imperative statements might read:
Install an operating system on this machineInstall these dependenciesDownload code from this URLMove the code to this directoryDo this 3 times for 3 other machines
The declarative version of this would simply read: 4 machines have software from this URL, installed at this directory.
IaC encourages and promotes declarative system administration tools over custom imperative solutions.
This led to the emergence of technologies like Docker Containers, Ansible, Terraform, and Kubernetes, which utilize static declarative configuration files.
Human readability and consistent reproducible state are the beneficial outcomes.
These configuration files were naturally added to Git for tracking and review.
This is close but not quite GitOps.
Many of the traditional system administration problems have been solved at this point in DevOps history.
Configuration files and tools are now stored in a central location, documented and accessible by many team members.
Commits and pull requests were used to track modifications to the configuration and foster collaboration discussion and review.
The only remaining problem with this stage is that the configuration still feels disconnected from the live system.
Once a configuration pull request is approved and merged to the repo, the live system is manually updated to match the state of the static repo.
This is the exact problem GitOps solves.
The GitOps idea was first hatched and shared by WeaveWorks, an enterprise Kubernetes management firm and has since proliferated throughout the DevOps community.
GitOps is an extension of IaC and declarative configuration discussed above.
GitOps adds some magic to the pull request workflow that syncs the state of the live system to that of the static configuration repository.
The benefits of GitOps
GitOps shares many of the same benefits as an agile feature branch software development workflow.
The first major benefit is ease of adoption due to the usage of common tools.
Git is the de facto standard of version control systems and is a common software development tool for most developers and software teams.
This makes it easy for developers familiar with Git to become cross functional contributors and participate in GitOps.
Using a version control system lets a team track all modifications to the configuration of a system.
This gives a “source of truth” and valuable audit trail to review if something breaks or behaves unexpectedly.
Teams can review the GitOps history and see when a regression was introduced.
Additionally this audit trail can be used as a reference for compliance or security auditing.
The GitOps history can be used as proof when things like encryption certificates are modified or updated.
GitOps brings transparency and clarity to an organization's infrastructure needs around a central repo.
Containing all systems configurations in a central repository helps scale contribution input from team members.
Pull requests made through hosted Git services like Bitbucket have rich tools for code review and discussion commentary.
This builds passive communication loops that allows the full engineering team to observe and monitor infrastructure changes.
GitOps can greatly increase productivity for a DevOps team.
It allows them to quickly experiment with new infrastructure configurations.
If the new changes don’t behave as expected, a team can use Git history to revert changes to a known good state.
This is incredibly powerful since it enables the familiar “undo” functionality in a complicated infrastructure.
How GitOps works
GitOps procedures are performed by an underlying orchestration system.
GitOps itself is an agnostic best practice pattern.
Many popular GitOps solutions today primarily use Kubernetes as the orchestration system.
Some alternative GitOps tool sets are coming to market that support direct Terraform manipulation.
To achieve a full GitOps install, a pipeline platform is required.
Jenkins, Bitbucket Pipelines, or CircleCi are some popular pipeline tools that are complementary to GitOps.
Pipelines automate and bridge the gap between Git pull requests and the orchestration system.
Once pipeline hooks are established and triggered from pull requests, commands are executed to the orchestration piece.
A new pattern or component that is specifically introduced with GitOps is the GitOps “operator,” which is a mechanism that sits between the pipeline and the orchestration system.
A pull request starts the pipeline that then triggers the operator.
The operator examines the state of the repository and the start of the orchestration and syncs them.
The operator is the magic component of GitOps.
GitOps examples
Imagine a team identified a performance bottleneck or a spike in traffic and the team notices the load balancer is not working as expected.
They look into the GitOps repo that holds the infrastructure configuration and find a specific file that configures and deploys the load balancer.
They can review it on their online Git hosting site.
After some review and discussion they identify that some of the configuration values for the load balancer are not optimal and need to be adjusted.
A member of the team opens up a new pull request that optimizes the load balancer values.
The pull request is reviewed and approved by a second team member and merged into the repository.
The merge kicks off a GitOps pipeline, which triggers the GitOps operator.
The operator sees the load balancer configuration was changed.
It confirms with the systems orchestration tool that this does not match what is live on the teams cluster.
The operator signals the orchestration system to update the load balancer configuration.
The orchestrator handles the rest and automatically deploys the newly configured load balancer.
The team then monitors the newly updated live system to see it return to a healthy state.
This is an ideal GitOps scenario.
Let’s expand on it further to demonstrate GitOps utility.
Let’s imagine that instead of slightly tweaking the load balancer values to be more optimal, the team makes an aggressive decision to deploy an entirely new load balancer type.
They feel the current load balancer is fundamentally flawed and want to try an alternative option.
The workflow is the same as the value tweak.
The team creates a pull request that introduces an entirely new load balancer configuration and deletes the old configuration.
It is approved and deployed through the pipeline.
Unfortunately the team finds that this new type of load balancer is incompatible with some other services within their cluster.
The new load balancer causes critical traffic failures and halts user operations.
Luckily because the team has a complete GitOps pipeline they can quickly undo these load balancer changes.
The team will make another pull request that reverts the repository back to the old known functional load balancer.
This again will be noted by the GitOps pipeline and automatically deployed.
It will rapidly improve the infrastructure and improves the reliability score of the team.
Summary
GitOps is an incredibly powerful workflow pattern for managing modern cloud infrastructure.
Though primarily focused on Kubernetes cluster management, the DevOps community is applying and publishing GitOps solutions to other non-Kubernetes systems.
GitOps can bring many benefits to an engineering team including improved communication, visibility, stability, and system reliability.
One of the core requirements for a GitOps experience is a modern hosted Git platform like Bitbucket.
Git cheat sheet
Use this handy git cheat sheet guide to enhance your workflow.
This Git cheat sheet saves you time when you just can't remember what a command is or don't want to use git help in the command line.
It is hard to memorize all the important Git commands by heart, so print this out or save it to your desktop to resort to when you get stuck.
We’ve included the basic Git commands to help you learn Git, and more advanced concepts around Git branches, remote repositories, undoing changes, and more.
Download nowDownload now
Setting up a repository
This tutorial provides an overview of how to set up a repository (repo) under Git version control.
This resource will walk you through initializing a Git repository for a new or existing project.
Included below are workflow examples of repositories both created locally and cloned from remote repositories.
This guide assumes a basic familiarity with a command-line interface.
The high level points this guide will cover are:
Initializing a new Git repo
Cloning an existing Git repo
Committing a modified version of a file to the repo
Configuring a Git repo for remote collaboration
Common Git version control commands
By the end of this module, you should be able to create a Git repo, use common Git commands, commit a modified file, view your project’s history and configure a connection to a Git hosting service (Bitbucket).
What is a Git repository?
A Git repository is a virtual storage of your project.
It allows you to save versions of your code, which you can access when needed.
Initializing a new repository: git init
To create a new repo, you'll use the git init command.
git init is a one-time command you use during the initial setup of a new repo.
Executing this command will create a new .git subdirectory in your current working directory.
This will also create a new main branch.
Versioning an existing project with a new git repository
This example assumes you already have an existing project folder that you would like to create a repo within.
You'll first cd to the root project folder and then execute the git init command.
cd /path/to/your/existing/code
git init
Pointing git init to an existing project directory will execute the same initialization setup as mentioned above, but scoped to that project directory.
git init <project directory>
Visit the git init page for a more detailed resource on git init.
Cloning an existing repository: git clone
If a project has already been set up in a central repository, the clone command is the most common way for users to obtain a local development clone.
Like git init, cloning is generally a one-time operation.
Once a developer has obtained a working copy, all version control operations are managed through their local repository.
git clone <repo url>git clone is used to create a copy or clone of remote repositories.
You pass git clone a repository URL.
Git supports a few different network protocols and corresponding URL formats.
In this example, we'll be using the Git SSH protocol.
Git SSH URLs follow a template of: git@HOSTNAME:USERNAME/REPONAME.git
An example Git SSH URL would be: git@bitbucket.org:rhyolight/javascript-data-store.git where the template values match:
HOSTNAME: bitbucket.orgUSERNAME: rhyolightREPONAME: javascript-data-store
When executed, the latest version of the remote repo files on the main branch will be pulled down and added to a new folder.
The new folder will be named after the REPONAME in this case javascript-data-store.
The folder will contain the full history of the remote repository and a newly created main branch.
For more documentation on git clone usage and supported Git URL formats, visit the git clone Page.
Saving changes to the repository: git add and git commit
Now that you have a repository cloned or initialized, you can commit file version changes to it.
The following example assumes you have set up a project at /path/to/project.
The steps being taken in this example are:
Change directories to /path/to/project
Create a new file CommitTest.txt with contents ~"test content for git tutorial"~
git add CommitTest.txt to the repository staging area
Create a new commit with a message describing what work was done in the commit
cd /path/to/project
echo "test content for git tutorial" >> CommitTest.txt
git add CommitTest.txt
git commit -m "added CommitTest.txt to the repo"
After executing this example, your repo will now have CommitTest.txt added to the history and will track future updates to the file.
This example introduced two additional git commands: add and commit.
This was a very limited example, but both commands are covered more in depth on the git add and git commit pages.
Another common use case for git add is the --all option.
Executing git add --all will take any changed and untracked files in the repo and add them to the repo and update the repo's working tree.
Repo-to-repo collaboration: git push
It’s important to understand that Git’s idea of a “working copy” is very different from the working copy you get by checking out source code from an SVN repository.
Unlike SVN, Git makes no distinction between the working copies and the central repository—they're all full-fledged Git repositories.
This makes collaborating with Git fundamentally different than with SVN.
Whereas SVN depends on the relationship between the central repository and the working copy, Git’s collaboration model is based on repository-to-repository interaction.
Instead of checking a working copy into SVN’s central repository, you push or pull commits from one repository to another.
Of course, there’s nothing stopping you from giving certain Git repos special meaning.
For example, by simply designating one Git repo as the “central” repository, it’s possible to replicate a centralized workflow using Git.
This is accomplished through conventions rather than being hardwired into the VCS itself.
Bare vs. cloned repositories
If you used git clone in the previous "Initializing a new Repository" section to set up your local repository, your repository is already configured for remote collaboration.
git clone will automatically configure your repo with a remote pointed to the Git URL you cloned it from.
This means that once you make changes to a file and commit them, you can git push those changes to the remote repository.
If you used git init to make a fresh repo, you'll have no remote repo to push changes to.
A common pattern when initializing a new repo is to go to a hosted Git service like Bitbucket and create a repo there.
The service will provide a Git URL that you can then add to your local Git repository and git push to the hosted repo.
Once you have created a remote repo with your service of choice you will need to update your local repo with a mapping.
We discuss this process in the Configuration & Set Up guide below.
If you prefer to host your own remote repo, you'll need to set up a "Bare Repository." Both git init and git clone accept a --bare argument.
The most common use case for bare repo is to create a remote central Git repository
Configuration & set up: git config
Once you have a remote repo setup, you will need to add a remote repo url to your local git config, and set an upstream branch for your local branches.
The git remote command offers such utility.
git remote add <remote_name> <remote_repo_url>
This command will map remote repository at to a ref in your local repo under .
Once you have mapped the remote repo you can push local branches to it.
git push -u <remote_name> <local_branch_name>
This command will push the local repo branch under < local_branch_name > to the remote repo at < remote_name >.
For more in-depth look at git remote, see the Git remote page.
In addition to configuring a remote repo URL, you may also need to set global Git configuration options such as username, or email.
The git config command lets you configure your Git installation (or an individual repository) from the command line.
This command can define everything from user info, to preferences, to the behavior of a repository.
Several common configuration options are listed below.
Git stores configuration options in three separate files, which lets you scope options to individual repositories (local), user (Global), or the entire system (system):
Local: /.git/config – Repository-specific settings.
Global: /.gitconfig – User-specific settings.
This is where options set with the --global flag are stored.
System: $(prefix)/etc/gitconfig – System-wide settings.
Define the author name to be used for all commits in the current repository.
Typically, you’ll want to use the --global flag to set configuration options for the current user.
git config --global user.name <name>
Define the author name to be used for all commits by the current user.
Adding the --local option or not passing a config level option at all, will set the user.name for the current local repository.
git config --local user.email <email>
Define the author email to be used for all commits by the current user.
git config --global alias.<alias-name> <git-command>
Create a shortcut for a Git command.
This is a powerful utility to create custom shortcuts for commonly used git commands.
A simplistic example would be:
git config --global alias.ci commit
This creates a ci command that you can execute as a shortcut to git commit.
To learn more about git aliases visit the git config page.
git config --system core.editor <editor>
Define the text editor used by commands like git commit for all users on the current machine.
The < editor > argument should be the command that launches the desired editor (e.g., vi).
This example introduces the --system option.
The --system option will set the configuration for the entire system, meaning all users and repos on a machine.
For more detailed information on configuration levels visit the git config page.
git config --global --edit
Open the global configuration file in a text editor for manual editing.
An in-depth guide on how to configure a text editor for git to use can be found on the Git config page.
Discussion
All configuration options are stored in plaintext files, so the git config command is really just a convenient command-line interface.
Typically, you’ll only need to configure a Git installation the first time you start working on a new development machine, and for virtually all cases, you'll want to use the --global flag.
One important exception is to override the author email address.
You may wish to set your personal email address for personal and open source repositories, and your professional email address for work-related repositories.
Git stores configuration options in three separate files, which lets you scope options to individual repositories, users, or the entire system:
/.git/config – Repository-specific settings.
~/.gitconfig – User-specific settings.
This is where options set with the --global flag are stored.
$(prefix)/etc/gitconfig – System-wide settings.
When options in these files conflict, local settings override user settings, which override system-wide.
If you open any of these files, you’ll see something like the following:
[user] name = John Smith email = john@example.com [alias] st = status co = checkout br = branch up = rebase ci = commit [core] editor = vim
You can manually edit these values to the exact same effect as git config.
Example
The first thing you’ll want to do after installing Git is tell it your name/email and customize some of the default settings.
A typical initial configuration might look something like the following:
Tell Git who you are git configgit --global user.name "John Smith" git config --global user.email john@example.com
Select your favorite text editor
git config --global core.editor vim
Add some SVN-like aliases
git config --global alias.st status
git config --global alias.co checkout
git config --global alias.br branch
git config --global alias.up rebase
git config --global alias.ci commit
This will produce the ~ /.gitconfig file from the previous section.
Take a more in-depth look at git config on the git config page.
This page will explore the git init command in depth.
By the end of this page you will be informed on the core functionality and extended feature set of git init.
This exploration includes:
git init options and usage
.git directory overview
custom git init directory environment values
git init vs. git clonegit init bare repositories
git init templates
The git init command creates a new Git repository.
It can be used to convert an existing, unversioned project to a Git repository or initialize a new, empty repository.
Most other Git commands are not available outside of an initialized repository, so this is usually the first command you'll run in a new project.
Executing git init creates a .git subdirectory in the current working directory, which contains all of the necessary Git metadata for the new repository.
This metadata includes subdirectories for objects, refs, and template files.
A HEAD file is also created which points to the currently checked out commit.
Aside from the .git directory, in the root directory of the project, an existing project remains unaltered (unlike SVN, Git doesn't require a .git subdirectory in every subdirectory).
By default, git init will initialize the Git configuration to the .git subdirectory path.
The subdirectory path can be modified and customized if you would like it to live elsewhere.
You can set the $GIT_DIR environment variable to a custom path and git init will initialize the Git configuration files there.
Additionally you can pass the --separate-git-dir argument for the same result.
A common use case for a separate .git subdirectory is to keep your system configuration "dotfiles" (.bashrc, .vimrc, etc.) in the home directory while keeping the .git folder elsewhere.
Usage
Compared to SVN, the git init command is an incredibly easy way to create new version-controlled projects.
Git doesn’t require you to create a repository, import files, and check out a working copy.
Additionally, Git does not require any pre-existing server or admin privileges.
All you have to do is cd into your project subdirectory and run git init, and you'll have a fully functional Git repository.
git init
Transform the current directory into a Git repository.
This adds a .git subdirectory to the current directory and makes it possible to start recording revisions of the project.
git init <directory>
Create an empty Git repository in the specified directory.
Running this command will create a new subdirectory called containing nothing but the .git subdirectory.
If you've already run git init on a project directory and it contains a .git subdirectory, you can safely run git init again on the same project directory.
It will not override an existing .git configuration.
git init vs. git clone
A quick note: git init and git clone can be easily confused.
At a high level, they can both be used to "initialize a new git repository." However, git clone is dependent on git init.
git clone is used to create a copy of an existing repository.
Internally, git clone first calls git init to create a new repository.
It then copies the data from the existing repository, and checks out a new set of working files.
Learn more on the git clone page.
Bare repositories --- git init --bare
git init --bare <directory>
Initialize an empty Git repository, but omit the working directory.
Shared repositories should always be created with the --bare flag (see discussion below).
Conventionally, repositories initialized with the --bare flag end in .git.
For example, the bare version of a repository called my-project should be stored in a directory called my-project.git.
The --bare flag creates a repository that doesn’t have a working directory, making it impossible to edit files and commit changes in that repository.
You would create a bare repository to git push and git pull from, but never directly commit to it.
Central repositories should always be created as bare repositories because pushing branches to a non-bare repository has the potential to overwrite changes.
Think of --bare as a way to mark a repository as a storage facility, as opposed to a development environment.
This means that for virtually all Git workflows, the central repository is bare, and developers local repositories are non-bare.
The most common use case for git init --bare is to create a remote central repository:
ssh <user>@<host> cd path/above/repo git init --bare my-project.git
First, you SSH into the server that will contain your central repository.
Then, you navigate to wherever you’d like to store the project.
Finally, you use the --bare flag to create a central storage repository.
Developers would then clone my-project.git to create a local copy on their development machine.
git init templates
git init <directory> --template=<template_directory>
Initializes a new Git repository and copies files from the into the repository.
Templates allow you to initialize a new repository with a predefined .git subdirectory.
You can configure a template to have default directories and files that will get copied to a new repository's .git subdirectory.
The default Git templates usually reside in a `/usr/share/git-core/templates` directory but may be a different path on your machine.
The default templates are a good reference and example of how to utilize template features.
A powerful feature of templates that's exhibited in the default templates is Git Hook configuration.
You can create a template with predefined Git hooks and initialize your new git repositories with common hooks ready to go.
Learn more about Git Hooks at the Git Hook page.
Configuration
All configurations of git init take a argument.
If you provide the , the command is run inside it.
If this directory does not exist, it will be created.
In addition to the options and configuration already discussed, Git init has a few other command line options.
A full list of them follows:
-Q--QUIET
Only prints "critical level" messages, Errors, and Warnings.
All other output is silenced.
--BARE
Creates a bare repository.
(See the "Bare Repositories" section above.)
--TEMPLATE=
Specifies the directory from which templates will be used.
(See the "Git Init Templates" section above.)
--SEPARATE-GIT-DIR=
Creates a text file containing the path to .
This file acts as a link to the .git directory.
This is useful if you would like to store your .git directory on a separate location or drive from your project's working files.
Some common use cases for --separate-git-dir are:
To keep your system configuration "dotfiles" (.bashrc, .vimrc, etc.) in the home directory while keeping the .git folder elsewhere
Your Git history has grown very large in disk size and you need to move it elsewhere to a separate high-capacity drive
You want to have a Git project in a publicly accessible directory like `www:root`
You can call git init --separate-git-dir on an existing repository and the .git dir will be moved to the specified path.
--SHARED[=(FALSE|TRUE|UMASK|GROUP|ALL|WORLD|EVERYBODY|0XXX)]
Set access permissions for the new repository.
This specifies which users and groups using Unix-level permissions are allowed to push/pull to the repository.
Examples
Create a new git repository for an existing code base
Here we'll examine the git clone command in depth.
git clone is a Git command line utility which is used to target an existing repository and create a clone, or copy of the target repository.
In this page we'll discuss extended configuration options and common use cases of git clone.
Some points we'll cover here are:
Cloning a local or remote repository
Cloning a bare repository
Using shallow options to partially clone repositories
Git URL syntax and supported protocols
On the setting up a repository guide, we covered a basic use case of git clone.
This page will explore more complex cloning and configuration scenarios.
Purpose: repo-to-repo collaboration development copy
If a project has already been set up in a central repository, the git clone command is the most common way for users to obtain a development copy.
Like git init, cloning is generally a one-time operation.
Once a developer has obtained a working copy, all version control operations and collaborations are managed through their local repository.
Repo-to-repo collaboration
It’s important to understand that Git’s idea of a “working copy” is very different from the working copy you get by checking out code from an SVN repository.
Unlike SVN, Git makes no distinction between the working copy and the central repository—they're all full-fledged Git repositories.
This makes collaborating with Git fundamentally different than with SVN.
Whereas SVN depends on the relationship between the central repository and the working copy, Git’s collaboration model is based on repository-to-repository interaction.
Instead of checking a working copy into SVN’s central repository, you push or pull commits from one repository to another.
Of course, there’s nothing stopping you from giving certain Git repos special meaning.
For example, by simply designating one Git repo as the “central” repository, it’s possible to replicate a centralized workflow using Git.
The point is, this is accomplished through conventions rather than being hardwired into the VCS itself.
Usage
git clone is primarily used to point to an existing repo and make a clone or copy of that repo at in a new directory, at another location.
The original repository can be located on the local filesystem or on remote machine accessible supported protocols.
The git clone command copies an existing Git repository.
This is sort of like SVN checkout, except the “working copy” is a full-fledged Git repository—it has its own history, manages its own files, and is a completely isolated environment from the original repository.
As a convenience, cloning automatically creates a remote connection called "origin" pointing back to the original repository.
This makes it very easy to interact with a central repository.
This automatic connection is established by creating Git refs to the remote branch heads under refs/remotes/origin and by initializing remote.origin.url and remote.origin.fetch configuration variables.
An example demonstrating using git clone can be found on the setting up a repository guide.
The example below demonstrates how to obtain a local copy of a central repository stored on a server accessible at example.com using the SSH username john:
git clone ssh://john@example.com/path/to/my-project.git
cd my-project
# Start working on the project
The first command initializes a new Git repository in the my-project folder on your local machine and populates it with the contents of the central repository.
Then, you can cd into the project and start editing files, committing snapshots, and interacting with other repositories.
Also note that the .git extension is omitted from the cloned repository.
This reflects the non-bare status of the local copy.
Cloning to a specific folder
git clone <repo> <directory>
Clone the repository located at <repo> into the folder called ~<directory>! on the local machine.
Cloning a specific tag
git clone --branch <tag> <repo>
Clone the repository located at <repo> and only clone the ref for <tag>.
Shallow clone
git clone -depth=1 <repo>
Clone the repository located at <repo> and only clone the
history of commits specified by the option depth=1.
In this example a clone of <repo> is made and only the most recent commit is included in the new cloned Repo.
Shallow cloning is most useful when working with repos that have an extensive commit history.
An extensive commit history may cause scaling problems such as disk space usage limits and long wait times when cloning.
A Shallow clone can help alleviate these scaling issues.
Configuration options
git clone -branch
The -branch argument lets you specify a specific branch to clone instead of the branch the remote HEAD is pointing to, usually the main branch.
In addition you can pass a tag instead of branch for the same effect.
git clone -branch new_feature git://remoterepository.git
This above example would clone only the new_feature branch from the remote Git repository.
This is purely a convenience utility to save you time from downloading the HEAD ref of the repository and then having to additionally fetch the ref you need.
git clone -mirror vs. git clone -bare
git clone --bare
Similar to git init --bare, when the -bare argument is passed to git clone, a copy of the remote repository will be made with an omitted working directory.
This means that a repository will be set up with the history of the project that can be pushed and pulled from, but cannot be edited directly.
In addition, no remote branches for the repo will be configured with the -bare repository.
Like git init --bare, this is used to create a hosted repository that developers will not edit directly.
git clone --mirror
Passing the --mirror argument implicitly passes the --bare argument as well.
This means the behavior of --bare is inherited by --mirror.
Resulting in a bare repo with no editable working files.
In addition, --mirror will clone all the extended refs of the remote repository, and maintain remote branch tracking configuration.
You can then run git remote update on the mirror and it will overwrite all refs from the origin repo.
Giving you exact 'mirrored' functionality.
Other configuration options
For a comprehensive list of other git clone options visit the official Git documentation.
In this document, we'll touch on some other common options.
git clone --template
git clone --template=<template_directory> <repo location>
Clones the repo at <repo location> and applies the template from <template directory> to the newly created local branch.
A thorough refrence on Git templates can be found on our git init page.
Git URLs
Git has its own URL syntax which is used to pass remote repository locations to Git commands.
Because git clone is most commonly used on remote repositories we will examine Git URL syntax here.
Git URL protocols
-SSH
Secure Shell (SSH) is a ubiquitous authenticated network protocol that is commonly configured by default on most servers.
Because SSH is an authenticated protocol, you'll need to establish credentials with the hosting server before connecting.
ssh://[user@]host.xz[:port]/path/to/repo.git/- GIT
A protocol unique to git.
Git comes with a daemon that runs on port (9418).
The protocol is similar to SSH however it has NO AUTHENTICATION.
git://host.xz[:port]/path/to/repo.git/- HTTP
Hyper text transfer protocol.
The protocol of the web, most commonly used for transferring web page HTML data over the Internet.
Git can be configured to communicate over HTTP http[s]://host.xz[:port]/path/to/repo.git/
Summary
In this document we took a deep look at git clone.
The most important takeaways are:
1. git clone is used to create a copy of a target repo
2. The target repo can be local or remote
3. Git supports a few network protocols to connect to remote repos
4. There are many different configuration options available that change the content of the clone
For further, deeper reference on git clone functionality, consult the official Git documentation.
We also cover practical examples of git clone in our setting up a repository guide.
git config
In this document, we'll take an in-depth look at the git config command.
We briefly discussed git config usage on our Setting up a Repository page.
The git config command is a convenience function that is used to set Git configuration values on a global or local project level.
These configuration levels correspond to .gitconfig text files.
Executing git config will modify a configuration text file.
We'll be covering common configuration settings like email, username, and editor.
We'll discuss Git aliases, which allow you to create shortcuts for frequently used Git operations.
Becoming familiar with git config and the various Git configuration settings will help you create a powerful, customized Git workflow.
Usage
The most basic use case for git config is to invoke it with a configuration name, which will display the set value at that name.
Configuration names are dot delimited strings composed of a 'section' and a 'key' based on their hierarchy.
For example: user.emailgit config user.email
In this example, email is a child property of the user configuration block.
This will return the configured email address, if any, that Git will associate with locally created commits.
git config levels and files
Before we further discuss git config usage, let's take a moment to cover configuration levels.
The git config command can accept arguments to specify which configuration level to operate on.
The following configuration levels are available:
--local
By default, git config will write to a local level if no configuration option is passed.
Local level configuration is applied to the context repository git config gets invoked in.
Local configuration values are stored in a file that can be found in the repo's .git directory: .git/config--global
Global level configuration is user-specific, meaning it is applied to an operating system user.
Global configuration values are stored in a file that is located in a user's home directory.
~ /.gitconfig on unix systems and C:\Users\\.gitconfig on windows
--system
System-level configuration is applied across an entire machine.
This covers all users on an operating system and all repos.
The system level configuration file lives in a gitconfig file off the system root path.
$(prefix)/etc/gitconfig on unix systems.
On windows this file can be found at C:\Documents and Settings\All Users\Application Data\Git\config on Windows XP, and in C:\ProgramData\Git\config on Windows Vista and newer.
Thus the order of priority for configuration levels is: local, global, system.
This means when looking for a configuration value, Git will start at the local level and bubble up to the system level.
Writing a value
Expanding on what we already know about git config, let's look at an example in which we write a value:
git config --global user.email "your_email@example.com"
This example writes the value your_email@example.com to the configuration name user.email.
It uses the --global flag so this value is set for the current operating system user.
git config editor - core.editor
Many Git commands will launch a text editor to prompt for further input.
One of the most common use cases for git config is configuring which editor Git should use.
Listed below is a table of popular editors and matching git config commands:
~ git config --global core.editor "'c:/program files/sublime text 3/sublimetext.exe' -w"~
Textmate
~ git config --global core.editor "mate -w"~
Merge tools
In the event of a merge conflict, Git will launch a "merge tool." By default, Git uses an internal implementation of the common Unix diff program.
The internal Git diff is a minimal merge conflict viewer.
There are many external third party merge conflict resolutions that can be used instead.
For an overview of various merge tools and configuration, see our guide on tips and tools to resolve conflits with Git.
git config --global merge.tool kdiff3
Colored outputs
Git supports colored terminal output which helps with rapidly reading Git output.
You can customize your Git output to use a personalized color theme.
The git config command is used to set these color values.
color.ui
This is the master variable for Git colors.
Setting it to false will disable all Git's colored terminal output.
$ git config --global color.ui false
By default, color.ui is set to auto which will apply colors to the immediate terminal output stream.
The auto setting will omit color code output if the output stream is redirected to a file or piped to another process.
You can set the color.ui value to always which will also apply color code output when redirecting the output stream to files or pipes.
This can unintentionally cause problems since the receiving pipe may not be expecting color-coded input.
Git color values
In addition to color.ui, there are many other granular color settings.
Like color.ui, these color settings can all be set to false, auto, or always.
These color settings can also have a specific color value set.
Some examples of supported color values are:
normal
black
red
green
yellow
blue
magenta
cyan
white
Colors may also be specified as hexadecimal color codes like #ff0000, or ANSI 256 color values if your terminal supports it.
Git color configuration settings
1. color.branch
Configures the output color of the Git branch command
2. color.branch.<slot>
This value is also applicable to Git branch output.
<slot> is one of the following:
1. current: the current branch
2. local: a local branch
3. remote: a remote branch ref in refs/remotes
4. upstream: an upstream tracking branch
5. plain: any other ref
3. color.diff
Applies colors to git diff, git log, and git show output
4. color.diff.<slot>
Configuring a <slot> value under color.diff tells git which part of the patch to use a specific color on.
1. context: The context text of the diff.
Git context is the lines of text content shown in a diff or patch that highlights changes.
2. plain: a synonym for context
3. meta: applies color to the meta information of the diff
4. frag: applies color to the "hunk header" or "function in hunk header"
5. old: applies a color to the removed lines in the diff
6. new: colors the added lines of the diff
7. commit: colors commit headers within the diff
8. whitespace: sets a color for any whitespace errors in a diff
5. color.decorate.<slot>
Customize the color for git log --decorate output.
The supported <slot> values are: branch, remoteBranch, tag, stash, or HEAD.
They are respectively applicable to local branches, remote-tracking branches, tags, stashed changes and HEAD.
6. color.grep
Applies color to the output of git grep.
7. color.grep. <slot>
Also applicable to git grep.
The <slot> variable specifies which part of the grep output to apply color.
1. context: non-matching text in context lines
2. filename: filename prefix
3. function: function name lines
4. linenumber: line number prefix
5. match: matching text
6. matchContext: matching text in context lines
7. matchSelected: matching text in selected lines
8. selected: non-matching text in selected lines
9. separator: separators between fields on a line (:, -, and =) and between hunks (--)
8. color.interactive
This variable applies color for interactive prompts and displays.
Examples are git add --interactive and git clean --interactive
9. color.interactive.<slot>
The <slot> variable can be specified to target more specific "interactive output".
The available <slot> values are: prompt, header, help, error; and each act on the corresponding interactive output.
10. color.pager
Enables or disables colored output when the pager is in use
11. color.showBranch
Enables or disables color output for the git show branch command
12.

color.status
A boolean value that enables or disables color output for Git status
13.
color.status.<slot>
Used to specify custom color for specified git status elements.
<slot> supports the following values:
1. header
Targets the header text of the status area
2. added or updated
Both target files which are added but not committed
3.
changed
Targets files that are modified but not added to the git index
4. untracked
Targets files which are not tracked by Git
5. branch
Applies color to the current branch
6. nobranch
The color the "no branch" warning is shown in
7. unmerged
Colors files which have unmerged changes
Aliases
You may be familiar with the concept of aliases from your operating system command-line; if not, they're custom shortcuts that define which command will expand to longer or combined commands.
Aliases save you the time and energy cost of typing frequently used commands.
Git provides its own alias system.
A common use case for Git aliases is shortening the commit command.
Git aliases are stored in Git configuration files.
This means you can use the git config command to configure aliases.
git config --global alias.ci commit
This example creates a ci alias for the git commit command.
You can then invoke git commit by executing git ci.
Aliases can also reference other aliases to create powerful combos.
git config --global alias.amend ci --amend
This example creates an alias amend which composes the ci alias into a new alias that uses --amend flag.
Formatting & whitespace
Git has several "whitespace" features that can be configured to highlight whitespace issues when using git diff.
The whitespace issues will be highlighted using the configured color color.diff.whitespace
The following features are enabled by default:
blank-at-eol highlights orphan whitespaces at the line endings
space-before-tab highlights a space character that appears before a tab character when indenting a line
blank-at-eof highlights blank lines inserted at the end of a file
The following features are disabled by default
indent-with-non-tab highlights a line that is indented with spaces instead of tabs
tab-in-indent highlights an initial tab indent as an error
trailing-space is shorthand for both blank-at-eol and blank-at-eof
cr-at-eol highlights a carriage-return at the line endings
tabwidth= defines how many character positions a tab occupies.
The default value is 8.
Allowed values are 1-63
Summary
In this article, we covered the use of the git config command.
We discussed how the command is a convince method for editing raw git config files on the filesystem.
We looked at basic read and write operations for configuration options.
We took a look at common config patterns:
How to configure the Git editor
How to override configuration levels
How to reset configuration defaults
How to customize git colors
Overall, git config is a helper tool that provides a shortcut to editing raw git config files on disk.
We covered in depth personal customization options.
Basic knowledge of git configuration options is a prerequisite for setting up a repository.
See our guide there for a demonstration of the basics.
Git Alias
This section will focus on Git aliases.
To better understand the value of Git aliases we must first discuss what an alias is.
The term alias is synonymous with a shortcut.
Alias creation is a common pattern found in other popular utilities like `bash` shell.
Aliases are used to create shorter commands that map to longer commands.
Aliases enable more efficient workflows by requiring fewer keystrokes to execute a command.
For a brief example, consider the git checkout command.
The checkout command is a frequently used git command, which adds up in cumulative keystrokes over time.
An alias can be created that maps git co to git checkout, which saves precious human fingertip power by allowing the shorter keystroke form: git co to be typed instead.
Git Alias Overview
It is important to note that there is no direct git alias command.
Aliases are created through the use of the git config command and the Git configuration files.
As with other configuration values, aliases can be created in a local or global scope.
To better understand Git aliases let us create some examples.
$ git config --global alias.co checkout
$ git config --global alias.br branch
$ git config --global alias.ci commit

$ git config --global alias.st status
The previous code example creates globally stored shortcuts for common git commands.
Creating the aliases will not modify the source commands.
So git checkout will still be available even though we now have the git co alias.
These aliases were created with the --global flag which means they will be stored in Git's global operating system level configuration file.
On linux systems, the global config file is located in the User home directory at /.gitconfig.
    [alias]
    co = checkout

        br = branch
        ci = commit
        st = status
This demonstrates that the aliases are now equivalent to the source commands.
Usage
Git aliasing is enabled through the use of git config, For command-line option and usage examples please review the git configdocumentation.
Examples
Using aliases to create new Git commands
A common Git pattern is to remove recently added files from the staging area.
This is achieved by leveraging options to the git reset command.
A new alias can be created to encapsulate this behavior and create a new alias-command-keyword which is easy to remember:
git config --global alias.unstage 'reset HEAD --'
The preceding code example creates a new alias unstage.
This now enables the invocation of git unstage.
git unstage which will perform a reset on the staging area.
This makes the following two commands equivalent.
git unstage fileA
$ git reset HEAD -- fileA
Discussion
How do I create Git Aliases?
Aliases can be created through two primary methods:
Directly editing Git config files
The global or local config files can be manually edited and saved to create aliases.
The global config file lives at $HOME/.gitconfig file path.
The local path lives within an active git repository at /.git/config
The config files will respect an [alias] section that looks like:
[alias]

co = checkout
This means that co is a shortcut for checkout
Using the git config to create aliases
As previously demonstrated the git config command is a convenient utility to quickly create aliases.
The git config command is actually a helper utility for writing to the global and local Git config files.
git config --global alias.co checkout
Invoking this command will update the underlying global config file just as it had been edited in our previous example.
Git Alias Summary
Git aliases are a powerful workflow tool that create shortcuts to frequently used Git commands.
Using Git aliases will make you a faster and more efficient developer.
Aliases can be used to wrap a sequence of Git commands into new faux Git command.
Git aliases are created through the use of the git config command which essentially modifies local or global Git config files.
Learn more on the git config page.
Saving changes
When working in Git, or other version control systems, the concept of "saving" is a more nuanced process than saving in a word processor or other traditional file editing applications.
The traditional software expression of "saving" is synonymous with the Git term "committing".
A commit is the Git equivalent of a "save".
Traditional saving should be thought of as a file system operation that is used to overwrite an existing file or write a new file.
Alternatively, Git committing is an operation that acts upon a collection of files and directories.
Saving changes in Git vs SVN is also a different process.
SVN Commits or 'check-ins' are operations that make a remote push to a centralized server.
This means an SVN commit needs Internet access in order to fully 'save' project changes.
Git commits can be captured and built up locally, then pushed to a remote server as needed using the git push -u origin main command.
The difference between the two methods is a fundamental difference between architecture designs.
Git is a distributed application model whereas SVN is a centralized model.
Distributed applications are generally more robust as they do not have a single point of failure like a centralized server.
Git has an additional saving mechanism called 'the stash'.
The stash is an ephemeral storage area for changes that are not ready to be committed.
The stash operates on the working directory, the first of the three trees and has extensive usage options.
To learn more visit the git stash page.
A Git repository can be configured to ignore specific files or directories.
This will prevent Git from saving changes to any ignored content.
Git has multiple methods of configuration that manage the ignore list.
Git ignore configure is discussed in further detail on the git ignore page.
git add
The git add command adds a change in the working directory to the staging area.
It tells Git that you want to include updates to a particular file in the next commit.
However, git add doesn't really affect the repository in any significant way—changes are not actually recorded until you run git commit.
In conjunction with these commands, you'll also need git status to view the state of the working directory and the staging area.
How it works
The git add and git commit commands compose the fundamental Git workflow.
These are the two commands that every Git user needs to understand, regardless of their team’s collaboration model.
They are the means to record versions of a project into the repository’s history.
Developing a project revolves around the basic edit/stage/commit pattern.
First, you edit your files in the working directory.
When you’re ready to save a copy of the current state of the project, you stage changes with git add.
After you’re happy with the staged snapshot, you commit it to the project history with git commit.
The git reset command is used to undo a commit or staged snapshot.
In addition to git add and git commit, a third command git push is essential for a complete collaborative Git workflow.
git push is utilized to send the committed changes to remote repositories for collaboration.
This enables other team members to access a set of saved changes.
The git add command should not be confused with svn add, which adds a file to the repository.
Instead, git add works on the more abstract level of changes.
This means that git add needs to be called every time you alter a file, whereas svn add only needs to be called once for each file.
It may sound redundant, but this workflow makes it much easier to keep a project organized.
The staging area
The primary function of the git add command, is to promote pending changes in the working directory, to the git staging area.
The staging area is one of Git's more unique features, and it can take some time to wrap your head around it if you’re coming from an SVN (or even a Mercurial) background.
It helps to think of it as a buffer between the working directory and the project history.
The staging area is considered one of the "three trees" of Git, along with, the working directory, and the commit history.
Instead of committing all of the changes you've made since the last commit, the stage lets you group related changes into highly focused snapshots before actually committing it to the project history.
This means you can make all sorts of edits to unrelated files, then go back and split them up into logical commits by adding related changes to the stage and commit them piece-by-piece.
As in any revision control system, it’s important to create atomic commits so that it’s easy to track down bugs and revert changes with minimal impact on the rest of the project.
Common options
git add <file>
Stage all changes in <file> for the next commit.
git add <directory>
Stage all changes in <directory> for the next commit.
git add -p
Begin an interactive staging session that lets you choose portions of a file to add to the next commit.
This will present you with a chunk of changes and prompt you for a command.
Use y to stage the chunk, n to ignore the chunk, s to split it into smaller chunks, e to manually edit the chunk, and q to exit.
Examples
When you’re starting a new project, git add serves the same function as svn import.
To create an initial commit of the current directory, use the following two commands:
git add .
git commit
Once you’ve got your project up-and-running, new files can be added by passing the path to git add:
git add hello.py

git commit
The above commands can also be used to record changes to existing files.
Again, Git doesn’t differentiate between staging changes in new files vs. changes in files that have already been added to the repository.
Summary
In review, git add is the first command in a chain of operations that directs Git to "save" a snapshot of the current project state, into the commit history.
When used on its own, git add will promote pending changes from the working directory to the staging area.
The git status command is used to examine the current state of the repository and can be used to confirm a git add promotion.
The git reset command is used to undo a git add.
The git commit command is then used to Commit a snapshot of the staging directory to the repositories commit history.
Git commit
The git commit command captures a snapshot of the project's currently staged changes.
Committed snapshots can be thought of as “safe” versions of a project—Git will never change them unless you explicitly ask it to.
Prior to the execution of git commit, The git add command is used to promote or 'stage' changes to the project that will be stored in a commit.
These two commands git commit and git add are two of the most frequently used.
Git commit vs SVN commit
While they share the same name, git commit is nothing like svn commit.
This shared term can be a point of confusion for Git newcomers who have a svn background, and it is important to emphasize the difference.
To compare git commit vs svn commit is to compare a centralized application model (svn) vs a distributed application model (Git).
In SVN, a commit pushes changes from the local SVN client, to a remote centralized shared SVN repository.
In Git, repositories are distributed, Snapshots are committed to the local repository, and this requires absolutely no interaction with other Git repositories.
Git commits can later be pushed to arbitrary remote repositories.
How it works
At a high-level, Git can be thought of as a timeline management utility.
Commits are the core building block units of a Git project timeline.
Commits can be thought of as snapshots or milestones along the timeline of a Git project.
Commits are created with the git commit command to capture the state of a project at that point in time.
Git Snapshots are always committed to the local repository.
This is fundamentally different from SVN, wherein the working copy is committed to the central repository.
In contrast, Git doesn’t force you to interact with the central repository until you’re ready.
Just as the staging area is a buffer between the working directory and the project history, each developer’s local repository is a buffer between their contributions and the central repository.
This changes the basic development model for Git users.
Instead of making a change and committing it directly to the central repo, Git developers have the opportunity to accumulate commits in their local repo.
This has many advantages over SVN-style collaboration: it makes it easier to split up a feature into atomic commits, keep related commits grouped together, and clean up local history before publishing it to the central repository.
It also lets developers work in an isolated environment, deferring integration until they’re at a convenient point to merge with other users.
While isolation and deferred integration are individually beneficial, it is in a team's best interest to integrate frequently and in small units.
For more information regarding best practices for Git team collaboration read how teams structure their Git workflow.
Snapshots, not differences
Aside from the practical distinctions between SVN and Git, their underlying implementation also follows entirely divergent design philosophies.
Whereas SVN tracks differences of a file, Git’s version control model is based on snapshots.
For example, a SVN commit consists of a diff compared to the original file added to the repository.
Git, on the other hand, records the entire contents of each file in every commit.
This makes many Git operations much faster than SVN, since a particular version of a file doesn’t have to be “assembled” from its diffs—the complete revision of each file is immediately available from Git's internal database.
Git's snapshot model has a far-reaching impact on virtually every aspect of its version control model, affecting everything from its branching and merging tools to its collaboration work-flows.
Common options
git commit
Commit the staged snapshot.
This will launch a text editor prompting you for a commit message.
After you’ve entered a message, save the file and close the editor to create the actual commit.
git commit -a
Commit a snapshot of all changes in the working directory.
This only includes modifications to tracked files (those that have been added with git add at some point in their history).
git commit -m "commit message"
A shortcut command that immediately creates a commit with a passed commit message.
By default, git commit will open up the locally configured text editor, and prompt for a commit message to be entered.
Passing the -m option will forgo the text editor prompt in-favor of an inline message.
git commit -am "commit message"
A power user shortcut command that combines the -a and -m options.
This combination immediately creates a commit of all the staged changes and takes an inline commit message.
git commit --amend
This option adds another level of functionality to the commit command.
Passing this option will modify the last commit.
Instead of creating a new commit, staged changes will be added to the previous commit.
This command will open up the system's configured text editor and prompt to change the previously specified commit message.
Examples
Saving changes with a commit
The following example assumes you’ve edited some content in a file called hello.py on the current branch, and are ready to commit it to the project history.
First, you need to stage the file with git add, then you can commit the staged snapshot.
git add hello.py
This command will add hello.py to the Git staging area.
We can examine the result of this action by using the git status command.
git status
On branch main

Changes to be committed:
(use "git reset HEAD <file>..." to unstage)
 new file: hello.py
The green output new file: hello.py indicates that hello.py will be saved with the next commit.
From the commit is created by executing:
git commit
This will open a text editor (customizable via git config) asking for a commit log message, along with a list of what’s being committed:
# Please enter the commit message for your changes.

Lines starting
# with '#' will be ignored, and an empty message aborts the commit.
# On branch main
# Changes to be committed:

# (use "git reset HEAD ..." to unstage)
#
#modified: hello.py
Git doesn't require commit messages to follow any specific formatting constraints, but the canonical format is to summarize the entire commit on the first line in less than 50 characters, leave a blank line, then a detailed explanation of what’s been changed.
For example:
Change the message displayed by hello.py
- Update the sayHello() function to output the user's name
- Change the sayGoodbye() function to a friendlier message
It is a common practice to use the first line of the commit message as a subject line, similar to an email.
The rest of the log message is considered the body and used to communicate details of the commit change set.
Note that many developers also like to use the present tense in their commit messages.
This makes them read more like actions on the repository, which makes many of the history-rewriting operations more intuitive.
How to update (amend) a commit
To continue with the hello.py example above.
Let's make further updates to hello.py and execute the following:
git add hello.py

git commit --amend
This will once again, open up the configured text editor.
This time, however, it will be pre-filled with the commit message we previously entered.
This indicates that we are not creating a new commit, but editing the last.
Summary
The git commit command is one of the core primary functions of Git.
Prior use of the git add command is required to select the changes that will be staged for the next commit.
Then git commit is used to create a snapshot of the staged changes along a timeline of a Git projects history.
Learn more about git addusage on the accompanying page.
The git status command can be used to explore the state of the staging area and pending commit.
The commit model of SVN and Git are significantly different but often confused, because of the shared terminology.
If you are coming to Git from a personal history of SVN usage, it is good to learn that in Git, commits are cheap and should be used frequently.
Whereas SVN commits are an expensive operation that makes a remote request, Git commits are done locally and with a more efficient algorithm.
Git diff
Comparing changes with git diff
Diffing is a function that takes two input data sets and outputs the changes between them.
git diff is a multi-use Git command that when executed runs a diff function on Git data sources.
These data sources can be commits, branches, files and more.
This document will discuss common invocations of git diff and diffing work flow patterns.
The git diff command is often used along with git status and git log to analyze the current state of a Git repo.
Reading diffs: outputs
Raw output format
The following examples will be executed in a simple repo.
The repo is created with the commands below:
$:> mkdir diff_test_repo
$:> cd diff_test_repo
$:> touch diff_test.txt
$:> echo "this is a git diff test example" > diff_test.txt

$:> git init .
Initialized empty Git repository in /Users/kev/code/test/.git/
$:> git add diff_test.txt
$:> git commit -am"add diff test file"

[main (root-commit) 6f77fc3] add diff test file
1 file changed, 1 insertion(+)
create mode 100644 diff_test.txt
If we execute git diff at this point, there will be no output.
This is expected behavior as there are no changes in the repo to diff.
Once the repo is created and we've added the diff_test.txt file, we can change the contents of the file to start experimenting with diff output.
$:> echo "this is a diff example" > diff_test.txt
Executing this command will change the content of the diff_test.txt file.
Once modified, we can view a diff and analyze the output.
Now executing git diff will produce the following output:
diff --git a/diff_test.txt b/diff_test.txt
index 6b0c6cf..b37e70a 100644

--- a/diff_test.txt
+++ b/diff_test.txt
@@ -1 +1 @@
-this is a git diff test example

+this is a diff example
Let us now examine a more detailed breakdown of the diff output.
1.
Comparison input
diff --git a/diff_test.txt b/diff_test.txt
This line displays the input sources of the diff.
We can see that a/diff_test.txt and b/diff_test.txt have been passed to the diff.
2.
Meta data
index 6b0c6cf..b37e70a 100644
This line displays some internal Git metadata.
You will most likely not need this information.
The numbers in this output correspond to Git object version hash identifiers.
3.
Markers for changes
--- a/diff_test.txt

+++ b/diff_test.txt
These lines are a legend that assigns symbols to each diff input source.
In this case, changes from a/diff_test.txt are marked with a --- and the changes from b/diff_test.txt are marked with the +++ symbol.
4.
Diff chunks
The remaining diff output is a list of diff 'chunks'.
A diff only displays the sections of the file that have changes.
In our current example, we only have one chunk as we are working with a simple scenario.
Chunks have their own granular output semantics.
@@ -1 +1 @@
-this is a git diff test example
+this is a diff example
The first line is the chunk header.
Each chunk is prepended by a header inclosed within @@ symbols.
The content of the header is a summary of changes made to the file.
In our simplified example, we have -1 +1 meaning line one had changes.
In a more realistic diff, you would see a header like:
@@ -34,6 +34,8 @@
In this header example, 6 lines have been extracted starting from line number 34.
Additionally, 8 lines have been added starting at line number 34.
The remaining content of the diff chunk displays the recent changes.
Each changed line is prepended with a + or - symbol indicating which version of the diff input the changes come from.
As we previously discussed, - indicates changes from the a/diff_test.txt and + indicates changes from b/diff_test.txt.
Highlighting changes
1.
git diff --color-words
git diff also has a special mode for highlighting changes with much better granularity: ‐‐color-words.
This mode tokenizes added and removed lines by whitespace and then diffs those.
$:> git diff --color-words
diff --git a/diff_test.txt b/diff_test.txt
index 6b0c6cf..b37e70a 100644
--- a/diff_test.txt

+++ b/diff_test.txt
@@ -1 +1 @@
this is agit difftest example
Now the output displays only the color-coded words that have changed.
2.
git diff-highlight
If you clone the git source, you’ll find a sub-directory called contrib.
It contains a bunch of git-related tools and other interesting bits and pieces that haven’t yet been promoted to git core.
One of these is a Perl script called diff-highlight.
Diff-highlight pairs up matching lines of diff output and highlights sub-word fragments that have changed.
$:> git diff | /your/local/path/to/git-core/contrib/diff-highlight/diff-highlight
diff --git a/diff_test.txt b/diff_test.txt

index 6b0c6cf..b37e70a 100644
--- a/diff_test.txt
+++ b/diff_test.txt
@@ -1 +1 @@

-this is a git diff test example
+this is a diff example
Now we’ve pared down our diff to the smallest possible change.
Diffing binary files
In addition to the text file utilities we have thus far demonstrated, git diff can be run on binary files.
Unfortunately, the default output is not very helpful.
$:> git diff
Binary files a/script.pdf and b/script.pdf differ
Git does have a feature that allows you to specify a shell command to transform the content of your binary files into text prior to performing the diff.
It does require a little set up though.
First, you need to specify a textconv filter describing how to convert a certain type of binary to text.
We're using a simple utility called pdftohtml (available via homebrew) to convert my PDFs into human readable HTML.
You can set this up for a single repository by editing your .git/config file, or globally by editing ~ /.gitconfig[diff "pdfconv"]
textconv=pdftohtml -stdout
Then all you need to do is associate one or more file patterns with our pdfconv filter.
You can do this by creating a .gitattributes file in the root of your repository.
*.pdf diff=pdfconv
Once configured, git diff will first run the binary file through the configured converter script and diff the converter output.
The same technique can be applied to get useful diffs from all sorts of binary files, for example: zips, jars and other archives: using unzip -l (or similar) in place of pdf2html will show you paths that have been added or removed between commits images: exiv2 can be used to show metadata changes such as image dimensions documents: conversion tools exist for transforming .odf, .doc and other document formats to plain text.
In a pinch, strings will often work for binary files where no formal converter exists.
Comparing files: git diff file
The git diff command can be passed an explicit file path option.
When a file path is passed to git diff the diff operation will be scoped to the specified file.
The below examples demonstrate this usage.
git diff HEAD ./path/to/file
This example is scoped to ./path/to/file when invoked, it will compare the specific changes in the working directory, against the index, showing the changes that are not staged yet.
By default git diff will execute the comparison against HEAD.
Omitting HEAD in the example above git diff ./path/to/file has the same effect.
git diff --cached ./path/to/file
When git diff is invoked with the --cached option the diff will compare the staged changes with the local repository.
The --cached option is synonymous with --staged.
Comparing all changes
Invoking git diff without a file path will compare changes across the entire repository.
The above, file specific examples, can be invoked without the ./path/to/file argument and have the same output results across all files in the local repo.
Changes since last commit
By default git diff will show you any uncommitted changes since the last commit.
git diff
Comparing files between two different commits
git diff can be passed Git refs to commits to diff.
Some example refs are, HEAD, tags, and branch names.
Every commit in Git has a commit ID which you can get when you execute GIT LOG.
You can also pass this commit ID to git diff.
git log --prety=oneline

957fbc92b123030c389bf8b4b874522bdf2db72c add feature
ce489262a1ee34340440e55a0b99ea6918e19e7a rename some classes
6b539f280d8b0ec4874671bae9c6bed80b788006 refactor some code for feature
646e7863348a427e1ed9163a9a96fa759112f102 add some copy to body

$:> git diff 957fbc92b123030c389bf8b4b874522bdf2db72c ce489262a1ee34340440e55a0b99ea6918e19e7a
Comparing branches
Comparing two branches
Branches are compared like all other ref inputs to git diffgit diff branch1..other-feature-branch
This example introduces the dot operator.
The two dots in this example indicate the diff input is the tips of both branches.
The same effect happens if the dots are omitted and a space is used between the branches.
Additionally, there is a three dot operator:
git diff branch1...other-feature-branch
The three dot operator initiates the diff by changing the first input parameter branch1.
It changes branch1 into a ref of the shared common ancestor commit between the two diff inputs, the shared ancestor of branch1 and other-feature-branch.
The last parameter input parameter remains unchanged as the tip of other-feature-branch.
Comparing files from two branches
To compare a specific file across branches, pass in the path of the file as the third argument to git diffgit diff main new_branch ./diff_test.txt
Summary
This page disscused the Git diffing process and the git diff command.
We discussed how to read git diff output and the various data included in the output.
Examples were provided on how to alter the git diff output with highlighting and colors.
We discussed different diffing strategies such as how to diff files in branches and specific commits.
In addition to the git diff command, we also used git log and git checkout.
The git stash command takes your uncommitted changes (both staged and unstaged), saves them away for later use, and then reverts them from your working copy.
For example:
$ git status
On branch main

Changes to be committed:
new file:   style.css
Changes not staged for commit:
modified:   index.html

$ git stash
Saved working directory and index state WIP on main: 5002d47 our new homepage
HEAD is now at 5002d47 our new homepage
$ git status

On branch main
nothing to commit, working tree clean
At this point you're free to make changes, create new commits, switch branches, and perform any other Git operations; then come back and re-apply your stash when you're ready.
Note that the stash is local to your Git repository; stashes are not transferred to the server when you push.
Re-applying your stashed changes
You can reapply previously stashed changes with git stash pop:
$ git status
On branch main

nothing to commit, working tree clean
$ git stash pop
On branch main
Changes to be committed:

new file:   style.css
Changes not staged for commit:
modified:   index.html
Dropped refs/stash@{0} (32b3aa1d185dfe6d57b3c3cc3b32cbf3e380cc6a)
Popping your stash removes the changes from your stash and reapplies them to your working copy.
Alternatively, you can reapply the changes to your working copy and keep them in your stash with git stash apply:
$ git stash apply
On branch main

Changes to be committed:
new file:   style.css
Changes not staged for commit:
modified:   index.html
This is useful if you want to apply the same stashed changes to multiple branches.
Now that you know the basics of stashing, there is one caveat with git stash you need to be aware of: by default Git won't stash changes made to untracked or ignored files.
Stashing untracked or ignored files
By default, running git stash will stash:
changes that have been added to your index (staged changes)
changes made to files that are currently tracked by Git (unstaged changes)
But it will not stash:
new files in your working copy that have not yet been staged
files that have been ignored
So if we add a third file to our example above, but don't stage it (i.e.
we don't run git add), git stash won't stash it.
$ script.js

$ git status
On branch main
Changes to be committed:
new file:   style.css

Changes not staged for commit:
modified:   index.html
Untracked files:
script.js

$ git stash
Saved working directory and index state WIP on main: 5002d47 our new homepage
HEAD is now at 5002d47 our new homepage
$ git status

On branch main
Untracked files:
script.js
Adding the -u option (or --include-untracked) tells git stash to also stash your untracked files:
$ git status
On branch main
Changes to be committed:
new file:   style.css

Changes not staged for commit:
modified:   index.html
Untracked files:
script.js

$ git stash -u
Saved working directory and index state WIP on main: 5002d47 our new homepage
HEAD is now at 5002d47 our new homepage
$ git status

On branch main
nothing to commit, working tree clean
You can include changes to ignored files as well by passing the -a option (or --all) when running git stash.
Managing multiple stashes
You aren't limited to a single stash.
You can run git stash several times to create multiple stashes, and then use git stash list to view them.
By default, stashes are identified simply as a "WIP" – work in progress – on top of the branch and commit that you created the stash from.
After a while it can be difficult to remember what each stash contains:
$ git stash list
stash@{0}: WIP on main: 5002d47 our new homepage
stash@{1}: WIP on main: 5002d47 our new homepage
stash@{2}: WIP on main: 5002d47 our new homepage
To provide a bit more context, it's good practice to annotate your stashes with a description, using git stash save "message":
$ git stash save "add style to our site"
Saved working directory and index state On main: add style to our site
HEAD is now at 5002d47 our new homepage

$ git stash list
stash@{0}: On main: add style to our site
stash@{1}: WIP on main: 5002d47 our new homepage
stash@{2}: WIP on main: 5002d47 our new homepage
By default, git stash pop will re-apply the most recently created stash: stash@{0}
You can choose which stash to re-apply by passing its identifier as the last argument, for example:
$ git stash pop stash@{2}
Viewing stash diffs
You can view a summary of a stash with git stash show:
$ git stash show
index.html | 1 +
style.css | 3 +++

2 files changed, 4 insertions(+)
Or pass the -p option (or --patch) to view the full diff of a stash:
$ git stash show -p
diff --git a/style.css b/style.css

new file mode 100644
index 0000000..d92368b
--- /dev/null
+++ b/style.css

@@ -0,0 +1,3 @@
+* {
+  text-decoration: blink;
+}

diff --git a/index.html b/index.html
index 9daeafb..ebdcbd2 100644
--- a/index.html
+++ b/index.html

@@ -1 +1,2 @@
+<link rel="stylesheet" href="style.css"/>
Partial stashes
You can also choose to stash just a single file, a collection of files, or individual changes from within files.
If you pass the -p option (or --patch) to git stash, it will iterate through each changed "hunk" in your working copy and ask whether you wish to stash it:
$ git stash -p
diff --git a/style.css b/style.css
new file mode 100644

index 0000000..d92368b
--- /dev/null
+++ b/style.css
@@ -0,0 +1,3 @@

+* {
+  text-decoration: blink;
+}
Stash this hunk [y,n,q,a,d,/,e,?]? y

diff --git a/index.html b/index.html
index 9daeafb..ebdcbd2 100644
--- a/index.html
+++ b/index.html

@@ -1 +1,2 @@
+<link rel="stylesheet" href="style.css"/>
Stash this hunk [y,n,q,a,d,/,e,?]? n
You can hit ? for a full list of hunk commands.
Commonly useful ones are:
Command
Description
/
search for a hunk by regex
?
help
n
don't stash this hunk
q
quit (any hunks that have already been selected will be stashed)
s
split this hunk into smaller hunks
y
stash this hunk
There is no explicit "abort" command, but hitting CTRL-C(SIGINT) will abort the stash process.
Creating a branch from your stash
If the changes on your branch diverge from the changes in your stash, you may run into conflicts when popping or applying your stash.
Instead, you can use git stash branch to create a new branch to apply your stashed changes to:
$ git stash branch add-stylesheet stash@{1}

Switched to a new branch 'add-stylesheet'
On branch add-stylesheet
Changes to be committed:
new file:   style.css

Changes not staged for commit:
modified:   index.html
Dropped refs/stash@{1} (32b3aa1d185dfe6d57b3c3cc3b32cbf3e380cc6a)
This checks out a new branch based on the commit that you created your stash from, and then pops your stashed changes onto it.
Cleaning up your stash
If you decide you no longer need a particular stash, you can delete it with git stash drop:
$ git stash drop stash@{1}
Dropped stash@{1} (17e2697fd8251df6163117cb3d58c1f62a5e7cdb)
Or you can delete all of your stashes with:
$ git stash clear
How git stash works
If you just wanted to know how to use git stash, you can stop reading here.
But if you're curious about how Git (and git stash) works under the hood, read on!
Stashes are actually encoded in your repository as commit objects.
The special ref at .git/refs/stash points to your most recently created stash, and previously created stashes are referenced by the stash ref's reflog.
This is why you refer to stashes by stash@{n}: you're actually referring to the nth reflog entry for the stash ref.
Since a stash is just a commit, you can inspect it with git log:
$ git log --oneline --graph stash@{0}
*-.
953ddde WIP on main: 5002d47 our new homepage

|\ \
| | * 24b35a1 untracked files on main: 5002d47 our new homepage
| * 7023dd4 index on main: 5002d47 our new homepage
|/

* 5002d47 our new homepage
Depending on what you stashed, a single git stash operation creates either two or three new commits.
The commits in the diagram above are:
stash@{0}, a new commit to store the tracked files that were in your working copy when you ran git stashstash@{0}'s first parent, the pre-existing commit that was at HEAD when you ran git stashstash@{0}'s second parent, a new commit representing the index when you ran git stashstash@{0}'s third parent, a new commit representing untracked files that were in your working copy when you ran git stash.
This third parent only created if:
your working copy actually contained untracked files; and
you specified the --include-untracked or --all option when invoked git stash.
How git stash encodes your worktree and index as commits:
Before stashing, your worktree may contain changes to tracked files, untracked files, and ignored files.
Some of these changes may also be staged in the index.
Invoking git stash encodes any changes to tracked files as two new commits in your DAG: one for unstaged changes, and one for changes staged in the index.
The special refs/stash ref is updated to point to them.
Using the --include-untracked option also encodes any changes to untracked files as an additional commit.
Using the --all option includes changes to any ignored files alongside changes to untracked files in the same commit.
When you run git stash pop, the changes from the commits above are used to update your working copy and index, and the stash reflog is shuffled to remove the popped commit.
Note that the popped commits aren't immediately deleted, but do become candidates for future garbage collection.
.gitignore
Git sees every file in your working copy as one of three things:
tracked - a file which has been previously staged or committed;
untracked - a file which has not been staged or committed; or
ignored - a file which Git has been explicitly told to ignore.
Ignored files are usually build artifacts and machine generated files that can be derived from your repository source or should otherwise not be committed.
Some common examples are:
dependency caches, such as the contents of /node_modules or /packages
compiled code, such as .o, .pyc, and .class files
build output directories, such as /bin, /out, or /target
files generated at runtime, such as .log, .lock, or .tmp
hidden system files, such as .DS_Store or Thumbs.db
personal IDE config files, such as .idea/workspace.xml
Ignored files are tracked in a special file named .gitignore that is checked in at the root of your repository.
There is no explicit git ignore command: instead the .gitignore file must be edited and committed by hand when you have new files that you wish to ignore.
.gitignore files contain patterns that are matched against file names in your repository to determine whether or not they should be ignored.
Ignoring files in Git
Git ignore patternsShared .gitignore files in your repositoryPersonal Git ignore rulesGlobal Git ignore rulesIgnoring a previously committed fileCommitting an ignored fileStashing an ignored fileDebugging .gitignore files
Git ignore patterns
.gitignore uses globbing patterns to match against file names.
You can construct your patterns using various symbols:
Prepending an exclamation mark to a pattern negates it.
If a file matches a pattern, but also matches a negating pattern defined later in the file, it will not be ignored.
If you don't append a slash, the pattern will match both files and the contents of directories with that name.
In the example matches on the left, both directories and files named logs are ignored
Appending a slash indicates the pattern is a directory.
The entire contents of any directory in the repository matching that name – including all of its files and subdirectories – will be ignored
logs/ !logs/important.log
logs/debug.loglogs/important.log
Wait a minute! Shouldn't logs/important.log be negated in the example on the left
Nope! Due to a performance-related quirk in Git, you can not negate a file that is ignored due to a pattern matching a directory
Patterns specifying a file in a particular directory are relative to the repository root.
(You can prepend a slash if you like, but it doesn't do anything special.)
** these explanations assume your .gitignore file is in the top level directory of your repository, as is the convention.
If your repository has multiple .gitignore files, simply mentally replace "repository root" with "directory containing the .gitignore file" (and consider unifying them, for the sanity of your team).*
In addition to these characters, you can use # to include comments in your .gitignore file:
# ignore all logs
*.log
You can use \ to escape .gitignore pattern characters if you have files or directories containing them:
# ignore the file literally named foo[01].txt
foo\[01\].txt
Shared .gitignore files in your repository
Git ignore rules are usually defined in a .gitignore file at the root of your repository.
However, you can choose to define multiple .gitignore files in different directories in your repository.
Each pattern in a particular .gitignore file is tested relative to the directory containing that file.
However the convention, and simplest approach, is to define a single .gitignore file in the root.
As your .gitignore file is checked in, it is versioned like any other file in your repository and shared with your teammates when you push.
Typically you should only include patterns in .gitignore that will benefit other users of the repository.
Personal Git ignore rules
You can also define personal ignore patterns for a particular repository in a special file at .git/info/exclude.
These are not versioned, and not distributed with your repository, so it's an appropriate place to include patterns that will likely only benefit you.
For example if you have a custom logging setup, or special development tools that produce files in your repository's working directory, you could consider adding them to .git/info/exclude to prevent them from being accidentally committed to your repository.
Global Git ignore rules
In addition, you can define global Git ignore patterns for all repositories on your local system by setting the Git core.excludesFile property.
You'll have to create this file yourself.
If you're unsure where to put your global .gitignore file, your home directory isn't a bad choice (and makes it easy to find later).
Once you've created the file, you'll need to configure its location with git config:
$ touch ~/.gitignore
$ git config --global core.excludesFile ~/.gitignore
You should be careful what patterns you choose to globally ignore, as different file types are relevant for different projects.
Special operating system files (e.g.
.DS_Store and thumbs.db) or temporary files created by some developer tools are typical candidates for ignoring globally.
Ignoring a previously committed file
If you want to ignore a file that you've committed in the past, you'll need to delete the file from your repository and then add a .gitignore rule for it.
Using the --cached option with git rm means that the file will be deleted from your repository, but will remain in your working directory as an ignored file.
$ echo debug.log >> .gitignore
$ git rm --cached debug.log

rm 'debug.log'
$ git commit -m "Start ignoring debug.log"
You can omit the --cached option if you want to delete the file from both the repository and your local file system.
Committing an ignored file
It is possible to force an ignored file to be committed to the repository using the -f (or --force) option with git add:
$ cat .gitignore
*.log
$ git add -f debug.log

$ git commit -m "Force adding debug.log"
You might consider doing this if you have a general pattern (like *.log) defined, but you want to commit a specific file.
However a better solution is to define an exception to the general rule:
$ echo !debug.log >> .gitignore

$ cat .gitignore
*.log
!debug.log
$ git add debug.log

$ git commit -m "Adding debug.log"
This approach is more obvious, and less confusing, for your teammates.
Stashing an ignored file
git stash is a powerful Git feature for temporarily shelving and reverting local changes, allowing you to re-apply them later on.
As you'd expect, by default git stash ignores ignored files and only stashes changes to files that are tracked by Git.
However, you can invoke git stash with the --all option to stash changes to ignored and untracked files as well.
Debugging .gitignore files
If you have complicated .gitignore patterns, or patterns spread over multiple .gitignore files, it can be difficult to track down why a particular file is being ignored.
You can use the git check-ignore command with the -v (or --verbose) option to determine which pattern is causing a particular file to be ignored:
$ git check-ignore -v debug.log
.gitignore:3:*.log  debug.log
The output shows:
<file containing the pattern> : <line number of the pattern> : <pattern> <file name>
You can pass multiple file names to git check-ignore if you like, and the names themselves don't even have to correspond to files that exist in your repository.
Git Status: Inspecting a repository
git status
The git status command displays the state of the working directory and the staging area.
It lets you see which changes have been staged, which haven’t, and which files aren’t being tracked by Git.
Status output does not show you any information regarding the committed project history.
For this, you need to use git log.
Related git commands
git tag
Tags are ref's that point to specific points in Git history.
git tag is generally used to capture a point in history that is used for a marked version release (i.e.
v1.0.1).
git blame
The high-level function of git blame is the display of author metadata attached to specific committed lines in a file.
This is used to explore the history of specific code and answer questions about what, how, and why the code was added to a repository.
git log
The git log command displays committed snapshots.
It lets you list the project history, filter it, and search for specific changes.
Usage
git status
List which files are staged, unstaged, and untracked.
Discussion
The git status command is a relatively straightforward command.
It simply shows you what's been going on with git add and git commit.
Status messages also include relevant instructions for staging/unstaging files.
Sample output showing the three main categories of a git status call is included below:
# On branch main

# Changes to be committed:
# (use "git reset HEAD <file>..." to unstage)
#
#modified: hello.py

#
# Changes not staged for commit:
# (use "git add <file>..." to update what will be committed)
# (use "git checkout -- <file>..." to discard changes in working directory)

#
#modified: main.py
#
# Untracked files:

# (use "git add <file>..." to include in what will be committed)
#
#hello.pyc
Ignoring Files
Untracked files typically fall into two categories.
They're either files that have just been added to the project and haven't been committed yet, or they're compiled binaries like .pyc, .obj, .exe, etc.
While it's definitely beneficial to include the former in the git status output, the latter can make it hard to see what’s actually going on in your repository.
For this reason, Git lets you completely ignore files by placing paths in a special file called .gitignore.
Any files that you'd like to ignore should be included on a separate line, and the * symbol can be used as a wildcard.
For example, adding the following to a .gitignore file in your project root will prevent compiled Python modules from appearing in git status:
*.pyc
Example
It's good practice to check the state of your repository before committing changes so that you don't accidentally commit something you don't mean to.
This example displays the repository status before and after staging and committing a snapshot:
# Edit hello.py

git status
# hello.py is listed under "Changes not staged for commit"
git add hello.py
git status

# hello.py is listed under "Changes to be committed"
git commit
git status
# nothing to commit (working directory clean)
The first status output will show the file as unstaged.
The git add action will be reflected in the second git status, and the final status output will tell you that there is nothing to commit—the working directory matches the most recent commit.
Some Git commands (e.g., git merge) require the working directory to be clean so that you don't accidentally overwrite changes.
git log
The git log command displays committed snapshots.
It lets you list the project history, filter it, and search for specific changes.
While git status lets you inspect the working directory and the staging area, git log only operates on the committed history.
Log output can be customized in several ways, from simply filtering commits to displaying them in a completely user-defined format.
Some of the most common configurations of git log are presented below.
Usage
git log
Display the entire commit history using the default formatting.
If the output takes up more than one screen, you can use Space to scroll and q to exit.
git log -n <limit>
Limit the number of commits by .
For example, git log -n 3 will display only 3 commits.
Condense each commit to a single line.
This is useful for getting a high-level overview of the project history.
git log --onelinegit log --stat
Along with the ordinary git log information, include which files were altered and the relative number of lines that were added or deleted from each of them.
git log -p
Display the patch representing each commit.
This shows the full diff of each commit, which is the most detailed view you can have of your project history.
git log --author="<pattern>"
Search for commits by a particular author.
The argument can be a plain string or a regular expression.
git log --grep="<pattern>"
Search for commits with a commit message that matches , which can be a plain string or a regular expression.
git log <since>..<until>
Show only commits that occur between < since > and < until >.
Both arguments can be either a commit ID, a branch name, HEAD, or any other kind of revision reference.
git log <file>
Only display commits that include the specified file.
This is an easy way to see the history of a particular file.
git log --graph --decorate --oneline
A few useful options to consider.
The --graph flag that will draw a text based graph of the commits on the left hand side of the commit messages.
--decorate adds the names of branches or tags of the commits that are shown.
--oneline shows the commit information on a single line making it easier to browse through commits at-a-glance.
Discussion
The git log command is Git's basic tool for exploring a repository’s history.
It’s what you use when you need to find a specific version of a project or figure out what changes will be introduced by merging in a feature branch.
commit 3157ee3718e180a9476bf2e5cab8e3f1e78a73b7

Author: John Smith
Most of this is pretty straightforward; however, the first line warrants some explanation.
The 40-character string after commit is an SHA-1 checksum of the commit’s contents.
This serves two purposes.
First, it ensures the integrity of the commit—if it was ever corrupted, the commit would generate a different checksum.
Second, it serves as a unique ID for the commit.
This ID can be used in commands like git log .. to refer to specific commits.
For instance, git log 3157e..5ab91 will display everything between the commits with ID's 3157e and 5ab91.
Aside from checksums, branch names (discussed in the Branch Module) and the HEAD keyword are other common methods for referring to individual commits.
HEAD always refers to the current commit, be it a branch or a specific commit.
The ~ character is useful for making relative references to the parent of a commit.
For example, 3157e~1 refers to the commit before 3157e, and HEAD~3 is the great-grandparent of the current commit.
The idea behind all of these identification methods is to let you perform actions based on specific commits.
The git log command is typically the starting point for these interactions, as it lets you find the commits you want to work with.
Example
The Usage section provides many examples of git log, but keep in mind that several options can be combined into a single command:
git log --author="John Smith" -p hello.py
This will display a full diff of all the changes John Smith has made to the file hello.py.
The ..
syntax is a very useful tool for comparing branches.
The next example displays a brief overview of all the commits that are in some-feature that are not in main.
git log --oneline main..some-feature
Git tag
Tagging
This document will discuss the Git concept of tagging and the git tag command.
Tags are ref's that point to specific points in Git history.
Tagging is generally used to capture a point in history that is used for a marked version release (i.e.
v1.0.1).
A tag is like a branch that doesn’t change.
Unlike branches, tags, after being created, have no further history of commits.
For more info on branches visit the git branch page.
This document will cover the different kind of tags, how to create tags, listing all tags, deleting tags, sharing tags, and more.
Creating a tag
To create a new tag execute the following command:
git tag <tagname>
Replace < tagname > with a semantic identifier to the state of the repo at the time the tag is being created.
A common pattern is to use version numbers like git tag v1.4.
Git supports two different types of tags, annotated and lightweight tags.
The previous example created a lightweight tag.
Lightweight tags and Annotated tags differ in the amount of accompanying meta data they store.
A best practice is to consider Annotated tags as public, and Lightweight tags as private.
Annotated tags store extra meta data such as: the tagger name, email, and date.
This is important data for a public release.
Lightweight tags are essentially 'bookmarks' to a commit, they are just a name and a pointer to a commit, useful for creating quick links to relevant commits.
Annotated Tags
Annotated tags are stored as full objects in the Git database.
To reiterate, They store extra meta data such as: the tagger name, email, and date.
Similar to commits and commit messages Annotated tags have a tagging message.
Additionally, for security, annotated tags can be signed and verified with GNU Privacy Guard (GPG).
Suggested best practices for git tagging is to prefer annotated tags over lightweight so you can have all the associated meta-data.
git tag -a v1.4
Executing this command will create a new annotated tag identified with v1.4.
The command will then open up the configured default text editor to prompt for further meta data input.
git tag -a v1.4 -m "my version 1.4"
Executing this command is similar to the previous invocation, however, this version of the command is passed the -m option and a message.
This is a convenience method similar to git commit -m that will immediately create a new tag and forgo opening the local text editor in favor of saving the message passed in with the -m option.
Lightweight Tags
git tag v1.4-lw
Executing this command creates a lightweight tag identified as v1.4-lw. Lightweight tags are created with the absence of the -a, -s, or -m options.
Lightweight tags create a new tag checksum and store it in the .git/ directory of the project's repo.
Listing Tags
To list stored tags in a repo execute the following:
git tag
This will output a list of tags:
v0.10.0
v0.10.0-rc1
v0.11.0
v0.11.0-rc1

v0.11.1
v0.11.2
v0.12.0
v0.12.0-rc1

v0.12.1
v0.12.2
v0.13.0
v0.13.0-rc1

v0.13.0-rc2
To refine the list of tags the -l option can be passed with a wild card expression:
$ git tag -l *-rc*
v0.10.0-rc1

v0.11.0-rc1
v0.12.0-rc1
v0.13.0-rc1
v0.13.0-rc2

v0.14.0-rc1
v0.9.0-rc1
v15.0.0-rc.1
v15.0.0-rc.2

v15.4.0-rc.3
This previous example uses the -l option and a wildcard expression of -rc which returns a list of all tags marked with a -rc prefix, traditionally used to identify release candidates.
Tagging Old Commits
The previous tagging examples have demonstrated operations on implicit commits.
By default, git tag will create a tag on the commit that HEAD is referencing.
Alternatively git tag can be passed as a ref to a specific commit.
This will tag the passed commit instead of defaulting to HEAD. To gather a list of older commits execute the git log command.
$ git log --pretty=oneline

15027957951b64cf874c3557a0f3547bd83b3ff6 Merge branch 'feature'
a6b4c97498bd301d84096da251c98a07c7723e65 add update method for thing
0d52aaab4479697da7686c15f77a3d64d9165190 one more thing
6d52a271eda8725415634dd79daabbc4d9b6008e Merge branch 'experiment'
Executing git log will output a list of commits.
In this example we will pick the top most commit Merge branch 'feature' for the new tag.
We will need to reference to the commit SHA hash to pass to Git:
git tag -a v1.2 15027957951b64cf874c3557a0f3547bd83b3ff6
Executing the above git tag invocation will create a new annotated commit identified as v1.2 for the commit we selected in the previous git log example.
ReTagging/Replacing Old Tags
If you try to create a tag with the same identifier as an existing tag, Git will throw an error like:
fatal: tag 'v0.4' already exists
Additionally if you try to tag an older commit with an existing tag identifier Git will throw the same error.
In the event that you must update an existing tag, the -f FORCE option must be used.
git tag -a -f v1.4 15027957951b64cf874c3557a0f3547bd83b3ff6
Executing the above command will map the 15027957951b64cf874c3557a0f3547bd83b3ff6 commit to the v1.4 tag identifier.
It will override any existing content for the v1.4 tag.
Sharing: Pushing Tags to Remote
Sharing tags is similar to pushing branches.
By default, git push will not push tags.
Tags have to be explicitly passed to git push.
$ git push origin v1.4
Counting objects: 14, done.
Delta compression using up to 8 threads.

Compressing objects: 100% (12/12), done.
Writing objects: 100% (14/14), 2.05 KiB | 0 bytes/s, done.
Total 14 (delta 3), reused 0 (delta 0)
To git@bitbucket.com:atlasbro/gittagdocs.git

 * [new tag]         v1.4 -> v1.4
To push multiple tags simultaneously pass the --tags option to git push command.
When another user clones or pulls a repo they will receive the new tags.
Checking Out Tags
You can view the state of a repo at a tag by using the git checkout command.
git checkout v1.4
The above command will checkout the v1.4 tag.
This puts the repo in a detached HEAD state.
This means any changes made will not update the tag.
They will create a new detached commit.
This new detached commit will not be part of any branch and will only be reachable directly by the commits SHA hash.
Therefore it is a best practice to create a new branch anytime you're making changes in a detached HEAD state.
Deleting Tags
Deleting tags is a straightforward operation.
Passing the -d option and a tag identifier to git tag will delete the identified tag.
$ git tag

v1
v2
v3
$ git tag -d v1

$ git tag
v2
v3
In this example git tag is executed to display a list of tags showing v1, v2, v3, Then git tag -d v1 is executed which deletes the v1 tag.
Summary
To recap, Tagging is an additional mechanism used to create a snap shot of a Git repo.
Tagging is traditionally used to create semantic version number identifier tags that correspond to software release cycles.
The git tag command is the primary driver of tag: creation, modification and deletion.
There are two types of tags; annotated and lightweight.
Annotated tags are generally the better practices as they store additional valuable meta data about the tag.
Additional Git commands covered in this document were git push, and git checkout. Visit their corresponding pages for discussion on their extended use.
Git blame
The git blame command is a versatile troubleshooting utility that has extensive usage options.
The high-level function of git blame is the display of author metadata attached to specific committed lines in a file.
This is used to examine specific points of a file's history and get context as to who the last author was that modified the line.
This is used to explore the history of specific code and answer questions about what, how, and why the code was added to a repository.
Git blame is often used with a GUI display.
Online Git hosting sites like Bitbucket offer blame views which are UI wrappers to git blame.
These views are referenced in collaborative discussions around pull requests and commits.
Additionally, most IDE's that have Git integration also have dynamic blame views.
How It Works
In order to demonstrate git blame we need a repository with some history.
We will use the open source project git-blame-example.
This open source project is a simple repository that contains a README.md file which has a few commits from different authors.
The first step of our git blame usage example is to git clone the example repository.
git clone https://kevzettler@bitbucket.org/kevzettler/git-blame-example.git && cd git-blame-example
Now that we have a copy of the example code we can start exploring it with git blame.
The state of the example repo can be examined using git log.
The commit history should look like the following:
$ git log
commit 548dabed82e4e5f3734c219d5a742b1c259926b2
Author: Juni Mukherjee <jmukherjee@atlassian.com>

Date:   Thu Mar 1 19:55:15 2018 +0000
    Another commit to help git blame track the who, the what, and the when
commit eb06faedb1fdd159d62e4438fc8dbe9c9fe0728b
Author: Juni Mukherjee <jmukherjee@atlassian.com>

Date:   Thu Mar 1 19:53:23 2018 +0000
    Creating the third commit, along with Kev and Albert, so that Kev can get git blame docs.
commit 990c2b6a84464fee153253dbf02e845a4db372bb
Merge: 82496ea 89feb84

Author: Albert So <aso@atlassian.com>
Date:   Thu Mar 1 05:33:01 2018 +0000
    Merged in albert-so/git-blame-example/albert-so/readmemd-edited-online-with-bitbucket-1519865641474 (pull request #2)
    README.md edited online with Bitbucket

commit 89feb84d885fe33d1182f2112885c2a64a4206ec
Author: Albert So <aso@atlassian.com>
Date:   Thu Mar 1 00:54:03 2018 +0000
    README.md edited online with Bitbucket
git blame only operates on individual files.
A file-path is required for any useful output.
The default execution of git blame will simply output the commands help menu.
For this example, we will operate on the README.MD file.
It is a common open source software practice to include a README file in the root of a git repository as documentation source for the project.
git blame README.MD
Executing the above command will give us our first sample of blame output.
The following output is a subset of the full blame output of the README.
Additionally, this output is static is reflective of the state of the repo at the time of this writing.
$ git blame README.md
82496ea3 (kevzettler     2018-02-28 13:37:02 -0800  1) # Git Blame example
82496ea3 (kevzettler     2018-02-28 13:37:02 -0800  2)

89feb84d (Albert So      2018-03-01 00:54:03 +0000  3) This repository is an example of a project with multiple contributors making commits.
82496ea3 (kevzettler     2018-02-28 13:37:02 -0800  4)
82496ea3 (kevzettler     2018-02-28 13:37:02 -0800  5) The repo use used elsewhere to demonstrate `git blame`
82496ea3 (kevzettler     2018-02-28 13:37:02 -0800  6)

89feb84d (Albert So      2018-03-01 00:54:03 +0000  7) Lorem ipsum dolor sit amet, consectetur adipisicing elit, sed do eiusmod TEMPOR incididunt ut labore et dolore magna aliqua.
Ut enim ad minim veniam, quis nostrud exercitation ullamco laboris nisi ut aliquip ex ea commodo consequat.
Duis aute irure dolor in reprehenderit in voluptate velit esse cillum dolore eu fugiat nulla pariatur.
Excepteur sint occaecat cupidatat non proident, sunt in culpa qui officia deserunt mollit anim id est laborum

89feb84d (Albert So      2018-03-01 00:54:03 +0000  8)
eb06faed (Juni Mukherjee 2018-03-01 19:53:23 +0000  9) Annotates each line in the given file with information from the revision which last modified the line.
Optionally, start annotating from the given revision.
eb06faed (Juni Mukherjee 2018-03-01 19:53:23 +0000 10)

548dabed (Juni Mukherjee 2018-03-01 19:55:15 +0000 11) Creating a line to support documentation needs for git blame.
548dabed (Juni Mukherjee 2018-03-01 19:55:15 +0000 12)
548dabed (Juni Mukherjee 2018-03-01 19:55:15 +0000 13) Also, it is important to have a few of these commits to clearly reflect the who, the what and the when.
This will help Kev get good screenshots when he runs the git blame on this README.
This is a sample of the first 13 lines of the README.md file.
To better understand this output lets break down a line.
The following table displays the content of line 3 and the columns of the table indicate the column content.
Id
Author
Timestamp
Line Number
Line Content
89feb84d
Albert So
2018-03-01 00:54:03 +0000
3
This repository is an example of a project with multiple contributors making commits.
If we review the blame output list, we can make some observations.
There are three authors listed.
In addition to the project's maintainer Kev Zettler, Albert So, and Juni Mukherjee are also listed.
Authors are generally the most valuable part of git blame output.
The timestamp column is also primarily helpful.
What the change was is indicated by line content column.
Common Options
git blame -L 1,5 README.md
The -L option will restrict the output to the requested line range.
Here we have restricted the output to lines 1 through 5.
git blame -e README.md
The -e option shows the authors email address instead of username.
git blame -w README.md
The -w option ignores whitespace changes.
If a previous author has modified the spacing of a file by switching from tabs to spaces or adding new lines this, unfortunately, obscures the output of git blame by showing these changes.
git blame -M README.md
The -M option detects moved or copied lines within in the same file.
This will report the original author of the lines instead of the last author that moved or copied the lines.
git blame -C README.md
The -C option detects lines that were moved or copied from other files.
This will report the original author of the lines instead of the last author that moved or copied the lines.
Git Blame vs Git Log
While git blame displays the last author that modified a line, often times you will want to know when a line was originally added.
This can be cumbersome to achieve using git blame.
It requires a combination of the -w, -C, and -M options.
It can be far more convenient to use the git logcommand.
To list all original commits in-which a specific code piece was added or modified execute git log with the -S option.
Append the -S option with the code you are looking for.
Let's take one of the lines from the README output above to use as an example.
Let us take the text "CSS3D and WebGL renderers" from Line 12 of the README output.
$ git log -S"CSS3D and WebGL renderers." --pretty=format:'%h %an %ad %s'

e339d3c85 Mario Schuettel Tue Oct 13 16:51:06 2015 +0200 reverted README.md to original content
509c2cc35 Daniel Tue Sep 8 13:56:14 2015 +0200 Updated README
cb20237cc Mr.doob Mon Dec 31 00:22:36 2012 +0100 Removed DOMRenderer.
Now with the CSS3DRenderer it has become irrelevant.
This output shows us that content from the README was added or modified 3 times by 3 different authors.
It was originally added in commit cb20237cc by Mr.doob.
In this example, git log has also been prepended with the --pretty-format option.
This option converts the default output format of git log into one that matches the format of git log.
For more information on usage and configuration options visit the git log page.
Summary
The git blame command is used to examine the contents of a file line by line and see when each line was last modified and who the author of the modifications was.
The output format of git blame can be altered with various command line options.
Online Git hosting solutions like Bitbucket offer blame views, which offer a superior user experience to command line git blame usage.
git blame and git log can be used in combination to help discover the history of a file's contents.
The git log command has some similar blame functionality, to learn more visit the git log overview page.
Undoing Commits & Changes
In this section, we will discuss the available 'undo' Git strategies and commands.
It is first important to note that Git does not have a traditional 'undo' system like those found in a word processing application.
It will be beneficial to refrain from mapping Git operations to any traditional 'undo' mental model.
Additionally, Git has its own nomenclature for 'undo' operations that it is best to leverage in a discussion.
This nomenclature includes terms like reset, revert, checkout, clean, and more.
A fun metaphor is to think of Git as a timeline management utility.
Commits are snapshots of a point in time or points of interest along the timeline of a project's history.
Additionally, multiple timelines can be managed through the use of branches.
When 'undoing' in Git, you are usually moving back in time, or to another timeline where mistakes didn't happen.
This tutorial provides all of the necessary skills to work with previous revisions of a software project.
First, it shows you how to explore old commits, then it explains the difference between reverting public commits in the project history vs. resetting unpublished changes on your local machine.
Finding what is lost: Reviewing old commits
The whole idea behind any version control system is to store “safe” copies of a project so that you never have to worry about irreparably breaking your code base.
Once you’ve built up a project history of commits, you can review and revisit any commit in the history.
One of the best utilities for reviewing the history of a Git repository is the git log command.
In the example below, we use git log to get a list of the latest commits to a popular open-source graphics library.
git log --oneline
e2f9a78fe Replaced FlyControls with OrbitControls
d35ce0178 Editor: Shortcuts panel Safari support.
9dbe8d0cf Editor: Sidebar.Controls to Sidebar.Settings.Shortcuts.

Clean up.
05c5288fc Merge pull request #12612 from TyLindberg/editor-controls-panel
0d8b6e74b Merge pull request #12805 from harto/patch-1
23b20c22e Merge pull request #12801 from gam0022/improve-raymarching-example-v2

fe78029f1 Fix typo in documentation
7ce43c448 Merge pull request #12794 from WestLangley/dev-x
17452bb93 Merge pull request #12778 from OndrejSpanel/unitTestFixes
b5c1b5c70 Merge pull request #12799 from dhritzkiv/patch-21

1b48ff4d2 Updated builds.
88adbcdf6 WebVRManager: Clean up.
2720fbb08 Merge pull request #12803 from dmarcos/parentPoseObject
9ed629301 Check parent of poseObject instead of camera

219f3eb13 Update GLTFLoader.js
15f13bb3c Update GLTFLoader.js
6d9c22a3b Update uniforms only when onWindowResize
881b25b58 Update ProjectionMatrix on change aspect
Each commit has a unique SHA-1 identifying hash.
These IDs are used to travel through the committed timeline and revisit commits.
By default, git log will only show commits for the currently selected branch.
It is entirely possible that the commit you're looking for is on another branch.
You can view all commits across all branches by executing git log --branches=*.
The command git branch is used to view and visit other branches.
Invoking the command, git branch -a will return a list of all known branch names.
One of these branch names can then be logged using git log .
When you have found a commit reference to the point in history you want to visit, you can utilize the git checkout command to visit that commit.
Git checkout is an easy way to “load” any of these saved snapshots onto your development machine.
During the normal course of development, the HEAD usually points to main or some other local branch, but when you check out a previous commit, HEAD no longer points to a branch—it points directly to a commit.
This is called a “detached HEAD” state, and it can be visualized as the following:
Checking out an old file does not move the HEAD pointer.
It remains on the same branch and same commit, avoiding a 'detached head' state.
You can then commit the old version of the file in a new snapshot as you would any other changes.
So, in effect, this usage of git checkout on a file, serves as a way to revert back to an old version of an individual file.
For more information on these two modes visit the git checkout page
Viewing an old revision
This example assumes that you’ve started developing a crazy experiment, but you’re not sure if you want to keep it or not.
To help you decide, you want to take a look at the state of the project before you started your experiment.
First, you’ll need to find the ID of the revision you want to see.
git log --oneline
Let’s say your project history looks something like the following:
b7119f2 Continue doing crazy things

872fa7e Try something crazy
a1e8fb5 Make some important changes to hello.txt
435b61d Create hello.txt
9773e52 Initial import
You can use git checkout to view the “Make some import changes to hello.txt” commit as follows:
git checkout a1e8fb5
This makes your working directory match the exact state of the a1e8fb5 commit.
You can look at files, compile the project, run tests, and even edit files without worrying about losing the current state of the project.
Nothing you do in here will be saved in your repository.
To continue developing, you need to get back to the “current” state of your project:
git checkout main
This assumes that you're developing on the default main branch.
Once you’re back in the main branch, you can use either git revert or git reset to undo any undesired changes.
Undoing a committed snapshot
There are technically several different strategies to 'undo' a commit.
The following examples will assume we have a commit history that looks like:
git log --oneline
872fa7e Try something crazy
a1e8fb5 Make some important changes to hello.txt
435b61d Create hello.txt

9773e52 Initial import
We will focus on undoing the 872fa7e Try something crazy commit.
Maybe things got a little too crazy.
How to undo a commit with git checkout
Using the git checkout command we can checkout the previous commit, a1e8fb5, putting the repository in a state before the crazy commit happened.
Checking out a specific commit will put the repo in a "detached HEAD" state.
This means you are no longer working on any branch.
In a detached state, any new commits you make will be orphaned when you change branches back to an established branch.
Orphaned commits are up for deletion by Git's garbage collector.
The garbage collector runs on a configured interval and permanently destroys orphaned commits.
To prevent orphaned commits from being garbage collected, we need to ensure we are on a branch.
From the detached HEAD state, we can execute git checkout -b new_branch_without_crazy_commit.
This will create a new branch named new_branch_without_crazy_commit and switch to that state.
The repo is now on a new history timeline in which the 872fa7e commit no longer exists.
At this point, we can continue work on this new branch in which the 872fa7e commit no longer exists and consider it 'undone'.
Unfortunately, if you need the previous branch, maybe it was your main branch, this undo strategy is not appropriate.
Let's look at some other 'undo' strategies.
For more information and examples review our in-depth git checkout discussion.
How to undo a public commit with git revert
Let's assume we are back to our original commit history example.
The history that includes the 872fa7e commit.
This time let's try a revert 'undo'.
If we execute git revert HEAD, Git will create a new commit with the inverse of the last commit.
This adds a new commit to the current branch history and now makes it look like:
git log --oneline
e2f9a78 Revert "Try something crazy"
872fa7e Try something crazy
a1e8fb5 Make some important changes to hello.txt

435b61d Create hello.txt
9773e52 Initial import
At this point, we have again technically 'undone' the 872fa7e commit.
Although 872fa7e still exists in the history, the new e2f9a78 commit is an inverse of the changes in 872fa7e.
Unlike our previous checkout strategy, we can continue using the same branch.
This solution is a satisfactory undo.
This is the ideal 'undo' method for working with public shared repositories.
If you have requirements of keeping a curated and minimal Git history this strategy may not be satisfactory.
How to undo a commit with git reset
For this undo strategy we will continue with our working example.
git reset is an extensive command with multiple uses and functions.
If we invoke git reset --hard a1e8fb5 the commit history is reset to that specified commit.
Examining the commit history with git log will now look like:
git log --oneline
a1e8fb5 Make some important changes to hello.txt
435b61d Create hello.txt

9773e52 Initial import
The log output shows the e2f9a78 and 872fa7e commits no longer exist in the commit history.
At this point, we can continue working and creating new commits as if the 'crazy' commits never happened.
This method of undoing changes has the cleanest effect on history.
Doing a reset is great for local changes however it adds complications when working with a shared remote repository.
If we have a shared remote repository that has the 872fa7e commit pushed to it, and we try to git push a branch where we have reset the history, Git will catch this and throw an error.
Git will assume that the branch being pushed is not up to date because of it's missing commits.
In these scenarios, git revert should be the preferred undo method.
Undoing the last commit
In the previous section, we discussed different strategies for undoing commits.
These strategies are all applicable to the most recent commit as well.
In some cases though, you might not need to remove or reset the last commit.
Maybe it was just made prematurely.
In this case you can amend the most recent commit.
Once you have made more changes in the working directory and staged them for commit by using git add, you can execute git commit --amend.
This will have Git open the configured system editor and let you modify the last commit message.
The new changes will be added to the amended commit.
Undoing uncommitted changes
Before changes are committed to the repository history, they live in the staging index and the working directory.
You may need to undo changes within these two areas.
The staging index and working directory are internal Git state management mechanisms.
For more detailed information on how these two mechanisms operate, visit the git reset page which explores them in depth.
The working directory
The working directory is generally in sync with the local file system.
To undo changes in the working directory you can edit files like you normally would using your favorite editor.
Git has a couple utilities that help manage the working directory.
There is the git clean command which is a convenience utility for undoing changes to the working directory.
Additionally, git reset can be invoked with the --mixed or --hard options and will apply a reset to the working directory.
The staging index
The git add command is used to add changes to the staging index.
Git reset is primarily used to undo the staging index changes.
A --mixed reset will move any pending changes from the staging index back into the working directory.
Undoing public changes
When working on a team with remote repositories, extra consideration needs to be made when undoing changes.
Git reset should generally be considered a 'local' undo method.
A reset should be used when undoing changes to a private branch.
This safely isolates the removal of commits from other branches that may be in use by other developers.
Problems arise when a reset is executed on a shared branch and that branch is then pushed remotely with git push.
Git will block the push in this scenario complaining that the branch being pushed is out of date from the remote branch as it is missing commits.
The preferred method of undoing shared history is git revert.
A revert is safer than a reset because it will not remove any commits from a shared history.
A revert will retain the commits you want to undo and create a new commit that inverts the undesired commit.
This method is safer for shared remote collaboration because a remote developer can then pull the branch and receive the new revert commit which undoes the undesired commit.
Summary
We covered many high-level strategies for undoing things in Git.
It's important to remember that there is more than one way to 'undo' in a Git project.
Most of the discussion on this page touched on deeper topics that are more thoroughly explained on pages specific to the relevant Git commands.
The most commonly used 'undo' tools are git checkout,git revert, and git reset.
Some key points to remember are:
Once changes have been committed they are generally permanent
Use git checkout to move around and review the commit history
git revert is the best tool for undoing shared public changes
git reset is best used for undoing local private changes
In addition to the primary undo commands, we took a look at other Git utilities: git log for finding lost commits git clean for undoing uncommitted changes git add for modifying the staging index.
Each of these commands has its own in-depth documentation.
To learn more about a specific command mentioned here, visit the corresponding links.
Git Clean
In this section, we will focus on a detailed discussion of the git clean command.
Git clean is to some extent an 'undo' command.
Git clean can be considered complementary to other commands like git reset and git checkout.
Whereas these other commands operate on files previously added to the Git tracking index, the git clean command operates on untracked files.
Untracked files are files that have been created within your repo's working directory but have not yet been added to the repository's tracking index using the git add command.
To better demonstrate the difference between tracked and untracked files consider the following command line example
$ mkdir git_clean_test

$ cd git_clean_test/
$ git init .
Initialized empty Git repository in /Users/kev/code/git_clean_test/.git/
$ echo "tracked" > ./tracked_file

$ git add ./tracked_file
$ echo "untracked" > ./untracked_file
$ mkdir ./untracked_dir && touch ./untracked_dir/file
$ git status

On branch master
Initial commit
Changes to be committed: (use "git rm --cached <file>..." to unstage)
new file: tracked_file

Untracked files: (use "git add <file>..." to include in what will be committed) untracked_dir/ untracked_file
The example creates a new Git repository in the git_clean_test directory.
It then proceeds to create a tracked_file which is added to the Git index, additionally, an untracked_file is created, and an untracked_dir.
The example then invokes git status which displays output indicating Git's internal state of tracked and untracked changes.
With the repository in this state, we can execute the git clean command to demonstrate its intended purpose.
$ git clean fatal: clean.requireForce defaults to true and neither -i, -n, nor -f given; refusing to clean
At this point, executing the default git clean command may produce a fatal error.
The example above demonstrates what this may look like.
By default, Git is globally configured to require that git clean be passed a "force" option to initiate.
This is an important safety mechanism.
When finally executed git clean is not undo-able.
When fully executed, git clean will make a hard filesystem deletion, similar to executing the command line rm utility.
Make sure you really want to delete the untracked files before you run it.
Common options and usage
Given the previous explanation of the default git clean behaviors and caveats, the following content demonstrates various git clean use cases and the accompanying command line options required for their operation.
-n
The -n option will perform a “dry run” of git clean.
This will show you which files are going to be removed without actually removing them.
It is a best practice to always first perform a dry run of git clean.
We can demonstrate this option in the demo repo we created earlier.
$ git clean -n
Would remove untracked_file
The output tells us that untracked_file will be removed when the git clean command is executed.
Notice that the untracked_dir is not reported in the output here.
By default git clean will not operate recursively on directories.
This is another safety mechanism to prevent accidental permanent deletion.
-f or --force
The force option initiates the actual deletion of untracked files from the current directory.
Force is required unless the clean.requireForce configuration option is set to false.
This will not remove untracked folders or files specified by .gitignore.
Let us now execute a live git clean in our example repo.
$ git clean -f

Removing untracked_file
The command will output the files that are removed.
You can see here that untracked_file has been removed.
Executing git status at this point or doing a ls will show that untracked_file has been deleted and is nowhere to be found.
By default git clean -f will operate on all the current directory untracked files.
Additionally, a < path > value can be passed with the -f option that will remove a specific file.
git clean -f <path>
-d include directories
The -d option tells git clean that you also want to remove any untracked directories, by default it will ignore directories.
We can add the -d option to our previous examples:
$ git clean -dn
Would remove untracked_dir/

$ git clean -df
Removing untracked_dir/
Here we have executed a 'dry run' using the -dn combination which outputs untracked_dir is up for removal.
Then we execute a forced clean, and receive output that untracked_dir is removed.
-x force removal of ignored files
A common software release pattern is to have a build or distribution directory that is not committed to the repositories tracking index.
The build directory will contain ephemeral build artifacts that are generated from the committed source code.
This build directory is usually added to the repositories .gitignore file.
It can be convenient to also clean this directory with other untracked files.
The -x option tells git clean to also include any ignored files.
As with previous git clean invocations, it is a best practice to execute a 'dry run' first, before the final deletion.
The -x option will act on all ignored files, not just project build specific ones.
This could be unintended things like ./.idea IDE configuration files.
git clean -xf
Like the -d option -x can be passed and composed with other options.
This example demonstrates a combination with -f that will remove untracked files from the current directory as well as any files that Git usually ignores.
Interactive mode or git clean interactive
In addition to the ad-hoc command line execution we have demonstrated so far, git clean has an "interactive" mode that you can initiate by passing the -i option.
Let us revisit the example repo from the introduction of this document.
In that initial state, we will start an interactive clean session.
$ git clean -di
Would remove the following items:
untracked_dir/  untracked_file
*** Commands ***

1: clean
2: filter by pattern    3: select by numbers    4: ask each             5: quit
 6: help
What now>
We have initiated the interactive session with the -d option so it will also act upon our untracked_dir.
The interactive mode will display a What now> prompt that requests a command to apply to the untracked files.
The commands themselves are fairly self explanatory.
We'll take a brief look at each in a random order starting with command 6: help.
Selecting command 6 will further explain the other commands:
What now> 6

clean               - start cleaning
filter by pattern   - exclude items from deletion
select by numbers   - select items to be deleted by numbers
ask each            - confirm each deletion (like "rm -i")

quit
- stop cleaning
help
- this screen
?
 - help for prompt selection
5: quit
Is straight forward and will exit the interactive session.
1: clean
Will delete the indicated items.
If we were to execute 1: clean at this point untracked_dir/ untracked_file would be removed
4: ask each
will iterate over each untracked file and display a Y/N prompt for a deletion.
It looks like the following:
*** Commands ***

1: clean
2: filter by pattern    3: select by numbers    4: ask each             5: quit
 6: help
What now> 4
Remove untracked_dir/ [y/N]? N
Remove untracked_file [y/N]? N
2: filter by pattern
Will display an additional prompt that takes input used to filter the list of untracked files.
Would remove the following items:
untracked_dir/  untracked_file

*** Commands ***
1: clean
2: filter by pattern    3: select by numbers    4: ask each             5: quit
 6: help
What now> 2
untracked_dir/  untracked_file

Input ignore patterns>> *_file
untracked_dir/
Here we input the *_file wildcard pattern which then restricts the untracked file list to just untracked_dir.
3: select by numbers
Similar to command 2, command 3 works to refine the list of untracked file names.
The interactive session will prompt for numbers that correspond to an untracked file name.
Would remove the following items:
untracked_dir/  untracked_file

*** Commands ***
1: clean
2: filter by pattern    3: select by numbers    4: ask each             5: quit
 6: help
What now> 3
1: untracked_dir/    2: untracked_file

Select items to delete>> 2
1: untracked_dir/  * 2: untracked_file
Select items to delete>>
Would remove the following item:

untracked_file
*** Commands ***
1: clean
2: filter by pattern    3: select by numbers    4: ask each             5: quit
 6: help
Summary
To recap, git clean is a convenience method for deleting untracked files in a repo's working directory.
Untracked files are those that are in the repo's directory but have not yet been added to the repo's index with git add.
Overall the effect of git clean can be accomplished using git status and the operating systems native deletion tools.
Git clean can be used alongside git reset to fully undo any additions and commits in a repository.
Git Revert
The git revert command can be considered an 'undo' type command, however, it is not a traditional undo operation.
Instead of removing the commit from the project history, it figures out how to invert the changes introduced by the commit and appends a new commit with the resulting inverse content.
This prevents Git from losing history, which is important for the integrity of your revision history and for reliable collaboration.
Reverting should be used when you want to apply the inverse of a commit from your project history.
This can be useful, for example, if you’re tracking down a bug and find that it was introduced by a single commit.
Instead of manually going in, fixing it, and committing a new snapshot, you can use git revert to automatically do all of this for you.
How it works
The git revert command is used for undoing changes to a repository's commit history.
Other 'undo' commands like, git checkout and git reset, move the HEAD and branch ref pointers to a specified commit.
Git revert also takes a specified commit, however, git revert does not move ref pointers to this commit.
A revert operation will take the specified commit, inverse the changes from that commit, and create a new "revert commit".
The ref pointers are then updated to point at the new revert commit making it the tip of the branch.
To demonstrate let’s create an example repo using the command line examples below:
$ mkdir git_revert_test
$ cd git_revert_test/
$ git init .

Initialized empty Git repository in /git_revert_test/.git/
$ touch demo_file
$ git add demo_file
$ git commit -am"initial commit"

[main (root-commit) 299b15f] initial commit
1 file changed, 0 insertions(+), 0 deletions(-)
create mode 100644 demo_file
$ echo "initial content" >> demo_file

$ git commit -am"add new content to demo file"
[main 3602d88] add new content to demo file
n 1 file changed, 1 insertion(+)
$ echo "prepended line content" >> demo_file

$ git commit -am"prepend content to demo file"
[main 86bb32e] prepend content to demo file
1 file changed, 1 insertion(+)
$ git log --oneline

86bb32e prepend content to demo file
3602d88 add new content to demo file
299b15f initial commit
Here we have initialized a repo in a newly created directory named git_revert_test.
We have made 3 commits to the repo in which we have added a file demo_file and modified its content twice.
At the end of the repo setup procedure, we invoke git log to display the commit history, showing a total of 3 commits.
With the repo in this state, we are ready to initiate a git revert.$ git revert HEAD [main b9cd081] Revert "prepend content to demo file" 1 file changed, 1 deletion(-)Git revert expects a commit ref was passed in and will not execute without one.
Here we have passed in the HEAD ref.
This will revert the latest commit.
This is the same behavior as if we reverted to commit 3602d8815dbfa78cd37cd4d189552764b5e96c58.
Similar to a merge, a revert will create a new commit which will open up the configured system editor prompting for a new commit message.
Once a commit message has been entered and saved Git will resume operation.
We can now examine the state of the repo using git log and see that there is a new commit added to the previous log:
$ git log --oneline 1061e79 Revert "prepend content to demo file" 86bb32e prepend content to demo file 3602d88 add new content to demo file 299b15f initial commit
Note that the 3rd commit is still in the project history after the revert.
Instead of deleting it, git revert added a new commit to undo its changes.
As a result, the 2nd and 4th commits represent the exact same code base and the 3rd commit is still in our history just in case we want to go back to it down the road.
Common options
-e
--edit
This is a default option and doesn't need to be specified.
This option will open the configured system editor and prompts you to edit the commit message prior to committing the revert
--no-edit
This is the inverse of the -e option.
The revert will not open the editor.
-n

--no-commit
Passing this option will prevent git revert from creating a new commit that inverses the target commit.
Instead of creating the new commit this option will add the inverse changes to the Staging Index and Working Directory.
These are the other trees Git uses to manage the state of the repository.
For more info visit the git reset page.
Resetting vs. reverting
It's important to understand that git revert undoes a single commit—it does not "revert" back to the previous state of a project by removing all subsequent commits.
In Git, this is actually called a reset, not a revert.
Reverting has two important advantages over resetting.
First, it doesn’t change the project history, which makes it a “safe” operation for commits that have already been published to a shared repository.
For details about why altering shared history is dangerous, please see the git reset page.
Second, git revert is able to target an individual commit at an arbitrary point in the history, whereas git reset can only work backward from the current commit.
For example, if you wanted to undo an old commit with git reset, you would have to remove all of the commits that occurred after the target commit, remove it, then re-commit all of the subsequent commits.
Needless to say, this is not an elegant undo solution.
For a more detailed discussion on the differences between git revert and other 'undo' commands see Resetting, Checking Out and Reverting.
Summary
The git revert command is a forward-moving undo operation that offers a safe method of undoing changes.
Instead of deleting or orphaning commits in the commit history, a revert will create a new commit that inverses the changes specified.
Git revert is a safer alternative to git reset in regards to losing work.
To demonstrate the effects of git revert we leveraged other commands that have more in-depth documentation on their individual pages: git log, git commit, andgit reset.
Git Reset
The git reset command is a complex and versatile tool for undoing changes.
It has three primary forms of invocation.
These forms correspond to command line arguments --soft, --mixed, --hard.
The three arguments each correspond to Git's three internal state management mechanism's, The Commit Tree (HEAD), The Staging Index, and The Working Directory.
Git Reset & Three Trees of Git
To properly understand git reset usage, we must first understand Git's internal state management systems.
Sometimes these mechanisms are called Git's "three trees".
Trees may be a misnomer, as they are not strictly traditional tree data-structures.
They are, however, node and pointer-based data structures that Git uses to track a timeline of edits.
The best way to demonstrate these mechanisms is to create a changeset in a repository and follow it through the three trees.
To get started we will create a new repository with the commands below:
$ mkdir git_reset_test
$ cd git_reset_test/

$ git init .
Initialized empty Git repository in /git_reset_test/.git/
$ touch reset_lifecycle_file
$ git add reset_lifecycle_file

$ git commit -m"initial commit"
[main (root-commit) d386d86] initial commit
1 file changed, 0 insertions(+), 0 deletions(-)
create mode 100644 reset_lifecycle_file
The above example code creates a new git repository with a single empty file, reset_lifecycle_file.
At this point, the example repository has a single commit (d386d86) from adding reset_lifecycle_file.
The working directory
The first tree we will examine is "The Working Directory".
This tree is in sync with the local filesystem and is representative of the immediate changes made to content in files and directories.
$ echo 'hello git reset' > reset_lifecycle_file
$ git status

On branch main
Changes not staged for commit:
(use "git add ..." to update what will be committed)
(use "git checkout -- ..." to discard changes in working directory)

modified: reset_lifecycle_file
In our demo repository, we modify and add some content to the reset_lifecycle_file.
Invoking git status shows that Git is aware of the changes to the file.
These changes are currently a part of the first tree, "The Working Directory".
Git status can be used to show changes to the Working Directory.
They will be displayed in the red with a 'modified' prefix.
Staging index
Next up is the 'Staging Index' tree.
This tree is tracking Working Directory changes, that have been promoted with git add, to be stored in the next commit.
This tree is a complex internal caching mechanism.
Git generally tries to hide the implementation details of the Staging Index from the user.
To accurately view the state of the Staging Index we must utilize a lesser known Git command git ls-files.
The git ls-files command is essentially a debug utility for inspecting the state of the Staging Index tree.
git ls-files -s
100644 e69de29bb2d1d6434b8b29ae775ad8c2e48c5391 0   reset_lifecycle_file
Here we have executed git ls-files with the -s or --stage option.
Without the -s option the git ls-files output is simply a list of file names and paths that are currently part of the index.
The -s option displays additional metadata for the files in the Staging Index.
This metadata is the staged contents' mode bits, object name, and stage number.
Here we are interested in the object name, the second value (d7d77c1b04b5edd5acfc85de0b592449e5303770).
This is a standard Git object SHA-1 hash.
It is a hash of the content of the files.
The Commit History stores its own object SHA's for identifying pointers to commits and refs and the Staging Index has its own object SHA's for tracking versions of files in the index.
Next, we will promote the modified reset_lifecycle_file into the Staging Index.
$ git add reset_lifecycle_file
$ git status

On branch main Changes to be committed:
(use "git reset HEAD ..." to unstage)
modified: reset_lifecycle_file
Here we have invoked git add reset_lifecycle_file which adds the file to the Staging Index.
Invoking git status now shows reset_lifecycle_file in green under "Changes to be committed".
It is important to note that git status is not a true representation of the Staging Index.
The git status command output displays changes between the Commit History and the Staging Index.
Let us examine the Staging Index content at this point.
$ git ls-files -s 100644 d7d77c1b04b5edd5acfc85de0b592449e5303770 0 reset_lifecycle_file
We can see that the object SHA for reset_lifecycle_file has been updated from e69de29bb2d1d6434b8b29ae775ad8c2e48c5391 to d7d77c1b04b5edd5acfc85de0b592449e5303770.
Commit history
The final tree is the Commit History.
The git commit command adds changes to a permanent snapshot that lives in the Commit History.
This snapshot also includes the state of the Staging Index at the time of commit.
$ git commit -am"update content of reset_lifecycle_file"

[main dc67808] update content of reset_lifecycle_file
1 file changed, 1 insertion(+)
$ git status
On branch main

nothing to commit, working tree clean
Here we have created a new commit with a message of "update content of resetlifecyclefile".
The changeset has been added to the Commit History.
Invoking git status at this point shows that there are no pending changes to any of the trees.
Executing git log will display the Commit History.
Now that we have followed this changeset through the three trees we can begin to utilize git reset.
How it works
At a surface level, git reset is similar in behavior to git checkout.
Where git checkout solely operates on the HEAD ref pointer, git reset will move the HEAD ref pointer and the current branch ref pointer.
To better demonstrate this behavior consider the following example:
This example demonstrates a sequence of commits on the main branch.
The HEAD ref and main branch ref currently point to commit d.
Now let us execute and compare, both git checkout b and git reset b.
git checkout b
With git checkout, the main ref is still pointing to d.
The HEAD ref has been moved, and now points at commit b.
The repo is now in a 'detached HEAD' state.
git reset b
Comparatively, git reset, moves both the HEAD and branch refs to the specified commit.
In addition to updating the commit ref pointers, git reset will modify the state of the three trees.
The ref pointer modification always happens and is an update to the third tree, the Commit tree.
The command line arguments --soft, --mixed, and --hard direct how to modify the Staging Index, and Working Directory trees.
Main Options
The default invocation of git reset has implicit arguments of --mixed and HEAD.
This means executing git reset is equivalent to executing git reset --mixed HEAD.
In this form HEAD is the specified commit.
Instead of HEAD any Git SHA-1 commit hash can be used.
--hard
This is the most direct, DANGEROUS, and frequently used option.
When passed --hard The Commit History ref pointers are updated to the specified commit.
Then, the Staging Index and Working Directory are reset to match that of the specified commit.
Any previously pending changes to the Staging Index and the Working Directory gets reset to match the state of the Commit Tree.
This means any pending work that was hanging out in the Staging Index and Working Directory will be lost.
To demonstrate this, let's continue with the three tree example repo we established earlier.
First let's make some modifications to the repo.
Execute the following commands in the example repo:
$ echo 'new file content' > new_file
$ git add new_file
$ echo 'changed content' >> reset_lifecycle_file
These commands have created a new file named new_file and added it to the repo.
Additionally, the content of reset_lifecycle_file will be modified.
With these changes in place let us now examine the state of the repo using git status.
$ git status
On branch main

Changes to be committed:
 (use "git reset HEAD ..." to unstage)
new file: new_file
Changes not staged for commit:

 (use "git add ..." to update what will be committed)
 (use "git checkout -- ..." to discard changes in working directory)
modified: reset_lifecycle_file
We can see that there are now pending changes to the repo.
The Staging Index tree has a pending change for the addition of new_file and the Working Directory has a pending change for the modifications to reset_lifecycle_file.
Before moving forward let us also examine the state of the Staging Index:
$ git ls-files -s
100644 8e66654a5477b1bf4765946147c49509a431f963 0 new_file

100644 d7d77c1b04b5edd5acfc85de0b592449e5303770 0 reset_lifecycle_file
We can see that new_file has been added to the index.
We have made updates to reset_lifecycle_file but the Staging Index SHA (d7d77c1b04b5edd5acfc85de0b592449e5303770) remains the same.
This is expected behavior because have not used git add to promote these changes to the Staging Index.
These changes exist in the Working Directory.
Let us now execute a git reset --hard and examine the new state of the repository.
$ git reset --hard
HEAD is now at dc67808 update content of reset_lifecycle_file

$ git status
On branch main
nothing to commit, working tree clean
$ git ls-files -s

100644 d7d77c1b04b5edd5acfc85de0b592449e5303770 0 reset_lifecycle_file
Here we have executed a "hard reset" using the --hard option.
Git displays output indicating that HEAD is pointing to the latest commit dc67808.
Next, we check the state of the repo with git status.
Git indicates there are no pending changes.
We also examine the state of the Staging Index and see that it has been reset to a point before new_file was added.
Our modifications to reset_lifecycle_file and the addition of new_file have been destroyed.
This data loss cannot be undone, this is critical to take note of.
--mixed
This is the default operating mode.
The ref pointers are updated.
The Staging Index is reset to the state of the specified commit.
Any changes that have been undone from the Staging Index are moved to the Working Directory.
Let us continue.
$ echo 'new file content' > new_file
$ git add new_file

$ echo 'append content' >> reset_lifecycle_file
$ git add reset_lifecycle_file
$ git status
On branch main

Changes to be committed:
(use "git reset HEAD ..." to unstage)
new file: new_file
modified: reset_lifecycle_file

$ git ls-files -s
100644 8e66654a5477b1bf4765946147c49509a431f963 0 new_file
100644 7ab362db063f9e9426901092c00a3394b4bec53d 0 reset_lifecycle_file
In the example above we have made some modifications to the repository.
Again, we have added a new_file and modified the contents of reset_lifecycle_file.
These changes are then applied to the Staging Index with git add.
With the repo in this state, we will now execute the reset.
$ git reset --mixed

$ git status
On branch main
Changes not staged for commit:
(use "git add ..." to update what will be committed)

(use "git checkout -- ..." to discard changes in working directory)
modified: reset_lifecycle_file
Untracked files:
(use "git add ..." to include in what will be committed)

new_file
no changes added to commit (use "git add" and/or "git commit -a")
$ git ls-files -s
100644 d7d77c1b04b5edd5acfc85de0b592449e5303770 0 reset_lifecycle_file
Here we have executed a "mixed reset".
To reiterate, --mixed is the default mode and the same effect as executing git reset.
Examining the output from git status and git ls-files, shows that the Staging Index has been reset to a state where reset_lifecycle_file is the only file in the index.
The object SHA for reset_lifecycle_file has been reset to the previous version.
The important things to take note of here is that git status shows us that there are modifications to reset_lifecycle_file and there is an untracked file: new_file.
This is the explicit --mixed behavior.
The Staging Index has been reset and the pending changes have been moved into the Working Directory.
Compare this to the --hard reset case where the Staging Index was reset and the Working Directory was reset as well, losing these updates.
--soft
When the --soft argument is passed, the ref pointers are updated and the reset stops there.
The Staging Index and the Working Directory are left untouched.
This behavior can be hard to clearly demonstrate.
Let's continue with our demo repo and prepare it for a soft reset.
$ git add reset_lifecycle_file
$ git ls-files -s

100644 67cc52710639e5da6b515416fd779d0741e3762e 0 reset_lifecycle_file
$ git status
On branch main
Changes to be committed:

(use "git reset HEAD ..." to unstage)
modified: reset_lifecycle_file
Untracked files:
(use "git add ..." to include in what will be committed)

new_file
Here we have again used git add to promote the modified reset_lifecycle_file into the Staging Index.
We confirm that the index has been updated with the git ls-files output.
The output from git status now displays the "Changes to be committed" in green.
The new_file from our previous examples is floating around in the Working Directory as an untracked file.
Lets quickly execute rm new_file to delete the file as we will not need it for the upcoming examples.
With the repository in this state we now execute a soft reset.
$ git reset --soft
$ git status
On branch main
Changes to be committed:

(use "git reset HEAD ..." to unstage)
modified: reset_lifecycle_file
$ git ls-files -s
100644 67cc52710639e5da6b515416fd779d0741e3762e 0 reset_lifecycle_file
We have executed a 'soft reset'.
Examining the repo state with git status and git ls-files shows that nothing has changed.
This is expected behavior.
A soft reset will only reset the Commit History.
By default, git reset is invoked with HEAD as the target commit.
Since our Commit History was already sitting on HEAD and we implicitly reset to HEAD nothing really happened.
To better understand and utilize --soft we need a target commit that is not HEAD.
We have reset_lifecycle_file waiting in the Staging Index.
Let's create a new commit.
$ git commit -m"prepend content to reset_lifecycle_file"
At this point, our repo should have three commits.
We will be going back in time to the first commit.
To do this we will need the first commit's ID.
This can be found by viewing output from git log.
$ git log
commit 62e793f6941c7e0d4ad9a1345a175fe8f45cb9df

Author: bitbucket
Date: Fri Dec 1 15:03:07 2017 -0800
prepend content to reset_lifecycle_file
commit dc67808a6da9f0dec51ed16d3d8823f28e1a72a

Author: bitbucket
Date: Fri Dec 1 10:21:57 2017 -0800
update content of reset_lifecycle_file
commit 780411da3b47117270c0e3a8d5dcfd11d28d04a4

Author: bitbucket
Date: Thu Nov 30 16:50:39 2017 -0800
initial commit
Keep in mind that Commit History ID's will be unique to each system.
This means the commit ID's in this example will be different from what you see on your personal machine.
The commit ID we are interested in for this example is 780411da3b47117270c0e3a8d5dcfd11d28d04a4.
This is the ID that corresponds to the "initial commit".
Once we have located this ID we will use it as the target for our soft reset.
Before we travel back in time lets first check the current state of the repo.
$ git status && git ls-files -s
On branch main
nothing to commit, working tree clean

100644 67cc52710639e5da6b515416fd779d0741e3762e 0 reset_lifecycle_file
Here we execute a combo command of git status and git ls-files -s this shows us there are pending changes to the repo and reset_lifecycle_file in the Staging Index is at a version of 67cc52710639e5da6b515416fd779d0741e3762e.
With this in mind lets execute a soft reset back to our first commit.
$git reset --soft 780411da3b47117270c0e3a8d5dcfd11d28d04a4

$ git status && git ls-files -s
On branch main
Changes to be committed:
(use "git reset HEAD ..." to unstage)

modified: reset_lifecycle_file
100644 67cc52710639e5da6b515416fd779d0741e3762e 0 reset_lifecycle_file
The code above executes a "soft reset" and also invokes the git status and git ls-files combo command, which outputs the state of the repository.
We can examine the repo state output and note some interesting observations.
First, git status indicates there are modifications to reset_lifecycle_file and highlights them indicating they are changes staged for the next commit.
Second, the git ls-files input indicates that the Staging Index has not changed and retains the SHA 67cc52710639e5da6b515416fd779d0741e3762e we had earlier.
To further clarify what has happened in this reset let us examine the git log:$ git log commit 780411da3b47117270c0e3a8d5dcfd11d28d04a4 Author: bitbucket Date: Thu Nov 30 16:50:39 2017 -0800 initial commit
The log output now shows that there is a single commit in the Commit History.
This helps to clearly illustrate what --soft has done.
As with all git reset invocations, the first action reset takes is to reset the commit tree.
Our previous examples with --hard and --mixed have both been against the HEAD and have not moved the Commit Tree back in time.
During a soft reset, this is all that happens.
This may then be confusing as to why git status indicates there are modified files.
--soft does not touch the Staging Index, so the updates to our Staging Index followed us back in time through the commit history.
This can be confirmed by the output of git ls-files -s showing that the SHA for reset_lifecycle_file is unchanged.
As a reminder, git status does not show the state of 'the three trees', it essentially shows a diff between them.
In this case, it is displaying that the Staging Index is ahead of the changes in the Commit History as if we have already staged them.
Resetting vs Reverting
If git revert is a “safe” way to undo changes, you can think of git reset as the dangerous method.
There is a real risk of losing work with git reset.
Git reset will never delete a commit, however, commits can become 'orphaned' which means there is no direct path from a ref to access them.
These orphaned commits can usually be found and restored using git reflog.
Git will permanently delete any orphaned commits after it runs the internal garbage collector.
By default, Git is configured to run the garbage collector every 30 days.
Commit History is one of the 'three git trees' the other two, Staging Index and Working Directory are not as permanent as Commits.
Care must be taken when using this tool, as it’s one of the only Git commands that have the potential to lose your work.
Whereas reverting is designed to safely undo a public commit, git reset is designed to undo local changes to the Staging Index and Working Directory.
Because of their distinct goals, the two commands are implemented differently: resetting completely removes a changeset, whereas reverting maintains the original changeset and uses a new commit to apply the undo.
Don't Reset Public History
You should never use git reset when any snapshots after have been pushed to a public repository.
After publishing a commit, you have to assume that other developers are reliant upon it.
Removing a commit that other team members have continued developing poses serious problems for collaboration.
When they try to sync up with your repository, it will look like a chunk of the project history abruptly disappeared.
The sequence below demonstrates what happens when you try to reset a public commit.
The origin/main branch is the central repository’s version of your local main branch.
As soon as you add new commits after the reset, Git will think that your local history has diverged from origin/main, and the merge commit required to synchronize your repositories is likely to confuse and frustrate your team.
The point is, make sure that you’re using git reset on a local experiment that went wrong—not on published changes.
If you need to fix a public commit, the git revert command was designed specifically for this purpose.
Examples
git reset <file>
Remove the specified file from the staging area, but leave the working directory unchanged.
This unstages a file without overwriting any changes.
git reset
Reset the staging area to match the most recent commit, but leave the working directory unchanged.
This unstages all files without overwriting any changes, giving you the opportunity to re-build the staged snapshot from scratch.
git reset --hard
Reset the staging area and the working directory to match the most recent commit.
In addition to unstaging changes, the --hard flag tells Git to overwrite all changes in the working directory, too.
Put another way: this obliterates all uncommitted changes, so make sure you really want to throw away your local developments before using it.
git reset
Move the current branch tip backward to commit, reset the staging area to match, but leave the working directory alone.
All changes made since will reside in the working directory, which lets you re-commit the project history using cleaner, more atomic snapshots.
git reset --hard
Move the current branch tip backward to and reset both the staging area and the working directory to match.
This obliterates not only the uncommitted changes, but all commits after, as well.
Unstaging a file
The git reset command is frequently encountered while preparing the staged snapshot.
The next example assumes you have two files called hello.py and main.py that you’ve already added to the repository.
# Edit both hello.py and main.py

# Stage everything in the current directory
git add .
# Realize that the changes in hello.py and main.py
# should be committed in different snapshots

# Unstage main.py
git reset main.py
# Commit only hello.py
git commit -m "Make some changes to hello.py"

# Commit main.py in a separate snapshot
git add main.py
git commit -m "Edit main.py"
As you can see, git reset helps you keep your commits highly-focused by letting you unstage changes that aren’t related to the next commit.
Removing Local Commits
The next example shows a more advanced use case.
It demonstrates what happens when you’ve been working on a new experiment for a while, but decide to completely throw it away after committing a few snapshots.
# Create a new file called `foo.py` and add some code to it

# Commit it to the project history
git add foo.py
git commit -m "Start developing a crazy feature"
# Edit `foo.py` again and change some other tracked files, too

# Commit another snapshot
git commit -a -m "Continue my crazy feature"
# Decide to scrap the feature and remove the associated commits
git reset --hard HEAD~2
The git reset HEAD~2 command moves the current branch backward by two commits, effectively removing the two snapshots we just created from the project history.
Remember that this kind of reset should only be used on unpublished commits.
Never perform the above operation if you’ve already pushed your commits to a shared repository.
Summary
To review, git reset is a powerful command that is used to undo local changes to the state of a Git repo.
Git reset operates on "The Three Trees of Git".
These trees are the Commit History (HEAD), the Staging Index, and the Working Directory.
There are three command line options that correspond to the three trees.
The options --soft, --mixed, and --hard can be passed to git reset.
In this article we leveraged several other Git commands to help demonstrate the reset processes.
Learn more about those commands on their individual pages at: git status, git log, git add, git checkout, git reflog, and git revert.
Git RM
A common question when getting started with Git is "How do I tell Git not to track a file (or files) any more?" The git rm command is used to remove files from a Git repository.
It can be thought of as the inverse of the git add command.
Git rm Overview
The git rm command can be used to remove individual files or a collection of files.
The primary function of git rm is to remove tracked files from the Git index.
Additionally, git rm can be used to remove files from both the staging index and the working directory.
There is no option to remove a file from only the working directory.
The files being operated on must be identical to the files in the current HEAD.
If there is a discrepancy between the HEAD version of a file and the staging index or working tree version, Git will block the removal.
This block is a safety mechanism to prevent removal of in-progress changes.
Note that git rm does not remove branches.
Learn more about using git branches
Usage
<file>…
Specifies the target files to remove.
The option value can be an individual file, a space delimited list of files file1 file2 file3, or a wildcard file glob (~./directory/*).
-f
--force
The -f option is used to override the safety check that Git makes to ensure that the files in HEAD match the current content in the staging index and working directory.
-n

--dry-run
The "dry run" option is a safeguard that will execute the git rm command but not actually delete the files.
Instead it will output which files it would have removed.
-r
The -r option is shorthand for 'recursive'.
When operating in recursive mode git rm will remove a target directory and all the contents of that directory.
--
The separator option is used to explicitly distinguish between a list of file names and the arguments being passed to git rm.
This is useful if some of the file names have syntax that might be mistaken for other options.
--cached
The cached option specifies that the removal should happen only on the staging index.
Working directory files will be left alone.
--ignore-unmatch
This causes the command to exit with a 0 sigterm status even if no files matched.
This is a Unix level status code.
The code 0 indicates a successful invocation of the command.
The --ignore-unmatch option can be helpful when using git rm as part of a greater shell script that needs to fail gracefully.
-q
--quiet
The quiet option hides the output of the git rm command.
The command normally outputs one line for each file removed.
How to undo git rm
Executing git rm is not a permanent update.
The command will update the staging index and the working directory.
These changes will not be persisted until a new commit is created and the changes are added to the commit history.
This means that the changes here can be "undone" using common Git commands.
git reset HEAD
A reset will revert the current staging index and working directory back to the HEAD commit.
This will undo a git rm.
git checkout .
A checkout will have the same effect and restore the latest version of a file from HEAD.
In the event that git rm was executed and a new commit was created which persist the removal, git reflog can be used to find a ref that is before the git rm execution.
Learn more about using git reflog.
Discussion
The <file> argument given to the command can be exact paths, wildcard file glob patterns, or exact directory names.
The command removes only paths currently commited to the Git repository.
Wildcard file globbing matches across directories.
It is important to be cautious when using wildcard globs.
Consider the examples: directory/* and directory*.
The first example will remove all sub files of directory/ whereas the second example will remove all sibling directories like directory1 directory2 directory_whatever which may be an unexpected result.
The scope of git rm
The git rm command operates on the current branch only.
The removal event is only applied to the working directory and staging index trees.
The file removal is not persisted to the repository history until a new commit is created.
Why use git rm instead of rm
A Git repository will recognize when a regular shell rm command has been executed on a file it is tracking.
It will update the working directory to reflect the removal.
It will not update the staging index with the removal.
An additional git add command will have to be executed on the removed file paths to add the changes to the staging index.
The git rm command acts a shortcut in that it will update the working directory and the staging index with the removal.
Examples
git rm Documentation/\*.txt
This example uses a wildcard file glob to remove all *.txt files that are children of the Documentation directory and any of its subdirectories.
Note that the asterisk * is escaped with slashes in this example; this is a guard that prevents the shell from expanding the wildcard.
The wildcard then expands the pathnames of files and subdirectories under the Documentation/ directory.
git rm -f git-*.sh
This example uses the force option and targets all wildcard git-*.sh files.
The force option explicitly removes the target files from both the working directory and staging index.
How to remove files no longer in the filesystem
As stated above in "Why use git rm instead of rm" , git rm is actually a convenience command that combines the standard shell rm and git add to remove a file from the working directory and promote that removal to the staging index.
A repository can get into a cumbersome state in the event that several files have been removed using only the standard shell rm command.
If intentions are to record all the explicitly removed files as part of the next commit, git commit -a will add all the removal events to the staging index in preparation of the next commit.
If however, intentions are to persistently remove the files that were removed with the shell rm, use the following command:
git diff --name-only --diff-filter=D -z | xargs -0 git rm --cached
This command will generate a list of the removed files from the working directory and pipe that list to git rm --cached which will update the staging index.
Git rm summary
git rm is a command that operates on two of the primary Git internal state management trees: the working directory, and staging index.
git rm is used to remove a file from a Git repository.
It is a convenience method that combines the effect of the default shell rm command with git add.
This means that it will first remove a target from the filesystem and then add that removal event to the staging index.
The command is one of many that can be used for undoing changes in Git.
Rewriting history
Intro
This tutorial will cover various methods of rewriting and altering Git history.
Git uses a few different methods to record changes.
We will discuss the strengths and weaknesses of the different methods and give examples of how to work with them.
This tutorial discusses some of the most common reasons for overwriting committed snapshots and shows you how to avoid the pitfalls of doing so.
Git's main job is to make sure you never lose a committed change.
But it's also designed to give you total control over your development workflow.
This includes letting you define exactly what your project history looks like; however, it also creates the potential of losing commits.
Git provides its history-rewriting commands under the disclaimer that using them may result in lost content.
Git has several mechanisms for storing history and saving changes.
These mechanisms include: Commit --amend, git rebase and git reflog.
These options give you powerful work flow customization options.
By the end of this tutorial, you'll be familiar with commands that will let you restructure your Git commits, and be able to avoid pitfalls that are commonly encountered when rewriting history.
Changing the Last Commit: git commit --amend
The git commit --amend command is a convenient way to modify the most recent commit.
It lets you combine staged changes with the previous commit instead of creating an entirely new commit.
It can also be used to simply edit the previous commit message without changing its snapshot.
But, amending does not just alter the most recent commit, it replaces it entirely, meaning the amended commit will be a new entity with its own ref.
To Git, it will look like a brand new commit, which is visualized with an asterisk (*) in the diagram below.
There are a few common scenarios for using git commit --amend.
We'll cover usage examples in the following sections.
Change most recent Git commit message
git commit --amend
Let's say you just committed and you made a mistake in your commit log message.
Running this command when there is nothing staged lets you edit the previous commit’s message without altering its snapshot.
Premature commits happen all the time in the course of your everyday development.
It’s easy to forget to stage a file or to format your commit message the wrong way.
The --amend flag is a convenient way to fix these minor mistakes.
git commit --amend -m "an updated commit message"
Adding the -m option allows you to pass in a new message from the command line without being prompted to open an editor.
Changing committed files
The following example demonstrates a common scenario in Git-based development.
Let's say we've edited a few files that we would like to commit in a single snapshot, but then we forget to add one of the files the first time around.
Fixing the error is simply a matter of staging the other file and committing with the --amend flag:
# Edit hello.py and main.py
git add hello.py
git commit

# Realize you forgot to add the changes from main.py
git add main.py
git commit --amend --no-edit
The --no-edit flag will allow you to make the amendment to your commit without changing its commit message.
The resulting commit will replace the incomplete one, and it will look like we committed the changes to hello.py and main.py in a single snapshot.
Don’t amend public commits
Amended commits are actually entirely new commits and the previous commit will no longer be on your current branch.
This has the same consequences as resetting a public snapshot.
Avoid amending a commit that other developers have based their work on.
This is a confusing situation for developers to be in and it’s complicated to recover from.
Recap
To review, git commit --amend lets you take the most recent commit and add new staged changes to it.
You can add or remove changes from the Git staging area to apply with a --amend commit.
If there are no changes staged, a --amend will still prompt you to modify the last commit message log.
Be cautious when using --amend on commits shared with other team members.
Amending a commit that is shared with another user will potentially require confusing and lengthy merge conflict resolutions.
Changing older or multiple commits
To modify older or multiple commits, you can use git rebase to combine a sequence of commits into a new base commit.
In standard mode, git rebase allows you to literally rewrite history — automatically applying commits in your current working branch to the passed branch head.
Since your new commits will be replacing the old, it's important to not use git rebase on commits that have been pushed public, or it will appear that your project history disappeared.
In these or similar instances where it's important to preserve a clean project history, adding the -i option to git rebase allows you to run rebase interactive.
This gives you the opportunity to alter individual commits in the process, rather than moving all commits.
You can learn more about interactive rebasing and additional rebase commands on the git rebase page.
Changing committed files
During a rebase, the edit or e command will pause the rebase playback on that commit and allow you to make additional changes with git commit --amend Git will interrupt the playback and present a message:
Stopped at 5d025d1...
formatting

You can amend the commit now, with
git commit --amend
Once you are satisfied with your changes, run
git rebase --continue
Multiple messages
Each regular Git commit will have a log message explaining what happened in the commit.
These messages provide valuable insight into the project history.
During a rebase, you can run a few commands on commits to modify commit messages.
Reword or 'r' will stop rebase playback and let you rewrite the individual commit message during.
Squash or 's' during rebase playback, any commits marked s will be paused on and you will be prompted to edit the separate commit messages into a combined message.
More on this in the squash commits section below.
Fixup or 'f' has the same combining effect as squash.
Unlike squash, fixup commits will not interrupt rebase playback to open an editor to combine commit messages.
The commits marked 'f' will have their messages discarded in-favor of the previous commit's message.
Squash commits for a clean history
The s "squash" command is where we see the true utility of rebase.
Squash allows you to specify which commits you want to merge into the previous commits.
This is what enables a "clean history." During rebase playback, Git will execute the specified rebase command for each commit.
In the case of squash commits, Git will open your configured text editor and prompt to combine the specified commit messages.
This entire process can be visualized as follows:
Note that the commits modified with a rebase command have a different ID than either of the original commits.
Commits marked with pick will have a new ID if the previous commits have been rewritten.
Modern Git hosting solutions like Bitbucket now offer "auto squashing" features upon merge.
These features will automatically rebase and squash a branch's commits for you when utilizing the hosted solutions UI.
For more info see "Squash commits when merging a Git branch with Bitbucket."
Recap
Git rebase gives you the power to modify your history, and interactive rebasing allows you to do so without leaving a “messy” trail.
This creates the freedom to make and correct errors and refine your work, while still maintaining a clean, linear project history.
The safety net: git reflog
Reference logs, or "reflogs" are a mechanism Git uses to record updates applied to tips of branches and other commit references.
Reflog allows you to go back to commits even though they are not referenced by any branch or tag.
After rewriting history, the reflog contains information about the old state of branches and allows you to go back to that state if necessary.
Every time your branch tip is updated for any reason (by switching branches, pulling in new changes, rewriting history or simply by adding new commits), a new entry will be added to the reflog.
In this section we will take a high level look at the git reflog command and explore some common uses.
Usage
git reflog
This displays the reflog for the local repository.
git reflog --relative-date
This shows the reflog with relative date information (e.g.
2 weeks ago).
Example
To understand git reflog, let's run through an example.
0a2e358 HEAD@{0}: reset: moving to HEAD~2
0254ea7 HEAD@{1}: checkout: moving from 2.2 to main
c10f740 HEAD@{2}: checkout: moving from main to 2.2
The reflog above shows a checkout from main to the 2.2 branch and back.
From there, there's a hard reset to an older commit.
The latest activity is represented at the top labeled HEAD@{0}.
If it turns out that you accidentally moved back, the reflog will contain the commit main pointed to (0254ea7) before you accidentally dropped 2 commits.
git reset --hard 0254ea7
Using Git reset, it is now possible to change main back to the commit it was before.
This provides a safety net in case the history was accidentally changed.
It's important to note that the reflog only provides a safety net if changes have been committed to your local repository and that it only tracks movements of the repositories branch tip.
Additionally reflog entries have an expiration date.
The default expiration time for reflog entries is 90 days.
For additional information, see our git reflog page.
Summary
In this article we discussed several methods of changing git history, and undoing git changes.
We took a high level look at the git rebase process.
Some Key takeaways are:
There are many ways to rewrite history with git.
Use git commit --amend to change your latest log message.
Use git commit --amend to make modifications to the most recent commit.
Use git rebase to combine commits and modify history of a branch.
git rebase -i gives much more fine grained control over history modifications than a standard git rebase.
Learn more about the commands we covered at their individual pages:
git rebasegit reflog
git rebase
This document will serve as an in-depth discussion of the git rebase command.
The Rebase command has also been looked at on the setting up a repository and rewriting history pages.
This page will take a more detailed look at git rebase configuration and execution.
Common Rebase use cases and pitfalls will be covered here.
Rebase is one of two Git utilities that specializes in integrating changes from one branch onto another.
The other change integration utility is git merge.
Merge is always a forward moving change record.
Alternatively, rebase has powerful history rewriting features.
For a detailed look at Merge vs. Rebase, visit our Merging vs Rebasing guide.
Rebase itself has 2 main modes: "manual" and "interactive" mode.
We will cover the different Rebase modes in more detail below.
What is git rebase?
git reflog
This page provides a detailed discussion of the git reflog command.
Git keeps track of updates to the tip of branches using a mechanism called reference logs, or "reflogs." Many Git commands accept a parameter for specifying a reference or "ref", which is a pointer to a commit.
Common examples include:
git checkout git reset git merge
Reflogs track when Git refs were updated in the local repository.
In addition to branch tip reflogs, a special reflog is maintained for the Git stash.
Reflogs are stored in directories under the local repository's .git directory.
git reflog directories can be found at .git/logs/refs/heads/., .git/logs/HEAD, and also .git/logs/refs/stash if the git stash has been used on the repo.
We discussed git reflog at a high level on the Rewriting History Page.
This document will cover: extended configuration options of git reflog, common use-cases and pitfalls of git reflog, how to undo changes with git reflog, and more.
Basic usage
The most basic Reflog use case is invoking:
git reflog
This is essentially a short cut that's equivalent to:
git reflog show HEAD
This will output the HEAD reflog.
You should see output similar to:
eff544f HEAD@{0}: commit: migrate existing content
bf871fd HEAD@{1}: commit: Add Git Reflog outline
9a4491f HEAD@{2}: checkout: moving from main to git_reflog
9a4491f HEAD@{3}: checkout: moving from Git_Config to main

39b159a HEAD@{4}: commit: expand on git context
9b3aa71 HEAD@{5}: commit: more color clarification
f34388b HEAD@{6}: commit: expand on color support
9962aed HEAD@{7}: commit: a git editor -> the Git editor
Visit the Rewriting History page for another example of common reflog access.
Reflog references
By default, git reflog will output the reflog of the HEAD ref.
HEAD is a symbolic reference to the currently active branch.
Reflogs are available for other refs as well.
The syntax to access a git ref is name@{qualifier}.
In addition to HEAD refs, other branches, tags, remotes, and the Git stash can be referenced as well.
You can get a complete reflog of all refs by executing:
git reflog show --all
To see the reflog for a specific branch pass that branch name to git reflog showgit reflog show otherbranch 9a4491f otherbranch@{0}: commit: seperate articles into branch PRs 35aee4a otherbranch{1}: commit (initial): initial commit add git-init and setting-up-a-repo docs
Executing this example will show a reflog for the otherbranch branch.
The following example assumes you have previously stashed some changes using the git stash command.
git reflog stash 0d44de3 stash@{0}: WIP on git_reflog: c492574 flesh out intro
This will output a reflog for the Git stash.
The returned ref pointers can be passed to other Git commands:
git diff stash@{0} otherbranch@{0}
When executed, this example code will display Git diff output comparing the stash@{0} changes against the otherbranch@{0} ref.
Timed reflogs
Every reflog entry has a timestamp attached to it.
These timestamps can be leveraged as the qualifier token of Git ref pointer syntax.
This enables filtering Git reflogs by time.
The following are some examples of available time qualifiers:
1.minute.ago1.hour.ago1.day.agoyesterday1.week.ago1.month.ago1.year.ago2011-05-17.09:00:00
Time qualifiers can be combined (e.g.
1.day.2.hours.ago), Additionally plural forms are accepted (e.g.
5.minutes.ago).
Time qualifier refs can be passed to other git commands.
git diff main@{0} main@{1.day.ago}
This example will diff the current main branch against main 1 day ago.
This example is very useful if you want to know changes that have occurred within a time frame.
Subcommands & configuration options
git reflog accepts few addition arguments which are considered subcommands.
Show - git reflog show
show is implicitly passed by default.
For example, the command:
git reflog main@{0}
is equivalent to the command:
git reflog show main@{0}
In addition, git reflog show is an alias for git log -g --abbrev-commit --pretty=oneline.
Executing git reflog show will display the log for the passed .
Expire - git reflog expire
The expire subcommand cleans up old or unreachable reflog entries.
The expire subcommand has potential for data loss.
This subcommand is not typically used by end users, but used by git internally.
Passing a -n or --dry-run option to git reflog expire Will perform a "dry run" which will output which reflog entries are marked to be pruned, but will not actually prune them.
By default, the reflog expiration date is set to 90 days.
An expire time can be specified by passing a command line argument --expire=time to git reflog expire or by setting a git configuration name of gc.reflogExpire.
Delete - git reflog delete
The delete subcommand is self explanatory and will delete a passed in reflog entry.
As with expire, delete has potential to lose data and is not commonly invoked by end users.
Recovering lost commits
Git never really loses anything, even when performing history rewriting operations like rebasing or commit amending.
For the next example let's assume that we have made some new changes to our repo.
Our git log --pretty=oneline looks like the following:
338fbcb41de10f7f2e54095f5649426cb4bf2458 extended content 1e63ceab309da94256db8fb1f35b1678fb74abd4 bunch of content c49257493a95185997c87e0bc3a9481715270086 flesh out intro eff544f986d270d7f97c77618314a06f024c7916 migrate existing content bf871fd762d8ef2e146d7f0226e81a92f91975ad Add Git Reflog outline 35aee4a4404c42128bee8468a9517418ed0eb3dc initial commit add git-init and setting-up-a-repo docs
We then commit those changes and execute the following:
#make changes to HEAD git commit -am "some WIP changes"
With the addition of the new commit.
The log now looks like:
37656e19d4e4f1a9b419f57850c8f1974f871b07 some WIP changes 338fbcb41de10f7f2e54095f5649426cb4bf2458 extended content 1e63ceab309da94256db8fb1f35b1678fb74abd4 bunch of content c49257493a95185997c87e0bc3a9481715270086 flesh out intro eff544f986d270d7f97c77618314a06f024c7916 migrate existing content bf871fd762d8ef2e146d7f0226e81a92f91975ad Add Git Reflog outline 35aee4a4404c42128bee8468a9517418ed0eb3dc initial commit add git-init and setting-up-a-repo docs
At this point we perform an interactive rebase against the main branch by executing...
git rebase -i origin/main
During the rebase we mark commits for squash with the s rebase subcommand.
During the rebase, we squash a few commits into the most recent "some WIP changes" commit.
Because we squashed commits the git log output now looks like:
40dhsoi37656e19d4e4f1a9b419f57850ch87dah987698hs some WIP changes 35aee4a4404c42128bee8468a9517418ed0eb3dc initial commit add git-init and setting-up-a-repo docs
If we examine git log at this point it appears that we no longer have the commits that were marked for squashing.
What if we want to operate on one of the squashed commits? Maybe to remove its changes from history? This is an opportunity to leverage the reflog.
git reflog 37656e1 HEAD@{0}: rebase -i (finish): returning to refs/heads/git_reflog 37656e1 HEAD@{1}: rebase -i (start): checkout origin/main 37656e1 HEAD@{2}: commit: some WIP changes
We can see there are reflog entries for the start and finish of the rebase and prior to those is our "some WIP changes" commit.
We can pass the reflog ref to git reset and reset to a commit that was before the rebase.
git reset HEAD@{2}
Executing this reset command will move HEAD to the commit where "some WIP changes" was added, essentially restoring the other squashed commits.
Summary
In this tutorial we discussed the git reflog command.
Some key points covered were:
How to view reflog for specific branches
How to undo a git rebase using the reflog
How specify and view time based reflog entries
We briefly mentioned that git reflog can be used with other git commands like git checkout, git reset, and git merge.
Learn more at their respective pages.
For additional discussion on refs and the reflog, learn more here.
git syncing
SVN uses a single centralized repository to serve as the communication hub for developers, and collaboration takes place by passing changesets between the developers’ working copies and the central repository.
This is different from Git's distributed collaboration model, which gives every developer their own copy of the repository, complete with its own local history and branch structure.
Users typically need to share a series of commits rather than a single changeset.
Instead of committing a changeset from a working copy to the central repository, Git lets you share entire branches between repositories.
The git remote command is one piece of the broader system which is responsible for syncing changes.
Records registered through the git remote command are used in conjunction with the git fetch, git push, and git pull commands.
These commands all have their own syncing responsibilities which can be explored on the corresponding links.
Git remote
The git remote command lets you create, view, and delete connections to other repositories.
Remote connections are more like bookmarks rather than direct links into other repositories.
Instead of providing real-time access to another repository, they serve as convenient names that can be used to reference a not-so-convenient URL.
For example, the following diagram shows two remote connections from your repo into the central repo and another developer’s repo.
Instead of referencing them by their full URLs, you can pass the origin and john shortcuts to other Git commands.
Git remote usage overview
The git remote command is essentially an interface for managing a list of remote entries that are stored in the repository's ./.git/config file.
The following commands are used to view the current state of the remote list.
Viewing git remote configurations
git remote
List the remote connections you have to other repositories.
git remote -v
Same as the above command, but include the URL of each connection.
Creating and modifying git remote configurations
The git remote command is also a convenience or 'helper' method for modifying a repo's ./.git/config file.
The commands presented below let you manage connections with other repositories.
The following commands will modify the repo's /.git/config file.
The result of the following commands can also be achieved by directly editing the ./.git/config file with a text editor.
git remote add <name> <url>
Create a new connection to a remote repository.
After adding a remote, you’ll be able to use <name> as a convenient shortcut for <url> in other Git commands.
git remote rm <name>
Remove the connection to the remote repository called <name>.
git remote rename <old-name> <new-name>
Rename a remote connection from <old-name> to <new-name>.
Git remote discussion
Git is designed to give each developer an entirely isolated development environment.
This means that information is not automatically passed back and forth between repositories.
Instead, developers need to manually pull upstream commits into their local repository or manually push their local commits back up to the central repository.
The git remote command is really just an easier way to pass URLs to these "sharing" commands.
The origin Remote
When you clone a repository with git clone, it automatically creates a remote connection called origin pointing back to the cloned repository.
This is useful for developers creating a local copy of a central repository, since it provides an easy way to pull upstream changes or publish local commits.
This behavior is also why most Git-based projects call their central repository origin.
Repository URLs
Git supports many ways to reference a remote repository.
Two of the easiest ways to access a remote repo are via the HTTP and the SSH protocols.
HTTP is an easy way to allow anonymous, read-only access to a repository.
For example:
http://host/path/to/repo.git
But, it’s generally not possible to push commits to an HTTP address (you wouldn’t want to allow anonymous pushes anyways).
For read-write access, you should use SSH instead:
ssh://user@host/path/to/repo.git
You’ll need a valid SSH account on the host machine, but other than that, Git supports authenticated access via SSH out of the box.
Modern secure 3rd party hosting solutions like Bitbucket.com will provide these URLs for you.
Git remote commands
The git remote command is one of many Git commands that takes additional appended 'subcommands'.
Below is an examination of the commonly used git remote subcommands.
ADD <NAME> <URL>
Adds a record to ./.git/config for remote named <name> at the repository url <url>.
Accepts a -f option, that will git fetch immediately after the remote record is created.
Accepts a --tags option, that will git fetch immediately and import every tag from the remote repository.
RENAME <OLD> <NEW>
Updates ./.git/config to rename the record <OLD> to <NEW>.
All remote-tracking branches and configuration settings for the remote are updated.
REMOVE or RM <NAME>
Modifies ./.git/config and removes the remote named <NAME>.
All remote-tracking branches and configuration settings for the remote are removed.
GET-URL <NAME>
Outputs the URLs for a remote record.
Accepts --push, push URLs are queried rather than fetch URLs.
With --all, all URLs for the remote will be listed.
SHOW <NAME>
Outputs high-level information about the remote <NAME>.
PRUNE <NAME>
Deletes any local branches for <NAME> that are not present on the remote repository.
Accepts a --dry-run option which will list what branches are set to be pruned, but will not actually prune them.
Git remote examples
In addition to origin, it’s often convenient to have a connection to your teammates’ repositories.
For example, if your co-worker, John, maintained a publicly accessible repository on dev.example.com/john.git, you could add a connection as follows:
git remote add john http://dev.example.com/john.git
Having this kind of access to individual developers’ repositories makes it possible to collaborate outside of the central repository.
This can be very useful for small teams working on a large project.
Showing your remotes
By default, the git remote command will list previously stored remote connections to other repositories.
This will produce single line output that lists the names of "bookmark" name of remote repos.
$ git remote

origin
upstream
other_users_repo
Invoking git remote with the -v option will print the list of bookmarked repository names and additionally, the corresponding repository URL.
The -v option stands for "verbose".
Below is example output of verbose git remote output.
git remote -v
origin  git@bitbucket.com:origin_user/reponame.git (fetch)

origin  git@bitbucket.com:origin_user/reponame.git (push)
upstream    https://bitbucket.com/upstream_user/reponame.git (fetch)
upstream    https://bitbucket.com/upstream_user/reponame.git (push)
other_users_repo    https://bitbucket.com/other_users_repo/reponame (fetch)

other_users_repo    https://bitbucket.com/other_users_repo/reponame (push)
Adding Remote Repositories
The git remote add command will create a new connection record to a remote repository.
After adding a remote, you’ll be able to use as a convenient shortcut for in other Git commands.
For more information on the accepted URL syntax, view the "Repository URLs" section below.
This command will create a new record within the repository's ./.git/config.
An example of this config file update follows:$ git remote add fake_test https://bitbucket.com/upstream_user/reponame.git; [remote "remote_test"]
url = https://bitbucket.com/upstream_user/reponame.git
fetch = +refs/heads/*:refs/remotes/remote_test/*
Inspecting a Remote
The show subcommand can be appended to git remote to give detailed output on the configuration of a remote.
This output will contain a list of branches associated with the remote and also the endpoints attached for fetching and pushing.
git remote show upstream
* remote upstream
 Fetch URL: https://bitbucket.com/upstream_user/reponame.git

 Push URL: https://bitbucket.com/upstream_user/reponame.git
 HEAD branch: main
 Remote branches:
  main tracked

  simd-deprecated tracked
  tutorial tracked
 Local ref configured for 'git push':
  main pushes to main (fast-forwardable)
Fetching and pulling from Git remotes
Once a remote record has been configured through the use of the git remote command, the remote name can be passed as an argument to other Git commands to communicate with the remote repo.
Both git fetch, and git pull can be used to read from a remote repository.
Both commands have different operations that are explained in further depth on their respective links.
Pushing to Git remotes
The git push command is used to write to a remote repository.
git push <remote-name> <branch-name>
This example will upload the local state of <branch-name> to the remote repository specified by <remote-name>.
Renaming and Removing Remotes
git remote rename <old-name> <new-name>
The command git remote rename is self-explanatory.
When executed, this command will rename a remote connection from <old-name> to <new-name>.
Additionally, this will modify the contents of ./.git/config to rename the record for the remote there as well.
git remote rm <name>
The command git remote rm will remove the connection to the remote repository specified by the <name> parameter.
To demonstrate let us 'undo' the remote addition from our last example.
If we execute git remote rm remote_test, and then examine the contents of ./.git/config we can see that the [remote "remote_test"] record is no longer there.
git fetch
The git fetch command downloads commits, files, and refs from a remote repository into your local repo.
Fetching is what you do when you want to see what everybody else has been working on.
It’s similar to svn update in that it lets you see how the central history has progressed, but it doesn’t force you to actually merge the changes into your repository.
Git isolates fetched content from existing local content; it has absolutely no effect on your local development work.
Fetched content has to be explicitly checked out using the git checkout command.
This makes fetching a safe way to review commits before integrating them with your local repository.
When downloading content from a remote repo, git pull and git fetch commands are available to accomplish the task.
You can consider git fetch the 'safe' version of the two commands.
It will download the remote content but not update your local repo's working state, leaving your current work intact.
git pull is the more aggressive alternative; it will download the remote content for the active local branch and immediately execute git merge to create a merge commit for the new remote content.
If you have pending changes in progress this will cause conflicts and kick-off the merge conflict resolution flow.
How git fetch works with remote branches
To better understand how git fetch works let us discuss how Git organizes and stores commits.
Behind the scenes, in the repository's ./.git/objects directory, Git stores all commits, local and remote.
Git keeps remote and local branch commits distinctly separate through the use of branch refs.
The refs for local branches are stored in the ./.git/refs/heads/.
Executing the git branch command will output a list of the local branch refs.
The following is an example of git branch output with some demo branch names.
git branch
main
feature1
debug2
Examining the contents of the /.git/refs/heads/ directory would reveal similar output.
ls ./.git/refs/heads/
main
feature1

debug2
Remote branches are just like local branches, except they map to commits from somebody else’s repository.
Remote branches are prefixed by the remote they belong to so that you don’t mix them up with local branches.
Like local branches, Git also has refs for remote branches.
Remote branch refs live in the ./.git/refs/remotes/ directory.
The next example code snippet shows the branches you might see after fetching a remote repo conveniently named remote-repo:
git branch -r
# origin/main

# origin/feature1
# origin/debug2
# remote-repo/main
# remote-repo/other-feature
This output displays the local branches we had previously examined but now displays them prefixed with origin/.
Additionally, we now see the remote branches prefixed with remote-repo.
You can check out a remote branch just like a local one, but this puts you in a detached HEAD state (just like checking out an old commit).
You can think of them as read-only branches.
To view your remote branches, simply pass the -r flag to the git branch command.
You can inspect remote branches with the usual git checkout and git log commands.
If you approve the changes a remote branch contains, you can merge it into a local branch with a normal git merge.
So, unlike SVN, synchronizing your local repository with a remote repository is actually a two-step process: fetch, then merge.
The git pull command is a convenient shortcut for this process.
Git fetch commands and options
git fetch <remote>
Fetch all of the branches from the repository.
This also downloads all of the required commits and files from the other repository.
git fetch <remote> <branch>
Same as the above command, but only fetch the specified branch.
git fetch --all
A power move which fetches all registered remotes and their branches:
git fetch --dry-run
The --dry-run option will perform a demo run of the command.
It will output examples of actions it will take during the fetch but not apply them.
Git fetch examples
git fetch a remote branch
The following example will demonstrate how to fetch a remote branch and update your local working state to the remote contents.
In this example, let us assume there is a central repo origin from which the local repository has been cloned from using the git clone command.
Let us also assume an additional remote repository named coworkers_repo that contains a feature_branch which we will configure and fetch.
With these assumptions set let us continue the example.
Firstly we will need to configure the remote repo using the git remote command.
git remote add coworkers_repo git@bitbucket.org:coworker/coworkers_repo.git
Here we have created a reference to the coworker's repo using the repo URL.
We will now pass that remote name to git fetch to download the contents.
git fetch coworkers_repo coworkers/feature_branch
fetching coworkers/feature_branch
We now locally have the contents of coworkers/feature_branch we will need the integrate this into our local working copy.
We begin this process by using the git checkout command to checkout the newly downloaded remote branch.
git checkout coworkers/feature_branch
Note: checking out coworkers/feature_branch'.

You are in 'detached HEAD' state.
You can look around, make experimental
changes and commit them, and you can discard any commits you make in this
state without impacting any branches by performing another checkout.

If you want to create a new branch to retain commits you create, you may
do so (now or later) by using -b with the checkout command again.
Example:
git checkout -b <new-branch-name>
The output from this checkout operation indicates that we are in a detached HEAD state.
This is expected and means that our HEAD ref is pointing to a ref that is not in sequence with our local history.
Being that HEAD is pointed at the coworkers/feature_branch ref, we can create a new local branch from that ref.
The 'detached HEAD' output shows us how to do this using the git checkout command:
git checkout -b local_feature_branch
Here we have created a new local branch named local_feature_branch.
This puts updates HEAD to point at the latest remote content and we can continue development on it from this point.
Synchronize origin with git fetch
The following example walks through the typical workflow for synchronizing your local repository with the central repository's main branch.
git fetch origin
This will display the branches that were downloaded:
a1e8fb5..45e66a4 main -> origin/main

a1e8fb5..9e8ab1c develop -> origin/develop
* [new branch] some-feature -> origin/some-feature
The commits from these new remote branches are shown as squares instead of circles in the diagram below.
As you can see, git fetch gives you access to the entire branch structure of another repository.
To see what commits have been added to the upstream main, you can run a git log using origin/main as a filter:
git log --oneline main..origin/main
To approve the changes and merge them into your local main branch use the following commands:
git checkout main

git log origin/main
Then we can use git merge origin/main:
git merge origin/main
The origin/main and main branches now point to the same commit, and you are synchronized with the upstream developments.
Git fetch summary
In review, git fetch is a primary command used to download contents from a remote repository.
git fetch is used in conjunction with git remote, git branch, git checkout, and git reset to update a local repository to the state of a remote.
The git fetch command is a critical piece of collaborative git work flows.
git fetch has similar behavior to git pull, however, git fetch can be considered a safer, nondestructive version.
git push
The git push command is used to upload local repository content to a remote repository.
Pushing is how you transfer commits from your local repository to a remote repo.
It's the counterpart to git fetch, but whereas fetching imports commits to local branches, pushing exports commits to remote branches.
Remote branches are configured using the git remote command.
Pushing has the potential to overwrite changes, caution should be taken when pushing.
These issues are discussed below.
Git push usage
git push <remote> <branch>
Push the specified branch to , along with all of the necessary commits and internal objects.
This creates a local branch in the destination repository.
To prevent you from overwriting commits, Git won’t let you push when it results in a non-fast-forward merge in the destination repository.git push <remote> --force
Same as the above command, but force the push even if it results in a non-fast-forward merge.
Do not use the --force flag unless you’re absolutely sure you know what you’re doing.
git push <remote> --all
Push all of your local branches to the specified remote.
git push <remote> --tags
Tags are not automatically pushed when you push a branch or use the --all option.
The --tags flag sends all of your local tags to the remote repository.
Git push discussion
git push is most commonly used to publish an upload local changes to a central repository.
After a local repository has been modified a push is executed to share the modifications with remote team members.
The above diagram shows what happens when your local main has progressed past the central repository’s main and you publish changes by running git push origin main.
Notice how git push is essentially the same as running git merge main from inside the remote repository.
Git push and syncing
git push is one component of many used in the overall Git "syncing" process.
The syncing commands operate on remote branches which are configured using the git remote command.
git push can be considered and 'upload' command whereas, git fetch and git pull can be thought of as 'download' commands.
Once changesets have been moved via a download or upload a git merge may be performed at the destination to integrate the changes.
Pushing to bare repositories
A frequently used, modern Git practice is to have a remotely hosted --bare repository act as a central origin repository.
This origin repository is often hosted off-site with a trusted 3rd party like Bitbucket.
Since pushing messes with the remote branch structure, It is safest and most common to push to repositories that have been created with the --bare flag.
Bare repos don’t have a working directory so a push will not alter any in progress working directory content.
For more information on bare repository creation, read about git init.
Force Pushing
Git prevents you from overwriting the central repository’s history by refusing push requests when they result in a non-fast-forward merge.
So, if the remote history has diverged from your history, you need to pull the remote branch and merge it into your local one, then try pushing again.
This is similar to how SVN makes you synchronize with the central repository via svn update before committing a changeset.
The --force flag overrides this behavior and makes the remote repository’s branch match your local one, deleting any upstream changes that may have occurred since you last pulled.
The only time you should ever need to force push is when you realize that the commits you just shared were not quite right and you fixed them with a git commit --amend or an interactive rebase.
However, you must be absolutely certain that none of your teammates have pulled those commits before using the --force option.
Examples
Default git push
The following example describes one of the standard methods for publishing local contributions to the central repository.
First, it makes sure your local main is up-to-date by fetching the central repository’s copy and rebasing your changes on top of them.
The interactive rebase is also a good opportunity to clean up your commits before sharing them.
Then, the git push command sends all of the commits on your local main to the central repository.
git checkout main
git fetch origin main

git rebase -i origin/main
# Squash commits, fix up commit messages etc.
git push origin main
Since we already made sure the local main was up-to-date, this should result in a fast-forward merge, and git push should not complain about any of the non-fast-forward issues discussed above.
Amended force push
The git commit command accepts a --amend option which will update the previous commit.
A commit is often amended to update the commit message or add new changes.
Once a commit is amended a git push will fail because Git will see the amended commit and the remote commit as diverged content.
The --force option must be used to push an amended commit.
# make changes to a repo and git add
git commit --amend
# update the existing commit message

git push --force origin main
The above example assumes it is being executed on an existing repository with a commit history.
git commit --amend is used to update the previous commit.
The amended commit is then force pushed using the --force option.
Deleting a remote branch or tag
Sometimes branches need to be cleaned up for book keeping or organizational purposes.
The fully delete a branch, it must be deleted locally and also remotely.
git branch -D branch_name

git push origin :branch_name
The above will delete the remote branch named branch_name passing a branch name prefixed with a colon to git push will delete the remote branch.
git pull
The git pull command is used to fetch and download content from a remote repository and immediately update the local repository to match that content.
Merging remote upstream changes into your local repository is a common task in Git-based collaboration work flows.
The git pull command is actually a combination of two other commands, git fetch followed by git merge.
In the first stage of operation git pull will execute a git fetch scoped to the local branch that HEAD is pointed at.
Once the content is downloaded, git pull will enter a merge workflow.
A new merge commit will be-created and HEAD updated to point at the new commit.
Git pull usage
How it works
The git pull command first runs git fetch which downloads content from the specified remote repository.
Then a git merge is executed to merge the remote content refs and heads into a new local merge commit.
To better demonstrate the pull and merging process let us consider the following example.
Assume we have a repository with a main branch and a remote origin.
In this scenario, git pull will download all the changes from the point where the local and main diverged.
In this example, that point is E.
git pull will fetch the diverged remote commits which are A-B-C.
The pull process will then create a new local merge commit containing the content of the new diverged remote commits.
In the above diagram, we can see the new commit H.
This commit is a new merge commit that contains the contents of remote A-B-C commits and has a combined log message.
This example is one of a few git pull merging strategies.
A --rebase option can be passed to git pull to use a rebase merging strategy instead of a merge commit.
The next example will demonstrate how a rebase pull works.
Assume that we are at a starting point of our first diagram, and we have executed git pull --rebase.
In this diagram, we can now see that a rebase pull does not create the new H commit.
Instead, the rebase has copied the remote commits A--B--C and rewritten the local commits E--F--G to appear after them them in the local origin/main commit history.
Common Options
git pull <remote>
Fetch the specified remote’s copy of the current branch and immediately merge it into the local copy.
This is the same as git fetch <remote> followed by git merge origin/<current-branch>.
git pull --no-commit <remote>
Similar to the default invocation, fetches the remote content but does not create a new merge commit.
git pull --rebase <remote>
Same as the previous pull Instead of using git merge to integrate the remote branch with the local one, use git rebase.
git pull --verbose
Gives verbose output during a pull which displays the content being downloaded and the merge details.
Git pull discussion
You can think of git pull as Git's version of svn update.
It’s an easy way to synchronize your local repository with upstream changes.
The following diagram explains each step of the pulling process.
You start out thinking your repository is synchronized, but then git fetch reveals that origin's version of main has progressed since you last checked it.
Then git merge immediately integrates the remote main into the local one.
Git pull and syncing
git pull is one of many commands that claim the responsibility of 'syncing' remote content.
The git remote command is used to specify what remote endpoints the syncing commands will operate on.
The git pushcommand is used to upload content to a remote repository.
The git fetch command can be confused with git pull.
They are both used to download remote content.
An important safety distinction can be made between git pull and get fetch.
git fetch can be considered the "safe" option whereas, git pull can be considered unsafe.
git fetch will download the remote content and not alter the state of the local repository.
Alternatively, git pull will download remote content and immediately attempt to change the local state to match that content.
This may unintentionally cause the local repository to get in a conflicted state.
Pulling via Rebase
The --rebase option can be used to ensure a linear history by preventing unnecessary merge commits.
Many developers prefer rebasing over merging, since it’s like saying, "I want to put my changes on top of what everybody else has done." In this sense, using git pull with the --rebase flag is even more like svn update than a plain git pull.
In fact, pulling with --rebase is such a common workflow that there is a dedicated configuration option for it:
git config --global branch.autosetuprebase always
After running that command, all git pull commands will integrate via git rebase instead of git merge.
Git Pull Examples
The following examples demonstrate how to use git pull in common scenarios:
Default Behavior
git pull
Executing the default invocation of git pull will is equivalent to git fetch origin HEAD and git merge HEAD where HEAD is ref pointing to the current branch.
Git pull on remotes
git checkout new_feature
git pull <remote repo>
This example first performs a checkout and switches to the branch.
Following that, the git pull is executed with being passed.
This will implicitly pull down the newfeature branch from .
Once the download is complete it will initiate a git merge.
Git pull rebase instead of merge
The following example demonstrates how to synchronize with the central repository's main branch using a rebase:
git checkout main
git pull --rebase origin
This simply moves your local changes onto the top of what everybody else has already contributed.
Making a Pull Request
Pull requests are a feature that makes it easier for developers to collaborate using Bitbucket.
They provide a user-friendly web interface for discussing proposed changes before integrating them into the official project.
In their simplest form, pull requests are a mechanism for a developer to notify team members that they have completed a feature.
Once their feature branch is ready, the developer files a pull request via their Bitbucket account.
This lets everybody involved know that they need to review the code and merge it into the main branch.
But, the pull request is more than just a notification—it’s a dedicated forum for discussing the proposed feature.
If there are any problems with the changes, teammates can post feedback in the pull request and even tweak the feature by pushing follow-up commits.
All of this activity is tracked directly inside of the pull request.
Compared to other collaboration models, this formal solution for sharing commits makes for a much more streamlined workflow.
SVN and Git can both automatically send notification emails with a simple script; however, when it comes to discussing changes, developers typically have to rely on email threads.
This can become haphazard, especially when follow-up commits are involved.
Pull requests put all of this functionality into a friendly web interface right next to your Bitbucket repositories.
Anatomy of a Pull Request
When you file a pull request, all you’re doing is requesting that another developer (e.g., the project maintainer) pulls a branch from your repository into their repository.
This means that you need to provide 4 pieces of information to file a pull request: the source repository, the source branch, the destination repository, and the destination branch.
Many of these values will be set to a sensible default by Bitbucket.
However, depending on your collaboration workflow, your team may need to specify different values.
The above diagram shows a pull request that asks to merge a feature branch into the official main branch, but there are many other ways to use pull requests.
How it works
Pull requests can be used in conjunction with the Feature Branch Workflow, the Gitflow Workflow, or the Forking Workflow.
But a pull request requires either two distinct branches or two distinct repositories, so they will not work with the Centralized Workflow.
Using pull requests with each of these workflows is slightly different, but the general process is as follows:
A developer creates the feature in a dedicated branch in their local repo.
The developer pushes the branch to a public Bitbucket repository.
The developer files a pull request via Bitbucket.
The rest of the team reviews the code, discusses it, and alters it.
The project maintainer merges the feature into the official repository and closes the pull request.
The rest of this section describes how pull requests can be leveraged against different collaboration workflows.
Feature Branch Workflow With Pull Requests
The Feature Branch Workflow uses a shared Bitbucket repository for managing collaboration, and developers create features in isolated branches.
But, instead of immediately merging them into main, developers should open a pull request to initiate a discussion around the feature before it gets integrated into the main codebase.
There is only one public repository in the Feature Branch Workflow, so the pull request’s destination repository and the source repository will always be the same.
Typically, the developer will specify their feature branch as the source branch and the main branch as the destination branch.
After receiving the pull request, the project maintainer has to decide what to do.
If the feature is ready to go, they can simply merge it into main and close the pull request.
But, if there are problems with the proposed changes, they can post feedback in the pull request.
Follow-up commits will show up right next to the relevant comments.
It’s also possible to file a pull request for a feature that is incomplete.
For example, if a developer is having trouble implementing a particular requirement, they can file a pull request containing their work-in-progress.
Other developers can then provide suggestions inside of the pull request, or even fix the problem themselves with additional commits.
Gitflow Workflow With Pull Requests
The Gitflow Workflow is similar to the Feature Branch Workflow, but defines a strict branching model designed around the project release.
Adding pull requests to the Gitflow Workflow gives developers a convenient place to talk about a release branch or a maintenance branch while they’re working on it.
The mechanics of pull requests in the Gitflow Workflow are the exact same as the previous section: a developer simply files a pull request when a feature, release, or hotfix branch needs to be reviewed, and the rest of the team will be notified via Bitbucket.
Features are generally merged into the develop branch, while release and hotfix branches are merged into both develop and main.
Pull requests can be used to formally manage all of these merges.
Forking Workflow With Pull Requests
In the Forking Workflow, a developer pushes a completed feature to their own public repository instead of a shared one.
After that, they file a pull request to let the project maintainer know that it’s ready for review.
The notification aspect of pull requests is particularly useful in this workflow because the project maintainer has no way of knowing when another developer has added commits to their Bitbucket repository.
Since each developer has their own public repository, the pull request’s source repository will differ from its destination repository.
The source repository is the developer’s public repository and the source branch is the one that contains the proposed changes.
If the developer is trying to merge the feature into the main codebase, then the destination repository is the official project and the destination branch is main.
Pull requests can also be used to collaborate with other developers outside of the official project.
For example, if a developer was working on a feature with a teammate, they could file a pull request using the teammate’s Bitbucket repository for the destination instead of the official project.
They would then use the same feature branch for the source and destination branches.
The two developers could discuss and develop the feature inside of the pull request.
When they’re done, one of them would file another pull request asking to merge the feature into the official main branch.
This kind of flexibility makes pull requests very powerful collaboration tool in the Forking workflow.
Example
The example below demonstrates how pull requests can be used in the Forking Workflow.
It is equally applicable to developers working in small teams and to a third-party developer contributing to an open source project.
In the example, Mary is a developer, and John is the project maintainer.
Both of them have their own public Bitbucket repositories, and John’s contains the official project.
Mary forks the official project
To start working in the project, Mary first needs to fork John’s Bitbucket repository.
She can do this by signing in to Bitbucket, navigating to John’s repository, and clicking the Fork button.
After filling out the name and description for the forked repository, she will have a server-side copy of the project.
Mary clones her Bitbucket repository
Next, Mary needs to clone the Bitbucket repository that she just forked.
This will give her a working copy of the project on her local machine.
She can do this by running the following command:
git clone https://user@bitbucket.org/user/repo.git
Keep in mind that git clone automatically creates an origin remote that points back to Mary’s forked repository.
Mary develops a new feature
Before she starts writing any code, Mary needs to create a new branch for the feature.
This branch is what she will use as the source branch of the pull request.
git checkout -b some-feature

# Edit some code
git commit -a -m "Add first draft of some feature"
Mary can use as many commits as she needs to create the feature.
And, if the feature’s history is messier than she would like, she can use an interactive rebase to remove or squash unnecessary commits.
For larger projects, cleaning up a feature’s history makes it much easier for the project maintainer to see what’s going on in the pull request.
Mary pushes the feature to her Bitbucket repository
After her feature is complete, Mary pushes the feature branch to her own Bitbucket repository (not the official repository) with a simple git push:
git push origin some-branch
This makes her changes available to the project maintainer (or any collaborators who might need access to them).
Mary creates the pull request
After Bitbucket has her feature branch, Mary can create the pull request through her Bitbucket account by navigating to her forked repository and clicking the Pull request button in the top-right corner.
The resulting form automatically sets Mary’s repository as the source repository, and it asks her to specify the source branch, the destination repository, and the destination branch.
Mary wants to merge her feature into the main codebase, so the source branch is her feature branch, the destination repository is John’s public repository, and the destination branch is main.
She’ll also need to provide a title and description for the pull request.
If there are other people who need to approve the code besides John, she can enter them in the Reviewers field.
After she creates the pull request, a notification will be sent to John via his Bitbucket feed and (optionally) via email.
John reviews the pull request
John can access all of the pull requests people have filed by clicking on the Pull request tab in his own Bitbucket repository.
Clicking on Mary’s pull request will show him a description of the pull request, the feature’s commit history, and a diff of all the changes it contains.
If he thinks the feature is ready to merge into the project, all he has to do is hit the Merge button to approve the pull request and merge Mary’s feature into his main branch.
But, for this example, let’s say John found a small bug in Mary’s code, and needs her to fix it before merging it in.
He can either post a comment to the pull request as a whole, or he can select a specific commit in the feature’s history to comment on.
Mary adds a follow-up commit
If Mary has any questions about the feedback, she can respond inside of the pull request, treating it as a discussion forum for her feature.
To correct the error, Mary adds another commit to her feature branch and pushes it to her Bitbucket repository, just like she did the first time around.
This commit is automatically added to the original pull request, and John can review the changes again, right next to his original comment.
John accepts the pull request
Finally, John accepts the changes, merges the feature branch into main, and closes the pull request.
The feature is now integrated into the project, and any other developers working on it can pull it into their own local repositories using the standard git pull command.
Where to go from here
You should now have all of the tools you need to start integrating pull requests into your existing workflow.
Remember, pull requests are not a replacement for any of the Git-based collaboration workflows, but rather a convenient addition to them that makes collaboration more accessible to all of your team members.
Git Branch
This document is an in-depth review of the git branch command and a discussion of the overall Git branching model.
Branching is a feature available in most modern version control systems.
Branching in other VCS's can be an expensive operation in both time and disk space.
In Git, branches are a part of your everyday development process.
Git branches are effectively a pointer to a snapshot of your changes.
When you want to add a new feature or fix a bug—no matter how big or how small—you spawn a new branch to encapsulate your changes.
This makes it harder for unstable code to get merged into the main code base, and it gives you the chance to clean up your future's history before merging it into the main branch.
The diagram above visualizes a repository with two isolated lines of development, one for a little feature, and one for a longer-running feature.
By developing them in branches, it’s not only possible to work on both of them in parallel, but it also keeps the main branch free from questionable code.
The implementation behind Git branches is much more lightweight than other version control system models.
Instead of copying files from directory to directory, Git stores a branch as a reference to a commit.
In this sense, a branch represents the tip of a series of commits—it's not a container for commits.
The history for a branch is extrapolated through the commit relationships.
As you read, remember that Git branches aren't like SVN branches.
Whereas SVN branches are only used to capture the occasional large-scale development effort, Git branches are an integral part of your everyday workflow.
The following content will expand on the internal Git branching architecture.
How it works
A branch represents an independent line of development.
Branches serve as an abstraction for the edit/stage/commit process.
You can think of them as a way to request a brand new working directory, staging area, and project history.
New commits are recorded in the history for the current branch, which results in a fork in the history of the project.
The git branch command lets you create, list, rename, and delete branches.
It doesn’t let you switch between branches or put a forked history back together again.
For this reason, git branch is tightly integrated with the git checkout and git merge commands.
Common Options
git branch
List all of the branches in your repository.
This is synonymous with git branch --list.git branch <branch>
Create a new branch called <branch>.
This does not check out the new branch.
git branch -d <branch>
Delete the specified branch.
This is a “safe” operation in that Git prevents you from deleting the branch if it has unmerged changes.
git branch -D <branch>
Force delete the specified branch, even if it has unmerged changes.
This is the command to use if you want to permanently throw away all of the commits associated with a particular line of development.
git branch -m <branch>
Rename the current branch to <branch>.
git branch -a
List all remote branches.
Creating Branches
It's important to understand that branches are just pointers to commits.
When you create a branch, all Git needs to do is create a new pointer, it doesn’t change the repository in any other way.
If you start with a repository that looks like this:
Then, you create a branch using the following command:
git branch crazy-experiment
The repository history remains unchanged.
All you get is a new pointer to the current commit:
Note that this only creates the new branch.
To start adding commits to it, you need to select it with git checkout, and then use the standard git add and git commit commands.
Creating remote branches
So far these examples have all demonstrated local branch operations.
The git branch command also works on remote branches.
In order to operate on remote branches, a remote repo must first be configured and added to the local repo config.
$ git remote add new-remote-repo https://bitbucket.com/user/repo.git
# Add remote repo to local repo config
$ git push <new-remote-repo> crazy-experiment~

# pushes the crazy-experiment branch to new-remote-repo
This command will push a copy of the local branch crazy-experiment to the remote repo <remote>.
Deleting Branches
Once you’ve finished working on a branch and have merged it into the main code base, you’re free to delete the branch without losing any history:
git branch -d crazy-experiment
However, if the branch hasn’t been merged, the above command will output an error message:
error: The branch 'crazy-experiment' is not fully merged.
If you are sure you want to delete it, run 'git branch -D crazy-experiment'.
This protects you from losing access to that entire line of development.
If you really want to delete the branch (e.g., it’s a failed experiment), you can use the capital -D flag:
git branch -D crazy-experiment
This deletes the branch regardless of its status and without warnings, so use it judiciously.
The previous commands will delete a local copy of a branch.
The branch may still exist in remote repos.
To delete a remote branch execute the following.
git push origin --delete crazy-experiment
Or
git push origin :crazy-experiment
This will push a delete signal to the remote origin repository that triggers a delete of the remote crazy-experiment branch.
Summary
In this document we discussed Git's branching behavior and the git branch command.
The git branch commands primary functions are to create, list, rename and delete branches.
To operate further on the resulting branches the command is commonly used with other commands like git checkout.
Learn more about git checkout branch operations; such as switching branches and merging branches, on the git checkout page.
Compared to other VCSs, Git's branch operations are inexpensive and frequently used.
This flexibility enables powerful Git workflow customization.
For more info on Git workflows visit our extended workflow discussion pages: The Feature Branch Workflow, GitFlow Workflow, and Forking Workflow.
Git Checkout
This page is an examination of the git checkout command.
It will cover usage examples and edge cases.
In Git terms, a "checkout" is the act of switching between different versions of a target entity.
The git checkout command operates upon three distinct entities: files, commits, and branches.
In addition to the definition of "checkout" the phrase "checking out" is commonly used to imply the act of executing the git checkout command.
In the Undoing Changes topic, we saw how git checkout can be used to view old commits.
The focus for the majority of this document will be checkout operations on branches.
Checking out branches is similar to checking out old commits and files in that the working directory is updated to match the selected branch/revision; however, new changes are saved in the project history—that is, it’s not a read-only operation.
Checking out branches
The git checkout command lets you navigate between the branches created by git branch.
Checking out a branch updates the files in the working directory to match the version stored in that branch, and it tells Git to record all new commits on that branch.
Think of it as a way to select which line of development you’re working on.
Having a dedicated branch for each new feature is a dramatic shift from a traditional SVN workflow.
It makes it ridiculously easy to try new experiments without the fear of destroying existing functionality, and it makes it possible to work on many unrelated features at the same time.
In addition, branches also facilitate several collaborative workflows.
The git checkout command may occasionally be confused with git clone.
The difference between the two commands is that clone works to fetch code from a remote repository, alternatively checkout works to switch between versions of code already on the local system.
Usage: Existing branches
Assuming the repo you're working in contains pre-existing branches, you can switch between these branches using git checkout.
To find out what branches are available and what the current branch name is, execute git branch.
$> git branch
main
another_branch
feature_inprogress_branch

$> git checkout feature_inprogress_branch
The above example demonstrates how to view a list of available branches by executing the git branch command, and switch to a specified branch, in this case, the feature_inprogress_branch.
New Branches
Git checkout works hand-in-hand with git branch.
The git branch command can be used to create a new branch.
When you want to start a new feature, you create a new branch off main using git branch new_branch.
Once created you can then use git checkout new_branch to switch to that branch.
Additionally, The git checkout command accepts a -b argument that acts as a convenience method which will create the new branch and immediately switch to it.
You can work on multiple features in a single repository by switching between them with git checkout.
git checkout -b <new-branch>
The above example simultaneously creates and checks out <new-branch>.
The -b option is a convenience flag that tells Git to run git branch before running git checkout <new-branch>.
git checkout -b <new-branch> <existing-branch>
By default git checkout -b will base the new-branch off the current HEAD.
An optional additional branch parameter can be passed to git checkout.
In the above example, <existing-branch> is passed which then bases new-branch off of existing-branch instead of the current HEAD.
Switching Branches
Switching branches is a straightforward operation.
Executing the following will point HEAD to the tip of <branchname>.git checkout <branchname>
Git tracks a history of checkout operations in the reflog.
You can execute git reflog to view the history.
Git Checkout a Remote Branch
When collaborating with a team it is common to utilize remote repositories.
These repositories may be hosted and shared or they may be another colleague's local copy.
Each remote repository will contain its own set of branches.
In order to checkout a remote branch you have to first fetch the contents of the branch.
git fetch --all
In modern versions of Git, you can then checkout the remote branch like a local branch.
git checkout <remotebranch>
Older versions of Git require the creation of a new branch based on the remote.
git checkout -b <remotebranch> origin/<remotebranch>
Additionally you can checkout a new local branch and reset it to the remote branches last commit.
git checkout -b <branchname>
git reset --hard origin/<branchname>
Detached HEADS
Now that we’ve seen the three main uses of git checkout on branches, it's important to discuss the “detached HEAD” state.
Remember that the HEAD is Git’s way of referring to the current snapshot.
Internally, the git checkout command simply updates the HEAD to point to either the specified branch or commit.
When it points to a branch, Git doesn't complain, but when you check out a commit, it switches into a “detached HEAD” state.
This is a warning telling you that everything you’re doing is “detached” from the rest of your project’s development.
If you were to start developing a feature while in a detached HEAD state, there would be no branch allowing you to get back to it.
When you inevitably check out another branch (e.g., to merge your feature in), there would be no way to reference your feature:
The point is, your development should always take place on a branch—never on a detached HEAD.
This makes sure you always have a reference to your new commits.
However, if you’re just looking at an old commit, it doesn’t really matter if you’re in a detached HEAD state or not.
Summary
This page focused on usage of the git checkout command when changing branches.
In summation, git checkout, when used on branches, alters the target of the HEAD ref.
It can be used to create branches, switch branches, and checkout remote branches.
The git checkout command is an essential tool for standard Git operation.
It is a counterpart to git merge.
The git checkout and git merge commands are critical tools to enabling git workflows.
Git Merge
Merging is Git's way of putting a forked history back together again.
The git merge command lets you take the independent lines of development created by git branch and integrate them into a single branch.
Note that all of the commands presented below merge into the current branch.
The current branch will be updated to reflect the merge, but the target branch will be completely unaffected.
Again, this means that git merge is often used in conjunction with git checkout for selecting the current branch and git branch -d for deleting the obsolete target branch.
How it works
Git merge will combine multiple sequences of commits into one unified history.
In the most frequent use cases, git merge is used to combine two branches.
The following examples in this document will focus on this branch merging pattern.
In these scenarios, git merge takes two commit pointers, usually the branch tips, and will find a common base commit between them.
Once Git finds a common base commit it will create a new "merge commit" that combines the changes of each queued merge commit sequence.
Say we have a new branch feature that is based off the main branch.
We now want to merge this feature branch into main.
Invoking this command will merge the specified branch feature into the current branch, we'll assume main.
Git will determine the merge algorithm automatically (discussed below).
Merge commits are unique against other commits in the fact that they have two parent commits.
When creating a merge commit Git will attempt to auto magically merge the separate histories for you.
If Git encounters a piece of data that is changed in both histories it will be unable to automatically combine them.
This scenario is a version control conflict and Git will need user intervention to continue.
Preparing to merge
Before performing a merge there are a couple of preparation steps to take to ensure the merge goes smoothly.
Confirm the receiving branch
Execute git status to ensure that HEAD is pointing to the correct merge-receiving branch.
If needed, execute git checkout to switch to the receiving branch.
In our case we will execute git checkout main.
Fetch latest remote commits
Make sure the receiving branch and the merging branch are up-to-date with the latest remote changes.
Execute git fetch to pull the latest remote commits.
Once the fetch is completed ensure the main branch has the latest updates by executing git pull.
Merging
Once the previously discussed "preparing to merge" steps have been taken a merge can be initiated by executing git merge where is the name of the branch that will be merged into the receiving branch.
Fast Forward Merge
A fast-forward merge can occur when there is a linear path from the current branch tip to the target branch.
Instead of “actually” merging the branches, all Git has to do to integrate the histories is move (i.e., “fast forward”) the current branch tip up to the target branch tip.
This effectively combines the histories, since all of the commits reachable from the target branch are now available through the current one.
For example, a fast forward merge of some-feature into main would look something like the following:
However, a fast-forward merge is not possible if the branches have diverged.
When there is not a linear path to the target branch, Git has no choice but to combine them via a 3-way merge.
3-way merges use a dedicated commit to tie together the two histories.
The nomenclature comes from the fact that Git uses three commits to generate the merge commit: the two branch tips and their common ancestor.
While you can use either of these merge strategies, many developers like to use fast-forward merges (facilitated through rebasing) for small features or bug fixes, while reserving 3-way merges for the integration of longer-running features.
In the latter case, the resulting merge commit serves as a symbolic joining of the two branches.
Our first example demonstrates a fast-forward merge.
The code below creates a new branch, adds two commits to it, then integrates it into the main line with a fast-forward merge.
# Start a new feature
git checkout -b new-feature main
# Edit some files
git add <file>

git commit -m "Start a feature"
# Edit some files
git add <file>
git commit -m "Finish a feature"

# Merge in the new-feature branch
git checkout main
git merge new-feature
git branch -d new-feature
This is a common workflow for short-lived topic branches that are used more as an isolated development than an organizational tool for longer-running features.
Also note that Git should not complain about the git branch -d, since new-feature is now accessible from the main branch.
In the event that you require a merge commit during a fast forward merge for record keeping purposes you can execute git merge with the --no-ff option.
git merge --no-ff <branch>
This command merges the specified branch into the current branch, but always generates a merge commit (even if it was a fast-forward merge).
This is useful for documenting all merges that occur in your repository.
3-way merge
The next example is very similar, but requires a 3-way merge because main progresses while the feature is in-progress.
This is a common scenario for large features or when several developers are working on a project simultaneously.
Start a new feature
git checkout -b new-feature main
# Edit some files

git add <file>
git commit -m "Start a feature"
# Edit some files
git add <file>

git commit -m "Finish a feature"
# Develop the main branch
git checkout main
# Edit some files

git add <file>
git commit -m "Make some super-stable changes to main"
# Merge in the new-feature branch
git merge new-feature

git branch -d new-feature
Note that it’s impossible for Git to perform a fast-forward merge, as there is no way to move main up to new-feature without backtracking.
For most workflows, new-feature would be a much larger feature that took a long time to develop, which would be why new commits would appear on main in the meantime.
If your feature branch was actually as small as the one in the above example, you would probably be better off rebasing it onto main and doing a fast-forward merge.
This prevents superfluous merge commits from cluttering up the project history.
Resolving conflict
If the two branches you're trying to merge both changed the same part of the same file, Git won't be able to figure out which version to use.
When such a situation occurs, it stops right before the merge commit so that you can resolve the conflicts manually.
The great part of Git's merging process is that it uses the familiar edit/stage/commit workflow to resolve merge conflicts.
When you encounter a merge conflict, running the git status command shows you which files need to be resolved.
For example, if both branches modified the same section of hello.py, you would see something like the following:
On branch main

Unmerged paths:
(use "git add/rm ..." as appropriate to mark resolution)
both modified: hello.py
How conflicts are presented
When Git encounters a conflict during a merge, It will edit the content of the affected files with visual indicators that mark both sides of the conflicted content.
These visual markers are: <<<<<<>>>>>>.
Its helpful to search a project for these indicators during a merge to find where conflicts need to be resolved.
here is some content not affected by the conflict

<<<<<<< main
this is conflicted text from main
=======
this is conflicted text from feature branch

>>>>>>> feature branch;
Generally the content before the ======= marker is the receiving branch and the part after is the merging branch.
Once you've identified conflicting sections, you can go in and fix up the merge to your liking.
When you're ready to finish the merge, all you have to do is run git add on the conflicted file(s) to tell Git they're resolved.
Then, you run a normal git commit to generate the merge commit.
It’s the exact same process as committing an ordinary snapshot, which means it’s easy for normal developers to manage their own merges.
Note that merge conflicts will only occur in the event of a 3-way merge.
It’s not possible to have conflicting changes in a fast-forward merge.
Summary
This document is an overview of the git merge command.
Merging is an essential process when working with Git.
We discussed the internal mechanics behind a merge and the differences between a fast forward merge and a three way, true merge.
Some key take-aways are:
Git merging combines sequences of commits into one unified history of commits.
There are two main ways Git will merge: Fast Forward and Three way
Git can automatically merge commits unless there are changes that conflict in both commit sequences.
This document integrated and referenced other Git commands like: git branch, git pull, and git fetch.
Visit their corresponding stand-alone pages for more information.
Git merge conflicts
Version control systems are all about managing contributions between multiple distributed authors ( usually developers ).
Sometimes multiple developers may try to edit the same content.
If Developer A tries to edit code that Developer B is editing a conflict may occur.
To alleviate the occurrence of conflicts developers will work in separate isolated branches.
The git merge command's primary responsibility is to combine separate branches and resolve any conflicting edits.
Understanding merge conflicts
Merging and conflicts are a common part of the Git experience.
Conflicts in other version control tools like SVN can be costly and time-consuming.
Git makes merging super easy.
Most of the time, Git will figure out how to automatically integrate new changes.
Conflicts generally arise when two people have changed the same lines in a file, or if one developer deleted a file while another developer was modifying it.
In these cases, Git cannot automatically determine what is correct.
Conflicts only affect the developer conducting the merge, the rest of the team is unaware of the conflict.
Git will mark the file as being conflicted and halt the merging process.
It is then the developers' responsibility to resolve the conflict.
Types of merge conflicts
A merge can enter a conflicted state at two separate points.
When starting and during a merge process.
The following is a discussion of how to address each of these conflict scenarios.
Git fails to start the merge
A merge will fail to start when Git sees there are changes in either the working directory or staging area of the current project.
Git fails to start the merge because these pending changes could be written over by the commits that are being merged in.
When this happens, it is not because of conflicts with other developer's, but conflicts with pending local changes.
The local state will need to be stabilized using git stash, git checkout, git commit or git reset.
A merge failure on start will output the following error message:
error: Entry '<fileName>' not uptodate.
Cannot merge.
(Changes in working directory)
Git fails during the merge
A failure DURING a merge indicates a conflict between the current local branch and the branch being merged.
This indicates a conflict with another developers code.
Git will do its best to merge the files but will leave things for you to resolve manually in the conflicted files.
A mid-merge failure will output the following error message:
error: Entry '<fileName>' would be overwritten by merge.
Cannot merge.
(Changes in staging area)
Creating a merge conflict
In order to get real familiar with merge conflicts, the next section will simulate a conflict to later examine and resolve.
The example will be using a Unix-like command-line Git interface to execute the example simulation.
$ mkdir git-merge-test
$ cd git-merge-test

$ git init .
$ echo "this is some content to mess with" > merge.txt
$ git add merge.txt
$ git commit -am"we are commiting the inital content"

[main (root-commit) d48e74c] we are commiting the inital content
1 file changed, 1 insertion(+)
create mode 100644 merge.txt
This code example executes a sequence of commands that accomplish the following.
Create a new directory named git-merge-test, change to that directory, and initialize it as a new Git repo.
Create a new text file merge.txt with some content in it.
Add merge.txt to the repo and commit it.
Now we have a new repo with one branch main and a file merge.txt with content in it.
Next, we will create a new branch to use as the conflicting merge.
$ git checkout -b new_branch_to_merge_later
$ echo "totally different content to merge later" > merge.txt
$ git commit -am"edited the content of merge.txt to cause a conflict"

[new_branch_to_merge_later 6282319] edited the content of merge.txt to cause a conflict
1 file changed, 1 insertion(+), 1 deletion(-)
The proceeding command sequence achieves the following:
create and check out a new branch named new_branch_to_merge_later
overwrite the content in merge.txt
commit the new content
With this new branch: new_branch_to_merge_later we have created a commit that overrides the content of merge.txtgit checkout main
Switched to branch 'main'
echo "content to append" >> merge.txt
git commit -am"appended content to merge.txt"
[main 24fbe3c] appended content to merge.tx
1 file changed, 1 insertion(+)
This chain of commands checks out the main branch, appends content to merge.txt, and commits it.
This now puts our example repo in a state where we have 2 new commits.
One in the main branch and one in the new_branch_to_merge_later branch.
At this time lets git merge new_branch_to_merge_later and see what happen!
$ git merge new_branch_to_merge_later
Auto-merging merge.txt
CONFLICT (content): Merge conflict in merge.txt

Automatic merge failed; fix conflicts and then commit the result.
BOOM .
A conflict appears.
Thanks, Git for letting us know about this!
How to identify merge conflicts
As we have experienced from the proceeding example, Git will produce some descriptive output letting us know that a CONFLICT has occcured.
We can gain further insight by running the git status command
$ git status

On branch main
You have unmerged paths.
(fix conflicts and run "git commit")
(use "git merge --abort" to abort the merge)

Unmerged paths:
(use "git add <file>..." to mark resolution)
both modified:   merge.txt
The output from git status indicates that there are unmerged paths due to a conflict.
The merge.text file now appears in a modified state.
Let's examine the file and see whats modified.
$ cat merge.txt
<<<<<<< HEAD

this is some content to mess with
content to append
=======
totally different content to merge later

>>>>>>> new_branch_to_merge_later
Here we have used the cat command to put out the contents of the merge.txt file.
We can see some strange new additions
<<<<<<< HEAD=======>>>>>>> new_branch_to_merge_later
Think of these new lines as "conflict dividers".
The ======= line is the "center" of the conflict.
All the content between the center and the <<<<<<< HEAD line is content that exists in the current branch main which the HEAD ref is pointing to.
Alternatively all content between the center and >>>>>>> new_branch_to_merge_later is content that is present in our merging branch.
How to resolve merge conflicts using the command line
The most direct way to resolve a merge conflict is to edit the conflicted file.
Open the merge.txt file in your favorite editor.
For our example lets simply remove all the conflict dividers.
The modified merge.txt content should then look like:
this is some content to mess with

content to append
totally different content to merge later
Once the file has been edited use git add merge.txt to stage the new merged content.
To finalize the merge create a new commit by executing:
git commit -m "merged and resolved the conflict in merge.txt"
Git will see that the conflict has been resolved and creates a new merge commit to finalize the merge.
Git commands that can help resolve merge conflicts
General tools
git status
The status command is in frequent use when a working with Git and during a merge it will help identify conflicted files.
git log --merge
Passing the --merge argument to the git log command will produce a log with a list of commits that conflict between the merging branches.
git diffdiff helps find differences between states of a repository/files.
This is useful in predicting and preventing merge conflicts.
Tools for when git fails to start a merge
git checkoutcheckout can be used for undoing changes to files, or for changing branches
git reset --mixedreset can be used to undo changes to the working directory and staging area.
Tools for when git conflicts arise during a merge
git merge --abort
Executing git merge with the --abort option will exit from the merge process and return the branch to the state before the merge began.
git resetGit reset can be used during a merge conflict to reset conflicted files to a know good state
Summary
Merge conflicts can be an intimidating experience.
Luckily, Git offers powerful tools to help navigate and resolve conflicts.
Git can handle most merges on its own with automatic merging features.
A conflict arises when two separate branches have made edits to the same line in a file, or when a file has been deleted in one branch but edited in the other.
Conflicts will most likely happen when working in a team environment.
There are many tools to help resolve merge conflicts.
Git has plenty of command line tools we discussed here.
For more detailed information on these tools visit stand-alone pages for git log, git reset, git status, git checkout, and git reset.
In addition to the Git, many third-party tools offer streamlined merge conflict support features.
Git Merge Strategy Options and Examples
When a piece of work is complete, tested and ready to be merged back into the main line of development, your team has some policy choices to make.
What are your merge strategy options? In this article we'll examine the possibilities and then provide some notes on how Atlassian operates.
Hopefully at the end you'll have the tools to decide what works best for your team.
Git Merge Strategies
A merge happens when combining two branches.
Git will take two (or more) commit pointers and attempt to find a common base commit between them.
Git has several different methods to find a base commit, these methods are called "merge strategies".
Once Git finds a common base commit it will create a new "merge commit" that combines the changes of the specified merge commits.
Technically, a merge commit is a regular commit which just happens to have two parent commits.
git merge will automatically select a merge strategy unless explicitly specified.
The git merge and git pull commands can be passed an -s (strategy) option.
The -s option can be appended with the name of the desired merge strategy.
If not explicitly specified, Git will select the most appropriate merge strategy based on the provided branches.
The following is a list of the available merge strategies.
Recursive
git merge -s recursive branch1 branch2
This operates on two heads.
Recursive is the default merge strategy when pulling or merging one branch.
Additionally this can detect and handle merges involving renames, but currently cannot make use of detected copies.
This is the default merge strategy when pulling or merging one branch.
Resolve
git merge -s resolve branch1 branch2
This can only resolve two heads using a 3-way merge algorithm.
It tries to carefully detect cris-cross merge ambiguities and is considered generally safe and fast.
Octopus
git merge -s octopus branch1 branch2 branch3 branchN
The default merge strategy for more than two heads.
When more than one branch is passed octopus is automatically engaged.
If a merge has conflicts that need manual resolution octopus will refuse the merge attempt.
It is primarily used for bundling similar feature branch heads together.
Ours
git merge -s ours branch1 branch2 branchN
The Ours strategy operates on multiple N number of branches.
The output merge result is always that of the current branch HEAD.
The "ours" term implies the preference effectively ignoring all changes from all other branches.
It is intended to be used to combine history of similar feature branches.
Subtree
git merge -s subtree branchA branchB
This is an extension of the recursive strategy.
When merging A and B, if B is a child subtree of A, B is first updated to reflect the tree structure of A, This update is also done to the common ancestor tree that is shared between A and B.
Types of Git Merge Strategies
Explicit Merges
Explicit merges are the default merge type.
The 'explicit' part is that they create a new merge commit.
This alters the commit history and explicitly shows where a merge was executed.
The merge commit content is also explicit in the fact that it shows which commits were the parents of the merge commit.
Some teams avoid explicit merges because arguably the merge commits add "noise" to the history of the project.
implicit merge via rebase or fast-forward merge
Squash on merge, generally without explicit merge
Recursive Git Merge Strategy Options
The 'recursive' strategy introduced above, has its own subset of additional operation options.
ours
Not to be confused with the Ours merge strategy.
This option conflicts to be auto-resolved cleanly by favoring the 'our' version.
Changes from the 'theirs' side are automatically incorporated if they do not conflict.
theirs
The opposite of the 'ours' strategy.
the "theirs" option favors the foreign merging tree in conflict resolution.
patience
This option spends extra time to avoid mis-merges on unimportant matching lines.
This options is best used when branches to be merged have extremely diverged.
diff-algorithimignore-*
ignore-space-change
ignore-all-space
ignore-space-at-eol
ignore-cr-at-eol
A set of options that target whitespace characters.
Any line that matches the subset of the passed option will be ignored.
renormalize
This option runs a check-out and check-in on all of the tree git trees while resolving a three-way merge.
This option is intended to be used with merging branches with differing checkin/checkout states.
no-normalize
Disables the renormalize option.
This overrides the merge.renormalize configuration variable.
no-renames
This option will ignore renamed files during the merge.
find-renames=n
This is the default behavior.
The recursive merge will honor file renames.
The n parameter can be used to pass a threshold for rename similarity.
The default n value is 100%.subtree
This option borrows from the `subtree` strategy.
Where the strategy operates on two trees and modifies how to make them match on a shared ancestor, this option instead operates on the path metadata of the tree to make them match.
Our Git Merge Policy
Atlassian strongly prefers using explicit merges.
The reason is very simple: explicit merges provide great traceability and context on the features being merged.
A local history clean-up rebase before sharing a feature branch for review is absolutely encouraged, but this does not change the policy at all.
It augments it.
Comparing Workflows
Git is the most commonly used version control system today.
A Git workflow is a recipe or recommendation for how to use Git to accomplish work in a consistent and productive manner.
Git workflows encourage developers and DevOps teams to leverage Git effectively and consistently.
Git offers a lot of flexibility in how users manage changes.
Given Git's focus on flexibility, there is no standardized process on how to interact with Git.
When working with a team on a Git-managed project, it’s important to make sure the team is all in agreement on how the flow of changes will be applied.
To ensure the team is on the same page, an agreed-upon Git workflow should be developed or selected.
There are several publicized Git workflows that may be a good fit for your team.
Here, we will discuss some of these Git workflow options.
The array of possible workflows can make it hard to know where to begin when implementing Git in the workplace.
This page provides a starting point by surveying the most common Git workflows for software teams.
As you read through, remember that these workflows are designed to be guidelines rather than concrete rules.
We want to show you what’s possible, so you can mix and match aspects from different workflows to suit your individual needs.
What is a successful Git workflow?
When evaluating a workflow for your team, it's most important that you consider your team’s culture.
You want the workflow to enhance the effectiveness of your team and not be a burden that limits productivity.
Some things to consider when evaluating a Git workflow are:
Does this workflow scale with team size?
Is it easy to undo mistakes and errors with this workflow?
Does this workflow impose any new unnecessary cognitive overhead to the team?
Centralized Workflow
The Centralized Workflow is a great Git workflow for teams transitioning from SVN.
Like Subversion, the Centralized Workflow uses a central repository to serve as the single point-of-entry for all changes to the project.
Instead of trunk, the default development branch is called main and all changes are committed into this branch.
This workflow doesn’t require any other branches besides main.
Transitioning to a distributed version control system may seem like a daunting task, but you don’t have to change your existing workflow to take advantage of Git.
Your team can develop projects in the exact same way as they do with Subversion.
However, using Git to power your development workflow presents a few advantages over SVN.
First, it gives every developer their own local copy of the entire project.
This isolated environment lets each developer work independently of all other changes to a project - they can add commits to their local repository and completely forget about upstream developments until it's convenient for them.
Second, it gives you access to Git’s robust branching and merging model.
Unlike SVN, Git branches are designed to be a fail-safe mechanism for integrating code and sharing changes between repositories.
The Centralized Workflow is similar to other workflows in its utilization of a remote server-side hosted repository that developers push and pull form.
Compared to other workflows, the Centralized Workflow has no defined pull request or forking patterns.
A Centralized Workflow is generally better suited for teams migrating from SVN to Git and smaller size teams.
How it works
Developers start by cloning the central repository.
In their own local copies of the project, they edit files and commit changes as they would with SVN; however, these new commits are stored locally - they’re completely isolated from the central repository.
This lets developers defer synchronizing upstream until they’re at a convenient break point.
To publish changes to the official project, developers "push" their local main branch to the central repository.
This is the equivalent of svn commit, except that it adds all of the local commits that aren’t already in the central main branch.
Initialize the central repository
First, someone needs to create the central repository on a server.
If it’s a new project, you can initialize an empty repository.
Otherwise, you’ll need to import an existing Git or SVN repository.
Central repositories should always be bare repositories (they shouldn’t have a working directory), which can be created as follows:
ssh user@host git init --bare /path/to/repo.git
Be sure to use a valid SSH username for user, the domain or IP address of your server for host, and the location where you'd like to store your repo for /path/to/repo.git.
Note that the .git extension is conventionally appended to the repository name to indicate that it’s a bare repository.
Hosted central repositories
Central repositories are often created through 3rd party Git hosting services like Bitbucket Cloud or Bitbucket Server.
The process of initializing a bare repository discussed above is handled for you by the hosting service.
The hosting service will then provide an address for the central repository to access from your local repository.
Clone the central repository
Next, each developer creates a local copy of the entire project.
This is accomplished via the git clone command:
git clone ssh://user@host/path/to/repo.git
When you clone a repository, Git automatically adds a shortcut called origin that points back to the “parent” repository, under the assumption that you'll want to interact with it further on down the road.
Make changes and commit
Once the repository is cloned locally, a developer can make changes using the standard Git commit process: edit, stage, and commit.
If you’re not familiar with the staging area, it’s a way to prepare a commit without having to include every change in the working directory.
This lets you create highly focused commits, even if you’ve made a lot of local changes.
git status # View the state of the repo
git add <some-file> # Stage a file
git commit # Commit a file</some-file>
Remember that since these commands create local commits, John can repeat this process as many times as he wants without worrying about what’s going on in the central repository.
This can be very useful for large features that need to be broken down into simpler, more atomic chunks.
Push new commits to central repository
Once the local repository has new changes committed.
These change will need to be pushed to share with other developers on the project.
git push origin main
This command will push the new committed changes to the central repository.
When pushing changes to the central repository, it is possible that updates from another developer have been previously pushed that contain code which conflict with the intended push updates.
Git will output a message indicating this conflict.
In this situation, git pull will first need to be executed.
This conflict scenario will be expanded on in the following section.
Managing conflicts
The central repository represents the official project, so its commit history should be treated as sacred and immutable.
If a developer’s local commits diverge from the central repository, Git will refuse to push their changes because this would overwrite official commits.
Before the developer can publish their feature, they need to fetch the updated central commits and rebase their changes on top of them.
This is like saying, “I want to add my changes to what everyone else has already done.” The result is a perfectly linear history, just like in traditional SVN workflows.
If local changes directly conflict with upstream commits, Git will pause the rebasing process and give you a chance to manually resolve the conflicts.
The nice thing about Git is that it uses the same git status and git add commands for both generating commits and resolving merge conflicts.
This makes it easy for new developers to manage their own merges.
Plus, if they get themselves into trouble, Git makes it very easy to abort the entire rebase and try again (or go find help).
Example
Let’s take a general example at how a typical small team would collaborate using this workflow.
We’ll see how two developers, John and Mary, can work on separate features and share their contributions via a centralized repository.
John works on his feature
In his local repository, John can develop features using the standard Git commit process: edit, stage, and commit.
Remember that since these commands create local commits, John can repeat this process as many times as he wants without worrying about what’s going on in the central repository.
Mary works on her feature
Meanwhile, Mary is working on her own feature in her own local repository using the same edit/stage/commit process.
Like John, she doesn’t care what’s going on in the central repository, and she really doesn’t care what John is doing in his local repository, since all local repositories are private.
John publishes his feature
Once John finishes his feature, he should publish his local commits to the central repository so other team members can access it.
He can do this with the git push command, like so:
git push origin main
Remember that origin is the remote connection to the central repository that Git created when John cloned it.
The main argument tells Git to try to make the origin’s main branch look like his local main branch.
Since the central repository hasn’t been updated since John cloned it, this won’t result in any conflicts and the push will work as expected.
Mary tries to publish her feature
Let’s see what happens if Mary tries to push her feature after John has successfully published his changes to the central repository.
She can use the exact same push command:
git push origin main
But, since her local history has diverged from the central repository, Git will refuse the request with a rather verbose error message:
error: failed to push some refs to '/path/to/repo.git'
hint: Updates were rejected because the tip of your current branch is behind
hint: its remote counterpart.

Merge the remote changes (e.g.
'git pull')
hint: before pushing again.
hint: See the 'Note about fast-forwards' in 'git push --help' for details.
This prevents Mary from overwriting official commits.
She needs to pull John’s updates into her repository, integrate them with her local changes, and then try again.
Mary rebases on top of John’s commit(s)
Mary can use git pull to incorporate upstream changes into her repository.
This command is sort of like svn update—it pulls the entire upstream commit history into Mary’s local repository and tries to integrate it with her local commits:
git pull --rebase origin main
The --rebase option tells Git to move all of Mary’s commits to the tip of the main branch after synchronising it with the changes from the central repository, as shown below:
The pull would still work if you forgot this option, but you would wind up with a superfluous “merge commit” every time someone needed to synchronize with the central repository.
For this workflow, it’s always better to rebase instead of generating a merge commit.
Mary resolves a merge conflict
Rebasing works by transferring each local commit to the updated main branch one at a time.
This means that you catch merge conflicts on a commit-by-commit basis rather than resolving all of them in one massive merge commit.
This keeps your commits as focused as possible and makes for a clean project history.
In turn, this makes it much easier to figure out where bugs were introduced and, if necessary, to roll back changes with minimal impact on the project.
If Mary and John are working on unrelated features, it’s unlikely that the rebasing process will generate conflicts.
But if it does, Git will pause the rebase at the current commit and output the following message, along with some relevant instructions:
CONFLICT (content): Merge conflict in <some-file>The great thing about Git is that anyone can resolve their own merge conflicts.
In our example, Mary would simply run a git status to see where the problem is.
Conflicted files will appear in the Unmerged paths section:
# Unmerged paths:
# (use "git reset HEAD <some-file>..." to unstage)
# (use "git add/rm <some-file>..." as appropriate to mark resolution)
#

# both modified: <some-file>
Then, she’ll edit the file(s) to her liking.
Once she’s happy with the result, she can stage the file(s) in the usual fashion and let git rebase do the rest:
git add <some-file>

git rebase --continue
And that’s all there is to it.
Git will move on to the next commit and repeat the process for any other commits that generate conflicts.
If you get to this point and realize and you have no idea what’s going on, don’t panic.
Just execute the following command and you’ll be right back to where you started:
git rebase --abort
Mary successfully publishes her feature
After she’s done synchronizing with the central repository, Mary will be able to publish her changes successfully:
git push origin main
Where to go from here
As you can see, it’s possible to replicate a traditional Subversion development environment using only a handful of Git commands.
This is great for transitioning teams off of SVN, but it doesn’t leverage the distributed nature of Git.
The Centralized Workflow is great for small teams.
The conflict resolution process detailed above can form a bottleneck as your team scales in size.
If your team is comfortable with the Centralized Workflow but wants to streamline its collaboration efforts, it's definitely worth exploring the benefits of the Feature Branch Workflow.
By dedicating an isolated branch to each feature, it’s possible to initiate in-depth discussions around new additions before integrating them into the official project.
Other common workflows
The Centralized Workflow is essentially a building block for other Git workflows.
Most popular Git workflows will have some sort of centralized repo that individual developers will push and pull from.
Below we will briefly discuss some other popular Git workflows.
These extended workflows offer more specialized patterns in regard to managing branches for feature development, hot fixes, and eventual release.
Feature branching
Feature Branching is a logical extension of Centralized Workflow.
The core idea behind the Feature Branch Workflow is that all feature development should take place in a dedicated branch instead of the main branch.
This encapsulation makes it easy for multiple developers to work on a particular feature without disturbing the main codebase.
It also means the main branch should never contain broken code, which is a huge advantage for continuous integration environments.
Gitflow Workflow
The Gitflow Workflow was first published in a highly regarded 2010 blog post from Vincent Driessen at nvie.
The Gitflow Workflow defines a strict branching model designed around the project release.
This workflow doesn’t add any new concepts or commands beyond what’s required for the Feature Branch Workflow.
Instead, it assigns very specific roles to different branches and defines how and when they should interact.
Forking Workflow
The Forking Workflow is fundamentally different than the other workflows discussed in this tutorial.
Instead of using a single server-side repository to act as the “central” codebase, it gives every developer a server-side repository.
This means that each contributor has not one, but two Git repositories: a private local one and a public server-side one.
Guidelines
There is no one size fits all Git workflow.
As previously stated, it’s important to develop a Git workflow that is a productivity enhancement for your team.
In addition to team culture, a workflow should also complement business culture.
Git features like branches and tags should complement your business’s release schedule.
If your team is using task tracking project management software you may want to use branches that correspond with tasks in progress.
In addition, some guidelines to consider when deciding on a workflow are:
Short-lived branches
The longer a branch lives separate from the production branch, the higher the risk for merge conflicts and deployment challenges.
Short-lived branches promote cleaner merges and deploys.
Minimize and simplify reverts
It’s important to have a workflow that helps proactively prevent merges that will have to be reverted.
A workflow that tests a branch before allowing it to be merged into the main branch is an example.
However, accidents do happen.
That being said, it’s beneficial to have a workflow that allows for easy reverts that will not disrupt the flow for other team members.
Match a release schedule
A workflow should complement your business’s software development release cycle.
If you plan to release multiple times a day, you will want to keep your main branch stable.
If your release schedule is less frequent, you may want to consider using Git tags to tag a branch to a version.
Summary
In this document we discussed Git workflows.
We took an in-depth look at a Centralized Workflow with practical examples.
Expanding on the Centralized Workflow we discussed additional specialized workflows.
Some key takeaways from this document are:
There is no one-size-fits-all Git workflow
A workflow should be simple and enhance the productivity of your team
Your business requirements should help shape your Git workflow
To read about the next Git workflow check out our comprehensive breakdown of the Feature Branch Workflow.
Git Feature Branch Workflow
The core idea behind the Feature Branch Workflow is that all feature development should take place in a dedicated branch instead of the main branch.
This encapsulation makes it easy for multiple developers to work on a particular feature without disturbing the main codebase.
It also means the main branch will never contain broken code, which is a huge advantage for continuous integration environments.
Encapsulating feature development also makes it possible to leverage pull requests, which are a way to initiate discussions around a branch.
They give other developers the opportunity to sign off on a feature before it gets integrated into the official project.
Or, if you get stuck in the middle of a feature, you can open a pull request asking for suggestions from your colleagues.
The point is, pull requests make it incredibly easy for your team to comment on each other’s work.
The Git Feature Branch Workflow is a composable workflow that can be leveraged by other high-level Git workflows.
We discussed other Git workflows on the Git workflow overview page.
Git Feature Branch Workflow is branching model focused, meaning that it is a guiding framework for managing and creating branches.
Other workflows are more repo focused.
The Git Feature Branch Workflow can be incorporated into other workflows.
The Gitflow, and Git Forking Workflows traditionally use a Git Feature Branch Workflow in regards to their branching models.
How it works
The Feature Branch Workflow assumes a central repository, and main represents the official project history.
Instead of committing directly on their local main branch, developers create a new branch every time they start work on a new feature.
Feature branches should have descriptive names, like animated-menu-items or issue-#1061.
The idea is to give a clear, highly-focused purpose to each branch.
Git makes no technical distinction between the main branch and feature branches, so developers can edit, stage, and commit changes to a feature branch.
In addition, feature branches can (and should) be pushed to the central repository.
This makes it possible to share a feature with other developers without touching any official code.
Since main is the only “special” branch, storing several feature branches on the central repository doesn’t pose any problems.
Of course, this is also a convenient way to back up everybody’s local commits.
The following is a walk-through of the life-cycle of a feature branch.
Start with the main branch
All feature branches are created off the latest code state of a project.
This guide assumes this is maintained and updated in the main branch.
git checkout main

git fetch origin
git reset --hard origin/main
This switches the repo to the main branch, pulls the latest commits and resets the repo's local copy of main to match the latest version.
Create a new-branch
Use a separate branch for each feature or issue you work on.
After creating a branch, check it out locally so that any changes you make will be on that branch.
git checkout -b new-feature
This checks out a branch called new-feature based on main, and the -b flag tells Git to create the branch if it doesn’t already exist.
Update, add, commit, and push changes
On this branch, edit, stage, and commit changes in the usual fashion, building up the feature with as many commits as necessary.
Work on the feature and make commits like you would any time you use Git.
When ready, push your commits, updating the feature branch on Bitbucket.
git status
git add <some-file>
git commit
Push feature branch to remote
It’s a good idea to push the feature branch up to the central repository.
This serves as a convenient backup, when collaborating with other developers, this would give them access to view commits to the new branch.
git push -u origin new-feature
This command pushes new-feature to the central repository (origin), and the -u flag adds it as a remote tracking branch.
After setting up the tracking branch, git push can be invoked without any parameters to automatically push the new-feature branch to the central repository.
To get feedback on the new feature branch, create a pull request in a repository management solution like Bitbucket Cloud or Bitbucket Data Center.
From there, you can add reviewers and make sure everything is good to go before merging.
Resolve feedback
Now teammates comment and approve the pushed commits.
Resolve their comments locally, commit, and push the suggested changes to Bitbucket.
Your updates appear in the pull request.
Merge your pull request
Before you merge, you may have to resolve merge conflicts if others have made changes to the repo.
When your pull request is approved and conflict-free, you can add your code to the main branch.
Merge from the pull request in Bitbucket.
Pull requests
Aside from isolating feature development, branches make it possible to discuss changes via pull requests.
Once someone completes a feature, they don’t immediately merge it into main.
Instead, they push the feature branch to the central server and file a pull request asking to merge their additions into main.
This gives other developers an opportunity to review the changes before they become a part of the main codebase.
Code review is a major benefit of pull requests, but they’re actually designed to be a generic way to talk about code.
You can think of pull requests as a discussion dedicated to a particular branch.
This means that they can also be used much earlier in the development process.
For example, if a developer needs help with a particular feature, all they have to do is file a pull request.
Interested parties will be notified automatically, and they’ll be able to see the question right next to the relevant commits.
Once a pull request is accepted, the actual act of publishing a feature is much the same as in the Centralized Workflow.
First, you need to make sure your local main is synchronized with the upstream main.
Then, you merge the feature branch into main and push the updated main back to the central repository.
Pull requests can be facilitated by product repository management solutions like Bitbucket Cloud or Bitbucket Server.
View the Bitbucket Server pull requests documentation for an example.
Example
The following is an example of the type of scenario in which a feature branching workflow is used.
The scenario is that of a team doing code review around on a new feature pull request.
This is one example of the many purposes this model can be used for.
Mary begins a new feature
Before she starts developing a feature, Mary needs an isolated branch to work on.
She can request a new branch with the following command:
git checkout -b marys-feature main
This checks out a branch called marys-feature based on main, and the -b flag tells Git to create the branch if it doesn’t already exist.
On this branch, Mary edits, stages, and commits changes in the usual fashion, building up her feature with as many commits as necessary:
git status
git add <some-file>
git commit
Mary goes to lunch
Mary adds a few commits to her feature over the course of the morning.
Before she leaves for lunch, it’s a good idea to push her feature branch up to the central repository.
This serves as a convenient backup, but if Mary was collaborating with other developers, this would also give them access to her initial commits.
git push -u origin marys-feature
This command pushes marys-feature to the central repository (origin), and the -u flag adds it as a remote tracking branch.
After setting up the tracking branch, Mary can call git push without any parameters to push her feature.
Mary finishes her feature
When Mary gets back from lunch, she completes her feature.
Before merging it into main, she needs to file a pull request letting the rest of the team know she's done.
But first, she should make sure the central repository has her most recent commits:
git push
Then, she files the pull request in her Git GUI asking to merge marys-feature into main, and team members will be notified automatically.
The great thing about pull requests is that they show comments right next to their related commits, so it's easy to ask questions about specific changesets.
Bill receives the pull request
Bill gets the pull request and takes a look at marys-feature. He decides he wants to make a few changes before integrating it into the official project, and he and Mary have some back-and-forth via the pull request.
Mary makes the changes
To make the changes, Mary uses the exact same process as she did to create the first iteration of her feature.
She edits, stages, commits, and pushes updates to the central repository.
All her activity shows up in the pull request, and Bill can still make comments along the way.
If he wanted, Bill could pull marys-feature into his local repository and work on it on his own.
Any commits he added would also show up in the pull request.
Mary publishes her feature
Once Bill is ready to accept the pull request, someone needs to merge the feature into the stable project (this can be done by either Bill or Mary):
git checkout main

git pull
git pull origin marys-feature
git push
This process often results in a merge commit.
Some developers like this because it’s like a symbolic joining of the feature with the rest of the code base.
But, if you’re partial to a linear history, it’s possible to rebase the feature onto the tip of main before executing the merge, resulting in a fast-forward merge.
Some GUI’s will automate the pull request acceptance process by running all of these commands just by clicking an “Accept” button.
If yours doesn’t, it should at least be able to automatically close the pull request when the feature branch gets merged into main.
Meanwhile, John is doing the exact same thing
While Mary and Bill are working on marys-feature and discussing it in her pull request, John is doing the exact same thing with his own feature branch.
By isolating features into separate branches, everybody can work independently, yet it’s still trivial to share changes with other developers when necessary.
Summary
In this document, we discussed the Git Feature Branch Workflow.
This workflow helps organize and track branches that are focused on business domain feature sets.
Other Git workflows like the Git Forking Workflow and the Gitflow Workflow are repo focused and can leverage the Git Feature Branch Workflow to manage their branching models.
This document demonstrated a high-level code example and fictional example for implementing the Git Feature Branch Workflow.
Some key associations to make with the Feature Branch Workflow are:
focused on branching patterns
can be leveraged by other repo oriented workflows
promotes collaboration with team members through pull requests and merge reviews
Utilizing git rebase during the review and merge stages of a feature branch will create enforce a cohesive Git history of feature merges.
A feature branching model is a great tool to promote collaboration within a team environment.
Go one click deeper into Git workflows by reading our comprehensive tutorial of the Gitflow Workflow.
Gitflow Workflow
Gitflow is a legacy Git workflow that was originally a disruptive and novel strategy for managing Git branches.
Gitflow has fallen in popularity in favor of trunk-based workflows, which are now considered best practices for modern continuous software development and DevOps practices.
Gitflow also can be challenging to use with CI/CD.
This post details Gitflow for historical purposes.
What is Gitflow?
Giflow is an alternative Git branching model that involves the use of feature branches and multiple primary branches.
It was first published and made popular by Vincent Driessen at nvie.
Compared to trunk-based development, Giflow has numerous, longer-lived branches and larger commits.
Under this model, developers create a feature branch and delay merging it to the main trunk branch until the feature is complete.
These long-lived feature branches require more collaboration to merge and have a higher risk of deviating from the trunk branch.
They can also introduce conflicting updates.
Gitflow can be used for projects that have a scheduled release cycle and for the DevOps best practice of continuous delivery.
This workflow doesn’t add any new concepts or commands beyond what’s required for the Feature Branch Workflow.
Instead, it assigns very specific roles to different branches and defines how and when they should interact.
In addition to feature branches, it uses individual branches for preparing, maintaining, and recording releases.
Of course, you also get to leverage all the benefits of the Feature Branch Workflow: pull requests, isolated experiments, and more efficient collaboration.
Getting Started
Gitflow is really just an abstract idea of a Git workflow.
This means it dictates what kind of branches to set up and how to merge them together.
We will touch on the purposes of the branches below.
The git-flow toolset is an actual command line tool that has an installation process.
The installation process for git-flow is straightforward.
Packages for git-flow are available on multiple operating systems.
On OSX systems, you can execute brew install git-flow.
On windows you will need to download and install git-flow.
After installing git-flow you can use it in your project by executing git flow init.
Git-flow is a wrapper around Git.
The git flow init command is an extension of the default git init command and doesn't change anything in your repository other than creating branches for you.
How it works
Develop and main branches
Instead of a single main branch, this workflow uses two branches to record the history of the project.
The main branch stores the official release history, and the develop branch serves as an integration branch for features.
It's also convenient to tag all commits in the main branch with a version number.
The first step is to complement the default main with a develop branch.
A simple way to do this is for one developer to create an empty develop branch locally and push it to the server:
git branch develop

git push -u origin develop
This branch will contain the complete history of the project, whereas main will contain an abridged version.
Other developers should now clone the central repository and create a tracking branch for develop.
When using the git-flow extension library, executing git flow init on an existing repo will create the develop branch:
$ git flow init
Initialized empty Git repository in ~/project/.git/
No branches exist yet.
Base branches must be created now.

Branch name for production releases: [main]
Branch name for "next release" development: [develop]
How to name your supporting branch prefixes?
Feature branches? [feature/]

Release branches? [release/]
Hotfix branches? [hotfix/]
Support branches? [support/]
Version tag prefix? []

$ git branch
* develop
main
Feature branches
Each new feature should reside in its own branch, which can be pushed to the central repository for backup/collaboration.
But, instead of branching off of main, feature branches use develop as their parent branch.
When a feature is complete, it gets merged back into develop.
Features should never interact directly with main.
Note that feature branches combined with the develop branch is, for all intents and purposes, the Feature Branch Workflow.
But, the Gitflow workflow doesn’t stop there.
Feature branches are generally created off to the latest develop branch.
Creating a feature branch
Without the git-flow extensions:
git checkout develop
git checkout -b feature_branch
When using the git-flow extension:
git flow feature start feature_branch
Continue your work and use Git like you normally would.
Finishing a feature branch
When you’re done with the development work on the feature, the next step is to merge the feature_branch into develop.
Without the git-flow extensions:
git checkout develop
git merge feature_branch
Using the git-flow extensions:
git flow feature finish feature_branch
Release branches
Once develop has acquired enough features for a release (or a predetermined release date is approaching), you fork a release branch off of develop.
Creating this branch starts the next release cycle, so no new features can be added after this point—only bug fixes, documentation generation, and other release-oriented tasks should go in this branch.
Once it's ready to ship, the release branch gets merged into main and tagged with a version number.
In addition, it should be merged back into develop, which may have progressed since the release was initiated.
Using a dedicated branch to prepare releases makes it possible for one team to polish the current release while another team continues working on features for the next release.
It also creates well-defined phases of development (e.g., it's easy to say, “This week we're preparing for version 4.0,” and to actually see it in the structure of the repository).
Making release branches is another straightforward branching operation.
Like feature branches, release branches are based on the develop branch.
A new release branch can be created using the following methods.
Without the git-flow extensions:
git checkout develop
git checkout -b release/0.1.0
When using the git-flow extensions:
$ git flow release start 0.1.0

Switched to a new branch 'release/0.1.0'
Once the release is ready to ship, it will get merged it into main and develop, then the release branch will be deleted.
It’s important to merge back into develop because critical updates may have been added to the release branch and they need to be accessible to new features.
If your organization stresses code review, this would be an ideal place for a pull request.
To finish a release branch, use the following methods:
Without the git-flow extensions:
git checkout main
git merge release/0.1.0
Or with the git-flow extension:
git flow release finish '0.1.0'
Hotfix branches
Maintenance or “hotfix” branches are used to quickly patch production releases.
Hotfix branches are a lot like release branches and feature branches except they're based on main instead of develop.
This is the only branch that should fork directly off of main.
As soon as the fix is complete, it should be merged into both main and develop (or the current release branch), and main should be tagged with an updated version number.
Having a dedicated line of development for bug fixes lets your team address issues without interrupting the rest of the workflow or waiting for the next release cycle.
You can think of maintenance branches as ad hoc release branches that work directly with main.
A hotfix branch can be created using the following methods:
Without the git-flow extensions:
git checkout main

git checkout -b hotfix_branch
When using the git-flow extensions:
$ git flow hotfix start hotfix_branch
Similar to finishing a release branch, a hotfix branch gets merged into both main and develop.git checkout main
git merge hotfix_branch
git checkout develop
git merge hotfix_branch
git branch -D hotfix_branch$ git flow hotfix finish hotfix_branch
Example
A complete example demonstrating a Feature Branch Flow is as follows.
Assuming we have a repo setup with a main branch.
git checkout main
git checkout -b develop
git checkout -b feature_branch

# work happens on feature branch
git checkout develop
git merge feature_branch
git checkout main

git merge develop
git branch -d feature_branch
In addition to the feature and release flow, a hotfix example is as follows:
git checkout main

git checkout -b hotfix_branch
# work is done commits are added to the hotfix_branch
git checkout develop
git merge hotfix_branch

git checkout main
git merge hotfix_branch
Summary
Here we discussed the Gitflow Workflow.
Gitflow is one of many styles of Git workflows you and your team can utilize.
Some key takeaways to know about Gitflow are:
The workflow is great for a release-based software workflow.
Gitflow offers a dedicated channel for hotfixes to production.
The overall flow of Gitflow is:
A develop branch is created from main
A release branch is created from developFeature branches are created from develop
When a feature is complete it is merged into the develop branch
When the release branch is done it is merged into develop and main
If an issue in main is detected a hotfix branch is created from main
Once the hotfix is complete it is merged to both develop and main
Next, learn about the Forking Workflow or visit our workflow comparison page.
Forking Workflow
The Forking Workflow is fundamentally different than other popular Git workflows.
Instead of using a single server-side repository to act as the “central” codebase, it gives every developer their own server-side repository.
This means that each contributor has not one, but two Git repositories: a private local one and a public server-side one.
The Forking Workflow is most often seen in public open source projects.
The main advantage of the Forking Workflow is that contributions can be integrated without the need for everybody to push to a single central repository.
Developers push to their own server-side repositories, and only the project maintainer can push to the official repository.
This allows the maintainer to accept commits from any developer without giving them write access to the official codebase.
The Forking Workflow typically follows a branching model based on the Gitflow Workflow.
This means that complete feature branches will be purposed for merge into the original project maintainer's repository.
The result is a distributed workflow that provides a flexible way for large, organic teams (including untrusted third-parties) to collaborate securely.
This also makes it an ideal workflow for open source projects.
How it works
As in the other Git workflows, the Forking Workflow begins with an official public repository stored on a server.
But when a new developer wants to start working on the project, they do not directly clone the official repository.
Instead, they fork the official repository to create a copy of it on the server.
This new copy serves as their personal public repository—no other developers are allowed to push to it, but they can pull changes from it (we’ll see why this is important in a moment).
After they have created their server-side copy, the developer performs a git clone to get a copy of it onto their local machine.
This serves as their private development environment, just like in the other workflows.
When they're ready to publish a local commit, they push the commit to their own public repository—not the official one.
Then, they file a pull request with the main repository, which lets the project maintainer know that an update is ready to be integrated.
The pull request also serves as a convenient discussion thread if there are issues with the contributed code.
The following is a step-by-step example of this workflow.
A developer 'forks' an 'official' server-side repository.
This creates their own server-side copy.
The new server-side copy is cloned to their local system.
A Git remote path for the 'official' repository is added to the local clone.
A new local feature branch is created.
The developer makes changes on the new branch.
New commits are created for the changes.
The branch gets pushed to the developer's own server-side copy.
The developer opens a pull request from the new branch to the 'official' repository.
The pull request gets approved for merge and is merged into the original server-side repository
To integrate the feature into the official codebase, the maintainer pulls the contributor’s changes into their local repository, checks to make sure it doesn’t break the project, merges it into their local main branch, then pushes the main branch to the official repository on the server.
The contribution is now part of the project, and other developers should pull from the official repository to synchronize their local repositories.
It’s important to understand that the notion of an “official” repository in the Forking Workflow is merely a convention.
In fact, the only thing that makes the official repository so official is that it’s the public repository of the project maintainer.
Forking vs cloning
It's important to note that "forked" repositories and "forking" are not special operations.
Forked repositories are created using the standard git clone command.
Forked repositories are generally "server-side clones" and usually managed and hosted by a 3rd party Git service like Bitbucket.
There is no unique Git command to create forked repositories.
A clone operation is essentially a copy of a repository and its history.
Branching in the Forking Workflow
All of these personal public repositories are really just a convenient way to share branches with other developers.
Everybody should still be using branches to isolate individual features, just like in the Feature Branch Workflow and the Gitflow Workflow. The only difference is how those branches get shared.
In the Forking Workflow, they are pulled into another developer’s local repository, while in the Feature Branch and Gitflow Workflows they are pushed to the official repository.
Fork a repository
All new developers to a Forking Workflow project need to fork the official repository.
As previously stated, forking is just a standard git clone operation.
It’s possible to do this by SSH’ing into the server and running git clone to copy it to another location on the server.
Popular Git hosting services like Bitbucket, offer repo forking features that automate this step.
Clone your fork
Next each developer needs to clone their own public forked repository.
They can do this with the familiar git clone command.
Assuming the use of Bitbucket to host these repositories, developers on a project should have their own Bitbucket account and they should clone their forked copy of the repository with:
git clone https://user@bitbucket.org/user/repo.git
Adding a remote
Whereas other Git workflows use a single origin remote that points to the central repository, the Forking Workflow requires two remotes—one for the official repository, and one for the developer’s personal server-side repository.
While you can call these remotes anything you want, a common convention is to use origin as the remote for your forked repository (this will be created automatically when you run git clone) and upstream for the official repository.
git remote add upstream https://bitbucket.org/maintainer/repo
You’ll need to create the upstream remote yourself using the above command.
This will let you easily keep your local repository up-to-date as the official project progresses.
Note that if your upstream repository has authentication enabled (i.e., it's not open source), you'll need to supply a username, like so:
git remote add upstream https://user@bitbucket.org/maintainer/repo.git
This requires users to supply a valid password before cloning or pulling from the official codebase.
Working in a branch: making & pushing changes
In the developer's local copy of the forked repository they can edit code, commit changes, and create branches just like in other Git workflows:
git checkout -b some-feature # Edit some code git commit -a -m "Add first draft of some feature"
All of their changes will be entirely private until they push it to their public repository.
And, if the official project has moved forward, they can access new commits with git pull:
git pull upstream main
Since developers should be working in a dedicated feature branch, this should generally result in a fast-forward merge.
Making a Pull Request
Once a developer is ready to share their new feature, they need to do two things.
First, they have to make their contribution accessible to other developers by pushing it to their public repository.
Their origin remote should already be set up, so all they should have to do is the following:
git push origin feature-branch
This diverges from the other workflows in that the origin remote points to the developer’s personal server-side repository, not the main codebase.
Second, they need to notify the project maintainer that they want to merge their feature into the official codebase.
Bitbucket provides a “pull request” button that leads to a form asking you to specify which branch you want to merge into the official repository.
Typically, you’ll want to integrate your feature branch into the upstream remote’s main branch.
Summary
To recap, the Forking Workflow is commonly used in public open-source projects.
Forking is a git clone operation executed on a server copy of a projects repo.
A Forking Workflow is often used in conjunction with a Git hosting service like Bitbucket.
A high-level example of a Forking Workflow is:
You want to contribute to an open source library hosted at bitbucket.org/userA/open-project
Using Bitbucket you create a fork of the repo to bitbucket.org/YourName/open-project
On your local system you execute git clone on https://bitbucket.org/YourName/open-project to get a local copy of the repo
You create a new feature branch in your local repo
Work is done to complete the new feature and git commit is executed to save the changes
You then push the new feature branch to your remote forked repo
Using Bitbucket you open up a pull request for the new branch against the original repo at bitbucket.org/userA/open-project
The Forking Workflow helps a maintainer of a project open up the repository to contributions from any developer without having to manually manage authorization settings for each individual contributor.
This gives the maintainer more of a "pull" style workflow.
Most commonly used in open-source projects, the Forking Workflow can also be applied to private business workflows to give more authoritative control over what is merged into a release.
This can be useful in teams that have Deploy Managers or strict release cycles.
Unsure what workflow is right for you? Check out our comprehensive Git workflow comparison page.
SVN to Git - prepping for the migration
In Why Git?, we discussed the many ways that Git can help your team become more agile.
Once you’ve decided to make the switch, your next step is to figure out how to migrate your existing development workflow to Git.
This article explains some of the biggest changes you’ll encounter while transitioning your team from SVN to Git.
The most important thing to remember during the migration process is that Git is not SVN.
To realize the full potential of Git, try your best to open up to new ways of thinking about version control.
For administrators
Adopting Git can take anywhere from a few days to several months depending on the size of your team.
This section addresses some of the main concerns for engineering managers when it comes to training employees on Git and migrating repositories from SVN to Git.
Basic Git commands
Git once had a reputation for a steep learning curve.
However the Git maintainers have been steadily releasing new improvements like sensible defaults and contextual help messages that have made the on-boarding process a lot more pleasant.
Atlassian offers a comprehensive series of self-paced Git tutorials, as well as webinars and live training sessions.
Together, these should provide all the training options your team needs to get started with Git.
To get you started, here are a list of some basic Git commands to get you going with Git:
Configure the author name and email address to be used with your commits.Note that Git strips some characters (for example trailing periods) from user.name.
If you mess up, you can replace the changes in your working tree with the last content in head:Changes already added to the index, as well as new files, will be kept.
git checkout --
Instead, to drop all your local changes and commits, fetch the latest history from the server and point your local main branch at it, do this:
git fetch origin
git reset --hard origin/main
Search
Search the working directory for foo():
git grep "foo()"
Git Migration Tools
There’s a number of tools available to help you migrate your existing projects from SVN to Git, but before you decide what tools to use, you need to figure out how you want to migrate your code.
Your options are:
Migrate your entire codebase to Git and stop using SVN altogether.
Don’t migrate any existing projects to Git, but use Git for all new projects.
Migrate some of your projects to Git while continuing to use SVN for other projects.
Use SVN and Git simultaneously on the same projects.
A complete transition to Git limits the complexity in your development workflow, so this is the preferred option.
However, this isn’t always possible in larger companies with dozens of development teams and potentially hundreds of projects.
In these situations, a hybrid approach is a safer option.
Your choice of migration tool(s) depends largely on which of the above strategies you choose.
Some of the most common SVN-to-Git migration tools are introduced below.
Atlassian’s migration scripts
If you’re interested in making an abrupt transition to Git, Atlassian’s migration scripts are a good choice for you.
These scripts provide all the tools you need to reliably convert your existing SVN repositories to Git repositories.
The resulting native-Git history ensures you won’t need to deal with any SVN-to-Git interoperability issues after the conversion process.
We’ve provided a complete technical walkthrough for using these scripts to convert your entire codebase to a collection of Git repositories.
This walkthrough explains everything from extracting SVN author information to re-organizing non-standard SVN repository structures.
SVN Mirror for Stash (now Bitbucket) plugin
SVN Mirror for Stash is a Bitbucket plugin that lets you easily maintain a hybrid codebase that works with both SVN and Git.
Unlike Atlassian’s migration scripts, SVN Mirror for Stash lets you use Git and SVN simultaneously on the same project for as long as you like.
This compromise solution is a great option for larger companies.
It enables incremental Git adoption by letting different teams migrate workflows at their convenience.
What is Git-SVN?
The git-svn tool is an interface between a local Git repository and a remote SVN repository.
Git-svn lets developers write code and create commits locally with Git, then push them up to a central SVN repository with svn commit-style behavior.
This should be temporary, but is helpful when debating making the switch from SVN to Git.
git svn is a good option if you’re not sure about making the switch to Git and want to let some of your developers explore Git commands without committing to a full-on migration.
It’s also perfect for the training phase—instead of an abrupt transition, your team can ease into it with local Git commands before worrying about collaboration workflows.
Note that git svn should only be a temporary phase of your migration process.
Since it still depends on SVN for the “backend,” it can’t leverage the more powerful Git features like branching or advanced collaboration workflows.
Rollout Strategies
Migrating your codebase is only one aspect of adopting Git.
You also need to consider how to introduce Git to the people behind that codebase.
External consultants, internal Git champions, and pilots teams are the three main strategies for moving your development team over to Git.
External Git Consultants
Git consultants can essentially handle the migration process for you for a nominal fee.
This has the advantage of creating a Git workflow that’s perfectly suited to your team without investing the time to figure it out on your own.
It also makes expert training resources available to you while your team is learning Git.
Atlassian Experts are pros when it comes to SVN to Git migration and are a good resource for sourcing a Git consultant.
On the other hand, designing and implementing a Git workflow on your own is a great way for your team to understand the inner workings of their new development process.
This avoids the risk of your team being left in the dark when your consultant leaves.
Internal Git Champions
A Git champion is a developer inside of your company who’s excited to start using Git.
Leveraging a Git champion is a good option for companies with a strong developer culture and eager programmers comfortable being early adopters.
The idea is to enable one of your engineers to become a Git expert so they can design a Git workflow tailored to your company and serve as an internal consultant when it’s time to transition the rest of the team to Git.
Compared to an external consultant, this has the advantage of keeping your Git expertise in-house.
However, it requires a larger time investment to train that Git champion, and it runs the risk of choosing the wrong Git workflow or implementing it incorrectly.
Pilot Teams
The third option for transitioning to Git is to test it out on a pilot team.
This works best if you have a small team working on a relatively isolated project.
This could work even better by combining external consultants with internal Git champions in the pilot team for a winning combo.
This has the advantage of requiring buy-in from your entire team, and also limits the risk of choosing the wrong workflow, since it gets input from the entire team while designing the new development process.
In other words, it ensures any missing pieces are caught sooner than when a consultant or champion designs the new workflow on their own.
On the other hand, using a pilot team means more initial training and setup time: instead of one developer figuring out a new workflow, there’s a whole team that could potentially be temporarily less productive while they’re getting comfortable with their new workflow.
However, this short term pain is absolutely worth the long term gain.
Security and Permissions
Access control is an aspect of Git where you need to fundamentally re-think how you manage your codebase.
In SVN, you typically store your entire codebase in a single central repository, then limit access to different teams or individuals by folder.
In Git, this is not possible: developers must retrieve the entire repository to work with it.
You typically can not retrieve a subset of the repository, as you can with SVN.
permissions can only be granted to entire Git repositories.
This means you have to split up your large, monolithic SVN repository into several small Git repositories.
We actually experienced this first hand here at Atlassian when our Jira development team migrated to Git.
All of our Jira plugins used to be stored in a single SVN repository, but after the migration, each plugin ended up in its own repository.
Keep in mind that Git was designed to securely integrate code contributions from thousands of independent Linux developers, so it definitely provides some way to set up whatever kind of access control your team needs.
This may, however, require a fresh look at your build cycle.
If you’re concerned about maintaining dependencies between your new collection of Git repositories, you may find a dependency management layer on top of Git helpful.
A dependency management layer will help with build times because as a project grows, you need “caching” in order to speed up your build time.
A list of recommended dependency management layer tools for every technology stack can be found in this helpful article: "Git and project dependencies".
For developers
A Repository for Every Developer
As a developer, the biggest change you’ll need to adjust to is the distributed nature of Git.
Instead of a single central repository, every developer has their own copy of the entire repository.
This dramatically changes the way you collaborate with your fellow programmers.
Instead of checking out an SVN repository with svn checkout and getting a working copy, you clone the entire Git repository to your local machine with git clone.
Collaboration occurs by moving branches between repositories with either git push, git fetch, or git pull.
Sharing is commonly done on the branch level in Git but can be done on the commit level, similar to SVN.
But in Git, a commit represents the entire state of the whole project instead rather than file modifications.
Since you can use branches in both Git and SVN, the important distinction here is that you can commit locally with Git, without sharing your work.
This enables you to experiment more freely, work more effectively offline and speeds up almost all version control related commands.
However, it’s important to understand that a remote repository is not a direct link into somebody else’s repository.
It’s simply a bookmark that prevents you from having to re-type the full URL each time you interact with a remote repository.
Until you explicitly pull or push a branch to a remote repository, you’re working in an isolated environment.
The other big adjustment for SVN users is the notion of “local” and “remote” repositories.
Local repositories are on your local machine, and all other repositories are referred to as remote repositories.
The main purpose of a remote repository is to make your code accessible to the rest of the team, and thus no active development takes place in them.
Local repositories reside on your local machine, and it’s where you do all of your software development.
Don’t Be Scared of Branching or Merging
In SVN, you commit code by editing files in your working copy, then running svn commit to send the code to the central repository.
Everybody else can then pull those changes into their own working copies with svn update.
SVN branches are usually reserved for large, long-running aspects of a project because merging is a dangerous procedure that has the potential to break the project.
Git’s basic development workflow is much different.
Instead of being bound to a single line of development (e.g., trunk/), life revolves around branching and merging.
When you want to start working on anything in Git, you create and check out a new branch with git checkout -b .
This gives you a dedicated line of development where you can write code without worrying about affecting anyone else on your team.
If you break something beyond repair, you simply throw the branch away with git branch -d .
If you build something useful, you file a pull request asking to merge it into the main branch.
Potential Git Workflows
When choosing a Git workflow it is important to consider your team's needs.
A simple workflow can maximise development speed and flexibility, while a more complex workflow can ensure greater consistency and control of work in progress.
You can adapt and combine the general approaches listed below to suit your needs and the different roles on your team.
A core developer might use feature branches while a contractor works from a fork, for example.
A centralized workflow provides the closest match to common SVN processes, so it's a good option to get started.
Building on that idea, using a feature branch workflow lets developers keep their work in progress isolated and important shared branches protected.
Feature branches also form the basis for managing changes via pull requests.
A Gitflow workflow is a more formal, structured extension to feature branching, making it a great option for larger teams with well-defined release cycles.
Finally, consider a forking workflow if you need maximum isolation and control over changes, or have many developers contributing to one repository.
But, if you really want to get the most out of Git as a professional team, you should consider the feature branch workflow.
This is a truly distributed workflow that is highly secure, incredibly scalable, and quintessentially agile.
Conclusion
Transitioning your team to Git can be a daunting task, but it doesn’t have to be.
This article introduced some of the common options for migrating your existing codebase, rolling out Git to your development teams, and dealing with security and permissions.
We also introduced the biggest challenges that your developers should be prepared for during the migration process.
Hopefully, you now have a solid foundation for introducing distributed development to your company, regardless of its size or current development practices.
Migrate to Git from SVN
We’ve broken down the SVN-to-Git migration process into 5 simple steps:
Prepare your environment for the migration.
Convert the SVN repository to a local Git repository.
Synchronize the local Git repository when the SVN repository changes.
Share the Git repository with your developers via Bitbucket.
Migrate your development efforts from SVN to Git.
The prepare, convert, and synchronize steps take a SVN commit history and turn it into a Git repository.
The best way to manage these first 3 steps is to designate one of your team members as the migration lead (if you’re reading this guide, that person is probably you).
All 3 of these steps should be performed on the migration lead’s local computer.
After the synchronize phase, the migration lead should have no trouble keeping a local Git repository up-to-date with an SVN counterpart.
To share the Git repository, the migration lead can share their local Git repository with other developers by pushing it to Bitbucket, a Git hosting service.
Once it’s on Bitbucket, other developers can clone the converted Git repository to their local machines, explore its history with Git commands, and begin integrating it into their build processes.
However, we advocate a one-way synchronization from SVN to Git until your team is ready to switch to a pure Git workflow.
This means that everybody should treat their Git repository as read-only and continue committing to the original SVN repository.
The only changes to the Git repository should happen when the migration lead synchronizes it and pushes the updates to Bitbucket.
This provides a clear-cut transition period where your team can get comfortable with Git without interrupting your existing SVN-based workflow.
Once you’re confident that your developers are ready to make the switch, the final step in the migration process is to freeze your SVN repository and begin committing with Git instead.
This switch should be a very natural process, as the entire Git workflow is already in place and your developers have had all the time they need to get comfortable with it.
By this point, you have successfully migrated your project from SVN to Git.
Prepare
The first step to migrating a project from SVN to Git-based version control is to prepare the migration lead’s local machine.
In this phase, you’ll download a convenient utility script, mount a case-sensitive filesystem (if necessary), and map author information from SVN to Git.
All of the the following steps should be performed on the migration lead’s local machine.
Download the migration script
Git comes with most of the necessary tools for importing an SVN repository; however, there are a few missing bits of functionality that Atlassian has rolled into a handy JAR file.
This file will be integral to the migration, so be sure to download svn-migration-scripts.jar from Atlassian’s Bitbucket account.
This guide assumes that you’ve saved it in your home directory.
Disclaimer: for the svn migration you need a case-sensitive filesystem and this does not work on NTFS.
We suggest using this on a Linux machine.
Once you’ve downloaded it, it’s a good idea to verify the scripts to make sure you have the Java Runtime Environment, Git, Subversion, and the git-svn utility installed.
Open a command prompt and run the following:
java -jar ~/svn-migration-scripts.jar verify
This will display an error message in the console if you don’t have the necessary programs for the migration process.
Make sure that any missing software is installed before moving on.
If you get a warning about being unable to determine a version, run export LANG=C (*nix) or SET LANG=C (Windows) and try again.
If you’re performing the migration on a computer running OS X, you’ll also see the following warning:
You appear to be running on a case-insensitive file-system.
This is unsupported, and can result in data loss.
We’ll address this in the next section.
Mount a case-sensitive disk image
Migrating to Git should be done on a case-sensitive file system to avoid corrupting the repository.
This is a problem if you’re performing the migration on an OS X computer, as the OS X filesystem isn’t case-sensitive.
If you’re not running OS X, all you need to do is create a directory on your local machine called ~/GitMigration.
This is where you will perform the conversion.
After that, you can skip to the next section.
If you are running OS X, you need to mount a case-sensitive disk image with the create-disk-image script included in svn-migration-scripts.jar.
It takes two parameters:
The size of the disk image to create in gigabytes.
You can use any size you like, as long as it’s bigger than the SVN repository that you’re trying to migrate.
The name of the disk image.
This guide uses GitMigration for this value.
For example, the following command creates a 5GB disk image called GitMigration:
java -jar ~/svn-migration-scripts.jar create-disk-image 5 GitMigration
The disk image is mounted in your home directory, so you should now see a directory called ~/GitMigration on your local machine.
This serves as a virtual case-sensitive filesystem, and it’s where you’ll store the converted Git repository.
Extract the author information
SVN only records the username of the author for each revision.
Git, however, stores the full name and email address of the author.
This means that you need to create a text file that maps SVN usernames to their Git counterparts.
Run the following commands to automatically generate this text file:
cd ~/GitMigration java -jar ~/svn-migration-scripts.jar authors > authors.txt
Be sure to replace with the URI of the SVN repository that you want to migrate.
For example, if your repository resided at https://svn.example.com, you would run the following:
java -jar ~/svn-migration-scripts.jar authors https://svn.example.com > authors.txt
This creates a text file called authors.txt that contains the username of every author in the SVN repository along with a generated name and email address.
It should look something like this:
j.doe = j.doe m.smith = m.smith
Change the portion to the right of the equal sign to the full name and email address of the corresponding user.
For example, you might change the above authors to:
j.doe = John Doe m.smith = Mary Smith
Summary
Now that you have your migration scripts, disk image (OS X only), and author information, you’re ready to import your SVN history into a new Git repository.
The next phase explains how this conversion works.
Convert
The next step in the migration from SVN to Git is to import the contents of the SVN repository into a new Git repository.
We’ll do this with the git svn utility that is included with most Git distributions, then we’ll clean up the results with svn-migration-scripts.jar.
Beware that the conversion process can take a significant amount of time for larger repositories, even when cloning from a local SVN repository.
As a benchmark, converting a 400MB repository with 33,000 commits on main took around 12 hours to complete.
For reasonably sized repositories, the following steps should be run on the migration lead’s local computer.
However, if you have a very large SVN repository and want to cut down on the conversion time, you can run git svn clone on the SVN server instead of on the migration lead’s local machine.
This will avoid the overhead of cloning via a network connection.
Clone the SVN repository
The git svn clone command transforms the trunk, branches, and tags in your SVN repository into a new Git repository.
Depending on the structure of your SVN repo, the command needs to be configured differently.
Standard SVN layouts
If your SVN project uses the standard /trunk, /branches, and /tags directory layout, you can use the --stdlayout option instead of manually specifying the repository’s structure.
Run the following command in the ~/GitMigration directory:
git svn clone --stdlayout --authors-file=authors.txt
<svn-repo>/<project> <git-repo-name>
Where is the URI of the SVN repository that you want to migrate and, is the name of the project that you want to import, and is the directory name of the new Git repository.
For example, if you were migrating a project called Confluence, hosted on https://svn.atlassian.com, you might run the following:
git svn clone --stdlayout --authors-file=authors.txt https://svn.atlassian.com/Confluence ConfluenceAsGitNon-standard SVN layouts
If your SVN repository doesn’t have a standard layout, you need to provide the locations of your trunk, branches, and tags using the --trunk, --branches, and --tags command line options.
For example, if you have branches stored in both the /branches directory and the /bugfixes directories, you would use the following command:
git svn clone --trunk=/trunk --branches=/branches
--branches=/bugfixes --tags=/tags --authors-file=authors.txt
<svn-repo>/<project> <git-repo-name>
Inspect the new Git repository
After git svn clone has finished (this might take a while), you’ll find a new directory called <git-repo-name> in ~/GitMigration.
This is the converted Git repository.
You should be able to switch into <git-repo-name> and run any of the standard Git commands to explore your project.
Branches and tags are not imported into the new Git repository as you might expect.
You won’t find any of your SVN branches in the git branch output, nor will you find any of your SVN tags in the git tag output.
But, if you run git branch -r, you’ll find all of the branches and tags from your SVN repository.
The git svn clone command imports your SVN branches as remote branches and imports your SVN tags as remote branches prefixed with tags/.
This behavior makes certain two-way synchronization procedures easier, but it can be very confusing when trying to make a one-way migration Git.
That’s why our next step will be to convert these remote branches to local branches and actual Git tags.
Clean the new Git repository
The clean-git script included in svn-migration-scripts.jar turns the SVN branches into local Git branches and the SVN tags into full-fledged Git tags.
Note that this is a destructive operation, and you will not be able to move commits from the Git repository back into the SVN repository.
If you’re following this migration guide, this isn’t a problem, as it advocates a one-way sync from SVN to Git (the Git repository is considered read-only until after the Migrate step).
However, if you’re planning on committing to the Git repository and the SVN repository during the migration process, you should not perform the following commands.
This is an advanced task, as is not recommended for the typical project.
To see what can be cleaned up, run the following command in ~/GitMigration/:
java -Dfile.encoding=utf-8 -jar ~/svn-migration-scripts.jar clean-git
This will output all of the changes the script wants to make, but it won’t actually make any of them.
To execute these changes, you need to use the --force option, like so:
java -Dfile.encoding=utf-8 -jar ~/svn-migration-scripts.jar clean-git --force
You should now see all of your SVN branches in the git branch output, along with your SVN tags in the git tag output.
This means that you’ve successfully converted your SVN project to a Git repository.
Summary
In this step, you turned an SVN repository into a new Git repository with the git svn clone command, then cleaned up the structure of the resulting repository with svn-migration-scripts.jar.
In the next step, you’ll learn how to keep this new Git repo in sync with any new commits to the SVN repository.
This will be a similar process to the conversion, but there are some important workflow considerations during this transition period.
Synchronize
It’s very easy to synchronize your Git repository with new commits in the original SVN repository.
This makes for a comfortable transition period in the migration process where you can continue to use your existing SVN workflow, but begin to experiment with Git.
It’s possible to synchronize in both directions.
However, we recommend a one-way sync from SVN to Git.
During your transition period, you should only commit to your SVN repository, not your Git repo.
Once you’re confident that your team is ready to make the switch, you can complete the migration process and begin to commit changes with Git instead of SVN.
In the meantime, you should continue to commit to your SVN repository and synchronize your Git repository whenever necessary.
This process is similar to the Convert phase, but since you’re only dealing with incremental changes, it should be much more efficient.
Update the authors file
The authors.txt file that we used to map SVN usernames to full names and email addresses is essential to the synchronization process.
If it has been moved from the ~/GitMigration/authors.txt location that we’ve been using thus far, you need to update its location with:
git config svn.authorsfile
If new developers have committed to the SVN repository since the last sync (or the initial clone), the authors file needs to be updated accordingly.
You can do this by manually appending new users to authors.txt, or you can use the --authors-prog option, as discussed in the next section.
For one-off synchronizations it’s often easier to directly edit the authors file; however, the---authors-prog option is preferred if you’re performing unsupervised syncs (i.e.
in a scheduled task).
Automatically generating Git authors
If your authors file doesn’t need to be updated, you can skip to the next section.
The git svn command includes an option called --authors-prog, which points to a script that automatically transforms SVN usernames into Git authors.
You’ll need to configure this script to accept the SVN username as its only argument and return a single line in the form of Name (just like the right hand side of the existing authors file).
This option can be very useful if you need to periodically add new developers to your project.
If you want to use the --authors-prog option, create a file called authors.sh option in ~/GitMigration.
Add the following line to authors.sh to return a dummy Git name and email for any authors that aren’t found in authors.txt:
echo "$1 "
Again, this will only generate a dummy name and email based on the SVN username, so feel free to alter it if you can provide a more meaningful mapping.
Fetch the new SVN commits
Unlike SVN, Git makes a distinction between downloading upstream commits and integrating them into the project.
The former is called "fetching", while the latter can be done via merging or rebasing.
In the ~/GitMigration directory, run the following command to fetch any new commits from the original SVN repository.
git svn fetch
This is similar to the git svn clone command from the previous phase in that it only updates the Git repository’s remote branches--the local branches will not reflect any of the updates yet.
Your remote branches, on the other hand, should exactly match your SVN repo’s history.
If you’re using the --authors-prog option, you need include it in the above command, like so:
git svn fetch --authors-prog=authors.sh
Synchronize with the fetched commits
To apply the downloaded commits to the repository, run the following command:
java -Dfile.encoding=utf-8 -jar ~/svn-migration-scripts.jar sync-rebase
This will rebase the fetched commits onto your local branches so that they match their remote counterparts.
You should now be able to see the new commits in your git log output.
Clean up the Git repo (again)
It’s also a good idea to run the git-clean script again to remove any obsolete tags or branches that were deleted from the original SVN repository since the last sync:
java -Dfile.encoding=utf-8 -jar ~/svn-migration-scripts.jar clean-git --force
Your local Git repository should now be synchronized with your SVN repository.
Summary
During this transition period, it’s very important that your developers only commit to the original SVN repository.
The only time the Git repository should be updated is via the synchronization process discussed above.
This is much easier than managing a two-way synchronization workflow, but it still allows you to start integrating Git into your build process.
Share
In SVN, developers share contributions by committing changes from a working copy on their local computer to a central repository.
Then, other developers pull these updates from the central repo into their own local working copies.
Git’s collaboration workflow is much different.
Instead of differentiating between working copies and the central repository, Git gives each developer their own local copy of the entire repository.
Changes are committed to this local repository instead of a central one.
To share updates with other developers, you need to push these local changes to a public Git repository on a server.
Then, the other developers can pull your new commits from the public repo into their own local repositories.
Giving each developer their own complete repository is the heart of distributed version control, and it opens up a wide array of potential workflows.
You can read more about these workflows from our Git Workflows section.
So far, you’ve only been working with a local Git repository.
This page explains how to push this local repo to a public repository hosted on Bitbucket.
Sharing the Git repository during the migration allows your team to experiment with Git commands without affecting their active SVN development.
Until you’re ready to make the switch, it’s very important to treat the shared Git repositories as read-only.
All development should continue to be committed to the original SVN repository.
Create a Bitbucket account
If you don’t already have a Bitbucket account, you’ll need to create one.
Hosting is free for up to 5 users, so you can start experimenting with new Git workflows right away.
Create a Bitbucket repository
Next, you’ll need to create a Bitbucket repository.
Bitbucket makes it very easy to administer your hosted repositories via a web interface.
All you have to do is click the Create repository button after you’ve logged in.
In the resulting form, add a name and description for your repository.
If your project is private, keep the Access level option checked so that only designated developers are allowed to clone it.
For the Forking field, use Allow only private forks.
Use Git for the Repository type, select any project management tools you want to use, and select the primary programming language of your project in the Language field.
To create the hosted repository, submit the form by clicking the Create repository button.
After your repository is set up, you’ll see a Next steps page that describes some useful commands for importing an existing project.
The rest of this page will walk you through those instructions step-by-step.
Add an origin remote
To make it easier to push commits from your local Git repository to the Bitbucket repository you just created, you should record the Bitbucket repo’s URL in a remote.
A remote is just a convenient shortcut for a URL.
Technically, you can use anything you like for the shortcut, but if the remote repository serves as the official codebase for the project, it’s conventionally referred to as origin.
Run the following in your local Git repository to add your new Bitbucket repository as the origin remote.
git remote add origin https://@bitbucket.org//.git
Be sure to change to your Bitbucket username and to the name of the Bitbucket repository.
You should also be able to copy and paste the complete URL from the Bitbucket web interface.
After running the above command, you can use origin in other Git commands to refer to your Bitbucket repository.
Push the local repository to Bitbucket
Next, you need to populate your Bitbucket repository with the contents of your local Git repository.
This is called “pushing,” and can be accomplished with the following command:
git push -u origin --all
The -u option tells Git to track the upstream branches.
This enables Git to tell you if the remote repo’s commit history is ahead or behind your local ones.
The --all option pushes all of the local branches to the remote repository.
You also need to push your local tags to the Bitbucket repository with the --tags option:
git push --tagsYour Bitbucket repository is now essentially a clone of your local repository.
In the Bitbucket web interface, you should be able to explore the entire commit history of all of your branches.
Share the repository with your team
All you have to do now is share the URL of your Bitbucket repository with any other developers that need access to the repository.
The URL for any Git repository can be copy-and-pasted from the repository home page on Bitbucket:
If your repository is private, you’ll also need to grant access to your team members in the Administration tab of the Bitbucket web interface.
Users and groups can be managed by clicking the Access management link the left sidebar.
As an alternative, you can use Bitbucket’s built-in invitation feature to invite other developers to fork the repository.
The invited users will automatically be given access to the repository, so you don’t need to worry about granting permissions.
Once they have the URL of your repository, another developer can copy the repository to their local machine with git clone and begin working with the project.
For example, after running the following command on their local machine, another developer would find a new Git repository containing the project in the directory.
git clone https://@bitbucket.org//.git
Continue committing with SVN, not Git
You should now be able to push your local project to a remote repository, and your team should be able to use that remote repository to clone the project onto their local machines.
These are all the tools you need to start collaborating with Git.
However, you and your team should continue to commit changes using SVN until everybody is ready to make the switch.
The only changes to the Git repository should come from the original SVN repository using the synchronization process discussed on the previous page.
For all intents and purposes, this means that all of your Git repositories (both local and remote) are read-only.
Your developers can experiment with them, and you can begin to integrate them into your build process, but you should avoid committing any permanent changes using Git.
Summary
In this step, you set up a Bitbucket repository to share your converted Git repository with other developers.
You should now have all the tools you need to implement any of the git workflows described in Git Workflows.
You can continue synchronizing with the SVN repository and sharing the resulting Git commits via Bitbucket for as long as it takes to get your development team comfortable with Git.
Then, you can complete the migration process by retiring your SVN repository.
Migrate
This migration guide advocates a one-way synchronization from SVN to Git during the transition period.
This means that while your team is getting comfortable with Git, they should still only be committing to the original SVN repository.
When you’re ready to make the switch, the SVN repository should freeze at whatever state it’s in.
Then, developers should begin committing to their local Git repositories and sharing them via Bitbucket.
The discrete switch from SVN to Git makes for a very intuitive migration.
All of your developers should already understand the new Git workflows that they’ll be using, and they should have had plenty of time to practice using Git commands on the local repositories they cloned from Bitbucket.
This page guides you through the final step of the migration.
Synchronize the Git repository
Before finalizing your migration to Git, you should make sure that your Git repository contains any new changes that have been committed to your SVN repository.
You can do this with the same process described in the Synchronize phase.
git svn fetch java -Dfile.encoding=utf-8 -jar ~/svn-migration-scripts.jar sync-rebase java -Dfile.encoding=utf-8 -jar ~/svn-migration-scripts.jar clean-git --force
Backup the SVN repository
While you can still see your pre-Git project history in the migrated repository, it’s a good idea to backup the SVN repository just in case you ever need to explore the raw SVN data.
An easy way to backup an SVN repo is to run the following on the machine that hosts the central SVN repository.
If your SVN repo is hosted on a Linux machine, you can use the following:
svnadmin dump | gzip -9 >
Replace with the file path of the SVN repository that you’re backing up, and replace with the file path of the compressed file containing the backup.
Make the SVN repository read-only
All of your developers should now be committing with Git.
To enforce this convention, you can make your SVN repository read-only.
This process can vary depending on your server setup, but if you’re using the svnserve daemon, you can accomplish this by editing your SVN repo’s conf/svnserve.conf file.
It’s [general] section should contain the following lines:
anon-access = read auth-access = read
This tells svnserve that both anonymous and authenticated users only have read permissions.
Summary
And that’s all there is to migrating a project to Git.
Your team should now be developing with a pure Git workflow and enjoying all of the benefits of distributed development.
Good job!
Perforce to Git - why to make the move
Git is the leading SCM solution for software developers.
Interest in Git has grown steadily since its initial release in 2005.
Today it is popular among professional teams of all scales, from indie developers to large enterprises, as well as critical open source projects such as Android and the Linux kernel.
Yet Perforce, a commercial centralized SCM system, still resonates with game developers and other subsets of software developers.
Why is that? In order to understand this lingering appeal, we’ll have to review some of the reasons why Git surpassed Perforce and other centralized SCM systems for general development, and see why the game development industry has been slower to switch.
How Git ate the world
Take a step back to 1995.
Your two options for SCM are CVS and ClearCase.
CVS is free and, feature-wise, worth every penny.
ClearCase is incredibly expensive but powerful: it can handle real merges (up to a 64-way merge!), global development teams, and software projects with multiple modules.
Now Perforce enters the picture.
It isn’t free, but it’s much cheaper than ClearCase.
It’s not as powerful as ClearCase, but it’s relatively fast and gets the job done.
And that’s the recipe for a successful commercial SCM product.
Indeed, as ClearCase slowly fades away and Subversion stagnates, a few years ago Perforce seemed ripe for wider adoption.
Fast-forward to the present.
Git is now the top SCM tool for software developers.
What happened?
Distributed Speed
Git is distributed: every developer has the full history of their code repository locally.
This makes the initial clone of the repository slower (unless you are using Smart Mirroring), but subsequent operations such as commit, blame, diff, merge, and log dramatically faster.
Perforce, for the most part, requires a connection to the server in order to even see the history of changes.
And that single central server becomes a bottleneck as teams and projects get bigger.
Commands like viewing history (p4 changes), creating a tag (p4 label or p4 tag), making a branch (p4 integ), or even making a file writable in your workspace (p4 edit) require write access to the server – which is an obvious bottleneck when thousands of users are accessing that server.
Cost
Perforce, although it no longer publishes pricing, is known to be in the range of several hundred dollars per user for purchase and a percentage of that for annual renewals.
For larger teams, it can also require fairly expensive hardware for that big central server.
Git by itself is open source and completely free.
Bitbucket Server, which offers technical support and on premise installation, is a fraction of the cost of Perforce.
Take a team of 50 developers.
Bitbucket would cost $600 per year compared to tens of thousands of dollars for Perforce.
That adds up to a lot of free lunches for hard-working hackers.
Workflow
Putting aside all the bells and whistles, fundamentally an SCM tool is about collaboration: letting a team of developers work on a shared set of software files.
Git offers simple and computationally inexpensive branching, which opens up the door to a variety of cool workflows.
Task branching, Git Flow, forked repositories – there’s a fast and easy workflow for any type of team from open source to professional development, aided by powerful code review and collaboration tools.
Git also makes it easy to collaborate across company boundaries, a common requirement in cross-functional development.
Even if physical network access to a Git shared repository is not possible, Git patch and bundle tools make sharing data simple.
Perforce, on the other hand, maintains a branching record on a per-file basis, compared to a per-commit basis with Git.
What does this mean? Well, for starters it creates an awful lot of metadata in the Perforce database every time you make a branch.
That contributes to performance problems at larger deployments, to the extent that many Perforce administrators restrict branch creation.
Consider that for a moment: every time you want to make a task branch to try out a new feature, you’ve got to go and ask permission.
If you can’t make task branches, you might check in unstable code on the main branch, or just wait until you’re “done” before committing at all.
You sacrifice the benefit of having CI/CD on your task branches and being able to track granular work-in-progress.
The end result is reduced productivity as developers either live with less productive workflows or just start using Git on the side and figure out how to manually merge their work back to Perforce.
Besides being expensive, Perforce branches aren’t conducive to the type of workflow most developers prefer.
Perforce branches are shared, so there is no such thing as a private task branch with periodic rebasing.
And Perforce’s merge algorithms are overly complicated, with entire articles written about how to merge files that were renamed or had their attributes modified.
And sharing code between Perforce servers? You’re back to sharing tar files with no common history.
Perforce’s data model thinks of software history as being unique to a single server, compared to Git’s easy ability to clone and share history everywhere.
Mind share and community
Putting aside commercial competitors, why did Git beat out Mercurial and other worthy competitors? There is some value in momentum of course, and Git has it.
Git was created by Linus Torvalds to solve the distributed development challenges of the Linux kernel project, and now is the standard SCM tool for Linux, Android, OpenStack, and most other significant open source projects.
It’s what all the cool kids are using – so if you’re a hiring manager, you can probably assume that a new engineer can (and will want to) work with Git without requiring extensive training.
And, of course, you have the full power of a vibrant open source community standing behind Git.
Git is evolving rapidly to solve real-world problems, with major new features like Git LFS arriving on the scene.
You can contribute your own code to the Git project if there’s a bug you want to see fixed, and you’ll never be locked into a commercial product with a roadmap and pace set by a single company.
Just look at the range of Git client programs available: several powerful desktop GUIs, Windows Explorer integration, plugins for every IDE and developer tool.
GUIs and developer tools
In the original days of Git, the GUI and tool support was somewhat lacking.
This was a stumbling block for users who prefer a visual interface for interacting with their Git repositories.
Non-technical collaborators such as game artists were particularly disenfranchised.
Perforce’s Windows Explorer plugin was a hit with this audience.
But thankfully those days are past.
GUIs like Sourcetree offer a point-and-click experience and there are a multitude of shell integrations for Git.
Bitbucket provides code review, merge and pull requests, forking, online code browsing, and a plethora of other collaboration tools.
Indeed, everyone from data scientists to creative agencies are organizing communities that make use of the open collaboration that Git and Bitbucket make possible.
Game developers are special
So that being said, what’s stopped some communities like game developers and researchers working with huge data sets from jumping on the bandwagon? It all boils down to the type of data and the complexity of the project organization.
Binary files
Game developers, particularly artists, need to work with large binary objects like textures and audio assets.
Data scientists may have massive data sets comprising billions of event samples.
That poses two problems for Git.
These files can’t be merged.
A centralized locking mechanism is handy, and Perforce offers one.
(Note however that even a centralized server only offers a locking mechanism on a single branch, so relying on this feature implies that you had a very restricted workflow.)
These files cause Git to slow down as the size of the repository grows.
The repository size problem is largely addressed by Git LFS, an extension that lets Git handle large files while delegating the actual file storage elsewhere.
The problem of file locking bears examination on two fronts.
From a software configuration management perspective, Git LFS has a superior breed of file locking on the roadmap.
Git LFS will help coordinate locking binary files across multiple branches with an algorithm that makes sure you’re working on the latest version, no matter which branch you’re on.
That opens up branching workflows to users working with large binary files, compared to Perforce’s single-branch locking model.
It is also useful to think about file locking as a coordination problem.
If you’re going to start working on a shared asset that can’t be merged, how do you broadcast that knowledge to all interested parties? Again, here’s where the advent of modern workflows using pull requests and real-time team collaboration really shines.
You can quickly communicate your intentions using HipChat and check to see if there’s any outstanding work in progress on a particular file.
It’s also interesting to consider how the problem of handling large files will evolve in the era of Big Data.
In order to test a Big Data analytics job, you may need a data set that’s several terabytes in size.
Forget about any SCM system – this project is tested and run on a Big Data-compatible file system.
What’s needed here is a CI/CD system that can orchestrate a more complex pipeline with artifacts living on HDFS or S3.
That leads to our next topic.
Large projects
Game development is a classic example of a software project with multiple modules or components – the game engine, the UI, static art, video renderings, and so on.
Perforce as a monolithic centralized repository can host all of these modules in a single server, and let users choose which parts to pick into their own workspace.
However, this advantage is largely moot now.
Modern Git systems like Bitbucket provide easier management of Git multi-module tools like submodules and subtrees.
And more importantly, large projects like Android have shown how to manage a complex project using higher level composition tools.
Many of these lessons have been pulled into modern CI/CD tools like Bamboo and Bitbucket Pipelines, which can orchestrate complex continuous integration workflows, model the dependencies between projects, and manage artifacts between projects.
This trend largely follows the Git (and *nix) philosophy of building a tool that does a single job very well.
Continuous integration and continuous delivery (CI/CD) is a practice of its own, with tools that are dedicated to understanding build and release workflow.
It also aligns with modern software development best practices, which aim to use small self-contained microservices rather than monolithic projects.
Next steps
There’s clearly some momentum in the “Perforce to Git” camp, and Git and modern CI/CD tools are now poised to handle the largest and most complex development efforts.
Indeed, Perforce even made a tool called Git Fusion that lets you extract part of a central Perforce repository as a Git repo.
Unfortunately, while Git Fusion was a noble effort, trying to layer Git onto a centralized SCM system isn’t very easy; if you attempt to mix your usage models, you can quite easily corrupt one system’s view of the data.
If you don’t mix your usage models, it’s hard to see the value of putting a commercial centralized backend behind Git.
The trend as we’ve seen is actually in the other direction: how do you put the last few remaining pieces of centralized SCM that were useful into Git?
If you’re using Perforce for any software or game development, you’re probably wondering (nervously) about how to migrate to Git.
How do you even do that? And is it worth the switching cost? That’s exactly what we’ll cover in the next article.
There are two general approaches for moving the data over from Perforce to Git.
Before we dive into that area, we need to consider a fundamental difference between how Perforce and Git handle software projects.
A Perforce server can hold tens or hundreds of distinct software projects, each with its own branching model.
A developer defines a “view” that tells the Perforce server which files to put into a working copy.
A Git repository on the other hand normally holds a single software project and its branches and tags (although large monolithic Git repos do exist).
You typically clone the repo and, perhaps, check out submodules or subtrees.
The question of moving the data, then, has two parts: how to extract data from Perforce, and how to translate that into an equivalent set of Git repositories.
Moving Perforce Data Option 1: Using Git Fusion
If you want to preserve the entire history of your data in Perforce, you can use Perforce’s own Git Fusion tool to extract a section of a Perforce server (a single project) into a Git repo.
Essentially, you:
Install Git Fusion
Set up the correct views of your data, including the branching structure
Use any Git client to clone from Git Fusion
Push your repo into Bitbucket
Hands-on example *In order to work through this example you’ll need a Perforce server with Git Fusion already operational.* Let’s say that you have a Perforce project living in the repository path //depot/acme/… (in Perforce depot view syntax).
It has three branches: - //depot/acme/main/… - //depot/acme/r1.0/… - //depot/acme/r1.1/… Keep in mind that with Perforce you see branches as additional directories in the tree.
Your first step is to configure Git Fusion so that it understands the branching relationship in Perforce.
To do this, you create a repo configuration file: [@repo] description = Acme project charset = utf8 [main] git-branch-name = main view = //depot/acme/main/… … [r1.0] git-branch-name = r1.0 view = //depot/acme/r1.0/… … [r1.1] git-branch-name = r1.1 view = //depot/acme/r1.1/… … Submit this file to Perforce under the path //.git-fusion/repos/acme/p4gf_config Now create an empty project called acme in Bitbucket using the normal Bitbucket administration tools.

You can configure the access control and team members per your usual standards.
Next, clone from Git Fusion: git clone https:///acme cd acme git remote add bitbucket  git push –u --all bitbucket git push --tags Bitbucket That’s it! You should now see the imported history in Bitbucket.
Now, this may not always give you a 100% faithful copy of your Perforce data.
There are some Perforce operations, like partial merges, that just have no equivalent in Git.
But all in all, this method will get most of your history without too much effort.
Keep in mind that preserving the last 10 years of branching history from a legacy SCM doesn’t mean that you have to keep using the same workflow.
Notably, you should consider adopting feature branch workflows like Git Flow as a practical first step.
Pros and cons
Requires the most setup work and runtime
Preserves the most history (letting you shut down legacy Perforce server)
Maintains legacy branching model in history
Moving Perforce Data Option 2: Start over
The other option is to start over.
Forget all that crufty history: just extract the head (tip) of each branch in Perforce that corresponds to your project, and check that stuff into a new empty Git repo.
(This implies that you have Perforce workspaces defined with a correct ‘view’ of the data you want.)
This is the simplest and fastest technique.
No matter how complicated your Perforce history was, your new Git repo is lean and mean.
You get the chance to start a new Git-based workflow without any accumulated baggage.
The main drawback is that you probably want to keep the old Perforce server around in a read-only mode in case anyone needs to dig into historical code for any reason.
This won’t cost you anything in license fees but it does imply that you’re keeping that old server alive for a while.
**Hands-on example** Go into your Perforce workspace (the directory where the main branch of your project data is checked out) and run: p4 sync This fetches the latest revision of your files.
Now create an empty project called acme in Bitbucket using the normal Bitbucket administration tools.
You can configure the access control and team members per your usual standards.
Next, create a new Git repo in your workspace and push to Bitbucket: git init .

git remote add origin  git push –u --all origin git push --tags origin You should now see the latest snapshot of your code as the first commit in your new Bitbucket project.
Pros and cons
Fast and simple
Redesign branching model and workflow
Legacy Perforce server used for read-only access
Step 2: Users and permissions
After the data is moved over, the next task is usually to start mapping your users and permissions into new Bitbucket projects.
If you use LDAP for a user directory you’ll save some time here.
Otherwise, you can easily extract a set of user accounts from Perforce using the p4 users –o command and then enter them into Bitbucket a project at a time.
Translating Perforce permissions into the equivalent Bitbucket permissions can be difficult because Perforce permissions are granular and complex, with the possibility of excluding access to individual files.
This complicated permission scheme is one reason why a Perforce server can bog down – every attempt at access may cause the server to perform an expensive computation on a complicated data structure.
In most cases it’s faster just to ask project leads to define a simpler set of permissions in Bitbucket using the normal project, repo, and branch level permissions.
Indeed, you’ll want to revisit your permission setup anyway, as Git offers up so many new workflow options.
For example, in Perforce you may have restricted branch creation, while in Bitbucket you may only need to restrict push access to the main branch.
Step 3: Binary files
If you stored large binary blobs in Perforce, think carefully about how you want to manage those in Git.
You could try out Git LFS, or you could simply use a regular artifact management system instead.
In any case you don’t want to blindly push large blobs into a Git repo.
Step 4: Complex dependencies
A Perforce working copy may actually map in read-only copies of data from several modules.
In Git, this is done either using submodules, subtrees, or by leveraging CI/CD or artifact management systems.
There’s no easy answer here, but some data import tools can model a submodule relationship between Git repos.
For a more in depth look on how to use submodules or subtrees, you can read about each here: https://blogs.atlassian.com/2013/05/alternatives-to-git-submodule-git-subtree/.
Step 5: How to structure your team during the migration
So, your Perforce server has 100 projects from 10 teams.
You’ve got a migration strategy and tool set laid out.
Schedule the maintenance window and go!
Er… no.
Remember that switching SCM tools is as much about developers as it is data.
You’ve got people, process, and schedule to consider – don’t try to boil the ocean in a single day.
It’s too risky.
You need to consider a project plan during the actual migration phase.
(It might be a good time to try out a new Jira workflow…) Here are some options you can look at.
Migrate team-by-team and project-by-project.
Aim to start a project and team at the beginning of a sprint or program increment, when you have some time to adapt.
Migrate incrementally.
Import all of your data in a weekend, but then let teams slowly complete the switch to Git over time.
Periodically pickup the deltas by re-running your import tools.
Although more complex, this strategy isn’t bad if you have dependencies between teams and the early adopters need at least a recent snapshot in Git to feed their CI/CD pipeline.
Use both systems at the same time for a period of time.
While not for the faint of heart, it’s technically feasible to use Git Fusion to do a two-way data exchange as long as you are not doing complex operations that will confuse the data translator.
Lastly, invest in communicating the changes to the team – the motivation, the why, and a series of steps for how to do it.
Pick an “early adopter” team with engineers experienced in the entire software development lifecycle, and have that team be a model for the others.
Find Git champions to assist people when they have a difficulty.
Making small, understandable, iterative changes will help this process be successful.
Step 6: Mirrors and Clusters
Perforce has a simple but effective system for mirroring data to remote sites to reduce the effect of latency.
It has a more complex system for running a set of local mirrors for read-only clustering.
Although latency is simply not as much of a concern for Git, if you are running a worldwide operation you should look at Bitbucket Data Center for both clustering and mirroring, which will greatly speed up your clone times for a global team.
Step 7: ALM Tools
And now for some good news – you’ve got a lot of choices for your ALM tool stack when you move from Perforce to Git.
Pretty much every developer and ALM tool out there works with Git, and of course Bitbucket gives you great integration with Jira and Bamboo.
As you transition to Git, you can explore Bamboo features such as Plan Branches that take advantage of a feature branch workflow.
Step 8: Defining success
So how exactly do you measure success during a migration from Perforce to Git? In many migration projects we tend to focus too much on the fidelity of data transfer.
But that is not a useful metric for many reasons.
It’s likely that you can never get a bit-for-bit history in Git that is exactly the equivalent of what happened in a centralized SCM system like Perforce.
A more practical approach is to use CI/CD for verification.
Once you switch your CI/CD pipeline from Perforce to Git, do all your tests still pass? And can you still deploy your software? If all of your important older builds can still pass through your CI/CD pipeline, then it’s time to declare victory!
That’s a wrap
So now you’ve seen why there’s movement from Perforce to Git, and how to actually get there.
The next step is to choose a Git solution.
If you are switching from Perforce for game development, see why game developers love Bitbucket.
How to move a full Git repository
If you're wrangling multiple Git repositorites, you'll eventually want to move files from one to another.
This tutorial will show you how you can move a full Git repository from one remote server to another.
The steps below even allow you to choose which branches and tags to include.
Let’s call the original repository ORI and the new one NEW, here are the steps required to copy everything from ORI to NEW:
1. Create a local repository in the temp-dir directory using:
git clone <url to ORI repo> temp-dir2.
Go into the temp-dir directory.
3. To see a list of the different branches in ORI do:
git branch -a4.
Checkout all the branches that you want to copy from ORI to NEW using:
git checkout branch-name5.
Now fetch all the tags from ORI using:
git fetch --tags6.
Before doing the next step make sure to check your local tags and branches using the following commands:
git tag
git branch -a
7.
Now clear the link to the ORI repository with the following command:
git remote rm origin
8. Now link your local repository to your newly created NEW repository using the following command:
git remote add origin <url to NEW repo>
9. Now push all your branches and tags with these commands:
git push origin --all
git push --tags
10.
You now have a full copy from your ORI repo.
Extra
If you want to simply copy the entire repository you can use
git clone --mirror <url to ORI repo> temp-dir
to replace step 1 to 5.
Advanced Git Tutorials
Atlassian’s Git tutorials introduce the most common Git commands, and our Git Workflows modules discuss how these commands are typically used to facilitate collaboration.
Alone, these are enough to get a development team up and running with Git.
But, if you really want to leverage the full power of Git, you’re ready to dive into our Advanced Git articles.
Each of these articles provide an in-depth discussion of an advanced feature of Git.
Instead of presenting new commands and concepts, they refine your existing Git skills by explaining what’s going on under the hood.
Armed with this knowledge, you’ll be able to use familiar Git commands more effectively.
More importantly, you’ll never be scared of breaking your Git repository because you’ll understand why it broke and how to fix it.
Merging vs. Rebasing
Git is all about working with divergent history.
Its git merge and git rebase commands offer alternative ways to integrate commits from different branches, and both options come with their own advantages.
In this article, we’ll discuss how and when a basic git merge operation can be replaced with a rebase.
Learn more
Resetting, Checking Out, and Reverting
The git reset, git checkout, and git revert commands are all similar in that they undo some type of change in your repository.
But, they all affect different combinations of the working directory, staged snapshot, and commit history.
This article clearly defines how these commands differ and when each of them should be used in the standard Git workflows.
Learn more
Advanced Git Log
The git log command is what makes your project history useful.
Without it, you wouldn’t be able to access any of your commits.
But, if you’re like most aspiring Git users, you’ve probably only scratched the surface of what’s possible with git log.
This article walks you through its advanced formatting and filtering options, giving you the power to extract all sorts of interesting information from your Git repository.
Learn more
Git Hooks
If you want to perform custom actions when a certain event takes place in a Git repository, hooks are your tool of choice.
They let you normalize commit messages, automate testing suites, notify continuous integration systems, and much more.
After this article, you’ll understand the many ways in which Git hooks can streamline your workflow.
Learn more
Refs and the Reflog
A ref is Git’s internal way of referring to a commit.
You’re already familiar with many categories of refs, including commit hashes and branch names.
But, there are many other types of refs, and virtually every Git command utilizes them in some form or another.
You’ll walk away from this article with an intimate knowledge of Git’s inner workings.
Learn more
Merging vs. Rebasing
The git rebase command has a reputation for being magical Git voodoo that beginners should stay away from, but it can actually make life much easier for a development team when used with care.
In this article, we’ll compare git rebase with the related git merge command and identify all of the potential opportunities to incorporate rebasing into the typical Git workflow.
Conceptual Overview
The first thing to understand about git rebase is that it solves the same problem as git merge.
Both of these commands are designed to integrate changes from one branch into another branch—they just do it in very different ways.
Consider what happens when you start working on a new feature in a dedicated branch, then another team member updates the main branch with new commits.
This results in a forked history, which should be familiar to anyone who has used Git as a collaboration tool.
Now, let’s say that the new commits in main are relevant to the feature that you’re working on.
To incorporate the new commits into your feature branch, you have two options: merging or rebasing.
The Merge Option
The easiest option is to merge the main branch into the feature branch using something like the following:
git checkout feature
git merge main
Or, you can condense this to a one-liner:
git merge feature main
This creates a new “merge commit” in the feature branch that ties together the histories of both branches, giving you a branch structure that looks like this:
Merging is nice because it’s a non-destructive operation.
The existing branches are not changed in any way.
This avoids all of the potential pitfalls of rebasing (discussed below).
On the other hand, this also means that the feature branch will have an extraneous merge commit every time you need to incorporate upstream changes.
If main is very active, this can pollute your feature branch’s history quite a bit.
While it’s possible to mitigate this issue with advanced git log options, it can make it hard for other developers to understand the history of the project.
The Rebase Option
As an alternative to merging, you can rebase the feature branch onto main branch using the following commands:
git checkout feature
git rebase main
This moves the entire feature branch to begin on the tip of the main branch, effectively incorporating all of the new commits in main.
But, instead of using a merge commit, rebasing re-writes the project history by creating brand new commits for each commit in the original branch.
The major benefit of rebasing is that you get a much cleaner project history.
First, it eliminates the unnecessary merge commits required by git merge.
Second, as you can see in the above diagram, rebasing also results in a perfectly linear project history—you can follow the tip of feature all the way to the beginning of the project without any forks.
This makes it easier to navigate your project with commands like git log, git bisect, and gitk.
But, there are two trade-offs for this pristine commit history: safety and traceability.
If you don’t follow the Golden Rule of Rebasing, re-writing project history can be potentially catastrophic for your collaboration workflow.
And, less importantly, rebasing loses the context provided by a merge commit—you can’t see when upstream changes were incorporated into the feature.
Interactive Rebasing
Interactive rebasing gives you the opportunity to alter commits as they are moved to the new branch.
This is even more powerful than an automated rebase, since it offers complete control over the branch’s commit history.
Typically, this is used to clean up a messy history before merging a feature branch into main.
To begin an interactive rebasing session, pass the i option to the git rebase command:
git checkout feature
git rebase -i main
This will open a text editor listing all of the commits that are about to be moved:
pick 33d5b7a Message for commit #1
pick 9480b3d Message for commit #2
pick 5c67e61 Message for commit #3
This listing defines exactly what the branch will look like after the rebase is performed.
By changing the pick command and/or re-ordering the entries, you can make the branch’s history look like whatever you want.
For example, if the 2nd commit fixes a small problem in the 1st commit, you can condense them into a single commit with the fixup command:
pick 33d5b7a Message for commit #1

fixup 9480b3d Message for commit #2
pick 5c67e61 Message for commit #3
When you save and close the file, Git will perform the rebase according to your instructions, resulting in project history that looks like the following:
Eliminating insignificant commits like this makes your feature’s history much easier to understand.
This is something that git merge simply cannot do.
The Golden Rule of Rebasing
Once you understand what rebasing is, the most important thing to learn is when not to do it.
The golden rule of git rebase is to never use it on public branches.
For example, think about what would happen if you rebased main onto your feature branch:
The rebase moves all of the commits in main onto the tip of feature.
The problem is that this only happened in your repository.
All of the other developers are still working with the original main.
Since rebasing results in brand new commits, Git will think that your main branch’s history has diverged from everybody else’s.
The only way to synchronize the two main branches is to merge them back together, resulting in an extra merge commit and two sets of commits that contain the same changes (the original ones, and the ones from your rebased branch).
Needless to say, this is a very confusing situation.
So, before you run git rebase, always ask yourself, “Is anyone else looking at this branch?” If the answer is yes, take your hands off the keyboard and start thinking about a non-destructive way to make your changes (e.g., the git revert command).
Otherwise, you’re safe to re-write history as much as you like.
Force-Pushing
If you try to push the rebased main branch back to a remote repository, Git will prevent you from doing so because it conflicts with the remote main branch.
But, you can force the push to go through by passing the --force flag, like so:
# Be very careful with this command! git push --force
This overwrites the remote main branch to match the rebased one from your repository and makes things very confusing for the rest of your team.
So, be very careful to use this command only when you know exactly what you’re doing.
One of the only times you should be force-pushing is when you’ve performed a local cleanup after you’ve pushed a private feature branch to a remote repository (e.g., for backup purposes).
This is like saying, “Oops, I didn’t really want to push that original version of the feature branch.
Take the current one instead.” Again, it’s important that nobody is working off of the commits from the original version of the feature branch.
Workflow Walkthrough
Rebasing can be incorporated into your existing Git workflow as much or as little as your team is comfortable with.
In this section, we’ll take a look at the benefits that rebasing can offer at the various stages of a feature’s development.
The first step in any workflow that leverages git rebase is to create a dedicated branch for each feature.
This gives you the necessary branch structure to safely utilize rebasing:
Local Cleanup
One of the best ways to incorporate rebasing into your workflow is to clean up local, in-progress features.
By periodically performing an interactive rebase, you can make sure each commit in your feature is focused and meaningful.
This lets you write your code without worrying about breaking it up into isolated commits—you can fix it up after the fact.
When calling git rebase, you have two options for the new base: The feature’s parent branch (e.g., main), or an earlier commit in your feature.
We saw an example of the first option in the Interactive Rebasing section.
The latter option is nice when you only need to fix up the last few commits.
For example, the following command begins an interactive rebase of only the last 3 commits.
git checkout feature git rebase -i HEAD~3
By specifying HEAD~3 as the new base, you’re not actually moving the branch—you’re just interactively re-writing the 3 commits that follow it.
Note that this will not incorporate upstream changes into the feature branch.
If you want to re-write the entire feature using this method, the git merge-base command can be useful to find the original base of the feature branch.
The following returns the commit ID of the original base, which you can then pass to git rebase:
git merge-base feature main
This use of interactive rebasing is a great way to introduce git rebase into your workflow, as it only affects local branches.
The only thing other developers will see is your finished product, which should be a clean, easy-to-follow feature branch history.
But again, this only works for private feature branches.
If you’re collaborating with other developers via the same feature branch, that branch is public, and you’re not allowed to re-write its history.
There is no git merge alternative for cleaning up local commits with an interactive rebase.
Incorporating Upstream Changes Into a Feature
In the Conceptual Overview section, we saw how a feature branch can incorporate upstream changes from main using either git merge or git rebase.
Merging is a safe option that preserves the entire history of your repository, while rebasing creates a linear history by moving your feature branch onto the tip of main.
This use of git rebase is similar to a local cleanup (and can be performed simultaneously), but in the process it incorporates those upstream commits from main.
Keep in mind that it’s perfectly legal to rebase onto a remote branch instead of main.
This can happen when collaborating on the same feature with another developer and you need to incorporate their changes into your repository.
For example, if you and another developer named John added commits to the feature branch, your repository might look like the following after fetching the remote feature branch from John’s repository:
You can resolve this fork the exact same way as you integrate upstream changes from main: either merge your local feature with john/feature, or rebase your local feature onto the tip of john/feature.
Note that this rebase doesn’t violate the Golden Rule of Rebasing because only your local feature commits are being moved—everything before that is untouched.
This is like saying, “add my changes to what John has already done.” In most circumstances, this is more intuitive than synchronizing with the remote branch via a merge commit.
By default, the git pull command performs a merge, but you can force it to integrate the remote branch with a rebase by passing it the --rebase option.
Reviewing a Feature With a Pull Request
If you use pull requests as part of your code review process, you need to avoid using git rebase after creating the pull request.
As soon as you make the pull request, other developers will be looking at your commits, which means that it’s a public branch.
Re-writing its history will make it impossible for Git and your teammates to track any follow-up commits added to the feature.
Any changes from other developers need to be incorporated with git merge instead of git rebase.
For this reason, it’s usually a good idea to clean up your code with an interactive rebase before submitting your pull request.
Integrating an Approved Feature
After a feature has been approved by your team, you have the option of rebasing the feature onto the tip of the main branch before using git merge to integrate the feature into the main code base.
This is a similar situation to incorporating upstream changes into a feature branch, but since you’re not allowed to re-write commits in the main branch, you have to eventually use git merge to integrate the feature.
However, by performing a rebase before the merge, you’re assured that the merge will be fast-forwarded, resulting in a perfectly linear history.
This also gives you the chance to squash any follow-up commits added during a pull request.
If you’re not entirely comfortable with git rebase, you can always perform the rebase in a temporary branch.
That way, if you accidentally mess up your feature’s history, you can check out the original branch and try again.
For example:
git checkout feature

git checkout -b temporary-branch
git rebase -i main
# [Clean up the history]
git checkout main

git merge temporary-branch
Summary
And that’s all you really need to know to start rebasing your branches.
If you would prefer a clean, linear history free of unnecessary merge commits, you should reach for git rebase instead of git merge when integrating changes from another branch.
On the other hand, if you want to preserve the complete history of your project and avoid the risk of re-writing public commits, you can stick with git merge.
Either option is perfectly valid, but at least now you have the option of leveraging the benefits of git rebase.
Resetting, Checking Out & Reverting
The git reset, git checkout, and git revert commands are some of the most useful tools in your Git toolbox.
They all let you undo some kind of change in your repository, and the first two commands can be used to manipulate either commits or individual files.
Because they’re so similar, it’s very easy to mix up which command should be used in any given development scenario.
In this article, we’ll compare the most common configurations of git reset, git checkout, and git revert.
Hopefully, you’ll walk away with the confidence to navigate your repository using any of these commands.
It helps to think about each command in terms of their effect on the three state management mechanisms of a Git repository: the working directory, the staged snapshot, and the commit history.
These components are sometimes known as "The three trees" of Git.
We explore the three trees in depth on the git reset page.
Keep these mechanisms in mind as you read through this article.
A checkout is an operation that moves the HEAD ref pointer to a specified commit.
To demonstrate this consider the following example.
This example demonstrates a sequence of commits on the main branch.
The HEAD ref and main branch ref currently point to commit d.
Now let us execute git checkout bThis is an update to the "Commit History" tree.
The git checkout command can be used in a commit, or file level scope.
A file level checkout will change the file's contents to those of the specific commit.
A revert is an operation that takes a specified commit and creates a new commit which inverses the specified commit.
git revert can only be run at a commit level scope and has no file level functionality.
A reset is an operation that takes a specified commit and resets the "three trees" to match the state of the repository at that specified commit.
A reset can be invoked in three different modes which correspond to the three trees.
Checkout and reset are generally used for making local or private 'undos'.
They modify the history of a repository that can cause conflicts when pushing to remote shared repositories.
Revert is considered a safe operation for 'public undos' as it creates new history which can be shared remotely and doesn't overwrite history remote team members may be dependent on.
Git Reset vs Revert vs Checkout reference
The table below sums up the most common use cases for all of these commands.
Be sure to keep this reference handy, as you’ll undoubtedly need to use at least some of them during your Git career.
Command
Scope
Common use cases
git reset
Commit-level
Discard commits in a private branch or throw away uncommited changes
git reset
File-level
Unstage a file
git checkout
Commit-level
Switch between branches or inspect old snapshots
git checkout
File-level
Discard changes in the working directory
git revert
Commit-level
Undo commits in a public branch
git revert
File-level
(N/A)
Commit Level Operations
The parameters that you pass to git reset and git checkout determine their scope.
When you don’t include a file path as a parameter, they operate on whole commits.
That’s what we’ll be exploring in this section.
Note that git revert has no file-level counterpart.
Reset A Specific Commit
On the commit-level, resetting is a way to move the tip of a branch to a different commit.
This can be used to remove commits from the current branch.
For example, the following command moves the hotfix branch backwards by two commits.
git checkout hotfix git reset HEAD~2
The two commits that were on the end of hotfix are now dangling, or orphaned commits.
This means they will be deleted the next time Git performs a garbage collection.
In other words, you’re saying that you want to throw away these commits.
This can be visualized as the following:
This usage of git reset is a simple way to undo changes that haven’t been shared with anyone else.
It’s your go-to command when you’ve started working on a feature and find yourself thinking, “Oh crap, what am I doing? I should just start over.”
In addition to moving the current branch, you can also get git reset to alter the staged snapshot and/or the working directory by passing it one of the following flags:
--soft – The staged snapshot and working directory are not altered in any way.
--mixed – The staged snapshot is updated to match the specified commit, but the working directory is not affected.
This is the default option.
--hard – The staged snapshot and the working directory are both updated to match the specified commit.
It’s easier to think of these modes as defining the scope of a git reset operation.
For further detailed information visit the git reset page.
Checkout old commits
The git checkout command is used to update the state of the repository to a specific point in the projects history.
When passed with a branch name, it lets you switch between branches.
git checkout hotfix
Internally, all the above command does is move HEAD to a different branch and update the working directory to match.
Since this has the potential to overwrite local changes, Git forces you to commit or stash any changes in the working directory that will be lost during the checkout operation.
Unlike git reset, git checkout doesn’t move any branches around.
You can also check out arbitrary commits by passing the commit reference instead of a branch.
This does the exact same thing as checking out a branch: it moves the HEAD reference to the specified commit.
For example, the following command will check out the grandparent of the current commit:
git checkout HEAD~2This is useful for quickly inspecting an old version of your project.
However, since there is no branch reference to the current HEAD, this puts you in a detached HEAD state.
This can be dangerous if you start adding new commits because there will be no way to get back to them after you switch to another branch.
For this reason, you should always create a new branch before adding commits to a detached HEAD.
Undo Public Commits with Revert
Reverting undoes a commit by creating a new commit.
This is a safe way to undo changes, as it has no chance of re-writing the commit history.
For example, the following command will figure out the changes contained in the 2nd to last commit, create a new commit undoing those changes, and tack the new commit onto the existing project.
git checkout hotfix git revert HEAD~2
This can be visualized as the following:
Contrast this with git reset, which does alter the existing commit history.
For this reason, git revert should be used to undo changes on a public branch, and git reset should be reserved for undoing changes on a private branch.
You can also think of git revert as a tool for undoing committed changes, while git reset HEAD is for undoing uncommitted changes.
Like git checkout, git revert has the potential to overwrite files in the working directory, so it will ask you to commit or stash changes that would be lost during the revert operation.
File-level Operations
The git reset and git checkout commands also accept an optional file path as a parameter.
This dramatically alters their behavior.
Instead of operating on entire snapshots, this forces them to limit their operations to a single file.
Git Reset A Specific File
When invoked with a file path, git reset updates the staged snapshot to match the version from the specified commit.
For example, this command will fetch the version of foo.py in the 2nd-to-last commit and stage it for the next commit:
git reset HEAD~2 foo.py
As with the commit-level version of git reset, this is more commonly used with HEAD rather than an arbitrary commit.
Running git reset HEAD foo.py will unstage foo.py.
The changes it contains will still be present in the working directory.
The --soft, --mixed, and --hard flags do not have any effect on the file-level version of git reset, as the staged snapshot is always updated, and the working directory is never updated.
Git Checkout File
Checking out a file is similar to using git reset with a file path, except it updates the working directory instead of the stage.
Unlike the commit-level version of this command, this does not move the HEAD reference, which means that you won’t switch branches.
For example, the following command makes foo.py in the working directory match the one from the 2nd-to-last commit:
git checkout HEAD~2 foo.py
Just like the commit-level invocation of git checkout, this can be used to inspect old versions of a project—but the scope is limited to the specified file.
If you stage and commit the checked-out file, this has the effect of “reverting” to the old version of that file.
Note that this removes all of the subsequent changes to the file, whereas the git revert command undoes only the changes introduced by the specified commit.
Like git reset, this is commonly used with HEAD as the commit reference.
For instance, git checkout HEAD foo.py has the effect of discarding unstaged changes to foo.py.
This is similar behavior to git reset HEAD --hard, but it operates only on the specified file.
Summary
You should now have all the tools you could ever need to undo changes in a Git repository.
The git reset, git checkout, and git revert commands can be confusing, but when you think about their effects on the working directory, staged snapshot, and commit history, it should be easier to discern which command fits the development task at hand.
Advanced Git log
The purpose of any version control system is to record changes to your code.
This gives you the power to go back into your project history to see who contributed what, figure out where bugs were introduced, and revert problematic changes.
But, having all of this history available is useless if you don’t know how to navigate it.
That’s where the git log command comes in.
By now, you should already know the basic git log command for displaying commits.
But, you can alter this output by passing many different parameters to git log.
The advanced features of git log can be split into two categories: formatting how each commit is displayed, and filtering which commits are included in the output.
Together, these two skills give you the power to go back into your project and find any information that you could possibly need.
Formatting Log Output
First, this article will take a look at the many ways in which git log’s output can be formatted.
Most of these come in the form of flags that let you request more or less information from git log.
If you don’t like the default git log format, you can use git config’s aliasing functionality to create a shortcut for any of the formatting options discussed below.
Please see in The git config Command for how to set up an alias.
Oneline
The --oneline flag condenses each commit to a single line.
By default, it displays only the commit ID and the first line of the commit message.
Your typical git log --oneline output will look something like this:
0e25143 Merge branch 'feature'
ad8621a Fix a bug in the feature
16b36c6 Add a new feature
23ad9ad Add the initial code base
This is very useful for getting a high-level overview of your project.
Decorating
Many times it’s useful to know which branch or tag each commit is associated with.
The --decorate flag makes git log display all of the references (e.g., branches, tags, etc) that point to each commit.
This can be combined with other configuration options.
For example, running git log --oneline --decorate will format the commit history like so:
0e25143 (HEAD, main) Merge branch 'feature'
ad8621a (feature) Fix a bug in the feature

16b36c6 Add a new feature
23ad9ad (tag: v0.9) Add the initial code base
This lets you know that the top commit is also checked out (denoted by HEAD) and that it is also the tip of the main branch.
The second commit has another branch pointing to it called feature, and finally the 4th commit is tagged as v0.9.
Branches, tags, HEAD, and the commit history are almost all of the information contained in your Git repository, so this gives you a more complete view of the logical structure of your repository.
Diffs
The git log command includes many options for displaying diffs with each commit.
Two of the most common options are --stat and -p.
The --stat option displays the number of insertions and deletions to each file altered by each commit (note that modifying a line is represented as 1 insertion and 1 deletion).
This is useful when you want a brief summary of the changes introduced by each commit.
For example, the following commit added 67 lines to the hello.py file and removed 38 lines:
commit f2a238924e89ca1d4947662928218a06d39068c3

Author: John <john@example.com>
Date:   Fri Jun 25 17:30:28 2014 -0500
Add a new feature
hello.py | 105 ++++++++++++++++++++++++-----------------

1 file changed, 67 insertion(+), 38 deletions(-)
The amount of + and - signs next to the file name show the relative number of changes to each file altered by the commit.
This gives you an idea of where the changes for each commit can be found.
If you want to see the actual changes introduced by each commit, you can pass the -p option to git log.
This outputs the entire patch representing that commit:
commit 16b36c697eb2d24302f89aa22d9170dfe609855b
Author: Mary <mary@example.com>
Date:   Fri Jun 25 17:31:57 2014 -0500

Fix a bug in the feature
diff --git a/hello.py b/hello.py
index 18ca709..c673b40 100644
--- a/hello.py

+++ b/hello.py
@@ -13,14 +13,14 @@ B
-print("Hello, World!")
+print("Hello, Git!")
For commits with a lot of changes, the resulting output can become quite long and unwieldy.
More often than not, if you’re displaying a full patch, you’re probably searching for a specific change.
For this, you want to use the pickaxe option.
The Shortlog
The git shortlog command is a special version of git log intended for creating release announcements.
It groups each commit by author and displays the first line of each commit message.
This is an easy way to see who’s been working on what.
For example, if two developers have contributed 5 commits to a project, the git shortlog output might look like the following:
Mary (2):
  Fix a bug in the feature
  Fix a serious security hole in our framework
John (3):

  Add the initial code base
  Add a new feature
  Merge branch 'feature'
By default, git shortlog sorts the output by author name, but you can also pass the -n option to sort by the number of commits per author.
Graphs
The --graph option draws an ASCII graph representing the branch structure of the commit history.
This is commonly used in conjunction with the --oneline and --decorate commands to make it easier to see which commit belongs to which branch:
git log --graph --oneline --decorate
For a simple repository with just 2 branches, this will produce the following:
*   0e25143 (HEAD, main) Merge branch 'feature'
|\
| * 16b36c6 Fix a bug in the new feature

| * 23ad9ad Start a new feature
* | ad8621a Fix a critical security issue
|/
* 400e4b7 Fix typos in the documentation

* 160e224 Add the initial code base
The asterisk shows which branch the commit was on, so the above graph tells us that the 23ad9ad and 16b36c6 commits are on a topic branch and the rest are on the main branch.
While this is a nice option for simple repositories, you’re probably better off with a more full-featured visualization tool like gitk or Sourcetree for projects that are heavily branched.
Custom Formatting
For all of your other git log formatting needs, you can use the --pretty=format:"" option.
This lets you display each commit however you want using printf-style placeholders.
For example, the %cn, %h and %cd characters in the following command are replaced with the committer name, abbreviated commit hash, and the committer date, respectively.
git log --pretty=format:"%cn committed %h on %cd"
This results in the following format for each commit:
John committed 400e4b7 on Fri Jun 24 12:30:04 2014 -0500 John committed 89ab2cf on Thu Jun 23 17:09:42 2014 -0500 Mary committed 180e223 on Wed Jun 22 17:21:19 2014 -0500 John committed f12ca28 on Wed Jun 22 13:50:31 2014 -0500
The complete list of placeholders can be found in the Pretty Formats section of the git log manual page.
Aside from letting you view only the information that you’re interested in, the --pretty=format:"" option is particularly useful when you’re trying to pipe git log output into another command.
Filtering the Commit History
Formatting how each commit gets displayed is only half the battle of learning git log.
The other half is understanding how to navigate the commit history.
The rest of this article introduces some of the advanced ways to pick out specific commits in your project history using git log.
All of these can be combined with any of the formatting options discussed above.
By Amount
The most basic filtering option for git log is to limit the number of commits that are displayed.
When you’re only interested in the last few commits, this saves you the trouble of viewing all the commits in a page.
You can limit git log’s output by including the - option.
For example, the following command will display only the 3 most recent commits.
git log -3
By Date
If you’re looking for a commit from a specific time frame, you can use the --after or --before flags for filtering commits by date.
These both accept a variety of date formats as a parameter.
For example, the following command only shows commits that were created after July 1st, 2014 (inclusive):
git log --after="2014-7-1"
You can also pass in relative references like "1 week ago" and "yesterday":
git log --after="yesterday"
To search for a commits that were created between two dates, you can provide both a --before and --after date.
For instance, to display all the commits added between July 1st, 2014 and July 4th, 2014, you would use the following:
git log --after="2014-7-1" --before="2014-7-4"
Note that the --since and --until flags are synonymous with --after and --before, respectively.
By Author
When you’re only looking for commits created by a particular user, use the --author flag.
This accepts a regular expression, and returns all commits whose author matches that pattern.
If you know exactly who you’re looking for, you can use a plain old string instead of a regular expression:
git log --author="John"
This displays all commits whose author includes the name John.
The author name doesn’t need to be an exact match—it just needs to contain the specified phrase.
You can also use regular expressions to create more complex searches.
For example, the following command searches for commits by either Mary or John.
git log --author="John\|Mary"
Note that the author’s email is also included with the author’s name, so you can use this option to search by email, too.
If your workflow separates committers from authors, the --committer flag operates in the same fashion.
By Message
To filter commits by their commit message, use the --grep flag.
This works just like the --author flag discussed above, but it matches against the commit message instead of the author.
For example, if your team includes relevant issue numbers in each commit message, you can use something like the following to pull out all of the commits related to that issue:
git log --grep="JRA-224:"
You can also pass in the -i parameter to git log to make it ignore case differences while pattern matching.
By File
Many times, you’re only interested in changes that happened to a particular file.
To show the history related to a file, all you have to do is pass in the file path.
For example, the following returns all commits that affected either the foo.py or the bar.py file:
git log -- foo.py bar.py
The -- parameter is used to tell git log that subsequent arguments are file paths and not branch names.
If there’s no chance of mixing it up with a branch, you can omit the --.
By Content
It’s also possible to search for commits that introduce or remove a particular line of source code.
This is called a pickaxe, and it takes the form of -S"".
For example, if you want to know when the string Hello, World! was added to any file in the project, you would use the following command:
git log -S"Hello, World!"
If you want to search using a regular expression instead of a string, you can use the -G"" flag instead.
This is a very powerful debugging tool, as it lets you locate all of the commits that affect a particular line of code.
It can even show you when a line was copied or moved to another file.
By Range
You can pass a range of commits to git log to show only the commits contained in that range.
The range is specified in the following format, where and are commit references:
git log ..
This command is particularly useful when you use branch references as the parameters.
It’s a simple way to show the differences between 2 branches.
Consider the following command:
git log main..feature
The main..feature range contains all of the commits that are in the feature branch, but aren’t in the main branch.
In other words, this is how far feature has progressed since it forked off of main.
You can visualize this as follows:
Note that if you switch the order of the range (feature..main), you will get all of the commits in main, but not in feature.
If git log outputs commits for both versions, this tells you that your history has diverged.
Filtering Merge Commits
By default, git log includes merge commits in its output.
But, if your team has an always-merge policy (that is, you merge upstream changes into topic branches instead of rebasing the topic branch onto the upstream branch), you’ll have a lot of extraneous merge commits in your project history.
You can prevent git log from displaying these merge commits by passing the --no-merges flag:
git log --no-merges
On the other hand, if you’re only interested in the merge commits, you can use the --merges flag:
git log --merges
This returns all commits that have at least two parents.
Summary
You should now be fairly comfortable using git log’s advanced parameters to format its output and select which commits you want to display.
This gives you the power to pull out exactly what you need from your project history.
These new skills are an important part of your Git toolkit, but remember that git log is often used in conjunction other Git commands.
Once you’ve found the commit you’re looking for, you typically pass it off to git checkout, git revert, or some other tool for manipulating your commit history.
So, be sure to keep on learning about Git’s advanced features.
Git Hooks
Git hooks are scripts that run automatically every time a particular event occurs in a Git repository.
They let you customize Git’s internal behavior and trigger customizable actions at key points in the development life cycle.
Common use cases for Git hooks include encouraging a commit policy, altering the project environment depending on the state of the repository, and implementing continuous integration workflows.
But, since scripts are infinitely customizable, you can use Git hooks to automate or optimize virtually any aspect of your development workflow.
In this article, we’ll start with a conceptual overview of how Git hooks work.
Then, we’ll survey some of the most popular hooks for use in both local and server-side repositories.
Conceptual Overview
All Git hooks are ordinary scripts that Git executes when certain events occur in the repository.
This makes them very easy to install and configure.
Hooks can reside in either local or server-side repositories, and they are only executed in response to actions in that repository.
We’ll take a concrete look at categories of hooks later in this article.
The configuration discussed in the rest of this section applies to both local and server-side hooks.
Installing Hooks
Hooks reside in the .git/hooks directory of every Git repository.
Git automatically populates this directory with example scripts when you initialize a repository.
If you take a look inside .git/hooks, you’ll find the following files:
applypatch-msg.sample       pre-push.sample

commit-msg.sample           pre-rebase.sample
post-update.sample          prepare-commit-msg.sample
pre-applypatch.sample       update.sample
pre-commit.sample
These represent most of the available hooks, but the .sample extension prevents them from executing by default.
To “install” a hook, all you have to do is remove the .sample extension.
Or, if you’re writing a new script from scratch, you can simply add a new file matching one of the above filenames, minus the .sample extension.
As an example, try installing a simple prepare-commit-msg hook.
Remove the .sample extension from this script, and add the following to the file:
#!/bin/sh
echo "# Please include a useful commit message!" > $1
Hooks need to be executable, so you may need to change the file permissions of the script if you’re creating it from scratch.
For example, to make sure that prepare-commit-msg is executable, you would run the following command:
chmod +x prepare-commit-msg
You should now see this message in place of the default commit message every time you run git commit.
We’ll take a closer look at how this actually works in the Prepare Commit Message section.
For now, let’s just revel in the fact that we can customize some of Git’s internal functionality.
The built-in sample scripts are very useful references, as they document the parameters that are passed in to each hook (they vary from hook to hook).
Scripting Languages
The built-in scripts are mostly shell and PERL scripts, but you can use any scripting language you like as long as it can be run as an executable.
The shebang line (#!/bin/sh) in each script defines how your file should be interpreted.
So, to use a different language, all you have to do is change it to the path of your interpreter.
For instance, we can write an executable Python script in the prepare-commit-msg file instead of using shell commands.
The following hook will do the same thing as the shell script in the previous section.
#!/usr/bin/env python
import sys, os
commit_msg_filepath = sys.argv[1]
with open(commit_msg_filepath, 'w') as f:

f.write("# Please include a useful commit message!")
Notice how the first line changed to point to the Python interpreter.
And, instead of using $1 to access the first argument passed to the script, we used sys.argv[1] (again, more on this in a moment).
This is a very powerful feature for Git hooks because it lets you work in whatever language you’re most comfortable with.
Scope of Hooks
Hooks are local to any given Git repository, and they are not copied over to the new repository when you run git clone.
And, since hooks are local, they can be altered by anybody with access to the repository.
This has an important impact when configuring hooks for a team of developers.
First, you need to find a way to make sure hooks stay up-to-date amongst your team members.
Second, you can’t force developers to create commits that look a certain way—you can only encourage them to do so.
Maintaining hooks for a team of developers can be a little tricky because the .git/hooks directory isn’t cloned with the rest of your project, nor is it under version control.
A simple solution to both of these problems is to store your hooks in the actual project directory (above the .git directory).
This lets you edit them like any other version-controlled file.
To install the hook, you can either create a symlink to it in .git/hooks, or you can simply copy and paste it into the .git/hooks directory whenever the hook is updated.
As an alternative, Git also provides a Template Directory mechanism that makes it easier to install hooks automatically.
All of the files and directories contained in this template directory are copied into the .git directory every time you use git init or git clone.
All of the local hooks described below can be altered—or completely un-installed—by the owner of a repository.
It’s entirely up to each team member whether or not they actually use a hook.
With this in mind, it’s best to think of Git hooks as a convenient developer tool rather than a strictly enforced development policy.
That said, it is possible to reject commits that do not conform to some standard using server-side hooks.
We’ll talk more about this later in the article.
Local Hooks
Local hooks affect only the repository in which they reside.
As you read through this section, remember that each developer can alter their own local hooks, so you can’t use them as a way to enforce a commit policy.
They can, however, make it much easier for developers to adhere to certain guidelines.
In this section, we’ll be exploring 6 of the most useful local hooks:
pre-commitprepare-commit-msgcommit-msgpost-commitpost-checkoutpre-rebase
The first 4 hooks let you plug into the entire commit life cycle, and the final 2 let you perform some extra actions or safety checks for the git checkout and git rebase commands, respectively.
All of the pre- hooks let you alter the action that’s about to take place, while the post- hooks are used only for notifications.
We’ll also see some useful techniques for parsing hook arguments and requesting information about the repository using lower-level Git commands.
Pre-Commit
The pre-commit script is executed every time you run git commit before Git asks the developer for a commit message or generates a commit object.
You can use this hook to inspect the snapshot that is about to be committed.
For example, you may want to run some automated tests that make sure the commit doesn’t break any existing functionality.
No arguments are passed to the pre-commit script, and exiting with a non-zero status aborts the entire commit.
Let’s take a look at a simplified (and more verbose) version of the built-in pre-commit hook.
This script aborts the commit if it finds any whitespace errors, as defined by the git diff-index command (trailing whitespace, lines with only whitespace, and a space followed by a tab inside the initial indent of a line are considered errors by default).
#!/bin/sh
# Check if this is the initial commit

if git rev-parse --verify HEAD >/dev/null 2>&1
then
echo "pre-commit: About to create a new commit..."
against=HEAD

else
echo "pre-commit: About to create the first commit..."
against=4b825dc642cb6eb9a060e54bf8d69288fbee4904
fi

# Use git diff-index to check for whitespace errors
echo "pre-commit: Testing for whitespace errors..."
if ! git diff-index --check --cached $against
then

echo "pre-commit: Aborting commit due to whitespace errors"
exit 1
else
echo "pre-commit: No whitespace errors :)"

exit 0
fi
In order to use git diff-index, we need to figure out which commit reference we’re comparing the index to.
Normally, this is HEAD; however, HEAD doesn’t exist when creating the initial commit, so our first task is to account for this edge case.
We do this with git rev-parse --verify, which simply checks whether or not the argument (HEAD) is a valid reference.
The >/dev/null 2>&1 portion silences any output from git rev-parse.
Either HEAD or an empty commit object is stored in the against variable for use with git diff-index.
The 4b825d... hash is a magic commit ID that represents an empty commit.
The git diff-index --cached command compares a commit against the index.
By passing the --check option, we’re asking it to warn us if the changes introduces whitespace errors.
If it does, we abort the commit by returning an exit status of 1, otherwise we exit with 0 and the commit workflow continues as normal.
This is just one example of the pre-commit hook.
It happens to use existing Git commands to run tests on the changes introduced by the proposed commit, but you can do anything you want in pre-commit including executing other scripts, running a 3rd-party test suite, or checking code style with Lint.
Prepare Commit Message
The prepare-commit-msg hook is called after the pre-commit hook to populate the text editor with a commit message.
This is a good place to alter the automatically generated commit messages for squashed or merged commits.
One to three arguments are passed to the prepare-commit-msg script:
The name of a temporary file that contains the message.
You change the commit message by altering this file in-place.
The type of commit.
This can be message (-m or -F option), template (-t option), merge (if the commit is a merge commit), or squash (if the commit is squashing other commits).
The SHA1 hash of the relevant commit.
Only given if -c, -C, or --amend option was given.
As with pre-commit, exiting with a non-zero status aborts the commit.
We already saw a simple example that edited the commit message, but let’s take a look at a more useful script.
When using an issue tracker, a common convention is to address each issue in a separate branch.
If you include the issue number in the branch name, you can write a prepare-commit-msg hook to automatically include it in each commit message on that branch.
#!/usr/bin/env python

import sys, os, re
from subprocess import check_output
# Collect the parameters
commit_msg_filepath = sys.argv[1]

if len(sys.argv) > 2:
commit_type = sys.argv[2]
else:
commit_type = ''

if len(sys.argv) > 3:
commit_hash = sys.argv[3]
else:
commit_hash = ''

print "prepare-commit-msg: File: %s\nType: %s\nHash: %s" % (commit_msg_filepath, commit_type, commit_hash)
# Figure out which branch we're on
branch = check_output(['git', 'symbolic-ref', '--short', 'HEAD']).strip()
print "prepare-commit-msg: On branch '%s'" % branch

# Populate the commit message with the issue #, if there is one
if branch.startswith('issue-'):
print "prepare-commit-msg: Oh hey, it's an issue branch."
result = re.match('issue-(.*)', branch)

issue_number = result.group(1)
with open(commit_msg_filepath, 'r+') as f:
    content = f.read()
    f.seek(0, 0)

    f.write("ISSUE-%s %s" % (issue_number, content))
First, the above prepare-commit-msg hook shows you how to collect all of the parameters that are passed to the script.
Then, it calls git symbolic-ref --short HEAD to get the branch name that corresponds to HEAD.
If this branch name starts with issue-, it re-writes the commit message file contents to include the issue number in the first line.
So, if your branch name is issue-224, this will generate the following commit message.
ISSUE-224
# Please enter the commit message for your changes.
Lines starting

# with '#' will be ignored, and an empty message aborts the commit.
# On branch issue-224
# Changes to be committed:
#   modified:   test.txt
One thing to keep in mind when using prepare-commit-msg is that it runs even when the user passes in a message with the -m option of git commit.
This means that the above script will automatically insert the ISSUE-[#] string without letting the user edit it.
You can handle this case by seeing if the 2nd parameter (commit_type) is equal to message.
However, without the -m option, the prepare-commit-msg hook does allow the user to edit the message after its generated, so this is really more of a convenience script than a way to enforce a commit message policy.
For that, you need the commit-msg hook discussed in the next section.
Commit Message
The commit-msg hook is much like the prepare-commit-msg hook, but it’s called after the user enters a commit message.
This is an appropriate place to warn developers that their message doesn’t adhere to your team’s standards.
The only argument passed to this hook is the name of the file that contains the message.
If it doesn’t like the message that the user entered, it can alter this file in-place (just like with prepare-commit-msg) or it can abort the commit entirely by exiting with a non-zero status.
For example, the following script checks to make sure that the user didn’t delete the ISSUE-[#] string that was automatically generated by the prepare-commit-msg hook in the previous section.
#!/usr/bin/env python

import sys, os, re
from subprocess import check_output
# Collect the parameters
commit_msg_filepath = sys.argv[1]

# Figure out which branch we're on
branch = check_output(['git', 'symbolic-ref', '--short', 'HEAD']).strip()
print "commit-msg: On branch '%s'" % branch
# Check the commit message if we're on an issue branch

if branch.startswith('issue-'):
print "commit-msg: Oh hey, it's an issue branch."
result = re.match('issue-(.*)', branch)
issue_number = result.group(1)

required_message = "ISSUE-%s" % issue_number
with open(commit_msg_filepath, 'r') as f:
    content = f.read()
    if not content.startswith(required_message):

        print "commit-msg: ERROR! The commit message must start with '%s'" % required_message
        sys.exit(1)
While this script is called every time the user creates a commit, you should avoid doing much outside of checking the commit message.
If you need to notify other services that a snapshot was committed, you should use the post-commit hook instead.
Post-Commit
The post-commit hook is called immediately after the commit-msg hook.
It can’t change the outcome of the git commit operation, so it’s used primarily for notification purposes.
The script takes no parameters and its exit status does not affect the commit in any way.
For most post-commit scripts, you’ll want access to the commit that was just created.
You can use git rev-parse HEAD to get the new commit’s SHA1 hash, or you can use git log -1 HEAD to get all of its information.
For example, if you want to email your boss every time you commit a snapshot (probably not the best idea for most workflows), you could add the following post-commit hook.
#!/usr/bin/env python

import smtplib
from email.mime.text import MIMEText
from subprocess import check_output
# Get the git log --stat entry of the new commit

log = check_output(['git', 'log', '-1', '--stat', 'HEAD'])
# Create a plaintext email message
msg = MIMEText("Look, I'm actually doing some work:\n\n%s" % log)
msg['Subject'] = 'Git post-commit hook notification'

msg['From'] = 'mary@example.com'
msg['To'] = 'boss@example.com'
# Send the message
SMTP_SERVER = 'smtp.example.com'

SMTP_PORT = 587
session = smtplib.SMTP(SMTP_SERVER, SMTP_PORT)
session.ehlo()
session.starttls()

session.ehlo()
session.login(msg['From'], 'secretPassword')
session.sendmail(msg['From'], msg['To'], msg.as_string())
session.quit()
It’s possible to use post-commit to trigger a local continuous integration system, but most of the time you’ll want to be doing this in the post-receive hook.
This runs on the server instead of the user’s local machine, and it also runs every time any developer pushes their code.
This makes it a much more appropriate place to perform your continuous integration.
Post-Checkout
The post-checkout hook works a lot like the post-commit hook, but it’s called whenever you successfully check out a reference with git checkout.
This is nice for clearing out your working directory of generated files that would otherwise cause confusion.
This hook accepts three parameters, and its exit status has no affect on the git checkout command.
The ref of the previous HEAD
The ref of the new HEAD
A flag telling you if it was a branch checkout or a file checkout.
The flag will be 1 and 0, respectively.
A common problem with Python developers occurs when generated .pyc files stick around after switching branches.
The interpreter sometimes uses these .pyc instead of the .py source file.
To avoid any confusion, you can delete all .pyc files every time you check out a new branch using the following post-checkout script:
#!/usr/bin/env python
import sys, os, re

from subprocess import check_output
# Collect the parameters
previous_head = sys.argv[1]
new_head = sys.argv[2]

is_branch_checkout = sys.argv[3]
if is_branch_checkout == "0":
print "post-checkout: This is a file checkout.
Nothing to do."

sys.exit(0)
print "post-checkout: Deleting all '.pyc' files in working directory"
for root, dirs, files in os.walk('.'):
for filename in files:

    ext = os.path.splitext(filename)[1]
    if ext == '.pyc':
        os.unlink(os.path.join(root, filename))
The current working directory for hook scripts is always set to the root of the repository, so the os.walk('.') call iterates through every file in the repository.
Then, we check its extension and delete it if it’s a .pyc file.
You can also use the post-checkout hook to alter your working directory based on which branch you have checked out.
For example, you might use a plugins branch to store all of your plugins outside of the core codebase.
If these plugins require a lot of binaries that other branches do not, you can selectively build them only when you’re on the plugins branch.
Pre-Rebase
The pre-rebase hook is called before git rebase changes anything, making it a good place to make sure something terrible isn’t about to happen.
This hook takes 2 parameters: the upstream branch that the series was forked from, and the branch being rebased.
The second parameter is empty when rebasing the current branch.
To abort the rebase, exit with a non-zero status.
For example, if you want to completely disallow rebasing in your repository, you could use the following pre-rebase script:
#!/bin/sh
# Disallow all rebasing

echo "pre-rebase: Rebasing is dangerous.
Don't do it."
exit 1
Now, every time you run git rebase, you’ll see this message:
pre-rebase: Rebasing is dangerous.
Don't do it.
The pre-rebase hook refused to rebase.
For a more in-depth example, take a look at the included pre-rebase.sample script.
This script is a little more intelligent about when to disallow rebasing.
It checks to see if the topic branch that you’re trying to rebase has already been merged into the next branch (which is assumed to be the mainline branch).
If it has, you’re probably going to get into trouble by rebasing it, so the script aborts the rebase.
Server-side Hooks
Server-side hooks work just like local ones, except they reside in server-side repositories (e.g., a central repository, or a developer’s public repository).
When attached to the official repository, some of these can serve as a way to enforce policy by rejecting certain commits.
There are 3 server-side hooks that we’ll be discussing in the rest of this article:
pre-receiveupdatepost-receive
All of these hooks let you react to different stages of the git push process.
The output from server-side hooks are piped to the client’s console, so it’s very easy to send messages back to the developer.
But, you should also keep in mind that these scripts don’t return control of the terminal until they finish executing, so you should be careful about performing long-running operations.
Pre-Receive
The pre-receive hook is executed every time somebody uses git push to push commits to the repository.
It should always reside in the remote repository that is the destination of the push, not in the originating repository.
The hook runs before any references are updated, so it’s a good place to enforce any kind of development policy that you want.
If you don’t like who is doing the pushing, how the commit message is formatted, or the changes contained in the commit, you can simply reject it.
While you can’t stop developers from making malformed commits, you can prevent these commits from entering the official codebase by rejecting them with pre-receive.
The script takes no parameters, but each ref that is being pushed is passed to the script on a separate line on standard input in the following format:
<old-value> <new-value> <ref-name>
You can see how this hook works using a very basic pre-receive script that simply reads in the pushed refs and prints them out.
#!/usr/bin/env python
import sys

import fileinput
# Read in each ref that the user is trying to update
for line in fileinput.input():
print "pre-receive: Trying to push ref: %s" % line

# Abort the push
# sys.exit(1)
Again, this is a little different than the other hooks because information is passed to the script via standard input instead of as command-line arguments.
After placing the above script in the .git/hooks directory of a remote repository and pushing the main branch, you’ll see something like the following in your console:
b6b36c697eb2d24302f89aa22d9170dfe609855b 85baa88c22b52ddd24d71f05db31f4e46d579095 refs/heads/main
You can use these SHA1 hashes, along with some lower-level Git commands, to inspect the changes that are going to be introduced.
Some common use cases include:
Rejecting changes that involve an upstream rebase
Preventing non-fast-forward merges
Checking that the user has the correct permissions to make the intended changes (mostly used for centralized Git workflows)
If multiple refs are pushed, returning a non-zero status from pre-receive aborts all of them.
If you want to accept or reject branches on a case-by-case basis, you need to use the update hook instead.
Update
The update hook is called after pre-receive, and it works much the same way.
It’s still called before anything is actually updated, but it’s called separately for each ref that was pushed.
That means if the user tries to push 4 branches, update is executed 4 times.
Unlike pre-receive, this hook doesn’t need to read from standard input.
Instead, it accepts the following 3 arguments:
The name of the ref being updated
The old object name stored in the ref
The new object name stored in the ref
This is the same information passed to pre-receive, but since update is invoked separately for each ref, you can reject some refs while allowing others.
#!/usr/bin/env python
import sys

branch = sys.argv[1]
old_commit = sys.argv[2]
new_commit = sys.argv[3]
print "Moving '%s' from %s to %s" % (branch, old_commit, new_commit)

# Abort pushing only this branch
# sys.exit(1)
The above update hook simply outputs the branch and the old/new commit hashes.
When pushing more than one branch to the remote repository, you’ll see the print statement execute for each branch.
Post-Receive
The post-receive hook gets called after a successful push operation, making it a good place to perform notifications.
For many workflows, this is a better place to trigger notifications than post-commit because the changes are available on a public server instead of residing only on the user’s local machine.
Emailing other developers and triggering a continuous integration system are common use cases for post-receive.
The script takes no parameters, but is sent the same information as pre-receive via standard input.
Summary
In this article, we learned how Git hooks can be used to alter internal behavior and receive notifications when certain events occur in a repository.
Hooks are ordinary scripts that reside in the .git/hooks repository, which makes them very easy to install and customize.
We also looked at some of the most common local and server-side hooks.
These let us plug in to the entire development life cycle.
We now know how to perform customizable actions at every stage in the commit creation process, as well as the git push process.
With a little bit of scripting knowledge, this lets you do virtually anything you can imagine with a Git repository.
Refs and the Reflog
Git is all about commits: you stage commits, create commits, view old commits, and transfer commits between repositories using many different Git commands.
The majority of these commands operate on a commit in some form or another, and many of them accept a commit reference as a parameter.
For example, you can use git checkout to view an old commit by passing in a commit hash, or you can use it to switch branches by passing in a branch name.
By understanding the many ways to refer to a commit, you make all of these commands that much more powerful.
In this chapter, we’ll shed some light on the internal workings of common commands like git checkout, git branch, and git push by exploring the many methods of referring to a commit.
We’ll also learn how to revive seemingly “lost” commits by accessing them through Git’s reflog mechanism.
Hashes
The most direct way to reference a commit is via its SHA-1 hash.
This acts as the unique ID for each commit.
You can find the hash of all your commits in the git log output.
commit 0c708fdec272bc4446c6cabea4f0022c2b616eba Author: Mary Johnson Date: Wed Jul 9 16:37:42 2014 -0500 Some commit message
When passing the commit to other Git commands, you only need to specify enough characters to uniquely identify the commit.
For example, you can inspect the above commit with git show by running the following command:
git show 0c708f
It’s sometimes necessary to resolve a branch, tag, or another indirect reference into the corresponding commit hash.
For this, you can use the git rev-parse command.
The following returns the hash of the commit pointed to by the main branch:
git rev-parse main
This is particularly useful when writing custom scripts that accept a commit reference.
Instead of parsing the commit reference manually, you can let git rev-parse normalize the input for you.
Refs
A ref is an indirect way of referring to a commit.
You can think of it as a user-friendly alias for a commit hash.
This is Git’s internal mechanism of representing branches and tags.
Refs are stored as normal text files in the .git/refs directory, where .git is usually called .git.
To explore the refs in one of your repositories, navigate to .git/refs.
You should see the following structure, but it will contain different files depending on what branches, tags, and remotes you have in your repo:
.git/refs/ heads/ main some-feature remotes/ origin/ main tags/ v0.9
The heads directory defines all of the local branches in your repository.
Each filename matches the name of the corresponding branch, and inside the file you’ll find a commit hash.
This commit hash is the location of the tip of the branch.
To verify this, try running the following two commands from the root of the Git repository:
# Output the contents of `refs/heads/main` file: cat .git/refs/heads/main # Inspect the commit at the tip of the `main` branch: git log -1 main
The commit hash returned by the cat command should match the commit ID displayed by git log.
To change the location of the main branch, all Git has to do is change the contents of the refs/heads/main file.
Similarly, creating a new branch is simply a matter of writing a commit hash to a new file.
This is part of the reason why Git branches are so lightweight compared to SVN.
The tags directory works the exact same way, but it contains tags instead of branches.
The remotes directory lists all remote repositories that you created with git remote as separate subdirectories.
Inside each one, you’ll find all the remote branches that have been fetched into your repository.
Specifying Refs
When passing a ref to a Git command, you can either define the full name of the ref, or use a short name and let Git search for a matching ref.
You should already be familiar with short names for refs, as this is what you’re using each time you refer to a branch by name.
git show some-feature
The some-feature argument in the above command is actually a short name for the branch.
Git resolves this to refs/heads/some-feature before using it.
You can also specify the full ref on the command line, like so:
git show refs/heads/some-feature
This avoids any ambiguity regarding the location of the ref.
This is necessary, for instance, if you had both a tag and a branch called some-feature.
However, if you’re using proper naming conventions, ambiguity between tags and branches shouldn’t generally be a problem.
We’ll see more full ref names in the Refspecs section.
Packed Refs
For large repositories, Git will periodically perform a garbage collection to remove unnecessary objects and compress refs into a single file for more efficient performance.
You can force this compression with the garbage collection command:
git gc
This moves all of the individual branch and tag files in the refs folder into a single file called packed-refs located in the top of the .git directory.
If you open up this file, you’ll find a mapping of commit hashes to refs:
00f54250cf4e549fdfcafe2cf9a2c90bc3800285 refs/heads/feature 0e25143693cfe9d5c2e83944bbaf6d3c4505eb17 refs/heads/main bb883e4c91c870b5fed88fd36696e752fb6cf8e6 refs/tags/v0.9
On the outside, normal Git functionality won’t be affected in any way.
But, if you’re wondering why your .git/refs folder is empty, this is where the refs went.
Special Refs
In addition to the refs directory, there are a few special refs that reside in the top-level .git directory.
They are listed below:
HEAD – The currently checked-out commit/branch.
FETCH_HEAD – The most recently fetched branch from a remote repo.
ORIG_HEAD – A backup reference to HEAD before drastic changes to it.
MERGE_HEAD – The commit(s) that you’re merging into the current branch with git merge.
CHERRY_PICK_HEAD – The commit that you’re cherry-picking.
These refs are all created and updated by Git when necessary.
For example, The git pull command first runs git fetch, which updates the FETCH_HEAD reference.
Then, it runs git merge FETCH_HEAD to finish pulling the fetched branches into the repository.
Of course, you can use all of these like any other ref, as I’m sure you’ve done with HEAD.
These files contain different content depending on their type and the state of your repository.
The HEAD ref can contain either a symbolic ref, which is simply a reference to another ref instead of a commit hash, or a commit hash.
For example, take a look at the contents of HEAD when you’re on the main branch:
git checkout main cat .git/HEAD
This will output ref: refs/heads/main, which means that HEAD points to the refs/heads/main ref.
This is how Git knows that the main branch is currently checked out.
If you were to switch to another branch, the contents of HEAD would be updated to reflect the new branch.
But, if you were to check out a commit instead of a branch, HEAD would contain a commit hash instead of a symbolic ref.
This is how Git knows that it’s in a detached HEAD state.
For the most part, HEAD is the only reference that you’ll be using directly.
The others are generally only useful when writing lower-level scripts that need to hook into Git’s internal workings.
Refspecs
A refspec maps a branch in the local repository to a branch in a remote repository.
This makes it possible to manage remote branches using local Git commands and to configure some advanced git push and git fetch behavior.
A refspec is specified as [+]<src>:<dst>.
The <src> parameter is the source branch in the local repository, and the <dst> parameter is the destination branch in the remote repository.
The optional + sign is for forcing the remote repository to perform a non-fast-forward update.
Refspecs can be used with the git push command to give a different name to the remote branch.
For example, the following command pushes the main branch to the origin remote repo like an ordinary git push, but it uses qa-main as the name for the branch in the origin repo.
This is useful for QA teams that need to push their own branches to a remote repo.
git push origin main:refs/heads/qa-main
You can also use refspecs for deleting remote branches.
This is a common situation for feature-branch workflows that push the feature branches to a remote repo (e.g., for backup purposes).
The remote feature branches still reside in the remote repo after they are deleted from the local repo, so you get a build-up of dead feature branches as your project progresses.
You can delete them by pushing a refspec that has an empty parameter, like so:
git push origin :some-feature
This is very convenient, since you don’t need to log in to your remote repository and manually delete the remote branch.
Note that as of Git v1.7.0 you can use the --delete flag instead of the above method.
The following will have the same effect as the above command:
git push origin --delete some-feature
By adding a few lines to the Git configuration file, you can use refspecs to alter the behavior of git fetch.
By default, git fetch fetches all of the branches in the remote repository.
The reason for this is the following section of the .git/config file:
[remote "origin"] url = https://git@github.com:mary/example-repo.git fetch = +refs/heads/*:refs/remotes/origin/*
The fetch line tells git fetch to download all of the branches from the origin repo.
But, some workflows don’t need all of them.
For example, many continuous integration workflows only care about the main branch.
To fetch only the main branch, change the fetch line to match the following:
[remote "origin"] url = https://git@github.com:mary/example-repo.git fetch = +refs/heads/main:refs/remotes/origin/main
You can also configure git push in a similar manner.
For instance, if you want to always push the main branch to qa-main in the origin remote (as we did above), you would change the config file to:
[remote "origin"] url = https://git@github.com:mary/example-repo.git fetch = +refs/heads/main:refs/remotes/origin/main push = refs/heads/main:refs/heads/qa-main
Refspecs give you complete control over how various Git commands transfer branches between repositories.
They let you rename and delete branches from your local repository, fetch/push to branches with different names, and configure git push and git fetch to work with only the branches that you want.
Relative Refs
You can also refer to commits relative to another commit.
The ~ character lets you reach parent commits.
For example, the following displays the grandparent of HEAD:
git show HEAD~2
But, when working with merge commits, things get a little more complicated.
Since merge commits have more than one parent, there is more than one path that you can follow.
For 3-way merges, the first parent is from the branch that you were on when you performed the merge, and the second parent is from the branch that you passed to the git merge command.
The ~ character will always follow the first parent of a merge commit.
If you want to follow a different parent, you need to specify which one with the ^ character.
For example, if HEAD is a merge commit, the following returns the second parent of HEAD.
git show HEAD^2
You can use more than one ^ character to move more than one generation.
For instance, this displays the grandparent of HEAD (assuming it’s a merge commit) that rests on the second parent.
git show HEAD^2^1
To clarify how ~ and ^ work, the following figure shows you how to reach any commit from A using relative references.
In some cases, there are multiple ways to reach a commit.
Relative refs can be used with the same commands that a normal ref can be used.
For example, all of the following commands use a relative reference:
# Only list commits that are parent of the second parent of a merge commit git log HEAD^2 # Remove the last 3 commits from the current branch git reset HEAD~3 # Interactively rebase the last 3 commits on the current branch git rebase -i HEAD~3
The Reflog
The reflog is Git’s safety net.
It records almost every change you make in your repository, regardless of whether you committed a snapshot or not.
You can think of it as a chronological history of everything you’ve done in your local repo.
To view the reflog, run the git reflog command.
It should output something that looks like the following:
400e4b7 HEAD@{0}: checkout: moving from main to HEAD~2 0e25143 HEAD@{1}: commit (amend): Integrate some awesome feature into `main` 00f5425 HEAD@{2}: commit (merge): Merge branch ';feature'; ad8621a HEAD@{3}: commit: Finish the feature
This can be translated as follows:
You just checked out HEAD~2
Before that you amended a commit message
Before that you merged the feature branch into main
Before that you committed a snapshot
The HEAD{} syntax lets you reference commits stored in the reflog.
It works a lot like the HEAD~ references from the previous section, but the refers to an entry in the reflog instead of the commit history.
You can use this to revert to a state that would otherwise be lost.
For example, lets say you just scrapped a new feature with git reset.
Your reflog might look something like this:
ad8621a HEAD@{0}: reset: moving to HEAD~3 298eb9f HEAD@{1}: commit: Some other commit message bbe9012 HEAD@{2}: commit: Continue the feature 9cb79fa HEAD@{3}: commit: Start a new feature
The three commits before the git reset are now dangling, which means that there is no way to reference them—except through the reflog.
Now, let’s say you realize that you shouldn’t have thrown away all of your work.
All you have to do is check out the HEAD@{1} commit to get back to the state of your repository before you ran git reset.
git checkout HEAD@{1}
This puts you in a detached HEAD state.
From here, you can create a new branch and continue working on your feature.
Summary
You should now be quite comfortable referring to commits in a Git repository.
We learned how branches and tags were stored as refs in the .git subdirectory, how to read a packed-refs file, how HEAD is represented, how to use refspecs for advanced pushing and fetching, and how to use the relative ~ and ^ operators to traverse a branch hierarchy.
We also took a look at the reflog, which is a way to reference commits that are not available through any other means.
This is a great way to recover from those little “Oops, I shouldn’t have done that” situations.
The point of all this was to be able to pick out exactly the commit that you need in any given development scenario.
It’s very easy to leverage the skills you learned in this article against your existing Git knowledge, as some of the most common commands accept refs as arguments, including git log, git show, git checkout, git reset, git revert, git rebase, and many others.
Git submodules
Git submodules allow you to keep a git repository as a subdirectory of another git repository.
Git submodules are simply a reference to another repository at a particular snapshot in time.
Git submodules enable a Git repository to incorporate and track version history of external code.
What is a git submodule?
Often a code repository will depend upon external code.
This external code can be incorporated in a few different ways.
The external code can be directly copied and pasted into the main repository.
This method has the downside of losing any upstream changes to the external repository.
Another method of incorporating external code is through the use of a language's package management system like Ruby Gems or NPM.
This method has the downside of requiring installation and version management at all places the origin code is deployed.
Both of these suggested incorporation methods do not enable tracking edits and changes to the external repository.
A git submodule is a record within a host git repository that points to a specific commit in another external repository.
Submodules are very static and only track specific commits.
Submodules do not track git refs or branches and are not automatically updated when the host repository is updated.
When adding a submodule to a repository a new .gitmodules file will be created.
The .gitmodules file contains meta data about the mapping between the submodule project's URL and local directory.
If the host repository has multiple submodules, the .gitmodules file will have an entry for each submodule.
When should you use a git submodule?
If you need to maintain a strict version management over your external dependencies, it can make sense to use git submodules.
The following are a few best use cases for git submodules.
When an external component or subproject is changing too fast or upcoming changes will break the API, you can lock the code to a specific commit for your own safety.
When you have a component that isn’t updated very often and you want to track it as a vendor dependency.
When you are delegating a piece of the project to a third party and you want to integrate their work at a specific time or release.
Again this works when updates are not too frequent.
Common commands for git submodules
Add git submodule
The git submodule add is used to add a new submodule to an existing repository.
The following is an example that creates an empty repo and explores git submodules.
$ mkdir git-submodule-demo
$ cd git-submodule-demo/

$ git init
Initialized empty Git repository in /Users/atlassian/git-submodule-demo/.git/
This sequence of commands will create a new directory git-submodule-demo, enter that directory, and initialize it as a new repository.
Next we will add a submodule to this fresh new repo.
$ git submodule add https://bitbucket.org/jaredw/awesomelibrary
Cloning into '/Users/atlassian/git-submodule-demo/awesomelibrary'...
remote: Counting objects: 8, done.
remote: Compressing objects: 100% (6/6), done.

remote: Total 8 (delta 1), reused 0 (delta 0)
Unpacking objects: 100% (8/8), done.
The git submodule add command takes a URL parameter that points to a git repository.
Here we have added the awesomelibrary as a submodule.
Git will immediately clone the submodule.
We can now review the current state of the repository using git status...
$ git status
On branch main

No commits yet
Changes to be committed:
(use "git rm --cached <file>..." to unstage)
new file:   .gitmodules

new file:   awesomelibrary
There are now two new files in the repository .gitmodules and the awesomelibrary directory.
Looking at the contents of .gitmodules shows the new submodule mapping
[submodule "awesomelibrary"]

path = awesomelibrary
url = https://bitbucket.org/jaredw/awesomelibrary
$ git add .gitmodules awesomelibrary/
$ git commit -m "added submodule"
[main (root-commit) d5002d0] added submodule
2 files changed, 4 insertions(+)
create mode 100644 .gitmodules
create mode 160000 awesomelibrary
The default behavior of git submodule init is to copy the mapping from the .gitmodules file into the local ./.git/config file.
This may seem redundant and lead to questioning git submodule init usefulness.
git submodule init has extend behavior in which it accepts a list of explicit module names.
This enables a workflow of activating only specific submodules that are needed for work on the repository.
This can be helpful if there are many submodules in a repo but they don't all need to be fetched for work you are doing.
Submodule workflows
Once submodules are properly initialized and updated within a parent repository they can be utilized exactly like stand-alone repositories.
This means that submodules have their own branches and history.
When making changes to a submodule it is important to publish submodule changes and then update the parent repositories reference to the submodule.
Let’s continue with the awesomelibrary example and make some changes:
$ cd awesomelibrary/

$ git checkout -b new_awesome
Switched to a new branch 'new_awesome'
$ echo "new awesome file" > new_awesome.txt
$ git status

On branch new_awesome
Untracked files:
(use "git add <file>..." to include in what will be committed)
new_awesome.txt

nothing added to commit but untracked files present (use "git add" to track)
$ git add new_awesome.txt
$ git commit -m "added new awesome textfile"
[new_awesome 0567ce8] added new awesome textfile

1 file changed, 1 insertion(+)
create mode 100644 new_awesome.txt
$ git branch
main

* new_awesome
Here we have changed directory to the awesomelibrary submodule.
We have created a new text file new_awesome.txt with some content and we have added and committed this new file to the submodule.
Now let us change directories back to the parent repository and review the current state of the parent repo.
$ cd ..
$ git status
On branch main
Changes not staged for commit:

(use "git add <file>..." to update what will be committed)
(use "git checkout -- <file>..." to discard changes in working directory)
modified:   awesomelibrary (new commits)
no changes added to commit (use "git add" and/or "git commit -a")
Executing git status shows us that the parent repository is aware of the new commits to the awesomelibrary submodule.
It doesn't go into detail about the specific updates because that is the submodule repositories responsibility.
The parent repository is only concerned with pinning the submodule to a commit.
Now we can update the parent repository again by doing a git add and git commit on the submodule.
This will put everything into a good state with the local content.
If you are working in a team environment it is critical that you then git push the submodule updates, and the parent repository updates.
When working with submodules, a common pattern of confusion and error is forgetting to push updates for remote users.
If we revisit the awesomelibrary work we just did, we pushed only the updates to the parent repository.
Another developer would go to pull the latest parent repository and it would be pointing at a commit of awesomelibrary that they were unable to pull because we had forgotten to push the submodule.
This would break the remote developers local repo.
To avoid this failure scenario make sure to always commit and push the submodule and parent repository.
Conclusion
Git submodules are a powerful way to leverage git as an external dependency management tool.
Weigh the pros and cons of git submodules before using them, as they are an advanced feature and may take a learning curve for team members to adopt.
Git subtree: the alternative to Git submodule
The Internet is full of articles on why you shouldn’t use Git submodules.
While submodules are useful for a few use cases, they do have several drawbacks.
Are there alternatives? The answer is: yes! There are (at least) two tools that can help track the history of software dependencies in your project while allowing you to keep using Git:
git subtree
Google repo
In this post we will look at git subtree and show why it is an improvement – albeit not perfect – over git submodule.
What is git subtree, and why should I use it?
git subtree lets you nest one repository inside another as a sub-directory.
It is one of several ways Git projects can manage project dependencies.
Why you may want to consider git subtree
Management of a simple workflow is easy.
Older version of Git are supported (even older than v1.5.2).
The sub-project’s code is available right after the clone of the super project is done.
git subtree does not require users of your repository to learn anything new.
They can ignore the fact that you are using git subtree to manage dependencies.
git subtree does not add new metadata files like git submodule does (i.e., .gitmodule).
Contents of the module can be modified without having a separate repository copy of the dependency somewhere else.
Drawbacks (but in our opinion they're largely acceptable):
You must learn about a new merge strategy (i.e.git subtree).
Contributing code back upstream for the sub-projects is slightly more complicated.
The responsibility of not mixing super and sub-project code in commits lies with you.
How to use git subtree
git subtree is available in stock version of Git since May 2012 – v1.7.11 and above.
The version installed by homebrew on OSX already has subtree properly wired, but on some platforms you might need to follow the installation instructions.
Here is a canonical example of tracking a vim plug-in using git subtree.
The quick and dirty way without remote tracking
If you just want a couple of one-liners to cut and paste, read this paragraph.
First add git subtree at a specified prefix folder:
git subtree add --prefix .vim/bundle/tpope-vim-surround https://bitbucket.org/vim-plugins-mirror/vim-surround.git main --squash
(The common practice is to not store the entire history of the subproject in your main repository, but If you want to preserve it just omit the –squash flag.)
The above command produces this output:
git fetch https://bitbucket.org/vim-plugins-mirror/vim-surround.git main
warning: no common commits

remote: Counting objects: 338, done.
remote: Compressing objects: 100% (145/145), done.
remote: Total 338 (delta 101), reused 323 (delta 89)
Receiving objects: 100% (338/338), 71.46 KiB, done.

Resolving deltas: 100% (101/101), done.
From https://bitbucket.org/vim-plugins-mirror/vim-surround.git
* branch main -} FETCH_HEAD
Added dir '.vim/bundle/tpope-vim-surround'
As you can see this records a merge commit by squashing the whole history of the vim-surround repository into a single one:
1bda0bd [3 minutes ago] (HEAD, stree) Merge commit 'ca1f4da9f0b93346bba9a430c889a95f75dc0a83' as '.vim/bundle/tpope-vim-surround' [Nicola Paolucci]
ca1f4da [3 minutes ago] Squashed '.vim/bundle/tpope-vim-surround/' content from commit 02199ea [Nicola Paolucci]
If after a while you want to update the code of the plugin from the upstream repository you can just do a git subtree pull:
git subtree pull --prefix .vim/bundle/tpope-vim-surround https://bitbucket.org/vim-plugins-mirror/vim-surround.git main --squash
This is very quick and painless, but the commands are slightly lengthy and hard to remember.
We can make the commands shorter by adding the sub-project as a remote.
Adding the sub-project as a remote
Adding the subtree as a remote allows us to refer to it in shorter form:
git remote add -f tpope-vim-surround https://bitbucket.org/vim-plugins-mirror/vim-surround.git
Now we can add the subtree (as before), but now we can refer to the remote in short form:
git subtree add --prefix .vim/bundle/tpope-vim-surround tpope-vim-surround main --squash
The command to update the sub-project at a later date becomes:
git fetch tpope-vim-surround main
git subtree pull --prefix .vim/bundle/tpope-vim-surround tpope-vim-surround main --squash
Contributing back upstream
We can freely commit our fixes to the sub-project in our local working directory now.
When it’s time to contribute back to the upstream project, we need to fork the project and add it as another remote:
git remote add durdn-vim-surround ssh://git@bitbucket.org/durdn/vim-surround.git
Now we can use the subtree push command like the following:
git subtree push --prefix=.vim/bundle/tpope-vim-surround/ durdn-vim-surround main
git push using: durdn-vim-surround main
Counting objects: 5, done.
Delta compression using up to 4 threads.

Compressing objects: 100% (3/3), done.
Writing objects: 100% (3/3), 308 bytes, done.
Total 3 (delta 2), reused 0 (delta 0)
To ssh://git@bitbucket.org/durdn/vim-surround.git

02199ea..dcacd4b dcacd4b21fe51c9b5824370b3b224c440b3470cb -} main
After this we’re ready and we can open a pull-request to the maintainer of the package.
Can I do this without using the git subtree command?
Yes! Yes you can.
git subtree is different from the subtree merge strategy.
You can still use the merge strategy even if for some reason git subtree is not available.
Here is how you would go about it.
Add the dependency as a simple git remote:
git remote add -f tpope-vim-surround https://bitbucket.org/vim-plugins-mirror/vim-surround.git
Before reading the contents of the dependency into the repository, it’s important to record a merge so that we can track the entire tree history of the plug-in up to this point:
git merge -s ours --no-commit tpope-vim-surround/main
Which outputs:
Automatic merge went well; stopped before committing as requested
We then read the content of the latest tree-object into the plugin repository into our working directory ready to be committed:
git read-tree --prefix=.vim/bundle/tpope-vim-surround/ -u tpope-vim-surround/main
Now we can commit (and it will be a merge commit that will preserve the history of the tree we read):
git ci -m"[subtree] adding tpope-vim-surround"
[stree 779b094] [subtree] adding tpope-vim-surround
When we want to update the project we can now pull using the git subtree merge strategy:
git pull -s subtree tpope-vim-surround main
Git subtree is a great alternative
After having used git submodules for a while, you'll see git subtree solves lots of the problems with git submodule.
As usual, with all things Git, there is a learning curve to make the most of the feature.
Follow me on Twitter @durdn for more things and stuff about Git.
And check out Atlassian Bitbucket if you’re looking for a good tool to manage your Git repos.
Update: After publishing this piece, I also wrote an article on the power of Git subtree.
Git is a fantastic choice for tracking the evolution of your code base and collaborating efficiently with your peers.
But what happens when the repository you want to track is really really big?
In this post I’ll give you some techniques for dealing with it.
Two categories of big repositories
If you think about it there are broadly two major reasons for repositories growing massive:
They accumulate a very very long history (the project grows over a very long period of time and the baggage accumulates)
They include huge binary assets that need to be tracked and paired together with code.
…or it could be both.
Sometimes the second type of problem is compounded by the fact that old, deprecated binary artifacts are still stored in the repository.
But there’s a moderately easy – if annoying – fix for that (see below).
The techniques and workarounds for each scenario are different, though sometimes complementary.
So I’ll cover them separately.
Cloning repositories with a very long history
Even though threshold for a qualifying a repository as “massive” is pretty high, they’re still a pain to clone.
And you can’t always avoid long histories.
Some repos have to be kept in tact for legal or regulatory reasons.
Simple solution: git shallow clone
The first solution to a fast clone and saving developer’s and system’s time and disk space is to copy only recent revisions.
Git’s shallow clone option allows you to pull down only the latest n commits of the repo’s history.
How do you do it? Just use the –depth option.
For example:
git clone --depth [depth] [remote-url]
Imagine you accumulated ten or more years of project history in your repository.
For example, we migrated Jira (an 11 year-old code base) to Git.
The time savings for repos like this can add up and be very noticeable.
The full clone of Jira is 677MB, with the working directory being another 320MB, made up of more than 47,000+ commits.
A shallow clone of the repo takes 29.5 seconds, compared to 4 minutes 24 seconds for a full clone with all the history.
The benefit grows proportionately to how many binary assets your project has swallowed over time.
Tip:Build systems connected to your Git repo benefit from shallow clones, too!
Shallow clones used to be somewhat impaired citizens of the Git world as some operations were barely supported.
But recent versions (1.9 and above) have improved the situation greatly, and you can properly pull and push to repositories even from a shallow clone now.
Surgical solution: git filter branch
For the huge repositories that have lots of binary cruft committed by mistake, or old assets not needed anymore, a great solution is to use git filter-branch.
The command lets you walk through the entire history of the project filtering out, modifying, and skipping files according to predefined patterns.
It is a very powerful tool once you’ve identified where your repo is heavy.
There are helper scripts available to identify big objects, so that part should be easy enough.
The syntax goes like this:
git filter-branch --tree-filter 'rm -rf [/path/to/spurious/asset/folder]'git filter-branch has a minor drawback, though: once you use _filter-branch_, you effectively rewrite the entire history of your project.
That is, all commit ids change.
This requires every developer to re-clone the updated repository.
So if you’re planning to carry out a cleanup action using git filter-branch, you should alert your team, plan a short freeze while the operation is carried out, and then notify everyone that they should clone the repository again.
Tip: More on git filter-branch in this post about tearing apart your Git repo.
Alternative to git shallow-clone: clone only one branch
Since git 1.7.10, you can also limit the amount of history you clone by cloning a single branch, like so:
git clone [remote url] --branch [branch_name] --single-branch [folder]
This specific hack is useful when you’re working with long running and divergent branches, or if you have lots branches and only ever need to work with a few of them.
If you only have a handful of branches with very few differences you probably won’t see a huge difference using this.
Managing repositories with huge binary assets
The second type of big repository is those with huge binary assets.
This is something many different kinds of software (and non-software!) teams encounter. Gaming teams have to juggle around huge 3D models, web development teams might need to track raw image assets, CAD teams might need to manipulate and track the status of binary deliverables.
Git is not especially bad at handling binary assets, but it’s not especially good either.
By default, Git will compress and store all subsequent full versions of the binary assets, which is obviously not optimal if you have many.
There are some basic tweaks that improve the situation, like running the garbage collection (‘git gc’), or tweaking the usage of delta commits for some binary types in .gitattributes.
But it’s important to reflect on the nature of your project’s binary assets, as that will help you determine the winning approach.
For example, here are some points to consider:
For binary files that change significantly – and not just some meta data headers – the delta compression is probably going to be useless.
So use ‘delta off’ for those files to avoid the unnecessary delta compression work as part of the repack.
In the scenario above, it’s likely that those files don’t zlib compress very well either so you could turn compression off with ‘core.compression 0’ or ‘core.loosecompression 0’.
That’s a global setting that would negatively affect all the non-binary files that actually compress well so this makes sense if you split the binary assets into a separate repository.
t’s important to remember that ‘git gc’ turns the “duplicated” loose objects into a single pack file.
But again, unless the files compress in some way, that probably won’t make any significant difference in the resulting pack file.
Explore the tuning of ‘core.bigFileThreshold’.
Anything larger than 512MB won’t be delta compressed anyway (without having to set .gitattributes) so maybe that’s something worth tweaking.
Solution for big folder trees: git sparse-checkout
A mild help to the binary assets problem is Git’s sparse checkout option (available since Git 1.7.0).
This technique allows to keep the working directory clean by explicitly detailing which folders you want to populate.
Unfortunately, it does not affect the size of the overall local repository, but can be helpful if you have a huge tree of folders.
What are the involved commands? Here’s an example:
Clone the full repository once: ‘git clone’
Activate the feature: ‘git config core.sparsecheckout true’
Add folders that are needed explicitly, ignoring assets folders:
echo src/ .git/info/sparse-checkout
Read the tree as specified:
git read-tree -m -u HEAD
After the above, you can go back to use your normal git commands, but your work directory will only contain the folders you specified above.
Solution for controlling when you update large files: submodules
[UPDATE] …or you can skip all that and use Git LFS
If you work with large files on a regular basis, the best solution might be to take advantage of the large file support (LFS) Atlassian co-developed with GitHub in 2015.
(Yes, you read that right.
We teamed up with GitHub on an open-source contribution to the Git project.)
Git LFS is an extension that stores pointers (naturally!) to large files in your repository, instead of storing the files themselves in there.
The actual files are stored on a remote server.
As you can imagine, this dramatically reduces the time it takes to clone your repo.
Bitbucket supports Git LFS, as does GitHub.
So chances are, you already have access to this technology.
It’s especially helpful for teams that include designers, videographers, musicians, or CAD users.
Conclusions
Don’t give up the fantastic capabilities of Git just because you have a big repository history or huge files.
There are workable solutions to both problems.
Check out the other articles I linked to above for more info on submodules, project dependencies, and Git LFS.
And for refreshers on commands and workflow, our Git microsite has loads of tutorials.
Happy coding!
Git is a distributed version control system, meaning the entire history of the repository is transferred to the client during the cloning process.
For projects containing large files, particularly large files that are modified regularly, this initial clone can take a huge amount of time, as every version of every file has to be downloaded by the client.
Git LFS (Large File Storage) is a Git extension developed by Atlassian, GitHub, and a few other open source contributors, that reduces the impact of large files in your repository by downloading the relevant versions of them lazily.
Specifically, large files are downloaded during the checkout process rather than during cloning or fetching.
Git LFS does this by replacing large files in your repository with tiny pointer files.
During normal usage, you'll never see these pointer files as they are handled automatically by Git LFS:
When you add a file to your repository, Git LFS replaces its contents with a pointer, and stores the file contents in a local Git LFS cache.
When you push new commits to the server, any Git LFS files referenced by the newly pushed commits are transferred from your local Git LFS cache to the remote Git LFS store tied to your Git repository.
When you checkout a commit that contains Git LFS pointers, they are replaced with files from your local Git LFS cache, or downloaded from the remote Git LFS store.
Git LFS is seamless: in your working copy you'll only see your actual file content.
This means you can use Git LFS without changing your existing Git workflow; you simply git checkout, edit, git add, and git commit as normal.
git clone and git pull operations will be significantly faster as you only download the versions of large files referenced by commits that you actually check out, rather than every version of the file that ever existed.
To use Git LFS, you will need a Git LFS aware host such as Bitbucket Cloud or Bitbucket Data Center.
Repository users will need to have the Git LFS command-line client installed, or a Git LFS aware GUI client such as Sourcetree.
Fun fact: Steve Streeting, the Atlassian developer who invented Sourcetree, is also a major contributor to the Git LFS project, so Sourcetree and Git LFS work together rather well.
What is Git LFS?
Installing Git LFSCreating a new Git LFS repositoryCloning an existing Git LFS repositorySpeeding up clonesPulling and checking outSpeeding up pullsTracking files with Git LFSCommitting and pushingMoving a Git LFS repository between hostsFetching extra Git LFS historyDeleting local Git LFS filesDeleting remote Git LFS files from the serverFinding paths or commits that reference a Git LFS objectIncluding/excluding Git LFS filesLocking Git LFS filesHow Git LFS works
Installing Git LFS
There are three easy ways to install Git LFS:
a.
Install it using your favorite package manager.
git-lfs packages are available for Homebrew, MacPorts, dnf, and packagecloud; or
b.
Download and install Git LFS from the project website; or
c.
Install Sourcetree, a free Git GUI client that comes bundled with Git LFS.
Once git-lfs is on your path, run git lfs install to initialize Git LFS (you can skip this step if you installed Sourcetree):
$ git lfs install Git LFS initialized.
You'll only need to run git lfs install once.
Once initialized for your system, Git LFS will bootstrap itself automatically when you clone a repository containing Git LFS content.
Creating a new Git LFS repository
To create a new Git LFS aware repository, you'll need to run git lfs install after you create the repository:
# initialize Git
$ mkdir Atlasteroids
$ cd Atlasteroids
$ git init

Initialized empty Git repository in /Users/tpettersen/Atlasteroids/.git/
# initialize Git LFS
$ git lfs install
Updated pre-push hook.

Git LFS initialized.
This installs a special pre-pushGit hook in your repository that will transfer Git LFS files to the server when you git push.
Git LFS is automatically enabled for all Bitbucket Cloud repositories.
For Bitbucket Data Center, you'll need to enable Git LFS in your repository settings:
Once Git LFS is initialized for your repository, you can specify which files to track using git lfs track.
Cloning an existing Git LFS repository
Once Git LFS is installed, you can clone a Git LFS repository as normal using git clone.
At the end of the cloning process Git will check out the default branch (usually main), and any Git LFS files needed to complete the checkout process will be automatically downloaded for you.
For example:
$ git clone git@bitbucket.org:tpettersen/Atlasteroids.git
Cloning into 'Atlasteroids'...
remote: Counting objects: 156, done.

remote: Compressing objects: 100% (154/154), done.
remote: Total 156 (delta 87), reused 0 (delta 0)
Receiving objects: 100% (156/156), 54.04 KiB | 31.00 KiB/s, done.
Resolving deltas: 100% (87/87), done.

Checking connectivity...
done.
Downloading Assets/Sprites/projectiles-spritesheet.png (21.14 KB)
Downloading Assets/Sprites/productlogos_cmyk-spritesheet.png (301.96 KB)

Downloading Assets/Sprites/shuttle2.png (1.62 KB)
Downloading Assets/Sprites/space1.png (1.11 MB)
Checking out files: 100% (81/81), done.
There are four PNGs in this repository being tracked by Git LFS.
When running git clone, Git LFS files are downloaded one at a time as pointer files are checked out of your repository.
Speeding up clones
If you're cloning a repository with a large number of LFS files, the explicit git lfs clone command offers far better performance:
$ git lfs clone git@bitbucket.org:tpettersen/Atlasteroids.git

Cloning into 'Atlasteroids'...
remote: Counting objects: 156, done.
remote: Compressing objects: 100% (154/154), done.
remote: Total 156 (delta 87), reused 0 (delta 0)

Receiving objects: 100% (156/156), 54.04 KiB | 0 bytes/s, done.
Resolving deltas: 100% (87/87), done.
Checking connectivity...
done.

Git LFS: (4 of 4 files) 1.14 MB / 1.15 MB
Rather than downloading Git LFS files one at a time, the git lfs clone command waits until the checkout is complete, and then downloads any required Git LFS files as a batch.
This takes advantage of parallelized downloads, and dramatically reduces the number of HTTP requests and processes spawned (which is especially important for improving performance on Windows).
Pulling and checking out
Just like cloning, you can pull from a Git LFS repository using a normal git pull.
Any needed Git LFS files will be downloaded as part of the automatic checkout process once the pull completes:
$ git pull
Updating 4784e9d..7039f0a
Downloading Assets/Sprites/powerup.png (21.14 KB)
Fast-forward
Assets/Sprites/powerup.png | 3 +
Assets/Sprites/powerup.png.meta | 4133 ++++++++++++++++++++++++++++++++++++++++++++++++++++++++++++++++++++
2 files changed, 4136 insertions(+)
create mode 100644 Assets/Sprites/projectiles-spritesheet.png
create mode 100644 Assets/Sprites/projectiles-spritesheet.png.meta
No explicit commands are needed to retrieve Git LFS content.
However, if the checkout fails for an unexpected reason, you can download any missing Git LFS content for the current commit with git lfs pull:
$ git lfs pull
Git LFS: (4 of 4 files) 1.14 MB / 1.15 MB
Speeding up pulls
Like git lfs clone, git lfs pull downloads your Git LFS files as a batch.
If you know a large number of files have changed since the last time you pulled, you may wish to disable the automatic Git LFS download during checkout, and then batch download your Git LFS content with an explicit git lfs pull.
This can be done by overriding your Git config with the -c option when you invoke git pull:
$ git -c filter.lfs.smudge= -c filter.lfs.required=false pull && git lfs pull
Since that's rather a lot of typing, you may wish to create a simple Git alias to perform a batched Git and Git LFS pull for you:
$ git config --global alias.plfs "\!git -c filter.lfs.smudge= -c filter.lfs.required=false pull && git lfs pull"
$ git plfs
This will greatly improve performance when a large number of Git LFS files need to be downloaded (again, especially on Windows).
Tracking files with Git LFS
When you add a new type of large file to your repository, you'll need to tell Git LFS to track it by specifying a pattern using the git lfs track command:
$ git lfs track "*.ogg"
Tracking *.ogg
Note that the quotes around "*.ogg" are important.
Omitting them will cause the wildcard to be expanded by your shell, and individual entries will be created for each .ogg file in your current directory:
# probably not what you want
$ git lfs track *.ogg
Tracking explode.ogg
Tracking music.ogg
Tracking phaser.ogg
The patterns supported by Git LFS are the same as those supported by .gitignore, for example:
# track all .ogg files in any directory
$ git lfs track "*.ogg"
# track files named music.ogg in any directory
$ git lfs track "music.ogg"
# track all files in the Assets directory and all subdirectories
$ git lfs track "Assets/"
# track all files in the Assets directory but *not* subdirectories
$ git lfs track "Assets/*"
# track all ogg files in Assets/Audio
$ git lfs track "Assets/Audio/*.ogg"
# track all ogg files in any directory named Music
$ git lfs track "**/Music/*.ogg"
# track png files containing "xxhdpi" in their name, in any directory
$ git lfs track "*xxhdpi*.png
These patterns are relative to the directory in which you ran the git lfs track command.
To keep things simple, it is best to run git lfs track from the root of your repository.
Note that Git LFS does not support negative patterns like .gitignore does.
After running git lfs track, you'll notice a new file named .gitattributes in the directory you ran the command from.
.gitattributes is a Git mechanism for binding special behaviors to certain file patterns.
Git LFS automatically creates or updates .gitattributes files to bind tracked file patterns to the Git LFS filter.
However, you will need to commit any changes to the .gitattributes file to your repository yourself:
$ git lfs track "*.ogg"
Tracking *.ogg
$ git add .gitattributes
$ git diff --cached
diff --git a/.gitattributes b/.gitattributes
new file mode 100644
index 0000000..b6dd0bb
--- /dev/null
+++ b/.gitattributes
@@ -0,0 +1 @@
+*.ogg filter=lfs diff=lfs merge=lfs -text
$ git commit -m "Track ogg files with Git LFS"
For ease of maintenance, it is simplest to keep all Git LFS patterns in a single .gitattributes file by always running git lfs track from the root of your repository.
However, you can display a list of all patterns that are currently tracked by Git LFS (and the .gitattributes files they are defined in) by invoking git lfs track with no arguments:
$ git lfs track
Listing tracked paths
*.stl (.gitattributes)
*.png (Assets/Sprites/.gitattributes)
*.ogg (Assets/Audio/.gitattributes)
You can stop tracking a particular pattern with Git LFS by simply removing the appropriate line from your .gitattributes file, or by running the git lfs untrack command:
$ git lfs untrack "*.ogg"
Untracking *.ogg
$ git diff
diff --git a/.gitattributes b/.gitattributes
index b6dd0bb..e69de29 100644
--- a/.gitattributes
+++ b/.gitattributes
@@ -1 +0,0 @@
-*.ogg filter=lfs diff=lfs merge=lfs -text
After running git lfs untrack you will again have to commit the changes to .gitattributes yourself.
Committing and pushing
You can commit and push as normal to a repository that contains Git LFS content.
If you have committed changes to files tracked by Git LFS, you will see some additional output from git push as the Git LFS content is transferred to the server:
$ git push
Git LFS: (3 of 3 files) 4.68 MB / 4.68 MB
Counting objects: 8, done.
Delta compression using up to 8 threads.
Compressing objects: 100% (8/8), done.
Writing objects: 100% (8/8), 1.16 KiB | 0 bytes/s, done.
Total 8 (delta 1), reused 0 (delta 0)
To git@bitbucket.org:tpettersen/atlasteroids.git
7039f0a..b3684d3 main -> main
If transferring the LFS files fails for some reason, the push will be aborted and you can safely try again.
Like Git, Git LFS storage is content addressable: content is stored against a key which is a SHA-256 hash of the content itself.
This means it is always safe to re-attempt transferring Git LFS files to the server; you can't accidentally overwrite a Git LFS file's contents with the wrong version.
Moving a Git LFS repository between hosts
To migrate a Git LFS repository from one hosting provider to another, you can use a combination of git lfs fetch and git lfs push with the --all option specified.
For example, to move all Git and Git LFS repository from a remote named github to a remote named bitbucket :
# create a bare clone of the GitHub repository
$ git clone --bare git@github.com:kannonboy/atlasteroids.git
$ cd atlasteroids
# set up named remotes for Bitbucket and GitHub
$ git remote add bitbucket git@bitbucket.org:tpettersen/atlasteroids.git
$ git remote add github git@github.com:kannonboy/atlasteroids.git
# fetch all Git LFS content from GitHub
$ git lfs fetch --all github
# push all Git and Git LFS content to Bitbucket
$ git push --mirror bitbucket
$ git lfs push --all bitbucket
Fetching extra Git LFS history
Git LFS typically only downloads the files needed for commits that you actually checkout locally.
However, you can force Git LFS to download extra content for other recently modified branches using git lfs fetch --recent:
$ git lfs fetch --recent
Fetching main
Git LFS: (0 of 0 files, 14 skipped) 0 B / 0 B, 2.83 MB skipped
Fetching recent branches within 7 days
Fetching origin/power-ups
Git LFS: (8 of 8 files, 4 skipped) 408.42 KB / 408.42 KB, 2.81 MB skipped
Fetching origin/more-music
Git LFS: (1 of 1 files, 14 skipped) 1.68 MB / 1.68 MB, 2.83 MB skipped
This is useful for batch downloading new Git LFS content while you're out at lunch, or if you're planning on reviewing work from your teammates and will not be able to download content later on due to limited internet connectivity.
For example, you may wish to run git lfs fetch --recent before jumping on a plane!
Git LFS considers any branch or tag containing a commit newer than seven days as recent.
You can configure the number of days considered as recent by setting the lfs.fetchrecentrefsdays property:
# download Git LFS content for branches or tags updated in the last 10 days
$ git config lfs.fetchrecentrefsdays 10
By default, git lfs fetch --recent will only download Git LFS content for the commit at the tip of a recent branch or tag.
However you can configure Git LFS to download content for earlier commits on recent branches and tags by configuring the lfs.fetchrecentcommitsdays property:
# download the latest 3 days of Git LFS content for each recent branch or tag
$ git config lfs.fetchrecentcommitsdays 3
Use this setting with care: if you have fast moving branches, this can result in a huge amount of data being downloaded.
However it can be useful if you need to review interstitial changes on a branch, cherry picking commits across branches, or rewrite history.
As discussed in Moving a Git LFS repository between hosts, you can also elect to fetch all Git LFS content for your repository with git lfs fetch --all:
$ git lfs fetch --all
Scanning for all objects ever referenced...
23 objects found
Fetching objects...
Git LFS: (9 of 9 files, 14 skipped) 2.06 MB / 2.08 MB, 2.83 MB skipped
Deleting local Git LFS files
You can delete files from your local Git LFS cache with the git lfs prune command:
$ git lfs prune
4 local objects, 33 retained
Pruning 4 files, (2.1 MB)
Deleted 4 files
This will delete any local Git LFS files that are considered old.
An old file is any file not referenced by:
the currently checked out commit
a commit that has not yet been pushed (to origin, or whatever lfs.pruneremotetocheck is set to)
a recent commit
By default, a recent commit is any commit created in the last ten days.
This is calculated by adding:
the value of the lfs.fetchrecentrefsdays property discussed in Fetching extra Git LFS history (which defaults to seven); to
the value of the lfs.pruneoffsetdays property (which defaults to three)
You can configure the prune offset to retain Git LFS content for a longer period:
# don't prune commits younger than four weeks (7 + 21)
$ git config lfs.pruneoffsetdays 21
Unlike Git's built-in garbage collection, Git LFS content is not pruned automatically, so running git lfs prune on a regular basis is a good idea to keep your local repository size down.
You can test out what effect a prune operation will have with git lfs prune --dry-run:
$ git lfs prune --dry-run
4 local objects, 33 retained
4 files would be pruned (2.1 MB)
And exactly which Git LFS objects will be pruned with git lfs prune --verbose --dry-run:
$ git lfs prune --dry-run --verbose
4 local objects, 33 retained
4 files would be pruned (2.1 MB)
* 4a3a36141cdcbe2a17f7bcf1a161d3394cf435ac386d1bff70bd4dad6cd96c48 (2.0 MB)
* 67ad640e562b99219111ed8941cb56a275ef8d43e67a3dac0027b4acd5de4a3e (6.3 KB)
* 6f506528dbf04a97e84d90cc45840f4a8100389f570b67ac206ba802c5cb798f (1.7 MB)
* a1d7f7cdd6dba7307b2bac2bcfa0973244688361a48d2cebe3f3bc30babcf1ab (615.7 KB)
The long hexadecimal strings output by --verbose mode are SHA-256 hashes (also known as Object IDs, or OIDs) of the Git LFS objects to be pruned.
You can use the techniques described in Finding paths or commits that reference a Git LFS object to find our more about the objects that will be pruned.
As an additional safety check, you can use the --verify-remote option to check whether the remote Git LFS store has a copy of your Git LFS objects before they are pruned:
$ git lfs prune --verify-remote
16 local objects, 2 retained, 12 verified with remote
Pruning 14 files, (1.7 MB)
Deleted 14 files
This makes the pruning process significantly slower, but gives you peace of mind knowing that any pruned objects are recoverable from the server.
You can enable the --verify-remote option permanently for your system by configuring the lfs.pruneverifyremotealways property globally:
$ git config --global lfs.pruneverifyremotealways true
Or you can enable remote verification for just the context repository by omitting the --global option from the command above.
Deleting remote Git LFS files from the server
The Git LFS command-line client doesn't support pruning files from the server, so how you delete them depends on your hosting provider.
In Bitbucket Cloud, you can view and delete Git LFS files via Repository Settings > Git LFS:
Note that each Git LFS file is indexed by its SHA-256 OID; the paths that reference each file are not visible via the UI.
This is because there could be many different paths at many different commits that may refer to a given object, so looking them up would be a very slow process.
To determine what a given Git LFS file actually contains, you have three options:
look at the file preview image and file type in the left hand column of the Bitbucket Git LFS UI
download the file using the link in the right hand column of the Bitbucket Git LFS UI -search for commits referencing the Git LFS object's SHA-256 OID, as discussed in the next section
Finding paths or commits that reference a Git LFS object
If you have a Git LFS SHA-256 OID, you can determine which commits reference it with git log --all -p -S :
$ git log --all -p -S 3b6124b8b01d601fa20b47f5be14e1be3ea7759838c1aac8f36df4859164e4cc
commit 22a98faa153d08804a63a74a729d8846e6525cb0
Author: Tim Pettersen <tpettersen@atlassian.com>
Date: Wed Jul 27 11:03:27 2016 +1000
Projectiles and exploding asteroids
diff --git a/Assets/Sprites/projectiles-spritesheet.png
new file mode 100755
index 0000000..49d7baf
--- /dev/null
+++ b/Assets/Sprites/projectiles-spritesheet.png
@@ -0,0 +1,3 @@
+version https://git-lfs.github.com/spec/v1
+oid sha256:3b6124b8b01d601fa20b47f5be14e1be3ea7759838c1aac8f36df4859164e4cc
+size 21647
This git log incantation generates a patch (-p) from commits on any branch (--all) that add or remove a line (-S) containing the specified string (a Git LFS SHA-256 OID).
The patch shows you the commit and the path to the LFS object, as well as who added it, and when it was committed.
You can simply checkout the commit, and Git LFS will download the file if needed and place it in your working copy.
If you suspect that a particular Git LFS object is in your current HEAD, or on a particular branch, you can use git grep to find the file path that references it:
# find a particular object by OID in HEAD
$ git grep 3b6124b8b01d601fa20b47f5be14e1be3ea7759838c1aac8f36df4859164e4cc HEAD
HEAD:Assets/Sprites/projectiles-spritesheet.png:oid sha256:3b6124b8b01d601fa20b47f5be14e1be3ea7759838c1aac8f36df4859164e4cc
# find a particular object by OID on the "power-ups" branch
$ git grep e88868213a5dc8533fc9031f558f2c0dc34d6936f380ff4ed12c2685040098d4 power-ups
power-ups:Assets/Sprites/shield2.png:oid sha256:e88868213a5dc8533fc9031f558f2c0dc34d6936f380ff4ed12c2685040098d4
You can replace HEAD or power-ups with any ref, commit, or tree that contains the Git LFS object.
Including/excluding Git LFS files
In some situations you may want to only download a subset of the available Git LFS content for a particular commit.
For example, when configuring a CI build to run unit tests, you may only need your source code, so may want to exclude heavyweight files that aren't necessary to build your code.
You can exclude a pattern or subdirectory using git lfs fetch -X (or --exclude):
$ git lfs fetch -X "Assets/**"
Alternatively, you may want to only include a particular pattern or subdirectory.
For example, an audio engineer could fetch just ogg and wav files with git lfs fetch -I (or --include):
$ git lfs fetch -I "*.ogg,*.wav"
If you combine includes and excludes, only files that match an include pattern and do not match an exclude pattern will be fetched.
For example, you can fetch everything in your Assets directory exceptgifs with:
$ git lfs fetch -I "Assets/**" -X "*.gif"
Excludes and includes support the same patterns as git lfs track and .gitignore.
You can make these patterns permanent for a particular repository by setting the lfs.fetchinclude and lfs.fetchexclude config properties:
$ git config lfs.fetchinclude "Assets/**"
$ git config lfs.fetchexclude "*.gif"
These settings can also be applied to every repository on your system by appending the --global option.
Locking Git LFS files
Unfortunately, there is no easy way of resolving binary merge conflicts.
With Git LFS file locking, you can lock files by extension or by file name and prevent binary files from being overwritten during a merge.
In order to take advantage of LFS' file locking feature, you first need to tell Git which type of files are lockable.
In the example below, the `--lockable` flag is appended to the `git lfs track` command which both stores PSD files in LFS and marks them as lockable.
$ git lfs track "*.psd" --lockable
Then add the following to your .gitattributes file:
*.psd filter=lfs diff=lfs merge=lfs -text lockable
When preparing to make changes to an LFS file, you'll use the lock command in order to register the file as locked on your Git server.
$ git lfs lock images/foo.psd
Locked images/foo.psd
Once you no longer need the file lock, you can remove it using Git LFS' unlock command.
$ git lfs unlock images/foo.psd
Git LFS file locks can be overridden, similar to git push, using a --force flag.
Do not use the --force flag unless you’re absolutely sure you know what you’re doing.
$ git lfs unlock images/foo.psd --force
How Git LFS works
If you're interested in learning more about clean and smudge filters, pre-push hooks, and the other interesting computer science behind Git LFS, check out this presentation from Atlassian on Git LFS at LinuxCon 2016:
Git gc
The git gc command is a repository maintenance command.
The "gc" stands for garbage collection.
Executing git gc is literally telling Git to clean up the mess it's made in the current repository.
Garbage collection is a concept that originates from interpreted programming languages which do dynamic memory allocation.
Garbage collection in interpreted languages is used to recover memory that has become inaccessible to the executing program.
Git repositories accumulate various types of garbage.
One type of Git garbage is orphaned or inaccessible commits.
Git commits can become inaccessible when performing history altering commands like git resets or git rebase.
In an effort to preserve history and avoid data loss Git will not delete detached commits.
A detached commit can still be checked out, cherry picked, and examined through the git log.
In addition to detached commit clean up, git gc will also perform compression on stored Git Objects, freeing up precious disk space.
When Git identifies a group of similar objects it will compress them into a 'pack'.
Packs are like zip files of Git bjects and live in the ./git/objects/pack directory within a repository.
What does git gc actually do?
Before execution, git gc first checks several git configvalues.
These values will help clarify the rest of git gc responsibility.
git gc configuration
gc.reflogExpire
An optional variable that defaults to 90 days.
It is used to set how long records in a branches reflog should be preserved.
gc.reflogExpireUnreachable
An optional variable that defaults to 30 days.
It is used to set how long inaccessible reflog records should be preserved.
gc.aggressiveWindow
An optional variable that defaults to 250.
It controls how much time is spent in the delta compression phase of object packing when git gc is executed with the --aggressive option.
gc.aggressiveDepth
Optional variable that defaults to 50.
It controls the depth of compression git-repack uses during a git gc --aggresive execution
gc.pruneExpire
Optional variable that defaults to "2 weeks ago".
It sets how long a inaccessible object will be preserved before pruning
gc.worktreePruneExpire
Optional variable that defaults to "3 months ago".
It sets how long a stale working tree will be preserved before being deleted.
git gc execution
Behind the scenes git gc actually executes a bundle of other internal subcommands like git prune, git repack, git pack and git rerere.
The high-level responsibility of these commands is to identify any Git objects that are outside the threshold levels set from the git gc configuration.
Once identified, these objects are then compressed, or pruned accordingly.
git gc best practices and FAQS
Garbage collection is run automatically on several frequently used commands:
git pullgit mergegit rebasegit commit
The frequency in which git gc should be manually executed corresponds to the activity level of a repository.
A repository with a single contributing developer will need to execute git gc far less often than a frequently-updated multi-user repository.
git gc vs git prune
git gc is a parent command and git prune is a child.
git gc will internally trigger git prune.
git prune is used to remove Git objects that have been deemed inaccessible by the git gc configuration.
Learn more about git prune.
What is git gc aggressive?
git gc can be invoked with the --aggressive command line option.
The --aggressive option causes git gc to spend more time on its optimization effort.
This causes git gc to run slower but will save more disk space after its completion.
The effects of --aggressive are persistent and only need to be run after a large volume of changes to a repository.
What is git gc auto?
The git gc --auto command variant first checks if any housekeeping is required on the repo before executing.
If it finds housekeeping is not needed it exits without doing any work.
Some Git commands implicitly run git gc --auto after execution to clean up any loose objects they have created.
Before execution git gc --auto will check the git configuration for threshold values on loose objects and packing compression size.
These values can be set with git config.
If the repository surpasses any of the housekeeping thresholds git gc --auto will be executed.
Getting started with git gc
You're probably already using git gc without noticing.
As discussed in the best practices section, it is automatically invoked through frequently used commands.
If you want to manually invoke it simply execute git gc and you should see an output indicating the work it has performed.
Git Prune
The git prune command is an internal housekeeping utility that cleans up unreachable or "orphaned" Git objects.
Unreachable objects are those that are inaccessible by any refs.
Any commit that cannot be accessed through a branch or tag is considered unreachable.
git prune is generally not executed directly.
Prune is considered a garbage collection command and is a child command of the git gc command.
Git Prune Overview
In order to understand the effects of git prune we need to simulate a scenario where a commit becomes unreachable.
The following is a sequence of command line executions that will simulate this experience.
~ $ cd git-prune-demo/
~/git-prune-demo $ git init .
Initialized empty Git repository in /Users/kev/Dropbox/git-prune-demo/.git/
~/git-prune-demo $ echo "hello git prune" > hello.txt
~/git-prune-demo $ git add hello.txt
~/git-prune-demo $ git commit -am "added hello.txt"
The preceding sequence of commands will create a new repository in a directory named git-prune-demo.
One commit consisting of a new file hello.text is added to the repo with the basic content of "hello git prune".
Next, we will create modify hello.txt and create a new commit from those modifications.
~/git-prune-demo $ echo "this is second line txt" >> hello.txt
~/git-prune-demo $ cat hello.txt
hello git prune
this is second line txt
~/git-prune-demo $ git commit -am "added another line to hello.txt"
[main 5178bec] added another line to hello.txt
1 file changed, 1 insertion(+)
We now have a 2 commit history in this demo repo.
We can verify by using git log:
~/git-prune-demo $ git log
commit 5178becc2ca965e1728554ce1cb8de2f2c2370b1
Author: kevzettler <kevzettler@gmail.com>
Date: Sun Sep 30 14:49:59 2018 -0700
added another line to hello.txt
commit 994b122045cf4bf0b97139231b4dd52ea2643c7e
Author: kevzettler <kevzettler@gmail.com>
Date: Sun Sep 30 09:43:41 2018 -0700
added hello.txt
The git log output displays the 2 commits and corresponding commit messages about the edits made to hello.txt.
The next step is for us to make one of the commits unreachable.
We will do this by utilizing the git reset command.
We reset the state of the repo to the first commit.
the "added hello.txt" commit.
~/git-prune-demo $ git reset --hard 994b122045cf4bf0b97139231b4dd52ea2643c7e
HEAD is now at 994b122 added hello.txt
If we now use git log to examine the state of the repository we can see that we only have one commit
~/git-prune-demo $ git log
commit 994b122045cf4bf0b97139231b4dd52ea2643c7e
Author: kevzettler <kevzettler@gmail.com>
Date: Sun Sep 30 09:43:41 2018 -0700
added hello.txt
The demo repository is now in a state that contains a detached commit.
The second commit we made with the message "added another line to hello.txt" is no longer displayed in the git log output and is now detached.
It may appear as though we have lost or deleted the commit, but Git is very strict about not deleting history.
We can confirm it is still available, but detached, by using git checkout to visit it directly:
~/git-prune-demo $ git checkout 5178becc2ca965e1728554ce1cb8de2f2c2370b1
Note: checking out '5178becc2ca965e1728554ce1cb8de2f2c2370b1'.
You are in 'detached HEAD' state.
You can look around, make experimental
changes and commit them, and you can discard any commits you make in this
state without impacting any branches by performing another checkout.
If you want to create a new branch to retain commits you create, you may
do so (now or later) by using -b with the checkout command again.
Example:
git checkout -b <new-branch-name>
HEAD is now at 5178bec...
added another line to hello.txt
~/git-prune-demo $ git log
commit 5178becc2ca965e1728554ce1cb8de2f2c2370b1
Author: kevzettler <kevzettler@gmail.com>
Date: Sun Sep 30 14:49:59 2018 -0700
added another line to hello.txt
commit 994b122045cf4bf0b97139231b4dd52ea2643c7e
Author: kevzettler <kevzettler@gmail.com>
Date: Sun Sep 30 09:43:41 2018 -0700
added hello.txt
When we check out the detached commit, Git is thoughtful enough to give us a detailed message explaining that we are in a detached state.
If we examine the log here we can see that the "added another line to hello.txt" commit is now back in the log output! Now that we know the repository is in a good simulation state with a detached commit we can practice using git prune.
First though, let us return to the main branch using git checkout~/git-prune-demo $ git checkout main
Warning: you are leaving 1 commit behind, not connected to
any of your branches:
5178bec added another line to hello.txt
If you want to keep it by creating a new branch, this may be a good time
to do so with:
git branch <new-branch-name> 5178bec
Switched to branch 'main'
When returning to main via git checkout, Git is again thoughtful enough to let us know that we are leaving a detached commit behind.
It's now time to prune the detached commit! Next, we will execute git prune but we must be sure to pass some options to it.
--dry-run and --verbose will display output indicating what is set to be pruned but not actually prune it.
~/git-prune-demo $ git prune --dry-run --verbose
This command will most likely return empty output.
Empty output implies that the prune will not actually delete anything.
Why would this happen? Well, the commit is most likely not fully detached.
Somewhere Git is still maintaining a reference to it.
This is a prime example of why git prune is not to be used stand-alone outside of git gc.
This is also a good example of how it is hard to fully lose data with Git.
Most likely Git is storing a reference to our detached commit in the reflog.
We can investigate by running git reflog.
You should see some output describing the sequence of actions we took to get here.
For more info on git reflog visit the git reflog page.
In addition to preserving history in the reflog, Git has internal expiration dates on when it will prune detached commits.
Again, these are all implementation details that git gc handles and git prune should not be used standalone.
To conclude our git prune simulation demo we must clear the reflog
~/git-prune-demo $ git reflog expire --expire=now --expire-unreachable=now --all
The above command will force expire all entries to the reflog that are older than now.
This is a brutal and dangerous command that you should never have to use as casual Git user.
We are executing this command to demonstrate a successful git prune.
With the reflog totally wiped we can now execute git prune.
~/git-prune-demo $ git prune --dry-run --verbose --expire=now
1782293bdfac16b5408420c5cb0c9a22ddbdd985 blob
5178becc2ca965e1728554ce1cb8de2f2c2370b1 commit
a1b3b83440d2aa956ad6482535cbd121510a3280 commit
f91c3433eae245767b9cd5bdb46cd127ed38df26 tree
This command should output a list of Git SHA object references that looks like the above.
Usage
git prune has a short list of options that we covered in the overview section.
-n --dry-run
Don't execute the prune.
Just show an output of what it will do
-v --verbose
Display output of all objects and actions taken by the prune
--progress
Displays output that indicates the progress of the prune
--expire <time>
Force expiration of objects that are past <head>…
Specifying a will preserve any options from that head ref
Discussion
What’s the Difference Between Git Prune, Git Fetch --prune, and Git Remote Prune?
git remote prune and git fetch --prune do the same thing: delete the refs to branches that don't exist on the remote.
This is highly desirable when working in a team workflow in which remote branches are deleted after merge to main.
The second command, git fetch --prune will connect to the remote and fetch the latest remote state before pruning.
It is essentially a combination of commands:
git fetch --all && git remote prune
The generic git prune command is entirely different.
As discussed in the overview section, git prune will delete locally detached commits.
How Do I Clean Outdated Branches?
git fetch --prune is the best utility for cleaning outdated branches.
It will connect to a shared remote repository remote and fetch all remote branch refs.
It will then delete remote refs that are no longer in use on the remote repository.
Does Git Remote Prune Origin Delete the Local Branch?
No git remote prune origin will only delete the refs to remote branches that no longer exist.
Git stores both local and remote refs.
A repository will have local/origin and remote/origin ref collections.
git remote prune origin will only prune the refs in remote/origin.
This safely leaves local work in local/origin.
Git Prune Summary
The git prune command is intended to be invoked as a child command to git gc.
It is highly unlikely you will ever need to invoke git prune in a day to day software engineering capacity.
Other commands are needed to understand the effects of git prune.
Some commands used in this article were git log, git reflog, and git checkout.
Git Bash
At its core, Git is a set of command line utility programs that are designed to execute on a Unix style command-line environment.
Modern operating systems like Linux and macOS both include built-in Unix command line terminals.
This makes Linux and macOS complementary operating systems when working with Git.
Microsoft Windows instead uses Windows command prompt, a non-Unix terminal environment.
In Windows environments, Git is often packaged as part of higher level GUI applications.
GUIs for Git may attempt to abstract and hide the underlying version control system primitives.
This can be a great aid for Git beginners to rapidly contribute to a project.
Once a project's collaboration requirements grow with other team members, it is critical to be aware of how the actual raw Git methods work.
This is when it can be beneficial to drop a GUI version for the command line tools.
Git Bash is offered to provide a terminal Git experience.
What is Git Bash?
Git Bash is an application for Microsoft Windows environments which provides an emulation layer for a Git command line experience.
Bash is an acronym for Bourne Again Shell.
A shell is a terminal application used to interface with an operating system through written commands.
Bash is a popular default shell on Linux and macOS.
Git Bash is a package that installs Bash, some common bash utilities, and Git on a Windows operating system.
How to install Git Bash
Git Bash comes included as part of the Git For Windows package.
Download and install Git For Windows like other Windows applications.
Once downloaded find the included .exe file and open to execute Git Bash.
How to use Git Bash
Git Bash has the same operations as a standard Bash experience.
It will be helpful to review basic Bash usage.
Advanced usage of Bash is outside the scope of this Git focused document.
How to navigate folders
The Bash command pwd is used to print the 'present working directory'.
pwd is equivalent to executing cd on a DOS(Windows console host) terminal.
This is the folder or path that the current Bash session resides in.
The Bash command ls is used to 'list' contents of the current working directory.
ls is equivalent to DIR on a Windows console host terminal.
Both Bash and Windows console host have a cd command.
cd is an acronym for 'Change Directory'.
cd is invoked with an appended directory name.
Executing cd will change the terminal sessions current working directory to the passed directory argument.
Git Bash Commands
Git Bash is packaged with additional commands that can be found in the /usr/bin directory of the Git Bash emulation.
Git Bash can actually provide a fairly robust shell experience on Windows.
Git Bash comes packaged with the following shell commands which are outside the scope of this document: Ssh, scp, cat, find.
In addition the previously discussed set of Bash commands, Git Bash includes the full set of Git core commands discussed through out this site.
Learn more at the corresponding documentation pages for git clone, git commit, git checkout, git push, and more.
The best way to store your dotfiles: A bare Git repository
Disclaimer: the title is slightly hyperbolic, there are other proven solutions to the problem.
I do think the technique below is very elegant though.
Recently I read about this amazing technique in an Hacker News thread on people's solutions to store their dotfiles.
User StreakyCobrashowed his elegant setup and ...
It made so much sense! I am in the process of switching my own system to the same technique.
The only pre-requisite is to install Git.
In his words the technique below requires:
No extra tooling, no symlinks, files are tracked on a version control system, you can use different branches for different computers, you can replicate you configuration easily on new installation.
The technique consists in storing a Git bare repository in a "side" folder (like $HOME/.cfg or $HOME/.myconfig) using a specially crafted alias so that commands are run against that repository and not the usual .git local folder, which would interfere with any other Git repositories around.
Starting from scratch
If you haven't been tracking your configurations in a Git repository before, you can start using this technique easily with these lines:
git init --bare $HOME/.cfg
alias config='/usr/bin/git --git-dir=$HOME/.cfg/ --work-tree=$HOME'
config config --local status.showUntrackedFiles no
echo "alias config='/usr/bin/git --git-dir=$HOME/.cfg/ --work-tree=$HOME'" >> $HOME/.bashrc
The first line creates a folder ~/.cfg which is a Git bare repository that will track our files.
Then we create an alias config which we will use instead of the regular git when we want to interact with our configuration repository.
We set a flag - local to the repository - to hide files we are not explicitly tracking yet.
This is so that when you type config status and other commands later, files you are not interested in tracking will not show up as untracked.
Also you can add the alias definition by hand to your .bashrc or use the the fourth line provided for convenience.
I packaged the above lines into a snippet up on Bitbucket and linked it from a short-url.
So that you can set things up with:
curl -Lks http://bit.do/cfg-init | /bin/bash
After you've executed the setup any file within the $HOME folder can be versioned with normal commands, replacing git with your newly created config alias, like:
config status
config add .vimrc
config commit -m "Add vimrc"
config add .bashrc
config commit -m "Add bashrc"
config push
Install your dotfiles onto a new system (or migrate to this setup)
If you already store your configuration/dotfiles in a Git repository, on a new system you can migrate to this setup with the following steps:
Prior to the installation make sure you have committed the alias to your .bashrc or .zsh:
alias config='/usr/bin/git --git-dir=$HOME/.cfg/ --work-tree=$HOME'
And that your source repository ignores the folder where you'll clone it, so that you don't create weird recursion problems:
echo ".cfg" >> .gitignore
Now clone your dotfiles into a bare repository in a "dot" folder of your $HOME:
git clone --bare <git-repo-url> $HOME/.cfg
Define the alias in the current shell scope:
alias config='/usr/bin/git --git-dir=$HOME/.cfg/ --work-tree=$HOME'
Checkout the actual content from the bare repository to your $HOME:
config checkout
The step above might fail with a message like:
error: The following untracked working tree files would be overwritten by checkout:
.bashrc
.gitignore
Please move or remove them before you can switch branches.
Aborting
This is because your $HOME folder might already have some stock configuration files which would be overwritten by Git.
The solution is simple: back up the files if you care about them, remove them if you don't care.
I provide you with a possible rough shortcut to move all the offending files automatically to a backup folder:
mkdir -p .config-backup && \
config checkout 2>&1 | egrep "\s+\." | awk {'print $1'} | \
xargs -I{} mv {} .config-backup/{}
Re-run the check out if you had problems:
config checkout
Set the flag showUntrackedFiles to no on this specific (local) repository:
config config --local status.showUntrackedFiles no
You're done, from now on you can now type config commands to add and update your dotfiles:
config status
config add .vimrc
config commit -m "Add vimrc"
config add .bashrc
config commit -m "Add bashrc"
config push
Again as a shortcut not to have to remember all these steps on any new machine you want to setup, you can create a simple script, store it as Bitbucket snippet like I did, create a short url for it and call it like this:
curl -Lks http://bit.do/cfg-install | /bin/bash
For completeness this is what I ended up with (tested on many freshly minted Alpine Linux containers to test it out):
git clone --bare https://bitbucket.org/durdn/cfg.git $HOME/.cfg
function config {
/usr/bin/git --git-dir=$HOME/.cfg/ --work-tree=$HOME $@
}
mkdir -p .config-backup
config checkout
if [ $? = 0 ]; then
echo "Checked out config.";
else
echo "Backing up pre-existing dot files.";
config checkout 2>&1 | egrep "\s+\." | awk {'print $1'} | xargs -I{} mv {} .config-backup/{}
fi;
config checkout
config config status.showUntrackedFiles no
Wrapping up
I hope you find this technique useful to track your configuration.
If you're curious, my dotfiles live here.
Also please do stay connected by following @durdn or my awesome team at @atlassiandev.
Git Cherry Pick
git cherry-pick is a powerful command that enables arbitrary Git commits to be picked by reference and appended to the current working HEAD.
Cherry picking is the act of picking a commit from a branch and applying it to another.
git cherry-pick can be useful for undoing changes.
For example, say a commit is accidently made to the wrong branch.
You can switch to the correct branch and cherry-pick the commit to where it should belong.
When to use git cherry pick
git cherry-pick is a useful tool but not always a best practice.
Cherry picking can cause duplicate commits and many scenarios where cherry picking would work, traditional merges are preferred instead.
With that said git cherry-pick is a handy tool for a few scenarios...
Team collaboration.
Often times a team will find individual members working in or around the same code.
Maybe a new product feature has a backend and frontend component.
There may be some shared code between to two product sectors.
Maybe the backend developer creates a data structure that the frontend will also need to utilize.
The frontend developer could use git cherry-pick to pick the commit in which this hypothetical data structure was created.
This pick would enable the frontend developer to continue progress on their side of the project.
Bug hotfixes
When a bug is discovered it is important to deliver a fix to end users as quickly as possible.
For an example scenario,say a developer has started work on a new feature.
During that new feature development they identify a pre-existing bug.
The developer creates an explicit commit patching this bug.
This new patch commit can be cherry-picked directly to the main branch to fix the bug before it effects more users.
Undoing changes and restoring lost commits
Sometimes a feature branch may go stale and not get merged into main.
Sometimes a pull request might get closed without merging.
Git never loses those commits and through commands like git log and git reflog they can be found and cherry picked back to life.
How to use git cherry pick
To demonstrate how to use git cherry-pick let us assume we have a repository with the following branch state:
a - b - c - d Main
\
e - f - g Featuregit cherry-pick usage is straight forward and can be executed like:
git cherry-pick commitSha
In this example commitSha is a commit reference.
You can find a commit reference by using git log.
In this example we have constructed lets say we wanted to use commit `f` in main.
First we ensure that we are working on the main branch.
git checkout main
Then we execute the cherry-pick with the following command:
git cherry-pick f
Once executed our Git history will look like:
a - b - c - d - f Main
\
e - f - g Feature
The f commit has been successfully picked into the main branch
Examples of git cherry pick
git cherry pick can also be passed some execution options.
-edit
Passing the -edit option will cause git to prompt for a commit message before applying the cherry-pick operation
--no-commit
The --no-commit option will execute the cherry pick but instead of making a new commit it will move the contents of the target commit into the working directory of the current branch.
--signoff
The --signoff option will add a 'signoff' signature line to the end of the cherry-pick commit message
In addition to these helpful options git cherry-pick also accepts a variety of merge strategy options.
Learn more about these options at the git merge strategies documentation.
Additionally, git cherry-pick also accepts option input for merge conflict resolution, this includes options: --abort --continue and --quit this options are covered more in depth with regards to git merge and git rebase.
Summary
Cherry picking is a powerful and convenient command that is incredibly useful in a few scenarios.
Cherry picking should not be misused in place of git merge or git rebase.
The git log command is required to help find commits to cherry pick.
Gitk
Gitk is a graphical repository browser.
It was the first of its kind.
It can be thought of as a GUI wrapper for git log.
It is useful for exploring and visualizing the history of a repository.
It’s written in tcl/tk which makes it portable across operating systems.
gitk is maintained by Paul Mackerras as an independent project, separate from Git core.
Stable versions are distributed as part of the Git suite for the convenience of end users.
Gitk can be a helpful learning aid for newcomers to Git.
Gitk Overview
Gitk can be a helpful learning utility for those new to version control, or those transitioning from another version control system like subversion.
Gitk is a convenience utility that is packaged with Git core.
It provides a graphical user interface that helps with visualization of Git's internal mechanics.
Other popular Git GUIs are git-gui and Atlassian's own Sourcetree.
Usage
Gitk is invoked similarly to git log.
Executing the gitk command will launch the Gitk UI which will look similar to the following:
The upper left pane displays the commits to the repository, with the latest on top.
The lower right displays the list of files impacted by the selected commit.
The lower left pane displays the commit details and full diff.
Clicking a file in the lower right pane focuses the diff in the lower left pane to the relevant section.
Gitk will reflect the current state of the repository.
If the repository state is modified through separate command line usage like changing branches Gitk will need to be reloaded.
Gitk can be reloaded by on the File menu -> Reload.
By default Gitk will render the current history of commits.
Gitk has a variety of command line options that can be passed on initialization.
These options primarily restrict the list of commits rendered to Gitk's top-level view.
The general form of execution with these revision options is as follows:
Options
gitk [<options>] [<revision range>] [--] [<path>…]
<revision range>
A revision range in the form ".." can be passed to show all revisions between and back to .
Alternatively, a single revision can be passed.
<path>…
Limit commits to a specific file path.
To isolate paths from revision names use "--" to separate the paths from any preceding options.
--all
Shows all branches, tags, refs.
--branches[=<pattern>] --tags[=<pattern>] --remotes[=<pattern>]
Displays the selected item (branches, tags, remotes) as if they were mainline commits.
When is passed, further limits refs to ones matching the specified pattern
--since=<date>
Render commits more recent than the specified date.
--until=<date>
Render commits older than the specified date.
--date-order
Sort commits by date.
--merge
Show commits that modify conflicted files that were identified during a merge
--left-right
Renders informative labels that indicate which side of a diff commits are from.
Commits from the left side are prefixed with a < symbol and those from the right with a > symbol.
--ancestry-path
When given a range of commits to display (e.g.
commit1..commit2 or commit2 commit1), only display commits that exist directly on the ancestry chain between the commit1 and commit2, i.e.
commits that are both descendants of commit1, and ancestors of commit2.
(See "History simplification" in git-log(1) for a more detailed explanation.)
L<start>,<end>:<file>
Powerful options that let you trace the history of a given code line number range.
Discussion & Examples
In order to provide any valuable output, Gitk needs an underlying repository with committed history.
The following code is a sequence of bash commands that will create a new repo with two branches that have commits and have been merged into one.
mkdir gitkdemo &&
cd gitkdemo &&
git init .
&&
echo "hello world" > index.txt &&
git add index.txt &&
git commit -m "added index.txt with hello world content"
This demo repository will be a good example to explore with Gitk.
This command sequence creates a new repo with 1 commit and an index.txt file.
Let us now invoke gitk to examine the repo.
Can Gitk Compare Two Commits?
Continuing with our demo repository let us now create an additional commit:
echo "prpended content to index" >> index.txt &&
git commit -am "prepended content to index"
Once the proceeding commands are executed, gitk will need to be reloaded.
Either reload gitk from the command line or use the GUI and navigate to File -> Reload.
Once reloaded we should see our new commit.
We can see that the main branch ref is now pointed at the new commit.
To compare these two commits we use the upper left history panel.
Within the history panel click on a commit that will be the base of the diff.
Once selected, right click on a second commit to open up a context menu.
This context menu will provide the options of
Diff this -> selected
Diff selected -> this
Selecting either of these options will cause a diff between the two commits to appear in the lower left pane which in our example will look like:
The diff output shows us that index.txt had a new line of "prepended content to index" added between the two commits.
How to Use Gitk to Compare Two Branches
Continuing with our example repo, let's create a new branch.
git checkout -b new_branch &&
echo "new branch content" > new_branch_file.txt &&
git add new_branch_file.txt &&
git commit -m "new branch commit with new file and prepended content" &&
echo "new branch index update" >> index.txt &&
git commit -am "new branch commit to index.txt with new content"
The proceeding command sequence will create a new branch named new_branch and add file new_branch_file.txt to it.
Additionally, new content is added to index.txt and an additional commit is made for that update.
We now have a new branch that is 2 commits ahead of main.
We must reload Gitk to reflect these changes.
This is a great learning opportunity to discuss Git's branching mechanism.
Gitk displays the commits as a straight line sequence of commits.
The term branch implies that we should expect a 'branch' or fork in the timeline.
Git branches are different from other version control systems.
In Git, a branch is a pointer to a commit.
The pointer moves to commits as they are created.
When you create a git branch, you are not changing anything in the structure of the repository or the source tree.
You are just creating a new pointer.
In order to compare the commits that differ between the 2 branches Gitk needs to be launched with a specified revision range.
Executing gitk main..new_branch will open Gitk with only the commits between the two branch refs
This is a powerful utility for comparing branches.
Gitk vs Git Gui
Git Gui is another Tcl/Tk based graphical user interface to Git.
Whereas Gitk focuses on navigating and visualizing the history of a repository, Git Gui focuses on refining individual commits, single file annotation and does not show project history.
Git Gui also supplies menu actions to launch Gitk for history exploration.
Git Gui is also invoked from the command line by executing git gui.
Gitk Summary
In conclusion, Gitk is a graphical interface wrapper for git log.
Gitk is incredibly powerful for visualizing and exploring the history of a repository.
Gitk is also a helpful tool for learning the internals of Git.
Git Show
What is git-show?
git-show is a command line utility that is used to view expanded details on Git objects such as blobs, trees, tags, and commits.
git-show has specific behavior per object type.
Tags show the tag message and other objects included in the tag.
Trees show the names and content of objects in a tree.
Blobs show the direct content of the blob.
Commits show a commit log message and a diff output of the changes in the commit.
Git objects are all accessed by references.
By default, git-show acts against the HEAD reference.
The HEAD reference always points to the last commit of the current branch.
Therefore, you can use git-show to display the log message and diff output of the latest commit.
Git-show options
<object>…
A reference to an object or a list of objects may be passed to examine those specific objects.
If no explicit objects are passed, git-show defaults to the HEAD reference.
--pretty[=<format>]
The pretty option takes a secondary format value that can be one of: oneline, short, medium, full, fuller, email, raw, and format:<string>.
If omitted, the format defaults to medium.
Each format option is a different template for how Git formats the show output.
The <code>oneline</code> option can be very helpful for showing a list of commits
--abbrev-commit
This option shortens the length of output commit IDs.
Commit IDs are 40 characters long and can be hard to view on narrow terminal screens.
This option combined with --pretty=oneline can produce a highly succinct git log output.
--no-abbrev-commit
Always Show the full 40 character commit ID.
This will ignore --abbrev-commit and any other options that abbreviate commit IDs like the --oneline format--oneline
This is a shortcut for using the expanded command --pretty=oneline --abbrev-commit--encoding[=<encoding>]
Character encoding on Git log messages defaults to UTF-8.
The encoding option can change to a different character encoding output.
This is useful if you are working with Git in an environment with different character encoding, like an Asian language terminal.
>--expand-tabs=<n>
--expand-tabs
--no-expand-tabs
These options replace tab characters with spaces in the log message output.
The n value can be set to configure how many space characters the tabs expand to.
Without an explicit n value tabs will expand to 8 spaces.
--no-expand-tabs is equivalent to n=0--notes=<ref>
--no-notes
Git has a note system that enables arbitrary ‘note’ metadata to be attached to objects.
This data can be hidden or filtered when using git-show.
--show-signature
This option will validate the commit is signed with an encrypted signature by passing it to a gpg subcommand.
Pretty formats for git-show
The --pretty option discussed above accepts several secondary options to massage the format of git-show output.
These secondary options are listed below with example template
oneline<sha1> <title line>
Oneline attempts to compact as much info into a single line as possible
shortcommit <sha1>
Author: <author>
<title line>mediumcommit <sha1>
Author: <author>
Date: <author date>
<title line>
<full commit message>fullcommit <sha1>
Author: <author>
Commit: <committer>
<title line>
<full commit message>fullercommit <sha1>
Author: <author>
AuthorDate: <author date>
Commit: <committer>
CommitDate: <committer date>
<title line>
<full commit message>emailFrom <sha1> <date>
From: <author>
Date: <author date>
Subject: [PATCH] <title line>
<full commit message>rawraw format ignores other direct formatting options passed to git-show and outputs the commit exactly as stored in the object.
Raw will disregard --abrev and --no-abbrev and always show the parent commits.
format:
format enables the specification of a custom output format.
It works similar to the C language’s printf command.
The --pretty=format option takes a secondary value of a template string.
The template has access to placeholder variables that will be filled with data from the commit object.
These placeholders are listed below:
%H: commit hash
%h: abbreviated commit hash
%T: tree hash
%t: abbreviated tree hash
%P: parent hashes
%p: abbreviated parent hashes
%an: author name
%aN: author name
%ae: author email
%aE: author email
%ad: author date (format respects --date= option)
%aD: author date, RFC2822 style
%ar: author date, relative
%at: author date, UNIX timestamp
%ai: author date, ISO 8601 format
%cn: committer name
%cN: committer name
%ce: committer email
%cE: committer email
%cd: committer date
%cD: committer date, RFC2822 style
%cr: committer date, relative
%ct: committer date, UNIX timestamp
%ci: committer date, ISO 8601 format
%d: ref names, like the --decorate option of git-log(1)
%e: encoding
%s: subject
%f: sanitized subject line, suitable for a filename
%b: body
%N: commit notes
%gD: reflog selector, e.g., refs/stash@{1}
%gd: shortened reflog selector, e.g., stash@{1}
%gs: reflog subject
%Cred: switch color to red
%Cgreen: switch color to green
%Cblue: switch color to blue
%Creset: reset color
%C(...): color specification, as described in color.branch.* config option
%m: left, right or boundary mark
%n: newline
%%: a raw %
%x00: print a byte from a hex code
%w([[,[,]]]): switch line wrapping, like the -w option of git-shortlog
Examples of git-show
git show --pretty="" --name-only bd61ad98
This will list all the files that were touched in a commit
git show REVISION:path/to/file
This will show a specific version of a file.
Replace the REVISON with a Git sha.
git show v2.0.0 6ef002d74cbbc099e1063728cab14ef1fc49c783
This will show the v2.0.0 tag and also commit at 6ef002d74cbbc099e1063728cab14ef1fc49c783git show commitA...commitD
This will output all commits in the range from commitA to commit D
Summary
git-show is a very versatile command for examining objects in a Git repo.
It can be used to target specific files at specific revisions.
Examining a commit range with git-show will output all the individual commits between the range.
git-show can be a helpful tool for creating patch notes and tracking changes in a repository.
Learn Git with Bitbucket Cloud
Objective
Learn the basics of Git with this space themed tutorial.
Mission Brief
Your mission is to learn the ropes of Git by completing the tutorial and tracking down all your team's space stations.
Commands covered in this tutorial:
git clone, git config, git add, git status, git commit, git push, git pull, git branch, git checkout, and git merge
As our new Bitbucket space station administrator, you need to be organized.
When you make files for your space station, you’ll want to keep them in one place and shareable with teammates, no matter where they are in the universe.
With Bitbucket, that means adding everything to a repository.
Let’s create one!
Some fun facts about repositories
You have access to all files in your local repository, whether you are working on one file or multiple files.
You can view public repositories without a Bitbucket account if you have the URL for that repository.
Each repository belongs to a user account or a team.
In the case of a user account, that user owns the repository.
+ In the case of a team, that team owns it.
The repository owner is the only person who can delete the repository.
If the repository belongs to a team, an admin can delete the repository.
A code project can consist of multiple repositories across multiple accounts but can also be a single repository from a single account.
Each repository has a 2 GB size limit, but we recommend keeping your repository no larger than 1 GB.
Step 1. Create the repository
Initially, the repository you create in Bitbucket is going to be empty without any code in it.
That's okay because you will start adding some files to it soon.
This Bitbucket repository will be the central repository for your files, which means that others can access that repository if you give them permission.
After creating a repository, you'll copy a version to your local system—that way you can update it from one repo, then transfer those changes to the other.
Do the following to create your repository:
From Bitbucket, click the + icon in the global sidebar and select Repository.
Bitbucket displays the Create a new repository page.
Take some time to review the dialog's contents.
With the exception of the Repository type, everything you enter on this page you can later change.
Enter BitbucketStationLocations for the Name field.
Bitbucket uses this Name in the URL of the repository.
For example, if the user the_best has a repository called awesome_repo, the URL for that repository would be https://bitbucket.org/the_best/awesome_repo.
For Access level, leave the This is a private repository box checked.
A private repository is only visible to you and those you give access to.
If this box is unchecked, everyone can see your repository.
Pick Git for the Repository type.
Keep in mind that you can't change the repository type after you click Create repository.
Click Create repository.
Bitbucket creates your repository and displays its Overview page.
Step 2. Explore your new repository
Take some time to explore the repository you have just created.
You should be on the repository's Overview page:
Click + from the global sidebar for common actions for a repository.
Click items in the navigation sidebar to see what's behind each one, including Settings to update repository details and other settings.
To view the shortcuts available to navigate these items, press the ? key on your keyboard.
When you click the Commits option in the sidebar, you find that you have no commits because you have not created any content for your repository.
Your repository is private and you have not invited anyone to the repository, so the only person who can create or edit the repository's content right now is you, the repository owner.
Copy your Git repository and add files
Now that you have a place to add and share your space station files, you need a way to get to it from your local system.
To set that up, you want to copy the Bitbucket repository to your system.
Git refers to copying a repository as "cloning" it.
When you clone a repository, you create a connection between the Bitbucket server (which Git knows as origin) and your local system.
Step 1. Clone your repository to your local system
Open a browser and a terminal window from your desktop.
After opening the terminal window, do the following:
Navigate to your home (~) directory
$ cd ~
As you use Bitbucket more, you will probably work in multiple repositories.
For that reason, it's a good idea to create a directory to contain all those repositories.
Create a directory to contain your repositories.
$ mkdir repos
From the terminal, update the directory you want to work in to your new repos directory.
$ cd ~/repos
From Bitbucket, go to your BitbucketStationLocations repository.
Click the + icon in the global sidebar and select Clone this repository.
Bitbucket displays a pop-up clone dialog.
By default, the clone dialog sets the protocol to HTTPS or SSH, depending on your settings.
For the purposes of this tutorial, don't change your default protocol.
Copy the highlighted clone command.
From your terminal window, paste the command you copied from Bitbucket and press Return.
Enter your Bitbucket password when the terminal asks for it.
If you created an account by linking to Google, use your password for that account.
If you experience a Windows password error:
In some versions of Microsoft Windows operating system and Git you might see an error similar to the one in the following example.
Windows clone password error example
$ git clone
https://emmap1@bitbucket.org/emmap1/bitbucketstationlocations.git
Cloning into 'bitbucketspacestation'...
fatal: could not read
Password for 'https://emmap1@bitbucket.org': No such file or directory
If you get this error, enter the following at the command line:
$ git config --global core.askpass
Then go back to step 4 and repeat the clone process.
The bash agent should now prompt you for your password.
You should only have to do this once.
At this point, your terminal window should look similar to this:
$ cd ~/repos
$ git clone https://emmap1@bitbucket.org/emmap1/bitbucketstationlocations.git
Cloning into 'bitbucketstationlocations'...
Password
warning: You appear to have cloned an empty repository.
You already knew that your repository was empty right? Remember that you have added no source files to it yet.
List the contents of your repos directory and you should see your bitbucketstationlocations directory in it.
$ ls
Congratulations! You've cloned your repository to your local system.
Step 2. Add a file to your local repository and put it on Bitbucket
With the repository on your local system, it's time to get to work.
You want to start keeping track of all your space station locations.
To do so, let's create a file about all your locations.
Go to your terminal window and navigate to the top level of your local repository.
$ cd ~/repos/bitbucketstationlocations/
Enter the following line into your terminal window to create a new file with content.
$ echo "Earth's Moon" >> locations.txt
If the command line doesn't return anything, it means you created the file correctly!
Get the status of your local repository.
The git status command tells you about how your project is progressing in comparison to your Bitbucket repository.
At this point, Git is aware that you created a new file, and you'll see something like this:
$ git status
On branch main
Initial commit
Untracked files:
(use "git add <file>..." to include in what will be committed)
locations.txt
nothing added to commit but untracked files present (use "git add" to track)
The file is untracked, meaning that Git sees a file not part of a previous commit.
The status output also shows you the next step: adding the file.
Tell Git to track your new locations.txt file using the git add command.
Just like when you created a file, the git add command doesn't return anything when you enter it correctly.
$ git add locations.txt
The git add command moves changes from the working directory to the Git staging area.
The staging area is where you prepare a snapshot of a set of changes before committing them to the official history.
Check the status of the file.
$ git status
On branch main
Initial commit
Changes to be committed:
(use "git rm --cached <file>..." to unstage)
new file: locations.txt
Now you can see the new file has been added (staged) and you can commit it when you are ready.
The git status command displays the state of the working directory and the staged snapshot.
Issue the git commit command with a commit message, as shown on the next line.
The -m indicates that a commit message follows.
$ git commit -m 'Initial commit'
[main (root-commit) fedc3d3] Initial commit
1 file changed, 1 insertion(+)
create mode 100644 locations.txt
The git commit takes the staged snapshot and commits it to the project history.
Combined with git add, this process defines the basic workflow for all Git users.
Up until this point, everything you have done is on your local system and invisible to your Bitbucket repository until you push those changes.
Learn a bit more about Git and remote repositories
Git's ability to communicate with remote repositories (in your case, Bitbucket is the remote repository) is the foundation of every Git-based collaboration workflow.
Git's collaboration model gives every developer their own copy of the repository, complete with its own local history and branch structure.
Users typically need to share a series of commits rather than a single changeset.
Instead of committing a changeset from a working copy to the central repository, Git lets you share entire branches between repositories.
You manage connections with other repositories and publish local history by "pushing" branches to other repositories.
You see what others have contributed by "pulling" branches into your local repository.
Go back to your local terminal window and send your committed changes to Bitbucket using git push origin main.
This command specifies that you are pushing to the main branch (the branch on Bitbucket) on origin (the Bitbucket server).
You should see something similar to the following response:
$ git push origin main
Counting objects: 3, done.
Writing objects: 100% (3/3), 253 bytes | 0 bytes/s, done.
Total 3 (delta 0), reused 0 (delta 0) To https://emmap1@bitbucket.org/emmap1/bitbucketstationlocations.git
* [new branch] main -> main
Branch main set up to track remote branch main from origin.
Your commits are now on the remote repository (origin).
Go to your BitbucketStationLocations repository on Bitbucket.
If you click Commits in the sidebar, you'll see a single commit on your repository.
Bitbucket combines all the things you just did into that commit and shows it to you.
You can see that the Author column shows the value you used when you configured the Git global file ( ~/.gitconfig).
If you click Source in the sidebar, you'll see that you have a single source file in your repository, the locations.txt file you just added.
Remember how the repository looked when you first created it? It probably looks a bit different now.
Pull changes from your Git repository on Bitbucket Cloud
Next on your list of space station administrator activities, you need a file with more details about your locations.
Since you don't have many locations at the moment, you are going to add them right from Bitbucket.
Step 1. Create a file in Bitbucket
To add your new locations file, do the following:
From your BitbucketStationLocations repository, click Source to open the source directory.
Notice you only have one file, locations.txt , in your directory.
A.
Source page: Click the link to open this page.
B.
Branch selection: Pick the branch you want to view.
C.
More options button: Click to open a menu with more options, such as 'Add file'.
D.
Source file area: View the directory of files in Bitbucket.
From the Source page, click the More options button in the top right corner and select Add file from the menu.
The More options button only appears after you have added at least one file to the repository.
A page for creating the new file opens, as shown in the following image.
A.
Branch with new file: Change if you want to add file to a different branch.
B.
New file area: Add content for your new file here.
Enter stationlocations in the filename field.
Select HTML from the Syntax mode list.
Add the following HTML code into the text box:
<p>Bitbucket has the following space stations:</p>
<p>
<b>Earth's Moon</b><br>
Headquarters
</p>
Click Commit.
The Commit message field appears with the message: stationlocations created online with Bitbucket.
Click Commit under the message field.
You now have a new file in Bitbucket! You are taken to a page with details of the commit, where you can see the change you just made:
If you want to see a list of the commits you've made so far, click Commits in the sidebar.
Step 2. Pull changes from a remote repository
Now we need to get that new file into your local repository.
The process is pretty straight forward, basically just the reverse of the push you used to get the locations.txt file into Bitbucket.
To pull the file into your local repository, do the following:
Open your terminal window and navigate to the top level of your local repository.
$ cd ~/repos/bitbucketstationlocations/
Enter the git pull --all command to pull all the changes from Bitbucket.
(In more complex branching workflows, pulling and merging all changes might not be appropriate .) Enter your Bitbucket password when asked for it.
Your terminal should look similar to the following
$ git pull --all
Fetching origin
remote: Counting objects: 3, done.
remote: Compressing objects: 100% (3/3), done.
remote: Total 3 (delta 0), reused 0 (delta 0)
Unpacking objects: 100% (3/3), done.
From https://bitbucket.org/emmap1/bitbucketstationlocations
fe5a280..fcbeeb0 main -> origin/main
Updating fe5a280..fcbeeb0
Fast-forward
stationlocations | 5 ++++++++++++++
1 file changed, 5 insertions(+)
create mode 100644 stationlocations
The git pull command merges the file from your remote repository (Bitbucket) into your local repository with a single command.
Navigate to your repository folder on your local system and you'll see the file you just added.
Fantastic! With the addition of the two files about your space station location, you have performed the basic Git workflow (clone, add, commit, push, and pull) between Bitbucket and your local system.
Use a Git branch to merge a file
Being a space station administrator comes with certain responsibilities.
Sometimes you’ll need to keep information locked down, especially when mapping out new locations in the solar system.
Learning branches will allow you to update your files and only share the information when you're ready.
Branches are most powerful when you're working on a team.
You can work on your own part of a project from your own branch, pull updates from Bitbucket, and then merge all your work into the main branch when it's ready.
Our documentation includes more explanation of why you would want to use branches.
A branch represents an independent line of development for your repository.
Think of it as a brand-new working directory, staging area, and project history.
Before you create any new branches, you automatically start out with the main branch.
For a visual example, this diagram shows the main branch and the other branch with a bug fix update.
Step 1. Create a branch and make a change
Create a branch where you can add future plans for the space station that you aren't ready to commit.
When you are ready to make those plans known to all, you can merge the changes into your Bitbucket repository and then delete the no-longer-needed branch.
It's important to understand that branches are just pointers to commits.
When you create a branch, all Git needs to do is create a new pointer—it doesn’t create a whole new set of files or folders.
Before you begin, your repository looks like this:
To create a branch, do the following:
Go to your terminal window and navigate to the top level of your local repository using the following command:
cd ~/repos/bitbucketstationlocations/
Create a branch from your terminal window.
$ git branch future-plans
This command creates a branch but does not switch you to that branch, so your repository looks something like this:
The repository history remains unchanged.
All you get is a new pointer to the current branch.
To begin working on the new branch, you have to check out the branch you want to use.
Checkout the new branch you just created to start using it.
$ git checkout future-plans
Switched to branch 'future-plans'
The git checkout command works hand-in-hand with git branch .
Because you are creating a branch to work on something new, every time you create a new branch (with git branch), you want to make sure to check it out (with git checkout) if you're going to use it.
Now that you’ve checked out the new branch, your Git workflow looks something like this:
Search for the bitbucketstationlocations folder on your local system and open it.
You will notice there are no extra files or folders in the directory as a result of the new branch.
Open the stationlocations file using a text editor.
Make a change to the file by adding another station location:
<p>Bitbucket has the following space stations:</p>
<p>
<b>Earth's Moon</b><br>
Headquarters
</p>
<p>
<b>Mars</b><br>
Recreation Department
</p>
Save and close the file.
Enter git status in the terminal window.
You will see something like this:
$ git status
On branch future-plans
Changes not staged for commit:
(use "git add <file>..." to update what will be committed)
(use "git checkout -- <file>..." to discard changes in working directory)
modified: stationlocations
no changes added to commit (use "git add" and/or "git commit -a")
Notice the On branch future-plans line? If you entered git status previously, the line was on branch main because you only had the one main branch.
Before you stage or commit a change, always check this line to make sure the branch where you want to add the change is checked out.
Stage your file.
$ git add stationlocations
Enter the git commit command in the terminal window, as shown with the following:
$ git commit stationlocations -m 'making a change in a branch'
[future-plans e3b7732] making a change in a branch
1 file changed, 4 insertions(+)
With this recent commit, your repository looks something like this:
Now it's time to merge the change that you just made back into the main branch.
Step 2. Merge your branch: fast-forward merging
Your space station is growing, and it's time for the opening ceremony of your Mars location.
Now that your future plans are becoming a reality, you can merge your future-plans branch into the main branch on your local system.
Because you created only one branch and made one change, use the fast-forward branch method to merge.
You can do a fast-forward merge because you have a linear path from the current branch tip to the target branch.
Instead of “actually” merging the branches, all Git has to do to integrate the histories is move (i.e., “fast-forward”) the current branch tip up to the target branch tip.
This effectively combines the histories, since all of the commits reachable from the target branch are now available through the current one.
This branch workflow is common for short-lived topic branches with smaller changes and are not as common for longer-running features.
To complete a fast-forward merge do the following:
Go to your terminal window and navigate to the top level of your local repository.
$ cd ~/repos/bitbucketstationlocations/
Enter the git status command to be sure you have all your changes committed and find out what branch you have checked out.
$ git status
On branch future-plans
nothing to commit, working directory clean
Switch to the main branch.
$ git checkout main
Switched to branch 'main'
Your branch is up-to-date with 'origin/main'.
Merge changes from the future-plans branch into the main branch.
It will look something like this:
$ git merge future-plans
Updating fcbeeb0..e3b7732
Fast-forward
stationlocations | 4 ++++
1 file changed, 4 insertions(+)
You've essentially moved the pointer for the main branch forward to the current head and your repository looks something like the fast forward merge above.
Because you don't plan on using future-plans anymore, you can delete the branch.
$ git branch -d future-plans
Deleted branch future-plans (was e3b7732).
When you delete future-plans, you can still access the branch from main using a commit id.
For example, if you want to undo the changes added from future-plans, use the commit id you just received to go back to that branch.
Enter git status to see the results of your merge, which show that your local repository is one ahead of your remote repository.
It will look something like this:
$ git status
On branch main
Your branch is ahead of 'origin/main' by 1 commit.
(use "git push" to publish your local commits)
nothing to commit, working directory clean
Here's what you've done so far:
Created a branch and checked it out
Made a change in the new branch
Committed the change to the new branch
Integrated that change back into the main branch
Deleted the branch you are no longer using.
Next, we need to push all this work back up to Bitbucket, your remote repository.
Step 3. Push your change to Bitbucket
You want to make it possible for everyone else to see the location of the new space station.
To do so, you can push the current state of your local repository to Bitbucket.
This diagram shows what happens when your local repository has changes that the central repository does not have and you push those changes to Bitbucket.
Here's how to push your change to the remote repository:
From the repository directory in your terminal window, enter git push origin main to push the changes.
It will result in something like this:
$ git push origin main
Counting objects: 3, done.
Delta compression using up to 8 threads.
Compressing objects: 100% (3/3), done.
Writing objects: 100% (3/3), 401 bytes | 0 bytes/s, done.
Total 3 (delta 0), reused 0 (delta 0)
To https://emmap1@bitbucket.org/emmap1/bitbucketstationlocations.git
fcbeeb0..e3b7732 main -> main
Click the Overview page of your Bitbucket repository, and notice you can see your push in the Recent Activity stream.
Click Commits and you can see the commit you made on your local system.
Notice that the change keeps the same commit id as it had on your local system.
You can also see that the line to the left of the commits list has a straight-forward path and shows no branches.
That’s because the future-plans branch never interacted with the remote repository, only the change we created and committed.
Click Branches and notice that the page has no record of the branch either.
Click Source, and then click the stationlocations file.
You can see the last change to the file has the commit id you just pushed.
Click the file history list to see the changes committed for this file, which will look similar to the following figure.
You are done!
Not sure you will be able to remember all the Git commands you just learned? No problem.
Bookmark our basic Git commands page so that you can refer to it when needed.
Learn about code review in Bitbucket Cloud
Objective
Create a repository and add someone as a reviewer to your pull request to start collaborating on your code.
Disclaimer: The following section of this tutorial outlines the steps of adding a reviewer (or team member) to your pull request, so you can collaborate on your code in Bitbucket Cloud.
If you are not working with a teammate or do not need to add reviewers at this time, feel free to move onto the next tutorial: Learn branching in Bitbucket Cloud.
Mission Brief
So far, you’ve been the only person working in your repositories and on your code.
What if you wanted to have someone review your code and provide feedback? By adding a reviewer to your pull request, you can do just that, whether you’re in the same room or across the universe.
Time
Audience
Prerequisites
15 minutes
You have some experience using Bitbucket Cloud.
If not, try out one of our beginner tutorials.
About branches and pull requests
When you work on a team with multiple Bitbucket users, you'll want to work on your own set of code separately from the main codebase.
Branches allow you to do just that.
A branch represents an independent line of development for your repository.
Think of it as a brand-new working directory, staging area, and project history.
After you create a branch, you work on and commit code to that branch, pull updates from Bitbucket to keep your branch up-to-date, and then push all your work to Bitbucket.
Once you've got code changes on a branch in Bitbucket, you can create a pull request, which is where code review takes place.
Your teammates will comment on your code with feedback and questions and eventually (hopefully) approve the pull request.
When you have enough approvals, merge the pull request to merge your branch into the main code.
Create a repository
You just arrived at the Bitbucket space station and it's time to go through the orientation process, part of which involves making updates to your welcome package and getting them approved.
Click + in the global sidebar and select Repository under Create.
Make sure the team you created is the repository Owner.
Enter anything you want for the Project name and Repository name.
If you can't think of anything, how about Welcome package and First impressions, respectively.
From Include a README?, select either of the Yes options.
From Version control system, pick an option for the type of repository you want to create.
If you're not sure, keep as is.
Click Create repository and you'll land on the Source view of your brand, new repository.
From Source, select > Add file.
Name the file survey.html, then copy this code and paste it into the main text area.
\<\!DOCTYPE html>
<html>
<head>
<meta http-equiv="Content-Type" content="text/html; charset=utf-8">
<style media="screen" type="text/css">
body {
margin: auto;
width: 700px;
color: #FFFFFF;
font-family: Arial, sans-serif;
background-color: #172B4D;
}
body>h1 {
margin: 50px;
font-size: 50px;
text-align: center;
color: #0052CC;
}
</style>
</head>
<body>
<h2>Team up in space</h2>
<p>
Welcome to the team! You've made it this far so we know that you've got the potential to do great things.
Because you're going to be collaborating with other awesome people, anything you add needs to be code reviewed and approved.
That's just how a team works! You should have already created a branch and checked it out locally.
If you haven't, go back to the tutorial and do that now.
We'll be here.
</p>
<p>
Because you're on your own branch, you can go crazy.
Spice up this file any way you like.
Add more files to this repository if you see fit.
If want to take it slow and are just here to learn about pull requests, you can use this opportunity to fill out our short questionaire.
</p>
<br>
<p>
<b>Question 1</b>: Have you used pull requests before?
</p>
<p>
<b>Answer 1</b>: **** Your answer here **** </p>
<p>
<b>Question 2</b>: Why do you want to learn about code review?
</p>
<p>
<b>Answer 2</b>: **** Your answer here **** </p>
<p>
<b>Question 3</b>: Who do you plan to work with on Bitbucket? </p>
<p>
<b>Answer 3</b>: **** Your answer here **** </p>
</body>
</html>
Click Commit and then Commit again from the dialog.
Your repository is looking pretty good now.
Take a look around if you feel like it.
Clone and make a change on a new branch
When you know that you will be adding reviewers to review and approve your code prior to merging, you’d most likely already have the repository cloned before creating a branch.
So that’s what we’re going to do first before you set up your own branch.
If you're using command line
Step 1. Clone your repository to your local system
Let's get it onto your local system so that you can really start working on it.
From the repository, click the Clone button in the top right.
Bitbucket displays the Clone this repository dialog.
By default, the clone dialog sets the protocol to HTTPS or SSH, depending on your settings.
As a result, you don't need to change your default protocol.
Copy the clone command.
From a terminal window, change into the local directory where you want to clone your repository.
$ cd ~/<path_to_directory>
Paste the command you copied from Bitbucket, for example:
$ git clone https://breezy@bitbucket.org/powerstars/first-impressions.git
Cloning into 'first-impressions'...
Password for 'https://breezycloud@bitbucket.org':
remote: Counting objects: 6, done.
remote: Compressing objects: 100% (5/5), done.
remote: Total 6 (delta 1), reused 0 (delta 0)
Unpacking objects: 100% (6/6), done.
For more details, check out our cloning video to see how it's done:
Step 2. Create a branch and pull in locally
Now that your repository is all set up, next comes the fun part.
You can create branches locally or through Bitbucket.
Let's create one from Bitbucket for the purposes of this tutorial.
Click Branches from the left navigation.
You'll see that you already have one branch — your primary branch, main.
Click Create a branch in the top right corner.
After you create a branch, you need to check it out on your local system.
Bitbucket provides you with a fetch and checkout command that you can copy and paste into your command line, similar to the following:
$ git fetch && git checkout my-updates
Password for 'https://breezycloud@bitbucket.org':
From https://bitbucket.org/planetbreezycloud/first-impressions
* [new branch] my-updates -> origin/my-updates
Branch 'my-updates' set up to track remote branch 'my-updates' from 'origin'.
Switched to a new branch 'my-updates'
As you can see, you've switched to your new branch locally, allowing you to work on and push that separate line of code.
Step 3. Make a change to the branch
Now, it's your turn to makes some changes to your repository.
Like the file mentions, you can go as crazy or as simple as you like.
Change up the CSS.
Add more files.
Compose a space opera.
Or simply answer the questions.
Open the survey.html file (or whatever you named it) with a text editor.
Make your changes, big or small, and then save and close the file.
From your terminal window, you should still be in the repository directory unless you've changed something.
Display the status of the repository with git status.
You should see the survey.html file you modified.
If you added or modified other files, you'll see those as well.
$ git status
On branch my-updates
Your branch is up-to-date with 'origin/my-updates'.
Changes not staged for commit:
(use "git add <file>..." to update what will be committed)
(use "git checkout -- <file>..." to discard changes in working directory)
modified: survey.html
no changes added to commit (use "git add" and/or "git commit -a")
Add your changes locally with git add :
$ git add survey.html
Commit your changes locally with git commit -m "your commit message":
$ git commit -m "Answered questions"
[my-updates 7506040] Answered questions
1 file changed, 3 insertions(+), 3 deletions(-)
Enter git push origin to push the changes to your branch on Bitbucket, and enter your password to finish pushing changes.
$ git push origin my-updates
Password for 'https://breezycloud@bitbucket.org':
Counting objects: 3, done.
Delta compression using up to 8 threads.
Compressing objects: 100% (3/3), done.
Writing objects: 100% (3/3), 350 bytes | 350.00 KiB/s, done.
Total 3 (delta 1), reused 0 (delta 0)
To https://bitbucket.org/planetbreezycloud/first-impressions.git
454ccaf..7506040 my-updates -> my-updates
Branch main set up to track remote branch main from origin.
From Bitbucket, click the Source page of your repository.
You should see both branches in the dropdown.
Any other commits you make to my-updates will also appear on that branch.
If you're using Sourcetree
Step 1. Clone your repository to your local system
Let's get it onto your local system so that you can really start working on it.
From the repository, click + in the global sidebar and select Clone this repository under Get to work.
Click the Clone in Sourcetree button.
From the Clone New window, update the Destination Path to/first-impressions/.
Click the Clone button.
To see how it's done, check out the Clone a repository part of our video here:
Step 2. Create a branch and pull in locally
Now that your repository is all set up, next comes the fun part.
Because branches aren't only a Bitbucket concept, you can create one locally.
However, we're going to create one from Bitbucket for the purposes of this tutorial.
Click Branches from the left navigation.
You'll see that you already have one branch — your main branch.
Click Create a branch in the top right corner.
Enter a Branch name and click Create.
If you aren't sure what to name your branch, go with something like my-updates.
After you create a branch, you need to check it out from your local system.
To do so, click the Check out in Sourcetree button.
From the Checkout Existing dialog in Sourcetree, click Checkout.
Now you've got a branch in Bitbucket and it's checked out to your local system, allowing you to work on and push that separate line of code.
Step 3. Make a change to the branch
Now, it's your turn to makes some changes to your repository.
Like the file mentions, you can go as crazy or as simple as you like.
Change up the CSS.
Add more files.
Compose a space opera.
Or simply answer the questions.
From the repository in Sourcetree, click the Show in Finder button.
Open the survey.html file (or whatever you named it) with a text editor.
Make your changes, big or small, and then save and close the file.
Open Sourcetree and notice that your repository has Uncommitted changes.
(Git only) Add the file to the staging area:
Select the Uncommitted changes line.
From the Unstaged files list, place a checkmark next to the survey.html file (and any other files with uncommitted changes).
From the Confirm Stage? dialog, click OK.
Click the Commit button at the top to commit the file.
Enter a commit message in the space provided, something like Answered questions.
Click the Commit button under the message box.
When you switch back to the view, you see that the file has been committed but not pushed to the Bitbucket repository.
From Sourcetree, click the Push button to push your committed changes.
From the dialog that appears, click OK to push your branch with the commit to Bitbucket.
From Bitbucket, click the Source page of your repository.
You should see both branches in the dropdown.
Any other commits you make to my-updates will also appear on that branch.
Create a pull request to merge your change
To add reviewers to check and approve your code prior to merging, your next step is to create a pull request.
In addition to a place for code review, a pull request shows a comparison of your changes against the original repository (also known as a diff) and provides an easy way to merge code when ready.
Step 1. Create the pull request
You need a branch to create a pull request.
Good thing you already have one.
From your repository, click + in the global sidebar.
Then, click Create a pull request under Get to work.
Bitbucket displays the request form.
Complete the form:
You've already got an automatic Title, your last commit message.
Add a Description if you'd like.
(Optional - adding a reviewer) If you need someone to review and/or approve your code prior to merging, add them in the Reviewers field.
You can see that Breezy Cloud was added as the reviewer to the example pull request below.
In order to add a reviewer to a pull request, you must first grant the user access to your repository by adding them to a group.
For more information and detailed steps, refer to the following: Grant repository access to users and groups.
Note: You can always create the pull request and then add reviewers later.
When you're done, the form will look something like this:
Click Create pull request.
Bitbucket opens the pull request, and if you added a reviewer, they will receive an email notification with details about the pull request for them to review.
Step 2. Merge your pull request
Not so fast! You may have noticed the Merge button at the top.
Before you click it, you need to wait for an approval of your changes.
In addition to the email notification your teammates receive, they'll also see the pull request appear under Pull requests to review on the Your work dashboard.
From the pull request, the reviewer can view the diff and add comments to start a discussion before clicking the Approve button.
When someone approves your pull request, you'll get an email notification.
Once you've got the approvals you need (in this case just one!), you can merge.
From the pull request, click Merge.
And that's it! If you want to see what it looks like when your branch merges with the main branch, click Commits to see the commit tree.
Learn Branching with Bitbucket Cloud
Objective
This tutorial will teach you the basics of creating, working in, reviewing, and merging branches using Git and Bitbucket Cloud.
This tutorial is for you if you already understand the basic Git workflow including how to:
Clone: copying the remote repository in Bitbucket Cloud to your local system
Add or stage: taking changes you have made and get them ready to add to your git history
Commit: add new or changed files to the git history for the repository
Pull: get new changes others have added to the repository into your local repository
Push: get changes from your local system onto the remote repository
If you don't know the Git basics, don't worry just check out our Learn Git with Bitbucket Cloud tutorial and you'll be up to speed in no time.
Why branching matters
Branching is one of the best ways to get the most out of Git for version control.
Branching in Git allows you to:
Have several teams working from a single repository concurrently.
Have team members anywhere in the world using Bitbucket Cloud to collaborate.
Have multiple lines of development running at the same time independent of each other without needing code freezes.
Get set up
Since we want you to feel like you're working on a team, in a common Bitbucket repository, we will have you fork a public repository we have supplied.
What is a fork?Fork is another way of saving a clone or copy.
The term fork (in programming) derives from a Unix system call that creates a copy of an existing process.
So, unlike a branch, a fork is independent from the original repository.
If the original repository is deleted, the fork remains.
If you fork a repository, you get that repository and all of its branches.
Go to tutorials/tutorials.git.bitbucket.org
Click + > Fork this repository on the left side of the screen.
Modify the Name so it is unique to your team, then click Fork repository.
Create a directory for the repository which will be easy to navigate to.
You might choose something like this: $ mkdir test-repositories $ cd test-repositories/ $ test-repositories
The preceding example creates the test-repositories directory using the mkdir (make directory) command and switches to that directory using the cd (change directory) command.
Clone the forked repository into the directory you just created.
It might look something like this: $ git clone https://dstevenstest@bitbucket.org/dstevenstest/mygittutorial.bitbucket.io.git Cloning into 'mygittutorial.bitbucket.io'...
remote: Counting objects: 12392, done.
remote: Compressing objects: 100% (12030/12030), done.
remote: Total 12392 (delta 8044), reused 564 (delta 360) Receiving objects: 100% (12392/12392), 2.72 MiB | 701.00 KiB/s, done.
Resolving deltas: 100% (8044/8044), done.
$ cd mygittutorial.bitbucket.io/
Which clones the repository using the git clone command and creates the directory the clone created mygittutorial.git.bitbucket.io.
Create a branch and change something using the branching workflow
You're going to add a quote on your website in this branch.
Create a branch using the git branch command.
$ git branch test-1
Check out the branch you just created using the git checkout command.
$ git checkout test-1 Switched to branch 'test-1'
List the branches you have locally using the git branch command.
$ git branch main * test-1
Make an update to the editme.html file by adding a quote.
You can use something like the following:
This is a quote, and I like it.
A quote: The Art of Quoting
Add that change.
git add editme.html
Note: your change isn't committed to the Git history yet it's in a "waiting" state.
We learned about this in Saving changes.
Commit the change with a descriptive commit message.
git commit editme.html -m'added a new quote' [test-1 063b772] added a new quote 1 file changed, 3 insertions(+), 3 deletions(-)
Note: now the changes is part of the Git history as a single "commit" We learned about this in Saving changes.
Push that change to Bitbucket using the git push command.
git push fatal: The current branch test-1 has no upstream branch.
To push the current branch and set the remote as upstream, use git push --set-upstream origin test-1
You will see an error because the first time you push a new branch you created locally you have to designate that branch.
Push the branch and change using the git push branch command.
$ git push origin test-1 Counting objects: 3, done.
Delta compression using up to 8 threads.
Compressing objects: 100% (3/3), done.
Writing objects: 100% (3/3), 363 bytes | 0 bytes/s, done.
Total 3 (delta 2), reused 0 (delta 0) remote: remote: Create pull request for test-1: remote: https://bitbucket.org/dstevenstest/dans.git.bitbucket.org/pull-requests/new?source=test-1&t=1 remote: To https://bitbucket.org/dstevenstest/dans.git.bitbucket.org.git * [new branch] test-1 -> test-1
This tells the system that the origin repository is the destination of this new branch.
Open your tutorial repository and click Branches.
You should now see both the main and the test-1 branches.
It should look something like this:
Create, fetch, and checkout a remote branch
When you're working in a team you'll likely have to pull or fetch branches which other team members create and push to Bitbucket.
This example will give you some of the basics of creating and working with branches others create.
Go to your tutorial repository in Bitbucket and click Branches.
You should see something like this:
Click Create branch, name the branch test-2, and click Create.
Copy the git fetch command in the check out your branch dialog.
It will probably look something like this: $ git fetch && git checkout test-2 From https://bitbucket.org/dstevenstest/dans.git.bitbucket.org * [new branch] test-2 -> origin/test-2 Branch test-2 set up to track remote branch test-2 from origin.
Switched to a new branch 'test-2'
Use the git branch command in your terminal.
You should see a list of branches something like this: $ git branch main test-1 * test-2
The branch with the asterisk * is the active branch.
This is critical to remember when you are working in any branching workflow.
Use the git status command and you'll see something like this: $ git status On branch test-2 Your branch is up-to-date with 'origin/test-2'.
nothing to commit, working tree clean
You can see what branch you're on and that the branch is currently up to date with your remote (origin) branch.
Use the git checkout command to change the focus back to your other branch.
The command will look something like this: $ git checkout test-1 Switched to branch 'test-1' Your branch is ahead of 'origin/test-1' by 3 commits.
(use "git push" to publish your local commits)
One of the most important things to remember when working in branches is that you want to be sure the branch you're making changes to is the correct branch.
Push change and create a pull request
Now it's time to get your first change reviewed and merge the branch.
Click +> Create a pull request.
You can see your test-1 branch as the source branch and main in the destination branch.
Because we created this repository by forking an existing repository the destination is set to the main branch of the repository we forked.
To correct this you will need to change the repository destination branch (the branch into which you will merge your changes) from tutorials/tutorials.git.bitbucket.org to your repository.
You would also add reviewers on your team to the pull request.
Learn more about pull requests
Click Create pull request.
Make a comment in the pull request by selecting a line in the diff (the area displaying the change you made to the editme.html file).
Click Approve in the top left of the page.
Of course in a real pull request you'd have reviewers making comments
Click Merge.
(Optional) Update the Commit message with more details.
Select the Merge commit Merge strategy from the two options:
Merge commit—Keeps all commits from your source branch and makes them part of the destination branch.
This option is the same as entering git merge --no-ff in the command line.
Squash—Combines your commits when you merge the source branch into the destination branch.
This option is the same as entering git merge --squash in the command line.
Learn more for details on these two types of merge strategies.
Click Commits and you will see how the branch you just merged fits into the larger scheme of changes.
Delete a branch and pull main into local working branch
Now you've gone through the basic branching workflow and your change is in main.
The last thing we'll learn is how to delete the branch you just merged, pull the updated main branch, and merge the updated main branch into your test-2 branch.
Why delete the branch?
Remember, branching in Git differs from SVN or similar version control systems by using a branches as both long running branches, like a main and development branch, and short term development branches like the examples we use in this tutorial.
Because this is the case it's not a bad idea to delete local branches to keep your local environment cleaner.
Why pull main and merge it into test-2?
We're using this as an example of you working on a repository into which another team member is working.
It's a good idea to pull changes into your working branch from time to time to prevent merge conflicts in pull requests.
Open your terminal and run the git status command the result should look something like this: $ git status On branch test-1 nothing to commit, working tree clean
You can see you're on the branch you just used to make your change and that you don't have any changes.
We're ready to get rid of that branch now that we've finished that work.
Switch to the main branch by running the git checkout main command.
The result should look something like this: git checkout main Switched to branch 'main' Your branch is up-to-date with 'origin/main'.
Notice that the message says you are up-to-date? This is only your local branch.
We know this because we just merged a change into main and haven't pulled that change from the remote repository to our local system.
That's what we'll do next.
Run the git pull command.
The result should look something like this: $ git pull remote: Counting objects: 1, done.
remote: Total 1 (delta 0), reused 0 (delta 0) Unpacking objects: 100% (1/1), done.
From https://bitbucket.org/dstevenstest/dans.git.bitbucket.org 2d4c0ab..dd424cb main -> origin/main Updating 2d4c0ab..dd424cb Fast-forward editme.html | 6 +++--- 1 file changed, 3 insertions(+), 3 deletions(-)
What happened is that when you pull the changes from the remote repository git runs a fast-forward merge to integrate the changes you made.
It also lists how many files and lines in that file changed.
Run the git branch -d {branch_name} command to remove the test-1 branch.
The result will look something like this: $ git branch -d test-1 Deleted branch test-1 (was 063b772)
You can see that it deleted the branch and what the last commit hash was for that branch.
This is the safe way to delete a branch because git won't allow you to delete the branch if it has uncommitted changes.
You should be aware however that this won't prevent deleting changes which are committed to the git history but not merged into another branch.
Switch to the test-2 branch using the git checkout command.
$ git checkout test-2 Switched to branch 'test-2' Your branch is up-to-date with 'origin/test-2'.
Merge the main branch into your working branch using the git merge main test-2 command.
The result will look something like this: $ git merge main test-2 Updating 2d4c0ab..dd424cb Fast-forward editme.html | 6 +++--- 1 file changed, 3 insertions(+), 3 deletions(-)
It's important to remember the following:
The active branch matters.
If you want to merge main into test-2 you want to have test-2 checked out (active).
The same is true if you want to merge test-2 into main you need to have main checked out.
To see what branch is active at any time use git branch and the active branch will have an asterisk or use git status and it will tell you want branch you are on and if there are pending local changes.
We hope you've learned a bit about branching and the commands involved.
Let's review what we just covered:
Review the branching workflow
The Git Feature Branch workflow is an efficient way to get working with your team in Bitbucket.
In this workflow, all feature development takes place on branches separate from the main branch.
As a result, multiple developers can work on their own features without touching the main code.
Start with the main branch
This workflow helps you collaborate on your code with at least one other person.
As long as your Bitbucket and local repos are up-to-date, you're ready to get started.
Create a new-branch
Use a separate branch for each feature or issue you work on.
After creating a branch, check it out locally so that any changes you make will be on that branch.
Update, add, commit, and push changes
Work on the feature and make commits like you would any time you use Git.
When ready, push your commits, updating the feature branch on Bitbucket.
Get your code reviewed
To get feedback on your code, create a pull request in Bitbucket.
From there, you can add reviewers and make sure everything is good to go before merging.
Resolve feedback
Now your teammates comment and approve.
Resolve their comments locally, commit, and push changes to Bitbucket.
Your updates appear in the pull request.
Merge your branch
Before you merge, you may have to resolve merge conflicts if others have made changes to the repo.
When your pull request is approved and conflict-free, you can add your code to the main branch.
Merge from the pull request in Bitbucket.
This tutorial is limited in it's ability to show how branches make teams more effective.
There are several approaches to branching and we discuss some of these approaches in: Comparing workflows.
Learn how to undo changes in Git using Bitbucket Cloud
Objective
Learn how to undo changes on your local machine and a Bitbucket Cloud repository while collaborating with others.
Mission Brief
Commands covered in this tutorial: git revert, git reset, git log, and git status
Time
Audience
Prerequisites
40 minutes
This tutorial assumes familiarity with the following git commands:
git clone, git commit, git pull, and git push
Everyone makes mistakes.
Not every push is perfect so this tutorial will help you use the most common git functions to undo a change or changes safely.
This tutorial assumes familiarity with the following git commands:
git clonegit commitgit pullgit push
If you don't know those commands we can help you Learn git with Bitbucket Cloud.
Then come back here and learn how to undo changes.
These git commands are applicable to a windows or unix environment.
This tutorial will utilize unix command line utilities when instructing file system navigation.
Undoing changes on your local machine
When the change you want to undo is on your local system and hasn't been pushed to a remote repository there are two primary ways to undo your change:
Command
Definition
git revert
An 'undo' command, though not a traditional undo operation.
Instead of removing the commit, it figures out how to invert the changes in the commit, then appends a new commit with the inverse content.
This prevents Git from losing history, which is important for the integrity of your revision history and for reliable collaboration.
git reset
A versatile git command undoing changes.
The git reset command has a powerful set of options but we'll just be using the following reset modes for this tutorial:
--soft: Only resets the HEAD to the commit you select.
Works basically the same as git checkout but does not create a detached head state.
--mixed: Resets the HEAD to the commit you select in both the history and undoes the changes in the index.
--hard: Resets the HEAD to the commit you select in both the history, undoes the changes in the index, and undoes the changes in your working directory.
We won't be testing a hard reset for this tutorial.
For a complete description of how git reset works see git-scm.com's Git Tools - Reset Demystified.
As you progress through the tutorial you'll learn several other git commands as part of learning how to undo changes, so let's get started.
Fork a repository
Let's begin by creating a unique repository with all the code from the original.
This process is called “forking a repository”.
Forking is an extended git process that is enabled when a shared repository is hosted with a 3rd party hosting service like Bitbucket.
Click or enter the following URL: https://bitbucket.org/atlassian/tutorial-documentation-tests/commits/all
Click the + symbol on the left sidebar, then select Fork this repository, review the dialog and click Fork repository.
You should be taken to the overview of the new repository.
Click the + symbol and select Clone this repository.
On your computer clone the repository.
Navigate to the directory containing the cloned repository.
Now that you've got a repository full of code and an existing history on your local system you're ready to begin undoing some changes.
Find changes on your local system
You'll have to be able to find and reference the change you want to undo.
This can be accomplished by browsing the commit UI on Bitbucket and there are a few command line utilities that can locate a specific change.
git status
Git status returns the state of your working directory (the location of the repository on your local system) and the staging area (where you prepare a set of changes to add to the project history) and will show any files which have changes and if those changes have been added to the staging area.
Let us now execute git status and examine the current state of the repository.
$ git status
On branch main
Your branch is up-to-date with 'origin/main'.
nothing to commit, working tree clean
The output of git status here shows us that everything is up-to-date with the remote main branch and there are no pending changes are waiting to be committed.
In the next example we will make some edits to the repository and examine it in a pending changes state.
This means you have changes to files in the repository on your local system that you haven't prepared (or staged) to be added to the project history.
To demonstrate this next example, first open the myquote2.html file.
Make some modifications to the contents of myquote2.html, save and exit the file.
Let us once again execute git status to examine the repository in this state.
$ git status
On branch main
Your branch is up-to-date with 'origin/main'.
Changes not staged for commit:
(use "git add <file>..." to update what will be committed)
(use "git checkout -- <file>..." to discard changes in working directory)
Modified: myquote2.html
no changes added to commit (use "git add" and/or "git commit -a")
--
The output here shows that the repository has pending modifications to myquote2.html.
Good news! If the change you want to undo has, like the example above, not been added to the staging area yet you can just edit the file and keep going.
Git only starts tracking a change when you add it to the staging area and then commit it to the project history.
Let us now “undo” the changes we have made to myquote2.html.
Because this is a simplified example with minimal changes, we have two available methods for undoing the changes.
If we execute git checkout myquote2.html The repository will restore myquote2.html to the previously committed version.
Alternatively, we can execute git reset --hard which will revert the whole repository to the last commit.
git log
The git log command lets you list the project history, filter it, and search for specific changes.
While git status lets you inspect the working directory and the staging area, git log only shows the committed history.
The same log of commited history can be found within the Bitbucket UI by accessing the “commits” view of a repository.
The commits view for our demo repository can be found at: https://bitbucket.org/dans9190/tutorial-documentation-tests/commits/all.
This view will have similar output to the git log command line utility.
It can be used to find and identify a commit to undo.
In the following example you can see several things in the history but each change is, at it's root, a commit so that's what we'll need to find and undo.
$ git status
On branch main
Your branch is up-to-date with 'origin/main'.
nothing to commit, working tree clean
$ git log
commit 1f08a70e28d84d5034a8076db9103f22ec2e982c
Author: Daniel Stevens <dstevens@atlassian.com>
Date: Wed Feb 7 17:06:50 2018 +0000
Initial Bitbucket Pipelines configuration
commit 52f823ca251a132225dd1cc18ad768de8d336e84
Author: Daniel Stevens <dstevens@atlassian.com>
Date: Fri Sep 30 15:50:58 2016 -0700
repeated quote to show how a change moves through the process
commit 4801b87c2147dce83f1bf31acfcffa6cb1d7e0a5
Merge: 1a6a403 3b29606
Author: Dan Stevens [Atlassian] <dstevens@atlassian.com>
Date: Fri Jul 29 18:45:34 2016 +0000
Merged in changes (pull request #6)
Changes
Let's look a little closer at one of the commits in the list:
commit 52f823ca251a132225dd1cc18ad768de8d336e84
Author: Daniel Stevens <dstevens@atlassian.com>
Date: Fri Sep 30 15:50:58 2016 -0700
repeated quote to show how a change moves through the process
What you can see is each commit message has four elements:
Element
Description
Commit hash
An alphanumeric string (SHA-1 encoded) that identifies this specific change
Author
The person who committed the change
Date
The date the change was committed to the project
Commit message
A text string that describes the change(s).
Best practice tip: write short descriptive commit messages and you'll help create a more harmonious working repository for everyone.
Locate a specific commit
Most likely the change you want to undo will be somewhere further back in the project history which can be quite extensive.
So let's learn a couple basic operations using git log to find a specific change.
Go to your terminal window and navigate to the top level of your local repository using the cd (change directory) command.
$ cd ~/repos/tutorial-documentation-tests/
Enter the git log --oneline command.
Adding --oneline will display each commit on a single line that allows you to see more history in your terminal.
Press the q key to exit the commit log and return to your command prompt at any time.
You should see something like the following example:
$ git log --oneline
1f08a70 (HEAD -> main, origin/main, origin/HEAD) Initial Bitbucket Pipelines configuration
52f823c repeated quote to show how a change moves through the process
4801b87 Merged in changes (pull request #6)
1a6a403 myquote edited online with Bitbucket
3b29606 (origin/changes) myquote2.html edited online with Bitbucket
8b236d9 myquote edited online with Bitbucket
235b9a7 testing prs
c5826da more changes
...
Press the q key to return to your command prompt.
Locate the commit with the hash c5826da and more changes in the list the git log command produced.
Someone didn't write a descriptive commit message so we'll have to figure out if that's got the changes we need.
Highlight and copy the commit hash c5826da from the git log result in your terminal window.
Type git show then paste or transcribe the commit hash you copied and press enter.
You should see something like this:
$git show c5826daeb6ee3fd89e63ce35fc9f3594fe243605
commit c5826daeb6ee3fd89e63ce35fc9f3594fe243605
Author: Daniel Stevens <dstevens@atlassian.com>
Date: Tue Sep 8 13:50:23 2015 -0700
more changes
diff --git a/README.md b/README.md
index bdaee88..6bb2629 100644
--- a/README.md
+++ b/README.md
@@ -11,12 +11,7 @@ This README would normally document whatever steps are necessary to get your app
### How do I get set up? ###
* Summary of set up
-* Configuration
-* Dependencies
-* Database configuration
-* How to run tests
-* Deployment instructions
-* more stuff and things
:
The prompt at the bottom will continue to fill in until it shows the entire change.
Press q to exit to your command prompt.
Filter the git log to find a specific commit
You can filter and adjust the output of the git log with the following additions:
This filter
Does this
This example command
Would result in
-
Limits the number of commits shown
git log -10
The 10 most recent commits in the history
--after--before
Limits the commits shown to the correlating time frame
You can also use --after "yyyy-mm-dd" --before "yyyy-mm-dd"
git log --after 2017-07-04
All commits after July 4, 2017
--author="name"
Lists all commits whose author matches the name
git log --author="Alana"
All commits made by any author with Alana in the name field
--grep="message string"
Returns any commit with a commit message which matches the string you entered
git log --grep="HOT-"
All commits with HOT- as a text string in their messages
This was a very brief look at the git log command if you like working in the command like you'll probably want to check out the advanced git log tutorial.
Undo a change with git reset
To get started let's just undo the latest commit in the history.
In this case let's say you just enabled Bitbucket's CI/CD solution pipelines but realized the script isn't quite right.
Enter git log --oneline in your terminal window.
Copy the commit hash for the second commit in the log: 52f823c then press q to exit the log.
Enter git reset --soft 52f823c in your terminal window.
The command should run in the background if successful.
That's it, you've undone your first change.
Now let's see the result of this action.
Enter git status in your terminal window and you will see the commit was undone and is now an uncommitted change.
It should look something like this:
$ git status
On branch main
Your branch is behind 'origin/main' by 1 commit, and can be fast-forwarded.
(use "git pull" to update your local branch)
Changes to be committed:
(use "git reset HEAD <file>..." to unstage)
new file: bitbucket-pipelines.yml
Enter git log --oneline in your terminal window.
You should see something like this:
$ git log --oneline
52f823c repeated quote to show how a change moves through the process
4801b87 Merged in changes (pull request #6)
1a6a403 myquote edited online with Bitbucket
3b29606 (origin/changes) myquote2.html edited online with Bitbucket
8b236d9 myquote edited online with Bitbucket
235b9a7 testing prs
c5826da more changes
43a87f4 remivng
d5c4c62 a few small changes
23a7476 Merged in new-feature2 (pull request #3)
5cc4e1e add a commit message
cbbb5d6 trying a thing
438f956 adding section for permissions and cleaning up some formatting
23251c1 updated snipptes.xml organization into resources.
other files misc changes
3f630f8 Adding file to track changes
...
You can see the new HEAD of the branch is commit 52f823c which is exactly what you wanted.
Press q to exit the log.
Leave your terminal open because now that you've learned how to do a simple reset, let's try something a little more complex.
Undo several changes with git reset
Let's say you've realized that pull request #6 (4801b87), needed to be reworked and you want to keep a clean history so you'll reset the HEAD to commit 1a6a403 this time you'll use the git reset command.
Enter git log --online
Copy the commit hash 1a6a403 (myquote edited online with Bitbucket) which is the commit just below pull request #6 which has the changes we want to undo.
Enter git reset 1a6a403 in your terminal window.
The output should look something like this:
$ git reset 1a6a403
Unstaged changes after reset:
M README.md
M myquote2.html
You can see that the changes are now in an uncommitted state.
This means that now we've removed several changes from both the history of the project and the staging area.
Enter git status in your terminal window.
The output should look something like this:
$ git status
On branch main
Your branch is behind 'origin/main' by 6 commits, and can be fast-forwarded.
(use "git pull" to update your local branch)
Changes not staged for commit:
(use "git add <file>..." to update what will be committed)
(use "git checkout -- <file>..." to discard changes in working directory)
modified: README.md
modified: myquote2.html
Untracked files:
(use "git add <file>..." to include in what will be committed)
bitbucket-pipelines.yml
no changes added to commit (use "git add" and/or "git commit -a")
Now you can see that the first change we undid (the bitbucket-pipelines.yml file) is now completely untracked by git.
This is because invoking git reset removes the change from both the head of the branch and the tracking or index area of git.
The underlying process is a bit more complex than we can cover here, you can read more in git reset.
Enter git log --oneline in your terminal window.
1a6a403 myquote edited online with Bitbucket
8b236d9 myquote edited online with Bitbucket
43a87f4 remivng
d5c4c62 a few small changes
23a7476 Merged in new-feature2 (pull request #3)
5cc4e1e add a commit message
cbbb5d6 trying a thing
438f956 adding section for permissions and cleaning up some formatting
23251c1 updated snipptes.xml organization into resources.
other files misc changes
3f630f8 Adding file to track changes
e52470d README.md edited online with Bitbucket
e2fad94 README.md edited online with Bitbucket
592f84f Merge branch 'main' into new-feature2 Merge branch especially if it merges an updated upstream into a topic branch.
7d0bab8 added a line
879f965 adding to the quote file
8994332 Merged in HOT-235 (pull request #2)
b4a0b43 removed sarcastic remarks because they violate policy.
b5f5199 myquote2.html created online with Bitbucket
b851618 adding my first file
5b43509 writing and using tests
The log output now shows the commit history has also been modified and begins at commit 1a6a403.
For the sake of demonstration and further example, Let’s say we want to now undo the reset we just did.
After further consideration, maybe we wanted to keep the contents of pull request #6.
Pushing resets to Bitbucket
Git resets are one of a few “undo” methods git offers.
Resets are generally considered an ‘unsafe’ option for undoing changes.
Resets are fine when working locally on isolated code but become risky when shared with team members.
In order to share a branch that has been reset with a remote team a ‘forced push’ has to be executed.
A ‘forced push’ is initiated by executing git push -f.
A forced push will destroy any history on the branch that was built after the point of the push.
An example of this ‘unsafe’ scenario is followed:
Dev A has been working on a branch developing a new feature.
Dev B has been working on the same branch developing a separate feature.
Dev B decides to reset the branch to an earlier state before both Dev A and Dev B started work.
Dev B then force pushes the reset branch to the remote repository.
Dev A pulls the branch to receive any updates.
During this pull Dev A receives the forced update.
This resets Dev A’s local branch back in time before any of their feature work was done and loses their commits.
Undo a git reset
So far we have been passing git commit Sha hashes to git reset.
The git log output is now missing commits that we have reset.
How will we get those commits back? Git never fully deletes commit unless it has become detached any pointers to it.
Furthermore git stores a separate log of all ref movement called “the reflog”.
We can examine the reflog by executing git reflog.
1a6a403 HEAD@{0}: reset: moving to 1a6a403
1f08a70 HEAD@{1}: reset: moving to origin/main
1f08a70 HEAD@{2}: clone: from git@bitbucket.org:dans9190/tutorial-documentation-tests.git
Your output from git reflog should be similar to the above.
You can see a history of actions on the repo.
The top line is a reference to the reset we did to reset pull request #6.
Let us now reset the reset to restore pull request #6.
The second column of this reflog output indicates a ref pointer to a modification action take on the repo.
Here HEAD@{0} is a reference to the reset command we previously executed.
We do not want to replay that reset command so we will restore the repo to HEAD@{1}.$ git reset --hard HEAD@{1}
HEAD is now at 1f08a70 Initial Bitbucket Pipelines configuration
Let us now examine the repos commit history with git log --oneline:
$git log --online
1f08a70 Initial Bitbucket Pipelines configuration
52f823c repeated quote to show how a change moves through the process
4801b87 Merged in changes (pull request #6)
1a6a403 myquote edited online with Bitbucket
3b29606 myquote2.html edited online with Bitbucket
8b236d9 myquote edited online with Bitbucket
235b9a7 testing prs
c5826da more changes
43a87f4 remivng
d5c4c62 a few small changes
23a7476 Merged in new-feature2 (pull request #3)
5cc4e1e add a commit message
cbbb5d6 trying a thing
438f956 adding section for permissions and cleaning up some formatting
23251c1 updated snipptes.xml organization into resources.
other files misc changes
3f630f8 Adding file to track changes
e52470d README.md edited online with Bitbucket
e2fad94 README.md edited online with Bitbucket
592f84f Merge branch 'main' into new-feature2 Merge branch especially if it merges an updated upstream into a topic branch.
7d0bab8 added a line
:
Here we can see that the repo’s commit history has been restored to the previous version we were experimenting with.
We can see that commit 4801b87 restored even though it appeared lost from the first reset operation.
The git reflog is a powerful tool for undoing changes in the repository.
Learn more in depth usage on the git reflog page.
git revert
The previous set of examples did some serious time traveling undo operations using git reset and git reflog.
Git contains another ‘undo’ utility which is often considered ‘safer’ than reseting.
Reverting creates new commits which contain an inverse of the specified commits changes.
These revert commits can then be safely pushed to remote repositories to share with other developers.
The following section will demonstrate git revert usage.
Let us continue with our example from the previous section.
To start let us examine the log and find a commit to revert.
$ git log --online
1f08a70 Initial Bitbucket Pipelines configuration
52f823c repeated quote to show how a change moves through the process
4801b87 Merged in changes (pull request #6)
1a6a403 myquote edited online with Bitbucket
1f08a70 Initial Bitbucket Pipelines configuration
52f823c repeated quote to show how a change moves through the process
4801b87 Merged in changes (pull request #6)
1a6a403 myquote edited online with Bitbucket
3b29606 myquote2.html edited online with Bitbucket
8b236d9 myquote edited online with Bitbucket
235b9a7 testing prs
c5826da more changes
43a87f4 remivng
d5c4c62 a few small changes
23a7476 Merged in new-feature2 (pull request #3)
5cc4e1e add a commit message
cbbb5d6 trying a thing
438f956 adding section for permissions and cleaning up some formatting
23251c1 updated snipptes.xml organization into resources.
other files misc changes
3f630f8 Adding file to track changes
e52470d README.md edited online with Bitbucket
e2fad94 README.md edited online with Bitbucket
592f84f Merge branch 'main' into new-feature2 Merge branch especially if it merges an updated upstream into a topic branch.
7d0bab8 added a line
:
For this example let’s pick the most recent commit 1f08a70 as our commit to operate on.
For this scenario let's say that we want to undo the edits made in that commit.
Execute:
$ git revert 1f08a70
This will kick off a git merge workflow.
Git will create a new commit thats content is a reverse of the commit that was specified for the revert.
Git will then open up a configured text editor to prompt for a new commit message.
Reverts are considered the safer undo option because of this commit workflow.
The creation of revert commits leave a clear trail in the commit history of when an undo operation was executed.
You just learned how to undo changes!
Congratulations, you’re done! Come back to this tutorial any time or head to the Undoing Changes section to go more in depth.
Keep up the good work in Bitbucket!
What is version control?
Version control, also known as source control, is the practice of tracking and managing changes to software code.
Version control systems are software tools that help software teams manage changes to source code over time.
As development environments have accelerated, version control systems help software teams work faster and smarter.
They are especially useful for DevOps teams since they help them to reduce development time and increase successful deployments.
Version control software keeps track of every modification to the code in a special kind of database.
If a mistake is made, developers can turn back the clock and compare earlier versions of the code to help fix the mistake while minimizing disruption to all team members.
For almost all software projects, the source code is like the crown jewels - a precious asset whose value must be protected.
For most software teams, the source code is a repository of the invaluable knowledge and understanding about the problem domain that the developers have collected and refined through careful effort.
Version control protects source code from both catastrophe and the casual degradation of human error and unintended consequences.
Software developers working in teams are continually writing new source code and changing existing source code.
The code for a project, app or software component is typically organized in a folder structure or "file tree".
One developer on the team may be working on a new feature while another developer fixes an unrelated bug by changing code, each developer may make their changes in several parts of the file tree.
Version control helps teams solve these kinds of problems, tracking every individual change by each contributor and helping prevent concurrent work from conflicting.
Changes made in one part of the software can be incompatible with those made by another developer working at the same time.
This problem should be discovered and solved in an orderly manner without blocking the work of the rest of the team.
Further, in all software development, any change can introduce new bugs on its own and new software can't be trusted until it's tested.
So testing and development proceed together until a new version is ready.
Good version control software supports a developer's preferred workflow without imposing one particular way of working.
Ideally it also works on any platform, rather than dictate what operating system or tool chain developers must use.
Great version control systems facilitate a smooth and continuous flow of changes to the code rather than the frustrating and clumsy mechanism of file locking - giving the green light to one developer at the expense of blocking the progress of others.
Software teams that do not use any form of version control often run into problems like not knowing which changes that have been made are available to users or the creation of incompatible changes between two unrelated pieces of work that must then be painstakingly untangled and reworked.
If you're a developer who has never used version control you may have added versions to your files, perhaps with suffixes like "final" or "latest" and then had to later deal with a new final version.
Perhaps you've commented out code blocks because you want to disable certain functionality without deleting the code, fearing that there may be a use for it later.
Version control is a way out of these problems.
Version control software is an essential part of the every-day of the modern software team's professional practices.
Individual software developers who are accustomed to working with a capable version control system in their teams typically recognize the incredible value version control also gives them even on small solo projects.
Once accustomed to the powerful benefits of version control systems, many developers wouldn't consider working without it even for non-software projects.
Benefits of version control systems
Using version control software is a best practice for high performing software and DevOps teams.
Version control also helps developers move faster and allows software teams to preserve efficiency and agility as the team scales to include more developers.
Version Control Systems (VCS) have seen great improvements over the past few decades and some are better than others.
VCS are sometimes known as SCM (Source Code Management) tools or RCS (Revision Control System).
One of the most popular VCS tools in use today is called Git.
Git is a Distributed VCS, a category known as DVCS, more on that later.
Like many of the most popular VCS systems available today, Git is free and open source.
Regardless of what they are called, or which system is used, the primary benefits you should expect from version control are as follows.
A complete long-term change history of every file.
This means every change made by many individuals over the years.
Changes include the creation and deletion of files as well as edits to their contents.
Different VCS tools differ on how well they handle renaming and moving of files.
This history should also include the author, date and written notes on the purpose of each change.
Having the complete history enables going back to previous versions to help in root cause analysis for bugs and it is crucial when needing to fix problems in older versions of software.
If the software is being actively worked on, almost everything can be considered an "older version" of the software.
Branching and merging.
Having team members work concurrently is a no-brainer, but even individuals working on their own can benefit from the ability to work on independent streams of changes.
Creating a "branch" in VCS tools keeps multiple streams of work independent from each other while also providing the facility to merge that work back together, enabling developers to verify that the changes on each branch do not conflict.
Many software teams adopt a practice of branching for each feature or perhaps branching for each release, or both.
There are many different workflows that teams can choose from when they decide how to make use of branching and merging facilities in VCS.
Traceability.
Being able to trace each change made to the software and connect it to project management and bug tracking software such as Jira, and being able to annotate each change with a message describing the purpose and intent of the change can help not only with root cause analysis and other forensics.
Having the annotated history of the code at your fingertips when you are reading the code, trying to understand what it is doing and why it is so designed can enable developers to make correct and harmonious changes that are in accord with the intended long-term design of the system.
This can be especially important for working effectively with legacy code and is crucial in enabling developers to estimate future work with any accuracy.
While it is possible to develop software without using any version control, doing so subjects the project to a huge risk that no professional team would be advised to accept.
So the question is not whether to use version control but which version control system to use.
There are many choices, but here we are going to focus on just one, Git.
Learn more about other types of version control software.
Source code management
Source code management (SCM) is used to track modifications to a source code repository.
SCM tracks a running history of changes to a code base and helps resolve conflicts when merging updates from multiple contributors.
SCM is also synonymous with Version control.
As software projects grow in lines of code and contributor head count, the costs of communication overhead and management complexity also grow.
SCM is a critical tool to alleviate the organizational strain of growing development costs.
What is Git
By far, the most widely used modern version control system in the world today is Git.
Git is a mature, actively maintained open source project originally developed in 2005 by Linus Torvalds, the famous creator of the Linux operating system kernel.
A staggering number of software projects rely on Git for version control, including commercial projects as well as open source.
Developers who have worked with Git are well represented in the pool of available software development talent and it works well on a wide range of operating systems and IDEs (Integrated Development Environments).
Having a distributed architecture, Git is an example of a DVCS (hence Distributed Version Control System).
Rather than have only one single place for the full version history of the software as is common in once-popular version control systems like CVS or Subversion (also known as SVN), in Git, every developer's working copy of the code is also a repository that can contain the full history of all changes.
In addition to being distributed, Git has been designed with performance, security and flexibility in mind.
Performance
The raw performance characteristics of Git are very strong when compared to many alternatives.
Committing new changes, branching, merging and comparing past versions are all optimized for performance.
The algorithms implemented inside Git take advantage of deep knowledge about common attributes of real source code file trees, how they are usually modified over time and what the access patterns are.
Unlike some version control software, Git is not fooled by the names of the files when determining what the storage and version history of the file tree should be, instead, Git focuses on the file content itself.
After all, source code files are frequently renamed, split, and rearranged.
The object format of Git's repository files uses a combination of delta encoding (storing content differences), compression and explicitly stores directory contents and version metadata objects.
Being distributed enables significant performance benefits as well.
For example, say a developer, Alice, makes changes to source code, adding a feature for the upcoming 2.0 release, then commits those changes with descriptive messages.
She then works on a second feature and commits those changes too.
Naturally these are stored as separate pieces of work in the version history.
Alice then switches to the version 1.3 branch of the same software to fix a bug that affects only that older version.
The purpose of this is to enable Alice's team to ship a bug fix release, version 1.3.1, before version 2.0 is ready.
Alice can then return to the 2.0 branch to continue working on new features for 2.0 and all of this can occur without any network access and is therefore fast and reliable.
She could even do it on an airplane.
When she is ready to send all of the individually committed changes to the remote repository, Alice can "push" them in one command.
Security
Git has been designed with the integrity of managed source code as a top priority.
The content of the files as well as the true relationships between files and directories, versions, tags and commits, all of these objects in the Git repository are secured with a cryptographically secure hashing algorithm called SHA1.
This protects the code and the change history against both accidental and malicious change and ensures that the history is fully traceable.
With Git, you can be sure you have an authentic content history of your source code.
Some other version control systems have no protections against secret alteration at a later date.
This can be a serious information security vulnerability for any organization that relies on software development.
Flexibility
One of Git's key design objectives is flexibility.
Git is flexible in several respects: in support for various kinds of nonlinear development workflows, in its efficiency in both small and large projects and in its compatibility with many existing systems and protocols.
Git has been designed to support branching and tagging as first-class citizens (unlike SVN) and operations that affect branches and tags (such as merging or reverting) are also stored as part of the change history.
Not all version control systems feature this level of tracking.
Version control with Git
Git is the best choice for most software teams today.
While every team is different and should do their own analysis, here are the main reasons why version control with Git is preferred over alternatives:
Git is good
Git has the functionality, performance, security and flexibility that most teams and individual developers need.
These attributes of Git are detailed above.
In side-by-side comparisons with most other alternatives, many teams find that Git is very favorable.
Git is a de facto standard
Git is the most broadly adopted tool of its kind.
This makes Git attractive for the following reasons.
At Atlassian, nearly all of our project source code is managed in Git.
Vast numbers of developers already have Git experience and a significant proportion of college graduates may have experience with only Git.
While some organizations may need to climb the learning curve when migrating to Git from another version control system, many of their existing and future developers do not need to be trained on Git.
In addition to the benefits of a large talent pool, the predominance of Git also means that many third party software tools and services are already integrated with Git including IDEs, and our own tools like DVCS desktop client Sourcetree, issue and project tracking software, Jira, and code hosting service, Bitbucket.
If you are an inexperienced developer wanting to build up valuable skills in software development tools, when it comes to version control, Git should be on your list.
Git is a quality open source project
Git is a very well supported open source project with over a decade of solid stewardship.
The project maintainers have shown balanced judgment and a mature approach to meeting the long term needs of its users with regular releases that improve usability and functionality.
The quality of the open source software is easily scrutinized and countless businesses rely heavily on that quality.
Git enjoys great community support and a vast user base.
Documentation is excellent and plentiful, including books, tutorials and dedicated web sites.
There are also podcasts and video tutorials.
Being open source lowers the cost for hobbyist developers as they can use Git without paying a fee.
For use in open-source projects, Git is undoubtedly the successor to the previous generations of successful open source version control systems, SVN and CVS.
Criticism of Git
One common criticism of Git is that it can be difficult to learn.
Some of the terminology in Git will be novel to newcomers and for users of other systems, the Git terminology may be different, for example, revert in Git has a different meaning than in SVN or CVS.
Nevertheless, Git is very capable and provides a lot of power to its users.
Learning to use that power can take some time, however once it has been learned, that power can be used by the team to increase their development speed.
For those teams coming from a non-distributed VCS, having a central repository may seem like a good thing that they don't want to lose.
However, while Git has been designed as a distributed version control system (DVCS), with Git, you can still have an official, canonical repository where all changes to the software must be stored.
With Git, because each developer's repository is complete, their work doesn't need to be constrained by the availability and performance of the "central" server.
During outages or while offline, developers can still consult the full project history.
Because Git is flexible as well as being distributed, you can work the way you are accustomed to but gain the additional benefits of Git, some of which you may not even realise you're missing.
Now that you understand what version control is, what Git is and why software teams should use it, read on to discover the benefits Git can provide across the whole organization.
Why Git for your organization
Switching from a centralized version control system to Git changes the way your development team creates software.
And, if you’re a company that relies on its software for mission-critical applications, altering your development workflow impacts your entire business.
In this article, we’ll discuss how Git benefits each aspect of your organization, from your development team to your marketing team, and everything in between.
By the end of this article, it should be clear that Git isn’t just for agile software development—it’s for agile business.
Git for developers
Feature Branch Workflow
One of the biggest advantages of Git is its branching capabilities.
Unlike centralized version control systems, Git branches are cheap and easy to merge.
This facilitates the feature branch workflow popular with many Git users.
Feature branches provide an isolated environment for every change to your codebase.
When a developer wants to start working on something—no matter how big or small—they create a new branch.
This ensures that the main branch always contains production-quality code.
Using feature branches is not only more reliable than directly editing production code, but it also provides organizational benefits.
They let you represent development work at the same granularity as the your agile backlog.
For example, you might implement a policy where each Jira ticket is addressed in its own feature branch.
Distributed Development
In SVN, each developer gets a working copy that points back to a single central repository.
Git, however, is a distributed version control system.
Instead of a working copy, each developer gets their own local repository, complete with a full history of commits.
Having a full local history makes Git fast, since it means you don’t need a network connection to create commits, inspect previous versions of a file, or perform diffs between commits.
Distributed development also makes it easier to scale your engineering team.
If someone breaks the production branch in SVN, other developers can’t check in their changes until it’s fixed.
With Git, this kind of blocking doesn’t exist.
Everybody can continue going about their business in their own local repositories.
And, similar to feature branches, distributed development creates a more reliable environment.
Even if a developer obliterates their own repository, they can simply clone someone else’s and start anew.
Pull Requests
Many source code management tools such as Bitbucket enhance core Git functionality with pull requests.
A pull request is a way to ask another developer to merge one of your branches into their repository.
This not only makes it easier for project leads to keep track of changes, but also lets developers initiate discussions around their work before integrating it with the rest of the codebase.
Since they’re essentially a comment thread attached to a feature branch, pull requests are extremely versatile.
When a developer gets stuck with a hard problem, they can open a pull request to ask for help from the rest of the team.
Alternatively, junior developers can be confident that they aren’t destroying the entire project by treating pull requests as a formal code review.
Community
In many circles, Git has come to be the expected version control system for new projects.
If your team is using Git, odds are you won’t have to train new hires on your workflow, because they’ll already be familiar with distributed development.
In addition, Git is very popular among open source projects.
This means it’s easy to leverage 3rd-party libraries and encourage others to fork your own open source code.
Faster Release Cycle
The ultimate result of feature branches, distributed development, pull requests, and a stable community is a faster release cycle.
These capabilities facilitate an agile workflow where developers are encouraged to share smaller changes more frequently.
In turn, changes can get pushed down the deployment pipeline faster than the monolithic releases common with centralized version control systems.
As you might expect, Git works very well with continuous integration and continuous delivery environments.
Git hooks allow you to run scripts when certain events occur inside of a repository, which lets you automate deployment to your heart’s content.
You can even build or deploy code from specific branches to different servers.
For example, you might want to configure Git to deploy the most recent commit from the develop branch to a test server whenever anyone merges a pull request into it.
Combining this kind of build automation with peer review means you have the highest possible confidence in your code as it moves from development to staging to production.
Git for marketing
To understand how switching to Git affects your company’s marketing activities, imagine your development team has three distinct changes scheduled for completion in the next few weeks:
The entire team is finishing up a game-changing feature that they’ve been working on for the last 6 months.
Mary is implementing a smaller, unrelated feature that only impacts existing customers.
Rick is making some much-needed updates to the user interface.
If you’re using a traditional development workflow that relies on a centralized VCS, all of these changes would probably be rolled up into a single release.
Marketing can only make one announcement that focuses primarily on the game-changing feature, and the marketing potential of the other two updates is effectively ignored.
The shorter development cycle facilitated by Git makes it much easier to divide these into individual releases.
This gives marketers more to talk about, more often.
In the above scenario, marketing can build out three campaigns that revolve around each feature, and thus target very specific market segments.
For instance, they might prepare a big PR push for the game changing feature, a corporate blog post and newsletter blurb for Mary’s feature, and some guest posts about Rick’s underlying UX theory for sending to external design blogs.
All of these activities can be synchronized with a separate release.
Git for product management
The benefits of Git for product management is much the same as for marketing.
More frequent releases means more frequent customer feedback and faster updates in reaction to that feedback.
Instead of waiting for the next release 8 weeks from now, you can push a solution out to customers as quickly as your developers can write the code.
The feature branch workflow also provides flexibility when priorities change.
For instance, if you’re halfway through a release cycle and you want to postpone one feature in lieu of another time-critical one, it’s no problem.
That initial feature can sit around in its own branch until engineering has time to come back to it.
This same functionality makes it easy to manage innovation projects, beta tests, and rapid prototypes as independent codebases.
Git for designers
Feature branches lend themselves to rapid prototyping.
Whether your UX/UI designers want to implement an entirely new user flow or simply replace some icons, checking out a new branch gives them a sandboxed environment to play with.
This lets designers see how their changes will look in a real working copy of the product without the threat of breaking existing functionality.
Encapsulating user interface changes like this makes it easy to present updates to other stakeholders.
For example, if the director of engineering wants to see what the design team has been working on, all they have to do is tell the director to check out the corresponding branch.
Pull requests take this one step further and provide a formal place for interested parties to discuss the new interface.
Designers can make any necessary changes, and the resulting commits will show up in the pull request.
This invites everybody to participate in the iteration process.
Perhaps the best part of prototyping with branches is that it’s just as easy to merge the changes into production as it is to throw them away.
There’s no pressure to do either one.
This encourages designers and UI developers to experiment while ensuring that only the best ideas make it through to the customer.
Git for customer support
Customer support and customer success often have a different take on updates than product managers.
When a customer calls them up, they’re usually experiencing some kind of problem.
If that problem is caused by your company’s software, a bug fix needs to be pushed out as soon as possible.
Git’s streamlined development cycle avoids postponing bug fixes until the next monolithic release.
A developer can patch the problem and push it directly to production.
Faster fixes means happier customers and fewer repeat support tickets.
Instead of being stuck with, “Sorry, we’ll get right on that” your customer support team can start responding with “We’ve already fixed it!
Git for human resources
To a certain extent, your software development workflow determines who you hire.
It always helps to hire engineers that are familiar with your technologies and workflows, but using Git also provides other advantages.
Employees are drawn to companies that provide career growth opportunities, and understanding how to leverage Git in both large and small organizations is a boon to any programmer.
By choosing Git as your version control system, you’re making the decision to attract forward-looking developers.
Git for anyone managing a budget
Git is all about efficiency.
For developers, it eliminates everything from the time wasted passing commits over a network connection to the man hours required to integrate changes in a centralized version control system.
It even makes better use of junior developers by giving them a safe environment to work in.
All of this affects the bottom line of your engineering department.
But, don’t forget that these efficiencies also extend outside your development team.
They prevent marketing from pouring energy into collateral for features that aren’t popular.
They let designers test new interfaces on the actual product with little overhead.
They let you react to customer complaints immediately.
Being agile is all about finding out what works as quickly as possible, magnifying efforts that are successful, and eliminating ones that aren’t.
Git serves as a multiplier for all your business activities by making sure every department is doing their job more efficiently.
Install Git
Install Git on Mac OS X
There are several ways to install Git on a Mac.
In fact, if you've installed XCode (or it's Command Line Tools), Git may already be installed.
To find out, open a terminal and enter git --version.
$ git --version git version 2.7.0 (Apple Git-66)
Apple actually maintain and ship their own fork of Git, but it tends to lag behind mainstream Git by several major versions.
You may want to install a newer version of Git using one of the methods below:
Git for Mac Installer
The easiest way to install Git on a Mac is via the stand-alone installer:
Download the latest Git for Mac installer.
Follow the prompts to install Git.
Open a terminal and verify the installation was successful by typing git --version:
$ git --version git version 2.9.2
Configure your Git username and email using the following commands, replacing Emma's name with your own.
These details will be associated with any commits that you create:
$ git config --global user.name "Emma Paris" $ git config --global user.email "eparis@atlassian.com"
(Optional) To make Git remember your username and password when working with HTTPS repositories, configure the git-credential-osxkeychain helper.
Install Git with Homebrew
If you have installed Homebrew to manage packages on OS X, you can follow these instructions to install Git:
Open your terminal and install Git using Homebrew:
$ brew install git
Verify the installation was successful by typing which git --version:
$ git --version git version 2.9.2
Configure your Git username and email using the following commands, replacing Emma's name with your own.
These details will be associated with any commits that you create:
$ git config --global user.name "Emma Paris"$ git config --global user.email "eparis@atlassian.com"
(Optional) To make Git remember your username and password when working with HTTPS repositories, install the git-credential-osxkeychain helper.
Install Git with MacPorts
If you have installed MacPorts to manage packages on OS X, you can follow these instructions to install Git:
Open your terminal and update MacPorts:
$ sudo port selfupdate
Search for the latest available Git ports and variants:
$ port search git$ port variants git
Install Git with bash completion, the OS X keychain helper, and the docs:
$ sudo port install git +bash_completion+credential_osxkeychain+doc
Configure your Git username and email using the following commands, replacing Emma's name with your own.
These details will be associated with any commits that you create:
$ git config --global user.name "Emma Paris"$ git config --global user.email "eparis@atlassian.com"
(Optional) To make Git remember your username and password when working with HTTPS repositories, configure the git-credential-osxkeychain helper.
Install the git-credential-osxkeychain helper
Bitbucket supports pushing and pulling your Git repositories over both SSH and HTTPS.
To work with a private repository over HTTPS, you must supply a username and password each time you push or pull.
The git-credential-osxkeychain helper allows you to cache your username and password in the OSX keychain, so you don't have to retype it each time.
If you followed the MacPorts or Homebrew instructions above, the helper should already be installed.
Otherwise you'll need to download and install it.
Open a terminal window and check:
$ git credential-osxkeychain usage: git credential-osxkeychain
If you receive a usage statement, skip to step 4. If the helper is not installed, go to step 2.
Use curl to download git-credential-osxkeychain (or download it via your browser) and move it to /usr/local/bin:
$ curl -O http://github-media-downloads.s3.amazonaws.com/osx/git-credential-osxkeychain $ sudo mv git-credential-osxkeychain /usr/local/bin/
Make the file an executable:
$ chmod u+x /usr/local/bin/git-credential-osxkeychain
Configure git to use the osxkeychain credential helper.
$ git config --global credential.helper osxkeychain
The next time Git prompts you for a username and password, it will cache them in your keychain for future use.
Install Git with Atlassian Sourcetree
Sourcetree, a free visual Git client for Mac, comes with its own bundled version of Git.
You can download Sourcetree here.
To learn how to use Git with Sourcetree (and how to host your Git repositories on Bitbucket) you can follow our comprehensive Git tutorial with Bitbucket and Sourcetree.
Build Git from source on OS X
Building Git can be a little tricky on Mac due to certain libraries moving around between OS X releases.
On El Capitan (OS X 10.11), follow these instructions to build Git:
From your terminal install XCode's Command Line Tools (if you haven't already):
$ xcode-select --install
Install Homebrew.
Using Homebrew, install openssl:
$ brew install openssl
Clone the Git source (or if you don't yet have a version of Git installed, download and extract it):
$ git clone https://github.com/git/git.git
To build Git run make with the following flags:
$ NO_GETTEXT=1 make CFLAGS="-I/usr/local/opt/openssl/include" LDFLAGS="-L/usr/local/opt/openssl/lib"Next Step: Learn Git with Bitbucket Cloud
Install Git on Windows
Git for Windows stand-alone installer
Download the latest Git for Windows installer.
When you've successfully started the installer, you should see the Git Setup wizard screen.
Follow the Next and Finish prompts to complete the installation.
The default options are pretty sensible for most users.
Open a Command Prompt (or Git Bash if during installation you elected not to use Git from the Windows Command Prompt).
Run the following commands to configure your Git username and email using the following commands, replacing Emma's name with your own.
These details will be associated with any commits that you create:
$ git config --global user.name "Emma Paris" $ git config --global user.email "eparis@atlassian.com"Optional: Install the Git credential helper on Windows
Bitbucket supports pushing and pulling over HTTP to your remote Git repositories on Bitbucket.
Every time you interact with the remote repository, you must supply a username/password combination.
You can store these credentials, instead of supplying the combination every time, with the Git Credential Manager for Windows.
Git packages are available via apt:
From your shell, install Git using apt-get:
$ sudo apt-get update$ sudo apt-get install git
Verify the installation was successful by typing git --version:
$ git --versiongit version 2.9.2
Configure your Git username and email using the following commands, replacing Emma's name with your own.
These details will be associated with any commits that you create:
$ git config --global user.name "Emma Paris"$ git config --global user.email "eparis@atlassian.com"
Fedora (dnf/yum)
Git packages are available via both yum and dnf:
From your shell, install Git using dnf (or yum, on older versions of Fedora):
$ sudo dnf install git
or
$ sudo yum install git
Verify the installation was successful by typing git --version:
$ git --versiongit version 2.9.2
Configure your Git username and email using the following commands, replacing Emma's name with your own.
These details will be associated with any commits that you create
$ git config --global user.name "Emma Paris" $ git config --global user.email "eparis@atlassian.com"
Build Git from source on Linux
Debian / Ubuntu
Git requires the several dependencies to build on Linux.
These are available via apt:
From your shell, install the necessary dependencies using apt-get:
$ sudo apt-get update$ sudo apt-get install libcurl4-gnutls-dev libexpat1-dev gettext libz-dev libssl-dev asciidoc xmlto docbook2x
Clone the Git source (or if you don't yet have a version of Git installed, download and extract it):
$ git clone https://git.kernel.org/pub/scm/git/git.git
To build Git and install it under /usr, run make:
$ make all doc info prefix=/usr$ sudo make install install-doc install-html install-info install-man prefix=/usrFedora
Git requires the several dependencies to build on Linux.
These are available via both yum and dnf:
From your shell, install the necessary build dependencies using dnf (or yum, on older versions of Fedora):
$ sudo dnf install curl-devel expat-devel gettext-devel openssl-devel perl-devel zlib-devel asciidoc xmlto docbook2X
or using yum.
For yum, you may need to install the Extra Packages for Enterprise Linux (EPEL) repository first:
$ sudo yum install epel-release$ sudo yum install curl-devel expat-devel gettext-devel openssl-devel perl-devel zlib-devel asciidoc xmlto docbook2X
Symlink docbook2X to the filename that the Git build expects:
$ sudo ln -s /usr/bin/db2x_docbook2texi /usr/bin/docbook2x-texi
Clone the Git source (or if you don't yet have a version of Git installed, download and extract it):
$ git clone https://git.kernel.org/pub/scm/git/git.git
To build Git and install it under /usr, run make:
$ make all doc prefix=/usr$ sudo make install install-doc install-html install-man prefix=/usrNext Step: Learn Git with Bitbucket Cloud
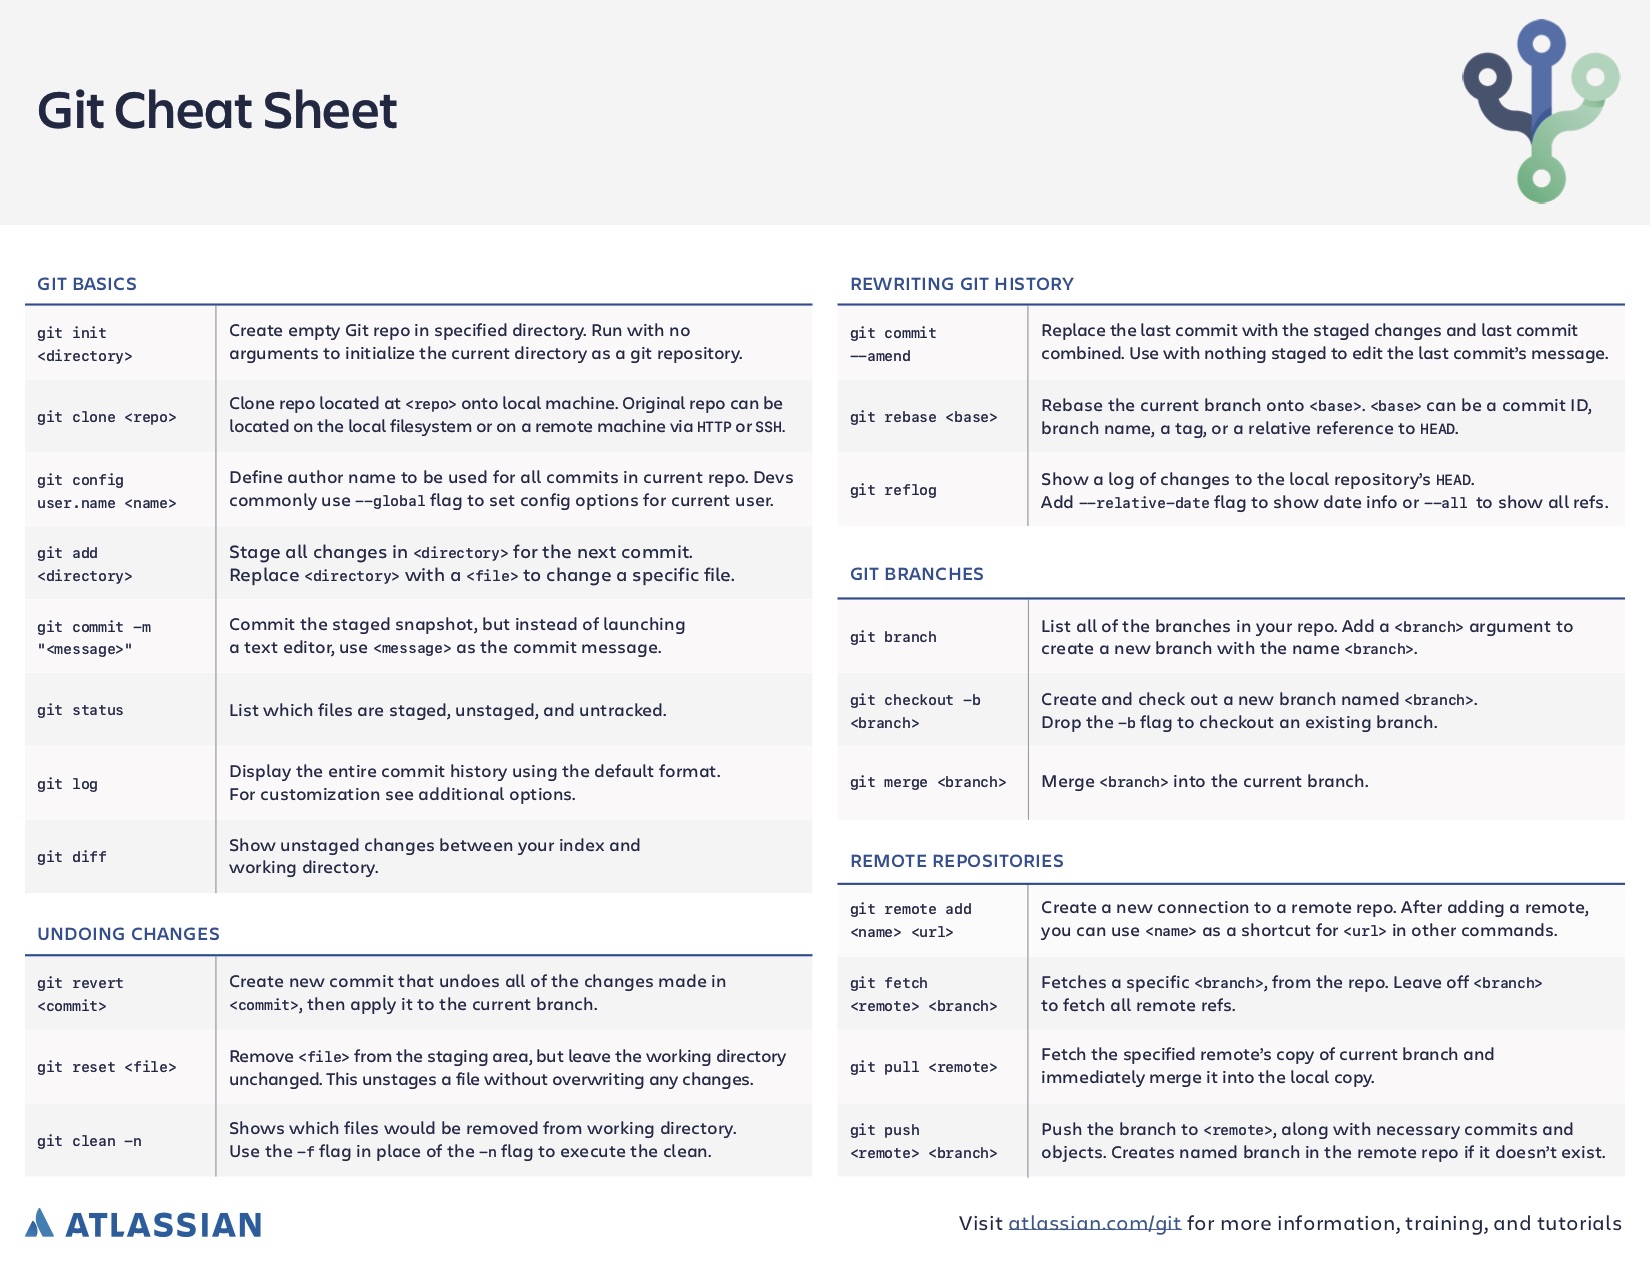 Download now
 The most common use case for
 Of course, there’s nothing stopping you from giving certain Git repos special meaning.
For example, by simply designating one Git repo as the “central” repository, it’s possible to replicate a centralized workflow using Git.
The point is, this is accomplished through conventions rather than being hardwired into the VCS itself.
Of course, there’s nothing stopping you from giving certain Git repos special meaning.
For example, by simply designating one Git repo as the “central” repository, it’s possible to replicate a centralized workflow using Git.
The point is, this is accomplished through conventions rather than being hardwired into the VCS itself.
 The
The  This makes many Git operations much faster than SVN, since a particular version of a file doesn’t have to be “assembled” from its diffs—the complete revision of each file is immediately available from Git's internal database.
Git's snapshot model has a far-reaching impact on virtually every aspect of its version control model, affecting everything from its branching and merging tools to its collaboration work-flows.
This makes many Git operations much faster than SVN, since a particular version of a file doesn’t have to be “assembled” from its diffs—the complete revision of each file is immediately available from Git's internal database.
Git's snapshot model has a far-reaching impact on virtually every aspect of its version control model, affecting everything from its branching and merging tools to its collaboration work-flows.

 You can hit ? for a full list of hunk commands.
Commonly useful ones are:
You can hit ? for a full list of hunk commands.
Commonly useful ones are:
 Invoking
  Using the
  Using the
  When you run
  Log output can be customized in several ways, from simply filtering commits to displaying them in a completely user-defined format.
Some of the most common configurations of
Log output can be customized in several ways, from simply filtering commits to displaying them in a completely user-defined format.
Some of the most common configurations of  Checking out an old file does not move the
 .svg?cdnVersion=217)
 Reverting has two important advantages over resetting.
First, it doesn’t change the project history, which makes it a “safe” operation for commits that have already been published to a shared repository.
For details about why altering shared history is dangerous, please see the git reset page.
Second,
Reverting has two important advantages over resetting.
First, it doesn’t change the project history, which makes it a “safe” operation for commits that have already been published to a shared repository.
For details about why altering shared history is dangerous, please see the git reset page.
Second, 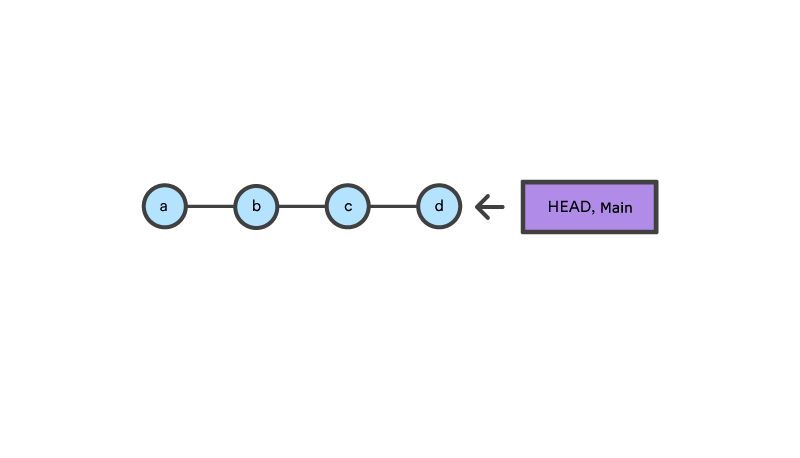 This example demonstrates a sequence of commits on the
 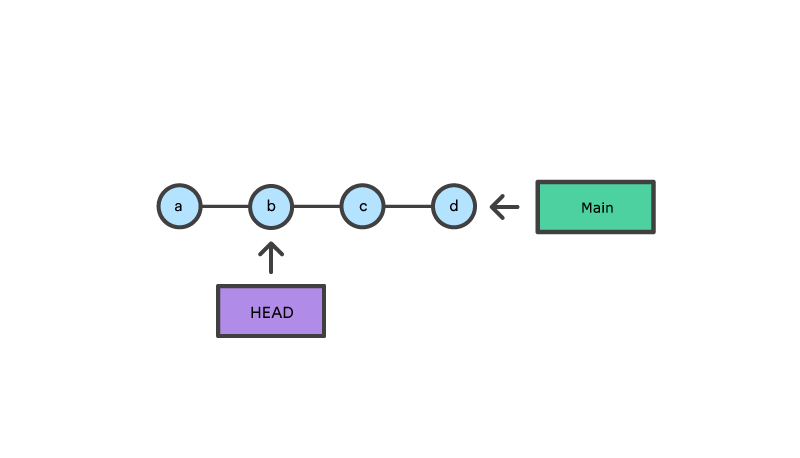 With
With 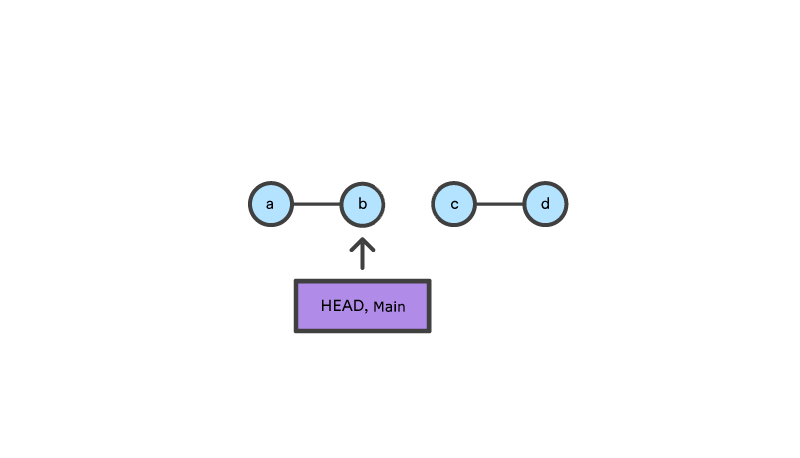 Comparatively,
 .svg?cdnVersion=217)
 As soon as you add new commits after the reset, Git will think that your local history has diverged from
 Note that the commits modified with a rebase command have a different ID than either of the original commits.
Commits marked with pick will have a new ID if the previous commits have been rewritten.
Modern Git hosting solutions like Bitbucket now offer "auto squashing" features upon merge.
These features will automatically rebase and squash a branch's commits for you when utilizing the hosted solutions UI.
For more info see "Squash commits when merging a Git branch with Bitbucket."
Note that the commits modified with a rebase command have a different ID than either of the original commits.
Commits marked with pick will have a new ID if the previous commits have been rewritten.
Modern Git hosting solutions like Bitbucket now offer "auto squashing" features upon merge.
These features will automatically rebase and squash a branch's commits for you when utilizing the hosted solutions UI.
For more info see "Squash commits when merging a Git branch with Bitbucket."

 To see what commits have been added to the upstream main, you can run a
  The above diagram shows what happens when your local
  In this scenario,
  In the above diagram, we can see the new commit H.
This commit is a new merge commit that contains the contents of remote A-B-C commits and has a combined log message.
This example is one of a few
In the above diagram, we can see the new commit H.
This commit is a new merge commit that contains the contents of remote A-B-C commits and has a combined log message.
This example is one of a few 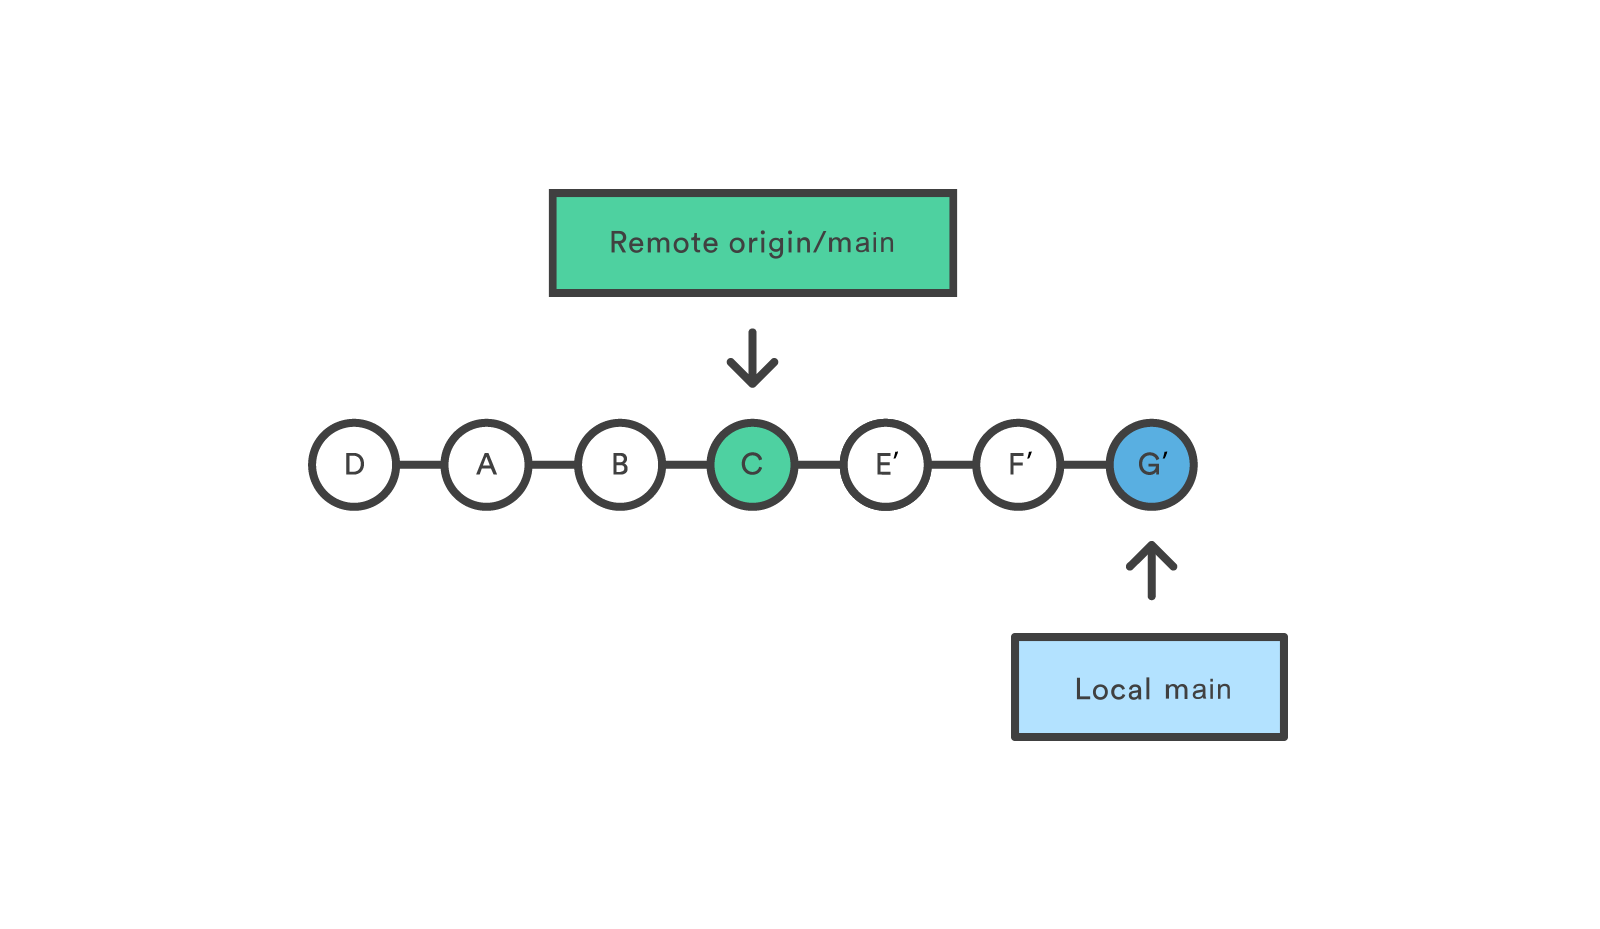 In this diagram, we can now see that a rebase pull does not create the new H commit.
Instead, the rebase has copied the remote commits A--B--C and rewritten the local commits E--F--G to appear after them them in the local origin/main commit history.
In this diagram, we can now see that a rebase pull does not create the new H commit.
Instead, the rebase has copied the remote commits A--B--C and rewritten the local commits E--F--G to appear after them them in the local origin/main commit history.
 You start out thinking your repository is synchronized, but then
  In their simplest form, pull requests are a mechanism for a developer to notify team members that they have completed a feature.
Once their feature branch is ready, the developer files a pull request via their Bitbucket account.
This lets everybody involved know that they need to review the code and merge it into the
In their simplest form, pull requests are a mechanism for a developer to notify team members that they have completed a feature.
Once their feature branch is ready, the developer files a pull request via their Bitbucket account.
This lets everybody involved know that they need to review the code and merge it into the  Compared to other collaboration models, this formal solution for sharing commits makes for a much more streamlined workflow.
SVN and Git can both automatically send notification emails with a simple script; however, when it comes to discussing changes, developers typically have to rely on email threads.
This can become haphazard, especially when follow-up commits are involved.
Pull requests put all of this functionality into a friendly web interface right next to your Bitbucket repositories.
Compared to other collaboration models, this formal solution for sharing commits makes for a much more streamlined workflow.
SVN and Git can both automatically send notification emails with a simple script; however, when it comes to discussing changes, developers typically have to rely on email threads.
This can become haphazard, especially when follow-up commits are involved.
Pull requests put all of this functionality into a friendly web interface right next to your Bitbucket repositories.
 Many of these values will be set to a sensible default by Bitbucket.
However, depending on your collaboration workflow, your team may need to specify different values.
The above diagram shows a pull request that asks to merge a feature branch into the official main branch, but there are many other ways to use pull requests.
Many of these values will be set to a sensible default by Bitbucket.
However, depending on your collaboration workflow, your team may need to specify different values.
The above diagram shows a pull request that asks to merge a feature branch into the official main branch, but there are many other ways to use pull requests.
 There is only one public repository in the Feature Branch Workflow, so the pull request’s destination repository and the source repository will always be the same.
Typically, the developer will specify their feature branch as the source branch and the
There is only one public repository in the Feature Branch Workflow, so the pull request’s destination repository and the source repository will always be the same.
Typically, the developer will specify their feature branch as the source branch and the 
 The mechanics of pull requests in the Gitflow Workflow are the exact same as the previous section: a developer simply files a pull request when a feature, release, or hotfix branch needs to be reviewed, and the rest of the team will be notified via Bitbucket.
Features are generally merged into the
The mechanics of pull requests in the Gitflow Workflow are the exact same as the previous section: a developer simply files a pull request when a feature, release, or hotfix branch needs to be reviewed, and the rest of the team will be notified via Bitbucket.
Features are generally merged into the  Since each developer has their own public repository, the pull request’s source repository will differ from its destination repository.
The source repository is the developer’s public repository and the source branch is the one that contains the proposed changes.
If the developer is trying to merge the feature into the main codebase, then the destination repository is the official project and the destination branch is
Since each developer has their own public repository, the pull request’s source repository will differ from its destination repository.
The source repository is the developer’s public repository and the source branch is the one that contains the proposed changes.
If the developer is trying to merge the feature into the main codebase, then the destination repository is the official project and the destination branch is  The two developers could discuss and develop the feature inside of the pull request.
When they’re done, one of them would file another pull request asking to merge the feature into the official main branch.
This kind of flexibility makes pull requests very powerful collaboration tool in the Forking workflow.
The two developers could discuss and develop the feature inside of the pull request.
When they’re done, one of them would file another pull request asking to merge the feature into the official main branch.
This kind of flexibility makes pull requests very powerful collaboration tool in the Forking workflow.
 To start working in the project, Mary first needs to fork John’s Bitbucket repository.
She can do this by signing in to Bitbucket, navigating to John’s repository, and clicking the Fork button.
To start working in the project, Mary first needs to fork John’s Bitbucket repository.
She can do this by signing in to Bitbucket, navigating to John’s repository, and clicking the Fork button.
 After filling out the name and description for the forked repository, she will have a server-side copy of the project.
 Next, Mary needs to clone the Bitbucket repository that she just forked.
This will give her a working copy of the project on her local machine.
She can do this by running the following command:
Next, Mary needs to clone the Bitbucket repository that she just forked.
This will give her a working copy of the project on her local machine.
She can do this by running the following command:
 Before she starts writing any code, Mary needs to create a new branch for the feature.
This branch is what she will use as the source branch of the pull request.
Before she starts writing any code, Mary needs to create a new branch for the feature.
This branch is what she will use as the source branch of the pull request.
 After her feature is complete, Mary pushes the feature branch to her own Bitbucket repository (not the official repository) with a simple
  After Bitbucket has her feature branch, Mary can create the pull request through her Bitbucket account by navigating to her forked repository and clicking the Pull request button in the top-right corner.
The resulting form automatically sets Mary’s repository as the source repository, and it asks her to specify the source branch, the destination repository, and the destination branch.
Mary wants to merge her feature into the main codebase, so the source branch is her feature branch, the destination repository is John’s public repository, and the destination branch is
After Bitbucket has her feature branch, Mary can create the pull request through her Bitbucket account by navigating to her forked repository and clicking the Pull request button in the top-right corner.
The resulting form automatically sets Mary’s repository as the source repository, and it asks her to specify the source branch, the destination repository, and the destination branch.
Mary wants to merge her feature into the main codebase, so the source branch is her feature branch, the destination repository is John’s public repository, and the destination branch is 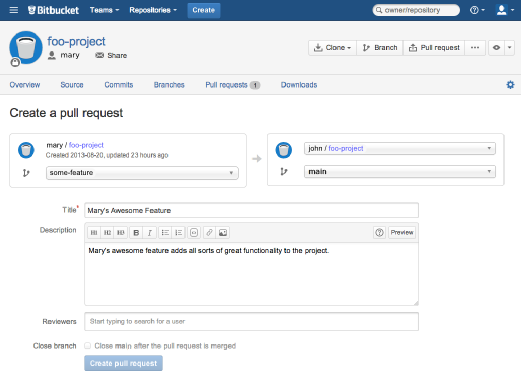 After she creates the pull request, a notification will be sent to John via his Bitbucket feed and (optionally) via email.
 John can access all of the pull requests people have filed by clicking on the Pull request tab in his own Bitbucket repository.
Clicking on Mary’s pull request will show him a description of the pull request, the feature’s commit history, and a diff of all the changes it contains.
If he thinks the feature is ready to merge into the project, all he has to do is hit the Merge button to approve the pull request and merge Mary’s feature into his
John can access all of the pull requests people have filed by clicking on the Pull request tab in his own Bitbucket repository.
Clicking on Mary’s pull request will show him a description of the pull request, the feature’s commit history, and a diff of all the changes it contains.
If he thinks the feature is ready to merge into the project, all he has to do is hit the Merge button to approve the pull request and merge Mary’s feature into his 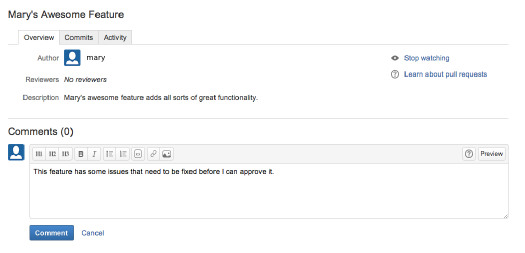
 The diagram above visualizes a repository with two isolated lines of development, one for a little feature, and one for a longer-running feature.
By developing them in branches, it’s not only possible to work on both of them in parallel, but it also keeps the
The diagram above visualizes a repository with two isolated lines of development, one for a little feature, and one for a longer-running feature.
By developing them in branches, it’s not only possible to work on both of them in parallel, but it also keeps the  Then, you create a branch using the following command:
 Note that this only creates the new branch.
To start adding commits to it, you need to select it with
Note that this only creates the new branch.
To start adding commits to it, you need to select it with  The point is, your development should always take place on a branch—never on a detached
 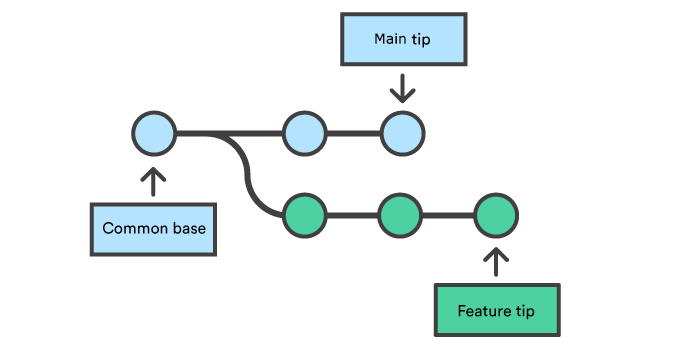 Invoking this command will merge the specified branch feature into the current branch, we'll assume
 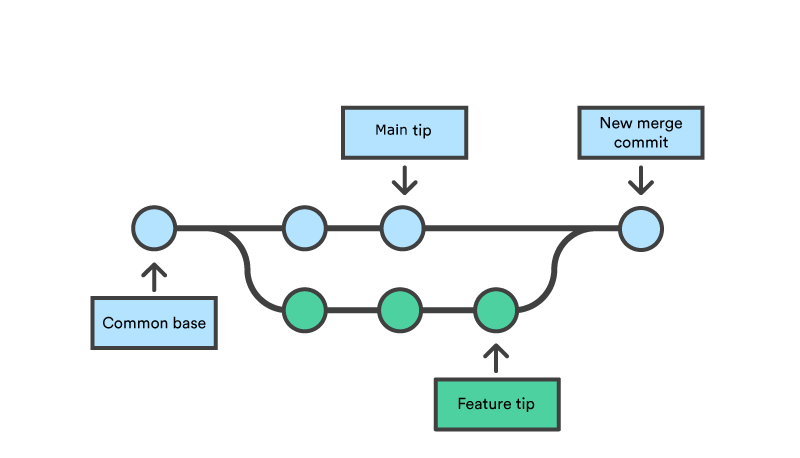 Merge commits are unique against other commits in the fact that they have two parent commits.
When creating a merge commit Git will attempt to auto magically merge the separate histories for you.
If Git encounters a piece of data that is changed in both histories it will be unable to automatically combine them.
This scenario is a version control conflict and Git will need user intervention to continue.
Merge commits are unique against other commits in the fact that they have two parent commits.
When creating a merge commit Git will attempt to auto magically merge the separate histories for you.
If Git encounters a piece of data that is changed in both histories it will be unable to automatically combine them.
This scenario is a version control conflict and Git will need user intervention to continue.
 However, a fast-forward merge is not possible if the branches have diverged.
When there is not a linear path to the target branch, Git has no choice but to combine them via a 3-way merge.
3-way merges use a dedicated commit to tie together the two histories.
The nomenclature comes from the fact that Git uses three commits to generate the merge commit: the two branch tips and their common ancestor.
However, a fast-forward merge is not possible if the branches have diverged.
When there is not a linear path to the target branch, Git has no choice but to combine them via a 3-way merge.
3-way merges use a dedicated commit to tie together the two histories.
The nomenclature comes from the fact that Git uses three commits to generate the merge commit: the two branch tips and their common ancestor.
 While you can use either of these merge strategies, many developers like to use fast-forward merges (facilitated through rebasing) for small features or bug fixes, while reserving 3-way merges for the integration of longer-running features.
In the latter case, the resulting merge commit serves as a symbolic joining of the two branches.
Our first example demonstrates a fast-forward merge.
The code below creates a new branch, adds two commits to it, then integrates it into the main line with a fast-forward merge.
While you can use either of these merge strategies, many developers like to use fast-forward merges (facilitated through rebasing) for small features or bug fixes, while reserving 3-way merges for the integration of longer-running features.
In the latter case, the resulting merge commit serves as a symbolic joining of the two branches.
Our first example demonstrates a fast-forward merge.
The code below creates a new branch, adds two commits to it, then integrates it into the main line with a fast-forward merge.
 The Centralized Workflow is a great Git workflow for teams transitioning from SVN.
Like Subversion, the Centralized Workflow uses a central repository to serve as the single point-of-entry for all changes to the project.
Instead of
The Centralized Workflow is a great Git workflow for teams transitioning from SVN.
Like Subversion, the Centralized Workflow uses a central repository to serve as the single point-of-entry for all changes to the project.
Instead of  First, someone needs to create the central repository on a server.
If it’s a new project, you can initialize an empty repository.
Otherwise, you’ll need to import an existing Git or SVN repository.
Central repositories should always be bare repositories (they shouldn’t have a working directory), which can be created as follows:
First, someone needs to create the central repository on a server.
If it’s a new project, you can initialize an empty repository.
Otherwise, you’ll need to import an existing Git or SVN repository.
Central repositories should always be bare repositories (they shouldn’t have a working directory), which can be created as follows:
 Before the developer can publish their feature, they need to fetch the updated central commits and rebase their changes on top of them.
This is like saying, “I want to add my changes to what everyone else has already done.” The result is a perfectly linear history, just like in traditional SVN workflows.
If local changes directly conflict with upstream commits, Git will pause the rebasing process and give you a chance to manually resolve the conflicts.
The nice thing about Git is that it uses the same
Before the developer can publish their feature, they need to fetch the updated central commits and rebase their changes on top of them.
This is like saying, “I want to add my changes to what everyone else has already done.” The result is a perfectly linear history, just like in traditional SVN workflows.
If local changes directly conflict with upstream commits, Git will pause the rebasing process and give you a chance to manually resolve the conflicts.
The nice thing about Git is that it uses the same .svg?cdnVersion=217) In his local repository, John can develop features using the standard Git commit process: edit, stage, and commit.
Remember that since these commands create local commits, John can repeat this process as many times as he wants without worrying about what’s going on in the central repository.
In his local repository, John can develop features using the standard Git commit process: edit, stage, and commit.
Remember that since these commands create local commits, John can repeat this process as many times as he wants without worrying about what’s going on in the central repository.
 Meanwhile, Mary is working on her own feature in her own local repository using the same edit/stage/commit process.
Like John, she doesn’t care what’s going on in the central repository, and she really doesn’t care what John is doing in his local repository, since all local repositories are private.
Meanwhile, Mary is working on her own feature in her own local repository using the same edit/stage/commit process.
Like John, she doesn’t care what’s going on in the central repository, and she really doesn’t care what John is doing in his local repository, since all local repositories are private.
 Once John finishes his feature, he should publish his local commits to the central repository so other team members can access it.
He can do this with the
Once John finishes his feature, he should publish his local commits to the central repository so other team members can access it.
He can do this with the  Let’s see what happens if Mary tries to push her feature after John has successfully published his changes to the central repository.
She can use the exact same push command:
Let’s see what happens if Mary tries to push her feature after John has successfully published his changes to the central repository.
She can use the exact same push command:
 Mary can use
  The pull would still work if you forgot this option, but you would wind up with a superfluous “merge commit” every time someone needed to synchronize with the central repository.
For this workflow, it’s always better to rebase instead of generating a merge commit.
The pull would still work if you forgot this option, but you would wind up with a superfluous “merge commit” every time someone needed to synchronize with the central repository.
For this workflow, it’s always better to rebase instead of generating a merge commit.
 Rebasing works by transferring each local commit to the updated
  The great thing about Git is that anyone can resolve their own merge conflicts.
In our example, Mary would simply run a
The great thing about Git is that anyone can resolve their own merge conflicts.
In our example, Mary would simply run a  After she’s done synchronizing with the central repository, Mary will be able to publish her changes successfully:
 Before she starts developing a feature, Mary needs an isolated branch to work on.
She can request a new branch with the following command:
Before she starts developing a feature, Mary needs an isolated branch to work on.
She can request a new branch with the following command:
.svg?cdnVersion=217) Mary adds a few commits to her feature over the course of the morning.
Before she leaves for lunch, it’s a good idea to push her feature branch up to the central repository.
This serves as a convenient backup, but if Mary was collaborating with other developers, this would also give them access to her initial commits.
Mary adds a few commits to her feature over the course of the morning.
Before she leaves for lunch, it’s a good idea to push her feature branch up to the central repository.
This serves as a convenient backup, but if Mary was collaborating with other developers, this would also give them access to her initial commits.
 When Mary gets back from lunch, she completes her feature.
Before merging it into
When Mary gets back from lunch, she completes her feature.
Before merging it into .svg?cdnVersion=217) Bill gets the pull request and takes a look at
Bill gets the pull request and takes a look at .svg?cdnVersion=217) To make the changes, Mary uses the exact same process as she did to create the first iteration of her feature.
She edits, stages, commits, and pushes updates to the central repository.
All her activity shows up in the pull request, and Bill can still make comments along the way.
If he wanted, Bill could pull
To make the changes, Mary uses the exact same process as she did to create the first iteration of her feature.
She edits, stages, commits, and pushes updates to the central repository.
All her activity shows up in the pull request, and Bill can still make comments along the way.
If he wanted, Bill could pull  Once Bill is ready to accept the pull request, someone needs to merge the feature into the stable project (this can be done by either Bill or Mary):

 Note that
  Once
Once  Maintenance or
  All new developers to a Forking Workflow project need to fork the official repository.
As previously stated, forking is just a standard
All new developers to a Forking Workflow project need to fork the official repository.
As previously stated, forking is just a standard  Once a developer is ready to share their new feature, they need to do two things.
First, they have to make their contribution accessible to other developers by pushing it to their public repository.
Their origin remote should already be set up, so all they should have to do is the following:
Once a developer is ready to share their new feature, they need to do two things.
First, they have to make their contribution accessible to other developers by pushing it to their public repository.
Their origin remote should already be set up, so all they should have to do is the following:
 After the synchronize phase, the migration lead should have no trouble keeping a local Git repository up-to-date with an SVN counterpart.
To share the Git repository, the migration lead can share their local Git repository with other developers by pushing it to Bitbucket, a Git hosting service.
After the synchronize phase, the migration lead should have no trouble keeping a local Git repository up-to-date with an SVN counterpart.
To share the Git repository, the migration lead can share their local Git repository with other developers by pushing it to Bitbucket, a Git hosting service.
 Once it’s on Bitbucket, other developers can clone the converted Git repository to their local machines, explore its history with Git commands, and begin integrating it into their build processes.
However, we advocate a one-way synchronization from SVN to Git until your team is ready to switch to a pure Git workflow.
This means that everybody should treat their Git repository as read-only and continue committing to the original SVN repository.
The only changes to the Git repository should happen when the migration lead synchronizes it and pushes the updates to Bitbucket.
This provides a clear-cut transition period where your team can get comfortable with Git without interrupting your existing SVN-based workflow.
Once you’re confident that your developers are ready to make the switch, the final step in the migration process is to freeze your SVN repository and begin committing with Git instead.
Once it’s on Bitbucket, other developers can clone the converted Git repository to their local machines, explore its history with Git commands, and begin integrating it into their build processes.
However, we advocate a one-way synchronization from SVN to Git until your team is ready to switch to a pure Git workflow.
This means that everybody should treat their Git repository as read-only and continue committing to the original SVN repository.
The only changes to the Git repository should happen when the migration lead synchronizes it and pushes the updates to Bitbucket.
This provides a clear-cut transition period where your team can get comfortable with Git without interrupting your existing SVN-based workflow.
Once you’re confident that your developers are ready to make the switch, the final step in the migration process is to freeze your SVN repository and begin committing with Git instead.
 This switch should be a very natural process, as the entire Git workflow is already in place and your developers have had all the time they need to get comfortable with it.
By this point, you have successfully migrated your project from SVN to Git.
This switch should be a very natural process, as the entire Git workflow is already in place and your developers have had all the time they need to get comfortable with it.
By this point, you have successfully migrated your project from SVN to Git.
 If you are running OS X, you need to mount a case-sensitive disk image with the
  Run the following commands to automatically generate this text file:
 Standard SVN layouts
If your SVN project uses the standard
Standard SVN layouts
If your SVN project uses the standard  This behavior makes certain two-way synchronization procedures easier, but it can be very confusing when trying to make a one-way migration Git.
That’s why our next step will be to convert these remote branches to local branches and actual Git tags.
This behavior makes certain two-way synchronization procedures easier, but it can be very confusing when trying to make a one-way migration Git.
That’s why our next step will be to convert these remote branches to local branches and actual Git tags.
 In the meantime, you should continue to commit to your SVN repository and synchronize your Git repository whenever necessary.
This process is similar to the Convert phase, but since you’re only dealing with incremental changes, it should be much more efficient.
In the meantime, you should continue to commit to your SVN repository and synchronize your Git repository whenever necessary.
This process is similar to the Convert phase, but since you’re only dealing with incremental changes, it should be much more efficient.
 Giving each developer their own complete repository is the heart of distributed version control, and it opens up a wide array of potential workflows.
You can read more about these workflows from our Git Workflows section.
So far, you’ve only been working with a local Git repository.
This page explains how to push this local repo to a public repository hosted on Bitbucket.
Sharing the Git repository during the migration allows your team to experiment with Git commands without affecting their active SVN development.
Until you’re ready to make the switch, it’s very important to treat the shared Git repositories as read-only.
All development should continue to be committed to the original SVN repository.
Giving each developer their own complete repository is the heart of distributed version control, and it opens up a wide array of potential workflows.
You can read more about these workflows from our Git Workflows section.
So far, you’ve only been working with a local Git repository.
This page explains how to push this local repo to a public repository hosted on Bitbucket.
Sharing the Git repository during the migration allows your team to experiment with Git commands without affecting their active SVN development.
Until you’re ready to make the switch, it’s very important to treat the shared Git repositories as read-only.
All development should continue to be committed to the original SVN repository.
 In the resulting form, add a name and description for your repository.
If your project is private, keep the Access level option checked so that only designated developers are allowed to clone it.
For the Forking field, use Allow only private forks.
Use Git for the Repository type, select any project management tools you want to use, and select the primary programming language of your project in the Language field.
In the resulting form, add a name and description for your repository.
If your project is private, keep the Access level option checked so that only designated developers are allowed to clone it.
For the Forking field, use Allow only private forks.
Use Git for the Repository type, select any project management tools you want to use, and select the primary programming language of your project in the Language field.
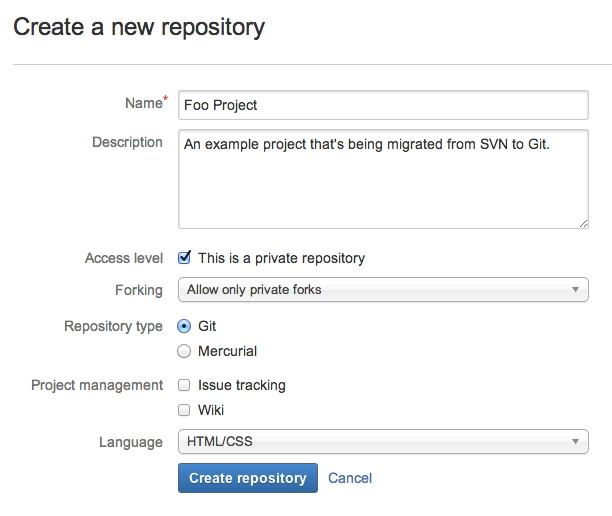 To create the hosted repository, submit the form by clicking the Create repository button.
After your repository is set up, you’ll see a Next steps page that describes some useful commands for importing an existing project.
The rest of this page will walk you through those instructions step-by-step.
To create the hosted repository, submit the form by clicking the Create repository button.
After your repository is set up, you’ll see a Next steps page that describes some useful commands for importing an existing project.
The rest of this page will walk you through those instructions step-by-step.
 After running the above command, you can use
  Your Bitbucket repository is now essentially a clone of your local repository.
In the Bitbucket web interface, you should be able to explore the entire commit history of all of your branches.
Your Bitbucket repository is now essentially a clone of your local repository.
In the Bitbucket web interface, you should be able to explore the entire commit history of all of your branches.
 If your repository is private, you’ll also need to grant access to your team members in the Administration tab of the Bitbucket web interface.
Users and groups can be managed by clicking the Access management link the left sidebar.
If your repository is private, you’ll also need to grant access to your team members in the Administration tab of the Bitbucket web interface.
Users and groups can be managed by clicking the Access management link the left sidebar.
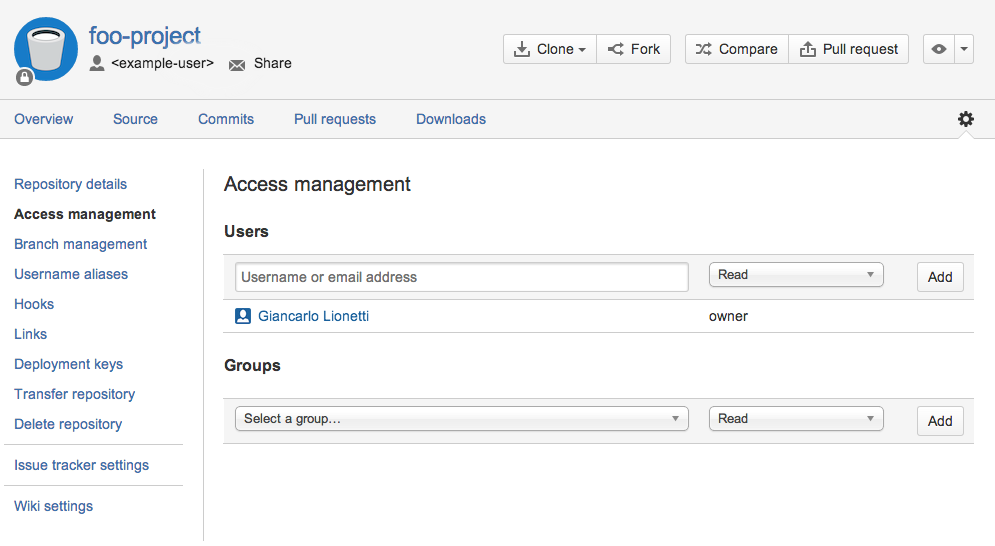 As an alternative, you can use Bitbucket’s built-in invitation feature to invite other developers to fork the repository.
The invited users will automatically be given access to the repository, so you don’t need to worry about granting permissions.
Once they have the URL of your repository, another developer can copy the repository to their local machine with
As an alternative, you can use Bitbucket’s built-in invitation feature to invite other developers to fork the repository.
The invited users will automatically be given access to the repository, so you don’t need to worry about granting permissions.
Once they have the URL of your repository, another developer can copy the repository to their local machine with 
 The discrete switch from SVN to Git makes for a very intuitive migration.
All of your developers should already understand the new Git workflows that they’ll be using, and they should have had plenty of time to practice using Git commands on the local repositories they cloned from Bitbucket.
This page guides you through the final step of the migration.
The discrete switch from SVN to Git makes for a very intuitive migration.
All of your developers should already understand the new Git workflows that they’ll be using, and they should have had plenty of time to practice using Git commands on the local repositories they cloned from Bitbucket.
This page guides you through the final step of the migration.
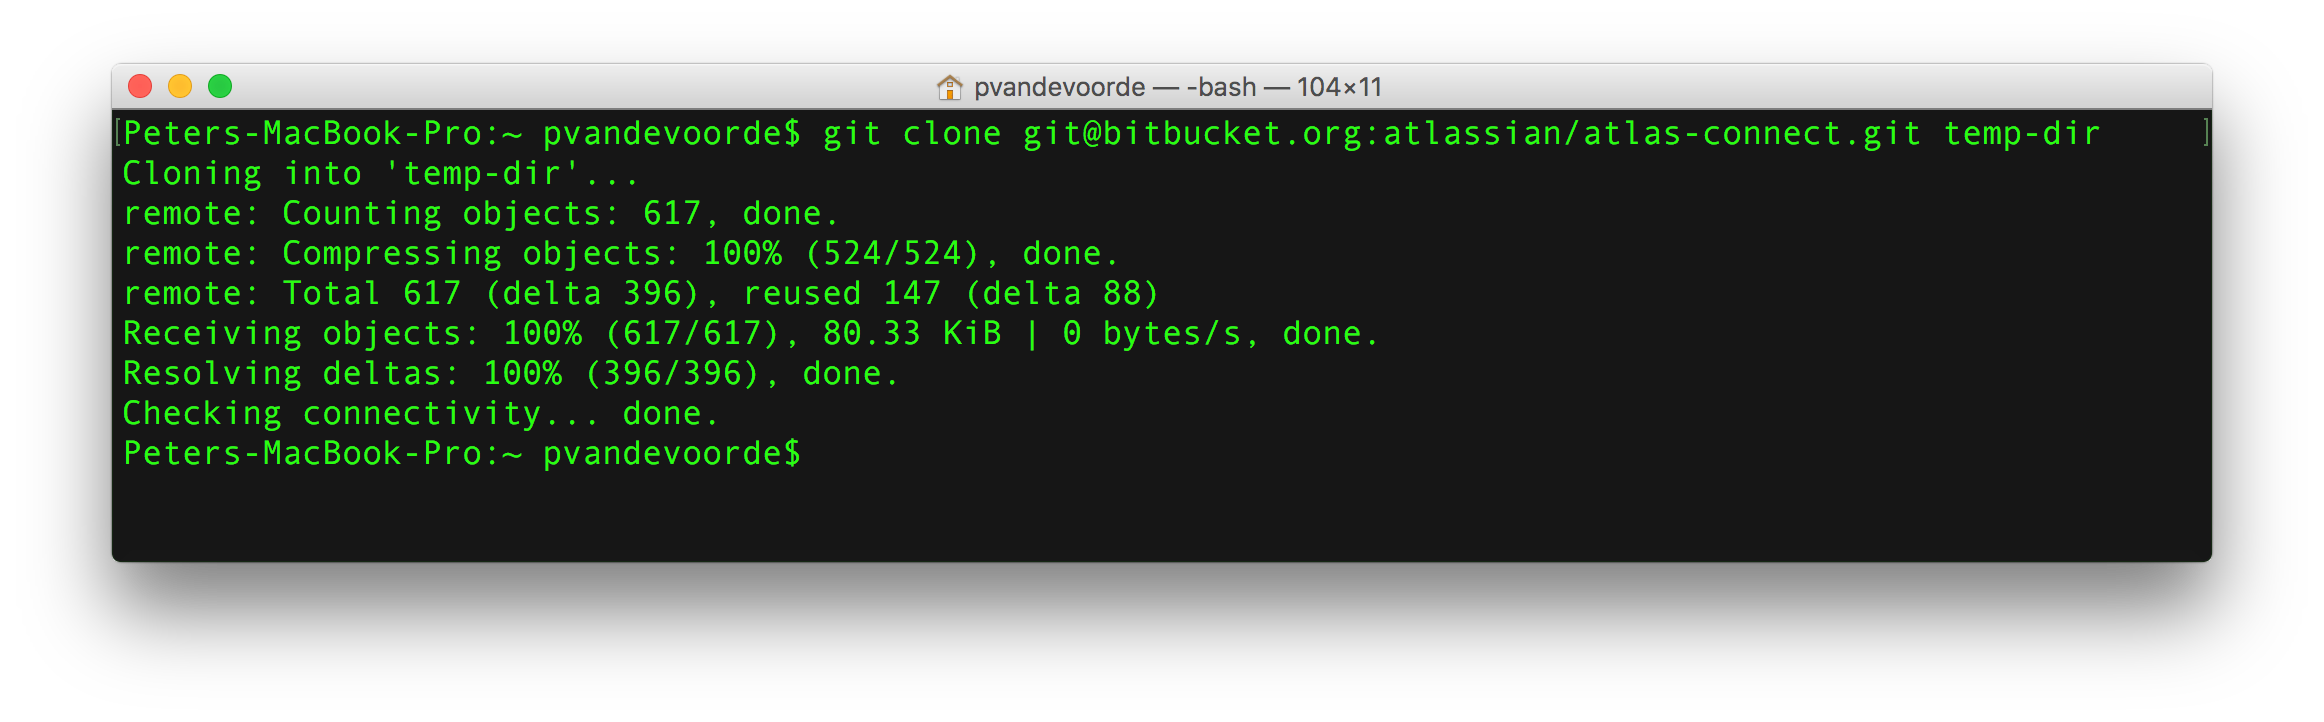 2.
Go into the temp-dir directory.
3. To see a list of the different branches in ORI do:
2.
Go into the temp-dir directory.
3. To see a list of the different branches in ORI do:
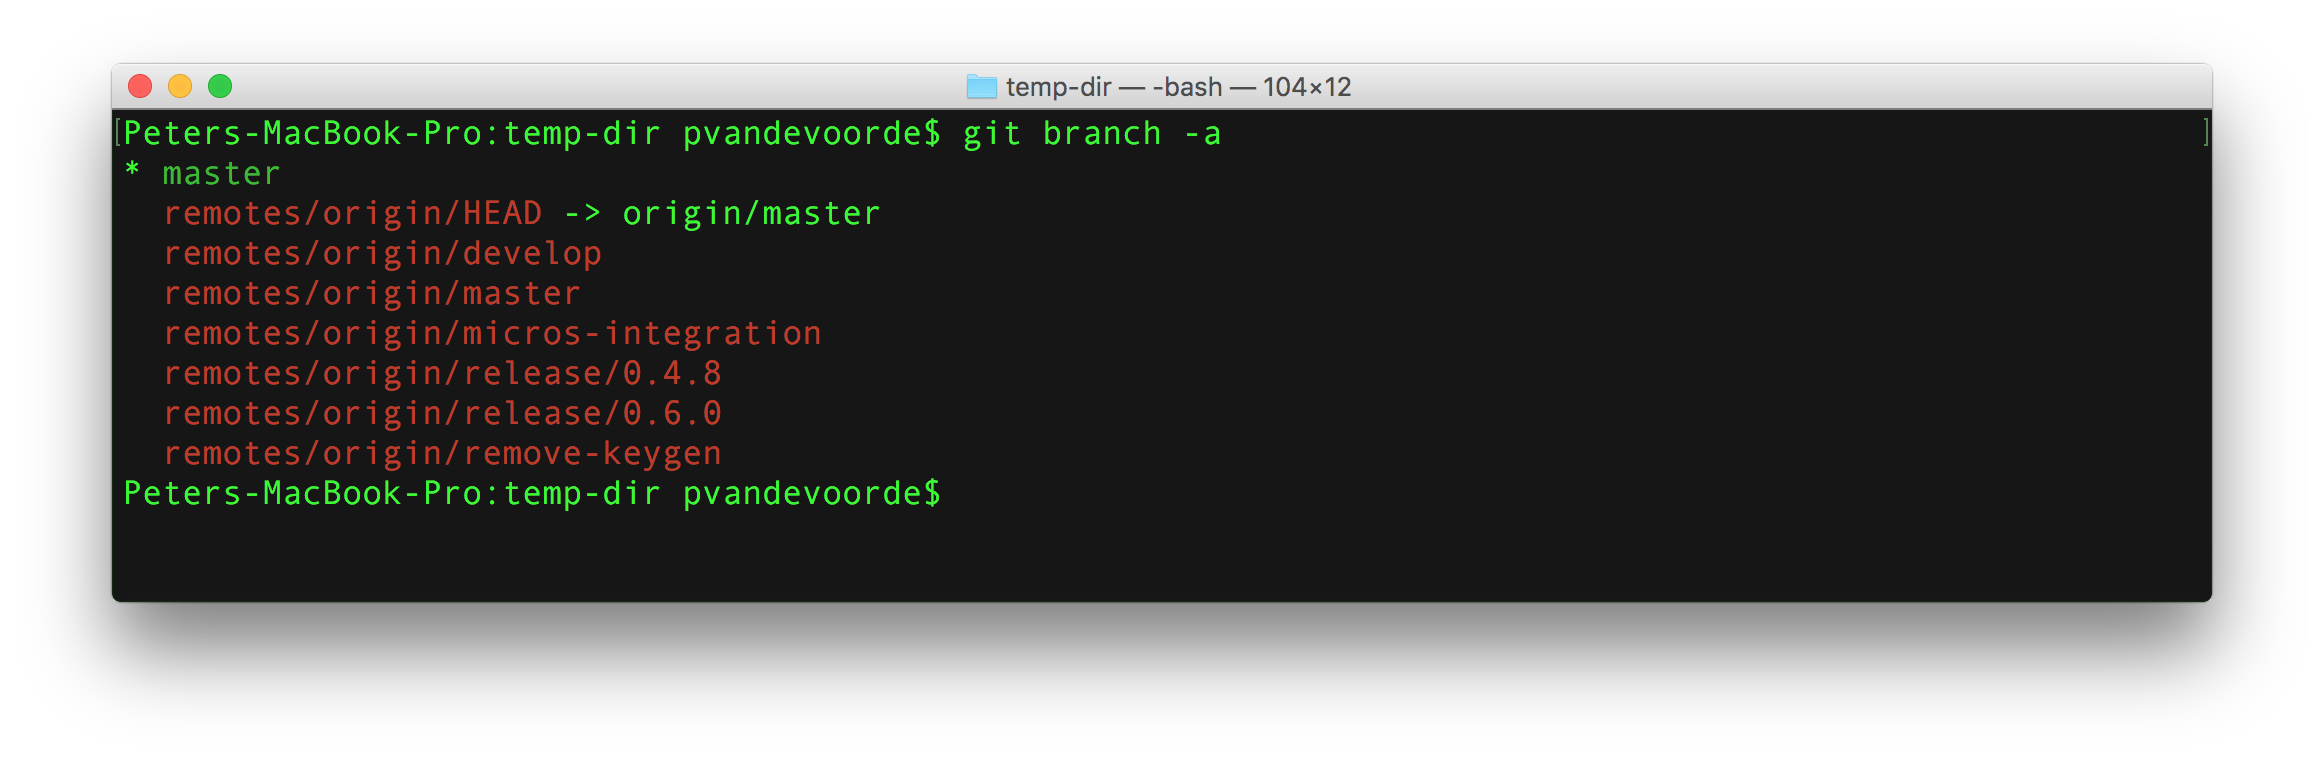 4.
Checkout all the branches that you want to copy from ORI to NEW using:
4.
Checkout all the branches that you want to copy from ORI to NEW using:
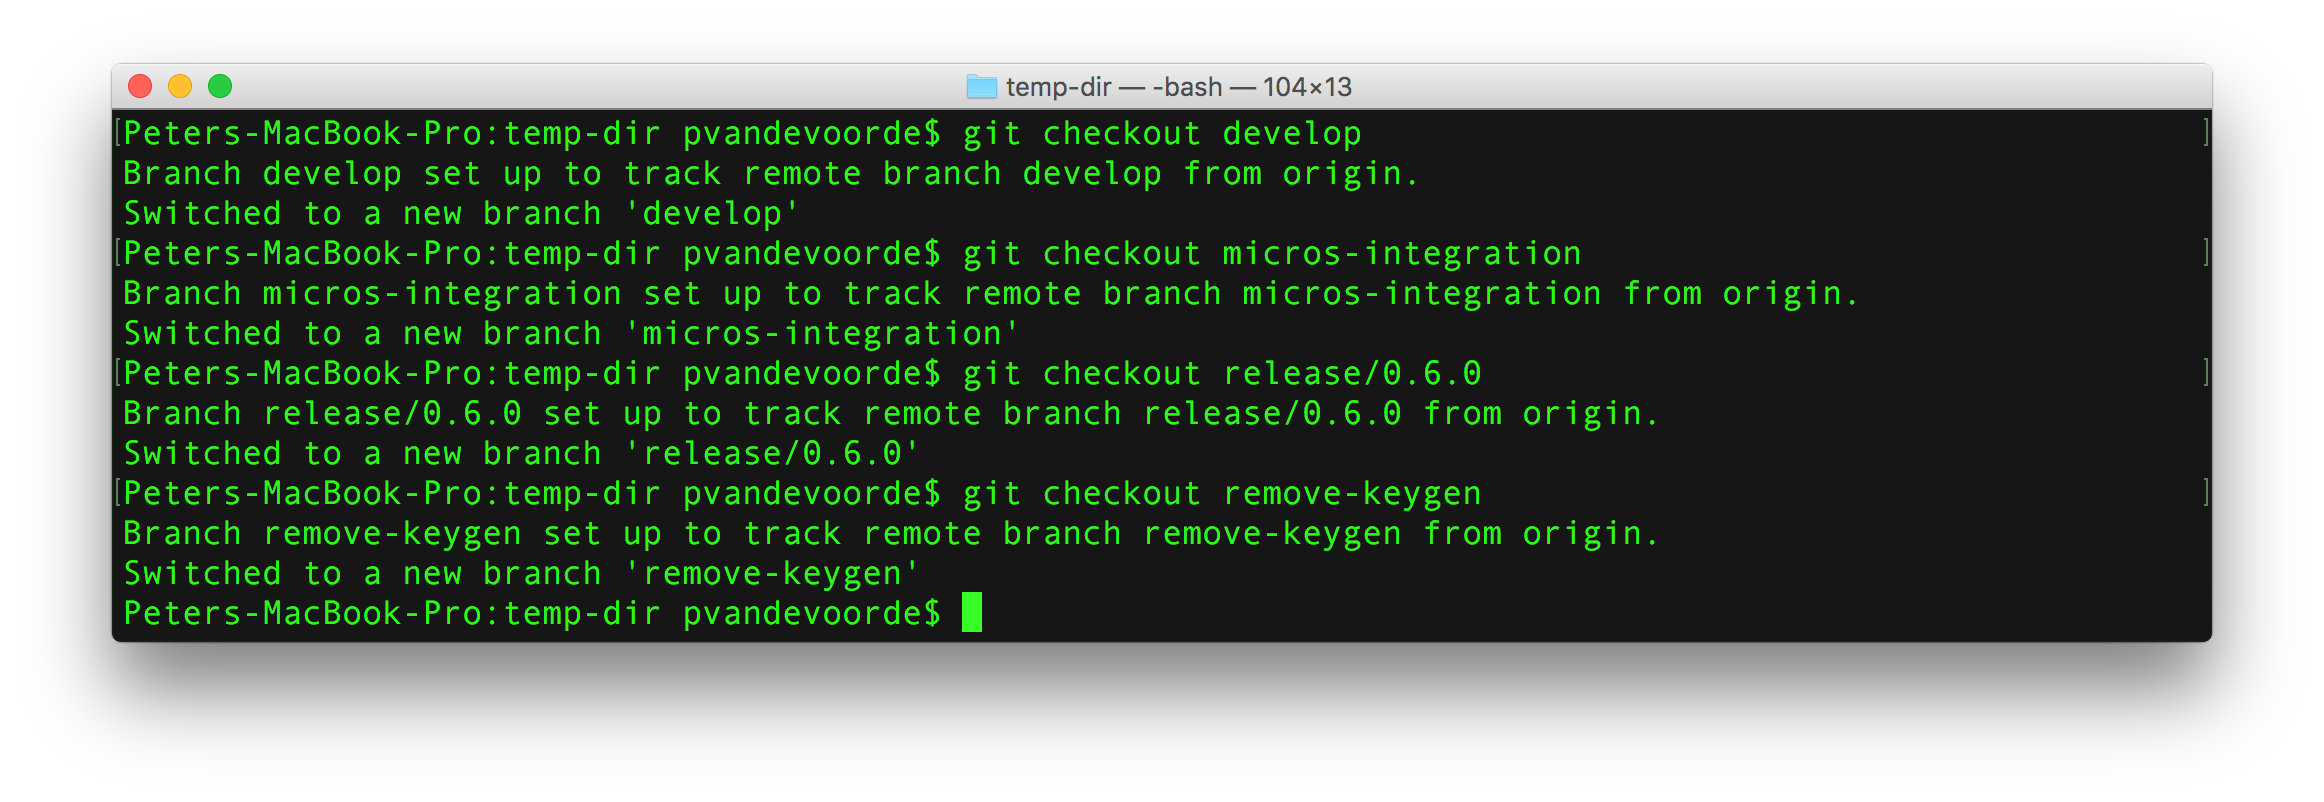 5.
Now fetch all the tags from ORI using:
5.
Now fetch all the tags from ORI using:
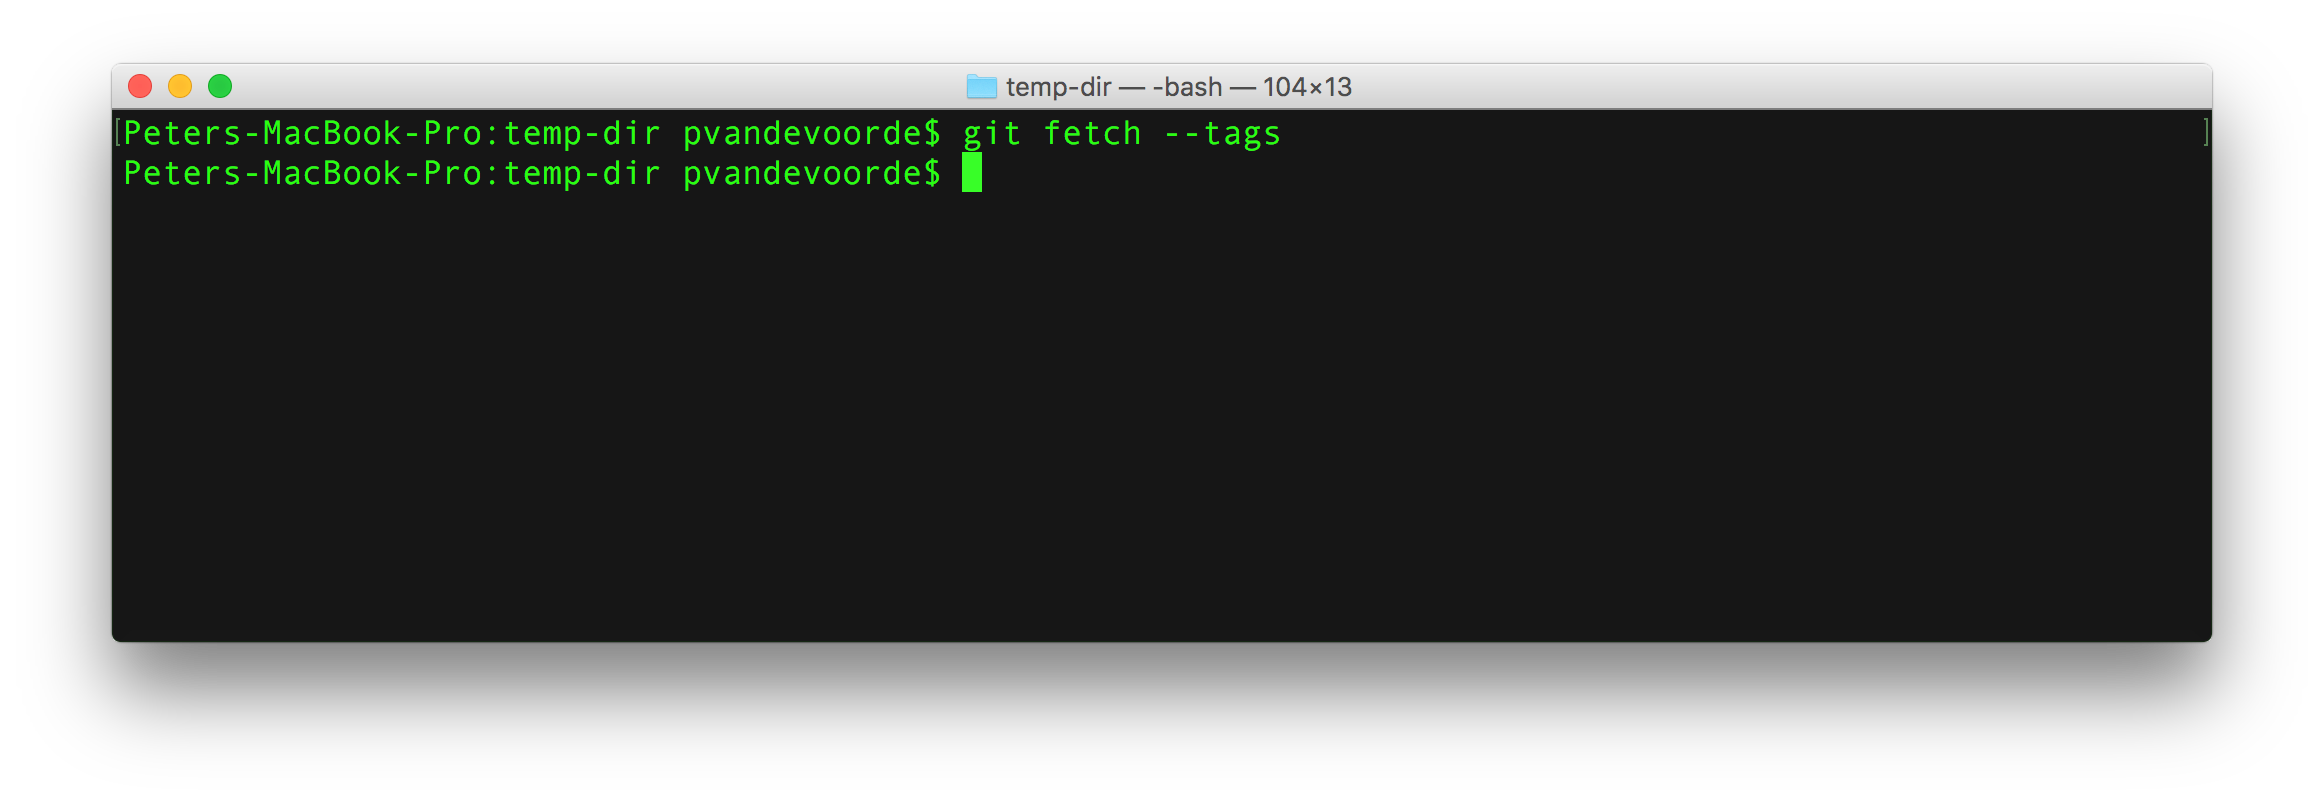 6.
Before doing the next step make sure to check your local tags and branches using the following commands:
6.
Before doing the next step make sure to check your local tags and branches using the following commands:
 7.
Now clear the link to the ORI repository with the following command:
7.
Now clear the link to the ORI repository with the following command:
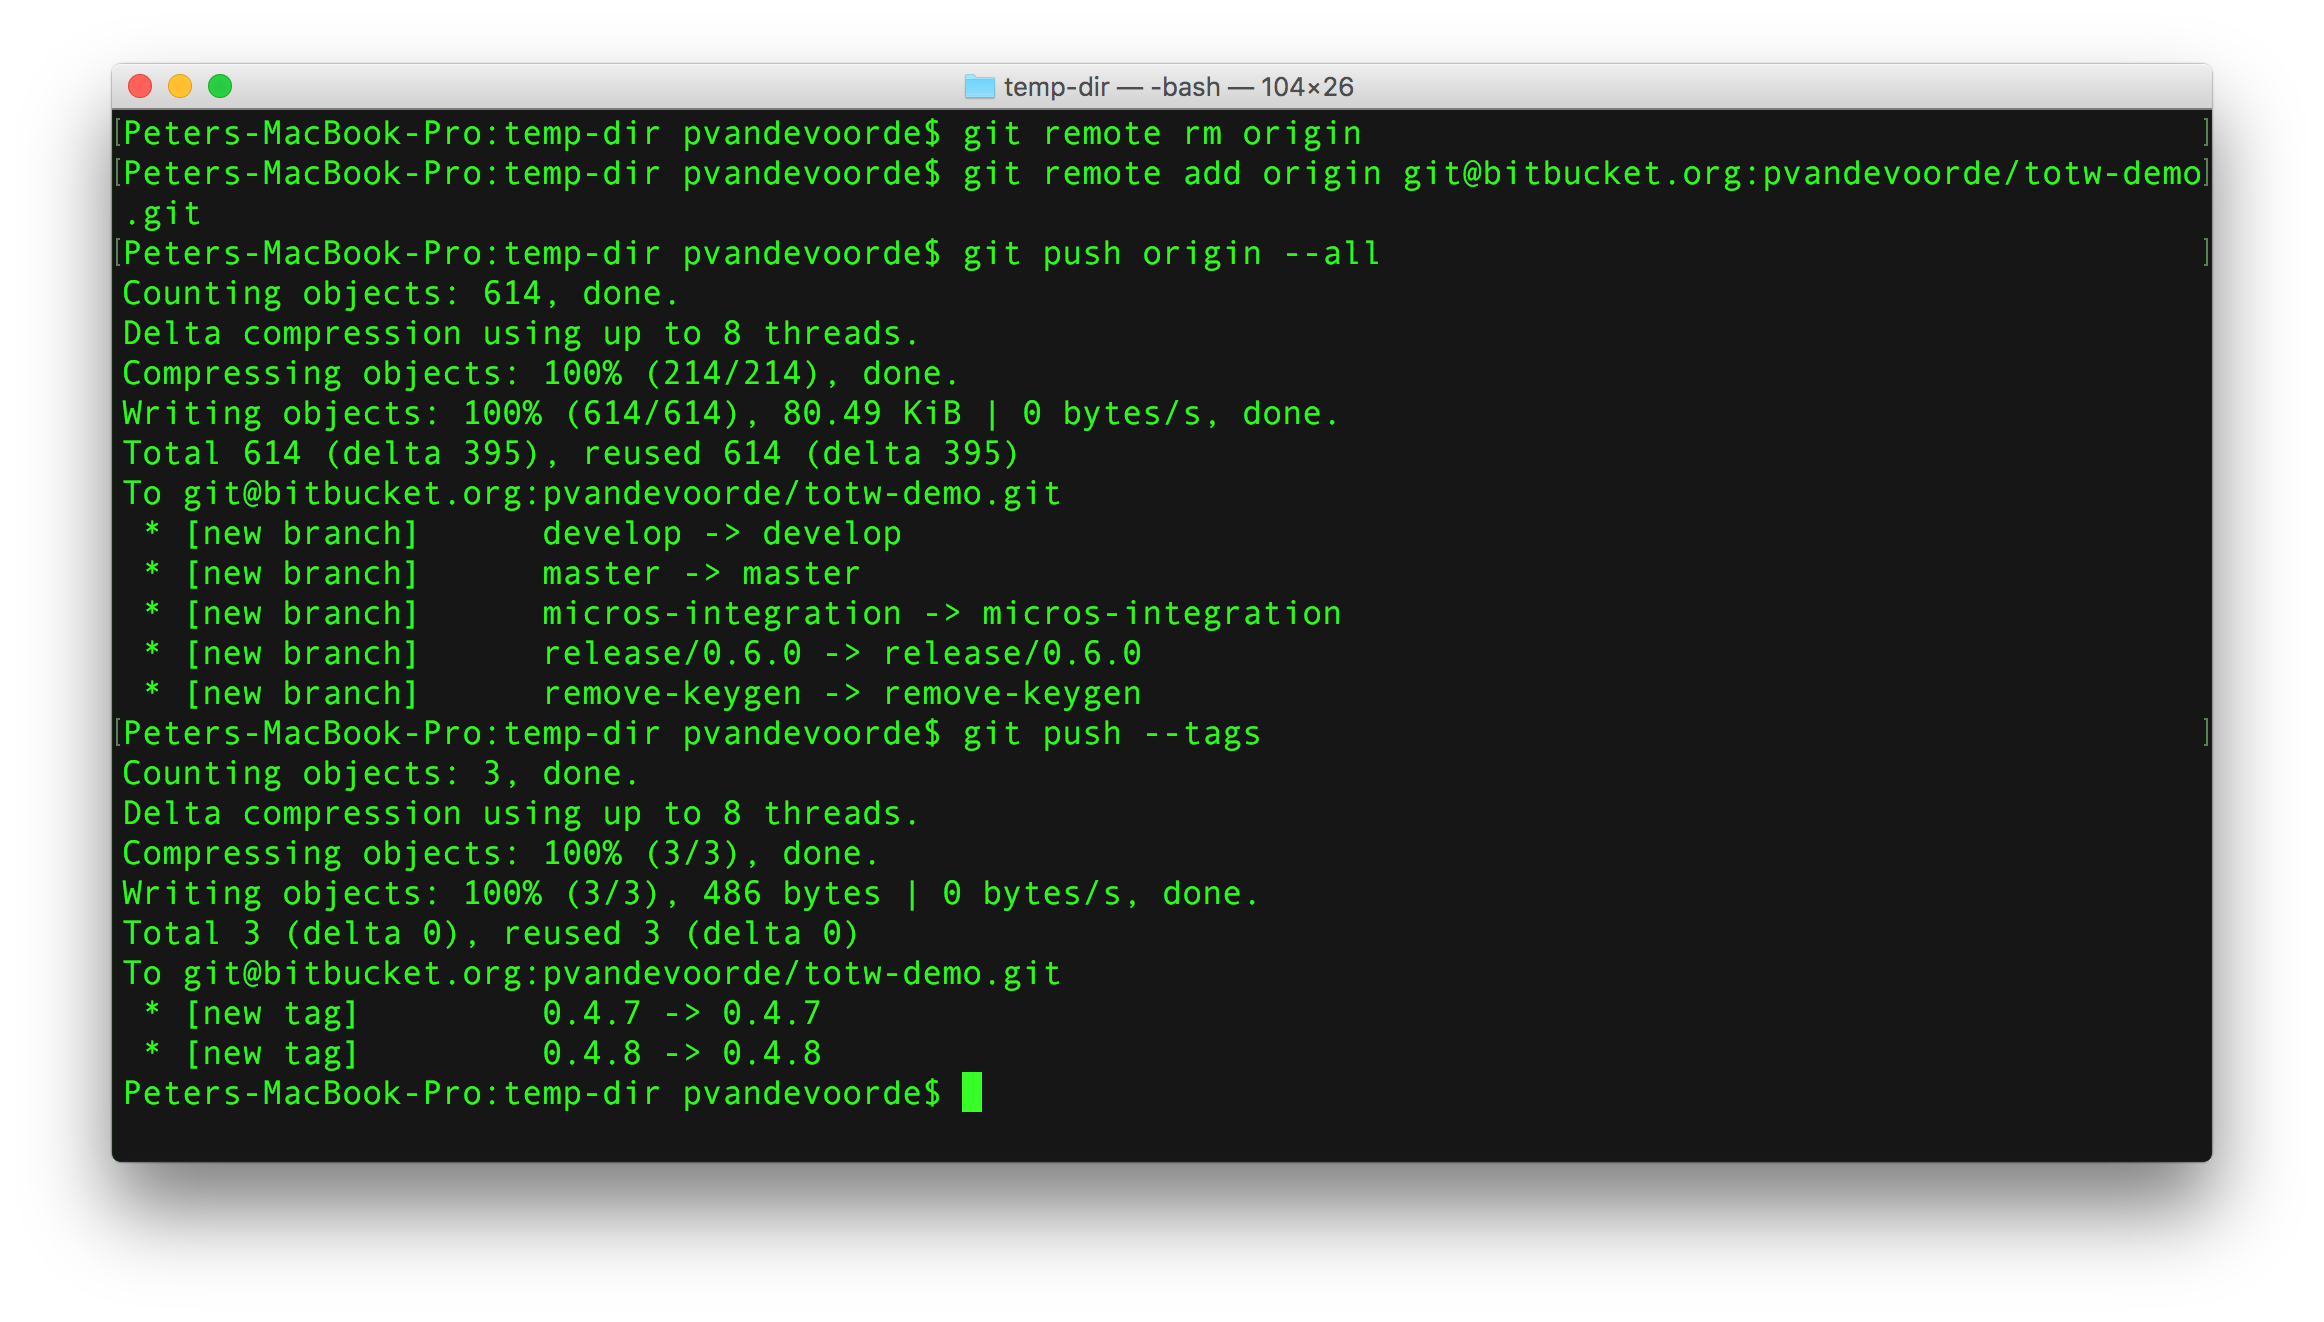 10.
You now have a full copy from your ORI repo.
10.
You now have a full copy from your ORI repo.
 Git is all about working with divergent history.
Its
Git is all about working with divergent history.
Its  The
The  The
The  If you want to perform custom actions when a certain event takes place in a Git repository, hooks are your tool of choice.
They let you normalize commit messages, automate testing suites, notify continuous integration systems, and much more.
After this article, you’ll understand the many ways in which Git hooks can streamline your workflow.
Learn more
If you want to perform custom actions when a certain event takes place in a Git repository, hooks are your tool of choice.
They let you normalize commit messages, automate testing suites, notify continuous integration systems, and much more.
After this article, you’ll understand the many ways in which Git hooks can streamline your workflow.
Learn more
 A ref is Git’s internal way of referring to a commit.
You’re already familiar with many categories of refs, including commit hashes and branch names.
But, there are many other types of refs, and virtually every Git command utilizes them in some form or another.
You’ll walk away from this article with an intimate knowledge of Git’s inner workings.
Learn more
A ref is Git’s internal way of referring to a commit.
You’re already familiar with many categories of refs, including commit hashes and branch names.
But, there are many other types of refs, and virtually every Git command utilizes them in some form or another.
You’ll walk away from this article with an intimate knowledge of Git’s inner workings.
Learn more
 Now, let’s say that the new commits in
  Merging is nice because it’s a non-destructive operation.
The existing branches are not changed in any way.
This avoids all of the potential pitfalls of rebasing (discussed below).
On the other hand, this also means that the
Merging is nice because it’s a non-destructive operation.
The existing branches are not changed in any way.
This avoids all of the potential pitfalls of rebasing (discussed below).
On the other hand, this also means that the  The major benefit of rebasing is that you get a much cleaner project history.
First, it eliminates the unnecessary merge commits required by
The major benefit of rebasing is that you get a much cleaner project history.
First, it eliminates the unnecessary merge commits required by  Eliminating insignificant commits like this makes your feature’s history much easier to understand.
This is something that
Eliminating insignificant commits like this makes your feature’s history much easier to understand.
This is something that  The rebase moves all of the commits in
 If you want to re-write the entire feature using this method, the
  You can resolve this fork the exact same way as you integrate upstream changes from
  Note that this rebase doesn’t violate the Golden Rule of Rebasing because only your local
  If you’re not entirely comfortable with
  It helps to think about each command in terms of their effect on the three state management mechanisms of a Git repository: the working directory, the staged snapshot, and the commit history.
These components are sometimes known as "The three trees" of Git.
We explore the three trees in depth on the
It helps to think about each command in terms of their effect on the three state management mechanisms of a Git repository: the working directory, the staged snapshot, and the commit history.
These components are sometimes known as "The three trees" of Git.
We explore the three trees in depth on the 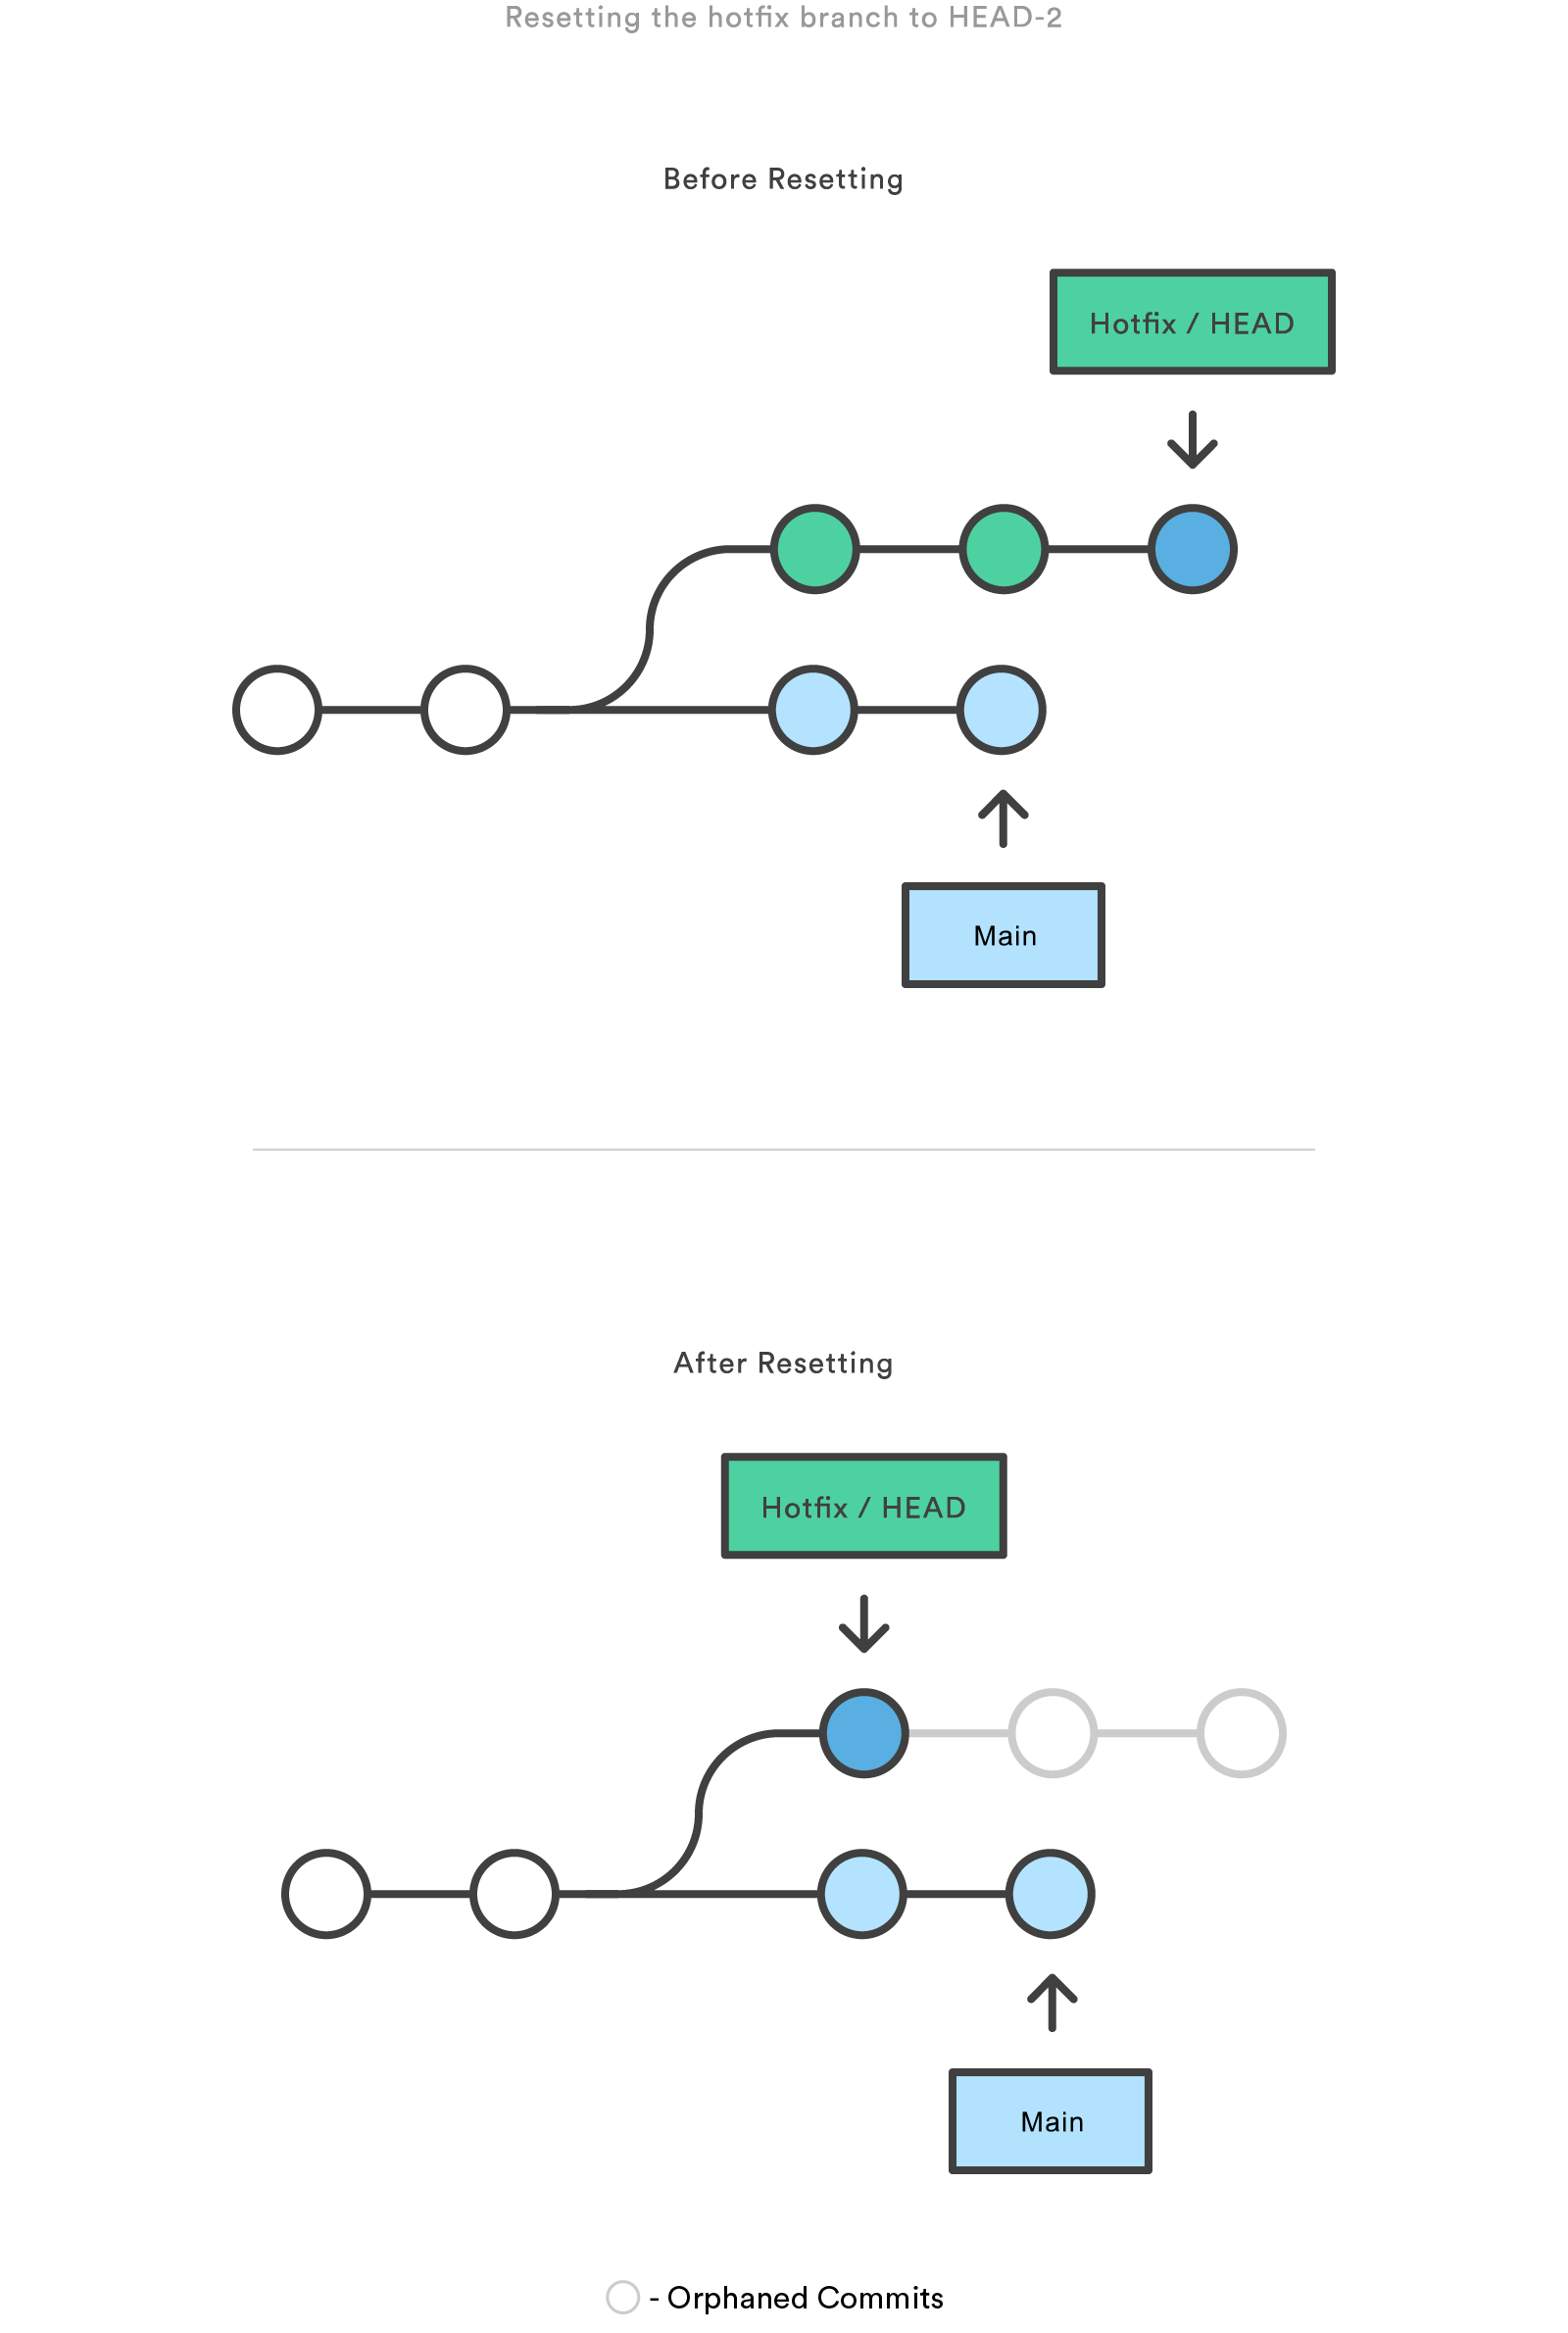 This usage of
 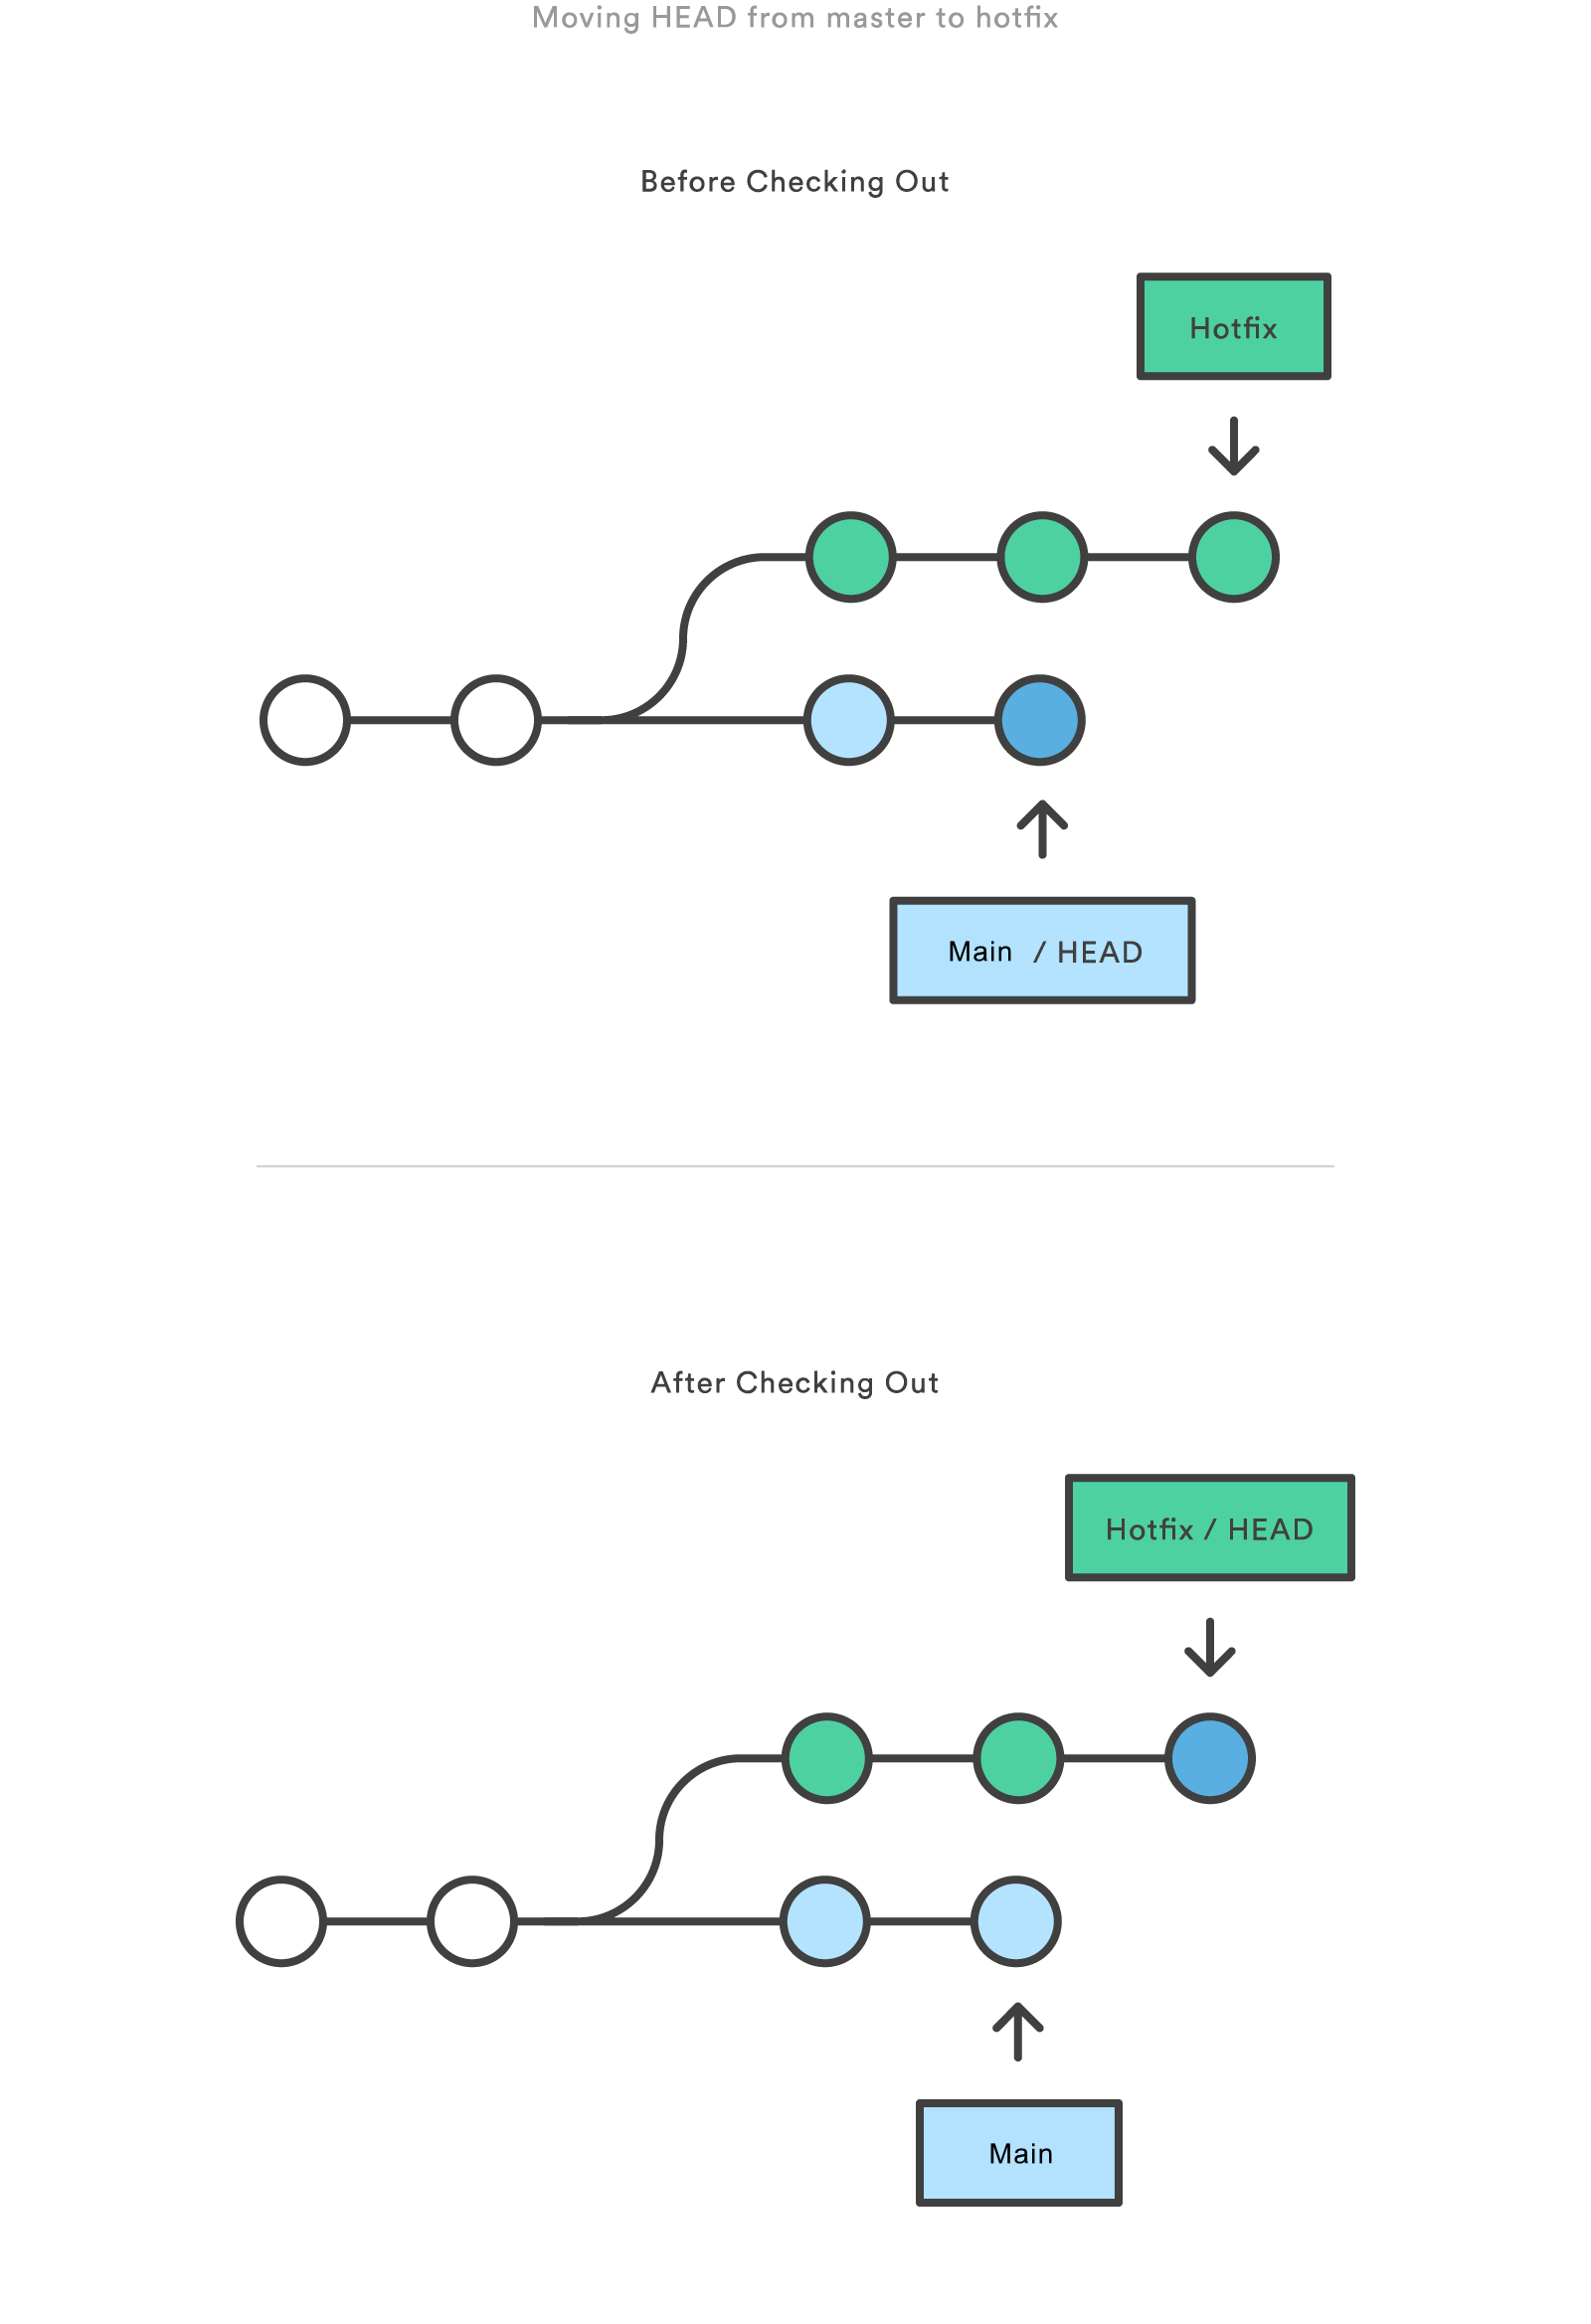 You can also check out arbitrary commits by passing the commit reference instead of a branch.
This does the exact same thing as checking out a branch: it moves the
You can also check out arbitrary commits by passing the commit reference instead of a branch.
This does the exact same thing as checking out a branch: it moves the  This is useful for quickly inspecting an old version of your project.
However, since there is no branch reference to the current
This is useful for quickly inspecting an old version of your project.
However, since there is no branch reference to the current  Contrast this with
  The
The  For example, the following command makes
  Note that if you switch the order of the range (
 Common use cases for Git hooks include encouraging a commit policy, altering the project environment depending on the state of the repository, and implementing continuous integration workflows.
But, since scripts are infinitely customizable, you can use Git hooks to automate or optimize virtually any aspect of your development workflow.
In this article, we’ll start with a conceptual overview of how Git hooks work.
Then, we’ll survey some of the most popular hooks for use in both local and server-side repositories.
Common use cases for Git hooks include encouraging a commit policy, altering the project environment depending on the state of the repository, and implementing continuous integration workflows.
But, since scripts are infinitely customizable, you can use Git hooks to automate or optimize virtually any aspect of your development workflow.
In this article, we’ll start with a conceptual overview of how Git hooks work.
Then, we’ll survey some of the most popular hooks for use in both local and server-side repositories.
 As an alternative, Git also provides a Template Directory mechanism that makes it easier to install hooks automatically.
All of the files and directories contained in this template directory are copied into the
As an alternative, Git also provides a Template Directory mechanism that makes it easier to install hooks automatically.
All of the files and directories contained in this template directory are copied into the  By understanding the many ways to refer to a commit, you make all of these commands that much more powerful.
In this chapter, we’ll shed some light on the internal workings of common commands like
By understanding the many ways to refer to a commit, you make all of these commands that much more powerful.
In this chapter, we’ll shed some light on the internal workings of common commands like  Relative refs can be used with the same commands that a normal ref can be used.
For example, all of the following commands use a relative reference:
Relative refs can be used with the same commands that a normal ref can be used.
For example, all of the following commands use a relative reference:
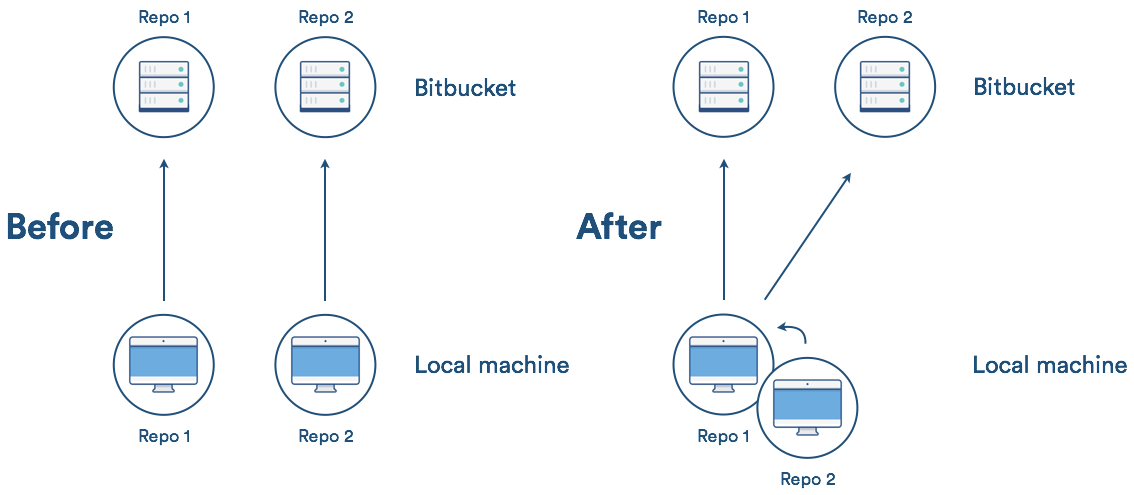 Why you may want to consider
 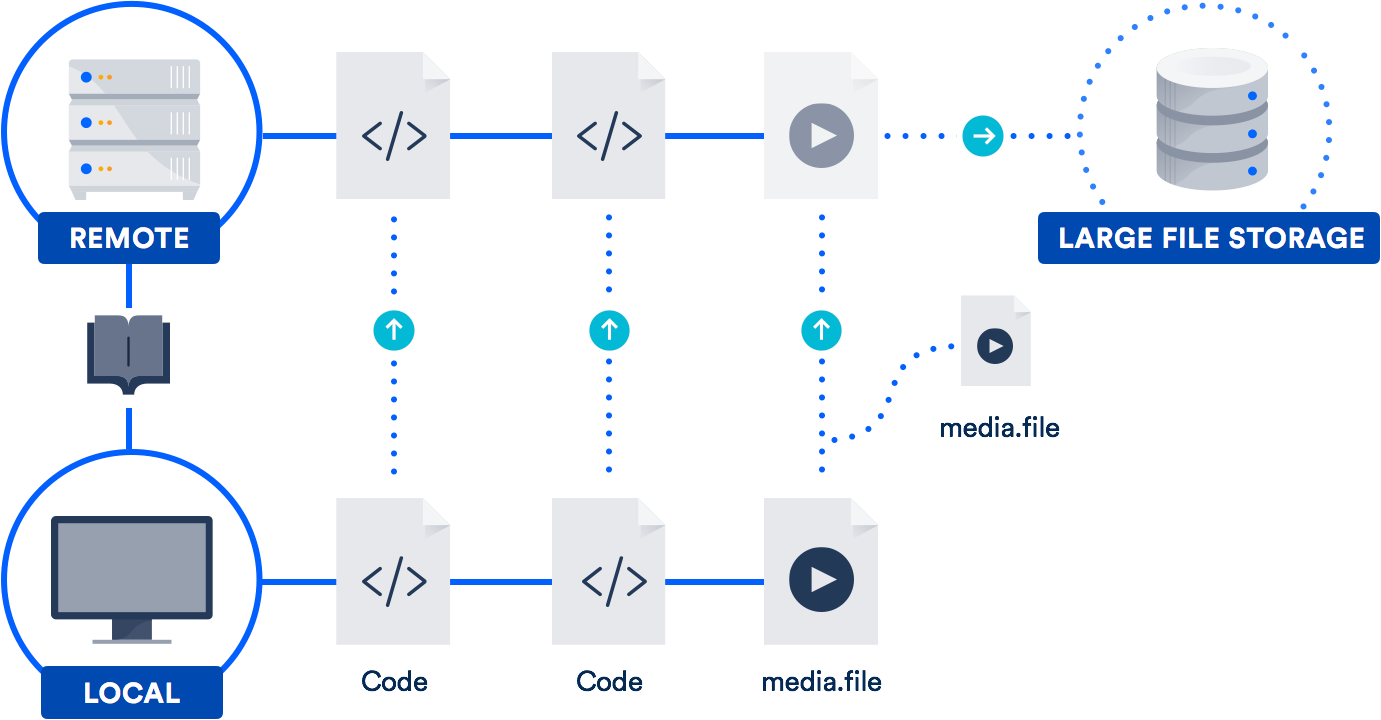 Bitbucket supports Git LFS, as does GitHub.
So chances are, you already have access to this technology.
It’s especially helpful for teams that include designers, videographers, musicians, or CAD users.
Bitbucket supports Git LFS, as does GitHub.
So chances are, you already have access to this technology.
It’s especially helpful for teams that include designers, videographers, musicians, or CAD users.
 When you push new commits to the server, any Git LFS files referenced by the newly pushed commits are transferred from your local Git LFS cache to the remote Git LFS store tied to your Git repository.
 When you checkout a commit that contains Git LFS pointers, they are replaced with files from your local Git LFS cache, or downloaded from the remote Git LFS store.
 Git LFS is seamless: in your working copy you'll only see your actual file content.
This means you can use Git LFS without changing your existing Git workflow; you simply
Git LFS is seamless: in your working copy you'll only see your actual file content.
This means you can use Git LFS without changing your existing Git workflow; you simply 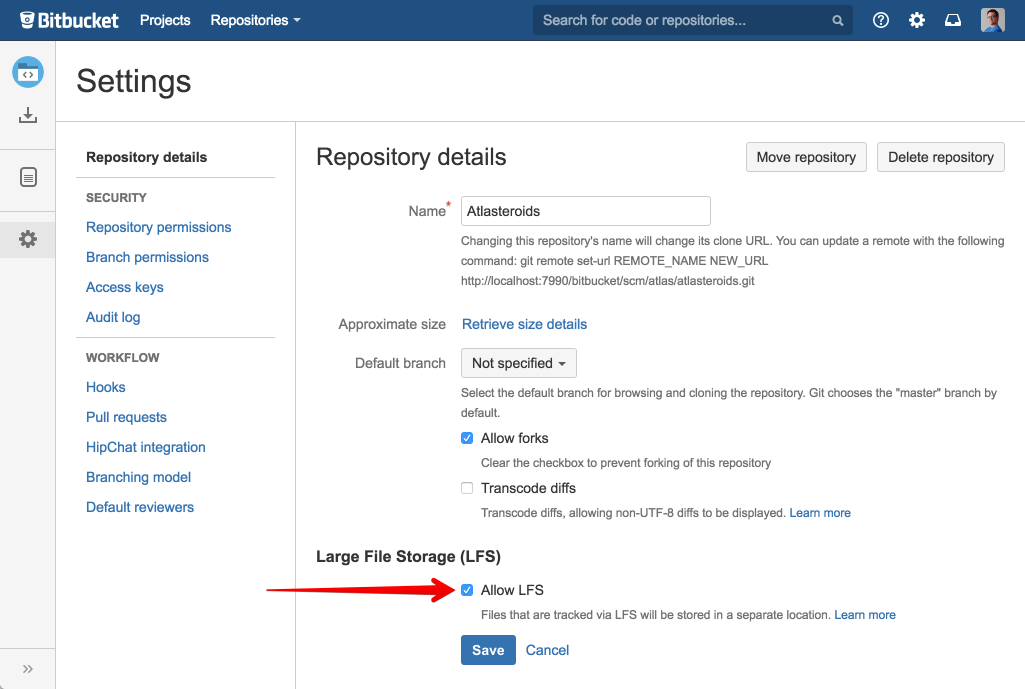 Once Git LFS is initialized for your repository, you can specify which files to track using
  However you can configure Git LFS to download content for earlier commits on recent branches and tags by configuring the
  As discussed in Moving a Git LFS repository between hosts, you can also elect to fetch all Git LFS content for your repository with
  You can configure the prune offset to retain Git LFS content for a longer period:
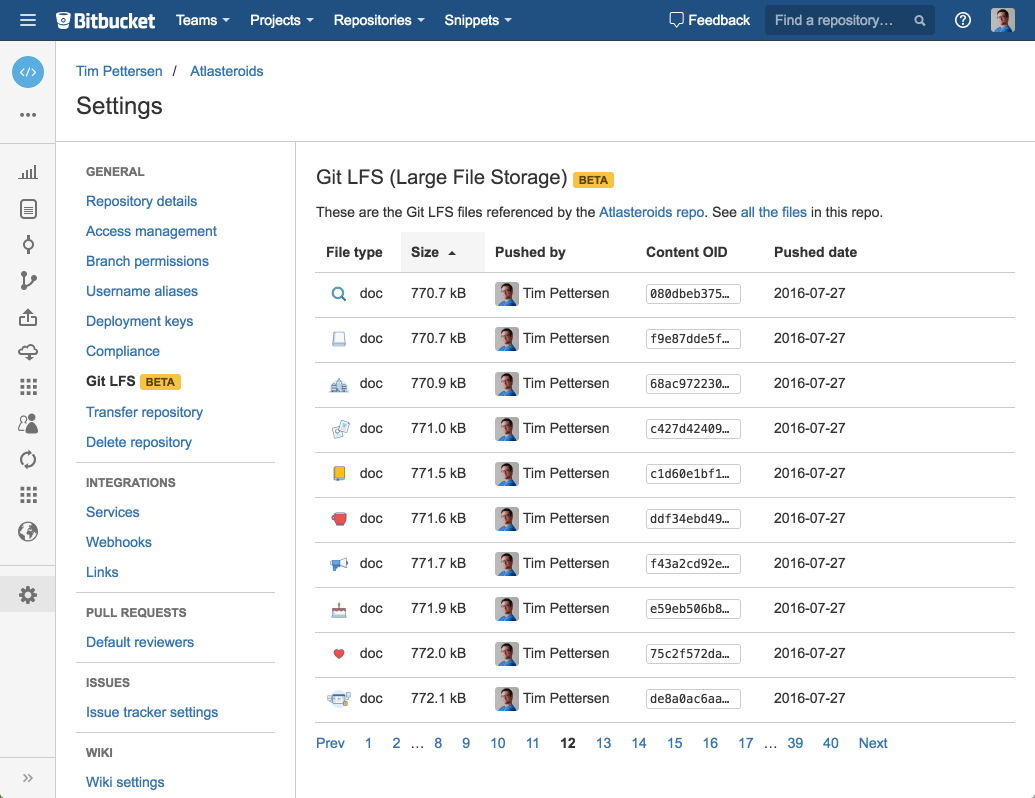 Note that each Git LFS file is indexed by its SHA-256 OID; the paths that reference each file are not visible via the UI.
This is because there could be many different paths at many different commits that may refer to a given object, so looking them up would be a very slow process.
To determine what a given Git LFS file actually contains, you have three options:
look at the file preview image and file type in the left hand column of the Bitbucket Git LFS UI
download the file using the link in the right hand column of the Bitbucket Git LFS UI -search for commits referencing the Git LFS object's SHA-256 OID, as discussed in the next section
Note that each Git LFS file is indexed by its SHA-256 OID; the paths that reference each file are not visible via the UI.
This is because there could be many different paths at many different commits that may refer to a given object, so looking them up would be a very slow process.
To determine what a given Git LFS file actually contains, you have three options:
look at the file preview image and file type in the left hand column of the Bitbucket Git LFS UI
download the file using the link in the right hand column of the Bitbucket Git LFS UI -search for commits referencing the Git LFS object's SHA-256 OID, as discussed in the next section
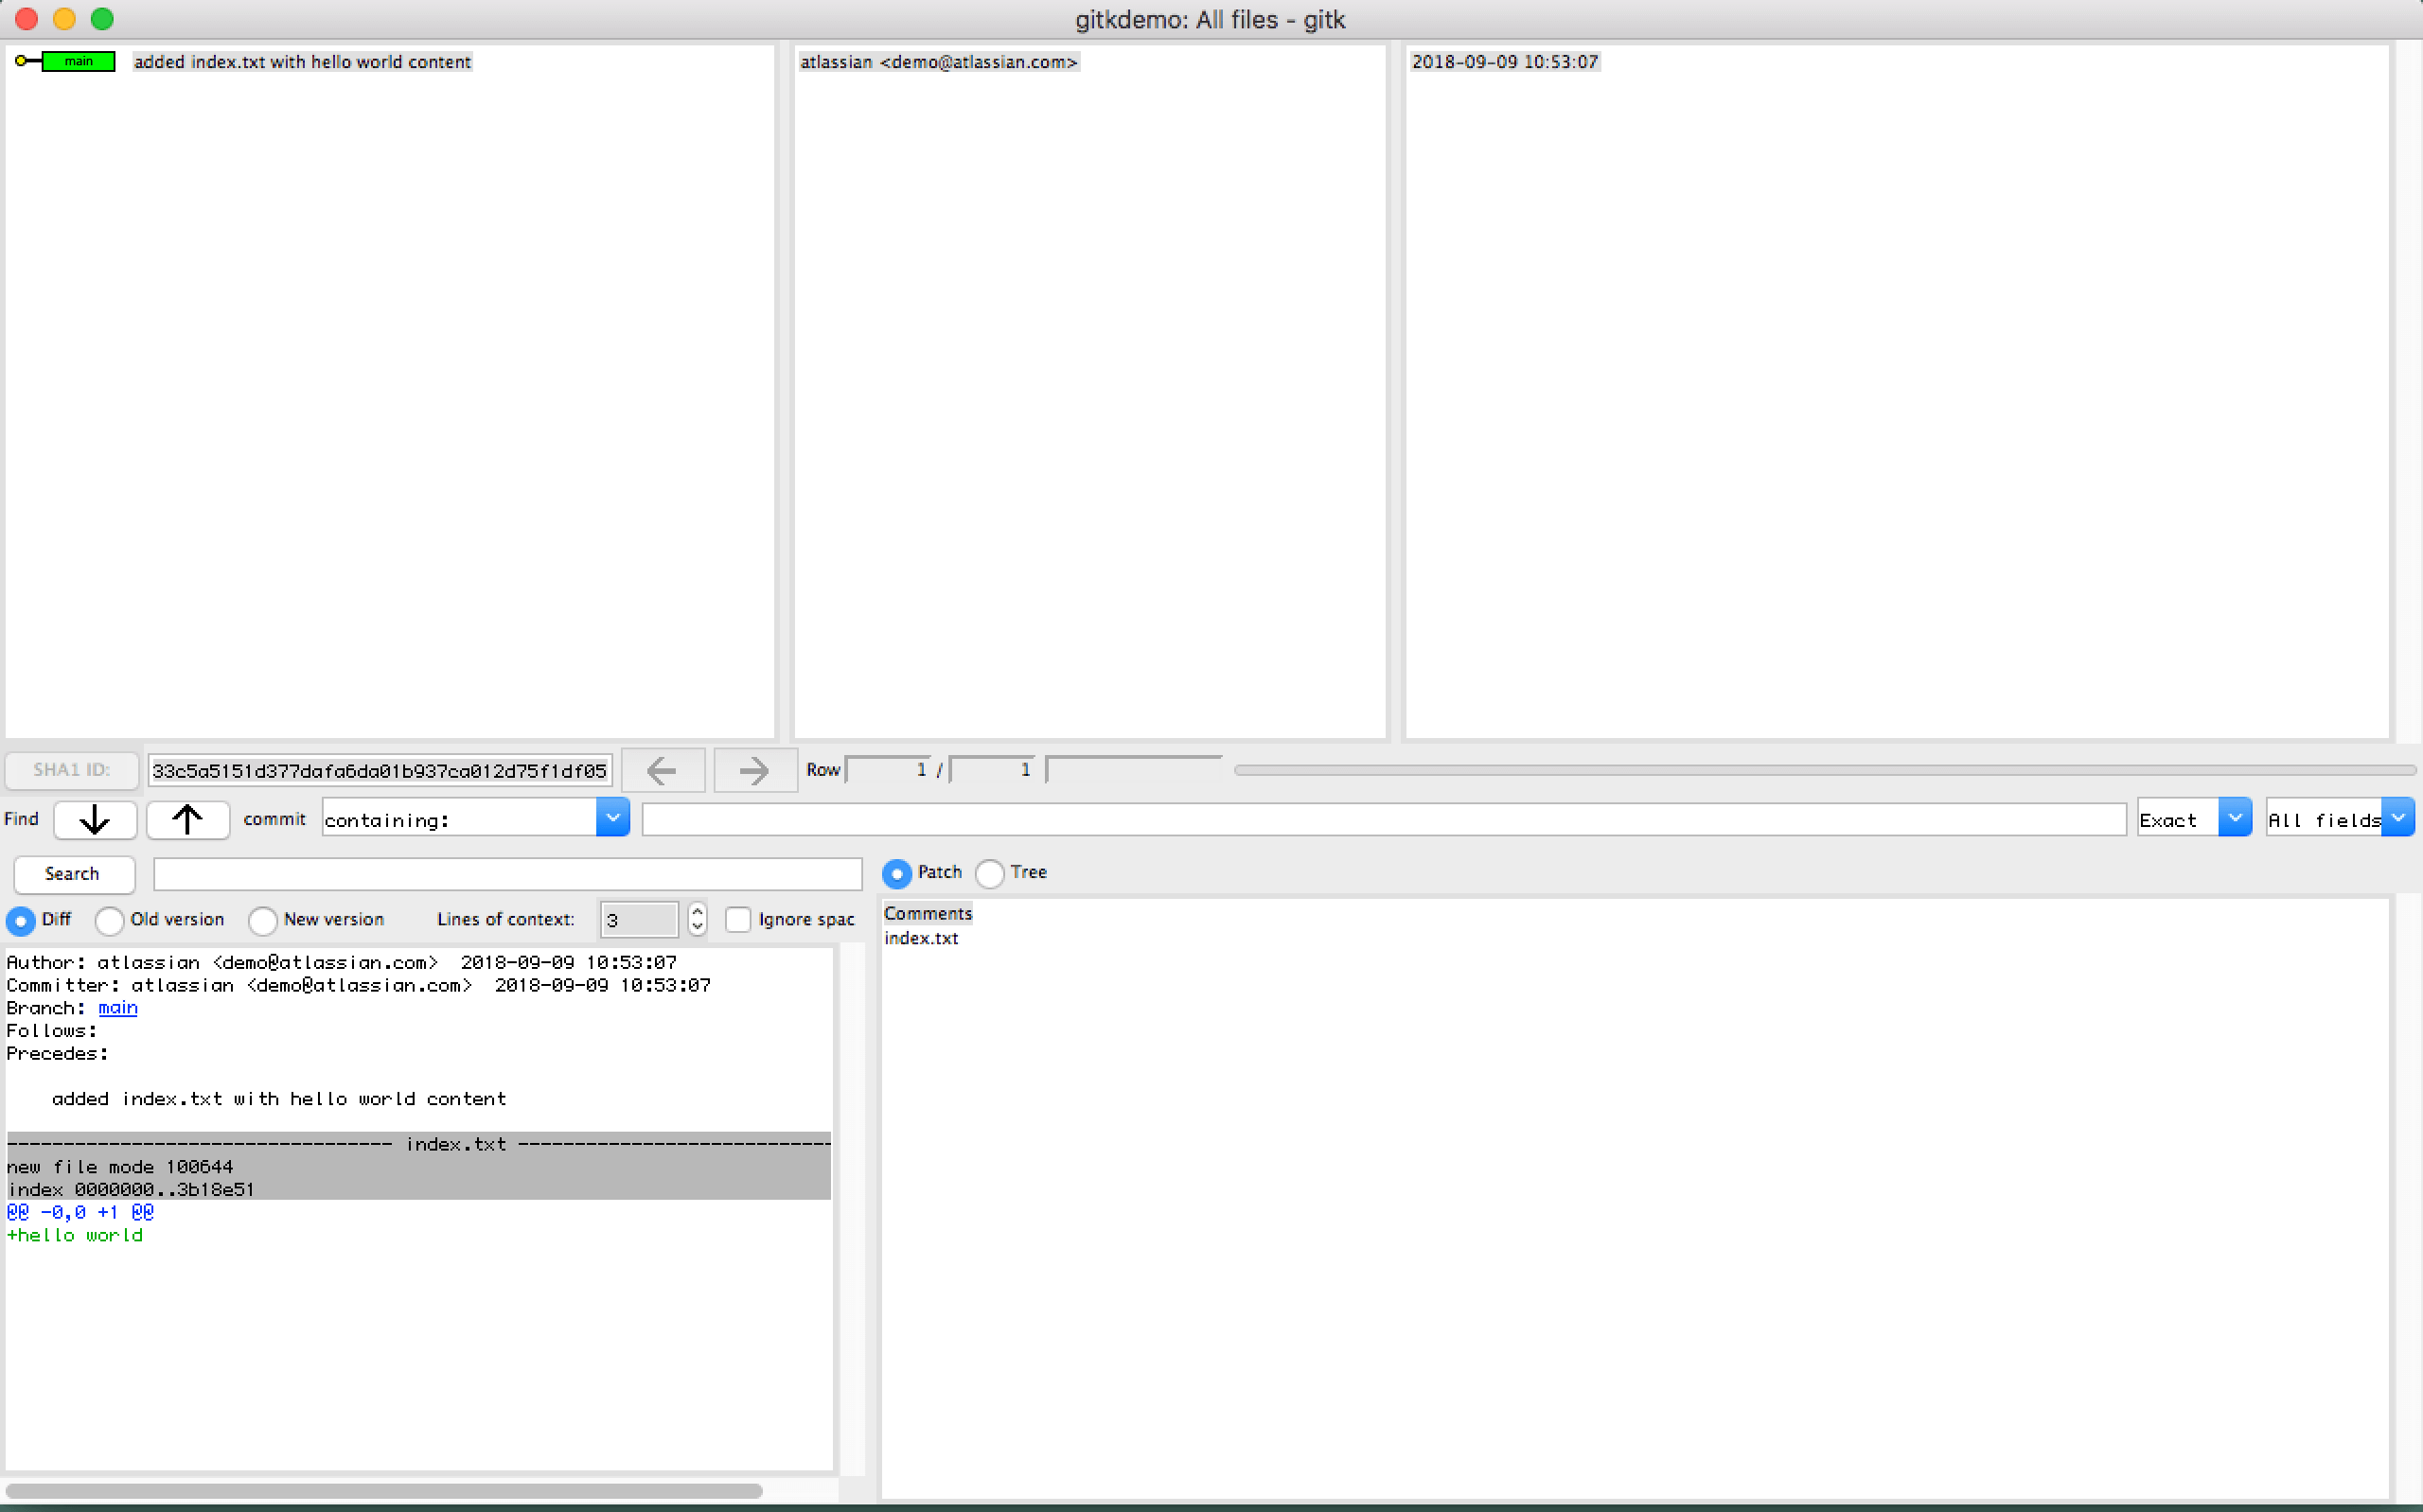 The upper left pane displays the commits to the repository, with the latest on top.
The lower right displays the list of files impacted by the selected commit.
The lower left pane displays the commit details and full diff.
Clicking a file in the lower right pane focuses the diff in the lower left pane to the relevant section.
Gitk will reflect the current state of the repository.
If the repository state is modified through separate command line usage like changing branches Gitk will need to be reloaded.
Gitk can be reloaded by on the File menu -> Reload.
By default Gitk will render the current history of commits.
Gitk has a variety of command line options that can be passed on initialization.
These options primarily restrict the list of commits rendered to Gitk's top-level view.
The general form of execution with these revision options is as follows:
The upper left pane displays the commits to the repository, with the latest on top.
The lower right displays the list of files impacted by the selected commit.
The lower left pane displays the commit details and full diff.
Clicking a file in the lower right pane focuses the diff in the lower left pane to the relevant section.
Gitk will reflect the current state of the repository.
If the repository state is modified through separate command line usage like changing branches Gitk will need to be reloaded.
Gitk can be reloaded by on the File menu -> Reload.
By default Gitk will render the current history of commits.
Gitk has a variety of command line options that can be passed on initialization.
These options primarily restrict the list of commits rendered to Gitk's top-level view.
The general form of execution with these revision options is as follows:
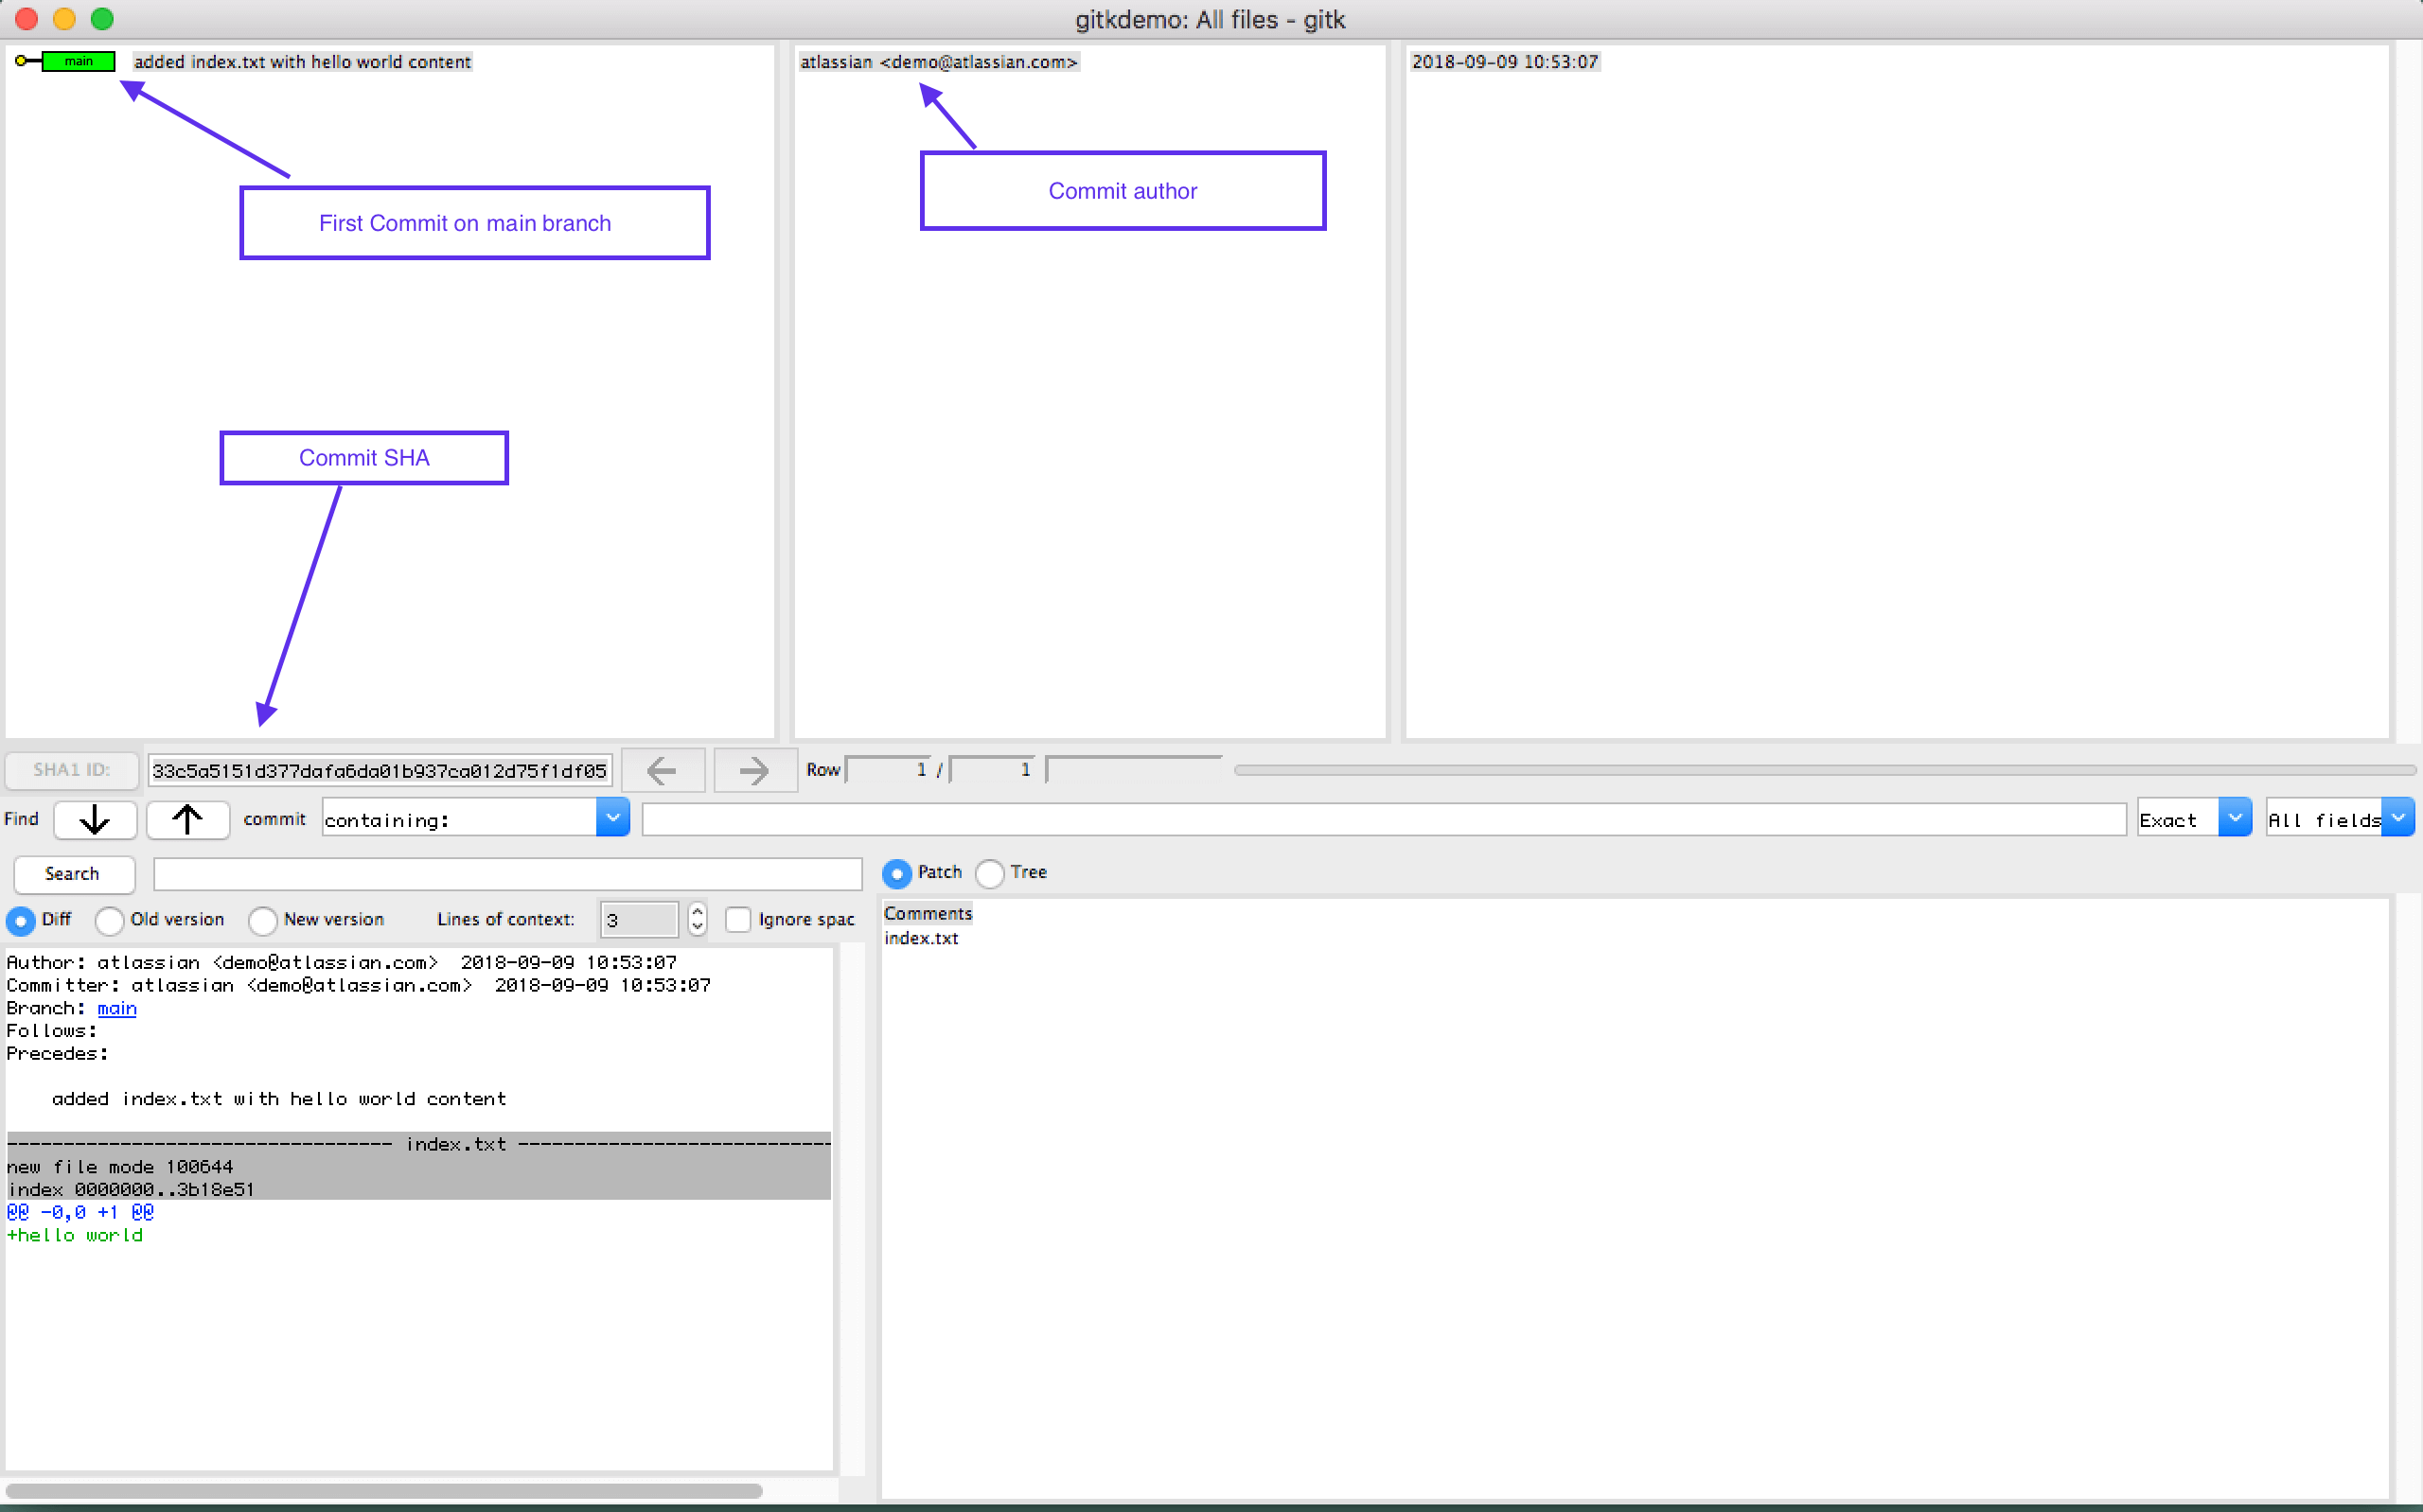
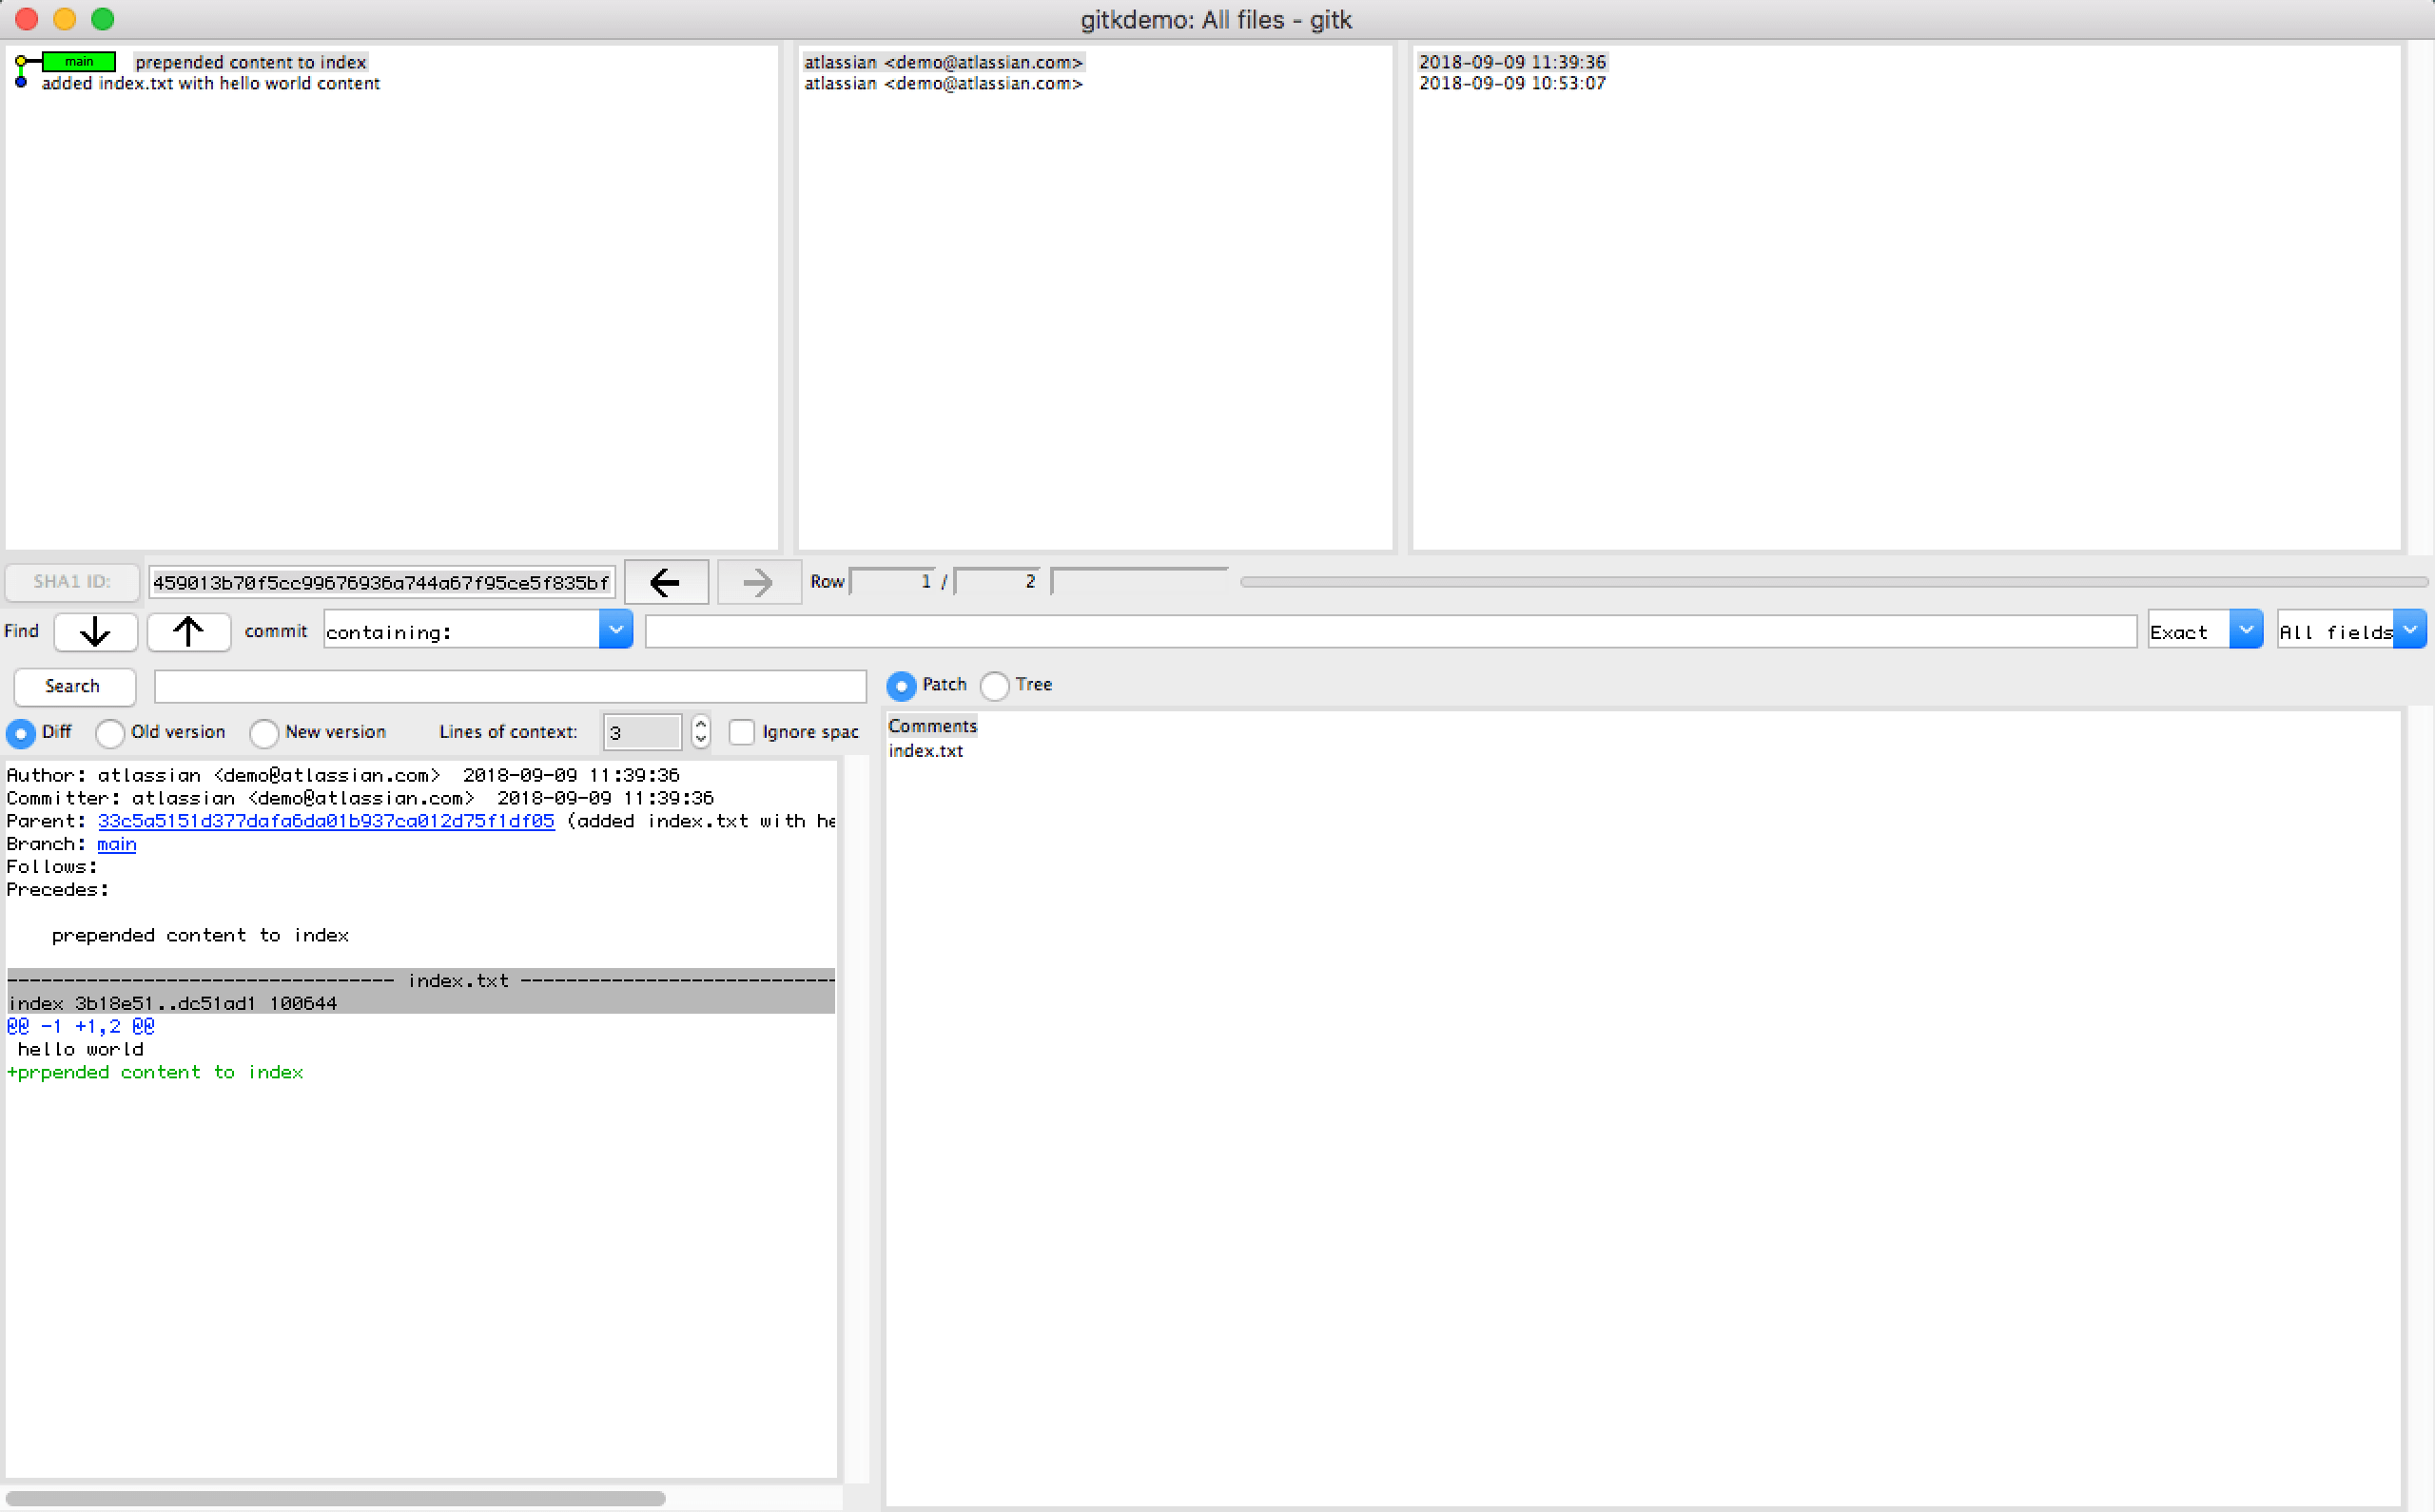 We can see that the
 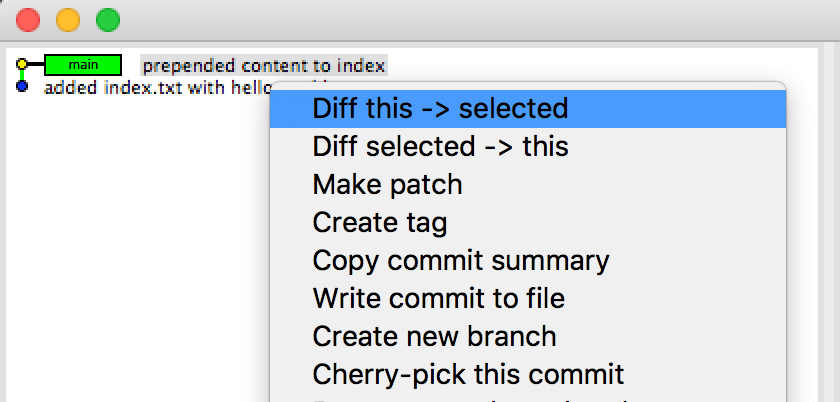 This context menu will provide the options of
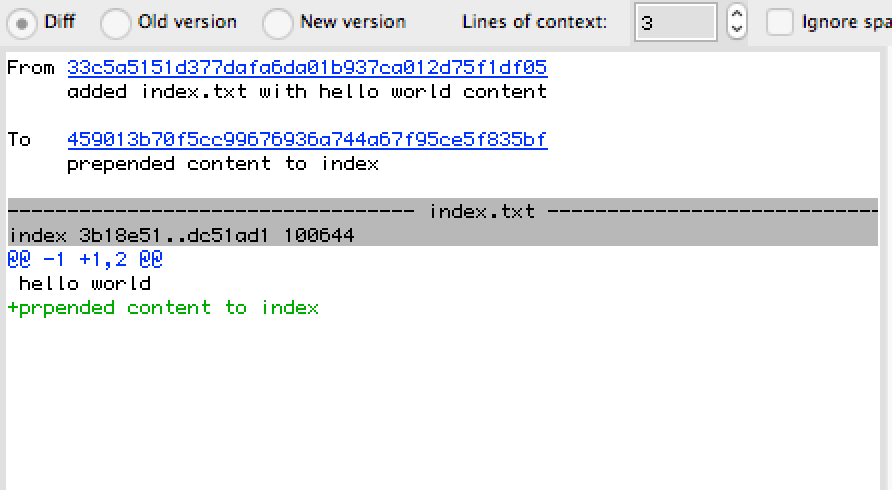 The diff output shows us that
 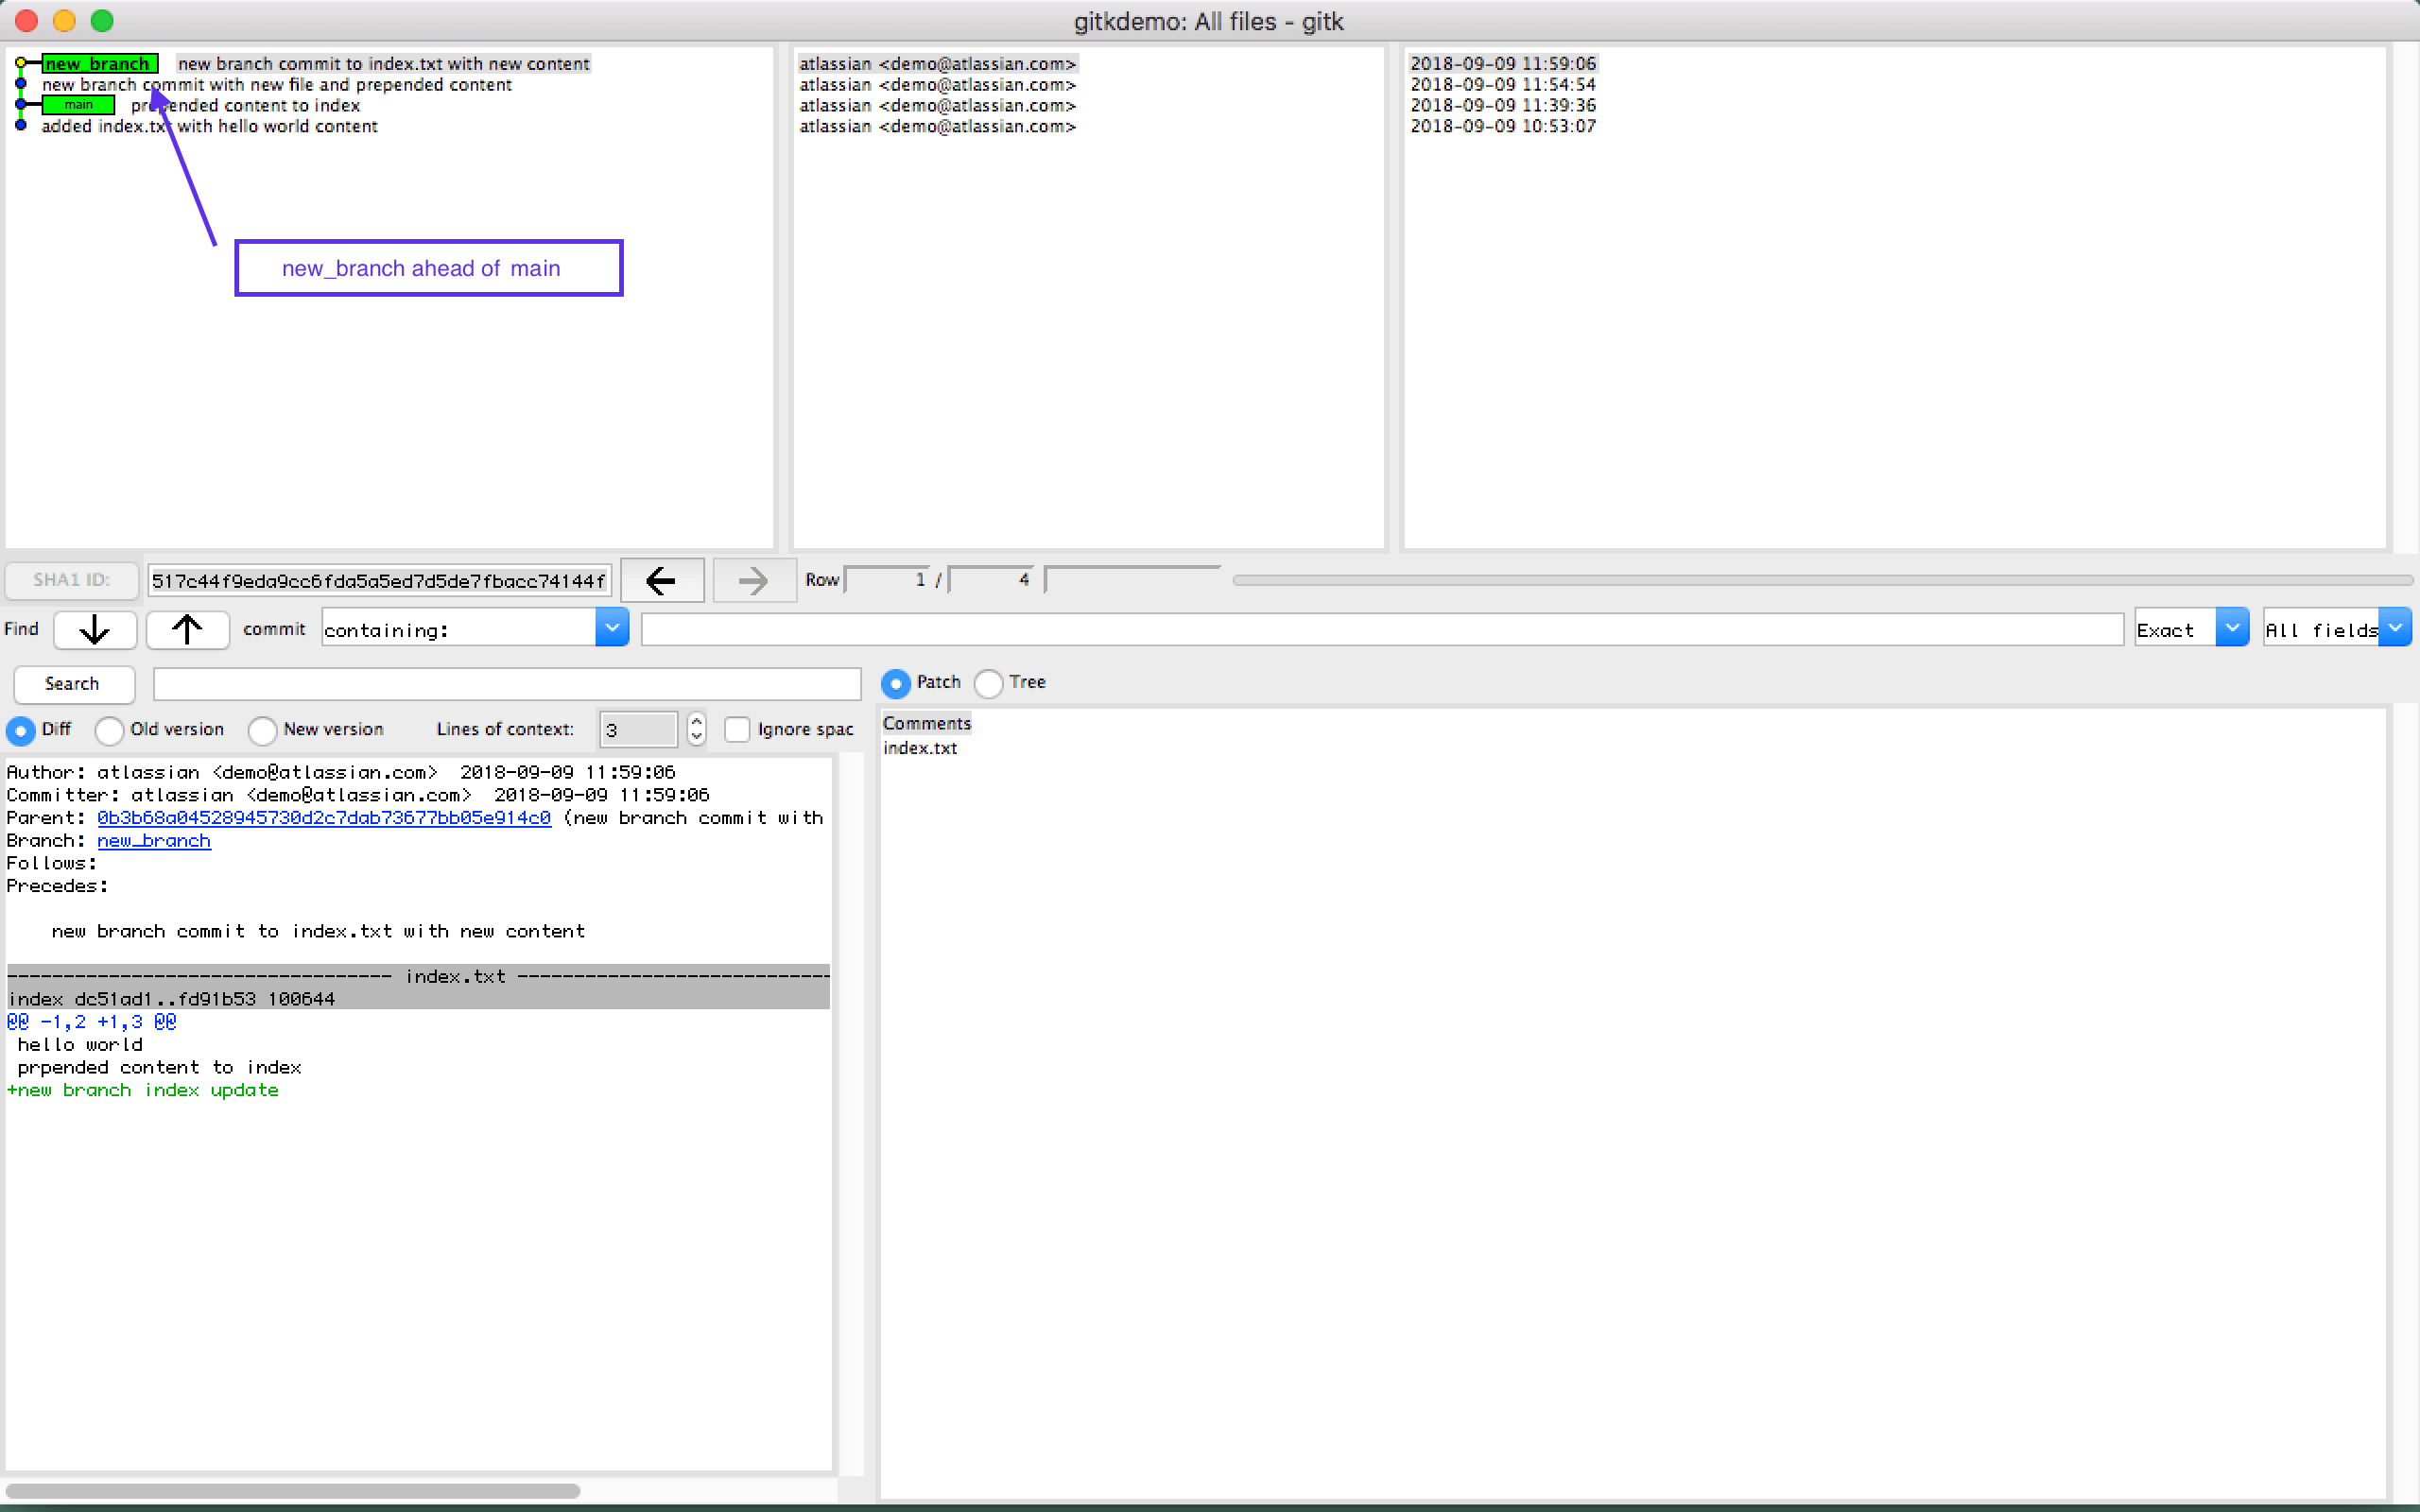 This is a great learning opportunity to discuss Git's branching mechanism.
Gitk displays the commits as a straight line sequence of commits.
The term branch implies that we should expect a 'branch' or fork in the timeline.
Git branches are different from other version control systems.
In Git, a branch is a pointer to a commit.
The pointer moves to commits as they are created.
When you create a
This is a great learning opportunity to discuss Git's branching mechanism.
Gitk displays the commits as a straight line sequence of commits.
The term branch implies that we should expect a 'branch' or fork in the timeline.
Git branches are different from other version control systems.
In Git, a branch is a pointer to a commit.
The pointer moves to commits as they are created.
When you create a 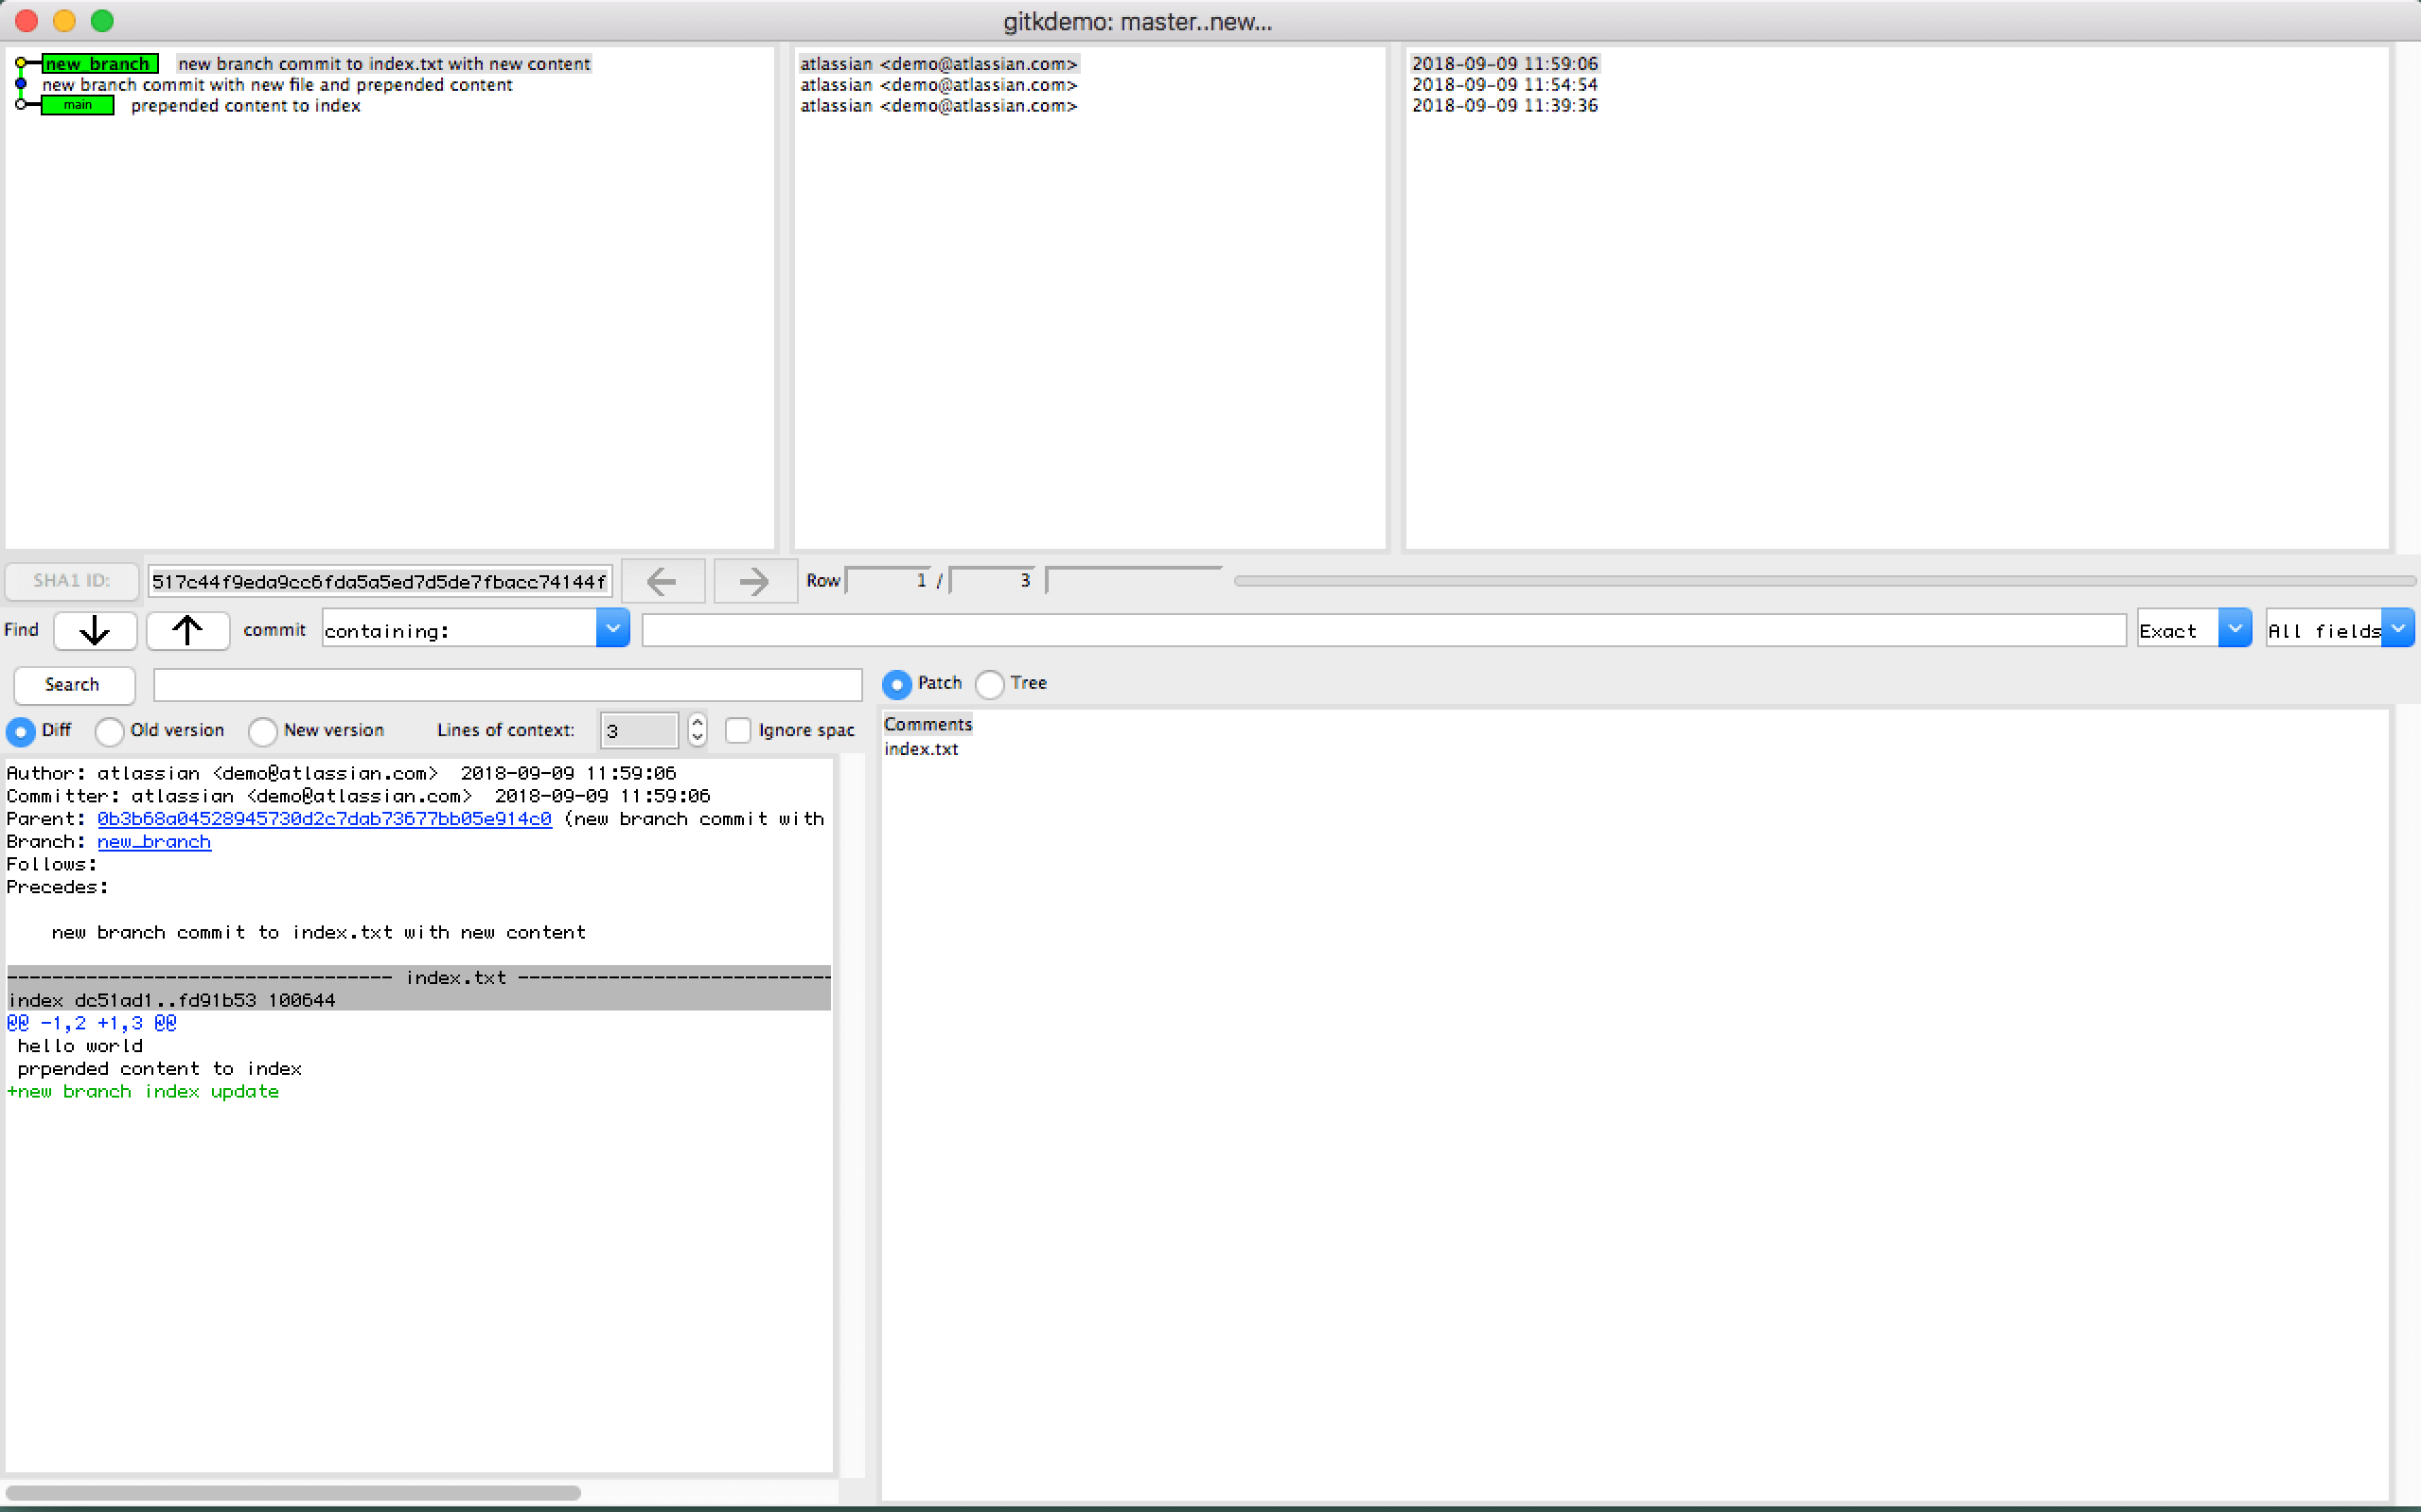 This is a powerful utility for comparing branches.
 Do the following to create your repository:
From Bitbucket, click the + icon in the global sidebar and select Repository.
Do the following to create your repository:
From Bitbucket, click the + icon in the global sidebar and select Repository.
 Bitbucket displays the Create a new repository page.
Take some time to review the dialog's contents.
With the exception of the Repository type, everything you enter on this page you can later change.
Bitbucket displays the Create a new repository page.
Take some time to review the dialog's contents.
With the exception of the Repository type, everything you enter on this page you can later change.
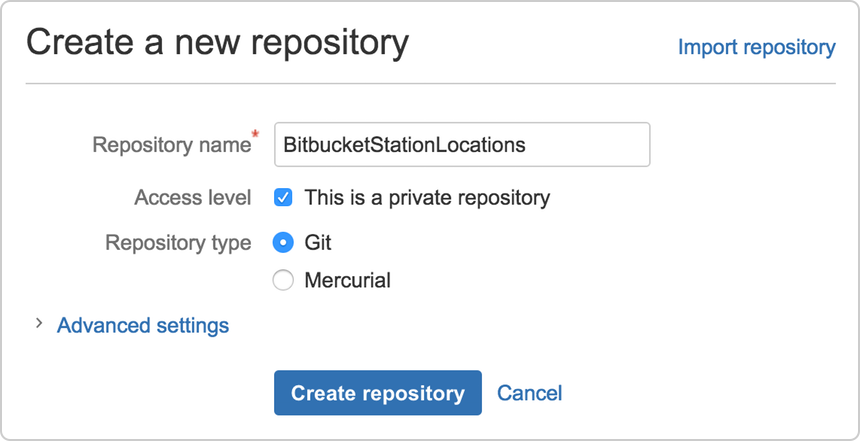 Enter
Enter  Click + from the global sidebar for common actions for a repository.
Click items in the navigation sidebar to see what's behind each one, including Settings to update repository details and other settings.
To view the shortcuts available to navigate these items, press the ? key on your keyboard.
When you click the Commits option in the sidebar, you find that you have no commits because you have not created any content for your repository.
Your repository is private and you have not invited anyone to the repository, so the only person who can create or edit the repository's content right now is you, the repository owner.
Click + from the global sidebar for common actions for a repository.
Click items in the navigation sidebar to see what's behind each one, including Settings to update repository details and other settings.
To view the shortcuts available to navigate these items, press the ? key on your keyboard.
When you click the Commits option in the sidebar, you find that you have no commits because you have not created any content for your repository.
Your repository is private and you have not invited anyone to the repository, so the only person who can create or edit the repository's content right now is you, the repository owner.

 Copy the highlighted clone command.
From your terminal window, paste the command you copied from Bitbucket and press Return.
Enter your Bitbucket password when the terminal asks for it.
If you created an account by linking to Google, use your password for that account.
If you experience a Windows password error:
In some versions of Microsoft Windows operating system and Git you might see an error similar to the one in the following example.
Copy the highlighted clone command.
From your terminal window, paste the command you copied from Bitbucket and press Return.
Enter your Bitbucket password when the terminal asks for it.
If you created an account by linking to Google, use your password for that account.
If you experience a Windows password error:
In some versions of Microsoft Windows operating system and Git you might see an error similar to the one in the following example.
 Check the status of the file.
 Up until this point, everything you have done is on your local system and invisible to your Bitbucket repository until you push those changes.
Learn a bit more about Git and remote repositories
Git's ability to communicate with remote repositories (in your case, Bitbucket is the remote repository) is the foundation of every Git-based collaboration workflow.
Git's collaboration model gives every developer their own copy of the repository, complete with its own local history and branch structure.
Users typically need to share a series of commits rather than a single changeset.
Instead of committing a changeset from a working copy to the central repository, Git lets you share entire branches between repositories.
Up until this point, everything you have done is on your local system and invisible to your Bitbucket repository until you push those changes.
Learn a bit more about Git and remote repositories
Git's ability to communicate with remote repositories (in your case, Bitbucket is the remote repository) is the foundation of every Git-based collaboration workflow.
Git's collaboration model gives every developer their own copy of the repository, complete with its own local history and branch structure.
Users typically need to share a series of commits rather than a single changeset.
Instead of committing a changeset from a working copy to the central repository, Git lets you share entire branches between repositories.
 You manage connections with other repositories and publish local history by "pushing" branches to other repositories.
You see what others have contributed by "pulling" branches into your local repository.
Go back to your local terminal window and send your committed changes to Bitbucket using
You manage connections with other repositories and publish local history by "pushing" branches to other repositories.
You see what others have contributed by "pulling" branches into your local repository.
Go back to your local terminal window and send your committed changes to Bitbucket using  Go to your BitbucketStationLocations repository on Bitbucket.
If you click Commits in the sidebar, you'll see a single commit on your repository.
Bitbucket combines all the things you just did into that commit and shows it to you.
You can see that the Author column shows the value you used when you configured the Git global file
Go to your BitbucketStationLocations repository on Bitbucket.
If you click Commits in the sidebar, you'll see a single commit on your repository.
Bitbucket combines all the things you just did into that commit and shows it to you.
You can see that the Author column shows the value you used when you configured the Git global file  Remember how the repository looked when you first created it? It probably looks a bit different now.
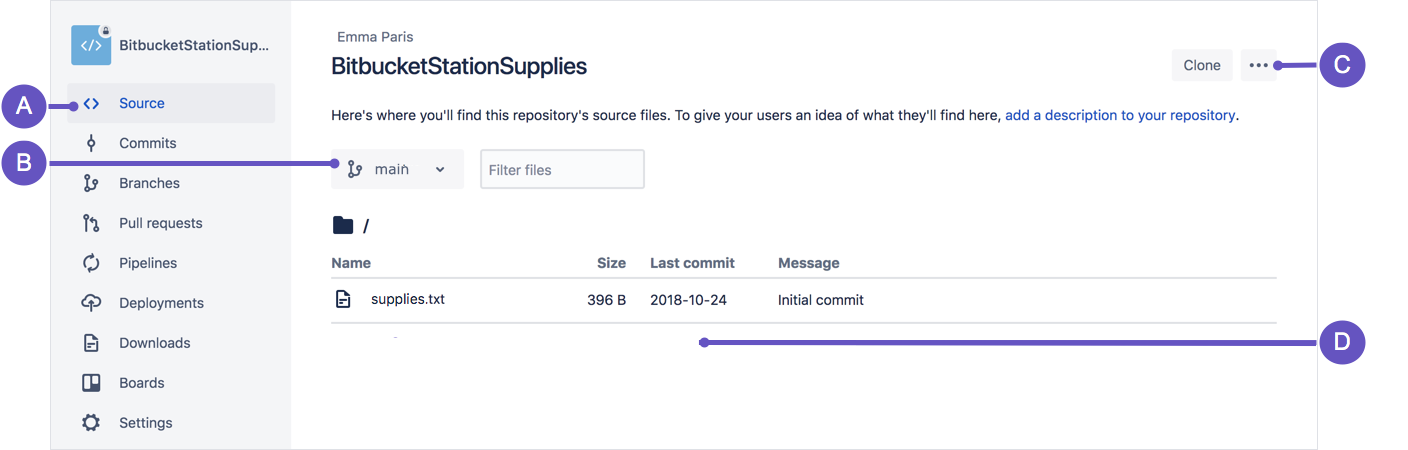 A.
Source page: Click the link to open this page.
B.
Branch selection: Pick the branch you want to view.
C.
More options button: Click to open a menu with more options, such as 'Add file'.
D.
Source file area: View the directory of files in Bitbucket.
From the Source page, click the More options button in the top right corner and select Add file from the menu.
The More options button only appears after you have added at least one file to the repository.
A page for creating the new file opens, as shown in the following image.
A.
Source page: Click the link to open this page.
B.
Branch selection: Pick the branch you want to view.
C.
More options button: Click to open a menu with more options, such as 'Add file'.
D.
Source file area: View the directory of files in Bitbucket.
From the Source page, click the More options button in the top right corner and select Add file from the menu.
The More options button only appears after you have added at least one file to the repository.
A page for creating the new file opens, as shown in the following image.
 A.
Branch with new file: Change if you want to add file to a different branch.
B.
New file area: Add content for your new file here.
Enter
A.
Branch with new file: Change if you want to add file to a different branch.
B.
New file area: Add content for your new file here.
Enter 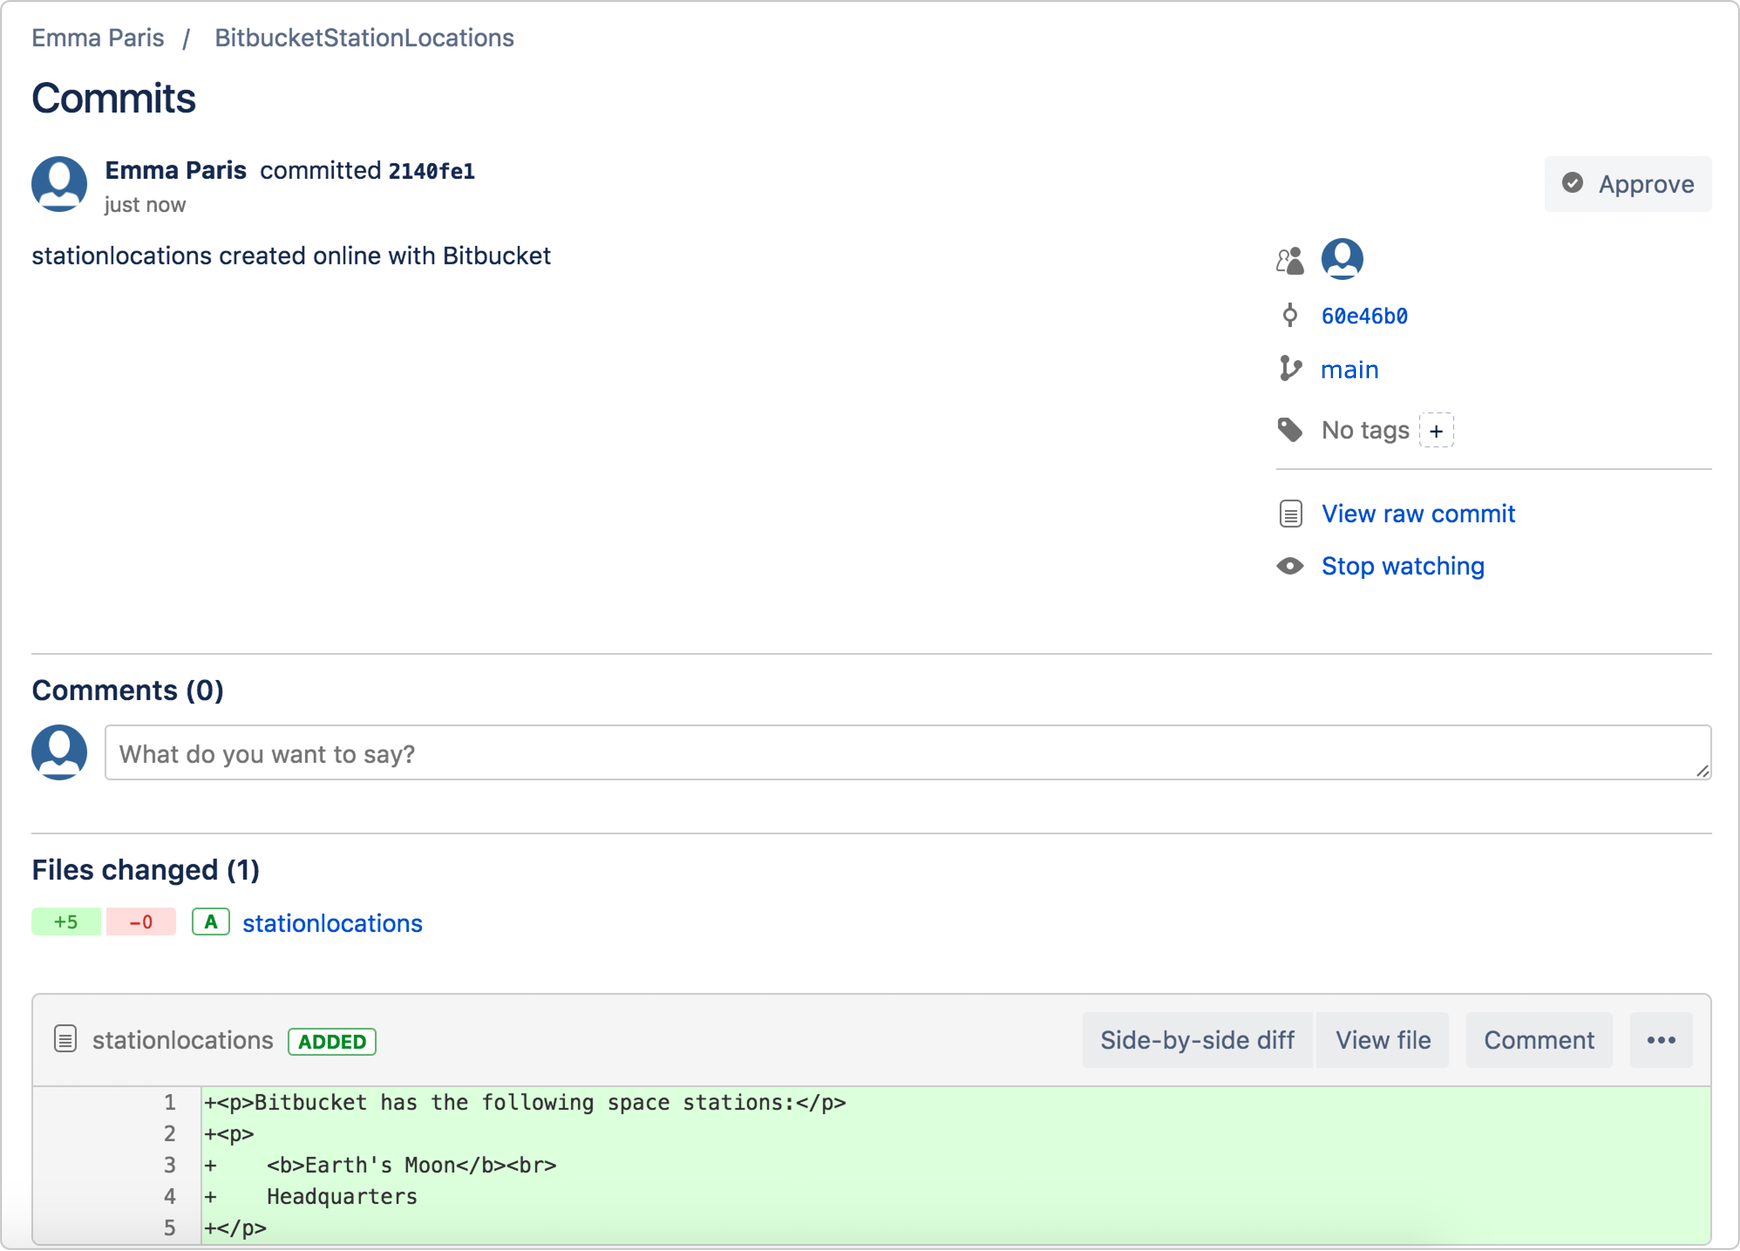 If you want to see a list of the commits you've made so far, click Commits in the sidebar.

 To create a branch, do the following:
Go to your terminal window and navigate to the top level of your local repository using the following command:
To create a branch, do the following:
Go to your terminal window and navigate to the top level of your local repository using the following command:
 The repository history remains unchanged.
All you get is a new pointer to the current branch.
To begin working on the new branch, you have to check out the branch you want to use.
Checkout the new branch you just created to start using it.
The repository history remains unchanged.
All you get is a new pointer to the current branch.
To begin working on the new branch, you have to check out the branch you want to use.
Checkout the new branch you just created to start using it.
 Search for the
  Now it's time to merge the change that you just made back into the
  This branch workflow is common for short-lived topic branches with smaller changes and are not as common for longer-running features.
To complete a fast-forward merge do the following:
Go to your terminal window and navigate to the top level of your local repository.
This branch workflow is common for short-lived topic branches with smaller changes and are not as common for longer-running features.
To complete a fast-forward merge do the following:
Go to your terminal window and navigate to the top level of your local repository.
 Here's how to push your change to the remote repository:
From the repository directory in your terminal window, enter
Here's how to push your change to the remote repository:
From the repository directory in your terminal window, enter 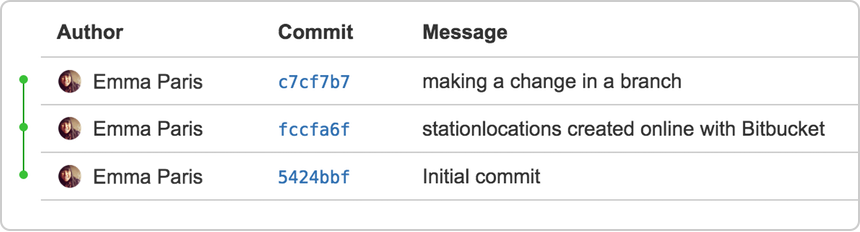 You can also see that the line to the left of the commits list has a straight-forward path and shows no branches.
That’s because the
You can also see that the line to the left of the commits list has a straight-forward path and shows no branches.
That’s because the 
 > Add file.
Name the file
> Add file.
Name the file 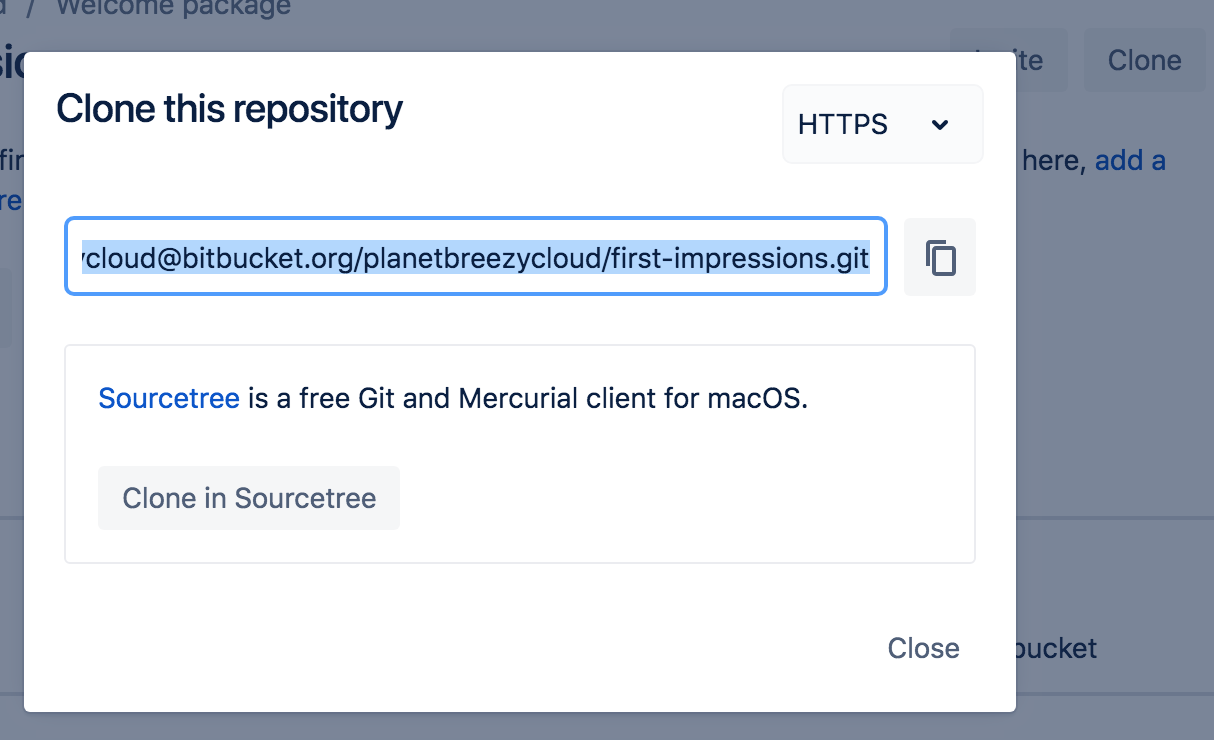 Copy the clone command.
From a terminal window, change into the local directory where you want to clone your repository.
Copy the clone command.
From a terminal window, change into the local directory where you want to clone your repository.
 Click the Clone in Sourcetree button.
From the Clone New window, update the Destination Path to
Click the Clone in Sourcetree button.
From the Clone New window, update the Destination Path to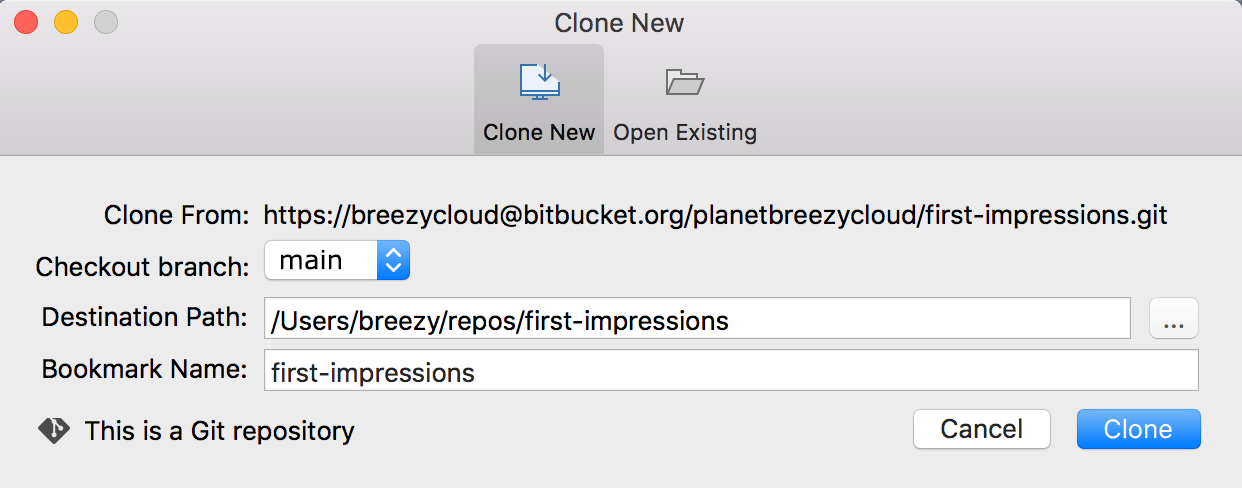 Click the Clone button.
To see how it's done, check out the Clone a repository part of our video here:
Click the Clone button.
To see how it's done, check out the Clone a repository part of our video here:
 Open the
 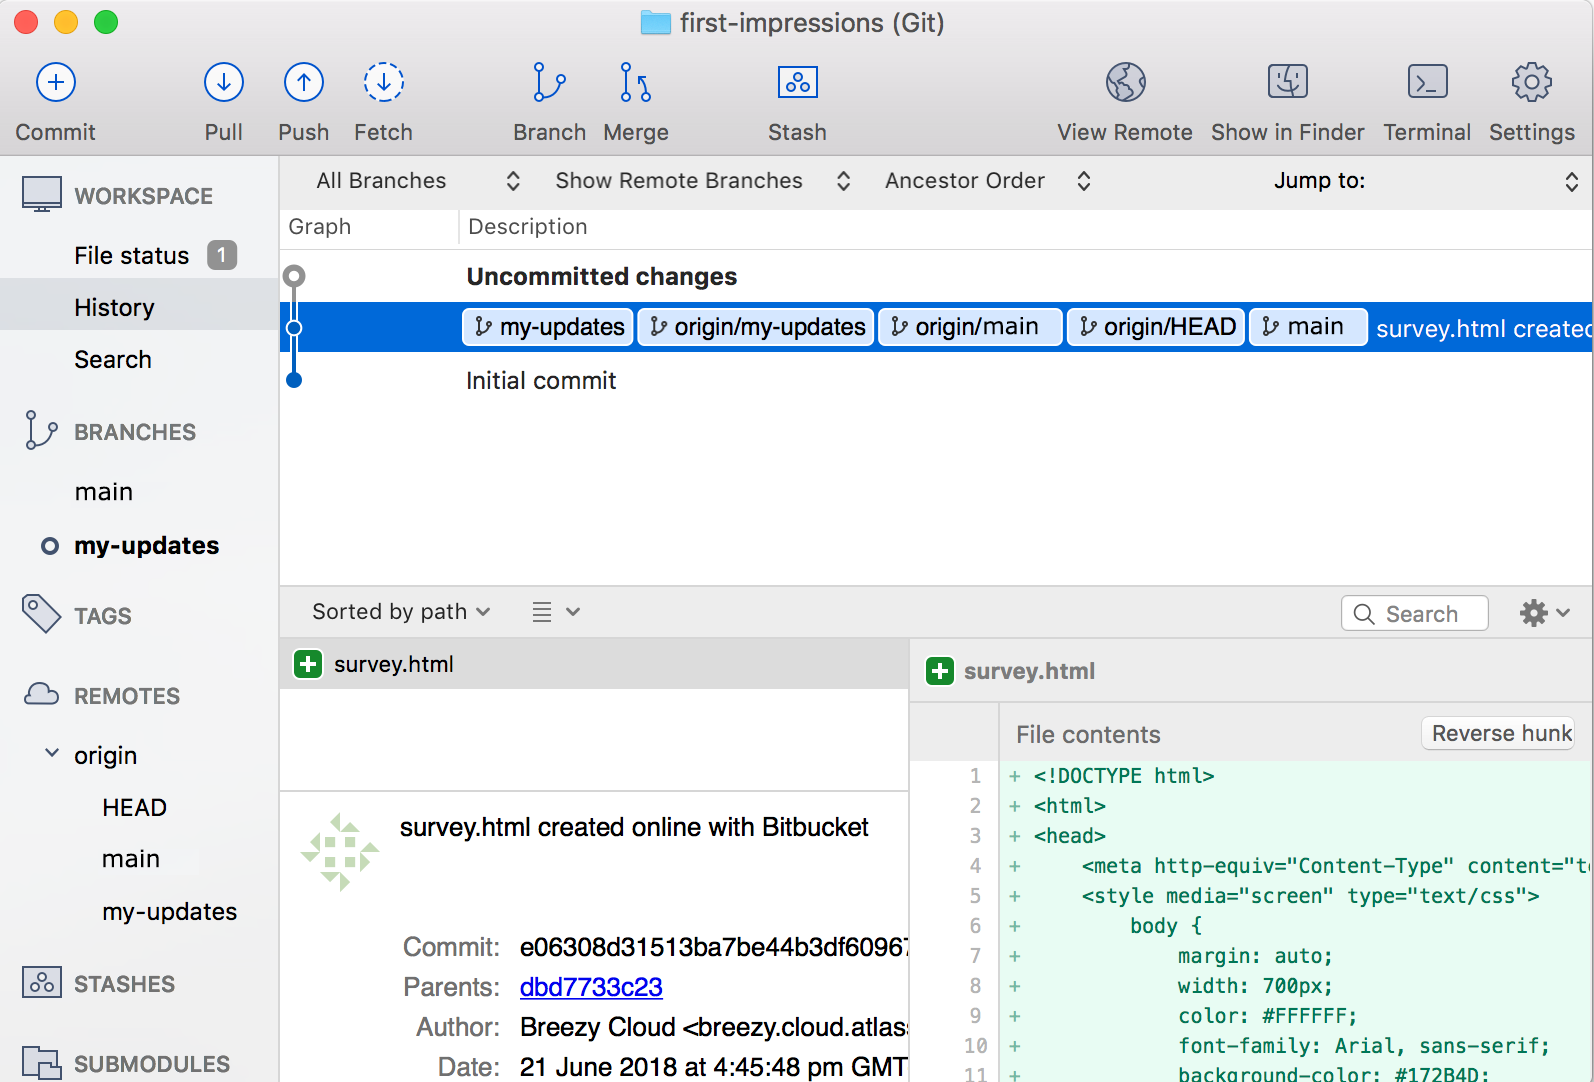 (Git only) Add the file to the staging area:
Select the Uncommitted changes line.
From the Unstaged files list, place a checkmark next to the survey.html file (and any other files with uncommitted changes).
(Git only) Add the file to the staging area:
Select the Uncommitted changes line.
From the Unstaged files list, place a checkmark next to the survey.html file (and any other files with uncommitted changes).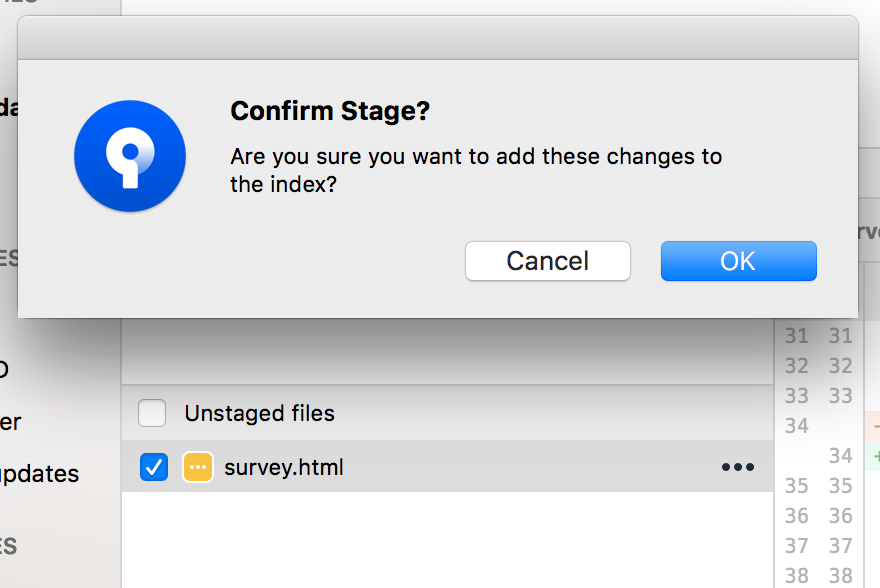 From the Confirm Stage? dialog, click OK.
Click the Commit button at the top to commit the file.
Enter a commit message in the space provided, something like Answered questions.
Click the Commit button under the message box.
When you switch back to the view, you see that the file has been committed but not pushed to the Bitbucket repository.
From Sourcetree, click the Push button to push your committed changes.
From the dialog that appears, click OK to push your branch with the commit to Bitbucket.
From Bitbucket, click the Source page of your repository.
You should see both branches in the dropdown.
Any other commits you make to my-updates will also appear on that branch.
From the Confirm Stage? dialog, click OK.
Click the Commit button at the top to commit the file.
Enter a commit message in the space provided, something like Answered questions.
Click the Commit button under the message box.
When you switch back to the view, you see that the file has been committed but not pushed to the Bitbucket repository.
From Sourcetree, click the Push button to push your committed changes.
From the dialog that appears, click OK to push your branch with the commit to Bitbucket.
From Bitbucket, click the Source page of your repository.
You should see both branches in the dropdown.
Any other commits you make to my-updates will also appear on that branch.
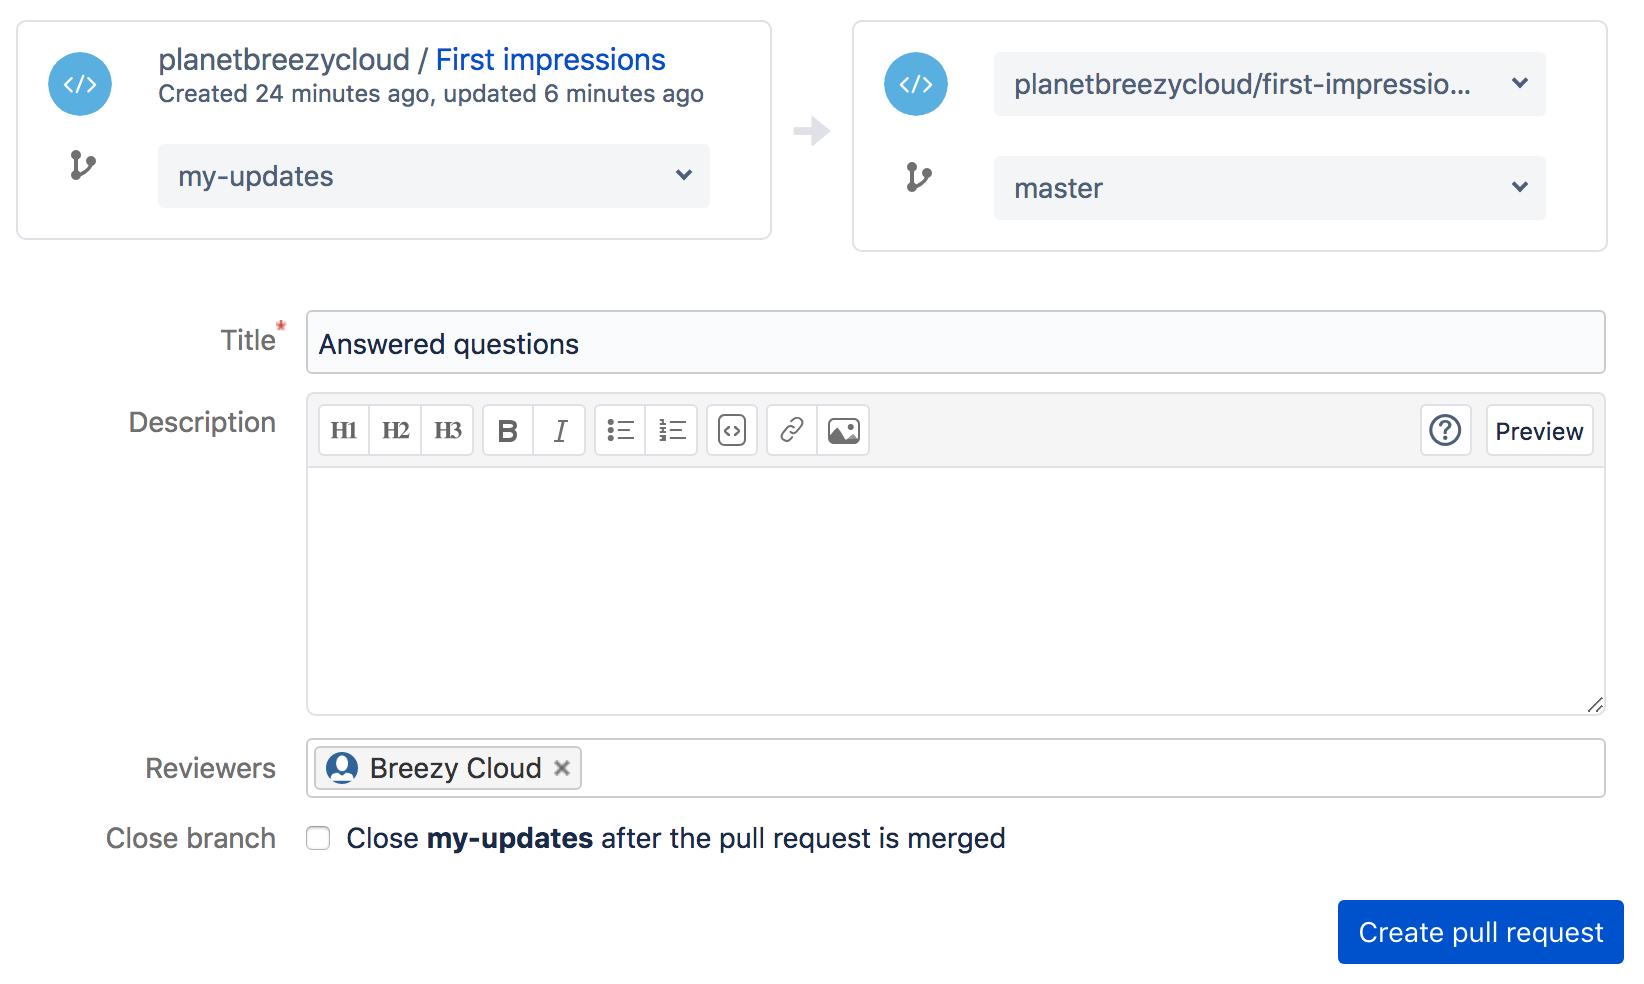 Click Create pull request.
Bitbucket opens the pull request, and if you added a reviewer, they will receive an email notification with details about the pull request for them to review.
Click Create pull request.
Bitbucket opens the pull request, and if you added a reviewer, they will receive an email notification with details about the pull request for them to review.
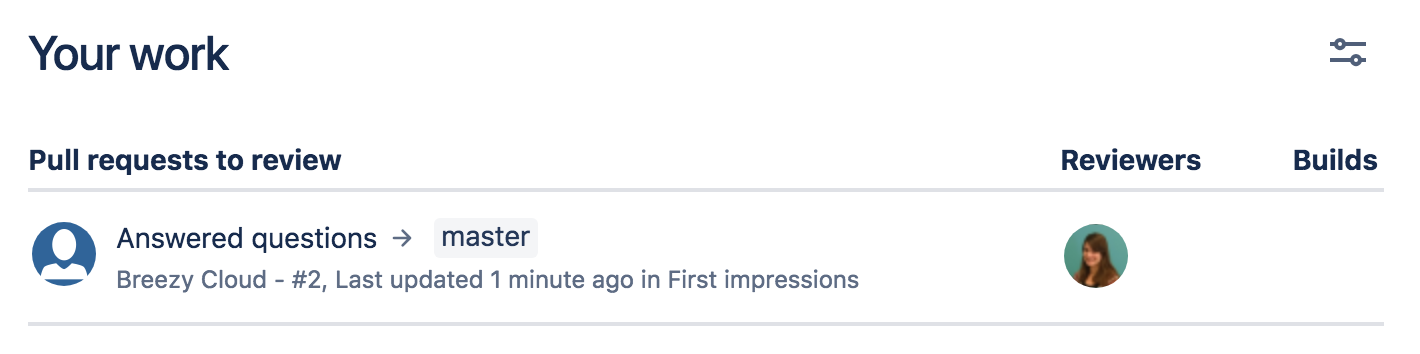 From the pull request, the reviewer can view the diff and add comments to start a discussion before clicking the Approve button.
When someone approves your pull request, you'll get an email notification.
Once you've got the approvals you need (in this case just one!), you can merge.
From the pull request, click Merge.
And that's it! If you want to see what it looks like when your branch merges with the main branch, click Commits to see the commit tree.
From the pull request, the reviewer can view the diff and add comments to start a discussion before clicking the Approve button.
When someone approves your pull request, you'll get an email notification.
Once you've got the approvals you need (in this case just one!), you can merge.
From the pull request, click Merge.
And that's it! If you want to see what it looks like when your branch merges with the main branch, click Commits to see the commit tree.
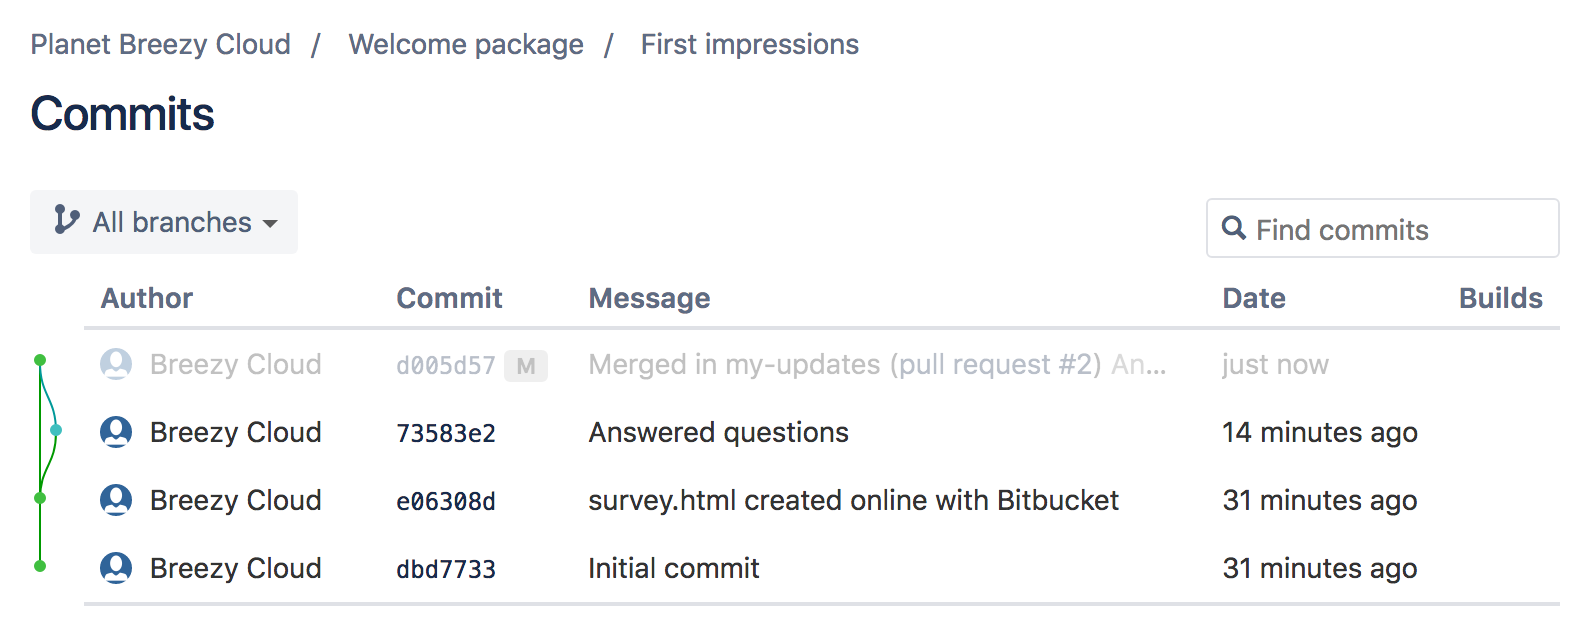
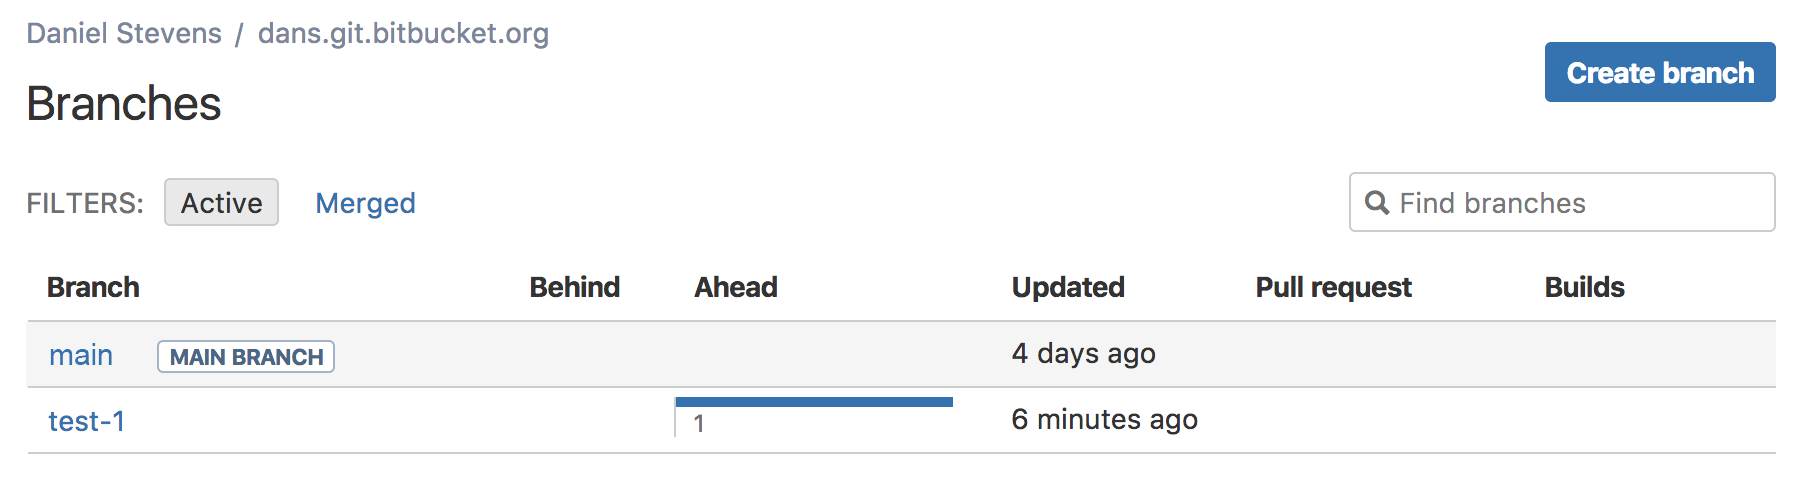
 Click Create branch, name the branch test-2, and click Create.
Copy the git fetch command in the check out your branch dialog.
It will probably look something like this:
Click Create branch, name the branch test-2, and click Create.
Copy the git fetch command in the check out your branch dialog.
It will probably look something like this: 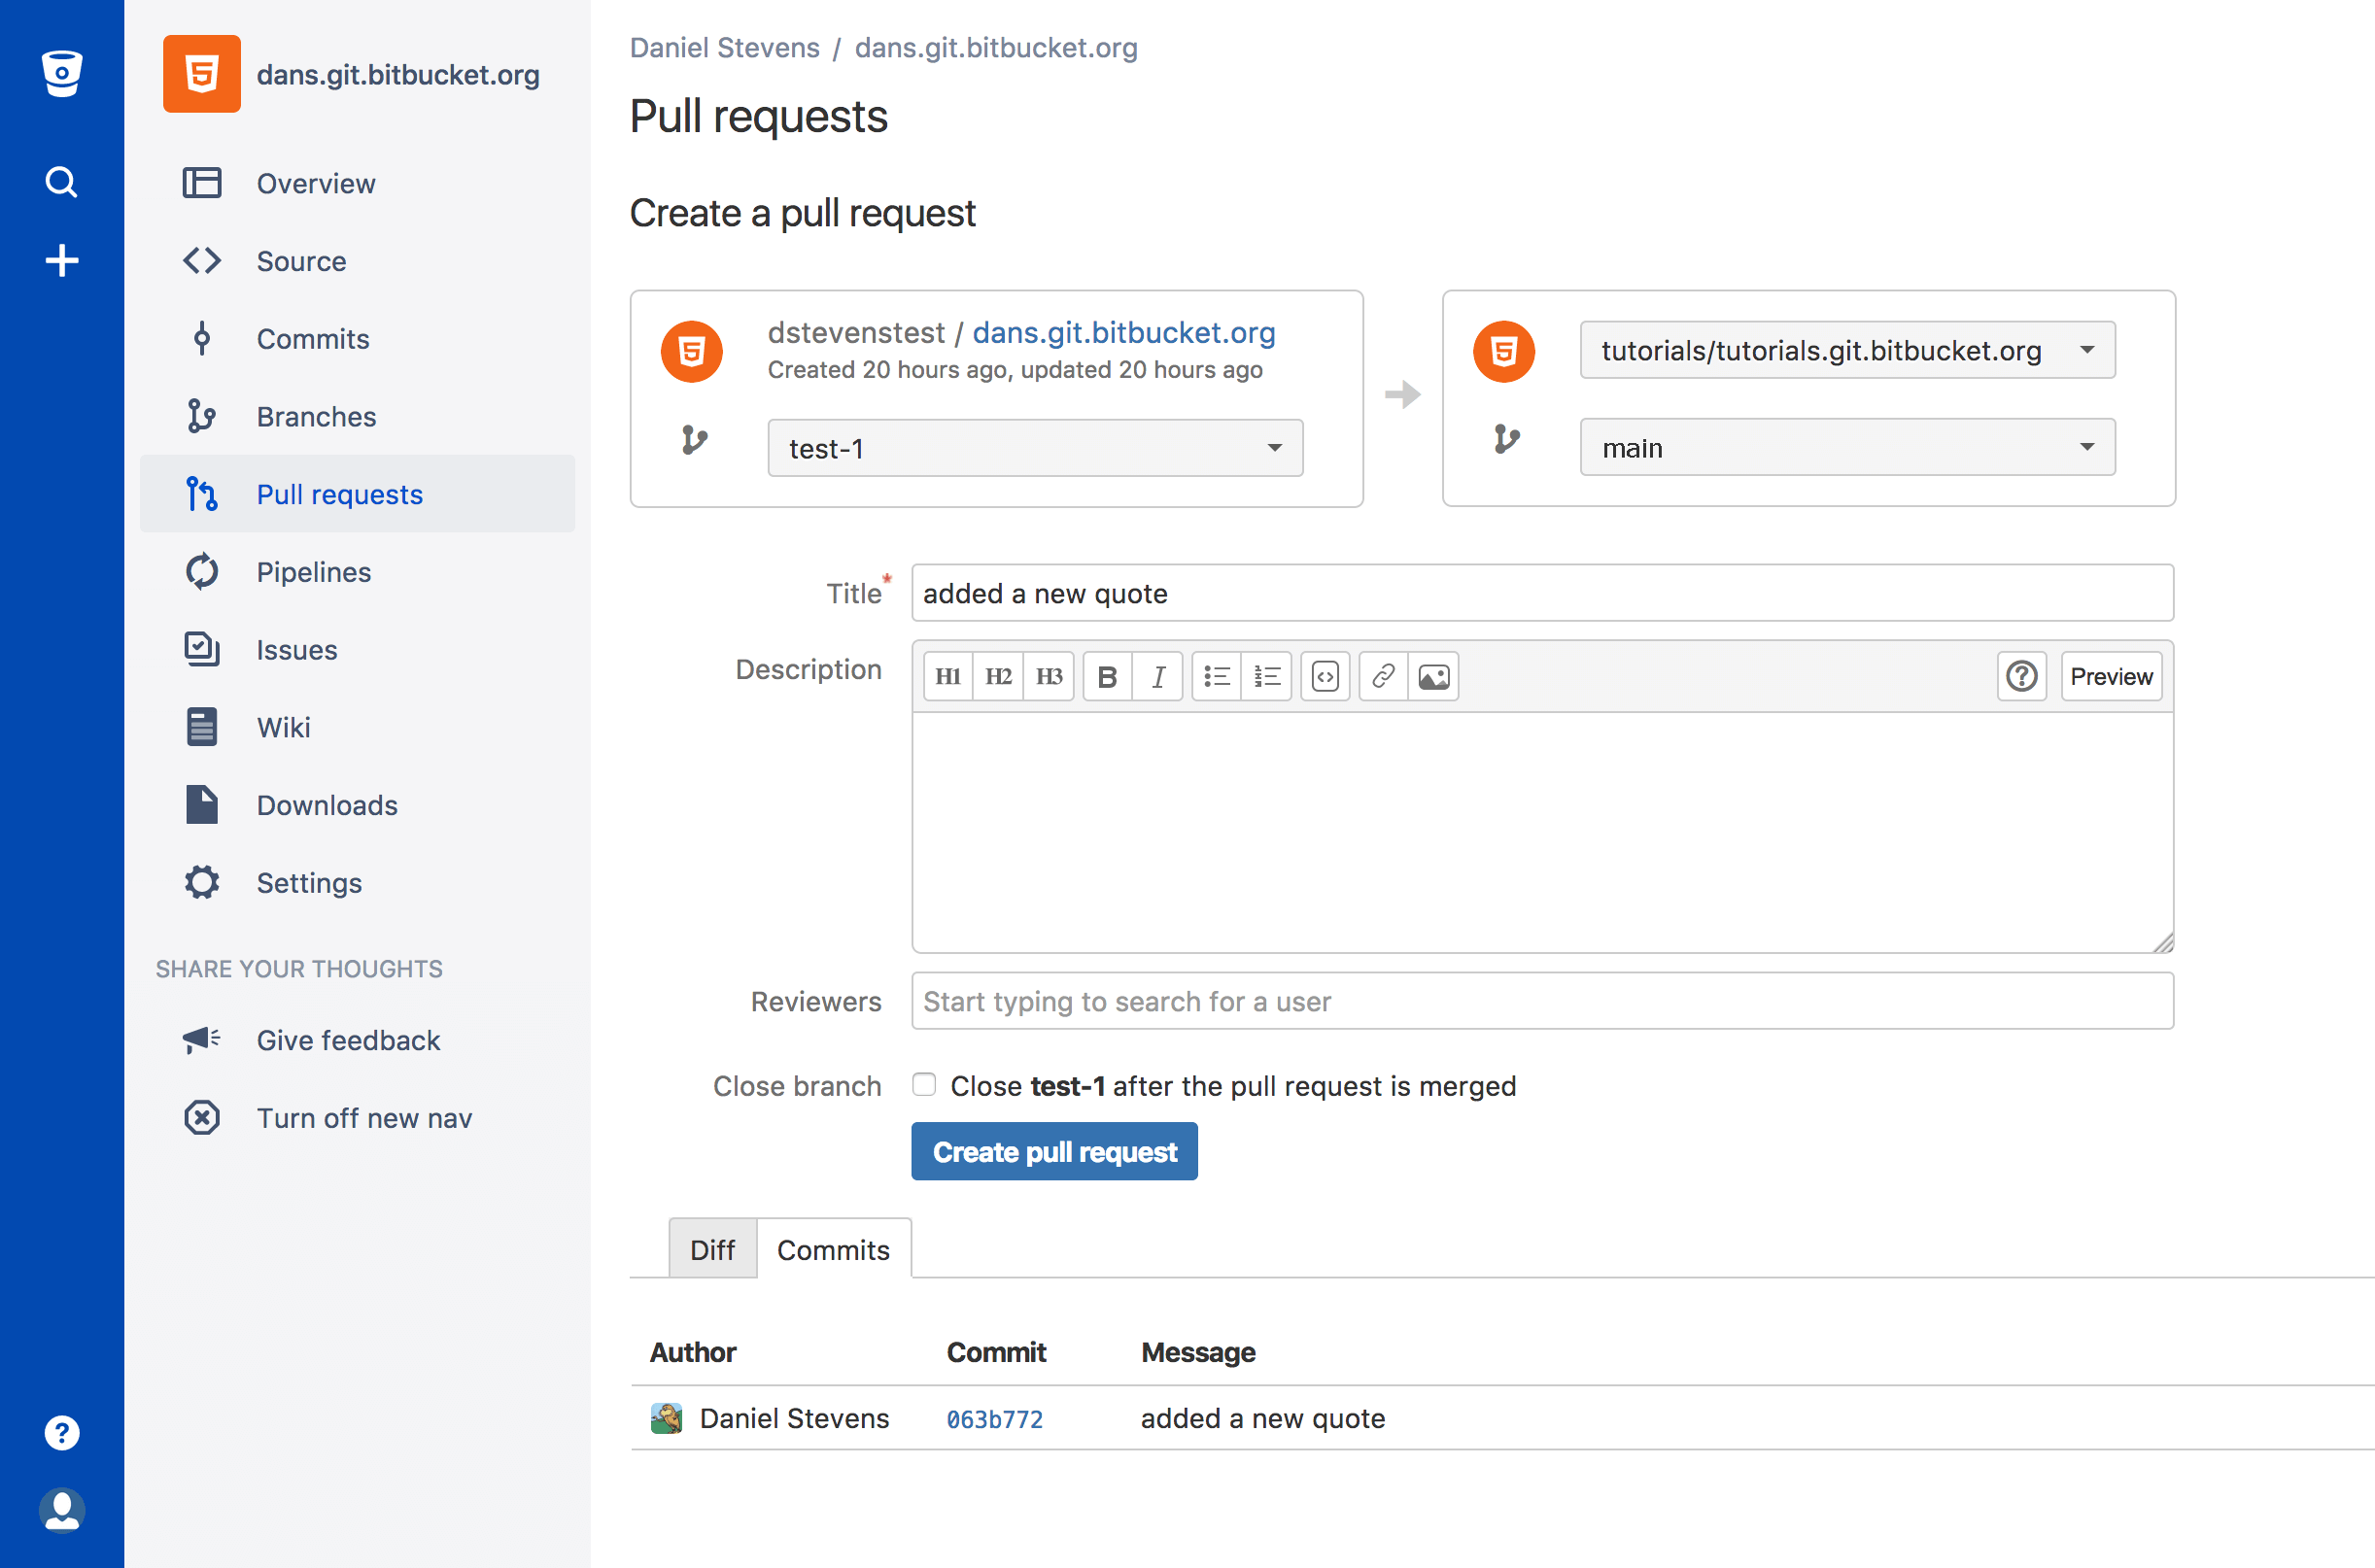 You would also add reviewers on your team to the pull request.
Learn more about pull requests
Click Create pull request.
Make a comment in the pull request by selecting a line in the diff (the area displaying the change you made to the editme.html file).
Click Approve in the top left of the page.
Of course in a real pull request you'd have reviewers making comments
Click Merge.
(Optional) Update the Commit message with more details.
Select the Merge commit Merge strategy from the two options:
Merge commit—Keeps all commits from your source branch and makes them part of the destination branch.
This option is the same as entering git merge --no-ff in the command line.
Squash—Combines your commits when you merge the source branch into the destination branch.
This option is the same as entering git merge --squash in the command line.
Learn more for details on these two types of merge strategies.
Click Commits and you will see how the branch you just merged fits into the larger scheme of changes.
You would also add reviewers on your team to the pull request.
Learn more about pull requests
Click Create pull request.
Make a comment in the pull request by selecting a line in the diff (the area displaying the change you made to the editme.html file).
Click Approve in the top left of the page.
Of course in a real pull request you'd have reviewers making comments
Click Merge.
(Optional) Update the Commit message with more details.
Select the Merge commit Merge strategy from the two options:
Merge commit—Keeps all commits from your source branch and makes them part of the destination branch.
This option is the same as entering git merge --no-ff in the command line.
Squash—Combines your commits when you merge the source branch into the destination branch.
This option is the same as entering git merge --squash in the command line.
Learn more for details on these two types of merge strategies.
Click Commits and you will see how the branch you just merged fits into the larger scheme of changes.

 In this article, we’ll discuss how Git benefits each aspect of your organization, from your development team to your marketing team, and everything in between.
By the end of this article, it should be clear that Git isn’t just for agile software development—it’s for agile business.
In this article, we’ll discuss how Git benefits each aspect of your organization, from your development team to your marketing team, and everything in between.
By the end of this article, it should be clear that Git isn’t just for agile software development—it’s for agile business.
 Feature branches provide an isolated environment for every change to your codebase.
When a developer wants to start working on something—no matter how big or small—they create a new branch.
This ensures that the main branch always contains production-quality code.
Using feature branches is not only more reliable than directly editing production code, but it also provides organizational benefits.
They let you represent development work at the same granularity as the your agile backlog.
For example, you might implement a policy where each Jira ticket is addressed in its own feature branch.
Feature branches provide an isolated environment for every change to your codebase.
When a developer wants to start working on something—no matter how big or small—they create a new branch.
This ensures that the main branch always contains production-quality code.
Using feature branches is not only more reliable than directly editing production code, but it also provides organizational benefits.
They let you represent development work at the same granularity as the your agile backlog.
For example, you might implement a policy where each Jira ticket is addressed in its own feature branch.
 Having a full local history makes Git fast, since it means you don’t need a network connection to create commits, inspect previous versions of a file, or perform diffs between commits.
Distributed development also makes it easier to scale your engineering team.
If someone breaks the production branch in SVN, other developers can’t check in their changes until it’s fixed.
With Git, this kind of blocking doesn’t exist.
Everybody can continue going about their business in their own local repositories.
And, similar to feature branches, distributed development creates a more reliable environment.
Even if a developer obliterates their own repository, they can simply clone someone else’s and start anew.
Having a full local history makes Git fast, since it means you don’t need a network connection to create commits, inspect previous versions of a file, or perform diffs between commits.
Distributed development also makes it easier to scale your engineering team.
If someone breaks the production branch in SVN, other developers can’t check in their changes until it’s fixed.
With Git, this kind of blocking doesn’t exist.
Everybody can continue going about their business in their own local repositories.
And, similar to feature branches, distributed development creates a more reliable environment.
Even if a developer obliterates their own repository, they can simply clone someone else’s and start anew.
 Since they’re essentially a comment thread attached to a feature branch, pull requests are extremely versatile.
When a developer gets stuck with a hard problem, they can open a pull request to ask for help from the rest of the team.
Alternatively, junior developers can be confident that they aren’t destroying the entire project by treating pull requests as a formal code review.
Since they’re essentially a comment thread attached to a feature branch, pull requests are extremely versatile.
When a developer gets stuck with a hard problem, they can open a pull request to ask for help from the rest of the team.
Alternatively, junior developers can be confident that they aren’t destroying the entire project by treating pull requests as a formal code review.
 In addition, Git is very popular among open source projects.
This means it’s easy to leverage 3rd-party libraries and encourage others to fork your own open source code.
In addition, Git is very popular among open source projects.
This means it’s easy to leverage 3rd-party libraries and encourage others to fork your own open source code.
 As you might expect, Git works very well with continuous integration and continuous delivery environments.
Git hooks allow you to run scripts when certain events occur inside of a repository, which lets you automate deployment to your heart’s content.
You can even build or deploy code from specific branches to different servers.
For example, you might want to configure Git to deploy the most recent commit from the develop branch to a test server whenever anyone merges a pull request into it.
Combining this kind of build automation with peer review means you have the highest possible confidence in your code as it moves from development to staging to production.
As you might expect, Git works very well with continuous integration and continuous delivery environments.
Git hooks allow you to run scripts when certain events occur inside of a repository, which lets you automate deployment to your heart’s content.
You can even build or deploy code from specific branches to different servers.
For example, you might want to configure Git to deploy the most recent commit from the develop branch to a test server whenever anyone merges a pull request into it.
Combining this kind of build automation with peer review means you have the highest possible confidence in your code as it moves from development to staging to production.
 For instance, they might prepare a big PR push for the game changing feature, a corporate blog post and newsletter blurb for Mary’s feature, and some guest posts about Rick’s underlying UX theory for sending to external design blogs.
All of these activities can be synchronized with a separate release.
For instance, they might prepare a big PR push for the game changing feature, a corporate blog post and newsletter blurb for Mary’s feature, and some guest posts about Rick’s underlying UX theory for sending to external design blogs.
All of these activities can be synchronized with a separate release.
 The feature branch workflow also provides flexibility when priorities change.
For instance, if you’re halfway through a release cycle and you want to postpone one feature in lieu of another time-critical one, it’s no problem.
That initial feature can sit around in its own branch until engineering has time to come back to it.
This same functionality makes it easy to manage innovation projects, beta tests, and rapid prototypes as independent codebases.
The feature branch workflow also provides flexibility when priorities change.
For instance, if you’re halfway through a release cycle and you want to postpone one feature in lieu of another time-critical one, it’s no problem.
That initial feature can sit around in its own branch until engineering has time to come back to it.
This same functionality makes it easy to manage innovation projects, beta tests, and rapid prototypes as independent codebases.
 Encapsulating user interface changes like this makes it easy to present updates to other stakeholders.
For example, if the director of engineering wants to see what the design team has been working on, all they have to do is tell the director to check out the corresponding branch.
Pull requests take this one step further and provide a formal place for interested parties to discuss the new interface.
Designers can make any necessary changes, and the resulting commits will show up in the pull request.
This invites everybody to participate in the iteration process.
Perhaps the best part of prototyping with branches is that it’s just as easy to merge the changes into production as it is to throw them away.
There’s no pressure to do either one.
This encourages designers and UI developers to experiment while ensuring that only the best ideas make it through to the customer.
Encapsulating user interface changes like this makes it easy to present updates to other stakeholders.
For example, if the director of engineering wants to see what the design team has been working on, all they have to do is tell the director to check out the corresponding branch.
Pull requests take this one step further and provide a formal place for interested parties to discuss the new interface.
Designers can make any necessary changes, and the resulting commits will show up in the pull request.
This invites everybody to participate in the iteration process.
Perhaps the best part of prototyping with branches is that it’s just as easy to merge the changes into production as it is to throw them away.
There’s no pressure to do either one.
This encourages designers and UI developers to experiment while ensuring that only the best ideas make it through to the customer.
 But, don’t forget that these efficiencies also extend outside your development team.
They prevent marketing from pouring energy into collateral for features that aren’t popular.
They let designers test new interfaces on the actual product with little overhead.
They let you react to customer complaints immediately.
Being agile is all about finding out what works as quickly as possible, magnifying efforts that are successful, and eliminating ones that aren’t.
Git serves as a multiplier for all your business activities by making sure every department is doing their job more efficiently.
But, don’t forget that these efficiencies also extend outside your development team.
They prevent marketing from pouring energy into collateral for features that aren’t popular.
They let designers test new interfaces on the actual product with little overhead.
They let you react to customer complaints immediately.
Being agile is all about finding out what works as quickly as possible, magnifying efforts that are successful, and eliminating ones that aren’t.
Git serves as a multiplier for all your business activities by making sure every department is doing their job more efficiently.