Socket.IO
Must Watch!
MustWatch
Overview
Socket.IO is a JavaScript library for real-time web applications.
It enables real-time, bi-directional communication between web clients and servers.
It has two parts: a client-side library that runs in the browser, and a server-side library for node.js.
Both components have an identical API.
Real-time applications
A real-time application (RTA) is an application that functions within a period that the user senses as immediate or current.
Some examples of real-time applications are -
Instant messengers - Chat apps like Whatsapp, Facebook Messenger, etc.
You need not refresh your app/website to receive new messages.
Push Notifications - When someone tags you in a picture on Facebook, you receive a notification instantly.
Collaboration Applications - Apps like google docs, which allow multiple people to update same documents simultaneously and apply changes to all people's instances.
Online Gaming - Games like Counter Strike, Call of Duty, etc., are also some examples of real-time applications.
Why Socket.IO?
Writing a real-time application with popular web applications stacks like LAMP (PHP) has traditionally been very hard.
It involves polling the server for changes, keeping track of timestamps, and it is a lot slower than it should be.
Sockets have traditionally been the solution around which most real-time systems are architected, providing a bi-directional communication channel between a client and a server.
This means that the server can push messages to clients.
Whenever an event occurs, the idea is that the server will get it and push it to the concerned connected clients.
Socket.IO is quite popular, it is used by Microsoft Office, Yammer, Zendesk, Trello, and numerous other organizations to build robust real-time systems.
It one of the most powerful JavaScript frameworks on GitHub, and most depended-upon NPM (Node Package Manager) module.
Socket.IO also has a huge community, which means finding help is quite easy.
ExpressJS
We will be using express to build the web server that Socket.IO will work with.
Any other node-server-side framework or even node HTTP server can be used.
However, ExpressJS makes it easy to define routes and other things.
To read more about express and get a basic idea about it, head to ExpressJS tutorial.
Environment
To get started with developing using the Socket.IO, you need to have Node and npm (node package manager) installed.
If you do not have these, head over to Node setup to install node on your local system.
Confirm that node and npm are installed by running the following commands in your terminal.
node --version
npm --version
You should get an output similar to -
v5.0.0 3.5.2
Open your terminal and enter the following in your terminal to create a new folder and enter the following commands -
$ mkdir test-project
$ cd test-proect
$ npm init
It will ask you some questions; answer them in the following way -
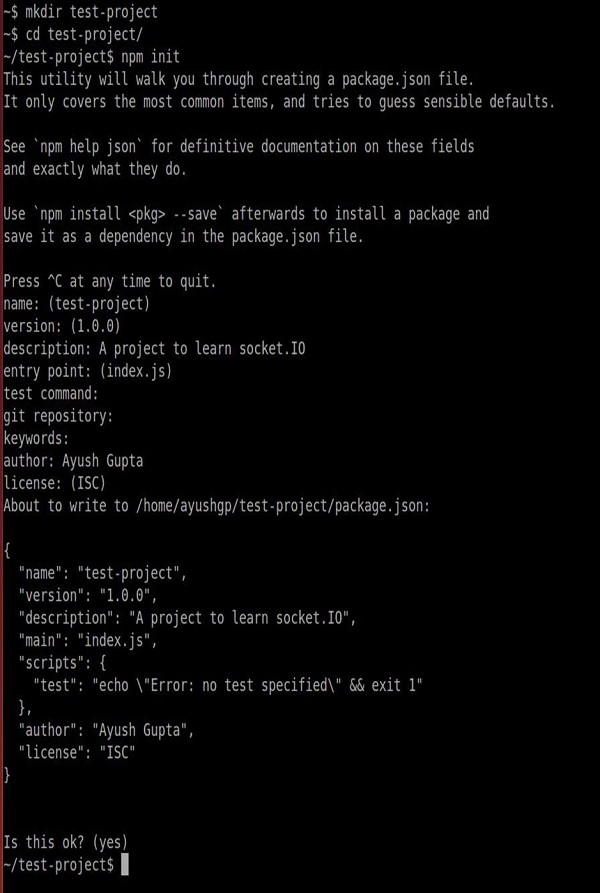 This will create a ‘package.json node.js’ configuration file.
Now we need to install Express and Socket.IO.
To install these and save them to package.json file, enter the following command in your terminal, into the project directory.
npm install --save express socket.io
One final thing is that we should keep restarting the server.
When we make changes, we will need a tool called nodemon.
To install nodemon, open your terminal and enter the following command -
npm install -g nodemon
Whenever you need to start the server, instead of using the node app.js use, nodemon app.js.
This will ensure that you do not need to restart the server whenever you change a file.
It speeds up the development process.
Now, we have our development environment set up.
Let us now get started with developing real-time applications with Socket.IO.
This will create a ‘package.json node.js’ configuration file.
Now we need to install Express and Socket.IO.
To install these and save them to package.json file, enter the following command in your terminal, into the project directory.
npm install --save express socket.io
One final thing is that we should keep restarting the server.
When we make changes, we will need a tool called nodemon.
To install nodemon, open your terminal and enter the following command -
npm install -g nodemon
Whenever you need to start the server, instead of using the node app.js use, nodemon app.js.
This will ensure that you do not need to restart the server whenever you change a file.
It speeds up the development process.
Now, we have our development environment set up.
Let us now get started with developing real-time applications with Socket.IO.
Hello World
Create a file called app.js and enter the following code to set up an express application -
var app = require('express')();
var http = require('http').Server(app);
app.get('/', function(req, res) {
res.sendfile('index.html');
});
http.listen(3000, function() {
console.log('listening on *:3000');
});
We will need an index.html file to serve, create a new file called index.html and enter the following code in it -
<!DOCTYPE html>
<html>
<head>
<title>Hello world</title>
</head>
<body>Hello world</body>
</html>
To test if this works, go to the terminal and run this app using the following command -
nodemon app.js
This will run the server on localhost:3000.
Go to the browser and enter localhost:3000 to check this.
This sets up our express application and is now serving a HTML file on the root route.
Now we will require Socket.IO and will log "A user connected", every time a user goes to this page and "A user disconnected", every time someone navigates away/closes this page.
var app = require('express')();
var http = require('http').Server(app);
var io = require('socket.io')(http);
app.get('/', function(req, res) {
res.sendfile('index.html');
});
//Whenever someone connects this gets executed
io.on('connection', function(socket) {
console.log('A user connected');
//Whenever someone disconnects this piece of code executed
socket.on('disconnect', function () {
console.log('A user disconnected');
});
});
http.listen(3000, function() {
console.log('listening on *:3000');
});
The require('socket.io')(http) creates a new socket.io instance attached to the http server.
The io.on event handler handles connection, disconnection, etc., events in it, using the socket object.
We have set up our server to log messages on connections and disconnections.
We now have to include the client script and initialize the socket object there, so that clients can establish connections when required.
The script is served by our io server at '/socket.io/socket.io.js'.
After completing the above procedure, the index.html file will look as follows -
<!DOCTYPE html>
<html>
<head>
<title>Hello world</title>
</head>
<script src = "/socket.io/socket.io.js"></script>
<script>
var socket = io();
</script>
<body>Hello world</body>
</html>
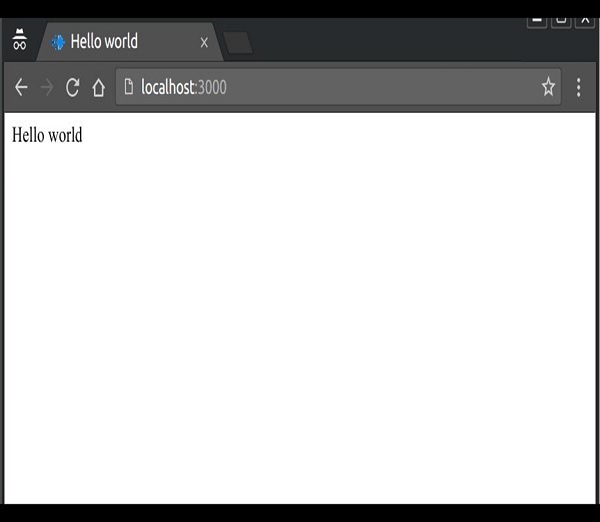
If you go to localhost:3000 now (make sure your server is running), you will get Hello World printed in your browser.
Now check your server console logs, it will show the following message -
A user connected
If you refresh your browser, it will disconnect the socket connection and recreate.
You can see the following on your console logs -
A user connected
A user disconnected
A user connected
We now have socket connections working.
This is how easy it is to set up connections in Socket.IO.
Event Handling
Sockets work based on events.
There are some reserved events, which can be accessed using the socket object on the server side.
These are -
Connect
Message
Disconnect
Reconnect
Ping
Join and
Leave
The client-side socket object also provides us with some reserved events, which are -
Connect
Connect_error
Connect_timeout
Reconnect, etc
In the Hello World example, we used the connection and disconnection events to log when a user connected and left.
Now we will be using the message event to pass message from the server to the client.
To do this, modify the io.on ('connection', function(socket)) call to include the following -
var app = require('express')();
var http = require('http').Server(app);
var io = require('socket.io')(http);
app.get('/', function(req, res) {
res.sendfile('index.html');
});
io.on('connection', function(socket) {
console.log('A user connected');
//Send a message after a timeout of 4seconds
setTimeout(function() {
socket.send('Sent a message 4seconds after connection!');
}, 4000);
socket.on('disconnect', function () {
console.log('A user disconnected');
});
});
http.listen(3000, function() {
console.log('listening on *:3000');
});
This will send an event called message(built in) to our client, four seconds after the client connects.
The send function on socket object associates the 'message' event.
Now, we need to handle this event on our client side.
So, edit your index.html script tag to include the following code -
<script>
var socket = io();
socket.on('message', function(data){document.write(data)});
</script>
We are now handling the 'message' event on the client.
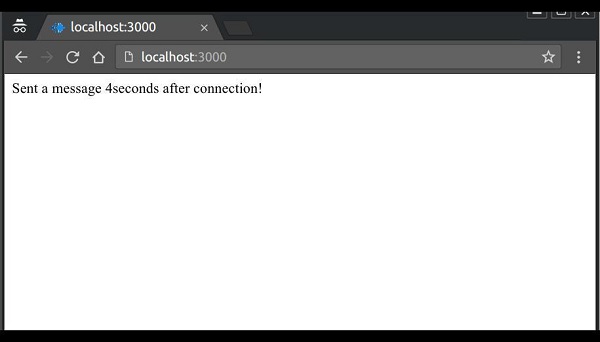
When you go to the page in your browser now, you will be presented with the following screenshot.
 After 4 seconds pass and the server sends the message event, our client will handle it and produce the following output -
 Note - We sent a string of text here; we can also send an object in any event.
Message was a built-in event provided by the API, but is of not much use in a real application, as we need to be able to differentiate between events.
To allow this, Socket.IO provides us the ability to create custom events.
You can create and fire custom events using the socket.emit function.
For example, the following code emits an event called testerEvent -
var app = require('express')();
var http = require('http').Server(app);
var io = require('socket.io')(http);
app.get('/', function(req, res) {
res.sendfile('index.html');
});
io.on('connection', function(socket) {
console.log('A user connected');
//Send a message when
setTimeout(function() {
//Sending an object when emmiting an event
socket.emit('testerEvent', { description: 'A custom event named testerEvent!'});
}, 4000);
socket.on('disconnect', function () {
console.log('A user disconnected');
});
});
http.listen(3000, function() {
console.log('listening on localhost:3000');
});
To handle this custom event on client we need a listener that listens for the event testerEvent.
The following code handles this event on the client -
<!DOCTYPE html>
<html>
<head>
<title>Hello world</title>
</head>
<script src = "/socket.io/socket.io.js"></script>
<script>
var socket = io();
socket.on('testerEvent', function(data){document.write(data.description)});
</script>
<body>Hello world</body>
</html>
This will work in the same way as our previous example, with the event being testerEvent in this case.
When you open your browser and go to localhost:3000, you'll be greeted with -
Hello world
After four seconds, this event will be fired and the browser will have the text changed to -
A custom event named testerEvent!
We can also emit events from the client.
To emit an event from your client, use the emit function on the socket object.
<!DOCTYPE html>
<html>
<head>
<title>Hello world</title>
</head>
<script src = "/socket.io/socket.io.js"></script>
<script>
var socket = io();
socket.emit('clientEvent', 'Sent an event from the client!');
</script>
<body>Hello world</body>
</html>
To handle these events, use the on function on the socket object on your server.
var app = require('express')();
var http = require('http').Server(app);
var io = require('socket.io')(http);
app.get('/', function(req, res) {
res.sendfile('index.html');
});
io.on('connection', function(socket) {
socket.on('clientEvent', function(data) {
console.log(data);
});
});
http.listen(3000, function() {
console.log('listening on localhost:3000');
});
So, now if we go to localhost:3000, we will get a custom event called clientEvent fired.
This event will be handled on the server by logging -
Sent an event from the client!
Note - We sent a string of text here; we can also send an object in any event.
Message was a built-in event provided by the API, but is of not much use in a real application, as we need to be able to differentiate between events.
To allow this, Socket.IO provides us the ability to create custom events.
You can create and fire custom events using the socket.emit function.
For example, the following code emits an event called testerEvent -
var app = require('express')();
var http = require('http').Server(app);
var io = require('socket.io')(http);
app.get('/', function(req, res) {
res.sendfile('index.html');
});
io.on('connection', function(socket) {
console.log('A user connected');
//Send a message when
setTimeout(function() {
//Sending an object when emmiting an event
socket.emit('testerEvent', { description: 'A custom event named testerEvent!'});
}, 4000);
socket.on('disconnect', function () {
console.log('A user disconnected');
});
});
http.listen(3000, function() {
console.log('listening on localhost:3000');
});
To handle this custom event on client we need a listener that listens for the event testerEvent.
The following code handles this event on the client -
<!DOCTYPE html>
<html>
<head>
<title>Hello world</title>
</head>
<script src = "/socket.io/socket.io.js"></script>
<script>
var socket = io();
socket.on('testerEvent', function(data){document.write(data.description)});
</script>
<body>Hello world</body>
</html>
This will work in the same way as our previous example, with the event being testerEvent in this case.
When you open your browser and go to localhost:3000, you'll be greeted with -
Hello world
After four seconds, this event will be fired and the browser will have the text changed to -
A custom event named testerEvent!
We can also emit events from the client.
To emit an event from your client, use the emit function on the socket object.
<!DOCTYPE html>
<html>
<head>
<title>Hello world</title>
</head>
<script src = "/socket.io/socket.io.js"></script>
<script>
var socket = io();
socket.emit('clientEvent', 'Sent an event from the client!');
</script>
<body>Hello world</body>
</html>
To handle these events, use the on function on the socket object on your server.
var app = require('express')();
var http = require('http').Server(app);
var io = require('socket.io')(http);
app.get('/', function(req, res) {
res.sendfile('index.html');
});
io.on('connection', function(socket) {
socket.on('clientEvent', function(data) {
console.log(data);
});
});
http.listen(3000, function() {
console.log('listening on localhost:3000');
});
So, now if we go to localhost:3000, we will get a custom event called clientEvent fired.
This event will be handled on the server by logging -
Sent an event from the client!
Broadcasting
Broadcasting means sending a message to all connected clients.
Broadcasting can be done at multiple levels.
We can send the message to all the connected clients, to clients on a namespace and clients in a particular room.
To broadcast an event to all the clients, we can use the io.sockets.emit method.
Note - This will emit the event to ALL the connected clients (event the socket that might have fired this event).
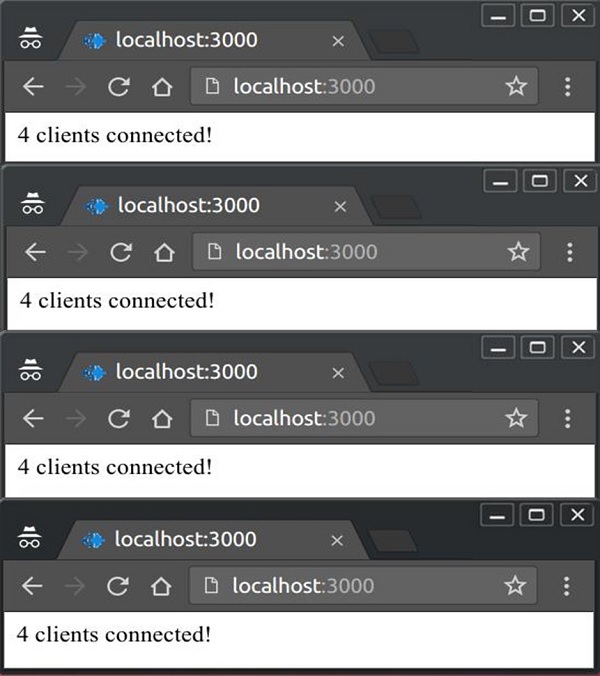
In this example, we will broadcast the number of connected clients to all the users.
Update the app.js file to incorporate the following.
var app = require('express')();
var http = require('http').Server(app);
var io = require('socket.io')(http);
app.get('/', function(req, res) {
res.sendfile('index.html');
});
var clients = 0;
io.on('connection', function(socket) {
clients++;
io.sockets.emit('broadcast',{ description: clients + ' clients connected!'});
socket.on('disconnect', function () {
clients--;
io.sockets.emit('broadcast',{ description: clients + ' clients connected!'});
});
});
http.listen(3000, function() {
console.log('listening on localhost:3000');
});
On the client side, we just need to handle the broadcast event -
<!DOCTYPE html>
<html>
<head>
<title>Hello world</title>
</head>
<script src = "/socket.io/socket.io.js"></script>
<script>
var socket = io();
socket.on('broadcast',function(data) {
document.body.innerHTML = '';
document.write(data.description);
});
</script>
<body>Hello world</body>
</html>
If you connect four clients, you will get the following result -
 This was to send an event to everyone.
Now, if we want to send an event to everyone, but the client that caused it (in the previous example, it was caused by new clients on connecting), we can use the socket.broadcast.emit.
Let us send the new user a welcome message and update the other clients about him/her joining.
So in your app.js file, on connection of client send him a welcome message and broadcast connected client number to all others.
var app = require('express')();
var http = require('http').Server(app);
var io = require('socket.io')(http);
app.get('/', function(req, res) {
res.sendfile('index.html');
});
var clients = 0;
io.on('connection', function(socket) {
clients++;
socket.emit('newclientconnect',{ description: 'Hey, welcome!'});
socket.broadcast.emit('newclientconnect',{ description: clients + ' clients connected!'})
socket.on('disconnect', function () {
clients--;
socket.broadcast.emit('newclientconnect',{ description: clients + ' clients connected!'})
});
});
http.listen(3000, function() {
console.log('listening on localhost:3000');
});
And your html to handle this event -
<!DOCTYPE html>
<html>
<head>
<title>Hello world</title>
</head>
<script src = "/socket.io/socket.io.js"></script>
<script>
var socket = io();
socket.on('newclientconnect',function(data) {
document.body.innerHTML = '';
document.write(data.description);
});
</script>
<body>Hello world</body>
</html>
Now, the newest client gets a welcome message and others get how many clients are connected currently to the server.
This was to send an event to everyone.
Now, if we want to send an event to everyone, but the client that caused it (in the previous example, it was caused by new clients on connecting), we can use the socket.broadcast.emit.
Let us send the new user a welcome message and update the other clients about him/her joining.
So in your app.js file, on connection of client send him a welcome message and broadcast connected client number to all others.
var app = require('express')();
var http = require('http').Server(app);
var io = require('socket.io')(http);
app.get('/', function(req, res) {
res.sendfile('index.html');
});
var clients = 0;
io.on('connection', function(socket) {
clients++;
socket.emit('newclientconnect',{ description: 'Hey, welcome!'});
socket.broadcast.emit('newclientconnect',{ description: clients + ' clients connected!'})
socket.on('disconnect', function () {
clients--;
socket.broadcast.emit('newclientconnect',{ description: clients + ' clients connected!'})
});
});
http.listen(3000, function() {
console.log('listening on localhost:3000');
});
And your html to handle this event -
<!DOCTYPE html>
<html>
<head>
<title>Hello world</title>
</head>
<script src = "/socket.io/socket.io.js"></script>
<script>
var socket = io();
socket.on('newclientconnect',function(data) {
document.body.innerHTML = '';
document.write(data.description);
});
</script>
<body>Hello world</body>
</html>
Now, the newest client gets a welcome message and others get how many clients are connected currently to the server.
Namespaces
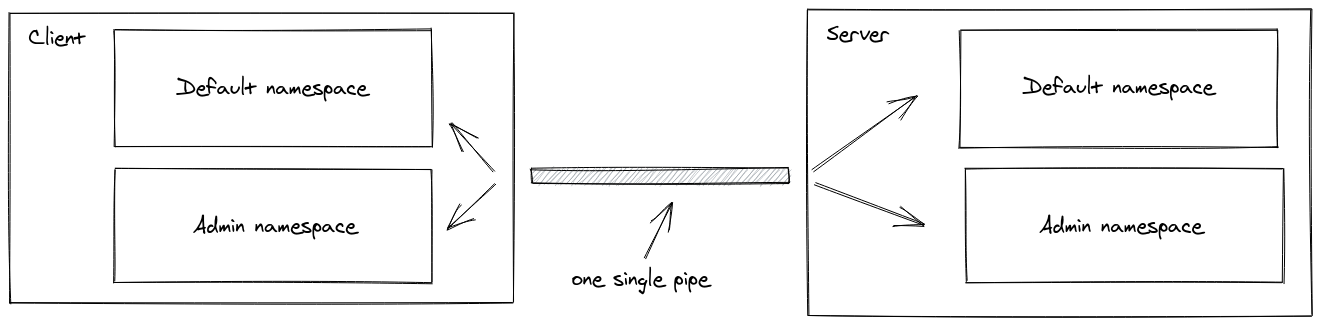
Socket.IO allows you to “namespace” your sockets, which essentially means assigning different endpoints or paths.
This is a useful feature to minimize the number of resources (TCP connections) and at the same time separate concerns within your application by introducing separation between communication channels.
Multiple namespaces actually share the same WebSockets connection thus saving us socket ports on the server.
Namespaces are created on the server side.
However, they are joined by clients by sending a request to the server.
Default Namespaces
The root namespace '/' is the default namespace, which is joined by clients if a namespace is not specified by the client while connecting to the server.
All connections to the server using the socket-object client side are made to the default namespace.
For example -
var socket = io();
This will connect the client to the default namespace.
All events on this namespace connection will be handled by the io object on the server.
All the previous examples were utilizing default namespaces to communicate with the server and back.
Custom Namespaces
We can create our own custom namespaces.
To set up a custom namespace, we can call the ‘of’ function on the server side -
var app = require('express')();
var http = require('http').Server(app);
var io = require('socket.io')(http);
app.get('/', function(req, res) {
res.sendfile('index.html');
});
var nsp = io.of('/my-namespace');
nsp.on('connection', function(socket) {
console.log('someone connected');
nsp.emit('hi', 'Hello everyone!');
});
http.listen(3000, function() {
console.log('listening on localhost:3000');
});
Now, to connect a client to this namespace, you need to provide the namespace as an argument to the io constructor call to create a connection and a socket object on client side.
For example, to connect to the above namespace, use the following HTML -
<!DOCTYPE html>
<html>
<head>
<title>Hello world</title>
</head>
<script src = "/socket.io/socket.io.js"></script>
<script>
var socket = io('/my-namespace');
socket.on('hi',function(data) {
document.body.innerHTML = '';
document.write(data);
});
</script>
<body></body>
</html>
Every time someone connects to this namespace, they will receive a ‘hi’ event.
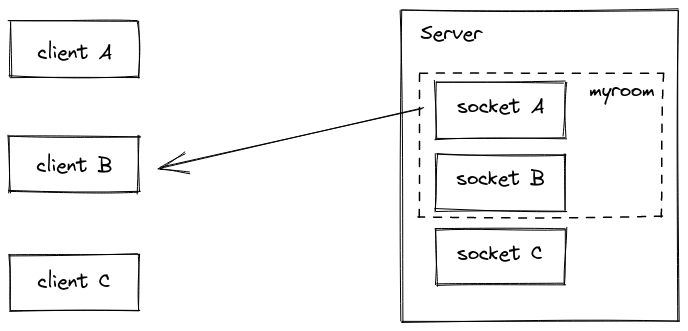
Rooms
Within each namespace, you can also define arbitrary channels that sockets can join and leave.
These channels are called rooms.
Rooms are used to further-separate concerns.
Rooms also share the same socket connection like namespaces.
One thing to keep in mind while using rooms is that they can only be joined on the server side.
Joining Rooms
You can call the join method on the socket to subscribe the socket to a given channel/room.
For example, let us create rooms called 'room-<room-number>' and join some clients.
As soon as this room is full, create another room and join clients there.
Note - We are currently doing this on the default namespace, i.e.
'/'.
You can also implement this in custom namespaces in the same fashion.
To join a room you need to provide the room name as the argument to your join function call.
var app = require('express')();
var http = require('http').Server(app);
var io = require('socket.io')(http);
app.get('/', function(req, res) {
res.sendfile('index.html');
});
var roomno = 1;
io.on('connection', function(socket) {
//Increase roomno 2 clients are present in a room.
if(io.nsps['/'].adapter.rooms["room-"+roomno] && io.nsps['/'].adapter.rooms["room-"+roomno].length > 1) roomno++;
socket.join("room-"+roomno);
//Send this event to everyone in the room.
io.sockets.in("room-"+roomno).emit('connectToRoom', "You are in room no.
"+roomno);
})
http.listen(3000, function() {
console.log('listening on localhost:3000');
});
Just handle this connectToRoom event on the client.
<!DOCTYPE html>
<html>
<head>
<title>Hello world</title>
</head>
<script src = "/socket.io/socket.io.js"></script>
<script>
var socket = io();
socket.on('connectToRoom',function(data) {
document.body.innerHTML = '';
document.write(data);
});
</script>
<body></body>
</html>
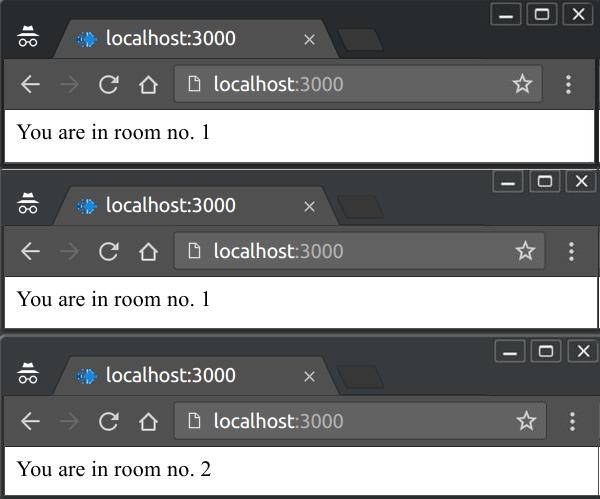
Now if you connect three clients, the first two will get the following message -
You are in room no. 1
The last client will get the following message -
You are in room no. 2
Leaving a room
To leave a room, you need to call the leave function just as you called the join function on the socket.
For example - To leave room 'room-1',
socket.leave("room-"+roomno);
Error Handling
We have worked on local servers until now, which will almost never give us errors related to connections, timeouts, etc.
However, in real life production environments, handling such errors are of utmost importance.
Therefore, we will now discuss how we can handle connection errors on the client side.
The client API provides us with following built in events -
Connect - When the client successfully connects.
Connecting - When the client is in the process of connecting.
Disconnect - When the client is disconnected.
Connect_failed - When the connection to the server fails.
Error - An error event is sent from the server.
Message - When the server sends a message using the send function.
Reconnect - When reconnection to the server is successful.
Reconnecting - When the client is in the process of connecting.
Reconnect_failed - When the reconnection attempt fails.
To handle errors, we can handle these events using the out-socket object that we created on our client.
For example - If we have a connection that fails, we can use the following code to connect to the server again -
socket.on('connect_failed', function() {
document.write("Sorry, there seems to be an issue with the connection!");
})
Logging and Debugging
Socket.IO uses a very famous debugging module developed by ExpresJS's main author, called debug.
Earlier Socket.IO used to log everything to the console making it quite difficult to debug the problem.
After the v1.0 release, you can specify what you want to log.
Server-side
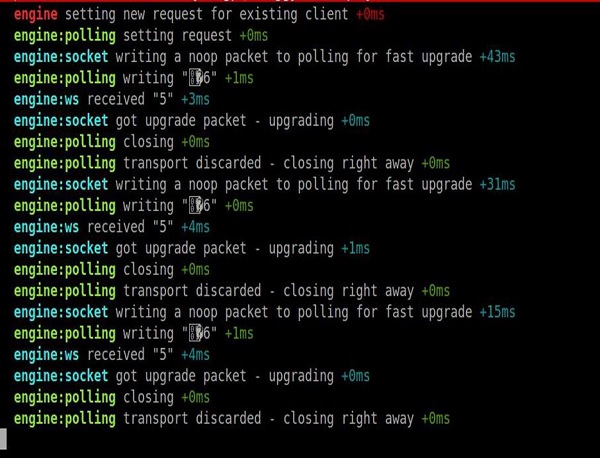
The best way to see what information is available is to use the * -
DEBUG=* node app.js
This will colorize and output everything that happens to your server console.
For example, we can consider the following screenshot.
Client-side
Paste this to console, click enter and refresh your page.
This will again output everything related to Socket.io to your console.
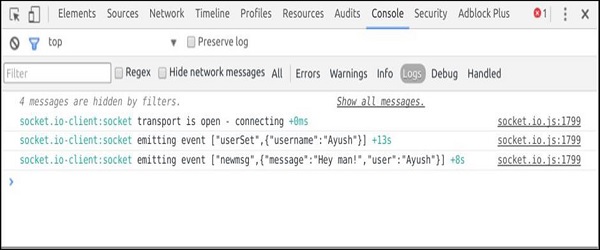
localStorage.debug = '*';
You can limit the output to get the debug info with incoming data from the socket using the following command.
localStorage.debug = 'socket.io-client:socket';
You can see the result like the following screenshot, if you use the second statement to log the info -
 There is a very good blog post related to socket.io debugging here.
Internals
In this chapter, we will discuss regarding Fallbacks, Connection using Socket.IO, Events and Messages.
Fallbacks
Socket.IO has a lot of underlying transport mechanisms, which deal with various constraints arising due to cross browser issues, WebSocket implementations, firewalls, port blocking, etc.
Though W3C has a defined specification for WebSocket API, it is still lacking in implementation.
Socket.IO provides us with fallback mechanisms, which can deal with such issues.
If we develop apps using the native API, we have to implement the fallbacks ourselves.
Socket.IO covers a large list of fallbacks in the following order -
WebSockets
FlashSocket
XHR long polling
XHR multipart streaming
XHR polling
JSONP polling
iframes
Connection using Socket.IO
The Socket.IO connection begins with the handshake.
This makes the handshake a special part of the protocol.
Apart from the handshake, all the other events and messages in the protocol are transferred over the socket.
Socket.IO is intended for use with web applications, and therefore it is assumed that these applications will always be able to use HTTP.
It is because of this reasoning that the Socket.IO handshake takes place over HTTP using a POST request on the handshake URI (passed to the connect method).
Events and messages
WebSocket native API only sends messages across.
Socket.IO provides an addition layer over these messages, which allows us to create events and again helps us develop apps easily by separating the different types of messages sent.
The native API sends messages only in plain text.
This is also taken care of by Socket.IO.
It handles the serialization and deserialization of data for us.
We have an official client API for the web.
For other clients such as native mobile phones, other application clients also we can use Socket.IO using the following steps.
Step 1 - A connection needs to be established using the same connection protocol discussed above.
Step 2 - The messages need to be in the same format as specified by Socket.IO.
This format enables Socket.IO to determine the type of the message and the data sent in the message and some metadata useful for operation.
The message format is -
[type] : [id ('+')] : [endpoint] (: [data]
The parameters in the above command are explained below -
Type is a single digit integer, specifying what type message it is.
ID is message ID, an incremental integer used for acknowledgements.
Endpoint is the socket endpoint that the message is intended to be delivered to...
Data is the associated data to be delivered to the socket.
In case of messages, it is treated as plain text, for other events, it is treated as JSON.
In the next chapter, we will write a chat application in Socket.IO.
Chat Application
Now that we are well acquainted with Socket.IO, let us write a chat application, which we can use to chat on different chat rooms.
We will allow users to choose a username and allow them to chat using them.
So first, let us set up our HTML file to request for a username -
<!DOCTYPE html>
<html>
<head>
<title>Hello world</title>
</head>
<script src = "/socket.io/socket.io.js"></script>
<script>
var socket = io();
</script>
<body>
<input type = "text" name = "name" value = "" placeholder = "Enter your name!">
<button type = "button" name = "button">Let me chat!</button>
</body>
</html>
Now that we have set up our HTML to request for a username, let us create the server to accept connections from the client.
We will allow people to send their chosen usernames using the setUsername event.
If a user exists, we will respond by a userExists event, else using a userSet event.
var app = require('express')();
var http = require('http').Server(app);
var io = require('socket.io')(http);
app.get('/', function(req, res) {
res.sendfile('index.html');
});
users = [];
io.on('connection', function(socket) {
console.log('A user connected');
socket.on('setUsername', function(data) {
if(users.indexOf(data) > -1) {
users.push(data);
socket.emit('userSet', {username: data});
} else {
socket.emit('userExists', data + ' username is taken! Try some other username.');
}
})
});
http.listen(3000, function() {
console.log('listening on localhost:3000');
});
We need to send the username to the server when people click on the button.
If user exists, we show an error message; else, we show a messaging screen -
<!DOCTYPE html>
<html>
<head>
<title>Hello world</title>
</head>
<script src = "/socket.io/socket.io.js"></script>
<script>
var socket = io();
function setUsername() {
socket.emit('setUsername', document.getElementById('name').value);
};
var user;
socket.on('userExists', function(data) {
document.getElementById('error-container').innerHTML = data;
});
socket.on('userSet', function(data) {
user = data.username;
document.body.innerHTML = '<input type = "text" id = "message">\
<button type = "button" name = "button" onclick = "sendMessage()">Send</button>\
<div id = "message-container"></div>';
});
function sendMessage() {
var msg = document.getElementById('message').value;
if(msg) {
socket.emit('msg', {message: msg, user: user});
}
}
socket.on('newmsg', function(data) {
if(user) {
document.getElementById('message-container').innerHTML += '<div><b>' +
data.user + '</b>: ' + data.message + '</div>'
}
})
</script>
<body>
<div id = "error-container"></div>
<input id = "name" type = "text" name = "name" value = ""
placeholder = "Enter your name!">
<button type = "button" name = "button" onclick = "setUsername()">
Let me chat!
</button>
</body>
</html>
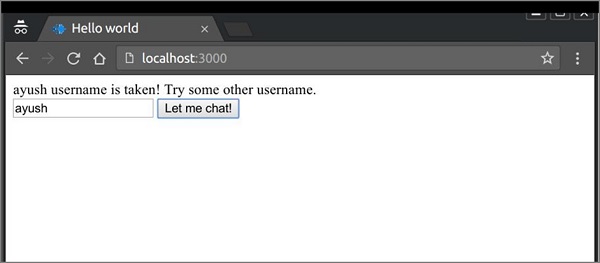
Now if you connect two clients with same username, it will give you an error as shown in the screenshot below -
 Once you have provided an acceptable username, you will be taken to a screen with a message box and a button to send messages.
Now, we have to handle and direct the messages to the connected client.
For that, modify your app.js file to include the following changes -
var app = require('express')();
var http = require('http').Server(app);
var io = require('socket.io')(http);
app.get('/', function(req, res) {
res.sendfile('index.html');
});
users = [];
io.on('connection', function(socket) {
console.log('A user connected');
socket.on('setUsername', function(data) {
console.log(data);
if(users.indexOf(data) > -1) {
socket.emit('userExists', data + ' username is taken! Try some other username.');
} else {
users.push(data);
socket.emit('userSet', {username: data});
}
});
socket.on('msg', function(data) {
//Send message to everyone
io.sockets.emit('newmsg', data);
})
});
http.listen(3000, function() {
console.log('listening on localhost:3000');
});
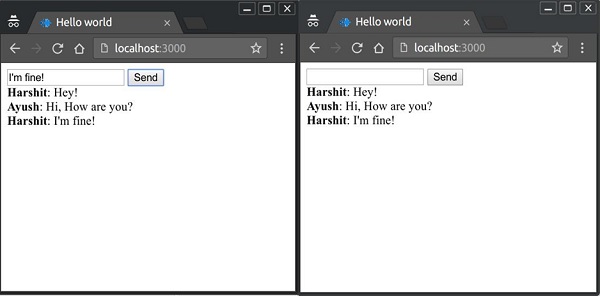
Now connect any number of clients to your server, provide them a username and start chatting! In the following example, we have connected two clients with names Ayush and Harshit and sent some messages from both the clients -
Once you have provided an acceptable username, you will be taken to a screen with a message box and a button to send messages.
Now, we have to handle and direct the messages to the connected client.
For that, modify your app.js file to include the following changes -
var app = require('express')();
var http = require('http').Server(app);
var io = require('socket.io')(http);
app.get('/', function(req, res) {
res.sendfile('index.html');
});
users = [];
io.on('connection', function(socket) {
console.log('A user connected');
socket.on('setUsername', function(data) {
console.log(data);
if(users.indexOf(data) > -1) {
socket.emit('userExists', data + ' username is taken! Try some other username.');
} else {
users.push(data);
socket.emit('userSet', {username: data});
}
});
socket.on('msg', function(data) {
//Send message to everyone
io.sockets.emit('newmsg', data);
})
});
http.listen(3000, function() {
console.log('listening on localhost:3000');
});
Now connect any number of clients to your server, provide them a username and start chatting! In the following example, we have connected two clients with names Ayush and Harshit and sent some messages from both the clients -
Useful Links on Socket.IO
Socket.io - Official website for socket.io, its you complete detail including socket.io library and associated documentation.
Socket.io at npm socket.io repository at npm
Useful Books on Socket.IO


Introduction
What Socket.IO is
Socket.IO is a library that enables real-time, bidirectional and event-based communication between the browser and the server.
It consists of:
a Node.js server: Source | API
a Javascript client library for the browser (which can be also run from Node.js): Source | API

How does that work?
The client will try to establish a WebSocket connection if possible, and will fall back on HTTP long polling if not.
WebSocket is a communication protocol which provides a full-duplex and low-latency channel between the server and the browser.
More information can be found here.
So, in the best-case scenario, provided that:
the browser supports WebSocket (97% of all browsers in 2020)
there is no element (proxy, firewall, …) preventing WebSocket connections between the client and the server
you can consider the Socket.IO client as a “slight” wrapper around the WebSocket API.
Instead of writing:
const socket = new WebSocket("ws://localhost:3000");
socket.onopen = () => {
socket.send("Hello!");
};
socket.onmessage = (data) => {
console.log(data);
};
You will have, on the client-side:
const socket = io("ws://localhost:3000");
socket.on("connect", () => {
// either with send()
socket.send("Hello!");
// or with emit() and custom event names
socket.emit("salutations", "Hello!", { "mr": "john" }, Uint8Array.from([1, 2, 3, 4]));
});
// handle the event sent with socket.send()
socket.on("message", data => {
console.log(data);
});
// handle the event sent with socket.emit()
socket.on("greetings", (elem1, elem2, elem3) => {
console.log(elem1, elem2, elem3);
});
The API on the server-side is similar, you also get a socket object which extends the Node.js EventEmitter class:
const io = require("socket.io")(3000);
io.on("connection", socket => {
// either with send()
socket.send("Hello!");
// or with emit() and custom event names
socket.emit("greetings", "Hey!", { "ms": "jane" }, Buffer.from([4, 3, 3, 1]));
// handle the event sent with socket.send()
socket.on("message", (data) => {
console.log(data);
});
// handle the event sent with socket.emit()
socket.on("salutations", (elem1, elem2, elem3) => {
console.log(elem1, elem2, elem3);
});
});
Socket.IO provides additional features over a plain WebSocket object, which are listed below.
But first, let’s detail what the Socket.IO library is not.
What Socket.IO is not
Socket.IO is NOT a WebSocket implementation.
Although Socket.IO indeed uses WebSocket as a transport when possible, it adds additional metadata to each packet.
That is why a WebSocket client will not be able to successfully connect to a Socket.IO server, and a Socket.IO client will not be able to connect to a plain WebSocket server either.
// WARNING: the client will NOT be able to connect!
const socket = io("ws://echo.websocket.org");
If you are looking for a plain WebSocket server, please take a look at ws or uWebSockets.js.
There are also talks to include a WebSocket server in the Node.js core.
On the client-side, you might be interested by the robust-websocket package.
Namespaces
A Namespace is a communication channel that allows you to split the logic of your application over a single shared connection (also called “multiplexing”).
Introduction
Each namespace has its own:
event handlers
io.of("/orders").on("connection", (socket) => {
socket.on("order:list", () => {});
socket.on("order:create", () => {});
});
io.of("/users").on("connection", (socket) => {
socket.on("user:list", () => {});
});
rooms
const orderNamespace = io.of("/orders");
orderNamespace.on("connection", (socket) => {
socket.join("room1");
orderNamespace.to("room1").emit("hello");
});
const userNamespace = io.of("/users");
userNamespace.on("connection", (socket) => {
socket.join("room1"); // distinct from the room in the "orders" namespace
userNamespace.to("room1").emit("holà");
});
middlewares
const orderNamespace = io.of("/orders");
orderNamespace.use((socket, next) => {
// ensure the socket has access to the "orders" namespace, and then
next();
});
const userNamespace = io.of("/users");
userNamespace.use((socket, next) => {
// ensure the socket has access to the "users" namespace, and then
next();
});
Possible use cases:
you want to create a special namespace that only authorized users have access to, so the logic related to those users is separated from the rest of the application
const adminNamespace = io.of("/admin");
adminNamespace.use((socket, next) => {
// ensure the user has sufficient rights
next();
});
adminNamespace.on("connection", socket => {
socket.on("delete user", () => {
// ...
});
});
your application has multiple tenants so you want to dynamically create one namespace per tenant
const workspaces = io.of(/^\/\w+$/);
workspaces.on("connection", socket => {
const workspace = socket.nsp;
workspace.emit("hello");
});
Main namespace
Until now, you interacted with the main namespace, called /.
The io instance inherits all of its methods:
io.on("connection", (socket) => {});
io.use((socket, next) => { next() });
io.emit("hello");
// are actually equivalent to
io.of("/").on("connection", (socket) => {});
io.of("/").use((socket, next) => { next() });
io.of("/").emit("hello");
Some tutorials may also mention io.sockets, it’s simply an alias for io.of("/").
io.sockets === io.of("/")
Custom namespaces
To set up a custom namespace, you can call the of function on the server-side:
const nsp = io.of("/my-namespace");
nsp.on("connection", socket => {
console.log("someone connected");
});
nsp.emit("hi", "everyone!");
Client initialization
Same-origin version:
const socket = io(); // or io("/"), the main namespace
const orderSocket = io("/orders"); // the "orders" namespace
const userSocket = io("/users"); // the "users" namespace
Cross-origin/Node.js version:
const socket = io("https://example.com"); // or io("https://example.com/"), the main namespace
const orderSocket = io("https://example.com/orders"); // the "orders" namespace
const userSocket = io("https://example.com/users"); // the "users" namespace
In the example above, only one WebSocket connection will be established, and the packets will automatically be routed to the right namespace.
Please note that multiplexing will be disabled in the following cases:
multiple creation for the same namespace
const socket1 = io();
const socket2 = io(); // no multiplexing, two distinct WebSocket connections
different domains
const socket1 = io("https://first.example.com");
const socket2 = io("https://second.example.com"); // no multiplexing, two distinct WebSocket connections
usage of the forceNew option
const socket1 = io();
const socket2 = io("/admin", { forceNew: true }); // no multiplexing, two distinct WebSocket connections
Dynamic namespaces
It is also possible to dynamically create namespaces, either with a regular expression:
io.of(/^\/dynamic-\d+$/);
or with a function:
io.of((name, auth, next) => {
next(null, true); // or false, when the creation is denied
});
You can have access to the new namespace in the connection event:
io.of(/^\/dynamic-\d+$/).on("connection", (socket) => {
const namespace = socket.nsp;
});
The return value of the of() method is what we call the parent namespace, from which you can:
register middlewares
const parentNamespace = io.of(/^\/dynamic-\d+$/);
parentNamespace.use((socket, next) => { next() });
The middleware will automatically be registered on each child namespace.
broadcast events
const parentNamespace = io.of(/^\/dynamic-\d+$/);
parentNamespace.emit("hello"); // will be sent to users in /dynamic-1, /dynamic-2, ...
Complete API
The complete API exposed by the Namespace instance can be found here.
Client API
https://socket.io/docs/v3/client-api/index.html
IO
Exposed as the io namespace in the standalone build, or the result of calling require("socket.io-client").
<script src="/socket.io/socket.io.js"></script>
<script>
const socket = io("http://localhost");
</script>
const io = require("socket.io-client");
// or with import syntax
import { io } from "socket.io-client";
io.protocol
(Number)
The protocol revision number (currently: 5).
The protocol defines the format of the packets exchanged between the client and the server.
Both the client and the server must use the same revision in order to understand each other.
You can find more information here.
io([url][, options])
url (String) (defaults to window.location)
options (Object)
forceNew (Boolean) whether to reuse an existing connection
Returns Socket
Creates a new Manager for the given URL, and attempts to reuse an existing Manager for subsequent calls, unless the multiplex option is passed with false.
Passing this option is the equivalent of passing "force new connection": true or forceNew: true.
A new Socket instance is returned for the namespace specified by the pathname in the URL, defaulting to /.
For example, if the url is http://localhost/users, a transport connection will be established to http://localhost and a Socket.IO connection will be established to /users.
Query parameters can also be provided, either with the query option or directly in the url (example: http://localhost/users?token=abc).
const io = require("socket.io-client");
const socket = io("ws://example.com/my-namespace", {
reconnectionDelayMax: 10000,
auth: {
token: "123"
},
query: {
"my-key": "my-value"
}
});
is the short version of:
const { Manager } = require("socket.io-client");
const manager = new Manager("ws://example.com", {
reconnectionDelayMax: 10000,
query: {
"my-key": "my-value"
}
});
const socket = manager.socket("/my-namespace", {
auth: {
token: "123"
}
});
See new Manager(url[, options]) for the list of available options.
Please note: manager.socket("/my-namespace", options ) will only read the auth key in the options object.
query: {…} and other optional values are only used when passed via a new Manager(uri, options) instance.
Manager
The Manager manages the Engine.IO client instance, which is the low-level engine that establishes the connection to the server (by using transports like WebSocket or HTTP long-polling).
The Manager handles the reconnection logic.
A single Manager can be used by several Sockets.
Please note that, in most cases, you won’t use the Manager directly but use the Socket instance instead.
new Manager(url[, options])
url (String)
options (Object)
Returns Manager
Available options:
Option
Default value
Description
path
/socket.io
name of the path that is captured on the server side
reconnection
true
whether to reconnect automatically
reconnectionAttempts
Infinity
number of reconnection attempts before giving up
reconnectionDelay
1000
how long to initially wait before attempting a new reconnection.
Affected by +/- randomizationFactor, for example the default initial delay will be between 500 to 1500ms.
reconnectionDelayMax
5000
maximum amount of time to wait between reconnections.
Each attempt increases the reconnection delay by 2x along with a randomization factor.
randomizationFactor
0.5
0 <= randomizationFactor <= 1
timeout
20000
connection timeout before an error event is emitted
autoConnect
true
by setting this false, you have to call manager.open whenever you decide it’s appropriate
query
{}
additional query parameters that are sent when connecting a namespace (then found in socket.handshake.query object on the server-side)
parser
-
the parser to use.
Defaults to an instance of the Parser that ships with socket.io.
See socket.io-parser.
Available options for the underlying Engine.IO client:
Option
Default value
Description
upgrade
true
whether the client should try to upgrade the transport from long-polling to something better.
forceJSONP
false
forces JSONP for polling transport.
jsonp
true
determines whether to use JSONP when necessary for polling.
If disabled (by settings to false) an error will be emitted (saying “No transports available”) if no other transports are available.
If another transport is available for opening a connection (e.g.
WebSocket) that transport will be used instead.
forceBase64
false
forces base 64 encoding for polling transport even when XHR2 responseType is available and WebSocket even if the used standard supports binary.
enablesXDR
false
enables XDomainRequest for IE8 to avoid loading bar flashing with click sound.
default to false because XDomainRequest has a flaw of not sending cookie.
timestampRequests
-
whether to add the timestamp with each transport request.
Note: polling requests are always stamped unless this option is explicitly set to false
timestampParam
t
the timestamp parameter
transports
["polling", "websocket"]
a list of transports to try (in order).
Engine always attempts to connect directly with the first one, provided the feature detection test for it passes.
transportOptions
{}
hash of options, indexed by transport name, overriding the common options for the given transport
rememberUpgrade
false
If true and if the previous websocket connection to the server succeeded, the connection attempt will bypass the normal upgrade process and will initially try websocket.
A connection attempt following a transport error will use the normal upgrade process.
It is recommended you turn this on only when using SSL/TLS connections, or if you know that your network does not block websockets.
onlyBinaryUpgrades
false
whether transport upgrades should be restricted to transports supporting binary data
requestTimeout
0
timeout for xhr-polling requests in milliseconds (0) (only for polling transport)
protocols
-
a list of subprotocols (see MDN reference) (only for websocket transport)
Node.js-only options for the underlying Engine.IO client:
Option
Default value
Description
agent
false
the http.Agent to use
pfx
-
Certificate, Private key and CA certificates to use for SSL.
key
-
Private key to use for SSL.
passphrase
-
A string of passphrase for the private key or pfx.
cert
-
Public x509 certificate to use.
ca
-
An authority certificate or array of authority certificates to check the remote host against.
ciphers
-
A string describing the ciphers to use or exclude.
Consult the cipher format list for details on the format.
rejectUnauthorized
true
If true, the server certificate is verified against the list of supplied CAs.
An “error” event is emitted if verification fails.
Verification happens at the connection level, before the HTTP request is sent.
perMessageDeflate
true
parameters of the WebSocket permessage-deflate extension (see ws module api docs).
Set to false to disable.
extraHeaders
{}
Headers that will be passed for each request to the server (via xhr-polling and via websockets).
These values then can be used during handshake or for special proxies.
forceNode
false
Uses NodeJS implementation for websockets - even if there is a native Browser-Websocket available, which is preferred by default over the NodeJS implementation.
(This is useful when using hybrid platforms like nw.js or electron)
localAddress
-
the local IP address to connect to
manager.reconnection([value])
value (Boolean)
Returns Manager|Boolean
Sets the reconnection option, or returns it if no parameters are passed.
manager.reconnectionAttempts([value])
value (Number)
Returns Manager|Number
Sets the reconnectionAttempts option, or returns it if no parameters are passed.
manager.reconnectionDelay([value])
value (Number)
Returns Manager|Number
Sets the reconnectionDelay option, or returns it if no parameters are passed.
manager.reconnectionDelayMax([value])
value (Number)
Returns Manager|Number
Sets the reconnectionDelayMax option, or returns it if no parameters are passed.
manager.timeout([value])
value (Number)
Returns Manager|Number
Sets the timeout option, or returns it if no parameters are passed.
manager.open([callback])
callback (Function)
Returns Manager
If the manager was initiated with autoConnect to false, launch a new connection attempt.
The callback argument is optional and will be called once the attempt fails/succeeds.
manager.connect([callback])
Synonym of manager.open([callback]).
manager.socket(nsp, options)
nsp (String)
options (Object)
Returns Socket
Creates a new Socket for the given namespace.
Only auth ({ auth: {key: "value"} }) is read from the options object.
Other keys will be ignored and should be passed when instancing a new Manager(nsp, options).
Event: ‘error’
error (Object) error object
Fired upon a connection error.
Event: ‘reconnect’
attempt (Number) reconnection attempt number
Fired upon a successful reconnection.
Event: ‘reconnect_attempt’
attempt (Number) reconnection attempt number
Fired upon an attempt to reconnect.
Event: ‘reconnect_error’
error (Object) error object
Fired upon a reconnection attempt error.
Event: ‘reconnect_failed’
Fired when couldn’t reconnect within reconnectionAttempts.
Event: 'ping'
Fired when a ping packet is received from the server.
Socket
A Socket is the fundamental class for interacting with the server.
A Socket belongs to a certain Namespace (by default /) and uses an underlying Manager to communicate.
A Socket is basically an EventEmitter which sends events to — and receive events from — the server over the network.
socket.emit("hello", { a: "b", c: [] });
socket.on("hey", (...args) => {
// ...
});
More information can be found here.
socket.id
(String)
An unique identifier for the socket session.
Set after the connect event is triggered, and updated after the reconnect event.
const socket = io("http://localhost");
console.log(socket.id); // undefined
socket.on("connect", () => {
console.log(socket.id); // "G5p5..."
});
socket.connected
(Boolean)
Whether or not the socket is connected to the server.
const socket = io("http://localhost");
socket.on("connect", () => {
console.log(socket.connected); // true
});
socket.disconnected
(Boolean)
Whether or not the socket is disconnected from the server.
const socket = io("http://localhost");
socket.on("connect", () => {
console.log(socket.disconnected); // false
});
socket.open()
Returns Socket
Manually opens the socket.
const socket = io({
autoConnect: false
});
// ...
socket.open();
It can also be used to manually reconnect:
socket.on("disconnect", () => {
socket.open();
});
socket.connect()
Synonym of socket.open().
socket.send([…args][, ack])
args
ack (Function)
Returns Socket
Sends a message event.
See socket.emit(eventName[, …args][, ack]).
socket.emit(eventName[, …args][, ack])
eventName (String)
args
ack (Function)
Returns true
Emits an event to the socket identified by the string name.
Any other parameters can be included.
All serializable datastructures are supported, including Buffer.
socket.emit("hello", "world");
socket.emit("with-binary", 1, "2", { 3: "4", 5: Buffer.from([6, 7, 8]) });
The ack argument is optional and will be called with the server answer.
socket.emit("ferret", "tobi", (data) => {
console.log(data); // data will be "woot"
});
// server:
// io.on("connection", (socket) => {
// socket.on("ferret", (name, fn) => {
// fn("woot");
// });
// });
socket.on(eventName, callback)
eventName (String)
callback (Function)
Returns Socket
Register a new handler for the given event.
socket.on("news", (data) => {
console.log(data);
});
// with multiple arguments
socket.on("news", (arg1, arg2, arg3, arg4) => {
// ...
});
// with callback
socket.on("news", (cb) => {
cb(0);
});
The socket actually inherits every method of the Emitter class, like hasListeners, once or off (to remove an event listener).
socket.onAny(callback)
callback (Function)
Register a new catch-all listener.
socket.onAny((event, ...args) => {
console.log(`got ${event}`);
});
socket.prependAny(callback)
callback (Function)
Register a new catch-all listener.
The listener is added to the beginning of the listeners array.
socket.prependAny((event, ...args) => {
console.log(`got ${event}`);
});
socket.offAny([listener])
listener (Function)
Removes the previously registered listener.
If no listener is provided, all catch-all listeners are removed.
const myListener = () => { /* ...
*/ };
socket.onAny(myListener);
// then, later
socket.offAny(myListener);
socket.offAny();
socket.listenersAny()
Returns Function[]
Returns the list of registered catch-all listeners.
const listeners = socket.listenersAny();
socket.compress(value)
value (Boolean)
Returns Socket
Sets a modifier for a subsequent event emission that the event data will only be compressed if the value is true.
Defaults to true when you don’t call the method.
socket.compress(false).emit("an event", { some: "data" });
socket.close()
Returns Socket
Disconnects the socket manually.
socket.disconnect()
Synonym of socket.close().
Event: 'connect'
Fired upon connection to the Namespace (including a successful reconnect {
// ...
});
// note: you should register event handlers outside of connect,
// so they are not registered again on reconnection
socket.on("myevent", () => {
// ...
});
Event: ‘disconnect’
reason (String)
Fired upon disconnection.
The list of possible disconnection reasons:
Reason
Description
io server disconnect
The server has forcefully disconnected the socket with socket.disconnect()
io client disconnect
The socket was manually disconnected using socket.disconnect()
ping timeout
The server did not send a PING within the pingInterval + pingTimeout range
transport close
The connection was closed (example: the user has lost connection, or the network was changed from WiFi to 4G)
transport error
The connection has encountered an error (example: the server was killed during a HTTP long-polling cycle)
In the first two cases (explicit disconnection), the client will not try to reconnect and you need to manually call socket.connect().
In all other cases, the client will wait for a small random delay and then try to reconnect:
socket.on("disconnect", (reason) => {
if (reason === "io server disconnect") {
// the disconnection was initiated by the server, you need to reconnect manually
socket.connect();
}
// else the socket will automatically try to reconnect
});
Event: ‘connect_error’
connect_error (Object) error object
Fired when an namespace middleware error occurs.
socket.on("connect_error", (error) => {
// ...
});
Rooms
https://socket.io/docs/v3/rooms/
A room is an arbitrary channel that sockets can join and leave.
It can be used to broadcast events to a subset of clients:
 Please note that rooms are a server-only concept (i.e. the client does not have access to the list of rooms it has joined).
Joining and leaving
You can call join to subscribe the socket to a given channel:
io.on('connection', socket => {
socket.join('some room');
});
And then simply use to or in (they are the same) when broadcasting or emitting:
io.to('some room').emit('some event');
You can emit to several rooms at the same time:
io.to('room1').to('room2').to('room3').emit('some event');
In that case, a union is performed: every socket that is at least in one of the rooms will get the event once (even if the socket is in two or more rooms).
You can also broadcast to a room from a given socket:
io.on('connection', function(socket){
socket.to('some room').emit('some event');
});
In that case, every socket in the room excluding the sender will get the event.
 To leave a channel you call
 leave in the same fashion as join.
Default room
Each Socket in Socket.IO is identified by a random, unguessable, unique identifier Socket#id.
For your convenience, each socket automatically joins a room identified by its own id.
This makes it easy to implement private messages:
io.on("connection", socket => {
socket.on("private message", (anotherSocketId, msg) => {
socket.to(anotherSocketId).emit("private message", socket.id, msg);
});
});
Sample use cases
broadcast data to each device / tab of a given user
io.on('connection', async (socket) => {
const userId = await fetchUserId(socket);
socket.join(userId);
// and then later
io.to(userId).emit('hi');
});
send notifications about a given entity
io.on('connection', async (socket) => {
const projects = await fetchProjects(socket);
projects.forEach(project => socket.join('project:' + project.id));
// and then later
io.to('project:4321').emit('project updated');
});
Usage with asynchronous code
Please make sure to use io.to(...).emit(...) (or socket.to(...).emit(...)) in a synchronous manner.
Example with callback:
// BAD
const room = socket.to('room1');
saveProduct(() => {
room.emit('product-updated');
});
// GOOD
saveProduct(() => {
socket.to('room1').emit('product-updated');
});
Example with async/await:
// BAD
io.to('room2').emit('details', await fetchDetails());
// GOOD
const details = await fetchDetails();
io.to('room2').emit('details', details);
Explanation: the to() method does not return a new object, it mutates an attribute on the io (respectively, the socket) object.
This also applies to other broadcast modifiers:
local
broadcast
volatile
Disconnection
Upon disconnection, sockets leave all the channels they were part of automatically, and no special teardown is needed on your part.
You can fetch the rooms the Socket was in by listening to the disconnecting event:
io.on('connection', socket => {
socket.on('disconnecting', () => {
console.log(socket.rooms); // the Set contains at least the socket ID
});
socket.on('disconnect', () => {
// socket.rooms.size === 0
});
});
With multiple Socket.IO servers
Like global broadcasting, broadcasting to rooms also works with multiple Socket.IO servers.
You just need to replace the default Adapter by the Redis Adapter.
More information about it here.
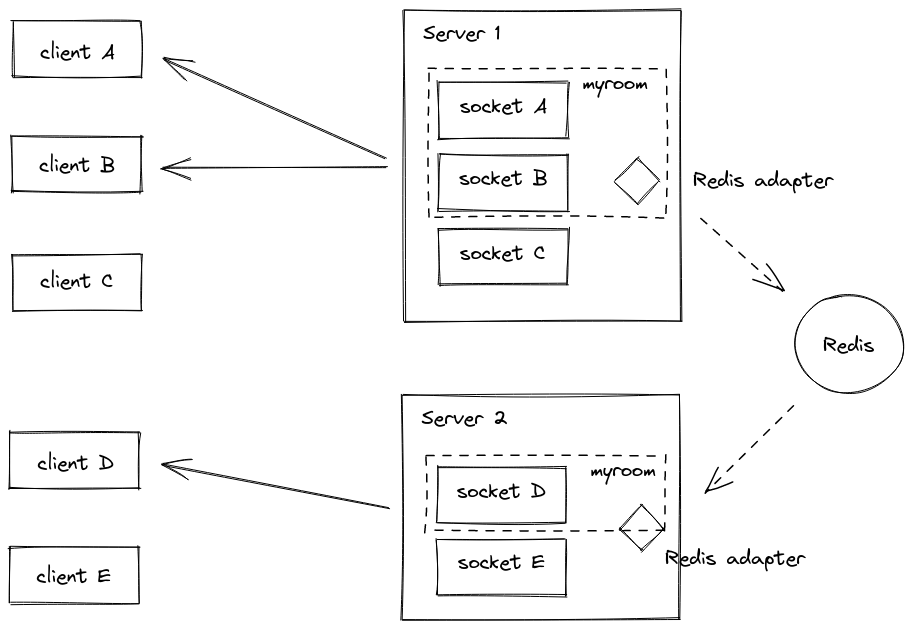
Implementation details
The “room” feature is implemented by what we call an Adapter.
This Adapter is a server-side component which is responsible for:
storing the relationships between the Socket instances and the rooms
broadcasting events to all (or a subset of) clients
You can find the code of the default in-memory adapter here.
Basically, it consists in two ES6 Maps:
sids: Map<SocketId, Set<Room>>
rooms: Map<Room, Set<SocketId>>
Calling socket.join("the-room") will result in:
in the ̀sids Map, adding “the-room” to the Set identified by the socket ID
in the rooms Map, adding the socket ID in the Set identified by the string “the-room”
Those two maps are then used when broadcasting:
a broadcast to all sockets (io.emit()) loops through the sids Map, and send the packet to all sockets
a broadcast to a given room (io.to("room21").emit()) loops through the Set in the rooms Map, and sends the packet to all matching sockets
You can access those objects with:
// main namespace
const rooms = io.of("/").adapter.rooms;
const sids = io.of("/").adapter.sids;
// custom namespace
const rooms = io.of("/my-namespace").adapter.rooms;
const sids = io.of("/my-namespace").adapter.sids;
Notes:
those objects are not meant to be directly modified, you should always use socket.join(...) and socket.leave(...) instead.
in a multi-server setup, the rooms and sids objects are not shared between the Socket.IO servers (a room may only “exist” on one server and not on another).
Room events
Starting with socket.io@3.1.0, the underlying Adapter will emit the following events:
create-room (argument: room)
delete-room (argument: room)
join-room (argument: room, id)
leave-room (argument: room, id)
Example:
io.of("/").adapter.on("create-room", (room) => {
console.log(`room ${room} was created`);
});
io.of("/").adapter.on("join-room", (room, id) => {
console.log(`socket ${id} has joined room ${room}`);
});
Using multiple nodes
https://socket.io/docs/v3/using-multiple-nodes/index.html
When deploying multiple Socket.IO servers, there are two things to take care of:
enabling sticky session, if HTTP long-polling is enabled (which is the default): see below
using the Redis adapter (or another compatible Adapter): see below
Sticky load balancing
If you plan to distribute the load of connections among different processes or machines, you have to make sure that all requests associated with a particular session ID reach the process that originated them.
Why is sticky-session required
This is because the HTTP long-polling transport sends multiple HTTP requests during the lifetime of the Socket.IO session.
In fact, Socket.IO could technically work without sticky sessions, with the following synchronization (in dashed lines):
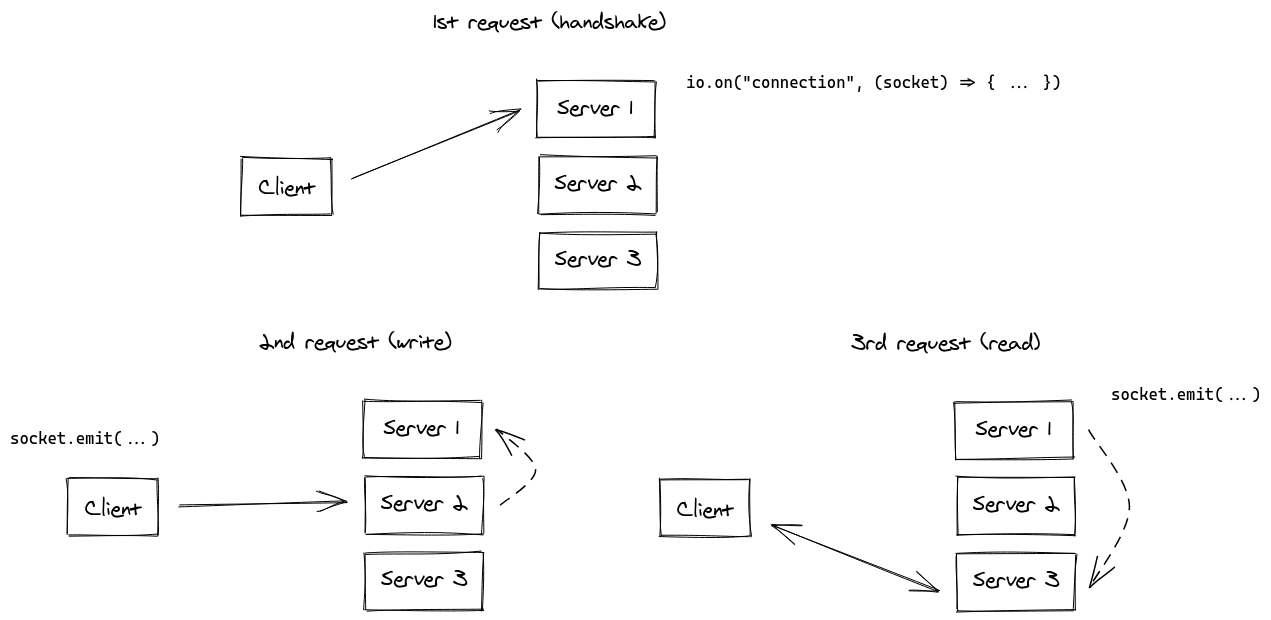 While obviously possible to implement, we think that this synchronization process between the Socket.IO servers would result in a big performance hit for your application.
Remarks:
without enabling sticky-session, you will experience HTTP 400 errors due to “Session ID unknown”
the WebSocket transport does not have this limitation, since it relies on a single TCP connection for the whole session.
Which means that if you disable the HTTP long-polling transport (which is a perfectly valid choice in 2021), you won’t need sticky sessions:
const socket = io("https://io.yourhost.com", {
// WARNING: in that case, there is no fallback to long-polling
transports: [ "websocket" ] // or [ "websocket", "polling" ] (the order matters)
});
Documentation:
While obviously possible to implement, we think that this synchronization process between the Socket.IO servers would result in a big performance hit for your application.
Remarks:
without enabling sticky-session, you will experience HTTP 400 errors due to “Session ID unknown”
the WebSocket transport does not have this limitation, since it relies on a single TCP connection for the whole session.
Which means that if you disable the HTTP long-polling transport (which is a perfectly valid choice in 2021), you won’t need sticky sessions:
const socket = io("https://io.yourhost.com", {
// WARNING: in that case, there is no fallback to long-polling
transports: [ "websocket" ] // or [ "websocket", "polling" ] (the order matters)
});
Documentation: transports
Enabling sticky-session
To achieve sticky-session, there are two main solutions:
routing clients based on a cookie (recommended solution)
routing clients based on their originating address
You will find below some examples with common load-balancing solutions:
NginX (IP-based)
Apache HTTPD (cookie-based)
HAProxy (cookie-based)
Traefik (cookie-based)
Node.js cluster module
For other platforms, please refer to the relevant documentation:
Kubernetes: https://kubernetes.github.io/ingress-nginx/examples/affinity/cookie/
AWS (Application Load Balancers): https://docs.aws.amazon.com/elasticloadbalancing/latest/application/load-balancer-target-groups.html#sticky-sessions
GCP: https://cloud.google.com/load-balancing/docs/backend-service#session_affinity
Heroku: https://devcenter.heroku.com/articles/session-affinity
Important note: if you are in a CORS situation (the front domain is different from the server domain) and session affinity is achieved with a cookie, you need to allow credentials:
Server
const io = require("socket.io")(httpServer, {
cors: {
origin: "https://front-domain.com",
methods: ["GET", "POST"],
credentials: true
}
});
Client
const io = require("socket.io-client");
const socket = io("https://server-domain.com", {
withCredentials: true
});
Without it, the cookie will not be sent by the browser and you will experience HTTP 400 “Session ID unknown” responses.
More information here.
NginX configuration
Within the http { } section of your nginx.conf file, you can declare a upstream section with a list of Socket.IO process you want to balance load between:
http {
server {
listen 3000;
server_name io.yourhost.com;
location / {
proxy_set_header X-Forwarded-For $proxy_add_x_forwarded_for;
proxy_set_header Host $host;
proxy_pass http://nodes;
# enable WebSockets
proxy_http_version 1.1;
proxy_set_header Upgrade $http_upgrade;
proxy_set_header Connection "upgrade";
}
}
upstream nodes {
# enable sticky session with either "hash" (uses the complete IP address)
hash $remote_addr consistent;
# or "ip_hash" (uses the first three octets of the client IPv4 address, or the entire IPv6 address)
# ip_hash;
# or "sticky" (needs commercial subscription)
# sticky cookie srv_id expires=1h domain=.example.com path=/;
server app01:3000;
server app02:3000;
server app03:3000;
}
}
Notice the hash instruction that indicates the connections will be sticky.
Make sure you also configure worker_processes in the topmost level to indicate how many workers NginX should use.
You might also want to look into tweaking the worker_connections setting within the events { } block.
Links:
Example
NginX Documentation
Apache HTTPD configuration
Header add Set-Cookie "SERVERID=sticky.%{BALANCER_WORKER_ROUTE}e; path=/" env=BALANCER_ROUTE_CHANGED
<Proxy "balancer://nodes_polling">
BalancerMember "http://app01:3000" route=app01
BalancerMember "http://app02:3000" route=app02
BalancerMember "http://app03:3000" route=app03
ProxySet stickysession=SERVERID
</Proxy>
<Proxy "balancer://nodes_ws">
BalancerMember "ws://app01:3000" route=app01
BalancerMember "ws://app02:3000" route=app02
BalancerMember "ws://app03:3000" route=app03
ProxySet stickysession=SERVERID
</Proxy>
RewriteEngine On
RewriteCond %{HTTP:Upgrade} =websocket [NC]
RewriteRule /(.*) balancer://nodes_ws/$1 [P,L]
RewriteCond %{HTTP:Upgrade} !=websocket [NC]
RewriteRule /(.*) balancer://nodes_polling/$1 [P,L]
ProxyTimeout 3
Links:
Example
Documentation
HAProxy configuration
# Reference: http://blog.haproxy.com/2012/11/07/websockets-load-balancing-with-haproxy/
listen chat
bind *:80
default_backend nodes
backend nodes
option httpchk HEAD /health
http-check expect status 200
cookie io prefix indirect nocache # using the `io` cookie set upon handshake
server app01 app01:3000 check cookie app01
server app02 app02:3000 check cookie app02
server app03 app03:3000 check cookie app03
Links:
Example
Documentation
Traefik
Using container labels:
# docker-compose.yml
services:
traefik:
image: traefik:2.4
volumes:
- /var/run/docker.sock:/var/run/docker.sock
links:
- server
server:
image: my-image:latest
labels:
- "traefik.http.routers.my-service.rule=PathPrefix(`/`)"
- traefik.http.services.my-service.loadBalancer.sticky.cookie.name=server_id
- traefik.http.services.my-service.loadBalancer.sticky.cookie.httpOnly=true
With the File provider:
## Dynamic configuration
http:
services:
my-service:
rule: "PathPrefix(`/`)"
loadBalancer:
sticky:
cookie:
name: server_id
httpOnly: true
Links:
Example
Documentation
Using Node.js Cluster
Just like NginX, Node.js comes with built-in clustering support through the cluster module.
There are several solutions, depending on your use case:
NPM package
How it works
@socket.io/sticky
the routing is based on the sid query parameter
sticky-session
the routing is based on connection.remoteAddress
socketio-sticky-session
the routing based on the x-forwarded-for header)
Example with @socket.io/sticky:
const cluster = require("cluster");
const http = require("http");
const { Server } = require("socket.io");
const redisAdapter = require("socket.io-redis");
const numCPUs = require("os").cpus().length;
const { setupMaster, setupWorker } = require("@socket.io/sticky");
if (cluster.isMaster) {
console.log(`Master ${process.pid} is running`);
const httpServer = http.createServer();
setupMaster(httpServer, {
loadBalancingMethod: "least-connection", // either "random", "round-robin" or "least-connection"
});
httpServer.listen(3000);
for (let i = 0; i < numCPUs; i++) {
cluster.fork();
}
cluster.on("exit", (worker) => {
console.log(`Worker ${worker.process.pid} died`);
cluster.fork();
});
} else {
console.log(`Worker ${process.pid} started`);
const httpServer = http.createServer();
const io = new Server(httpServer);
io.adapter(redisAdapter({ host: "localhost", port: 6379 }));
setupWorker(io);
io.on("connection", (socket) => {
/* ...
*/
});
}
Passing events between nodes
The Redis adapter
Now that you have multiple Socket.IO nodes accepting connections, if you want to broadcast events to all clients (or to the clients in a certain room) you’ll need some way of passing messages between processes or computers.
The interface in charge of routing messages is what we call the Adapter.
You can implement your own on top of the socket.io-adapter (by inheriting from it) or you can use the one we provide on top of Redis: socket.io-redis:
const io = require("socket.io")(3000);
const redis = require("socket.io-redis");
io.adapter(redis({ host: "localhost", port: 6379 }));
Then the following call:
io.emit("hi", "all sockets");
will be broadcast to every clients through the Pub/Sub mechanism of Redis:
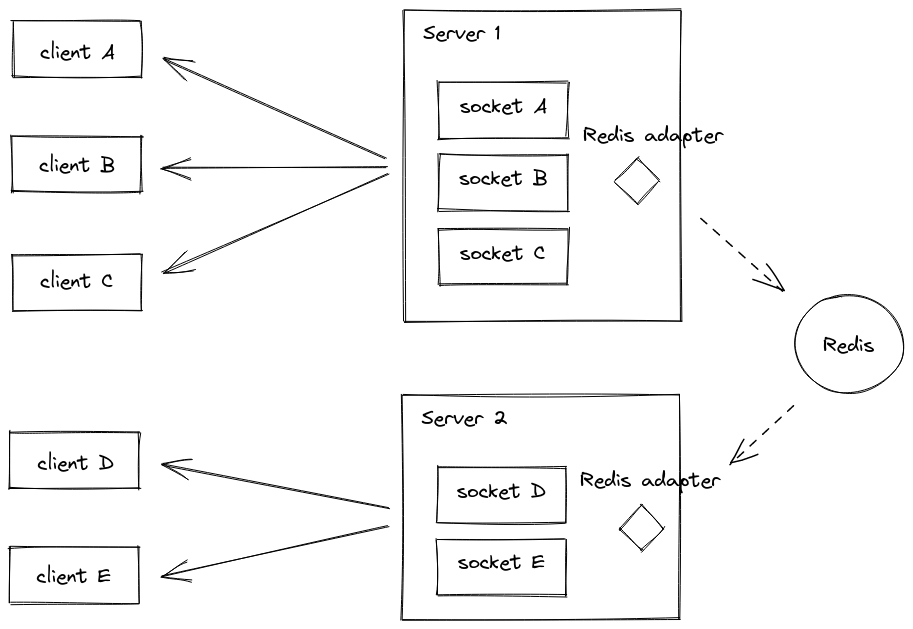
Sending messages from the outside world
Using the Redis adapter has another benefit: you can now emit events from outside the context of your Socket.IO processes.
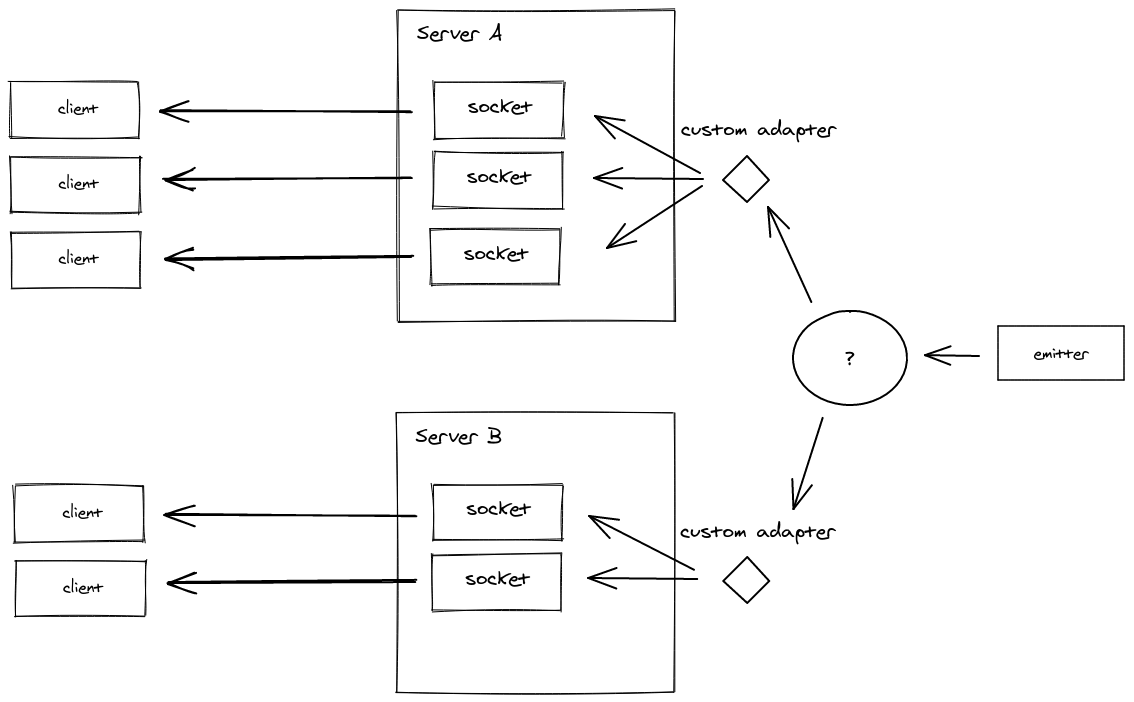 This emitter is available in several languages:
Javascript: https://github.com/socketio/socket.io-emitter
Java: https://github.com/sunsus/socket.io-java-emitter
Python: https://pypi.org/project/socket.io-emitter/
PHP: https://github.com/rase-/socket.io-php-emitter
Golang: https://github.com/yosuke-furukawa/socket.io-go-emitter
Perl: https://metacpan.org/pod/SocketIO::Emitter
Rust: https://github.com/epli2/socketio-rust-emitter
This emitter is available in several languages:
Javascript: https://github.com/socketio/socket.io-emitter
Java: https://github.com/sunsus/socket.io-java-emitter
Python: https://pypi.org/project/socket.io-emitter/
PHP: https://github.com/rase-/socket.io-php-emitter
Golang: https://github.com/yosuke-furukawa/socket.io-go-emitter
Perl: https://metacpan.org/pod/SocketIO::Emitter
Rust: https://github.com/epli2/socketio-rust-emitter
The Socket instance (client-</side)
https://socket.io/docs/v3/client-socket-instance/
Besides emitting and listening to events, the Socket instance has a few attributes that may be of use in your application:
Socket#id
Each new connection is assigned a random 20-characters identifier.
This identifier is synced with the value on the server-side.
// server-side
io.on("connection", (socket) => {
console.log(socket.id); // x8WIv7-mJelg7on_ALbx
});
// client-side
socket.on("connect", () => {
console.log(socket.id); // x8WIv7-mJelg7on_ALbx
});
socket.on("disconnect", () => {
console.log(socket.id); // undefined
});
Socket#connected
This attribute describes whether the socket is currently connected to the server.
socket.on("connect", () => {
console.log(socket.connected); // true
});
socket.on("disconnect", () => {
console.log(socket.connected); // false
});
Lifecycle
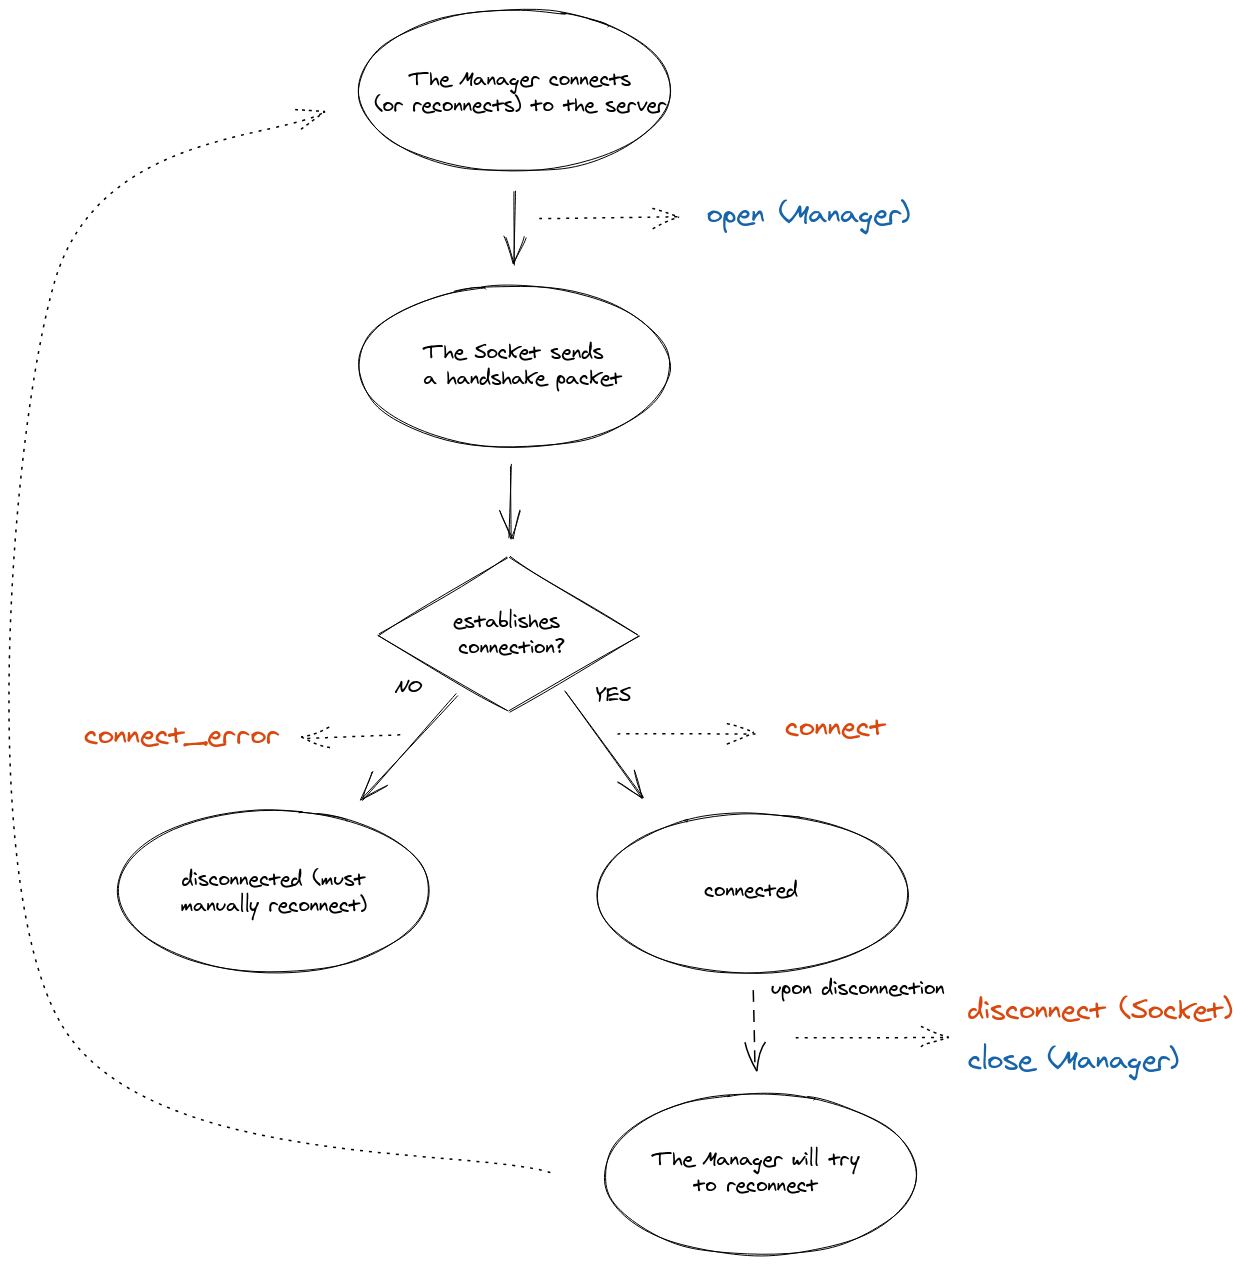
Events
The Socket instance emits three special events:
connect
connect_error
disconnect
Please note that since Socket.IO v3, the Socket instance does not emit any event related to the reconnection logic anymore.
You can listen to the events on the Manager instance directly:
socket.io.on("reconnection_attempt", () => {
// ...
});
socket.io.on("reconnect", () => {
// ...
});
More information can be found in the migration guide.
connect
This event is fired by the Socket instance upon connection and reconnection.
socket.on("connect", () => {
// ...
});
Please note that you shouldn’t register event handlers in the connect handler itself, as a new handler will be registered every time the Socket reconnects:
// BAD
socket.on("connect", () => {
socket.on("data", () => { /* ...
*/ });
});
// GOOD
socket.on("connect", () => {
// ...
});
socket.on("data", () => { /* ...
*/ });
connect_error
This event is fired when:
the low-level connection cannot be established
the connection is denied by the server in a middleware function
In the first case, the Socket will automatically try to reconnect, after a given delay.
In the latter case, you need to manually reconnect.
You might need to update the credentials:
// either by directly modifying the `auth` attribute
socket.on("connect_error", () => {
socket.auth.token = "abcd";
socket.connect();
});
// or if the `auth` attribute is a function
const socket = io({
auth: (cb) => {
cb(localStorage.getItem("token"));
}
});
socket.on("connect_error", () => {
setTimeout(() => {
socket.connect();
}, 1000);
});
disconnect
This event is fired upon disconnection.
socket.on("disconnect", (reason) => {
// ...
});
Here is the list of possible reasons:
Reason
Description
io server disconnect
The server has forcefully disconnected the socket with socket.disconnect()
io client disconnect
The socket was manually disconnected using socket.disconnect()
ping timeout
The server did not send a PING within the pingInterval + pingTimeout range
transport close
The connection was closed (example: the user has lost connection, or the network was changed from WiFi to 4G)
transport error
The connection has encountered an error (example: the server was killed during a HTTP long-polling cycle)
In the first two cases (explicit disconnection), the client will not try to reconnect and you need to manually call socket.connect().
In all other cases, the client will wait for a small random delay and then try to reconnect:
socket.on("disconnect", (reason) => {
if (reason === "io server disconnect") {
// the disconnection was initiated by the server, you need to reconnect manually
socket.connect();
}
// else the socket will automatically try to reconnect
});
Note: those events, along with disconnecting, newListener and removeListener, are special events that shouldn’t be used in your application:
// BAD, will throw an error
socket.emit("disconnect");
Complete API
The complete API exposed by the Socket instance can be found here.
Server API
Server
Exposed by require("socket.io").
Related documentation pages:
installation
initialization
details of the server instance
new Server(httpServer[, options])
httpServer (http.Server) the server to bind to.
options (Object)
Works with and without new:
const io = require("socket.io")();
// or
const { Server } = require("socket.io");
const io = new Server();
Available options:
Option
Default value
Description
path
/socket.io
name of the path to capture
serveClient
true
whether to serve the client files
adapter
-
the adapter to use.
Defaults to an instance of the Adapter that ships with socket.io which is memory based.
See socket.io-adapter
parser
-
the parser to use.
Defaults to an instance of the Parser that ships with socket.io.
See socket.io-parser.
connectTimeout
45000
the number of ms before closing a client that has not successfully joined a namespace.
Available options for the underlying Engine.IO server:
Option
Default value
Description
pingTimeout
5000
how many ms without a pong packet to consider the connection closed
pingInterval
25000
how many ms before sending a new ping packet
upgradeTimeout
10000
how many ms before an uncompleted transport upgrade is cancelled
maxHttpBufferSize
1e6
how many bytes or characters a message can be, before closing the session (to avoid DoS).
allowRequest
A function that receives a given handshake or upgrade request as its first parameter, and can decide whether to continue or not.
The second argument is a function that needs to be called with the decided information: fn(err, success), where success is a boolean value where false means that the request is rejected, and err is an error code.
transports
["polling", "websocket"]
transports to allow connections to
allowUpgrades
true
whether to allow transport upgrades
perMessageDeflate
false
parameters of the WebSocket permessage-deflate extension (see ws module api docs).
Set to true to enable.
httpCompression
true
parameters of the http compression for the polling transports (see zlib api docs).
Set to false to disable.
wsEngine
ws
what WebSocket server implementation to use.
Specified module must conform to the ws interface (see ws module api docs).
Default value is ws.
An alternative c++ addon is also available by installing the eiows module.
cors
the list of options that will be forwarded to the cors module
cookie
the list of options that will be forwarded to the cookie module
allowEIO3
false
whether to enable compatibility with Socket.IO v2 clients
More information here.
new Server(port[, options])
port (Number) a port to listen to (a new http.Server will be created)
options (Object)
See above for the list of available options.
const io = require("socket.io")(3000, {
path: "/test",
serveClient: false,
// below are engine.IO options
pingInterval: 10000,
pingTimeout: 5000,
cookie: false
});
new Server(options)
options (Object)
See above for the list of available options.
const io = require("socket.io")({
path: "/test",
serveClient: false,
});
// either
const server = require("http").createServer();
io.attach(server, {
pingInterval: 10000,
pingTimeout: 5000,
cookie: false
});
server.listen(3000);
// or
io.attach(3000, {
pingInterval: 10000,
pingTimeout: 5000,
cookie: false
});
server.sockets
(Namespace)
An alias for the default (/) namespace.
io.sockets.emit("hi", "everyone");
// is equivalent to
io.of("/").emit("hi", "everyone");
server.serveClient([value])
value (Boolean)
Returns Server|Boolean
If value is true the attached server (see Server#attach) will serve the client files.
Defaults to true.
This method has no effect after attach is called.
If no arguments are supplied this method returns the current value.
// pass a server and the `serveClient` option
const io = require("socket.io")(http, { serveClient: false });
// or pass no server and then you can call the method
const io = require("socket.io")();
io.serveClient(false);
io.attach(http);
server.path([value])
value (String)
Returns Server|String
Sets the path value under which engine.io and the static files will be served.
Defaults to /socket.io.
If no arguments are supplied this method returns the current value.
const io = require("socket.io")();
io.path("/myownpath");
// client-side
const socket = io({
path: "/myownpath"
});
server.adapter([value])
value (Adapter)
Returns Server|Adapter
Sets the adapter value.
Defaults to an instance of the Adapter that ships with socket.io which is memory based.
See socket.io-adapter.
If no arguments are supplied this method returns the current value.
const io = require("socket.io")(3000);
const redis = require("socket.io-redis");
io.adapter(redis({ host: "localhost", port: 6379 }));
server.attach(httpServer[, options])
httpServer (http.Server) the server to attach to
options (Object)
Attaches the Server to an engine.io instance on httpServer with the supplied options (optionally).
server.attach(port[, options])
port (Number) the port to listen on
options (Object)
Attaches the Server to an engine.io instance on a new http.Server with the supplied options (optionally).
server.listen(httpServer[, options])
Synonym of server.attach(httpServer[, options]).
server.listen(port[, options])
Synonym of server.attach(port[, options]).
server.bind(engine)
engine (engine.Server)
Returns Server
Advanced use only.
Binds the server to a specific engine.io Server (or compatible API) instance.
server.onconnection(socket)
socket (engine.Socket)
Returns Server
Advanced use only.
Creates a new socket.io client from the incoming engine.io (or compatible API) Socket.
server.of(nsp)
nsp (String|RegExp|Function)
Returns Namespace
Initializes and retrieves the given Namespace by its pathname identifier nsp.
If the namespace was already initialized it returns it immediately.
const adminNamespace = io.of("/admin");
A regex or a function can also be provided, in order to create namespace in a dynamic way:
const dynamicNsp = io.of(/^\/dynamic-\d+$/).on("connection", (socket) => {
const newNamespace = socket.nsp; // newNamespace.name === "/dynamic-101"
// broadcast to all clients in the given sub-namespace
newNamespace.emit("hello");
});
// client-side
const socket = io("/dynamic-101");
// broadcast to all clients in each sub-namespace
dynamicNsp.emit("hello");
// use a middleware for each sub-namespace
dynamicNsp.use((socket, next) => { /* ... */ });
With a function:
io.of((name, query, next) => {
// the checkToken method must return a boolean, indicating whether the client is able to connect or not.
next(null, checkToken(query.token));
}).on("connection", (socket) => { /* ... */ });
server.close([callback])
callback (Function)
Closes the Socket.IO server.
The callback argument is optional and will be called when all connections are closed.
Note: this also closes the underlying HTTP server.
const Server = require("socket.io");
const PORT = 3030;
const server = require("http").Server();
const io = Server(PORT);
io.close(); // Close current server
server.listen(PORT); // PORT is free to use
io = Server(server);
server.engine.generateId
Overwrites the default method to generate your custom socket id.
The function is called with a node request object (http.IncomingMessage) as first parameter.
const uuid = require("uuid");
io.engine.generateId = (req) => {
return uuid.v4(); // must be unique across all Socket.IO servers
}
Namespace
Represents a pool of sockets connected under a given scope identified by a pathname (eg: /chat).
More information can be found here.
namespace.name
(String)
The namespace identifier property.
namespace.sockets
(Map<SocketId, Socket>)
A map of Socket instances that are connected to this namespace.
// number of sockets in this namespace (on this node)
const socketCount = io.of("/admin").sockets.size;
namespace.adapter
(Adapter)
The “Adapter” used for the namespace.
Useful when using the Adapter based on Redis, as it exposes methods to manage sockets and rooms across your cluster.
Note: the adapter of the main namespace can be accessed with io.of("/").adapter.
Please see the explanation here.
namespace.to(room)
room (String)
Returns Namespace for chaining
Sets a modifier for a subsequent event emission that the event will only be broadcasted to clients that have joined the given room.
To emit to multiple rooms, you can call to several times.
const io = require("socket.io")();
const adminNamespace = io.of("/admin");
adminNamespace.to("level1").emit("an event", { some: "data" });
namespace.in(room)
Synonym of namespace.to(room).
namespace.emit(eventName[, …args])
eventName (String)
args
Returns true
Emits an event to all connected clients.
The following two are equivalent:
const io = require("socket.io")();
io.emit("an event sent to all connected clients"); // main namespace
const chat = io.of("/chat");
chat.emit("an event sent to all connected clients in chat namespace");
Note: acknowledgements are not supported when emitting from namespace.
namespace.allSockets()
Returns Promise<Set<SocketId>>
Gets a list of socket IDs connected to this namespace (across all nodes if applicable).
// all sockets in the main namespace
const ids = await io.allSockets();
// all sockets in the main namespace and in the "user:1234" room
const ids = await io.in("user:1234").allSockets();
// all sockets in the "chat" namespace
const ids = await io.of("/chat").allSockets();
// all sockets in the "chat" namespace and in the "general" room
const ids = await io.of("/chat").in("general").allSockets();
namespace.use(fn)
fn (Function)
Registers a middleware, which is a function that gets executed for every incoming Socket, and receives as parameters the socket and a function to optionally defer execution to the next registered middleware.
Errors passed to middleware callbacks are sent as special connect_error packets to clients.
// server-side
io.use((socket, next) => {
const err = new Error("not authorized");
err.data = { content: "Please retry later" }; // additional details
next(err);
});
// client-side
socket.on("connect_error", err => {
console.log(err instanceof Error); // true
console.log(err.message); // not authorized
console.log(err.data); // { content: "Please retry later" }
});
Event: ‘connection’
socket (Socket) socket connection with client
Fired upon a connection from client.
io.on("connection", (socket) => {
// ...
});
io.of("/admin").on("connection", (socket) => {
// ...
});
Event: ‘connect’
Synonym of Event: “connection”.
Flag: ‘volatile’
Sets a modifier for a subsequent event emission that the event data may be lost if the clients are not ready to receive messages (because of network slowness or other issues, or because they’re connected through long polling and is in the middle of a request-response cycle).
io.volatile.emit("an event", { some: "data" }); // the clients may or may not receive it
Flag: ‘local’
Sets a modifier for a subsequent event emission that the event data will only be broadcast to the current node (when the Redis adapter is used).
io.local.emit("an event", { some: "data" });
Socket
A Socket is the fundamental class for interacting with browser clients.
A Socket belongs to a certain Namespace (by default /) and uses an underlying Client to communicate.
It should be noted the Socket doesn’t relate directly to the actual underlying TCP/IP socket and it is only the name of the class.
Within each Namespace, you can also define arbitrary channels (called room) that the Socket can join and leave.
That provides a convenient way to broadcast to a group of Sockets (see Socket#to below).
The Socket class inherits from EventEmitter.
The Socket class overrides the emit method, and does not modify any other EventEmitter method.
All methods documented here which also appear as EventEmitter methods (apart from emit) are implemented by EventEmitter, and documentation for EventEmitter applies.
More information can be found here.
socket.id
(String)
A unique identifier for the session, that comes from the underlying Client.
socket.rooms
(Set)
A Set of strings identifying the rooms this client is in.
io.on("connection", (socket) => {
console.log(socket.rooms); // Set { <socket.id> }
socket.join("room1");
console.log(socket.rooms); // Set { <socket.id>, "room1" }
});
socket.client
(Client)
A reference to the underlying Client object.
socket.conn
(engine.Socket)
A reference to the underlying Client transport connection (engine.io Socket object).
This allows access to the IO transport layer, which still (mostly) abstracts the actual TCP/IP socket.
socket.request
(Request)
A getter proxy that returns the reference to the request that originated the underlying engine.io Client.
Useful for accessing request headers such as Cookie or User-Agent.
const cookie = require("cookie");
io.on("connection", (socket) => {
const cookies = cookie.parse(socket.request.headers.cookie || ");
});
socket.handshake
(Object)
The handshake details:
{
headers: /* the headers sent as part of the handshake */,
time: /* the date of creation (as string) */,
address: /* the ip of the client */,
xdomain: /* whether the connection is cross-domain */,
secure: /* whether the connection is secure */,
issued: /* the date of creation (as unix timestamp) */,
url: /* the request URL string */,
query: /* the query params of the first request */,
auth: /* the authentication payload */
}
Usage:
io.use((socket, next) => {
let handshake = socket.handshake;
// ...
});
io.on("connection", (socket) => {
let handshake = socket.handshake;
// ...
});
socket.send([…args][, ack])
args
ack (Function)
Returns Socket
Sends a message event.
See socket.emit(eventName[, …args][, ack]).
socket.emit(eventName[, …args][, ack])
(overrides EventEmitter.emit)
eventName (String)
args
ack (Function)
Returns true
Emits an event to the socket identified by the string name.
Any other parameters can be included.
All serializable datastructures are supported, including Buffer.
socket.emit("hello", "world");
socket.emit("with-binary", 1, "2", { 3: "4", 5: Buffer.from([6]) });
The ack argument is optional and will be called with the client’s answer.
io.on("connection", (socket) => {
socket.emit("an event", { some: "data" });
socket.emit("ferret", "tobi", (data) => {
console.log(data); // data will be "woot"
});
// the client code
// client.on("ferret", (name, fn) => {
// fn("woot");
// });
});
socket.on(eventName, callback)
(inherited from EventEmitter)
eventName (String)
callback (Function)
Returns Socket
Register a new handler for the given event.
socket.on("news", (data) => {
console.log(data);
});
// with several arguments
socket.on("news", (arg1, arg2, arg3) => {
// ...
});
// or with acknowledgement
socket.on("news", (data, callback) => {
callback(0);
});
socket.once(eventName, listener)
socket.removeListener(eventName, listener)
socket.removeAllListeners([eventName])
socket.eventNames()
Inherited from EventEmitter (along with other methods not mentioned here).
See the Node.js documentation for the events module.
socket.onAny(callback)
callback (Function)
Register a new catch-all listener.
socket.onAny((event, ...args) => {
console.log(`got ${event}`);
});
socket.prependAny(callback)
callback (Function)
Register a new catch-all listener.
The listener is added to the beginning of the listeners array.
socket.prependAny((event, ...args) => {
console.log(`got ${event}`);
});
socket.offAny([listener])
listener (Function)
Removes the previously registered listener.
If no listener is provided, all catch-all listeners are removed.
const myListener = () => { /* ... */ };
socket.onAny(myListener);
// then, later
socket.offAny(myListener);
socket.offAny();
socket.listenersAny()
Returns Function[]
Returns the list of registered catch-all listeners.
const listeners = socket.listenersAny();
socket.join(room)
room (string) | (string[])
Returns void | Promise
Adds the socket to the given room or to the list of rooms.
io.on("connection", (socket) => {
socket.join("room 237");
console.log(socket.rooms); // Set { <socket.id>, "room 237" }
socket.join(["room 237", "room 238"]);
io.to("room 237").emit("a new user has joined the room"); // broadcast to everyone in the room
});
The mechanics of joining rooms are handled by the Adapter that has been configured (see Server#adapter above), defaulting to socket.io-adapter.
For your convenience, each socket automatically joins a room identified by its id (see Socket#id).
This makes it easy to broadcast messages to other sockets:
io.on("connection", (socket) => {
socket.on("say to someone", (id, msg) => {
// send a private message to the socket with the given id
socket.to(id).emit("my message", msg);
});
});
socket.leave(room)
room (String)
Returns void | Promise
Removes the socket from the given room.
io.on("connection", (socket) => {
socket.leave("room 237");
io.to("room 237").emit(`user ${socket.id} has left the room`);
});
Rooms are left automatically upon disconnection.
socket.to(room)
room (String)
Returns Socket for chaining
Sets a modifier for a subsequent event emission that the event will only be broadcasted to clients that have joined the given room (the socket itself being excluded).
To emit to multiple rooms, you can call to several times.
io.on("connection", (socket) => {
// to one room
socket.to("others").emit("an event", { some: "data" });
// to multiple rooms
socket.to("room1").to("room2").emit("hello");
// a private message to another socket
socket.to(/* another socket id */).emit("hey");
// WARNING: `socket.to(socket.id).emit()` will NOT work, as it will send to everyone in the room
// named `socket.id` but the sender.
Please use the classic `socket.emit()` instead.
});
Note: acknowledgements are not supported when broadcasting.
socket.in(room)
Synonym of socket.to(room).
socket.compress(value)
value (Boolean) whether to following packet will be compressed
Returns Socket for chaining
Sets a modifier for a subsequent event emission that the event data will only be compressed if the value is true.
Defaults to true when you don’t call the method.
io.on("connection", (socket) => {
socket.compress(false).emit("uncompressed", "that's rough");
});
socket.disconnect(close)
close (Boolean) whether to close the underlying connection
Returns Socket
Disconnects this socket.
If value of close is true, closes the underlying connection.
Otherwise, it just disconnects the namespace.
io.on("connection", (socket) => {
setTimeout(() => socket.disconnect(true), 5000);
});
Flag: ‘broadcast’
Sets a modifier for a subsequent event emission that the event data will only be broadcast to every sockets but the sender.
io.on("connection", (socket) => {
socket.broadcast.emit("an event", { some: "data" }); // everyone gets it but the sender
});
Flag: ‘volatile’
Sets a modifier for a subsequent event emission that the event data may be lost if the client is not ready to receive messages (because of network slowness or other issues, or because they’re connected through long polling and is in the middle of a request-response cycle).
io.on("connection", (socket) => {
socket.volatile.emit("an event", { some: "data" }); // the client may or may not receive it
});
Event: ‘disconnect’
reason (String) the reason of the disconnection (either client or server-side)
Fired upon disconnection.
io.on("connection", (socket) => {
socket.on("disconnect", (reason) => {
// ...
});
});
Possible reasons:
Reason
Description
server namespace disconnect
The socket was forcefully disconnected with socket.disconnect()
client namespace disconnect
The client has manually disconnected the socket using socket.disconnect()
server shutting down
The server is, well, shutting down
ping timeout
The client did not send a PONG packet in the pingTimeout delay
transport close
The connection was closed (example: the user has lost connection, or the network was changed from WiFi to 4G)
transport error
The connection has encountered an error
Event: ‘disconnecting’
reason (String) the reason of the disconnection (either client or server-side)
Fired when the client is going to be disconnected (but hasn’t left its rooms yet).
io.on("connection", (socket) => {
socket.on("disconnecting", (reason) => {
console.log(socket.rooms); // Set { ... }
});
});
Note: those events, along with connect, connect_error, newListener and removeListener, are special events that shouldn’t be used in your application:
// BAD, will throw an error
socket.emit("disconnect");
Client
The Client class represents an incoming transport (engine.io) connection.
A Client can be associated with many multiplexed Sockets that belong to different Namespaces.
client.conn
(engine.Socket)
A reference to the underlying engine.io Socket connection.
client.request
(Request)
A getter proxy that returns the reference to the request that originated the engine.io connection.
Useful for accessing request headers such as Cookie or User-Agent.
Emit cheatsheet
io.on("connection", (socket) => {
// sending to the client
socket.emit("hello", "can you hear me?", 1, 2, "abc");
// sending to all clients except sender
socket.broadcast.emit("broadcast", "hello friends!");
// sending to all clients in "game" room except sender
socket.to("game").emit("nice game", "let's play a game");
// sending to all clients in "game1" and/or in "game2" room, except sender
socket.to("game1").to("game2").emit("nice game", "let's play a game (too)");
// sending to all clients in "game" room, including sender
io.in("game").emit("big-announcement", "the game will start soon");
// sending to all clients in namespace "myNamespace", including sender
io.of("myNamespace").emit("bigger-announcement", "the tournament will start soon");
// sending to a specific room in a specific namespace, including sender
io.of("myNamespace").to("room").emit("event", "message");
// sending to individual socketid (private message)
io.to(socketId).emit("hey", "I just met you");
// WARNING: `socket.to(socket.id).emit()` will NOT work, as it will send to everyone in the room
// named `socket.id` but the sender. Please use the classic `socket.emit()` instead.
// sending with acknowledgement
socket.emit("question", "do you think so?", (answer) => {});
// sending without compression
socket.compress(false).emit("uncompressed", "that's rough");
// sending a message that might be dropped if the client is not ready to receive messages
socket.volatile.emit("maybe", "do you really need it?");
// sending to all clients on this node (when using multiple nodes)
io.local.emit("hi", "my lovely babies");
// sending to all connected clients
io.emit("an event sent to all connected clients");
});
Note: The following events are reserved and should not be used as event names by your application:
connect
connect_error
disconnect
disconnecting
newListener
removeListener
// BAD, will throw an error
socket.emit(disconnecting);
List of Socket.io Events
Client-side events for socket.io object:
connect. Fired upon a successful connection.
connect_error. Fired upon a connection error.
Parameters:
Object error object
connect_timeout. Fired upon a connection timeout.
reconnect. Fired upon a successful reconnection.
Parameters:
Number reconnection attempt number
reconnect_attempt. Fired upon an attempt to reconnect.
reconnecting. Fired upon an attempt to reconnect.
Parameters:
Number reconnection attempt number
reconnect_error. Fired upon a reconnection attempt error.
Parameters:
Object error object
reconnect_failed. Fired when couldn’t reconnect within reconnectionAttempts
Client-side events for socket object:
Client-side events for socket object:
connect. Fired upon connecting.
error. Fired upon a connection error
Parameters:
Object error data
disconnect. Fired upon a disconnection.
reconnect. Fired upon a successful reconnection.
Parameters:
Number reconnection attempt number
reconnect_attempt. Fired upon an attempt to reconnect.
reconnecting. Fired upon an attempt to reconnect.
Parameters:
Number reconnection attempt number
reconnect_error. Fired upon a reconnection attempt error.
Parameters:
Object error object
reconnect_failed. Fired when couldn’t reconnect within reconnectionAttempts
Server-side events:
Server-side events:
connection / connect. Fired upon a connection.
Parameters:
Socket the incoming socket.
Edit:
For the current version (1.3.4) the reconnect_attempt and reconnecting
client-side events are synonyms.