Setting Up Python
Download Python Download PyGame python -m pip install -U pygame --user To see if it works, run one of the included examples: python3 -m pygame.examples.aliensThe Anatomy of a PyGame Game
The following is the simplest barebones app that can be made using the PyGame pipeline: import pygame pygame.init() screen = pygame.display.set_mode((400, 300)) done = False while not done: for event in pygame.event.get(): if event.type == pygame.QUIT: done = True pygame.display.flip() import pygame - this is of course needed to access the PyGame framework. pygame.init() - This kicks things off. It initializes all the modules required for PyGame. pygame.display.set_mode((width, height)) - This will launch a window of the desired size. The return value is a Surface object which is the object you will perform graphical operations on. This will be discussed later. pygame.event.get() - this empties the event queue. If you do not call this, the windows messages will start to pile up and your game will become unresponsive in the opinion of the operating system. pygame.QUIT - This is the event type that is fired when you click on the close button in the corner of the window. pygame.display.flip() - PyGame is double-buffered. This swaps the buffers. All you need to know is that this call is required in order for any updates that you make to the game screen to become visible. When you run this, you'll see: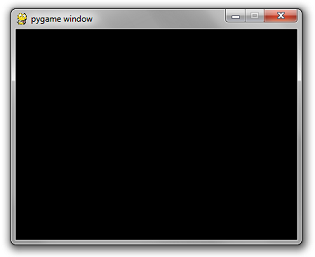 Which is not amazing at all.
Because it's a black box that does nothing.
Which is not amazing at all.
Because it's a black box that does nothing.
Drawing Something
pygame.draw.rect - As you can imagine, this will draw a rectangle. I takes in a few arguments, including the surface to draw on (I'll be drawing on the screen instance), the color, and the coordinates/dimensions of the rectangle. # Add this somewhere after the event pumping and before the display.flip() pygame.draw.rect(screen, (0, 128, 255), pygame.Rect(30, 30, 60, 60)) The first argument is the surface instance to draw the rectangle to. The second argument is the (red, green, blue) tuple that represents the color to draw with. The third argument is a pygame.Rect instance. The arguments for this constructor are the x and y coordintaes of the top left corner, the width, and the height.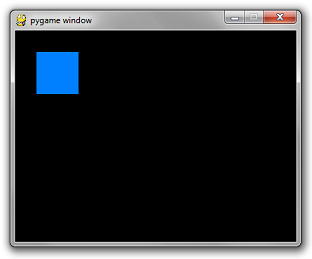
Interactivity
Add the following code before the loop: is_blue = True Modify your rectangle code to pick a color conditionally: if is_blue: color = (0, 128, 255) else: color = (255, 100, 0) pygame.draw.rect(screen, color, pygame.Rect(30, 30, 60, 60)) Finally, the important bit. Add the following if statement to your for loop in the same sequence as the other if statement in there... if event.type == pygame.KEYDOWN and event.key == pygame.K_SPACE: is_blue = not is_blue Press space to change the box color.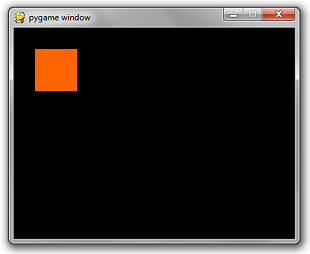 As you can imagine, there is also a corresponding pygame.KEYUP event type and a pygame.K_%%%%% for almost every key on your keyboard.
To see this list, go to a python terminal and use dir(pygame).
>>> import pygame
>>> filter(lambda x:'K_' in x, dir(pygame))
['K_0', 'K_1', 'K_2', 'K_3', 'K_4', 'K_5', 'K_6', 'K_7', 'K_8', 'K_9', 'K_AMPERS
AND', 'K_ASTERISK', 'K_AT', 'K_BACKQUOTE', 'K_BACKSLASH', 'K_BACKSPACE', 'K_BREA
K', 'K_CAPSLOCK', 'K_CARET', 'K_CLEAR', 'K_COLON', 'K_COMMA', 'K_DELETE', 'K_DOL
LAR', 'K_DOWN', 'K_END', 'K_EQUALS', 'K_ESCAPE', 'K_EURO', 'K_EXCLAIM', 'K_F1',
'K_F10', 'K_F11', 'K_F12', 'K_F13', 'K_F14', 'K_F15', 'K_F2', 'K_F3', 'K_F4', 'K
_F5', 'K_F6', 'K_F7', 'K_F8', 'K_F9', 'K_FIRST', 'K_GREATER', 'K_HASH', 'K_HELP'
, 'K_HOME', 'K_INSERT', 'K_KP0', 'K_KP1', 'K_KP2', 'K_KP3', 'K_KP4', 'K_KP5', 'K
_KP6', 'K_KP7', 'K_KP8', 'K_KP9', 'K_KP_DIVIDE', 'K_KP_ENTER', 'K_KP_EQUALS', 'K
_KP_MINUS', 'K_KP_MULTIPLY', 'K_KP_PERIOD', 'K_KP_PLUS', 'K_LALT', 'K_LAST', 'K_
LCTRL', 'K_LEFT', 'K_LEFTBRACKET', 'K_LEFTPAREN', 'K_LESS', 'K_LMETA', 'K_LSHIFT
', 'K_LSUPER', 'K_MENU', 'K_MINUS', 'K_MODE', 'K_NUMLOCK', 'K_PAGEDOWN', 'K_PAGE
UP', 'K_PAUSE', 'K_PERIOD', 'K_PLUS', 'K_POWER', 'K_PRINT', 'K_QUESTION', 'K_QUO
TE', 'K_QUOTEDBL', 'K_RALT', 'K_RCTRL', 'K_RETURN', 'K_RIGHT', 'K_RIGHTBRACKET',
'K_RIGHTPAREN', 'K_RMETA', 'K_RSHIFT', 'K_RSUPER', 'K_SCROLLOCK', 'K_SEMICOLON'
, 'K_SLASH', 'K_SPACE', 'K_SYSREQ', 'K_TAB', 'K_UNDERSCORE', 'K_UNKNOWN', 'K_UP'
, 'K_a', 'K_b', 'K_c', 'K_d', 'K_e', 'K_f', 'K_g', 'K_h', 'K_i', 'K_j', 'K_k', '
K_l', 'K_m', 'K_n', 'K_o', 'K_p', 'K_q', 'K_r', 'K_s', 'K_t', 'K_u', 'K_v', 'K_w
', 'K_x', 'K_y', 'K_z']
>>>
There are also mouse event types, but that will be covered later.
As you can imagine, there is also a corresponding pygame.KEYUP event type and a pygame.K_%%%%% for almost every key on your keyboard.
To see this list, go to a python terminal and use dir(pygame).
>>> import pygame
>>> filter(lambda x:'K_' in x, dir(pygame))
['K_0', 'K_1', 'K_2', 'K_3', 'K_4', 'K_5', 'K_6', 'K_7', 'K_8', 'K_9', 'K_AMPERS
AND', 'K_ASTERISK', 'K_AT', 'K_BACKQUOTE', 'K_BACKSLASH', 'K_BACKSPACE', 'K_BREA
K', 'K_CAPSLOCK', 'K_CARET', 'K_CLEAR', 'K_COLON', 'K_COMMA', 'K_DELETE', 'K_DOL
LAR', 'K_DOWN', 'K_END', 'K_EQUALS', 'K_ESCAPE', 'K_EURO', 'K_EXCLAIM', 'K_F1',
'K_F10', 'K_F11', 'K_F12', 'K_F13', 'K_F14', 'K_F15', 'K_F2', 'K_F3', 'K_F4', 'K
_F5', 'K_F6', 'K_F7', 'K_F8', 'K_F9', 'K_FIRST', 'K_GREATER', 'K_HASH', 'K_HELP'
, 'K_HOME', 'K_INSERT', 'K_KP0', 'K_KP1', 'K_KP2', 'K_KP3', 'K_KP4', 'K_KP5', 'K
_KP6', 'K_KP7', 'K_KP8', 'K_KP9', 'K_KP_DIVIDE', 'K_KP_ENTER', 'K_KP_EQUALS', 'K
_KP_MINUS', 'K_KP_MULTIPLY', 'K_KP_PERIOD', 'K_KP_PLUS', 'K_LALT', 'K_LAST', 'K_
LCTRL', 'K_LEFT', 'K_LEFTBRACKET', 'K_LEFTPAREN', 'K_LESS', 'K_LMETA', 'K_LSHIFT
', 'K_LSUPER', 'K_MENU', 'K_MINUS', 'K_MODE', 'K_NUMLOCK', 'K_PAGEDOWN', 'K_PAGE
UP', 'K_PAUSE', 'K_PERIOD', 'K_PLUS', 'K_POWER', 'K_PRINT', 'K_QUESTION', 'K_QUO
TE', 'K_QUOTEDBL', 'K_RALT', 'K_RCTRL', 'K_RETURN', 'K_RIGHT', 'K_RIGHTBRACKET',
'K_RIGHTPAREN', 'K_RMETA', 'K_RSHIFT', 'K_RSUPER', 'K_SCROLLOCK', 'K_SEMICOLON'
, 'K_SLASH', 'K_SPACE', 'K_SYSREQ', 'K_TAB', 'K_UNDERSCORE', 'K_UNKNOWN', 'K_UP'
, 'K_a', 'K_b', 'K_c', 'K_d', 'K_e', 'K_f', 'K_g', 'K_h', 'K_i', 'K_j', 'K_k', '
K_l', 'K_m', 'K_n', 'K_o', 'K_p', 'K_q', 'K_r', 'K_s', 'K_t', 'K_u', 'K_v', 'K_w
', 'K_x', 'K_y', 'K_z']
>>>
There are also mouse event types, but that will be covered later.
Adventuring around
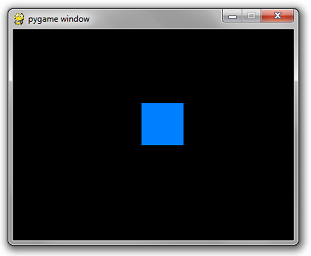
Our box is bored of switching from aquamarine to orangish red. He wants to move around. There is an additional way to access key events. You can get the depression status of any key by calling pygame.key.get_pressed(). This returns a huge array filled with 1's and 0's. Mostly 0's. When you check the integer value of any of the pygame.K_%%%%% constants, you'll notice it's a number. >>> pygame.K_LEFTBRACKET 91 >>> This value is not-so-coincidentally the index of the get_pressed() array that corresponds to that key. So if you want to see if the Up Arrow is pressed, the way to do that is: up_pressed = pygame.get_pressed()[pygame.K_UP] Simple as that. This is useful for the sort of events that you want to do when the user holds down a button. For example, moving around a sprite when the user holds down any arrow keys. Applying this concept to our current box game, this is what the code looks like now: import pygame pygame.init() screen = pygame.display.set_mode((400, 300)) done = False is_blue = True x = 30 y = 30 while not done: for event in pygame.event.get(): if event.type == pygame.QUIT: done = True if event.type == pygame.KEYDOWN and event.key == pygame.K_SPACE: is_blue = not is_blue pressed = pygame.key.get_pressed() if pressed[pygame.K_UP]: y -= 3 if pressed[pygame.K_DOWN]: y += 3 if pressed[pygame.K_LEFT]: x -= 3 if pressed[pygame.K_RIGHT]: x += 3 if is_blue: color = (0, 128, 255) else: color = (255, 100, 0) pygame.draw.rect(screen, color, pygame.Rect(x, y, 60, 60)) pygame.display.flip()Hmm...that's not what I wanted...
 Two things are wrong.
Each time you draw a rectangle, the rectangle from the previous frames remains on the screen.
It moves really really really fast.
For the first, you simply need to reset the screen to black before you draw the rectangle.
There is a simple method on Surface called fill that does this.
It takes in an rgb tuple.
screen.fill((0, 0, 0))
Secondly, the duration of each frame is as short as your super fancy computer can make it.
The framerate needs to be throttled at a sane number such as 60 frames per second.
Luckily, there is a simple class in pygame.time called Clock that does this for us.
It has a method called tick which takes in a desired fps rate.
clock = pygame.time.Clock()
...
while not done:
...
# will block execution until 1/60 seconds have passed
# since the previous time clock.tick was called.
clock.tick(60)
Put it all together and you get:
import pygame
pygame.init()
screen = pygame.display.set_mode((400, 300))
done = False
is_blue = True
x = 30
y = 30
clock = pygame.time.Clock()
while not done:
for event in pygame.event.get():
if event.type == pygame.QUIT:
done = True
if event.type == pygame.KEYDOWN and event.key == pygame.K_SPACE:
is_blue = not is_blue
pressed = pygame.key.get_pressed()
if pressed[pygame.K_UP]: y -= 3
if pressed[pygame.K_DOWN]: y += 3
if pressed[pygame.K_LEFT]: x -= 3
if pressed[pygame.K_RIGHT]: x += 3
screen.fill((0, 0, 0))
if is_blue: color = (0, 128, 255)
else: color = (255, 100, 0)
pygame.draw.rect(screen, color, pygame.Rect(x, y, 60, 60))
pygame.display.flip()
clock.tick(60)
Two things are wrong.
Each time you draw a rectangle, the rectangle from the previous frames remains on the screen.
It moves really really really fast.
For the first, you simply need to reset the screen to black before you draw the rectangle.
There is a simple method on Surface called fill that does this.
It takes in an rgb tuple.
screen.fill((0, 0, 0))
Secondly, the duration of each frame is as short as your super fancy computer can make it.
The framerate needs to be throttled at a sane number such as 60 frames per second.
Luckily, there is a simple class in pygame.time called Clock that does this for us.
It has a method called tick which takes in a desired fps rate.
clock = pygame.time.Clock()
...
while not done:
...
# will block execution until 1/60 seconds have passed
# since the previous time clock.tick was called.
clock.tick(60)
Put it all together and you get:
import pygame
pygame.init()
screen = pygame.display.set_mode((400, 300))
done = False
is_blue = True
x = 30
y = 30
clock = pygame.time.Clock()
while not done:
for event in pygame.event.get():
if event.type == pygame.QUIT:
done = True
if event.type == pygame.KEYDOWN and event.key == pygame.K_SPACE:
is_blue = not is_blue
pressed = pygame.key.get_pressed()
if pressed[pygame.K_UP]: y -= 3
if pressed[pygame.K_DOWN]: y += 3
if pressed[pygame.K_LEFT]: x -= 3
if pressed[pygame.K_RIGHT]: x += 3
screen.fill((0, 0, 0))
if is_blue: color = (0, 128, 255)
else: color = (255, 100, 0)
pygame.draw.rect(screen, color, pygame.Rect(x, y, 60, 60))
pygame.display.flip()
clock.tick(60)
 You'll have to take my word on the fact that you can move it around.
That concludes this part of the tutorial.
You'll have to take my word on the fact that you can move it around.
That concludes this part of the tutorial.
Next up: Images.
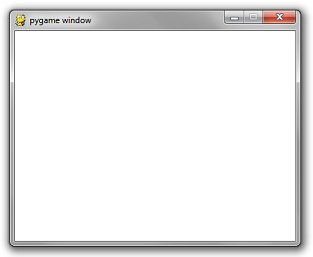
In the previous installment, I briefly talked about and used Surface objects. You can instantiate a blank surface by simply calling the Surface constructor with a width and height tuple... surface = pygame.Surface((100, 100)) This will create a blank 24-bit RGB image that's 100 x 100 pixels. The default color will be black. Blitting such an image on a white background will result in this: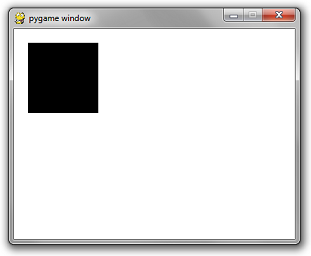 However, if you want a 32-bit RGBA image, you can also include an optional argument in the Surface constructor...
surface = pygame.Surface((100, 100), pygame.SRCALPHA)
This will create a 100 x 100 image that's initialized to transparent.
Blitting such an image on a whilte background will result in this:
However, if you want a 32-bit RGBA image, you can also include an optional argument in the Surface constructor...
surface = pygame.Surface((100, 100), pygame.SRCALPHA)
This will create a 100 x 100 image that's initialized to transparent.
Blitting such an image on a whilte background will result in this:
 Solid color images and rectangles aren't very interesting.
Let's use an image file.
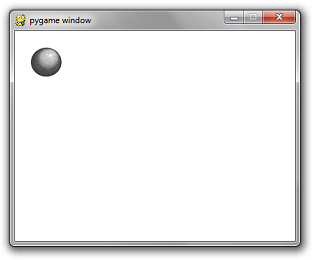
Suppose you had a friendly PNG image...
Solid color images and rectangles aren't very interesting.
Let's use an image file.
Suppose you had a friendly PNG image...
 To load an image from file, there is a simple call to pygame.image.load...
image = pygame.image.load('ball.png')
replacing your pygame.Surface((100, 100)) code with the code above will result in:
To load an image from file, there is a simple call to pygame.image.load...
image = pygame.image.load('ball.png')
replacing your pygame.Surface((100, 100)) code with the code above will result in:
 Do not use pygame.image.load repeatedly on the same image within your game loop.
That would be embarrassing for you as a programmer and me as a tutorial writer.
Initialize images once.
One strategy I like to use is to create a string-to-surface dictionary in one centralized location.
Then I write a function called get_image that takes in a file path.
If the image has been loaded already, then it returns the initialized image.
If not, it does the initialization.
The beauty of this is that it is fast and it removes the clutter of initializing images at the beginning of key areas of your game logic.
You can also use it to centralize the abstraction of directory separators for different operating systems.
But a code snippet is worth a thousand words...
import pygame
import os
_image_library = {}
def get_image(path):
global _image_library
image = _image_library.get(path)
if image == None:
canonicalized_path = path.replace('/', os.sep).replace('\\', os.sep)
image = pygame.image.load(canonicalized_path)
_image_library[path] = image
return image
pygame.init()
screen = pygame.display.set_mode((400, 300))
done = False
clock = pygame.time.Clock()
while not done:
for event in pygame.event.get():
if event.type == pygame.QUIT:
done = True
screen.fill((255, 255, 255))
screen.blit(get_image('ball.png'), (20, 20))
pygame.display.flip()
clock.tick(60)
Do not use pygame.image.load repeatedly on the same image within your game loop.
That would be embarrassing for you as a programmer and me as a tutorial writer.
Initialize images once.
One strategy I like to use is to create a string-to-surface dictionary in one centralized location.
Then I write a function called get_image that takes in a file path.
If the image has been loaded already, then it returns the initialized image.
If not, it does the initialization.
The beauty of this is that it is fast and it removes the clutter of initializing images at the beginning of key areas of your game logic.
You can also use it to centralize the abstraction of directory separators for different operating systems.
But a code snippet is worth a thousand words...
import pygame
import os
_image_library = {}
def get_image(path):
global _image_library
image = _image_library.get(path)
if image == None:
canonicalized_path = path.replace('/', os.sep).replace('\\', os.sep)
image = pygame.image.load(canonicalized_path)
_image_library[path] = image
return image
pygame.init()
screen = pygame.display.set_mode((400, 300))
done = False
clock = pygame.time.Clock()
while not done:
for event in pygame.event.get():
if event.type == pygame.QUIT:
done = True
screen.fill((255, 255, 255))
screen.blit(get_image('ball.png'), (20, 20))
pygame.display.flip()
clock.tick(60)
Big Scary Warning
Windows is not case sensitive when it comes to file names. All other major operating systems are. If your file is called ball.png and you use pygame.image.load('BALL.PNG') it will work if you are on windows. However when you give your game to someone running on a mac or linux, it will explode and they won't be very happy with you. So be careful. After a few embarrassing PyWeek hotfixes I had to send out, I now play it safe and make ALL of my image files lowercase. Then in my get_image function, I call .lower() in the canonicalize_path step.Setting the alpha of images
If you have a surface that does not have per-pixel alpha (e.g. a surface you initialized without pygame.SRCALPHA) then you can set the alpha of the whole surface with the set_alpha method. Then, when you blit the image, it will be blitted at the faded opacity. If you would like to blit an image with per-pixel alpha at a faded opacity, that is unfortunately impossible to do directly. However, I did invent a lovely hack to get around this limitation which you can read about here if you are interested. If you want to change a 24-bit image to 32-bit or vice versa, use the .convert_alpha() method. For vice-versa, use the .convert() method which will overlay any per-pixel alpha values over black. That concludes this installment. Next up: Sound. The sound and music API's are fairly simple. I feel funny basically going through the documentation and re-iterating it. However, I'll show you some non straightforward tricks as well, like playing a set of songs on shuffle. But first, the basics...Playing a song once:
pygame.mixer.music.load('foo.mp3') pygame.mixer.music.play(0)Playing a song infinitely:
pygame.mixer.music.load('foo.mp3') pygame.mixer.music.play(-1) The number being passed in is the number of times to repeat the song. 0 will play it once. Calling play without a number is like calling it with 0. pygame.mixer.music.play() # play onceQueuing a Song:
If you want a song to start playing immediately after a song is finished, then you can use there's a queue method. pygame.mixer.music.queue('next_song.mp3')Stopping a Song:
pygame.mixer.music.stop() The stop function will also nullify any entries in the queue.Doing Something When a Song Ends:
The times that you really need a queue are rare. Typically you'll just want to play the same song over again until you change it. But suppose you want to play a selection of 4 or 5 songs in sequence over and over again. Or even play randomly from a list of songs forever. At this point it's better to implement your own logic and use the handy set_endevent function. In part 1, I showed you how to pump the event queue. When going through the events, you check the event.type field and see if it's pygame.QUIT or pygame.KEYDOWN, etc. These type values are just integers. When you call the set_endevent function, it expects a number as input. Its value will be used in the event.type field when the song nautrally ends. Confused? Here's some code... ... SONG_END = pygame.USEREVENT + 1 pygame.mixer.music.set_endevent(SONG_END) pygame.mixer.music.load('song.mp3') pygame.mixer.music.play() ... while True: ... for event in pygame.event.get(): ... if event.type == SONG_END: print("the song ended!") ... The USEREVENT + 1 is to ensure that the number assigned to SONG_END isn't inadvertently equal to any other predefined event. Like pygame.VIDEORESIZE or something. USEREVENT has the highest value in the enum.Shuffle and Repeat:
If, for example, you wanted to play randomly from a list of 5 songs, one could create a list of the songs as a global: _songs = ['song_1.mp3', 'song_2.mp3', 'song_3.mp3', 'song_4.mp3', 'song_5.mp3'] Add a flag indicating which song is currently playing: _currently_playing_song = None And write a function that chooses a different song randomly that gets called each time the SONG_END event is fired: import random def play_a_different_song(): global _currently_playing_song, _songs next_song = random.choice(_songs) while next_song == _currently_playing_song: next_song = random.choice(_songs) _currently_playing_song = next_song pygame.mixer.music.load(next_song) pygame.mixer.music.play() Or if you want them to play in the same sequence each time: def play_next_song(): global _songs _songs = _songs[1:] + [_songs[0]] # move current song to the back of the list pygame.mixer.music.load(_songs[0]) pygame.mixer.music.play()Sounds
The music API is very centralized. However sounds require the creation of sound objects that you have to hold on to. Much like images. Sounds have a simple .play() method that will start playing the sound. effect = pygame.mixer.Sound('beep.wav') effect.play() Because you can make the mistake of storing sound instances redundantly, I suggest creating a sound library much like the image library from part 2. _sound_library = {} def play_sound(path): global _sound_library sound = _sound_library.get(path) if sound == None: canonicalized_path = path.replace('/', os.sep).replace('\\', os.sep) sound = pygame.mixer.Sound(canonicalized_path) _sound_library[path] = sound sound.play() There are many more features but this is really all you need to do 95% of what most games will require of you.Next up: Drawing Geometric Shapes
Just like the mixer module, the drawing API is fairly straightforward with a few examples. Therefore instead of re-iterating the documentation as part of this tutorial, I'll instead show you a few simple (and not-so-simple) examples of what can be doing with the draw module in PyGame and a few pitfalls to be aware of. At the end of this tutorial/demo you'll see a massive code dump of a sample application. Simply run this script and you'll be presented with a PyGame app that is a sequence of draw module demos. While running it, press spacebar to proceed through the demos.Demo 1: Rectangle
Nothing spectacular about this: pygame.draw.rect(surface, color, pygame.Rect(left, top, width, height))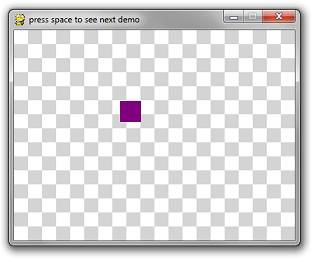
Demo 2: Circle
Also nothing spectacular about this: pygame.draw.circle(surface, color, (x, y), radius)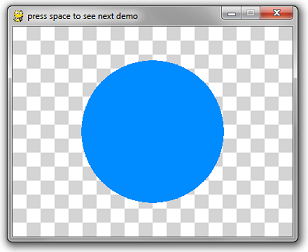
Demo 3: Built in Outlines:
This is the first caveat you should be aware of. PyGame's method for creating "thicker" outlines for circles is to draw multiple 1-pixel outlines. In theory, it sounds okay, until you see the result: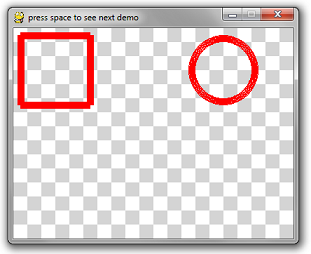 The circle has noticeable pixel gaps in it.
Even more embarrassing is the rectangle, which uses 4 line-draw calls at the desired thickness.
This creates weird corners.
The way to do this for most drawing API calls is to pass in an optional last parameter which is the thickness.
# draw a rectangle
pygame.draw.rect(surface, color, pygame.Rect(10, 10, 100, 100), 10)
# draw a circle
pygame.draw.circle(surface, color, (300, 60), 50, 10)
Moral of the story: when you draw a polygon, rectangle, circle, etc, draw it filled in or with 1-pixel thickness.
Everything else is not very well implemented.
The circle has noticeable pixel gaps in it.
Even more embarrassing is the rectangle, which uses 4 line-draw calls at the desired thickness.
This creates weird corners.
The way to do this for most drawing API calls is to pass in an optional last parameter which is the thickness.
# draw a rectangle
pygame.draw.rect(surface, color, pygame.Rect(10, 10, 100, 100), 10)
# draw a circle
pygame.draw.circle(surface, color, (300, 60), 50, 10)
Moral of the story: when you draw a polygon, rectangle, circle, etc, draw it filled in or with 1-pixel thickness.
Everything else is not very well implemented.
Demo 4: Acceptable Outlines
If you must draw a rectangle that has 10-pixel-thick borders, then it's best that you re-implement the logic yourself with either 10 1-pixel-thick rectangle calls, or 4 10-pixel-thick rectangle calls for each side.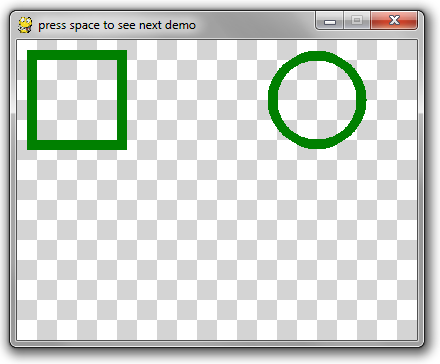 For an example, see the do_nice_outlines function below.
Demo 5: Polygons
This API is pretty straightforward. The point list is a list of tuples of x-y coordinates for the polygon. pygame.draw.polygon(surface, color, point_list)
Demo 6: Lines
Lines are also straight-forward: pygame.draw.line(surface, color, (startX, startY), (endX, endY), width) So I decided to go a bit crazy and wrote a 3D spinning wireframe cube using the line method and a lot of math.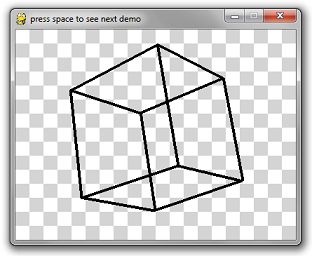 import pygame
import math
import time
# Ignore these 3 functions.
Scroll down for the relevant code.
def create_background(width, height):
colors = [(255, 255, 255), (212, 212, 212)]
background = pygame.Surface((width, height))
tile_width = 20
y = 0
while y < height:
x = 0
while x < width:
row = y // tile_width
col = x // tile_width
pygame.draw.rect(
background,
colors[(row + col) % 2],
pygame.Rect(x, y, tile_width, tile_width))
x += tile_width
y += tile_width
return background
def is_trying_to_quit(event):
pressed_keys = pygame.key.get_pressed()
alt_pressed = pressed_keys[pygame.K_LALT] or pressed_keys[pygame.K_RALT]
x_button = event.type == pygame.QUIT
altF4 = alt_pressed and event.type == pygame.KEYDOWN and event.key == pygame.K_F4
escape = event.type == pygame.KEYDOWN and event.key == pygame.K_ESCAPE
return x_button or altF4 or escape
def run_demos(width, height, fps):
pygame.init()
screen = pygame.display.set_mode((width, height))
pygame.display.set_caption('press space to see next demo')
background = create_background(width, height)
clock = pygame.time.Clock()
demos = [
do_rectangle_demo,
do_circle_demo,
do_horrible_outlines,
do_nice_outlines,
do_polygon_demo,
do_line_demo
]
the_world_is_a_happy_place = 0
while True:
the_world_is_a_happy_place += 1
for event in pygame.event.get():
if is_trying_to_quit(event):
return
if event.type == pygame.KEYDOWN and event.key == pygame.K_SPACE:
demos = demos[1:]
screen.blit(background, (0, 0))
if len(demos) == 0:
return
demos[0](screen, the_world_is_a_happy_place)
pygame.display.flip()
clock.tick(fps)
# Everything above this line is irrelevant to this tutorial.
def do_rectangle_demo(surface, counter):
left = (counter // 2) % surface.get_width()
top = (counter // 3) % surface.get_height()
width = 30
height = 30
color = (128, 0, 128) # purple
# Draw a rectangle
pygame.draw.rect(surface, color, pygame.Rect(left, top, width, height))
def do_circle_demo(surface, counter):
x = surface.get_width() // 2
y = surface.get_height() // 2
max_radius = min(x, y) * 4 // 5
radius = abs(int(math.sin(counter * 3.14159 * 2 / 200) * max_radius)) + 1
color = (0, 140, 255) # aquamarine
# Draw a circle
pygame.draw.circle(surface, color, (x, y), radius)
def do_horrible_outlines(surface, counter):
color = (255, 0, 0) # red
# draw a rectangle
pygame.draw.rect(surface, color, pygame.Rect(10, 10, 100, 100), 10)
# draw a circle
pygame.draw.circle(surface, color, (300, 60), 50, 10)
def do_nice_outlines(surface, counter):
color = (0, 128, 0) # green
# draw a rectangle
pygame.draw.rect(surface, color, pygame.Rect(10, 10, 100, 10))
pygame.draw.rect(surface, color, pygame.Rect(10, 10, 10, 100))
pygame.draw.rect(surface, color, pygame.Rect(100, 10, 10, 100))
pygame.draw.rect(surface, color, pygame.Rect(10, 100, 100, 10))
# draw a circle
center_x = 300
center_y = 60
radius = 45
iterations = 150
for i in range(iterations):
ang = i * 3.14159 * 2 / iterations
dx = int(math.cos(ang) * radius)
dy = int(math.sin(ang) * radius)
x = center_x + dx
y = center_y + dy
pygame.draw.circle(surface, color, (x, y), 5)
def do_polygon_demo(surface, counter):
color = (255, 255, 0) # yellow
num_points = 8
point_list = []
center_x = surface.get_width() // 2
center_y = surface.get_height() // 2
for i in range(num_points * 2):
radius = 100
if i % 2 == 0:
radius = radius // 2
ang = i * 3.14159 / num_points + counter * 3.14159 / 60
x = center_x + int(math.cos(ang) * radius)
y = center_y + int(math.sin(ang) * radius)
point_list.append((x, y))
pygame.draw.polygon(surface, color, point_list)
def rotate_3d_points(points, angle_x, angle_y, angle_z):
new_points = []
for point in points:
x = point[0]
y = point[1]
z = point[2]
new_y = y * math.cos(angle_x) - z * math.sin(angle_x)
new_z = y * math.sin(angle_x) + z * math.cos(angle_x)
y = new_y
# isn't math fun, kids?
z = new_z
new_x = x * math.cos(angle_y) - z * math.sin(angle_y)
new_z = x * math.sin(angle_y) + z * math.cos(angle_y)
x = new_x
z = new_z
new_x = x * math.cos(angle_z) - y * math.sin(angle_z)
new_y = x * math.sin(angle_z) + y * math.cos(angle_z)
x = new_x
y = new_y
new_points.append([x, y, z])
return new_points
def do_line_demo(surface, counter):
color = (0, 0, 0) # black
cube_points = [
[-1, -1, 1],
[-1, 1, 1],
[1, 1, 1],
[1, -1, 1],
[-1, -1, -1],
[-1, 1, -1],
[1, 1, -1],
[1, -1, -1]]
connections = [
(0, 1),
(1, 2),
(2, 3),
(3, 0),
(4, 5),
(5, 6),
(6, 7),
(7, 4),
(0, 4),
(1, 5),
(2, 6),
(3, 7)
]
t = counter * 2 * 3.14159 / 60 # this angle is 1 rotation per second
# rotate about x axis every 2 seconds
# rotate about y axis every 4 seconds
# rotate about z axis every 6 seconds
points = rotate_3d_points(cube_points, t / 2, t / 4, t / 6)
flattened_points = []
for point in points:
flattened_points.append(
(point[0] * (1 + 1.0 / (point[2] + 3)),
point[1] * (1 + 1.0 / (point[2] + 3))))
for con in connections:
p1 = flattened_points[con[0]]
p2 = flattened_points[con[1]]
x1 = p1[0] * 60 + 200
y1 = p1[1] * 60 + 150
x2 = p2[0] * 60 + 200
y2 = p2[1] * 60 + 150
# This is the only line that really matters
pygame.draw.line(surface, color, (x1, y1), (x2, y2), 4)
run_demos(400, 300, 60)
import pygame
import math
import time
# Ignore these 3 functions.
Scroll down for the relevant code.
def create_background(width, height):
colors = [(255, 255, 255), (212, 212, 212)]
background = pygame.Surface((width, height))
tile_width = 20
y = 0
while y < height:
x = 0
while x < width:
row = y // tile_width
col = x // tile_width
pygame.draw.rect(
background,
colors[(row + col) % 2],
pygame.Rect(x, y, tile_width, tile_width))
x += tile_width
y += tile_width
return background
def is_trying_to_quit(event):
pressed_keys = pygame.key.get_pressed()
alt_pressed = pressed_keys[pygame.K_LALT] or pressed_keys[pygame.K_RALT]
x_button = event.type == pygame.QUIT
altF4 = alt_pressed and event.type == pygame.KEYDOWN and event.key == pygame.K_F4
escape = event.type == pygame.KEYDOWN and event.key == pygame.K_ESCAPE
return x_button or altF4 or escape
def run_demos(width, height, fps):
pygame.init()
screen = pygame.display.set_mode((width, height))
pygame.display.set_caption('press space to see next demo')
background = create_background(width, height)
clock = pygame.time.Clock()
demos = [
do_rectangle_demo,
do_circle_demo,
do_horrible_outlines,
do_nice_outlines,
do_polygon_demo,
do_line_demo
]
the_world_is_a_happy_place = 0
while True:
the_world_is_a_happy_place += 1
for event in pygame.event.get():
if is_trying_to_quit(event):
return
if event.type == pygame.KEYDOWN and event.key == pygame.K_SPACE:
demos = demos[1:]
screen.blit(background, (0, 0))
if len(demos) == 0:
return
demos[0](screen, the_world_is_a_happy_place)
pygame.display.flip()
clock.tick(fps)
# Everything above this line is irrelevant to this tutorial.
def do_rectangle_demo(surface, counter):
left = (counter // 2) % surface.get_width()
top = (counter // 3) % surface.get_height()
width = 30
height = 30
color = (128, 0, 128) # purple
# Draw a rectangle
pygame.draw.rect(surface, color, pygame.Rect(left, top, width, height))
def do_circle_demo(surface, counter):
x = surface.get_width() // 2
y = surface.get_height() // 2
max_radius = min(x, y) * 4 // 5
radius = abs(int(math.sin(counter * 3.14159 * 2 / 200) * max_radius)) + 1
color = (0, 140, 255) # aquamarine
# Draw a circle
pygame.draw.circle(surface, color, (x, y), radius)
def do_horrible_outlines(surface, counter):
color = (255, 0, 0) # red
# draw a rectangle
pygame.draw.rect(surface, color, pygame.Rect(10, 10, 100, 100), 10)
# draw a circle
pygame.draw.circle(surface, color, (300, 60), 50, 10)
def do_nice_outlines(surface, counter):
color = (0, 128, 0) # green
# draw a rectangle
pygame.draw.rect(surface, color, pygame.Rect(10, 10, 100, 10))
pygame.draw.rect(surface, color, pygame.Rect(10, 10, 10, 100))
pygame.draw.rect(surface, color, pygame.Rect(100, 10, 10, 100))
pygame.draw.rect(surface, color, pygame.Rect(10, 100, 100, 10))
# draw a circle
center_x = 300
center_y = 60
radius = 45
iterations = 150
for i in range(iterations):
ang = i * 3.14159 * 2 / iterations
dx = int(math.cos(ang) * radius)
dy = int(math.sin(ang) * radius)
x = center_x + dx
y = center_y + dy
pygame.draw.circle(surface, color, (x, y), 5)
def do_polygon_demo(surface, counter):
color = (255, 255, 0) # yellow
num_points = 8
point_list = []
center_x = surface.get_width() // 2
center_y = surface.get_height() // 2
for i in range(num_points * 2):
radius = 100
if i % 2 == 0:
radius = radius // 2
ang = i * 3.14159 / num_points + counter * 3.14159 / 60
x = center_x + int(math.cos(ang) * radius)
y = center_y + int(math.sin(ang) * radius)
point_list.append((x, y))
pygame.draw.polygon(surface, color, point_list)
def rotate_3d_points(points, angle_x, angle_y, angle_z):
new_points = []
for point in points:
x = point[0]
y = point[1]
z = point[2]
new_y = y * math.cos(angle_x) - z * math.sin(angle_x)
new_z = y * math.sin(angle_x) + z * math.cos(angle_x)
y = new_y
# isn't math fun, kids?
z = new_z
new_x = x * math.cos(angle_y) - z * math.sin(angle_y)
new_z = x * math.sin(angle_y) + z * math.cos(angle_y)
x = new_x
z = new_z
new_x = x * math.cos(angle_z) - y * math.sin(angle_z)
new_y = x * math.sin(angle_z) + y * math.cos(angle_z)
x = new_x
y = new_y
new_points.append([x, y, z])
return new_points
def do_line_demo(surface, counter):
color = (0, 0, 0) # black
cube_points = [
[-1, -1, 1],
[-1, 1, 1],
[1, 1, 1],
[1, -1, 1],
[-1, -1, -1],
[-1, 1, -1],
[1, 1, -1],
[1, -1, -1]]
connections = [
(0, 1),
(1, 2),
(2, 3),
(3, 0),
(4, 5),
(5, 6),
(6, 7),
(7, 4),
(0, 4),
(1, 5),
(2, 6),
(3, 7)
]
t = counter * 2 * 3.14159 / 60 # this angle is 1 rotation per second
# rotate about x axis every 2 seconds
# rotate about y axis every 4 seconds
# rotate about z axis every 6 seconds
points = rotate_3d_points(cube_points, t / 2, t / 4, t / 6)
flattened_points = []
for point in points:
flattened_points.append(
(point[0] * (1 + 1.0 / (point[2] + 3)),
point[1] * (1 + 1.0 / (point[2] + 3))))
for con in connections:
p1 = flattened_points[con[0]]
p2 = flattened_points[con[1]]
x1 = p1[0] * 60 + 200
y1 = p1[1] * 60 + 150
x2 = p2[0] * 60 + 200
y2 = p2[1] * 60 + 150
# This is the only line that really matters
pygame.draw.line(surface, color, (x1, y1), (x2, y2), 4)
run_demos(400, 300, 60)
Next up: Fonts and Text
If you're looking for the quick answer on how to render text, here it is: import pygame pygame.init() screen = pygame.display.set_mode((640, 480)) clock = pygame.time.Clock() done = False font = pygame.font.SysFont("comicsansms", 72) text = font.render("Hello, World", True, (0, 128, 0)) while not done: for event in pygame.event.get(): if event.type == pygame.QUIT: done = True if event.type == pygame.KEYDOWN and event.key == pygame.K_ESCAPE: done = True screen.fill((255, 255, 255)) screen.blit(text, (320 - text.get_width() // 2, 240 - text.get_height() // 2)) pygame.display.flip() clock.tick(60)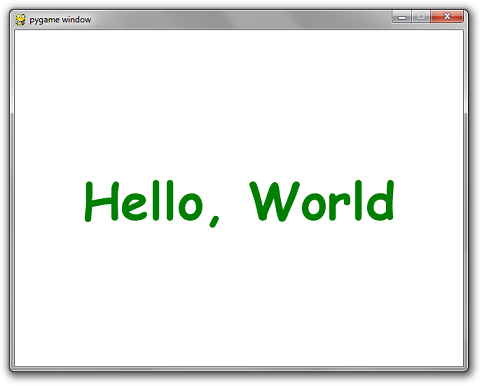 But of course, there's a few things not ideal about this.
Rule #1: You should never assume a certain font is installed on the user's computer.
Even in CSS there is a way to define a hierarchy of fonts to use.
If the best choice for font isn't available, an alternate is used.
You should follow the same pattern.
Luckily, PyGame has a way to enumerate all the fonts available on the machine:
all_fonts = pygame.font.get_fonts()
Additionally, there's a way to instantiate the default system font:
font = pygame.font.Font(None, size)
And alternatively, you can pass in the name of a font file you include along with your code instead of None to guarantee the existence of the perfect font:
font = pygame.font.Font("myresources/fonts/Papyrus.ttf", 26)
Using any combination of the above, you can write a better font creation function.
For example, here's a function that takes a list of font names, a font size and will create a font instance for the first available font in the list.
If none are available, it'll use the default system font.
def make_font(fonts, size):
available = pygame.font.get_fonts()
# get_fonts() returns a list of lowercase spaceless font names
choices = map(lambda x:x.lower().replace(' ', ''), fonts)
for choice in choices:
if choice in available:
return pygame.font.SysFont(choice, size)
return pygame.font.Font(None, size)
You can even further improve it by caching the font instance by font name and size.
_cached_fonts = {}
def get_font(font_preferences, size):
global _cached_fonts
key = str(font_preferences) + '|' + str(size)
font = _cached_fonts.get(key, None)
if font == None:
font = make_font(font_preferences, size)
_cached_fonts[key] = font
return font
You can take it a step further and actually cache the rendered text itself.
Storing an image is cheaper than rendering a new one, especially if you plan on having the same text show up for more than one consecutive frame.
Yes.
That is your plan if you want it to be readable.
_cached_text = {}
def create_text(text, fonts, size, color):
global _cached_text
key = '|'.join(map(str, (fonts, size, color, text)))
image = _cached_text.get(key, None)
if image == None:
font = get_font(fonts, size)
image = font.render(text, True, color)
_cached_text[key] = image
return image
But of course, there's a few things not ideal about this.
Rule #1: You should never assume a certain font is installed on the user's computer.
Even in CSS there is a way to define a hierarchy of fonts to use.
If the best choice for font isn't available, an alternate is used.
You should follow the same pattern.
Luckily, PyGame has a way to enumerate all the fonts available on the machine:
all_fonts = pygame.font.get_fonts()
Additionally, there's a way to instantiate the default system font:
font = pygame.font.Font(None, size)
And alternatively, you can pass in the name of a font file you include along with your code instead of None to guarantee the existence of the perfect font:
font = pygame.font.Font("myresources/fonts/Papyrus.ttf", 26)
Using any combination of the above, you can write a better font creation function.
For example, here's a function that takes a list of font names, a font size and will create a font instance for the first available font in the list.
If none are available, it'll use the default system font.
def make_font(fonts, size):
available = pygame.font.get_fonts()
# get_fonts() returns a list of lowercase spaceless font names
choices = map(lambda x:x.lower().replace(' ', ''), fonts)
for choice in choices:
if choice in available:
return pygame.font.SysFont(choice, size)
return pygame.font.Font(None, size)
You can even further improve it by caching the font instance by font name and size.
_cached_fonts = {}
def get_font(font_preferences, size):
global _cached_fonts
key = str(font_preferences) + '|' + str(size)
font = _cached_fonts.get(key, None)
if font == None:
font = make_font(font_preferences, size)
_cached_fonts[key] = font
return font
You can take it a step further and actually cache the rendered text itself.
Storing an image is cheaper than rendering a new one, especially if you plan on having the same text show up for more than one consecutive frame.
Yes.
That is your plan if you want it to be readable.
_cached_text = {}
def create_text(text, fonts, size, color):
global _cached_text
key = '|'.join(map(str, (fonts, size, color, text)))
image = _cached_text.get(key, None)
if image == None:
font = get_font(fonts, size)
image = font.render(text, True, color)
_cached_text[key] = image
return image
Putting it all together.
Now here's that original "Hello, World" example but with the improved code: import pygame def make_font(fonts, size): available = pygame.font.get_fonts() # get_fonts() returns a list of lowercase spaceless font names choices = map(lambda x:x.lower().replace(' ', ''), fonts) for choice in choices: if choice in available: return pygame.font.SysFont(choice, size) return pygame.font.Font(None, size) _cached_fonts = {} def get_font(font_preferences, size): global _cached_fonts key = str(font_preferences) + '|' + str(size) font = _cached_fonts.get(key, None) if font == None: font = make_font(font_preferences, size) _cached_fonts[key] = font return font _cached_text = {} def create_text(text, fonts, size, color): global _cached_text key = '|'.join(map(str, (fonts, size, color, text))) image = _cached_text.get(key, None) if image == None: font = get_font(fonts, size) image = font.render(text, True, color) _cached_text[key] = image return image pygame.init() screen = pygame.display.set_mode((640, 480)) clock = pygame.time.Clock() done = False font_preferences = [ "Bizarre-Ass Font Sans Serif", "They definitely dont have this installed Gothic", "Papyrus", "Comic Sans MS"] text = create_text("Hello, World", font_preferences, 72, (0, 128, 0)) while not done: for event in pygame.event.get(): if event.type == pygame.QUIT: done = True if event.type == pygame.KEYDOWN and event.key == pygame.K_ESCAPE: done = True screen.fill((255, 255, 255)) screen.blit(text, (320 - text.get_width() // 2, 240 - text.get_height() // 2)) pygame.display.flip() clock.tick(60)Next up: More on Input
There are two basic ways to get the state of any input device. Those are checking the event queue or polling. Every time a key or button is pressed or released, or the mouse is moved, an event is added to the event queue. You must empty this event queue out each frame by either calling pygame.event.get() or pygame.event.pump(). pygame.event.get() will return a list of all the events since the last time you emptied the queue. The way to handle those events depends on the type of event itself. The type of the event can be checked by reading the event.type field. Examples of pretty much each type of common event can be seen in the extended code sample below. There are more types, but they are fairly uncommon. The other way to check for events is to poll for the state of keys or buttons. pygame.key.get_pressed() - will get a list of booleans that describes the state of each keyboard key. The value of the key constant (such as pygame.K_TAB) can be used as the index into this giant list. Therefore pygame.key.get_pressed()[pygame.K_TAB] is an expression that is true when the tab key is pressed. pygame.mouse.get_pos() - returns the coordinates of the mouse cursor. Will return (0, 0) if the mouse hasn't moved over the screen yet. pygame.mouse.get_pressed() - like pygame.key.get_pressed(), returns the state of each mouse button. The value returned is a tuple of size 3 that corresponds to the left, middle, and right buttons. Here's a little program that has a bit of everything: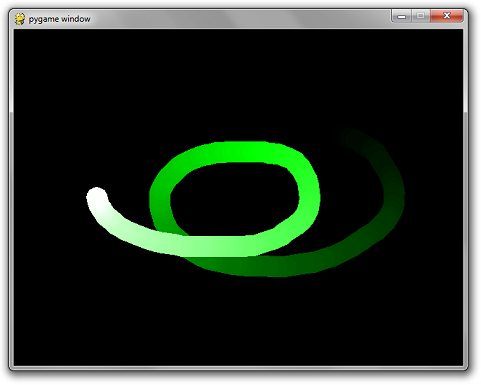 Moving the mouse causes a trail to be drawn after it.
Pressing W while holding Ctrl will close the window.
Same for Alt + F4.
Pressing the close button will close the window
Pressing r, g, or b keys will make the trail turn red, green, and blue respectively.
Pressing the left mouse button will cause the trail to become thicker.
Pressing the right mouse button will cause the trail to become thinner.
import pygame
def main():
pygame.init()
screen = pygame.display.set_mode((640, 480))
clock = pygame.time.Clock()
radius = 15
x = 0
y = 0
mode = 'blue'
points = []
while True:
pressed = pygame.key.get_pressed()
alt_held = pressed[pygame.K_LALT] or pressed[pygame.K_RALT]
ctrl_held = pressed[pygame.K_LCTRL] or pressed[pygame.K_RCTRL]
for event in pygame.event.get():
# determin if X was clicked, or Ctrl+W or Alt+F4 was used
if event.type == pygame.QUIT:
return
if event.type == pygame.KEYDOWN:
if event.key == pygame.K_w and ctrl_held:
return
if event.key == pygame.K_F4 and alt_held:
return
if event.key == pygame.K_ESCAPE:
return
# determine if a letter key was pressed
if event.key == pygame.K_r:
mode = 'red'
elif event.key == pygame.K_g:
mode = 'green'
elif event.key == pygame.K_b:
mode = 'blue'
if event.type == pygame.MOUSEBUTTONDOWN:
if event.button == 1: # left click grows radius
radius = min(200, radius + 1)
elif event.button == 3: # right click shrinks radius
radius = max(1, radius - 1)
if event.type == pygame.MOUSEMOTION:
# if mouse moved, add point to list
position = event.pos
points = points + [position]
points = points[-256:]
screen.fill((0, 0, 0))
# draw all points
i = 0
while i < len(points) - 1:
drawLineBetween(screen, i, points[i], points[i + 1], radius, mode)
i += 1
pygame.display.flip()
clock.tick(60)
def drawLineBetween(screen, index, start, end, width, color_mode):
c1 = max(0, min(255, 2 * index - 256))
c2 = max(0, min(255, 2 * index))
if color_mode == 'blue':
color = (c1, c1, c2)
elif color_mode == 'red':
color = (c2, c1, c1)
elif color_mode == 'green':
color = (c1, c2, c1)
dx = start[0] - end[0]
dy = start[1] - end[1]
iterations = max(abs(dx), abs(dy))
for i in range(iterations):
progress = 1.0 * i / iterations
aprogress = 1 - progress
x = int(aprogress * start[0] + progress * end[0])
y = int(aprogress * start[1] + progress * end[1])
pygame.draw.circle(screen, color, (x, y), width)
main()
Moving the mouse causes a trail to be drawn after it.
Pressing W while holding Ctrl will close the window.
Same for Alt + F4.
Pressing the close button will close the window
Pressing r, g, or b keys will make the trail turn red, green, and blue respectively.
Pressing the left mouse button will cause the trail to become thicker.
Pressing the right mouse button will cause the trail to become thinner.
import pygame
def main():
pygame.init()
screen = pygame.display.set_mode((640, 480))
clock = pygame.time.Clock()
radius = 15
x = 0
y = 0
mode = 'blue'
points = []
while True:
pressed = pygame.key.get_pressed()
alt_held = pressed[pygame.K_LALT] or pressed[pygame.K_RALT]
ctrl_held = pressed[pygame.K_LCTRL] or pressed[pygame.K_RCTRL]
for event in pygame.event.get():
# determin if X was clicked, or Ctrl+W or Alt+F4 was used
if event.type == pygame.QUIT:
return
if event.type == pygame.KEYDOWN:
if event.key == pygame.K_w and ctrl_held:
return
if event.key == pygame.K_F4 and alt_held:
return
if event.key == pygame.K_ESCAPE:
return
# determine if a letter key was pressed
if event.key == pygame.K_r:
mode = 'red'
elif event.key == pygame.K_g:
mode = 'green'
elif event.key == pygame.K_b:
mode = 'blue'
if event.type == pygame.MOUSEBUTTONDOWN:
if event.button == 1: # left click grows radius
radius = min(200, radius + 1)
elif event.button == 3: # right click shrinks radius
radius = max(1, radius - 1)
if event.type == pygame.MOUSEMOTION:
# if mouse moved, add point to list
position = event.pos
points = points + [position]
points = points[-256:]
screen.fill((0, 0, 0))
# draw all points
i = 0
while i < len(points) - 1:
drawLineBetween(screen, i, points[i], points[i + 1], radius, mode)
i += 1
pygame.display.flip()
clock.tick(60)
def drawLineBetween(screen, index, start, end, width, color_mode):
c1 = max(0, min(255, 2 * index - 256))
c2 = max(0, min(255, 2 * index))
if color_mode == 'blue':
color = (c1, c1, c2)
elif color_mode == 'red':
color = (c2, c1, c1)
elif color_mode == 'green':
color = (c1, c2, c1)
dx = start[0] - end[0]
dy = start[1] - end[1]
iterations = max(abs(dx), abs(dy))
for i in range(iterations):
progress = 1.0 * i / iterations
aprogress = 1 - progress
x = int(aprogress * start[0] + progress * end[0])
y = int(aprogress * start[1] + progress * end[1])
pygame.draw.circle(screen, color, (x, y), width)
main()
Next up: Centralized Scene Logic
This isn't a PyGame-specific tutorial per-se. It's more of an application of good software design concepts. This model of doing things has served me well for many complicated games. If you are not familiar with Object-Oriented programming in Python, familiarize yourself now. Done? Excellent. Here is a class definition for a SceneBase: class SceneBase: def __init__(self): self.next = self def ProcessInput(self, events): print("uh-oh, you didn't override this in the child class") def Update(self): print("uh-oh, you didn't override this in the child class") def Render(self, screen): print("uh-oh, you didn't override this in the child class") def SwitchToScene(self, next_scene): self.next = next_scene When you override this class, you have 3 method implementations to fill in. ProcessInput - This method will receive all the events that happened since the last frame. Update - Put your game logic in here for the scene. Render - Put your render code here. It will receive the main screen Surface as input. Of course, this class needs the appropriate harness to work. Here is an example program that does something simple: It launches the PyGame pipeline with a scene that is a blank red background. When you press the ENTER key, it changes to blue. This code may seem like overkill, but it does lots of other subtle things as well while at the same time keeps the complexity of your game logic contained into a snazzy OO model. Once you start adding more complexity to your game, this model will save you lots of headaches. Additional benefits are listed below. # The first half is just boiler-plate stuff... import pygame class SceneBase: def __init__(self): self.next = self def ProcessInput(self, events, pressed_keys): print("uh-oh, you didn't override this in the child class") def Update(self): print("uh-oh, you didn't override this in the child class") def Render(self, screen): print("uh-oh, you didn't override this in the child class") def SwitchToScene(self, next_scene): self.next = next_scene def Terminate(self): self.SwitchToScene(None) def run_game(width, height, fps, starting_scene): pygame.init() screen = pygame.display.set_mode((width, height)) clock = pygame.time.Clock() active_scene = starting_scene while active_scene != None: pressed_keys = pygame.key.get_pressed() # Event filtering filtered_events = [] for event in pygame.event.get(): quit_attempt = False if event.type == pygame.QUIT: quit_attempt = True elif event.type == pygame.KEYDOWN: alt_pressed = pressed_keys[pygame.K_LALT] or \ pressed_keys[pygame.K_RALT] if event.key == pygame.K_ESCAPE: quit_attempt = True elif event.key == pygame.K_F4 and alt_pressed: quit_attempt = True if quit_attempt: active_scene.Terminate() else: filtered_events.append(event) active_scene.ProcessInput(filtered_events, pressed_keys) active_scene.Update() active_scene.Render(screen) active_scene = active_scene.next pygame.display.flip() clock.tick(fps) # The rest is code where you implement your game using the Scenes model class TitleScene(SceneBase): def __init__(self): SceneBase.__init__(self) def ProcessInput(self, events, pressed_keys): for event in events: if event.type == pygame.KEYDOWN and event.key == pygame.K_RETURN: # Move to the next scene when the user pressed Enter self.SwitchToScene(GameScene()) def Update(self): pass def Render(self, screen): # For the sake of brevity, the title scene is a blank red screen screen.fill((255, 0, 0)) class GameScene(SceneBase): def __init__(self): SceneBase.__init__(self) def ProcessInput(self, events, pressed_keys): pass def Update(self): pass def Render(self, screen): # The game scene is just a blank blue screen screen.fill((0, 0, 255)) run_game(400, 300, 60, TitleScene()) Other awesome things you can easily do with this: You can change the screen mode with a hotkey. With the event filtering, you can add another clause to check for something like 'f' or F11 and then re-initialize the display to fullscreen or something. (if you pass pygame.FULLSCREEN in as a 2nd argument to pygame.display.set_mode, it will create a fullscreen window) Another huge advantage is you can create your own input model. Instead of simply filtering out pygame events, you can map the pygame events to your own event class. Instead of checking for pygame.K_SPACE to see if Hero Dude should fire his lazor, you can create a custom event where your check looks something more like myevent.type == 'FIRE_LAZOR'. The beauty of this is you can write an input configuration menu where you can map keys to actions or offer presets for various keyboard types (such as Dvorak users who get angry at programmers who use w/a/s/d keys for movement). Putting this logic in one centralized location keeps you from having to worry about all this each time you need to check the keys (just be sure to modify get_pressed accordingly if you do this). Ditto ^ for JoyStick/Gamepad functionality. Currently, the user cannot resize the window. In a traditional code layout, you'd have to rewrite all your render code to take into consideration the scale of the resized window. However, you can modify the above code to create an intermediate screen Surface object that you pass in to the scenes' Render method. This intermediate screen will be the size of the logical width and height of the game (in this case, 400 x 300). Then, for each frame, you can use PyGame's scale transforms to adjust the logical screen to the size of the real window. This way, your code can pretend that the size of the window is always 400 x 300, but the actual size of the window is unconstrained. Remember, clean code is happy code!Intro tutorial, basics
-Intro
Tutorials about how to blit images onto screen using pygame. Pygame is actually a wrapper for SDL (simple direct media), the cross-platform multi media library.-Where to get help...
pygame documentation. It is possible that the pygame documentation is a bit inaccurate. To get the exact help you can always look it up in the shell like this: C:\>python Python 2.4.1 (#65, Mar 30 2005, 09:13:57) [MSC v.1310 32 bit (Intel)] on win32 Type "help", "copyright", "credits" or "license" for more information. >>> import pygame >>> help(pygame.event.get) Help on built-in function get in module pygame.event: get(...) pygame.event.get([type]) -> list of Events get all of an event type from the queue Pass this a type of event that you are interested in, and it will return a list of all matching event types from the queue. If no types are passed, this will return all the events from the queue. You may also optionally pass a sequence of event types. For example, to fetch all the keyboard events from the queue, you would call, 'pygame.event.get([KEYDOWN,KEYUP])'. >>> Instead of pygame you can use the help() command on any function or class or module, e.g. help(pygame.event.Event) or help(pygame.event).-The minimal code
I recommend to adjust your coding style to the PEP8 guidelines because then you will not have any trouble if you want to publish your code later. minimal pygame code: # import the pygame module, so you can use it import pygame # define a main function def main(): # initialize the pygame module pygame.init() # load and set the logo logo = pygame.image.load("logo32x32.png") pygame.display.set_icon(logo) pygame.display.set_caption("minimal program") # create a surface on screen that has the size of 240 x 180 screen = pygame.display.set_mode((240,180)) # define a variable to control the main loop running = True # main loop while running: # event handling, gets all event from the event queue for event in pygame.event.get(): # only do something if the event is of type QUIT if event.type == pygame.QUIT: # change the value to False, to exit the main loop running = False # run the main function only if this module is executed as the main script # (if you import this as a module then nothing is executed) if __name__=="__main__": # call the main function main() Function documentation: pygame.init() pygame.display.set_mode((240,180)) pygame.event.get() event.type download source. This should show you an empty window like the following image.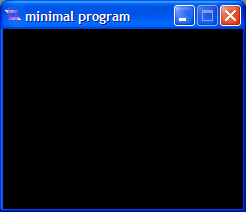 The only thing you can do is close it.
A QUIT event is generated when you click on the close button and since we handle the QUIT event in the main loop it will actually close.
Make sure you understand what it is done in this code because I will use it as a basis to all other examples.
Perhaps you ask yourself how to run this script.
This is simple: either you can just doubleclick it and it will run or you have to open a shell/command in that directory.
Then type either just the name of the "*.py" file you want to run or you can run it by typing "python *.py" where *.py is the file you want to run.
I recommend that you open a shell because in case of an error you can see the traceback and find the place where the error happened.
The only thing you can do is close it.
A QUIT event is generated when you click on the close button and since we handle the QUIT event in the main loop it will actually close.
Make sure you understand what it is done in this code because I will use it as a basis to all other examples.
Perhaps you ask yourself how to run this script.
This is simple: either you can just doubleclick it and it will run or you have to open a shell/command in that directory.
Then type either just the name of the "*.py" file you want to run or you can run it by typing "python *.py" where *.py is the file you want to run.
I recommend that you open a shell because in case of an error you can see the traceback and find the place where the error happened.
-What a surface is...
In pygame there is a object called surface for representing an image. The surface is a data structure to hold the information needed for the image. A surface can have different formats. For the different formats refer to the pygame documentation. There are also some ways to improve blitting (term for drawing a surface) speed. Two function exists to do that: convert() and convert_alpha() (if the image has per pixel alpha, transparent areas). They convert the surface to the format of the video surface (the screen surface) because it is faster to blit a surface to another using the same format. I found some info about the blitting speeds here: !broken link: http://aspn.activestate.com/ASPN/Mail/Message/pygame-users/783417"Blit tutorial
- First blit
The idea is to put an image on screen. I suggest that you look first at the documentation of the blit() function in the surface module. The blit function copy the pixel from one surface to another.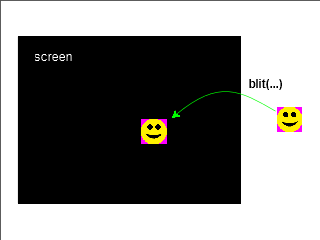 Before we can do that, we need to load the image.
You will find the load()-function in the image module of pygame.
image = pygame.image.load("01_image.png")
(if you have your image in a subdirectory then you should use os.path.join() to join your path together because if you do otherwise it could cause problems on different platforms)
Now we have loaded the image and can blit it to the screen.
screen.blit(image, (50,50))
What it does is copy the pixels of the image surface to the screen surface.
The position (50,50)
is the top left corner of the image.
If you try that now you will get a black screen.
It is because we have forgot to update the screen.
The full screen update is done using pygame.display.flip().
pygame.display.flip()
Before we can do that, we need to load the image.
You will find the load()-function in the image module of pygame.
image = pygame.image.load("01_image.png")
(if you have your image in a subdirectory then you should use os.path.join() to join your path together because if you do otherwise it could cause problems on different platforms)
Now we have loaded the image and can blit it to the screen.
screen.blit(image, (50,50))
What it does is copy the pixels of the image surface to the screen surface.
The position (50,50)
is the top left corner of the image.
If you try that now you will get a black screen.
It is because we have forgot to update the screen.
The full screen update is done using pygame.display.flip().
pygame.display.flip()
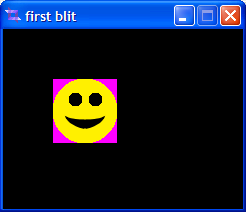 After that it is visible on screen.
We have written to the screen surface in the memory before and
now we have updated it on the display.
So far we have updated the screen only once, after we have "blit-ed" the image to the screen surface.
Try it first by yourself before you take a look at the source "first blit".
After that it is visible on screen.
We have written to the screen surface in the memory before and
now we have updated it on the display.
So far we have updated the screen only once, after we have "blit-ed" the image to the screen surface.
Try it first by yourself before you take a look at the source "first blit".
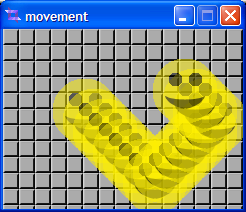
- Using background
The idea is to use a background to blit the image on top. The background can be either another image or just a filled surface. Filling the surface is the easier background but not the nicest one. In code it is just the fill(color, rect=None) function: screen.fill((r,g,b)) After that you blit your image over it as shown in the first section.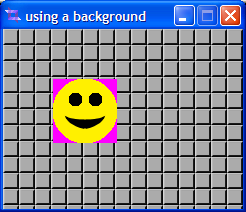 Using a background image is similar, but instead of filling it you blit the background image first on the screen:
screen.blit(bgd_image, (0,0))
We blit it at the top left corner of the screen that is (0,0).
The background image bgd_image should have the same size as the screen (or bigger but the clipped parts will not be seen).
Note the order we have had to blit the images, first the background, then the image.
Try it first by yourself, then take a look at the source "using background"
Using a background image is similar, but instead of filling it you blit the background image first on the screen:
screen.blit(bgd_image, (0,0))
We blit it at the top left corner of the screen that is (0,0).
The background image bgd_image should have the same size as the screen (or bigger but the clipped parts will not be seen).
Note the order we have had to blit the images, first the background, then the image.
Try it first by yourself, then take a look at the source "using background"
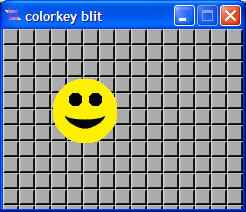 Well, as you can see in the images above, around the "smiley" there is a ugly pink border.
Usually you do not want to have only square sized images in your game.
There is a technique called
colorkey that makes one color fully transparent.
The function is quite simple, its called set_colorkey(color):
image.set_colorkey((255,0,255))
You get the source
, but try it first by your own.
WARNING: if an image has an alpha value set, then the color_key will not work! A simple trick to make colorkey work is: image.set_alpha(None) to disable it and then you can use set_colorkey(...) on it.
Well, as you can see in the images above, around the "smiley" there is a ugly pink border.
Usually you do not want to have only square sized images in your game.
There is a technique called
colorkey that makes one color fully transparent.
The function is quite simple, its called set_colorkey(color):
image.set_colorkey((255,0,255))
You get the source
, but try it first by your own.
WARNING: if an image has an alpha value set, then the color_key will not work! A simple trick to make colorkey work is: image.set_alpha(None) to disable it and then you can use set_colorkey(...) on it.
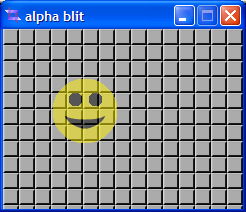 Using the alpha value you can make an image transparent.
This can be used to make some cool effects.
The code to use is simple as using a colorkey.
Its set_alpha(value):
image.set_alpha(128)
This will make the image half transparent using the per surface alpha (not per pixel alpha).
Here I use a colorkey too to make the pink border transparent.
Well to avoid some problems using alpha and colorkey I have looked it up in the sdl documentation
what combinations will work.
Its because not any combination is possible and you might then wonder why it does not do what you want.
In the documentation is said:
Using the alpha value you can make an image transparent.
This can be used to make some cool effects.
The code to use is simple as using a colorkey.
Its set_alpha(value):
image.set_alpha(128)
This will make the image half transparent using the per surface alpha (not per pixel alpha).
Here I use a colorkey too to make the pink border transparent.
Well to avoid some problems using alpha and colorkey I have looked it up in the sdl documentation
what combinations will work.
Its because not any combination is possible and you might then wonder why it does not do what you want.
In the documentation is said:
 # now blit the smiley on screen
screen.blit(image, (xpos, ypos))
# and update the screen (don't forget that!)
pygame.display.flip()
But what is that? What have we done wrong? Well I think we forgot to erase the current screen.
Because now there is an image of the smiley at each position it once was.
So let us fix that.
Before blitting the smiley we have to erase the screen.
How to do it? Just blit the background over anything on the screen.
# first erase the screen
#(just blit the background over anything on screen)
screen.blit(bgd_image, (0,0))
# now blit the smiley on screen
screen.blit(image, (xpos, ypos))
# and update the screen (don't forget that!)
pygame.display.flip()
So what have we learned? For a moving or somehow changing image, the basic algorithm is as follows:
# now blit the smiley on screen
screen.blit(image, (xpos, ypos))
# and update the screen (don't forget that!)
pygame.display.flip()
But what is that? What have we done wrong? Well I think we forgot to erase the current screen.
Because now there is an image of the smiley at each position it once was.
So let us fix that.
Before blitting the smiley we have to erase the screen.
How to do it? Just blit the background over anything on the screen.
# first erase the screen
#(just blit the background over anything on screen)
screen.blit(bgd_image, (0,0))
# now blit the smiley on screen
screen.blit(image, (xpos, ypos))
# and update the screen (don't forget that!)
pygame.display.flip()
So what have we learned? For a moving or somehow changing image, the basic algorithm is as follows:
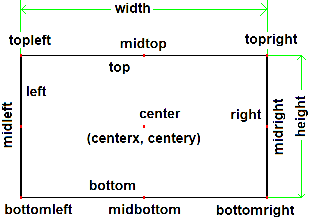 First of all I have to introduce you topygame.Rect.
It is a very useful object you need to understand.
So take a good look at it.
It has a lot of different attributes as shown on the right.
Let's say you want to put the topleft
corner of the rectangle to (100,100) you can just write(assuming r is an instance of pygame.Rect):
r.topleft = (100, 100) (all other values like center, topright, etc.
will be set to correct values too).
Now then, after we have learned how to use the rect object, we will move on to discuss the dirty rects technique.
First of all I have to introduce you topygame.Rect.
It is a very useful object you need to understand.
So take a good look at it.
It has a lot of different attributes as shown on the right.
Let's say you want to put the topleft
corner of the rectangle to (100,100) you can just write(assuming r is an instance of pygame.Rect):
r.topleft = (100, 100) (all other values like center, topright, etc.
will be set to correct values too).
Now then, after we have learned how to use the rect object, we will move on to discuss the dirty rects technique.
 Perhaps you have been asking yourself: Why updating the entire screen if only a few pixels actually changed?
You are right, it is faster (in most cases) to only update the changed areas.
These areas are called "dirty rects" because they need a redraw and they are normally of a rectangular shape.
Now the question arises how to find these dirty rects.
Fortunately, the blit(...)
function returns apygame.Rect
.
The only thing we have to do is to store that rect into a list.
Then instead of usingflip()
you want to use update()
because update takes a list of rectangles as argument.
You guessed right, it will update on screen areas described by the rectangles.
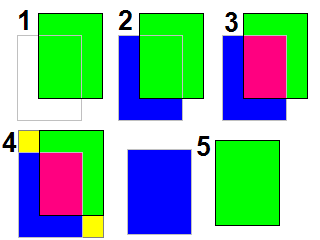
But, wait, if you have a sprite moving around, does this
update the screen correctly? No it does not.
As you can see on the picture at the right the area where it was has to be updated too (blue area).
I call it old_rect.
Since most sprites move not far in one frame,
most of the time you will have an intersection (pink area) as shown in 3.
So if you would update the two areas independently it would work fine, but the pink area in 3 would be updated twice and that is not good performance.
The simplest thing to do is to union the two rects as shown in 4.
The yellow areas were not dirty, but now they will be updated too.
So instead of two rects (blue and green) we now have one big one containing both.
This is howpygame.sprites.RenderUpdates
works.
Case 5 is not interesting because you will have to update both rects anyway.
# draw method from pygame.sprites.RenderUpdates
def draw(self, surface):
spritedict = self.spritedict # {sprite:old_rect}
surface_blit = surface.blit # speed up
dirty = self.lostsprites # dirty rects (from removed sprites)
self.lostsprites = []
dirty_append = dirty.append # speed up
for s in self.sprites():
r = spritedict[s] # get the old_rect
newrect = surface_blit(s.image, s.rect)# draw it
if r is 0: # first time the old_rect is 0
dirty_append(newrect) # add the rect from the blit, nothing else to do
else:
if newrect.colliderect(r): # if the old_rect and the newrect overlap, case 3
dirty_append(newrect.union(r)) # append the union of these two rects
else:
dirty_append(newrect) # not overlapping so append both, newrect and
dirty_append(r) # old_rect to the dirty list, case 5
spritedict[s] = newrect # replace the old one with the new one
return dirty # return the dirty rects list
Is it the best we can do? I think not.
If you have many moving sprites which overlap in their movement, this approach will still update many areas twice.
And it has one more major disadvantage:
it has to clear and redraw every sprite (otherwise is would not work, see dirty flags
).
But that leads us to the next
section: dirty areas union.
Perhaps you have been asking yourself: Why updating the entire screen if only a few pixels actually changed?
You are right, it is faster (in most cases) to only update the changed areas.
These areas are called "dirty rects" because they need a redraw and they are normally of a rectangular shape.
Now the question arises how to find these dirty rects.
Fortunately, the blit(...)
function returns apygame.Rect
.
The only thing we have to do is to store that rect into a list.
Then instead of usingflip()
you want to use update()
because update takes a list of rectangles as argument.
You guessed right, it will update on screen areas described by the rectangles.
But, wait, if you have a sprite moving around, does this
update the screen correctly? No it does not.
As you can see on the picture at the right the area where it was has to be updated too (blue area).
I call it old_rect.
Since most sprites move not far in one frame,
most of the time you will have an intersection (pink area) as shown in 3.
So if you would update the two areas independently it would work fine, but the pink area in 3 would be updated twice and that is not good performance.
The simplest thing to do is to union the two rects as shown in 4.
The yellow areas were not dirty, but now they will be updated too.
So instead of two rects (blue and green) we now have one big one containing both.
This is howpygame.sprites.RenderUpdates
works.
Case 5 is not interesting because you will have to update both rects anyway.
# draw method from pygame.sprites.RenderUpdates
def draw(self, surface):
spritedict = self.spritedict # {sprite:old_rect}
surface_blit = surface.blit # speed up
dirty = self.lostsprites # dirty rects (from removed sprites)
self.lostsprites = []
dirty_append = dirty.append # speed up
for s in self.sprites():
r = spritedict[s] # get the old_rect
newrect = surface_blit(s.image, s.rect)# draw it
if r is 0: # first time the old_rect is 0
dirty_append(newrect) # add the rect from the blit, nothing else to do
else:
if newrect.colliderect(r): # if the old_rect and the newrect overlap, case 3
dirty_append(newrect.union(r)) # append the union of these two rects
else:
dirty_append(newrect) # not overlapping so append both, newrect and
dirty_append(r) # old_rect to the dirty list, case 5
spritedict[s] = newrect # replace the old one with the new one
return dirty # return the dirty rects list
Is it the best we can do? I think not.
If you have many moving sprites which overlap in their movement, this approach will still update many areas twice.
And it has one more major disadvantage:
it has to clear and redraw every sprite (otherwise is would not work, see dirty flags
).
But that leads us to the next
section: dirty areas union.
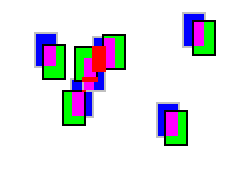 As you can see on the pictures at the right side, there are some overlapping areas.
The green rectangles are sprites moving around, the blue ones are the old position of a green
sprite.
The pink and red areas represent overlapping parts.
The red indicates 3 or more overlapping dirty rectangles and Pink represents two overlapping rectangles.
The idea now is to update only the area really needed.
But how to find it?
One way is a constructive algorithm:
As you can see on the pictures at the right side, there are some overlapping areas.
The green rectangles are sprites moving around, the blue ones are the old position of a green
sprite.
The pink and red areas represent overlapping parts.
The red indicates 3 or more overlapping dirty rectangles and Pink represents two overlapping rectangles.
The idea now is to update only the area really needed.
But how to find it?
One way is a constructive algorithm:
 This algorithm is good if there are some overlapping areas.
The result of it can be seen on the right side.
You get only 3 dirty areas on screen.
The biggest one is actually a bit too big, but I have found that this is not a performance
bottleneck as long the rect does not cover most of the screen (because then a full screen redraw would probably be faster).In worst case the dirty area is just the screen area.
The worst case it when no rectangle overlaps with any other.
In that case it is an O(n**2) algorithm.
This code is actually use in the DirtyLayered group
(know as FastRenderGroup too, see FastRenderGroup).
There is a similar problem as using dirty rects, see: dirty flags
.
This algorithm is good if there are some overlapping areas.
The result of it can be seen on the right side.
You get only 3 dirty areas on screen.
The biggest one is actually a bit too big, but I have found that this is not a performance
bottleneck as long the rect does not cover most of the screen (because then a full screen redraw would probably be faster).In worst case the dirty area is just the screen area.
The worst case it when no rectangle overlaps with any other.
In that case it is an O(n**2) algorithm.
This code is actually use in the DirtyLayered group
(know as FastRenderGroup too, see FastRenderGroup).
There is a similar problem as using dirty rects, see: dirty flags
.
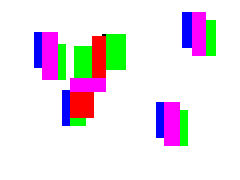 Actually this idea is quite new to me and I have to admit I have not tried it yet.
I have no idea how good its performance is so do not blame me if it does not work.
The idea is to find the overlapping parts and split these areas in a way so the resulting rectangles do not overlap.
As you can see in the picture I have tried to visualize that using different colors.
In this case you will get 17 rectangles.
You can get a large number
of rectangles by splitting and I do no know if that could be an performance hit.
Actually this idea is quite new to me and I have to admit I have not tried it yet.
I have no idea how good its performance is so do not blame me if it does not work.
The idea is to find the overlapping parts and split these areas in a way so the resulting rectangles do not overlap.
As you can see in the picture I have tried to visualize that using different colors.
In this case you will get 17 rectangles.
You can get a large number
of rectangles by splitting and I do no know if that could be an performance hit.
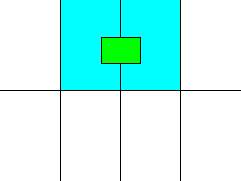 The main idea of tiling it to split the screen into a number of smaller areas.
Then when you draw a sprite, you have to check in which areas where the four corners of the sprite and set that area(s) dirty.
Next sprite you test you will not have to check that dirty area(s)
again because it is already dirty and will be updated.
Until now I have tried to implement a
tiling algorithm but got always something slower than the Dirty areas union.
On the right you can see a single sprite
(green).
That causes an update of the two blue areas of the screen.
As the other approaches this one has a similar problem, see:dirty flags
The main idea of tiling it to split the screen into a number of smaller areas.
Then when you draw a sprite, you have to check in which areas where the four corners of the sprite and set that area(s) dirty.
Next sprite you test you will not have to check that dirty area(s)
again because it is already dirty and will be updated.
Until now I have tried to implement a
tiling algorithm but got always something slower than the Dirty areas union.
On the right you can see a single sprite
(green).
That causes an update of the two blue areas of the screen.
As the other approaches this one has a similar problem, see:dirty flags
 In code it is something like this:
import pygame
import pygame.sprite.Sprite as Sprite
class SimpleAnimation(Sprite):
def __init__(self, frames):
Sprite.__init__(self)
self.frames = frames # save the images in here
self.current = 0 # idx of current image of the animation
self.image = frames[0] # just to prevent some errors
self.rect = self.image.get_rect() # same here
self.playing = 0
def update(self, *args):
if self.playing: # only update the animation if it is playing
self.current += 1
if self.current == len(self.frames):
self.current = 0
self.image = self.frames[self.current]
# only needed if size changes within the animation
self.rect = self.image.get_rect(center=self.rect.center)
To be able to do this we need to store some information.
As you can see the frames are stored in a list.
Furthermore we need to know which image is the current image, therefor we save the index saved in 'current'.
Naturally you will have to load and put the frames into the list before you call
update() the first time.
The attribute 'self.playing' could be changed through the functions 'start()', 'stop()' or 'pause()' and 'resume()'.
I did not put them here because they are very simple (the basic idea is to play around with self.current).
This is the simplest, frame-based and endless looping animation you can have.
It has the disadvantage of running with the fps of your game.
In code it is something like this:
import pygame
import pygame.sprite.Sprite as Sprite
class SimpleAnimation(Sprite):
def __init__(self, frames):
Sprite.__init__(self)
self.frames = frames # save the images in here
self.current = 0 # idx of current image of the animation
self.image = frames[0] # just to prevent some errors
self.rect = self.image.get_rect() # same here
self.playing = 0
def update(self, *args):
if self.playing: # only update the animation if it is playing
self.current += 1
if self.current == len(self.frames):
self.current = 0
self.image = self.frames[self.current]
# only needed if size changes within the animation
self.rect = self.image.get_rect(center=self.rect.center)
To be able to do this we need to store some information.
As you can see the frames are stored in a list.
Furthermore we need to know which image is the current image, therefor we save the index saved in 'current'.
Naturally you will have to load and put the frames into the list before you call
update() the first time.
The attribute 'self.playing' could be changed through the functions 'start()', 'stop()' or 'pause()' and 'resume()'.
I did not put them here because they are very simple (the basic idea is to play around with self.current).
This is the simplest, frame-based and endless looping animation you can have.
It has the disadvantage of running with the fps of your game.
 The easy way is actually very simple.
The only thing you have to do is to change the order of the frames in your animation.
So for a forward animation you might have this order: [1,2,3,4,5] for a 5 frame long animation.
To make a reverse of that you simply have to change this to: [5,4,3,2,1].
And the pingpong animation is not more complicated: [1,2,3,4,5,4,3,2] or [1,2,3,4,5,5,4,3,2,1].
Using this technique you can make any sequence you want with the frames.
The only thing you have to pay attention to is do not load an image twice.
frames = []
for i in range(5):
frames.append(pygame.image.load("pic"+str(i)+".png"))
for i in range(4, -1, -1):
frames.append(pygame.image.load("pic"+str(i)+".png")) # wrong!!
# gives [0,1,2,3,4,4',3',2',1',0'] but WRONG because frames have been loaded twice!!
#better
frames = []
for i in range(5):
frames.append(pygame.image.load("pic"+str(i)+".png"))
for i in range(5):
frames.append(frames[4-i]) # right, using same object twice
# this gives [0,1,2,3,4,4,3,2,1,0]
Instead of writing custom code you can wrap this functionality into functions:
As you can see, the only thing you need to get different kinds of sequences are loading functions or perhaps even better, functions which constructs another sequence from the normal standard case [0,1,2,3,4,...].
cache = {} # has to be global (or a class variable)
def get_sequence(frames_names, sequence, optimize=True):
frames = []
global cache
for name in frames_names:
if not cache.has_key(name): # check if it has benn loaded already
image = pygame.image.load(name) # not optimized
if optimize:
if image.get_alpha() is not None:
image = image.convert_alpha()
else:
image = image.convert()
cache[name] = image
# constructs a sequence of frames equal to frames_names
frames.append(cache[name])
frames2 = []
for idx in sequence:
# constructing the animation sequence according to sequence
frames2.append(frames[idx])
return frames2
def get_names_list(basename, ext, num, num_digits=1, offset=0):
names = []
# format string basename+zero_padded_number+.+ext
format = "%s%0"+str(num_digits)+"d.%s"
for i in range(offset, num+1):
names.append(format % (basename, i,ext))
return names
image_names = get_names_list("pic", "png", 4) # ["pic0.png","pic1.png","pic2.png","pic3.png"]
sequence = [0,1,2,3,2,1]
frames = get_sequence(image_names, sequence) # [0,1,2,3,2,1]
Notes: Loading should be done by a resource manager if
available (it is better than nothing).
You might want to use other filename formats.
The indices in the sequence list must not exceed the number of frames in image_names.
The easy way is actually very simple.
The only thing you have to do is to change the order of the frames in your animation.
So for a forward animation you might have this order: [1,2,3,4,5] for a 5 frame long animation.
To make a reverse of that you simply have to change this to: [5,4,3,2,1].
And the pingpong animation is not more complicated: [1,2,3,4,5,4,3,2] or [1,2,3,4,5,5,4,3,2,1].
Using this technique you can make any sequence you want with the frames.
The only thing you have to pay attention to is do not load an image twice.
frames = []
for i in range(5):
frames.append(pygame.image.load("pic"+str(i)+".png"))
for i in range(4, -1, -1):
frames.append(pygame.image.load("pic"+str(i)+".png")) # wrong!!
# gives [0,1,2,3,4,4',3',2',1',0'] but WRONG because frames have been loaded twice!!
#better
frames = []
for i in range(5):
frames.append(pygame.image.load("pic"+str(i)+".png"))
for i in range(5):
frames.append(frames[4-i]) # right, using same object twice
# this gives [0,1,2,3,4,4,3,2,1,0]
Instead of writing custom code you can wrap this functionality into functions:
As you can see, the only thing you need to get different kinds of sequences are loading functions or perhaps even better, functions which constructs another sequence from the normal standard case [0,1,2,3,4,...].
cache = {} # has to be global (or a class variable)
def get_sequence(frames_names, sequence, optimize=True):
frames = []
global cache
for name in frames_names:
if not cache.has_key(name): # check if it has benn loaded already
image = pygame.image.load(name) # not optimized
if optimize:
if image.get_alpha() is not None:
image = image.convert_alpha()
else:
image = image.convert()
cache[name] = image
# constructs a sequence of frames equal to frames_names
frames.append(cache[name])
frames2 = []
for idx in sequence:
# constructing the animation sequence according to sequence
frames2.append(frames[idx])
return frames2
def get_names_list(basename, ext, num, num_digits=1, offset=0):
names = []
# format string basename+zero_padded_number+.+ext
format = "%s%0"+str(num_digits)+"d.%s"
for i in range(offset, num+1):
names.append(format % (basename, i,ext))
return names
image_names = get_names_list("pic", "png", 4) # ["pic0.png","pic1.png","pic2.png","pic3.png"]
sequence = [0,1,2,3,2,1]
frames = get_sequence(image_names, sequence) # [0,1,2,3,2,1]
Notes: Loading should be done by a resource manager if
available (it is better than nothing).
You might want to use other filename formats.
The indices in the sequence list must not exceed the number of frames in image_names.
 Marked with green is when your animation has to be updated (every 50ms, this is a 20 fps animation).
The red marks show you how long it took to pass once through the main loop (call it dt, delta time).
As you can see this time (dt) varies each pass through the main loop.
So now you see what I was talking about (if you would have frame based animation then on each red mark the image of the animation would have changed).
The black numbers represent the current time.
The simplest approach leads to following code:
import os
from pygame.sprite import Sprite
class TimedAnimation(Sprite):
def __init__(self, frames, pos, fps=20):
Sprite.__init__(self)
self.frames = frames # store frames in a list
self.image = frames[0]
self.rect = self.image.get_rect(topleft=pos)
self.current = 0 # current image of the animation
self.playing = 0 # to know if it is playing
self._next_update = 0 # next time it has to be updated in ms
self._inv_period = fps/1000.
# 1./period of the animation in ms
self._start_time = 0 # has to be set when the animation is started
self._paused_time = 0
self_pause_start = 0
self._frames_len = len(self.frames)
def update(self, dt, t):
# dt: time that has passed in last pass through main loop, t: current time
if self.playing:
# period is duration of one frame, so dividing the time the animation
# is running by the period of one frame on gets the number of frames
self.current = int((t-self._start_time-self._paused_time)*self._inv_period)
self.current %= self._frames_len
# update image
self.image = self.frames[self.current]
# only needed if size changes between frames
self.rect = self.image.get_rect(center=self.rect.center)
The code should be more or less self explanatory.
My question now is: Can we make it more efficient?
Why go through all these calculations, even if the animation stays in the same frame?
Let's try it:
class TimedAnimation2(Sprite):
def __init__(self, frames, pos, fps=20):
Sprite.__init__(self)
self.frames = frames # store frames in a list
self.image = frames[0]
self.rect = self.image.get_rect(topleft=pos)
self.current = 0 # current image of the animation
self.playing = 0 # to know if it is playing
self._next_update = 0 # next time it has to be updated in ms
self._period = 1000./fps # frequency/period of the animation in ms
def update(self, dt, t):
if self.playing:
# accumulate time since last update
self._next_update += dt
# if more time has passed as a period, then we need to update
if self._next_update >= self._period:
# skipping frames if too much time has passed
# since _next_update is bigger than period this is at least 1
self.current += int(self._next_update/self._period)
# time that already has passed since last update
self._next_update %= self._period
# known code
self.current %= len(self.frames)
# update image
self.image = self.frames[self.current]
# only needed if size changes between frames
self.rect = self.image.get_rect(center=self.rect.center)
This should be much better, since the "big work" is only done when really needed.
But it still needs to accumulate the time passed.
If you contemplate about it, you actually can get rid of it too:
class TimedAnimation3(Sprite):
def __init__(self, frames, pos, fps=20):
Sprite.__init__(self)
self.frames = frames # store frames in a list
self.image = frames[0]
self.rect = self.image.get_rect(topleft=pos)
self.current = 0 # current image of the animation
self.playing = 0 # to know if it is playing
self._next_update = 0 # next time it has to be updated in ms
self._period = 1000./fps # period of the animation in ms
self._inv_period = 1./self._period
self._paused_time = 0
self._pause_start = 0
self._frames_len = len(self.frames)
def update(self, dt, t):
if self.playing:
# do only something if the time has come
if self._next_update <= t:
# time past since it should have updated
delta = t - self._paused_time - self._next_update
# calculate if there are any skipped frames
skipped_frames = int(delta*self._inv_period)
# next time to update
self._next_update = self._next_update + self._period + skipped_frames * self._period
# update to next image
self.current += (1+skipped_frames)
# bind it to the length of the animation
self.current %= self._frames_len
# update image
self.image = self.frames[self.current]
# only needed if size changes between frames
self.rect = self.image.get_rect(center=self.rect.center)
Actually, after some profiling I found that the first approach, the simplest one is the fastest.
I think it is caused by the small number of instructions when it really updates.
The other two approaches need to calculate much more.
But since the difference is small (~5ms max) it does not matter which one you choose to use.
I would choose the simplest one to use.
About frame skipping: it occurs when the frame rate of the main loop is slower than the one from the animation.
It should not happen, but it can.
If you are sure that you will never experience frame skipping then you can remove the code (actually it is the same as when skipped_frames is 0, which it should be most of the time).
Another thing I want to mention is that instead of passing in the real time, perhaps it would be better to pass in a game time.
When doing so then you can manipulate the game time to make some effects like slow motion, fast motion and implementing a pause will cause no trouble (just stop the game time from advancing).
Marked with green is when your animation has to be updated (every 50ms, this is a 20 fps animation).
The red marks show you how long it took to pass once through the main loop (call it dt, delta time).
As you can see this time (dt) varies each pass through the main loop.
So now you see what I was talking about (if you would have frame based animation then on each red mark the image of the animation would have changed).
The black numbers represent the current time.
The simplest approach leads to following code:
import os
from pygame.sprite import Sprite
class TimedAnimation(Sprite):
def __init__(self, frames, pos, fps=20):
Sprite.__init__(self)
self.frames = frames # store frames in a list
self.image = frames[0]
self.rect = self.image.get_rect(topleft=pos)
self.current = 0 # current image of the animation
self.playing = 0 # to know if it is playing
self._next_update = 0 # next time it has to be updated in ms
self._inv_period = fps/1000.
# 1./period of the animation in ms
self._start_time = 0 # has to be set when the animation is started
self._paused_time = 0
self_pause_start = 0
self._frames_len = len(self.frames)
def update(self, dt, t):
# dt: time that has passed in last pass through main loop, t: current time
if self.playing:
# period is duration of one frame, so dividing the time the animation
# is running by the period of one frame on gets the number of frames
self.current = int((t-self._start_time-self._paused_time)*self._inv_period)
self.current %= self._frames_len
# update image
self.image = self.frames[self.current]
# only needed if size changes between frames
self.rect = self.image.get_rect(center=self.rect.center)
The code should be more or less self explanatory.
My question now is: Can we make it more efficient?
Why go through all these calculations, even if the animation stays in the same frame?
Let's try it:
class TimedAnimation2(Sprite):
def __init__(self, frames, pos, fps=20):
Sprite.__init__(self)
self.frames = frames # store frames in a list
self.image = frames[0]
self.rect = self.image.get_rect(topleft=pos)
self.current = 0 # current image of the animation
self.playing = 0 # to know if it is playing
self._next_update = 0 # next time it has to be updated in ms
self._period = 1000./fps # frequency/period of the animation in ms
def update(self, dt, t):
if self.playing:
# accumulate time since last update
self._next_update += dt
# if more time has passed as a period, then we need to update
if self._next_update >= self._period:
# skipping frames if too much time has passed
# since _next_update is bigger than period this is at least 1
self.current += int(self._next_update/self._period)
# time that already has passed since last update
self._next_update %= self._period
# known code
self.current %= len(self.frames)
# update image
self.image = self.frames[self.current]
# only needed if size changes between frames
self.rect = self.image.get_rect(center=self.rect.center)
This should be much better, since the "big work" is only done when really needed.
But it still needs to accumulate the time passed.
If you contemplate about it, you actually can get rid of it too:
class TimedAnimation3(Sprite):
def __init__(self, frames, pos, fps=20):
Sprite.__init__(self)
self.frames = frames # store frames in a list
self.image = frames[0]
self.rect = self.image.get_rect(topleft=pos)
self.current = 0 # current image of the animation
self.playing = 0 # to know if it is playing
self._next_update = 0 # next time it has to be updated in ms
self._period = 1000./fps # period of the animation in ms
self._inv_period = 1./self._period
self._paused_time = 0
self._pause_start = 0
self._frames_len = len(self.frames)
def update(self, dt, t):
if self.playing:
# do only something if the time has come
if self._next_update <= t:
# time past since it should have updated
delta = t - self._paused_time - self._next_update
# calculate if there are any skipped frames
skipped_frames = int(delta*self._inv_period)
# next time to update
self._next_update = self._next_update + self._period + skipped_frames * self._period
# update to next image
self.current += (1+skipped_frames)
# bind it to the length of the animation
self.current %= self._frames_len
# update image
self.image = self.frames[self.current]
# only needed if size changes between frames
self.rect = self.image.get_rect(center=self.rect.center)
Actually, after some profiling I found that the first approach, the simplest one is the fastest.
I think it is caused by the small number of instructions when it really updates.
The other two approaches need to calculate much more.
But since the difference is small (~5ms max) it does not matter which one you choose to use.
I would choose the simplest one to use.
About frame skipping: it occurs when the frame rate of the main loop is slower than the one from the animation.
It should not happen, but it can.
If you are sure that you will never experience frame skipping then you can remove the code (actually it is the same as when skipped_frames is 0, which it should be most of the time).
Another thing I want to mention is that instead of passing in the real time, perhaps it would be better to pass in a game time.
When doing so then you can manipulate the game time to make some effects like slow motion, fast motion and implementing a pause will cause no trouble (just stop the game time from advancing).
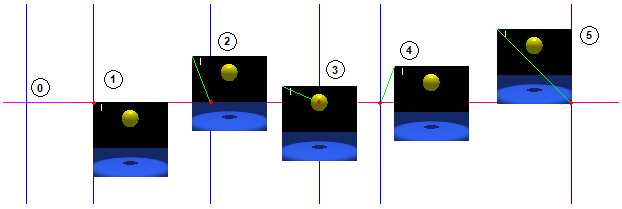 If you want to blit a image to another you tell where to blit the image.
Normally in pygame the image is blit with its topleft corner at the coordinates you defined (see case 1).
But now a anchor point is used which displaces the image accordingly.
In case 2 and the other cases there is a anchor point defined as (x,y) distance from the topleft corner.
You even can place the anchor point outside the image like in case 4.
So in case 2 it would be something like (x,y) == (10, 20).
The anchor point is the coordinate using the topleft corner as (0,0).
Look at it as an "offset" of the image with reversed signs.
This additional information can be stored either once for the animation,
then it is more like an offset, or for each frame (which makes more sense).
Like in the frame based timing this information can be saved into a tuple like (anchp_x, anchp_y, frame).
Lets look at the code of a simple frame based animation using the anchor point-technique:
import pygame
from pygame.sprite import Sprite as Sprite
class AnchoredAnimation(Sprite):
def __init__(self, frames, pos, fps=20):
Sprite.__init__(self)
self.frames = frames # [(anchp_x, anchp_y, image),...]
self.current = 0 # idx of current image of the animation
self.posx = pos[0] # instead of setting the position to the
self.posy = pos[1] # rect argument set these values, update handles it
anchx, anchy, self.image = frames[0] # just to prevent some errors
self.rect = self.image.get_rect(topleft = (pos[0]-anchx,pos[1]-anchy)) # same here
self.playing = 0
def update(self, *args):
if self.playing: # only update the animation if it is playing
self.current += 1
if self.current == len(self.frames):
self.current = 0
anchp_x, anchp_y, self.image = self.frames[self.current]
# moving image to match anchor point, - because it is an anchor point
self.rect.topleft = (self.posx - anchp_x, self.posy - anchp_y)
If you use an offset (how much the image has moved fom the anchor point), then line 27 looks like this:
self.rect.topleft = (self.posx + anchp_x, self.posy + anchp_y)
The only thing left to discuss concerning anchor point is how to use them.
Imagine you an animation of a item rotation around the position point.
Assume the item itself is not animated.
There are two ways of doing it: Either you make the animation in a way that all images are big enough so the entire diameter is on the images.
Then on each image the item rotates a bit further.
Now you have an animation of a rotating item.
The other way is using the anchor point.
You can use one single image (since the item itself is not animated) which is only that big enough to hold the item itself.
Then, using different anchor point, let it rotate.
Here is an image to explain it:
If you want to blit a image to another you tell where to blit the image.
Normally in pygame the image is blit with its topleft corner at the coordinates you defined (see case 1).
But now a anchor point is used which displaces the image accordingly.
In case 2 and the other cases there is a anchor point defined as (x,y) distance from the topleft corner.
You even can place the anchor point outside the image like in case 4.
So in case 2 it would be something like (x,y) == (10, 20).
The anchor point is the coordinate using the topleft corner as (0,0).
Look at it as an "offset" of the image with reversed signs.
This additional information can be stored either once for the animation,
then it is more like an offset, or for each frame (which makes more sense).
Like in the frame based timing this information can be saved into a tuple like (anchp_x, anchp_y, frame).
Lets look at the code of a simple frame based animation using the anchor point-technique:
import pygame
from pygame.sprite import Sprite as Sprite
class AnchoredAnimation(Sprite):
def __init__(self, frames, pos, fps=20):
Sprite.__init__(self)
self.frames = frames # [(anchp_x, anchp_y, image),...]
self.current = 0 # idx of current image of the animation
self.posx = pos[0] # instead of setting the position to the
self.posy = pos[1] # rect argument set these values, update handles it
anchx, anchy, self.image = frames[0] # just to prevent some errors
self.rect = self.image.get_rect(topleft = (pos[0]-anchx,pos[1]-anchy)) # same here
self.playing = 0
def update(self, *args):
if self.playing: # only update the animation if it is playing
self.current += 1
if self.current == len(self.frames):
self.current = 0
anchp_x, anchp_y, self.image = self.frames[self.current]
# moving image to match anchor point, - because it is an anchor point
self.rect.topleft = (self.posx - anchp_x, self.posy - anchp_y)
If you use an offset (how much the image has moved fom the anchor point), then line 27 looks like this:
self.rect.topleft = (self.posx + anchp_x, self.posy + anchp_y)
The only thing left to discuss concerning anchor point is how to use them.
Imagine you an animation of a item rotation around the position point.
Assume the item itself is not animated.
There are two ways of doing it: Either you make the animation in a way that all images are big enough so the entire diameter is on the images.
Then on each image the item rotates a bit further.
Now you have an animation of a rotating item.
The other way is using the anchor point.
You can use one single image (since the item itself is not animated) which is only that big enough to hold the item itself.
Then, using different anchor point, let it rotate.
Here is an image to explain it:
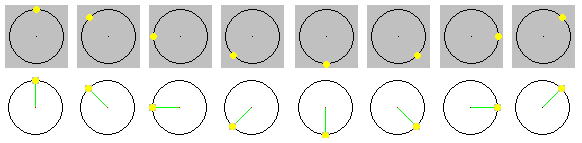 explanation: green and red dot: anchor point with green line of displacement
grey: size of image
The black circle is not part of the image.
As you can see in the first case big images are used.
In the second one the images are much smaller, even if the item would have been animated.
So if I like to save memory then I would go for solution 2.
You always will have to ask yourself: Do you want to do something in a animation or do you want to simulate it (like using a anchor point).
explanation: green and red dot: anchor point with green line of displacement
grey: size of image
The black circle is not part of the image.
As you can see in the first case big images are used.
In the second one the images are much smaller, even if the item would have been animated.
So if I like to save memory then I would go for solution 2.
You always will have to ask yourself: Do you want to do something in a animation or do you want to simulate it (like using a anchor point).
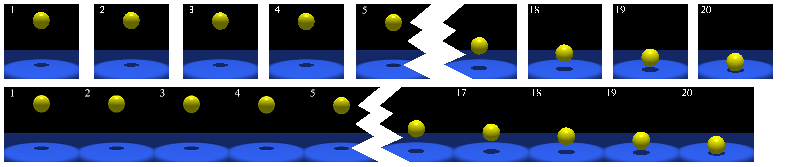 The upper part represents single images, the lower part one big image with all the single images packed next to each other.
It has some advantages if you use strips or even matrices.
The upper part represents single images, the lower part one big image with all the single images packed next to each other.
It has some advantages if you use strips or even matrices.
