Programiz Python Tutorial


How to Get Started With Python?

Learn how to install Python on your operating system and different ways to run it. Also, you will learn to write "Hello, World!" program in Python

Python is a cross-platform programming language, meaning, it runs on multiple platforms like Windows, Mac OS X, Linux, Unix and has even been ported to the Java and .NET virtual machines. It is free and open source.

Even though most of today’s Linux and Mac have Python preinstalled in it, the version might be out-of-date. So, it is always a good idea to install the most current version. You can download the latest version of Python and install it.

Starting The Interpreter

After installation, the python interpreter lives in the installed directory.

By default it is /usr/local/bin/pythonX.X in Linux/Unix and C:\PythonXX in Windows, where the 'X' denotes the version number. To invoke it from the shell or the command prompt we need to add this location in the search path.

Search path is a list of directories (locations) where the operating system searches for executables. For example, in Windows command prompt, we can type set path=%path%;c:\python33 (python33 means version 3.3, it might be different in your case) to add the location to path for that particular session.

In Mac OS we need not worry about this as the installer takes care about the search path.

Now there are various ways to start Python.

1. Immediate mode

Typing python in the command line will invoke the interpreter in immediate mode. We can directly type in Python expressions and press enter to get the output.

>>> 

is the Python prompt. It tells us that the interpreter is ready for our input. Try typing in 1 + 1 and press enter. We get 2 as the output. This prompt can be used as a calculator. To exit this mode type exit() or quit() and press enter.

2. Script mode

This mode is used to execute Python program written in a file. Such a file is called a script. Scripts can be saved to disk for future use. Python scripts have the extension .py, meaning that the filename ends with .py.

For example: helloWorld.py

To execute this file in script mode we simply write python helloWorld.py at the command prompt.

Integrated Development Environment (IDE)

We can use any text editing software to write a Python script file.

We just need to save it with the .py extension. But using an IDE can make our life a lot easier. IDE is a piece of software that provides useful features like code hinting, syntax highlighting and checking, file explorers etc. to the programmer for application development.

Using an IDE can get rid of redundant tasks and significantly decrease the time required for application development.

IDEL is a graphical user interface (GUI) that can be installed along with the Python programming language and is available from the official website.

We can also use other commercial or free IDE according to our preference. We have used the PyScripter IDE for our testing and we recommend the same. It is free and open source.

Hello World Example

Now that we have Python up and running, we can continue on to write our first Python program.

Type the following code in any text editor or an IDE and save it as helloWorld.py

print("Hello world!")

Now at the command window, go to the loaction of this file. You can use the cd command to change directory.

To run the script, type python helloWorld.py in the command window. We should be able to see the output as follows:

Hello world!

If you are using PyScripter, there is a green arrow button on top. Press that button or press Ctrl+F9 on your keyboard to run the program.

In this program we have used the built-in function print(), to print out a string to the screen. String is the value inside the quotation marks, i.e. Hello world! . Now try printing out your name by modifying this program.

Congratulations! You just wrote your first program in Python.

As we can see, it was pretty easy. This is the beauty of Python programming language.

Python Keywords and Identifier

You will learn about keywords (reserved words in Python) and identifiers (name given to variables, functions etc).

Python Keywords

Keywords are the reserved words in Python.

We cannot use a keyword as variable name, function name or any other identifier. They are used to define the syntax and structure of the Python language.

In Python, keywords are case sensitive.

There are 33 keywords in Python 3.3. This number can vary slightly in course of time.

All the keywords except True, False and None are in lowercase and they must be written as it is. The list of all the keywords are given below.

Keywords in Python programming language
False class finally is return
None continue for lambda try
True def from nonlocal while
and del global not with
as elif if or yield
assert else import pass  
break except in raise  

Looking at all the keywords at once and trying to figure out what they mean might be overwhelming.

If you want to have an overview, here is the complete list of all the keywords with examples.

Python Identifiers

Identifier is the name given to entities like class, functions, variables etc. in Python. It helps differentiating one entity from another.

Rules for writing identifiers

  1. Identifiers can be a combination of letters in lowercase (a to z) or uppercase (A to Z) or digits (0 to 9) or an underscore (_). Names like myClass, var_1 and print_this_to_screen, all are valid example.
  2. An identifier cannot start with a digit. 1variable is invalid, but variable1 is perfectly fine.
  3. Keywords cannot be used as identifiers.
    
    >>> global = 1
      File "<interactive input>", line 1
        global = 1
               ^
    SyntaxError: invalid syntax
    
  4. We cannot use special symbols like !, @, #, $, % etc. in our identifier.
    
    >>> a@ = 0
      File "<interactive input>", line 1
        a@ = 0
         ^
    SyntaxError: invalid syntax
    
  5. Identifier can be of any length.

Things to care about

Python is a case-sensitive language. This means, Variable and variable are not the same. Always name identifiers that make sense.

While, c = 10 is valid. Writing count = 10 would make more sense and it would be easier to figure out what it does even when you look at your code after a long gap.

Multiple words can be separated using an underscore, this_is_a_long_variable.

We can also use camel-case style of writing, i.e., capitalize every first letter of the word except the initial word without any spaces. For example: camelCaseExample

Python Statement, Indentation and Comments

In this article, you will learn about Python statements, why indentation is important and use of comments in programming.
Python Statement, Indentation and Comments

Python Statement

Instructions that a Python interpreter can execute are called statements. For example, a = 1 is an assignment statement. if statement, for statement, while statement etc. are other kinds of statements which will be discussed later.

Multi-line statement

In Python, end of a statement is marked by a newline character. But we can make a statement extend over multiple lines with the line continuation character (\). For example:

a = 1 + 2 + 3 + \
    4 + 5 + 6 + \
    7 + 8 + 9

This is explicit line continuation. In Python, line continuation is implied inside parentheses ( ), brackets [ ] and braces { }. For instance, we can implement the above multi-line statement as

a = (1 + 2 + 3 +
    4 + 5 + 6 +
    7 + 8 + 9)

Here, the surrounding parentheses ( ) do the line continuation implicitly. Same is the case with [ ] and { }. For example:

colors = ['red',
          'blue',
          'green']

We could also put multiple statements in a single line using semicolons, as follows

a = 1; b = 2; c = 3

Python Indentation

Most of the programming languages like C, C++, Java use braces { } to define a block of code. Python uses indentation.

A code block (body of a function, loop etc.) starts with indentation and ends with the first unindented line. The amount of indentation is up to you, but it must be consistent throughout that block.

Generally four whitespaces are used for indentation and is preferred over tabs. Here is an example.

for i in range(1,11):
    print(i)
    if i == 5:
        break

The enforcement of indentation in Python makes the code look neat and clean. This results into Python programs that look similar and consistent.

Indentation can be ignored in line continuation. But it's a good idea to always indent. It makes the code more readable. For example:

if True:
    print('Hello')
    a = 5

and

if True: print('Hello'); a = 5

both are valid and do the same thing. But the former style is clearer.

Incorrect indentation will result into IndentationError.

Python Comments

Comments are very important while writing a program. It describes what's going on inside a program so that a person looking at the source code does not have a hard time figuring it out. You might forget the key details of the program you just wrote in a month's time. So taking time to explain these concepts in form of comments is always fruitful.

In Python, we use the hash (#) symbol to start writing a comment.

It extends up to the newline character. Comments are for programmers for better understanding of a program. Python Interpreter ignores comment. 

#This is a comment
#print out Hello
print('Hello')

Multi-line comments

If we have comments that extend multiple lines, one way of doing it is to use hash (#) in the beginning of each line. For example:

#This is a long comment
#and it extends
#to multiple lines

Another way of doing this is to use triple quotes, either ''' or """.

These triple quotes are generally used for multi-line strings. But they can be used as multi-line comment as well. Unless they are not docstrings, they do not generate any extra code.

"""This is also a
perfect example of
multi-line comments"""

Docstring in Python

Docstring is short for documentation string.

It is a string that occurs as the first statement in a module, function, class, or method definition. We must write what a function/class does in the docstring.

Triple quotes are used while writing docstrings. For example:

def double(num):
    """Function to double the value"""
    return 2*num

Docstring is available to us as the attribute __doc__ of the function. Issue the following code in shell once you run the above program.

>>> print(double.__doc__)
Function to double the value

Python Variables and Data Types

In this tutorial, you will learn about variables, rules for naming a variable and different types of variable you can create in Python.
Python Variables and Data Types

Python Variables

A variable is a location in memory used to store some data (value).

They are given unique names to differentiate between different memory locations. The rules for writing a variable name is same as the rules for writing identifiers in Python.

We don't need to declare a variable before using it. In Python, we simply assign a value to a variable and it will exist. We don't even have to declare the type of the variable. This is handled internally according to the type of value we assign to the variable.

Variable assignment

We use the assignment operator (=) to assign values to a variable. Any type of value can be assigned to any valid variable.

a = 5
b = 3.2
c = "Hello"

Here, we have three assignment statements. 5 is an integer assigned to the variable a.

Similarly, 3.2 is a floating point number and "Hello" is a string (sequence of characters) assigned to the variables b and c respectively.

Multiple assignments

In Python, multiple assignments can be made in a single statement as follows:

a, b, c = 5, 3.2, "Hello"

If we want to assign the same value to multiple variables at once, we can do this as

x = y = z = "same"

This assigns the "same" string to all the three variables.

Data types in Python

Every value in Python has a datatype. Since everything is an object in Python programming, data types are actually classes and variables are instance (object) of these classes.

There are various data types in Python. Some of the important types are listed below.

Python Numbers

Integers, floating point numbers and complex numbers falls under Python numbers category. They are defined as int, float and complex class in Python.

We can use the type() function to know which class a variable or a value belongs to and the isinstance() function to check if an object belongs to a particular class.

a = 5
print(a, "is of type", type(a))

a = 2.0
print(a, "is of type", type(a))

a = 1+2j
print(a, "is complex number?", isinstance(1+2j,complex))

Integers can be of any length, it is only limited by the memory available.

A floating point number is accurate up to 15 decimal places. Integer and floating points are separated by decimal points. 1 is integer, 1.0 is floating point number.

Complex numbers are written in the form, x + yj, where x is the real part and y is the imaginary part. Here are some examples.

>>> a = 1234567890123456789
>>> a
1234567890123456789
>>> b = 0.1234567890123456789
>>> b
0.12345678901234568
>>> c = 1+2j
>>> c
(1+2j)

Notice that the float variable b got truncated.

Python List

List is an ordered sequence of items. It is one of the most used datatype in Python and is very flexible. All the items in a list do not need to be of the same type.

Declaring a list is pretty straight forward. Items separated by commas are enclosed within brackets [ ].

>>> a = [1, 2.2, 'python']

We can use the slicing operator [ ] to extract an item or a range of items from a list. Index starts form 0 in Python.

a = [5,10,15,20,25,30,35,40]

# a[2] = 15
print("a[2] = ", a[2])

# a[0:3] = [5, 10, 15]
print("a[0:3] = ", a[0:3])

# a[5:] = [30, 35, 40]
print("a[5:] = ", a[5:])

Lists are mutable, meaning, value of elements of a list can be altered.

>>> a = [1,2,3]
>>> a[2]=4
>>> a
[1, 2, 4]

Python Tuple

Tuple is an ordered sequence of items same as list.The only difference is that tuples are immutable. Tuples once created cannot be modified.

Tuples are used to write-protect data and are usually faster than list as it cannot change dynamically.

It is defined within parentheses () where items are separated by commas.

>>> t = (5,'program', 1+3j)

We can use the slicing operator [] to extract items but we cannot change its value.

t = (5,'program', 1+3j)

# t[1] = 'program'
print("t[1] = ", t[1])

# t[0:3] = (5, 'program', (1+3j))
print("t[0:3] = ", t[0:3])

# Generates error
# Tuples are immutable
t[0] = 10

Python Strings

String is sequence of Unicode characters. We can use single quotes or double quotes to represent strings. Multi-line strings can be denoted using triple quotes, ''' or """.

>>> s = "This is a string"
>>> s = '''a multiline

Like list and tuple, slicing operator [ ] can be used with string. Strings are immutable.

s = 'Hello world!'

# s[4] = 'o'
print("s[4] = ", s[4])

# s[6:11] = 'world'
print("s[6:11] = ", s[6:11])

# Generates error
# Strings are immutable in Python
s[5] ='d'

Python Set

Set is an unordered collection of unique items. Set is defined by values separated by comma inside braces { }. Items in a set are not ordered.

a = {5,2,3,1,4}

# printing set variable
print("a = ", a)

# data type of variable a
print(type(a))

We can perform set operations like union, intersection on two sets. Set have unique values. They eliminate duplicates.

>>> a = {1,2,2,3,3,3}
>>> a
{1, 2, 3}

Since, set are unordered collection, indexing has no meaning. Hence the slicing operator [] does not work.

>>> a = {1,2,3}
>>> a[1]
Traceback (most recent call last):
  File "<string>", line 301, in runcode
  File "<interactive input>", line 1, in <module>
TypeError: 'set' object does not support indexing

Python Dictionary

Dictionary is an unordered collection of key-value pairs.

It is generally used when we have a huge amount of data. Dictionaries are optimized for retrieving data. We must know the key to retrieve the value.

In Python, dictionaries are defined within braces {} with each item being a pair in the form key:value. Key and value can be of any type.

>>> d = {1:'value','key':2}
>>> type(d)
<class 'dict'>

We use key to retrieve the respective value. But not the other way around.

d = {1:'value','key':2}
print(type(d))

print("d[1] = ", d[1]);

print("d['key'] = ", d['key']);

# Generates error
print("d[2] = ", d[2]);

Conversion between data types

We can convert between different data types by using different type conversion functions like int(), float(), str() etc.

>>> float(5)
5.0

Conversion from float to int will truncate the value (make it closer to zero).

>>> int(10.6)
10
>>> int(-10.6)
-10

Conversion to and from string must contain compatible values.

>>> float('2.5')
2.5
>>> str(25)
'25'
>>> int('1p')
Traceback (most recent call last):
  File "<string>", line 301, in runcode
  File "<interactive input>", line 1, in <module>
ValueError: invalid literal for int() with base 10: '1p'

We can even convert one sequence to another.

>>> set([1,2,3])
{1, 2, 3}
>>> tuple({5,6,7})
(5, 6, 7)
>>> list('hello')
['h', 'e', 'l', 'l', 'o']

To convert to dictionary, each element must be a pair

>>> dict([[1,2],[3,4]])
{1: 2, 3: 4}
>>> dict([(3,26),(4,44)])
{3: 26, 4: 44}

Python Input, Output and Import

This tutorial focuses on two built-in functions print() and input() to perform I/O task in Python. Also, you will learn to import modules and use them in your program.
Input/Output

Python provides numerous built-in functions that are readily available to us at the Python prompt.

Some of the functions like input() and print() are widely used for standard input and output operations respectively. Let us see the output section first.

Python Output Using print() function

We use the print() function to output data to the standard output device (screen).

We can also output data to a file, but this will be discussed later. An example use is given below.

print('This sentence is output to the screen')
# Output: This sentence is output to the screen

a = 5

print('The value of a is', a)
# Output: The value of a is 5

In the second print() statement, we can notice that a space was added between the string and the value of variable a.This is by default, but we can change it.

The actual syntax of the print() function is

print(*objects, sep=' ', end='\n', file=sys.stdout, flush=False)

Here, objects is the value(s) to be printed.

The sep separator is used between the values. It defaults into a space character.

After all values are printed, end is printed. It defaults into a new line.

The file is the object where the values are printed and its default value is sys.stdout (screen). Here are an example to illustrate this.

print(1,2,3,4)
# Output: 1 2 3 4

print(1,2,3,4,sep='*')
# Output: 1*2*3*4

print(1,2,3,4,sep='#',end='&')
# Output: 1#2#3#4&

Output formatting

Sometimes we would like to format our output to make it look attractive. This can be done by using the str.format() method. This method is visible to any string object.

>>> x = 5; y = 10
>>> print('The value of x is {} and y is {}'.format(x,y))
The value of x is 5 and y is 10

Here the curly braces {} are used as placeholders. We can specify the order in which it is printed by using numbers (tuple index).

print('I love {0} and {1}'.format('bread','butter'))
# Output: I love bread and butter

print('I love {1} and {0}'.format('bread','butter'))
# Output: I love butter and bread

We can even use keyword arguments to format the string.

>>> print('Hello {name}, {greeting}'.format(greeting = 'Goodmorning', name = 'John'))
Hello John, Goodmorning

We can even format strings like the old sprintf() style used in C programming language. We use the % operator to accomplish this.

>>> x = 12.3456789
>>> print('The value of x is %3.2f' %x)
The value of x is 12.35
>>> print('The value of x is %3.4f' %x)
The value of x is 12.3457

Python Input

Up till now, our programs were static. The value of variables were defined or hard coded into the source code.

To allow flexibility we might want to take the input from the user. In Python, we have the input() function to allow this. The syntax for input() is

input([prompt])

where prompt is the string we wish to display on the screen. It is optional.

>>> num = input('Enter a number: ')
Enter a number: 10
>>> num
'10'

Here, we can see that the entered value 10 is a string, not a number. To convert this into a number we can use int() or float() functions.

>>> int('10')
10
>>> float('10')
10.0

This same operation can be performed using the eval() function. But it takes it further. It can evaluate even expressions, provided the input is a string

>>> int('2+3')
Traceback (most recent call last):
  File "<string>", line 301, in runcode
  File "<interactive input>", line 1, in <module>
ValueError: invalid literal for int() with base 10: '2+3'
>>> eval('2+3')
5

Python Import

When our program grows bigger, it is a good idea to break it into different modules.

A module is a file containing Python definitions and statements. Python modules have a filename and end with the extension .py.

Definitions inside a module can be imported to another module or the interactive interpreter in Python. We use the import keyword to do this.

For example, we can import the math module by typing in import math.

import math
print(math.pi)

Now all the definitions inside math module are available in our scope. We can also import some specific attributes and functions only, using the from keyword. For example:

>>> from math import pi
>>> pi
3.141592653589793

While importing a module, Python looks at several places defined in sys.path. It is a list of directory locations.

>>> import sys
>>> sys.path
['', 
 'C:\\Python33\\Lib\\idlelib', 
 'C:\\Windows\\system32\\python33.zip', 
 'C:\\Python33\\DLLs', 
 'C:\\Python33\\lib', 
 'C:\\Python33', 
 'C:\\Python33\\lib\\site-packages']

We can add our own location to this list as well.

Python Operators

In this article, you'll learn everything about different types of operators in Python, their syntax and how to use them with examples.
Python Operators

Operators are special symbols in Python that carry out arithmetic or logical computation. The value that the operator operates on is called the operand.

For example:

>>> 2+3
5

Here, + is the operator that performs addition. 2 and 3 are the operands and 5 is the output of the operation.

Python has a number of operators which are classified below.

Type of operators in Python
Arithmetic operators
Comparison (Relational) operators
Logical (Boolean) operators
Bitwise operators
Assignment operators
Special operators

Arithmetic operators

Arithmetic operators are used to perform mathematical operations like addition, subtraction, multiplication etc.

Arithmetic operators in Python
Operator Meaning Example
+ Add two operands or unary plus x + y
+2
- Subtract right operand from the left or unary minus x - y
-2
* Multiply two operands x * y
/ Divide left operand by the right one (always results into float) x / y
% Modulus - remainder of the division of left operand by the right x % y (remainder of x/y)
// Floor division - division that results into whole number adjusted to the left in the number line x // y
** Exponent - left operand raised to the power of right x**y (x to the power y)

Example #1: Arithmetic operators in Python

x = 15
y = 4

# Output: x + y = 19
print('x + y =',x+y)

# Output: x - y = 11
print('x - y =',x-y)

# Output: x * y = 60
print('x * y =',x*y)

# Output: x / y = 3.75
print('x / y =',x/y)

# Output: x // y = 3
print('x // y =',x//y)

# Output: x ** y = 50625
print('x ** y =',x**y)

When you run the program, the output will be:

x + y = 19
x - y = 11
x * y = 60
x / y = 3.75
x // y = 3
x ** y = 50625

Comparison operators

Comparison operators are used to compare values. It either returns True or False according to the condition.

Comparision operators in Python
Operator Meaning Example
> Greater that - True if left operand is greater than the right x > y
< Less that - True if left operand is less than the right x < y
== Equal to - True if both operands are equal x == y
!= Not equal to - True if operands are not equal x != y
>= Greater than or equal to - True if left operand is greater than or equal to the right x >= y
<= Less than or equal to - True if left operand is less than or equal to the right x <= y

Example #2: Comparison operators in Python

x = 10
y = 12

# Output: x > y is False
print('x > y  is',x>y)

# Output: x < y is True
print('x < y  is',x<y)

# Output: x == y is False
print('x == y is',x==y)

# Output: x != y is True
print('x != y is',x!=y)

# Output: x >= y is False
print('x >= y is',x>=y)

# Output: x <= y is True
print('x <= y is',x<=y)

Logical operators

Logical operators are the and, or, not operators.

Logical operators in Python
Operator Meaning Example
and True if both the operands are true x and y
or True if either of the operands is true x or y
not True if operand is false (complements the operand) not x

Example #3: Logical Operators in Python

x = True
y = False

# Output: x and y is False
print('x and y is',x and y)

# Output: x or y is True
print('x or y is',x or y)

# Output: not x is False
print('not x is',not x)

Here is the truth table for these operators.

Bitwise operators

Bitwise operators act on operands as if they were string of binary digits. It operates bit by bit, hence the name.

For example, 2 is 10 in binary and 7 is 111.

In the table below: Let x = 10 (0000 1010 in binary) and y = 4 (0000 0100 in binary)

Bitwise operators in Python
Operator Meaning Example
& Bitwise AND x& y = 0 (0000 0000)
| Bitwise OR x | y = 14 (0000 1110)
~ Bitwise NOT ~x = -11 (1111 0101)
^ Bitwise XOR x ^ y = 14 (0000 1110)
>> Bitwise right shift x>> 2 = 2 (0000 0010)
<< Bitwise left shift x<< 2 = 40 (0010 1000)

Assignment operators

Assignment operators are used in Python to assign values to variables.

a = 5 is a simple assignment operator that assigns the value 5 on the right to the variable a on the left.

There are various compound operators in Python like a += 5 that adds to the variable and later assigns the same. It is equivalent to a = a + 5.

Assignment operators in Python
Operator Example Equivatent to
= x = 5 x = 5
+= x += 5 x = x + 5
-= x -= 5 x = x - 5
*= x *= 5 x = x * 5
/= x /= 5 x = x / 5
%= x %= 5 x = x % 5
//= x //= 5 x = x // 5
**= x **= 5 x = x ** 5
&= x &= 5 x = x & 5
|= x |= 5 x = x | 5
^= x ^= 5 x = x ^ 5
>>= x >>= 5 x = x >> 5
<<= x <<= 5 x = x << 5

Special operators

Python language offers some special type of operators like the identity operator or the membership operator. They are described below with examples.

Identity operators

is and is not are the identity operators in Python. They are used to check if two values (or variables) are located on the same part of the memory. Two variables that are equal does not imply that they are identical.

Identity operators in Python
Operator Meaning Example
is True if the operands are identical (refer to the same object) x is True
is not True if the operands are not identical (do not refer to the same object) x is not True

Example #4: Identity operators in Python

x1 = 5
y1 = 5
x2 = 'Hello'
y2 = 'Hello'
x3 = [1,2,3]
y3 = [1,2,3]

# Output: False
print(x1 is not y1)

# Output: True
print(x2 is y2)

# Output: False
print(x3 is y3)

Here, we see that x1 and y1 are integers of same values, so they are equal as well as identical. Same is the case with x2 and y2 (strings).

But x3 and y3 are list. They are equal but not identical. Since list are mutable (can be changed), interpreter locates them separately in memory although they are equal.

Membership operators

in and not in are the membership operators in Python. They are used to test whether a value or variable is found in a sequence (string, list, tuple, set and dictionary).

In a dictionary we can only test for presence of key, not the value.

Operator Meaning Example
in True if value/variable is found in the sequence 5 in x
not in True if value/variable is not found in the sequence 5 not in x

Example #5: Membership operators in Python

x = 'Hello world'
y = {1:'a',2:'b'}

# Output: True
print('H' in x)

# Output: True
print('hello' not in x)

# Output: True
print(1 in y)

# Output: False
print('a' in y)

Here, 'H' is in x but 'hello' is not present in x (remember, Python is case sensitive). Similary, 1 is key and 'a' is the value in dictionary y. Hence, 'a' in y returns False.

Python if...else Statement

In this article, you will learn to create decisions in a Python program using different forms of if..else statement.
Python if...else Statement

Decision making is required when we want to execute a code only if a certain condition is satisfied.

The if…elif…else statement is used in Python for decision making.

Python if Statement Syntax

if test expression:
    statement(s)

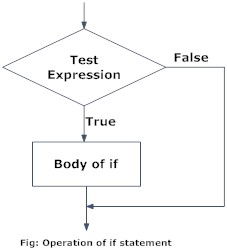
Here, the program evaluates the test expression and will execute statement(s) only if the text expression is True.

If the text expression is False, the statement(s) is not executed.

In Python, the body of the if statement is indicated by the indentation. Body starts with an indentation and the first unindented line marks the end.

Python interprets non-zero values as True. None and 0 are interpreted as False.

Python if Statement Flowchart

Flowchart of if statement in Python programming

Example: Python if Statement

# If the number is positive, we print an appropriate message

num = 3
if num > 0:
    print(num, "is a positive number.")
print("This is always printed.")

num = -1
if num > 0:
    print(num, "is a positive number.")
print("This is also always printed.")

When you run the program, the output will be:

3 is a positive number
This is always printed
This is also always printed.

In the above example, num > 0 is the test expression.

The body of if is executed only if this evaluates to True.

When variable num is equal to 3, test expression is true and body inside body of if is executed.

If variable num is equal to -1, test expression is false and body inside body of if is skipped.

The print() statement falls outside of the if block (unindented). Hence, it is executed regardless of the test expression.

Python if...else Statement

Syntax of if...else

if test expression:
    Body of if
else:
    Body of else

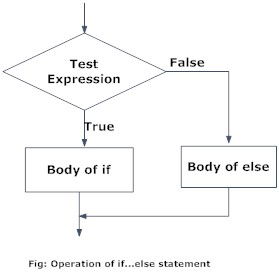
The if..else statement evaluates test expression and will execute body of if only when test condition is True.

If the condition is False, body of else is executed. Indentation is used to separate the blocks.

Python if..else Flowchart

Flowchart of if...else statement in Python Programming

Example of if...else

# Program checks if the number is positive or negative
# And displays an appropriate message

num = 3

# Try these two variations as well. 
# num = -5
# num = 0

if num >= 0:
    print("Positive or Zero")
else:
    print("Negative number")

In the above example, when num is equal to 3, the test expression is true and body of if is executed and body of else is skipped.

If num is equal to -5, the test expression is false and body of else is executed and body of if is skipped.

If num is equal to 0, the test expression is true and body of if is executed and body of else is skipped.

Python if...elif...else

Syntax of if...elif...else

if test expression:
    Body of if
elif test expression:
    Body of elif
else: 
    Body of else

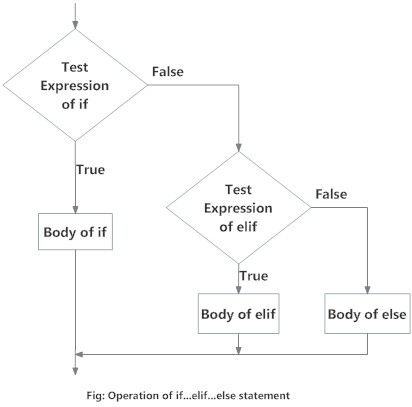
The elif is short for else if. It allows us to check for multiple expressions.

If the condition for if is False, it checks the condition of the next elif block and so on.

If all the conditions are False, body of else is executed.

Only one block among the several if...elif...else blocks is executed according to the condition.

The if block can have only one else block. But it can have multiple elif blocks.

Flowchart of if...elif...else

Flowchart of if...elif....else in python programming

Example of if...elif...else

# In this program, 
# we check if the number is positive or
# negative or zero and 
# display an appropriate message

num = 3.4

# Try these two variations as well:
# num = 0
# num = -4.5

if num > 0:
    print("Positive number")
elif num == 0:
    print("Zero")
else:
    print("Negative number")

When variable num is positive, Positive number is printed.

If num is equal to 0, Zero is printed.

If num is negative, Negative number is printed

Python Nested if statements

We can have a if...elif...else statement inside another if...elif...else statement. This is called nesting in computer programming.

Any number of these statements can be nested inside one another. Indentation is the only way to figure out the level of nesting. This can get confusing, so must be avoided if we can.

Python Nested if Example

# In this program, we input a number
# check if the number is positive or
# negative or zero and display
# an appropriate message
# This time we use nested if

num = float(input("Enter a number: "))
if num >= 0:
    if num == 0:
        print("Zero")
    else:
        print("Positive number")
else:
    print("Negative number")

Output 1

Enter a number: 5
Positive number

Output 2

Enter a number: -1
Negative number

Output 3

Enter a number: 0
Zero

Python for Loop

In this article, you'll learn to iterate over a sequence of elements using the different variations of for loop.
Python for loop

The for loop in Python is used to iterate over a sequence (list, tuple, string) or other iterable objects. Iterating over a sequence is called traversal.

Syntax of for Loop

for val in sequence:
	Body of for

Here, val is the variable that takes the value of the item inside the sequence on each iteration.

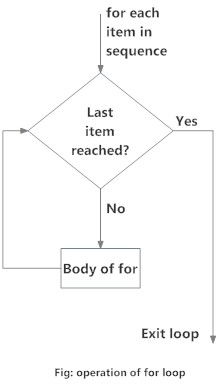
Loop continues until we reach the last item in the sequence. The body of for loop is separated from the rest of the code using indentation.

Flowchart of for Loop

Flowchart of for Loop in Python programming

Example: Python for Loop

# Program to find the sum of all numbers stored in a list

# List of numbers
numbers = [6, 5, 3, 8, 4, 2, 5, 4, 11]

# variable to store the sum
sum = 0

# iterate over the list
for val in numbers:
	sum = sum+val

# Output: The sum is 48
print("The sum is", sum)
	

when you run the program, the output will be:

The sum is 48

The range() function

We can generate a sequence of numbers using range() function. range(10) will generate numbers from 0 to 9 (10 numbers).

We can also define the start, stop and step size as range(start,stop,step size). step size defaults to 1 if not provided.

This function does not store all the values in memory, it would be inefficient. So it remembers the start, stop, step size and generates the next number on the go.

To force this function to output all the items, we can use the function list().

The following example will clarify this.

# Output: range(0, 10)
print(range(10))

# Output: [0, 1, 2, 3, 4, 5, 6, 7, 8, 9]
print(list(range(10)))

# Output: [2, 3, 4, 5, 6, 7]
print(list(range(2, 8)))

# Output: [2, 5, 8, 11, 14, 17]
print(list(range(2, 20, 3)))	

We can use the range() function in for loops to iterate through a sequence of numbers. It can be combined with the len() function to iterate though a sequence using indexing. Here is an example.

# Program to iterate through a list using indexing

genre = ['pop', 'rock', 'jazz']

# iterate over the list using index
for i in range(len(genre)):
	print("I like", genre[i])

When you run the program, the output will be:

I like pop
I like rock
​I like jazz

for loop with else

A for loop can have an optional else block as well. The else part is executed if the items in the sequence used in for loop exhausts.

break statement can be used to stop a for loop. In such case, the else part is ignored.

Hence, a for loop's else part runs if no break occurs.

Here is an example to illustrate this.

digits = [0, 1, 5]

for i in digits:
    print(i)
else:
    print("No items left.")

When you run the program, the output will be:

0
1
5
No items left.

Here, the for loop prints items of the list until the loop exhausts. When the for loop exhausts, it executes the block of code in the else and prints

No items left.

Python while Loop

Loops are used in programming to repeat a specific block of code. In this article, you will learn to create a while loop in Python.
Python while Loop

The while loop in Python is used to iterate over a block of code as long as the test expression (condition) is true.

We generally use this loop when we don't know beforehand, the number of times to iterate.

Syntax of while Loop in Python

while test_expression:
    Body of while

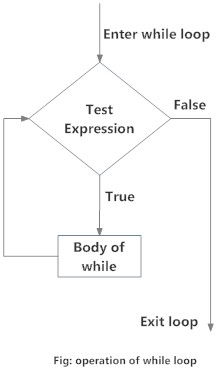
In while loop, test expression is checked first. The body of the loop is entered only if the test_expression evaluates to True. After one iteration, the test expression is checked again. This process continues until the test_expression evaluates to False.

In Python, the body of the while loop is determined through indentation.

Body starts with indentation and the first unindented line marks the end.

Python interprets any non-zero value as True. None and 0 are interpreted as False.

Flowchart of while Loop

while Loop in Python programming

Example: Python while Loop

# Program to add natural
# numbers upto 
# sum = 1+2+3+...+n

# To take input from the user,
# n = int(input("Enter n: "))

n = 10

# initialize sum and counter
sum = 0
i = 1

while i <= n:
    sum = sum + i
    i = i+1    # update counter

# print the sum
print("The sum is", sum)

When you run the program, the output will be:

Enter n: 10
The sum is 55

In the above program, the test expression will be True as long as our counter variable i is less than or equal to n (10 in our program).

We need to increase the value of counter variable in the body of the loop. This is very important (and mostly forgotten). Failing to do so will result in an infinite loop (never ending loop).

Finally the result is displayed.

while loop with else

Same as that of for loop, we can have an optional else block with while loop as well.

The else part is executed if the condition in the while loop evaluates to False. The while loop can be terminated with a break statement.

In such case, the else part is ignored. Hence, a while loop's else part runs if no break occurs and the condition is false.

Here is an example to illustrate this.

# Example to illustrate
# the use of else statement
# with the while loop

counter = 0

while counter < 3:
    print("Inside loop")
    counter = counter + 1
else:
    print("Inside else")

Output

Inside loop
Inside loop
Inside loop
Inside else

Here, we use a counter variable to print the string Inside loop three times.

On the forth iteration, the condition in while becomes False. Hence, the else part is executed.

Python break and continue

In this article, you will learn to use break and continue statements to alter the flow of a loop.
Python break and continue Statements

In Python, break and continue statements can alter the flow of a normal loop.

Loops iterate over a block of code until test expression is false, but sometimes we wish to terminate the current iteration or even the whole loop without cheking test expression.

The break and continue statements are used in these cases.

Python break statement

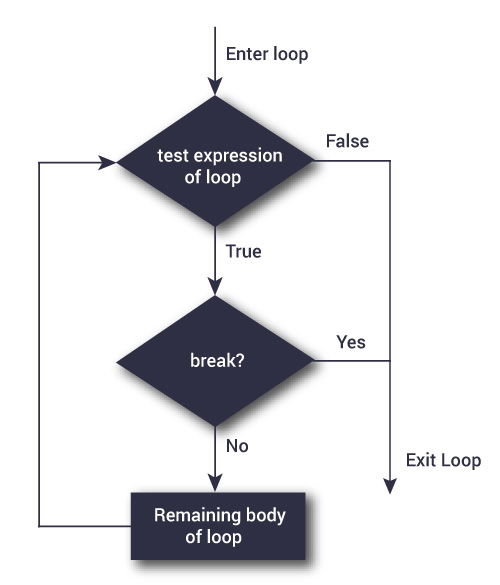
The break statement terminates the loop containing it. Control of the program flows to the statement immediately after the body of the loop.

If break statement is inside a nested loop (loop inside another loop), break will terminate the innermost loop.

Syntax of break

break

Flowchart of break

Flowchart of break statement in Python

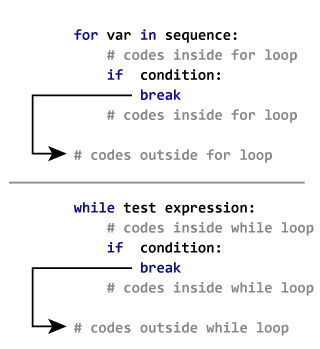
The working of break statement in for loop and while loop is shown below.

How break statement works in Python?

Example: Python break

# Use of break statement inside loop

for val in "string":
    if val == "i":
        break
    print(val)

print("The end")

Output

s
t
r
The end

In this program, we iterate through the "string" sequence. We check if the letter is "i", upon which we break from the loop. Hence, we see in our output that all the letters up till "i" gets printed. After that, the loop terminates.

Python continue statement

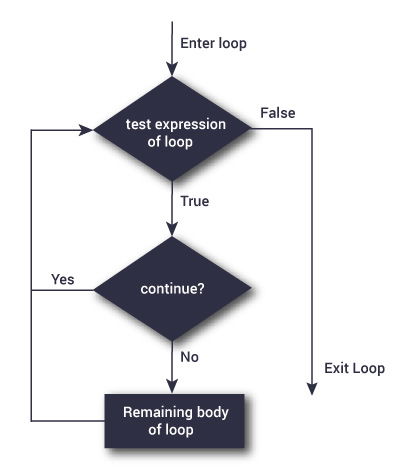
The continue statement is used to skip the rest of the code inside a loop for the current iteration only. Loop does not terminate but continues on with the next iteration.

Syntax of Continue

continue

Flowchart of continue 

Flowchart of continue statement in Python

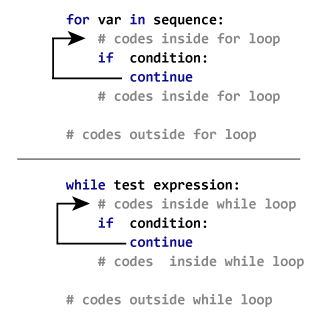
The working of continue statement in for and while loop is shown below.

How continue statement works in python

Example: Python continue

# Program to show the use of continue statement inside loops

for val in "string":
    if val == "i":
        continue
    print(val)

print("The end")

Output

s
t
r
n
g
The end

This program is same as the above example except the break statement has been replaced with continue.

We continue with the loop, if the string is "i", not executing the rest of the block. Hence, we see in our output that all the letters except "i" gets printed.

Python pass statement

In this article, you'll learn about pass statement. It is used as a placeholder for future implementation of functions, loops, etc.
Python pass statement

In Python programming, pass is a null statement. The difference between a comment and pass statement in Python is that, while the interpreter ignores a comment entirely, pass is not ignored.

However, nothing happens when pass is executed. It results into no operation (NOP).

Syntax of pass

pass

We generally use it as a placeholder.

Suppose we have a loop or a function that is not implemented yet, but we want to implement it in the future. They cannot have an empty body. The interpreter would complain. So, we use the pass statement to construct a body that does nothing.

Example: pass Statement

# pass is just a placeholder for
# functionality to be added later.
sequence = {'p', 'a', 's', 's'}
for val in sequence:
    pass

We can do the same thing in an empty function or class as well.


def function(args):
    pass

class example:
    pass

Python Functions

In this article, you'll learn about functions; what is a function, the syntax, components and types of a function. Also, you'll learn to create a function in Python.
Python functions

In Python, function is a group of related statements that perform a specific task.

Functions help break our program into smaller and modular chunks. As our program grows larger and larger, functions make it more organized and manageable.

Furthermore, it avoids repetition and makes code reusable.

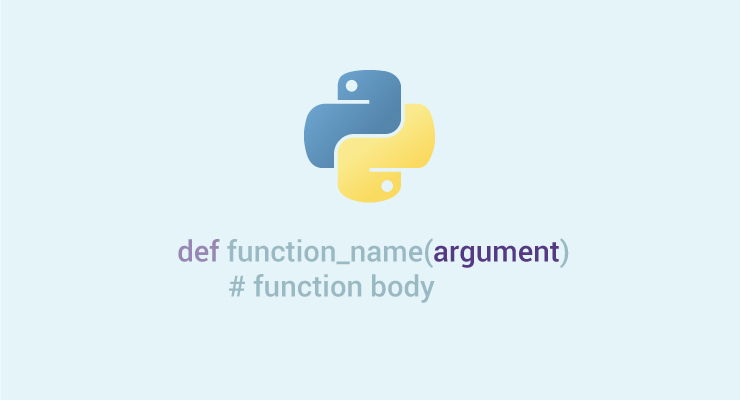
Syntax of Function

def function_name(parameters):
	"""docstring"""
	statement(s)

Above shown is a function definition which consists of following components.

  1. Keyword def marks the start of function header.
  2. A function name to uniquely identify it. Function naming follows the same rules of writing identifiers in Python.
  3. Parameters (arguments) through which we pass values to a function. They are optional.
  4. A colon (:) to mark the end of function header.
  5. Optional documentation string (docstring) to describe what the function does.
  6. One or more valid python statements that make up the function body. Statements must have same indentation level (usually 4 spaces).
  7. An optional return statement to return a value from the function.

Example of a function

def greet(name):
	"""This function greets to
	the person passed in as
	parameter"""
	print("Hello, " + name + ". Good morning!")

Function Call

Once we have defined a function, we can call it from another function, program or even the Python prompt. To call a function we simply type the function name with appropriate parameters.

>>> greet('Paul')
Hello, Paul. Good morning!
	

Note: Try running the above code into the Python shell to see the output.

Docstring

The first string after the function header is called the docstring and is short for documentation string. It is used to explain in brief, what a function does.

Although optional, documentation is a good programming practice. Unless you can remember what you had for dinner last week, always document your code.

In the above example, we have a docstring immediately below the function header. We generally use triple quotes so that docstring can extend up to multiple lines. This string is available to us as __doc__ attribute of the function.

For example:

Try running the following into the Python shell to see the output.

>>> print(greet.__doc__)
This function greets to
	the person passed into the
	name parameter
	

The return statement

The return statement is used to exit a function and go back to the place from where it was called.

Syntax of return

return [expression_list]

This statement can contain expression which gets evaluated and the value is returned. If there is no expression in the statement or the return statement itself is not present inside a function, then the function will return the None object.

For example:

>>> print(greet("May"))
Hello, May. Good morning!
None
	

Here, None is the returned value.

Example of return

def absolute_value(num):
	"""This function returns the absolute
	value of the entered number"""

	if num >= 0:
		return num
	else:
		return -num

# Output: 2
print(absolute_value(2))

# Output: 4
print(absolute_value(-4))
	

How Function works in Python?

How function works in Python?

Scope and Lifetime of variables

Scope of a variable is the portion of a program where the variable is recognized. Parameters and variables defined inside a function is not visible from outside. Hence, they have a local scope.

Lifetime of a variable is the period throughout which the variable exits in the memory. The lifetime of variables inside a function is as long as the function executes.

They are destroyed once we return from the function. Hence, a function does not remember the value of a variable from its previous calls.

Here is an example to illustrate the scope of a variable inside a function.

def my_func():
	x = 10
	print("Value inside function:",x)

x = 20
my_func()
print("Value outside function:",x)
	

Output

Value inside function: 10
Value outside function: 20
	

Here, we can see that the value of x is 20 initially. Even though the function my_func() changed the value of x to 10, it did not effect the value outside the function.

This is because the variable x inside the function is different (local to the function) from the one outside. Although they have same names, they are two different variables with different scope.

On the other hand, variables outside of the function are visible from inside. They have a global scope.

We can read these values from inside the function but cannot change (write) them. In order to modify the value of variables outside the function, they must be declared as global variables using the keyword global.

Types of Functions

Basically, we can divide functions into the following two types:

  1. Built-in functions - Functions that are built into Python.
  2. User-defined functions - Functions defined by the users themselves.

Python Function Arguments

In Python, you can define a function that takes variable number of arguments. You will learn to define such functions using default, keyword and arbitrary arguments in this article.
Python arguments

In user-defined function topic, we learned about defining a function and calling it. Otherwise, the function call will result into an error. Here is an example.

def greet(name,msg):
   """This function greets to
   the person with the provided message"""
   print("Hello",name + ', ' + msg)

greet("Monica","Good morning!")

Output

Hello Monica, Good morning!

Here, the function greet() has two parameters.

Since, we have called this function with two arguments, it runs smoothly and we do not get any error.

If we call it with different number of arguments, the interpreter will complain. Below is a call to this function with one and no arguments along with their respective error messages.

>>> greet("Monica")    # only one argument
TypeError: greet() missing 1 required positional argument: 'msg'
>>> greet()    # no arguments
TypeError: greet() missing 2 required positional arguments: 'name' and 'msg'

Variable Function Arguments

Up until now functions had fixed number of arguments. In Python there are other ways to define a function which can take variable number of arguments.

Three different forms of this type are described below.

Python Default Arguments

Function arguments can have default values in Python.

We can provide a default value to an argument by using the assignment operator (=). Here is an example.

def greet(name, msg = "Good morning!"):
   """
   This function greets to
   the person with the
   provided message.

   If message is not provided,
   it defaults to "Good
   morning!"
   """

   print("Hello",name + ', ' + msg)

greet("Kate")
greet("Bruce","How do you do?")

In this function, the parameter name does not have a default value and is required (mandatory) during a call.

On the other hand, the parameter msg has a default value of "Good morning!". So, it is optional during a call. If a value is provided, it will overwrite the default value.

Any number of arguments in a function can have a default value. But once we have a default argument, all the arguments to its right must also have default values.

This means to say, non-default arguments cannot follow default arguments. For example, if we had defined the function header above as:

def greet(msg = "Good morning!", name):

We would get an error as:

SyntaxError: non-default argument follows default argument

Python Keyword Arguments

When we call a function with some values, these values get assigned to the arguments according to their position.

For example, in the above function greet(), when we called it as greet("Bruce","How do you do?"), the value "Bruce" gets assigned to the argument name and similarly "How do you do?" to msg.

Python allows functions to be called using keyword arguments. When we call functions in this way, the order (position) of the arguments can be changed. Following calls to the above function are all valid and produce the same result.

>>> # 2 keyword arguments
>>> greet(name = "Bruce",msg = "How do you do?")

>>> # 2 keyword arguments (out of order)
>>> greet(msg = "How do you do?",name = "Bruce") 

>>> # 1 positional, 1 keyword argument
>>> greet("Bruce",msg = "How do you do?")           

As we can see, we can mix positional arguments with keyword arguments during a function call. But we must keep in mind that keyword arguments must follow positional arguments.

Having a positional argument after keyword arguments will result into errors. For example the function call as follows:

greet(name="Bruce","How do you do?")

Will result into error as:

SyntaxError: non-keyword arg after keyword arg

Python Arbitrary Arguments

Sometimes, we do not know in advance the number of arguments that will be passed into a function.Python allows us to handle this kind of situation through function calls with arbitrary number of arguments.

In the function definition we use an asterisk (*) before the parameter name to denote this kind of argument. Here is an example.

def greet(*names):
   """This function greets all
   the person in the names tuple."""

   # names is a tuple with arguments
   for name in names:
       print("Hello",name)

greet("Monica","Luke","Steve","John")

Output

Hello Monica
Hello Luke
Hello Steve
Hello John

Here, we have called the function with multiple arguments. These arguments get wrapped up into a tuple before being passed into the function. Inside the function, we use a for loop to retrieve all the arguments back.

Python Recursion

In this article, you will learn to create a recursive function; a function that calls itself.
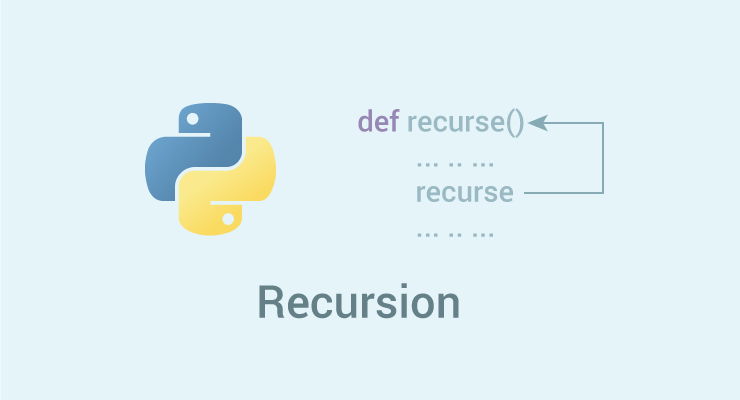
Working of recursive function in Python

Recursion is the process of defining something in terms of itself.

A physical world example would be to place two parallel mirrors facing each other. Any object in between them would be reflected recursively.

Python Recursive Function

We know that in Python, a function can call other functions. It is even possible for the function to call itself. These type of construct are termed as recursive functions.

Following is an example of recursive function to find the factorial of an integer.

Factorial of a number is the product of all the integers from 1 to that number. For example, the factorial of 6 (denoted as 6!) is 1*2*3*4*5*6 = 720.

Example of recursive function

# An example of a recursive function to
# find the factorial of a number

def calc_factorial(x):
    """This is a recursive function
    to find the factorial of an integer"""

    if x == 1:
        return 1
    else:
        return (x * calc_factorial(x-1))

num = 4
print("The factorial of", num, "is", calc_factorial(num))		

In the above example, calc_factorial() is a recursive functions as it calls itself.

When we call this function with a positive integer, it will recursively call itself by decreasing the number.

Each function call multiples the number with the factorial of number 1 until the number is equal to one. This recursive call can be explained in the following steps.


calc_factorial(4)              # 1st call with 4
4 * calc_factorial(3)          # 2nd call with 3
4 * 3 * calc_factorial(2)      # 3rd call with 2
4 * 3 * 2 * calc_factorial(1)  # 4th call with 1
4 * 3 * 2 * 1                  # return from 4th call as number=1
4 * 3 * 2                      # return from 3rd call
4 * 6                          # return from 2nd call
24                             # return from 1st call

Our recursion ends when the number reduces to 1. This is called the base condition.

Every recursive function must have a base condition that stops the recursion or else the function calls itself infinitely.

Advantages of recursion

  1. Recursive functions make the code look clean and elegant.
  2. A complex task can be broken down into simpler sub-problems using recursion.
  3. Sequence generation is easier with recursion than using some nested iteration.

Disadvantages of recursion

  1. Sometimes the logic behind recursion is hard to follow through.
  2. Recursive calls are expensive (inefficient) as they take up a lot of memory and time.
  3. Recursive functions are hard to debug.

Python Anonymous/Lambda Function

In this article, you'll learn about the anonymous function, also known as lambda functions. You'll learn what is it, its syntax and how to use it (with examples).
Python anonymous lambda function

In Python, anonymous function is a function that is defined without a name.

While normal functions are defined using the def keyword, in Python anonymous functions are defined using the lambda keyword.

Hence, anonymous functions are also called lambda functions.

Lambda Functions

A lambda function has the following syntax.

Syntax of Lambda Function

lambda arguments: expression

Lambda functions can have any number of arguments but only one expression. The expression is evaluated and returned. Lambda functions can be used wherever function objects are required.

Example of Lambda Function

Here is an example of lambda function that doubles the input value.

# Program to show the use of lambda functions

double = lambda x: x * 2

# Output: 10
print(double(5))

In the above program, lambda x: x * 2 is the lambda function. Here x is the argument and x * 2 is the expression that gets evaluated and returned.

This function has no name. It returns a function object which is assigned to the identifier double. We can now call it as a normal function. The statement

double = lambda x: x * 2

is nearly the same as

def double(x):
   return x * 2

Use of Lambda Function

We use lambda functions when we require a nameless function for a short period of time.

In Python, we generally use it as an argument to a higher-order function (a function that takes in other functions as arguments). Lambda functions are used along with built-in functions like filter(), map() etc.

Example use with filter()

The filter() function in Python takes in a function and a list as arguments.

The function is called with all the items in the list and a new list is returned which contains items for which the function evaluats to True.

Here is an example use of filter() function to filter out only even numbers from a list.

# Program to filter out only the even items from a list

my_list = [1, 5, 4, 6, 8, 11, 3, 12]

new_list = list(filter(lambda x: (x%2 == 0) , my_list))

# Output: [4, 6, 8, 12]
print(new_list)

Example use with map()

The map() function in Python takes in a function and a list.

The function is called with all the items in the list and a new list is returned which contains items returned by that function for each item.

Here is an example use of map() function to double all the items in a list.

# Program to double each item in a list using map()

my_list = [1, 5, 4, 6, 8, 11, 3, 12]

new_list = list(map(lambda x: x * 2 , my_list))

# Output: [2, 10, 8, 12, 16, 22, 6, 24]
print(new_list)

Python Modules

In this article, you will learn to create and import custom modules in Python. Also, you will find different techniques to import and use custom and built-in modules in Python.
Python Modules

Modules refer to a file containing Python statements and definitions.

A file containing Python code, for e.g.: example.py, is called a module and its module name would be example.

We use modules to break down large programs into small manageable and organized files. Furthermore, modules provide reusability of code.

We can define our most used functions in a module and import it, instead of copying their definitions into different programs.

Let us create a module. Type the following and save it as example.py.

# Python Module example

def add(a, b):
   """This program adds two
   numbers and return the result"""

   result = a + b
   return result

Here, we have defined a function add() inside a module named example. The function takes in two numbers and returns their sum.

How to import modules in Python?

We can import the definitions inside a module to another module or the interactive interpreter in Python.

We use the import keyword to do this. To import our previously defined module example we type the following in the Python prompt.

>>> import example

This does not enter the names of the functions defined in example directly in the current symbol table. It only enters the module name example there.

Using the module name we can access the function using dot (.) operation. For example:

>>> example.add(4,5.5)
9.5

Python has a ton of standard modules available.

You can check out the full list of Python standard modules and what they are for. These files are in the Lib directory inside the location where you installed Python.

Standard modules can be imported the same way as we import our user-defined modules.

There are various ways to import modules. They are listed as follows.

Python import statement

We can import a module using import statement and access the definitions inside it using the dot operator as described above. Here is an example.

# import statement example
# to import standard module math

import math
print("The value of pi is", math.pi)

When you run the program, the output will be:

The value of pi is 3.141592653589793

Import with renaming

We can import a module by renaming it as follows.

# import module by renaming it

import math as m
print("The value of pi is", m.pi)

We have renamed the math module as m. This can save us typing time in some cases.

Note that the name math is not recognized in our scope. Hence, math.pi is invalid, m.pi is the correct implementation.

Python from...import statement

We can import specific names form a module without importing the module as a whole. Here is an example.

# import only pi from math module

from math import pi
print("The value of pi is", pi)

We imported only the attribute pi form the module.

In such case we don't use the dot operator. We could have imported multiple attributes as follows.

>>> from math import pi, e
>>> pi
3.141592653589793
>>> e
2.718281828459045

Import all names

We can import all names(definitions) form a module using the following construct.

# import all names form
# the standard module math

from math import *
print("The value of pi is", pi)

We imported all the definitions from the math module. This makes all names except those beginnig with an underscore, visible in our scope.

Importing everything with the asterisk (*) symbol is not a good programming practice. This can lead to duplicate definitions for an identifier. It also hampers the readability of our code.

Python Module Search Path

While importing a module, Python looks at several places. Interpreter first looks for a built-in module then (if not found) into a list of directories defined in sys.path. The search is in this order.

  • The current directory.
  • PYTHONPATH (an environment variable with a list of directory).
  • The installation-dependent default directory.
>>> import sys
>>> sys.path
['',
'C:\\Python33\\Lib\\idlelib',
'C:\\Windows\\system32\\python33.zip',
'C:\\Python33\\DLLs',
'C:\\Python33\\lib',
'C:\\Python33',
'C:\\Python33\\lib\\site-packages']

We can add modify this list to add our own path.

Reloading a module

The Python interpreter imports a module only once during a session. This makes things more efficient. Here is an example to show how this works.

Suppose we have the following code in a module named my_module.

# This module shows the effect of
#  multiple imports and reload

print("This code got executed")

Now we see the effect of multiple imports.

>>> import my_module
This code got executed
>>> import my_module

We can see that our code got executed only once. This goes to say that our module was imported only once.

Now if our module changed during the course of the program, we would have to reload it.One way to do this is to restart the interpreter. But this does not help much.

Python provides a neat way of doing this. We can use the reload() function inside the imp module to reload a module. This is how its done.

>>> import imp
>>> import my_module
This code got executed
>>> import my_module
>>> imp.reload(my_module)
This code got executed
<module 'my_module' from '.\\my_module.py'>

The dir() built-in function

We can use the dir() function to find out names that are defined inside a module.

For example, we have defined a function add() in the module example that we had in the beginning.

>>> dir(example)
['__builtins__',
'__cached__',
'__doc__',
'__file__',
'__initializing__',
'__loader__',
'__name__',
'__package__',
'add']

Here, we can see a sorted list of names (along with add). All other names that begin with an underscore are default Python attributes associated with the module (we did not define them ourself).

For example, the __name__ attribute contains the name of the module.

>>> import example
>>> example.__name__
'example'

All the names defined in our current namespace can be found out using the dir() function without any arguments.

>>> a = 1
>>> b = "hello"
>>> import math
>>> dir()
['__builtins__', '__doc__', '__name__', 'a', 'b', 'math', 'pyscripter']

Python Package

In this article, you'll learn to divide your code base into clean, efficient modules using Python packages. Also, you'll learn to import and use your own or third party packagesin your Python program.
Python packages

We don't usually store all of our files in our computer in the same location. We use a well-organized hierarchy of directories for easier access.

Similar files are kept in the same directory, for example, we may keep all the songs in the "music" directory. Analogous to this, Python has packages for directories and modules for files.

As our application program grows larger in size with a lot of modules, we place similar modules in one package and different modules in different packages. This makes a project (program) easy to manage and conceptually clear.

Similar, as a directory can contain sub-directories and files, a Python package can have sub-packages and modules.

A directory must contain a file named __init__.py in order for Python to consider it as a package. This file can be left empty but we generally place the initialization code for that package in this file.

Here is an example. Suppose we are developing a game, one possible organization of packages and modules could be as shown in the figure below.

Package Module Structure in Python Programming

Importing module from a package

We can import modules from packages using the dot (.) operator.

For example, if want to import the start module in the above example, it is done as follows.

import Game.Level.start

Now if this module contains a function named select_difficulty(), we must use the full name to reference it.

Game.Level.start.select_difficulty(2)

If this construct seems lengthy, we can import the module without the package prefix as follows.

from Game.Level import start

We can now call the function simply as follows.

start.select_difficulty(2)

Yet another way of importing just the required function (or class or variable) form a module within a package would be as follows.

from Game.Level.start import select_difficulty

Now we can directly call this function.

select_difficulty(2)

Although easier, this method is not recommended. Using the full namespace avoids confusion and prevents two same identifier names from colliding.

While importing packages, Python looks in the list of directories defined in sys.path, similar as for module search path.

Python Numbers, Type Conversion and Mathematics

In this article, you'll learn about the different numbers used in Python, how to convert from one data type to the other, and the mathematical operations supported in Python.
Python numbers

Python supports integers, floating point numbers and complex numbers. They are defined as int, float and complex class in Python.

Integers and floating points are separated by the presence or absence of a decimal point. 5 is integer whereas 5.0 is a floating point number.

Complex numbers are written in the form, x + yj, where x is the real part and y is the imaginary part.

We can use the type() function to know which class a variable or a value belongs to and isinstance() function to check if it belongs to a particular class.

a = 5

# Output: <class 'int'>
print(type(a))

# Output: <class 'float'>
print(type(5.0))

# Output: (8+3j)
c = 5 + 3j
print(c + 3)

# Output: True
print(isinstance(c, complex))

While integers can be of any length, a floating point number is accurate only up to 15 decimal places (the 16th place is inaccurate).

Numbers we deal with everyday are decimal (base 10) number system. But computer programmers (generally embedded programmer) need to work with binary (base 2), hexadecimal (base 16) and octal (base 8) number systems.

In Python, we can represent these numbers by appropriately placing a prefix before that number. Following table lists these prefix.

Number system prefix for Python numbers
Number System Prefix
Binary '0b' or '0B'
Octal '0o' or '0O'
Hexadecimal '0x' or '0X'

Here are some examples

# Output: 107
print(0b1101011)

# Output: 253 (251 + 2)
print(0xFB + 0b10)

# Output: 13
print(0o15)

When you run the program, the output will be:

107
253
13

Type Conversion

We can convert one type of number into another. This is also known as coercion.

Operations like addition, subtraction coerce integer to float implicitly (automatically), if one of the operand is float.

>>> 1 + 2.0
3.0

We can see above that 1 (integer) is coerced into 1.0 (float) for addition and the result is also a floating point number.

We can also use built-in functions like int(), float() and complex() to convert between types explicitly. These function can even convert from strings.

>>> int(2.3)
2
>>> int(-2.8)
-2
>>> float(5)
5.0
>>> complex('3+5j')
(3+5j)

When converting from float to integer, the number gets truncated (integer that is closer to zero).

Python Decimal

Python built-in class float performs some calculations that might amaze us. We all know that the sum of 1.1 and 2.2 is 3.3, but Python seems to disagree.

>>> (1.1 + 2.2) == 3.3
False

What is going on?

It turns out that floating-point numbers are implemented in computer hardware as binary fractions, as computer only understands binary (0 and 1). Due to this reason, most of the decimal fractions we know, cannot be accurately stored in our computer.

Let's take an example. We cannot represent the fraction 1/3 as a decimal number. This will give 0.33333333... which is infinitely long, and we can only approximate it.

Turns out decimal fraction 0.1 will result into an infinitely long binary fraction of 0.000110011001100110011... and our computer only stores a finite number of it.

This will only approximate 0.1 but never be equal. Hence, it is the limitation of our computer hardware and not an error in Python.

>>> 1.1 + 2.2
3.3000000000000003

To overcome this issue, we can use decimal module that comes with Python. While floating point numbers have precision up to 15 decimal places, the decimal module has user settable precision.

import decimal

# Output: 0.1
print(0.1)

# Output: Decimal('0.1000000000000000055511151231257827021181583404541015625')
print(decimal.Decimal(0.1))

This module is used when we want to carry out decimal calculations like we learned in school.

It also preserves significance. We know 25.50 kg is more accurate than 25.5 kg as it has two significant decimal places compared to one.

from decimal import Decimal as D
# Output: Decimal('3.3')
print(D('1.1') + D('2.2'))

# Output: Decimal('3.000')
print(D('1.2') * D('2.50'))

Notice the trailing zeroes in the above example.

We might ask, why not implement Decimal every time, instead of float? The main reason is efficiency. Floating point operations are carried out must faster than Decimal operations.

When to use Decimal instead of float?

We generally use Decimal in the following cases.

  • When we are making financial applications that need exact decimal representation.
  • When we want to control the level of precision required.
  • When we want to implement the notion of significant decimal places.
  • When we want the operations to be carried out like we did at school

Python Fractions

Python provides operations involving fractional numbers through its fractions module.

A fraction has a numerator and a denominator, both of which are integers. This module has support for rational number arithmetic.

We can create Fraction objects in various ways.

import fractions

# Output: 3/2
print(fractions.Fraction(1.5))

# Output: 5
print(fractions.Fraction(5))

# Output: 1/3
print(fractions.Fraction(1,3))

While creating Fraction from float, we might get some unusual results. This is due to the imperfect binary floating point number representation as discussed in the previous section.

Fortunately, Fraction allows us to instantiate with string as well. This is the preferred options when using decimal numbers.

import fractions

# As float
# Output: 2476979795053773/2251799813685248
print(fractions.Fraction(1.1))

# As string
# Output: 11/10
print(fractions.Fraction('1.1'))

This datatype supports all basic operations. Here are few examples.

from fractions import Fraction as F

# Output: 2/3
print(F(1,3) + F(1,3))

# Output: 6/5
print(1 / F(5,6))

# Output: False
print(F(-3,10) > 0)

# Output: True
print(F(-3,10) < 0)

Python Mathematics

Python offers modules like math and random to carry out different mathematics like trigonometry, logarithms, probability and statistics, etc.

import math

# Output: 3.141592653589793
print(math.pi)

# Output: -1.0
print(math.cos(math.pi))

# Output: 22026.465794806718
print(math.exp(10))

# Output: 3.0
print(math.log10(1000))

# Output: 1.1752011936438014
print(math.sinh(1))

# Output: 720
print(math.factorial(6))

Here is the full list functions and attributes available in Python math module.

import random

# Output: 16
print(random.randrange(10,20))

x = ['a', 'b', 'c', 'd', 'e']

# Get random choice
print(random.choice(x))

# Shuffle x
random.shuffle(x)

# Print the shuffled x
print(x)

# Print random element
print(random.random())

Here is the full list functions and attributes available in Python random module.

Python List

In this article, you'll learn everything about Python lists; how they are created, slicing of a list, adding or removing elements from them and so on.
Python Lists

Python offers a range of compound datatypes often referred to as sequences. List is one of the most frequently used and very versatile datatype used in Python.

How to create a list?

In Python programming, a list is created by placing all the items (elements) inside a square bracket [ ], separated by commas.

It can have any number of items and they may be of different types (integer, float, string etc.).

# empty list
my_list = []

# list of integers
my_list = [1, 2, 3]

# list with mixed datatypes
my_list = [1, "Hello", 3.4]

Also, a list can even have another list as an item. This is called nested list.

# nested list
my_list = ["mouse", [8, 4, 6], ['a']]

How to access elements from a list?

There are various ways in which we can access the elements of a list.

List Index

We can use the index operator [] to access an item in a list. Index starts from 0. So, a list having 5 elements will have index from 0 to 4.

Trying to access an element other that this will raise an IndexError. The index must be an integer. We can't use float or other types, this will result into TypeError.

Nested list are accessed using nested indexing.

my_list = ['p','r','o','b','e']
# Output: p
print(my_list[0])

# Output: o
print(my_list[2])

# Output: e
print(my_list[4])

# Error! Only integer can be used for indexing
# my_list[4.0]

# Nested List
n_list = ["Happy", [2,0,1,5]]

# Nested indexing

# Output: a
print(n_list[0][1])    

# Output: 5
print(n_list[1][3])

Negative indexing

Python allows negative indexing for its sequences. The index of -1 refers to the last item, -2 to the second last item and so on.

my_list = ['p','r','o','b','e']

# Output: e
print(my_list[-1])

# Output: p
print(my_list[-5])

How to slice lists in Python?

We can access a range of items in a list by using the slicing operator (colon).

my_list = ['p','r','o','g','r','a','m','i','z']
# elements 3rd to 5th
print(my_list[2:5])

# elements beginning to 4th
print(my_list[:-5])

# elements 6th to end
print(my_list[5:])

# elements beginning to end
print(my_list[:])

Slicing can be best visualized by considering the index to be between the elements as shown below. So if we want to access a range, we need two index that will slice that portion from the list.

Element Slicing from a list in Python

How to change or add elements to a list?

List are mutable, meaning, their elements can be changed unlike string or tuple.

We can use assignment operator (=) to change an item or a range of items.

# mistake values
odd = [2, 4, 6, 8]

# change the 1st item    
odd[0] = 1            

# Output: [1, 4, 6, 8]
print(odd)

# change 2nd to 4th items
odd[1:4] = [3, 5, 7]  

# Output: [1, 3, 5, 7]
print(odd)                   

We can add one item to a list using append() method or add several items using extend() method.

odd = [1, 3, 5]

odd.append(7)

# Output: [1, 3, 5, 7]
print(odd)

odd.extend([9, 11, 13])

# Output: [1, 3, 5, 7, 9, 11, 13]
print(odd)

We can also use + operator to combine two lists. This is also called concatenation.

The * operator repeats a list for the given number of times.

odd = [1, 3, 5]

# Output: [1, 3, 5, 9, 7, 5]
print(odd + [9, 7, 5])

#Output: ["re", "re", "re"]
print(["re"] * 3)

Furthermore, we can insert one item at a desired location by using the method insert() or insert multiple items by squeezing it into an empty slice of a list.

odd = [1, 9]
odd.insert(1,3)

# Output: [1, 3, 9] 
print(odd)

odd[2:2] = [5, 7]

# Output: [1, 3, 5, 7, 9]
print(odd)

How to delete or remove elements from a list?

We can delete one or more items from a list using the keyword del. It can even delete the list entirely.

my_list = ['p','r','o','b','l','e','m']

# delete one item
del my_list[2]

# Output: ['p', 'r', 'b', 'l', 'e', 'm']     
print(my_list)

# delete multiple items
del my_list[1:5]  

# Output: ['p', 'm']
print(my_list)

# delete entire list
del my_list       

# Error: List not defined
print(my_list)

We can use remove() method to remove the given item or pop() method to remove an item at the given index.

The pop() method removes and returns the last item if index is not provided. This helps us implement lists as stacks (first in, last out data structure).

We can also use the clear() method to empty a list.

my_list = ['p','r','o','b','l','e','m']
my_list.remove('p')

# Output: ['r', 'o', 'b', 'l', 'e', 'm']
print(my_list)

# Output: 'o'
print(my_list.pop(1))

# Output: ['r', 'b', 'l', 'e', 'm']
print(my_list)

# Output: 'm'
print(my_list.pop())

# Output: ['r', 'b', 'l', 'e']
print(my_list)

my_list.clear()

# Output: []
print(my_list)

Finally, we can also delete items in a list by assigning an empty list to a slice of elements.

>>> my_list = ['p','r','o','b','l','e','m']
>>> my_list[2:3] = []
>>> my_list
['p', 'r', 'b', 'l', 'e', 'm']
>>> my_list[2:5] = []
>>> my_list
['p', 'r', 'm']

Python List Methods

Methods that are available with list object in Python programming are tabulated below.

They are accessed as list.method(). Some of the methods have already been used above.

Python List Methods
append() - Add an element to the end of the list
extend() - Add all elements of a list to the another list
insert() - Insert an item at the defined index
remove() - Removes an item from the list
pop() - Removes and returns an element at the given index
clear() - Removes all items from the list
index() - Returns the index of the first matched item
count() - Returns the count of number of items passed as an argument
sort() - Sort items in a list in ascending order
reverse() - Reverse the order of items in the list
copy() - Returns a shallow copy of the list

Some examples of Python list methods:

my_list = [3, 8, 1, 6, 0, 8, 4]

# Output: 1
print(my_list.index(8))

# Output: 2
print(my_list.count(8))

my_list.sort()

# Output: [0, 1, 3, 4, 6, 8, 8]
print(my_list)

my_list.reverse()

# Output: [8, 8, 6, 4, 3, 1, 0]
print(my_list)

List Comprehension: Elegant way to create new List

List comprehension is an elegant and concise way to create new list from an existing list in Python.

List comprehension consists of an expression followed by for statement inside square brackets.

Here is an example to make a list with each item being increasing power of 2.

pow2 = [2 ** x for x in range(10)]

# Output: [1, 2, 4, 8, 16, 32, 64, 128, 256, 512]
print(pow2)

This code is equivalent to

pow2 = []
for x in range(10):
   pow2.append(2 ** x)

A list comprehension can optionally contain more for or if statements. An optional if statement can filter out items for the new list. Here are some examples.

>>> pow2 = [2 ** x for x in range(10) if x > 5]
>>> pow2
[64, 128, 256, 512]
>>> odd = [x for x in range(20) if x % 2 == 1]
>>> odd
[1, 3, 5, 7, 9, 11, 13, 15, 17, 19]
>>> [x+y for x in ['Python ','C '] for y in ['Language','Programming']]
['Python Language', 'Python Programming', 'C Language', 'C Programming']

Other List Operations in Python

List Membership Test

We can test if an item exists in a list or not, using the keyword in.

my_list = ['p','r','o','b','l','e','m']

# Output: True
print('p' in my_list)

# Output: False
print('a' in my_list)

# Output: True
print('c' not in my_list)

Iterating Through a List

Using a for loop we can iterate though each item in a list.

for fruit in ['apple','banana','mango']:
    print("I like",fruit)

Built-in Functions with List

Built-in functions like all(), any(), enumerate(), len(), max(), min(), list(), sorted() etc. are commonly used with list to perform different tasks.

Built-in Functions with List
Function Description
all() Return True if all elements of the list are true (or if the list is empty).
any() Return True if any element of the list is true. If the list is empty, return False.
enumerate() Return an enumerate object. It contains the index and value of all the items of list as a tuple.
len() Return the length (the number of items) in the list.
list() Convert an iterable (tuple, string, set, dictionary) to a list.
max() Return the largest item in the list.
min() Return the smallest item in the list
sorted() Return a new sorted list (does not sort the list itself).
sum() Return the sum of all elements in the list.


Python Tuple

In this article, you'll learn everything about Python tuples. More specifically, what are tuples, how to create them, when to use them and various methods you should be familiar with.
Python tuple

In Python programming, a tuple is similar to a list. The difference between the two is that we cannot change the elements of a tuple once it is assigned whereas in a list, elements can be changed.

Advantages of Tuple over List

Since, tuples are quite similiar to lists, both of them are used in similar situations as well.

However, there are certain advantages of implementing a tuple over a list. Below listed are some of the main advantages:

  • We generally use tuple for heterogeneous (different) datatypes and list for homogeneous (similar) datatypes.
  • Since tuple are immutable, iterating through tuple is faster than with list. So there is a slight performance boost.
  • Tuples that contain immutable elements can be used as key for a dictionary. With list, this is not possible.
  • If you have data that doesn't change, implementing it as tuple will guarantee that it remains write-protected.

Creating a Tuple

A tuple is created by placing all the items (elements) inside a parentheses (), separated by comma. The parentheses are optional but is a good practice to write it.

A tuple can have any number of items and they may be of different types (integer, float, list, string etc.).

# empty tuple
# Output: ()
my_tuple = ()
print(my_tuple)

# tuple having integers
# Output: (1, 2, 3)
my_tuple = (1, 2, 3)
print(my_tuple)

# tuple with mixed datatypes
# Output: (1, "Hello", 3.4)
my_tuple = (1, "Hello", 3.4)
print(my_tuple)

# nested tuple
# Output: ("mouse", [8, 4, 6], (1, 2, 3))
my_tuple = ("mouse", [8, 4, 6], (1, 2, 3))
print(my_tuple)

# tuple can be created without parentheses
# also called tuple packing
# Output: 3, 4.6, "dog"

my_tuple = 3, 4.6, "dog"
print(my_tuple)

# tuple unpacking is also possible
# Output:
# 3
# 4.6
# dog
a, b, c = my_tuple
print(a)
print(b)
print(c)

Creating a tuple with one element is a bit tricky.

Having one element within parentheses is not enough. We will need a trailing comma to indicate that it is in fact a tuple.

# only parentheses is not enough
# Output: <class 'str'>
my_tuple = ("hello")
print(type(my_tuple))

# need a comma at the end
# Output: <class 'tuple'>
my_tuple = ("hello",)  
print(type(my_tuple))

# parentheses is optional
# Output: <class 'tuple'>
my_tuple = "hello",
print(type(my_tuple))

Accessing Elements in a Tuple

There are various ways in which we can access the elements of a tuple.

1. Indexing

We can use the index operator [] to access an item in a tuple where the index starts from 0.

So, a tuple having 6 elements will have index from 0 to 5. Trying to access an element other that (6, 7,...) will raise an IndexError.

The index must be an integer, so we cannot use float or other types. This will result into TypeError.

Likewise, nested tuple are accessed using nested indexing, as shown in the example below.

my_tuple = ('p','e','r','m','i','t')

# Output: 'p'
print(my_tuple[0])

# Output: 't'
print(my_tuple[5])

# index must be in range
# If you uncomment line 14,
# you will get an error.
# IndexError: list index out of range

#print(my_tuple[6])

# index must be an integer
# If you uncomment line 21,
# you will get an error.
# TypeError: list indices must be integers, not float

#my_tuple[2.0]

# nested tuple
n_tuple = ("mouse", [8, 4, 6], (1, 2, 3))

# nested index
# Output: 's'
print(n_tuple[0][3])

# nested index
# Output: 4
print(n_tuple[1][1])

When you run the program, the output will be:

p
t
s
4

2. Negative Indexing

Python allows negative indexing for its sequences.

The index of -1 refers to the last item, -2 to the second last item and so on.

my_tuple = ('p','e','r','m','i','t')

# Output: 't'
print(my_tuple[-1])

# Output: 'p'
print(my_tuple[-6])

3. Slicing

We can access a range of items in a tuple by using the slicing operator - colon ":".

my_tuple = ('p','r','o','g','r','a','m','i','z')

# elements 2nd to 4th
# Output: ('r', 'o', 'g')
print(my_tuple[1:4])

# elements beginning to 2nd
# Output: ('p', 'r')
print(my_tuple[:-7])

# elements 8th to end
# Output: ('i', 'z')
print(my_tuple[7:])

# elements beginning to end
# Output: ('p', 'r', 'o', 'g', 'r', 'a', 'm', 'i', 'z')
print(my_tuple[:])

Slicing can be best visualized by considering the index to be between the elements as shown below. So if we want to access a range, we need the index that will slice the portion from the tuple.

Element Slicing in Python

Changing a Tuple

Unlike lists, tuples are immutable.

This means that elements of a tuple cannot be changed once it has been assigned. But, if the element is itself a mutable datatype like list, its nested items can be changed.

We can also assign a tuple to different values (reassignment).

my_tuple = (4, 2, 3, [6, 5])

# we cannot change an element
# If you uncomment line 8
# you will get an error:
# TypeError: 'tuple' object does not support item assignment

#my_tuple[1] = 9

# but item of mutable element can be changed
# Output: (4, 2, 3, [9, 5])
my_tuple[3][0] = 9
print(my_tuple)

# tuples can be reassigned
# Output: ('p', 'r', 'o', 'g', 'r', 'a', 'm', 'i', 'z')
my_tuple = ('p','r','o','g','r','a','m','i','z')
print(my_tuple)

We can use + operator to combine two tuples. This is also called concatenation.

We can also repeat the elements in a tuple for a given number of times using the * operator.

Both + and * operations result into a new tuple.

# Concatenation
# Output: (1, 2, 3, 4, 5, 6)
print((1, 2, 3) + (4, 5, 6))

# Repeat
# Output: ('Repeat', 'Repeat', 'Repeat')
print(("Repeat",) * 3)

Deleting a Tuple

As discussed above, we cannot change the elements in a tuple. That also means we cannot delete or remove items from a tuple.

But deleting a tuple entirely is possible using the keyword del.

my_tuple = ('p','r','o','g','r','a','m','i','z')

# can't delete items
# if you uncomment line 8,
# you will get an error:
# TypeError: 'tuple' object doesn't support item deletion

#del my_tuple[3]

# can delete entire tuple
# NameError: name 'my_tuple' is not defined
del my_tuple
my_tuple

Python Tuple Methods

Methods that add items or remove items are not available with tuple. Only the following two methods are available.

Python Tuple Method
Method Description
count(x) Return the number of items that is equal to x
index(x) Return index of first item that is equal to x

Some examples of Python tuple methods:

my_tuple = ('a','p','p','l','e',)

# Count
# Output: 2
print(my_tuple.count('p'))

# Index
# Output: 3
print(my_tuple.index('l'))

Other Tuple Operations

1. Tuple Membership Test

We can test if an item exists in a tuple or not, using the keyword in.

my_tuple = ('a','p','p','l','e',)

# In operation
# Output: True
print('a' in my_tuple)

# Output: False
print('b' in my_tuple)

# Not in operation
# Output: True
print('g' not in my_tuple)

2. Iterating Through a Tuple

Using a for loop we can iterate though each item in a tuple.

# Output: 
# Hello John
# Hello Kate
for name in ('John','Kate'):
     print("Hello",name)    

Built-in Functions with Tuple

Built-in functions like all(), any(), enumerate(), len(), max(), min(), sorted(), tuple() etc. are commonly used with tuple to perform different tasks.

Built-in Functions with Tuple
Function Description
all() Return True if all elements of the tuple are true (or if the tuple is empty).
any() Return True if any element of the tuple is true. If the tuple is empty, return False.
enumerate() Return an enumerate object. It contains the index and value of all the items of tuple as pairs.
len() Return the length (the number of items) in the tuple.
max() Return the largest item in the tuple.
min() Return the smallest item in the tuple
sorted() Take elements in the tuple and return a new sorted list (does not sort the tuple itself).
sum() Retrun the sum of all elements in the tuple.
tuple() Convert an iterable (list, string, set, dictionary) to a tuple.


Python Strings

In this tutorial you will learn to create, format, modify and delete strings in Python. Also, you will be introduced to various string operations and functions.
Strings in Python Programming

A string is a sequence of characters.

A character is simply a symbol. For example, the English language has 26 characters.

Computers do not deal with characters, they deal with numbers (binary). Even though you may see characters on your screen, internally it is stored and manipulated as a combination of 0's and 1's.

This conversion of character to a number is called encoding, and the reverse process is decoding. ASCII and Unicode are some of the popular encoding used.

In Python, string is a sequence of Unicode character. Unicode was introduced to include every character in all languages and bring uniformity in encoding. You can learn more about Unicode from here.

How to create a string?

Strings can be created by enclosing characters inside a single quote or double quotes. Even triple quotes can be used in Python but generally used to represent multiline strings and docstrings.

# all of the following are equivalent
my_string = 'Hello'
print(my_string)

my_string = "Hello"
print(my_string)

my_string = '''Hello'''
print(my_string)

# triple quotes string can extend multiple lines
my_string = """Hello, welcome to
           the world of Python"""
print(my_string)

When you run the program, the output will be:

Hello
Hello
Hello
Hello, welcome to
           the world of Python

How to access characters in a string?

We can access individual characters using indexing and a range of characters using slicing. Index starts from 0. Trying to access a character out of index range will raise an IndexError. The index must be an integer. We can't use float or other types, this will result into TypeError.

Python allows negative indexing for its sequences.

The index of -1 refers to the last item, -2 to the second last item and so on. We can access a range of items in a string by using the slicing operator (colon).

str = 'programiz'
print('str = ', str)

#first character
print('str[0] = ', str[0])

#last character
print('str[-1] = ', str[-1])

#slicing 2nd to 5th character
print('str[1:5] = ', str[1:5])

#slicing 6th to 2nd last character
print('str[5:-2] = ', str[5:-2])

If we try to access index out of the range or use decimal number, we will get errors.

# index must be in range
>>> my_string[15]  
...
IndexError: string index out of range

# index must be an integer
>>> my_string[1.5] 
...
TypeError: string indices must be integers

Slicing can be best visualized by considering the index to be between the elements as shown below.

If we want to access a range, we need the index that will slice the portion from the string.

Element Slicing in Python

How to change or delete a string?

Strings are immutable. This means that elements of a string cannot be changed once it has been assigned. We can simply reassign different strings to the same name.

>>> my_string = 'programiz'
>>> my_string[5] = 'a'
...
TypeError: 'str' object does not support item assignment
>>> my_string = 'Python'
>>> my_string
'Python'

We cannot delete or remove characters from a string. But deleting the string entirely is possible using the keyword del.

>>> del my_string[1]
...
TypeError: 'str' object doesn't support item deletion
>>> del my_string
>>> my_string
...
NameError: name 'my_string' is not defined

Python String Operations

There are many operations that can be performed with string which makes it one of the most used datatypes in Python.

Concatenation of Two or More Strings

Joining of two or more strings into a single one is called concatenation.

The + operator does this in Python. Simply writing two string literals together also concatenates them.

The * operator can be used to repeat the string for a given number of times.

str1 = 'Hello'
str2 ='World!'

# using +
print('str1 + str2 = ', str1 + str2)

# using *
print('str1 * 3 =', str1 * 3)

Writing two string literals together also concatenates them like + operator.

If we want to concatenate strings in different lines, we can use parentheses.

>>> # two string literals together
>>> 'Hello ''World!'
'Hello World!'

>>> # using parentheses
>>> s = ('Hello '
...      'World')
>>> s
'Hello World'

Iterating Through String

Using for loop we can iterate through a string. Here is an example to count the number of 'l' in a string.

count = 0
for letter in 'Hello World':
    if(letter == 'l'):
        count += 1
print(count,'letters found')

String Membership Test

We can test if a sub string exists within a string or not, using the keyword in.

>>> 'a' in 'program'
True
>>> 'at' not in 'battle'
False

Built-in functions to Work with Python

Various built-in functions that work with sequence, works with string as well.

Some of the commonly used ones are enumerate() and len(). The enumerate() function returns an enumerate object. It contains the index and value of all the items in the string as pairs. This can be useful for iteration.

Similarly, len() returns the length (number of characters) of the string.

str = 'cold'

# enumerate()
list_enumerate = list(enumerate(str))
print('list(enumerate(str) = ', list_enumerate)

#character count
print('len(str) = ', len(str))

Python String Formatting

Escape Sequence

If we want to print a text like -He said, "What's there?"- we can neither use single quote or double quotes. This will result into SyntaxError as the text itself contains both single and double quotes.

>>> print("He said, "What's there?"")
...
SyntaxError: invalid syntax
>>> print('He said, "What's there?"')
...
SyntaxError: invalid syntax

One way to get around this problem is to use triple quotes. Alternatively, we can use escape sequences.

An escape sequence starts with a backslash and is interpreted differently. If we use single quote to represent a string, all the single quotes inside the string must be escaped. Similar is the case with double quotes. Here is how it can be done to represent the above text.

# using triple quotes
print('''He said, "What's there?"''')

# escaping single quotes
print('He said, "What\'s there?"')

# escaping double quotes
print("He said, \"What's there?\"")

Here is a list of all the escape sequence supported by Python.

Escape Sequence in Python
Escape Sequence Description
\newline Backslash and newline ignored
\\ Backslash
\' Single quote
\" Double quote
\a

ASCII Bell

\b ASCII Backspace
\f ASCII Formfeed
\n ASCII Linefeed
\r ASCII Carriage Return
\t ASCII Horizontal Tab
\v ASCII Vertical Tab
\ooo Character with octal value ooo
\xHH Character with hexadecimal value HH

Here are some examples

>>> print("C:\\Python32\\Lib")
C:\Python32\Lib

>>> print("This is printed\nin two lines")
This is printed
in two lines

>>> print("This is \x48\x45\x58 representation")
This is HEX representation

Raw String to ignore escape sequence

Sometimes we may wish to ignore the escape sequences inside a string. To do this we can place r or R in front of the string. This will imply that it is a raw string and any escape sequence inside it will be ignored.

>>> print("This is \x61 \ngood example")
This is a
good example
>>> print(r"This is \x61 \ngood example")
This is \x61 \ngood example

The format() Method for Formatting Strings

The format() method that is available with the string object is very versatile and powerful in formatting strings. Format strings contains curly braces {} as placeholders or replacement fields which gets replaced.

We can use positional arguments or keyword arguments to specify the order.

# default(implicit) order
default_order = "{}, {} and {}".format('John','Bill','Sean')
print('\n--- Default Order ---')
print(default_order)

# order using positional argument
positional_order = "{1}, {0} and {2}".format('John','Bill','Sean')
print('\n--- Positional Order ---')
print(positional_order)

# order using keyword argument
keyword_order = "{s}, {b} and {j}".format(j='John',b='Bill',s='Sean')
print('\n--- Keyword Order ---')
print(keyword_order)

The format() method can have optional format specifications. They are separated from field name using colon. For example, we can left-justify <, right-justify > or center ^ a string in the given space. We can also format integers as binary, hexadecimal etc. and floats can be rounded or displayed in the exponent format. There are a ton of formatting you can use. Visit here for all the string formatting available with the format() method.

>>> # formatting integers
>>> "Binary representation of {0} is {0:b}".format(12)
'Binary representation of 12 is 1100'

>>> # formatting floats
>>> "Exponent representation: {0:e}".format(1566.345)
'Exponent representation: 1.566345e+03'

>>> # round off
>>> "One third is: {0:.3f}".format(1/3)
'One third is: 0.333'

>>> # string alignment
>>> "|{:<10}|{:^10}|{:>10}|".format('butter','bread','ham')
'|butter    |  bread   |       ham|'

Old style formatting

We can even format strings like the old sprintf() style used in C programming language. We use the % operator to accomplish this.

>>> x = 12.3456789
>>> print('The value of x is %3.2f' %x)
The value of x is 12.35
>>> print('The value of x is %3.4f' %x)
The value of x is 12.3457

Common Python String Methods

There are numerous methods available with the string object. The format() method that we mentioned above is one of them. Some of the commonly used methods are lower(), upper(), join(), split(), find(), replace() etc. Here is a complete list of all the built-in methods to work with strings in Python.

>>> "PrOgRaMiZ".lower()
'programiz'
>>> "PrOgRaMiZ".upper()
'PROGRAMIZ'
>>> "This will split all words into a list".split()
['This', 'will', 'split', 'all', 'words', 'into', 'a', 'list']
>>> ' '.join(['This', 'will', 'join', 'all', 'words', 'into', 'a', 'string'])
'This will join all words into a string'
>>> 'Happy New Year'.find('ew')
7
>>> 'Happy New Year'.replace('Happy','Brilliant')
'Brilliant New Year'

Python Sets

In this article, you'll learn everything about Python sets; how they are created, adding or removing elements from them, and all operations performed on sets in Python.
Python sets

A set is an unordered collection of items. Every element is unique (no duplicates) and must be immutable (which cannot be changed).

However, the set itself is mutable. We can add or remove items from it.

Sets can be used to perform mathematical set operations like union, intersection, symmetric difference etc.

How to create a set?

A set is created by placing all the items (elements) inside curly braces {}, separated by comma or by using the built-in function set().

It can have any number of items and they may be of different types (integer, float, tuple, string etc.). But a set cannot have a mutable element, like list, set or dictionary, as its element.

# set of integers
my_set = {1, 2, 3}
print(my_set)

# set of mixed datatypes
my_set = {1.0, "Hello", (1, 2, 3)}
print(my_set)

Try the following examples as well.

# set do not have duplicates
# Output: {1, 2, 3, 4}
my_set = {1,2,3,4,3,2}
print(my_set)

# set cannot have mutable items
# here [3, 4] is a mutable list
# If you uncomment line #12,
# this will cause an error.
# TypeError: unhashable type: 'list'

#my_set = {1, 2, [3, 4]}

# we can make set from a list
# Output: {1, 2, 3}
my_set = set([1,2,3,2])
print(my_set)

Creating an empty set is a bit tricky.

Empty curly braces {} will make an empty dictionary in Python. To make a set without any elements we use the set() function without any argument.

# initialize a with {}
a = {}

# check data type of a
# Output: <class 'dict'>
print(type(a))

# initialize a with set()
a = set()

# check data type of a
# Output: <class 'set'>
print(type(a))

How to change a set in Python?

Sets are mutable. But since they are unordered, indexing have no meaning.

We cannot access or change an element of set using indexing or slicing. Set does not support it.

We can add single element using the add() method and multiple elements using the update() method. The update() method can take tuples, lists, strings or other sets as its argument. In all cases, duplicates are avoided.

# initialize my_set
my_set = {1,3}
print(my_set)

# if you uncomment line 9,
# you will get an error
# TypeError: 'set' object does not support indexing

#my_set[0]

# add an element
# Output: {1, 2, 3}
my_set.add(2)
print(my_set)

# add multiple elements
# Output: {1, 2, 3, 4}
my_set.update([2,3,4])
print(my_set)

# add list and set
# Output: {1, 2, 3, 4, 5, 6, 8}
my_set.update([4,5], {1,6,8})
print(my_set)

When you run the program, the output will be:

{1, 3}
{1, 2, 3}
{1, 2, 3, 4}
{1, 2, 3, 4, 5, 6, 8}

How to remove elements from a set?

A particular item can be removed from set using methods, discard() and remove().

The only difference between the two is that, while using discard() if the item does not exist in the set, it remains unchanged. But remove() will raise an error in such condition.

The following example will illustrate this.

# initialize my_set
my_set = {1, 3, 4, 5, 6}
print(my_set)

# discard an element
# Output: {1, 3, 5, 6}
my_set.discard(4)
print(my_set)

# remove an element
# Output: {1, 3, 5}
my_set.remove(6)
print(my_set)

# discard an element
# not present in my_set
# Output: {1, 3, 5}
my_set.discard(2)
print(my_set)

# remove an element
# not present in my_set
# If you uncomment line 27,
# you will get an error.
# Output: KeyError: 2

#my_set.remove(2)

Similarly, we can remove and return an item using the pop() method.

Set being unordered, there is no way of determining which item will be popped. It is completely arbitrary.

We can also remove all items from a set using clear().

# initialize my_set
# Output: set of unique elements
my_set = set("HelloWorld")
print(my_set)

# pop an element
# Output: random element
print(my_set.pop())

# pop another element
# Output: random element
my_set.pop()
print(my_set)

# clear my_set
#Output: set()
my_set.clear()
print(my_set)

Python Set Operations

Sets can be used to carry out mathematical set operations like union, intersection, difference and symmetric difference. We can do this with operators or methods.

Let us consider the following two sets for the following operations.

>>> A = {1, 2, 3, 4, 5}
>>> B = {4, 5, 6, 7, 8}

Set Union
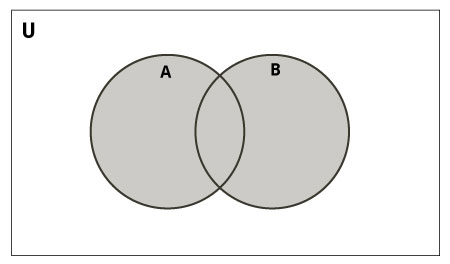
Set Union in Python

Union of A and B is a set of all elements from both sets.

Union is performed using | operator. Same can be accomplished using the method union().

# initialize A and B
A = {1, 2, 3, 4, 5}
B = {4, 5, 6, 7, 8}

# use | operator
# Output: {1, 2, 3, 4, 5, 6, 7, 8}
print(A | B)

Try the following examples on Python shell.


# use union function
>>> A.union(B)
{1, 2, 3, 4, 5, 6, 7, 8}

# use union function on B
>>> B.union(A)
{1, 2, 3, 4, 5, 6, 7, 8}

Set Intersection
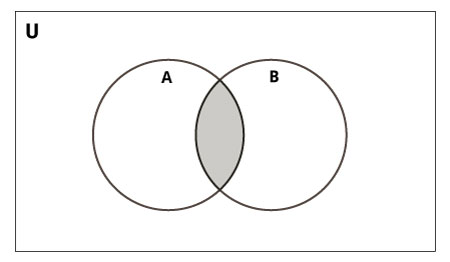
Set Intersection in Python

Intersection of A and B is a set of elements that are common in both sets.

Intersection is performed using & operator. Same can be accomplished using the method intersection().

# initialize A and B
A = {1, 2, 3, 4, 5}
B = {4, 5, 6, 7, 8}

# use & operator
# Output: {4, 5}
print(A & B)

Try the following examples on Python shell.


# use intersection function on A
>>> A.intersection(B)
{4, 5}

# use intersection function on B
>>> B.intersection(A)
{4, 5}

Set Difference
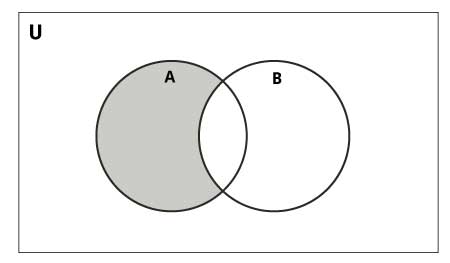
Set Difference in Python

Difference of A and B (A - B) is a set of elements that are only in A but not in B. Similarly, B - A is a set of element in B but not in A.

Difference is performed using - operator. Same can be accomplished using the method difference().

# initialize A and B
A = {1, 2, 3, 4, 5}
B = {4, 5, 6, 7, 8}

# use - operator on A
# Output: {1, 2, 3}
print(A - B)

Try the following examples on Python shell.


# use difference function on A
>>> A.difference(B)
{1, 2, 3}

# use - operator on B
>>> B - A
{8, 6, 7}

# use difference function on B
>>> B.difference(A)
{8, 6, 7}

Set Symmetric Difference
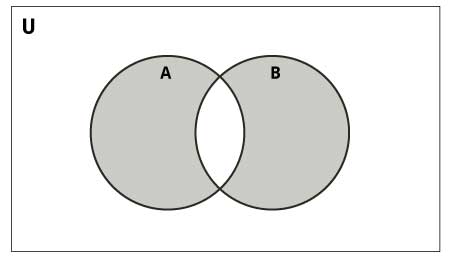
Set Symmetric Difference in Python

Symmetric Difference of A and B is a set of elements in both A and B except those that are common in both.

Symmetric difference is performed using ^ operator. Same can be accomplished using the method symmetric_difference().

# initialize A and B
A = {1, 2, 3, 4, 5}
B = {4, 5, 6, 7, 8}

# use ^ operator
# Output: {1, 2, 3, 6, 7, 8}
print(A ^ B)

Try the following examples on Python shell.


# use symmetric_difference function on A
>>> A.symmetric_difference(B)
{1, 2, 3, 6, 7, 8}

# use symmetric_difference function on B
>>> B.symmetric_difference(A)
{1, 2, 3, 6, 7, 8}

Different Python Set Methods

There are many set methods, some of which we have already used above. Here is a list of all the methods that are available with set objects.

Python Set Methods
Method Description
add() Add an element to a set
clear() Remove all elements form a set
copy() Return a shallow copy of a set
difference() Return the difference of two or more sets as a new set
difference_update() Remove all elements of another set from this set
discard() Remove an element from set if it is a member. (Do nothing if the element is not in set)
intersection() Return the intersection of two sets as a new set
intersection_update() Update the set with the intersection of itself and another
isdisjoint() Return True if two sets have a null intersection
issubset() Return True if another set contains this set
issuperset() Return True if this set contains another set
pop() Remove and return an arbitary set element. Raise KeyError if the set is empty
remove() Remove an element from a set. If the element is not a member, raise a KeyError
symmetric_difference() Return the symmetric difference of two sets as a new set
symmetric_difference_update() Update a set with the symmetric difference of itself and another
union() Return the union of sets in a new set
update() Update a set with the union of itself and others

Other Set Operations

Set Membership Test

We can test if an item exists in a set or not, using the keyword in.

# initialize my_set
my_set = set("apple")

# check if 'a' is present
# Output: True
print('a' in my_set)

# check if 'p' is present
# Output: False
print('p' not in my_set)

Iterating Through a Set

Using a for loop, we can iterate though each item in a set.

>>> for letter in set("apple"):
...     print(letter)
...    
a
p
e
l

Built-in Functions with Set

Built-in functions like all(), any(), enumerate(), len(), max(), min(), sorted(), sum() etc. are commonly used with set to perform different tasks.

Built-in Functions with Set
Function Description
all() Return True if all elements of the set are true (or if the set is empty).
any() Return True if any element of the set is true. If the set is empty, return False.
enumerate() Return an enumerate object. It contains the index and value of all the items of set as a pair.
len() Return the length (the number of items) in the set.
max() Return the largest item in the set.
min() Return the smallest item in the set.
sorted() Return a new sorted list from elements in the set(does not sort the set itself).
sum() Retrun the sum of all elements in the set.

Python Frozenset

Frozenset is a new class that has the characteristics of a set, but its elements cannot be changed once assigned. While tuples are immutable lists, frozensets are immutable sets.

Sets being mutable are unhashable, so they can't be used as dictionary keys. On the other hand, frozensets are hashable and can be used as keys to a dictionary.

Frozensets can be created using the function frozenset().

This datatype supports methods like copy(), difference(), intersection(), isdisjoint(), issubset(), issuperset(), symmetric_difference() and union(). Being immutable it does not have method that add or remove elements.

# initialize A and B
A = frozenset([1, 2, 3, 4])
B = frozenset([3, 4, 5, 6])

Try these examples on Python shell.

>>> A.isdisjoint(B)
False
>>> A.difference(B)
frozenset({1, 2})
>>> A | B
frozenset({1, 2, 3, 4, 5, 6})
>>> A.add(3)
...
AttributeError: 'frozenset' object has no attribute 'add'

Python Dictionary

In this article, you'll learn everything about Python dictionary; how they are created, accessing, adding and removing elements from them and, various built-in methods.
Python Dictionary

Python dictionary is an unordered collection of items. While other compound data types have only value as an element, a dictionary has a key: value pair.

Dictionaries are optimized to retrieve values when the key is known.

How to create a dictionary?

Creating a dictionary is as simple as placing items inside curly braces {} separated by comma.

An item has a key and the corresponding value expressed as a pair, key: value.

While values can be of any data type and can repeat, keys must be of immutable type (string, number or tuple with immutable elements) and must be unique.

# empty dictionary
my_dict = {}

# dictionary with integer keys
my_dict = {1: 'apple', 2: 'ball'}

# dictionary with mixed keys
my_dict = {'name': 'John', 1: [2, 4, 3]}

# using dict()
my_dict = dict({1:'apple', 2:'ball'})

# from sequence having each item as a pair
my_dict = dict([(1,'apple'), (2,'ball')])

As you can see above, we can also create a dictionary using the built-in function dict().

How to access elements from a dictionary?

While indexing is used with other container types to access values, dictionary uses keys. Key can be used either inside square brackets or with the get() method.

The difference while using get() is that it returns None instead of KeyError, if the key is not found.

my_dict = {'name':'Jack', 'age': 26}

# Output: Jack
print(my_dict['name'])

# Output: 26
print(my_dict.get('age'))

# Trying to access keys which doesn't exist throws error
# my_dict.get('address')
# my_dict['address']

When you run the program, the output will be:

Jack
26

How to change or add elements in a dictionary?

Dictionary are mutable. We can add new items or change the value of existing items using assignment operator.

If the key is already present, value gets updated, else a new key: value pair is added to the dictionary.

my_dict = {'name':'Jack', 'age': 26}

# update value
my_dict['age'] = 27

#Output: {'age': 27, 'name': 'Jack'}
print(my_dict)

# add item
my_dict['address'] = 'Downtown'  

# Output: {'address': 'Downtown', 'age': 27, 'name': 'Jack'}
print(my_dict)

When you run the program, the output will be:

{'name': 'Jack', 'age': 27}
{'name': 'Jack', 'age': 27, 'address': 'Downtown'}

How to delete or remove elements from a dictionary?

We can remove a particular item in a dictionary by using the method pop(). This method removes as item with the provided key and returns the value.

The method, popitem() can be used to remove and return an arbitrary item (key, value) form the dictionary. All the items can be removed at once using the clear() method.

We can also use the del keyword to remove individual items or the entire dictionary itself.

# create a dictionary
squares = {1:1, 2:4, 3:9, 4:16, 5:25}  

# remove a particular item
# Output: 16
print(squares.pop(4))  

# Output: {1: 1, 2: 4, 3: 9, 5: 25}
print(squares)

# remove an arbitrary item
# Output: (1, 1)
print(squares.popitem())

# Output: {2: 4, 3: 9, 5: 25}
print(squares)

# delete a particular item
del squares[5]  

# Output: {2: 4, 3: 9}
print(squares)

# remove all items
squares.clear()

# Output: {}
print(squares)

# delete the dictionary itself
del squares

# Throws Error
# print(squares)

When you run the program, the output will be:

16
{1: 1, 2: 4, 3: 9, 5: 25}
(1, 1)
{2: 4, 3: 9, 5: 25}
{2: 4, 3: 9}
{}

Python Dictionary Methods

Methods that are available with dictionary are tabulated below. Some of them have already been used in the above examples.

Python Dictionary Methods
Method Description
clear() Remove all items form the dictionary.
copy() Return a shallow copy of the dictionary.
fromkeys(seq[, v]) Return a new dictionary with keys from seq and value equal to v (defaults to None).
get(key[,d]) Return the value of key. If key doesnot exit, return d (defaults to None).
items() Return a new view of the dictionary's items (key, value).
keys() Return a new view of the dictionary's keys.
pop(key[,d]) Remove the item with key and return its value or d if key is not found. If d is not provided and key is not found, raises KeyError.
popitem() Remove and return an arbitary item (key, value). Raises KeyError if the dictionary is empty.
setdefault(key[,d]) If key is in the dictionary, return its value. If not, insert key with a value of d and return d (defaults to None).
update([other]) Update the dictionary with the key/value pairs from other, overwriting existing keys.
values() Return a new view of the dictionary's values

Here are a few example use of these methods.

marks = {}.fromkeys(['Math','English','Science'], 0)

# Output: {'English': 0, 'Math': 0, 'Science': 0}
print(marks)

for item in marks.items():
    print(item)

# Output: ['English', 'Math', 'Science']
list(sorted(marks.keys()))

Python Dictionary Comprehension

Dictionary comprehension is an elegant and concise way to create new dictionary from an iterable in Python.

Dictionary comprehension consists of an expression pair (key: value) followed by for statement inside curly braces {}.

Here is an example to make a dictionary with each item being a pair of a number and its square.

squares = {x: x*x for x in range(6)}

# Output: {0: 0, 1: 1, 2: 4, 3: 9, 4: 16, 5: 25}
print(squares)

This code is equivalent to

squares = {}
for x in range(6):
   squares[x] = x*x

A dictionary comprehension can optionally contain more for or if statements.

An optional if statement can filter out items to form the new dictionary.

Here are some examples to make dictionary with only odd items.

odd_squares = {x: x*x for x in range(11) if x%2 == 1}

# Output: {1: 1, 3: 9, 5: 25, 7: 49, 9: 81}
print(odd_squares)

Other Dictionary Operations

Dictionary Membership Test

We can test if a key is in a dictionary or not using the keyword in. Notice that membership test is for keys only, not for values.

squares = {1: 1, 3: 9, 5: 25, 7: 49, 9: 81}

# Output: True
print(1 in squares)

# Output: True
print(2 not in squares)

# membership tests for key only not value
# Output: False
print(49 in squares)

Iterating Through a Dictionary

Using a for loop we can iterate though each key in a dictionary.

squares = {1: 1, 3: 9, 5: 25, 7: 49, 9: 81}
for i in squares:
    print(squares[i])

Built-in Functions with Dictionary

Built-in functions like all(), any(), len(), cmp(), sorted() etc. are commonly used with dictionary to perform different tasks.

Built-in Functions with Dictionary
Function Description
all() Return True if all keys of the dictionary are true (or if the dictionary is empty).
any() Return True if any key of the dictionary is true. If the dictionary is empty, return False.
len() Return the length (the number of items) in the dictionary.
cmp() Compares items of two dictionaries.
sorted() Return a new sorted list of keys in the dictionary.

Here are some examples that uses built-in functions to work with dictionary.

squares = {1: 1, 3: 9, 5: 25, 7: 49, 9: 81}

# Output: 5
print(len(squares))

# Output: [1, 3, 5, 7, 9]
print(sorted(squares))


Python File I/O

In this article, you'll learn about Python file operations. More specifically, opening a file, reading from it, writing into it, closing it and various file methods you should be aware of.
Python file IO

File is a named location on disk to store related information. It is used to permanently store data in a non-volatile memory (e.g. hard disk).

Since, random access memory (RAM) is volatile which loses its data when computer is turned off, we use files for future use of the data.

When we want to read from or write to a file we need to open it first. When we are done, it needs to be closed, so that resources that are tied with the file are freed.

Hence, in Python, a file operation takes place in the following order.

  1. Open a file
  2. Read or write (perform operation)
  3. Close the file

How to open a file?

Python has a built-in function open() to open a file. This function returns a file object, also called a handle, as it is used to read or modify the file accordingly.

>>> f = open("test.txt")    # open file in current directory
>>> f = open("C:/Python33/README.txt")  # specifying full path

We can specify the mode while opening a file. In mode, we specify whether we want to read 'r', write 'w' or append 'a' to the file. We also specify if we want to open the file in text mode or binary mode.

The default is reading in text mode. In this mode, we get strings when reading from the file.

On the other hand, binary mode returns bytes and this is the mode to be used when dealing with non-text files like image or exe files.

Python File Modes
Mode Description
'r' Open a file for reading. (default)
'w' Open a file for writing. Creates a new file if it does not exist or truncates the file if it exists.
'x' Open a file for exclusive creation. If the file already exists, the operation fails.
'a' Open for appending at the end of the file without truncating it. Creates a new file if it does not exist.
't' Open in text mode. (default)
'b' Open in binary mode.
'+' Open a file for updating (reading and writing)
f = open("test.txt")      # equivalent to 'r' or 'rt'
f = open("test.txt",'w')  # write in text mode
f = open("img.bmp",'r+b') # read and write in binary mode

Unlike other languages, the character 'a' does not imply the number 97 until it is encoded using ASCII (or other equivalent encodings).

Moreover, the default encoding is platform dependent. In windows, it is 'cp1252' but 'utf-8' in Linux.

So, we must not also rely on the default encoding or else our code will behave differently in different platforms.

Hence, when working with files in text mode, it is highly recommended to specify the encoding type.

f = open("test.txt",mode = 'r',encoding = 'utf-8')

How to close a file Using Python?

When we are done with operations to the file, we need to properly close the file.

Closing a file will free up the resources that were tied with the file and is done using Python close() method.

Python has a garbage collector to clean up unreferenced objects but, we must not rely on it to close the file.

f = open("test.txt",encoding = 'utf-8')
# perform file operations
f.close()

This method is not entirely safe. If an exception occurs when we are performing some operation with the file, the code exits without closing the file.

A safer way is to use a try...finally block.

try:
   f = open("test.txt",encoding = 'utf-8')
   # perform file operations
finally:
   f.close()

This way, we are guaranteed that the file is properly closed even if an exception is raised, causing program flow to stop.

The best way to do this is using the with statement. This ensures that the file is closed when the block inside with is exited.

We don't need to explicitly call the close() method. It is done internally.

with open("test.txt",encoding = 'utf-8') as f:
   # perform file operations

How to write to File Using Python?

In order to write into a file in Python, we need to open it in write 'w', append 'a' or exclusive creation 'x' mode.

We need to be careful with the 'w' mode as it will overwrite into the file if it already exists. All previous data are erased.

Writing a string or sequence of bytes (for binary files) is done using write() method. This method returns the number of characters written to the file.

with open("test.txt",'w',encoding = 'utf-8') as f:
   f.write("my first file\n")
   f.write("This file\n\n")
   f.write("contains three lines\n")

This program will create a new file named 'test.txt' if it does not exist. If it does exist, it is overwritten.

We must include the newline characters ourselves to distinguish different lines.

How to read files in Python?

To read a file in Python, we must open the file in reading mode.

There are various methods available for this purpose. We can use the read(size) method to read in size number of data. If size parameter is not specified, it reads and returns up to the end of the file.

>>> f = open("test.txt",'r',encoding = 'utf-8')
>>> f.read(4)    # read the first 4 data
'This'

>>> f.read(4)    # read the next 4 data
' is '

>>> f.read()     # read in the rest till end of file
'my first file\nThis file\ncontains three lines\n'

>>> f.read()  # further reading returns empty sting
''

We can see that, the read() method returns newline as '\n'. Once the end of file is reached, we get empty string on further reading.

We can change our current file cursor (position) using the seek() method. Similarly, the tell() method returns our current position (in number of bytes).

>>> f.tell()    # get the current file position
56

>>> f.seek(0)   # bring file cursor to initial position
0

>>> print(f.read())  # read the entire file
This is my first file
This file
contains three lines

We can read a file line-by-line using a for loop. This is both efficient and fast.

>>> for line in f:
...     print(line, end = '')
...
This is my first file
This file
contains three lines

The lines in file itself has a newline character '\n'.

Moreover, the print() end parameter to avoid two newlines when printing.

Alternately, we can use readline() method to read individual lines of a file. This method reads a file till the newline, including the newline character.

>>> f.readline()
'This is my first file\n'

>>> f.readline()
'This file\n'

>>> f.readline()
'contains three lines\n'

>>> f.readline()
''

Lastly, the readlines() method returns a list of remaining lines of the entire file. All these reading method return empty values when end of file (EOF) is reached.

>>> f.readlines()
['This is my first file\n', 'This file\n', 'contains three lines\n']

Python File Methods

There are various methods available with the file object. Some of them have been used in above examples.

Here is the complete list of methods in text mode with a brief description.

Python File Methods
Method Description
close() Close an open file. It has no effect if the file is already closed.
detach() Separate the underlying binary buffer from the TextIOBase and return it.
fileno() Return an integer number (file descriptor) of the file.
flush() Flush the write buffer of the file stream.
isatty() Return True if the file stream is interactive.
read(n) Read atmost n characters form the file. Reads till end of file if it is negative or None.
readable() Returns True if the file stream can be read from.
readline(n=-1) Read and return one line from the file. Reads in at most n bytes if specified.
readlines(n=-1) Read and return a list of lines from the file. Reads in at most n bytes/characters if specified.
seek(offset,from=SEEK_SET) Change the file position to offset bytes, in reference to from (start, current, end).
seekable() Returns True if the file stream supports random access.
tell() Returns the current file location.
truncate(size=None) Resize the file stream to size bytes. If size is not specified, resize to current location.
writable() Returns True if the file stream can be written to.
write(s) Write string s to the file and return the number of characters written.
writelines(lines) Write a list of lines to the file.

Python Directory and Files Management

In this article, you'll learn about file and directory management in Python, i.e. creating a directory, renaming it, listing all directories and working with them.
Python directory and files management

If there are a large number of files to handle in your Python program, you can arrange your code within different directories to make things more manageable.

A directory or folder is a collection of files and sub directories. Python has the os module, which provides us with many useful methods to work with directories (and files as well).

Get Current Directory

We can get the present working directory using the getcwd() method.

This method returns the current working directory in the form of a string. We can also use the getcwdb() method to get it as bytes object.

>>> import os

>>> os.getcwd()
'C:\\Program Files\\PyScripter'

>>> os.getcwdb()
b'C:\\Program Files\\PyScripter'

The extra backslash implies escape sequence. The print() function will render this properly.

>>> print(os.getcwd())
C:\Program Files\PyScripter

Changing Directory

We can change the current working directory using the chdir() method.

The new path that we want to change to must be supplied as a string to this method. We can use both forward slash (/) or the backward slash (\) to separate path elements.

It is safer to use escape sequence when using the backward slash.

>>> os.chdir('C:\\Python33')

>>> print(os.getcwd())
C:\Python33

List Directories and Files

All files and sub directories inside a directory can be known using the listdir() method.

This method takes in a path and returns a list of sub directories and files in that path. If no path is specified, it returns from the current working directory.

>>> print(os.getcwd())
C:\Python33

>>> os.listdir()
['DLLs',
'Doc',
'include',
'Lib',
'libs',
'LICENSE.txt',
'NEWS.txt',
'python.exe',
'pythonw.exe',
'README.txt',
'Scripts',
'tcl',
'Tools']

>>> os.listdir('G:\\')
['$RECYCLE.BIN',
'Movies',
'Music',
'Photos',
'Series',
'System Volume Information']

Making a New Directory

We can make a new directory using the mkdir() method.

This method takes in the path of the new directory. If the full path is not specified, the new directory is created in the current working directory.

>>> os.mkdir('test')

>>> os.listdir()
['test']

Renaming a Directory or a File

The rename() method can rename a directory or a file.

The first argument is the old name and the new name must be supplies as the second argument.

>>> os.listdir()
['test']

>>> os.rename('test','new_one')

>>> os.listdir()
['new_one']

Removing Directory or File

A file can be removed (deleted) using the remove() method.

Similarly, the rmdir() method removes an empty directory.

>>> os.listdir()
['new_one', 'old.txt']

>>> os.remove('old.txt')
>>> os.listdir()
['new_one']

>>> os.rmdir('new_one')
>>> os.listdir()
[]

However, note that rmdir() method can only remove empty directories.

In order to remove a non-empty directory we can use the rmtree() method inside the shutil module.

>>> os.listdir()
['test']

>>> os.rmdir('test')
Traceback (most recent call last):
...
OSError: [WinError 145] The directory is not empty: 'test'

>>> import shutil

>>> shutil.rmtree('test')
>>> os.listdir()
[]

Python Errors and Built-in Exceptions

Python (interpreter) raises exceptions when it encounter errors. For example: divided by zero. In this article, you will learn about different exceptions that are built-in in Python.
Python Errors and Built-in Exceptions

When writing a program, we, more often than not, will encounter errors.

Error caused by not following the proper structure (syntax) of the language is called syntax error or parsing error.

>>> if a < 3
  File "<interactive input>", line 1
    if a < 3
           ^
SyntaxError: invalid syntax

We can notice here that a colon is missing in the if statement.

Errors can also occur at runtime and these are called exceptions. They occur, for example, when a file we try to open does not exist (FileNotFoundError), dividing a number by zero (ZeroDivisionError), module we try to import is not found (ImportError) etc.

Whenever these type of runtime error occur, Python creates an exception object. If not handled properly, it prints a traceback to that error along with some details about why that error occurred.

>>> 1 / 0
Traceback (most recent call last):
 File "<string>", line 301, in runcode
 File "<interactive input>", line 1, in <module>
ZeroDivisionError: division by zero

>>> open("imaginary.txt")
Traceback (most recent call last):
 File "<string>", line 301, in runcode
 File "<interactive input>", line 1, in <module>
FileNotFoundError: [Errno 2] No such file or directory: 'imaginary.txt'

Python Built-in Exceptions

Illegal operations can raise exceptions. There are plenty of built-in exceptions in Python that are raised when corresponding errors occur. We can view all the built-in exceptions using the local() built-in functions as follows.

>>> locals()['__builtins__']

This will return us a dictionary of built-in exceptions, functions and attributes.

Some of the common built-in exceptions in Python programming along with the error that cause then are tabulated below.

Python Built-in Exceptions
Exception Cause of Error
AssertionError Raised when assert statement fails.
AttributeError Raised when attribute assignment or reference fails.
EOFError Raised when the input() functions hits end-of-file condition.
FloatingPointError Raised when a floating point operation fails.
GeneratorExit Raise when a generator's close() method is called.
ImportError Raised when the imported module is not found.
IndexError Raised when index of a sequence is out of range.
KeyError Raised when a key is not found in a dictionary.
KeyboardInterrupt Raised when the user hits interrupt key (Ctrl+c or delete).
MemoryError Raised when an operation runs out of memory.
NameError Raised when a variable is not found in local or global scope.
NotImplementedError Raised by abstract methods.
OSError Raised when system operation causes system related error.
OverflowError Raised when result of an arithmetic operation is too large to be represented.
ReferenceError Raised when a weak reference proxy is used to access a garbage collected referent.
RuntimeError Raised when an error does not fall under any other category.
StopIteration Raised by next() function to indicate that there is no further item to be returned by iterator.
SyntaxError Raised by parser when syntax error is encountered.
IndentationError Raised when there is incorrect indentation.
TabError Raised when indentation consists of inconsistent tabs and spaces.
SystemError Raised when interpreter detects internal error.
SystemExit Raised by sys.exit() function.
TypeError Raised when a function or operation is applied to an object of incorrect type.
UnboundLocalError Raised when a reference is made to a local variable in a function or method, but no value has been bound to that variable.
UnicodeError Raised when a Unicode-related encoding or decoding error occurs.
UnicodeEncodeError Raised when a Unicode-related error occurs during encoding.
UnicodeDecodeError Raised when a Unicode-related error occurs during decoding.
UnicodeTranslateError Raised when a Unicode-related error occurs during translating.
ValueError Raised when a function gets argument of correct type but improper value.
ZeroDivisionError Raised when second operand of division or modulo operation is zero.

We can also define our own exception in Python (if required). Visit this page to learn more about user-defined exceptions

We can handle these built-in and user-defined exceptions in Python using try, except and finally statements

Python Exception Handling - Try, Except and Finally

In this article, you'll learn how to handle exceptions in your Python program using try, except and finally statements. This will motivate you to write clean, readable and efficient code in Python.
Python Exception Handling

Python has many built-in exceptions which forces your program to output an error when something in it goes wrong.

When these exceptions occur, it causes the current process to stop and passes it to the calling process until it is handled. If not handled, our program will crash.

For example, if function A calls function B which in turn calls function C and an exception occurs in function C. If it is not handled in C, the exception passes to B and then to A.

If never handled, an error message is spit out and our program come to a sudden, unexpected halt.

Catching Exceptions in Python

In Python, exceptions can be handled using a try statement.

A critical operation which can raise exception is placed inside the try clause and the code that handles exception is written in except clause.

It is up to us, what operations we perform once we have caught the exception. Here is a simple example.

# import module sys to get the type of exception
import sys

randomList = ['a', 0, 2]

for entry in randomList:
    try:
        print("The entry is", entry)
        r = 1/int(entry)
        break
    except:
        print("Oops!",sys.exc_info()[0],"occured.")
        print("Next entry.")
        print()
print("The reciprocal of",entry,"is",r)

Output

The entry is a
Oops! <class 'ValueError'> occured.
Next entry.

The entry is 0
Oops! <class 'ZeroDivisionError' > occured.
Next entry.

The entry is 2
The reciprocal of 2 is 0.5

In this program, we loop until the user enters an integer that has a valid reciprocal. The portion that can cause exception is placed inside try block.

If no exception occurs, except block is skipped and normal flow continues. But if any exception occurs, it is caught by the except block.

Here, we print the name of the exception using ex_info() function inside sys module and ask the user to try again. We can see that the values 'a' and '1.3' causes ValueError and '0' causes ZeroDivisionError.

Catching Specific Exceptions in Python

In the above example, we did not mention any exception in the except clause.

This is not a good programming practice as it will catch all exceptions and handle every case in the same way. We can specify which exceptions an except clause will catch.

A try clause can have any number of except clause to handle them differently but only one will be executed in case an exception occurs.

We can use a tuple of values to specify multiple exceptions in an except clause. Here is an example pseudo code.

try:
   # do something
   pass

except ValueError:
   # handle ValueError exception
   pass

except (TypeError, ZeroDivisionError):
   # handle multiple exceptions
   # TypeError and ZeroDivisionError
   pass

except:
   # handle all other exceptions
   pass

Raising Exceptions

In Python programming, exceptions are raised when corresponding errors occur at run time, but we can forcefully raise it using the keyword raise.

We can also optionally pass in value to the exception to clarify why that exception was raised.

>>> raise KeyboardInterrupt
Traceback (most recent call last):
...
KeyboardInterrupt

>>> raise MemoryError("This is an argument")
Traceback (most recent call last):
...
MemoryError: This is an argument

>>> try:
...     a = int(input("Enter a positive integer: "))
...     if a <= 0:
...         raise ValueError("That is not a positive number!")
... except ValueError as ve:
...     print(ve)
...    
Enter a positive integer: -2
That is not a positive number!

try...finally

The try statement in Python can have an optional finally clause. This clause is executed no matter what, and is generally used to release external resources.

For example, we may be connected to a remote data center through the network or working with a file or working with a Graphical User Interface (GUI).

In all these circumstances, we must clean up the resource once used, whether it was successful or not. These actions (closing a file, GUI or disconnecting from network) are performed in the finally clause to guarantee execution.

Here is an example of file operations to illustrate this.

try:
   f = open("test.txt",encoding = 'utf-8')
   # perform file operations
finally:
   f.close()

This type of construct makes sure the file is closed even if an exception occurs.

Python Custom Exceptions

In this article, you will learn to define custom exceptions depending upon your requirements.
Python Exceptions: Built-in and User-defined

Python has many built-in exceptions which forces your program to output an error when something in it goes wrong.

However, sometimes you may need to create custom exceptions that serves your purpose.

In Python, users can define such exceptions by creating a new class. This exception class has to be derived, either directly or indirectly, from Exception class. Most of the built-in exceptions are also derived form this class.

>>> class CustomError(Exception):
...     pass
...

>>> raise CustomError
Traceback (most recent call last):
...
__main__.CustomError

>>> raise CustomError("An error occurred")
Traceback (most recent call last):
...
__main__.CustomError: An error occurred

Here, we have created a user-defined exception called CustomError which is derived from the Exception class. This new exception can be raised, like other exceptions, using the raise statement with an optional error message.

When we are developing a large Python program, it is a good practice to place all the user-defined exceptions that our program raises in a separate file. Many standard modules do this. They define their exceptions separately as exceptions.py or errors.py (generally but not always).

User-defined exception class can implement everything a normal class can do, but we generally make them simple and concise. Most implementations declare a custom base class and derive others exception classes from this base class. This concept is made clearer in the following example.

Example: User-Defined Exception in Python

In this example, we will illustrate how user-defined exceptions can be used in a program to raise and catch errors.

This program will ask the user to enter a number until they guess a stored number correctly. To help them figure it out, hint is provided whether their guess is greater than or less than the stored number.

# define Python user-defined exceptions
class Error(Exception):
   """Base class for other exceptions"""
   pass

class ValueTooSmallError(Error):
   """Raised when the input value is too small"""
   pass

class ValueTooLargeError(Error):
   """Raised when the input value is too large"""
   pass

# our main program
# user guesses a number until he/she gets it right

# you need to guess this number
number = 10

while True:
   try:
       i_num = int(input("Enter a number: "))
       if i_num < number:
           raise ValueTooSmallError
       elif i_num > number:
           raise ValueTooLargeError
       break
   except ValueTooSmallError:
       print("This value is too small, try again!")
       print()
   except ValueTooLargeError:
       print("This value is too large, try again!")
       print()

print("Congratulations! You guessed it correctly.")

Here is a sample run of this program.

Enter a number: 12
This value is too large, try again!

Enter a number: 0
This value is too small, try again!

Enter a number: 8
This value is too small, try again!

Enter a number: 10
Congratulations! You guessed it correctly.

Here, we have defined a base class called Error.

The other two exceptions (ValueTooSmallError and ValueTooLargeError) that are actually raised by our program are derived from this class. This is the standard way to define user-defined exceptions in Python programming, but you are not limited to this way only.

Visit this page to learn in detail about how you can handle exceptions in Python.

Python Namespace and Scope

In this article, you will learn about namespace; mapping from names to objects and, scope of a variable.
Python Namespace and scope of a variable

If you have ever read 'The Zen of Python' (type "import this" in Python interpreter), the last line states, Namespaces are one honking great idea -- let's do more of those! So what are these mysterious namespaces? Let us first look at what name is.

Name (also called identifier) is simply a name given to objects. Everything in Python is an object. Name is a way to access the underlying object.

For example, when we do the assignment a = 2, here 2 is an object stored in memory and a is the name we associate it with. We can get the address (in RAM) of some object through the built-in function, id(). Let's check it.

# Note: You may get different value of id

a = 2
# Output: id(2)= 10919424
print('id(2) =', id(2))

# Output: id(a) = 10919424
print('id(a) =', id(a))

Here, both refer to the same object. Let's make things a little more interesting.

# Note: You may get different value of id

a = 2

# Output: id(a) = 10919424
print('id(a) =', id(a))

a = a+1

# Output: id(a) = 10919456
print('id(a) =', id(a))

# Output: id(3) = 10919456
print('id(3) =', id(3))

b = 2

# Output: id(2)= 10919424
print('id(2) =', id(2))

What is happening in the above sequence of steps? A diagram will help us explain this.

Memory diagram of a variable

Initially, an object 2 is created and the name a is associated with it, when we do a = a+1, a new object 3 is created and now a associates with this object.

Note that id(a) and id(3) have same values.

Furthermore, when we do b = 2, the new name b gets associated with the previous object 2.

This is efficient as Python doesn't have to create a new duplicate object. This dynamic nature of name binding makes Python powerful; a name could refer to any type of object.

>>> a = 5
>>> a = 'Hello World!'
>>> a = [1,2,3]

All these are valid and a will refer to three different types of object at different instances. Functions are objects too, so a name can refer to them as well.

def printHello():
    print("Hello")     
a = printHello()

# Output: Hello
a

Our same name a can refer to a function and we can call the function through it, pretty neat.

What is a namespace?

So now that we understand what names are, we can move on to the concept of namespaces.

To simply put it, namespace is a collection of names.

In Python, you can imagine a namespace as a mapping of every name, you have defined, to corresponding objects.

Different namespaces can co-exist at a given time but are completely isolated.

A namespace containing all the built-in names is created when we start the Python interpreter and exists as long we don't exit.

This is the reason that built-in functions like id(), print() etc. are always available to us from any part of the program. Each module creates its own global namespace.

These different namespaces are isolated. Hence, the same name that may exist in different modules do not collide.

Modules can have various functions and classes. A local namespace is created when a function is called, which has all the names defined in it. Similar, is the case with class. Following diagram may help to clarify this concept.

Nested Namespaces in Python Programming

Python Variable Scope

Although there are various unique namespaces defined, we may not be able to access all of them from every part of the program. The concept of scope comes into play.

Scope is the portion of the program from where a namespace can be accessed directly without any prefix.

At any given moment, there are at least three nested scopes.

  1. Scope of the current function which has local names
  2. Scope of the module which has global names
  3. Outermost scope which has built-in names

When a reference is made inside a function, the name is searched in the local namespace, then in the global namespace and finally in the built-in namespace.

If there is a function inside another function, a new scope is nested inside the local scope.

Example of Scope and Namespace in Python

def outer_function():
    b = 20
    def inner_func():
        c = 30

a = 10

Here, the variable a is in the global namespace. Variable b is in the local namespace of outer_function() and c is in the nested local namespace of inner_function().

When we are in inner_function(), c is local to us, b is nonlocal and a is global. We can read as well as assign new values to c but can only read b and c from inner_function().

If we try to assign as a value to b, a new variable b is created in the local namespace which is different than the nonlocal b. Same thing happens when we assign a value to a.

However, if we declare a as global, all the reference and assignment go to the global a. Similarly, if we want to rebind the variable b, it must be declared as nonlocal. The following example will further clarify this.

def outer_function():
    a = 20
    def inner_function():
        a = 30
        print('a =',a)

    inner_function()
    print('a =',a)
     
a = 10
outer_function()
print('a =',a)

As you can see, the output of this program is

a = 30
a = 20
a = 10

In this program, three different variables a are defined in separate namespaces and accessed accordingly. While in the following program,

def outer_function():
    global a
    a = 20
    def inner_function():
        global a
        a = 30
        print('a =',a)

    inner_function()
    print('a =',a)
     
a = 10
outer_function()
print('a =',a)

The output of the program is.

a = 30
a = 30
a = 30 

Here, all reference and assignment are to the global a due to the use of keyword global.

Python Objects and Class

In this article, you'll learn about the core functionality of Python, Python objects and classes. You'll learn what a class is, how to create it and use it in your program.
Python classes and objects

Python is an object oriented programming language. Unlike procedure oriented programming, where the main emphasis is on functions, object oriented programming stress on objects.

Object is simply a collection of data (variables) and methods (functions) that act on those data. And, class is a blueprint for the object.

We can think of class as a sketch (prototype) of a house. It contains all the details about the floors, doors, windows etc. Based on these descriptions we build the house. House is the object.

As, many houses can be made from a description, we can create many objects from a class. An object is also called an instance of a class and the process of creating this object is called instantiation.

Defining a Class in Python

Like function definitions begin with the keyword def, in Python, we define a class using the keyword class.

The first string is called docstring and has a brief description about the class. Although not mandatory, this is recommended.

Here is a simple class definition.

class MyNewClass:
    '''This is a docstring. I have created a new class'''
    pass

A class creates a new local namespace where all its attributes are defined. Attributes may be data or functions.

There are also special attributes in it that begins with double underscores (__). For example, __doc__ gives us the docstring of that class.

As soon as we define a class, a new class object is created with the same name. This class object allows us to access the different attributes as well as to instantiate new objects of that class.

class MyClass:
	"This is my second class"
	a = 10
	def func(self):
		print('Hello')

# Output: 10
print(MyClass.a)

# Output: <function MyClass.func at 0x0000000003079BF8>
print(MyClass.func)

# Output: 'This is my second class'
print(MyClass.__doc__)

When you run the program, the output will be:

10
<function 0x7feaa932eae8="" at="" myclass.func="">
This is my second class

Creating an Object in Python

We saw that the class object could be used to access different attributes.

It can also be used to create new object instances (instantiation) of that class. The procedure to create an object is similar to a function call.

>>> ob = MyClass()

This will create a new instance object named ob. We can access attributes of objects using the object name prefix.

Attributes may be data or method. Method of an object are corresponding functions of that class. Any function object that is a class attribute defines a method for objects of that class.

This means to say, since MyClass.func is a function object (attribute of class), ob.func will be a method object.

class MyClass:
	"This is my second class"
	a = 10
	def func(self):
		print('Hello')

# create a new MyClass
ob = MyClass()

# Output: <function MyClass.func at 0x000000000335B0D0>
print(MyClass.func)

# Output: <bound method MyClass.func of <__main__.MyClass object at 0x000000000332DEF0>>
print(ob.func)

# Calling function func()
# Output: Hello
ob.func()

You may have noticed the self parameter in function definition inside the class but, we called the method simply as ob.func() without any arguments. It still worked.

This is because, whenever an object calls its method, the object itself is passed as the first argument. So, ob.func() translates into MyClass.func(ob).

In general, calling a method with a list of n arguments is equivalent to calling the corresponding function with an argument list that is created by inserting the method's object before the first argument.

For these reasons, the first argument of the function in class must be the object itself. This is conventionally called self. It can be named otherwise but we highly recommend to follow the convention.

Now you must be familiar with class object, instance object, function object, method object and their differences.

Constructors in Python

Class functions that begins with double underscore (__) are called special functions as they have special meaning.

Of one particular interest is the __init__() function. This special function gets called whenever a new object of that class is instantiated.

This type of function is also called constructors in Object Oriented Programming (OOP). We normally use it to initialize all the variables.

class ComplexNumber:
    def __init__(self,r = 0,i = 0):
        self.real = r
        self.imag = i

    def getData(self):
        print("{0}+{1}j".format(self.real,self.imag))

# Create a new ComplexNumber object
c1 = ComplexNumber(2,3)

# Call getData() function
# Output: 2+3j
c1.getData()

# Create another ComplexNumber object
# and create a new attribute 'attr'
c2 = ComplexNumber(5)
c2.attr = 10

# Output: (5, 0, 10)
print((c2.real, c2.imag, c2.attr))

# but c1 object doesn't have attribute 'attr'
# AttributeError: 'ComplexNumber' object has no attribute 'attr'
c1.attr

In the above example, we define a new class to represent complex numbers. It has two functions, __init__() to initialize the variables (defaults to zero) and getData() to display the number properly.

An interesting thing to note in the above step is that attributes of an object can be created on the fly. We created a new attribute attr for object c2 and we read it as well. But this did not create that attribute for object c1.

Deleting Attributes and Objects

Any attribute of an object can be deleted anytime, using the del statement. Try the following on the Python shell to see the output.

>>> c1 = ComplexNumber(2,3)
>>> del c1.imag
>>> c1.getData()
Traceback (most recent call last):
...
AttributeError: 'ComplexNumber' object has no attribute 'imag'

>>> del ComplexNumber.getData
>>> c1.getData()
Traceback (most recent call last):
...
AttributeError: 'ComplexNumber' object has no attribute 'getData'

We can even delete the object itself, using the del statement.

>>> c1 = ComplexNumber(1,3)
>>> del c1
>>> c1
Traceback (most recent call last):
...
NameError: name 'c1' is not defined

Actually, it is more complicated than that. When we do c1 = ComplexNumber(1,3), a new instance object is created in memory and the name c1 binds with it.

On the command del c1, this binding is removed and the name c1 is deleted from the corresponding namespace. The object however continues to exist in memory and if no other name is bound to it, it is later automatically destroyed.

This automatic destruction of unreferenced objects in Python is also called garbage collection.

Deleting Object in Python

Python Inheritance

Inheritance enable us to define a class that takes all the functionality from parent class and allows us to add more. In this article, you will learn to use inheritance in Python.
Creating derived class from a base class using inheritance

Inheritance is a powerful feature in object oriented programming.

It refers to defining a new class with little or no modification to an existing class. The new class is called derived (or child) class and the one from which it inherits is called the base (or parent) class.

Python Inheritance Syntax

class BaseClass:
  Body of base class
class DerivedClass(BaseClass):
  Body of derived class

Derived class inherits features from the base class, adding new features to it. This results into re-usability of code.

Example of Inheritance in Python

To demonstrate the use of inheritance, let us take an example.

A polygon is a closed figure with 3 or more sides. Say, we have a class called Polygon defined as follows.

class Polygon:
    def __init__(self, no_of_sides):
        self.n = no_of_sides
        self.sides = [0 for i in range(no_of_sides)]

    def inputSides(self):
        self.sides = [float(input("Enter side "+str(i+1)+" : ")) for i in range(self.n)]

    def dispSides(self):
        for i in range(self.n):
            print("Side",i+1,"is",self.sides[i])

This class has data attributes to store the number of sides, n and magnitude of each side as a list, sides.

Method inputSides() takes in magnitude of each side and similarly, dispSides() will display these properly.

A triangle is a polygon with 3 sides. So, we can created a class called Triangle which inherits from Polygon. This makes all the attributes available in class Polygon readily available in Triangle. We don't need to define them again (code re-usability). Triangle is defined as follows.

class Triangle(Polygon):
    def __init__(self):
        Polygon.__init__(self,3)

    def findArea(self):
        a, b, c = self.sides
        # calculate the semi-perimeter
        s = (a + b + c) / 2
        area = (s*(s-a)*(s-b)*(s-c)) ** 0.5
        print('The area of the triangle is %0.2f' %area)

However, class Triangle has a new method findArea() to find and print the area of the triangle. Here is a sample run.

>>> t = Triangle()

>>> t.inputSides()
Enter side 1 : 3
Enter side 2 : 5
Enter side 3 : 4

>>> t.dispSides()
Side 1 is 3.0
Side 2 is 5.0
Side 3 is 4.0

>>> t.findArea()
The area of the triangle is 6.00

We can see that, even though we did not define methods like inputSides() or dispSides() for class Triangle, we were able to use them.

If an attribute is not found in the class, search continues to the base class. This repeats recursively, if the base class is itself derived from other classes.

Method Overriding in Python

In the above example, notice that __init__() method was defined in both classes, Triangle as well Polygon. When this happens, the method in the derived class overrides that in the base class. This is to say, __init__() in Triangle gets preference over the same in Polygon.

Generally when overriding a base method, we tend to extend the definition rather than simply replace it. The same is being done by calling the method in base class from the one in derived class (calling Polygon.__init__() from __init__() in Triangle).

A better option would be to use the built-in function super(). So, super().__init__(3) is equivalent to Polygon.__init__(self,3) and is preferred. You can learn more about the super() function in Python.

Two built-in functions isinstance() and issubclass() are used to check inheritances. Function isinstance() returns True if the object is an instance of the class or other classes derived from it. Each and every class in Python inherits from the base class object.

>>> isinstance(t,Triangle)
True

>>> isinstance(t,Polygon)
True

>>> isinstance(t,int)
False

>>> isinstance(t,object)
True

Similarly, issubclass() is used to check for class inheritance.

>>> issubclass(Polygon,Triangle)
False

>>> issubclass(Triangle,Polygon)
True

>>> issubclass(bool,int)
True

Python Multiple Inheritance

In this article, you'll learn what is multiple inheritance in Python and how to use it in your program. You'll also learn about multilevel inheritance and the method resolution order.
Python Multiple Inheritance

Like C++, a class can be derived from more than one base classes in Python. This is called multiple inheritance.

In multiple inheritance, the features of all the base classes are inherited into the derived class. The syntax for multiple inheritance is similar to single inheritance.

Python Multiple Inheritance Example

class Base1:
    pass

class Base2:
    pass

class MultiDerived(Base1, Base2):
    pass

Here, MultiDerived is derived from classes Base1 and Base2.

Multiple Inheritance in Python

The class MultiDerived inherits from both Base1 and Base2.

Multilevel Inheritance in Python

On the other hand, we can also inherit form a derived class. This is called multilevel inheritance. It can be of any depth in Python.

In multilevel inheritance, features of the base class and the derived class is inherited into the new derived class.

An example with corresponding visualization is given below.

class Base:
    pass

class Derived1(Base):
    pass

class Derived2(Derived1):
    pass

Here, Derived1 is derived from Base, and Derived2 is derived from Derived1.

Multilevel Inheritance in Python

Method Resolution Order in Python

Every class in Python is derived from the class object. It is the most base type in Python.

So technically, all other class, either built-in or user-defines, are derived classes and all objects are instances of object class.

# Output: True
print(issubclass(list,object))

# Output: True
print(isinstance(5.5,object))

# Output: True
print(isinstance("Hello",object))

In the multiple inheritance scenario, any specified attribute is searched first in the current class. If not found, the search continues into parent classes in depth-first, left-right fashion without searching same class twice.

So, in the above example of MultiDerived class the search order is [MultiDerived, Base1, Base2, object]. This order is also called linearization of MultiDerived class and the set of rules used to find this order is called Method Resolution Order (MRO).

MRO must prevent local precedence ordering and also provide monotonicity. It ensures that a class always appears before its parents and in case of multiple parents, the order is same as tuple of base classes.

MRO of a class can be viewed as the __mro__ attribute or mro() method. The former returns a tuple while latter returns a list.

>>> MultiDerived.__mro__
(<class '__main__.MultiDerived'>,
 <class '__main__.Base1'>,
 <class '__main__.Base2'>,
 <class 'object'>)

>>> MultiDerived.mro()
[<class '__main__.MultiDerived'>,
 <class '__main__.Base1'>,
 <class '__main__.Base2'>,
 <class 'object'>]

Here is a little more complex multiple inheritance example and its visualization along with the MRO.

Multiple Inheritance Visualization

class X: pass
class Y: pass
class Z: pass

class A(X,Y): pass
class B(Y,Z): pass

class M(B,A,Z): pass

# Output:
# [<class '__main__.M'>, <class '__main__.B'>,
# <class '__main__.A'>, <class '__main__.X'>,
# <class '__main__.Y'>, <class '__main__.Z'>,
# <class 'object'>]

print(M.mro())

Refer to this, for further discussion on MRO and to know the actual algorithm how it is calculated.

Python Operator Overloading

You can change the meaning of an operator in Python depending upon the operands used. This practice is known as operating overloading.
Operator overloading in Python

Python operators work for built-in classes. But same operator behaves differently with different types. For example, the + operator will, perform arithmetic addition on two numbers, merge two lists and concatenate two strings.

This feature in Python, that allows same operator to have different meaning according to the context is called operator overloading.

So what happens when we use them with objects of a user-defined class? Let us consider the following class, which tries to simulate a point in 2-D coordinate system.

class Point:
    def __init__(self, x = 0, y = 0):
        self.x = x
        self.y = y

Now, run the code and try to add two points in Python shell.


>>> p1 = Point(2,3)
>>> p2 = Point(-1,2)
>>> p1 + p2
Traceback (most recent call last):
...
TypeError: unsupported operand type(s) for +: 'Point' and 'Point'

Whoa! That's a lot of complains. TypeError was raised since Python didn't know how to add two Point objects together.

However, the good news is that we can teach this to Python through operator overloading. But first, let's get a notion about special functions.

Special Functions in Python

Class functions that begins with double underscore __ are called special functions in Python. This is because, well, they are not ordinary. The __init__() function we defined above, is one of them. It gets called every time we create a new object of that class. There are a ton of special functions in Python.

Using special functions, we can make our class compatible with built-in functions.

>>> p1 = Point(2,3)
>>> print(p1)
<__main__.Point object at 0x00000000031F8CC0>

That did not print well. But if we define __str__() method in our class, we can control how it gets printed. So, let's add this to our class.

class Point:
    def __init__(self, x = 0, y = 0):
        self.x = x
        self.y = y
    
    def __str__(self):
        return "({0},{1})".format(self.x,self.y)

Now let's try the print() function again.


>>> p1 = Point(2,3)
>>> print(p1)
(2,3)

That's better. Turns out, that this same method is invoked when we use the built-in function str() or format().


>>> str(p1)
'(2,3)'

>>> format(p1)
'(2,3)'

So, when you do str(p1) or format(p1), Python is internally doing p1.__str__(). Hence the name, special functions.

Ok, now back to operator overloading.

Overloading the + Operator in Python

To overload the + sign, we will need to implement __add__() function in the class. With great power comes great responsibility. We can do whatever we like, inside this function. But it is sensible to return a Point object of the coordinate sum.

class Point:
    def __init__(self, x = 0, y = 0):
        self.x = x
        self.y = y
    
    def __str__(self):
        return "({0},{1})".format(self.x,self.y)
    
    def __add__(self,other):
        x = self.x + other.x
        y = self.y + other.y
        return Point(x,y)

Now let's try that addition again.


>>> p1 = Point(2,3)
>>> p2 = Point(-1,2)
>>> print(p1 + p2)
(1,5)

What actually happens is that, when you do p1 + p2, Python will call p1.__add__(p2) which in turn is Point.__add__(p1,p2). Similarly, we can overload other operators as well. The special function that we need to implement is tabulated below.

Operator Overloading Special Functions in Python
Operator Expression Internally
Addition p1 + p2 p1.__add__(p2)
Subtraction p1 - p2 p1.__sub__(p2)
Multiplication p1 * p2 p1.__mul__(p2)
Power p1 ** p2 p1.__pow__(p2)
Division p1 / p2 p1.__truediv__(p2)
Floor Division p1 // p2 p1.__floordiv__(p2)
Remainder (modulo) p1 % p2 p1.__mod__(p2)
Bitwise Left Shift p1 << p2 p1.__lshift__(p2)
Bitwise Right Shift p1 >> p2 p1.__rshift__(p2)
Bitwise AND p1 & p2 p1.__and__(p2)
Bitwise OR p1 | p2 p1.__or__(p2)
Bitwise XOR p1 ^ p2 p1.__xor__(p2)
Bitwise NOT ~p1 p1.__invert__()

Overloading Comparison Operators in Python

Python does not limit operator overloading to arithmetic operators only. We can overload comparison operators as well.

Suppose, we wanted to implement the less than symbol < symbol in our Point class.

Let us compare the magnitude of these points from the origin and return the result for this purpose. It can be implemented as follows.

class Point:
    def __init__(self, x = 0, y = 0):
        self.x = x
        self.y = y
    
    def __str__(self):
        return "({0},{1})".format(self.x,self.y)
    
    def __lt__(self,other):
        self_mag = (self.x ** 2) + (self.y ** 2)
        other_mag = (other.x ** 2) + (other.y ** 2)
        return self_mag < other_mag

Try these sample runs in Python shell.


>>> Point(1,1) < Point(-2,-3)
True

>>> Point(1,1) < Point(0.5,-0.2)
False

>>> Point(1,1) < Point(1,1)
False

Similarly, the special functions that we need to implement, to overload other comparison operators are tabulated below.

Comparision Operator Overloading in Python
Operator Expression Internally
Less than p1 < p2 p1.__lt__(p2)
Less than or equal to p1 <= p2 p1.__le__(p2)

Equal to

p1 == p2 p1.__eq__(p2)
Not equal to p1 != p2 p1.__ne__(p2)
Greater than p1 > p2 p1.__gt__(p2)
Greater than or equal to p1 >= p2 p1.__ge__(p2)

Python Iterators

Iterators are objects that can be iterated upon. In this tutorial, you will learn how iterator works and how you can build your own iterator using __iter__ and __next__ methods.
Python Iterators

Iterators are everywhere in Python. They are elegantly implemented within for loops, comprehensions, generators etc. but hidden in plain sight.

Iterator in Python is simply an object that can be iterated upon. An object which will return data, one element at a time.

Technically speaking, Python iterator object must implement two special methods, __iter__() and __next__(), collectively called the iterator protocol.

An object is called iterable if we can get an iterator from it. Most of built-in containers in Python like: list, tuple, string etc. are iterables.

The iter() function (which in turn calls the __iter__() method) returns an iterator from them.

Iterating Through an Iterator in Python

We use the next() function to manually iterate through all the items of an iterator. When we reach the end and there is no more data to be returned, it will raise StopIteration. Following is an example.

# define a list
my_list = [4, 7, 0, 3]

# get an iterator using iter()
my_iter = iter(my_list)

## iterate through it using next() 

#prints 4
print(next(my_iter))

#prints 7
print(next(my_iter))

## next(obj) is same as obj.__next__()

#prints 0
print(my_iter.__next__())

#prints 3
print(my_iter.__next__())

## This will raise error, no items left
next(my_iter)

A more elegant way of automatically iterating is by using the for loop. Using this, we can iterate over any object that can return an iterator, for example list, string, file etc.

>>> for element in my_list:
...     print(element)
...     
4
7
0
3

How for loop actually works?

As we see in the above example, the for loop was able to iterate automatically through the list.

In fact the for loop can iterate over any iterable. Let's take a closer look at how the for loop is actually implemented in Python.

for element in iterable:
    # do something with element

Is actually implemented as.

# create an iterator object from that iterable
iter_obj = iter(iterable)

# infinite loop
while True:
    try:
        # get the next item
        element = next(iter_obj)
        # do something with element
    except StopIteration:
        # if StopIteration is raised, break from loop
        break

So internally, the for loop creates an iterator object, iter_obj by calling iter() on the iterable.

Ironically, this for loop is actually an infinite while loop.

Inside the loop, it calls next() to get the next element and executes the body of the for loop with this value. After all the items exhaust, StopIteration is raised which is internally caught and the loop ends. Note that any other kind of exception will pass through.

Building Your Own Iterator in Python

Building an iterator from scratch is easy in Python. We just have to implement the methods __iter__() and __next__().

The __iter__() method returns the iterator object itself. If required, some initialization can be performed.

The __next__() method must return the next item in the sequence. On reaching the end, and in subsequent calls, it must raise StopIteration.

Here, we show an example that will give us next power of 2 in each iteration. Power exponent starts from zero up to a user set number.

class PowTwo:
    """Class to implement an iterator
    of powers of two"""

    def __init__(self, max = 0):
        self.max = max

    def __iter__(self):
        self.n = 0
        return self

    def __next__(self):
        if self.n <= self.max:
            result = 2 ** self.n
            self.n += 1
            return result
        else:
            raise StopIteration

Now we can create an iterator and iterate through it as follows.

>>> a = PowTwo(4)
>>> i = iter(a)
>>> next(i)
1
>>> next(i)
2
>>> next(i)
4
>>> next(i)
8
>>> next(i)
16
>>> next(i)
Traceback (most recent call last):
...
StopIteration

We can also use a for loop to iterate over our iterator class.

>>> for i in PowTwo(5):
...     print(i)
...     
1
2
4
8
16
32

Python Infinite Iterators

It is not necessary that the item in an iterator object has to exhaust. There can be infinite iterators (which never ends). We must be careful when handling such iterator.

Here is a simple example to demonstrate infinite iterators.

The built-in function iter() can be called with two arguments where the first argument must be a callable object (function) and second is the sentinel. The iterator calls this function until the returned value is equal to the sentinel.

>>> int()
0

>>> inf = iter(int,1)
>>> next(inf)
0
>>> next(inf)
0

We can see that the int() function always returns 0. So passing it as iter(int,1) will return an iterator that calls int() until the returned value equals 1. This never happens and we get an infinite iterator.

We can also built our own infinite iterators. The following iterator will, theoretically, return all the odd numbers.

class InfIter:
    """Infinite iterator to return all
        odd numbers"""

    def __iter__(self):
        self.num = 1
        return self

    def __next__(self):
        num = self.num
        self.num += 2
        return num

A sample run would be as follows.

>>> a = iter(InfIter())
>>> next(a)
1
>>> next(a)
3
>>> next(a)
5
>>> next(a)
7

And so on...

Be careful to include a terminating condition, when iterating over these type of infinite iterators.

The advantage of using iterators is that they save resources. Like shown above, we could get all the odd numbers without storing the entire number system in memory. We can have infinite items (theoretically) in finite memory.

Iterator also makes our code look cool.

There's an easier way to create iterators in Python. To learn more visit: Python generators using yield.

Python Generators

In this article, you'll learn how to create iterations easily using Python generators, how is it different from iterators and normal functions, and why you should use it.
Python Generators using Yield

There is a lot of overhead in building an iterator in Python; we have to implement a class with __iter__() and __next__() method, keep track of internal states, raise StopIteration when there was no values to be returned etc.

This is both lengthy and counter intuitive. Generator comes into rescue in such situations.

Python generators are a simple way of creating iterators. All the overhead we mentioned above are automatically handled by generators in Python.

Simply speaking, a generator is a function that returns an object (iterator) which we can iterate over (one value at a time).

How to create a generator in Python?

It is fairly simple to create a generator in Python. It is as easy as defining a normal function with yield statement instead of a return statement.

If a function contains at least one yield statement (it may contain other yield or return statements), it becomes a generator function. Both yield and return will return some value from a function.

The difference is that, while a return statement terminates a function entirely, yield statement pauses the function saving all its states and later continues from there on successive calls.

Differences between Generator function and a Normal function

Here is how a generator function differs from a normal function.

  • Generator function contains one or more yield statement.
  • When called, it returns an object (iterator) but does not start execution immediately.
  • Methods like __iter__() and __next__() are implemented automatically. So we can iterate through the items using next().
  • Once the function yields, the function is paused and the control is transferred to the caller.
  • Local variables and their states are remembered between successive calls.
  • Finally, when the function terminates, StopIteration is raised automatically on further calls.

Here is an example to illustrate all of the points stated above. We have a generator function named my_gen() with several yield statements.

# A simple generator function
def my_gen():
    n = 1
    print('This is printed first')
    # Generator function contains yield statements
    yield n

    n += 1
    print('This is printed second')
    yield n

    n += 1
    print('This is printed at last')
    yield n

An interactive run in the interpreter is given below. Run these in the Python shell to see the output.

>>> # It returns an object but does not start execution immediately.
>>> a = my_gen()

>>> # We can iterate through the items using next().
>>> next(a)
This is printed first
1
>>> # Once the function yields, the function is paused and the control is transferred to the caller.

>>> # Local variables and theirs states are remembered between successive calls.
>>> next(a)
This is printed second
2

>>> next(a)
This is printed at last
3

>>> # Finally, when the function terminates, StopIteration is raised automatically on further calls.
>>> next(a)
Traceback (most recent call last):
...
StopIteration
>>> next(a)
Traceback (most recent call last):
...
StopIteration

One interesting thing to note in the above example is that, the value of variable n is remembered between each call.

Unlike normal functions, the local variables are not destroyed when the function yields. Furthermore, the generator object can be iterated only once.

To restart the process we need to create another generator object using something like a = my_gen().

Note: One final thing to note is that we can use generators with for loops directly.

This is because, a for loop takes an iterator and iterates over it using next() function. It automatically ends when StopIteration is raised. Check here to know how a for loop is actually implemented in Python.

# A simple generator function
def my_gen():
    n = 1
    print('This is printed first')
    # Generator function contains yield statements
    yield n

    n += 1
    print('This is printed second')
    yield n

    n += 1
    print('This is printed at last')
    yield n

# Using for loop
for item in my_gen():
    print(item)    

When you run the program, the output will be:

This is printed first
1
This is printed second
2
This is printed at last
3

Python Generators with a Loop

The above example is of less use and we studied it just to get an idea of what was happening in the background.

Normally, generator functions are implemented with a loop having a suitable terminating condition.

Let's take an example of a generator that reverses a string.

def rev_str(my_str):
    length = len(my_str)
    for i in range(length - 1,-1,-1):
        yield my_str[i]

# For loop to reverse the string
# Output:
# o
# l
# l
# e
# h
for char in rev_str("hello"):
     print(char)

In this example, we use range() function to get the index in reverse order using the for loop.

It turns out that this generator function not only works with string, but also with other kind of iterables like list, tuple etc.

Python Generator Expression

Simple generators can be easily created on the fly using generator expressions. It makes building generators easy.

Same as lambda function creates an anonymous function, generator expression creates an anonymous generator function.

The syntax for generator expression is similar to that of a list comprehension in Python. But the square brackets are replaced with round parentheses.

The major difference between a list comprehension and a generator expression is that while list comprehension produces the entire list, generator expression produces one item at a time.

They are kind of lazy, producing items only when asked for. For this reason, a generator expression is much more memory efficient than an equivalent list comprehension.

# Initialize the list
my_list = [1, 3, 6, 10]

# square each term using list comprehension
# Output: [1, 9, 36, 100]
[x**2 for x in my_list]

# same thing can be done using generator expression
# Output: <generator object <genexpr> at 0x0000000002EBDAF8>
(x**2 for x in my_list)

We can see above that the generator expression did not produce the required result immediately. Instead, it returned a generator object with produces items on demand.

# Intialize the list
my_list = [1, 3, 6, 10]

a = (x**2 for x in my_list)
# Output: 1
print(next(a))

# Output: 9
print(next(a))

# Output: 36
print(next(a))

# Output: 100
print(next(a))

# Output: StopIteration
next(a)

Generator expression can be used inside functions. When used in such a way, the round parentheses can be dropped.

>>> sum(x**2 for x in my_list)
146

>>> max(x**2 for x in my_list)
100

Why generators are used in Python?

There are several reasons which make generators an attractive implementation to go for.

1. Easy to Implement

Generators can be implemented in a clear and concise way as compared to their iterator class counterpart. Following is an example to implement a sequence of power of 2's using iterator class.

class PowTwo:
    def __init__(self, max = 0):
        self.max = max

    def __iter__(self):
        self.n = 0
        return self

    def __next__(self):
        if self.n > self.max:
            raise StopIteration

        result = 2 ** self.n
        self.n += 1
        return result

This was lengthy. Now lets do the same using a generator function.

def PowTwoGen(max = 0):
    n = 0
    while n < max:
        yield 2 ** n
        n += 1

Since, generators keep track of details automatically, it was concise and much cleaner in implementation.

2. Memory Efficient

A normal function to return a sequence will create the entire sequence in memory before returning the result. This is an overkill if the number of items in the sequence is very large.

Generator implementation of such sequence is memory friendly and is preferred since it only produces one item at a time.

3. Represent Infinite Stream

Generators are excellent medium to represent an infinite stream of data. Infinite streams cannot be stored in memory and since generators produce only one item at a time, it can represent infinite stream of data.

The following example can generate all the even numbers (at least in theory).

def all_even():
    n = 0
    while True:
        yield n
        n += 2

4. Pipelining Generators

Generators can be used to pipeline a series of operations. This is best illustrated using an example.

Suppose we have a log file from a famous fast food chain. The log file has a column (4th column) that keeps track of the number of pizza sold every hour and we want to sum it to find the total pizzas sold in 5 years.

Assume everything is in string and numbers that are not available are marked as 'N/A'. A generator implementation of this could be as follows.

with open('sells.log') as file:
    pizza_col = (line[3] for line in file)
    per_hour = (int(x) for x in pizza_col if x != 'N/A')
    print("Total pizzas sold = ",sum(per_hour))

This pipelining is efficient and easy to read (and yes, a lot cooler!).

Python Closures

In this article, you'll learn what is a Python closure, how to define a closure, and reasons why you should use it.
Python Closures

Nonlocal variable in a nested function

Before getting into what a closure is, we have to first understand what a nested function and nonlocal variable is.

A function defined inside another function is called a nested function. Nested functions can access variables of the enclosing scope.

In Python, these non-local variables are read only by default and we must declare them explicitly as non-local (using nonlocal keyword) in order to modify them.

Following is an example of a nested function accessing a non-local variable.

def print_msg(msg):
# This is the outer enclosing function

    def printer():
# This is the nested function
        print(msg)

    printer()

# We execute the function
# Output: Hello
print_msg("Hello")

We can see that the nested function printer() was able to access the non-local variable msg of the enclosing function.

Defining a Closure Function

In the example above, what would happen if the last line of the function print_msg() returned the printer() function instead of calling it? This means the function was defined as follows.

def print_msg(msg):
# This is the outer enclosing function

    def printer():
# This is the nested function
        print(msg)

    return printer  # this got changed

# Now let's try calling this function.
# Output: Hello
another = print_msg("Hello")
another()

That's unusual.

The print_msg() function was called with the string "Hello" and the returned function was bound to the name another. On calling another(), the message was still remembered although we had already finished executing the print_msg() function.

This technique by which some data ("Hello") gets attached to the code is called closure in Python.

This value in the enclosing scope is remembered even when the variable goes out of scope or the function itself is removed from the current namespace.

Try running the following in the Python shell to see the output.

>>> del print_msg
>>> another()
Hello
>>> print_msg("Hello")
Traceback (most recent call last):
...
NameError: name 'print_msg' is not defined

When do we have a closure?

As seen from the above example, we have a closure in Python when a nested function references a value in its enclosing scope.

The criteria that must be met to create closure in Python are summarized in the following points.

  • We must have a nested function (function inside a function).
  • The nested function must refer to a value defined in the enclosing function.
  • The enclosing function must return the nested function.

When to use closures?

So what are closures good for?

Closures can avoid the use of global values and provides some form of data hiding. It can also provide an object oriented solution to the problem.

When there are few methods (one method in most cases) to be implemented in a class, closures can provide an alternate and more elegant solutions. But when the number of attributes and methods get larger, better implement a class.

Here is a simple example where a closure might be more preferable than defining a class and making objects. But the preference is all yours.

def make_multiplier_of(n):
    def multiplier(x):
        return x * n
    return multiplier

# Multiplier of 3
times3 = make_multiplier_of(3)

# Multiplier of 5
times5 = make_multiplier_of(5)

# Output: 27
print(times3(9))

# Output: 15
print(times5(3))

# Output: 30
print(times5(times3(2)))

Decorators in Python make an extensive use of closures as well.

On a concluding note, it is good to point out that the values that get enclosed in the closure function can be found out.

All function objects have a __closure__ attribute that returns a tuple of cell objects if it is a closure function. Referring to the example above, we know times3 and times5 are closure functions.

>>> make_multiplier_of.__closure__
>>> times3.__closure__
(<cell at 0x0000000002D155B8: int object at 0x000000001E39B6E0>,)

The cell object has the attribute cell_contents which stores the closed value.

>>> times3.__closure__[0].cell_contents
3
>>> times5.__closure__[0].cell_contents
5

Python Decorators

A decorator takes in a function, adds some functionality and returns it. In this article, you will learn how you can create a decorator and why you should use it.
Python Decorator

Python has an interesting feature called decorators to add functionality to an existing code.

This is also called metaprogramming as a part of the program tries to modify another part of the program at compile time.

What you need to know before learning decorators?

In order to understand about decorators, we must first know a few basic things in Python.

We must be comfortable with the fact that, everything in Python (Yes! Even classes), are objects. Names that we define are simply identifiers bound to these objects. Functions are no exceptions, they are objects too (with attributes). Various different names can be bound to the same function object.

Here is an example.

def first(msg):
    print(msg)    

first("Hello")

second = first
second("Hello")

When you run the code, both functions first and second gives same output. Here, the names first and second refer to the same function object.

Now things start getting weirder.

Functions can be passed as arguments to another function.

If you have used functions like map, filter and reduce in Python, then you already know about this.

Such function that take other functions as arguments are also called higher order functions. Here is an example of such a function.

def inc(x):
    return x + 1

def dec(x):
    return x - 1

def operate(func, x):
    result = func(x)
    return result

We invoke the function as follows.

>>> operate(inc,3)
4
>>> operate(dec,3)
2

Furthermore, a function can return another function.

def is_called():
    def is_returned():
        print("Hello")
    return is_returned

new = is_called()

#Outputs "Hello"
new()

Here, is_returned() is a nested function which is defined and returned, each time we call is_called().

Finally, we must know about closures in Python.

Getting back To decorators

Functions and methods are called callable as they can be called.

In fact, any object which implements the special method __call__() is termed callable. So, in the most basic sense, a decorator is a callable that returns a callable.

Basically, a decorator takes in a function, adds some functionality and returns it.

def make_pretty(func):
    def inner():
        print("I got decorated")
        func()
    return inner

def ordinary():
    print("I am ordinary")

When you run the following codes in shell,

>>> ordinary()
I am ordinary

>>> # let's decorate this ordinary function
>>> pretty = make_pretty(ordinary)
>>> pretty()
I got decorated
I am ordinary

In the example shown above, make_pretty() is a decorator. In the assignment step.

pretty = make_pretty(ordinary)

The function ordinary() got decorated and the returned function was given the name pretty.

We can see that the decorator function added some new functionality to the original function. This is similar to packing a gift. The decorator acts as a wrapper. The nature of the object that got decorated (actual gift inside) does not alter. But now, it looks pretty (since it got decorated).

Generally, we decorate a function and reassign it as,

ordinary = make_pretty(ordinary).

This is a common construct and for this reason, Python has a syntax to simplify this.

We can use the @ symbol along with the name of the decorator function and place it above the definition of the function to be decorated. For example,

@make_pretty
def ordinary():
    print("I am ordinary")

is equivalent to

def ordinary():
    print("I am ordinary")
ordinary = make_pretty(ordinary)

This is just a syntactic sugar to implement decorators.

Decorating Functions with Parameters

The above decorator was simple and it only worked with functions that did not have any parameters. What if we had functions that took in parameters like below?

def divide(a, b):
    return a/b

This function has two parameters, a and b. We know, it will give error if we pass in b as 0.

>>> divide(2,5)
0.4
>>> divide(2,0)
Traceback (most recent call last):
...
ZeroDivisionError: division by zero

Now let's make a decorator to check for this case that will cause the error.

def smart_divide(func):
   def inner(a,b):
      print("I am going to divide",a,"and",b)
      if b == 0:
         print("Whoops! cannot divide")
         return

      return func(a,b)
   return inner

@smart_divide
def divide(a,b):
    return a/b

This new implementation will return None if the error condition arises.

>>> divide(2,5)
I am going to divide 2 and 5
0.4

>>> divide(2,0)
I am going to divide 2 and 0
Whoops! cannot divide

In this manner we can decorate functions that take parameters.

A keen observer will notice that parameters of the nested inner() function inside the decorator is same as the parameters of functions it decorates. Taking this into account, now we can make general decorators that work with any number of parameter.

In Python, this magic is done as function(*args, **kwargs). In this way, args will be the tuple of positional arguments and kwargs will be the dictionary of keyword arguments. An example of such decorator will be.

def works_for_all(func):
    def inner(*args, **kwargs):
        print("I can decorate any function")
        return func(*args, **kwargs)
    return inner

Chaining Decorators in Python

Multiple decorators can be chained in Python.

This is to say, a function can be decorated multiple times with different (or same) decorators. We simply place the decorators above the desired function.

def star(func):
    def inner(*args, **kwargs):
        print("*" * 30)
        func(*args, **kwargs)
        print("*" * 30)
    return inner

def percent(func):
    def inner(*args, **kwargs):
        print("%" * 30)
        func(*args, **kwargs)
        print("%" * 30)
    return inner

@star
@percent
def printer(msg):
    print(msg)
printer("Hello")

This will give the output.


******************************
%%%%%%%%%%%%%%%%%%%%%%%%%%%%%%
Hello
%%%%%%%%%%%%%%%%%%%%%%%%%%%%%%
******************************

The above syntax of,

@star
@percent
def printer(msg):
    print(msg)

is equivalent to

def printer(msg):
    print(msg)
printer = star(percent(printer))

The order in which we chain decorators matter. If we had reversed the order as,

@percent
@star
def printer(msg):
    print(msg)

The execution would take place as,

%%%%%%%%%%%%%%%%%%%%%%%%%%%%%%
******************************
Hello
******************************
%%%%%%%%%%%%%%%%%%%%%%%%%%%%%%

Python @property

You will learn about Python @property; pythonic way to use getters and setters.
Python property

Python has a great concept called property which makes the life of an object oriented programmer much simpler.

Before defining and going into details of what @property is, let us first build an intuition on why it would be needed in the first place.

An Example To Begin With

Let us assume that you decide to make a class that could store the temperature in degree Celsius. It would also implement a method to convert the temperature into degree Fahrenheit. One way of doing this is as follows.

class Celsius:
    def __init__(self, temperature = 0):
        self.temperature = temperature

    def to_fahrenheit(self):
        return (self.temperature * 1.8) + 32

We could make objects out of this class and manipulate the attribute temperature as we wished. Try these on Python shell.

>>> # create new object
>>> man = Celsius()

>>> # set temperature
>>> man.temperature = 37

>>> # get temperature
>>> man.temperature
37

>>> # get degrees Fahrenheit
>>> man.to_fahrenheit()
98.60000000000001

The extra decimal places when converting into Fahrenheit is due to the floating point arithmetic error (try 1.1 + 2.2 in the Python interpreter).

Whenever we assign or retrieve any object attribute like temperature, as show above, Python searches it in the object's __dict__ dictionary.

>>> man.__dict__
{'temperature': 37}

Therefore, man.temperature internally becomes man.__dict__['temperature'].

Now, let's further assume that our class got popular among clients and they started using it in their programs. They did all kinds of assignments to the object.

One fateful day, a trusted client came to us and suggested that temperatures cannot go below -273 degree Celsius (students of thermodynamics might argue that it's actually -273.15), also called the absolute zero. He further asked us to implement this value constraint. Being a company that strive for customer satisfaction, we happily heeded the suggestion and released version 1.01 (an upgrade of our existing class).

Using Getters and Setters

An obvious solution to the above constraint will be to hide the attribute temperature (make it private) and define new getter and setter interfaces to manipulate it. This can be done as follows.

class Celsius:
    def __init__(self, temperature = 0):
        self.set_temperature(temperature)

    def to_fahrenheit(self):
        return (self.get_temperature() * 1.8) + 32

    # new update
    def get_temperature(self):
        return self._temperature

    def set_temperature(self, value):
        if value < -273:
            raise ValueError("Temperature below -273 is not possible")
        self._temperature = value

We can see above that new methods get_temperature() and set_temperature() were defined and furthermore, temperature was replaced with _temperature. An underscore (_) at the beginning is used to denote private variables in Python.

>>> c = Celsius(-277)
Traceback (most recent call last):
...
ValueError: Temperature below -273 is not possible

>>> c = Celsius(37)
>>> c.get_temperature()
37
>>> c.set_temperature(10)

>>> c.set_temperature(-300)
Traceback (most recent call last):
...
ValueError: Temperature below -273 is not possible

This update successfully implemented the new restriction. We are no longer allowed to set temperature below -273.

Please note that private variables don't exist in Python. There are simply norms to be followed. The language itself don't apply any restrictions.

>>> c._temperature = -300
>>> c.get_temperature()
-300

But this is not of great concern. The big problem with the above update is that, all the clients who implemented our previous class in their program have to modify their code from obj.temperature to obj.get_temperature() and all assignments like obj.temperature = val to obj.set_temperature(val).

This refactoring can cause headaches to the clients with hundreds of thousands of lines of codes.

All in all, our new update was not backward compatible. This is where property comes to rescue.

The Power of @property

The pythonic way to deal with the above problem is to use property. Here is how we could have achieved it.

class Celsius:
    def __init__(self, temperature = 0):
        self.temperature = temperature

    def to_fahrenheit(self):
        return (self.temperature * 1.8) + 32

    def get_temperature(self):
        print("Getting value")
        return self._temperature

    def set_temperature(self, value):
        if value < -273:
            raise ValueError("Temperature below -273 is not possible")
        print("Setting value")
        self._temperature = value

    temperature = property(get_temperature,set_temperature)

And, issue the following code in shell once you run it.

>>> c = Celsius()

We added a print() function inside get_temperature() and set_temperature() to clearly observe that they are being executed.

The last line of the code, makes a property object temperature. Simply put, property attaches some code (get_temperature and set_temperature) to the member attribute accesses (temperature).

Any code that retrieves the value of temperature will automatically call get_temperature() instead of a dictionary (__dict__) look-up. Similarly, any code that assigns a value to temperature will automatically call set_temperature(). This is one cool feature in Python.

We can see above that set_temperature() was called even when we created an object.

Can you guess why?

The reason is that when an object is created, __init__() method gets called. This method has the line self.temperature = temperature. This assignment automatically called set_temperature().

>>> c.temperature
Getting value
0

Similarly, any access like c.temperature automatically calls get_temperature(). This is what property does. Here are a few more examples.

>>> c.temperature = 37
Setting value

>>> c.to_fahrenheit()
Getting value
98.60000000000001

By using property, we can see that, we modified our class and implemented the value constraint without any change required to the client code. Thus our implementation was backward compatible and everybody is happy.

Finally note that, the actual temperature value is stored in the private variable _temperature. The attribute temperature is a property object which provides interface to this private variable.

Digging Deeper into Property

In Python, property() is a built-in function that creates and returns a property object. The signature of this function is

property(fget=None, fset=None, fdel=None, doc=None)

where, fget is function to get value of the attribute, fset is function to set value of the attribute, fdel is function to delete the attribute and doc is a string (like a comment). As seen from the implementation, these function arguments are optional. So, a property object can simply be created as follows.

>>> property()
<property object at 0x0000000003239B38>

A property object has three methods, getter(), setter(), and delete() to specify fget, fset and fdel at a later point. This means, the line

temperature = property(get_temperature,set_temperature)

could have been broken down as

# make empty property
temperature = property()
# assign fget
temperature = temperature.getter(get_temperature)
# assign fset
temperature = temperature.setter(set_temperature)

These two pieces of codes are equivalent.

Programmers familiar with decorators in Python can recognize that the above construct can be implemented as decorators.

We can further go on and not define names get_temperature and set_temperature as they are unnecessary and pollute the class namespace. For this, we reuse the name temperature while defining our getter and setter functions. This is how it can be done.

class Celsius:
    def __init__(self, temperature = 0):
        self._temperature = temperature

    def to_fahrenheit(self):
        return (self.temperature * 1.8) + 32

    @property
    def temperature(self):
        print("Getting value")
        return self._temperature

    @temperature.setter
    def temperature(self, value):
        if value < -273:
            raise ValueError("Temperature below -273 is not possible")
        print("Setting value")
        self._temperature = value

The above implementation is both, simple and recommended way to make properties. You will most likely encounter these types of constructs when looking for property in Python.

Well that's it for today.

Python Program to Print Hello world!
Python Program to Add Two Numbers
Python Program to Find the Square Root
Python Program to Calculate the Area of a Triangle
Python Program to Solve Quadratic Equation
Python Program to Swap Two Variables
Python Program to Generate a Random Number
Python Program to Convert Kilometers to Miles
Python Program to Convert Celsius To Fahrenheit
Python Program to Check if a Number is Positive, Negative or 0
Python Program to Check if a Number is Odd or Even
Python Program to Check Leap Year
Python Program to Find the Largest Among Three Numbers
Python Program to Check Prime Number
Python Program to Print all Prime Numbers in an Interval
Python Program to Find the Factorial of a Number
Python Program to Display the multiplication Table
Python Program to Print the Fibonacci sequence
Python Program to Check Armstrong Number
Python Program to Find Armstrong Number in an Interval
Python Program to Find the Sum of Natural Numbers
Python Program To Display Powers of 2 Using Anonymous Function
Python Program to Find Numbers Divisible by Another Number
Python Program to Convert Decimal to Binary, Octal and Hexadecimal
Python Program to Find ASCII Value of Character
Python Program to Find HCF or GCD
Python Program to Find LCM
Python Program to Find Factors of Number
Python Program to Make a Simple Calculator
Python Program to Shuffle Deck of Cards
Python Program to Display Calendar
Python Program to Display Fibonacci Sequence Using Recursion
Python Program to Find Sum of Natural Numbers Using Recursion
Python Program to Find Factorial of Number Using Recursion
Python Program to Convert Decimal to Binary Using Recursion
Python Program to Add Two Matrices
Python Program to Transpose a Matrix
Python Program to Multiply Two Matrices
Python Program to Check Whether a String is Palindrome or Not
Python Program to Remove Punctuations From a String
Python Program to Sort Words in Alphabetic Order
Python Program to Illustrate Different Set Operations
Python Program to Count the Number of Each Vowel
Python Program to Merge Mails
Python Program to Find the Size (Resolution) of a Image
Python Program to Find Hash of File