Getting Started
Welcome to the Krita Manual! In this section, we’ll try to get you up to speed.
If you are familiar with digital painting, we recommend checking out the Introduction Coming From Other Software category, which contains guides that get you up to speed with Krita by comparing its functions to other software.
If you are new to digital art, just start with Installation, which deals with installing Krita, and continue on to Starting Krita, which helps with making a new document and saving it, Basic Concepts, in which we’ll try to quickly cover the big categories of Krita’s functionality, and finally, Navigation, which helps you find basic usage help, such as panning, zooming and rotating.
When you have mastered those, you can look into the dedicated introduction pages for functionality in the User Manual, read through the over arching concepts behind (digital) painting in the General Concepts section, or just search the Reference Manual for what a specific button does.
Contents:
Introduction Coming From Other Software
Krita is not the only digital painting application in the world. Because we know our users might be approaching Krita with their experience from using other software, we have made guides to illustrate differences.
Contents:
Drawing Tablets
This page is about drawing tablets, what they are, how they work, and where things can go wrong.
What are tablets?
Drawing with a mouse can be unintuitive and difficult compared to pencil and paper. Even worse, extended mouse use can result in carpal tunnel syndrome. That’s why most people who draw digitally use a specialized piece of hardware known as a drawing tablet.
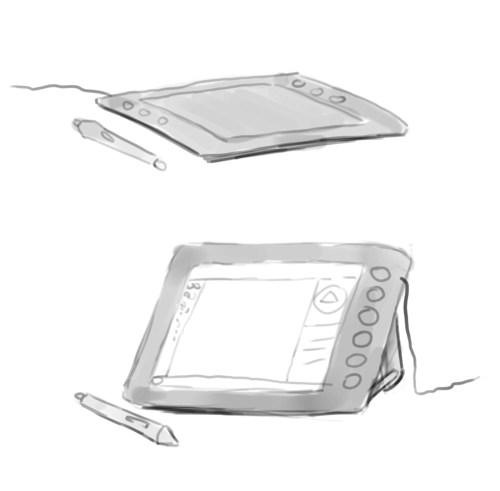
A drawing tablet is a piece of hardware that you can plug into your machine, much like a keyboard or mouse. It usually looks like a plastic pad, with a stylus. Another popular format is a computer monitors with stylus used to draw directly on the screen. These are better to use than a mouse because it’s more natural to draw with a stylus and generally better for your wrists.
With a properly installed tablet stylus, Krita can use information like pressure sensitivity, allowing you to make strokes that get bigger or smaller depending on the pressure you put on them, to create richer and more interesting strokes.
Note
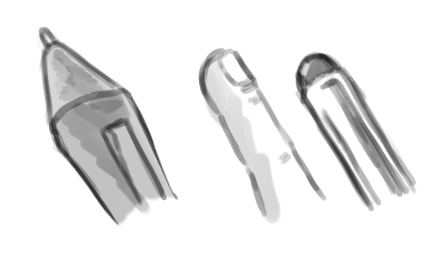
Sometimes, people confuse finger-touch styluses with a proper tablet. You can tell the difference because a drawing tablet stylus usually has a pointy nib, while a stylus made for finger-touch has a big rubbery round nib, like a finger. These tablets may not give good results and a pressure-sensitive tablet is recommended.
Drivers and Pressure Sensitivity
So you have bought a tablet, a real drawing tablet. And you wanna get it to work with Krita! So you plug in the USB cable, start up Krita and… It doesn’t work! Or well, you can make strokes, but that pressure sensitivity you heard so much about doesn’t seem to work.
This is because you need to install a program called a ‘driver’. Usually you can find the driver on a CD that was delivered alongside your tablet, or on the website of the manufacturer. Go install it, and while you wait, we’ll go into the details of what it is!
Running on your computer is a basic system doing all the tricky bits of running a computer for you. This is the operating system, or OS. Most people use an operating system called Windows, but people on an Apple device have an operating system called MacOS, and some people, including many of the developers use a system called Linux.
The base principle of all of these systems is the same though. You would like to run programs like Krita, called software, on your computer, and you want Krita to be able to communicate with the hardware, like your drawing tablet. But to have those two communicate can be really difficult - so the operating system, works as a glue between the two.
Whenever you start Krita, Krita will first make connections with the operating system, so it can ask it for a lot of these things: It would like to display things, and use the memory, and so on. Most importantly, it would like to get information from the tablet!
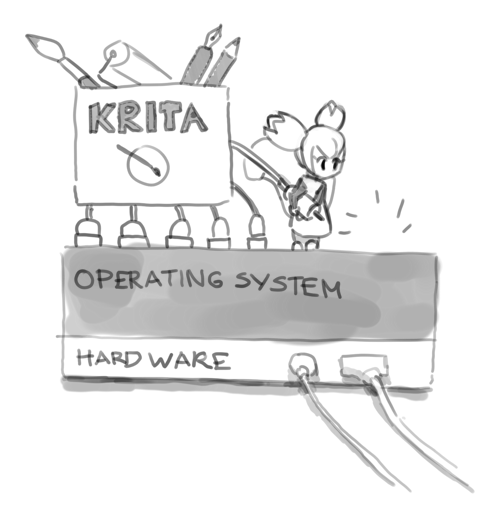
But it can’t! Turns out your operating system doesn’t know much about tablets. That’s what drivers are for. Installing a driver gives the operating system enough information so the OS can provide Krita with the right information about the tablet. The hardware manufacturer’s job is to write a proper driver for each operating system.
Warning
Because drivers modify the operating system a little, you will always need to restart your computer when installing or deinstalling a driver, so don’t forget to do this! Conversely, because Krita isn’t a driver, you don’t need to even deinstall it to reset the configuration, just rename or delete the configuration file.
Where it can go wrong
Krita automatically connects to your tablet if the drivers are installed. When things go wrong, usually the problem isn’t with Krita.
Surface pro tablets need two drivers
Certain tablets using n-trig, like the Surface Pro, have two types of drivers. N-trig by default only has Windows Ink drivers, but Krita requires Wintab-style drivers. It is recommended to install both versions. See the FAQ for more info on this.
Note
Since 3.3, Krita can use windows ink style drivers too, just go to and toggle the “Windows 8+ pointer input” there.
Windows 10 updates
Sometimes a Windows 10 update can mess up tablet drivers. In that case, reinstalling the drivers should work.
Broken Drivers
Tablet drivers need to be made by the manufacturer. Sometimes, with really cheap tablets, the hardware is fine, but the driver is badly written, which means that the driver just doesn’t work well. We cannot do anything about this, sadly. You will have to send a complaint to the manufacturer for this, or buy a better tablet with better quality drivers.
Conflicting Drivers
On Windows, you can only have a single wintab-style driver installed at a time. So be sure to deinstall the previous driver before installing the one that comes with the tablet you want to use. Other operating systems are a bit better about this, but even Linux, where the drivers are often preinstalled, cant run two tablets with different drivers at once.
Interfering software
Sometimes, there’s software that tries to make a security layer between Krita and the operating system. Sandboxie is an example of this. However, Krita cannot always connect to certain parts of the operating system while sandboxed, so it will often break in programs like sandboxie. Similarly, certain mouse software, like Razer utilities can also affect whether Krita can talk to the operating system, converting tablet information to mouse information. This type of software should be configured to leave Krita alone, or be deinstalled.
The following software has been reported to interfere with tablet events to Krita:
- Sandboxie
- Razer mouse utilities
- AMD catalyst “game mode” (this broke the right click for someone)
Flicks (Wait circle showing up and then calling the popup palette)
If you have a situation where trying to draw keeps bringing up the pop-up palette on windows, then the problem might be flicks. These are a type of gesture, a bit of windows functionality that allows you to make a motion to serve as a keyboard shortcut. Windows automatically turns these on when you install tablet drivers, because the people who made this part of windows forgot that people also draw with computers. So you will need to turn it off in the windows flicks configuration.
Wacom Double Click Sensitivity (Straight starts of lines)
If you experience an issue where the start of the stroke is straight, and have a wacom tablet, it could be caused by the Wacom driver double-click detection.
To fix this, go to the Wacom settings utility and lower the double click sensitivity.
Supported Tablets
Supported tablets are the ones of which Krita developers have a version themselves, so they can reliably fix bugs with them. We maintain a list of those here.
Loading and Saving Brushes
In the real world, when painting or drawing, you don’t just use one tool. You use pencils, erasers, paintbrushes, different types of paint, inks, crayons, etcetera. All these have different ways of making marks.
In a digital program like Krita you have something similar. We call this a brush engine. And much like how cars have different engines that give different feels when driving, or how pencils make distinctly different marks than rollerbal pens, different brush engines have totally different feels.
The brush engines have a lot of different settings as well. So, you can save those settings into presets.
Unlike Photoshop, Krita makes a difference between brush-tips and brush-presets. Tips are only a stamp of sorts, while the preset uses a tip and many other settings to create the full brush.
The Brush settings dropdown
To start, the Brush Settings Editor panel can be accessed in the toolbar, between the Blending Modes button on the right and the Patterns button on the left. Alternately, you can use the function key f5 to open it.
When you open Brush Settings Editor panel you will see something like this:
Tour of the brush settings dropdown

The brush settings drop down is divided into six areas,
Section A - General Information
This contains the Preset Icon, Live Brush Preview, the Preset Name, the Engine name, and several buttons for saving, renaming, and reloading.
Krita’s brush settings are stored into the metadata of a 200x200 png(The KPP file), where the image in the png file becomes the preset icon. This icon is used everywhere in Krita, and is useful for differentiating brushes in ways that the live preview cannot.
The live preview shows a stroke of the current brush as a little s-curve wiggle, with the pressure being non-existent on the left, and increasing to full pressure as it goes to the right. It can thus show the effect of the Pressure, Drawing Angle, Distance, Fade and Fuzzy Dab sensors, but none of the others. For some brush engines it cannot show anything. For the color smudge, filter brush and clone tool, it shows an alternating line pattern because these brush engines use the pixels already on canvas to change their effect.
After the preset name, there’s a button for renaming the brush. This will save the brush as a new brush and blacklist the previous name.
Engine
The engine of a brush is the underlying programming that generates the stroke from a brush. What that means is that different brush engines have different options and different results. You can see this as the difference between using crayons, pencils and inks, but because computers are maths devices, most of our brush engines produce different things in a more mathematical way.
For most artists the mathematical nature doesn’t matter as much as the different textures and marks each brush engine, and each brush engine has its own distinct flavor and use, and can be further customized by modifying the options.
Reloading
If you change a preset, an icon will appear behind the engine name. This is the reload button. You can use it to revert to the original brush settings.
Saving a preset.
On the right, there’s Save New Preset and Overwrite Preset.
- Overwrite Preset
- This will only enable if there are any changes. Pressing this will override the current preset with the new settings, keeping the name and the icon intact. It will always make a timestamped back up in the resources folder.
- Save New Preset
- Will take the current preset and all its changes and save it as a new preset. If no change was made, you will be making a copy of the current preset.
Save new preset will call up the following window, with a mini scratch pad, and all sorts of options to change the preset icon:
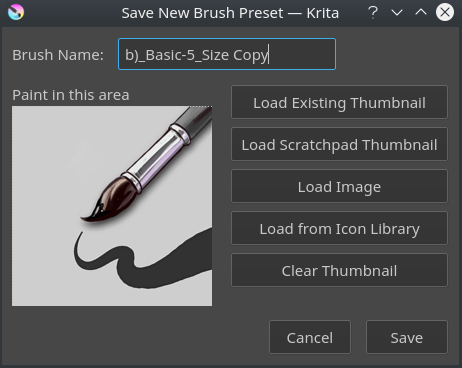
The image on the left is a mini scratchpad, you can draw on it with the current brush, allowing small modifications on the fly.
- Brush Name
- The Name of your brush. This is also used for the KPP file. If there’s already a brush with that name, it will effectively overwrite it.
- Load Existing Thumbnail
- This will load the existing thumbnail inside the preset.
- Load scratch pad thumbnail
- This will load the dashed area from the big scratch pad(Section C) into the thumbnail area.
- Load Image
- With this you can choose an image from disk to load as a thumbnail.
- Load from Icon Library
- This opens up the icon library.
- Clear Thumbnail
- This will make the mini scratch pad white.
The Icon Library
To make making presets icons faster, Krita got an icon library.
It allows you to select tool icons, and an optional small emblem. When you press OK it will load the resulting combination into the mini scratch pad and you can draw in the stroke.
If you go to your resources folder(), there’s a folder there called “preset_icons”, and in this folder there are “tool_icons” and “emblem_icons”. You can add semi-transparent pngs here and Krita will load those into the icon library as well so you can customize your icons even more!
At the top right of the icon library, there are three sliders. They allow you to adjust the tool icon. The top two are the same Hue and Saturation as in HSL adjustment, ad the lowest slider is a super simple levels filter. This is done this way because the levels filter allows maintaining the darkest shadows and brightest highlights on a tool icon, making it much better for quick adjustments.
If you’re done with everything, you can press save in the Save New Preset dialog and Krita will save the new brush.
Section B - The Preset Chooser
The preset chooser is much the same as the preset docker and the preset dropdown on F6. It’s unique in that it allows you to filter by engine and this is also where you can create brushes for an engine from scratch.
It is by default collapsed, so you will need to press the arrow at the top left of the brush engine to show it.
The top drop down is set to “all” by default, which means it shows all engines. It then shows a tag section where you can select the tags, the preset list and the search bar.
Underneath that there’s a plus icon, which when pressed gives you the full list of Krita’s engines. Selecting an engine from the list will for that engine.
The trashcan icon does the same as it does in the preset docker: delete , or rather, blacklist a preset so it won’t show up in the list.
Section C - The Scratch pad
When you tweak your brushes, you want to be able to check what each setting does. That’s why, to the right of the settings drop down, there is a scratch pad.
It is by default collapsed, so you will have to press the arrow at the top right of the brush settings to show it.
When saving a new preset, you can choose to get the icon from the scratch pad, this will load the dash area into the mini scratch pad of the Save New Preset dialog.
The scratch pad has five buttons underneath it. These are in order for:
- Showing the current brush image
- Adding a gradient to the scratch pad(useful for smudge brushes)
- Filling with the background color
- Clearing everything on the scratch pad.
Section D - The Options List
The options, as stated above, are different per brush engine. These represent the different parameters, toggles and knobs that you can turn to make a brush preset unique. For a couple of options, the main things to change are sliders and check boxes, but for a lot of them, they use curves instead.
Some options can be toggled, as noted by the little check boxes next to them, but others, like flow and opacity are so fundamental to how the brush works, that they are always on.
The little padlock icon next to the options is for locking the brush. This has its own page.
Section E - Option Configuration Widget
Where section D is the list of options, section E is the widget where you can change things.
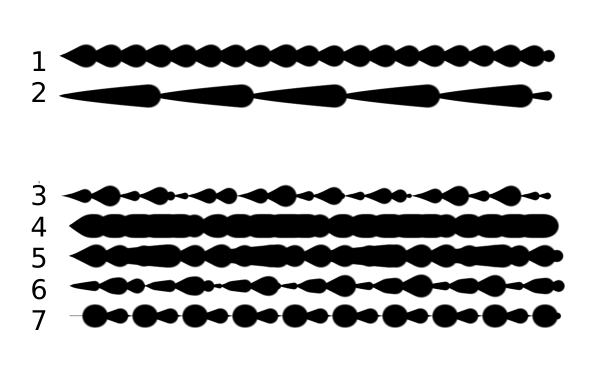
Using sensor curves
One of the big important things that makes art unique to the artist who created it is the style of the strokes. Strokes are different because they differ in speed, rotation, direction, and the amount of pressure put onto the stylus. Because these are so important, we would want to customize how these values are understood in detail. The best way to do this is to use curves.
Curves show up with the size widget for example. With an inking brush, we want to have size mapped to pressure. Just toggling the size option in the option list will do that.
However, different people have different wrists and thus will press differently on their stylus. Someone who presses softly tends to find it easy to make thin strokes, but very difficult to make thick strokes. Conversely, someone who presses hard on their stylus naturally will have a hard time making thin strokes, but easily makes thick ones.
Such a situation can be improved by using the curves to map pressure to output thinner lines or thicker ones.
The brush settings curves even have quick curve buttons for these at the top. Someone who has a hard time making small strokes should try the second to last concave button, while someone who has a hard time making thick strokes should try the third button, the S shape.
Underneath the curve widget there’s two more options:
- Share Curves across all settings
- This is for the list of sensors. Toggling this will make all the sensors use the same curve. Unchecked, all checked sensors will have separate curves.
- Curves Calculation Mode
This indicates how the multiple values of the sensor curves are used. The curves always go from 0 to 1.0, so if one curve outputs 0.5 and the other 0.7, then…
- Multiply
- Will multiply the two values, 0.5*0.7 = 0.35
- Addition
- Will add the two to a maximum of 1.0, so 0.5+0.7 = 1.2, which is then capped at 1.0.
- Maximum
- Will compare the two and pick the largest. So in the case of 0.5 and 0.7, the result is 0.7.
- Minimum
- Will compare the two and pick the smallest. So in the case of 0.5 and 0.7, the result is 0.5.
- Difference
- Will subtract the smallest value from the largest, so 0.7-0.5 = 0.2
It’s maybe better to see with the following example:
The first two are regular, the rest with different multiplication types.
- Is a brush with size set to the distance sensor.
- Is a brush with the size set to the fade sensor.
- The size is calculated from the fade and distance sensors multiplied.
- The size is calculated from the fade and distance sensors added to each other. Notice how thick it is.
- The size takes the maximum value from the values of the fade and distance sensors.
- The size takes the minimum value from the values of the face and distance sensors.
- The size is calculated by having the largest of the values subtracted with the smallest of the values.
Section F - Miscellaneous options
- Temporarily Save Tweaks to Preset (Dirty Presets)
This enables dirty presets. Dirty presets store the tweaks you make as long as this session of Krita is active. After that, the revert to default. Dirtied presets can be recognized by the icon in the top-left of the preset.
The icon in the top left of the first two presets indicate it is “Dirty”, meaning there’s tweaks made to the preset.
- Eraser Switch Size
- This switches the brush to a separately stored size when using the E key.
- Eraser Switch Opacity
- Same as above, but then with Eraser opacity.
- Instant Preview
- This allows you to toggle instant preview on the brush. The Instant Preview has a super-secret feature: when you press the instant preview label, and then right click it, it will show a threshold slider. This slider determines at what brush size instant preview is activated for the brush. This is useful because small brushes can be slower with instant preview, so the threshold ensures it only activates when necessary.
The On-canvas brush settings
There are on-canvas brush settings. If you open up the pop-up palette, there should be an icon on the bottom-right. Press that to show the on-canvas brush settings. You will see several sliders here, to quickly make small changes.
At the top it shows the currently active preset. Next to that is a settings button, click that to get a list of settings that can be shown and organized for the given brush engine. You can use the up and down arrows to order their position, and then left and right arrows to add or remove from the list. You can also drag and drop.
Making a Brush Preset
Now, let’s make a simple brush to test the waters with:
Getting a default for the brush engine.
First, open the settings with F5.
Then, press the arrow on the upper left to open the preset chooser. There, press the “+” icon to get a list of engines. For this brush we’re gonna make a pixel brush.
Example: Making an inking brush
- Draw on the scratch pad to see what the current brush looks like. If done correctly, you should have a 5px wide brush that has pressure set to opacity.
- Let us turn off the opacity first. Click on the opacity option in the right-hand list. The settings should now be changed to a big curve. This is the sensor curve.
- Uncheck the enable pen settings checkbox.
- Test on the scratch pad… there still seems to be something affecting opacity. This is due the flow option.
- Select the Flow option from the list on the right hand. Flow is like Opacity, except that Flow is per dab, and opacity is per stroke.
- Uncheck the enable pen settings checkbox here as well. Test again.
- Now you should be getting somewhere towards an inking brush. It is still too small however, and kinda grainy looking. Click Brush Tip in the brush engine options.
- Here, diameter is the size of the brush-tip. You can touch the slider change the size, or right-click it and type in a value. Set it to 25 and test again. It should be much better.
- Now to make the brush feel a bit softer, turn down the fade parameter to about 0.9. This’ll give the brush mask a softer edge.
- If you test again, you’ll notice the fade doesn’t seem to have much effect. This has to do with the spacing of the dabs: The closer they are together, the harder the line is. By default, this is 0.1, which is a bit low. If you set it to 10 and test, you’ll see what kind of effect spacing has. The Auto checkbox changes the way the spacing is calculated, and Auto Spacing with a value of 0.8 is the best value for inking brushes. Don’t forget that you can use right-click to type in a value.
- Now, when you test, the fade seems to have a normal effect… except on the really small sizes, which look pixelly. To get rid of that, check the anti-aliasing check box. If you test again, the lines should be much nicer now.
Saving the new Brush
When you’re satisfied, go to the upper left and select “save new preset”.
You will get the save preset dialog. Name the brush something like “My Preset”. Then, select “Load from Icon Library” to get the icon library. Choose a nice tool icon and press OK.
The icon will be loaded into the mini scratch pad on the left. Now doodle a nice stroke next to it. If you feel you messed up, just go back to the icon library to load a new icon.
Finally press “save”, and your brush should be done.
You can further modify your inking brush by…
- Changing the amount of pressure you need to put on a brush to make it full size.
- To do this, select the size option, and press the pressure sensor from the list next to the curve. The curve should look like a straight line. Now if you want a brush that gets big with little pressure, tick on the curve to make a point, and drag the point to the upper-left. The more the point is to the upper-left, the more extreme the effect. If you want instead a brush that you have to press really hard on to get to full size, drag the dot to the lower-right. Such a brush is useful for fine details. Don’t forget to save the changes to your brush when done.
- Making the fine lines look even softer by using the flow option.
- To do this, select the flow option, and turn back on the enable pen settings check box. Now if you test this, it is indeed a bit softer, but maybe a bit too much. Click on the curve to make a dot, and drag that dot to the top-left, half-way the horizontal of the first square of the grid. Now, if you test, the thin lines are much softer, but the hard your press, the harder the brush becomes.
Sharing Brushes
Okay, so you’ve made a new brush and want to share it. There are several ways to share a brush preset.
The recommended way to share brushes and presets is by using the resource bundle system. We have detailed instructions on how to use them on the resource management page.
However, there’s various old-fashioned ways of sharing brushes that can be useful when importing and loading very old packs:
Sharing a single preset
There are three types of resources a single preset can take:
- A Paintoppreset file: This is the preset proper, with the icon and the curves stored inside.
- A Brush file: This is the brush tip. When using masked brushes, there’s two of these.
- A Pattern file: this is when you are using textures.
So when you have a brush that uses unique predefined tips for either brush tip or masked brush, or unique textures you will need to share those resources as well with the other person.
To find those resources, go to .
There, the preset file will be inside paintoppresets, the brush tips inside brushes and the texture inside patterns.
Importing a single KPP file.
Now, if you want to use the single preset, you should go to the preset chooser on f6 and press the folder icon there. This will give a file dialog. Navigate to the kpp file and open it to import it.
If there’s brush tips and patterns coming with the file, do the same with pattern via the pattern docker, and for the brush-tip go to the settings dropdown(f5) and then go to the “brush-tip” option. There, select predefined brush, and then the “import” button to call up the file dialog.
Sharing via ZIP(old-fashioned)
Sharing via ZIP should be replaced with resource bundles, but older brush packs are stored in zip files.
Using a ZIP with the relevant files.
- Go to to open the resource folder.
- Then, open up the zip file.
- Copy the brushes, paintoppresets and patterns folders from the zip file to the resource folder. You should get a prompt to merge the folders, agree to this.
- Restart Krita
- Enjoy your brushes!
On-Canvas Brush Editor
Krita’s brush editor is, as you may know, on F5. However, sometimes you just want to modify a single parameter quickly. Perhaps even in canvas-only mode. The on canvas brush editor or brush HUD allows you to do this. It’s accessible from the pop-up palette, by ticking the lower-right arrow button.
You can change the amount of visible settings and their order by clicking the settings icon next to the brush name.
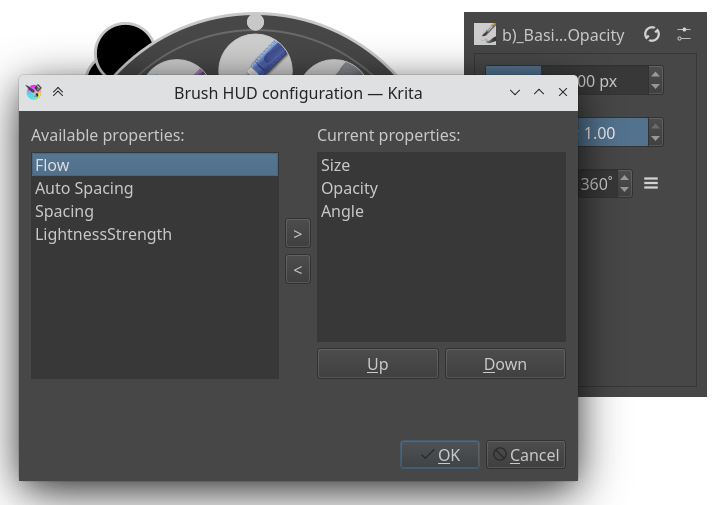
On the left are all unused settings, on the right are all used settings. You use the and buttons to move a setting between the two columns. The and buttons allow you to adjust the order of the used settings, for when you think flow is more important than size.
These set-ups are PER brush engine, so different brush engines can have different configurations.
Mirror Tools
Draw on one side of a mirror line while the Mirror Tool copies the results to the other side. The Mirror Tools are accessed along the toolbar. You can move the location of the mirror line by grabbing the handle.

Mirror Tools give a similar result to the Multibrush Tool, but unlike the Multibrush which only traces brush strokes like the Freehand Brush Tool, the Mirror Tools can be used with any other tool that traces strokes, such as the Straight Line Tool and the Bezier Curve Tool, and even with the Multibrush Tool.
Horizontal Mirror Tool - Mirror the results along the horizontal axis.
Vertical Mirror Tool - Mirror the results along the vertical axis.
There are additional options for each tool. You can access these by the clicking the drop-down arrow located on the right of each tool.
- Hide Mirror Line (toggle) – Locks the mirror axis and hides the axis line
- Lock (toggle) - hides the move icon on the axis line.
- Move to Canvas Center - Moves the axis line to the center of the canvas
Mirroring along a rotated line
The Mirror Tool can only mirror along a perfectly vertical or horizontal line. To mirror along a line that is at a rotated angle, use the Multibrush Tool and its various parameters, it has more advanced options besides basic symmetry.
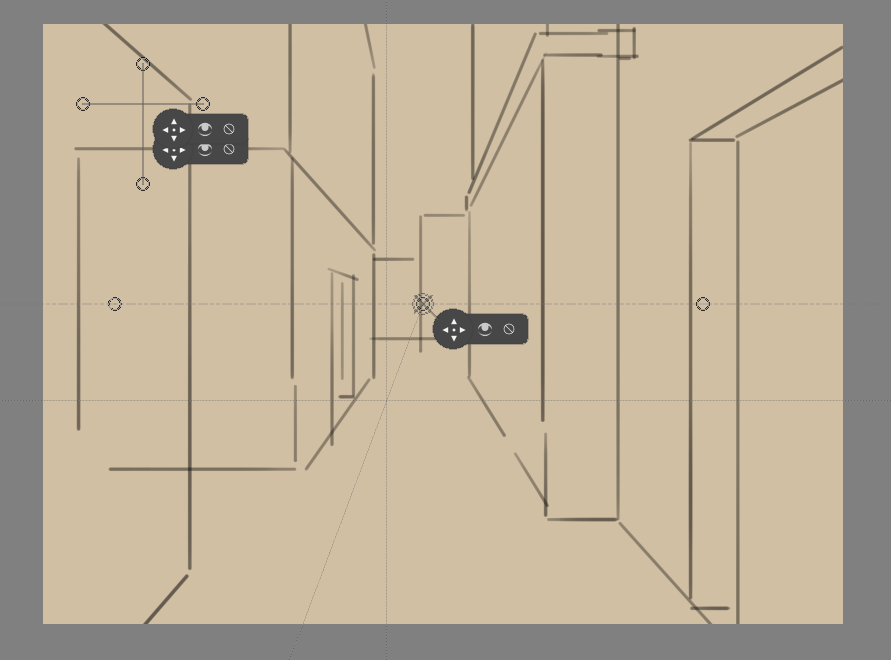
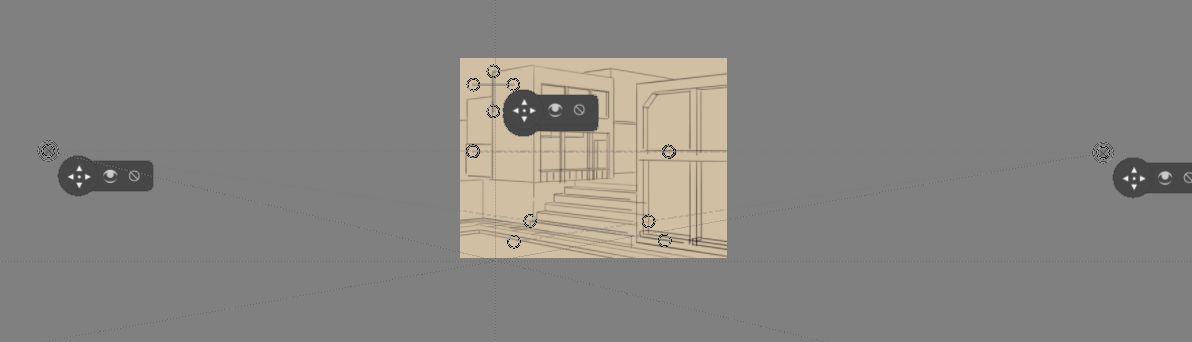
Painting with Assistants
The assistant system allows you to have a little help while drawing straight lines or circles.
They can function as a preview shape, or you can snap onto them with the freehand brush tool. In the tool options of free hand brush, you can toggle ‘snap to assistant’ to turn on snapping.

Krita’s vanishing point assistants in action
The following assistants are available in Krita:
Types:
There’s several types in Krita. You can select a type of assistant via the tool options docker.
Ellipse
An assistant for drawing ellipses and circles.
This assistant consists of three points: the first two are the axis of the ellipse, and the last one is to determine its width.
- Concentric Ellipse
- The same an ellipse, but allows for making ellipses that are concentric to each other.
If you press shift while holding the first two handles, they will snap to perfectly horizontal or vertical lines. Press Shift while holding the third handle, and it’ll snap to a perfect circle.
Perspective
This ruler takes four points and creates a perspective grid.
This grid can be used with the ‘perspective’ sensor, which can influence brushes.
If you press shift while holding any of the corner handles, they’ll snap to one of the other corner handles, in sets.
Ruler
There are three assistants in this group:
- Ruler
- Helps create a straight line between two points.
- Infinite Ruler
- Extrapolates a straight line beyond the two visible points on the canvas.
- Parallel Ruler
- This ruler allows you to draw a line parallel to the line between the two points anywhere on the canvas.
If you press shift while holding the first two handles, they will snap to perfectly horizontal or vertical lines.
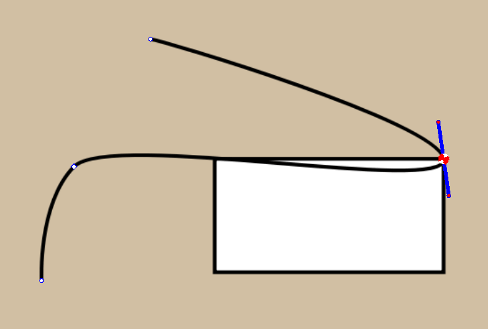
Spline
This assistant allows you to position and adjust four points to create a cubic bezier curve. You can then draw along the curve, snapping your brush stroke directly to the curve line. Perfect curves every time!
If you press shift while holding the first two handles, they will snap to perfectly horizontal or vertical lines. Press shift while holding the third or fourth handle, they will snap relative to the handle they are attached to.
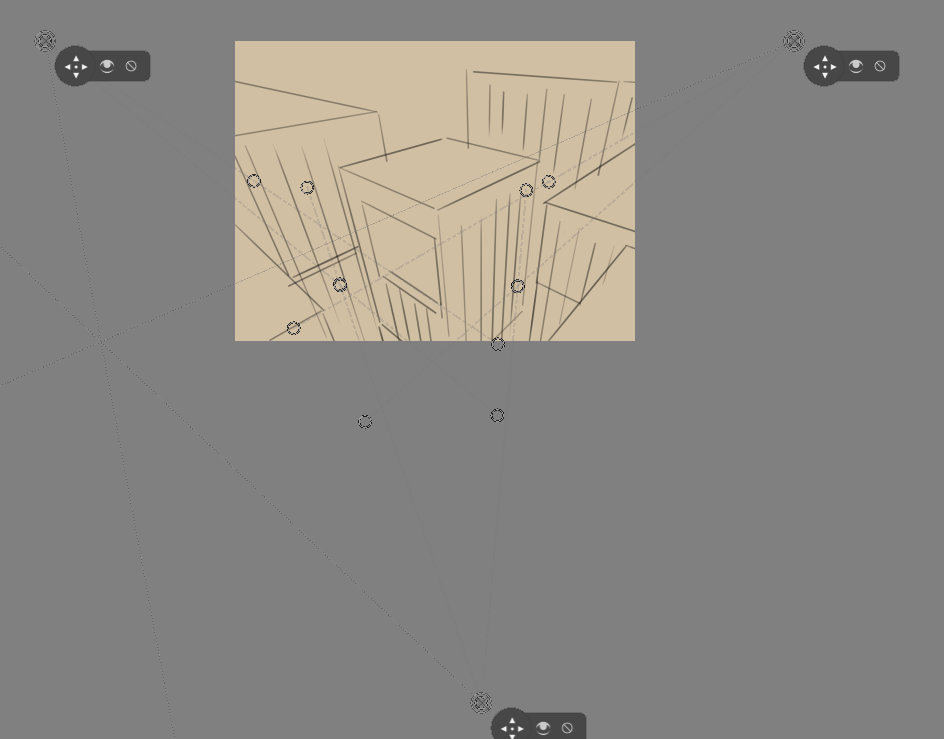
Vanishing Point
This assistant allows you to create a vanishing point, typically used for a horizon line. A preview line is drawn and all your snapped lines are drawn to this line.
It is one point, with four helper points to align it to previously created perspective lines.
They are made and manipulated with the Assistant Tool.
If you press shift while holding the center handle, they will snap to perfectly horizontal or vertical lines depending on the position of where it previously was.
Changed in version 4.1: The vanishing point assistant also shows several general lines.
When you’ve just created, or when you’ve just moved a vanishing point assistant, it will be selected. This means you can modify the amount of lines shown in the tool options of the Assistant Tool.
Fish Eye Point
Like the vanishing point assistant, this assistant is per a set of parallel lines in a 3d space. So to use it effectively, use two, where the second is at a 90 degree angle of the first, and add a vanishing point to the center of both. Or combine one with a parallel ruler and a vanishing point, or even one with two vanishing points. The possibilities are quite large.
This assistant will not just give feedback/snapping between the vanishing points, but also give feedback to the relative left and right of the assistant. This is so you can use it in edge-cases like panoramas with relative ease.
If you press shift while holding the first two handles, they will snap to perfectly horizontal or vertical lines. Press shift while holding the third handle, and it’ll snap to a perfect circle.
Tutorials
Check out this in depth discussion and tutorial on https://www.youtube.com/watch?v=OhEv2pw3EuI
Setting up Krita for technical drawing-like perspectives
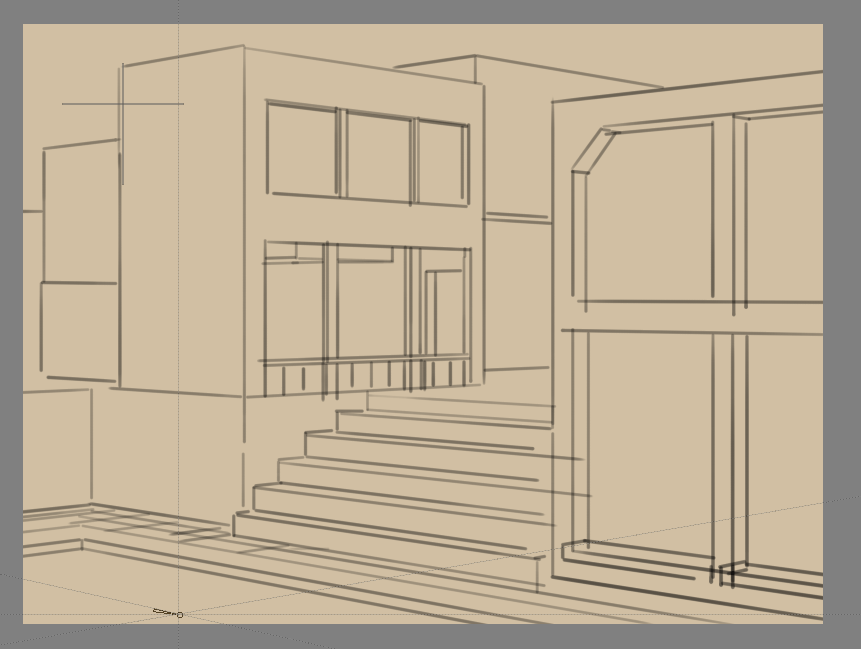
So now that you’ve seen the wide range of drawing assistants that Krita offers, here is an example of how using these assistants you can set up Krita for technical drawing.
This tutorial below should give you an idea of how to set up the assistants for specific types of technical views.
If you want to instead do true projection, check out the projection category.
Orthographic
Orthographic is a mode where you try to look at something from the left or the front. Typically, you try to keep everything in exact scale with each other, unlike perspective deformation.
The key assistant you want to use here is the Parallel Ruler. You can set these up horizontally or vertically, so you always have access to a Grid.
Axonometric
All of these are set up using three Parallel Rulers.
- Oblique
- For oblique, set two parallel rulers to horizontal and vertical, and one to an angle, representing depth.
- Dimetric & Isometric
- Isometric perspective has technically all three rulers set up at 120° from each other. Except when it’s game isometric, then it’s a type of dimetric projection where the diagonal values are a 116.565° from the main. The latter can be easily set up by snapping the assistants to a grid.
- Trimetric
- Is when all the angles are slightly different. Often looks like a slightly angled isometric.
Linear Perspective
- 1 Point Perspective
- A 1 point perspective is set up using 1 vanishing point, and two crossing perpendicular parallel rulers.
- 2 Point Perspective
- A 2 point perspective is set up using 2 vanishing point and 1 vertical parallel ruler. Often, putting the vanishing points outside the frame a little can decrease the strength of it.
- 3 Point Perspective
- A 3 point perspective is set up using 3 vanishing point rulers.
Logic of the vanishing point
There’s a little secret that perspective tutorials don’t always tell you, and that’s that a vanishing point is the point where any two parallel lines meet. This means that a 1 point perspective and 2 point perspective are virtually the same.
We can prove this via a little experiment. That good old problem: drawing a rail-road.
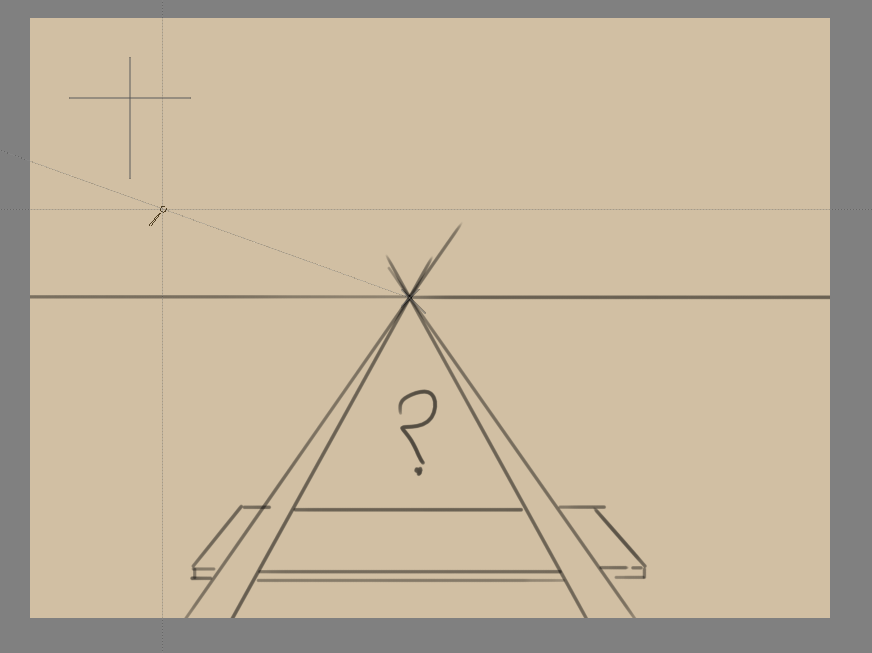
You are probably familiar with the problem: How to determine where the next beam is going to be, as perspective projection will make them look closer together.
Typically, the solution is to draw a line in the middle and then draw lines diagonally across. After all, those lines are parallel, meaning that the exact same distance is used.
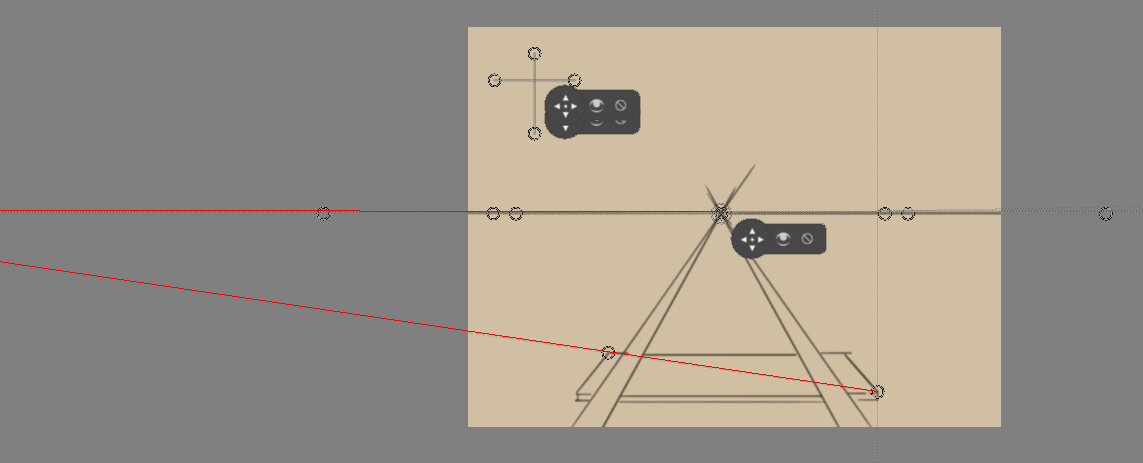
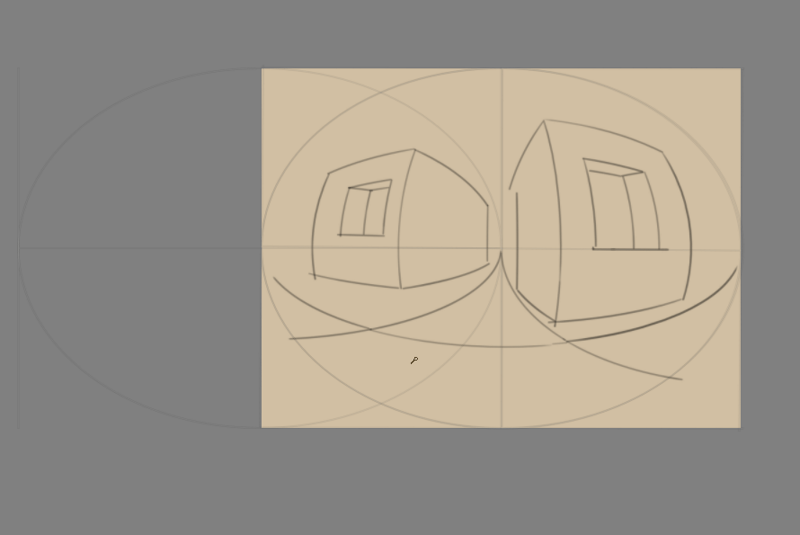
But because they are parallel, we can use a vanishing point assistant instead, and we use the alignment handles to align it to the diagonal of the beam, and to the horizontal (here marked with red).
That diagonal can then in turn be used to determine the position of the beams:
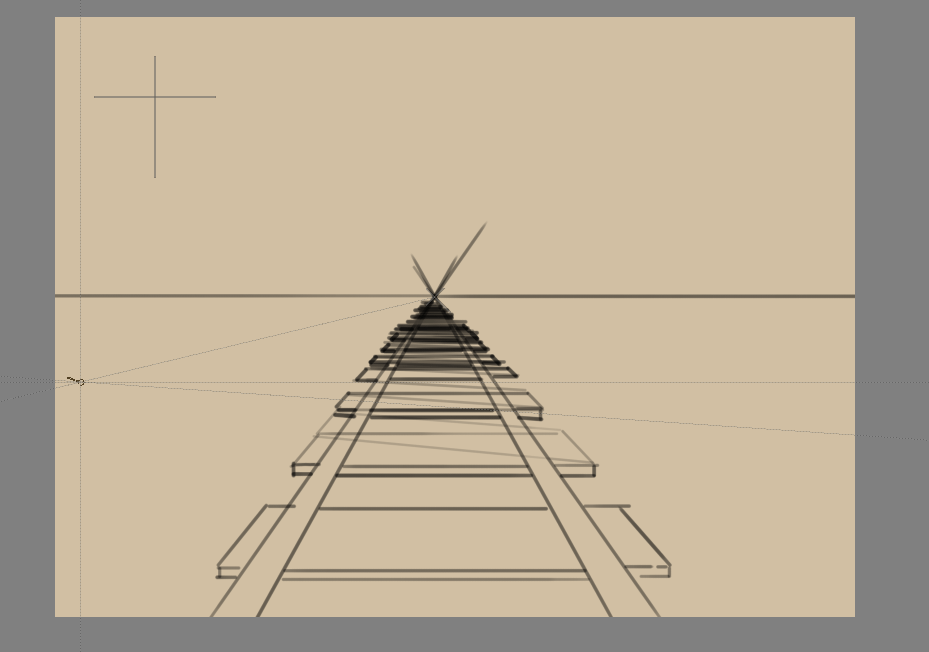
Because any given set of lines has a vanishing point(outside of the ones flat on the view-plane), there can be an infinite amount of vanishing points in a linear perspective. Therefore, Krita allows you to set vanishing points yourself instead of forcing you to only use a few.
Fish Eye perspective
Fish eye perspective works much the same as the linear perspective, the big difference being that in a fish-eye perspective, any parallel set of lines has two vanishing points, each for one side.
So, to set them up, the easiest way is one horizontal, one vertical, on the same spot, and one vanishing point assistant in the middle.
But, you can also make one horizontal one that is just as big as the other horizontal one, and put it halfway:
Working with Images
Computers work with files and as a painting program, Krita works with images as the type of file it creates and manipulates.
What do Images Contain?
If you have a text document, it of course contains letters, strung in the right order, so the computer loads them as coherent sentences.
Raster Data
This is the main data on the paint layers you make. So these are the strokes with the paint brush and look pixely up close. A multi-layer file will contain several of such layers, that get overlaid on top of each other so make the final image.
A single layer file will usually only contain raster data.
Vector Data
These are mathematical operations that tell the computer to draw pixels on a spot. This makes them much more scalable, because you just tell the operation to make the coordinates 4 times bigger to scale it up. Due to this vector data is much more editable, lighter, but at the same time it’s also much more CPU intensive.
Operation Data
Stuff like the filter layers, that tells Krita to change the colors of a layer, but also transparency masks, group layer and transformation masks are saved to multi-layer files. Being able to load these depend on the software that initially made the file. So Krita can load and save groups, transparency masks and layer effects from PSD, but not load or save transform masks.
Metadata
Metadata is information like the creation date, author, description and also information like DPI.
Image size
The image size is the dimension and resolution of the canvas. Image size has direct effect file size of the Krita document. The more pixels that need to be remembered and the higher the bit depth of the color, the heavier the resulting file will be.
DPI/PPI
DPI stands for Dots per Inch, PPI stands for Pixels per Inch. In printing industry, suppose if your printer prints at 300 DPI It means it is actually putting 300 dots of colors in an area equal to an Inch. This means the number of pixels your artwork has in a relative area of an Inch.
DPI is the concern of the printer, and artists while creating artwork should keep PPI in mind. According to the PPI you have set, the printers can decide how large your image should be on a piece of paper.
Some standards:
- 72 PPI
- This is the default PPI of monitors as assumed by all programs. It is not fully correct, as most monitors these days have 125 PPI or even 300 PPI for the retina devices. None the less, when making an image for computer consumption, this is the default.
- 120 PPI
- This is often used as standard for low-quality posters.
- 300 PPI
- This is the minimum you should use for quality prints.
- 600 PPI
- The quality used for line art for comics.
Color depth
We went over color depth in the Color Management page. What you need to understand is that Krita has image color spaces, and layer color spaces, the latter which can save memory if used right. For example, having a line art layer in grayscale can half the memory costs.
Image color space vs layer color space vs conversion.
Because there’s a difference between image color space and layer color space, you can change only the image color space in which will leave the layers alone. But if you want to change the color space of the file including all the layers you can do it by going to Image > Convert Image Color Space this will convert all the layers Color space as well.
Author and Description
Krita will automatically save who created the image into your image’s metadata. Along with the other data such as time and date of creation and modification, Krita also shows editing time of a document in the document information dialog, useful for professional illustrators, speed-painters to keep track of the time they worked on an artwork for billing purposes. It detects when you haven’t performed actions for a while, and has a precision of +- 60 seconds. You can empty it in the document info dialog and of course by unzipping you .kra file and editing the meta-data there.
These things can be edited in , and for the author’s information . Profiles can be switched under .
Setting the canvas background color
You can set the canvas background color via . This allows you to turn the background color non-transparent and to change the color. This is also useful for certain file formats which force a background color instead of transparency. PNG and JPG export use this color as the default color to fill in transparency if you do not want to export transparency.
If you come in from a program like Paint Tool Sai, then using this option, or using Set Canvas Background Color in the new file options, will allow you to work in a slightly more comfortable environment, where transparency isn’t depicted with checkered boxes.
Basic transforms
There’s some basic transforms available in the image menu.
- Shear Image
- This will allow you to skew the whole image and its layers.
- Rotate
- This will allow you to rotate the image and all its layers quickly.
- Mirror Horizontal/Vertical
- This will allow you to mirror the whole image with all its layers.
But there are more options than that…
Cropping and resizing the canvas
You can crop and image with the Crop Tool, to cut away extra space and improve the composition.
Trimming
Using , Krita resizes the image to the dimensions of the layer selected. Useful for when you paste a too large image into the layer and want to resize the canvas to the extent of this layer.
is a faster cousin to the crop tool, This helps us to resize the canvas to the dimension of any active selection. This is especially useful with right clicking the layer on the layer stack and choosing Select Opaque. will then crop the canvas to the selection bounding box.
is actually for layers, and will trim all layers to the size of the image, making your files lighter by getting rid of invisible data.
Resizing the canvas
You can also resize the canvas via ). The dialog box is shown below.
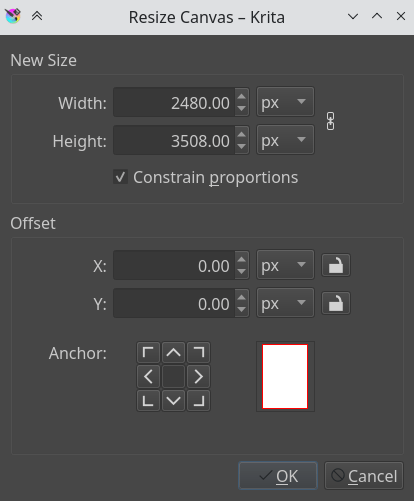
In this, constraint proportions will make sure the height and width stay in proportion to each other as you change them. Offset makes indicates where the new canvas space is added around the current image. You basically decide where the current image goes(if you press the left-button, it’ll go to the center left, and the new canvas space will be added to the right of the image).
Another way to resize the canvas according to the need while drawing is when you scroll away from the end of the canvas, you can see an arrow appear. Clicking this will extend the canvas in that direction. You can see the arrow marked in red in the example below

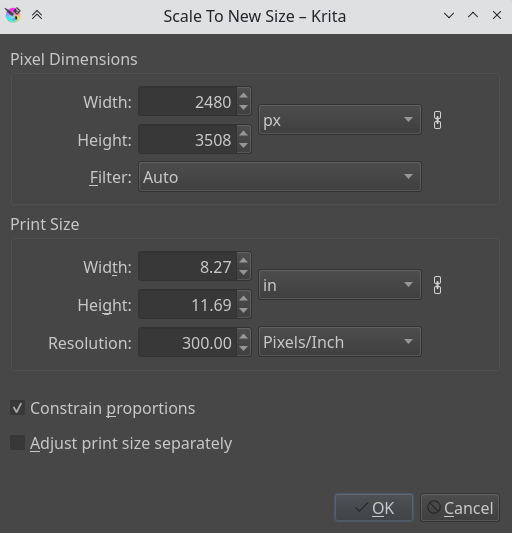
Resizing the image
Scale Image to New Size allows you to resize the whole image. Also, importantly, this is where you can change the resolution or upres your image. So for instance, if you were initially working at 72 PPI to block in large shapes and colors, images, etc… And now you want to really get in and do some detail work at 300 or 400 PPI this is where you would make the change.
Like all other dialogs where a chain link appears, when the chain is linked the aspect ratio is maintained. To disconnect the chain, just click on the links and the two halves will separate.
Separating Images.
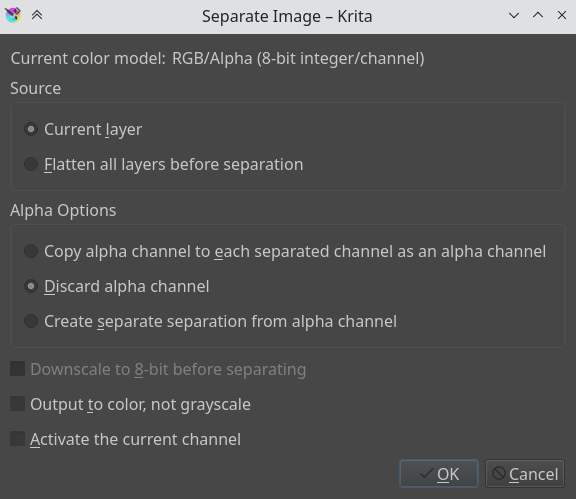
This powerful image manipulation feature lets you separate an image into its different components or channels.
This is useful for people working in print, or people manipulating game textures. There’s no combine functionality, but what you can do, if using colored output, is to set two of the channels to the addition Blending Modes.
For grayscale images in the RGB space, you can use the copy red, copy green and copy blue blending modes, with using the red one for the red channel image, etc.
Saving, Exporting and Opening Files
When Krita creates or opens a file, it has a copy of the file in memory, that it edits. This is part of the way how computers work: They make a copy of their file in the ram. Thus, when saving, Krita takes it’s copy and copies it over the existing file. There’s a couple of tricks you can do with saving.
- Save
- Krita saves the current image in its memory to a defined place on the hard-drive. If the image hadn’t been saved before, Krita will ask you where to save it.
- Save As
- Make a copy of your current file by saving it with a different name. Krita will switch to the newly made file as its active document.
- Open
- Open a saved file. Fairly straightforward.
- Export
- Save a file to a new location without actively opening it. Useful for when you are working on a layered file, but only need to save a flattened version of it to a certain location.
- Open Existing Document As Untitled Document
- This is a bit of an odd one, but it opens a file, and forgets where you saved it to, so that when pressing ‘save’ it asks you where to save it. This is also called ‘import’ in other programs.
- Create Copy from Current Image
- Makes a new copy of the current image. Similar to Open Existing Document As Untitled Document, but then with already opened files.
- Save Incremental Version
- Saves the current image as ‘filename’_XXX.kra and switches the current document to it.
- Save Incremental Backup.
- Exports the current image as ‘filename’_XXX.kra.
Note
Since Krita’s file format is compressed data file, in case of corrupt or broken file you can open it with archive managers and extract the contents of the layers. This will help you to recover as much as possible data from the file. On windows, you will need to rename it to filename.zip to open it.
Templates
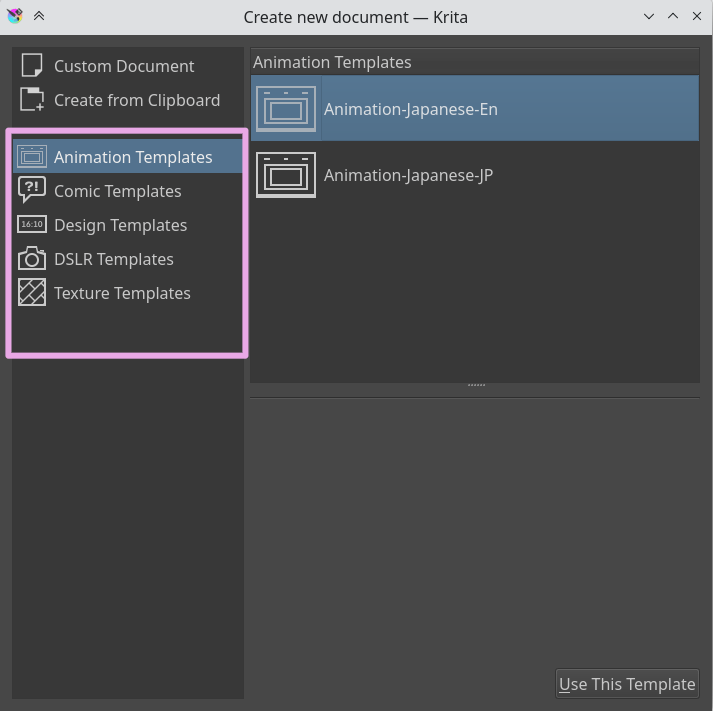
Templates are just .kra files which are saved in a special location so it can be pulled up by Krita quickly. This is like the Open Existing Document and Untitled Document but then with a nicer place in the UI.
You can make your own template file from any .kra file, by using create template from image in the file menu. This will add your current document as a new template, including all its properties along with the layers and layer contents.
We have the following defaults:
Comic Templates
These templates are specifically designed for you to just get started with drawing comics. The comic template relies on a system of vectors and clones of those vector layers which automatically reflect any changes made to the vector layers. In between these two, you can draw your picture, and not fear them drawing over the panel. Use Inherit Alpha to clip the drawing by the panel.
- European Bande Desinée Template.
- This one is reminiscent of the system used by for example TinTin or Spirou et Fantasio. These panels focus on wide images, and horizontal cuts.
- US-style comics Template.
- This one is reminiscent of old DC and Marvel comics, such as Batman or Captain America. Nine images for quick story progression.
- Manga Template.
- This one is based on Japanese comics, and focuses on a thin vertical gutter and a thick horizontal gutter, ensuring that the reader finished the previous row before heading to the next.
- Waffle Iron Grid
- 12 little panels at you disposal.
Design Templates
These are templates for design and have various defaults with proper ppi at your disposal:
- Cinema 16:10
- Cinema 2.93:1
- Presentation A3-landscape
- Presentation A4 portrait.
- Screen 4:3
- Web Design
DSLR templates
These have some default size for photos
- Canon 55D
- Canon 5DMK3
- Nikon D3000
- Nikon D5000
- Nikon D7000
Texture Templates.
These are for making 3D textures, and are between 1024, to 4092.
Introduction to Layers and Masks
Krita supports layers which help to better control parts and elements of your painting.
Think of an artwork or collage made with various stacks of papers with some paper cut such that they show the paper beneath them while some hide what’s beneath them. If you want to replace an element in the artwork, you replace that piece of paper instead of drawing the entire thing. In Krita instead of papers we use Layers. Layers are part of the document which may or may not be transparent, they may be smaller or bigger than the document itself, they can arrange one above other, named and grouped.
Layers can give better control over your artwork for example you can re-color an entire artwork just by working on the separate color layer and thereby not destroying the line art which will reside above this color layer.
You can edit individual layers, you can even add special effects to them, like Layer styles, blending modes, transparency, filters and transforms. Krita takes all these layers in its layer stack, including the special effects and combines or composites together a final image. This is just one of the many digital image manipulation tricks that Krita has up its sleeve!
Usually, when you put one paint layer on top of another, the upper paint layer will be fully visible, while the layer behind it will either be obscured, occluded or only partially visible.
Managing layers
Some artists draw with limited number of layers but some prefer to have different elements of the artwork on separate layer. Krita has some good layer management features which make the layer management task easy.
You can group layers and organise the elements of your artwork.
The layer order can be changed or layers can be moved in and out of a group in the layer stack by simply holding them and dragging and dropping. Layers can also be copied across documents while in the subwindow mode, by dragging and dropping from one document to another.
These features save time and also help artists in maintaining the file with a layer stack which will be easy to understand for others who work on the same file. In addition to these layers and groups can both be labeled and filtered by colors, thus helping the artists to visually differentiate them.
To assign a color label to your layer or layer group you have to right click on the layer and choose one of the given colors from the context menu. To remove an already existing color label you can click on the ‘x’ marked box in the context menu.

Once you assign color labels to your layers, you can then filter layers having similar color label by clicking on one or more colors in the list from the drop-down situated at the top-right corner of the layer docker

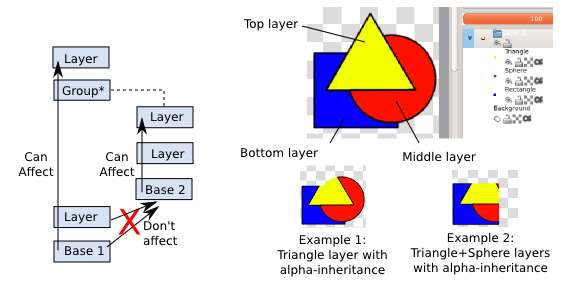
Types of Layers

The image above shows the various types of layers in Layers, Each layer type has a different purpose for example all the vector elements can be only placed on a vector layer and similarly normal raster elements are mostly on the paint layer, Layers and Masks page contains more information about these types layers.
Now Let us see how these layers are composited in Krita.
How are layers composited in Krita ?
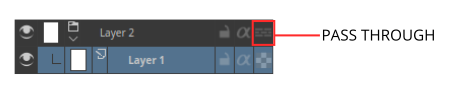
In Krita, the visible layers form a composite image which is shown on the canvas. The order in which Krita composites the layers is from bottom to top, much like the stack of papers we discussed above. As we continue adding layers, the image we see changes, according to the properties of the newly added layers on top. Group Layers composite separately from the other layers in the stack, except when pass through mode is activated. The layers inside a group form a composite image first and then this composite is taken into consideration while the layer stack is composited to form a whole image. If the pass through mode is activated by pressing the icon similar to bricked wall, the layers within the group are considered as if they are outside of that particular group in the layer stack, however, the visibility of the layers in a group depends on the visibility of the group.

The groups in a PSD file saved from Photoshop have pass-through mode on by default unless they are specifically set with other blending modes.
Inherit Alpha or Clipping layers
There is a clipping feature in Krita called inherit alpha. It is denoted by an alpha icon in the layer stack.
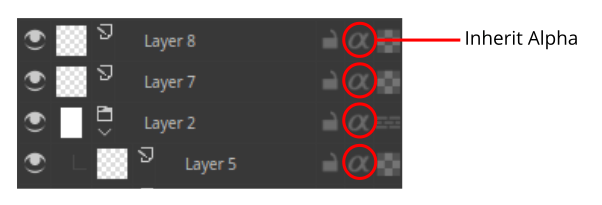
It can be somewhat hard to figure out how the inherit alpha feature works in Krita for the first time. Once you click on the inherit alpha icon on the layer stack, the pixels of the layer you are painting on are confined to the combined pixel area of all the layers below it. That means if you have the default white background layer as first layer, clicking on the inherit alpha icon and painting on any layer above will seem to have no effect as the entire canvas is filled with white. Hence, it is advised to put the base layer that you want the pixels to clip in a group layer. As mentioned above, group layers are composited separately, hence the layer which is the lowest layer in a group becomes the bounding layer and the content of the layers above this layer clips to it if inherit alpha is enabled.
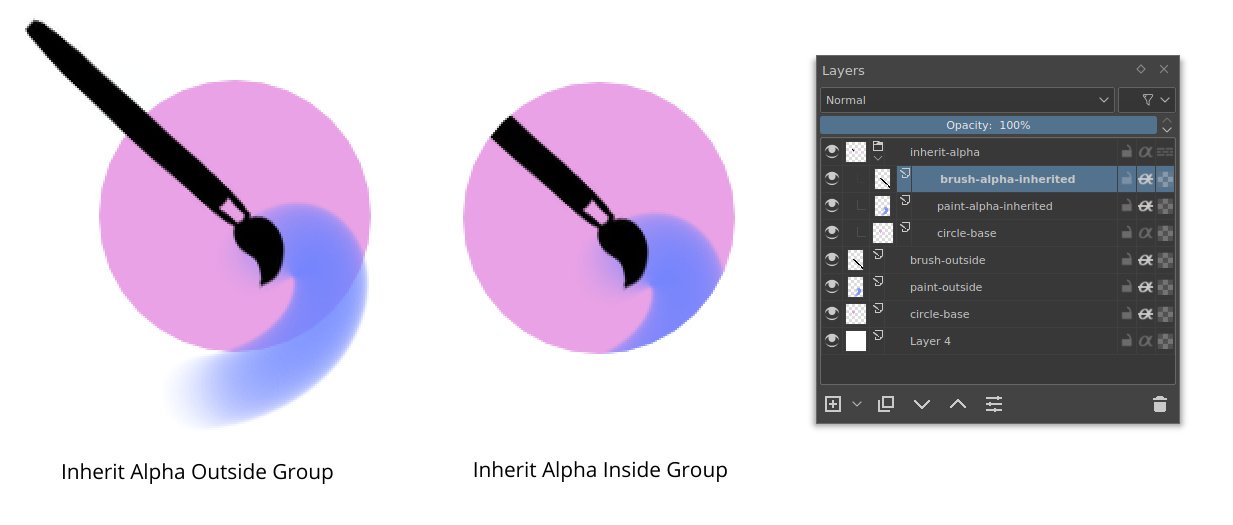
You can also enable alpha inheritance to a group layer.
Masks and Filters
Krita supports non-destructive editing of the content of the layer. Non-destructive editing means editing or changing a layer or image without actually changing the original source image permanently, the changes are just added as filters or masks over the original image while keeping it intact, this helps a lot when your workflow requires constant back and forth. You can go back to original image with a click of a button, Just hide the filter or mask you have your initial image.
You can add various filters to a layer with Filter mask, or add Filter layer which will affect the whole image. Layers can also be transformed non-destructively with the transformation masks, and even have portions temporarily hidden with a Transparenct Mask. Non-destructive effects like these are very useful when you change your mind later, or need to make a set of variations of an given image.
Note
You can merge all visible layers by selecting everything first . Then Combine them all by merging .
These filters and masks are accessible through the right click menu (as shown in the image below) and the Plus icon on the layer docker.

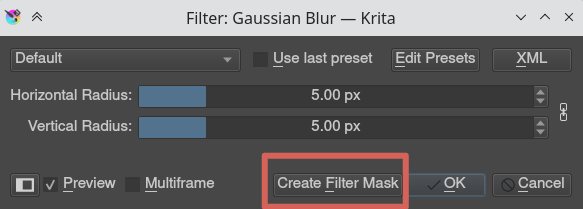
You can also add a filter as a mask from filter dialog itself, by clicking on the Create Filter Mask button.
All the filters and masks can also be applied over a group too, thus making it easy to non-destructively edit multiple layers at once. In the category Layers and masks you can read more about the individual types of layers and masks.
Layer Docker has more information about the shortcuts and other layer management workflows.
Selections
Selections allow you to pick a specific area of your artwork to change. There are many selection tools available that select in different ways. Once an area is selected, most tools will stay inside that area. On that area you can draw or use gradients to quickly get colored and/or shaded shapes with hard edges.
Creating Selections
The most common selection tools all exist at the bottom of the toolbox. Each tool selects things slightly differently. The links for each tool go into a more detailed description with how to use it.
| Rectangular Selection Tool |  |
Select the shape of a square. |
| Elliptical Selection Tool |  |
Select the shape of a circle. |
| Polygonal Selection Tool |  |
Click where you want each point of the Polygon to be. Double click to end your polygon and finalize your selection area. Use Shift + Z to undo last point. |
| Outline Selection Tool |  |
Outline/Lasso tool is used for a rough selection by drawing the outline. |
| Similar Color Selection Tool |  |
Similar Color Selection Tool |
| Contiguous Selection Tool |  |
Contiguous or “Magic Wand” selects a field of color, Adjust the fuzziness to allow more changes in the field of color, by default limited to the current layer. |
| Path Selection Tool |  |
Path select an area based on a vector path, click to get sharp corners or drag to get flowing lines and close the path with enter or connecting back to the first point. |
Note
You can also use the transform tools on your selection, a great way to try different proportions on parts of your image.
Editing Selections
The tool options for each selection tool gives you the ability to modify your selection.
| Action | Modifier | Shortcut |
| Replace | Ctrl | – |
| Intersect | Shift + Alt | – |
| Add | Shift | A |
| Subtract | Alt | S |
Removing Selections
If you want to delete the entire selection, the easiest way is to deselect everything. . Shortcut Ctrl + Shift + A.
Display Modes
In the bottom left-hand corner of the status bar there is a button to toggle how the selection is displayed. The two display modes are the following: (Marching) Ants and Mask. The red color with Mask can be changed in the preferences. You can edit the color under . If there is no selection, this button will not do anything.
Ants display mode (default) is best if you want to see the areas that are not selected.
Mask display mode is good if you are interested in seeing the various transparency levels for your selection. For example, you can create a selection with a gradient.
Global Selection Mask (Painting a Selection)
The global Selection Mask is your selection that appears on the layers docker. By default, this is hidden, so you will need to make it visible via .

Once the global Selection Mask is shown, you will need to create a selection. The benefit of using this is that you can paint your selection using any of the normal painting tools. The information is saved as grayscale. You might want to switch to the Mask display mode if it is difficult to see the results.
Selection from layer transparency
You can create a selection based on a layer’s transparency by right-clicking on the layer in the layer docker and selecting “Select Opaque” from the context menu.
Pixel and Vector Selection Types
Vector selections allow you to modify your selection with vector anchor tools. Pixel selections allow you to modify selections with pixel information. They both have their benefits and disadvantages. You can convert one type of selection to another.
When creating a selection, you can select what type of selection you want from the Mode in the selection tool options: Pixel or Vector.
Vector selections can modify as any other vector shape with the “Shape Handle” tool, if you try to paint on a vector selection it will be converted into a pixel selection. Pixel selections can be painted with any tool. You can also convert vector shapes to selection. In turn, vector selections can be made from vector shapes, and vector shapes can be converted to vector selections using the options in the selections menu. Krita will add a new vector layer for this shape.
One of the most common reasons to use vector selections is that they give you the ability to move and transform a selection. Moving the selection with a pixel selection will move the content on the layer. Moving the selection on a vector selection will only move the selection. You can also use the path editing tool to change the anchor points in the selection
If you started with a pixel selection, you can still convert it to a vector selection to get these benefits. Go to Select > Convert to Vector Selection.
Note
If you have multiple levels of transparency when you convert a selection to vector, you will lose the gray values.
Common Shortcuts while Using Selections
- Copy – Ctrl + C or Ctrl + Ins
- Paste – Ctrl + V or Shift + Ins
- Cut – Ctrl + X, Shift + Del
- Copy From All Layers – Ctrl + Shift + C
- Copy Selection to New Layer – Ctrl + Alt + J
- Cut Selection to New Layer – Ctrl + Shift + J
- Display or hide selection with Ctrl + H
Python Scripting
This section covers python scripting.
Contents:
Tag Management
Tags are how you organize common types of resources. They can be used with brushes, gradients, patterns, and even brush tips. You can select them from a drop-down menu above the resources. Selecting a tag will filter all the resources by that tag. Selecting the tag of “All” will show all resources. Krita comes installed with a few default tags. You can create and edit your own as well. The tags are managed similarly across the different types of resources.
You can use tags together with the Pop-up Palette for increased productivity.

Note
You can select different brush tags in the pop-up palette. This can be a quick way to access your favorite brushes.
Adding a New Tag for a Brush
By pressing the “+” next to the tag selection. you will get an option to add a tag. Type in the name you want and press Enter. You will need to go back to the “All” tag to start assigning brushes.
Assigning an Existing Tag to a Brush
Right-click on a brush in the Brush Presets Docker. You will get an option to assign a tag to the brush.
Changing a Tag’s Name
Select the existing tag that you want to have changed from the drop-down. Press the “+” icon next to the tag. You will get an option to rename it. Press Enter to confirm. All the existing brushes will remain in the newly named tag.
Deleting a Tag
Select the existing tag that you want to have removed from the drop-down. Press the “+” icon next to the tag.You will get an option to remove it.
Note
The default brushes that come with Krita cannot have their default tags removed.
Soft Proofing
When we make an image in Krita, and print that out with a printer, the image tends to look different. The colours are darker, or less dark than expected, maybe the reds are more aggressive, maybe contrast is lost. For simple documents, this isn’t much of a problem, but for professional prints, this can be very sad, as it can change the look and feel of an image drastically.
The reason this happens is simply because the printer uses a different color model(CMYK) and it has often access to a lower range of colors(called a gamut).
A naive person would suggest the following solution: do your work within the CMYK color model! But there are three problems with that:
- Painting in a CMYK space doesn’t guarantee that the colors will be the same on your printer. For each combination of Ink, Paper and Printing device, the resulting gamut of colors you can use is different. Which means that each of these could have a different profile associated with them.
- Furthermore, even if you have the profile and are working in the exact color space that your printer can output, the CMYK color space is very irregular, meaning that the color maths isn’t as nice as in other spaces. Blending modes are different in CMYK as well.
- Finally, working in that specific CMYK space means that the image is stuck to that space. If you are preparing your work for different a CMYK profile, due the paper, printer or ink being different, you might have a bigger gamut with more bright colors that you would like to take advantage of.
So ideally, you would do the image in RGB, and use all your favorite RGB tools, and let the computer do a conversion to a given CMYK space on the fly, just for preview. This is possible, and is what we call ‘’Soft Proofing’‘.
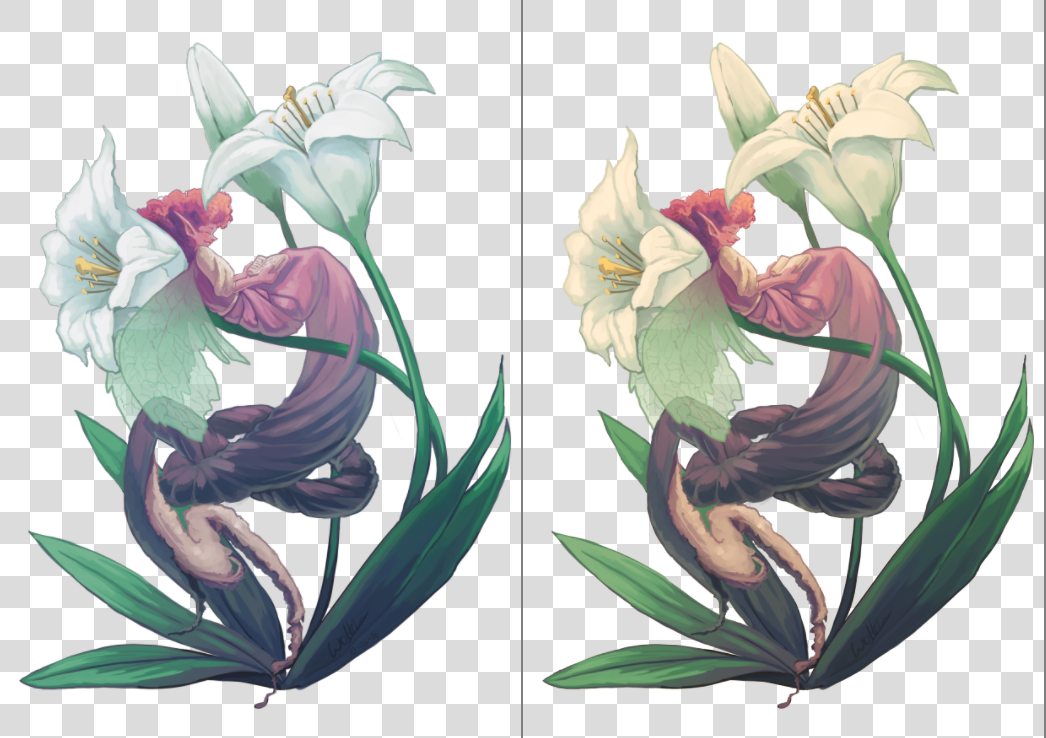
On the left, the original, on the right, a view where soft proofing is turned on. The difference is subtle due to the lack of really bright colors, but the soft proofed version is slightly less blueish in the whites of the flowers and slightly less saturated in the greens of the leaves.
You can toggle soft proofing on any image using Ctrl + Y. Unlike other programs, this is per-view, so that you can look at your image non-proofed and proofed, side by side. The settings are also per image, and saved into the .kra file. You can set the proofing options in .
There you can set the following options:
- Profile, Depth, Space
- Of these, only the profile is really important. This will serve as the profile you are proofing to. In a professional print workflow, this profile should be determined by the printing house.
- Intent
Set the proofing Intent. It uses the same intents as the intents mentioned in the color managed workflow.
Left: Soft proofed image with Adaptation state slider set to max. Right: Soft proofed image with Adaptation State set to minimum
- Adaptation State
- A feature which allows you to set whether Absolute Colorimetric will make the white in the image screen-white during proofing(The slider set to max), or whether it will use the white point of the profile(The slider set to minimum). Often CMYK profiles have a different white as the screen, or amongst one another due to the paper color being different.
- Black Point Compensation
- Set the black point compensation. Turning this off will crunch the shadow values to the minimum the screen and the proofing profile can handle, while turning this on will scale the black to the screen-range, showing you the full range of grays in the image.
- Gamut Warning
- Set the color of the out-of-gamut warning.
You can set the defaults that Krita uses in
To configure this properly, it’s recommended to make a test image to print(and that is printed by a properly set-up printer) and compare against, and then approximate in the proofing options how the image looks compared to the real-life copy you have made.
Out of Gamut Warning
The out of gamut warning, or gamut alarm, is an extra option on top of Soft-Proofing: It allows you to see which colors are being clipped, by replacing the resulting color with the set alarm color.
This can be useful to determine where certain contrasts are being lost, and to allow you to change it slowly to a less contrasted image.
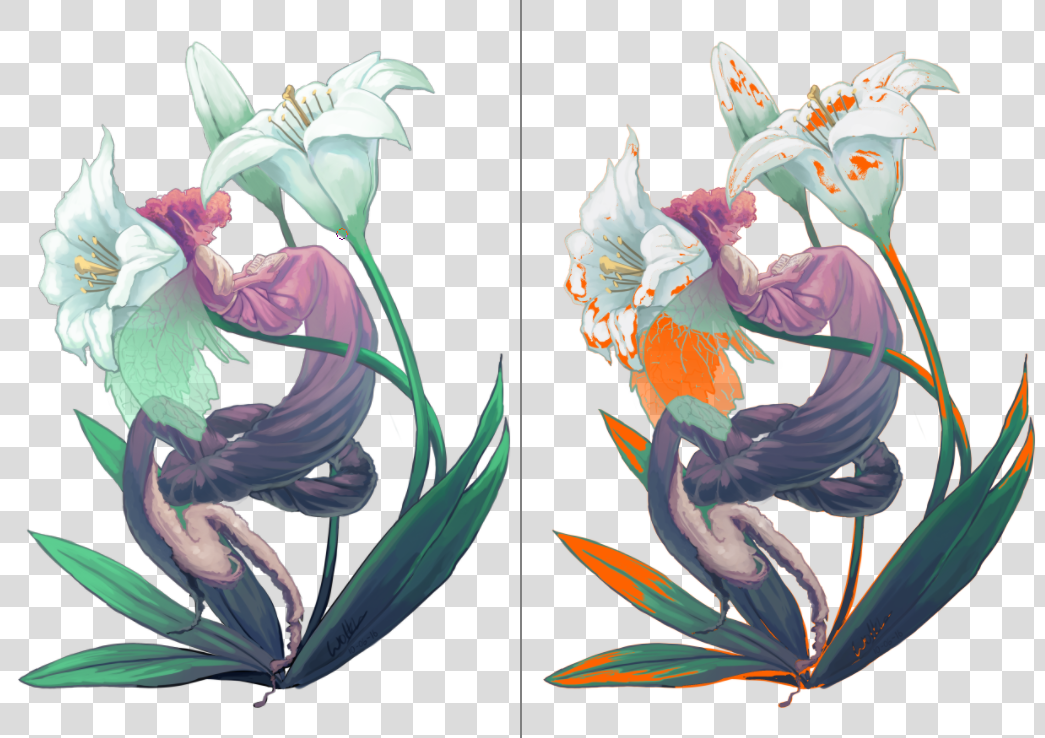
Left: View with original image, Right: View with soft proofing and gamut warnings turned on. Krita will save the gamut warning color alongside the proofing options into the Kra file, so pick a color that you think will stand out for your current image.
You can activate Gamut Warnings with Ctrl + Shift + Y, but it needs soft proofing activated to work fully.
Note
Soft Proofing doesn’t work properly in floating-point spaces, and attempting to force it will cause incorrect gamut alarms. It is therefore disabled.
Warning
Gamut Warnings sometimes give odd warnings for linear profiles in the shadows. This is a bug in LCMS, see here for more info.
Vector Graphics
Krita 4.0 has had a massive rewrite of the vector tools. So here’s a page explaining the vector tools:
What are vector graphics?
Krita is primarily a raster graphics editing tool, which means that most of the editing changes the values of the pixels on the raster that makes up the image.
Vector graphics on the other hand use mathematics to describe a shape. Because it uses a formula, vector graphics can be resized to any size.
On one hand, this makes vector graphics great for logos and banners. On the other hand, raster graphics are much easier to edit, so vectors tend to be the domain of deliberate design, using a lot of precision.
Tools for making shapes
You can start making vector graphics by first making a vector layer(press the arrow button next to the + in the layer docker to get extra layer types). Then, all the usual drawing tools outside of the freehand, dynamic and the multibrush tool can be used to draw shapes.
The path and polyline tool are the tools you used most often on a vector layer, as they allow you to make the most dynamic of shapes.
On the other hand, the Ellipse and Rectangle tools allow you to draw special shapes, which then can be edited to make special pie shapes, or for easy rounded rectangles.
The calligraphy and text tool also make special vectors. The calligraphy tool is for producing strokes that are similar to brush strokes, while the text tool makes a text object that can be edited afterwards.
All of these will use the current brush size to determine stroke thickness, as well as the current foreground and background color.
There is one last way to make vectors: The Vector Library docker. It allows you to add shapes that have been defined in an SVG file as symbols. Unlike the other tools, these have their own fill and stroke.
Arranging Shapes
A vector layer has its own hierarchy of shapes, much like how the whole image has a hierarchy of layers. So shapes can be in front of one another. This can be modified with the arrange docker, or with the Select Shapes Tool.
The arrange docker also allows you to group and ungroup shapes. It also allows you to precisely align shapes, for example, have them aligned to the center, or have an even spacing between all the shapes.
Editing shapes
Editing of vector shapes is done with the Select Shapes Tool and the Edit Shapes Tool.
The select shapes tool can be used to select vector shapes, to group them(via  ), ungroup them, to use booleans to combine or subtract shapes from one another(via ), to move them up and down, or to do quick transforms.
Fill
You can change the fill of a shape by selecting it and changing the active foreground color.
You can also change it by going into the tool options of the Select Shapes Tool and going to the fill tab.
Vector shapes can be filled with a solid color, a gradient or a pattern.
Stroke
Strokes can be filled with the same things as fills.
However, they can also be further changed. For example, you can add dashes and markers to the line.
Coordinates
Shapes can be moved with the Select Shapes tool, and in the tool options you can specify the exact coordinates.
Editing nodes and special parameters
If you have a shape selected, you can double click it to get to the appropriate tool to edit it. Usually this is the Edit Shape Tool, but for Text this is the Text Tool.
In the Edit Shape Tool, you can move around nodes on the canvas for regular paths. For special paths, like the ellipse and the rectangle, you can move nodes and edit the specific parameters in the tool options docker.
Working together with other programs
One of the big things Krita 4.0 brought was moving from ODG to SVG. What this means is that Krita saves as SVG inside KRA files, and that means we can open SVGs just fine. This is important as SVG is the most popular vector format.
Inkscape
You can copy and paste vectors from Krita to Inkscape, or from Inkscape to Krita. Only the SVG 1.1 features are supported, so don’t be surprised if a mesh gradient doesn’t cross over very well.
Snapping
In Krita 3.0, we now have functionality for Grids and Guides, but of course, this functionality is by itself not that interesting without snapping.
Snapping is the ability to have Krita automatically align a selection or shape to the grids and guides, document center and document edges. For Vector layers, this goes even a step further, and we can let you snap to bounding boxes, intersections, extrapolated lines and more.
All of these can be toggled using the snap pop-up menu which is assigned to Shift+S.
Now, let us go over what each option means:
- Grids
- This will snap the cursor to the current grid, as configured in the grid docker. This doesn’t need the grid to be visible. Grids are saved per document, making this useful for aligning your art work to grids, as is the case for game sprites and grid-based designs.
- Guides
- This allows you to snap to guides, which can be dragged out from the ruler. Guides do not need to be visible for this, and are saved per document. This is useful for comic panels and similar print-layouts, though we recommend Scribus for more intensive work.

- Orthogonal (Vector Only)
- This allows you to snap to a horizontal or vertical line from existing vector objects’s nodes(Unless dealing with resizing the height or width only, in which case you can drag the cursor over the path). This is useful for aligning object horizontally or vertically, like with comic panels.
- Node (Vector Only)
- This snaps a vector node or object to the nodes of another path.
- Extension (Vector Only)
- When we draw an open path, the last nodes on either side can be mathematically extended. This option allows you to snap to that. The direction of the node depends on its side handles in path editing mode.
- Intersection (Vector Only)
- This allows you to snap to an intersection of two vectors.
- Bounding box (Vector Only)
- This allows you to snap to the bounding box of a vector shape.
- Image bounds
- Allows you to snap to the vertical and horizontal borders of an image.
- Image center
- Allows you to snap to the horizontal and vertical center of an image.
The snap works for the following tools:
- Straight line
- Rectangle
- Ellipse
- Polyline
- Path
- Freehand path
- Polygon
- Gradient
- Shape Handling tool
- The Text-tool
- Assistant editing tools
- The move tool (note that it snaps to the cursor position and not the bounding box of the layer, selection or whatever you are trying to move)
- The Transform tool
- Rectangle select
- Elliptical select
- Polygonal select
- Path select
- Guides themselves can be snapped to grids and vectors.
Snapping doesn’t have a sensitivity yet, and by default is set to 10 screen pixels.
Animation with Krita
Thanks to the 2015 Kickstarter, Krita 3.0 now has animation. In specific, Krita has frame-by-frame raster animation. There’s still a lot of elements missing from it, like tweening, but the basic workflow is there.
To access the animation features, the easiest way is to change your workspace to Animation. This will make the animation dockers and workflow appear.
Animation curves
To create an animation curve (currently only for opacity) expand the “New Frame” button in the “Animation” dock and click “Add Opacity Keyframe”. You can now edit the keyframed value for opacity directly in the “Layers” dock, adding more keyframes will by default fade from the last to the next upcoming keyframe in the timeline over the frames between them. See animation curves for details
Workflow:
In traditional animation workflow, what you do is that you make key frames, which contain the important poses, and then draw frames in between(tweening in highly sophisticated animator’s jargon).
For this workflow, there are three important dockers:
- The Timeline Docker. View and control all of the frames in your animation. The timeline docker also contains functions to manage your layers. The layer that are created in the timeline docker also appear on the normal Layer docker.
- The Animation Docker. This docker contains the play buttons as the ability to change the frame-rate, playback speed and useful little options like auto-key framing.
- The Onion Skin Docker. This docker controls the look of the onion skin, which in turn is useful for seeing the previous frame.
Introduction to animation: How to make a walkcycle
The best way to get to understand all these different parts is to actually use them. Walk cycles are considered the most basic form of a full animation, because of all the different parts involved with them. Therefore, going over how one makes a walkcycle should serve as a good introduction.
Setup
First, we make a new file:
On the first tab, we type in a nice ratio like 1280x1024, set the dpi to 72(we’re making this for screens after all) and title the document ‘walkcycle’.
In the second tab, we choose a nice background color, and set the background to canvas-color. This means that Krita will automatically fill in any transparent bits with the background color. You can change this in . This seems to be most useful to people doing animation, as the layer you do animation on MUST be semi-transparent to get onion skinning working.
Note
Krita has a bunch of functionality for meta-data, starting at the create document screen. The title will be automatically used as a suggestion for saving and the description can be used by databases, or for you to leave comments behind. Not many people use it individually, but it can be useful for working in larger groups.
Then hit create!
Then, to get all the necessary tools for animation, select the workspace switcher:
The red arrow points at the workspace switcher.
And select the animation workspace.
Which should result in this:
The animation workspace adds the timeline, animation and onion skin dockers at the bottom.
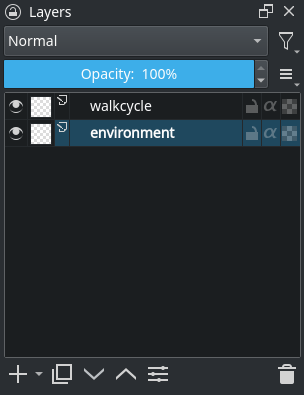
Animating
We have two transparent layers set up. Let’s name the bottom one ‘environment’ and the top ‘walkcycle’ by double clicking their names in the layer docker.
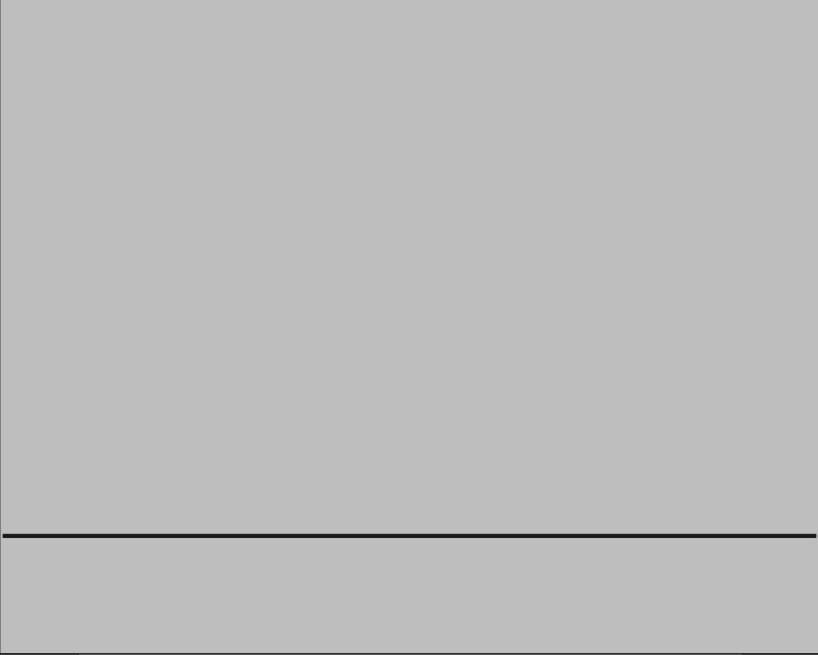
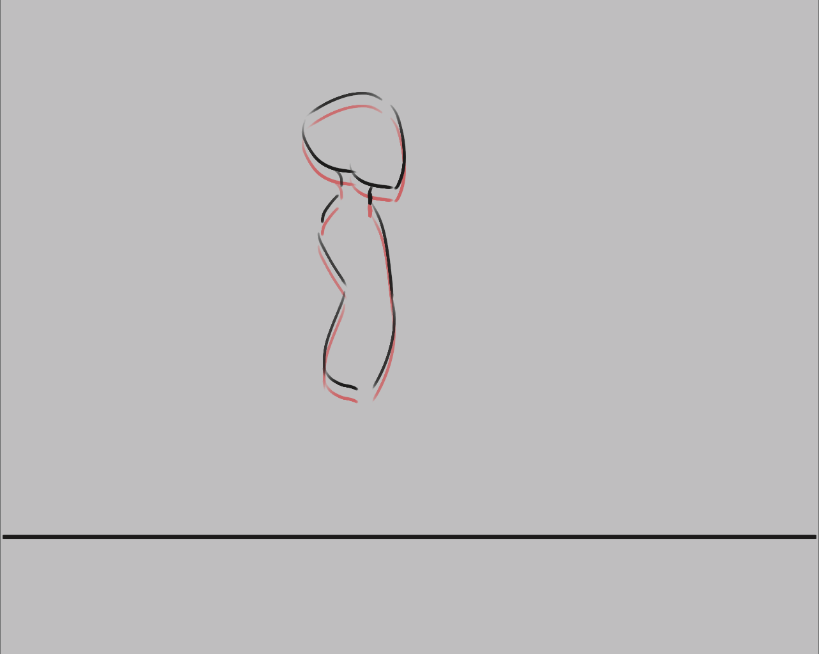
Use the straight line tool to draw a single horizontal line. This is the ground.
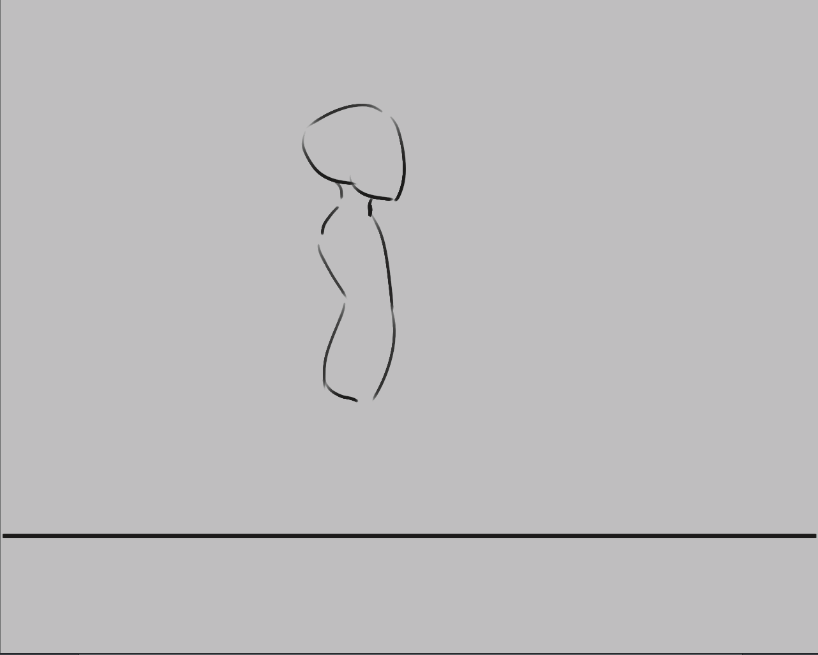
Then, select the ‘walkcycle’ layer and draw a head and torso (you can use any brush for this).
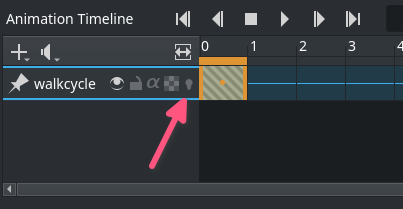
Now, selecting a new frame will not make a new frame automatically. Krita doesn’t actually see the ‘walkcycle’ layer as an animated layer at all!
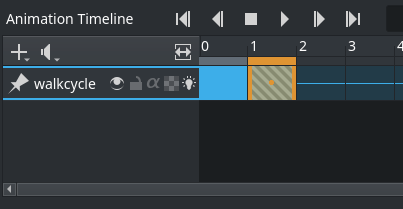
We can make it animatable by adding a frame to the timeline. a frame in
the timeline to get a context menu. Choose New Frame
You can see it has become an animated layer because of the onion skin icon showing up in the timeline docker.
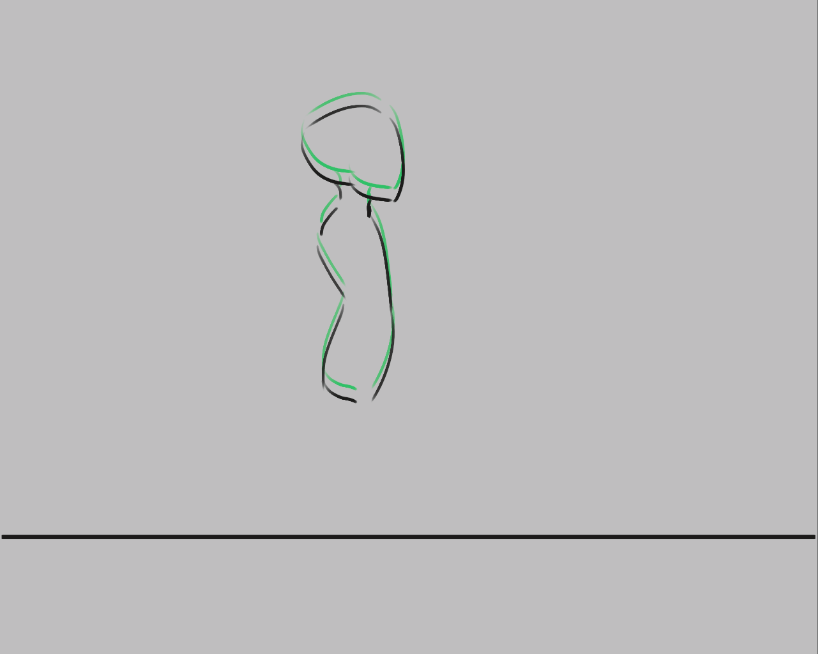
Use the to copy frame to copy the first frame onto the second. Then, use the with shift+↑ to move the frame contents up.
We can see the difference by turning on the onionskinning:
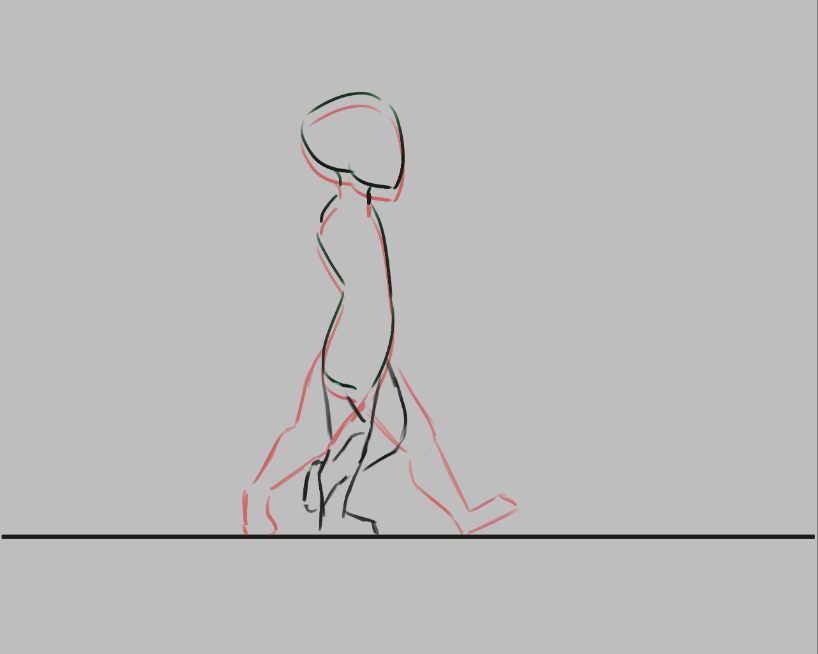
Now, you should see the previous frame as red.
Warning
Krita sees white as a color, not as transparent, so make sure the animation layer you are working on is transparent in the bits where there’s no drawing. You can fix the situation by use the Color to Alpha filter, but prevention is best.
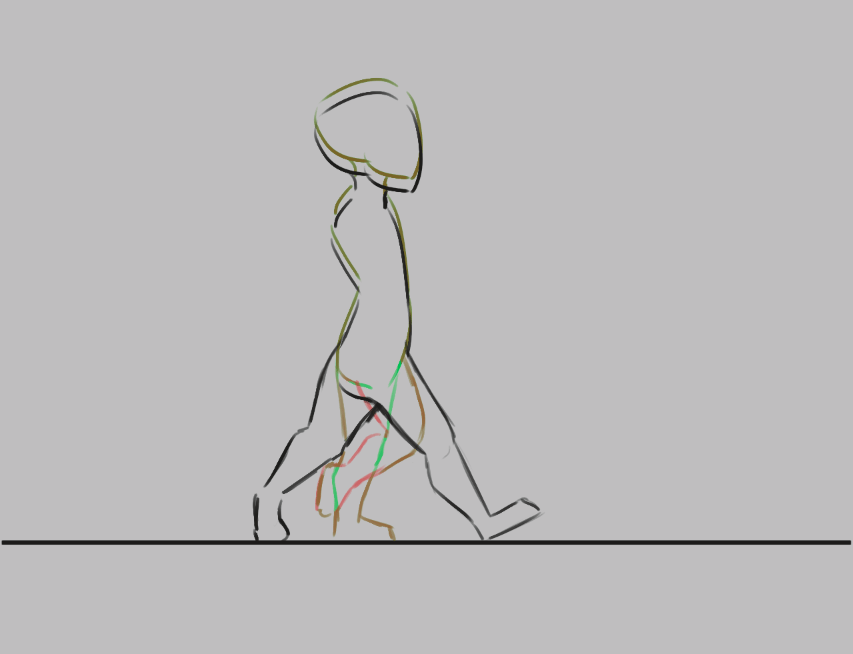
Future frames are drawn in green, and both colors can be configured in the onion skin docker.
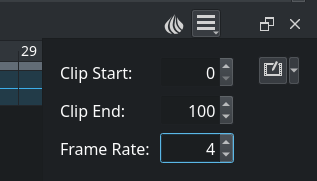
Now, we’re gonna draw the two extremes of the walkcycle. These are the pose where both legs are as far apart as possible, and the pose where one leg is full stretched and the other pulled in, read to take the next step.
Now, let’s copy these two… We could do that with Ctrl+drag, but here comes a tricky bit:
Ctrl+ also selects and deselects frames, so to copy…
- drag select all the frames you want to select.
- Ctrl+++drag. You need to make sure the first frame is ‘orange’, otherwise it won’t be copied along.
Now then…

squashed the timeline docker a bit to save space
- Copy frame 0 to frame 2
- Copy frame 1 to frame 3
- In the animation docker, set the frame-rate to 4
- select all frames in the timeline docker by dragging-selecting them.
- press play in the animation docker.
- Enjoy your first animation!
Expanding upon your rough walkcycle
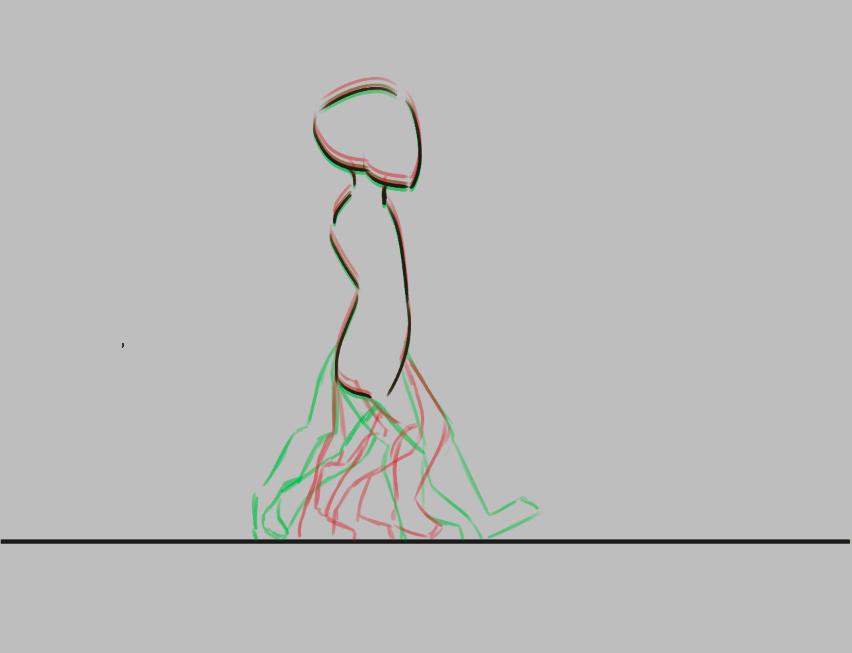
You can quickly make some space by Alt+dragging any frame. This’ll move that frame and all others after it in one go.
Then draw inbetweens on each frame that you add

You’ll find that the more frames you add, the more difficult it becomes to keep track of the onion skins.
You can modify the onion skin by using the onion skin docker, where you can change how many frames are visible at once, by toggling them on the top row. The bottom row is for controlling transparency, while below there you can modify the colors and extremity of the coloring.
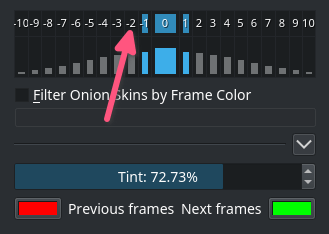
Animating with multiple layers
Okay, our walkcycle is missing some hands, let’s add them on a separate layer. So we make a new layer, and name it hands and…

Our walkcycle is gone from the time-line docker! This is a feature actually. A full animation can have so many little parts that an animator might want to remove the layers they’re not working on from the timeline docker. So you manually have to add them.
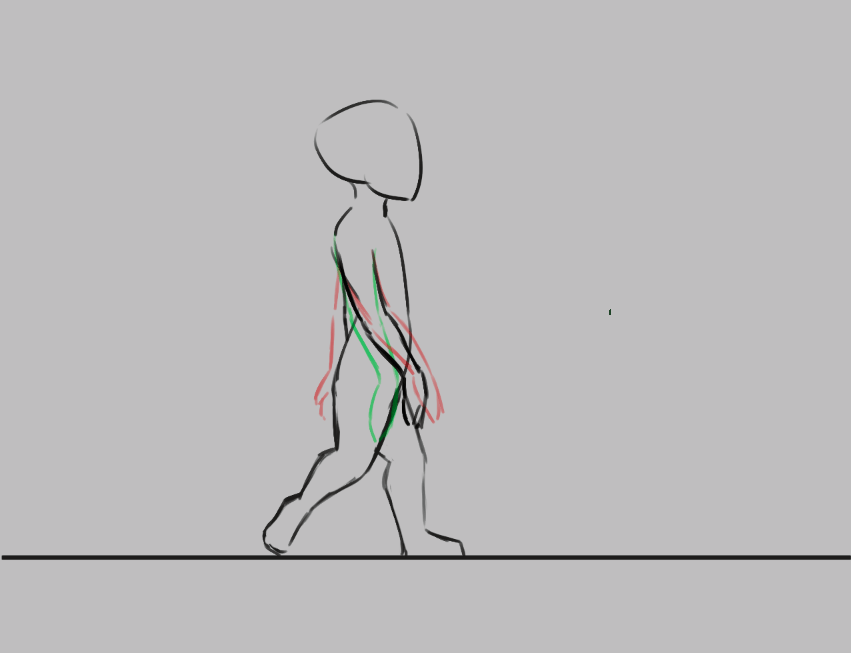
You can show any given layer in the timeline by doing on the layer in the layer docker, and toggling show in timeline.

Exporting
When you are done, select

It’s recommended to save out your file as a png, and preferably in its own folder. Krita can currently only export png sequences.

When pressing done, you can see the status of the export in the status bar below.

The images should be saved out as filenameXXX.png, giving their frame number.
Then use something like Gimp(Linux, OSX, Windows), ImageMagick(Linux, OSX, Windows), or any other gif creator to make a gif out of your image sequence:
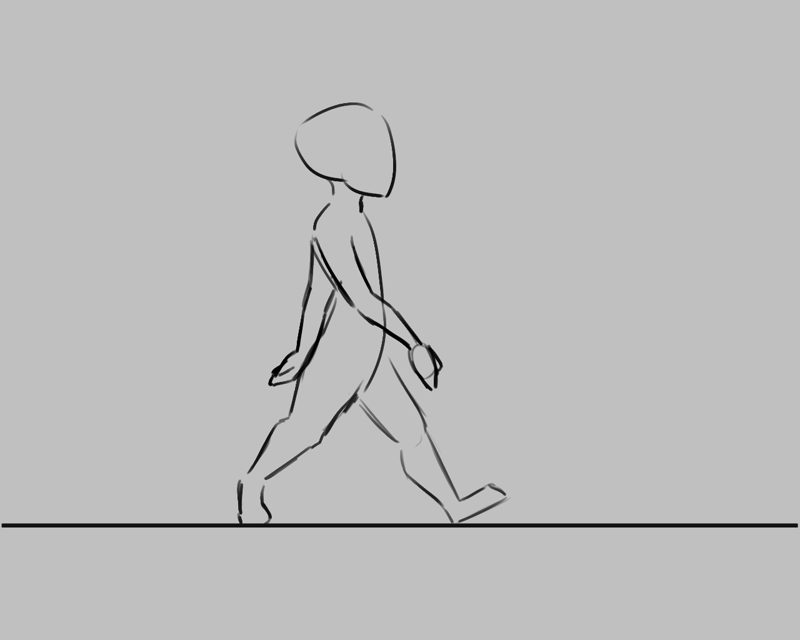
For example, you can use VirtualDub(Windows) and open all the frames and then go to File → Export → GIF
Enjoy your walkcycle!
Note
Krita 3.1 has a render animation feature. If you’re using the 3.1 beta, check out the Render Animation page for more information!
Importing animation frames
You can import animation frames in Krita 3.0.
First let us take a sprite sheet from Open Game Art.(This is the Libre Pixel Cup male walkcycle)
And we’ll use .
The slices are even, so for a sprite sheet of 9 sprites, use 8 vertical slices and 0 horizontal slices. Give it a proper name and save it as png.
Then, make a new canvas, and select . This will give you a little window. Select Add images. This should get you a file browser where you can select your images.
You can select multiple images at once.
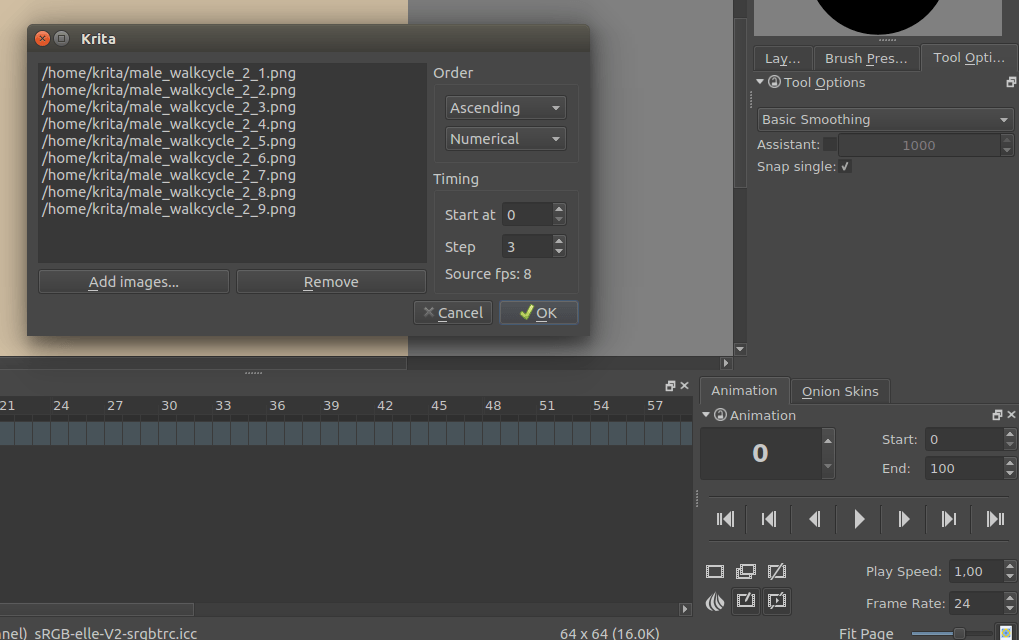
The frames are currently automatically ordered. You can set the ordering with the top-left two drop-down boxes.
- Start
- Indicates at which point the animation should be imported.
- Step
- Indicates the difference between the imported animation and the document frame rate. This animation is 8 frames big, and the fps of the document is 24 frames, so there should be a step of 3 to keep it even. As you can see, the window gives feedback of how much fps the imported animation would be with the currently given step.
Press OK, and your animation should be imported as a new layer.
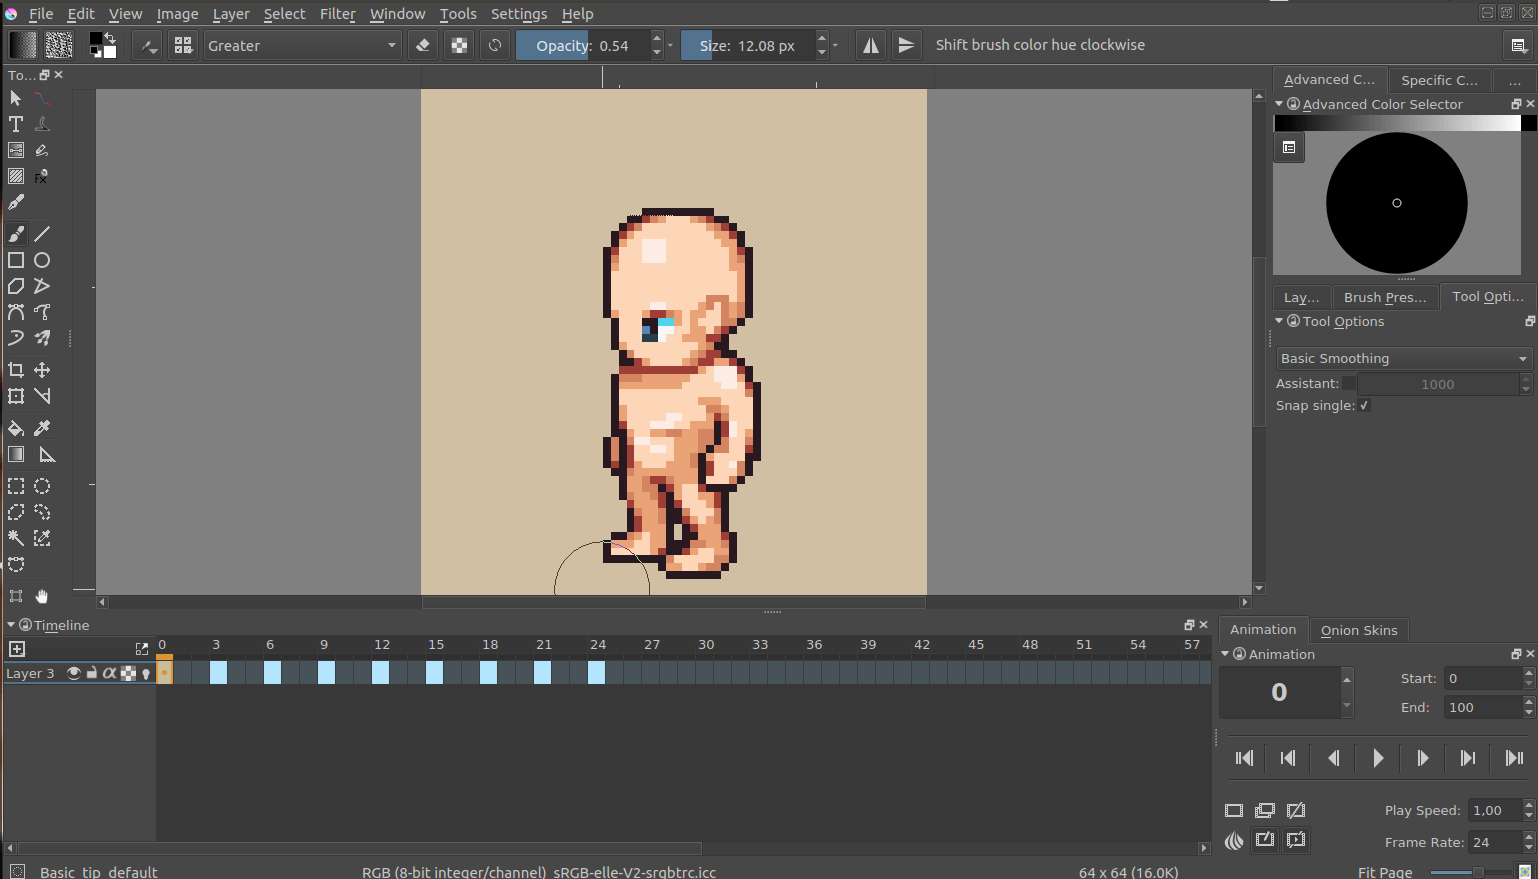
Reference
Japanese Animation Template
This template is used to make Japanese-style animation. It is designed on the assumption that it was used in co-production, so please customize its things like layer folders according to scale and details of your works.
Basic structure of its layers
Layers are organized so that your work will start from lower layers go to higher layers, except for coloring layers.
Its layer contents
from the bottom
- Layout Paper
- These layers are a form of layout paper. Anime tap holes are prepared on separate layers in case you have to print it out and continue your drawing traditionally.
- Layout (Background)
- These layers will contain background scenery or layouts which are scanned from a traditional drawing. If you don’t use them, you can remove them.
- Key drafts
- These layers are used to draw layouts digitally.
- Keys
- Where you add some details to the layouts and arrange them to draw “keys” of animation.
- Inbetweening
- Where you add inbetweens to keys for the process of coloring, and remove unnecessary details to finalize keys (To be accurate, I finish finalization of keys before beginning to add inbetweens)
- Coloring (under Inbetweening)
- Where you fill areas with colors according to specification of inbetweens.
- Time Sheet and Composition sheet
- This contains a time sheet and composition sheet. Please rotate them before using.
- Color set
- This contains colors used to draw main and auxiliary line art and fill highlight or shadows. You can add them to your palette.
Basic steps to make animation
Key draft –> assign them into Time sheet (or adjust them on Timeline, then assign them into Time sheet) –> adjust them on Timeline –> add frames to draw drafts for inbetweening if you need them –> Start drawing Keys
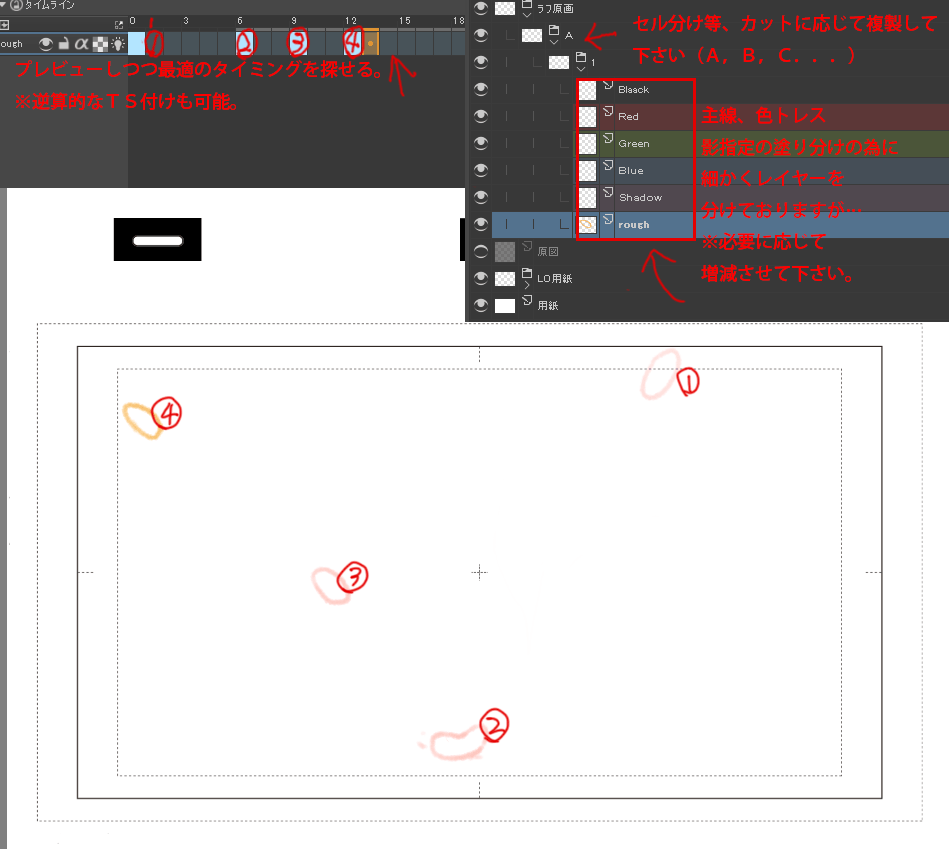
You can add layers and add them to timeline.
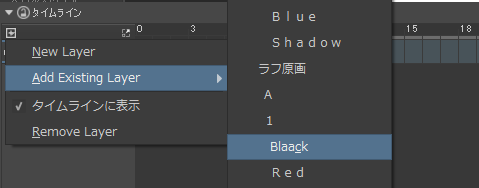
This is due difference between 24 drawing per second, which is used in Full Animation, and 12 drawing per second and 8 drawings per second, which are used in Limited Animation, on the Timeline docker.
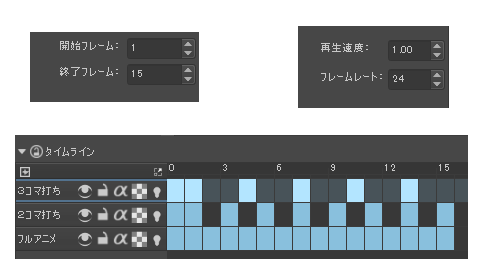
This is correspondence between Timeline and Time sheet. “Black” layer is to draw main line art which are used ordinary line art, “Red” layer is to draw red auxiliary linearts which are used to specify highlights, “Blue” layer is to draw blue auxiliary linearts which are used to specify shadows, and “Shadow” layer is to draw light green auxiliary line art which are used to specify darker shadows. However, probably you have to increase or decrease these layers according to your work.
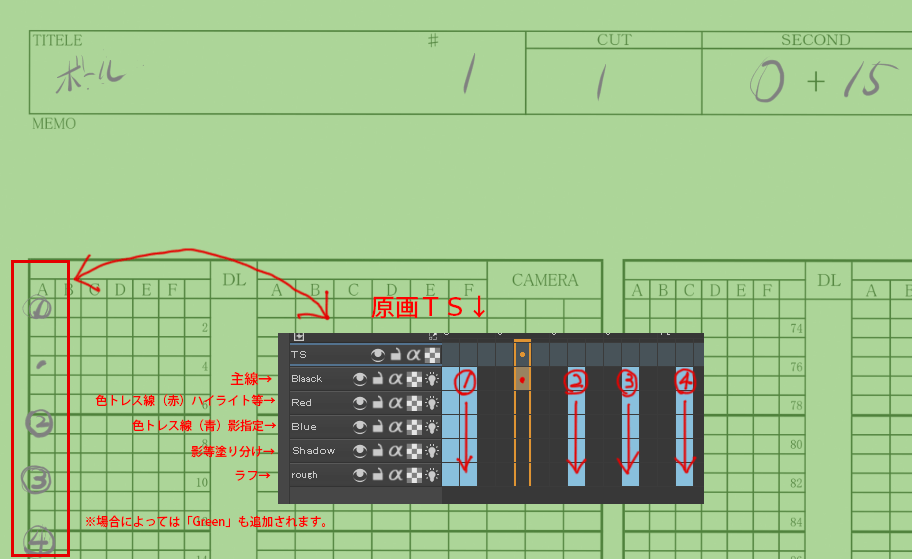
Finished keys, you will begin to draw the inbetweens. If you feel Krita is becoming slow, I recommend you to merge key drafts and keys, as well as to remove any unnecessary layers.
After finalizing keys and cleaning up unnecessary layers, add inbetweenings, using Time sheet and inbetweening drafts as reference.
This is its correspondence with Time sheetL
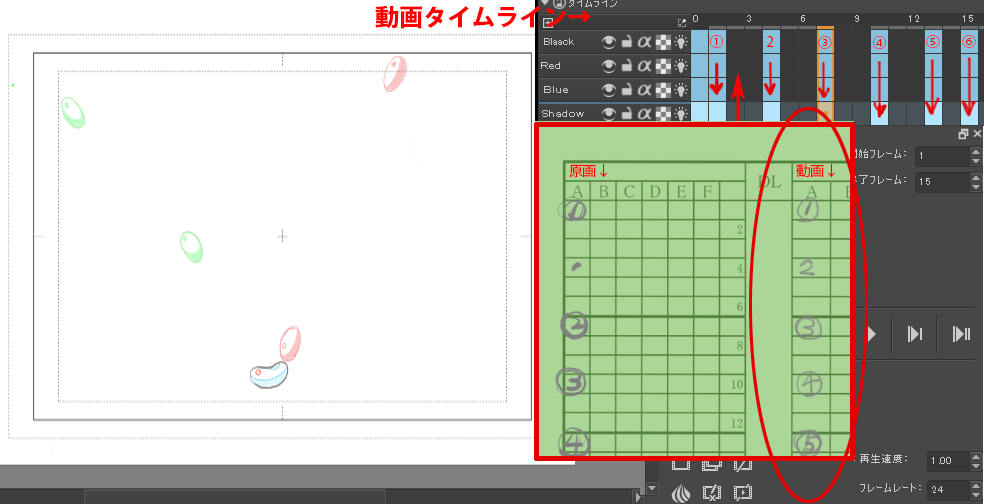
Once the vector functionality of Krita becomes better, I recommend you to use vector to finalize inbetweening.
If you do the colors in Krita, please use Coloring group layer. If you do colors in other software, I recommend to export frames as .TGA files.
Resolution
I made this template in 300 dpi because we have to print them to use them in traditional works which still fill an important role in Japanese Anime Studio. However, if you stick to digital, 150-120 dpi is enough to make animation. So you can decrease its resolution according to your need.
Originally written by Saisho Kazuki, Japanese professional animator, and translated by Tokiedian, KDE contributor.
Krita FAQ
This page contains common problems people have with Krita. Note that we assume that you are using the latest version of Krita. Please verify that to make sure.
Contents
- Krita FAQ
- General
- What is Krita?
- Is it possible to use Krita in my own language, not English?
- Does Krita have layer clip or clipping mask?
- Windows: OBS can’t record the Krita OpenGL canvas
- Where are the configuration files stored?
- Resetting Krita configuration
- Where are my resources stored?
- Krita tells me it can’t find some files and then closes, what should I do?
- What Graphics Cards does Krita support?
- I can’t edit text from PSD files created by Photoshop
- How much memory does my image take?
- Why do I get a checkerboard pattern when I use the eraser?
- Windows: Can I use Krita with Sandboxie?
- Can krita work with 8 bit (indexed) images?
- How can I produce a backtrace on Windows?
- Where can I find older versions of Krita?
- On Windows, the Krita User Interface is too small on my HiDPI screen
- I’m using Linux and Krita crashes on start
- Tablets
- Toolbox
- Resources
- Krita is slow
- Tools
- License, rights and the Krita Foundation
- Reference
- General
General
General questions
What is Krita?
This is our vision for the development of Krita:
Krita is a free and open source cross-platform application that offers an end-to-end solution for creating digital art files from scratch. Krita is optimized for frequent, prolonged and focused use. Explicitly supported fields of painting are illustrations, concept art, matte painting, textures, comics and animations. Developed together with users, Krita is an application that supports their actual needs and workflow. Krita supports open standards and interoperates with other applications.
Is it possible to use Krita in my own language, not English?
Krita should automatically use the system language. If that is not the case, please follow these steps:
- Settings –> Switch Application Language. A small window will appear.
- Click Primary language and select your language.
- Click OK to close the window.
- Restart krita and it will be displayed in your selected language!
If this doesn’t work, you might have to add a fall-back language as well. This is a bug, but we haven’t found the solution yet.
Does Krita have layer clip or clipping mask?
Krita has no clipping mask, but it has a clipping feature called inherit alpha. Let’s see this page and learn how to do clipping in Krita!
Windows: OBS can’t record the Krita OpenGL canvas
The possible workarounds for this is to do either of the following:
- Turn off OpenGL in Settings –> Configure Krita –> Display.
- Or don’t use the hardware accelerated mode (game recording mode) in OBS, thus capturing the whole desktop instead of attempting to capture only Krita.
You might also be able to work around the problem by using the ANGLE renderer instead of native OpenGL.
Where are the configuration files stored?
These are stored at the following places for the following operating systems:
- Linux
$HOME/.config/kritarc- Windows
%APPDATA%\Local\kritarc- MacOS X
$HOME/Library/Preferences/kritarc
The kritarc file is the configuration file. Krita does not store settings in the Windows registry.
Resetting Krita configuration
You can reset the Krita configuration in following way:
For Krita 3.0 and later: Delete/rename the kritarc file, found here:
- Linux
$HOME/.config/kritarc- Windows
%APPDATA%\Local\kritarc- MacOS X
$HOME/Library/Preferences/kritarc
There can be two other files you might want to remove: kritaopenglrc and kritadisplayrc.
If the configuration was causing a crash, don’t delete the mentioned file, but instead rename and send it to us in order for us to figure what caused the crash.
Windows users have a habit of uninstalling and reinstalling applications to solve problems. Unless the problem is that the installation was corrupted by a virus scanner or drive failure, that will NOT work. Uninstalling Krita then reinstalling replaces the bytes on your drive with exactly the same bytes that were there before. It doesn’t reset anything, least of all Krita’s settings.
Where are my resources stored?
- Linux
$HOME/.local/share/krita/- Windows
user\Appdata\Roaming\krita\or%APPDATA%\Roaming\krita\- Mac OS X
~/Library/Application Support/Krita/
Krita tells me it can’t find some files and then closes, what should I do?
Causes for this could be the following:
- It might be that your download got corrupted and is missing files (common with bad wifi and bad internet connection in general), in that case, try to find a better internet connection before trying to download again. Krita should be around 80 to 100 mb in size when downloading.
- It might be that something went wrong during installation. Check whether your harddrive is full and reinstall Krita with at least 120 MB of empty space. If not, and the problem still occurs, there might be something odd going on with your device and it’s recommended to find a computer expert to diagnose what is the problem.
- Some unzippers don’t unpack our zipfiles correctly. The native ones on windows, OSX and most linux distributions should be just fine, and we recommend using them.
- You manually, using a file manager deleted or moved resources around, and thus Krita cannot find them anymore.
What Graphics Cards does Krita support?
Krita can use OpenGL to accelerate painting and canvas zooming, rotation and panning. Nvidia and recent Intel GPUs give the best results. Make sure your OpenGL drivers support OpenGL 3.2 as the minimum. AMD/ATI GPU’s are known to be troublesome, especially with the proprietary drivers on Linux. However, it works perfectly with the Radeon free driver on linux for supported AMD GPU. Try to get a graphics card that can support OpenGL 3.2 or above for the best results, some examples:
- Intel
- Intel 3rd Generation HD Graphics, IvyBridge or Bay-Trail microarchitecture, released in 2012. Commonly available products: Celeron J1x00, N2x00, Celeron (G)1xx0, Pentium J2x00, N3500, Pentium (G)2xx0, Core i3/5/7-3xx0.
- AMD/ATI
- Radeon HD 2000 family, TeraScale 1 microarchitecture, Released in 2007. Commonly available products: Radeon HD 2400 PRO, Radeon HD 2600 PRO, etc.
- Nvidia
- GeForce 8 family, Tesla microarchitecture, released in 2006. Commonly available products: GeForce 8400 GS, GeForce 8800 GTS, 9800 GTX, GTS 250, etc.
For Krita 3.3 or later: Krita on Windows can use Direct3D 11 for graphics acceleration (through ANGLE). This is enabled automatically on systems with an Intel GPU.
I can’t edit text from PSD files created by Photoshop
There is no text support for psd file yet. The text will appear rasterized and converted into a paint layer.
How much memory does my image take?
For simple images, its easy to calculate: you multiply width * height * channels * size of the channels (so, for a 1000×1000 16 bit integer rgba image: 1000 x 1000 x 4 x 2). You multiply this by the number of layers plus two (one for the image, one for the display). If you add masks, filter layers or clone layers, it gets more complicated.
Why do I get a checkerboard pattern when I use the eraser?
You’re probably used to Gimp or Photoshop. The default background or first layer in these applications doesn’t have an alpha channel by default. Thus, on their background layer, the eraser paints in the background color.
In Krita, all layers have an alpha channel, if you want to paint in the background color, you should simply do it in a layer above the first one (Layer 1), that would prevent you from erasing the white background color, making the checkerboard visible. You get the same effect in, say, gimp, if you create new image, add an alpha channel and then use the eraser tool. Most Krita users will actually start a sketch in Krita by adding a new blank layer first before doing anything else. (the INSert key is a useful shortcut here). That doesn’t use extra memory, since a blank layer or a layer with a default color just takes one pixel worth of memory.
Windows: Can I use Krita with Sandboxie?
No, this is not recommended. Sandboxie causes stuttering and freezes due to the way it intercepts calls for resources on disk.
Can krita work with 8 bit (indexed) images?
No. Krita has been designed from the ground up to use real colors, not indexed palettes. There are no plans to support indexed color images, although Krita can export to some indexed color image formats, such as GIF. However, it does not offer detailed control over pixel values.
How can I produce a backtrace on Windows?
See also
If you experience a crash on Windows, and can reproduce the crash, the bug report will be much more valuable if you can create a backtrace. A backtrace is somewhat akin to an airplane’s blackbox, in that they tell what set of instructions your computer was running when it was crashing (where the crash happened), making it very useful to figure out why the crash happened.
The Dr. Mingw debugger is bundled with Krita. Please visit the page Dr. Mingw debugger for instructions on getting a backtrace with it.
Where can I find older versions of Krita?
All the older versions of Krita that are still available can be found here:
On Windows, the Krita User Interface is too small on my HiDPI screen
If you’re using Windows, you can set the display scaling to 150% or 200%, and enable the experimental HiDPI support in the configurations:
- On the menu, select
- On General page, switch to Window tab.
- Check Enable Hi-DPI support
- Restart Krita
You can also change the toolbox icon size by right-clicking on the toolbox and selecting a size.
I’m using Linux and Krita crashes on start
If you also see something like “QIODevice::seek: Invalid pos: -18” on the command line, it’s quite likely that at one point you had the Deepin file manager installed. That comes with some qimageio plugins that are completely and utterly broken. Krita’s reference images docker scans your Pictures folder on startup. It reads the images using Qt’s QImageIO class, which loads that Deepin plugin. The issue is reported to Deepin, but the Deepin developers don’t seem convinced that it makes sense to check whether there are any bytes to read, before reading the bytes.
Tablets
What tablets does Krita support?
Krita isn’t much fun without a pressure sensitive tablet. If the tablet has been properly configured, Krita should work out of the box.
On Windows, you need to either install the Wintab drivers for your tablet, or enable the Windows 8 Pointer Input option in Krita’s settings.
You can find a community curated list of tablets supported by krita here.
If you’re looking for information about tablets like the iPad or Android tablets, look here.
What if your tablet is not recognized by Krita?
Linux
We would like to see the full output of the following commands:
lsmodxinputxinput list-props(id can be fetched from the item 2)- Get the log of the tablet events (if applicable):
- Open a console application (e.g. Konsole on KDE)
- Set the amount of scrollback to ‘unlimited’ (for Konsole: )
- Start Krita by typing ‘krita’ and create any document
- Press Ctrl + Shift + T, you will see a message box telling the logging has started
- Try to reproduce your problem
- The console is now filled with the log. Attach it to a bug report
- Attach all this data to a bug report using public paste services like paste.kde.org
Windows
First check whether your tablet’s driver is correctly installed. Often, a driver update, a Windows update or the installation of Razer gaming mouse driver breaks tablets.
Then check whether switching to the Windows 8 Pointer API makes a difference: .
If you still have problems with Windows and your tablet, then we cannot help you without a tablet log.
- Install DebugView from the official Microsoft site
- Start DebugView
- Start Krita
- Press Ctrl + Shift + T, you will see a message box telling the logging has started
- Try to reproduce your problem
- Go back to DebugView and save its output to a file. Attach this file to a bug report or paste it using services like paste.kde.org.
However, in 100% of the cases where Windows users have reported that their tablet didn’t work over the past five years, the problem has been either a buggy driver or a broken driver installation, but not a bug in Krita.
How to fix a tablet offset on multiple screen setup on Windows
If you see that your tablet pointer has an offset when working with Krita canvas, it might be highly probable that Krita got incorrect screen resolution from the system. That problem happens mostly when an external monitor is present and when either a monitor or a tablet was connected after the system boot.
You can fix this issue manually by:
- Put your stylus away from the tablet.
- Start Krita without using a stylus, that is using a mouse or a keyboard.
- Press Shift key and hold it.
- Touch a tablet with your stylus so Krita would recognize it.
You will see a special dialog asking for the real screen resolution. Choose the correct value or enter it manually and press OK.
If you have a dual monitor setup and only the top half of the screen is reachable, you might have to enter the total width of both screens plus the double height of your monitor in this field.
If this didn’t work, and if you have a Wacom tablet, an offset in the canvas can be caused by a faulty Wacom preference file which is not removed or replaced by reinstalling the drivers.
To fix it, use the “Wacom Tablet Preference File Utility” to clear all the preferences. This should allow Krita to detect the correct settings automatically.
Warning
This will reset your tablets configuration, thus you will need to recalibrate/reconfigure it.
For Krita 3.3 or later: You can try to enable “Windows 8+ Pointer Input”, but some features might not work with it.
Microsoft Surface Pro and N-Trig
Krita 3.3.0 and later supports the Windows Pointer API (Windows Ink) natively. Your Surface Pro or other N-Trig enabled pen tablet should work out of the box with Krita after you enable Windows Ink in .
Tablet Pro and the Surface Pro
Unlike Wacom’s Companion, the Surface line of tablets doesn’t have working hardware buttons. Tablet Pro is a (non-free) utility that puts virtual buttons on screen. Krita 3.1 and above will have predefined shortcut profiles to work with Tablet Pro.
See http://www.youtube.com/watch?v=WKXZgYqC3tI for instructions.
Weird stuff happens on Windows, like ripples, rings, squiggles or poltergeists
Windows comes with a lot of settings to make it work with a pen. All these settings can be annoying. This tool can help you set the settings correctly when you’re using a tablet:
Toolbox
Toolbox missing
You can reset the Workspace by pressing the right most button on the toolbar, the Workspace switcher, and click on a desired Workspace from the list.
Or you can right-click on any docker title bar or open space in any toolbar, and select Toolbox. It’s the first option.
Also, you can check the Settings menu, it has got a lot of interesting stuff, then go to the Dockers menu and select Toolbox.
Tool icons size is too big
Right click the toolbox to set the size.
Krita can’t get maximized
This happens when your dockers are placed in such a way that the window cannot be made less high. Rearrange your Workspace.
Resources
Is there a way to restore a default brush that I have mistakenly overwritten with new settings to default?
Yes. First go to the resource folder, which is in
- Linux
$HOME/.local/share/krita/- Windows
user\Appdata\Roaming\krita\or%APPDATA%\Roaming\krita\- OSX
~/Library/Application Support/Krita/
You can easily do this by going into .
Then go into the paintoppressets folder and remove the latest created file that you made of your preset.
After that go back to the resources folder and edit the blacklist file to remove the previous paintoppreset so Krita will load it. (Yes, it is a bit of a convoluted system, but at the least you don’t lose your brushes)
How do I set favorite presets?
Right-click a brush in the brush docker and assign it a tag. Then right-click on canvas to call popup palette, click the second right-most icon on the bottom-right of the palette, now you can pick the tag which contains the brush you assigned to it.
Can Krita load Photoshop Brushes?
Yes, but there are limitations. You can load ABR files by using the by using the Import button in the Predefined brush tab in the brush editor. Since Adobe hasn’t disclosed the file format specification, we depend on reverse-engineering to figure out what to load, and currently that’s limited to basic features.
Krita is slow
There is a myriad of reasons why this might be. Below is a short checklist.
- Something else is hogging the cpu.
- You are running Windows, and have 3rdparty security software like Sandboxie or Total Defender installed
- you are working on images that are too big for your hardware (dimensions, channel depth or number of layers)
- you do not have canvas acceleration enabled
Please also check this page: https://phabricator.kde.org/T7199
Slow start-up
You probably have too many resources installed. Deactivate some bundles under .
If you’re using Windows with the portable zip file, Windows will scan all files every time you start Krita. That takes ages. Either use the installer or tell Microsoft Security Essentials to make an exception for Krita.
Slow Brushes
- Check if you accidentally turned on the stabilizer in the tool options docker.
- Try another scaling mode like trilinear. .
- Try a lower channel depth than 16-bit.
- For NVidia, try a 16-bit floating point color space.
- For older AMD CPU’s (Krita 2.9.10 and above), turn off the vector optimizations that are broken on AMD CPUs. . This isn’t needed if you’ve got an AMD threadrippercpu.
- It’s a fairly memory hungry program, so 2GB of ram is the minimum, and 4 gig is the preferable minimum.
- Check that nothing else is hogging your CPU
- Check that Instant Preview is enabled if you’re using bigger brushes (but for very small brushes, make sure is disabled).
- Set brush precision to 3 or auto.
- Use a larger value for brush spacing.
- If all of this fails, record a video and post a link and description on the Krita forum.
- Check whether OpenGL is enabled, and if it isn’t, enable it. If it is enabled, and you are on Windows, try the Angle renderer. Or disable it.
Slowdown after a been working for a while
Once you have the slowdown, click on the image-dimensions in the status bar. It will tell you how much RAM Krita is using, if it has hit the limit, or whether it has started swapping. Swapping can slow down a program a lot, so either work on smaller images or turn up the maximum amount of ram in .
Tools
Why does the Transform Tool give a good result and then get blurry upon finalizing?
The transform tool makes a preview that you edit before computing the finalized version. As this preview is using the screen resolution rather than the image resolution, it may feel that the result is blurry compared to the preview. See https://forum.kde.org/viewtopic.php?f=139&t=127269 for more info.
License, rights and the Krita Foundation
Who owns Krita?
The Stichting Krita Foundation owns the Krita trademark. The copyright on the source code is owned by everyone who has worked on the source code.
Who and what is Kiki?
Kiki is a cybersquirrel. She’s our mascot and has been designed by Tyson Tan. We choose a squirrel when we discovered that ‘krita’ is the Albanian word for Squirrel.
Why is Krita Free?
Krita is developed as free software within the KDE community. We believe that good tools should be available for all artists. You can also buy Krita on the Windows Store if you want to support Krita’s development or want to have automatic updates to newer versions.
Can I use Krita commercially?
Yes. What you create with Krita is your sole property. You own your work and can license your art however you want. Krita’s GPL license applies to Krita’s source code. Krita can be used commercially by artists for any purpose, by studios to make concept art, textures, or vfx, by game artists to work on commercial games, by scientists for research, and by students in educational institutions.
If you modify Krita itself, and distribute the result, you have to share your modifications with us. Krita’s GNU GPL license guarantees you this freedom. Nobody is ever permitted to take it away.
Can I get Krita for iPad? for Android?
Not at this point in time.
Who translates Krita
Krita is a KDE application — and proud of it! That means that Krita’s translations are done by KDE localization teams. If you want to help out, join the team for your language! There is another way you can help out making Krita look good in any language, and that is join the development team and fix issues within the code that make Krita harder to translate.