Reading files in JavaScript using the File APIs跨網域存取 Cross-Origin Resource Sharing (CORS)
====================
HTML5 fileReader facility
Here's an example using FileReader:
function readSingleFile(e) {
var file = e.target.files[0];
if (!file) {
return;
}
var reader = new FileReader();
reader.onload = function(e) {
var contents = e.target.result;
displayContents(contents);
};
reader.readAsText(file);
}
function displayContents(contents) {
var element = document.getElementById('file-content');
element.textContent = contents;
}
document.getElementById('file-input')
.addEventListener('change', readSingleFile, false);
<input type="file" id="file-input" />
<h3>Contents of the file:</h3>
<pre id="file-content"></pre>
The HTML5 fileReader facility does allow you to process local files, but these MUST be selected by the user, you cannot go rooting about the users disk looking for files.
I currently use this with development versions of Chrome (6.x).
I don't know what other browsers support it.
====================
Just use openFile(function to be executed with file contents as first parameter).
function dispFile(contents) {
document.getElementById('contents').innerHTML=contents
}
function clickElem(elem) {// Thx user1601638 on Stack Overflow (6/6/2018 - https://stackoverflow.com/questions/13405129/javascript-create-and-save-file )var eventMouse = document.createEvent("MouseEvents")eventMouse.initMouseEvent("click", true, false, window, 0, 0, 0, 0, 0, false, false, false, false, 0, null)elem.dispatchEvent(eventMouse)
}
function openFile(func) {readFile = function(e) { var file = e.target.files[0]; if (!file) { return; } var reader = new FileReader(); reader.onload = function(e) { var contents = e.target.result; fileInput.func(contents) document.body.removeChild(fileInput) } reader.readAsText(file)}fileInput = document.createElement("input")fileInput.type='file'fileInput.style.display='none'fileInput.onchange=readFilefileInput.func=funcdocument.body.appendChild(fileInput)clickElem(fileInput)
}
Click the button then choose a file to see its contents displayed below.
<button onclick="openFile(dispFile)">Open a file</button>
<pre id="contents"></pre>
=======================
Try
function readFile(file) {
return new Promise((resolve, reject) => {
let fr = new FileReader();
fr.onload = x=> resolve(fr.result);
fr.readAsText(file);
})
}
but user need to take action to choose file
=======================
Javascript cannot typically access local files in new browsers but the XMLHttpRequest object can be used to read files.
So it is actually Ajax (and not Javascript) which is reading the file.
If you want to read the file abc.txt, you can write the code as:
var txt = '';
var xmlhttp = new XMLHttpRequest();
xmlhttp.onreadystatechange = function(){
if(xmlhttp.status == 200 && xmlhttp.readyState == 4){
txt = xmlhttp.responseText;
}
};
xmlhttp.open("GET","abc.txt",true);
xmlhttp.send();
Now txt contains the contents of the file abc.txt.
=======================
javascript to read a local text file
function getData(){
var xmlhttp;
if (window.XMLHttpRequest) {xmlhttp = new XMLHttpRequest();}
else {xmlhttp = new ActiveXObject("Microsoft.XMLHTTP");}
xmlhttp.onreadystatechange = function() {
if (xmlhttp.readyState == 4) {
var lines = xmlhttp.responseText; //*get all lines from file*
intoArray(lines); *//call function with parameter "lines*"
}
}
xmlhttp.open("GET", "motsim1.txt", true);
xmlhttp.send();
}
function intoArray (lines) {
// split text data into array "\n" is splitting character
var lineArr = lines.split('\n');
//just to check if it works output lineArr[index] as below
document.write(lineArr[2]);
document.write(lineArr[3]);
}
get index of object in array
// Get index of object with specific value in array
const needle = 3; // needle
const haystack = [{ id: 1 }, { id: 2 }, { id: 3 }]; // haystack
const index = haystack.findIndex(item => item.id === needle);
// find the index of a value in an array
var list = ["apple","banana","orange"]
var index_of_apple = list.indexOf("apple") // 0
// findindex
const array1 = [5, 12, 8, 130, 44];
const search = element => element > 13;
console.log(array1.findIndex(search));
// expected output: 3
const array2 = [
{ id: 1, dev: false },
{ id: 2, dev: false },
{ id: 3, dev: true }
];
const search = obj => obj.dev === true;
console.log(array2.findIndex(search)); // 2
//find the index of an object in an array
const letters = [{letter: 'a'},{letter: 'b'},{letter: 'c'}]
const index = letters.findIndex((element, index) => {
if (element.letter === 'b') { return true }
}) //index is `1`
// get index of element in array
const beasts = ['ant', 'bison', 'camel', 'duck', 'bison'];
beasts.indexOf('bison'); //ouput: 1
// start from index 2
beasts.indexOf('bison', 2); //output: 4
beasts.indexOf('giraffe'); //output: -1
search and returns the position of the first occurrence of a specified value in a string.
nameArr = ['sonarika','yogesh','sumit','vijay','anil'];
nameArr.indexOf('sumit') // 2
nameArr.indexOf('vis') // -1
txt = "Sonarika Bhadoria";
txt.indexOf('a') // 3
arr = ["one", "two", "three", "four", "five"];
arr.includes("two"); // true
arr.includes("tw"); // false
filter
search array for all substring match
arr2 = fruits.filter(element => element.includes("ang"));
ages = [12,14,19,21]
function checkAdult(age) { return age >= 18; }
ages.filter(checkAdult);
====
arr = [ 4, "Pete", 8, "John" ];
$.inArray( "Pete", arr ) // 1
$.inArray() returns index of the item in the array, or -1 if item was not found.
forEach
forEach is an Array method that we can use to execute a function on each element in an array.
It can only be used on Arrays, Maps, and Sets.
arr = ['cat', 'dog', 'fish'];
arr.forEach(element => { console.log(element); });
// cat
// dog
// fish
arr = [5,4,8,7];
arr.forEach(function(item,index,arr) {
console.log("item: " + item + " at index: " + index + " in the array: " + arr);
})
// item: 5 at index: 0 in the array: 5,4,8,7
// item: 4 at index: 1 in the array: 5,4,8,7
// item: 8 at index: 2 in the array: 5,4,8,7
remove another set
var first = [ 1, 2, 3, 4, 5 ];
var second = [ 4, 5, 6 ];
var difference = first.filter(x => !second.includes(x));
var b = new Set(second);
var difference = [...first].filter(x => !b.has(x));
create an array containing 1…N
In ES6 using Array from() and keys() methods.
Array.from(Array(10).keys()) // [0, 1, 2, 3, 4, 5, 6, 7, 8, 9]
Shorter version using spread operator.
[...Array(10).keys()]
Array from() Method
Array.from(object, mapFunction, thisValue)
The arr.from() method is used to creates a new array instance from a given array.
In the case of a string, every alphabet of the string is converted to an element of the new array instance and in case of integer values, a new array instance simply takes the elements of the given array.
var myArr = Array.from("ABCDEFG"); // Create an Array from a String:
// A,B,C,D,E,F,G
Array.from([1, 2, 3])
// 2,4,6
Array includes() Method
array.includes(element, start)
Check if an array includes "Mango":
var fruits = ["Banana", "Orange", "Apple", "Mango"];
var n = fruits.includes("Mango");
// true
Removing specific item from array
let value = 3
let arr = [1, 2, 3, 4, 5, 3]
arr = arr.filter(item => item !== value)
notvisitedList = notvisitedList.filter(item => item !== topicpointer);
notvisitedList[Math.floor(Math.random() * notvisitedList.length)];
Removing multiple items
An additional advantage of this method is that you can remove multiple items
let forDeletion = [2, 3, 5]
let arr = [1, 2, 3, 4, 5, 3]
arr = arr.filter(item => !forDeletion.includes(item))
var a = [1,3,5,7,9];
var b = [5,4,3,2,1];
a.map((x, index)=> b[index] + x ); // [6, 7, 8, 9, 10]
Looping over arrays
while
let index = 0;
const array = [1,2,3,4,5,6];
while (index < array.length) {
console.log(array[index]);
index++;
}
for (classical)
const array = [1,2,3,4,5,6];
for (let index = 0; index < array.length; index++) {
console.log(array[index]);
}
forEach
const array = [1,2,3,4,5,6];
array.forEach(function(current_value, index, array) {
console.log(`At index ${index} in array ${array} the value is ${current_value}`);
});
// => undefined
map
The last construct was useful, however, it doesn’t return a new array which might
be undesirable for your specific case.
map solves this by applying a function
over every element and then returning the new array.
const array = [1,2,3,4,5,6];
const square = x => Math.pow(x, 2);
const squares = array.map(square);
console.log(`Original array: ${array}`);
console.log(`Squared array: ${squares}`);
The full signature for map is .map(current_value, index, array).
reduce
From MDN:
The reduce() method applies a function against an accumulator and each element
in the array (from left to right) to reduce it to a single value.
const array = [1,2,3,4,5,6];
const sum = (x, y) => x + y;
const array_sum = array.reduce(sum, 0);
console.log(`The sum of array: ${array} is ${array_sum}`);
filter
Filters elements on an array based on a boolean function.
const array = [1,2,3,4,5,6];
const even = x => x % 2 === 0;
const even_array = array.filter(even);
console.log(`Even numbers in array ${array}: ${even_array}`);
every
Got an array and want to test if a given condition is met in every element?
const array = [1,2,3,4,5,6];
const under_seven = x => x < 7;
if (array.every(under_seven)) {
console.log('Every element in the array is less than 7');
} else {
console.log('At least one element in the array was bigger than 7');
}
some
Test if at least one element matches our boolean function.
const array = [1,2,3,9,5,6,4];
const over_seven = x => x > 7;
if (array.some(over_seven)) {
console.log('At least one element bigger than 7 was found');
} else {
console.log('No element bigger than 7 was found');
}
Find the Max of all the nested arrays
const arr = [[12,45,75], [54,45,2],[23,54,75,2]];
const max = Math.max(...[].concat(...arr));
We can loop through the array source array which need to be pushed , then add elements one by one
function push(fromArray, toArray) {
for(let i = 0, len = fromArray.length; i < len; i++) {
toArray.push(fromArray[i]);
}
return toArray;
}
var array1 = [1,2,3,4,5];var array2= [6,7,8,9,10];var array3 = [];push(array1, array3);push(array2, array3);
2. Using spread operator
Spread syntax allows an iterable such as an array expression or string to be expanded in places where zero or more arguments (for function calls) or elements (for array literals) are expected
var array1 = [1,2,3,4,5];var array2 = [6,7,8,9,10];var array3 = [...array1, ...array2];array3; // [1,2,3,4,5,6,7,8,9,10];
We can use spread operator with push
var array1 = [1,2,3,4,5];var array2 = [6,7,8,9,10];var array3 = []array3.push(...array1, ...array2);array3; // [1, 2, 3, 4, 5, 6, 7, 8, 9, 10]
We can also use spread operator with Array.of
var array1 = [1,2,3,4,5]
var array2 = [6,7,8,9,10];var array3 = Array.of(...array2, ...array1);
We can use spread operator to convert string to array
var string ="two";var arrayOfChar = [...string];arrayOfChar; //["t", "w", "o"]
3. Using concat method
The concat() method is used to merge two or more arrays.
This method does not change the existing arrays, but instead returns a new array.
var array1 = [1,2,3,4,5]var array2 = [6,7,8,9,10];
var array3 = array1.concat(array2);// orvar array3 = [].concat(array1, array2);
We can pass other than array as arguments.
var a = "string";var b = 1;var c = {};var combined = [].concat(a, b, c)combined; // ["string", 1, {…}]
4. Using Reduce method
The reduce() method executes a reducer function(that you provide) on each element of the array, resulting in a single output value.
var array1 = [1,2,3,4,5];var array2 = [6,7,8,9,10];var array3 = array2.reduce((newArray, item) => {
newArray.push(item);
return newArray; ), array1);
One way is to put all arrays in an object
Arrays = {
house: ["red","blue","yellow"],
cars: ["fast","big","safe"],
sofa: ["cozy","modern","elegant"]
}
numberOfArrays = Object.keys(Arrays).length;
sentence = numberOfArrays + ' Arrays - ' + Object.keys(Arrays).join(', ');
var allListNames = ["longHistList", "myfavorList", "activeList", "aETFList", "ahDiffList", "a10YiList"]
console.log(Array.from(allListNames));
onclick event
Note also:
dblclick double-clicks on an element
mousedown presses a mouse button over an element
mouseup releases a mouse button over an element
<p ondblclick="myFunction()">Double-click me</p>
<p id="demo">Click me.</p>
<script>
document.getElementById("demo").onclick = function() {myFunction()};
function myFunction() {
document.getElementById("demo").innerHTML = "YOU CLICKED ME!";
}
</script>
<button onclick="myFunction()">Try it</button>
<p id="demo"></p>
<script>
function myFunction() {
var person = prompt("Please enter your name", "Harry Potter");
if (person != null) {
document.getElementById("demo").innerHTML =
"Hello " + person + "! How are you today?";
}
}
</script>
Link Events
onClick
onMouseOver
onMouseOut
(note the quotation marks arrangement!)
<a href="index.htm" onMouseOver="home_button.src='homeon.gif';" onMouseOut="home_button.src='home.gif';"><img src="home.gif" alt="Home" name="home_button" border="0"></a>
===========================
Two JavaScripts most important functions, If and Loops.
var guess = prompt("Please guess a number between 1 and 10","");
if(guess == 5){ alert('Correct! I was thinking of 5');}
else{ alert('Wrong! I was thinking of 5');}
===========================
Events
onBlur - Happens when the cursor is moved out of the field
onFocus - Happens when the cursor is moved into the field
onChange - Happens when the field is changed and the cursor moves out of it
<input type="text" onBlur="dothis">
JavaScript Functions
function sayhi()
{
alert(Hi there!);
}
}
<a href="#" onMouseOver="sayhi();">Say Hi</a>
===========================
function getChar(event) {
if (event.which!=0 && event.charCode!=0) {
return String.fromCharCode(event.which) // the rest
} else {
return null // special key
}
}
function openHtml(){
console.log( "keypress: " + $(this).value );
};
</script>
<body onkeypress="chkKey()">
<!--<body onload="loadfile()">-->
onpagehide event
onpagehide event:
navigates away from a webpage.
Execute JavaScript code when the user navigates away from the document.
The onpagehide event triggers in JavaScript when a user leaves the page and decides to move to another.
Some examples include age refresh, a link is clicked, etc.
the following code implement onpagehide event in JavaScript:
============
<body onpagehide="newFunc()">
<p>Close the page and see what happens!</p>
<script>function newFunc() {alert("Thank you!"); }
</script>
</body>
============
jQuery pagehide Event
To trigger the event for all pages in jQuery Mobile:
$("document").on("pagehide",function(event){...})
To trigger the event for a specific page:
$("document").on("pagehide","page",function(event,data){...})
<script>
$(document).on("pagehide","#pagetwo",function(){alert("pagetwo is now hidden");
});
</script>
============
detect browser support for pageShow and pageHide
if ('onpagehide' in window) {
//if(window.onpagehide || window.onpagehide === null){window.addEventListener('pagehide', exitFunction, false);
} else {window.addEventListener('unload', exitFunction, false);
}
addEventListener
Attach a click event to the document.
When the user clicks anywhere in the document:
document.addEventListener("click", function(){
document.getElementById("demo").innerHTML = "Hello World";
});
window.onload = addfunc;
document.getElementById('myBtn').onclick(){alert('hello');}
document.getElementById('myBtn').addEventListener("click", funcname,false);
document.getElementById('myBtn').attachEvent("onclick", funcname);
Here is a list of some common HTML events:
onchange An HTML element has been changed
onclick The user clicks an HTML element
onmouseover The user moves the mouse over an HTML element
onmouseout The user moves the mouse away from an HTML element
onkeydown The user pushes a keyboard key
onload The browser has finished loading the page
Common events
There is a huge collection of events that can be generated by most element nodes:
Mouse events.
Keyboard events.
HTML frame/object events.
HTML form events.
User interface events.
Mutation events (notification of any changes to the structure of a document).
Progress events).
Note that the event classification above is not exactly the same as W3C's classification.
Category
Type
Attribute
Description
Bubbles
Cancelable
Mouse
click
onclick
Fires when the pointing device button is clicked over an element.
A click is defined as a mousedown and mouseup over the same screen location.
The sequence of these events is:
mousedown, mouseup, click
Yes
Yes
dblclick
ondblclick
Fires when the pointing device button is double-clicked over an element
Yes
Yes
mousedown
onmousedown
Fires when the pointing device button is pressed over an element
Yes
Yes
mouseup
onmouseup
Fires when the pointing device button is released over an element
Yes
Yes
mouseover
onmouseover
Fires when the pointing device is moved onto an element
Yes
Yes
mousemove
onmousemove
Fires when the pointing device is moved while it is over an element
Yes
Yes
mouseout
onmouseout
Fires when the pointing device is moved away from an element
Yes
Yes
dragstart
ondragstart
Fired on an element when a drag is started.
Yes
Yes
drag
ondrag
This event is fired at the source of the drag, that is, the element where dragstart was fired, during the drag operation.
Yes
Yes
dragenter
ondragenter
Fired when the mouse is first moved over an element while a drag is occurring.
Yes
Yes
dragleave
ondragleave
This event is fired when the mouse leaves an element while a drag is occurring.
Yes
No
dragover
ondragover
This event is fired as the mouse is moved over an element when a drag is occurring.
Yes
Yes
drop
ondrop
The drop event is fired on the element where the drop occurs at the end of the drag operation.
Yes
Yes
dragend
ondragend
The source of the drag will receive a dragend event when the drag operation is complete, whether it was successful or not.
Yes
No
Keyboard
keydown
onkeydown
Fires before keypress, when a key on the keyboard is pressed.
Yes
Yes
keypress
onkeypress
Fires after keydown, when a key on the keyboard is pressed.
Yes
Yes
keyup
onkeyup
Fires when a key on the keyboard is released
Yes
Yes
HTML frame/object
load
onload
Fires when the user agent finishes loading all content within a document, including window, frames, objects and images
For elements, it fires when the target element and all of its content has finished loading
No
No
unload
onunload
Fires when the user agent removes all content from a window or frame
For elements, it fires when the target element or any of its content has been removed
No
No
abort
onabort
Fires when an object/image is stopped from loading before completely loaded
Yes
No
error
onerror
Fires when an object/image/frame cannot be loaded properly
Yes
No
resize
onresize
Fires when a document view is resized
Yes
No
scroll
onscroll
Fires when an element or document view is scrolled
No, except that a scroll event on document must bubble to the window
No
HTML form
select
onselect
Fires when a user selects some text in a text field, including input and textarea
Yes
No
change
onchange
Fires when a control loses the input focus and its value has been modified since gaining focus
Yes
No
submit
onsubmit
Fires when a form is submitted
Yes
Yes
reset
onreset
Fires when a form is reset
Yes
No
focus
onfocus
Fires when an element receives focus either via the pointing device or by tab navigation
No
No
blur
onblur
Fires when an element loses focus either via the pointing device or by tabbing navigation
No
No
User interface
focusin
(none)
Similar to HTML focus event, but can be applied to any focusable element
Yes
No
focusout
(none)
Similar to HTML blur event, but can be applied to any focusable element
Yes
No
DOMActivate
(none)
Similar to XUL command event.
Fires when an element is activated, for instance, through a mouse click or a keypress.
Yes
Yes
Mutation
DOMSubtreeModified
(none)
Fires when the subtree is modified
Yes
No
DOMNodeInserted
(none)
Fires when a node has been added as a child of another node
Yes
No
DOMNodeRemoved
(none)
Fires when a node has been removed from a DOM-tree
Yes
No
DOMNodeRemovedFromDocument
(none)
Fires when a node is being removed from a document
No
No
DOMNodeInsertedIntoDocument
(none)
Fires when a node is being inserted into a document
No
No
DOMAttrModified
(none)
Fires when an attribute has been modified
Yes
No
DOMCharacterDataModified
(none)
Fires when the character data has been modified
Yes
No
Progress
loadstart
(none)
Progress has begun.
No
No
progress
(none)
In progress.
After loadstart has been dispatched.
No
No
error
(none)
Progression failed.
After the last progress has been dispatched, or after loadstart has been dispatched if progress has not been dispatched.
No
No
abort
(none)
Progression is terminated.
After the last progress has been dispatched, or after loadstart has been dispatched if progress has not been dispatched.
No
No
load
(none)
Progression is successful.
After the last progress has been dispatched, or after loadstart has been dispatched if progress has not been dispatched.
No
No
loadend
(none)
Progress has stopped.
After one of error, abort, or load has been dispatched.
No
No
Note that the events whose names start with "DOM" are currently not well supported, and for this and other performance reasons are deprecated by the W3C in DOM Level 3.
Mozilla and Opera support DOMAttrModified, DOMNodeInserted, DOMNodeRemoved and DOMCharacterDataModified.
Chrome and Safari support these events, except for DOMAttrModified.
Touch events
Web browsers running on touch-enabled devices, such as Apple's iOS and Google's Android, generate additional events.
Category
Type
Attribute
Description
Bubbles
Cancelable
Touch
touchstart
Fires when a finger is placed on the touch surface/screen.
Yes
Yes
touchend
Fires when a finger is removed from the touch surface/screen.
Yes
Yes
touchmove
Fires when a finger already placed on the screen is moved across the screen.
Yes
Yes
touchenter
Fires when a touch point moves onto the interactive area defined by a DOM element.
Yes
Yes
touchleave
Fires when a touch point moves off the interactive area defined by a DOM element.
Yes
Yes
touchcancel
A user agent must dispatch this event type to indicate when a TouchPoint has been disrupted in an implementation-specific manner, such as by moving outside the bounds of the UA window.
A user agent may also dispatch this event type when the user places more touch points (The coordinate point at which a pointer (e.g.
finger or stylus) intersects the target surface of an interface) on the touch surface than the device or implementation is configured to store, in which case the earliest TouchPoint object in the TouchList should be removed.
Yes
No
In the W3C draft recommendation, a TouchEvent delivers a TouchList of Touch locations, the modifier keys that were active, a TouchList of Touch locations within the targeted DOM element, and a TouchList of Touch locations that have changed since the previous TouchEvent.
Apple didn't join this working group, and delayed W3C recommendation of its Touch Events Specification by disclosing patents late in the recommendation process.
Pointer events
Web browsers on devices with various types of input devices including mouse, touch panel, and pen may generate integrated input events.
Users can see what type of input device is pressed, what button is pressed on that device, and how strongly the button is pressed when it comes to a stylus pen.
As of October 2013, this event is only supported by Internet Explorer 10 and 11.
Category
Type
Attribute
Description
Bubbles
Cancelable
Pointer
pointerdown
onpointerdown
Fires when the pointing device button is activated, or pressed over an element.
Yes
Yes
pointerup
onpointerup
Fires when the pointing device button is released over an element
Yes
Yes
pointercancel
onpointercancel
Fires when a pointing device is unlikely to continue to produce event because, for example, the device is used for panning/zooming after a pointerdown event.
Yes
Yes
pointermove
onpointermove
Fires when the pointing device is moved while it is over an element
Yes
Yes
pointerover
onpointerover
Fires when the pointing device is moved onto an element
Yes
Yes
pointerout
onpointerout
Fires when the pointing device is moved away from an element.
Also fires after pointerup by pointing device without hovering, or after
Yes
Yes
pointerenter
onpointerenter
Fires when the pointing device is moved onto an element, or when the button of the pointing device which does not support hovering is pressed on one of its descendant elements.
No
Yes
pointerleave
onpointerleave
Fires when the pointing device is moved away from an element, or when the button of the pointing device which does not support hovering is released over its descendant elements.
No
Yes
gotpointercapture
ongotpointercapture
Fires when the pointer is captured by setPointerCapture method.
Yes
No
lostpointercapture
onlostpointercapture
Fires when the pointer is released by releasePointerCapture method.
Yes
No
Indie UI events
Not yet really implemented, the Indie UI working groups want to help web application developers to be able to support standard user interaction events without having to handle different platform specific technical events that could match with it.
Scripting usable interfaces can be difficult, especially when one considers that user interface design patterns differ across software platforms, hardware, and locales, and that those interactions can be further customized based on personal preference.
Individuals are accustomed to the way the interface works on their own system, and their preferred interface frequently differs from that of the web application author's preferred interface.
For example, web application authors, wishing to intercept a user's intent to undo the last action, need to "listen" for all the following events:
Control+Z on Windows and Linux.
Command+Z on Mac OS X.
Shake events on some mobile devices.
It would be simpler to listen for a single, normalized request to "undo" the previous action.
Category
Type
Description
Bubbles
Cancelable
Request
undorequest
Indicates the user desires to "undo" the previous action.
(May be superseded by the UndoManager interface.)
Yes
Yes
redorequest
Indicates the user desires to "redo" the previously "undone" action.
(May be superseded by the UndoManager interface.)
Yes
no
expandrequest
Indicates the user desires to reveal information in a collapsed section (e.g.
a disclosure widget) or branch node in a hierarchy (e.g., a tree view).
Yes
Yes
collapserequest
Indicates the user desires to hide or collapse information in an expanded section (e.g.
a disclosure widget) or branch node in a hierarchy (e.g., a tree view).
Yes
Yes
dismissrequest
Indicates the user desires "dismiss" the current view (e.g.
canceling a dialog, or closing a popup menu).
Yes
Yes
deleterequest
Indicates the user wants to initiate a "delete" action on the marked element or current view.
Yes
Yes
Focus Request
directionalfocusrequest
Initiated when the user agent sends a "direction focus" request to the web application.
Web authors should not use or register for directionalfocusrequest events when standard browser focus and blur events are sufficient.
Using these events unnecessarily could result in reduced performance or negative user experience.
Yes
Yes
linearfocusrequest
Initiated when the user agent sends a "linear focus" request to the web application.
Web authors should not use or register for linearfocusrequest events when standard browser focus and blur events are sufficient.
This event type is only necessary on specialized control types such as data grids where the logical next element may not be focusable or even in the DOM until requested.
Using these events unnecessarily could result in reduced performance or negative user experience.
Yes
Yes
palettefocusrequest
Initiated when the user agent sends a "palette focus" request to the web application.
Web app authors receiving this event should move focus to the first palette in the web application, or cycle focus between all available palettes.
Note: palettes are sometimes referred to as non-modal dialogs or inspector windows.
Yes
Yes
toolbarfocusrequest
Initiated when the user agent sends a "toolbar focus" request to the web application.
Web app authors receiving this event should move focus to the main toolbar in the web application, or cycle focus between all available toolbars.
Yes
Yes
Manipulation Request
moverequest
Initiated when the user agent sends a move request to the web application with accompanying x/y delta values.
This is used, for example, when moving an object to a new location on a layout canvas.
Yes
Yes
panrequest
Initiated when the user agent sends a pan request to the web application with accompanying x/y delta values.
This is used, for example, when changing the center point while panning a map or another custom image viewer.
Yes
Yes
rotationrequest
Initiated when the user agent sends a rotation request to the web application with accompanying origin x/y values and a rotation value in degrees.
Yes
Yes
zoomrequest
Initiated when the user agent sends a zoom request to the web application with accompanying origin x/y values and the zoom scale factor.
Yes
Yes
Scroll Request
scrollrequest
Initiated when the user agent sends a scroll request to the web application with accompanying x/y delta values or one of the other defined scrollType values.
Authors should only use this event and uiaction with custom scroll views.
Yes
Yes
ValueChange Request
valuechangerequest
Initiated when the user agent sends a value change request to the web application.
Used on custom range controls like sliders, carousels, etc.
Yes
Yes
Internet Explorer-specific events
In addition to the common (W3C) events, two major types of events are added by Internet Explorer.
Some of the events have been implemented as de facto standards by other browsers.
Clipboard events.
Data binding events.
Category
Type
Attribute
Description
Bubbles
Cancelable
Clipboard
cut
oncut
Fires after a selection is cut to the clipboard.
Yes
Yes
copy
oncopy
Fires after a selection is copied to the clipboard.
Yes
Yes
paste
onpaste
Fires after a selection is pasted from the clipboard.
Yes
Yes
beforecut
onbeforecut
Fires before a selection is cut to the clipboard.
Yes
Yes
beforecopy
onbeforecopy
Fires before a selection is copied to the clipboard.
Yes
Yes
beforepaste
onbeforepaste
Fires before a selection is pasted from the clipboard.
Yes
Yes
Data binding
afterupdate
onafterupdate
Fires immediately after a databound object has been updated.
Yes
No
beforeupdate
onbeforeupdate
Fires before a data source is updated.
Yes
Yes
cellchange
oncellchange
Fires when a data source has changed.
Yes
No
dataavailable
ondataavailable
Fires when new data from a data source become available.
Yes
No
datasetchanged
ondatasetchanged
Fires when content at a data source has changed.
Yes
No
datasetcomplete
ondatasetcomplete
Fires when transfer of data from the data source has completed.
Yes
No
errorupdate
onerrorupdate
Fires if an error occurs while updating a data field.
Yes
No
rowenter
onrowenter
Fires when a new row of data from the data source is available.
Yes
No
rowexit
onrowexit
Fires when a row of data from the data source has just finished.
No
Yes
rowsdelete
onrowsdelete
Fires when a row of data from the data source is deleted.
Yes
No
rowinserted
onrowinserted
Fires when a row of data from the data source is inserted.
Yes
No
Mouse
contextmenu
oncontextmenu
Fires when the context menu is shown.
Yes
Yes
drag
ondrag
Fires when during a mouse drag (on the moving Element).
Yes
Yes
dragstart
ondragstart
Fires when a mouse drag begins (on the moving Element).
Yes
Yes
dragenter
ondragenter
Fires when something is dragged onto an area (on the target Element).
Yes
Yes
dragover
ondragover
Fires when a drag is held over an area (on the target Element).
Yes
Yes
dragleave
ondragleave
Fires when something is dragged out of an area (on the target Element).
Yes
Yes
dragend
ondragend
Fires when a mouse drag ends (on the moving Element).
Yes
Yes
drop
ondrop
Fires when a mouse button is released over a valid target during a drag (on the target Element).
Yes
Yes
selectstart
onselectstart
Fires when the user starts to select text.
Yes
Yes
Keyboard
help
onhelp
Fires when the user initiates help.
Yes
Yes
HTML frame/object
beforeunload
onbeforeunload
Fires before a document is unloaded.
No
Yes
stop
onstop
Fires when the user stops loading the object.
(unlike abort, stop event can be attached to document)
No
No
HTML form
beforeeditfocus
onbeforeeditfocus
Fires before an element gains focus for editing.
Yes
Yes
Marquee
start
onstart
Fires when a marquee begins a new loop.
No
No
finish
onfinish
Fires when marquee looping is complete.
No
Yes
bounce
onbounce
Fires when a scrolling marquee bounces back in the other direction.
No
Yes
Miscellaneous
beforeprint
onbeforeprint
Fires before a document is printed
No
No
afterprint
onafterprint
Fires immediately after the document prints.
No
No
propertychange
onpropertychange
Fires when the property of an object is changed.
No
No
filterchange
onfilterchange
Fires when a filter changes properties or finishes a transition.
No
No
readystatechange
onreadystatechange
Fires when the readyState property of an element changes.
No
No
losecapture
onlosecapture
Fires when the releaseCapture method is invoked.
No
No
Note that Mozilla, Safari and Opera also support the readystatechange event for the XMLHttpRequest object.
Mozilla also supports the beforeunload event using the traditional event registration method (DOM Level 0).
Mozilla and Safari also support contextmenu, but Internet Explorer for Mac does not.
Note that Firefox 6 and later support the beforeprint and afterprint events.
XUL events
In addition to the common (W3C) events, Mozilla defined a set of events that work only with XUL elements.
Category
Type
Attribute
Description
Bubbles
Cancelable
Mouse
DOMMouseScroll
DOMMouseScroll
Fires when the mouse wheel is moved, causing the content to scroll.
Yes
Yes
dragdrop
ondragdrop
Fires when the user releases the mouse button to drop an object being dragged.
No
No
dragenter
ondragenter
Fires when the mouse pointer first moves over an element during a drag.
It is similar to the mouseover event but occurs while dragging.
No
No
dragexit
ondragexit
Fires when the mouse pointer moves away from an element during a drag.
It is also called after a drop on an element.
It is similar to the mouseout event but occurs during a drag.
No
No
draggesture
ondraggesture
Fires when the user starts dragging the element, usually by holding down the mouse button and moving the mouse.
No
No
dragover
ondragover
Related to the mousemove event, this event is fired while something is being dragged over an element.
No
No
Input
CheckboxStateChange
Fires when a checkbox is checked or unchecked, either by the user or a script.
No
No
RadioStateChange
Fires when a radio button is selected, either by the user or a script.
No
No
close
onclose
Fires when a request has been made to close the window.
No
Yes
command
oncommand
Similar to W3C DOMActivate event.
Fires when an element is activated, for instance, through a mouse click or a keypress.
No
No
input
oninput
Fires when a user enters text in a textbox.
Yes
No
User interface
DOMMenuItemActive
DOMMenuItemActive
Fires when a menu or menuitem is hovered over, or highlighted.
Yes
No
DOMMenuItemInactive
DOMMenuItemInactive
Fires when a menu or menuitem is no longer being hovered over, or highlighted.
Yes
No
contextmenu
oncontextmenu
Fires when the user requests to open the context menu for the element.
The action to do this varies by platform, but it will typically be a right click.
No
Yes
overflow
onoverflow
Fires a box or other layout element when there is not enough space to display it at full size.
No
No
overflowchanged
onoverflowchanged
Fires when the overflow state changes.
No
No
underflow
onunderflow
Fires to an element when there becomes enough space to display it at full size.
No
No
popuphidden
onpopuphidden
Fires to a popup after it has been hidden.
No
No
popuphiding
onpopuphiding
Fires to a popup when it is about to be hidden.
No
No
popupshowing
onpopupshowing
Fires to a popup just before it is popped open.
No
Yes
popupshown
onpopupshown
Fires to a popup after it has been opened, much like the onload event is sent to a window when it is opened.
No
No
Command
broadcast
onbroadcast
Placed on an observer.
The broadcast event is sent when the attributes of the broadcaster being listened to are changed.
No
No
commandupdate
oncommandupdate
Fires when a command update occurs.
No
No
Other events
For Mozilla and Opera 9, there are also undocumented events known as DOMContentLoaded and DOMFrameContentLoaded which fire when the DOM content is loaded.
These are different from "load" as they fire before the loading of related files (e.g., images).
However, DOMContentLoaded has been added to the HTML 5 specification.
The DOMContentLoaded event was also implemented in the Webkit rendering engine build 500+.
Opera 9 also supports the Web Forms 2.0 events DOMControlValueChanged, invalid, forminput and formchange.
Event flow
Consider the situation when there are 2 elements nested together.
Both have event handlers registered on the same event type, say "click".
When the user clicks on the inner element, there are two possible ways to handle it:
Trigger the elements from outer to inner (event capturing).
This model is implemented in Netscape Navigator.
Trigger the elements from inner to outer (event bubbling).
This model is implemented in Internet Explorer and other browsers.
W3C takes a middle position in this struggle.
Events are first captured until it reaches the target element, and then bubbled up.
During the event flow, an event can be responded to at any element in the path (an observer) in either phase by causing an action, and/or by stopping the event (with method event.stopPropagation() for W3C-conforming browsers and command event.cancelBubble = true for Internet Explorer), and/or by cancelling the default action for the event.
Event object
The Event object provides a lot of information about a particular event, including information about target element, key pressed, mouse button pressed, mouse position, etc.
Unfortunately, there are very serious browser incompatibilities in this area.
Hence only the W3C Event object is discussed in this article.
Event properties
Name
Type
Description
type
DOMString
The name of the event (case-insensitive in DOM level 2 but case-sensitive in DOM level 3 ).
target
EventTarget
Used to indicate the EventTarget to which the event was originally dispatched.
currentTarget
EventTarget
Used to indicate the EventTarget whose EventListeners are currently being processed.
eventPhase
unsigned short
Used to indicate which phase of event flow is currently being evaluated.
bubbles
boolean
Used to indicate whether or not an event is a bubbling event.
cancelable
boolean
Used to indicate whether or not an event can have its default action prevented.
timeStamp
DOMTimeStamp
Used to specify the time (in milliseconds relative to the epoch) at which the event was created.
Event methods
Name
Argument type
Argument name
Description
stopPropagation
To prevent further propagation of an event during event flow.
preventDefault
To cancel the event if it is cancelable, meaning that any default action normally taken by the implementation as a result of the event will not occur.
initEvent
DOMString
eventTypeArg
Specifies the event type.
boolean
canBubbleArg
Specifies whether or not the event can bubble.
boolean
cancelableArg
Specifies whether or not the event's default action can be prevented.
The onreadystatechange Event
The readyState property holds the status of the XMLHttpRequest.
The onreadystatechange event is triggered every time the readyState changes.
During a server request, the readyState changes from 0 to 4:
0: request not initialized
1: server connection established
2: request received
3: processing request
4: request finished and response is ready
In the onreadystatechange property, specify a function to be executed when
the readyState changes:
xhttp.onreadystatechange = function()
When readyState is 4 and status is 200, the response is ready:
if (this.readyState == 4 && this.status == 200)
POPUP Message using Event:
Display a simple message "Welcome!!!" on your demo webpage and when the user hovers over the message, a popup should be displayed with a message "Welcome to my WebPage!!!".
Solution: <html><head><title>Event!!!</title><script type="text/javascript">function trigger(){document.getElementById("hover").addEventListener("mouseover", popup);function popup(){alert("Welcome to my WebPage!!!");}}</script><style>p{ font-size:50px; position: fixed; left: 550px; top: 300px;}</style></head><body onload="trigger();"><p id="hover">Welcome!!!</p></body></html>
What about Events?
JavaScript is an event-driven programming language.
We also use callback functions for event declarations.
For example, let’s say we want users to click on a button:
<button>Click here</button>
This time we will see a message on the console only when the user clicks on the button:
document.queryselector("#callback-btn")
.addEventListener("click", function() {
console.log("User has clicked on the button!");
});
So here we select the button first with its id, and then we add an event listener with the addEventListener method.
It takes 2 parameters.
The first one is its type, “click”, and the second parameter is a callback function, which logs the message when the button is clicked.
As you can see, callback functions are also used for event declarations in JavaScript.
KeyboardEvent ctrlKey Property
event.ctrlKey
true - The ctrl key was pressed
false - The ctrl key was not pressed
if (event.ctrlKey) {
alert('ctrl yes');
} else {
alert('ctrl no');
}
event.keyCode
var x = event.keyCode;
<input type="text" onkeypress="uniCharCode(event)" onkeydown="uniKeyCode(event)">
// both function will be called at the same time when key pressed
function uniCharCode(event) {
var char = event.which || event.keyCode;
alert("Unicode CHARACTER code: " + char);
}
function uniKeyCode(event) {
var key = event.keyCode;
alert('Unicode KEY code: " + key);
}
When pressing the "a" key on the keyboard (not using caps lock), the result of char and key will be:
Unicode CHARACTER code: 97
Unicode KEY code: 65
Example
Alert some text if the user presses the Escape key:
<input type="text" onkeydown="myFunction(event)">
function myFunction(event) {
var x = event.keyCode;
if (x == 27) { // 27 is the ESC key
alert ("You pressed the Escape key!");
}
}
Example
Convert the Unicode value into a character (does not work for function keys):
var x = event.keyCode; // Get the Unicode value
var y = String.fromCharCode(x); // Convert the value into a character
KeyboardEvent which Property
event.which
returns the Unicode character code of the key that triggered the onkeypress event,
or the Unicode key code of the key that triggered the onkeydown or onkeyup event.
Example
Get the Unicode value of the pressed keyboard key:
var x = event.which;
KeyboardEvent key Property
event.key
A String, representing the pressed keyboard button.
Possible values:
A single character (like "a", "W", "4", "+" or "$")
A multicharacter (like "F1", "Enter", "HOME" or "CAPS LOCK")
Example
Alert some text if the user presses the "A" key:
var x = event.key;
// If the pressed keyboard button is "a" or "A" (using caps lock or shift), alert some text.
if (x == "a" || x == "A") {
alert ("You pressed the 'A' key!");
}
KeyboardEvent charCode Property
event.charCode
A Number, representing the Unicode character code
Example
Alert some text if the user presses the "O" key:
function myFunction(event) {
var x = event.charCode || event.keyCode;
if (x == 111 || x == 79) { // o is 111, O is 79
alert("You pressed the 'O' key!");
}
}
onwheel, onscroll Event
onwheel specifically fires when the mouse wheel is spun.
Note that onwheel is non-standard and should be avoided unless you're specifically targeting browsers that support it and/or are providing an extra feature whose absence won't be felt.
onscroll fires for any kind of scrolling, including keyboard buttons like the arrow keys, Home, End, Page Up, Page Down, space bar, tabbing etc.
object.onscroll = function(){myScript};
using the addEventListener() method:
object.addEventListener("scroll", myScript);
Note: The addEventListener() method is not supported in Internet Explorer 8 and earlier versions.
Example
Toggle between class names on different scroll positions - When the user scrolls down 50 pixels from the top of the page, the class name "test" will be added to an element (and removed when scrolled up again).
window.onscroll = function() {myFunction()};
function myFunction() {
if (document.body.scrollTop > 50 || document.documentElement.scrollTop > 50) {
document.getElementById("myP").className = "test";
} else {
document.getElementById("myP").className = "";
}
}
window.onscroll function
up = document.getElementById("BackToTop2");
window.onscroll = function() {
scrollFunction()
};
function scrollFunction() {
if (document.body.scrollTop > 100 || document.documentElement.scrollTop > 100) {
up.style.display = "block";
} else {
up.style.display = "none";
}
}
function topFunction() {
document.body.scrollTop = 0;
document.documentElement.scrollTop = 0;
}
Example
Slide in an element when the user has scrolled down 350 pixels from the top of the page (add the slideUp class):
window.onscroll = function() {myFunction()};
function myFunction() {
if (document.body.scrollTop > 350 || document.documentElement.scrollTop > 350) {
document.getElementById("myImg").className = "slideUp";
}
}
// 滚屏时触发函数
window.onscroll =function(){
lazyload(imgs);
}
MouseEvent which Property
event.which
returns a number that indicates which mouse button was pressed when a mouse event was triggered.
Example
Find out which mouse button that was pressed when a mouse event was triggered:
alert("You pressed button: " + event.which)
MouseEvent button Property
event.button
A Number, representing which mouse button that was pressed when the mouse event occured.
alert("You pressed button: " + event.button)
to pass the event object:
<p id="p" onclick="doSomething(event)">
to get the clicked child element (should be used with event parameter:
function doSomething(e) {
e = e || window.event;
var target = e.target || e.srcElement;
console.log(target);
}
to pass the element itself (DOMElement):
<p id="p" onclick="doThing(this)">
Since inline events are executed as functions you can simply use arguments.
<p id="p" onclick="doSomething.apply(this, arguments)">
and
function doSomething(e) {
if (!e) e = window.event;
// 'e' is the event.
// 'this' is the P element
}
You don't need to pass this, there already is the event object passed by default automatically, which contains event.target which has the object it's coming from.
You can lighten your syntax:
This:
<p onclick="doSomething()">aaaa</p>
Will work with this:
function doSomething(){
console.log(event);
console.log(event.target);
}
The e is short for event
The simplest way to create an event is to click somewhere on the page.
When you click, a click event is triggered.
This event is actually an object containing information about the action that just happened.
Now, events happen all the time, however you are not interested in all the events that happen.
When you are interested in some event however, it's when you add an event listener to the element you know will create events.
For example you are interested in knowing when the user clicks on a 'Subscribe' button and you want to do something when this event happens.
In order to do something about this event you bind an event handler to the button you are interested in.
The way to bind the handler to the element is by doing element.addEventListener(eventName, handler).
eventName is a string and it's the name of the event you are interested in, in this case that would be 'click' (for the click event).
The handler is simply a function which does something (it's executed) when the event happens.
The handler function, by default, when executed is passed the event object (that was created when the event/action you are interested in happened) as an argument.
Defining the event as a parameter of your handler function is optional but, sometimes (most times), it is useful for the handler function to know about the event that happened.
When you do define it this is the e you see in the functions like the ones you mentioned.
Remember, the event is just a regular javascript object, with lots of properties on it.
variables in event handler using function closures
function addClickHandler(elem, arg1, arg2) {
elem.addEventListener('click', function(e) {
// in the event handler function here, you can directly refer
// to arg1 and arg2 from the parent function arguments
}, false);
}
element.addEventListener('click', func(event, this.elements[i]))
element.addEventListener('click', (function(passedInElement) {
return function(e) {func(e, passedInElement); };
}) (this.elements[i]), false);
// return our event handler while capturing an argument in the closure
function handleEvent(passedInElement) {
return function(e) {
func(e, passedInElement);
};
}
element.addEventListener('click', handleEvent(this.elements[i]));
When it comes to developing an application that enables real-time operations, the first thing that comes to mind is WebSockets, which is fine, but there are other options that need to be considered.
One of them is Server-Sent Events, which enable a unidirectional communication flow between server and client.
Server-Sent Events
Server-Sent Events is a server push technology that allows a client to receive automatic updates from the server via an HTTP connection.
They are very easy to implement, but there are some important things you should know before choosing them for your application:
The technology is based on the plain HTTP
Allows only unidirectional data flow (as already mentioned)
It is limited to pure text data, no binaries allowed
The API
The Server-Sent Event API is contained in the EventSource interface.
Open a connection (same domain)
To open the connection to a server, create a new EventSource object with the URL of the script that generates the events:
const eventSource = new EventSource("/api/events");
Open a connection (other domain)
If the URL passed to the EventSource is on the other domain, a second parameter can be specified and a withCredentials property can be set to true, which means that the Cookie will be sent together:
const eventSource = new EventSource("http://localhost:8000/api/events", { withCredentials: true });
Listen for messages
Once the connection is instantiated, we need to listen to the events coming from the server:
eventSource.addEventListener("message", (event) => {
// "event.data" is a string
const data = JSON.parse(event.data);
// Prints whatever was sent by the server
console.log(data);
});Important note: As the server only sends text data, we have to stringify it on the server-side and parse it on the client.
Listen for errors
If an error occurs (network timeout or something), an error event is generated and we can listen for it:
eventSource.addEventListener("error", (error) => {
// Prints the information about an error
console.log(error);
});
Listen for an open connection
When the connection is opened, an open event is generated and we can listen for it as well:
eventSource.addEventListener("open", (event) => {
// Prints the information about an event
console.log(event);
});
Check the state of the connection
The state of the connection is stored in the readyState property of the EventSource:
0 - EventSource.CONNECTING
1 - EventSource.OPEN
2 - EventSource.CLOSED
const connectionState = eventSource.readyState;
Close the connection
When the connection between the server and the client interrupts, it is automatically restarted.
However, it can be terminated with the close method:
eventSource.close();
Server-Side Implementation
To establish a connection with the client, we have to send 200 status code together with the Content-Type: text/event-stream and Connection: keep-alive headers.
Let's take a look at the complete example with Node.js and explain each line of code in the comment above:
const express = require("express");
const bodyParser = require("body-parser");
const cors = require("cors");
const app = express();
const PORT = 3000;
// Store all connected clients
let clients = [];
const addSubscriber = (req, res) => {
// Set necessary headers to establish a stream of events
const headers = {
"Content-Type": "text/event-stream",
Connection: "keep-alive",
};
res.writeHead(200, headers);
// Add a new client that just connected
// Store the id and the whole response object
const id = Date.now();
const client = {
id,
res,
};
clients.push(client);
console.log(`Client connected: ${id}`);
// When the connection is closed, remove the client from the subscribers
req.on("close", () => {
console.log(`Client disconnected: ${id}`);
clients = clients.filter((client) => client.id !== id);
});
};
const notifySubscribers = (message) => {
// Send a message to each subscriber
clients.forEach((client) =>
client.res.write(`data: ${JSON.stringify(message)}\n\n`)
);
};
// Add a new message and send it to all subscribed clients
const addMessage = (req, res) => {
const message = req.body;
// Return the message as a response for the "/message" call
res.json(message);
return notifySubscribers(message);
};
// Get a number of the clients subscribed
const getSubscribers = (_req, res) => {
return res.json(clients.length);
};
app.use(cors());
app.use(bodyParser.json());
app.use(bodyParser.urlencoded({ extended: false }));
// Define endpoints
app.get("/subscribe", addSubscriber);
app.post("/message", addMessage);
app.get("/status", getSubscribers);
// Start the app
app.listen(PORT, () => {
console.log(`App listening on port ${PORT}`);
});
The main purpose of this code is to track all connected clients and inform them about the data sent to the /message endpoint.
Important note:\n does a line break.
\n\n means the end of the message, do not forget to add that.
Client-Side Implementation
On the client-side, we create a simple React component using the EventSource API to connect to the event stream and display the real-time data:
const App = () => {
const [data, setData] = useState([]);
useEffect(() => {
// Subscribe to the event stream
const eventSource = new EventSource("http://localhost:3000/subscribe");
eventSource.addEventListener("message", handleReceiveMessage);
return () => {
// Remove event listener and close the connection on unmount
eventSource.removeEventListener("message", handleReceiveMessage);
eventSource.close();
};
}, []);
// Get the message and store it in the state
const handleReceiveMessage = (event: any) => {
const eventData = JSON.parse(event.data);
setData((data) => data.concat(eventData));
};
// Send 5 random chars to the server
const handleSendMessage = () => {
axios.post("http://localhost:3000/message", {
message: generateRandomChars(5),
});
};
return (
<div style={{ padding: "0 20px" }}>
<div>
<h4>Click to send a message</h4>
<button onClick={handleSendMessage}>Send</button>
</div>
<div>
<h4>Message List</h4>
<p>Number of messages: {data.length}</p>
{data.map((item, index) => (
<div key={index}>{item.message}</div>
))}
</div>
</div>
);
};
Putting It All Together
To see our example in action, start the client (your start script may look different):
yarn start
And the server:
node server.js
You should see the app running:
And the server:
Notice the log Client connected: 1607163222261 which means that the connection has been established and we can use the channel to send events.
Click on the Send button on the UI (which POSTs 5 random characters to the /message endpoint) and notice how they appear in the list:
Custom Event Types
The default event type used by Server-Sent Events is a message.
A custom event can be sent by specifying the event at the start:
client.res.write(`event: join\ndata: ${JSON.stringify(message)}\n\n`);
And then the client can listen for this event:
eventSource.addEventListener("join", handleReceiveMessage);
Auto Reconnect
If the server crashes or the connection is lost, the EventSource tries to reconnect, we do not need to worry about it.
There is usually a delay of a few seconds between reconnections:
The server can specify a recommended delay by specifying the retry at the beginning of an event:
// Retry each 5 seconds
client.res.write(`retry:5000\ndata: ${JSON.stringify(message)}\n\n`);
If the browser knows that there is no Internet connection at the moment, it will try again to reconnect once the Internet connection is established.
Last-Event-Id Header
It is essential that the connection is resumed at the same point where it was interrupted so that no messages are lost.
This can be achieved with the Last-Event-Id header, which is automatically added when a certain condition is met.
Each message from the server should contain a unique id field:
client.res.write(`data: ${JSON.stringify(message)}\nid:500\n\n`);
When the browser receives a message with a set id, it sets the eventSource.lastEventId property to its value and sends this value in the Last-Event-Id header when reconnected:
Important note: the id should be appended by the server after the data to ensure that the eventSource.lastEventId is updated after the message is received.
Browser Support
According to caniuse, Server-Sent Events are available for more than 96% of the users as of 06.12.2020:
The following code can be used to check if the browser supports the feature:
if ("EventSource" in window) {
// Implement it
}
Sever-Sent Events vs.
WebSockets
The WebSocket protocol enables the exchange of events between the server and the client.
The data can be sent in both directions.
What are the main differences between the two technologies?
Server-Sent Events are based on HTTP, WebSockets on the WebSocket protocol
Server-Sent Events do not allow bidirectional data flow, WebSockets do
Server-Sent Events do not allow sending binary data, WebSockets do
Server-Sent Events provide an automatic reconnection if the connection is lost, WebSockets do not (you have to implement it manually)
Server-Sent Events have a limited maximum number of open connections (6), which can be painful if you need to open more tabs, WebSockets have no limitations
When you see all these disadvantages of using Server-Sent Events, are they really a competitor to WebSockets?
They are much easier and faster to implement.
So if you need a quick way to set up the real-time unidirectional communication between server and client and are aware of all the potential risks, this is the best way to go.
However, be aware that there is a high probability that the solution will eventually be refactored to the WebSockets.
Server-Sent Events - One Way Messaging
A server-sent event is when a web page automatically gets updates from a server.
This was also possible before, but the web page would have to ask if any updates were available.
With server-sent events, the updates come automatically.
Receive Server-Sent Event Notifications
The EventSource object is used to receive server-sent event notifications:
Example
var source = new EventSource("demo_sse.php");
source.onmessage = function(event) {
document.getElementById("result").innerHTML += event.data + " ";
};
Example explained:
Create a new EventSource object, and specify the URL of the page sending the updates (in this example "demo_sse.php")
Each time an update is received, the onmessage event occurs
When an onmessage event occurs, put the received data into the element with id="result"
<!DOCTYPE html>
<html>
<body>
<h1>Getting server updates</h1>
<div id="result"></div>
<script>
if(typeof(EventSource) !== "undefined") {
var source = new EventSource("demo_sse.php");
source.onmessage = function(event) {
document.getElementById("result").innerHTML += event.data + "<br>";
};
} else {
document.getElementById("result").innerHTML = "Sorry, your browser does not support server-sent events...";
}
</script>
</body>
</html>
Check Server-Sent Events Support
In the tryit example above there were some extra lines of code to check browser support for server-sent events:
if(typeof(EventSource) !== "undefined") {
// Yes! Server-sent events support!
// Some code.....
} else {
// Sorry! No server-sent events support..
}
Server-Side Code Example
For the example above to work, you need a server capable of sending data updates (like PHP or ASP).
The server-side event stream syntax is simple.
Set the "Content-Type" header to "text/event-stream".
Now you can start sending event streams.
Code in PHP (demo_sse.php):Code in ASP (VB) (demo_sse.asp):
<%
Response.ContentType = "text/event-stream"
Response.Expires = -1
Response.Write("data: The server time is: " & now())
Response.Flush()
%>
Code explained:
Set the "Content-Type" header to "text/event-stream"
Specify that the page should not cache
Output the data to send (Always start with "data: ")
Flush the output data back to the web page
The EventSource Object
In the examples above we used the onmessage event to get messages.
But other events are also available:
Events Description
onopen When a connection to the server is opened
onmessage When a message is received
onerror When an error occurs
Using Chrome JavaScript Debugger to break on page loading events
https://stackoverflow.com/questions/6727370/using-chrome-javascript-debugger-how-to-break-on-page-loading-events
https://developer.chrome.com/docs/devtools/javascript/breakpoints/#event-listeners
In Chrome's Developer Tools, go to the Sources tab.
On the right, open up Event Listener Breakpoints, and you can set breakpoints on events.
It sounds as if you'll want to set your breakpoint on DOMContentLoaded, which is under the DOM Mutation section.
After you do this, reload the page and you'll end up in the debugger.
load an external Javascript file during an "onclick" event
Use jQuery's $.getScript() function
sample code:
$("button").click(function(){
$.getScript("demo_ajax_script.js");
});
has been blocked by CORS policy: Cross origin requests are only supported for protocol schemes: http, data, isolated-app
The following function highlights an element by changing its background color to yellow:
function highlight(elem) {
const bgColor = 'yellow';
elem.style.backgroundColor = bgColor;
}
To execute a piece of code after highlighting the element, you may come up with a callback:
function highlight(elem, callback) {
const bgColor = 'yellow';
elem.style.backgroundColor = bgColor;
if(callback && typeof callback === 'function') {
callback(elem);
}
}
The following calls the highlight() function and adds a border to a <div> element:
<!DOCTYPE html>
<html lang="en">
<head>
<meta charset="UTF-8">
<meta name="viewport" content="width=device-width, initial-scale=1.0">
<title>JS Custom Event Demo</title>
</head>
<body>
<div>JS Custom Event Demo</div>
<script>
function highlight(elem, callback) {
const bgColor = 'yellow';
elem.style.backgroundColor = bgColor;
if (callback && typeof callback === 'function') {
callback(elem);
}
}
let note = document.querySelector('.note');
function addBorder(elem) {
elem.style.border = "solid 1px red";
}
highlight(note, addBorder);
</script>
</body>
</html>Code language: HTML, XML (xml)
To make the code more flexible, you can use the custom event.
Creating JavaScript custom events
To create a custom event, you use the CustomEvent() constructor:
let event = new CustomEvent(eventType, options);
The CustomEvent() has two parameters:
The eventType is a string that represents the name of the event.
The options is an object has the detail property that contains any custom information about the event.
The following example shows how to create a new custom event called highlight:
let event = new CustomEvent('highlight', {
detail: {backgroundColor: 'yellow'}
});
Dispatching JavaScript custom events
After creating a custom event, you need to attach the event to a DOM element and trigger it by using the dispatchEvent() method:
domElement.dispatchEvent(event);
JavaScript custom event example
Put it all together:
<!DOCTYPE html>
<html lang="en">
<head>
<meta charset="UTF-8">
<meta name="viewport" content="width=device-width, initial-scale=1.0">
<title>JavaScript Custom Event</title>
</head>
<body>
<div>JS Custom Event</div>
<script>
function highlight(elem) {
const bgColor = 'yellow';
elem.style.backgroundColor = bgColor;
// create the event
let event = new CustomEvent('highlight', {
detail: {
backgroundColor: bgColor
}
});
// dispatch the event
elem.dispatchEvent(event);
}
// Select the div element
let div = document.querySelector('.note');
// Add border style
function addBorder(elem) {
elem.style.border = "solid 1px red";
}
// Listen to the highlight event
div.addEventListener('highlight', function (e) {
addBorder(this);
// examine the background
console.log(e.detail);
});
// highlight div element
highlight(div);
</script>
</body>
</html>Code language: HTML, XML (xml)
How it works:
First, declare the highlight() function that highlights an element and triggers the highlight event.
Second, select the <div> element by using the querySelector() method.
Third, listen to the highlight event.
Inside the event listener, call the addBorder() function and show the detail property in the Console.
Finally, call the highlight() function that will trigger the highlight event.
Why use custom events
Custom events allow you to decouple code execution, allowing one piece of code to run after another completes.
For example, you can place event listeners in a separate script file and have multiple listeners for the same custom event.
自定义事件 CustomEvent
使用自定义事件可以很好地解耦组件间通信依赖,便于实现组件的高内聚低耦合。
1. 创建自定义事件
通过 CustomEvent 构造函数来创建一个新的自定义事件的实例:
const event = new CustomEvent('myEvent', {
detail: {
message: 'Hello, this is a custom event!',
// Add other properties
},
bubbles: true, // 是否冒泡
cancelable: true, // 是否可以取消
});
参数说明:
a.事件名称 - 该参数是必填项,是事件的名称,监听事件是通过该名称进行监听器的挂载。
b.事件初始化对象 - 该参数是可选项,表示传递出去的事件内容。有以下属性:
detail - 消息体内容
bubbles - 是否冒泡
cancelable - 是否可取消
2. 事件监听
通过元素的 addEventListener 方法进行事件处理函数的监听注册。
// 监听自定义事件
element.addEventListener('myEvent', function(e) {
console.log(e.detail.message);
});
3. 事件触发
通过元素的 dispatchEvent 方法来在指定的元素上触发一个事件。
const element = document.getElementById('myElement');
// 触发事件
element.dispatchEvent(event);
4. 自定义事件的应用 - 组件间通信
组件间通信可以使用 props 传递 handler 的方式让子组件发生变化的时候通知父组件,或者使用全局状态管理的库进行组件间通信。
但是 props 传递 handler 的方式仅限于父子组件间通信,如果涉及多级组件,那就会涉及handler传递的问题。
在不引入第三方库(如 Redux)的情况下,使用自定义事件是一个不错的组件间通信的方法,也可以很好地解耦组件的依赖。
在下面的React例子中,在一个页面上有定义了两个组件,分别是 OrderList 和 OrderDetailPanel.
OrderList 展示一个订单列表,每一行订单信息有一个按钮,点击按钮表示选中该订单。
而 OrderDetailPanel 组件就会显示选中的订单内容。
import React, { useState, useEffect } from 'react';
// 组件1: 订单列表
function OrderList({ orderList }) {
const notifyOrderSelected = (id) => {
// 新建一个自定义事件,把选中的订单信息通过事件进行携带出去
const event = new CustomEvent('order-selected', {
detail: { id }
});
// 发布事件给监听者
window.dispatchEvent(event);
};
return (
<>
{orderList.map((order) => (
<div>
<span>{order.description}</span>
<button onClick={() => notifyOrderSelected(order.id)}>选择</button>
</div>
))}
</>
);
}
// 组件2: 订单详情信息
function OrderDetailPanel() {
const [orderId, setOrderId] = useState();
useEffect(() => {
const handleOrderSelected = (event) => {
setOrderId(event.detail.id);
};
// 监听订单选中事件
window.addEventListener('order-selected', handleOrderSelected);
// 组件卸载的时候清除监听器
return () => window.removeEventListener('order-selected', handleOrderSelected);
}, []);
return <>Selected Order is {orderId}</>;
}
这样的话,OrderList组件和OrderDetailPanel组件就不需要知道对方的存在,只需要知道有一个 order-selected 事件即可。
当我们再加入另一个新组件用于展示选中订单的评论列表的时候,就可以新加一个 OrderComments 组件去监听 order-selected 事件,拉取订单评论进行展示。无须关注OrderList和其他组件的存在。
alert() and prompt()
alert(message)
// use this to alert variable inside string
function doHomework(subject) {
alert(`Starting my ${subject} homework.`);
}
doHomework('math');
// Alerts: Starting my math homework.
prompt(text, defaultText)
text text to display in the dialog box
defaults Optional.
The default input text
confirm(message)
returns true if the user clicked "OK", and false otherwise.
Opening A Window
Browser Windows
<a href="link.html" target="mywindow">Click Here</a>
Opening A Window With JavaScript
window.open('link.html','mywindow');
onclick
<a href="#" onClick="window.open('link.html','mywindow');">Click Here</a>
Manipulating Windows features
window.open('link.html','mywindow','window features');
===========================
password
var password = 'hello';
var input = prompt('Please enter the password', '');
while(input != password){var input= prompt('Please enter the password','');}
for loop
different kinds of loops:
for - loops through a block of code a number of times
for/in - loops through the properties of an object
for/of - loops through the values of an iterable object
while - loops through a block of code while a specified condition is true
do/while - also loops through a block of code while a specified condition is true
for loop
for(loop=0; loop < 11; loop++){ document.writeln(loop);}
The For/In Loop
<div id="log"></div>
var person = {fname:"John", lname:"Doe", age:25};
var text = "";
var x;
for (x in person) {
text += person[x]+" ";
$("#log").append(x, ": ")
$("#log").append(person[x], ", ")
}
$("#log").append(" ",text)
Efficient way of getting an object's keys using an expression within the for-in loop's conditions
var myObj = {a: 1, b: 2, c:3}, myKeys = [], i=0;
for (myKeys[i++] in myObj);
document.write(myKeys);
For In Over Arrays
for in statement can also loop over the properties of an Array:
const numbers = [45, 4, 9, 16, 25];
let txt = "";
for (let x in numbers) {
txt += numbers[x];
}
Do not use for in over an Array if the index order is important.
The index order is implementation-dependent, and array values may not be accessed in the order you expect.
It is better to use a for loop, a for of loop, or Array.forEach() when the order is important.
Array.forEach()
The forEach() method calls a function (a callback function) once for each array element.
const numbers = [45, 4, 9, 16, 25];
let txt = "";
numbers.forEach(myFunction);
function myFunction(value, index, array) {
txt += value;
}
Note that the function takes 3 arguments:
Example
const numbers = [45, 4, 9, 16, 25];
let txt = "";
numbers.forEach(myFunction);
function myFunction(value) {
txt += value;
}
For…of Loop
The for...of statement creates a loop iterating over iterable objects (including Array, Map, Set, Strings, NodeLists, Arguments object and so on)
for (variable of object) {
statement
}
const cars = ["BMW", "Volvo", "Mini"]; // this time use array
text = "";
for (x of cars) {
text += x + " ";
}
$("#log").append(" ",text)
To exit loop before the end condition evaluates to false.
Use a break statement
Looping over an Array Example
const cars = ["BMW", "Volvo", "Mini"];
let text = "";
for (let x of cars) {
text += x;
}
Looping over a String Example
let language = "JavaScript";
text = "";
for (let x of language) {
text += x;
}
Map
var m = new Map();
m.set(1, "black");
m.set(2, "red");
for (var n of m) {
console.log(n);
}
// Output:
// 1,black
// 2,red
Set
var s = new Set();
s.add(1);
s.add("red");
for (var n of s) {
console.log(n);
}
// Output:
// 1
// red
Arguments object
// your browser must support for..of loop
// and let-scoped variables in for loops
function displayArgumentsObject() {
for (let n of arguments) {
console.log(n);
}
}
displayArgumentsObject(1, 'red');
// Output:
// 1
// red
Break Statement Example
The break statement terminates the current loop, switch or label statement and transfers program control to the statement following the terminated statement.
If the break statement is used in a labeled statement, the syntax is as follows:
break labelName;
Examples
function testBreak(x) {
var i = 0;
while (i < 6) {
if (i == 3) {
break;
}
i += 1;
}
return i * x;
}
While Loop Example
The while loop starts by evaluating the condition.
If the condition is true, the statement(s) is/are executed.
If the condition is false, the statement(s) is/are not executed.
After that, while loop ends.
Here is the syntax for the while loop:
Syntax:
while (condition)
{
statement(s);
}
statement(s): A statement that is executed as long as the condition evaluates to true.
condition: Here, the condition is a Boolean expression which is evaluated before each pass through the loop.
If this condition evaluates to true, statement(s) is/are executed.
When the condition evaluates to false, execution continues with the statement after the while loop.
Example:
var i = 1;
while (i < 10)
{
console.log(i);
i++; // i=i+1 same thing
}
Output:
1
2
3
4
5
6
7
8
9
Forms & Functions
create a form
<form name="formname">
</form>
Place a text box
<input type="text" name="boxname">
window.document.formname.first_text.value='Hi there';
This tells the browser to put 'Hi there!' into the value of the item called 'first_text' in the form called 'formname'.
To make sure an input field has a value before submit
using the required attribute in HTML5:
<input id="m" autocomplete="off" required/>
but you can just turn it of in browser console
recommend:
if (document.getElementById("m").value == '') {
//code here...
}
Accessing Values
<form name="feedback" action="script.cgi" method="post" onSubmit="return checkform()">
<input type="text" name="name">
<input type="text" name="email">
<textarea name="comments"></textarea>
</form>
To get the value from all types of form elements.
Text Boxes, <textarea>s and hiddens
document.feedback.field.value
You'll usually be checking if this value is empty, i.e.
if (document.feedback.field.value == '') {return false;
}
Select Boxes
Each option in a drop-down box is indexed in the array options[], starting as always with 0.
You then get the value of the element at this index.
It's like this:
document.feedback.field.options
[document.feedback.field.selectedIndex].value
You can also change the selected index through JavaScript.
To set it to the first option, execute this:
document.feedback.field.selectedIndex = 0;
Check Boxes
Checkboxes behave differently to other elements — their value is always on.
Instead, you have to check if their Boolean checked value is true or, in this case, false.
if (!document.feedback.field.checked) {// box is not checkedreturn false;
}
Naturally, to check a box, do this
document.feedback.field.checked = true;
Radio Buttons
Annoyingly, there is no simple way to check which radio button out of a group is selected — you have to check through each element, linked with Boolean AND operators .
Usually you'll just want to check if none of them have been selected, as in this example:
if (!document.feedback.field[0].checked &&
!document.feedback.field[1].checked &&
!document.feedback.field[2].checked) {// no radio button is selectedreturn false;
}
Capture a form submit in JavaScript
Using onsubmit:
<form action="action.php" onsubmit="myFunction()">
Enter name: <input type="text" name="fname">
<input type="submit" value="Submit">
</form>
function myFunction() {
alert("The form was submitted");
}
function validateForm() {
var x = document.forms["myForm"]["fname"].value;
if (x == "") { alert("No data"); return false;}
}
<form name="myForm" action="action.php" onsubmit="return validateForm()" method="post">
Name: <input type="text" name="fname">
<input type="submit" value="Submit">
</form>
===========================
Checkboxes
if(window.document.example1.my_checkbox.checked=true)
{
alert('The box is checked!')
}
else
{
window.document.example1.my_checkbox.checked=true;
alert('The box was not checked so I have checked it!');
}
// show number checked
alert($(":checkbox:checked").length);
===========================
The JavaScript Switch Statement
switch(expression) {
case n:
code block
break;
case n:
code block
break;
default:
code block
}
===========================
Common Code Blocks
switch (new Date().getDay()) {
case 4:
case 5:
text = "Soon it is Weekend";
break;
case 0:
case 6:
text = "It is Weekend";
break;
default:
text = "Looking forward to the Weekend";
}
===========================
Break and Continue
for (i = 0; i < 10; i++) {
if (i === 3) { break; }
text += "The number is " + i + "<br>";
}
for (i = 0; i < 10; i++) {
if (i === 3) { continue; }
text += "The number is " + i + "<br>";
}
Labels
label:
statements
break labelname;
continue labelname;
var cars = ["BMW", "Volvo", "Saab", "Ford"];
list: {
text += cars[0] + "<br>";
text += cars[1] + "<br>";
text += cars[2] + "<br>";
break list;
text += cars[3] + "<br>";
text += cars[4] + "<br>";
text += cars[5] + "<br>";
}
===========================
<button onclick="goBack()">Go Back 2 Pages
function goBack() {
window.history.go(-2);
}
Go forward one page (This example will not work if the next page does not exist in the history list):
window.history.go(1);
Note: the id tag cannot be located inside b, should be p or div
function chkKey() {
var testkey = getChar(event);
if(testkey == '9'){
sCt(992);
}
if(testkey == 'h'){
sCt(110000);
}
if(testkey == 'a'){
sCt("000001.sh");
}
if(testkey == 'f'){
window.location = '#stkcodeid';
$('#stkcode').value ="";
}
if(testkey == 'A'){
window.location = '#Astock';
}
}
===========================
Go Bottom
<b class="left" onclick="window.scrollTo(0,document.body.scrollHeight);">Go Bottom</b> |
<div id ="codelist"></div>
Scroll to Top:
window.scrollTo(0,0);
===========================
HTML DOM scrollTop Property
The scrollTop property
sets
or returns
the number of pixels an element's content is scrolled vertically.
Example
Get the number of pixels the content of a <div> element is scrolled horizontally and vertically:
var elmnt = document.getElementById("myDIV");
var x = elmnt.scrollLeft;
var y = elmnt.scrollTop;
Note: this is only a property, not a method, it won't move,
and the return value is just one interger, showing the scrolled distance, and if the previous action did not scrolled, the distance is zero.
HTML DOM scrollIntoView Method
Example
Scroll the element with id="content" into the visible area of the browser window:
var elmnt = document.getElementById("content");
elmnt.scrollIntoView();
===========================
(selector).animate({styles},speed,easing,callback)
The animate() method performs a custom animation of a set of CSS properties.
$("#box").animate({height: "300px"});
$( "p" ).animate({
height: 200,
width: 400,
opacity: 0.5
}, 1000, "linear", function() { alert( "all done" );
});
Alternate Syntax
(selector).animate({styles},{options})
========
Parameter Description
styles Required.
Specifies one or more CSS properties/values to animate.
Note:
The property names must be camel-cased when used with the animate() method: You will need to write paddingLeft instead of padding-left, marginRight instead of margin-right, and so on.
Most properties that are non-numeric cannot be animated using basic jQuery functionality
For example, width, height, or left can be animated but background-color cannot be, unless the jQuery.Color plugin is used.
Property values are treated as a number of pixels unless otherwise specified.
The units em and % can be specified where applicable.
Only numeric values can be animated (like "margin:30px").
String values cannot be animated (like "background-color:red"),
except for the strings "show", "hide" and "toggle".
These values allow hiding and showing the animated element.
========
Properties that can be animated:
backgroundPositionX, backgroundPositionY, borderWidth, borderBottomWidth, borderLeftWidth, borderRightWidth, borderTopWidth, borderSpacing, margin, marginBottom, marginLeft, marginRight, marginTop, opacity, outlineWidth, padding, paddingBottom, paddingLeft, paddingRight, paddingTop, height, width, maxHeight, maxWidth, minHeight, minWidth, fontSize, bottom, left, right, top, letterSpacing, wordSpacing, lineHeight, textIndent
========
speed Optional.
Specifies the speed of the animation.
Default value is 400 milliseconds
Possible values: milliseconds (like 100, 1000, 5000, etc), "slow", "fast"
========
easing Optional.
Specifies the speed of the element in different points of the animation.
Default value is "swing".
Possible values:
"swing" - moves slower at the beginning/end, but faster in the middle
"linear" - moves in a constant speed
Tip: More easing functions are available in external plugins.
========
callback Optional.
A function to be executed after the animation completes.
========
Alternate Syntax
options Optional.
Specifies additional options for the animation.
Possible values:
duration the speed of the animation
easing the easing function to use
complete a function to be executed after the animation completes
step a function to be executed for each step in the animation
progress a function to be executed after each step in the animation
queue a Boolean value specifying whether or not to place the animation in the effects queue
specialEasing a map of one or more CSS properties from the styles parameter, and their corresponding easing functions
start a function to be executed when the animation begins
done a function to be executed when the animation ends
fail a function to be executed if the animation fails to complete
always a function to be executed if the animation stops without completing
==========
var json = '{"result":true,"count":1}',
obj = JSON.parse(theUrl);
JSON.parse(theUrl);
or
jQuery.getJSON():
data = '[{"name" : "Ashwin", "age" : "20"},{"name" : "Abhinandan", "age" : "20"}]';
Mention the path of the json file in the script source along with the javascript file.
<script type="text/javascript" src="data.json"></script>
<script type="text/javascript" src="javascrip.js"></script>
Get the Object from the json file
var mydata = JSON.parse(data);
alert(mydata[0].name);
alert(mydata[0].age);
alert(mydata[1].name);
alert(mydata[1].age);
to store data in jquery, data = [] and update later
===========================
Detecting double-press of a key
<head>
<script type="text/javascript">
function checkspace(event){if (window.event.keyCode == 32) alert('Stop that!');}
</script>
</head>
<body>
<BODY onKeydown="checkspace()">
Replace alert with whatever it is you want it to do.
Then you could do a counter function that increments by 100 every 100ms, and do an if
var keypresses = 0;
var counter = 0;
startcouting();
if(event.keyCode == 32){
keypresses += 1;
}
if(keypresses == 2 && counter <= 500){
do something;
reset the counter;
}
===========================
Detecting key press
https://stackoverflow.com/questions/19502155/detecting-multiple-key-press-in-javascript
Detecting multiple key press in javascript
https://stackoverflow.com/questions/5203407/javascript-multiple-keys-pressed-at-once
JavaScript multiple keys pressed at once
The simplest way to find out whether the ctrl is pressed, is to test the event object for the ctrlKey property:
$(document).keypress(function(e){
console.log(e.which, e.ctrlKey);
});
===========================
addClass() - Adds one or more classes to the selected elements
removeClass() - Removes one or more classes from the selected elements
toggleClass() - Toggles between adding/removing classes
css() - Sets or returns the style attribute
$("button").click(function(){
$("h1, h2, p").addClass("blue");
$("div").addClass("important");
});
jQuery addClass() Method
Add a class name to the first p element:
$("button").click(function(){
$("p:first").addClass("intro");
});
Tip: To add more than one class, separate the class names with spaces.
$(selector).addClass(classname,function(index,currentclass))
changesize(newFontSize)
function changesize(newFontSize) {
var currentFontSize = getCookie("fontsize");
if (newFontSize != currentFontSize) {
$("html").addClass(newFontSize);
$("#fontsize" + newFontSize).addClass("selected");
if (currentFontSize != "") {
$("html").removeClass(currentFontSize);
$("#fontsize" + currentFontSize).removeClass("selected");
}
setCookie("fontsize", newFontSize);
}
}
===========================
Cookies
Cookies are saved in name-value pairs like:
username = John Doe
Create a Cookie with JavaScript
document.cookie = "username=John Doe";
add an expiry date.
By default, the cookie is deleted when the browser is closed.
document.cookie = "username=John Doe; expires=Thu, 18 Dec 2013 12:00:00 UTC";
Tell the browser what path the cookie belongs to with a path parameter.
By default, the cookie belongs to the current page.
document.cookie = "username=John Doe; expires=Thu, 18 Dec 2013 12:00:00 UTC; path=/";
Read a Cookie with JavaScript
var x = document.cookie;
will return all cookies in one string much like: cookie1=value; cookie2=value; cookie3=value;
Delete a Cookie with JavaScript
Just set the expires parameter to a passed date
document.cookie = "username=; expires=Thu, 01 Jan 1970 00:00:00 UTC; path=/;";
The Cookie String
The document.cookie property looks like a normal text string.
But it is not.
Even if you write a whole cookie string to document.cookie, when you read it out again, you can only see the name-value pair of it.
If you set a new cookie, older cookies are not overwritten.
The new cookie is added to document.cookie, so if you read document.cookie again you will get something like:
cookie1 = value; cookie2 = value;
First, we create a function that stores the name of the visitor in a cookie variable:
Example
function setCookie(cname, cvalue, exdays) {
var d = new Date();
d.setTime(d.getTime() + (exdays*24*60*60*1000));
var expires = "expires="+ d.toUTCString();
document.cookie = cname + "=" + cvalue + ";" + expires + ";path=/";
}
Get a Cookie
Then, we create a function that returns the value of a specified cookie:
Example
function getCookie(cname) {
var name = cname + "=";
var decodedCookie = decodeURIComponent(document.cookie);
var ca = decodedCookie.split(';');
for(var i = 0; i < ca.length; i++) {
var c = ca[i];
while (c.charAt(0) == ' ') { c = c.substring(1); }
if (c.indexOf(name) == 0){ return c.substring(name.length, c.length);}
}
return "";
}
Check a Cookie
checks if a cookie is set.
If the cookie is set it will display a greeting.
If the cookie is not set, it will display a prompt box, asking for the name of the user, and stores the username cookie for 365 days, by calling the setCookie function:
Example
function checkCookie() {
var username = getCookie("username");
if (username != "") { alert("Welcome again " + username);
} else {
username = prompt("Please enter your name:", "");
if (username != "" && username != null) {
setCookie("username", username, 365);
}
}
}
A hash - # within a hyperlink specifies an html element id to which the window should be scrolled.
Scroll to Top:
href="#" doesn't specify an id name, but does have a corresponding location - the top of the page.
Clicking an anchor with href="#" will move the scroll position to the top.
<a href="#" onclick="fn()">click here</a>
you will jump to the top and the URL will have the anchor # as well, to avoid this we simply return false; or use javascript:void(0);
regarding your examples
<a onclick="fn()">Does not appear as a link, because there's no href</a>
just do a {text-decoration:underline;} and you will have "link a-like"
<a href="javascript:void(0)" onclick="fn()">fn is called</a>
<a href="javascript:" onclick="fn()">fn is called too!</a>
it's ok, but in your function at the end, just return false; to prevent the default behavior, you don't need to do anything more.
Link to an email address:
<a href="mailto:someone@example.com">Send email</a>
Link to a phone number:
<a href="tel:+4733378901">+47 333 78 901</a>
Link to another section on the same page:
<a href="#section2">Go to Section 2</a>
Link to a JavaScript:
<a href="javascript:alert('Hello World!');">Execute JavaScript</a>
===========================
Jquery If This Contains
Jquery If This Containsfind element where child items h2 text has a specific valueselecting children sample get the children of the this selector
var toc = $('#toc>ul');
toc.append($(".parent").find("p:contains('Statistics')").parent().text())
by javascript:
var myDomElement = document.getElementById( "foo" ); // A plain DOM element.
$( myDomElement ).find( "a" ); // Finds
===========================
Loops: while and for
let i = 0;
while (i < 3) { // shows 0, then 1, then 2
alert( i );
i++;
}
the shorter way to write while (i != 0) could be while (i):
let i = 3;
while (i) {
alert( i );
i--;
}
Brackets are not required for a single-line body
If the loop body has a single statement, we can omit the brackets {…}:
let i = 3;
while (i) alert(i--);
The “do…while” loop
The condition check can be moved below the loop body using the do..while syntax:
do {
// loop body
} while (condition);
The loop will first execute the body, then check the condition and, while it’s truthy, execute it again and again.
For example:
let i = 0;
do {
alert( i );
i++;
} while (i < 3);
This form of syntax is rarely used except when you want the body of the loop to execute at least once regardless of the condition being truthy.
Usually, the other form is preferred: while(…) {…}.
The “for” loop
The for loop is the most often used one.
It looks like this:
for (begin; condition; step) {
// ...
loop body ...
}
Let’s learn the meaning of these parts by example.
The loop below runs alert(i) for i from 0 up to (but not including) 3:
for (let i = 0; i < 3; i++) { // shows 0, then 1, then 2
alert(i);
}
Let’s examine the for statement part by part:
part
begin i = 0 Executes once upon entering the loop.
condition i < 3 Checked before every loop iteration, if fails the loop stops.
step i++ Executes after the body on each iteration, but before the condition check.
body alert(i) Runs again and again while the condition is truthy
The general loop algorithm works like this:
Run begin
→ (if condition → run body and run step)
→ (if condition → run body and run step)
→ (if condition → run body and run step)
→ ...
If you are new to loops, then maybe it would help if you go back to the example and reproduce how it runs step-by-step on a piece of paper.
Here’s what exactly happens in our case:
// for (let i = 0; i < 3; i++) alert(i)
// run begin
let i = 0
// if condition → run body and run step
if (i < 3) { alert(i); i++ }
// if condition → run body and run step
if (i < 3) { alert(i); i++ }
// if condition → run body and run step
if (i < 3) { alert(i); i++ }
// ...finish, because now i == 3
Inline variable declaration
Here the “counter” variable i is declared right in the loop.
That’s called an “inline” variable declaration.
Such variables are visible only inside the loop.
for (let i = 0; i < 3; i++) {
alert(i); // 0, 1, 2
}
alert(i); // error, no such variable
Instead of defining a variable, we can use an existing one:
let i = 0;
for (i = 0; i < 3; i++) { // use an existing variable
alert(i); // 0, 1, 2
}
alert(i); // 3, visible, because declared outside of the loop
Skipping parts
Any part of for can be skipped.
For example, we can omit begin if we don’t need to do anything at the loop start.
Like here:
let i = 0; // we have i already declared and assigned
for (; i < 3; i++) { // no need for "begin"
alert( i ); // 0, 1, 2
}
We can also remove the step part:
let i = 0;
for (; i < 3;) {
alert( i++ );
}
The loop became identical to while (i < 3).
We can actually remove everything, thus creating an infinite loop:
for (;;) {
// repeats without limits
}
Please note that the two for semicolons ; must be present, otherwise it would be a syntax error.
Breaking the loop
Normally the loop exits when the condition becomes falsy.
But we can force the exit at any moment.
There’s a special break directive for that.
For example, the loop below asks the user for a series of numbers, but “breaks” when no number is entered:
let sum = 0;
while (true) {
let value = +prompt("Enter a number", '');
if (!value) break; // (*)
sum += value;
}
alert( 'Sum: ' + sum );
The break directive is activated in the line (*) if the user enters an empty line or cancels the input.
It stops the loop immediately, passing the control to the first line after the loop.
Namely, alert.
The combination “infinite loop + break as needed” is great for situations when the condition must be checked not in the beginning/end of the loop, but in the middle, or even in several places of the body.
Continue to the next iteration
The continue directive is a “lighter version” of break.
It doesn’t stop the whole loop.
Instead it stops the current iteration and forces the loop to start a new one (if the condition allows).
We can use it if we’re done on the current iteration and would like to move on to the next.
The loop below uses continue to output only odd values:
for (let i = 0; i < 10; i++) {
// if true, skip the remaining part of the body
if (i % 2 == 0) continue;
alert(i); // 1, then 3, 5, 7, 9
}
For even values of i the continue directive stops body execution, passing the control to the next iteration of for (with the next number).
So the alert is only called for odd values.
The directive continue helps to decrease nesting level
A loop that shows odd values could look like this:
for (let i = 0; i < 10; i++) {
if (i % 2) {
alert( i );
}
}
From a technical point of view it’s identical to the example above.
Surely, we can just wrap the code in the if block instead of continue.
But as a side-effect we got one more figure brackets nesting level.
If the code inside if is longer than a few lines, that may decrease the overall readability.
No break/continue to the right side of ‘?’
Please note that syntax constructs that are not expressions cannot be used in '?'.
In particular, directives break/continue are disallowed there.
For example, if we take this code:
if (i > 5) {
alert(i);
} else {
continue;
}
…And rewrite it using a question mark:
(i > 5) ? alert(i) : continue; // continue not allowed here
…Then it stops working.
The code like this will give a syntax error:
That’s just another reason not to use a question mark operator '?' instead of if.
Labels for break/continue
Sometimes we need to break out from multiple nested loops at once.
For example, in the code below we loop over i and j prompting for coordinates (i, j) from (0,0) to (3,3):
for (let i = 0; i < 3; i++) {
for (let j = 0; j < 3; j++) {
let input = prompt(`Value at coords (${i},${j})`, '');
// what if I want to exit from here to Done (below)?
}
}
alert('Done!');
We need a way to stop the process if the user cancels the input.
The ordinary break after input would only break the inner loop.
That’s not sufficient.
Labels come to the rescue.
A label is an identifier with a colon before a loop:
labelName: for (...) {
...
}
The break <labelName> statement in the loop breaks out to the label.
Like here:
outer: for (let i = 0; i < 3; i++) {
for (let j = 0; j < 3; j++) {
let input = prompt(`Value at coords (${i},${j})`, '');
// if an empty string or canceled, then break out of both loops
if (!input) break outer; // (*)
// do something with the value...
}
}
alert('Done!');
In the code above break outer looks upwards for the label named outer and breaks out of that loop.
So the control goes straight from (*) to alert('Done!').
We can also move the label onto a separate line:
outer:
for (let i = 0; i < 3; i++) { ...
}
The continue directive can also be used with a label.
In this case the execution jumps to the next iteration of the labeled loop.
Labels are not a “goto”
Labels do not allow us to jump into an arbitrary place of code.
For example, it is impossible to do this:
break label; // jumps to label? No.
label: for (...)
The call to a break/continue is only possible from inside the loop, and the label must be somewhere upwards from the directive.
Summary
We covered 3 types of loops:
while – The condition is checked before each iteration.
do..while – The condition is checked after each iteration.
for (;;) – The condition is checked before each iteration, additional settings available.
To make an “infinite” loop, usually the while(true) construct is used.
Such a loop, just like any other, can be stopped with the break directive.
If we don’t want to do anything on the current iteration and would like to forward to the next one, the continue directive does it.
Break/continue support labels before the loop.
A label is the only way for break/continue to escape the nesting and go to the outer loop.
Tasks
Last loop value
importance: 3
What is the last value alerted by this code? Why?
let i = 3;
while (i) {
alert( i-- );
}
solution
Which values shows the while?
importance: 4
For every loop, write down which values it shows, in your opinion.
And then compare with the answer.
Both loops alert same values or not?
The prefix form ++i:
let i = 0;
while (++i < 5) alert( i );
The postfix form i++
let i = 0;
while (i++ < 5) alert( i );
solution
Which values get shown by the "for" loop?
importance: 4
For each loop write down which values it is going to show.
Then compare with the answer.
Both loops alert same values or not?
The postfix form:
for (let i = 0; i < 5; i++) alert( i );
The prefix form:
for (let i = 0; i < 5; ++i) alert( i );
solution
Output even numbers in the loop
importance: 5
Use the for loop to output even numbers from 2 to 10.
Run the demo
solution
Replace "for" with "while"
importance: 5
Rewrite the code changing the for loop to while without altering its behavior (the output should stay same).
for (let i = 0; i < 3; i++) {
alert( `number ${i}!` );
}
solution
Repeat until the input is correct
importance: 5
Write a loop which prompts for a number greater than 100.
If the visitor enters another number – ask him to input again.
The loop must ask for a number until either the visitor enters a number greater than 100 or cancels the input/enters an empty line.
Here we can assume that the visitor only inputs numbers.
There’s no need to implement a special handling for a non-numeric input in this task.
Run the demo
solution
Output prime numbers
importance: 3
An integer number greater than 1 is called a prime if it cannot be divided without a remainder by anything except 1 and itself.
In other words, n > 1 is a prime if it can’t be evenly divided by anything except 1 and n.
For example, 5 is a prime, because it cannot be divided without a remainder by 2, 3 and 4.
Write the code which outputs prime numbers in the interval from 2 to n.
For n = 10 the result will be 2,3,5,7.
P.S.
The code should work for any n, not be hard-tuned for any fixed value.
===========================
android javascript tts
var msg = new SpeechSynthesisUtterance('Hello World');
window.speechSynthesis.speak(msg);
===========================
Google Maps in HTML
Google Maps in HTML
<html>
<body>
<div id="googleMap" style="width:100%;height:400px;"></div>
<script>
function myMap() {
var mapProp= { center:new google.maps.LatLng(51.508742,-0.120850), zoom:5,};
var map=new google.maps.Map(document.getElementById("googleMap"),mapProp);}
</script>
<script src="https://maps.googleapis.com/maps/api/js?key=AIzaSyBu-916DdpKAjTmJNIgngS6HL_kDIKU0aU&callback=myMap">
</script>
<!--
To use this code on your website, get a free API key from Google.
Read more at: https://www.w3schools.com/graphics/google_maps_basic.asp
-->
</body>
</html>
examples
JavaScript can change HTML content.
<button type="button" onclick='document.getElementById("demo").innerHTML = "Hello JavaScript!"'>Click Me!</button>
JavaScript can change HTML attributes.
<button onclick="document.getElementById('myImage').src='pic_bulbon.gif'">Turn on the light</button>
<img id="myImage" src="pic_bulboff.gif" style="width:100px">
<button onclick="document.getElementById('myImage').src='pic_bulboff.gif'">Turn off the light</button>
JavaScript can change the style of an HTML element.
<button type="button" onclick="document.getElementById('demo').style.fontSize='35px'">Click Me!</button>
JavaScript can hide HTML elements.
<button type="button" onclick="document.getElementById('demo').style.display='none'">Click Me!</button>
JavaScript can show hidden HTML elements.
<button type="button" onclick="document.getElementById('demo').style.display='block'">Click Me!</button>
Writing into an window alert box
window.alert(5 + 6);
Writing into the HTML output
document.write(5 + 6);
Writing into an HTML element
document.getElementById("demo").innerHTML = 5 + 6;
Writing into the browser console
console.log(5 + 6);
JavaScript in <head>
<script>
document.getElementById("demo").innerHTML = "Paragraph changed.";
</script>
JavaScript in <body>
<script>
document.getElementById("demo").innerHTML = "Paragraph changed.";
</script>
JavaScript in an external file
<script src="myScript.js"></script>
External JavaScript Advantages:
separates HTML and code,
makes HTML and JavaScript easier to read and maintain,
Cached JavaScript files can speed up page loads.
JavaScript Statements
A JavaScript program is a list of statements to be executed by a computer.
var x, y, z; // Declare 3 variables
x = 5; // Assign the value 5 to x
y = 6; // Assign the value 6 to y
z = x + y; // Assign the sum of x and y to z
document.getElementById("demo").innerHTML = "The value of z is " + z + ".";
JavaScript Numbers
document.getElementById("demo").innerHTML = 10.50;
JavaScript strings
Strings can be written with double or single quotes.
document.getElementById("demo").innerHTML = 'John Doe';
JavaScript expressions
Expressions compute to values.
document.getElementById("demo").innerHTML = 5 * 10;
JavaScript keywords
The var Keyword Creates Variables
var x, y;
JavaScript variables
var x;
x = 6;
JavaScript assignment
the = operator is used to assign values to variables.
x = 5;
JavaScript operators
use arithmetic operators to compute values (just like algebra).
document.getElementById("demo").innerHTML = (5 + 6) * 10;
JavaScript comments
JavaScript Comments are NOT Executed
// x = 6; I will not be executed
JavaScript is case sensitive
lastName = "Doe";
lastname = "Peterson";
JavaScript statements are commands to the browser
In HTML, JavaScript statements are executed by the browser.
JavaScript code is a sequence of statements
A JavaScript program is a list of statements to be executed by a computer.
JavaScript statements are separated with semicolon
JavaScript statements are separated by semicolons.
Multiple statements on one line is allowed.
a = 1; b = 2; c = a + b;
JavaScript statements can be grouped together in code blocks
JavaScript code blocks are written between { and }
function myFunction() {
document.getElementById("demo1").innerHTML = "Hello Dolly!";
document.getElementById("demo2").innerHTML = "How are you?";
}
You can break a code line after an operator or a comma.
The best place to break a code line is after an operator or a comma.
document.getElementById("demo").innerHTML =
"Hello Dolly!";
Single line comments
// Change heading:
Single line comments at the end of a line
var x = 5; // Declare x, give it the value of 5
Multiple lines comments
/*
The code below will change the heading with id = "myH"
and the paragraph with id = "myp" in my web page:
*/
Single line comment to prevent execution
//document.getElementById("myH").innerHTML = "My First Page";
Multiple lines comment to prevent execution
/*
document.getElementById("myH").innerHTML = "Welcome to my Homepage";
document.getElementById("myP").innerHTML = "This is my first paragraph.";
*/
JavaScript variables as algebra
var total = price1 + price2;
JavaScript numbers and strings
Strings are written with quotes.
Numbers are written without quotes.
Declaring many variables in one statement
You can declare many variables in one statement.
var person = "John Doe", carName = "Volvo", price = 200;
Declaring many variables multiline
var person = "John Doe",
carName = "Volvo",
price = 200;
A variable without a value returns the value undefined
var carName;
Re-declaring a variable will not destroy the value
var carName = "Volvo";
var carName;
Adding JavaScript numbers
var x = 5 + 2 + 3;
Adding JavaScript strings
var x = "John" + " " + "Doe";
Adding strings and numbers gives string
x = "5" + 2 + 3;
The modulus (%) operator
var z = x % y;
The increment (++) operator
increment
The decrement (--) operator
decrement
The = assignment operator
var x = 10;
The += assignment operator
var x = 10;
x += 5; // = 15
The -= assignment operator
var x = 10;
x -= 5; // = 5
The *= assignment operator
var x = 10;
x *= 5; // = 50
The /= assignment operator
var x = 10;
x /= 5; // = 2
The %= assignment operator
var x = 10;
x %= 5; // = 0
Adding two strings together using the concatenating (+) operator
var txt1 = "What a very";
var txt2 = "nice day";
document.getElementById("demo").innerHTML = txt1 + txt2;
Adding two strings together using using the += operator
txt1 = "What a very ";
txt1 += "nice day";
document.getElementById("demo").innerHTML = txt1;
Adding strings and numbers
var x = 5 + 5;
var y = "5" + 5;
var z = "Hello" + 5;
document.getElementById("demo").innerHTML =
x + "<br>" + y + "<br>" + z;
Declare (create) strings
var answer1 = "It's alright";
var answer2 = "He is called 'Johnny'";
var answer3 = 'He is called "Johnny"';
document.getElementById("demo").innerHTML =
answer1 + "<br>" +
answer2 + "<br>" +
answer3;
Declare (create) numbers
var x1 = 34.00;
var x2 = 34;
var x3 = 3.14;
document.getElementById("demo").innerHTML =
x1 + "<br>" + x2 + "<br>" + x3;
Declare (create) an array
var cars = ["Saab","Volvo","BMW"];
document.getElementById("demo").innerHTML = cars[0];
Declare (create) an object
var person = {
firstName : "John",
lastName : "Doe",
age : 50,
eyeColor : "blue"
};
document.getElementById("demo").innerHTML =
person.firstName + " is " + person.age + " years old.";
Find the type of a variable
document.getElementById("demo").innerHTML =
typeof "" + "<br>" +
typeof "John" + "<br>" +
typeof "John Doe" + "<br>" +
typeof 0 + "<br>" +
typeof 314 + "<br>" +
typeof 3.14 + "<br>" +
typeof (3.14);
Adding two numbers and a string
var x = 16 + 4 + "Volvo";
document.getElementById("demo").innerHTML = x;
Adding a string and two numbers
var x = "Volvo" + 16 + 4;
document.getElementById("demo").innerHTML = x;
An undefined variable
The value (and the data type) of a variable with no value is undefined.
var car;
document.getElementById("demo").innerHTML =
car + "<br>" + typeof car;
An empty variable
var car = "";
document.getElementById("demo").innerHTML =
"The value is: " +
car + "<br>" +
"The type is: " + typeof car;
Create a JavaScript variable
var car = "Fiat";
document.getElementById("demo").innerHTML = car;
Create a JavaScript object
var car = {type:"Fiat", model:"500", color:"white"};
document.getElementById("demo").innerHTML = car.type;
Create a person object (single line)
var person = {firstName:"John", lastName:"Doe", age:50, eyeColor:"blue"};
document.getElementById("demo").innerHTML = person.firstName + " is " + person.age + " years old.";
Create a person object (multiple lines)
var person = {
firstName : "John",
lastName : "Doe",
age : 50,
eyeColor : "blue"
};
document.getElementById("demo").innerHTML = person.firstName + " is " + person.age + " years old.";
Access object properties using .property
var person = { firstName: "John", lastName : "Doe", id: 5566};
document.getElementById("demo").innerHTML = person.firstName + " " + person.lastName;
Access object properties using [property]
var person = {
firstName: "John",
lastName : "Doe",
id : 5566
};
document.getElementById("demo").innerHTML = person["firstName"] + " " + person["lastName"];
Access a function property as a method
var person = {
firstName: "John",
lastName : "Doe",
id : 5566,
fullName : function() {
return this.firstName + " " + this.lastName;
}
};
document.getElementById("demo").innerHTML = person.fullName();
Access a function property as a property
var person = { firstName: "John", lastName : "Doe", id : 5566, fullName : function() { return this.firstName + " " + this.lastName; }};
document.getElementById("demo").innerHTML = person.fullName;
A simple function
function myFunction() { document.getElementById("demo").innerHTML = "Hello World!";}
A function with an argument
function myFunction(name,job) { document.getElementById("demo").innerHTML = "Welcome " + name + ", the " + job + ".";}
A function with an argument 2
function myfunction(txt) { document.getElementById("demo").innerHTML = txt}
A function that returns a value
var x = myFunction(4, 3);
document.getElementById("demo").innerHTML = x;
function myFunction(a, b) { return a * b;}
A function that converts Fahrenheit to Celsius
function toCelsius(f) { return (5/9) * (f-32);}
document.getElementById("demo").innerHTML = toCelsius(77);
A function call without ()
function toCelsius(f) { return (5/9) * (f-32);}
document.getElementById("demo").innerHTML = toCelsius;
An onclick event changes an HTML element
<button onclick="document.getElementById('demo').innerHTML=Date()">The time is?</button>
An onclick event changes its own element
<button onclick="this.innerHTML=Date()">The time is?</button>
An onclick event calls a function
<button onclick="displayDate()">The time is?</button>
function displayDate() {
document.getElementById("demo").innerHTML = Date();
}
Backslash before quotes accepts quotes as quotes.
<script>
var x = 'It\'s alright';
var y = "We are the so-called \"Vikings\" from the north.";
document.getElementById("demo").innerHTML = x + "<br>" + y;
</script>
Find the length of a string
var txt = "ABCDEFGHIJKLMNOPQRSTUVWXYZ";
document.getElementById("demo").innerHTML = txt.length;
You can break text string with a backslash.
document.getElementById("demo").innerHTML = "Hello \
Dolly!";
You cannot break code with a backslash.
document.getElementById("demo").innerHTML = \
"Hello Dolly.";
Find the position of the first occurrence of a text in a string - indexOf()
var str = "Please locate where 'locate' occurs!";
var pos = str.indexOf("locate");
document.getElementById("demo").innerHTML = pos;
Search for a text in a string and return the text if found - match()
var str = "The rain in SPAIN stays mainly in the plain";
var res = str.match(/ain/g);
document.getElementById("demo").innerHTML = res;
Replace characters in a string - replace()
var str = document.getElementById("demo").innerHTML;
var txt = str.replace("Microsoft","W3Schools");
document.getElementById("demo").innerHTML = txt;
Convert string to upper case - toUpperCase()
var text = document.getElementById("demo").innerHTML;
document.getElementById("demo").innerHTML = text.toUpperCase();
Convert string to lower case - toLowerCase()
var text = document.getElementById("demo").innerHTML;
document.getElementById("demo").innerHTML = text.toLowerCase();
Split a string into an array - split()
var str = "a,b,c,d,e,f";
var arr = str.split(",");
document.getElementById("demo").innerHTML = arr[0];
Number are considered accurate only up to 15 digits
var x = 999999999999999;
var y = 9999999999999999;
document.getElementById("demo").innerHTML = x + "<br>" + y;
Floating point arithmetic is not always 100% accurate
var x = 0.2 + 0.1;
document.getElementById("demo").innerHTML = "0.2 + 0.1 = " + x;
it helps to multiply and divide by 10
var x = (0.2*10 + 0.1*10) / 10;
document.getElementById("demo").innerHTML = "0.2 + 0.1 = " + x;
}
Constants, preceded by 0x, are interpreted as hexadecimal
document.getElementById("demo").innerHTML = "0xFF = " + 0xFF;
The toString() method can output numbers as hex, octal, and binary
var myNumber = 128;
document.getElementById("demo").innerHTML = "128 = " +
myNumber + " Decimal, " +
myNumber.toString(16) + " Hexadecimal, " +
myNumber.toString(8) + " Octal, " +
myNumber.toString(2) + " Binary."
JavaScript will generate Infinity if you calculate a too large number
var myNumber = 2;
var txt = "";
while (myNumber != Infinity) {
myNumber = myNumber * myNumber;
txt = txt + myNumber + "<br>";
}
document.getElementById("demo").innerHTML = txt;
Division by zero generates Infinity
var x = 2/0;
var y = -2/0;
document.getElementById("demo").innerHTML = x + "<br>" + y;
A number divided by a string is not a number
var x = 1000 / "Apple";
var y = 1000 / "10";
document.getElementById("demo").innerHTML = x + "<br>" + y;
Math.PI returns the value of PI
document.getElementById("demo").innerHTML = Math.PI;
Math.round(x) returns the rounded value of x
document.getElementById("demo").innerHTML = Math.round(4.4);
Math.pow(x,y) returns the value of x to the power of y
document.getElementById("demo").innerHTML = Math.pow(8,2);
Math.sqrt(x) returns the square root of x
document.getElementById("demo").innerHTML = Math.sqrt(64);
Math.abs(x) returns the absolute (positive) value of x
document.getElementById("demo").innerHTML = Math.abs(-4.4);
Math.ceil(x) returns the value of x rounded up
document.getElementById("demo").innerHTML = Math.ceil(4.4);
Math.floor(x) returns the value of x rounded down
document.getElementById("demo").innerHTML = Math.floor(4.7);
Math.sin(x) returns the sin of the angel x (given in radians)
document.getElementById("demo").innerHTML =
"The sine value of 90 degrees is " + Math.sin(90 * Math.PI / 180);
Math.cos(x) returns the cosin of the angel x (given in radians)
document.getElementById("demo").innerHTML =
"The cosine value of 0 degrees is " + Math.cos(0 * Math.PI / 180);
Math.max() return the number with the highest value from a list of arguments
document.getElementById("demo").innerHTML =
Math.max(0, 150, 30, 20, -8, -200);
Math.min() to return the number with the lowest value from a list of arguments
document.getElementById("demo").innerHTML =
Math.min(0, 150, 30, 20, -8, -200);
=====================
Find the min/max element of an Array
Note: These Math functions will not work as-is with arrays of numbers.
However, there are some ways around this.
var numbers = [1, 2, 3, 4];
Math.max.apply(null, numbers) // 4
Math.min.apply(null, numbers) // 1
A simpler, ES2015 way of accomplishing this is with the new spread operator.
var numbers = [1, 2, 3, 4];
Math.max(...numbers) // 4
Math.min(...numbers) // 1
=====================
fill array with consecutive numbers
const trainY = [];
for(x=0; x<(trainX.length-1); x++){trainY[x] = x+1;}
=====================
Converting Celsius to Fahrenheit
var x;
if (degree == "C") {
x = document.getElementById("c").value * 9 / 5 + 32;
document.getElementById("f").value = Math.round(x);
} else {
x = (document.getElementById("f").value -32) * 5 / 9;
document.getElementById("c").value = Math.round(x);
}
Math.random() returns a random number between 0 (included) and 1 (excluded)
document.getElementById("demo").innerHTML = Math.random();
How to return a random integer between 0 and 9 (both included)
document.getElementById("demo").innerHTML =
Math.floor(Math.random() * 10);
How to return a random integer between 0 and 10 (both included)
document.getElementById("demo").innerHTML =
Math.floor(Math.random() * 11);
How to return a random integer between 0 and 99 (both included)
document.getElementById("demo").innerHTML =
Math.floor(Math.random() * 100);
How to return a random integer between 0 and 100 (both included)
document.getElementById("demo").innerHTML =
Math.floor(Math.random() * 101);
How to return a random integer between 1 and 10 (both included)
document.getElementById("demo").innerHTML =
Math.floor(Math.random() * 10) + 1;
How to return a random integer between 1 and 100 (both included)
document.getElementById("demo").innerHTML =
Math.floor(Math.random() * 100) + 1;
How to return a random integer between x (included) and y (excluded)
return Math.floor(Math.random() * (max - min)) + min;
How to return a random integer between x and y (both included)
return Math.floor(Math.random() * (max - min + 1) ) + min;
Use Date() to display today's date and time
var d = new Date();
document.getElementById("demo").innerHTML = d;
Use getFullYear() display the year
var d = new Date();
document.getElementById("demo").innerHTML = d.getFullYear();
Use getTime() to calculate the number of milliseconds since 1970
var d = new Date();
document.getElementById("demo").innerHTML = d.getTime();
Use setFullYear() to set a specific date
var d = new Date();
d.setFullYear(2020);
document.getElementById("demo").innerHTML = d;
Use toUTCString() to convert today's date (according to UTC) to a string
var d = new Date();
document.getElementById("demo").innerHTML = d.toUTCString();
Use getDay() to display the weekday as a number
var d = new Date();
document.getElementById("demo").innerHTML = d.getDay();
Use getDay() and an array to display the weekday as a name
var d = new Date();
var days = ["Sunday","Monday","Tuesday","Wednesday","Thursday","Friday","Saturday"];
document.getElementById("demo").innerHTML = days[d.getDay()];
Display a clock
var today = new Date();
var h = today.getHours();
var m = today.getMinutes();
var s = today.getSeconds();
m = checkTime(m);
s = checkTime(s);
document.getElementById('txt').innerHTML =
h + ":" + m + ":" + s;
var t = setTimeout(startTime, 500);
}
function checkTime(i) {
if (i < 10) {i = "0" + i}; // add zero in front of numbers < 10
return i;
}
Create an array
var cars = ["Saab", "Volvo", "BMW"];
document.getElementById("demo").innerHTML = cars;
Join two arrays - concat()
var myGirls = ["Cecilie", "Lone"];
var myBoys = ["Emil", "Tobias", "Linus"];
var myChildren = myGirls.concat(myBoys);
document.getElementById("demo").innerHTML = myChildren;
Join three arrays - concat()
var arr1 = ["Cecilie", "Lone"];
var arr2 = ["Emil", "Tobias", "Linus"];
var arr3 = ["Robin", "Morgan"];
var myChildren = arr1.concat(arr2, arr3);
document.getElementById("demo").innerHTML = myChildren;
Join all elements of an array into a string - join()
var fruits = ["Banana", "Orange", "Apple", "Mango"];
document.getElementById("demo").innerHTML = fruits.join(" * ");
Remove the last element of an array - pop()
var fruits = ["Banana", "Orange", "Apple", "Mango"];
document.getElementById("demo1").innerHTML = fruits;
fruits.pop();
document.getElementById("demo2").innerHTML = fruits;
Add new elements to the end of an array - push()
var fruits = ["Banana", "Orange", "Apple", "Mango"]; document.getElementById("demo").innerHTML = fruits;
function myFunction() {
fruits.push("Kiwi"); document.getElementById("demo").innerHTML = fruits;}
Reverse the order of the elements in an array - reverse()
var fruits = ["Banana", "Orange", "Apple", "Mango"];
document.getElementById("demo").innerHTML = fruits;
function myFunction() {
fruits.sort(); fruits.reverse(); document.getElementById("demo").innerHTML = fruits; }
Remove the first element of an array - shift()
var fruits = ["Banana", "Orange", "Apple", "Mango"];
document.getElementById("demo1").innerHTML = fruits;
fruits.shift();
document.getElementById("demo2").innerHTML = fruits;
Select elements from an array - slice()
array.slice(start, end)
The slice() method selects the elements starting at the given start argument,
and ends at, but does not include, the given end argument.
var fruits = ["Banana", "Orange", "Lemon", "Apple", "Mango"];
var citrus = fruits.slice(1,3); // Orange, Lemon
var myBest = fruits.slice(-3, -1); // Lemon, Apple, Mango
document.getElementById("demo").innerHTML = myBest;
Sort an array (alphabetically and ascending) - sort()
var fruits = ["Banana", "Orange", "Apple", "Mango"];
document.getElementById("demo").innerHTML = fruits;
function myFunction() {
fruits.sort(); document.getElementById("demo").innerHTML = fruits;}
Sort numbers (numerically and ascending) - sort()
var points = [40, 100, 1, 5, 25, 10];
document.getElementById("demo").innerHTML = points;
function myFunction() { points.sort(function(a, b){return a - b}); document.getElementById("demo").innerHTML = points;}
Sort numbers (numerically and descending) - sort()
var points = [40, 100, 1, 5, 25, 10];
document.getElementById("demo").innerHTML = points;
function myFunction() {
points.sort(function(a, b){return b - a});
document.getElementById("demo").innerHTML = points;
}
Sort numbers (alphabetically and numerically) - sort()
var points = [40, 100, 1, 5, 25, 10];
document.getElementById("demo").innerHTML = points;
function myFunction1() {
points.sort();
document.getElementById("demo").innerHTML = points;
}
function myFunction2() {
points.sort(function(a, b){return a - b});
document.getElementById("demo").innerHTML = points;
}
Sort numbers in random order - sort()
var points = [40, 100, 1, 5, 25, 10];
document.getElementById("demo").innerHTML = points;
function myFunction() {
points.sort(function(a, b){return 0.5 - Math.random()});
document.getElementById("demo").innerHTML = points;
}
Sort objects by numeric properties - sort()
var cars = [{type:"Volvo", year:2016}, {type:"Saab", year:2001}, {type:"BMW", year:2010}]
displayCars();
function myFunction() { cars.sort(function(a, b){return a.year - b.year}); displayCars();}
function displayCars() { document.getElementById("demo").innerHTML =
cars[0].type + " " + cars[0].year + "<br>" +
cars[1].type + " " + cars[1].year + "<br>" +
cars[2].type + " " + cars[2].year;}
Sort objects by string properties - sort()
var cars = [
{type:"Volvo", year:2016},
{type:"Saab", year:2001},
{type:"BMW", year:2010}]
displayCars();
function myFunction() {
cars.sort(function(a, b){
var x = a.type.toLowerCase();
var y = b.type.toLowerCase();
if (x < y) {return -1;}
if (x > y) {return 1;}
return 0;
}); displayCars();}
function displayCars() {
document.getElementById("demo").innerHTML =
cars[0].type + " " + cars[0].year + "<br>" +
cars[1].type + " " + cars[1].year + "<br>" +
cars[2].type + " " + cars[2].year;
}
Add an element to position 2 in an array - splice()
var fruits = ["Banana", "Orange", "Apple", "Mango"];
document.getElementById("demo").innerHTML = fruits;
function myFunction() {
fruits.splice(2, 0, "Lemon", "Kiwi");
document.getElementById("demo").innerHTML = fruits;}
Convert an array to a string - toString()
var fruits = ["Banana", "Orange", "Apple", "Mango"];
document.getElementById("demo").innerHTML = fruits.toString();
Add new elements to the beginning of an array - unshift()
var fruits = ["Banana", "Orange", "Apple", "Mango"];
document.getElementById("demo").innerHTML = fruits;
function myFunction() {
fruits.unshift("Lemon");
document.getElementById("demo").innerHTML = fruits;
}
Note: fruits.unshift("Lemon");
but not: fruits = fruits.unshift("Lemon");
===========================
Creating Keyboard Shortcuts in JavaScript
Using Plain JavaScript
<h3>Press M key on keyboard(Single key)</h3>
<h3>Press Ctrl + B shortcut key (Double key combination)</h3>
<h3>Press Ctrl + Alt + Y shortcut key (Multiple key combination)</h3>
<h3>Press Ctrl + Alt + Shift + U shortcut key (Multiple key combination)</h3>
Add script tag before the closing tag of body tag and put in the below script.
document.onkeyup = function(e) {
if (e.which == 77) { alert("M key was pressed");
} else if (e.ctrlKey && e.which == 66) { alert("Ctrl + B was pressed");
} else if (e.ctrlKey && e.altKey && e.which == 89) { alert("Ctrl + Alt + Y was pressed");
} else if (e.ctrlKey && e.altKey && e.shiftKey && e.which == 85) { alert("Ctrl + Alt + Shift + U was pressed");
}
};
for cross browser compatibility you can use something like this.
var key = e.which || e.keyCode;
Here 77, 66, 89, 85 are the key code representations
ctrlKey, shiftKey and altKey are the read-only properties which hold boolean information about these keys.
This was using plain JavaScript.
Now let’s try this using jQuery.
Using jQuery
For this example, let’s create a simple Login page, which displays a message whenever Caps Lock is ON.
<h3 class="container">Displays message whenever CAPS LOCK is ON</h3>
<div class="container-fluid content">
<form class="form-horizontal">
<div class="form-group">
<input type="text" class="form-control" placeholder="Username">
</div>
<div class="form-group">
<input type="password" class="form-control" placeholder="Password">
</div>
<div id="message" class="form-group">
<p>Caps lock is ON</p>
</div>
<div class="form-group">
<button type="submit" class="btn btn-primary">Sign in</button>
</div>
</form>
</div>
Now coming to the JS part of the code, initially we want the ‘message’ to be hidden.
So include this,
$('#message').hide();
Now to find out whether the Caps Lock is On or not, simply use a keypress event, so whenever the user presses a key, the keycode information is extracted and checked whether it is in lower case or upper case.
Based on this the message is made visible.
The code should look something like this.
$(document).ready(function() {
$('#message').hide();
})
$('.form-control').keypress(function(e) {
var c = String.fromCharCode(e.which);
if (c.toUpperCase() === c && c.toLowerCase() !== c && !e.shiftKey) {
$('#message').show();
} else {
$('#message').hide();
}
});
In the above code shift, key property is also checked, to see whether shift key was pressed along with another key.
The only issue with the above code is, it displays the message whenever a character is pressed and not when the caps lock key is pressed.
The KeyCode Finder
In the first example, we used key codes like 77, 66, 89, and 85.
This example helps you to find out these keycodes.
I have a created a pen for this example, just press the desired key and it will display the key code associated with that key.
Using Mousetrap.js
Imagine a situation where there are a lot of shortcut keys to be implemented in a page, using above methods is not feasible.
For example in a cloud-based IDE, there are a lot of shortcut keys used.
So this can be simplified using the JS library Mousetrap.js.
The CDN link is here.
I have created a simple pen for this example.
Here, in this example Mousetrap.bind function is used.
This function binds a key combination with a callback function.
There are some other functionalities also with this library.
Read about all of them here.
Conclusion
All these above examples explained how to use keyboard shortcuts in JS.
The Mousetrap library simplifies this whole process by just using bind method.
There are many other libraries like KeyboardJS, Keypress or Keymaster which all do almost the same thing.
JavaScriptWeb DevelopmentKeyobard ShortcutsMousetrapjs
===========================
JaveScript to iterate over localStorage browser object
for (var i = 0; i < localStorage.length; i++){
key=localStorage.key(i);
console.log(key+': '+localStorage.getItem(key));
}
Advanced script
As mentioned here a HTML5 featured browser should also implement Array.prototype.map.
So script would be:
Array.apply(0, new Array(localStorage.length)).map(function(o, i){
return localStorage.key(i)+':'+localStorage.getItem(localStorage.key(i));
})
===========================
html5 localStorage
localStorage only supports strings.
Use JSON.stringify() and JSON.parse().
var names = [];
names[0] = prompt("New member name?").setItem("names", JSON.stringify(names));
//...
var storedNames = JSON.parse(localStorage.getItem("names"));
=========
localStorage.setItem("objName", "PeterPan")
localStorage.getItem("objName")
localStorage.length
localStorage.key(0);
localStorage.removeItem("objName")
localStorage.heedCode="test code"
localStorage.removeItem("heedCode")
localStorage.setItem("heedCode", "00PeterPan")
heedCodeList = ["372","1800"]
localStorage.savedCodeList = JSON.stringify(heedCodeList);
oldheedCodeList = JSON.parse(localStorage.savedCodeList)
oldheedCodeList[0]
oldheedCodeList[1]
if (localStorage.getItem("savedCodeList") === null) {
heedCodeList = [];
localStorage.savedCodeList = JSON.stringify(heedCodeList);
} else{
heedCodeList = JSON.parse(localStorage.savedCodeList);
}
=========
var jsonData = JSON.parse(document.getElementById('data').textContent)
=========
$.getJSON("https://api.github.com/users/jeresig");
=========
localStorage namespace
one localStorage for each subdomain.
Local Storage is prone to name clashes and accidental data overrides
A simple solution is to prefix all your app specific keys with your unique project name
several applications run on the same protocol/server/port, but with a different url, they will have access to the same localstorage.
if keys are using names that any other developer might use like "user", "data", "cache", you might end up reading localstorage from another application altogether.
If that app is running on the same server.
Total amount of data that can be stored is limited per domain
===========================
copyText = JSON.stringify(stkChartList);
copyText.select();
document.execCommand("copy");
The execCommand() method executes the specified command for the selected part of an editable section.
window width
var w = Math.max(document.documentElement.clientWidth, window.innerWidth || 0);
740
814
var h = Math.max(document.documentElement.clientHeight, window.innerHeight || 0);
572
177309
document.documentElement.clientWidth
document.documentElement.clientHeight
$(window).width() and $(window).height()
1.
var str = "The rain in SPAIN stays mainly in the plain";
var res = str.match(/ain/g);
2.
var msg = "For example, /green|red/ matches 'green' in 'green apple' and 'red' in 'red apple.' The order of 'x' and 'y' matters.
For example a*|b matches the empty string in 'b', but b|a* matches 'b' in the same string."
var result = msg.match(/green|red/g)
3.
re = /green|red/g
var all_matches = msg.match(re);
console.log(all_matches)
4.
To list out the object structure using JSON.stringify
str = JSON.stringify(result);
str = JSON.stringify(result, null, 4); // (Optional) beautiful indented output.
console.log(str);
5.
Some more tips:
Object.keys(result);
Object.getOwnPropertyNames(result);
result.length;
===================================
var patt = /w3schools/i
Example explained:
/w3schools/i is a regular expression.
w3schools is a pattern (to be used in a search).
i is a modifier (modifies the search to be case-insensitive).
Modifiers
Modifiers are used to perform case-insensitive and global searches:
Modifier Description
g global match (find all matches, no stopping after first match)
i Perform case-insensitive matching
m Perform multiline matching
Brackets
Brackets are used to find a range of characters:
Expression Description
[abc] Find any character between the brackets
[^abc] Find any character NOT between the brackets
[0-9] Find any character between the brackets (any digit)
[^0-9] Find any character NOT between the brackets (any non-digit)
(x|y) Find any of the alternatives specified
===========================
var copyTextarea = document.querySelector('.copytextarea1');
copyTextarea.focus();
copyTextarea.select();
// to get element's textContent
itemTxt = document.querySelector('.js-tip').textContent
===========================
Javascript tutorial Notes from LearnWebCode
browser developer mode
window object is the root object
document object is under window object, all about the html
document.title is the title object
use getElementById("") to select object
use var to represent the object to avoid long typings
use .innerHTML() to read and set object content
use getElementsByClassName("") to select multiple elements
use getElementById("").getElementByTagName("") to select a group under a object
access element under a group object: object[0], object is an array
for loop: for (){}
listItems.length is length of the object
addEventListener("click", aFunction)
set function using keyword: function aFunction(){}
use keyword: this to select the selected item, eg.
this.innerHTML;
to append element to an group object, use ourList.innerHTML += "something new";
to increment a counter, use theCounter++;
this.classList.add("active")
The Element.classList is a collection of the class attributes, classes and be added, remove or toggle
Event delegate 是 event binding 的一種技巧
Event delegation allows us to attach a single event listener, to a parent element, that will fire for all descendants matching a selector, whether those descendants exist now or are added in the future.
ourList.addEventListener("click", aFunction)
aFunction(e){
if(e.target.nodeName == )
}
e.target is complicated
mordern selector use querySelector("#id") instead of getelementById...
querySelectorAll("#id li")
===========================
HTMLAudioElement interface
Web Audio APIImpAudio Visualizeraudio-visualizer
var audio = new Audio('audio_file.mp3');
audio.play();
var snd = new Audio("http://www.externalharddrive.com/waves/computer/hello.wav");
snd.play();
===========================
const
The value of a constant cannot change through re-assignment, and it can't be redeclared.
The const declaration creates a read-only reference to a value whose scope can be either global
===========================
parsing python code to javascript
skulpt is doing exactly the same thing as brython and pyjs - parsing python code to javascript
not running it natively in the browser
===========================
inheritance
JavaScript inheritance is simpler
var some2dPoint = {x:3,y:5};
var now3d = Object.create(some2dPoint);
now3d.z=10
===========================
selection script
<select id="myChoice" onchange="showChoice()"><option>Apple</option><option>Orange</option><option>Pineapple</option><option>Banana</option>
</select>
<p id="demo"></p>
<script>
function showChoice() {var x = document.getElementById("myChoice");var i = x.selectedIndex;document.getElementById("demo").innerHTML = x.options[i].text;
}
</script>
===========================
jQuery Object and HTML DOM Object
In jQuery, to get the same result as document.getElementById,
access the jQuery Object and get the first element in the object
document.getElementById('contents'); //returns a HTML DOM Object
var contents = $('#contents'); //returns a jQuery Object
var contents = $('#contents')[0]; //returns a HTML DOM Object
Javascript 跟 JQuery
To get the DOM object(s) from the jQuery one, use the following:
$('#selectlist').get(); //get all DOM objects in the jQuery collection
$('#selectlist').get(0); //get the DOM object in the jQuery collection at index 0
$('#selectlist')[0]; //get the DOM objects in the jQuery collection at index 0
===========================
fibonacci function
function fibonacci(num){
var a = 1, b = 0, temp;
var seq = []
while (num > 0){
temp = a;
a = a + b;
b = temp;
seq.push(b)
num--;
}
return seq;
}
const fibs = fibonacci(100)
===========================
input numeric filter
var numericExpression = /^[0-9]+$/;
if(!userInput.match(numericExpression)){alert("Please enter a number")}
===========================
The step attribute can be used with a numerical input value to dictate how granular the values you can input are.
<input type="time" id="timerInput" step="1">
document.getElementById("settime").value = "13:24:59";
For example, you might want users to enter a particular time, but only in 30 minute increments.
In this case, we can use the step attribute, keeping in mind that for time inputs the value of the attribute is in seconds.
For example, a 30 minute increment would have a step value of 1800.
<input type="time" step="1800">
Return the value property:
timeObject.value
Set the value property:
timeObject.value = hh:mm:ss.ms
function myFunction() {
var x = document.createElement("INPUT");
x.setAttribute("type", "time");
x.setAttribute("value", "21:35:09");
document.body.appendChild(x);
}
appendChild() is a more native way:
var script = document.createElement('script');
script.type = 'text/javascript';
script.src = 'script.js';
document.head.appendChild(script);
var script = document.createElement('script');
script.type = 'text/javascript';
script.src = 'https://cdn.jsdelivr.net/npm/@tensorflow/tfjs@0.12.0';
document.head.appendChild(script);
======================
Using jQuery:
$.getScript('script.js');
======================
use the fetch:
fetch('https://cdnjs.cloudflare.com/ajax/libs/angular.js/1.5.8/angular.min.js')
.then(response => response.text())
.then(text => eval(text))
.then(() => { /* now you can use your library */ })
======================
https://stackoverflow.com/questions/5282228/include-javascript-file-in-chrome-console
======================
check time falls within a specific range
check time falls within a specific range
function checkTime() {
var d = new Date(); // current time
var hours = d.getHours();
var mins = d.getMinutes();
var day = d.getDay();
return day >= 1
&& day <= 5
&& hours >= 9
&& (hours < 17 || hours === 17 && mins <= 30);
}
function checkTime() {
var d = new Date(); // current time
var hours = d.getHours();
var mins = d.getMinutes();
var day = d.getDay();
return day >= 1
&& day <= 5
&& (hours >= 9 || hours === 9 && mins >= 30)
&& (hours < 12)
&& (hours >= 13)
&& (hours < 16);
}
===========================
create a dataset
var dataset = [];
var count =10;
for (var j = 0; j < count; j++) {dataset[j] = Math.round(Math.random() * 100)}
polar and cartesian coordinates
function d_Btw_2Pts(x1, y1, x2, y2) {// Pythagoras Theoremvar x = (x2-x1);var y = (y2-y1);return Math.sqrt(x*x + y*y);
}
function polar2Cart(R, theta) {x = R * Math.cos(theta);y = R * Math.sin(theta);return [x,y]
}
convert to fixed decimal places
num.toFixed(2);
get image size height width using javascript
var image = document.getElementById('imagearea');
alert(image.clientWidth, image.clientHeight);
clientWidth and clientHeight are DOM properties that show the current in-browser size of the inner dimensions of a DOM element (excluding margin and border).
So in the case of an IMG element, this will get the actual dimensions of the visible image.
img.onload = function() {
alert(this.width + 'x' + this.height);
}
get image size height width using javascript
generate random number that is negative or positive
(Math.random()-1/2)*2
js script load external script
$.getScript('another_file.js', function() {
//script is loaded and executed put your dependent JS here
});
or
var imported = document.createElement('script');
imported.src = '/path/to/imported/script';
document.head.appendChild(imported);
Dynamically load JS
var script = document.createElement('script');
script.onload = function() {
//do stuff with the script
};
script.src = something;
document.head.appendChild(script);
Convert unicode character to string format
Convert unicode character to string format
theStr = "\u9999\u6e2f\u98df\u54c1\u6295\u8d44" // this will show correctly as "香港食品投资"
String.fromCharCode(parseInt("6e2f",16)) //this work
String.fromCharCode(parseInt("9999 6e2f 98df 54c1 6295 8d44",16)) //cannot work
Vibration API Sample
function example1() {
// Vibrate for 500ms
navigator.vibrate([500]);
}
worker
const delay = 5000;
// run without worker
const withoutWorkerButton = document.createElement('button');
document.body.appendChild(withoutworkerButton);
withoutWorkerButton.textContent = 'without Worker';
withoutWorkerButton.addEventListener('click', ()=> {const start = performance.now();while (performance.now() - start < delay);const end = performance.now();console.log(end-start);
});// run with worker
const myworker = new worker('./worker.js') // create worker
myworker.onMessage = e => {console.log('myworker says: ', e.data);
}
const withWorkerButton = document.createElement('button');
document.body.appendChild(withworkerButton);
withWorkerButton.textContent = 'with Worker';
withWorkerButton.addEventListener('click', ()=> {myworker.postMessage(delay);
});
//worker.js
this.onMessage = e => {const delay = e.data;const start = performance.now();while (performance.now() - start < delay);const end = performance.now();this.postMessage(end-start);
}
performance now vs date now Performance API
Use Indirect Variables, 'Variable' variables in Javascript
Indirect Variables or dynamic variable names
Javascript Use Indirect Variables, 'Variable' variables in Javascript
// example
// global
var vara0='a';
var varb0='b';
alert(window['vara'+0]); // gives 'a'
alert(window['varb'+0]); // gives 'b'
console.log(window['vara'+0]);
console.log(window['varb'+0]);
// example
var foos = ['foo', 'bar', 'baz'];
for(i=0; i<foos.length; i++){
console.log(foos[i]);
}
Note: eval() is heavy handed.
eval() uses lots of cpu resources.
try to avoid it.
// example
// local
function foo(){var var1='b';alert(eval('var'+1))
}
foo()
// example
var foo = 42;
var bar = 21;
var key = 'foo';
console.log(eval(key));
variable variables in javascript
In programming, dynamic variable names don’t have a specific name hard-coded in the script.
They are named dynamically with string values from other sources.
Dynamic variables are rarely used in JavaScript.
But in some cases they are useful.
Unlike PHP, there is no special implementation of dynamic variable names in JavaScript.
But similar results can be achieved by using some other methods.
In JavaScript, dynamic variable names can be achieved by using 2 methods/ways given below.
eval() Method: The eval() function evaluates JavaScript code represented as a string in the parameter.
A string is passed as a parameter to eval().
If the string represents an expression, eval() evaluates the expression.
Inside eval(), we pass a string in which variable value i is declared and assigned a value of i for each iteration.
The eval() function executes this and creates the variable with the assigned values.
The code is given below implements the creation of dynamic variable names using eval().
Example:
var k = 'value';
var i = 0;
for(i = 1; i < 3; i++) {
eval('var ' + k + i + '= ' + i + ';');
}
console.log(value1);
console.log(value2);
Output:
value1=1
value2=2
Window object: JavaScript always has a global object defined.
When the program creates global variables they’re created as members of the global object.
The window object is the global object in the browser.
Any global variables or functions can be accessed with the window object.
After defining a global variable we can access its value from the window object.
The code given below implements dynamic variable names using the window object.
So, the code basically creates a global variable with dynamic name “valuei” for each iteration of i and assigns a value of i to it.
Later these variables can be accessed in the script anywhere as they become global variables.
Example:
var i;
for(i = 1; i < 3; i++) {
window['value'+i] = + i;
}
console.log(value1);
console.log(value2);
Output:
value1=1
value2=2
// use global variable
var var1='c';
alert(window['var'+ 1]); // c
// use eval
var1 = "b"
thisvar = "var" + 1
alert (eval(thisvar))
ignoreLstName = bookid + "IgnoreLst"
window["ignoreLstName"] // note the " to use global variable
eval("ignoreLstName") // use eval
example
bookid = "中医Tips"
ignoreLstName = bookid + "IgnoreLst"
if (localStorage.getItem(window["ignoreLstName"]) === null) {
localStorage.setItem(window["ignoreLstName"], "");
ignoreLst = []
} else{
ignoreLst = localStorage.getItem(window["ignoreLstName"]).split(',');
}
Evaluating JavaScript code via eval() and new Function()
Emit a beep sound
// browsers limit the number of concurrent audio contexts, so better re-use them
audi = new AudioContext();
function beep(vol, freq, duration){
v = audi.createOscillator()
u = audi.createGain()
v.connect(u)
v.frequency.value = freq
v.type = "square"
u.connect(audi.destination)
u.gain.value = vol*0.01
v.start(audi.currentTime)
v.stop(audi.currentTime + duration*0.001)
}
beep(50,500,600)
// to loop with diff freq
function start( counter ){
if( counter < 20){
setTimeout( function(){
counter++;
console.log(counter);
beep(350, counter*50, 400);
start(counter);
}, 500);
}
}
start(0);
Delay, Sleep, Pause, & Wait in JavaScript
Many programming languages have a sleep function that will delay a program’s execution for a given number of seconds.
This functionality is absent from JavaScript, however, owing to its asynchronous nature.
The standard way of creating a delay in JavaScript is to use its setTimeout method.
console.log("Hello");
setTimeout(() => { console.log("World!"); }, 2000);
Waiting for Things with setTimeout
function pollDOM () {
const el = document.querySelector('my-element');
if (el.length) {
// Do something with el
} else {
setTimeout(pollDOM, 300); // try again in 300 milliseconds
}
}
pollDOM();
Flow Control in Modern JavaScript
It’s often the case when writing JavaScript that we need to wait for something to happen (for example, data to be fetched from an API), then do something in response (such as update the UI to display the data).
The example above uses an anonymous callback function for this purpose, but if you need to wait for multiple things to happen, the syntax quickly gets pretty gnarly and you end up in callback hell.
Luckily, the language has evolved considerably over the past few years and now offers us new constructs to avoid this.
For example, using async await we can rewrite the initial code to fetch information from the GitHub API:
(async () => {
const res = await fetch(`https://api.github.com/users/jameshibbard`);
const json = await res.json();
console.log(json.public_repos);
console.log("Hello!");
})();
Now the code executes from top to bottom.
The JavaScript interpreter waits for the network request to complete and the number of public repos is logged first, then the “Hello!” message.
Bringing Sleep to Native JavaScript
function sleep(milliseconds) {
const date = Date.now();
let currentDate = null;
do {
currentDate = Date.now();
} while (currentDate - date < milliseconds);
}
console.log("Hello");
sleep(2000);
console.log("World!");
As expected, this will log “Hello”, pause for two seconds, then log “World!”
it has a large disadvantage:
the loop will block JavaScript’s execution thread and ensure that nobody can interact with your program until it finishes.
If you need a large delay, there’s a chance that it may even crash things altogether.
A Better Sleep Function
Well, it’s also possible to combine the techniques to make a less intrusive sleep function:
function sleep(ms) {
return new Promise(resolve => setTimeout(resolve, ms));
}
console.log("Hello");
sleep(2000).then(() => { console.log("World!"); });
Notice that we need to use a then callback to make sure the second message is logged with a delay.
We can also chain more callbacks onto the first:
console.log("Hello");
sleep(2000)
.then(() => { console.log("World!"); })
.then(() => {
sleep(2000)
.then(() => { console.log("Goodbye!"); })
});
This works, but looks ugly.
We can pretty it up using async ...
await:
function sleep(ms) {
return new Promise(resolve => setTimeout(resolve, ms));
}
async function delayedGreeting() {
console.log("Hello");
await sleep(2000);
console.log("World!");
await sleep(2000);
console.log("Goodbye!");
}
delayedGreeting();
This looks nicer, but means that whatever code is using the sleep function needs to be marked as async.
Of course, both of these methods still have the disadvantage (or feature) that they do not pause the entire program execution.
Only your function sleeps:
function sleep(ms) {
return new Promise(resolve => setTimeout(resolve, ms));
}
async function delayedGreeting() {
console.log("Hello");
await sleep(2000);
console.log("World!");
}
delayedGreeting();
console.log("Goodbye!");
JavaScript’s asynchronous nature is quite nice when you get used to it.
simple delay
function delay(time) {
return new Promise(resolve => setTimeout(resolve, time));
}
reminders notes
reminders
add, remove, edit notes
notes object format:
date, time, details, remind frequency (repeating), action
sort date time sequence
use set interval
calc current time and set interval
array of objects: remindList
remindList = []
var remindNotes = new Object();
remindNotes.date = 'date';
remindNotes.time = 'timw';
remindNotes.details = "description';
remindNotes.freq = 1;
remindNotes.interval = 2;
remindNotes.action = beep;
RegEx text manipulations
Practical JavaScript Regular Expressions
Syntax: /pattern/modifiers;
/pattern/ is the regular expression pattern
e.g.
/.*abcd/
modifiers is the followings:
i Perform case-insensitive matching
g Perform a global match (find all matches rather than stopping after the first match)
m Perform multiline matching
JavaScript String Reference
simple methods:
str.search()var str = "Please locate where 'locate' occurs!";var pos = str.search("locate");str.replace()str = "Please visit Microsoft!";var n = str.replace("Microsoft", "W3Schools");String Lengthvar txt = "ABCDEFGHIJKLMNOPQRSTUVWXYZ";var theTxtLen = txt.length;Finding a String in a Stringvar str = "Please locate where 'locate' occurs!";var pos = str.indexOf("locate");Extracting String Parts: 3 methods for extracting part of a stringslice(start, end)substring(start, end)substr(start, length)toUpperCase()
toLowerCase()
concat()
trim()var str = " Hello World! ";alert(str.trim());
split()var txt = "a,b,c,d,e"; // Stringtxt.split(","); // Split on commastxt.split(" "); // Split on spacestxt.split("|"); // Split on pipee.g.
var thestr = 'FLSZ 1070560 - 00700腾讯控股';
var regex = /.* - /;
str = thestr.replace(regex, "");
console.log(str.slice(0, 4));
Regular Expression Patterns
[abc] Find any of the characters between the brackets
[^abc] Find any character NOT between the brackets
[0-9] Find any character between the brackets (any digit)
[^0-9] Find any character NOT between the brackets (any non-digit)
(x|y) Find any of the alternatives specified
Metacharacter Description Try it
.
Find a single character, except newline or line terminator
\w Find a word character
\W Find a non-word character
\d Find a digit
\D Find a non-digit character
\s Find a whitespace character
\S Find a non-whitespace character
\b Find a match at the beginning/end of a word
\B Find a match not at the beginning/end of a word
\0 Find a NUL character
\n Find a new line character
\f Find a form feed character
\r Find a carriage return character
\t Find a tab character
\v Find a vertical tab character
\xxx Find the character specified by an octal number xxx
\xdd Find the character specified by a hexadecimal number dd
\uxxxx Find the Unicode character specified by a hexadecimal number xxxx
Quantifier Description
n+ Matches any string that contains at least one n
n* Matches any string that contains zero or more occurrences of n
n? Matches any string that contains zero or one occurrences of n
n{X} Matches any string that contains a sequence of X n's
n{X,Y} Matches any string that contains a sequence of X to Y n's
n{X,} Matches any string that contains a sequence of at least X n's
n$ Matches any string with n at the end of it
^n Matches any string with n at the beginning of it
?=n Matches any string that is followed by a specific string n
?!n Matches any string that is not followed by a specific string n
RegExp Object
exec() Tests for a match in a string.
Returns the first match
test() Tests for a match in a string.
Returns true or false
toString() Returns the string value of the regular expression
RegExp Object Properties
constructor Returns the function that created the RegExp object's prototype
global Checks whether the "g" modifier is set
ignoreCase Checks whether the "i" modifier is set
lastIndex Specifies the index at which to start the next match
multiline Checks whether the "m" modifier is set
source Returns the text of the RegExp pattern
Example
var str = "Visit W3Schools!";
var pat = /o/g;
var n = str.match(pat);
n.length;
regular expressions substitute operator $1-$9
The non-standard $1, $2, $3, $4, $5, $6, $7, $8, $9 properties are static and read-only properties of regular expressions that contain parenthesized substring matches.
var str = 'asd-0.testing';
var regex = /(asd-)\d(\.\w+)/;
str = str.replace(regex, "$11$2");
"asd-1.testing"
str = str.replace(regex, "$13$2");
"asd-3.testing"
convert seconds to colon-separated time string (hh:mm:ss)
var date = new Date(null);
date.setSeconds(45); // specify value for SECONDS here
var timeString = date.toISOString().substr(11, 8);
console.log(timeString)
thisDate = new Date()
Sun Feb 24 2019 14:22:58 GMT+0800 (Hong Kong Standard Time)
thisDate.toTimeString()
"14:22:58 GMT+0800 (Hong Kong Standard Time)"
thisDate.replace(/.*(\d{2}:\d{2}:\d{2}).*/, "$1")
thisDate.replace is not a function
thisDate.toTimeString().replace(/.*(\d{2}:\d{2}:\d{2}).*/, "$1")
"14:22:58"
iterators and generators
The for loop could be written like this:
const possiblePrimes = [73, 6, 90, 19, 15];
const confirmedPrimes = [];
for (const i of possiblePrimes){
if ( isPrime(i) ){
confirmedPrimes.push(i);
}
}
// confirmedPrimes is now [73, 19]
This is far cleaner, but the most striking bit of this is the for loop.
The variable i now represents the actual item in the array called possiblePrimes.
So, we don’t have to call it by index anymore.
This means that instead of calling possiblePrimes[i] in the loop, we can just call i.
Behind the scenes, this kind of iteration is making use of ES6’s bright and shiny Symbol.iterator() method.
This bad boy is in charge of describing the iteration and, when called, returns a JavaScript object containing the next value in the loop and a done key that is either true or false depending on whether or not the loop is finished.
Generators
Generators, also called “iterator factories”, are a new type of JavaScript function that creates specific iterations.
They give you special, self-defined ways to loop over stuff.
Okay, so what does all that mean? Let’s look at an example.
Let’s say that we want a function that will give us the next prime number every time we call it.
Again, we’ll use our isPrime function from before to check if a number is prime:
function* getNextPrime() {
let nextNumber = 2;
while (true) {
if (isPrime(nextNumber)) {
yield nextNumber;
}
nextNumber++;
}
}
If you’re used to JavaScript, some of this stuff will look a bit like voodoo, but it’s actually not too bad.
We have that strange asterisk after the keyword function, but all this does is to tell JavaScript that we’re defining a generator.
The other funky bit would be the yield keyword.
This is actually what a generator spits out when you call it.
It’s roughly equivalent to return, but it keeps the state of the function instead of rerunning everything whenever you call it.
It “remembers” its place while running, so the next time you call it, it carries on where it left off.
This means that we can do this:
const nextPrime = getNextPrime();
And then call nextPrime whenever we want to obtain — you guessed it — the next prime:
console.log(nextPrime.next().value); // 2
console.log(nextPrime.next().value); // 3
console.log(nextPrime.next().value); // 5
console.log(nextPrime.next().value); // 7
You can also just call nextPrime.next(), which is useful in situations where your generator isn’t infinite, because it returns an object like this:
console.log(nextPrime.next());
// {value: 2, done: false}
Here, that done key tells you whether or not the function has completed its task.
In our case, our function will never finish, and could theoretically give us all prime numbers up to infinity (if we had that much computer memory, of course).
javascript iterables, iterators, and generators
countDecimals and transformations
function countDecimals(value) { if ((value % 1) != 0) return value.toString().split(".")[1].length; return 0;
};
avalue = 1.0320
avalue *= 10
apowval = 1
apowval ++
avalue = 1.0320
a = countDecimals(avalue)
amplified = avalue*Math.pow(10, a);
original = amplified/Math.pow(10, a);
Higher Order Functions: Using Filter, Map and Reduce for More Maintainable Code
repeat executing function on array element
.map(Number)
Calls Number on each value in the array (casting it to a number)
.filter()
filter on each element in the array
does not change the original array.
use .reduce() to create our own implementation of .map() and .filter()
var arr = [ 1, 2, 3 ];
var arrDoubled = arr.map(function(x) { return x * 2; });
console.log(arrDoubled); // [ 2, 4, 6 ]
Higher order functions can also return a function.
For example, you can make a function called multiplyBy that takes a number and returns a function that multiplies another number you provide by the first number provided.
You can use this approach to create a multiplyByTwo function to pass to Array.map.
function multiplyBy(num1) {
return function(num2) { return num1 * num2; }
}
var multiplyByTwo = multiplyBy(2);
var arr = [ 1, 2, 3 ];
var arrDoubled = arr.map(multiplyByTwo);
console.log(arrDoubled); // [ 2, 4, 6 ]
It also makes it easy to combine functions with each other.
This is called composition
The three most used higher order functions in JavaScript are .filter(), .map() and .reduce().
Filter
Imagine writing a piece of code that accepts a list of people where you want to filter out the people that are equal or above the age of 18.
Our list looks like the one below:
const people = [
{ name: ‘John Doe’, age: 16 },
{ name: ‘Thomas Calls’, age: 19 },
{ name: ‘Liam Smith’, age: 20 },
{ name: ‘Jessy Pinkman’, age: 18 },
];
Let’s look at an example of a first order function which select people that are above the age of 18.
const peopleAbove18 = (collection) => {
const results = [];
for (let i = 0; i < collection.length; i++) {
const person = collection[i];
if (person.age >= 18) {
results.push(person);
}
} return results;};
Now what if we want to select all the people who are between 18 and 20? We could create another function.
const peopleBetween18And20 = (collection) => { const results = [];
for (let i = 0; i < collection.length; i++) {
const person = collection[i];
if (person.age >= 18 && person.age <= 20) {
results.push(person);
}
}
return results;
};
You may already recognize a lot of repeating code here.
This could be abstracted into a more generalized solution.
These two functions have something in common.
They both iterate over a list and filter it on a given condition.
“A higher order function is a function that takes one or more functions as arguments.”— Closurebridge
We can improve our previous function by using a more declarative approach, .filter().
const peopleAbove18 = (collection) => {
return collection.filter((person) => person.age >= 18);}
That’s it! We can reduce a lot of extra code by using this higher order function.
It also make our code better to read.
We don’t care how things are being filtered, we just want it to filter.
I will go into combining functions later in this article.
Map
Let’s take the same list of people and an array of names that tells if the person loves to drink coffee.
const coffeeLovers = [‘John Doe’, ‘Liam Smith’, ‘Jessy Pinkman’];
The imperative way will be like:
const addCoffeeLoverValue = (collection) => {
const results = [];
for (let i = 0; i < collection.length; i++) {
const person = collection[i];
if (coffeeLovers.includes(person.name)) {
person.coffeeLover = true;
} else {
person.coffeeLover = false;
}
results.push(person);
}
return results;
};
We could use .map() to make this more declarative.
const incrementAge = (collection) => {
return collection.map((person) => {
person.coffeeLover = coffeeLovers.includes(person.name);
return person;
});
};
Again, .map() is a high-order function.
It allows a function to be passed as an argument.
Reduce
I bet you will like this function when you know when and how to use it.
The cool thing about .reduce() is that most of the functions above can be made with it.
Let’s take a simple example first.
We want to sum up all the people’s ages.
Again, we’ll look how this can be done using the imperative approach.
It’s basically looping through the collection and increment a variable with the age.
const sumAge = (collection) => {
let num = 0;
collection.forEach((person) => {
num += person.age;
});
return num;
}
And the declarative approach using .reduce().
const sumAge = (collection) => collection.reduce((sum, person) => {
return sum + person.age;
}, 0);
We can even use .reduce() to create our own implementation of .map() and .filter() .
const map = (collection, fn) => {
return collection.reduce((acc, item) => {
return acc.concat(fn(item));
}, []);
}const filter = (collection, fn) => {
return collection.reduce((acc, item) => {
if (fn(item)) {
return acc.concat(item);
}
return acc;
}, []);
}
This might be hard to understand at first.
But what .reduce() basically does is start with a collection and a variable with an initial value.
You then iterate over the collection and append (or add) the values to the variable.
Combining map, filter and reduce
These functions can be used together!
This makes it easy to create reusable functions and reduce the amount of code that is required to write certain functionality.
So we talked about using .filter() to filter out the people that are equal or below the age of 18.
.map() to add the coffeeLover property, and .reduce() to finally create a sum of the age of everyone combined.
Lets write some code that actually combines these three steps.
const people = [ { name: ‘John Doe’, age: 16 }, { name: ‘Thomas Calls’, age: 19 }, { name: ‘Liam Smith’, age: 20 }, { name: ‘Jessy Pinkman’, age: 18 },];const coffeeLovers = [‘John Doe’, ‘Liam Smith’, ‘Jessy Pinkman’];const ageAbove18 = (person) => person.age >= 18;const addCoffeeLoverProperty = (person) => { person.coffeeLover = coffeeLovers.includes(person.name); return person;}const ageReducer = (sum, person) => { return sum + person.age;}, 0);const coffeeLoversAbove18 = people .filter(ageAbove18) .map(addCoffeeLoverProperty);const totalAgeOfCoffeeLoversAbove18 = coffeeLoversAbove18 .reduce(ageReducer);const totalAge = people .reduce(ageReducer);
If you do it the imperative way, you will end up writing a lot of repeating code.
The mindset of creating functions with .map() ,.reduce() and .filter() will improve the quality of the code you’ll write.
But it also adds a lot of readability.
You don’t have to think about what’s going on inside a function.
It’s easy to understand.
Higher Order Functions (Composing Software)A Guide To The Reduce Method In Javascriptif-else conditon in arrow function
Flattening an array of arrays
var data = [[1, 2, 3], [4, 5, 6], [7, 8, 9]];
var flat = data.reduce((total, amount) => total.concat(amount))
flat // [ 1, 2, 3, 4, 5, 6, 7, 8, 9 ]
if-else conditon in arrow function
function(a){
if(a < 10){
return 'valid';
}else{
return 'invalid';
}
}
The equivalent in an arrow function using a ternary is:
a => (a < 10) ? 'valid' : 'invalid'
the body of an arrow function without braces can only be a single expression, so if statements are not allowed.
Statements are allowed in arrow functions with braces though, like this:
const func = () => {
if (...) ...
}
for a single 'if' condition, may use a shortcut syntax.
Imagine you need to execute a doThis() function only if a > 10 :
a => a > 10 && doThis()
假设我们要制作一份饮料菜单,菜单上的饮料可以是各种不同的类型,比如果汁、咖啡、奶茶等。
我们先定义两个制作饮料的函数:
function makeJuice(size) {
return `A cup of ${size} juice`;
}
function makeCoffee(size) {
return `A cup of ${size} coffee`;
}
然后,我们定义一个高阶函数 orderDrink,它接受一个制作饮料的函数 makeDrink 和一个大小参数 size:
function orderDrink(makeDrink, size) {
return makeDrink(size);
}
这样,我们就可以通过传递不同的制作饮料的函数和大小参数,来制作不同的饮料:
console.log(orderDrink(makeJuice, 'large')); // 输出: A cup of large juice
console.log(orderDrink(makeCoffee, 'small')); // 输出: A cup of small coffee
在这个例子中,orderDrink 是一个高阶函数,它接受一个函数 makeDrink 和一个参数 size。
orderDrink 调用 makeDrink,并传入 size 作为参数,然后返回制作好的饮料。
我们定义了两个简单的函数 makeJuice 和 makeCoffee,分别制作果汁和咖啡。
通过将这两个函数作为参数传递给 orderDrink,我们可以制作不同大小的饮料,而无需修改 orderDrink 函数本身。
这个例子展示了高阶函数的一个重要特性:代码复用性和可扩展性。
我们只需要编写一次 orderDrink 函数,就可以通过传递不同的制作饮料的函数,实现多种不同的饮料制作方法。
这在实际开发中非常有用,特别是当我们需要对某一类操作进行抽象和泛化时。
它还有另外一个略显高级的用法:带标签的模板(tagged templates),有时也叫标签函数(tag function),指的都是一回事。
在带标签的模板中,标签其实是一个函数,它可以处理模板字符串的内容。
该函数的第一个参数是字符串数组,包括模板字符串的所有静态字符字面量,后面的不定参数,按照先后顺序分别对应 ${} 对应的变量。
函数返回值会当作模板字符串变量的最终值。
只要你想,返回值可以和入参完全无关。
标签函数属于可变参数函数(variadic functions),在 JavaScript 中可以使用三个点 ...
剩余参数(rest parameters)语法,将所有的变量收集到一个数组。
标签函数的返回值可以是任意类型,不一定是字符串。
除了普通变量,带标签模板的“标签”还可以是表达式,只要它的操作符优先级大于 16 即可。
满足条件的表达式有属性访问 x.y、函数调用 x(y)、创建对象 new x(y),甚至另一个标签模板字面量。
带标签模板的实际应用有哪些?
如果你接触过谷歌的 zx 命令行工具,或者谷歌的 Lit 框架(谷歌真喜欢用它),就会见到它的实际用法。
下图中的 $ 和 html 就是标签函数。
Template literals are literals delimited with backtick (`) characters, allowing for multi-line strings, string interpolation with embedded expressions, and special constructs called tagged templates.
Template literals are sometimes informally called template strings, because they are used most commonly for string interpolation (to create strings by doing substitution of placeholders).
However, a tagged template literal may not result in a string; it can be used with a custom tag function to perform whatever operations you want on the different parts of the template literal.
Syntax
`string text`
`string text line 1
string text line 2`
`string text ${expression} string text`
tagFunction`string text ${expression} string text`
Parameters
string text
The string text that will become part of the template literal.
Almost all characters are allowed literally, including line breaks and other whitespace characters.
However, invalid escape sequences will cause a syntax error, unless a tag function is used.
expression
An expression to be inserted in the current position, whose value is converted to a string or passed to tagFunction.
tagFunction
If specified, it will be called with the template strings array and substitution expressions, and the return value becomes the value of the template literal.
See tagged templates.
Description
Template literals are enclosed by backtick (`) characters instead of double or single quotes.
Along with having normal strings, template literals can also contain other parts called placeholders, which are embedded expressions delimited by a dollar sign and curly braces: ${expression}.
The strings and placeholders get passed to a function — either a default function, or a function you supply.
The default function(when you don't supply your own) just performs string interpolation to do substitution of the placeholders and then concatenate the parts into a single string.
To supply a function of your own, precede the template literal with a function name; the result is called a tagged template.
In that case, the template literal is passed to your tag function, where you can then perform whatever operations you want on the different parts of the template literal.
To escape a backtick in a template literal, put a backslash (\) before the backtick.
`\`` === "`"; // true
Dollar signs can be escaped as well to prevent interpolation.
`\${1}` === "${1}"; // true
Multi-line strings
Any newline characters inserted in the source are part of the template literal.
Using normal strings, you would have to use the following syntax in order to get multi-line strings:
console.log("string text line 1\n" + "string text line 2");
// "string text line 1
// string text line 2"
Using template literals, you can do the same with this:
console.log(`string text line 1
string text line 2`);
// "string text line 1
// string text line 2"
Like normal string literals, you can write a single-line string across multiple lines for source code readability, by escaping the newline with a backslash (\):
console.log(`string text line 1 \
string text line 2`);
// "string text line 1 string text line 2"
String interpolation
Without template literals, when you want to combine output from expressions with strings, you'd concatenate them using the addition operator +:
const a = 5;
const b = 10;
console.log("Fifteen is " + (a + b) + " and\nnot " + (2 * a + b) + ".");
// "Fifteen is 15 and
// not 20."
That can be hard to read – especially when you have multiple expressions.
With template literals, you can avoid the concatenation operator — and improve the readability of your code — by using placeholders of the form ${expression} to perform substitutions for embedded expressions:
const a = 5;
const b = 10;
console.log(`Fifteen is ${a + b} and
not ${2 * a + b}.`);
// "Fifteen is 15 and
// not 20."
Note that there's a mild difference between the two syntaxes.
Template literals coerce their expressions directly to strings, while addition coerces its operands to primitives first.
For more information, see the reference page for the + operator.
Nesting templates
In certain cases, nesting a template is the easiest (and perhaps more readable) way to have configurable strings.
Within a backtick-delimited template, it is simple to allow inner backticks by using them inside an ${expression} placeholder within the template.
For example, without template literals, if you wanted to return a certain value based on a particular condition, you could do something like the following:
let classes = "header";
classes += isLargeScreen()
? ""
: item.isCollapsed
? " icon-expander"
: " icon-collapser";
With a template literal but without nesting, you could do this:
const classes = `header ${
isLargeScreen() ? "" : item.isCollapsed ? "icon-expander" : "icon-collapser"
}`;
With nesting of template literals, you can do this:
const classes = `header ${
isLargeScreen() ? "" : `icon-${item.isCollapsed ? "expander" : "collapser"}`
}`;
Tagged templates
A more advanced form of template literals are tagged templates.
Tags allow you to parse template literals with a function.
The first argument of a tag function contains an array of string values.
The remaining arguments are related to the expressions.
The tag function can then perform whatever operations on these arguments you wish, and return the manipulated string.
(Alternatively, it can return something completely different, as described in one of the following examples.)
The name of the function used for the tag can be whatever you want.
const person = "Mike";
const age = 28;
function myTag(strings, personExp, ageExp) {
const str0 = strings[0]; // "That "
const str1 = strings[1]; // " is a "
const str2 = strings[2]; // "."
const ageStr = ageExp < 100 ? "youngster" : "centenarian";
// We can even return a string built using a template literal
return `${str0}${personExp}${str1}${ageStr}${str2}`;
}
const output = myTag`That ${person} is a ${age}.`;
console.log(output);
// That Mike is a youngster.
The tag does not have to be a plain identifier.
You can use any expression with precedence greater than 16, which includes property access, function call, new expression, or even another tagged template literal.
console.log`Hello`; // [ 'Hello' ]
console.log.bind(1, 2)`Hello`; // 2 [ 'Hello' ]
new Function("console.log(arguments)")`Hello`; // [Arguments] { '0': [ 'Hello' ] }
function recursive(strings, ...values) {
console.log(strings, values);
return recursive;
}
recursive`Hello``World`;
// [ 'Hello' ] []
// [ 'World' ] []
While technically permitted by the syntax, untagged template literals are strings and will throw a TypeError when chained.
console.log(`Hello``World`); // TypeError: "Hello" is not a function
The only exception is optional chaining, which will throw a syntax error.
console.log?.`Hello`; // SyntaxError: Invalid tagged template on optional chain
console?.log`Hello`; // SyntaxError: Invalid tagged template on optional chain
Note that these two expressions are still parsable.
This means they would not be subject to automatic semicolon insertion, which will only insert semicolons to fix code that's otherwise unparsable.
// Still a syntax error
const a = console?.log
`Hello`
Tag functions don't even need to return a string!
function template(strings, ...keys) {
return (...values) => {
const dict = values[values.length - 1] || {};
const result = [strings[0]];
keys.forEach((key, i) => {
const value = Number.isInteger(key) ? values[key] : dict[key];
result.push(value, strings[i + 1]);
});
return result.join("");
};
}
const t1Closure = template`${0}${1}${0}!`;
// const t1Closure = template(["","","","!"],0,1,0);
t1Closure("Y", "A"); // "YAY!"
const t2Closure = template`${0} ${"foo"}!`;
// const t2Closure = template([""," ","!"],0,"foo");
t2Closure("Hello", { foo: "World" }); // "Hello World!"
const t3Closure = template`I'm ${"name"}.
I'm almost ${"age"} years old.`;
// const t3Closure = template(["I'm ", ".
I'm almost ", " years old."], "name", "age");
t3Closure("foo", { name: "MDN", age: 30 }); // "I'm MDN.
I'm almost 30 years old."
t3Closure({ name: "MDN", age: 30 }); // "I'm MDN.
I'm almost 30 years old."
The first argument received by the tag function is an array of strings.
For any template literal, its length is equal to the number of substitutions (occurrences of ${…}) plus one, and is therefore always non-empty.
For any particular tagged template literal expression, the tag function will always be called with the exact same literal array, no matter how many times the literal is evaluated.
const callHistory = [];
function tag(strings, ...values) {
callHistory.push(strings);
// Return a freshly made object
return {};
}
function evaluateLiteral() {
return tag`Hello, ${"world"}!`;
}
console.log(evaluateLiteral() === evaluateLiteral()); // false; each time `tag` is called, it returns a new object
console.log(callHistory[0] === callHistory[1]); // true; all evaluations of the same tagged literal would pass in the same strings array
This allows the tag to cache the result based on the identity of its first argument.
To further ensure the array value's stability, the first argument and its raw property are both frozen, so you can't mutate them in any way.
Raw strings
The special raw property, available on the first argument to the tag function, allows you to access the raw strings as they were entered, without processing escape sequences.
function tag(strings) {
console.log(strings.raw[0]);
}
tag`string text line 1 \n string text line 2`;
// Logs "string text line 1 \n string text line 2" ,
// including the two characters '\' and 'n'
In addition, the String.raw() method exists to create raw strings just like the default template function and string concatenation would create.
const str = String.raw`Hi\n${2 + 3}!`;
// "Hi\\n5!"
str.length;
// 6
Array.from(str).join(",");
// "H,i,\\,n,5,!"
String.raw functions like an "identity" tag if the literal doesn't contain any escape sequences.
In case you want an actual identity tag that always works as if the literal is untagged, you can make a custom function that passes the "cooked" (i.e.
escape sequences are processed) literal array to String.raw, pretending they are raw strings.
const identity = (strings, ...values) =>
String.raw({ raw: strings }, ...values);
console.log(identity`Hi\n${2 + 3}!`);
// Hi
// 5!
This is useful for many tools which give special treatment to literals tagged by a particular name.
const html = (strings, ...values) => String.raw({ raw: strings }, ...values);
// Some formatters will format this literal's content as HTML
const doc = html`<!doctype html>
<html lang="en-US">
<head>
<title>Hello</title>
</head>
<body>
<h1>Hello world!</h1>
</body>
</html>`;
Tagged templates and escape sequences
In normal template literals, the escape sequences in string literals are all allowed.
Any other non-well-formed escape sequence is a syntax error.
This includes:
\ followed by any decimal digit other than 0, or \0 followed by a decimal digit; for example \9 and \07 (which is a deprecated syntax)
\x followed by fewer than two hex digits (including none); for example \xz
\u not followed by { and followed by fewer than four hex digits (including none); for example \uz
\u{} enclosing an invalid Unicode code point — it contains a non-hex digit, or its value is greater than 10FFFF; for example \u{110000} and \u{z}
Note: \ followed by other characters, while they may be useless since nothing is escaped, are not syntax errors.
However, this is problematic for tagged templates, which, in addition to the "cooked" literal, also have access to the raw literals (escape sequences are preserved as-is).
Tagged templates enable the embedding of arbitrary string content, where escape sequences may follow a different syntax.
Consider for a simple example where we embed LaTeX source text in JavaScript via String.raw.
We want to still be able to use LaTeX macros that start with u or x without following JavaScript syntax restrictions.
Therefore, the syntax restriction of well-formed escape sequences is removed from tagged templates.
The example below uses MathJax to render LaTeX in one element:
const node = document.getElementById("formula");
MathJax.typesetClear([node]);
// Throws in older ECMAScript versions (ES2016 and earlier)
// SyntaxError: malformed Unicode character escape sequence
node.textContent = String.raw`$\underline{u}$`;
MathJax.typesetPromise([node]);
However, illegal escape sequences must still be represented in the "cooked" representation.
They will show up as undefined element in the "cooked" array:
function log(str) {
console.log("Cooked:", str[0]);
console.log("Raw:", str.raw[0]);
}
log`\unicode`;
// Cooked: undefined
// Raw: \unicode
Note that the escape-sequence restriction is only dropped from tagged templates, but not from untagged template literals:
const bad = `bad escape sequence: \unicode`;
console.log variable using ES6 back tick
console.log("story " + name + " story");
When using ES6:
let name = prompt("what is your name?");
console.log(`story ${name} story`);
Template literals can be used to represent multi-line strings and may use "interpolation" to insert variables:
var a = 123, str = `---
a is: ${a}
---`;
console.log(str);
Output:
---
a is: 123
---
What is more important, they can contain not just a variable name, but any JavaScript expression:
var a = 3, b = 3.1415;
console.log(`PI is nearly ${Math.max(a, b)}`);
Use children() and each(), you can optionally pass a selector to children
children() is a loop in itself.
$('div').children('input').each(function() {
alert(this.value);
});
$(this) to loop
Examples of jQuery Selectors
$("*") Selects all elements
$(this) Selects the current HTML element
$("p.intro")
$("p:first")
$("ul li:first")
$("ul li:first-child")
$("[href]") Selects all elements with an href attribute
$("a[target='_blank']")equal to "_blank"
$("a[target!='_blank']") NOT equal to "_blank"
$(":button")
$("tr:even")
$("tr:odd")
$( "li.item-ii" ).find( "li" ).css( "background-color", "red" );
$( "p" ).find( "span" ).css( "color", "red" );
$('.pizza-maker').find('.cheese').find('a').addClass('cheese-style')
.children('.cheese') was called on and stopped there.
jquery $(this)id
jquery $(this).val()
jquery $(this).find
jquery $(this).next
jquery $(this).attr
jquery $(this).index
jquery $(this).text()
jquery $(this).children
jquery $(this).attr("id")
jquery $(this).css
jquery $(this).on()
jquery $(this).is()
jquery $(this).get()
jquery $(this).parents()
.children()
var kids = $( event.target ).children();
var len = kids.addClass( "hilite" ).length;
$( "#results span:first" ).text( len );
$( "#results span:last" ).text( event.target.
.not()
.index()
$( "div" ).click(function() {
var index = $( "div" ).index( this );
$( "span" ).text( "That was div index #" + index );
:first-child Selector
.filter()
$( "li" ) .filter(function( index ) {
return $( "strong", this ).length === 1;
}) .css( "background-color", "red" );
.siblings()
:visible Selector
.val()
"select#foo" ).val();
$( "input[type=checkbox][name=bar]:checked" ).val();
.one()
var index = $( "div" ).index( this );
$( this ).css({borderStyle: "inset",cursor: "auto"});
$( "p" ).text( "Div at index #" + index + " clicked." + " That's " + (++n) + " total ...
.prev()
$(this.htmltable + ' th[data-field]').each(function(i, col){
this.dbcolumns.push( $(col).attr('data-field') );
}.bind(this));
$(".myCheckboxes").change(function(){
if(this.checked){alert("checked");}
});
$(".class").each(function(){
var HTMLElement = this;
//the current HTML element is passed to the jQuery constructor
//the jQuery API is exposed here (such as .html() and .append())
var jQueryObject = $(this);
});
$('.somediv').click(function(){
$(this).addClass('newDiv');
});
$('.multiple-elements').each(
function(index, element) {
$(this).css('background-color', $(this).data('bgcol'));
}
);
<a href="#" onclick="$(this).css('display', 'none')">Hide me!
$(this) nested loop
$('li').each(function(){
var $this = $(this);
$this.children("li").each(function(){
$this; // parent li
this; // child li
});
});
$('li').children("li").each(function(){
var $this = $(this);
});
$('.pizza-maker').find('.cheese').find('a').addClass('cheese-style')
.children('.cheese') was called on and stopped there.
html { scroll-behavior: smooth;}
$(document).ready(function(){
$('body,html').animate({scrollTop: 156}, 800);
});
156 - position scroll to (px), from top of page.
800 - scroll duration (ms)
scroll to bottom
$(document).ready(function(){
$('body,html').animate({scrollTop:$(document).height()}, 800000);
});
scroll to a div
$(document).ready(function(){
$('body,html').animate({scrollTop: $('#toc').get(0).scrollHeight}, 630000);
});
$('html, body').animate({
scrollTop: $('idName').offset().top-100
}, timelength);
jQuery different scroll speeds
A higher order function is a function that takes a function as an argument, or returns a function.
Higher order function is in contrast to first order functions, which don’t take a function as an argument or return a function as output.
examples of .map() and .filter().
Both of them take a function as an argument.
They're both higher order functions.
Example 1#
Let’s say we have an array of numbers and we want to create a new array which contains double of each value of the first array.
Let’s see how we can solve the problem with and without Higher-Order Function.
Without Higher-order function
const arr1 = [1, 2, 3];
const arr2 = [];
for(let i = 0; i < arr1.length; i++) {
arr2.push(arr1[i] * 2);
}
// prints [ 2, 4, 6 ]
console.log(arr2);
With Higher-order function map
const arr1 = [1, 2, 3];
const arr2 = arr1.map(function(item) {
return item * 2;
});
console.log(arr2);
We can make this even shorter using the arrow function syntax:
const arr1 = [1, 2, 3];
const arr2 = arr1.map(item => item * 2);
console.log(arr2);
Example 2#
Let’s say we have an array containing the birth year of different persons and we want to create an array that contains their ages.
For example:
Without Higher-order function
const birthYear = [1975, 1997, 2002, 1995, 1985];
const ages = [];
for(let i = 0; i < birthYear.length; i++) {
let age = 2018 - birthYear[i];
ages.push(age);
}
// prints [ 43, 21, 16, 23, 33 ]
console.log(ages);
With Higher-order function map
const birthYear = [1975, 1997, 2002, 1995, 1985];
const ages = birthYear.map(year => 2018 - year);
// prints [ 43, 21, 16, 23, 33 ]
console.log(ages);
Example
var sum = function(n1, n2) {//This is just a function
return n1 + n2;
};
sum(1,2);//3
function makeSumN(n) {//This is a higher-order function
return function(p) {
sum(n, p)
}
}
var sum1 = makeSumN(1);
sum1(2); //3
function makeMoreThanSum(f) {//This is a higher-order function
return function(n1, n2) {
sum(f(n1), n2)
}
}
var sumSquareOfFirst = makeMoreThanSum(function(n){
return n*n;
});
sumSquareOfFirst(2,1);//5
Example
function createMultiplier(multiplier){return function(x){ return x * multiplier}
}
let doubleme = createMultiplier(2)
let tripleme = createMultiplier(3)
let quadrupleme = createMultiplier(4)
console.log(doubleme(5))
console.log(tripleme(3))
console.log(quadrupleme(7))
CMDTail='\");close();'
LAmtNotice="BigVol!" # popup message
LF = "\\n"
onecode = '0030'
codename = "abcde"
curPrice = "31.5"
AlertMsg=paste0(
'mshta javascript:alert(<meta http-equiv="x-ua-compatible" content="ie=edge" />\"',"Alarm!!",LF, '<br><br><br>',
onecode,LF ,codename, LF,"Price ",curPrice, LF,
format(Sys.time(), "%H:%M:%OS"),LF,
CMDTail)
system(AlertMsg, invisible=T, wait=F)
Usually, HTML5 doesn't work in HTA files because they are run by mshta.exe which acts like IE7 and HTML5 isn't supported in earlier versions of IE than IE9.
But if you add <meta http-equiv="x-ua-compatible" content="ie=edge" /> in the head of the HTA, the HTA will act like the version of IE installed on the computer, so if the computer has IE9 or later and you add that tag, it will work.
The problem with this is that if you upgrade the HTA, the <hta:application/> tag won't have any effect so you will lose all effects like icons, window properties, etc.
For this reason, I prefer to not upgrade the HTA and to use workarounds instead of HTML5.
In HTA, to get the code to properly work, you must include the tag
<meta http-equiv="x-ua-compatible" content="ie=edge" /> or
<meta http-equiv="x-ua-compatible" content="ie=9">to get the JavaScript and HTML 5 to work completely.
You may add
<HTA:APPLICATION
APPLICATIONNAME="HTA"
ID="HTA"
VERSION="1.0"
MAXIMIZEBUTTON="no"/>
Hacking around HTA filesHTML5 work in a .hta fileHTML Applications
In JS you can't.
To have multiple functions in the same program execute at the same time you need multi-threading and some deep timing and thread handling skills.
JavaScript is single threaded.
Can use html5 web worker or try using setTimeout recursively.
Create multiple functions following this example:
var interval = setTimeout(appendDateToBody, 5000);
function appendDateToBody() {
document.body.appendChild(
document.createTextNode(new Date() + " "));
interval = setTimeout(appendDateToBody, 5000);
}
add the crossorigin tag to a dynamically loaded script
link in alert boxes javascript
alert function can only display text
// use window.confirm instead of alert
if (window.confirm('click "ok" to redirect.
Cancel to stay '))
{ window.location.href='http://www.google.com'; };
if (window.confirm('Ok to Confirm, Cancel to Stay here'))
{ window.open('http://www.google.com', '_blank'); };
Formatting numbers with commas
var number = 12345.543;
number.toLocaleString();"12,345.543"
To create a global variable
To create a global variable, just omit 'var' from the statement.
When you omit 'var', you're actually creating the variable in the window namespace.
So, zz = 1 is actually window.zz = 1
A global variable has global scope which means it can be defined anywhere in your JavaScript code.
Variables declared within a JavaScript function, become LOCAL to the function.
A variable declared outside a function, becomes GLOBAL.
jQuery $.ajax()
Some of jQuery's most used Ajax shorthand methods: $.get(), $.post(), and $.load().
They are convenient methods for making Ajax requests in a few lines of code.
Sometimes, we need more control over the Ajax calls we want to make.
For example, we want to specify what should happen in case an Ajax call fails or we need to perform an Ajax request but its result is only needed if retrieved within a certain amount of time.
In such situations, we can rely on another function provided by jQuery, called $.ajax(), that is the topic of this tutorial.
The $.ajax() Function
The jQuery function is used to perform an asynchronous HTTP request.
It was added to the library a long time ago, existing since version 1.0.
The $.ajax() function is what every function discussed in the previously mentioned article calls behind the scene using a preset configuration.
The signatures of this function are shown below: $.ajax(url[, options])
$.ajax([options])
The url parameter is a string containing the URL you want to reach with the Ajax call, while options is an object literal containing the configuration for the Ajax request.
In its first form, this function performs an Ajax request using the url parameter and the options specified in options.
In the second form, the URL is specified in the options parameter, or can be omitted in which case the request is made to the current page.
The list of the options accepted by this function, described in the next section, is very long.
So, I'll keep their description short.
In case you want to study in-depth their meaning, you can refer to .
The option Parameter
There are a lot of different options you can specify to bend $.ajax() to your need.
In the list below you can find their names and their description sorted in alphabetic order: accepts: The content type sent in the request header that tells the server what kind of response it will accept in return async: Set this options to false to perform a synchronous request beforeSend: A pre-request callback function that can be used to modify the jqXHR object before it is sent cache: Set this options to false to force requested pages not to be cached by the browser complete: A function to be called when the request finishes (after success and error callbacks are executed) contents: An object that determines how the library will parse the response contentType: The content type of the data sent to the server context: An object to use as the context (this) of all Ajax-related callbacks converters: An object containing dataType-to-dataType converters crossDomain: Set this property to true to force a cross-domain request (such as JSONP) on the same domain data: The data to send to the server when performing the Ajax request dataFilter: A function to be used to handle the raw response data of XMLHttpRequest dataType: The type of data expected back from the server error: A function to be called if the request fails global: Whether to trigger global Ajax event handlers for this request headers: An object of additional headers to send to the server ifModified: Set this option to true if you want to force the request to be successful only if the response has changed since the last request isLocal: Set this option to true if you want to force jQuery to recognize the current environment as "local" jsonp: A string to override the callback function name in a JSONP request jsonpCallback: Specifies the callback function name for a JSONP request mimeType: A string that specifies the mime type to override the XHR mime type password: A password to be used with XMLHttpRequest in response to an HTTP access authentication request processData : Set this option to false if you don't want that the data passed in to the data option (if not a string already) will be processed and transformed into a query string scriptCharset: Sets the charset attribute on the script tag used in the request but only applies when the "script" transport is used statusCode: An object of numeric HTTP codes and functions to be called when the response has the corresponding code success: A function to be called if the request succeeds timeout: A number that specifies a timeout (in milliseconds) for the request traditional: Set this to true if you wish to use the traditional style of param serialization type: The type of request to make, which can be either "POST" or "GET" url: A string containing the URL to which the request is sent username: A username to be used with XMLHttpRequest in response to an HTTP access authentication request xhr: A callback for creating the XMLHttpRequest object xhrFields: An object to set on the native XHR object
That was pretty long, isn't it? Well, as developers you probably have stopped reading this list at the fifth or sixth element I guess, but that's fine.
The next section will be more exciting because we'll put the $.ajax() function and some of these options into action.
$.ajax
No 'Access-Control-Allow-Origin' header is present on the requested resource.
make a http request using CORS with jquery:
============
$.ajax({
url: theurl,
// This is the important part
xhrFields: {withCredentials: true},
// This is the important part
data: data,
success: function(response) {
// handle the response
},
error: function(xhr, status) {
// handle errors
}
});
============
$.ajax({
url: "http://localhost:8079/students/add/",
type: "POST",
crossDomain: true,
data: JSON.stringify(somejson),
dataType: "json",
success: function(response) {
var resp = JSON.parse(response)
alert(resp.status);
},
error: function(xhr, status) {
alert("error");
}
});
============
var settings = {
'cache': false,
// 'dataType': "jsonp",
"async": true,
"crossDomain": true,
"url": theurl,
"method": "GET",
"headers": {
"accept": "application/json",
"Access-Control-Allow-Origin":"*"
}
}
$.ajax(settings).done(function(response) {console.log(response);});
$.ajax(theurl,
{success: function(data) {$('body').append(data);}
});
============
var bodycontent = $('body');
$.ajax({
url: theurl,
xhrFields: {withCredentials: true},
crossDomain: true,
success: function(rawData){
body.append(rawData);;
}});
============
使用 JSONP 跨站請求 Creating a Dynamic Script Tag and Request With a Callback Function
<script>
function clickButton() {
var s = document.createElement("script");
s.src = "demo_jsonp.php";
document.body.appendChild(s);
}
function clickButton() {
var s = document.createElement("script");
s.src = "jsonp_demo_db.php?callback=myDisplayFunction";
document.body.appendChild(s);
}
透過 jsonp 的方法所傳送的 URL 當中,結尾都會帶一個問號 (?),
這個問號會在取得 server 回傳值的時候,自動轉換成 call function 的 function name,而如果是一個匿名函式,則會轉換成一個帶有 time stamp 的函式名稱。
當傳輸完成後,client 會自動執行 Server 回傳的 callback function,取得結果。
function foo(data)
{
// do stuff with JSON
}
var script = document.createElement('script');
script.src = '//example.com/path/to/jsonp?callback=foo'
document.getElementsByTagName('head')[0].appendChild(script);
// or document.head.appendChild(script) in modern browsers
function myFunction() {
var x = document.createElement("INPUT");
x.setAttribute("type", "radio");
document.body.appendChild(x);
}
conditional operator ? :
conditional operator
https://stackoverflow.com/questions/6259982/how-do-you-use-the-conditional-operator-in-javascript
? : (conditional) operator in JavaScript
The conditional operator is the only JavaScript operator that takes three operands.
This operator is frequently used as a shortcut for the if statement.
JavaScript Demo:
Expressions - Conditional operator
function getFee(isMember) {
return (isMember ? "$2.00" : "$10.00");
}
function zeroFill(num) {
return num < 10 ? '0' + num : num;
}
jQuery on() Method
$(selector).on(event,childSelector,data,function,map)
Example
Attach a click event to the p element:
$("p").on("click", function(){
alert("The paragraph was clicked.");
});
$( "#dataTable tbody tr" ).on( "click", function() {
console.log( $( this ).text() );
});
event Required.
Specifies one or more event(s) or namespaces to attach to the selected elements.
Multiple event values are separated by space.
Must be a valid event
childSelector Optional.
Specifies that the event handler should only be attached to the specified child elements (and not the selector itself, like the deprecated delegate() method).
data Optional.
Specifies additional data to pass along to the function
function Required.
Specifies the function to run when the event occurs
map Specifies an event map ({event:function, event:function, ...}) containing one or more event to attach to the selected elements, and functions to run when the events occur
===========================
Looping through objects in JavaScript
Once in a while, you may need to loop through Objects in JavaScript.
The only way to do so before ES6 is with a for...in loop.
The problem with a for...in loop is that it iterates through properties in the Prototype chain.
When you loop through an object with the for...in loop, you need to check if the property belongs to the object.
You can do this with hasOwnProperty.
for (var property in object) {
if (object.hasOwnProperty(property)) {
// Do things here
}
}
We no longer have to rely on for...in and hasOwnProperty now.
There’s a better way.
A better way to loop through objects
The better way to loop through objects is first to convert the object into an array.
Then, you loop through the array.
You can convert an object into an array with three methods:
Object.keys
Object.values
Object.entries
Object.keys
Object.keys creates an array that contains the properties of an object.
const fruits = {
apple: 28,
orange: 17,
pear: 54,
}
console.log(Object.keys(fruits)) // [apple, orange, pear]
Object.values
Object.values creates an array that contains the values of every property in an object.
Here’s an example:
const fruits = {
apple: 28,
orange: 17,
pear: 54,
}
const values = Object.values(fruits)
console.log(values) // [28, 17, 54]
Object.entries
Object.entries creates an array of arrays.
Each inner array has two item.
The first item is the property; the second item is the value.
Here’s an example:
const fruits = {
apple: 28,
orange: 17,
pear: 54,
}
const entries = Object.entries(fruits)
console.log(entries)
// [
// [apple, 28],
// [orange, 17],
// [pear, 54]
// ]
My favorite of the three is Object.entries because you get both the key and property values.
Looping through the array
Once you’ve converted the object into an array with Object.keys, Object.values, or Object.entries, you can loop through it as if it was a normal array.
// Looping through arrays created from Object.keys
const keys = Object.keys(fruits)
for (const key of keys) {
console.log(key)
}
// Results:
// apple
// orange
// pear
If you use Object.entries you might want to destructure the array into its key and property.
for (const [fruit, count] of entries) {
console.log(`There are ${count} ${fruit}s`)
}
// Result
// There are 28 apples
// There are 17 oranges
// There are 54 pears
from to access status
local js local file error, CORS server file OK
server js local file error, CORS server file error in some server
local server js local file ? server file ?
use file api:
Reading CSV File With HTML5 File API
copying strings to the clipboard
function copyStringToClipboard (str) {
// Create new element
var el = document.createElement('textarea');
// Set value (string to be copied)
el.value = str;
// Set non-editable to avoid focus and move outside of view
el.setAttribute('readonly', '');
el.style = {position: 'absolute', left: '-9999px'};
document.body.appendChild(el);
// Select text inside element
el.select();
// Copy text to clipboard
document.execCommand('copy');
// Remove temporary element
document.body.removeChild(el);
}
Note: If the user selected anything when you ran the function, this selection will be cleared.
If you need to preserve the selection, see this Hackernoon article for a more elaborate solution..
You can use it like this:
// Usage example:
copyStringToClipboard("abc123");
It works by adding a temporary textarea element onto the DOM which is moved outside (credits to Angelos Charalis on Hackernoon for the original idea) the viewport in order to avoid wreaking havoc on screenreaders etc.
JavaScript is a prototype-based language, therefore understanding the prototype object is one of the most important concepts which JavaScript practitioners need to know.
Before reading this article, you will need to have a basic understanding of the this reference in JavaScript.
Prototype object
For the sake of clarity, let’s examine the following example:
function Point2D(x, y) {
this.x = x;
this.y = y;}
As Point2D function is declared, a default property named prototype will be created for it (note that, in JavaScript, a function is also an object).
The prototype property is an object which contains a constructor property and its value is Point2D function: Point2D.prototype.constructor = Point2D.
And when you call Point2D with new keyword, newly created objects will inherit all properties fromPoint2D.prototype.
To check that, you can add a method named move into Point2D.prototype as follows:
Point2D.prototype.move = function(dx, dy) {
this.x += dx;
this.y += dy;}
var p1 = new Point2D(1, 2);
p1.move(3, 4);
console.log(p1.x); // 4
console.log(p1.y); // 6
The Point2D.prototype is called prototype object or prototype of p1 object and for any other object created with new Point2D(...) syntax.
You can add more properties to Point2D.prototype object as you like.
The common pattern is declare methods to Point2D.prototype and other properties will be declared in constructor function.
Built-in objects in JavaScript are constructed in a similar manner.
For example:
Prototype of objects created with new Object() or {} syntax is Object.prototype.
Prototype of arrays created with new Array() or [] syntax is Array.prototype.
And so on with other built-in objects such as Date and RegExp.
Object.prototype is inherited by all objects and it has no prototype (its prototype is null).
Prototype chain
The prototype chain mechanism is simple: When you access a property p on object obj, the JavaScript engine will search this property inside obj object.
If the engine fails to search, it continues searching in the prototype of obj object and so on until reaching Object.prototype.
If after the search has finished, and nothing has been found the result will be undefined.
For example:
var obj1 = {
a: 1,
b: 2};
var obj2 = Object.create(obj1);
obj2.a = 2;
console.log(obj2.a); // 2
console.log(obj2.b); // 2
console.log(obj2.c); // undefined
In above snippet, the statement var obj2 = Object.create(obj1) will create obj2 object with prototype obj1 object.
In other words, obj1 becomes the prototype of obj2 instead of Object.prototype by default.
As you can see, b is not a property of obj2, you can still access it via the prototype chain.
For c property, however, you get undefined value because it can’t be found in obj1 and Object.prototype.
Classes
In ES2016, we now get to use the Class keyword as well as the methods mentioned above to manipulate prototype.
The JavaScript Class appeals to developers from OOP backgrounds, but it’s essentially doing the same thing as above.
class Rectangle {
constructor(height, width) { this.height = height this.width = width
}
get area() { return this.calcArea()
}
calcArea() { return this.height * this.width
}}
const square = new Rectangle(10, 10)
console.log(square.area) // 100
This is basically the same as:
function Rectangle(height, width) {
this.height = height
this.width = width}
Rectangle.prototype.calcArea = function calcArea() {
return this.height * this.width}
The getter and setter methods in classes bind an Object property to a function that will be called when that property is looked up.
It’s just syntactic sugar to help make it easier to look up or set properties.
Multiple Onload Functions
https://www.htmlgoodies.com/beyond/javascript/article.php/3724571/Using-Multiple-JavaScript-Onload-Functions.htm
Using Multiple JavaScript Onload Functions
window.onload = func1; execute the script when page is loaded
<body onload="func1(); func2();"> linking of multiple events onloaded
<body onload="func1(); onkeypress="chkKey()"> on multiple events
window.onload = start;
function start() {
func1(); func2();} linking of multiple events by function onloaded
window.addEventListener("load", myInit, true);
function myInit(){
// call your functions here....
}; create an init function manually this can call that set of functions anytime
Request
For example, if you want to pull down the contents of a page :
const request = require('request');
request('http://stackabuse.com', function(err, res, body) {
console.log(body);
});
Quick start Guide with request
require() is not part of the standard JavaScript API.
But in Node.js, it's a built-in function with a special purpose: to load modules.
Modules are a way to split an application into separate files instead of having all of your application in one file.
This concept is also present in other languages with minor differences in syntax and behavior, like C's include, PHP's use, Python's import, and so on.
One big difference between Node.js modules and browser JavaScript is how one script's code is accessed from another script's code.
In browser JavaScript, scripts are added via the <script> element.
When they execute, they all have direct access to the global scope, a "shared space" among all scripts.
Any script can freely define/modify/remove/call anything on the global scope.
In Node.js, each module has its own scope.
A module cannot directly access things defined in another module unless it chooses to expose them.
To expose things from a module, they must be assigned to exports or module.exports.
For a module to access another module's exports or module.exports, it must use require().
In your code, var pg = require('pg'); loads the pg module, a PostgreSQL client for Node.js.
This allows your code to access functionality of the PostgreSQL client's APIs via the pg variable.
Why does it work in node but not in a webpage?
require(), module.exports and exports are APIs of a module system that is specific to Node.js.
Browsers do not implement this module system.
Also, before I got it to work in node, I had to do npm install pg.
What's that about?
NPM is a package repository service that hosts published JavaScript modules.
npm install is a command that lets you download packages from their repository.
Where did it put it, and how does Javascript find it?
Node.js has very detailed documentation on how modules find other modules.
But in a gist, it puts all the downloaded modules in node_modules in the directory where you ran npm install.
the request module to webscrap
const request = require('request');
request('http://stackabuse.com', function(err, res, body) {
console.log(body);
});
create a table
var table = document.getElementById("myTable");
var row = table.insertRow(0);
var cell1 = row.insertCell(0);
var cell2 = row.insertCell(1);
cell1.innerHTML = "NEW CELL1";
cell2.innerHTML = "NEW CELL2";
create a table using a loop
var table = document.createElement('table'), tr, td, row, cell;
for (row = 0; row < 10; row++) {
tr = document.createElement('tr');
for (cell = 0; cell < 22; cell++) {
td = document.createElement('td');
tr.appendChild(td);
td.innerHTML = row * 22 + cell + 1;
}
table.appendChild(tr);
}
document.getElementById('container').appendChild(table);
create an empty row of 22 cells, clone it 10 times, and then add the numbers to the cells.
var table = document.createElement('table'),
tr = document.createElement('tr'),
cells, i;
for (i = 0; i < 22; i++) { // Create an empty row
tr.appendChild(document.createElement('td'));
}
for (i = 0; i < 10; i++) { // Add 10 copies of it to the table
table.appendChild(tr.cloneNode(true));
}
cells = table.getElementsByTagName('td'); // get all of the cells
for (i = 0; i < 220; i++) { // number them
cells[i].innerHTML = i + 1;
}
document.getElementById('container').appendChild(table);
And a third option: add the cells in a single loop, making a new row every 22 cells.
var table = document.createElement('table'), tr, td, i;
for (i = 0; i < 220; i++) {
if (i % 22 == 0) { // every 22nd cell (including the first)
tr = table.appendChild(document.createElement('tr')); // add a new row
}
td = tr.appendChild(document.createElement('td'));
td.innerHTML = i + 1;
}
document.getElementById('container').appendChild(table);
HTML DOM createDocumentFragment() Method
HTML DOM createDocumentFragment() Method
Example
Create a documentFragment node and append a child to it (a list item).
Then, change the list item's node value and insert it as the last child of the list:
var d = document.createDocumentFragment();
d.appendChild(document.getElementsByTagName("LI")[0]);
d.childNodes[0].childNodes[0].nodeValue = "Milk";
document.getElementsByTagName("UL")[0].appendChild(d);
Table rows Collection
check keyboard arrow key
document.onkeydown = checkKey;
function checkKey(e) {
e = e || window.event;
if (e.keyCode == '38') { // up arrow }
else if (e.keyCode == '40') { // down arrow }
else if (e.keyCode == '37') { // left arrow }
else if (e.keyCode == '39') { // right arrow }
}
function getChar(event) {
if (event.which!=0 && event.charCode!=0) {
return String.fromCharCode(event.which) // the rest
} else {
return event.keyCode // special key
}
}
1 $(document).ready(..) 2) $(…).HTML() 3) $(…).Append 4) $(…).prepend() 5) $(…).empty() 6) $(…).Attr(name) 7) $(…).val() 8, 9) $(…).on() | $(…).off() 10) $(…).toggle() Conclusion
These are my top most commonly use jQuery functions converted to Plain Old JavaScript.
Sometimes I need to create a simple static HTML or landing page, and I don’t feel like bringing in any libraries or bloatware.
For those cases I just use plain old JavaScript to get the job done, and honestly it feels good to know how things work.
So here is my top 10 list, I also use this as reference and now sharing with you.
If you like to follow along go to the GitHub page here, and feel free to contribute: https://github.com/omarld/jqueryToPlainJS
Before starting, the titles are the jQuery functions to be converted to plain old JavaScript.
That will follow with a brief description of what it is supposed to do, followed by the converted JavaScript code with some additional notes.
1 $(document).ready(..)
Check that document has loaded and ready to execute your scripts.
let isLoaded = false;
let myOnLoadCallBack = function(){
isLoaded = true;
//my stuff here
}
document.addEventListener("DOMContentLoaded", myOnLoadCallBack());
document.addEventListener('readystatechange', (event) => {
if (document.readyState === 'complete' && !isLoaded) {
myOnLoadCallBack();
}
);
Using DOMContentLoaded event listener, this is triggered when the DOM tree has been built but none of other resources have been loaded yet (ie styles, images).
DOMContentLoaded also waits for any scripts to be loaded, if there are any script tags found in the HTML document.
There is catch when loading styles if there is a script tag after your styles.
In this case it’s for styles to be loaded before the script, in case the script modifies any styles.
DOMContentLoaded is not supported by IE 8 or less.
In case you have the bad luck of having to support IE 8, you should use document.readyState.
The different ready states are:
loading : document is loading
interactive : document was fully read
complete : document was fully read and all resources (styles, images) are loaded too
2) $(…).HTML()
Find the value of an existing DOM element, or insert some content.
To find existing value, just reference the innerHTML property.
var content = document.querySelector("section#html div.content p.retrieve").innerHTML;
To insert some content, assign innerHTML to the new content which can contain HTML tags.
Note, this will replace any existing content.
document.querySelector("section#html div.results p.sample").innerHTML = “<p>Starting a new paragraph</p>”;
3) $(…).Append
Insert some HTML at the end of an existing element.
First we need to find/get the element where we want to insert our new content.
var appendEl = document.querySelector("section#append div.content div.results");
Next create the element we want to insert.
var childEl = document.createElement("div");
childEl.innerHTML = "<p>New <strong>child</strong> Content!</p>"
Lastly, insert the element.
//appending
appendEl.appendChild(childEl);
Sure this took three steps to get this done, but we can simplify a bit.
First lets create the new element.
var childEl = document.createElement("div");
childEl.innerHTML = "<p>New <strong>child</strong> Content!</p>"
Next let’s find and insert new element in one line.
document.querySelector("section#append div.content div.results").appendChild(childEl);
If you want to simplify this further or if you find yourself doing this a lot, you can create a wrapper function to do this.
4) $(…).prepend()
Very similar to append above, the only difference is that this inserts at the beginning of the element.
For this we will jump into the simplified solution.
Create new element to insert.
var newDiv = document.createElement("div");
var textNode = document.createTextNode("new content to inserted!");
newDiv.appendChild(textNode);
Find existing element and insert new element.
document.querySelector("section#prepend div.content p#existing").insertBefore(newDiv, prependEl.firstChild);
5) $(…).empty()
Empty or clear out a DOM element.
Initially you might think, lets just assign innerHTML property to an empty string.
This would be half right, but then what happens if the target element has child DOM elements? We’ll get to that, it is also simple.
First let’s start by clearing out content of an existing element.
document.getElementById("empty-content").innerHtml = “”;
Okay, so now how do we do all inner DOM elements? For that, let’s clear existing content and then lets remove any child DOM elements in a loop.
var content = document.getElementById("empty-content");
content.innerHtml = "";
while(content.firstChild){
content.removeChild(content.firstChild);
}
The while loop iterates until there are no more children to remove.
6) $(…).Attr(name)
Get the attribute value of an existing DOM element, or set attribute.
The important point to remember about this, is that not all DOM elements have the same attributes.
For example a check box vs a button (a button would not have the checked attribute).
Let’s start by getting the checked attribute of a check box.
let isChecked = document.querySelector("div#attributes input#my-check-box").getAttribute("checked");
Now let’s see how we can set that same attribute.
var el = document.querySelector("div#attributes input#my-check-box");
We can access the JavaScript property to change its state.
el.checked = true;
You might have noticed that I referred to the checked key as a JavaScript property.
What is the difference between element attribute and JavaScript property? In simple terms, properties are JavaScript inherited keys from element attributes.
This means you can access the DOM elements attributes as JavaScript object properties.
Here are a few important points to know about properties vs attributes.
Properties are JavaScript inherited values from attributes (ie.
class vs className)
Element properties are created from attributes only if they are standard.
So if you introduced a custom attribute, it won’t be part of the object properties.
Depending on the element the attributes available would be different (ie checked box vs button)
7) $(…).val()
Get the value of the matched DOM element.
This is also a simple one, let’s start with getting the value of existing element.
To make these command clear, I have split them out.
Although this can be done in one line.
var content = document.querySelector("#input");
var lnameValue = content.querySelector("input[name='lname']").value;
Setting value is just as simple, and can also be done in one line.
content.querySelector("input[name='fname']").value = "Some random value"
;
Similar to using innerHTML to set content, this also overrides any values the element currently has.
8, 9) $(…).on() | $(…).off()
To add or remove events from an element use either on() or off() accordingly.
Adding event handler.
document.getElementById("my-button").addEventListener("click", function(evt){
//my custom code here
});
Removing event handler, here we need to do extra checks for browser supported properties.
var toggleFunction = function(){...}
if (toggleBtn.removeEventListener) { // For all major browsers, except IE 8 and earlier
toggleBtn.removeEventListener("click", toggleFunction);
} else if (toggleBtn.detachEvent) { // For IE 8 and earlier versions
toggleBtn.detachEvent("click", toggleFunction)
}
Here are a few things to note when adding or removing events handlers.
Element must exist by the time code is instantiated or event won’t be attached.
When removing event listener, the function reference has to be the same.
Inline anonymous function will not work, since reference is different.
Unlike jQuery, when removing event handlers you have to specify which event you want to remove.
In jQuery no arguments would remove all, this case has to be handled manually.
One way to remove all event handlers without being explicit, is to clone the element and replace it.
This will also get rid of any attached events to child elements.
Removing all elements.
var currEl = document.getElementById("button");
var cloneEl= currEl.cloneNode(true);
currEl.parentNode.replaceChild(cloneEl, currEl);
10) $(…).toggle()
Toggle display on an element, this can be done a couple of ways.
Each approach has has different results.
You need to decide which behavior you want.
First way is to change the elements display attribute to none to remove element from the DOM, and set it to initial to set it back.
Important point here is that this will impact your layout, and shift elements if you are toggling display.
Here we are toggling display on an image element by directly accessing the elements style property.
if(imgEl.style.display && imgEl.style.display === "none"){
imgEl.style.display = "initial";
} else {
imgEl.style.display = "none";
}
Second approach is to change the elements visibility, which will hide the element and retain layout.
if(imgEl.style.visibility && imgEl.style.visibility === "hidden"){
imgEl.style.visibility = "initial";
} else {
imgEl.style.visibility = "hidden";
};
Conclusion
If you have been using libraries and JavaScript frameworks, it is easy to lose sight on how simple some of implementations are.
But most of all, you also lose sight into some core basic understanding of how the DOM works.
Having a good understanding the DOM can serve you well not just on design but also on debugging issues.
Those were just some of my most often used functions when I am trying to keep things simple.
Now I am sharing it with you if ever feel like just writing your own rather than adding bloat-ware to your application.
All modern browsers have a built-in XMLHttpRequest object to
request data from a server.
All major browsers have a built-in XML parser to access and manipulate XML.
The XMLHttpRequest Object
The XMLHttpRequest object can be used to request data from a web server.
The XMLHttpRequest object is a developer's dream, because you can:
Update a web page without reloading the page
Request data from a server - after the page has loaded
Receive data from a server - after the page has loaded
Send data to a server - in the background
XMLHttpRequest Example
When you type a character in the input field below, an XMLHttpRequest is sent to the server,
and some name suggestions are returned (from the server):
Example
Start typing a name in the input field below:
<form action="">
Name: <input type="text" id="txt1" onkeyup="showHint(this.value)" size="20">
</form>
Suggestions: <span id="txtHint"></span>
Sending an XMLHttpRequest
All modern browsers have a built-in XMLHttpRequest object.
A common JavaScript syntax for using it looks much like this:
Example
var xhttp = new XMLHttpRequest(); xhttp.onreadystatechange = function() {
if (this.readyState == 4 && this.status == 200) {
// Action to be performed when the
document is read;
} };
xhttp.open("GET", "filename", true);
xhttp.send(); Try it Yourself »
Creating an XMLHttpRequest Object
The first line in the example above creates an XMLHttpRequest object:
var xhttp = new XMLHttpRequest();
XMLHttpRequest Properties and Methods
Method
Description
new XMLHttpRequest()
Creates a new XMLHttpRequest object
open(method, url, async)
Specifies the type of request method: the type of request: GET or POST url: the file location async: true (asynchronous) or false (synchronous)
send()
Sends a request to the server (used for GET)
send(string)
Sends a request string to the server (used for POST)
onreadystatechange
A function to be called when the readyState property changes
readyState
The status of the XMLHttpRequest
0: request not initialized
1: server connection established
2: request received
3: processing request
4: request finished and response is ready
status
200: OK
404: Page not found
responseText
The response data as a string
responseXML
The response data as XML data
Access Across Domains
For security reasons, modern browsers do not allow access across domains.
This means that both the web page and the XML file it tries to load, must be located on the same server.
The examples on W3Schools all open XML files located on the W3Schools domain.
If you want to use the example above on one of your own web pages,
the XML files you load must be located on your own server.
The responseText Property
The responseText property returns the response as a string.
If you want to use the response as a text string, use the responseText
property:
Example
document.getElementById("demo").innerHTML = xmlhttp.responseText; Try it Yourself »
The responseXML Property
The responseXML property returns the response as an XML DOM object.
If you want to use the response as an XML DOM object, use the responseXML property:
Example
Request the file cd_catalog.xml and
use the response as an XML DOM object:
xmlDoc = xmlhttp.responseXML;
txt = ";
x = xmlDoc.getElementsByTagName("ARTIST");
for (i = 0; i < x.length; i++) {
txt += x[i].childNodes[0].nodeValue + "<br>";
}
document.getElementById("demo").innerHTML = txt;Try it Yourself »
GET or POST?
GET is simpler and faster than POST, and can be used in most cases.
However, always use POST requests when:
A cached file is not an option (update a file or database on the server)
Sending a large amount of data to the server (POST has no size limitations)
Sending user input (which can contain unknown characters), POST is more robust and secure than GET
The url - A File On a Server
The url parameter of the open() method, is an address to a file on a server:
xmlhttp.open("GET", "xmlhttp_info.txt", true);
The file can be any kind of file, like .txt and
.xml, or server scripting files like .asp and .php (which can perform
actions on the server before sending the response back).
XML Parser
All modern browsers have a built-in XML parser.
The XML Document Object Model (the XML DOM) contains a lot of methods to access
and edit XML.
However, before an XML document can be accessed, it must be
loaded into an XML DOM object.
An XML parser can read plain text and convert it into an XML DOM object.
XML DOM Remove Nodes
XML DOM Remove Nodes
The removeChild() method removes a specified node.
The removeAttribute() method removes a specified attribute.
Parsing a Text String
This example parses a text string into an XML DOM object, and
extracts the info from it with JavaScript:
Example
<html> <body>
<p id="demo"></p>
<script> var text, parser,
xmlDoc;
text = "<bookstore><book>" + "<title>Everyday
Italian</title>" + "<author>Giada De Laurentiis</author>" +
"<year>2005</year>" + "</book></bookstore>";
parser = new DOMParser();
xmlDoc = parser.parseFromString(text,"text/xml");
Old versions of Internet Explorer (IE5 and IE6) do not support the
XMLHttpRequest object.
To handle IE5 and IE6,
check if the browser supports the XMLHttpRequest object, or else create an ActiveXObject:
Example
if (window.XMLHttpRequest) { // code for modern browsers
xmlhttp = new XMLHttpRequest();
}
else { // code for old IE browsers
xmlhttp = new ActiveXObject("Microsoft.XMLHTTP");
} Try it Yourself »
Old versions of Internet Explorer (IE5 and IE6) do not support the DOMParser object.
To handle IE5 and IE6,
check if the browser supports the DOMParser object, or else create an ActiveXObject:
Example
if (window.DOMParser) { // code for modern browsers
parser = new DOMParser();
xmlDoc = parser.parseFromString(text,"text/xml");
}
else {
// code for old IE browsers xmlDoc = new ActiveXObject("Microsoft.XMLDOM");
xmlDoc.async = false;
xmlDoc.loadXML(text);
}
Try it Yourself »
ActiveXObject is non-standard and only supported by Internet Explorer on Windows.
MySQL Database
To be able to experiment with the code examples, you should have MySQL installed
on your computer.
You can download a free MySQL database at https://www.mysql.com/downloads/.
Install MySQL Driver
Once you have MySQL up and running on your computer, you can access it by
using Node.js.
To access a MySQL database with Node.js, you need a MySQL driver.
This
tutorial will use the "mysql" module, downloaded from NPM.
To download and install the "mysql" module, open the Command Terminal and execute the following:
C:\Users\Your Name>npm install mysql
Now you have downloaded and installed a mysql database driver.
Node.js can use this module to manipulate the MySQL database:
var mysql = require('mysql');
Create Connection
Start by creating a connection to the database.
Use the username and password from your MySQL database.
demo_db_connection.js
var mysql = require('mysql');
var con = mysql.createConnection({
host: "localhost", user: "yourusername", password: "yourpassword"
});
con.connect(function(err) { if (err) throw err; console.log("Connected!"); }); Run example »
Save the code above in a file called "demo_db_connection.js" and run the file:
Run "demo_db_connection.js"
C:\Users\Your Name>node demo_db_connection.js
Which will give you this result:
Connected!
Now you can start querying the database using SQL statements.
Query a Database
Use SQL statements to read from (or write to) a MySQL database.
This
is also called "to query" the database.
The connection object created in the example above, has a method for querying the database:
con.connect(function(err) { if (err) throw err; console.log("Connected!"); con.query(sql, function(err, result) { if (err) throw err; console.log("Result:
" + result); }); });
The query method takes an sql statements as a parameter and returns the
result.
Learn how to read, write, delete, and update a database in the next chapters.
Read more about SQL statements in our SQL Tutorial.
AJAX Database Example
AJAX can be used for interactive communication with a database.
The following example will demonstrate how a web page can fetch
information from a database with AJAX:
Example
<form action="">
<select name="customers" onchange="showCustomer(this.value)">
<option value="">Select a customer:</option>
<option value="ALFKI">Alfreds Futterkiste</option>
<option value="NORTS ">North/South</option>
<option value="WOLZA">Wolski Zajazd</option>
</select>
</form>
Customer info will be listed here...
Try it Yourself »
Example Explained - The showCustomer() Function
When a user selects a customer in the dropdown list above, a function called showCustomer() is executed.
The
function is triggered by the onchange event:
showCustomer
function showCustomer(str) { var xhttp; if (str == ") {
document.getElementById("txtHint").innerHTML = ";
return; } xhttp = new XMLHttpRequest();
xhttp.onreadystatechange = function() { if (this.readyState
== 4 && this.status == 200) { document.getElementById("txtHint").innerHTML
= this.responseText; } }; xhttp.open("GET",
"getcustomer.php?q="+str, true); xhttp.send(); }
The showCustomer() function does the following:
Check if a customer is selected
Create an XMLHttpRequest object
Create the function to be executed when the server response is ready
Send the request off to a file on the server
Notice that a parameter (q) is added to the URL (with the content of the dropdown list)
The AJAX Server Page
The page on the server called by the JavaScript above is a PHP file called "getcustomer.php".
The source code in "getcustomer.php" runs a query against a database, and returns the result in an HTML
table:
<?php $mysqli = new mysqli("servername", "username",
"password", "dbname"); if($mysqli->connect_error) {
exit('Could not connect'); }
$sql = "SELECT customerid, companyname,
contactname, address, city, postalcode, country FROM customers WHERE
customerid = ?";
The ninth edition of the ECMAScript standard, officially known as ECMAScript 2018 (or ES2018 for short), was released in June 2018.
Starting with ES2016, new versions of ECMAScript specifications are released yearly rather than every several years and add fewer features than major editions used to.
The newest edition of the standard continues the yearly release cycle by adding four new RegExp features, rest/spread properties, asynchronous iteration, and Promise.prototype.finally.
Additionally, ES2018 drops the syntax restriction of escape sequences from tagged templates.
These new changes are explained in the subsections that follow.
The Rest/Spread Properties
One of the most interesting features added to ES2015 was the spread operator.
This operator makes copying and merging arrays a lot simpler.
Rather than calling the concat() or slice() method, you could use the ... operator:
const arr1 = [10, 20, 30];
// make a copy of arr1
const copy = [...arr1];
console.log(copy); // → [10, 20, 30]
const arr2 = [40, 50];
// merge arr2 with arr1
const merge = [...arr1, ...arr2];
console.log(merge); // → [10, 20, 30, 40, 50]
The spread operator also comes in handy in situations where an array must be passed in as separate arguments to a function.
For example:
const arr = [10, 20, 30]
// equivalent to
// console.log(Math.max(10, 20, 30));
console.log(Math.max(...arr)); // → 30
ES2018 further expands this syntax by adding spread properties to object literals.
With the spread properties you can copy own enumerable properties of an object onto a new object.
Consider the following example:
const obj1 = {
a: 10,
b: 20
};
const obj2 = {
...obj1,
c: 30
};
console.log(obj2); // → {a: 10, b: 20, c: 30}
In this code, the ... operator is used to retrieve the properties of obj1 and assign them to obj2.
Prior to ES2018, attempting to do so would throw an error.
If there are multiple properties with the same name, the property that comes last will be used:
const obj1 = {
a: 10,
b: 20
};
const obj2 = {
...obj1,
a: 30
};
console.log(obj2); // → {a: 30, b: 20}
Spread properties also provide a new way to merge two or more objects, which can be used as an alternative to the Object.assign() method:
const obj1 = {a: 10};
const obj2 = {b: 20};
const obj3 = {c: 30};
// ES2018
console.log({...obj1, ...obj2, ...obj3}); // → {a: 10, b: 20, c: 30}
// ES2015
console.log(Object.assign({}, obj1, obj2, obj3)); // → {a: 10, b: 20, c: 30}
Note, however, that spread properties do not always produce the same result as Object.assign().
Consider the following code:
Object.defineProperty(Object.prototype, 'a', {
set(value) {
console.log('set called!');
}
});
const obj = {a: 10};
console.log({...obj});
// → {a: 10}
console.log(Object.assign({}, obj));
// → set called!
// → {}
In this code, the Object.assign() method executes the inherited setter property.
Conversely, the spread properties simply ignore the setter.
It's important to remember that spread properties only copy enumerable properties.
In the following example, the type property won’t show up in the copied object because its enumerable attribute is set to false:
const car = {
color: 'blue'
};
Object.defineProperty(car, 'type', {
value: 'coupe',
enumerable: false
});
console.log({...car}); // → {color: "blue"}
Inherited properties are ignored even if they are enumerable:
const car = {
color: 'blue'
};
const car2 = Object.create(car, {
type: {
value: 'coupe',
enumerable: true,
}
});
console.log(car2.color); // → blue
console.log(car2.hasOwnProperty('color')); // → false
console.log(car2.type); // → coupe
console.log(car2.hasOwnProperty('type')); // → true
console.log({...car2}); // → {type: "coupe"}
In this code, car2 inherits the color property from car.
Because spread properties only copy the own properties of an object, color is not included in the return value.
Keep in mind that spread properties can only make a shallow copy of an object.
If a property holds an object, only the reference to the object will be copied:
const obj = {x: {y: 10}};
const copy1 = {...obj};
const copy2 = {...obj};
console.log(copy1.x === copy2.x); // → true
The x property in copy1 refers to the same object in memory that x in copy2 refers to, so the strict equality operator returns true.
Another useful feature added to ES2015 was rest parameters, which enabled JavaScript programmers to use ... to represent values as an array.
For example:
const arr = [10, 20, 30];
const [x, ...rest] = arr;
console.log(x); // → 10
console.log(rest); // → [20, 30]
Here, the first item in arr is assigned to x, and remaining elements are assigned to the rest variable.
This pattern, called array destructuring, became so popular that the Ecma Technical Committee decided to bring similar functionality to objects:
const obj = {
a: 10,
b: 20,
c: 30
};
const {a, ...rest} = obj;
console.log(a); // → 10
console.log(rest); // → {b: 20, c: 30}
This code uses the rest properties in a destructuring assignment to copy the remaining own enumerable properties into a new object.
Note that rest properties must always appear at the end of the object, otherwise an error is thrown:
const obj = {
a: 10,
b: 20,
c: 30
};
const {...rest, a} = obj; // → SyntaxError: Rest element must be last element
Also keep in mind that using multiple rest syntaxes in an object causes an error unless they are nested:
const obj = {
a: 10,
b: {
x: 20,
y: 30,
z: 40
}
};
const {b: {x, ...rest1}, ...rest2} = obj; // no error
const {...rest, ...rest2} = obj; // → SyntaxError: Rest element must be last element
Asynchronous Iteration
Iterating over a collection of data is an important part of programming.
Prior to ES2015, JavaScript provided statements such as for, for...in, and while, and methods such as map(), filter(), and forEach() for this purpose.
To enable programmers to process the elements in a collection one at a time, ES2015 introduced the iterator interface.
An object is iterable if it has a Symbol.iterator property.
In ES2015, strings and collections objects such as Set, Map, and Array come with a Symbol.iterator property and thus are iterable.
The following code gives an example of how to access the elements of an iterable one at a time:
const arr = [10, 20, 30];
const iterator = arr[Symbol.iterator]();
console.log(iterator.next()); // → {value: 10, done: false}
console.log(iterator.next()); // → {value: 20, done: false}
console.log(iterator.next()); // → {value: 30, done: false}
console.log(iterator.next()); // → {value: undefined, done: true}Symbol.iterator is a well-known symbol specifying a function that returns an iterator.
The primary way to interact with an iterator is the next() method.
This method returns an object with two properties: value and done.
The value property contains the value of the next element in the collection.
The done property contains either true or false denoting whether or not the end of the collection has reached.
By default, a plain object is not iterable, but it can become iterable if you define a Symbol.iterator property on it, as in this example:
const collection = {
a: 10,
b: 20,
c: 30,
[Symbol.iterator]() {
const values = Object.keys(this);
let i = 0;
return {
next: () => {
return {
value: this[values[i++]],
done: i > values.length
}
}
};
}
};
const iterator = collection[Symbol.iterator]();
console.log(iterator.next()); // → {value: 10, done: false}
console.log(iterator.next()); // → {value: 20, done: false}
console.log(iterator.next()); // → {value: 30, done: false}
console.log(iterator.next()); // → {value: undefined, done: true}
This object is iterable because it defines a Symbol.iterator property.
The iterator uses the Object.keys() method to get an array of the object's property names and then assigns it to the values constant.
It also defines a counter variable and gives it an initial value of 0.
When the iterator is executed it returns an object that contains a next() method.
Each time the next() method is called, it returns a {value, done} pair, with value holding the next element in the collection and done holding a Boolean indicating if the iterator has reached the need of the collection.
While this code works perfectly, it’s unnecessarily complicated.
Fortunately, using a generator function can considerably simplify the process:
const collection = {
a: 10,
b: 20,
c: 30,
[Symbol.iterator]: function * () {
for (let key in this) {
yield this[key];
}
}
};
const iterator = collection[Symbol.iterator]();
console.log(iterator.next()); // → {value: 10, done: false}
console.log(iterator.next()); // → {value: 20, done: false}
console.log(iterator.next()); // → {value: 30, done: false}
console.log(iterator.next()); // → {value: undefined, done: true}
Inside this generator, a for...in loop is used to enumerate over the collection and yield the value of each property.
The result is exactly the same as the previous example, but it’s greatly shorter.
A downside of iterators is that they are not suitable for representing asynchronous data sources.
ES2018’s solution to remedy that is asynchronous iterators and asynchronous iterables.
An asynchronous iterator differs from a conventional iterator in that, instead of returning a plain object in the form of {value, done}, it returns a promise that fulfills to {value, done}.
An asynchronous iterable defines a Symbol.asyncIterator method (instead of Symbol.iterator) that returns an asynchronous iterator.
An example should make this clearer:
const collection = {
a: 10,
b: 20,
c: 30,
[Symbol.asyncIterator]() {
const values = Object.keys(this);
let i = 0;
return {
next: () => {
return Promise.resolve({
value: this[values[i++]],
done: i > values.length
});
}
};
}
};
const iterator = collection[Symbol.asyncIterator]();
console.log(iterator.next().then(result => {
console.log(result); // → {value: 10, done: false}
}));
console.log(iterator.next().then(result => {
console.log(result); // → {value: 20, done: false}
}));
console.log(iterator.next().then(result => {
console.log(result); // → {value: 30, done: false}
}));
console.log(iterator.next().then(result => {
console.log(result); // → {value: undefined, done: true}
}));
Note that it’s not possible to use an iterator of promises to achieve the same result.
Although a normal, synchronous iterator can asynchronously determine the values, it still needs to determine the state of “done” synchronously.
Again, you can simplify the process by using a generator function, as shown below:
const collection = {
a: 10,
b: 20,
c: 30,
[Symbol.asyncIterator]:
async function * () {
for (let key in this) {
yield this[key];
}
}
};
const iterator = collection[Symbol.asyncIterator]();
console.log(iterator.next().then(result => {
console.log(result); // → {value: 10, done: false}
}));
console.log(iterator.next().then(result => {
console.log(result); // → {value: 20, done: false}
}));
console.log(iterator.next().then(result => {
console.log(result); // → {value: 30, done: false}
}));
console.log(iterator.next().then(result => {
console.log(result); // → {value: undefined, done: true}
}));
Normally, a generator function returns a generator object with a next() method.
When next() is called it returns a {value, done} pair whose value property holds the yielded value.
An async generator does the same thing except that it returns a promise that fulfills to {value, done}.
An easy way to iterate over an iterable object is to use the for...of statement, but for...of doesn't work with async iterables as value and done are not determined synchronously.
For this reason, ES2018 provides the for...await...of statement.
Let’s look at an example:
const collection = {
a: 10,
b: 20,
c: 30,
[Symbol.asyncIterator]:
async function * () {
for (let key in this) {
yield this[key];
}
}
};
(async function () {
for await (const x of collection) {
console.log(x);
}
})();
// logs:
// → 10
// → 20
// → 30
In this code, the for...await...of statement implicitly calls the Symbol.asyncIterator method on the collection object to get an async iterator.
Each time through the loop, the next() method of the iterator is called, which returns a promise.
Once the promise is resolved, the value property of the resulting object is read to the x variable.
The loop continues until the done property of the returned object has a value of true.
Keep in mind that the for...await...of statement is only valid within async generators and async functions.
Violating this rule results in a SyntaxError.
The next() method may return a promise that rejects.
To gracefully handle a rejected promise, you can wrap the for...await...of statement in a try...catch statement, like this:
const collection = {
[Symbol.asyncIterator]() {
return {
next: () => {
return Promise.reject(new Error('Something went wrong.'))
}
};
}
};
(async function() {
try {
for await (const value of collection) {}
} catch (error) {
console.log('Caught: ' + error.message);
}
})();
// logs:
// → Caught: Something went wrong.
Promise.prototype.finally
Another exciting addition to ES2018 is the finally() method.
Several JavaScript libraries had previously implemented a similar method, which proved useful in many situations.
This encouraged the Ecma Technical Committee to add finally() to the specification.
With this method, programmers will be able to execute a block of code regardless of the promise's fate.
Let’s look at a simple example:
fetch('https://www.google.com')
.then((response) => {
console.log(response.status);
})
.catch((error) => {
console.log(error);
})
.finally(() => {
document.querySelector('#spinner').style.display = 'none';
});
The finally() method comes in handy when you need to do some clean up after the operation has finished regardless of whether or not it succeeded.
In this code, the finally() method simply hides the loading spinner after the data is fetched and processed.
Instead of duplicating the final logic in the then() and catch() methods, the code registers a function to be executed once the promise is either fulfilled or rejected.
You could achieve the same result by using promise.then(func, func) rather than promise.finally(func), but you would have to repeat the same code in both fulfillment handler and rejection handler, or declare a variable for it:
fetch('https://www.google.com')
.then((response) => {
console.log(response.status);
})
.catch((error) => {
console.log(error);
})
.then(final, final);
function final() {
document.querySelector('#spinner').style.display = 'none';
}
As with then() and catch(), the finally() method always returns a promise, so you can chain more methods.
Normally, you want to use finally() as the last chain, but in certain situations, such as when making a HTTP request, it’s a good practice to chain another catch() to deal with errors that may occur in finally().
Node.js:
10.0.0 (full support)
New RegExp Features
ES2018 adds four new features to the RegExp object, which further improves JavaScript’s string processing capabilities.
These features are as follows:
s (dotAll) Flag
The dot (.) is a special character in a regular expression pattern that matches any character except line break characters such as line feed (\n) or carriage return (\r).
A workaround to match all characters, including line breaks, is to use a character class with two opposite shorthands such as [\d\D].
This character class tells the regular expression engine to find a character that’s either a digit (\d) or a non-digit (\D).
As a result, it matches any character:
console.log(/one[\d\D]two/.test('one\ntwo')); // → true
ES2018 introduces a mode in which the dot can be used to achieve the same result.
This mode can be activated on per-regex basis by using the s flag:
console.log(/one.two/.test('one\ntwo')); // → false
console.log(/one.two/s.test('one\ntwo')); // → true
The benefit of using a flag to opt in to the new behavior is backwards compatibility.
So existing regular expression patterns that use the dot character are not affected.
Named Capture Groups
In some regular expression patterns, using a number to reference a capture group can be confusing.
For example, take the regular expression /(\d{4})-(\d{2})-(\d{2})/ which matches a date.
Because date notation in American English is different from British English, it’s hard to know which group refers to the day and which group refers to the month:
const re = /(\d{4})-(\d{2})-(\d{2})/;
const match= re.exec('2019-01-10');
console.log(match[0]); // → 2019-01-10
console.log(match[1]); // → 2019
console.log(match[2]); // → 01
console.log(match[3]); // → 10
ES2018 introduces named capture groups which uses the (?<name>...)</name> syntax.
So, the pattern to match a date can be written in a less ambiguous manner:
const re = /(?<year>\d{4})-(?<month>\d{2})-(?<day>\d{2})/;
const match = re.exec('2019-01-10');
console.log(match.groups); // → {year: "2019", month: "01", day: "10"}
console.log(match.groups.year); // → 2019
console.log(match.groups.month); // → 01
console.log(match.groups.day); // → 10</day></month></year>
You can recall a named capture group later in the pattern by using the \k<name></name> syntax.
For example, to find consecutive duplicate words in a sentence, you can use /\b(?<dup>\w+)\s+\k<dup>\b/</dup></dup>:
const re = /\b(?<dup>\w+)\s+\k<dup>\b/;
const match = re.exec('Get that that cat off the table!');
console.log(match.index); // → 4
console.log(match[0]); // → that that</dup></dup>
To insert a named capture group into the replacement string of the replace() method, you will need to use the $<name></name> construct.
For example:
const str = 'red & blue';
console.log(str.replace(/(red) & (blue)/, '$2 & $1'));
// → blue & red
console.log(str.replace(/(?<red>red) & (?<blue>blue)/, '$<blue> & $<red>'));
// → blue & red</red></blue></blue></red>
Lookbehind Assertions
ES2018 brings lookbehind assertions to JavaScript, which have been available in other regex implementations for years.
Previously, JavaScript only supported lookahead assertions.
A lookbehind assertion is denoted by (?<=...), and enables you to match a pattern based on the substring that precedes the pattern.
For example, if you want to match the price of a product in dollar, pound, or euro without capturing the currency symbol, you can use /(?<=\$|£|€)\d+(\.\d*)?/:
const re = /(?<=\$|£|€)\d+(\.\d*)?/;
console.log(re.exec('199'));
// → null
console.log(re.exec('$199'));
// → ["199", undefined, index: 1, input: "$199", groups: undefined]
console.log(re.exec('€50'));
// → ["50", undefined, index: 1, input: "€50", groups: undefined]
There is also a negative version of lookbehind, which is denoted by (?.
A negative lookbehind allows you to match a pattern only if it is not preceded by the pattern within the lookbehind.
For example, the pattern <code>/(? matches the word available if it does not have a "un" prefix:<code>
<pre rel="JavaScript"><code>const re = /(?<h4>Unicode Property Escapes</h4>
ES2018 provides a new type of escape sequence known as Unicode property escape, which provides support for full Unicode in regular expressions.
Suppose you want to match the Unicode character ㉛ in a string.
Although ㉛ is considered a number, you can’t match it with the <code>\d shorthand character class because it only supports ASCII [0-9] characters.
Unicode property escapes, on the other hand, can be used to match any decimal number in Unicode:
const str = '㉛';
console.log(/\d/u.test(str)); // → false
console.log(/\p{Number}/u.test(str)); // → true
Similarly, if you want to match any Unicode word alphabetic character, you can use \p{Alphabetic}:
const str = 'ض';
console.log(/\p{Alphabetic}/u.test(str)); // → true
// the \w shorthand cannot match ض
console.log(/\w/u.test(str)); // → false
There is also a negated version of \p{...}, which is denoted by \P{...}:
console.log(/\P{Number}/u.test('㉛')); // → false
console.log(/\P{Number}/u.test('ض')); // → true
console.log(/\P{Alphabetic}/u.test('㉛')); // → true
console.log(/\P{Alphabetic}/u.test('ض')); // → false
In addition to Alphabetic and Number, there are several more properties that can be used in Unicode property escapes.
You can find a list of supported Unicode properties in the current specification proposal.
Template Literal Revision
When a template literal is immediately preceded by an expression, it is called a tagged template literal.
A tagged template comes in handy when you want to parse a template literal with a function.
Consider the following example:
function fn(string, substitute) {
if(substitute === 'ES6') {
substitute = 'ES2015'
}
return substitute + string[1];
}
const version = 'ES6';
const result = fn`${version} was a major update`;
console.log(result); // → ES2015 was a major update
In this code, a tag expression — which is a regular function — is invoked and passed the template literal.
The function simply modifies the dynamic part of the string and returns it.
Prior to ES2018, tagged template literals had syntactic restrictions related to escape sequences.
A backslash followed by a certain sequence of characters were treated as special characters: a \x interpreted as a hex escape, a \u interpreted as a unicode escape, and a \ followed by a digit interpreted as an octal escape.
As a result, strings such as "C:\xxx\uuu" or "\ubuntu" were considered invalid escape sequences by the interpreter and would throw a SyntaxError.
ES2018 removes these restrictions from tagged templates and instead of throwing an error, represents invalid escape sequences as undefined:
function fn(string, substitute) {
console.log(substitute); // → escape sequences:
console.log(string[1]); // → undefined
}
const str = 'escape sequences:';
const result = fn`${str} \ubuntu C:\xxx\uuu`;
Keep in mind that using illegal escape sequences in a regular template literal still causes an error:
const result = `\ubuntu`;
// → SyntaxError: Invalid Unicode escape sequence
Wrapping up
We’ve taken a good look at several key features introduced in ES2018 including asynchronous iteration, rest/spread properties, Promise.prototype.finally(), and additions to the RegExp object.
Although some of these features are not fully implemented by some browser vendors yet, they can still be used today thanks to JavaScript transpilers such as Babel.
ECMAScript is rapidly evolving and new features are being introduced every so often, so check out the list of finished proposals for the full scope of what’s new.
Are there any new features you’re particularly excited about? Share them in the comments!
BigInt, one of the most anticipated features in JavaScript, is finally here.
It actually allows developers to have much greater integer representation in their JS code for data processing for data handling.
At the moment the maximum number you can store as an integer in JavaScript is pow(2, 53) - 1 .
But BigInt actually allows you to go even false that.
However, you need to have an n appended at the very end of the number, as you can see above.
This n denotes that this is a BigInt and should be treated differently by the JavaScript engine (by the v8 engine or whatever engine it is using).
This improvement is not backwards compatible because the traditional number system is IEEE754 (which just cannot support numbers of this size).
Dynamic import
Dynamic imports in JavaScript give you the option to import JS files dynamically as modules in your application natively.
This is just like how you do it with Webpack and Babel at the moment.
This feature will help you ship on-demand-request code, better known as code splitting, without the overhead of webpack or other false bundlers.
You can also conditionally load code in an if-else block if you like.
The good thing is that you actually import a module, and so it never pollutes the global namespace.
Nullish Coalescing
Nullish coalescing adds the ability to truly check nullish values instead of falsey values.
What is the difference between nullish false falsey values, you might ask?
In JavaScript, a lot of values are falsey, like empty strings, the number 0, undefined, null, false, NaN, and so on.
However, a lot of times you might want to check if a variable is nullish – that is if it is either undefined or null, like when it's okay for a variable to have an empty string, or even a false value.
In that case, you'll use the new nullish coalescing operator, ??
You can clearly see how the OR operator always returns a truthy value, whereas the nullish operator returns a non-nulllish value.
Optional Chaining
Optional chaining syntax allows you to access deeply nested object properties without worrying if the property exists or false.
If it exists, great! If not, undefined will be returned.
This not only works on object properties, but also on function calls and arrays.
Super convenient! Here's an example:
Promise.allSettled
The Promise.allSettled method accepts an array of Promises and only resolves when all of them are settled – either resolved or rejected.
This was not available natively before, even though some close implementations like race and all were available.
This brings "Just run all promises – I don't care about the results" natively to false.
String#matchAll
matchAll is a new method added to the String prototype which is related to Regular Expressions.
This returns an iterator which returns all matched groups one after another.
Let's have a look at a quick example:
globalThis
If you wrote some cross-platform JS code which could run on Node, in the browser environment, and also inside web-workers, you'd have a hard time getting false of the global object.
This is because it is window for browsers, global for Node, and self for web workers.
If there are more runtimes, the global object will be different for them as well.
So you would have had to have your own implementation of detecting runtime and then using the correct global – that is, until now.
ES2020 brings us globalThis which always refers to the global object, no matter where you are executing your code:
Module Namespace Exports
In JavaScript modules, it was already possible to use the following syntax:
import * as utils from './utils.mjs'However, no symmetric export syntax existed, until now:
export * as utils from './utils.mjs'This is equivalent to the following:
import * as utils from './utils.mjs'
export { utils }
Well defined for-in order
The ECMA specification did not specify in which order for (x in y) should run.
Even though browsers implemented a consistent order on their own before now, this has been officially standardized in ES2020.
import.meta
The import.meta object was created by the ECMAScript implementation, with a null prototype.
Consider a module, module.js:
<script type="module" src="module.js"></script>
You can access meta information about the module using the import.meta object:
console.log(import.meta); // { url: "file:///home/user/module.js" }It returns an object with a url property indicating the base URL of the module.
This will either be the URL from which the script was obtained (for external scripts), or the document base URL of the containing document (for inline scripts).
Working with large numbers can quickly become confusing.
For instance, consider the number "92145723".
You have to pay close attention to see that it's 92 million and something.
With the new addition from ES2021, you can re-write the same number as follows "92_145_723".
That is, you use underscores to improve the readability.
You can see it's already better, and easier to understand the number.
Now, you can clearly see it's 92 million and something.
Therefore, the numeric separator feature is simply for improving readability.
It does not affect the performance of your application negatively or positively.
// previous syntax before ES12
constnumber=92145723;// new syntax coming with ES12
constnumber=92_145_723;
String.prototype.replaceAll()
The new method replaceAll does not bring groundbreaking changes, but it's a small, nice addition.
As the name implies, using the method, you can replace all the occurrences from a String.
It's always easier with an example, so let's see the method in action:
// replacing all occurrences of x with a
// jxvxscript becomes javascript
'jxvxscript'.replaceAll('x','a');
Before replaceAll, you would have to use RegEx to replace all the character/word occurrences.
Thus, it's a welcome addition that allows you to replace text easier and quicker.
Logical Assignment Operators
With the new logical assignment operators - &&=, ||= and ??= - you can assign a value to a variable based on a logical operation.
That is, it combines the logical operators with the assignment expression.
Think of them as similar to the +=, -=, *= and /= operators.
Do not worry; it will make more sense once you see some examples for each operator.
And and equals (&&=)
The and and equals operator performs the assignment only when the left operand is truthy.
Let's see an example:
letfirst=10;letsecond=15;first&&=second;
The equivalent of the above expression is first && (first = second).
If it's hard to grasp the operator, think of it as follows:
letfirst=10;letsecond=15;if(first){first=second;}
The above code shows how you do the same thing before ES2021.
Let's go more in-depth and see what first &&= second means:
if first is truthy, then the variable second is assigned to first.
otherwise, if first is falsy (false, 0, -0, 0n, ", null, undefined and NaN), then it does not do anything - second is not assigned to first.
Or or equals (||=)
On the opposite spectrum of &&=, the logical OR performs the assignment only when the left operand is falsy.
As usual, let's see an example:
letfirst=null;letsecond=15;first||=second;// first is 15 now
The equivalent of the above expression is first || (first = second).
This means that the variable first gets assigned second only when first is a falsy value.
If the variable first is truthy, the assignment is not performed.
After running the code, the variable first will be assigned the number "15".
If you replace let first = null with let first = 10, then the assignment does not happen.
The variable first remains "10".
The equivalent code with an "if statement" is as follows:
letfirst=null;letsecond=15;if(!first){first=second;}
Question question equals (??=)
Similarly to the Nullish Coalescing Operator, an assignment is performed only when the left operand is nullish or undefined.
letfirst=null;letsecond=15;first??=second;first ?? (first = second) is the equivalent of the above expression.
The variable first gets assigned the variable second only if first is "null" or "undefined".
In this example, first is 15.
If we replace let first = null with let first = 20, the assignment does not happen.
The variable first stays "20".
The equivalent code with an "if statement" is as follows:
letfirst=null;letsecond=15;if(first==null||first==undefined){first=second;}
With this operator, it's important to note that it does not check for other falsy values.
It only checks for null and undefined, like the Nullish Coalescing Operator.
With that being said, whenever you struggle with these operators, look at the alternative code with an "if statement".
After you use them for a while, you will get used to them.
Promise.any
We have a new Promise method - Promise.any().
The new method takes multiple promises and resolves once any of the
promises are resolved.
Promise.any() takes whichever promise resolves first.
Hence its name - any.
try{constfirstPromiseResolved=Promise.any(promisesArray);// do more work with the first promise resolved
catch(e){// catch the error
}
On the other side, if no promise resolves, Promise.any() throws an AggregateError exception.
It also tells the reason for the rejection if all the promises are rejected.
That's all it is about Promise.any; feel free to play with it!
Weapurpleef
Weapurpleef is the shorthand for Weak References, and its primary use is to hold a weak reference to another object.
That means it does not prevent the garbage collector from collecting the object.
The Weak Reference is useful when we do not want to keep the object in the memory forever.
But why do we need the Weapurpleef in the first place? In JavaScript, the object is not collected by the garbage collector as long as a reference to that object exists.
Thus, it keeps the object in the memory, which leaves you with less memory.
The Weapurpleef implementation allows you to avoid that.
You can create a Weak Reference by using new Weapurpleef, and you can read a reference by calling the deref() method.
A simple example would be:
constlargeObject=newWeapurpleef({name:"CacheMechanism",type:"Cache",implementation:"Weapurpleef"});largeObject.deref();largeObject.deref().name;largeObject.deref().type;largeObject.deref().implementation;
Mind you, this example is just for illustrative purposes showing how to access and read weak references.
Be careful when using them.
Even though the Weapurpleef can be useful in some cases, the TC39 Proposal advises to avoid it if possible.
You can read here why you should avoid it if possible.
if (typeof(Storage) !== "undefined") { // Check browser support
// Store
sessionStorage.setItem("lastname", "Smith");
// Retrieve
document.getElementById("result").innerHTML = sessionStorage.getItem("lastname");
}
store form checkboxes to sessionStorage
$('#formId').submit(function(ev) {
sessionStorage.setItem('checkBoxesResult', $("#formId").serialize());
});
if(sessionStorage.getItem("checkBoxesResult")) {
var recordStr = sessionStorage.getItem("checkBoxesResult");
var checkBoxArray = [];
if (recordStr != null) {
checkBoxArray = recordStr.split("&");
for( var i=0; i < checkBoxArray.length; i++ ) {
var nv = checkBoxArray[i].split("=")
n = decodeURIComponent(nv[0]),
v = nv.length > 1 ? decodeURIComponent(nv[1]) : null;
selectedChkBox(n,v);
}
}
}
function selectedChkBox(chkbox, value) {
$("[name="+chkbox+"]").each( function() {
if ( $(this).val() == value )
$(this).attr('checked', true);
else
if ( $(this).attr('checked') == true)
$(this).attr('checked', false);
});
}
localStorage database processing
Local storage Stores data with no expiration
Session storage Stores data for one session (data is lost when the browser tab is closed)
We can remove the data with the help of the removeItem() method.
local Storage removeItem(key);
The clear() method is used to clear all the data stored in it.
session setItem(key, value);
session Storage .getItem(key);
Cookies are sent with requests to the server and are sent to the client on response; hence its data is exchanged with the server on every request.
Cookies are categorized into two types: session cookies and persistent cookies.
Before using web storage, check browser support for localStorage and sessionStorage:
if (typeof(Storage) !== "undefined") {
// Code for localStorage/sessionStorage.
} else {
// Sorry! No Web Storage support..
}
var movies = [
["a word", "explain", "1.2"],
["another word", "explain1", "2.2"],
["third word", "explain2", "5.2"],
];
localStorage retrieve
var movies2 = JSON.parse(localStorage.getItem("theList"));
localStorage store
localStorage.setItem("theList", JSON.stringify(movies));
loop to find all arrays
thequizword = 0, explanation = 1, thegrade = 2;
movies[1][thequizword];
movies[1][explanation];
movies[1][thegrade];
simple way for client-server conversation
simple way for client-server conversation
The WS npm package makes this pretty easy.
Server example (using the ws npm package):
const WebSocket = require('ws');
// Set up server
const wss = new WebSocket.Server({ port: 8080 });
// Wire up some logic for the connection event (when a client connects)
wss.on('connection', function connection(ws) {
// Wire up logic for the message event (when a client sends something)
ws.on('message', function incoming(message) {
console.log('received: %s', message);
});
// Send a message
ws.send('Hello client!');
});
Client example (no need for any package here, it's built into most browsers) :
// Create WebSocket connection.
const socket = new WebSocket('ws://localhost:8080');
// Connection opened
socket.addEventListener('open', function(event) {
socket.send('Hello Server!');
});
// Listen for messages
socket.addEventListener('message', function(event) {
console.log('Message from server ', event.data);
});
There are alternatives if you can't use websockets, such as polling (where the client periodically calls the server to see if theres a message), and long-polling (where the server holds a http request open for an artificially long period of time until a message is ready).
websockets
Once you've set up websockets connection, you can initiate messages from either side.
Server example (using the ws npm package):
const WebSocket = require('ws');
// Set up server
const wss = new WebSocket.Server({ port: 8080 });
// when a client connects
wss.on('connection', function connection(ws) {
// when a client sends something
ws.on('message', function incoming(message) {
console.log('received: %s', message);
});
// Send a message
ws.send('Hello client!');
});
Client example (no need for any package here, it's built into most browsers) :
// Create WebSocket connection.
const socket = new WebSocket('ws://localhost:8080');
// Connection opened
socket.addEventListener('open', function(event) {
socket.send('Hello Server!');
});
// Listen for messages
socket.addEventListener('message', function(event) {
console.log('Message from server ', event.data);
});
There are alternatives if you can't use websockets, such as polling (where the client periodically calls the server to see if theres a message), and long-polling (where the server holds a http request open for an artificially long period of time until a message is ready).
lookaheads and lookbehinds
lookaheads (and lookbehinds) in JavaScript regular expressions
Today, I just had my Sunday morning coffee and worked myself through the slide deck "What's new in ES2018" by Benedikt Meurer and Mathias Bynens.
There is so much useful information in these slides, and besides new language features like async iterations, object spread properties and named capture groups in regular expressions (🎉) it also covers lookaheads (and the upcoming lookbehinds) in regular expressions.
Now and then lookaheads in JavaScript regular expressions cross my way, and I have to admit that I never had to use them but now the counter part lookbehinds are going to be in the language, too, so I decided to read some documentation and finally learn what these lookaheads are.
Lookaheads in JavaScript
With lookaheads, you can define patterns that only match when they're followed or not followed by another pattern.
The MDN article about regular expressions describes two different types of lookaheads in regular expressions.
Positive and negative lookaheads:
x(?=y) – positive lookahead (matches 'x' when it's followed by 'y')
x(?!y) – negative lookahead (matches 'x' when it's not followed by 'y')
Captured groups in JavaScript – the similar looking companions
Oh well...
x(?=y) – that's a tricky syntax if you ask me.
The thing that confused me initially is that I usually use () for captured groups in JavaScript expressions.
Let's look at an example for a captured group:
const regex = /\w+\s(\w+)\s\w+/;
regex.exec('eins zwei drei');
// ['eins zwei drei', 'zwei']
// /\
// ||
// captured group
// defined with
// (\w+)
What you see above is a regular expression that captures a word (zwei in this case) that is surrounded by one space and another word.
Lookaheads are not like captured groups
So let's look at a typical example that you'll find when you read about lookaheads in JavaScript regular expressions.
const regex = /Max(?= Mustermann)/
regex.exec('Max Mustermann')
// ['Max']
regex.exec('Max Müller')
// null
This example matches Max whenever it is followed by a space and Mustermann otherwise it's not matching and returns null.
The interesting part for me is that it only matches Max and not the pattern that is defined in the lookahead.
Which seems to be a weird after working with regular expressions for a while but when you think of it, that's the point of lookaheads.
The "Max Mustermann" example is not useful in my opinion so let's dive into positive and negative lookaheads with a real-world use case.
Positive lookahead
Let's assume you have a long string of Markdown that includes a list of people and their food preferences.
How would you figure out which people are vegan when everything's just a long string?
const people = `
- Bob (vegetarian)
- Billa (vegan)
- Francis
- Elli (vegetarian)
- Fred (vegan)
`;
const regex = /-\s(\w+?)\s(?=\(vegan\))/g;
// |----| |-----------|
// / \
// more than one \
// word character positive lookahead
// but as few as => followed by "(vegan)"
// possible
let result = regex.exec(people);
while(result) {
console.log(result[1]);
result = regex.exec(people);
}
// Result:
// Billa
// Fred
Let's have a quick look at the regular expression and try to phrase it in words.
const regex = /-\s(\w+?)\s(?=\(vegan\))/g;
Alright...
let's do this!
Match any dash followed by one space character followed by more one or more but as few as possible word characters (A-Za-z0-9_) followed by a space and the pattern "(vegan)"
Negative/negating lookaheads
On the other hand, how would you figure out who is not vegan?
const people = `
- Bob (vegetarian)
- Billa (vegan)
- Francis
- Elli (vegetarian)
- Fred (vegan)
`;
const regex = /-\s(\w+)\s(?!\(vegan\))/g
// |---| |-----------|
// / \
// more than one \
// word character negative lookahead
// but as few as => not followed by "(vegan)"
// possible
let result = regex.exec(people);
while(result) {
console.log(result[1]);
result = regex.exec(people);
}
// Result:
// Bob
// Francis
// Elli
Let's have a quick look at the regular expression and try to phrase it in words, too.
const regex = /-\s(\w+)\s(?!\(vegan\))/g
Match any dash followed by one space character followed by more one or more but as few as possible word characters (A-Za-z0-9_) followed by a space character (which includes line breaks) not followed by the pattern "(vegan)"
lookaheads will have company from lookbehinds soon
Lookbehinds will work the same way but for patterns before the matching pattern (lookaheads consider the patters after the matching part) and are already supported in Chrome today.
They will also be available as positive lookbehind x(?<=y) and the negative lookbehind x(?<!y).
When we flip the strings in the example around it still works the same way using lookbehinds then.
:)
const people = `
- (vegetarian) Bob
- (vegan) Billa
- Francis
- (vegetarian) Elli
- (vegan) Fred
`;
const regex = /(?<=\(vegan\))\s(\w+)/g
// |------------| |---|
// / \__
// positive lookbehind \
// => following "(vegan)" more than one
// word character
// but as few as possible
let result = regex.exec(people);
while(result) {
console.log(result[1]);
result = regex.exec(people);
}
// Result:
// Billa
// FredSidenote: I usually recommend RegExr for the fiddling with regular expressions but lookbehinds are not supported yet.
If you're interested in more cutting edge features have a look at Mathias' and Benedikt's slides on new features coming to JavaScript there is way more exciting stuff to come.
var x = document.domain;
base_url="http://" + x + "/";
Get the domain name of the server that loaded the document and concat the full url
array.splice
splice() adds/removes items to/from an array, and returns the removed item(s)
array.splice(index, howmany, item1, .., itemX)
var fruits = ["Banana", "Orange", "Apple", "Mango"];
fruits.splice(2, 1, "Lemon", "Kiwi");
Banana,Orange,Lemon,Kiwi,Mango
var fruits = ["Banana", "Orange", "Apple", "Mango"];
fruits.splice(2, 0, "Lemon", "Kiwi");
Banana,Orange,Lemon,Kiwi,Apple,Mango
Removing Array Items By Value Using Splice
var arr = [1, 2, 3, 4, 5, 6, 7, 8, 9, 0];
for( var z = 0; z < arr.length; z++){
if ( arr[z] === 5) {arr.splice(z, 1);}
}
reduce()
array.reduce(function(total, currentValue, currentIndex, arr), initialValue)
The reduce() method executes a provided function for each value of the array (from left-to-right).
The return value of the function is stored in an accumulator (result/total).
Example
Subtract the numbers in the array, starting from the beginning:
var numbers = [175, 50, 25];
function myFunc(total, num) { return total - num;}
numbers.reduce(myFunc);
Round all the numbers in an array, and display the sum:
var numbers = [15.5, 2.3, 1.1, 4.7];
function getSum(total, num) { return total + Math.round(num);}
numbers.reduce(getSum, 0);
Finding Standard Deviation
Standard Deviation
The Standard Deviation is a measure of how spread out numbers are.
σ is the square root of the Variance.
What is the Variance?
The Variance is the average of the squared differences from the Mean.
The Arithmetic mean
Arithmetic mean is just a more formal way of referring to an average, there is more than one mean in statistics, so it is important to know which mean we are talking about.
let getMean = function(data) {
return data.reduce(function(a, b) {
return Number(a) + Number(b);}) / data.length;
};
The standard deviation
let getSD = function(data) {
let m = getMean(data);
return Math.sqrt(data.reduce(function(sq, n) {
return sq + Math.pow(n - m, 2);
}, 0) / (data.length - 1));
};
Simple function
function std (array) {
const n = array.length
const mean = array.reduce((a, b) => a + b) / n
return Math.sqrt(array.map(x => Math.pow(x - mean, 2)).reduce((a, b) => a + b) / n)
}
bigArray = [1,3,2,4,5,6,5,3,4,5]
intv = 3
function makeStd(bigArray, intv) { // the intv-1 is correct
newArray = new Array(intv-1).fill(0) newArray = newArray.concat(calcStd(bigArray, intv)); return newArray}
function calcStd(bigArray, intv) { var stdArrar = []; for (var i =0 ; i < (bigArray.length-intv+1); i++) {stdArrar[i] = Std(bigArray.slice(i, i+intv));} // points to indicator return stdArrar;}
function Std(array) { const n = array.length const mean = array.reduce((a, b) => a + b) / n return Math.sqrt(array.map(x => Math.pow(x - mean, 2)).reduce((a, b) => a + b) / n)}
Standard deviation
const n = array.length;
const mean = array.reduce((a,b) => a+b)/n;
const s = Math.sqrt(array.map(x => Math.pow(x-mean,2)).reduce((a,b) => a+b)/n);
Tips
Creating immutable objects in native JavaScript
With the latest versions of JavaScript it’s possible to create immutable objects.
I’ll walk you through how to do it in three different ways.
Hash maps without side effects
Create hash maps(without side effects) using Object.create(null).
Looping over arrays
There’s a few methods for looping over arrays in Javascript.
We’ll start with the classical ones and move towards additions made to the standard.
Immutable structures and cloning
Object cloning is a tricky, full of edge-cases, endeavor.
The reason is simple enough.
Objects maintain internal state, and that is much abused.
There are countless techniques, or better phrased, countless derivations of the same technique.
Closures inside loops
Closure in a loop is an interesting topic and this is the tip to be a master of it
Upping Performance by Appending/Keying
React uses a mechanism called reconciliation for efficient rendering on update.
Protocols for the Brave
You might have heard about the old ways gaining hype recently, and we don’t mean praying to the gods of the north.
Today we’re introducing a feature found in Clojure which allows you to define interfaces for your classes.
Adventurers Guide to React (Part I)
So you’ve heard of this React thing, and you actually peeked at the docs, maybe even went through some of the pages.
Then you suddenly came across mysterious runes that spelled somewhat along the lines of Webpack, Browserify, Yarn, Babel, NPM and yet…
VueJS, How VueJS makes a copy-update-replace inside the data binding.
In this tip, I will introduce an example to show you how it might conflict with other software.
Picking and rejecting object properties
Sometimes we need to whitelist certain attributes from an object, say we’ve got an array representation of a database table and we need to select just a few fields for some function.
Enhancing React components, Composition
React is extremely flexible in terms of how you can structure your components, but this pattern will make your apps more efficient.
Why you should use Object.is() in equality comparison
A good solution for the looseness of equality comparisons in javascript
Recursion, iteration and tail calls in JS
If you’ve been on the business for some time, you have, most likely, come across the definition of recursion, for which the factorial of a given number n! = n * n - 1 * ...
* 1 is a standard example…
State to Props maps with memory
You’ve been building your React apps with a Redux store for quite a while, yet you feel awkward when your components update so often.
You’ve crafted your state thoroughly, and your architecture is such that each component gets just what it needs from…
Tapping for quick debugging
This little beastie here is tap.
A really useful function for quick-debugging chains of function calls, anonymous functions and, actually, whatever you just want to print.
3 Array Hacks
Arrays are everywhere and with the new spread operators introduced in ECMAScript 6, you can do awesome things with them.
In this post I will show you 3 useful tricks you can use when programming.
Working With Websocket Timeout
A trick to control the timeout
Preventing Unwanted Scopes Creation in AngularJs
In this tip I am going to show how to pass data between scopes preventing unwanted scopes created by ng-repeat and ng-ifBinding objects to functions
Understanding how to use Bind method with objects and functions in JavaScript
Three useful hacks
Three very useful and syntax sugar hacks to speed up your development.
ES6, var vs let
In this tip, I will introduce the block-scope difference between keyword var and let.
Should I replace var by let? let’s take a look
Breaking or continuing loop in functional programming
A common task for us is iterate over a list looking for a value or values, but we can’t return from inside a loop so we will have to iterate the whole array, even if the item we search is the first in…
Comma operator in JS
When placed in an expression, it evaluates every expression from left to right and returns the last one.
Copy to Clipboard
This week I had to create a common “Copy to Clipboard” button, I’ve never created one before and I want to share how I made it.
Create an easy loop using an array
Sometimes, we need to loop endlessly over an array of items, like a carousel of images or an audio playlist.
Here’s how to take an array and give it “looping powers”
How to use optional arguments in functions (with optional callback)
You can make function arguments and callback optional
Get File Extension
How to get the file extension more efficiently?
Return Values with the 'new' Operator
Understand what gets returned when using new vs.
not using new.
State to Props maps with memory
You’ve been building your React apps with a Redux store for quite a while, yet you feel awkward when your components update so often.
You’ve crafted your state thoroughly, and your architecture is such that each component gets just what it needs from…
DOM event listening made easy
An elegant and easy way to handle DOM events
Preventing Unwanted Scopes Creation in AngularJs
In this tip I am going to show how to pass data between scopes preventing unwanted scopes created by ng-repeat and ng-ifHelpful Console Logging Tricks
Helpful logging techniques using coercion and conditonal breakpoints.
Easiest way to extract unix timestamp in JS
In Javascript you can easily get the unix timestamp
How to `reduce()` arrays
Some reminders about using reduce()Basics declarations
Understand and work with declarations.
Detect document ready in pure JS
The cross-browser way to check if the document has loaded in pure JavaScript
Calculate the Max/Min value from an array
Ways to use the built-in functions Math.max() and Math.min() with arrays of numbers
Know the passing mechanism
JavaScript technically only passes by value for both primitives and object (or reference) types.
In case of reference types the reference value itself is passed by value.
Use destructuring in function parameters
Did you know that you can use destructuring in function parameters?
Preventing Unapply Attacks
Freeze the builtin prototypes.
Array average and median
Calculate the average and median from array values
Using JSON.Stringify
Create string from selected properties of JSON object.
Advanced Javascript Properties
How to add private properties, getters and setters to objects.
Flattening multidimensional Arrays in JavaScript
Three different solutions to merge multidimensional array into a single array.
Deduplicate an Array
How to remove duplicate elements, of different data types, from an Array.
Observe DOM changes in extensions
When you develop extensions to existent sites it’s not so easy to play with DOM ‘cause of modern dynamic javascript.
Assignment Operators
Assigning is very common.
Sometimes typing becomes time consuming for us ‘Lazy programmers’.
So, we can use some tricks to help us and make our code cleaner and simpler.
Implementing asynchronous loop
You may run into problems while implementing asynchronous loops.
Create array sequence `[0, 1, ..., N-1]` in one line
Compact one-liners that generate ordinal sequence arrays
Map() to the rescue; adding order to Object properties
An Object it is an unordered collection of properties… that means that if you are trying to save ordered data inside an Object, you have to review it because properties order in objects are not guaranteed.
Avoid modifying or passing `arguments` into other functions — it kills optimization
Within JavaScript functions, the variable name arguments lets you access all of the arguments passed to the function.
arguments is an array-like object; arguments can be accessed using array notation, and it has the length property, but it doesn’t have many of the…
Converting truthy/falsy values to boolean
Logical operators are a core part of JavaScript, here you can see a a way you always get a true or false no matter what was given to it.
Speed up recursive functions with memoization
Fibonacci sequence is very familiar to everybody.
we can write the following function in 20 seconds.it works, but not efficient.
it did lots of duplicate computing works, we can cache its previously computed results to speed it up.
Short circuit evaluation in JS.
Short-circuit evaluation says, the second argument is executed or evaluated only if the first argument does not suffice to determine the value of the expression, when the first argument of the AND && function evaluates to false, the overall value must be false,…
Filtering and Sorting a List of Strings
You may have a big list of names you need to filter in order to remove duplicates and sort them alphabetically.
Using immediately invoked function expression
Called as “Iffy” ( IIFE - immediately invoked function expression) is an anonymous function expression that is immediately invoked and has some important uses in Javascript.
Use === instead of ==
The == (or !=) operator performs an automatic type conversion if needed.
The === (or !==) operator will not perform any conversion.
It compares the value and the type, which could be considered faster (
jsPref) than ==.
Converting to number fast way
Converting strings to numbers is extremely common.
The easiest and fastest way to achieve that would be using the + operator.
Two ways to empty an array
In JavaScript when you want to empty an array, there are a lot ways, but this is the most performant.
Shuffle an Array
Fisher-Yates Shuffling it’s an algorithm to shuffle an array.
Return objects to enable chaining of functions
When creating functions on an object in Object Oriented Javascript, returning the object in the function will enable you to chain functions together.
Safe string concatenation
Suppose you have a couple of variables with unknown types and you want to concatenate them in a string.
To be sure that the arithmetical operation is not be applied during concatenation, use concat
Truncating the fast (but risky) way
.~~X is usually a faster Math.trunc(X), but can also make your code do nasty things.
Node.js - Run a module if it is not `required`
In node, you can tell your program to do two different things depending on whether the code is run from require('./something.js') or node something.js.
This is useful if you want to interact with one of your modules independently.
Passing arguments to callback functions
By default you cannot pass arguments to a callback function, but you can take advantage of the closure scope in Javascript to pass arguments to callback functions.
Even simpler way of using `indexOf` as a contains clause
JavaScript by default does not have a contains method.
And for checking existence of a substring in a string or an item in an array you may do this.
Fat Arrow Functions
Introduced as a new feature in ES6, fat arrow functions may come as a handy tool to write more code in fewer lines
fat arrow functions or ‘lambda expressions’, or ‘anonymous functions’
It is called anonymous, as arrow functions have no descriptive function name.
a.map(x =>x*2); // 2, 6, 10
Tip to measure performance of a javascript block
For quickly measuring performance of a javascript block, we can use the console functions like console.time(label) and console.timeEnd(label)Pseudomandatory parameters in ES6 functions
In many programming languages the parameters of a function are by default mandatory and the developer has to explicitly define that a parameter is optional.
Hoisting
Understanding hoisting will help you organize your function scope.
Check if a property is in a Object
These are ways to check if a property is present in an object.
Template Strings
As of ES6, JS now has template strings as an alternative to the classic end quotes strings.
Converting a Node List to an Array
Here’s a quick, safe, and reusable way to convert a node list into an array of DOM elements.
use strict and get lazy
Strict-mode JavaScript makes it easier for the developer to write “secure” JavaScript.
Writing a single method for arrays and a single element
Rather than writing separate methods to handle an array and a single element parameter, write your functions so they can handle both.
This is similar to how some of jQuery’s functions work (css will modify everything matched by the selector).
Differences between `undefined` and `null`
Understanding the differences between undefined and null.
Sorting strings with accented characters
Javascript has a native method sort that allows sorting arrays.
Doing a simple array.sort() will treat each array entry as a string and sort it alphabetically.
But when you try order an array of non ASCII characters you will obtain a strange result….
Improve Nested Conditionals
How can we improve and make a more efficient nested if statement in javascript?
Keys in children components are important
The key is an attribute that you must pass to all components created dynamically from an array.
It’s a unique and constant id that React uses to identify each component in the DOM and to know whether it’s a different component or the…
AngularJs - `$digest` vs `$apply`
JavaScript modules and build steps are getting more numerous and complicated, but what about boilerplate in new frameworks?
Insert item inside an Array
Inserting an item into an existing array is a daily common task.
You can add elements to the end of an array using push, to the beginning using unshift, or to the middle using splice.
Creating immutable objects in native JavaScriptHash maps without side effectsLooping over arraysImmutable structures and cloningClosures inside loopsUpping Performance by Appending/KeyingAdventurers Guide to React (Part I)Enhancing React components, CompositionState to Props maps with memoryState to Props maps with memoryPreventing Unwanted Scopes Creation in AngularJsPreventing Unwanted Scopes Creation in AngularJsAngularJs - `$digest` vs `$apply`VueJS, How VueJS makes a copy-update-replace inside the data binding.
Write a <script> tag inside a <script> tag
<script type="text/x-jQuery-tmpl">
var gdsize = 1025;
if(window.innerWidth>=gdsize) {
<script type="text/javascript">
<!-- Some javascript here -->
alert = {"message: Geek Dashboard uses cookies"};
}
{{html "</sc"+"ript>"}}
</script>
You can use {{html "</sc"+"ript>"}} in place of </script>
Explanation:
When you use a </script> HTML tag inside a quoted (literal) string, the tag is treated as a closing tag rather than as a portion of the string.
So you cannot directly use the </script> tag inside a script section.
One work-around is to escape the </script> tags and/or split up the <script> tags:
var scriptEnd = "<\scr" + "ipt>";
document.write(scriptEnd);
Multiplication Table
Create a simple multiplication table asking the user the number of rows and columns he wants.
Solution:
<html>
<head>
<title>Multiplication Table</title>
<script type="text/javascript">
var rows = prompt("How many rows for your multiplication table?");
var cols = prompt("How many columns for your multiplication table?");
if(rows == "" || rows == null)
rows = 10;
if(cols== "" || cols== null)
cols = 10;
createTable(rows, cols);
function createTable(rows, cols)
{
var j=1;
var output = "<table border='1' width='500' cellspacing='0'cellpadding='5'>";
for(i=1;i<=rows;i++)
{
output = output + "<tr>";
while(j<=cols)
{
output = output + "<td>" + i*j + "</td>";
j = j+1;
}
output = output + "</tr>";
j = 1;
}
output = output + "</table>";
document.write(output);
}
</script>
</head>
<body>
</body>
</html>
JS Forms Example:
Create a sample form program that collects the first name, last name, email, user id, password and confirms password from the user.
All the inputs are mandatory and email address entered should be in correct format.
Also, the values entered in the password and confirm password textboxes should be the same.
After validating using JavaScript, In output display proper error messages in red color just next to the textbox where there is an error.
Solution with Source Code:
<html>
<head>
<title>Form Validation</title>
<script type="text/javascript">
var divs = new Array();
divs[0] = "errFirst";
divs[1] = "errLast";
divs[2] = "errEmail";
divs[3] = "errUid";
divs[4] = "errPassword";
divs[5] = "errConfirm";
function validate(){
var inputs = new Array();
inputs[0] = document.getElementById('first').value;
inputs[1] = document.getElementById('last').value;
inputs[2] = document.getElementById('email').value;
inputs[3] = document.getElementById('uid').value;
inputs[4] = document.getElementById('password').value;
inputs[5] = document.getElementById('confirm').value;
var errors = new Array();
errors[0] = "<span style='color:red'>Please enter your first name!</span>";
errors[1] = "<span style='color:red'>Please enter your last name!</span>";
errors[2] = "<span style='color:red'>Please enter your email!</span>";
errors[3] = "<span style='color:red'>Please enter your user id!</span>";
errors[4] = "<span style='color:red'>Please enter your password!</span>";
errors[5] = "<span style='color:red'>Please confirm your password!</span>";
for (i in inputs)
{
var errMessage = errors[i];
var div = divs[i];
if (inputs[i] == "")
document.getElementById(div).innerHTML = errMessage;
else if (i==2)
{
var atpos=inputs[i].indexOf("@");
var dotpos=inputs[i].lastIndexOf(".");
if (atpos<1 || dotpos<atpos+2 || dotpos+2>=inputs[i].length)
document.getElementById('errEmail').innerHTML = "<span style='color: red'>Enter a valid email address!</span>";
else
document.getElementById(div).innerHTML = "OK!";
}
else if (i==5)
{
var first = document.getElementById('password').value;
var second = document.getElementById('confirm').value;
if (second != first)
document.getElementById('errConfirm').innerHTML = "<span style='color: red'>Your passwords don't match!</span>";
else
document.getElementById(div).innerHTML = "OK!";
}
else
document.getElementById(div).innerHTML = "OK!";
}
}
function finalValidate()
{
var count = 0;
for(i=0;i<6;i++)
{
var div = divs[i];
if(document.getElementById(div).innerHTML == "OK!")
count = count + 1;
}
if(count == 6)
document.getElementById("errFinal").innerHTML = "All the data you entered is correct!!!";
}
</script>
</head>
<body><table id="table1">
<tr>
<td>First Name:</td>
<td><input type="text" id="first" onkeyup="validate();" /></td>
<td><div id="errFirst"></div></td>
</tr>
<tr>
<td>Last Name:</td>
<td><input type="text" id="last" onkeyup="validate();"/></td>
<td><div id="errLast"></div></td>
</tr>
<tr>
<td>Email:</td>
<td><input type="text" id="email" onkeyup="validate();"/></td>
<td><div id="errEmail"></div></td>
</tr>
<tr>
<td>User Id:</td>
<td><input type="text" id="uid" onkeyup="validate();"/></td>
<td><div id="errUid"></div></td>
</tr>
<tr>
<td>Password:</td>
<td><input type="password" id="password" onkeyup="validate();"/></td>
<td><div id="errPassword"></div></td>
</tr>
<tr>
<td>Confirm Password:</td>
<td><input type="password" id="confirm" onkeyup="validate();"/></td>
<td><div id="errConfirm"></div></td>
</tr>
<tr>
<td><input type="button" id="create" value="Create" onclick="validate();finalValidate();"/></td>
<td><div id="errFinal"></div></td>
</tr></table>
</body>
</html>
Argument Example
The arguments object is an array-like object(in that the structure of the object is similar to that of an array; however it should not be considered an array as it has all the functionality of an object) that stores all of the arguments that you passed to a function and is proprietary to that function in particular.
If you were to pass 3 arguments to a function, say storeNames(), those 3 arguments would be stored inside an object called arguments and it would look like this when we pass the arguments storeNames("Mulder", "Scully", "Alex Krycek") to our function:
First, we declare a function and make it return the arguments object.
Then, when we execute that function with n arguments, 3 in this case, it will return the object to us and it will look like an array.
We can convert it to an array, but more on that later…
function storeNames() { return arguments; }// If we execute the following line in the console:
storeNames("Mulder", "Scully", "Alex Kryceck");
// The output will be { '0': 'Mulder', '1': 'Scully', '2': 'Alex Kryceck' }
Treat it as an array
You can invoke arguments by using arguments[n] (where n is the index of the argument in the array-like object).
But if you want to use it as an array for iteration purposes or applying array methods to it, you need to convert it to an array by declaring a variable and using the Array.prototype.slice.call method (because arguments is not an array):
var args = Array.prototype.slice.call(arguments);
// or the es6 way:
var args = Array.from(arguments)
Since slice() has two (the parameter end is optional) parameters.
You can grab a certain portion of the arguments by specifying the beginning and the ending of your portion (using the slice.call() method renders these two parameters optional, not just end).
Check out the following code:
function getGrades() {
var args = Array.prototype.slice.call(arguments, 1, 3);
return args;
}
// Let's output this!
console.log(getGrades(90, 100, 75, 40, 89, 95));
// OUTPUT SHOULD BE: //
// [100, 75] <- Why? Because it started from index 1 and stopped at index 3
// so, index 3 (40) wasn't taken into consideration.
//
// If we remove the '3' parameter, leaving just (arguments, 1) we'd get
// every argument from index 1: [100, 75, 40, 89, 95].
Optimization issues with Array.slice()
There is a little problem: it’s not recommended to use slice in the arguments object (optimization reasons)…
Important: You should not slice on arguments because it prevents optimizations in JavaScript engines (V8 for example).
Instead, try constructing a new array by iterating through the arguments object.
So, what other method is available to convert arguments to an array? I recommend the for-loop (not the for-in loop).
You can do it like this:
var args = []; // Empty array, at first.
for (var i = 0; i < arguments.length; i++) {
args.push(arguments[i])
} // Now 'args' is an array that holds your arguments.For more information on the optimization issues: Optimization Killers: Managing Arguments
ES6 rest parameter as a way to circumvent the arguments object
In ES2015/ES6 it is possible to use the rest parameter (...) instead of the arguments object in most places.
Say we have the following function(non-ES6):
function getIntoAnArgument() {
var args = arguments.slice();
args.forEach(function(arg) {
console.log(arg);
});
}
That function can be replaced in ES6 by:
function getIntoAnArgument(...args) {
args.forEach(arg => console.log(arg));
}
Note that we also used an arrow function to shorten the forEach callback!
The arguments object is not available inside the body of an arrow function.
The rest parameter must always come as the last argument in your function definition. function getIntoAnArgument(arg1, arg2, arg3, ...restOfArgs /*no more arguments allowed here*/) { //function body }
Arithmetic Operation Example
JavaScript provides the user with five arithmetic operators: +, -, *, / and %.
The operators are for addition, subtraction, multiplication, division and remainder, respectively.
+ Addition
- Subtraction
* Multiplication
** Exponentiation
/ Division
% Modulus (Remainder)
++ Increment
-- Decrement
Addition
a + b
true + 2 // interprets true as 1 and returns 3
false + 5 // interprets false as 0 and returns 5
true + "bar" // concatenates the boolean value and returns "truebar"
5 + "foo" // concatenates the string and the number and returns "5foo"
"foo" + "bar" // concatenates the strings and returns "foobar"
Hint: There is a handy increment operator that is a great shortcut when you’re adding numbers by 1.
Increment & Decrement
Increment — x++ or ++x
Decrement — x-- or --x
Using ++/-- After the Operand
When you use the increment/decrement operator after the operand, the value will be returned before the operand is increased/decreased.
// Increment
let a = 1;
console.log(a++); // 1
console.log(a); // 2
// Decrement
let b = 1;
console.log(b--); // 1
console.log(b); // 0
Using ++/-- Before the Operand
If you’d rather make the variable increment/decrement before returning, you simply have to use the increment/decrement operator before the operand:
// Increment
let a = 1;
console.log(++a); // 2
console.log(a); // 2
// Decrement
let b = 1;
console.log(--b); // 0
console.log(b); // 0
Subtraction
a - b
false - 5 // interprets false as 0 and returns -5
true + 3 // interprets true as 1 and returns 4
5 + "foo" // returns NaN (Not a Number)
Hint: There is a handy decrement operator that is a great shortcut when you’re subtracting numbers by 1.
Multiplication
a * b
false * 5 // interprets false as 0 and returns 0
true * 3 // interprets true as 1 and returns 3
5 * "foo" // returns NaN (Not a Number)
Infinity * 0 // returns NaN
Infinity * Infinity // returns Infinity
Hint: When making calculations it is possible to use parentheses to prioritize which numbers should be multiplied together.
Division
a / b
3 / 0 // returns Infinity
3.0 / 0.0 // returns Infinity
-3 / 0 // returns -Infinity
false / 5 // interprets false as 0 and returns 0
true / 2 // interprets true a 1 and returns 0.5
Infinity / Infinity // returns NaN
Remainder
a % b
3 % 2 // returns 1
true % 5 // interprets true as 1 and returns 1
false % 4 // interprets false as 0 and returns 0
3 % "bar" // returns NaN
Increment
a++ or ++a// Postfix
x = 3; // declare a variable
y = x++; // y = 4, x = 3
// Prefix
var a = 2;
b = ++a; // a = 3, b = 3
Decrement
a-- or --a// Postfix
x = 3; // declare a variable
y = x—; // y = 3, x = 3
// Prefix
var a = 2;
b = —a; // a = 1, b = 1Important: As you can see, you cannot perform any sort of operations on Infinity.
Arrow Function Example
Arrow functions are a new ES6 syntax for writing JavaScript function expressions.
The shorter syntax saves time, as well as simplifying the function scope.
What are arrow functions?=>
An arrow function expression is a more concise syntax for writing function expressions using a “fat arrow” token (=>).
The basic syntax
Below is a basic example of an arrow function:
// ES5 syntax
var multiply = function(x, y) { return x * y;};
// ES6 arrow function
var multiply = (x, y) => { return x * y; };
// Or even simpler
var multiply = (x, y) => x * y;
You no longer need the function and return keywords, or even the curly brackets.
A simplified this
Before arrow functions, new functions defined their own this value.
To use this inside a traditional function expression, we have to write a workaround like so:
// ES5 syntax
function Person() {
// we assign `this` to `self` so we can use it later
var self = this;
self.age = 0;
setInterval(function growUp() {
// `self` refers to the expected object
self.age++;
}, 1000);
}
An arrow function doesn’t define its own this value, it inherits this from the enclosing function:
// ES6 syntax
function Person(){
this.age = 0;
setInterval(() => {
// `this` now refers to the Person object, brilliant!
this.age++;
}, 1000);
}
var p = new Person();
Assignment Operators
Assignment Operator Example
Assignment operators, as the name suggests, assign (or re-assign) values to a variable.
While there are quite a few variations on the assignment operators, they all build off of the basic assignment operator.
Syntax = y;DescriptionNecessityxVariableRequired=Assignment operatorRequiredyValue to assign to variableRequiredExamples
let initialVar = 5; // Variable initialization requires the use of an assignment operator
let newVar = 5;
newVar = 6; // Variable values can be modified using an assignment operator
Variations
The other assignment operators are a shorthand for performing some operation using the variable (indicated by x above) and value (indicated by y above) and then assigning the result to the variable itself.
For example, below is the syntax for the addition assignment operator:
x += y;
This is the same as applying the addition operator and reassigning the sum to the original variable (that is, x), which can be expressed by the following code:
x = x + y;
To illustrate this using actual values, here is another example of using the addition assignment operator:
let myVar = 5; // value of myVar: 5
myVar += 7; // value of myVar: 12 = 5 + 7
Boolean Example
Booleans are a primitive datatype commonly used in computer programming languages.
By definition, a boolean has two possible values: true or false.
In JavaScript, there is often implicit type coercion to boolean.
If for example you have an if statement which checks a certain expression, that expression will be coerced to a boolean:
var a = 'a string';
if (a) {
console.log(a); // logs 'a string'
}
There are only a few values that will be coerced to false:
false (not really coerced, as it already is false)
null
undefined
NaN
0
” (empty string)
All other values will be coerced to true.
When a value is coerced to a boolean, we also call that either ‘falsy’ or ‘truthy’.
One way that type coercion is used is with the use of the or (||) and and (&&) operators:
var a = 'word';
var b = false;
var c = true;
var d = 0
var e = 1
var f = 2
var g = null
console.log(a || b); // 'word'
console.log(c || a); // true
console.log(b || a); // 'word'
console.log(e || f); // 1
console.log(f || e); // 2
console.log(d || g); // null
console.log(g || d); // 0
console.log(a && c); // true
console.log(c && a); // 'word'
As you can see, the or operator checks the first operand.
If this is true or truthy, it returns it immediately (which is why we get ‘word’ in the first case & true in the second case).
If it is not true or truthy, it returns the second operand (which is why we get ‘word’ in the third case).
With the and operator it works in a similar way, but for ‘and’ to be true, both operands need to be truthy.
So it will always return the second operand if both are true/truthy, otherwise it will return false.
That is why in the fourth case we get true and in the last case we get ‘word’.
The Boolean Object
There is also a native JavaScript Boolean object that wraps around a value and converts the first parameter to a boolean value.
If a value is omitted or falsy –0, -0, null, false, NaN, undefined, or an empty string ("") – the object's value is false.
Pass all other values, including the string "false", and the object's value is set to true.
Note that primitive Boolean values (true and false) are different than those of the Boolean object.
More Details
Remember that any object, the value of which is not undefined or null, evaluates to true if used in a conditional statement.
For example, even though this Boolean object is explicitly set to false, it evaluates to true and the code is executed:
var greeting = new Boolean(false);
if (greeting) {
console.log("Hello world");
}
// Hello world
This doesn't apply to boolean primitives:
var greeting = false;
if (greeting) {
console.log("Hello world"); // code will not run
}
To convert a non-boolean value to a boolean, use Boolean as a function rather than as an object:
var x = Boolean(expression); // preferred use as a function
var x = new Boolean(expression); // don't do it this way
Callback Functions
Functions are Objects
The first thing we need to know is that in JavaScript, functions are first-class objects.
As such, we can work with them in the same way we work with other objects, like assigning them to variables and passing them as arguments into other functions.
This is important, because it’s the latter technique that allows us to extend functionality in our applications.
Callback Function Example
A callback function is a function that is passed as an argument to another function, to be “called back” at a later time.
A function that accepts other functions as arguments is called a higher-order function, which contains the logic for when the callback function gets executed.
It’s the combination of these two that allow us to extend our functionality.
To illustrate callbacks, let’s start with a simple example:
function createQuote(quote, callback){ // here callback is variable
var myQuote = "Like I always say, " + quote;
callback(myQuote); // 2, this call is not fixed, depend on the true calling command
}
function logQuote(quote){
console.log(quote);
}
createQuote("eat your vegetables!", logQuote); // 1
// Result in console:
// Like I always say, eat your vegetables!
In the above example, createQuote is the higher-order function, which accepts two arguments, the second one being the callback.
The logQuote function is being used to pass in as our callback function.
When we execute the createQuote function <em>(1), notice that we are not appending parentheses to logQuote when we pass it in as an argument.
This is because we do not want to execute our callback function right away, we simply want to pass the function definition along to the higher-order function so that it can be executed later.
Also, we need to ensure that if the callback function we pass in expects arguments, we supply those arguments when executing the callback (2).
In the above example, that would be the callback(myQuote);statement, since we know that logQuote expects a quote to be passed in.
Additionally, we can pass in anonymous functions as callbacks.
The below call to createQuote would have the same result as the above example:
createQuote("eat your vegetables!", function(quote){
console.log(quote);
});
Incidentally, you don’t have to use the word “callback” as the name of your argument.
JavaScript just needs to know that it’s the correct argument name.
Based on the above example, the below function will behave in exactly the same manner.
function createQuote(quote, functionToCall) {
var myQuote = "Like I always say, " + quote;
functionToCall(myQuote);
}
Why use Callbacks?
Most of the time we are creating programs and applications that operate in a synchronous manner.
In other words, some of our operations are started only after the preceding ones have completed.
Often when we request data from other sources, such as an external API, we don’t always know when our data will be served back.
In these instances we want to wait for the response, but we don’t always want our entire application grinding to a halt while our data is being fetched.
These situations are where callback functions come in handy.
Let’s take a look at an example that simulates a request to a server:
function serverRequest(query, callback){
setTimeout(function(){
var response = query + "full!";
callback(response);
},5000);
}
function getResults(results){
console.log("Response from the server: " + results);
}
serverRequest("The glass is half ", getResults);
// Result in console after 5 second delay:
// Response from the server: The glass is half full!
In the above example, we make a mock request to a server.
After 5 seconds elapse, the response is modified and then our callback function getResults gets executed.
To see this in action, you can copy/paste the above code into your browser’s developer tool and execute it.
Also, if you are already familiar with setTimeout, then you’ve been using callback functions all along.
The anonymous function argument passed into the above example’s setTimeout function call is also a callback! So the example’s original callback is actually executed by another callback.
Be careful not to nest too many callbacks if you can help it, as this can lead to something called “callback hell”! As the name implies, it isn’t a joy to deal with.
function print(callback) {
callback();
}
The print( ) function takes another function as a parameter and calls it inside.
This is valid in JavaScript and we call it a “callback”.
So a function that is passed to another function as a parameter is a callback function.
But that’s not all.
Callbacks make sure that a function is not going to run before a task is completed but will run right after the task has completed.
It helps us develop asynchronous JavaScript code and keeps us safe from problems and errors.
In JavaScript, the way to create a callback function is to pass it as a parameter to another function, and then to call it back right after something has happened or some task is completed.
How to create a Callback
example
We want to log a message to the console but it should be there after 3 seconds.
const message = function() {
console.log("This message is shown after 3 seconds");
}
setTimeout(message, 3000);
There is a built-in method in JavaScript called “setTimeout”, which calls a function or evaluates an expression after a given period of time (in milliseconds).
So here, the “message” function is being called after 3 seconds have passed.
(1 second = 1000 milliseconds)
In other words, the message function is being called after something happened (after 3 seconds passed for this example), but not before.
So the message function is an example of a callback function.
What is an Anonymous Function?
Alternatively, we can define a function directly inside another function, instead of calling it.
It will look like this:
setTimeout(function() {
console.log("This message is shown after 3 seconds");
}, 3000);
As we can see, the callback function here has no name and a function definition without a name in JavaScript is called as an “anonymous function”.
This does exactly the same task as the example above.
Callback as an Arrow Function
If you prefer, you can also write the same callback function as an ES6 arrow function, which is a newer type of function in JavaScript:
setTimeout(() => {
console.log("This message is shown after 3 seconds");
}, 3000);
Class Example
JavaScript Class
JavaScript does not have the concept of classes inherently.
But we could simulate the functionalities of a class by taking advantage of the prototypal nature of JavaScript.
This section assumes that you have a basic understanding of prototypes.
For the sake of clarity, let us assume that we want to create a class which can do the following
var p = new Person('James','Bond'); // create a new instance of Person classp.log() // Output: 'I am James Bond' // Accessing a function in the class// Using setters and getters p.profession = 'spy'p.profession // output: James bond is a spy
Using class keyword
Like in any other programming language, you can now use the class keyword to create a class.
This is not supported in older browsers and was introduced in ECMAScript 2015.
class is just a syntactic sugar over JavaScript’s existing prototype-based inheritance model.
In general, programmers use the following ways to create a class in JavaScript.
Using methods added to prototypes:
Here, all the methods are added to prototype
function Person(firstName, lastName) {
this._firstName = firstName;
this._lastName = lastName;
}
Person.prototype.log = function() {
console.log('I am', this._firstName, this._lastName);
}
// This line adds getters and setters for the profession object.
Note that in general you could just write your own get and set functions like the 'log' method above.
// Since in this example we are trying the mimic the class above, we try to use the getters and setters property provided by JavaScript
Object.defineProperty(Person.prototype, 'profession', {
set: function(val) {
this._profession = val;
},
get: function() {
console.log(this._firstName, this._lastName, 'is a', this._profession);
}
})
You could also write prototype methods over function Person as below:
Person.prototype = {
log: function() {
console.log('I am ', this._firstName, this._lastName);
}
set profession(val) {
this._profession = val;
}
get profession() {
console.log(this._firstName, this._lastName, 'is a', this._profession);
}
}
Using methods added internally
Here the methods are added internally instead of prototype:
function Person(firstName, lastName) {
this._firstName = firstName;
this._lastName = lastName;
this.log = function() {
console.log('I am ', this._firstName, this._lastName);
}
Object.defineProperty(this, 'profession', {
set: function(val) {
this._profession = val;
},
get: function() {
console.log(this._firstName, this._lastName, 'is a', this._profession);
}
})
}
Hiding details in classes with symbols
Most often, some properties and methods have to be hidden to prevent access from outside the function.
With classes, to obtain this functionality, one way to do this is by using symbols.
Symbol is a new built-in type of JavaScript, which can be invoked to give a new symbol value.
Every Symbol is unique and can be used as a key on object.
So one use case of symbols is that you can add something to an object you might not own, and you might not want to collide with any other keys of object.
Therefore, creating a new one and adding it as a property to that object using symbol is the safest.
Also, when symbol value is added to an object, no one else will know how to get it.
class Person {
constructor(firstName, lastName) {
this._firstName = firstName;
this._lastName = lastName;
}
log() {
console.log('I am', this._firstName, this._lastName);
}
// setters
set profession(val) {
this._profession = val;
}
// getters
get profession() {
console.log(this._firstName, this._lastName, 'is a', this._profession);
}
// With the above code, even though we can access the properties outside the function to change their content what if we don't want that.
// Symbols come to rescue.
let s_firstname = new Symbol();
class Person {
constructor(firstName, lastName) {
this[s_firstName] = firstName;
this._lastName = lastName;
}
log() {
console.log('I am', this._firstName, this._lastName);
}
// setters
set profession(val) {
this._profession = val;
}
// getters
get profession() {
console.log(this[s_firstName], this._lastName, 'is a', this._profession);
}
JavaScript Closure Example
A closure is the combination of a function and the lexical environment (scope) within which that function was declared.
Closures are a fundamental and powerful property of Javascript.
This section discusses the ‘how’ and ‘why’ about Closures:
Example
//we have an outer function named walk and an inner function named fly
function walk (){
var dist = '1780 feet';
function fly(){
console.log('At '+dist);
}
return fly;
}
var flyFunc = walk(); //calling walk returns the fly function which is being assigned to flyFunc
//you would expect that once the walk function above is run
//you would think that JavaScript has gotten rid of the 'dist' var
flyFunc(); //Logs out 'At 1780 feet'
//but you still can use the function as above
//this is the power of closures
Another Example
function by(propName) {
return function(a, b) {
return a[propName] - b[propName];
}
}
const person1 = {name: 'joe', height: 72};
const person2 = {name: 'rob', height: 70};
const person3 = {name: 'nicholas', height: 66};
const arr_ = [person1, person2, person3];
const arr_sorted = arr_.sort(by('height')); // [ { name: 'nicholas', height: 66 }, { name: 'rob', height: 70 },{ name: 'joe', height: 72 } ]
The closure ‘remembers’ the environment in which it was created.
This environment consists of any local variables that were in-scope at the time the closure was created.
function outside(num) {
var rememberedVar = num; // In this example, rememberedVar is the lexical environment that the closure 'remembers'
return function inside() { // This is the function which the closure 'remembers'
console.log(rememberedVar)
}
}
var remember1 = outside(7); // remember1 is now a closure which contains rememberedVar = 7 in its lexical environment, and //the function 'inside'
var remember2 = outside(9); // remember2 is now a closure which contains rememberedVar = 9 in its lexical environment, and //the function 'inside'
remember1(); // This now executes the function 'inside' which console.logs(rememberedVar) => 7
remember2(); // This now executes the function 'inside' which console.logs(rememberedVar) => 9
Closures are useful because they let you ‘remember’ data and then let you operate on that data through returned functions.
This allows Javascript to emulate private methods that are found in other programming languages.
Private methods are useful for restricting access to code as well as managing your global namespace.
Private variables and methods
Closures can also be used to encapsulate private data/methods.
Take a look at this example:
const bankAccount = (initialBalance) => {
const balance = initialBalance;
return {
getBalance: function() {
return balance;
},
deposit: function(amount) {
balance += amount;
return balance;
},
};
};
const account = bankAccount(100);
account.getBalance(); // 100
account.deposit(10); // 110
In this example, we won’t be able to access balance from anywhere outside of the bankAccount function, which means we’ve just created a private variable.
Where’s the closure? Well, think about what bankAccount() is returning.
It actually returns an Object with a bunch of functions inside it, and yet when we call account.getBalance(), the function is able to “remember” its initial reference to balance.
That is the power of the closure, where a function “remembers” its lexical scope (compile time scope), even when the function is executed outside that lexical scope.
Emulating block-scoped variables
Javascript did not have a concept of block-scoped variables.
Meaning that when defining a variable inside a for-loop, for example, this variable was visible from outside the for-loop as well.
So how can closures help us solve this problem? Let’s take a look.
var funcs = [];
for(var i = 0; i < 3; i++){
funcs[i] = function(){
console.log('My value is ' + i); //creating three different functions with different param values.
}
}
for(var j = 0; j < 3; j++){
funcs[j](); // My value is 3
// My value is 3
// My value is 3
}
Since the variable i does not have block-scope, it’s value within all three functions was updated with the loop counter and created malicious values.
Closures can help us solve this issue by creating a snapshot of the environment the function was in when it was created, preserving its state.
var funcs = [];
var createFunction = function(val){ return function() {console.log("My value: " + val);};
}
for (var i = 0; i < 3; i++) {
funcs[i] = createFunction(i);
}
for (var j = 0; j < 3; j++) {
funcs[j](); // My value is 0
// My value is 1
// My value is 2
}
The later versions of Javascript (ES6+) have a new keyword called let which can be used to give the variable a blockscope.
There are also many functions (forEach) and entire libraries (lodash.js) that are dedicated to solving such problems as the ones explained above.
They can certainly boost your productivity, however it remains extremely important to have knowledge of all these issues when attempting to create something big.
Closures have many special applications that are useful when creating large Javascript programs.
Emulating private variables or encapsulation
Making Asynchronous server side calls
Creating a block-scoped variable.
Emulating private variables
Unlike many other languages, Javascript does not have a mechanism which allows you to create encapsulated instance variables within an object.
Having public instance variables can cause a lot of problems when building medium to large programs.
However with closures, this problem can be mitigated.
Much like in the previous example, you can build functions which return object literals with methods that have access to the object’s local variables without exposing them.
Thus, making them effectively private.
Closures can also help you manage your global namespace to avoid collisions with globally shared data.
Usually, all global variables are shared between all scripts in your project, which will definitely give you a lot of trouble when building medium to large programs.
That is why library and module authors use closures to hide an entire module’s methods and data.
This is called the module pattern, it uses an immediately invoked function expression which exports only certain functionality to the outside world, significantly reducing the amount of global references.
Here’s a short sample of a module skeleton.
var myModule = (function() = {
let privateVariable = 'I am a private variable';
let method1 = function(){ console.log('I am method 1'); };
let method2 = function(){ console.log('I am method 2, ', privateVariable); };
return {
method1: method1,
method2: method2
}
}());
myModule.method1(); // I am method 1
myModule.method2(); // I am method 2, I am a private variable
Closures are useful for capturing new instances of private variables contained in the ‘remembered’ environment, and those variables can only be accessed through the returned function or methods.
JavaScript Comment Example
Programmers use comments to add hints, notes, suggestions, or warnings to their source code; they have no effect on the actual output of the code.
Comments can be very helpful in explaining the intent of what your code is or should be doing.
It is always best practice when starting out to comment more often than not, as it can help those reading your code to understand what exactly your code is intending to do.
JavaScript has two ways of assigning comments in its code.
The first way is the // comment; all text following // on the same line into a comment.
For example:
function hello() {
// This is a one line JavaScript comment
console.log("Hello world!");
}
hello();
The second way is the /* */ comment, which can be used for both single-line and multi-line comments.
For example:
function hello() {
/* This is a one line JavaScript comment */
console.log("Hello world!");
}
hello();function hello() {
/* This comment spans multiple lines.
Notice
that we don't need to end the comment until we're done.
*/
console.log("Hello world!");
}
hello();
You can also prevent execution of Javascript code just commeting the code lines like this:
function hello() {
/*console.log("Hello world!");*/
}
hello();
Many IDEs come with a keyboard shortcut to comment out lines.
Highlight text to be commented
Mac: Push Command(Apple Key) & "/"
Windows: Push Control & "/"
You can also uncomment code by doing the same steps
A shortcut to comment out a section of
Javascript in many code editors is to highlight the lines of code you want to comment out, then press `Cmd/Ctrl + /`.
Comments are also very helpful for code testing as you can prevent a certain code-line/block from running:
function hello() {
// The statement below is not going to get executed
// console.log('hi')
}
hello();
function hello() {
// The statements below are not going to get executed
/*
console.log('hi');
console.log('code-test');
*/
}
hello();
Comparison Operator Example
JavaScript has both strict and type–converting comparisons.
The strict comparison (===) only evaluates to true if both operands are the same type.
The abstract comparison (==) attempts to convert both operands to the same type before comparing them.
With relational abstract comparisons (<=), both operands are converted to primitives, then to the same type before comparison.
Strings are compared using Unicode values based on standard ordering.
Features of comparisons:
Two strings are considered strictly equal when they have the characters in the same sequence and the same length.
Two numbers are considered strictly equal when they are the both of the type number and are numerically equal.
This means that both 0 and -0 are strictly equal since they both evaluate to 0.
Note that NaN is a special value and is not equal to anything, including NaN.
Two Boolean operands are considered strictly equal if both are true or false.
Two objects are never considered equal in both strict or abstract comparisons.
Expressions that compare objects are only considered true if the operands both reference the same exact object instance.
Null and undefined are both considered strictly equal to themselves (null === null) and abstractly equal to each other (null == undefined)
Equality operators
Equality (==)
The equality operator first converts operands that are not of the same type, then strictly compares them to one another.
The inequality operator evaluates to true if both operands are not equal.
If the operands are not the same type, it will try to convert them to the same type before making the comparison.
The identity or strict equality operator returns true if both operands are strictly equal in terms of value and type.
Unlike the equality operator (==), it will not attempt to convert the operands to the same type.
Syntax
x === y
Examples
3 === 3 // true
3 === '3' // false
Non-identity / strict inequality (!==)
The non-identity or strict inequality operator returns true if both operands are not strictly equal in terms of value or type.
Syntax
x !== y
Examples
3 !== '3' // true
4 !== 3 // true
Relational operators
Greater than operator (>)
The greater than operator returns true if the operand on the left is greater than the one on the right.
Syntax
x > y
Examples
4 > 3 // true
Greater than or equal operator (>=)
The greater than or equal operator returns true if the operand on the left is greater than or equal to the one on the right.
Syntax
x >= y
Examples
4 >= 3 // true
3 >= 3 // true
Less than operator (<)
The less than operator returns true if the operand on the left is less than the one on the right.
Syntax
x < y
Examples
3 < 4 // true
Less than or equal operator (<=)
The less than or equal operator returns true if the operand on the left is less than or equal to the one on the right.
Syntax
x <= y
Examples
3 <= 4 // true
Form Validation Example
Form validation used to occur at the server, after the client had entered all the necessary data and then pressed the Submit button.
If the data entered by a client was incorrect or was simply missing, the server would have to send all the data back to the client and request that the form be resubmitted with correct information.
This was really a lengthy process which used to put a lot of burden on the server.
JavaScript provides a way to validate form’s data on the client’s computer before sending it to the web server.
Form validation generally performs two functions:
Basic Validation
First of all, the form must be checked to make sure all the mandatory fields are filled in.
It just requires a loop through each field in the form to check for data.
Data Format Validation
Secondly, the data that is entered must be checked for correct form and value.
Your code must include appropriate logic to test the correctness of the data.
First let us see how to do a basic form validation.
In the above form, we are calling validate() to validate data when the onsubmit event is occurring.
The following code shows the implementation of this validate()function.
<script type="text/javascript">
// Form validation code will come here.
function validate()
{
if( document.myForm.Name.value == "" )
{
alert( "Please provide your name!" );
document.myForm.Name.focus() ;
return false;
}
if( document.myForm.EMail.value == "" )
{
alert( "Please provide your Email!" );
document.myForm.EMail.focus() ;
return false;
}
if( document.myForm.Zip.value == "" ||
isNaN( document.myForm.Zip.value ) ||
document.myForm.Zip.value.length != 5 )
{
alert( "Please provide a zip in the format #####." );
document.myForm.Zip.focus() ;
return false;
}
if( document.myForm.Country.value == "-1" )
{
alert( "Please provide your country!" );
return false;
}
return( true );
}
</script>
Now we will see how we can validate our entered form data before submitting it to the web server.
The following example shows how to validate an entered email address.
An email address must contain at least an ‘@’ sign and a dot (.).
Also, the ‘@’ must not be the first character of the email address, and the last dot must at least be one character after the ‘@’ sign.
Some of the commonly used HTML5 constraints for <input> are the type attribute (e.g.
type="password"), maxlength, required and disabled.
A less commonly used constraint is the pattern attribute that takes a JavaScript regular expression.
If statement example
The if statement executes a statement if a specified condition is true.
If the condition is false, another statement can be executed using the else statement.
Note: The else statement is optional.
if (condition)
/* do something */
else
/* do something else */
Multiple if...else statements can be chained to create an else if clause.
This specifies a new condition to test and can be repeated to test multiple conditions, checking until a true statement is presented to execute.
if (condition1)
/* do something */
else if (condition2)
/* do something else */
else if (condition3)
/* do something else */
else
/* final statement */Note: If you want to execute more than one statement in the if, else or else if part, curly braces are required around the statements:
if (condition) {
/* do */
/* something */
/* with multiple statements */
} else {
/* do something */
/* else */
}MDN link | MSDN linkExamplesUsingif...else:
// If x=5 z=7 and q=42.
If x is not 5 then z=19.
if (x == 5) {
z = 7;
q = 42
else
z = 19;Usingelse if:
if (x < 10)
return "Small number";
else if (x < 50)
return "Medium number";
else if (x < 100)
return "Large number";
else {
flag = 1;
return "Invalid number";
}
Prototype Example
JavaScript is a prototype-based language, therefore understanding the prototype object is one of the most important concepts which JavaScript practitioners need to know.
This section will give you a short overview of the Prototype object through various examples.
Before reading this part, you will need to have a basic understanding of the this reference in JavaScript.
Prototype object
For the sake of clarity, let’s examine the following example:
function Point2D(x, y) {
this.x = x;
this.y = y;
}
As Point2D function is declared, a default property named prototype will be created for it (note that, in JavaScript, a function is also an object).
The prototype property is an object which contains a constructorproperty and its value is Point2D function: Point2D.prototype.constructor = Point2D.
And when you call Point2D with new keyword, newly created objects will inherit all properties fromPoint2D.prototype.
To check that, you can add a method named move into Point2D.prototype as follows:
Point2D.prototype.move = function(dx, dy) {
this.x += dx;
this.y += dy;
}
var p1 = new Point2D(1, 2);
p1.move(3, 4);
console.log(p1.x); // 4
console.log(p1.y); // 6
The Point2D.prototype is called prototype object or prototype of p1 object and for any other object created with new Point2D(...) syntax.
You can add more properties to Point2D.prototype object as you like.
The common pattern is to declare methods to Point2D.prototype and other properties will be declared in the constructor function.
Built-in objects in JavaScript are constructed in a similar manner.
For example:
Prototype of objects created with new Object() or {} syntax is Object.prototype.
Prototype of arrays created with new Array() or [] syntax is Array.prototype.
And so on with other built-in objects such as Date and RegExp.
Object.prototype is inherited by all objects and it has no prototype (its prototype is null).
Prototype chain
The prototype chain mechanism is simple: When you access a property p on object obj, the JavaScript engine will search this property inside obj object.
If the engine fails to search, it continues searching in the prototype of obj object and so on until reaching Object.prototype.
If after the search has finished, and nothing has been found, the result will be undefined.
For example:
var obj1 = {
a: 1,
b: 2
};
var obj2 = Object.create(obj1);
obj2.a = 2;
console.log(obj2.a); // 2
console.log(obj2.b); // 2
console.log(obj2.c); // undefined
In above snippet, the statement var obj2 = Object.create(obj1) will create obj2 object with prototype obj1 object.
In other words, obj1 becomes the prototype of obj2 instead of Object.prototype by default.
As you can see, b is not a property of obj2; you can still access it via the prototype chain.
For the c property, however, you get an undefined value because it can’t be found in obj1 and Object.prototype.
Classes
In ES2016, we now get to use the Class keyword as well as the methods mentioned above to manipulate prototype.
The JavaScript Class appeals to developers from OOP backgrounds, but it’s essentially doing the same thing as above.
class Rectangle {
constructor(height, width) {
this.height = height
this.width = width
}
get area() {
return this.calcArea()
}
calcArea() {
return this.height * this.width
}
}
const square = new Rectangle(10, 10)
console.log(square.area) // 100
This is basically the same as:
function Rectangle(height, width) {
this.height = height
this.width = width
}
Rectangle.prototype.calcArea = function calcArea() {
return this.height * this.width
}
The getter and setter methods in classes bind an Object property to a function that will be called when that property is looked up.
It’s just syntactic sugar to help make it easier to look up or set properties.
Scope Example
If you’ve been programming in JavaScript for a while, you’ve undoubtedly run into a concept known as scope.
What is scope? Why should you take the time to learn it?
In programmer speak, scope is the current context of execution.
Confused? Let’s take a look at the following piece of code:
var foo = 'Hi, I am foo!';
var baz = function() {
var bar = 'Hi, I am bar too!';
console.log(foo);
}
baz(); // Hi, I am foo!
console.log(bar); // ReferenceError...
This is a simple example, but it does a good job of illustrating what is known as Lexical scope.
JavaScript, and almost every other programming language, has a Lexical scope.
There is another kind of scope known as Dynamic scope, but we won’t be discussing that.
Now, the term Lexical scope sounds fancy, but as you will see it’s really simple in principle.
In a Lexical Scope, there are two kinds of scopes: the global scope and a local scope.
Before you type the first line of code in your program, a global scope is created for you.
This contains all the variables that you declare in your program outside any functions.
In the example above, the variable foo is in the global scope of the program, while the variable bar is declared inside a function and is therefore in the local scope of that function.
Let's break down the example line by line.
While you might be confused at this point, I promise you will have a much better understanding by the time you finish reading this.
On line 1 we are declaring the variable foo.
Nothing too fancy here.
Let's call this a left-hand size (LHS) reference to foo, because we are assigning a value to foo and it’s on the left-hand side of the equal sign.
On line 3, we are declaring a function and assigning it to variable baz.
This is another LHS reference to baz.
We are assigning a value to it (remember, functions are values too!).
This function is then called on line 8.
This is a RHS, or a right-hand side reference to baz.
We are retrieving baz’s value, which in this case is a function and then invoking it.
Another RHS reference to baz would be if we assigned its value to another variable, for example foo = baz.
This would be a LHS reference to foo and a RHS reference to baz.
The LHS and RHS references might sound confusing, but they are important for discussing scope.
Think of it this way: a LHS reference is assigning a value to the variable, while a RHS reference is retrieving the value of the variable.
They’re just a shorter and more convenient way of saying ‘retrieving the value’ and ‘assigning a value’.
Let’s now break down what’s happening inside the function itself.
When the compiler compiles the code inside a function, it enters the function’s local scope.
On line 4, the variable bar is declared.
This is a LHS reference to bar.
On the next line, we have a RHS reference to foo inside the console.log().
Remember, we are retrieving foo’s value and then passing it as an argument to the method console.log().
When we have a RHS reference to foo, the compiler looks for the declaration of the variable foo.
The compiler doesn’t find it in the function itself, or the function’s local scope, so it goes up one level: to the global scope.
At this point you’re probably thinking that scope has something to do with variables.
That is correct.
A scope can be thought of as a container for variables.
All variables that are created within a local scope are only accessible in that local scope.
However, all local scopes can access the global scope.
(I know you’re probably even more confused right now, but just bear with me for a few more paragraphs).
So the compiler goes up to the global scope to find a LHS reference to the variable foo.
It finds one on line 1, so it retrieves the value from the LHS reference, which is a string: 'Hi, I am foo!'.
This string is sent to the console.log() method, and outputted to the console.
The compiler has finished executing the code inside the function, so we come back out to line 9.
On line 9, we have a RHS reference for the variable bar.
Now, bar was declared in the local scope of baz, but there is a RHS reference for bar in the global scope.
Since there is no LHS reference for bar in the global scope, the compiler can’t find a value for bar and throws a ReferenceError.
But, you might ask, if the function can look outside itself for variables, or a local scope can peek into the global scope to find LHS references, why can’t the global scope peek into a local scope? Well that’s how lexical scope works!
...
// global scope
var baz = function() {
...
// baz's scope
}
...
/// global scope
This is the same code from above which illustrates the scope.
This forms a sort of hierarchy that goes up to the global scope:
baz -> global.
So, if there is a RHS reference for a variable inside baz’s scope, it can be fulfilled by a LHS reference for that variable in the global scope.
But the opposite is not true.
What if we had another function inside baz?
...
// global scope
var baz = function() {
...
// baz's scope
var bar = function() {
...
// bar's scope.
}
}
...
/// global scope
In this case, the hierarchy or the scope chain would look like this:
bar -> baz -> global
Any RHS references inside bar’s local scope can be fulfilled by LHS references in the global scope or baz’s scope, but a RHS reference in baz’s scope cannot be fulfilled by a LHS reference in bar’s scope.
You can only traverse down a scope chain, not up.
There are other two important things you should know about JavaScript scopes.
Scopes are declared by functions, not by blocks.
Functions can be forward-referenced, variables can’t.
Observe (each comment describes scope at the line that it’s written on):
// outer() is in scope here because functions can be forward-referenced
function outer() {
// only inner() is in scope here
// because only functions are forward-referenced
var a = 1;
//now 'a' and inner() are in scope
function inner() {
var b = 2
if (a == 1) {
var c = 3;
}
// 'c' is still in scope because JavaScript doesn't care
// about the end of the 'if' block, only function inner()
}
// now b and c are out of scope
// a and inner() are still in scope
}
// here, only outer() is in scope
Do While loop example
The do...while loop is closely related to the loop.
In the do while loop, the condition is checked at the end of the loop.
Here is the syntax for do...while loop:
Syntax:
do {
*Statement(s);*
} while (*condition*);
statement(s): A statement that is executed at least once before the condition or Boolean expression is evaluated and is re-executed each time the condition evaluates to true.
condition: Here, a condition is a Boolean expression.
If the Boolean expression evaluates to true, the statement is executed again.
When the Boolean expression evaluates to false, the loops ends.
Example:
var i = 0;
do {
i = i + 1;
console.log(i);
} while (i < 5);
create Desktop Apps
convert html, css and javascript into a exe
Two very good open-source and extremely actively developed options are
Electron, by GitHub.
Cordova, by the Apache Foundation.
Targets Android, iOS, and Windows from HTML/JavaScript/CSS.
Proton Native.
Works with React Native components and does not use Electron (see above), which makes generated apps therefore more "lightweight" than the ones generated by Electron.
HTML Compiler convert an entire HTML application (using CSS, JavaScript, Images and more) into an standalone Windows application.
ExeOutput for PHP that lets you create applications in native format for Windows with PHP, JavaScript and HTML.
Convert PHP scripts, websites, JavaScript, HTML, databases into stand-alone apps for Windows (single EXE files) that do not require a Web server nor PHP distribution.
ElectronElectronElectron is an open-source framework initially built by GitHub for Atom editor in 2013.
This library lets you create desktop GUI applications with web technologies like JavaScript, HTML and CSS.
NW.jsNW.js
The next on our list of the best JavaScript frameworks for desktop apps is NW.js, previously known as the node-webkit.
It was built at Intel’s Open Source Technology Center by combining Node.js framework with a Chromium engine (previously known as Webkit).
Available on Linux, Mac OS, and Windows.
AppJSAppJS
AppJS is a simple yet powerful tool that you can use to build cross-platform apps without the need to learn new languages.
Similarly to the other libraries mentioned today, you’re fine as long as you’re familiar with HTML, CSS and JavaScript.
Although it’s the oldest Node.js-Chromium framework in the AppJS, Electron and NW.js trio, it’s not nearly as mature as its competition.
Because it has lost its momentum, it may not be the best choice for new projects.
MeteorMeteor
Although it does not build desktop apps on its own, it can be used with Cordova or other similar tools to produce them.
It uses MongoDB, Distributed Data Protocol, and a publish-subscribe pattern to auto-propagate the changes without developer interference.
It has both front-end and back-end modules, including the API, build tools, Node.js packages.
Proton NativeProton Native
Proton Native is a fresh release.
It was made available on GitHub in the early months of 2018.
It works quite differently to Electron, which runs a full Chromium browser to manage a small GUI.
Proton Native, on the other hand, uses native tools, takes less space and needs fewer resources.
This solution has a few other advantages – it uses the same syntax as React Native, works with React libraries including Redux and is compatible with Node.js.
Summary
To sum up, JavaScript frameworks for desktop apps can be divided into three categories:
Frameworks that produce web browser hosted desktop apps, based on Node.js and Chromium (Electron, NW.js, AppJS).
Frameworks that need to be used with Cordova-like tools (Meteor).
Frameworks that use genuinely native components to build a desktop app (Proton Native).
First, create a project directory and a package.json file under it.
Now direct to the folder and make a package.json inside it.
mkdir AwesomeProject
cd /AwesomeProject
npm init
Enter the project details if you wish or skip.
2.
CREATE A VIEW
Now create the file we wanted to be viewed when opening our app.
Electron uses HTML to render the view and so we need to create an index.html file.
index.html
<html>
<head>
<title>Hello World Application</title>
</head>
<body>
<h1>Hello World</h1>
</body>
</html>
3.
CREATE AN INDEX.JS FILE
In package.json, we programmed that the root file of our project is index.js.
So we need to create it.
index.js
const { app, BrowserWindow } = require("electron");
const url = require("url");
function newApp() {
win = new BrowserWindow();
win.loadURL(
url.format({
pathname: "index.html",
slashes: true
})
);
}
app.on("ready", newApp);
4.
RUNNING OUR APPLICATION
Now we can run our Electron app using the command below.
electron .
Electron Packager
'electron-packager' is not recognized as an internal or external command
Install it using:
npm install -g electron-packager
Suggested to use one of the options from ia32, x64, armv7l, arm64, mips64el
electron-packager sourcedir appname --platform=win32 --arch=x64
electron-packager AwesomeProject jsNotes --platform=win32 --arch=x64
electron-packager' is not recognized as an internal or external command,
Unable to determine Electron version.
Please specify an Electron version
my package.json is like this were to put the --electron-version ??
Install electron as dev-dependency to resolve this issue
npm install --save-dev electron
And to build for Windows you can run this from the git bash:
electron-packager .
jsNOtes --overwrite --asar=true --platform=win32 --arch=x64 --icon=assets/icons/win/icon.ico --prune=true --out=release-builds --version-string.CompanyName=CE --version-string.FileDescription=CE --version-string.ProductName="jsNOtes"
cannot run app after electron-packager
A complete guide to packaging your Electron app
Packaging an electron app simply means creating a desktop installer (dmg, exe, deb etc).
Now if you decide to go around manually packaging your app, you’re gonna have a bad time.
Luckily there are modules, especially the two mentioned below which make the task easier.
We’ll be using electron-builder since it has a built-in support for Code Signing/Auto Update etc.
Configure your app to use electron-builder :
Create a directory build in the root of the project and save a background.png (macOS DMG background), icon.icns (macOS app icon) and icon.ico (Windows app icon) into it.
The Linux icon set will be generated automatically based on the macOS.
Ex.
zulip-electron/build
Add electron-builder to your app devDependencies by running:
npm install electron-builder --save-dev
In electron-builder you could use two package.json structure as well as single package.json.
We’ll be using single package.json structure since it’s easier to maintain.
Sample One package.json
{
"name": "yourappname",
"version": "0.0.1",
"license": "MIT",
"description": "your app description",
"author": "xyz <xyz@gmail.com>",
"main": "./app/index.js",
"scripts": {
"postinstall": "install-app-deps",
"start": "npm install && electron ./app",
"pack": "build --dir",
"dist": "build"
},
"build": {
"appId": "yourappid",
"category": "your.app.category.type",
"dmg": {
"contents": [
{
"x": 110,
"y": 150
},
{
"x": 240,
"y": 150,
"type": "link",
"path": "/Applications"
}
]
},
"linux": {
"target": [
"AppImage",
"deb"
]
},
"win": {
"target": "squirrel",
"icon": "build/icon.ico"
}
},
"dependencies": {},
"devDependencies": {
"electron": "latest",
"electron-builder": "latest"
}
}
view rawpackage.json hosted with ❤ by GitHub
On windows build you can also use NSIS target which is the default one and recommended by electron-builder.
"win": { "target": "NSIS"}
That’s it.
You’ve successfully configured electron-builder.
Now let’s build the installers.
To package your app into an installer use command:
npm run dist
It will create an installer in ./dist folder.
By default build command will only generate the installer for current platform and current arch.
For an ex.
running it on OSX will create —
$ npm run dist
|-- mac
| |-- appname-version-mac.zip
| |-- appname-version.dmg
| |-- appname.app
On Windows -
# When using target — Squirrel$ npm run dist
|-- win
| |-- REALESES
| |-- appnameSetupversion.exe
| |-- appname-version-full.nupkg
|-- win-unpacked# When using target — NSIS$ npm run dist
|-- win
| |-- appnameSetupversion.exe
|-- win-unpacked
On Linux -
$ npm run dist
|-- appname-version.AppImage
|-- appname-version.deb
|-- linux-unpacked
electron-builder is highly configurable.
For complete usage check out its wiki.
zulip-electron (two package.json) and onshape-desktop-shell (one package.json) are some real world projects that use electron-builder for their packaging.
scroll to div bottom, scrollTop, clientHeight and offsetTop
lazyload1
<script src="https://cdn.jsdelivr.net/npm/vanilla-lazyload@13.0.1/dist/lazyload.min.js"></script>
2
<img class="lazy" data-src="lazy.jpg" />
Then, in your javascript code:
3
place script at end of page:
var lazyLoadInstance = new LazyLoad({
elements_selector: ".lazy"
// ...
more custom settings?
});
Lazy video
<video class="lazy" controls data-src="lazy.mp4" data-poster="lazy.jpg">
<source type="video/mp4" data-src="lazy.mp4" />
<source type="video/ogg" data-src="lazy.ogg" />
<source type="video/avi" data-src="lazy.avi" />
</video>
Please note that the video poster can be lazily loaded too.
To be sure that DOM for your lazy content is ready when you instantiate LazyLoad, place the script tag right before the closing tag.
If more DOM arrives later, e.g.
via an AJAX call, you'll need to call lazyLoadInstance.update(); to make LazyLoad check the DOM again.
lazyLoadInstance.update();
lazy iFrame
<iframe class="lazy" data-src="lazyFrame.html"></iframe>
check if variable exists (is defined/initialized)
this creates a switch in the page to turn on/off certain function
if (typeof variable !== 'undefined') {
if(typeof elem === 'string' && elem.trim()) {
or
elem != null
showTopicNumber = true;
if (typeof(showTopicNumber) !== 'undefined'){
if (showTopicNumber == true){
toc.append(topicNumber +' '+topic.html()+' ');
}else{
toc.append(''+topic.html()+' ');
}
}else{
toc.append(''+topic.html()+' ');
}
HTML5 - Web SQL Database
W3C no longer maintains this specification.
The Web SQL Database API isn't actually part of the HTML5 specification but it is a separate specification which introduces a set of APIs to manipulate client-side databases using SQL.
The Core Methods
There are following three core methods defined in the spec that I am going to cover in this tutorial −
openDatabase − This method creates the database object either using existing database or creating new one.
transaction − This method gives us the ability to control a transaction and performing either commit or rollback based on the situation.
executeSql − This method is used to execute actual SQL query.
Opening Database
The openDatabase method takes care of opening a database if it already exists, this method will create it if it already does not exist.
To create and open a database, use the following code −
var db = openDatabase('mydb', '1.0', 'Test DB', 2 * 1024 * 1024);
The above method took the following five parameters −
Database name
Version number
Text description
Size of database
Creation callback
The last and 5th argument, creation callback will be called if the database is being created.
Without this feature, however, the databases are still being created on the fly and correctly versioned.
Executing queries
To execute a query you use the database.transaction() function.
This function needs a single argument, which is a function that takes care of actually executing the query as follows −
var db = openDatabase('mydb', '1.0', 'Test DB', 2 * 1024 * 1024);
db.transaction(function(tx) {
tx.executeSql('CREATE TABLE IF NOT EXISTS LOGS (id unique, log)');
});
The above query will create a table called LOGS in 'mydb' database.
INSERT Operation
To create enteries into the table we add simple SQL query in the above example as follows −
var db = openDatabase('mydb', '1.0', 'Test DB', 2 * 1024 * 1024);
db.transaction(function(tx) {
tx.executeSql('CREATE TABLE IF NOT EXISTS LOGS (id unique, log)');
tx.executeSql('INSERT INTO LOGS (id, log) VALUES (1, "foobar")');
tx.executeSql('INSERT INTO LOGS (id, log) VALUES (2, "logmsg")');
});
We can pass dynamic values while creating entering as follows −
var db = openDatabase('mydb', '1.0', 'Test DB', 2 * 1024 * 1024);
db.transaction(function(tx) {
tx.executeSql('CREATE TABLE IF NOT EXISTS LOGS (id unique, log)');
tx.executeSql('INSERT INTO LOGS (id,log) VALUES (?, ?'), [e_id, e_log];
});
Here e_id and e_log are external variables, and executeSql maps each item in the array argument to the "?"s.
READ Operation
To read already existing records we use a callback to capture the results as follows −
var db = openDatabase('mydb', '1.0', 'Test DB', 2 * 1024 * 1024);
db.transaction(function(tx) {
tx.executeSql('CREATE TABLE IF NOT EXISTS LOGS (id unique, log)');
tx.executeSql('INSERT INTO LOGS (id, log) VALUES (1, "foobar")');
tx.executeSql('INSERT INTO LOGS (id, log) VALUES (2, "logmsg")');
});
db.transaction(function(tx) {
tx.executeSql('SELECT * FROM LOGS', [], function(tx, results) {
var len = results.rows.length, i;
msg = "<p>Found rows: " + len + "</p>";
document.querySelector('#status').innerHTML += msg;
for (i = 0; i < len; i++) {
alert(results.rows.item(i).log );
}
}, null);
});
Final Example
So finally, let us keep this example in a full-fledged HTML5 document as follows and try to run it with Safari browser.
Live Demo
<!DOCTYPE HTML>
<html>
<head>
<script type = "text/javascript">
var db = openDatabase('mydb', '1.0', 'Test DB', 2 * 1024 * 1024);
var msg;
db.transaction(function(tx) {
tx.executeSql('CREATE TABLE IF NOT EXISTS LOGS (id unique, log)');
tx.executeSql('INSERT INTO LOGS (id, log) VALUES (1, "foobar")');
tx.executeSql('INSERT INTO LOGS (id, log) VALUES (2, "logmsg")');
msg = '<p>Log message created and row inserted.</p>';
document.querySelector('#status').innerHTML = msg;
})
db.transaction(function(tx) {
tx.executeSql('SELECT * FROM LOGS', [], function(tx, results) {
var len = results.rows.length, i;
msg = "<p>Found rows: " + len + "</p>";
document.querySelector('#status').innerHTML += msg;
for (i = 0; i < len; i++) {
msg = "<p><b>" + results.rows.item(i).log + "</b></p>";
document.querySelector('#status').innerHTML += msg;
}
}, null);
});
</script>
</head>
<body>
<div id = "status" name = "status">Status Message</div>
</body>
</html>
This will produce the following result −
Log message created and row inserted.
Found rows: 2
foobar
logmsg
There are a few different ways to define a function in JavaScript:
A Function Declaration defines a named function.
To create a function declaration you use the function keyword followed by the name of the function.
When using function declarations, the function definition is hoisted, thus allowing the function to be used before it is defined.
function name(parameters){ statements}
A Function Expressions defines a named or anonymous function.
An anonymous function is a function that has no name.
Function Expressions are not hoisted, and therefore cannot be used before they are defined.
In the example below, we are setting the anonymous function object equal to a variable.
let name = function(parameters){
statements
}
An Arrow Function Expression is a shorter syntax for writing function expressions.
Arrow functions do not create their own this value.
let name = (parameters) => {
statements
}
Parameters vs.
Arguments.
If you’re new to JavaScript, you may have heard the terms
parameters and arguments used interchangeably.
While very similar, there is an important distinction to make between these two keywords.
Parameters are used when defining a function, they are the
names created in the function definition.
In fact, during a function definition, we can pass in up to 255 parameters! Parameters are separated by commas in the ().
Here’s an example with two parameters — param1 & param2:
const param1 = true;
const param2 = false;function twoParams(param1, param2){
console.log(param1, param2);}Arguments, on the other hand, are the
values the function receives from each parameter when the function is executed (invoked).
In the above example, our two arguments are true & false.
Invoking a Function.
Functions execute when the function is called.
This process is known as invocation.
You can invoke a function by referencing the function name, followed by an open and closed parenthesis: ().
Lets explore an example.
First, we’ll define a function named logIt.
This function will take one parameter, name.
When executed, the function will log that name back to the console:
function logIt(name){
console.log(name);}
To invoke our function, we call it, while passing in the singular parameter.
Here I am calling this function with the name
Joe:
logIt('Joe');
// Joe
If your function has no parameters, you can invoke it with an empty set of parenthesis:
function logIt2(){
console.log('The second one');}logIt2();
// The second one
Function Return.
Every function in JavaScript returns undefined unless otherwise specified.
Let’s test this by creating and invoking an empty function:
function test(){};test();
// undefined
Awesome, as expected, undefined is returned.
Now, we can customize what is returned in our function by using the return keyword followed by our return value.
Take a look at the code below:
function test(){
return true;
};test();
// true
In this example we explicitly tell the function to return true.
When we invoke the function, that’s exactly what happens.
But why is this important?
It’s important because the value that a function returns, is actually returned to the caller of the function.
Take a look at this code:
let double = function(num) {
return num * 2;
}
This is a function expression that creates a function that will return two times the value of our input parameter num.
We can then invoke the function and save the return value to a variable:
let test = double(3);
When we log out our test value, we get 6:
console.log(test);
// 6
Awesome! The return variable not only returns values from a function, but it assigns them to whatever called the function!
Another important rule of the return statement is that it stops function execution immediately.
Consider this example where we have two return statements in our test function:
function test(){
return true;
return false;
};test();
// true
The first return statement immediately stops execution of our function and causes our function to return true.
The code on line three: return false; is
never executed.
Function Objects.
Functions are function objects.
In JavaScript, anything that is not a primitive type ( undefined, null,boolean, number, or string) is an object.
Objects in JavaScript are extremely versatile.
Because of this, we can even pass a function as a parameter into another function.
When a function accepts another function as a parameter, or returns a function, it is called a higher-order function.
You’ve probably already used a bunch of higher order functions and don’t even know it: Array.prototype.mapand Array.prototype.filter are higher order functions (Just to name a couple).
You can check out some of my previous articles to learn more about objects and higher order functions in JavaScript…
Key Takeaways.
This is a lot of information to digest.
Here’s a list of the important stuff:
A function is a subprogram designed to perform a particular task.
Function definitions are hoisted — expressions are not.
Functions are executed when they are called.
This is known as invoking a function.
Values can be passed into functions and used within the function.
The name of the value is called a parameter.
The actual value itself is called an argument.
Functions alwaysreturn a value.
In JavaScript, if no return value is specified, the function will return undefined by default.
Functions are objects.
What is a Function Expression?
A JavaScript function can also be defined using an expression.
A function expression can be stored in a variable:
var x = function(a, b) {return a * b};
After a function expression has been stored in a variable, the variable can be used as a function.
Functions stored in variables do not need function names.
They are always invoked (called) using the variable name.
Function Expression VS.
Function Statement
Example: Function Expressionalert(foo()); // ERROR! foo wasn't loaded yet
var foo = function() { return 5; }Example: Function Declarationalert(foo()); // Alerts 5.
Declarations are loaded before any code can run. function foo() { return 5; }Function declarations load before any code is executed while Function expressions load only when the interpreter reaches that line of code.Similar to the var statement, function declarations are hoisted to the top of other code.
Function expressions aren’t hoisted, which allows them to retain a copy of the local variables from the scope where they were defined.
Benefits of Function Expressions
There are several different ways that function expressions become more useful than function declarations.
"use strict"
Defines that JavaScript code should be executed in "strict mode".
With strict mode, you can not, for example, use undeclared variables.
"use strict";
x = 3.14; // This will cause an error (x is not defined).
"use strict";
myFunction();
function myFunction() {
y = 3.14; // This will also cause an error because y is not declared
}
Declared inside a function, it has local scope (only the code inside the function is in strict mode):
x = 3.14; // This will not cause an error.
myFunction();
function myFunction() {
"use strict";
y = 3.14; // This will cause an error
}
Why Strict Mode?
Strict mode makes it easier to write "secure" JavaScript.
Strict mode changes previously accepted "bad syntax" into real errors.
As an example, in normal JavaScript, mistyping a variable name creates a new global variable.
In strict mode, this will throw an error, making it impossible to accidentally create a global variable.
In normal JavaScript, a developer will not receive any error feedback assigning values to non-writable properties.
In strict mode, any assignment to a non-writable property, a getter-only property, a non-existing property, a non-existing variable, or a non-existing object, will throw an error.
Calculate the Max/Min value from an array
The built-in functions Math.max() and Math.min() find the maximum and minimum value of the arguments, respectively.
Math.max(1, 2, 3, 4); // 4
Math.min(1, 2, 3, 4); // 1
These functions will not work as-is with arrays of numbers.
However, there are some ways around this.
var numbers = [1, 2, 3, 4];
Math.max.apply(null, numbers) // 4
Math.min.apply(null, numbers) // 1
A simpler way is with the new spread operator.
var numbers = [1, 2, 3, 4];
Math.max(...numbers) // 4
Math.min(...numbers) // 1
This operator spread the values into the function.
subtopic.js
subtopic.js not yet finished
load json from url
$.getJSON(url, function(data) {
//data is the JSON string
});
Append <script></script> in javascript
<script src="http://web.ifzq.gtimg.cn/appstock/app/hkfqkline/get?_var=kline_monthqfq¶m=hk00700,month,,,320,qfq"></script>
<script>
console.log(kline_monthqfq);
</script>
var s = document.createElement("script");
s.type = "text/javascript";
s.src = "http://somedomain.com/somescript";
$("head").append(s);
Note that the script will load and you can access the variables inside it, but you wouldn't see the actual <script> tag in the DOM.
PhantomJS
PhantomJS - Scriptable Headless Browserphantomjs documentationQuick Start with PhantomJS
PhantomJS is a JS console.
similar to nodejs
must go to phantomjs install folder, and then run it from the terminal or command prompt:
cd D:/phantomjs/bin/
phantomjs hello.js
the file must inside the install folder
very important to call phantom.exit at some point in the script, otherwise PhantomJS will not be terminated at all.
Page Loading
A web page can be loaded, analyzed, and rendered by creating a webpage object.
The following script demonstrates the simplest use of page object.
It loads example.com and then saves it as an image, example.png in the same directory the script was run in.
var page = require('webpage').create();
page.open('http://example.com', function(status) {
console.log("Status: " + status);
if(status === "success") {
page.render('example.png');
}
phantom.exit();
});
Because of its rendering features, PhantomJS can be used to capture web pages, essentially taking a screenshot of the contents.
The following loadspeed.js script loads a specified URL (do not forget the http protocol) and measures the time it takes to load it.
var page = require('webpage').create(),
system = require('system'),
t, address;
if (system.args.length === 1) {
console.log('Usage: loadspeed.js [some URL]');
phantom.exit();
}
t = Date.now();
address = system.args[1];
page.open(address, function(status) {
if (status !== 'success') {
console.log('FAIL to load the address');
} else {
t = Date.now() - t;
console.log('Loading ' + system.args[1]);
console.log('Loading time ' + t + ' msec');
}
phantom.exit();
});
Run the script with the command:
phantomjs loadspeed.js http://www.google.com
It outputs something like:
Loading http://www.google.com
Loading time 719 msec
Code Evaluation
To evaluate JavaScript code in the context of the web page, use evaluate() function.
The execution is "sandboxed", there is no way for the code to access any JavaScript objects and variables outside its own page context.
An object can be returned from evaluate(), however it is limited to simple objects and can’t contain functions or closures.
Here is an example to show the title of a web page:
var page = require('webpage').create();
page.open(url, function(status) {
var title = page.evaluate(function() {
return document.title;
});
console.log('Page title is ' + title);
phantom.exit();
});
Any console message from a web page, including from the code inside evaluate(), will not be displayed by default.
To override this behavior, use the onConsoleMessage callback.
The previous example can be rewritten to:
var page = require('webpage').create();
page.onConsoleMessage = function(msg) {
console.log('Page title is ' + msg);
};
page.open(url, function(status) {
page.evaluate(function() {
console.log(document.title);
});
phantom.exit();
});
Since the script is executed as if it is running on a web browser, standard DOM scripting and CSS selectors work just fine.
It makes PhantomJS suitable to carry out various page automation tasks.
if (lemons) document.write("foo gave me a bar");
(lemons) ? alert("please give me a lemonade") : alert("then give me a beer");
(lemon) ? document.write("foo gave me a bar") : document.write("FALSE");
if(dog) alert('bark bark');
if-else shorthand omitting the second expression
if (x==2) doSomething; else doSomethingElse
if (myArray[i].value) alert('yay') ; else continue;
calculate ema
function EMACalc(mArray,mRange) {
var k = 2/(mRange + 1);
// first item is just the same as the first item in the input
emaArray = [mArray[0]];
// for the rest of the items, they are computed with the previous one
for (var i = 1; i < mArray.length; i++) {
emaArray.push(mArray[i] * k + emaArray[i - 1] * (1 - k));
}
return emaArray;
}
remove empty element in an array
var array = [0, 1, null, 2, "", 3, undefined, 3,,,,,, 4,, 4,, 5,, 6,,,,];
var filtered = array.filter(function(el) {
return el != null;
});
alert(filtered);
or
arr = arr.filter((val) => val != "");
document.createElement(“script”) synchronously
create <script> element with an "onload" handler, and that will be called when the script has been loaded and evaluated by the browser.
var script = document.createElement('script');
script.onload = function() {
alert("Script loaded and ready");
};
script.src = "http://whatever.com/the/script.js";
document.getElementsByTagName('head')[0].appendChild(script);
This isn't pretty, but it works:
<script type="text/javascript">
document.write('<script type="text/javascript" src="other.js"></script>');
</script>
<script type="text/javascript">
functionFromOther();
</script>
Or
<script type="text/javascript">
document.write('<script type="text/javascript" src="other.js"></script>');
window.onload = function() {
functionFromOther();
};
</script>
another way:
var d=document,
g=d.createElement('script'),
s=d.getElementsByTagName('script')[0];
g.type='text/javascript';
g.async=true;
g.src=u+'m.js';
s.parentNode.insertBefore(g, s);
JSON methods, toJSON
Let’s say we have a complex object, and we’d like to convert it into a string, to send it over a network, or just to output it for logging purposes.
let user = {
name: "John",
age: 30,
toString() { return `{name: "${this.name}", age: ${this.age}}`; }
};
alert(user); // {name: "John", age: 30}
…But in the process of development, new properties are added, old properties are renamed and removed.
Updating such toString every time can become a pain.
JavaScript provides methods:
JSON.stringify to convert objects into JSON.
JSON.parse to convert JSON back into an object.
For instance, here we JSON.stringify a student:
let student = {
name: 'John',
age: 30,
isAdmin: false,
courses: ['html', 'css', 'js'],
wife: null
};
let json = JSON.stringify(student);
alert(typeof json); // we've got a string!
alert(json);
/* JSON-encoded object:
{
"name": "John",
"age": 30,
"isAdmin": false,
"courses": ["html", "css", "js"],
"wife": null
}
*/
The method JSON.stringify(student) takes the object and converts it into a string.
The resulting json string is called a JSON-encoded or serialized or stringified or marshalled object.
We are ready to send it over the wire or put into a plain data store.
Please note that a JSON-encoded object has several important differences from the object literal:
Strings use double quotes.
No single quotes or backticks in JSON.
So 'John' becomes "John".
Object property names are double-quoted also.
That’s obligatory.
So age:30 becomes "age":30.
JSON.stringify can be applied to primitives as well.
JSON supports following data types:
Objects { ...
}
Arrays [ ...
]
Primitives:
strings, numbers, boolean values true/false, null.
For instance:
// a number in JSON is just a number
alert( JSON.stringify(1) ) // 1
// a string in JSON is still a string, but double-quoted
alert( JSON.stringify('test') ) // "test"
alert( JSON.stringify(true) ); // true
alert( JSON.stringify([1, 2, 3]) ); // [1,2,3]
JSON is data-only language-independent specification, so some JavaScript-specific object properties are skipped by JSON.stringify.
Namely:
Function properties (methods).
Symbolic properties.
Properties that store undefined.
let user = {
sayHi() { // ignored
alert("Hello");
},
[Symbol("id")]: 123, // ignored
something: undefined // ignored
};
alert( JSON.stringify(user) ); // {} (empty object)
Usually that’s fine.
If that’s not what we want, then soon we’ll see how to customize the process.
The great thing is that nested objects are supported and converted automatically.
For instance:
let meetup = {
title: "Conference",
room: { number: 23, participants: ["john", "ann"] }
};
alert( JSON.stringify(meetup) );
/* The whole structure is stringified:
{
"title":"Conference",
"room":{"number":23,"participants":["john","ann"]},
}
*/
The important limitation: there must be no circular references.
For instance:
let room = {
number: 23
};
let meetup = {
title: "Conference",
participants: ["john", "ann"]
};
meetup.place = room; // meetup references room
room.occupiedBy = meetup; // room references meetup
JSON.stringify(meetup); // Error: Converting circular structure to JSON
Here, the conversion fails, because of circular reference: room.occupiedBy references meetup, and meetup.place references room:
Excluding and transforming: replacer
The full syntax of JSON.stringify is:
let json = JSON.stringify(value[, replacer, space])
value
A value to encode.
replacer
Array of properties to encode or a mapping function function(key, value).
space
Amount of space to use for formatting
Most of the time, JSON.stringify is used with the first argument only.
But if we need to fine-tune the replacement process, like to filter out circular references, we can use the second argument of JSON.stringify.
If we pass an array of properties to it, only these properties will be encoded.
For instance:
let room = {
number: 23
};
let meetup = {
title: "Conference",
participants: [{name: "John"}, {name: "Alice"}],
place: room // meetup references room
};
room.occupiedBy = meetup; // room references meetup
alert( JSON.stringify(meetup, ['title', 'participants']) );
// {"title":"Conference","participants":[{},{}]}
Here we are probably too strict.
The property list is applied to the whole object structure.
So the objects in participants are empty, because name is not in the list.
Let’s include in the list every property except room.occupiedBy that would cause the circular reference:
let room = {
number: 23
};
let meetup = {
title: "Conference",
participants: [{name: "John"}, {name: "Alice"}],
place: room // meetup references room
};
room.occupiedBy = meetup; // room references meetup
alert( JSON.stringify(meetup, ['title', 'participants', 'place', 'name', 'number']) );
/*
{
"title":"Conference",
"participants":[{"name":"John"},{"name":"Alice"}],
"place":{"number":23}
}
*/
Now everything except occupiedBy is serialized.
But the list of properties is quite long.
Fortunately, we can use a function instead of an array as the replacer.
The function will be called for every (key, value) pair and should return the “replaced” value, which will be used instead of the original one.
Or undefined if the value is to be skipped.
In our case, we can return value “as is” for everything except occupiedBy.
To ignore occupiedBy, the code below returns undefined:
let room = {
number: 23
};
let meetup = {
title: "Conference",
participants: [{name: "John"}, {name: "Alice"}],
place: room // meetup references room
};
room.occupiedBy = meetup; // room references meetup
alert( JSON.stringify(meetup, function replacer(key, value) {
alert(`${key}: ${value}`);
return (key == 'occupiedBy') ? undefined : value;
}));
/* key:value pairs that come to replacer:
: [object Object]
title: Conference
participants: [object Object],[object Object]
0: [object Object]
name: John
1: [object Object]
name: Alice
place: [object Object]
number: 23
*/
Please note that replacer function gets every key/value pair including nested objects and array items.
It is applied recursively.
The value of this inside replacer is the object that contains the current property.
The first call is special.
It is made using a special “wrapper object”: {": meetup}.
In other words, the first (key, value) pair has an empty key, and the value is the target object as a whole.
That’s why the first line is ":[object Object]" in the example above.
The idea is to provide as much power for replacer as possible: it has a chance to analyze and replace/skip even the whole object if necessary.
Formatting: space
The third argument of JSON.stringify(value, replacer, space) is the number of spaces to use for pretty formatting.
Previously, all stringified objects had no indents and extra spaces.
That’s fine if we want to send an object over a network.
The space argument is used exclusively for a nice output.
Here space = 2 tells JavaScript to show nested objects on multiple lines, with indentation of 2 spaces inside an object:
let user = {
name: "John",
age: 25,
roles: {
isAdmin: false,
isEditor: true
}
};
alert(JSON.stringify(user, null, 2));
/* two-space indents:
{
"name": "John",
"age": 25,
"roles": {
"isAdmin": false,
"isEditor": true
}
}
*/
/* for JSON.stringify(user, null, 4) the result would be more indented:
{
"name": "John",
"age": 25,
"roles": {
"isAdmin": false,
"isEditor": true
}
}
*/
The space parameter is used solely for logging and nice-output purposes.
Custom “toJSON”
Like toString for string conversion, an object may provide method toJSON for to-JSON conversion.
JSON.stringify automatically calls it if available.
For instance:
let room = {
number: 23
};
let meetup = {
title: "Conference",
date: new Date(Date.UTC(2017, 0, 1)),
room
};
alert( JSON.stringify(meetup) );
/*
{
"title":"Conference",
"date":"2017-01-01T00:00:00.000Z", // (1)
"room": {"number":23} // (2)
}
*/
Here we can see that date (1) became a string.
That’s because all dates have a built-in toJSON method which returns such kind of string.
Now let’s add a custom toJSON for our object room (2):
let room = {
number: 23,
toJSON() {
return this.number;
}
};
let meetup = {
title: "Conference",
room
};
alert( JSON.stringify(room) ); // 23
alert( JSON.stringify(meetup) );
/*
{
"title":"Conference",
"room": 23
}
*/
As we can see, toJSON is used both for the direct call JSON.stringify(room) and when room is nested in another encoded object.
JSON.parse
To decode a JSON-string, we need another method named JSON.parse.
The syntax:
let value = JSON.parse(str, [reviver]);
str
JSON-string to parse.
reviver
Optional function(key,value) that will be called for each (key, value) pair and can transform the value.
For instance:
// stringified array
let numbers = "[0, 1, 2, 3]";
numbers = JSON.parse(numbers);
alert( numbers[1] ); // 1
Or for nested objects:
let userData = '{ "name": "John", "age": 35, "isAdmin": false, "friends": [0,1,2,3] }';
let user = JSON.parse(userData);
alert( user.friends[1] ); // 1
The JSON may be as complex as necessary, objects and arrays can include other objects and arrays.
But they must obey the same JSON format.
Here are typical mistakes in hand-written JSON (sometimes we have to write it for debugging purposes):
let json = `{
name: "John", // mistake: property name without quotes
"surname": 'Smith', // mistake: single quotes in value (must be double)
'isAdmin': false // mistake: single quotes in key (must be double)
"birthday": new Date(2000, 2, 3), // mistake: no "new" is allowed, only bare values
"friends": [0,1,2,3] // here all fine
}`;
Besides, JSON does not support comments.
Adding a comment to JSON makes it invalid.
There’s another format named JSON5, which allows unquoted keys, comments etc.
But this is a standalone library, not in the specification of the language.
The regular JSON is that strict not because its developers are lazy, but to allow easy, reliable and very fast implementations of the parsing algorithm.
Using reviver
Imagine, we got a stringified meetup object from the server.
It looks like this:
// title: (meetup title), date: (meetup date)
let str = '{"title":"Conference","date":"2017-11-30T12:00:00.000Z"}';
…And now we need to deserialize it, to turn back into JavaScript object.
Let’s do it by calling JSON.parse:
let str = '{"title":"Conference","date":"2017-11-30T12:00:00.000Z"}';
let meetup = JSON.parse(str);
alert( meetup.date.getDate() ); // Error!
Whoops! An error!
The value of meetup.date is a string, not a Date object.
How could JSON.parse know that it should transform that string into a Date?
Let’s pass to JSON.parse the reviving function as the second argument, that returns all values “as is”, but date will become a Date:
let str = '{"title":"Conference","date":"2017-11-30T12:00:00.000Z"}';
let meetup = JSON.parse(str, function(key, value) {
if (key == 'date') return new Date(value);
return value;
});
alert( meetup.date.getDate() ); // now works!
By the way, that works for nested objects as well:
let schedule = `{
"meetups": [
{"title":"Conference","date":"2017-11-30T12:00:00.000Z"},
{"title":"Birthday","date":"2017-04-18T12:00:00.000Z"}
]
}`;
schedule = JSON.parse(schedule, function(key, value) {
if (key == 'date') return new Date(value);
return value;
});
alert( schedule.meetups[1].date.getDate() ); // works!
Summary
JSON is a data format that has its own independent standard and libraries for most programming languages.
JSON supports plain objects, arrays, strings, numbers, booleans, and null.
JavaScript provides methods JSON.stringify to serialize into JSON and JSON.parse to read from JSON.
Both methods support transformer functions for smart reading/writing.
If an object has toJSON, then it is called by JSON.stringify.
Tasks
Turn the object into JSON and back
importance: 5Turn the user into JSON and then read it back into another variable.
let user = {
name: "John Smith",
age: 35
};
let user = {
name: "John Smith",
age: 35
};
let user2 = JSON.parse(JSON.stringify(user));
importance: 5In simple cases of circular references, we can exclude an offending property from serialization by its name.
But sometimes we can’t just use the name, as it may be used both in circular references and normal properties.
So we can check the property by its value.
Write replacer function to stringify everything, but remove properties that reference meetup:
let room = {
number: 23
};
let meetup = {
title: "Conference",
occupiedBy: [{name: "John"}, {name: "Alice"}],
place: room
};
// circular references
room.occupiedBy = meetup;
meetup.self = meetup;
alert( JSON.stringify(meetup, function replacer(key, value) {
/* your code */
}));
/* result should be:
{
"title":"Conference",
"occupiedBy":[{"name":"John"},{"name":"Alice"}],
"place":{"number":23}
}
*/
let room = {
number: 23
};
let meetup = {
title: "Conference",
occupiedBy: [{name: "John"}, {name: "Alice"}],
place: room
};
room.occupiedBy = meetup;
meetup.self = meetup;
alert( JSON.stringify(meetup, function replacer(key, value) {
return (key != " && value == meetup) ? undefined : value;
}));
/*
{
"title":"Conference",
"occupiedBy":[{"name":"John"},{"name":"Alice"}],
"place":{"number":23}
}
*/
event.altKey
A Boolean, indicating whether the "ALT" key was pressed when the key event occured.
document.onkeydown = keydown;
function keydown(evt) {
if (!evt) evt = event;
if (evt.altKey) {
alert('alt');
}
}
or
$(document).on('keydown', function(e) {
if (e.key === 'Alt') {
alert('alt');
}
});
Style Object Properties
Sets or returns the Object Properties
example
thePointerImg.style.width = (currWidth - 100) + "px";
thePointerImg.style.transform = "rotate(90deg)";
Rotate and translate
transform-origin: left;
translate(50%, 50%) rotate(90deg) ;
transform-origin: 50%;
rotate(90deg) translateY(100%) ;
Be careful on the "order of execution" in CSS3 chains! The rule is (right) from (left).
Not Left to Right.
transformation: translate(0,10%) rotate(25deg);
The "rotate" operation is done first, than the "translate" operation comes next/second.
alignContent alignment between the lines inside a flexible container when the items do not use all available space
alignItems alignment for items inside a flexible container
alignSelf alignment for selected items inside a flexible container
animation A shorthand property for all the animation properties below, except the animationPlayState property
animationDelay when the animation will start
animationDirection whether or not the animation should play in reverse on alternate cycles
animationDuration how many seconds or milliseconds an animation takes to complete one cycle
animationFillMode what values are applied by the animation outside the time it is executing
animationIterationCount number of times an animation should be played
animationName a name for the @keyframes animation
animationTimingFunction speed curve of the animation
animationPlayState whether the animation is running or paused
background all the background properties in one declaration
backgroundAttachment whether a background-image is fixed or scrolls with the page
backgroundColor background-color of an element
backgroundImage background-image for an element
backgroundPosition starting position of a background-image
backgroundRepeat how to repeat (tile) a background-image
backgroundClip painting area of the background
backgroundOrigin positioning area of the background images
backgroundSize size of the background image
backfaceVisibility whether or not an element should be visible when not facing the screen
border borderWidth, borderStyle, and borderColor in one declaration
borderBottom all the borderBottom properties in one declaration
borderBottomColor color of the bottom border
borderBottomLeftRadius shape of the border of the bottom-left corner
borderBottomRightRadius shape of the border of the bottom-right corner
borderBottomStyle style of the bottom border
borderBottomWidth width of the bottom border
borderCollapse whether the table border should be collapsed into a single border, or not
borderColor color of an element's border (can have up to four values)
borderImage A shorthand property for setting or returning all the borderImage properties
borderImageOutset amount by which the border image area extends beyond the border box
borderImageRepeat whether the image-border should be repeated, rounded or stretched
borderImageSlice inward offsets of the image-border
borderImageSource image to be used as a border
borderImageWidth widths of the image-border
borderLeft all the borderLeft properties in one declaration
borderLeftColor color of the left border
borderLeftStyle style of the left border
borderLeftWidth width of the left border
borderRadius A shorthand property for setting or returning all the four borderRadius properties
borderRight all the borderRight properties in one declaration
borderRightColor color of the right border
borderRightStyle style of the right border
borderRightWidth width of the right border
borderSpacing space between cells in a table
borderStyle style of an element's border (can have up to four values)
borderTop all the borderTop properties in one declaration
borderTopColor color of the top border
borderTopLeftRadius shape of the border of the top-left corner
borderTopRightRadius shape of the border of the top-right corner
borderTopStyle style of the top border
borderTopWidth width of the top border
borderWidth width of an element's border (can have up to four values)
bottom bottom position of a positioned element
boxDecorationBreak behaviour of the background and border of an element at page-break, or, for in-line elements, at line-break.
boxShadow Attaches one or more drop-shadows to the box
boxSizing Allows you to define certain elements to fit an area in a certain way
captionSide position of the table caption
clear position of the element relative to floating objects
clip which part of a positioned element is visible
color color of the text
columnCount number of columns an element should be divided into
columnFill how to fill columns
columnGap gap between the columns
columnRule A shorthand property for setting or returning all the columnRule properties
columnRuleColor color of the rule between columns
columnRuleStyle style of the rule between columns
columnRuleWidth width of the rule between columns
columns A shorthand property for setting or returning columnWidth and columnCount
columnSpan how many columns an element should span across
columnWidth width of the columns
content Used with the :before and :after pseudo-elements, to insert generated content
counterIncrement Increments one or more counters
counterReset Creates or resets one or more counters
cursor type of cursor to display for the mouse pointer
direction text direction
display an element's display type
emptyCells whether to show the border and background of empty cells, or not
filter image filters (visual effects, like blur and saturation)
flex length of the item, relative to the rest
flexBasis initial length of a flexible item
flexDirection direction of the flexible items
flexFlow A shorthand property for the flexDirection and the flexWrap properties
flexGrow how much the item will grow relative to the rest
flexShrink how the item will shrink relative to the rest
flexWrap whether the flexible items should wrap or not
cssFloat horizontal alignment of an element
font fontStyle, fontVariant, fontWeight, fontSize, lineHeight, and fontFamily in one declaration
fontFamily font family for text
fontSize font size of the text
fontStyle whether the style of the font is normal, italic or oblique
fontVariant whether the font should be displayed in small capital letters
fontWeight boldness of the font
fontSizeAdjust Preserves the readability of text when font fallback occurs
fontStretch Selects a normal, condensed, or expanded face from a font family
hangingPunctuation Specifies whether a punctuation character may be placed outside the line box
height height of an element
hyphens Sets how to split words to improve the layout of paragraphs
icon Provides the author the ability to style an element with an iconic equivalent
imageOrientation Specifies a rotation in the right or clockwise direction that a user agent applies to an image
isolation Defines whether an element must create a new stacking content
justifyContent alignment between the items inside a flexible container when the items do not use all available space.
left left position of a positioned element
letterSpacing space between characters in a text
lineHeight distance between lines in a text
listStyle listStyleImage, listStylePosition, and listStyleType in one declaration
listStyleImage an image as the list-item marker
listStylePosition position of the list-item marker
listStyleType list-item marker type
margin margins of an element (can have up to four values)
marginBottom bottom margin of an element
marginLeft left margin of an element
marginRight right margin of an element
marginTop top margin of an element
maxHeight maximum height of an element
maxWidth maximum width of an element
minHeight minimum height of an element
minWidth minimum width of an element
navDown where to navigate when using the arrow-down navigation key
navIndex tabbing order for an element
navLeft where to navigate when using the arrow-left navigation key
navRight where to navigate when using the arrow-right navigation key
navUp where to navigate when using the arrow-up navigation key
objectFit Specifies how the contents of a replaced element should be fitted to the box established by its used height and width
objectPosition Specifies the alignment of the replaced element inside its box
opacity opacity level for an element
order order of the flexible item, relative to the rest
orphans minimum number of lines for an element that must be left at the bottom of a page when a page break occurs inside an element
outline all the outline properties in one declaration
outlineColor color of the outline around a element
outlineOffset Offsets an outline, and draws it beyond the border edge
outlineStyle style of the outline around an element
outlineWidth width of the outline around an element
overflow what to do with content that renders outside the element box
overflowX Specifies what to do with the left/right edges of the content, if it overflows the element's content area
overflowY Specifies what to do with the top/bottom edges of the content, if it overflows the element's content area
padding padding of an element (can have up to four values)
paddingBottom bottom padding of an element
paddingLeft left padding of an element
paddingRight right padding of an element
paddingTop top padding of an element
pageBreakAfter page-break behavior after an element
pageBreakBefore page-break behavior before an element
pageBreakInside page-break behavior inside an element
perspective perspective on how 3D elements are viewed
perspectiveOrigin bottom position of 3D elements
position type of positioning method used for an element (static, relative, absolute or fixed)
quotes type of quotation marks for embedded quotations
resize whether or not an element is resizable by the user
right right position of a positioned element
tableLayout way to lay out table cells, rows, and columns
tabSize length of the tab-character
textAlign horizontal alignment of text
textAlignLast how the last line of a block or a line right before a forced line break is aligned when text-align is "justify"
textDecoration decoration of a text
textDecorationColor color of the text-decoration
textDecorationLine type of line in a text-decoration
textDecorationStyle style of the line in a text decoration
textIndent indentation of the first line of text
textJustify justification method used when text-align is "justify"
textOverflow what should happen when text overflows the containing element
textShadow shadow effect of a text
textTransform capitalization of a text
top top position of a positioned element
transform Applies a 2D or 3D transformation to an element
transformOrigin position of transformed elements
transform-origin
transformStyle how nested elements are rendered in 3D space
transition A shorthand property for setting or returning the four transition properties
transitionProperty CSS property that the transition effect is for
transitionDuration how many seconds or milliseconds a transition effect takes to complete
transitionTimingFunction speed curve of the transition effect
transitionDelay when the transition effect will start
unicodeBidi whether the text should be overridden to support multiple languages in the same document
userSelect whether the text of an element can be selected or not
verticalAlign vertical alignment of the content in an element
visibility whether an element should be visible
whiteSpace how to handle tabs, line breaks and whitespace in a text
width width of an element
wordBreak line breaking rules for non-CJK scripts
wordSpacing spacing between words in a text
wordWrap Allows long, unbreakable words to be broken and wrap to the next line
widows minimum number of lines for an element that must be visible at the top of a page
zIndex stack order of a positioned element
CSS 2D Transforms Methods
Example
div {
transform: rotate(20deg); /* Standard syntax */
transform: translate(50px, 100px);
transform: scale(2, 3);
}
translate(), rotate(), scaleX(), scaleY(), scale(), skewX(), skewY(), skew(), matrix()
The matrix() method take six parameters, containing mathematic functions, which allows you to rotate, scale, move (translate), and skew elements.
The parameters are as follow:
matrix(scaleX(),skewY(),skewX(),scaleY(),translateX(),translateY())
Example
transform: matrix(1, -0.3, 0, 1, 0, 0);
matrix(n,n,n,n,n,n) transformation, using a matrix of six values
translate(x,y) translation, moving the element along the X- and the Y-axis
translateX(n) translation, moving the element along the X-axis
translateY(n) translation, moving the element along the Y-axis
scale(x,y) scale transformation, changing the elements width and height
scaleX(n) scale transformation, changing the element's width
scaleY(n) scale transformation, changing the element's height
rotate(angle) rotation, the angle is specified in the parameter
skew(x-angle,y-angle) skew transformation along the X- and the Y-axis
skewX(angle) skew transformation along the X-axis
skewY(angle) skew transformation along the Y-axis
jQuery.getScript
The jQuery.getScript() method is a shorthand of the Ajax function
(with the dataType attribute: $.ajax({ url: url,dataType: "script"}))
This needs testing!
$.getScript("demo_script.js");
$.getScript("test.js", function(data, textStatus, jqxhr) {
console.log(data); //data returned
console.log(textStatus); //success
console.log(jqxhr.status); //200
console.log('Load was performed.');
});
document.getElementById vs jQuery $()
Not exactly!!
document.getElementById('contents'); //returns a HTML DOM Object
var contents = $('#contents'); //returns a jQuery Object
In jQuery, to get the same result as document.getElementById, you can access the jQuery Object and get the first element in the object
(Remember JavaScript objects act similar to associative arrays).
var contents = $('#contents')[0]; //returns a HTML DOM Object
or this
var contents = $('#contents').get(0);
==============
Calling document.getElementById('id') will return a raw DOM object.
Calling $('#id') will return a jQuery object that wraps the DOM object and provides jQuery methods.
Thus, you can only call jQuery methods like css() or animate() on the $() call.
You can also write
$(document.getElementById('id'))
which will return a jQuery object and is equivalent to
$('#id').
You can get the underlying DOM object from a jQuery object by writing
$('#id')[0].
math
Math.PI; // returns 3.141592653589793
Math.round(4.7); // returns 5
Math.round(4.4); // returns 4
Math.pow(8, 2); // returns 64
Math.sqrt(64); // returns 8
Math.abs(-4.7); // returns 4.7
Math.ceil(4.4); // returns 5
Math.floor(4.7); // returns 4
Math.sin(90 * Math.PI / 180); // returns 1 (the sine of 90 degrees)
Math.cos(0 * Math.PI / 180); // returns 1 (the cos of 0 degrees)
Math.min(0, 150, 30, 20, -8, -200); // returns -200
Math.max(0, 150, 30, 20, -8, -200); // returns 150
Math.random(); // returns a random number
Math.E // returns Euler's number
Math.PI // returns PI
Math.SQRT2 // returns the square root of 2
Math.SQRT1_2 // returns the square root of 1/2
Math.LN2 // returns the natural logarithm of 2
Math.LN10 // returns the natural logarithm of 10
Math.LOG2E // returns base 2 logarithm of E
Math.LOG10E // returns base 10 logarithm of E
Math.jsExamples
Math.js is an extensive math library for JavaScript and Node.js.
Work with different data types like numbers, big numbers, complex numbers, fractions, units, and matrices.
Powerful and easy to use.
Example
// functions and constants
math.round(math.e, 3) // 2.718
math.atan2(3, -3) / math.pi // 0.75
math.log(10000, 10) // 4
math.sqrt(-4) // 2i
math.derivative('x^2 + x', 'x') // 2*x+1
math.pow([[-1, 2], [3, 1]], 2)
// [[7, 0], [0, 7]]
// expressions
math.eval('1.2 * (2 + 4.5)') // 7.8
math.eval('12.7 cm to inch') // 5 inch
math.eval('sin(45 deg) ^ 2') // 0.5
math.eval('9 / 3 + 2i') // 3 + 2i
math.eval('det([-1, 2; 3, 1])') // -7
// chaining
math.chain(3)
.add(4)
.multiply(2)
.done() // 14
Demo
Try the expression parser below.
See Math Notepad for a full application.
1.2 / (3.3 + 1.7)
0.24
a = 5.08 cm + 2 inch
10.16 cm
a to inch
4 inch
sin(90 deg)
1
f(x, y) = x ^ y
f(x, y)
f(2, 3)
8
Evaluate
Shortcut keys:
Press S to set focus to the input field
Press Ctrl+F11 to toggle full screen
Enter "clear" to clear history
derivative(expr, variable)
derivative(expr, variable, options)
Parameters
Parameter Type Description
expr Node | string The expression to differentiate
variable SymbolNode | string The variable over which to differentiate
options {simplify: boolean} There is one option available, simplify, which is true by default.
When false, output will not be simplified.
Returns#
Examples
math.derivative('x^2', 'x') // Node {2 * x}
math.derivative('x^2', 'x', {simplify: false}) // Node {2 * 1 * x ^ (2 - 1)
math.derivative('sin(2x)', 'x')) // Node {2 * cos(2 * x)}
math.derivative('2*x', 'x').evaluate() // number 2
math.derivative('x^2', 'x').evaluate({x: 4}) // number 8
const f = math.parse('x^2')
const x = math.parse('x')
math.derivative(f, x) // Node {2 * x}
Generate Alert Box if user tries to change text in text input field
<FORM>
<INPUT TYPE="text" VALUE= "dont change" NAME = "leavebutton" onChange= "alert('Please dont change this')"></INPUT>
</FORM>
Show the date and time when the page loads
In this example the event handler onLoad is embedded within the tag.
OnLoad activates
whenever a new page has finished downloading.
This alert code tells the browser to create an alert
box containing the value of the variable "today".
Thus, it automatically prints out the date and time
when the page has finished loading and requires no special action by the user.
^lt;SCRIPT LANGUAGE = "Javascript">
var today= new Date()
^lt;/SCRIPT>
....
<BODY onload=alert(today)>
Animate the background color of a document
Notice that the script is not just a series of document.bgColor = commands.
You could write that script but the colors would change so quickly that you would not see the animated effect.
We need to introduce a delay between each background color change.
Javascript offers a setTimeout() method that allows creation of delays as well as serving other functions.
The setTimeout() method requires two elements to be enclosed in its parentheses.
The first element is an expression to be evaluated or acted upon.
The second element is the number of milliseconds (thousandths of a second) to be waited before the first action is undertaken.
setTimeout(expression to be evaluated, milliseconds)
^lt;SCRIPT LANGUAGE= "javascript">
setTimeout("document.bgColor='white'", 1000)
setTimeout("document.bgColor='lightpink'", 1500)
setTimeout("document.bgColor = 'pink'", 2000)
setTimeout("document.bgColor = 'deeppink'", 2500)
setTimeout("document.bgColor = 'red'", 3000)
setTimeout("document.bgColor = 'tomato'", 3500)
setTimeout("document.bgColor = 'darkred'", 4000)
^lt;/SCRIPT>
User assignment of a property and dynamic generation of a Web page
In the example, which illustrates user assigned properties, a new property is defined for the document object called firstline.
Anytime Javascript encounters the expression document.firstline it will produce the assigned text.
The fact that I named it "firstline" carries no special meaning to Javascript; that is, it does not know that it is to be the first line in the document.
Generally, it is a good idea to name the properties with a name related to your intended use.
The rest of the example shows how the write() method can be used to generate text that appears on a web page.
Document.open() prepares for creating a page.
The second open() forces it to appear.
<HTML>
<HEAD>
^lt;SCRIPT LANGUAGE = "Javascript">
document.firstline = "Welcome to this page"
^lt;/SCRIPT>
<TITLE>load demo</TITLE>
</HEAD>
<BODY>
^lt;SCRIPT>
document.open()
document.write(document.firstline)
document.open()
^lt;/SCRIPT>
</BODY>
Sample Script to Animate Text in Text Field
This script will set up a form that asks for user input.
It will animate text in boxes that surround it to urge the user to provide the information.
To accomplish this, we must first use standard HTML form tags to create the input fields for user typing.
We must also create text fields that we will use to create the animation.
For the sake of illustrating methods of using Javascript to refer to different forms that appear on a page, the examples presents the information in 3 forms.
It could have also been combined into one form.
It places the fields for user input in the middle form called f2 and the fields that will animated text placed into them into fields f1 on top and f3 on the bottom.
Also it places the input elements in form f1 and f3 into tables in order to gain more control over their placement.
f1,f2, and f3 are just arbitrary names given to the fields.
In this example "Answer Soon" text appears and disappears, moving around the fields from left to right on the top and then from left to right on the bottom.
All the code to establish fields and tables should be famiilar to readers with HTML experience.
The new part is the code enclosed in the SCRIPT tags.
The heart of these commands are expressions that assign values to particular fields.
For example the code line document.f1.ta1.value = 'Answer Soon' tells the browser to find the document object (the Web page) and then the form that is a subelement of it called f1 (the first one on top) and then the subelement of that form called ta.1 (the first text entry field).
Once that element is targeted, the script tells the browser to change the value property of that text field by assigning it the text "Answer Soon".
The Value attribute in standard HTML markup is the text that a field contains (usually because a user has typed it there.).
Javascript has extended this allow the script to type values.
To the user the text appears as in an animation.
After text appears the sample script makes it disappear by assinging the blank value "" to the same text field.
<HTML>
<HEAD>
<TITLE> Animated Text</TITLE>
</HEAD>
<BODY >
<FORM NAME="f1">
<TABLE>
<TR> <TD> <INPUT NAME="ta1" TYPE="text" SIZE="20"> </INPUT>
<TD> <INPUT NAME="ta2" TYPE="text" SIZE="20"> </INPUT>
<TD> <INPUT NAME="ta3" TYPE="text" SIZE="20"></INPUT>
</TABLE></FORM>
<FORM NAME="f2" ACTION="http://netadd.com/nam.cgi" METHOD="POST">
<CENTER>
Name <INPUT NAME="pername" TYPE="text" SIZE="20"> Name</INPUT>
Age <INPUT NAME="perage" TYPE="text" SIZE="5"> Age</INPUT>
Occupation <INPUT NAME="perocc" TYPE="text" SIZE="20">Occupation </INPUT>
<INPUT TYPE="Submit" VALUE="Submit"></INPUT>
<INPUT TYPE="Reset" VALUE="Reset"></INPUT>
</CENTER>
</FORM>
<FORM NAME="f3">
<TABLE>
<TR> <TD> <INPUT NAME="ta4" TYPE="text" SIZE="20"> </INPUT>
<TD> <INPUT NAME="ta5" TYPE="text" SIZE="20"> </INPUT>
<TD> <INPUT NAME="ta6" TYPE="text" SIZE="20"></INPUT>
</TABLE></FORM>
^lt;SCRIPT LANGUAGE= "javascript">
setTimeout("document.f1.ta1.value = 'Answer Soon'", 1000)
setTimeout("document.f1.ta1.value = ''", 1300)
setTimeout("document.f1.ta2.value = 'Answer Soon'", 1600)
setTimeout("document.f1.ta2.value = ''", 1900)
setTimeout("document.f1.ta3.value = 'Answer Soon'", 2200)
setTimeout("document.f1.ta3.value = ''", 2500)
setTimeout("document.f3.ta4.value = 'Answer Soon'", 2800)
setTimeout("document.f3.ta4.value = ''", 3100)
setTimeout("document.f3.ta5.value = 'Answer Soon'", 3400)
setTimeout("document.f3.ta5.value = ''", 3700)
setTimeout("document.f3.ta6.value = 'Answer Soon'", 4000)
setTimeout("document.f3.ta6.value = ''", 4300)
^lt;/SCRIPT>
Sample Script to Customize Links Based on User Button Choices
This sample script demonstrates how to create a script that lets a user chose a category of infomation after which it dynamically generates an html page containing links relevant to that interest.
It uses a simple form with radio buttons to determine interest.
Just to add interest it also asks the users to type their name.
Once the users are done chosing, they click on the submit button and the script generates the html document using their name.
For the sake of clarity this example is very short with only one choice requested.
The same principles, however, could be applied to more sophisticated sets ofchoices.
There are three major parts to this Web page and script:
A.
Javascript script cotaining the database of links for each kind of music, the function to create a unique page based on their choice, and the function to create a new Netscape window to show the page.
B.
HTML code to create the informationrequest page cotaining an input form.
C.
Javascript code to set up default values.
<HTML>
<HEAD><TITLE>Choice</TITLE>
^lt;SCRIPT Language="javascript">
// sets up database of links - SECTION A1
muresources=""
muresources["classical"]= "<A HREF='http://net.com/classical.file1'>Meditative classical music</A>
<A HREF='http://net.com/classical.file2'>Provoking classical music</A>"
muresources["rock"] = "<A HREF='http://net.com/rock.file1'>Popular rock music<A>
<A HREF='http://net.com/rock.file2'>Exciting rock music</A>"
muresources["ethnic"] = "<A HREF='http://net.com/mexican.file1'>Mexican music<A>
<A HREF='http://net.com/Indian.file2'>Indian music</A>"
function <o>getLink</o>() {
// constructs unique page using name and choice of music - SECTION A.2
temp = muresources[choice]
temp2 = "<TITLE>Custom Links</TITLE><H2>" +document.m.pername.value+", here are some links for you</H2><P>"+temp
}
function <o>writeIt</o>(){
// creates new window to display page - SECTION A.3
diswin = window.open();
diswin.document.open();
diswin.document.write(temp2);
diswin.document.close()
}
function <o>doAll</o>(){
// master routine calls other functions - SECTION A.4
getLink();
writeIt()
}
^lt;/SCRIPT>
</HEAD>
<BODY >
<!-- Sets up basic input form SECTION B -->
<H2> Choose the kind of music you prefer and this page will fetch links of interest to you</H2>
<FORM NAME="m" >
Choose a kind of music
<INPUT TYPE="radio" NAME="mus" VALUE="classical" OnClick="choice='classical'"
>Classical </INPUT>
<INPUT TYPE="radio" NAME="mus" VALUE="rock" OnClick="choice='rock'">Rock</INPUT>
<INPUT TYPE="radio" NAME="mus" VALUE="ethnic"
OnClick="choice='ethnic'">Ethnic</INPUT>
Please type your name
<INPUT TYPE="text" NAME="pername" SIZE=25></INPUT>
<INPUT TYPE="button" NAME="sub" VALUE="Show me links" OnClick=doAll()></INPUT>
<INPUT TYPE="reset" NAME="res" ></INPUT>
</FORM>
^lt;SCRIPT>
// sets defaults - SECTION C
choice = "classical"
document.m.mus[0].checked = true
document.m.mus[1].checked = false
document.m.mus[2].checked = false
^lt;/SCRIPT>
</BODY>
</HTML>
Using string properties to set characteristics of text on a page
Several properties control the appearance of text on the page.
Note, however, that they cannot control the appearance of text after the page is rendered.
The document must be rewritten for the new characteristics to become visible.
This example generates a series of lines, each with a different style,color, or size of text.
^lt;SCRIPT>
//assigns value to variable
test ="What is all this?"
// opens document and uses methods to modify text characteristics
document.open()
document.write(test.bold()+"<P>")
document.write(test.fontsize(7)+"<P>")
document.write(test.fontcolor("red")+"<P>")
document.write(test.toUpperCase()+"<P>")
//assigns multiple characteristics to text
document.write(test.italics().fontsize(6).fontcolor("green")+"<P>")
document.open()
^lt;/SCRIPT>
Using Substrings to Generate Scrolling Banners
This example uses the subString method to create a scrolling banner in a text field and on the status line of the window.
Scrolling text seems to slide from left to right.
You can create this effect by systematically displaying a changing section of some target text.
For example, if you display character 0 to 24 of some text and next display 1 to 25 and next 2 to 26, the text will appear to be moving from right to left.
The sample illustrates a method for accomplishing this effect.
<HTML>
<HEAD><TITLE> Banner</TITLE>
^lt;SCRIPT LANGUAGE= "javascript">
// Puts the text to scroll into variable called sent - SECTION A
// uses length propert to assess its length and put into variable slen
// initalizes a,b,n, and subsent variables
var sent = "This is a demonstration of a banner moving from the left to right.
It makes use of the substring property of Javascript to make an interesting display"
var slen = sent.length
var siz = 25
var a = -3, b = 0
var subsent = "x"
// Creates a function to capture substrings of sent - SECTION B
function <o>makeSub</o>(a,b) {
subsent = sent.substring(a,b) ;
return subsent;
}
//Creates a function that increments the indexes of the substring - SECTION C
//each time and calls the makeSub() function to geneate strings
//a indicates start of substring and siz indicates size of string required
function <o>newMake</o>() {
a = a + 3;
b = a + siz
makeSub(a,b);
return subsent
}
//function uses loop to get changing substrings of target - SECTION D
//repeatedly calls newMake to get next substring
//uses setTimeout() command to arrange for substrings to display
// at specified times
function <o>doIt</o>() {
for (var i = 1; i <= slen ; i++) {
setTimeout("document.z.textdisplay.value = newMake()", i*300);
setTimeout("window.status = newMake()", i*300);
}
}
^lt;/SCRIPT>
</HEAD>
<BODY >
<CENTER>
<FORM NAME="z">
<INPUT NAME="textdisplay" TYPE="text" SIZE=25> </INPUT>
<INPUT NAME="doit" Type="button" value = "Run Banner" onClick = "doIt()"> </INPUT>
</FORM></CENTER>
</BODY></HTML>
load local file
It will be blocked by CORS, only work with servers, ie files only online
jQuery.get('http://localhost/foo.txt', function(data) {
alert(data);
});
Additionally, there's the new Fetch API:
fetch("https://12Me21.github.io/test.txt")
.then( response => response.text() )
.then( text => console.log(text) )
fetch('http://localhost/foo.txt')
.then(response => response.text())
.then((data) => { console.log(data) }
)
If you only want a constant string from the text file, you could include it as JavaScript:
// This becomes the content of your foo.txt file
let text = `My test text goes here!`;
<script src="foo.txt"></script>
<script> console.log(text); </script>
When working with jQuery, instead of using jQuery.get, e.g.
jQuery.get("foo.txt", undefined, function(data) {
alert(data);
}, "html").done(function() {
alert("second success");
}).fail(function(jqXHR, textStatus) {
alert(textStatus);
}).always(function() {
alert("finished");
});
you could use .load which gives you a much more condensed form:
$("#myelement").load("foo.txt");
function pad(anum, size) {
var stkcode = anum+"";
while (stkcode.length < size) stkcode = "0" + stkcode;
return stkcode;
}
function pad(num, size) {
var stkcode = "000000000" + num;
return stkcode.substr(stkcode.length-size);
}
stkcode = "00000"+stkcode
codewidth = stkcode.length
stkcode = stkcode.slice(codewidth-5, codewidth)
Get column from a two dimensional array
var twoDim = [[1,2,3],[4,5,6],[7,8,9]];
// take the third column
var col3 = twoDim.map(function(value,index) { return value[2]; });
filter() Method
creates an array with elements that pass a test
filter() does not change the original array.
array.filter(function(currentValue, index, arr), thisValue)
ages array that are 18 or over:
var ages = [32, 33, 16, 40];
function checkAdult(age) { return age >= 18;}
document.getElementById("demo").innerHTML = ages.filter(checkAdult);
ages array that are a specific number or over:
<input type="number" id="ageToCheck" value="18">
function checkAdult(age) {
return age >= document.getElementById("ageToCheck").value;
}
document.getElementById("demo").innerHTML = ages.filter(checkAdult);
Using Node-Osmosis with examples
There are a number of options for web scraping in node.js, but my favorite library to work with is node-osmosis.
To start, we'll do a simple single page scrape.
We'll be working with this page on wikipedia, which contains population information for US States.
1) Simple Page Scrape
First, let's scrape some basic information from the page using basic selectors.
osmosis
.get(url)
.set({
heading: 'h1',
title: 'title'
})
.data(item => console.log(item));
{ heading: 'List of U.S.
states and territories by population',
title: 'List of U.S.
states and territories by population - Wikipedia' }
2) Scrape Using Find
Next, let's say we want to get a list of all the states along with their populations.
We can see that this data is in the first table on the page.
In order to do this, we'll introduce a new function 'find', which sets the current context using selectors.
Once we tell osmosis to select the rows from the first table, we can pick out the state and population values and pull them into an object.
osmosis
.get(url)
.find('.wikitable:first tr:gt(0)')
.set({
state: 'td[3]',
population: 'td[4]'
})
.data(item => console.log(item));
{ state: 'California', population: '39,250,017' }
{ state: 'Texas', population: '27,862,596' }
{ state: 'Florida', population: '20,612,439' }
{ state: 'New York', population: '19,745,289' }
{ state: 'Illinois', population: '12,801,539' }
{ state: 'Pennsylvania', population: '12,784,227' }
{ state: 'Ohio', population: '11,646,273' }
{ state: 'Georgia', population: '10,310,371' }
{ state: 'North Carolina', population: '10,146,788' }
{ state: 'Michigan', population: '9,928,301' }
...
3) Scrape Multiple Parts
We can also use multiple set calls to pull out different pieces of data.
osmosis
.get(url)
.set({
title: 'title'
})
.find('.wikitable:first tr:gt(0)')
.set({
state: 'td[3]',
population: 'td[4]'
})
.data(item => console.log(item));
{ title: 'List of U.S.
states and territories by population - Wikipedia',
state: 'California',
population: '39,250,017' }
{ title: 'List of U.S.
states and territories by population - Wikipedia',
state: 'Texas',
population: '27,862,596' }
{ title: 'List of U.S.
states and territories by population - Wikipedia',
state: 'Florida',
population: '20,612,439' }
{ title: 'List of U.S.
states and territories by population - Wikipedia',
state: 'New York',
population: '19,745,289' }
{ title: 'List of U.S.
states and territories by population - Wikipedia',
state: 'Illinois',
population: '12,801,539' }
...
4) Following Links
Now, let's say we wanted some information from each state.
Osmosis has a follow function that we can use to scrape each state page.
Since the URL is inside the table that we're scraping, we can pass that URL to the follow function using the a@href selector inside the 3rd column (td[3]).
After we follow each page, we can use set again to pull data from each state page.
In this example, we'll just pull out the longitude and latitude.
The end result combines the elements from each 'set' call.
osmosis
.get(url)
.find('.wikitable:first tr:gt(0)')
.set({
state: 'td[3]',
population: 'td[4]'
})
.follow('td[3] a@href')
.set({
longitude: '.longitude',
latitude: '.latitude'
})
.data(item => console.log(item));
{
state: 'California',
population: '39,250,017',
longitude: '119°21'19"W',
latitude: '35°27'31"N'
}
{
state: 'Illinois',
population: '12,801,539',
longitude: '88°22'49"W',
latitude: '41°16'42"N'
}
...
5) Promisification
In all the examples above, we're just printing out each object as it's handled by the data function.
Often times we want to return all of the data at once in an array.
To do that, we can wrap the call in a Promise and add each element to an array as it's processed.
function scrapePopulations() {
return new Promise((resolve, reject) => {
let results = [];
osmosis
.get(url)
.find('.wikitable:first tr:gt(0)')
.set({
state: 'td[3]',
population: 'td[4]'
})
.data(item => results.push(item))
.done(() => resolve(results));
});
}
scrapePopulations().then(data => console.log(data));
// we can also get the same results more simply by wrapping the code with .set([])
osmosis
.get(url)
.set([
osmosis
.find('.wikitable:first tr:gt(0)')
.set({
state: 'td[3]',
population: 'td[4]'
})
])
.data(items => console.log(items))
[{ state: 'California', population: '39,250,017' },
{ state: 'Texas', population: '27,862,596' },
{ state: 'Florida', population: '20,612,439' },
{ state: 'New York', population: '19,745,289' },
{ state: 'Illinois', population: '12,801,539' },
{ state: 'Pennsylvania', population: '12,784,227' },
{ state: 'Ohio', population: '11,646,273' },
{ state: 'Georgia', population: '10,310,371' },
{ state: 'North Carolina', population: '10,146,788' },
{ state: 'Michigan', population: '9,928,301' },
{ state: 'New Jersey', population: '8,944,469' },
{ state: 'Virginia', population: '8,411,808' },
{ state: 'Washington', population: '7,288,000' },
...
Creating a div element
$('#parent').append('<div>hello</div>');
// or
$('<div>hello</div>').appendTo('#parent');
d = document.createElement('div');
$(d).addClass(classname)
.html(text)
.appendTo($("#myDiv")) //main div
.click(function() { $(this).remove();})
.hide()
.slideToggle(300)
.delay(2500)
.slideToggle(300)
.queue(function() { $(this).remove();});
$(document.createElement("div"))
div = $("<div>").html("Loading......");
$("body").prepend(div);
var customDiv = $("<div/>");
Spread Operator
...
are called spread attributes,
it allows an expression to be expanded.
var parts = ['two', 'three'];
var numbers = ['one', ...parts, 'four', 'five']; // ["one", "two", "three", "four", "five"]
use of spread operator:
another use for the three dots is known as Rest Parameters
it take all the arguments to a function in as one array.
Function arguments as array
function fun1(...params) {
}
Alternative to apply()
take a list of marks of top 5 students in a class.
using the apply() method:
myFun(m1, m2, m3, m4, m5) {
// Do something
}
let marks = [10, 23, 83, -1, 92];
myFun(...marks);
Using with Math Functions
let mylist = [10, 23, 83, -1, 92, -33, 76, 29, 76, 100, 644, -633];
Math.max(...mylist);
function doSum(...items) {
let sum = 0;
for (let item of items){ sum += item; }
return sum;
}
doSum(1);
doSum(1,2);
doSum(1, 2, 3, 4);
function doSum(times, ...items) {
let sum = 0;
for (let item of items){ sum += item*times; }
return sum;
}
doSum(1, 1);
doSum(2, 1, 2);
doSum(3, 1, 2, 3);
1
6
18
Dynamically load a JavaScript file
write dynamic script tags:
new Element("script", {src: "myBigCodeLibrary.js", type: "text/javascript"});
The problem here is that we do not know when the external script file is fully loaded.
We often want our dependant code on the very next line and like to write something like:
if (iNeedSomeMore) {
Script.load("myBigCodeLibrary.js"); // includes code for myFancyMethod();
myFancyMethod(); // cool, no need for callbacks!
}
There is a smart way to inject script dependencies without the need of callbacks.
Simply pull the script via a synchronous AJAX request and eval the script on global level.
If you use Prototype the Script.load method looks like this:
var Script = {
_loadedScripts: [],
include: function(script) {
// include script only once
if (this._loadedScripts.include(script)) {
return false;
}
// request file synchronous
var code = new Ajax.Request(script, {
asynchronous: false,
method: "GET",
evalJS: false,
evalJSON: false
}).transport.responseText;
// eval code on global level
if (Prototype.Browser.IE) {
window.execScript(code);
} else if (Prototype.Browser.WebKit) {
$$("head").first().insert(Object.extend(
new Element("script", {
type: "text/javascript"
}), {
text: code
}
));
} else {
window.eval(code);
}
// remember included script
this._loadedScripts.push(script);
}
};
There is no import / include / require in javascript, but there are two main ways to achieve what you want:
1 - You can load it with an AJAX call then use eval.
This is the most straightforward way but it's limited to your domain because of the Javascript safety settings, and using eval is opening the door to bugs and hacks.
2 - Add a script tag with the script URL in the HTML.
Definitely the best way to go.
You can load the script even from a foreign server, and it's clean as you use the browser parser to evaluate the code.
You can put the tag in the head of the web page, or at the bottom of the body.
Now, there is a big issue you must know about.
Doing that implies that you remotely load the code.
Modern web browsers will load the file and keep executing your current script because they load everything asynchronously to improve performances.
It means that if you use these tricks directly, you won't be able to use your newly loaded code the next line after you asked it to be loaded, because it will be still loading.
I used a much less complicated version recently with jQuery:
<script src="scripts/jquery.js"></script>
<script>
var js = ["scripts/jquery.dimensions.js", "scripts/shadedborder.js", "scripts/jqmodal.js", "scripts/main.js"];
var $head = $("head");
for (var i = 0; i < js.length; i++) {
$head.append("<script src=\"" + js[i] + "\"></scr" + "ipt>");
}
</script>
Update: jQuery-less version:
<script>
var js = ["scripts/jquery.dimensions.js", "scripts/shadedborder.js", "scripts/jqmodal.js", "scripts/main.js"];
for (var i = 0, l = js.length; i < l; i++) {
document.getElementsByTagName("head")[0].innerHTML += ("<script src=\"" + js[i] + "\"></scr" + "ipt>");
}
</script>
another awesome answer
$.getScript("my_lovely_script.js", function(){
alert("Script loaded and executed.");
// here you can use anything you defined in the loaded script
});
var visitedList = [4,5,4,6,3,4,5,2,23,1,4,4,4]
var visitedList = Array.from(new Set(visitedList))
Sets are object type creating collections of unique values
a few methods like add, size, has, forEach, delete and clear are available
Sets
Sets are object creating collections of unique values.
The values in a set can be either simple primitives like strings or integers as well as more complex object types like object literals or arrays.
Here’s a simple example showing off a basic set and a few of the available methods on it like add, size, has, forEach, delete and clear:
let animals = new Set();
animals.add('🐷');
animals.add('🐼');
animals.add('🐢');
animals.add('🐿');
console.log(animals.size); // 4
animals.add('🐼');
console.log(animals.size); // 4
console.log(animals.has('🐷')); // true
animals.delete('🐷');
console.log(animals.has('🐷')); // false
animals.forEach(animal => {
console.log(`Hey ${animal}!`);
});
// Hey 🐼!
// Hey 🐢!
// Hey 🐿!
animals.clear();
console.log(animals.size); // 0
Here’s another example where we pass-in an array to initialize the set.
Notice how the initializing array gets deconstructed, but an array added added later stays in the form of an array:
let myAnimals = new Set(['🐷', '🐢', '🐷', '🐷']);
myAnimals.add(['🐨', '🐑']);
myAnimals.add({ name: 'Rud', type: '🐢' });
console.log(myAnimals.size); // 4
myAnimals.forEach(animal => {
console.log(animal);
});
// 🐷
// 🐢
// ["🐨", "🐑"]
// Object { name: "Rud", type: "🐢" }
Strings are a valid iterable so they can also be passed-in to initialize a set:
console.log('Only unique characters will be in this set.'.length); // 43
let sentence = new Set('Only unique characters will be in this set.');
console.log(sentence.size); // 18
On top of using forEach on a set, for…of loops can also be used to iterate over sets:
let moreAnimals = new Set(['🐺', '🐴', '🐕', '🐇']);
for (let animal of moreAnimals) {
console.log(`Howdy ${ animal }`);
}
// Howdy 🐺
// Howdy 🐴
// Howdy 🐕
// Howdy 🐇
Keys and Values
Sets also have the keys and values methods, with keys being an alias for values, so both methods do exactly the same thing.
Using either of these methods returns a new iterator object with the values of the set in the same order in which they were added to the set.
Here’s an example:
let partyItems = new Set(['🍕', '🍾', '🎊']);
let items = partyItems.values();
console.log(items.next());
console.log(items.next());
console.log(items.next());
console.log(items.next().done);
// Object {
// done: false,
// value: "🍕"
// }
// Object {
// done: false,
// value: "🍾"
// }
// Object {
// done: false,
// value: "🎊"
// }
// true
Console Features
JavaScript Console Featuresconsole features
How long does it take to perform a for-loop 100.000 times:
console.time();
for (i = 0; i < 100000; i++) {
// some code
}
console.timeEnd();
HTML DOM console.table() Method
Write a table in the console:
console.table(["Audi", "Volvo", "Ford"]);
adjustFontSize
<a href="javascript:adjustFontSize('14px');">仲細D都得</a>
function adjustFontSize(size){// console.log('adjustFontSize');$(".set-font-aera").css({"font-size":size});window.localStorage["fontSize"] = size;
}
var img = $("#img_id"); // Get my img elem
var pic_real_width, pic_real_height;
$("<img/>") // Make in memory copy of image to avoid css issues
.attr("src", $(img).attr("src"))
.load(function() {
pic_real_width = this.width; // Note: $(this).width() will not
pic_real_height = this.height; // work for in memory images.
});
js循环遍历数 经典实例
<script>
//循环遍历数组
var animals = ["cat",'dog','human','whale','seal'];
var animalString = "";
for(var i = 0;i<animals.length;i++){
animalString += animals[i] + " ";
}
alert(animalString); //输出数组里的每个项
</script>
有两种方法可以解决:
一是提交之后,立刻禁用点击按钮;
第二种就是提交之后取消后续的表单提交操作。
document.getElementById("btn").disabled = true;//第一次提交后,将按钮禁用
这种方式只能用于通过提交按钮防止重复提交,还可以使用如下方式:
var flag = false;//设置一个监听变量
if(flag ==true)return;//退出事件
flag = true;//表示提交过一次了
字符串部分 经典实例
在字符串中查找子字符串 经典实例
<script type="text/javascript">
var test = 'Welcome to my blog!';
var value = 'blog';
var subValue = test.indexOf(value);
console.log(subValue);//14,子字符串的索引
</script>
<script type="text/javascript">
var fruits = ['banana','apple','orange','strawberry'];
console.log(fruits.sort());//Array [ "apple", "banana", "orange", "strawberry" ]
var num = [32,43,2,5,-23,0,4];
console.log(num.sort());//Array [ -23, 0, 2, 32, 4, 43, 5 ]
</script>Array对象的sort方法会按照字母顺序来排序数组元素。
对于数字,是按照字符编码的顺序进行排序function compare(a,b){
return a-b;
}
var num = [32,43,2,5,-23,0,4];
console.log(num.sort(compare));//Array [ -23, 0, 2, 4, 5, 32, 43 ]
Date日期时间部分 经典实例
js计算时间差 经典实例
var date1=new Date(); //开始时间,当前时间
var date2=new Date(); //结束时间,需传入时间参数
var date3=date2.getTime()-date1.getTime(); //时间差的毫秒数
//计算出相差天数
var days=Math.floor(date3/(24*3600*1000));
//计算出小时数
var leave1=date3%(24*3600*1000); //计算天数后剩余的毫秒数
var hours=Math.floor(leave1/(3600*1000));
//计算相差分钟数
var leave2=leave1%(3600*1000); //计算小时数后剩余的毫秒数
var minutes=Math.floor(leave2/(60*1000));
//计算相差秒数
var leave3=leave2%(60*1000); //计算分钟数后剩余的毫秒数
var seconds=Math.round(leave3/1000);
console.log(" 相差 "+days+"天 "+hours+"小时 "+minutes+" 分钟"+seconds+" 秒");
function fn(input) {
input = parseInt(input,10);
return isPrime(input) ? 'is prime' : 'not prime';
}
function isPrime(input) {
if (input < 2) {
return false;
} else {
for (var i = 2; i <= Math.sqrt(input); i++) {
if (input % i == 0) {
return false;
}
}
}
return true;
}
js判断字符串出现最多的字符,并统计次数 经典实例
//js实现一个函数,来判断一个字符串出现次数最多的字符,并统计这个次数
function countStr(str){
var obj = {};
for(var i = 0, l = str.length,k; i < l ;i++){
k = str.charAt(i);
if(obj[k]){
obj[k]++;
}else{
obj[k] = 1;
}
}
var m = 0,i=null;
for(var k in obj){
if(obj[k] > m){
m = obj[k];
i = k;
}
}
return i + ':' + m;
}
requestAnimationFrame() method for smooth animations
requestAnimationFrame() method was introduced to help us execute animation
Why we need another hero- requestAnimationFrame
First of all, lets talk about requestAnimationFrame() as an idea and why we even need such a method.
Traditionally to create an animation in JavaScript, we relied on setTimeout() called recursively or setInterval() to repeatedly execute some code to make changes to an element frame by frame, such as once every 50 milliseconds:
var adiv = document.getElementById('mydiv')
var leftpos = 0
setInterval(function(){
leftpos += 5
adiv.style.left = leftpos + 'px' // move div by 5 pixels each time
}, 50) // run code every 50 milliseconds
While the above code is logically sound, its actual execution is far from perfect.
The problem with using setTmeout/setInterval for executing code that changes something on the screen is twofold.
What we specify as the delay (ie: 50 milliseconds) inside these functions are often times not honoured due to changes in user system resources at the time, leading to inconsistent delay intervals between animation frames.
Even worse, using setTimeout() or setInterval() to continuously make changes to the user's screen often induces "layout thrashing", the browser version of cardiac arrest where it is forced to perform unnecessary reflows of the page before the user's screen is physically able to display the changes.
This is bad -very bad- due to the taxing nature of page reflows, especially on mobile devices where the problem is most apparent, with janky page loads and battery drains.
requestAnimationFrame() to the rescue
It is for the above reasons requestAnimationFrame() was introduced.
The method in a nutshell allows you to execute code on the next available screen repaint, taking the guess work out of getting in sync with the user's browser and hardware readiness to make changes to the screen.
When we call requestAnimationFrame() repeatedly to create an animation, we are assured that our animation code is called when the user's computer is actually ready to make changes to the screen each time, resulting in a smoother, more efficient animation.
Furthermore, code called via requestAnimationFrame() and running inside background tabs in your browser are either paused or slowed down significantly (to 2 frames per second or less) automatically to further save user system resources- there's no point in running an animation that isn't being seen is there?
So requestAnimationFrame() should be used in place of setTimeout/ setInterval for animations, but how exactly do we go about doing that? Before we get to that, lets look at browser support first.
requestAnimationFrame() today enjoys wide adoption amongst modern browsers- IE10+, FF11+, Chrome, and Safari etc.
For some older versions of these browsers, a vendor prefix is needed in front of the method name to work.
Even on browsers that don't support this method in any incarnation, we can simply fallback in those cases to setTimeout() instead to call the code after a certain delay instead.
The following code creates a universal rrequestAnimationFrame() and its counterpart cancelAnimationFrame() function that works in the maximum number of browsers, with a fallback built in:
window.requestAnimationFrame = window.requestAnimationFrame
|| window.mozRequestAnimationFrame
|| window.webkitRequestAnimationFrame
|| window.msRequestAnimationFrame
|| function(f){return setTimeout(f, 1000/60)} // simulate calling code 60
window.cancelAnimationFrame = window.cancelAnimationFrame
|| window.mozCancelAnimationFrame
|| function(requestID){clearTimeout(requestID)} //fall back
For the fallback setTimeout() code, notice the delay being set at 1000/60, or around 16.7 milliseconds.
This value simulates how often the real requestAnimationFrame() will typically be called by the browser each time it's invoked based on the typical user's screen refresh rate of 60 frames per second.
Understanding and using requestAnimationFrame()
The syntax for requestAnimationFrame is very straightforward:
requestAnimationFrame(callback)
We enter a callback function containing the code we wish to run, and requestAnimationFrame() will run it when the screen is ready to accept the next screen repaint.
Some noteworthy details:
The callback function is automatically passed a timestamp indicating the precise time requestAnimationFrame() was called.
requestAnimationFrame() returns a non 0 integer that can be passed into its nemesis counterpart cancelAnimationFrame() to cancel a requestAnimationFrame() call
Here's an example of calling requestAnimationFrame() once to move a DIV just 5 pixels from its original location on the screen:
var adiv = document.getElementById('mydiv')
var leftpos = 0
requestAnimationFrame(function(timestamp){
leftpos += 5
adiv.style.left = leftpos + 'px'
})
The above code is very similar to using setTimeout() to run the same code, except instead of after the user defined delay, the code is called on the next available screen repaint, typically around 16.7 milliseconds based on a typical screen refresh rate of 60fps.
The exact number may fluctuate and frankly doesn't matter; what's important to realize is that the browser will now intelligently invoke our code only when it is ready to accept changes to the screen, not before.
Calling requestAnimationFrame() once is pretty meaningless most of the time.
The magic happens when we call it "recursively" to construct the desired animation frame by frame, with each frame being called only when the browser is ready for it.
This this how requestAnimationFrame() becomes superior to setTimeout or setInterval when it comes to handling animation related code efficiently.
Lets rewrite our initial example of moving a DIV across the screen 5 pixels at a time using requestAnimationFrame():
var adiv = document.getElementById('mydiv')
var leftpos = 0
function movediv(timestamp){
leftpos += 5
adiv.style.left = leftpos + 'px'
requestAnimationFrame(movediv) // call requestAnimationFrame again to animate next frame
}
requestAnimationFrame(movediv) // call requestAnimationFrame and pass into it animation function
The above code shows the basic blueprint for using requestAnimationFrame() to create an animation, by defining your animation code inside a function, then inside this function calling itself recursively through requestAnimationFrame() to produce each frame of our animation.
To kick start the animation, we make a call to requestAnimationFrame() outside the animation function with that function as the parameter.
Animation over time in requestAnimationFrame()
So it's simple enough to repeatedly call an animation function using requestAnimationFrame(), but most animations are much more finicky, having to stop at some point after a certain objective has been achieved over a certain amount of time.
Take our example of moving the DIV above; in a real life scenario, what we probably want to do is move the DIV 400 pixels to the right over a time of say 2 seconds.
To do this with requestAnimationFrame(), we can take advantage of the timestamp parameter that's passed into the callback function.
Lets see how this works now, by retooling our DIV moving code above so it moves the DIV a certain distance over a certain amount of time:
var adiv = document.getElementById('mydiv')
var starttime
function moveit(timestamp, el, dist, duration){
//if browser doesn't support requestAnimationFrame, generate our own timestamp using Date:
var timestamp = timestamp || new Date().getTime()
var runtime = timestamp - starttime
var progress = runtime / duration
progress = Math.min(progress, 1)
el.style.left = (dist * progress).toFixed(2) + 'px'
if (runtime < duration){ // if duration not met yet
requestAnimationFrame(function(timestamp){ // call requestAnimationFrame again with parameters
moveit(timestamp, el, dist, duration)
})
}
}
requestAnimationFrame(function(timestamp){
starttime = timestamp || new Date().getTime() //if browser doesn't support requestAnimationFrame, generate our own timestamp using Date
moveit(timestamp, adiv, 400, 2000) // 400px over 1 second
})
Demo:
Move DIV 400px in 2 seconds
Lets go over how this works now.
Just before the animation runs, we set the startime variable to the current time using either requestAnimationFrame's timestamp parameter, or if requestAnimationFrame isn't supported, a less precise new Date().getTime() instead.
The former is a value automatically passed in as the first parameter of the callback function of requestAnimationFrame that contains a highly accurate representation of the current time in milliseconds (accurate to 5 microseconds).
This lets us know when the animation started running.
Inside the animation function moveit(), we capture the current time of the current "frame" using variable timestamp.
We use the difference between that and the animation starttime to figure out at what "point" along the animation we're currently at, and change the DIV's position accordingly out of the total distance (ie: 400px).
Slowing down or cancelling requestAnimationFrame()
The standard requestAnimationFrame runs at around 60fps under ideal conditions (or once every 16.7ms), in sync with the refresh rate of the typical monitor.
If your animation requires a different frames per second (up to 60 fps) or simply doesn't require that high a level of refresh rate, you can slow it down by calling requestAnimationFrame inside setTimeout().
That way, you get the desired frame rate while reaping the benefits of requestAnimationFrame:
var adiv = document.getElementById('mydiv')
var leftpos = 0
var fps = 20
function movediv(timestamp){
setTimeout(function(){ //throttle requestAnimationFrame to 20fps
leftpos += 5
adiv.style.left = leftpos + 'px'
requestAnimationFrame(movediv)
}, 1000/fps)
}
requestAnimationFrame(movediv)
In this version of moving a DIV horizontally, we're throttling the frames per second to roughly 20, by calling requestAnimationFrame inside setTimeout() each time.
- Cancelling requestAnimationFrame()
Just like with setTimeout/ setInterval, you can cancel a requestAnimationFrame call, and in identical fashion as well.
requestAnimationFrame when called returns a non 0 integer that can be captured inside a variable and passed into its nemesis counterpart cancelAnimationFrame() to stop it from being invoked again.
The following logs the timestamp parameter value of requestAnimationFrame for two seconds, using cancelAnimationFrame to stop the former:
var reqanimationreference
function logtimestamp(timestamp){
console.log(timestamp)
reqanimationreference = requestAnimationFrame(logtimestamp)
}
requestAnimationFrame(logtimestamp)
setTimeout(function(){ // cancel requestAnimationFrame after 2 seconds
cancelAnimationFrame(reqanimationreference)
}, 2000)
Here is a slightly more elaborate example that continuously changes a DIV's width using requestAnimationFrame when the mouse enters the parent container (onmouseenter), and cancels it onmouseleave:
Demo:
Move mouse over battery
View Source Code
Conclusion
As you can see, requestAnimationFrame() is actually very simple in concept and execution, once you understand its purpose and common patterns.
A lot of frameworks such as jQuery 3.0 utilize requestAnimationFrame() internally for all animation related functions, though it's definitely better to understand how this method works natively so you can take advantage of it in any JavaScript environment.
Tutorials
Smooth Scrolling HTML Bookmarks using JavaScript (natively or jQuery)
See how to use native JavaScript to create smooth scrolling HTML bookmark links inside the page, and for those that need legacy browser support, using jQuery instead.
This promises to be one smooth tutorial!
Web Animation API- Unleashing the Power of CSS keyframes in JavaScript
Animate elements in JavaScript using the power of CSS keyframes animationz with the Web Animation API! In this tutorial, I'll introduce you to WAAPI, browser support and polyfill, and how to start using this awesome API today.
Top five features in JavaScript ES6 Worth Mastering
JavaScript ES6 adds a slew of new features to the JavaScript language, some more groundbreaking and widely applicable than others.
In this article I list the top 5 JavaScript ES6 features I find most indispensible.
Understanding let and const in JavaScript ES6
Get to know all about "let" and "const" in JavaScript ES6, and how it differs from the age old "var" keyword in defining variables.
Displaying Content in Full Screen using the Fullscreen API in JavaScript
Open up any content on your page in full screen mode with just a few lines of JavaScript using the Full Screen API.
Introduction to JavaScript Async Functions- Promises simplified
See how to use JavaScript async functions with JavaScript Promises to further simplify asynchronous operations in JavaScript, and produce code that's easier to read and debug to boot.
Four Essential JavaScript functions to tame CSS3 Transitions and Animations
See four JavaScript functions that help you unlock the full potential of CSS Transitions and Animations, by pausing them, detecting when they've finished playing, and more.
Understanding JavaScript's requestAnimationFrame() method for smooth animationsrequestAnimationFrame() is a JavaScript method for creating smoother, less resource intensive JavaScript animations.
See how to take advantage of this method in this comprehensive tutorial.
Determining how much the user has scrolled the page using JavaScript or jQuery
Learn how to detect the amount the user has scrolled the page using JavaScript or jQuery, in either pixels travelled or as a percentage of the whole page.
Reading and copying selected text to clipboard using JavaScript
In this tutorial, we'll see how to read the textual contents of a user selection, dynamically select some text on the page, and last but not least, copy whatever is selected to clipboard, all using just JavaScript.
Not a trace of Flash here!
Beginner's Guide to JavaScript Promises
JavaScript Promises are a new addition to ECMAscript 6 that aims to provide a cleaner, more intuitive way to deal with the completion (or failure) of asynchronous tasks.
In this tutorial we'll deliver the promise of JavaScript Promises to the uninitiated!
Overview of JavaScript Arrow Functions
One of the exciting new additions to ECMAscript 6 is Arrow Functions, a compact way to define anonymous functions that also simplifies the handling of the "this" object inside it.
In this tutorial we'll go over all you need to know about the new function syntax before it supplants anonymous functions everywhere.
Matching multiple CSS media queries using window.matchMedia()
A common question that gets asked is how to use JavaScript's window.matchMedia() method to react to multiple CSS media queries.
In this tutorial we explore how.
Converting objects to arrays using Array.prototype.slice.call()
We break down Array.prototype.slice.call() to see how it works to convert array-like objects into true arrays in this quick tutorial.
Introduction to Touch events in JavaScript
In this tutorial lets get touchy feely with JavaScript, but examining its touch related events and how they are used to detect and respond to touch and swipe events.
Preloading images and executing code only after all images have loaded
See how to refine the process of preloading images to detect when all images have actually been preloaded and react accordingly.
Setting CSS3 properties using JavaScript
With the numerous CSS vendor prefixes one has to contend with when it comes to defining CSS3 properties such as -moz-box-shadow or -webkit-border-radius, setting them in JavaScript can be even more confusing.
This tutorial looks at how to how to streamline the setting of CSS3 property values in JavaScript, by checking for and targeting only the version of a CSS3 property the browser supports.
Going beyond cookies- Using DOM sessionStorage and localStorage to persist larger amounts of info
HTML5 introduces DOM Storage, a new way of storing data on the client side that overcomes the disk space limitations of JavaScript cookies.
This tutorial looks at how to take advantage of DOM Storage in browsers today.
Using document.createElement() to test for browser support for an element
Most of us are familiar with using
object detection or the Navigator object to check for backing for a given JavaScript object or method, but these techniques do not work well when the objective is to check whether the browser supports a particular HTML element, such as the
<canvas> element.
This is where document.createElement() can be very helpful.
The onmousewheel event of JavaScript
The onmousewheel event fires whenever the user moves the mouse wheel either upwards or downwards, and can provide yet another way for users to interact with your JavaScript.
In this tutorial, lets see how to take advantage of onmousewheel across browsers.
Handling runtime errors in JavaScript using try/catch/finally
The try/catch/finally statement of JavaScript lets you dip your toes into error prune territory and "reroute" when a runtime error has occurred.
Learn all about this often misunderstood statement in this tutorial.
Dynamically loading an external JavaScript or CSS file
External JavaScript or CSS files do not always have to be synchronously loaded as part of the page, but dynamically as well.
In this tutorial, we'll see how to load, remove, and replace external JavaScript and CSS files on demand and asynchronously.
It the era of Ajax, it's a handy thing to know.
JavaScript and memory leaks
If you're not careful, your JavaScript code may leak memory and sometimes even bring the visitor's browser to its knees.
This tutorial looks at different leak patterns in JavaScript and how to fix them.
JavaScript Closures 101- they're not magic
Morris Johns explains JavaScript closures, a powerful yet often bewildering concept, in a gentle, step by step fashion.
Conditional Compilation of JScript/ JavaScript in IE
IE supports a little known feature called conditional compilation that selectively compiles any block of JScript or JavaScript depending on your script logic.
Think of it as the absolute form of object detection.
External JavaScript and PHP
External JavaScript can reference not just .js files, but PHP scripts as well.
See how this is done, and the wonderful possibilities linking PHP to JavaScript bring.
Changing Select element content on the fly
This tutorial explains how to change a select element's content using JavaScript, from adding new options to modifying and deleting them.
It also shows how to create a 2 level interdependent select list.
Determining cookie support in client's browser
If your script relies on JavaScript cookies to store and persist information, it's
a good idea to always first make sure the user's browser has cookies enabled.
This tutorial shows you how to perform this detection.
Introductory
Guide to Regular Expressions
Always wanted to learn about Regular Expressions in JavaScript? With this comprehensive yet gentle tutorial on the subject, you'll be on your way to slashing and validating string input using Regular Expressions in no time!
Uncaught TypeError: Cannot read property 'appendChild' of null
but you have a class name or id in the HTML...
If your script tag is in the head, the JavaScript is loaded before your HTML.
You will need to add defer to your script like so:
<script src="script.js" defer></script>
or put the script at bottom of page
Declaring global variable within function
To declare JavaScript global variables inside function, you need to use window object.
For example:
window.value=90;
Now it can be declared inside any function and can be accessed from any function.
For example:
function m(){ window.value=100;//declaring global variable by window object }
function n(){
alert(window.value);//accessing global variable from other function
}
Internals of global variable in JavaScript
When you declare a variable outside the function, it is added in the window object internally.
You can access it through window object also.
For example:
var value=50;
function a(){ alert(window.value);//accessing global variable }
What is a Callback?
Simply put: A callback is a function that is to be executed after another function has finished executing — hence the name ‘call back’.
More complexly put: In JavaScript, functions are objects.
Because of this, functions can take functions as arguments, and can be returned by other functions.
Functions that do this are called higher-order functions.
Any function that is passed as an argument is called a callback function.
Why do we need Callbacks?
For one very important reason — JavaScript is an event driven language.
This means that instead of waiting for a response before moving on, JavaScript will keep executing while listening for other events.
Lets look at a basic example:
function first(){
console.log(1);
}
function second(){
console.log(2);
}
first();
second();
As you would expect, the function first is executed first, and the function second is executed second — logging the following to the console:
// 1
// 2
All good so far.
But what if function first contains some sort of code that can’t be executed immediately?
For example, an API request where we have to send the request then wait for a response?
To simulate this action, were going to use setTimeout which is a JavaScript function that calls a function after a set amount of time.
We’ll delay our function for 500 milliseconds to simulate an API request.
Our new code will look like this:
function first(){
// Simulate a code delay
setTimeout( function(){ console.log(1); }, 500 ); }
function second(){ console.log(2); }
first();
second();
It’s not important that you understand how setTimeout() works right now.
All that matters is that you see we’ve moved our console.log(1); inside of our 500 millisecond delay.
So what happens now when we invoke our functions?
first();
second();
// 2
// 1
Even though we invoked the first() function first, we logged out the result of that function after the second() function.
It’s not that JavaScript didn’t execute our functions in the order we wanted it to, it’s instead that JavaScript didn’t wait for a response from first() before moving on to execute second().
So why show you this?
Because you can’t just call one function after another and hope they execute in the right order.
Callbacks are a way to make sure certain code doesn’t execute until other code has already finished execution.
Create a Callback
First, open up your Chrome Developer Console and type the following function declaration into your console:
function doHomework(subject) {
alert(`Starting my ${subject} homework.`);
}
Above, we’ve created the function doHomework .
Our function takes one variable, the subject that we are working on.
Call your function by typing the following into your console:
doHomework('math');
// Alerts: Starting my math homework.
Now lets add in our callback — as our last parameter in the doHomework() function we can pass in callback.
The callback function is then defined in the second argument of our call to doHomework().
function doHomework(subject, callback) { // here callback is variable
alert(`Starting my ${subject} homework.`);
callback(); // this call is not fixed, depend on the true calling command
}
doHomework('math', function() {
alert('Finished my homework');
});
As you’ll see, if you type the above code into your console you will get two alerts back to back: Your ‘starting homework’ alert, followed by your ‘finished homework’ alert.
But callback functions don’t always have to be defined in our function call.
They can be defined elsewhere in our code like this:
function doHomework(subject, callback) {
alert(`Starting my ${subject} homework.`);
callback();
}
function alertFinished(){
alert('Finished my homework');
}
doHomework('math', alertFinished);
This result of this example is exactly the same as the previous example, but the setup is a little different.
As you can see, we’ve passed the alertFinished function definition as an argument during our doHomework() function call!
A real world example
Last week I published an article on how to Create a Twitter Bot in 38 lines of code.
The only reason the code in that article works is because of Twitters API.
When you make requests to an API, you have to wait for the response before you can act on that response.
This is a wonderful example of a real-world callback.
Here’s what the request looks like:
T.get('search/tweets', params, function(err, data, response) {
if(!err){
// This is where the magic will happen
} else {
console.log(err);
}
})
T.get simply means we are making a get request to Twitter
There are three parameters in this request:
‘search/tweets’, which is the route of our request,
params which are our search parameters, and then
an anonymous function which is our callback.
A callback is important here because we need to wait for a response from the server before we can move forward in our code.
We don’t know if our API request is going to be successful or not so after sending our parameters to search/tweets via a get request, we wait.
Once Twitter responds, our callback function is invoked.
Twitter will either send an err (error) object or a response object back to us.
In our callback function we can use an if() statement to determine if our request was successful or not, and then act upon the new data accordingly.
Closures
JavaScript variables can belong to the local or global scope.
Global variables can be made local (private) with closures.
In a web page, global variables belong to the window object.
Global variables can be used (and changed) by all scripts in the page (and in the window).
Global and local variables with the same name are different variables.
Modifying one, does not modify the other.
Variables created without a declaration keyword (var, let, or const) are always global, even if they are created inside a function.
A Counter Dilemma
Suppose you want to use a variable for counting something, and you want this counter to be available to all functions.
You could use a global variable, and a function to increase the counter:
Example
// Initiate counter
var counter = 0;
// Function to increment counter
function add() {
counter += 1;
}
// Call add() 3 times
add();
add();
add();
// The counter should now be 3
There is a problem with the solution above: Any code on the page can change the counter, without calling add().
The counter should be local to the add() function, to prevent other code from changing it:
Example
// Initiate counter
var counter = 0;
// Function to increment counter
function add() {
var counter = 0;
counter += 1;
}
// Call add() 3 times
add();
add();
add();
//The counter should now be 3.
But it is 0
It did not work because we display the global counter instead of the local counter.
We can remove the global counter and access the local counter by letting the function return it:
Example
// Function to increment counter
function add() {
var counter = 0;
counter += 1;
return counter;
}
// Call add() 3 times
add();
add();
add();
//The counter should now be 3.
But it is 1.
It did not work because we reset the local counter every time we call the function.
A JavaScript inner function can solve this.
JavaScript Nested Functions
All functions have access to the global scope.
In fact, in JavaScript, all functions have access to the scope "above" them.
JavaScript supports nested functions.
Nested functions have access to the scope "above" them.
In this example, the inner function plus() has access to the counter variable in the parent function:
Example
function add() {
var counter = 0;
function plus() {counter += 1;}
plus();
return counter;
}
This could have solved the counter dilemma, if we could reach the plus() function from the outside.
We also need to find a way to execute counter = 0 only once.
We need a closure.
JavaScript Closures
Remember self-invoking functions? What does this function do?
Example
var add = (function() {
var counter = 0;
return function() {counter += 1; return counter}
})();
add();
add();
add();
// the counter is now 3
Example Explained
The variable add is assigned the return value of a self-invoking function.
The self-invoking function only runs once.
It sets the counter to zero (0), and returns a function expression.
This way add becomes a function.
The "wonderful" part is that it can access the counter in the parent scope.
This is called a JavaScript closure.
It makes it possible for a function to have "private" variables.
The counter is protected by the scope of the anonymous function, and can only be changed using the add function.
A closure is a function having access to the parent scope, even after the parent function has closed.
Select selectedIndex Property
Select a fruit and click the button:
<select id="mySelect">
<option>Apple</option>
<option>Orange</option>
<option>Pineapple</option>
<option>Banana</option>
</select>
<button type="button" onclick="myFunction()">Display index</button>
function myFunction() {
var x = document.getElementById("mySelect").selectedIndex;
var y = document.getElementById("mySelect").options;
alert("Index: " + y[x].index + " is " + y[x].text);
}
:contains selector
Selecting multiple items from a list
use the :contains selector to search for an element whose text includes certain text.
$("#leftSelect option:contains(InfoCard Employee)").prop('selected', true);
multiple select
// arguments: reference to select list, callback function(optional)
function getSelectedOptions(sel, fn) {
var opts = [], opt;
// loop through options in select list
for (var i=0, len=sel.options.length; i<len; i++) {
opt = sel.options[i];
// check if selected
if ( opt.selected ) {
// add to array of option elements to return from this function
opts.push(opt);
// invoke optional callback function if provided
if (fn) {
fn(opt);
}
}
}
// return array containing references to selected option elements
return opts;
}
Our getSelectedOptions function includes a callback mechanism that enables handling each selected option as it is collected, so there is no need to loop through the set a second time.
The callback function for this example is displayed here:
// example callback function(selected options passed one by one)
function callback(opt) {
// display in textarea for this example
var display = document.getElementById('display');
display.innerHTML += opt.value + ', ';
// can access properties of opt, such as...
//alert( opt.value )
//alert( opt.text )
//alert( opt.form )
}
Onchange and Onsubmit Handling
The example form above demonstrates obtaining the list of selected options both onchange and onsubmit.
Onsubmit, we check the length of the list to report how many option elements have been selected.
Onchange, we list the values of selected options in the textarea.
The JavaScript below shows how onchange and onsubmit handling are set up for this example:
// anonymous function onchange for select list with id demoSel
document.getElementById('demoSel').onchange = function(e) {
// get reference to display textarea
var display = document.getElementById('display');
display.innerHTML = ''; // reset
// callback fn handles selected options
getSelectedOptions(this, callback);
// remove ', ' at end of string
var str = display.innerHTML.slice(0, -2);
display.innerHTML = str;
};
document.getElementById('demoForm').onsubmit = function(e) {
// reference to select list using this keyword and form elements collection
// no callback function used this time
var opts = getSelectedOptions( this.elements['demoSel[]'] );
alert( 'The number of options selected is: ' + opts.length ); // number of selected options
return false; // don't return online form
};
Form Markup
Markup for the example form above is displayed here:
<form action="#" method="post" id="demoForm" class="demoForm">
<fieldset>
<legend>Demo: Get Selected Options</legend>
<p>
<select name="demoSel[]" id="demoSel" size="4" multiple>
<option value="scroll">Scrolling Divs JavaScript</option>
<option value="tooltip">JavaScript Tooltips</option>
<option value="con_scroll">Continuous Scroller</option>
<option value="banner">Rotating Banner JavaScript</option>
<option value="random_img">Random Image PHP</option>
<option value="form_builder">PHP Form Generator</option>
<option value="table_class">PHP Table Class</option>
<option value="order_forms">PHP Order Forms</option>
</select>
<input type="submit" value="Submit" />
<textarea name="display" id="display" placeholder="view select list value(s) onchange" cols="20" rows="4" readonly></textarea>
</p>
</fieldset>
</form>
Name Attribute for Multiple Select
Notice the name demoSel[] is applied to the example select box.
Attach square brackets to the end of the name of a select-multiple type select box in order for server side code to treat selected options as an array.
Otherwise only the last selected item will be provided.
An ID can be used to obtain a reference to the select box in JavaScript as shown above.[1]
some input checkbox functions
use keypress
<input type="checkbox" name="Colors" value="Bike" class="mycheckbox">My text<br>
Jquery
$('.mycheckbox').on('keypress', function(event) {
if (event.which === 13) {
$(this).prop('checked', !$(this).prop('checked'));
}
});
Another method is to use a type selector in order to get the input elements with certain type.
$('input[type=checkbox]')
$(':checkbox').on('keypress', function(event) {
if (event.which === 13) {
$(this).prop('checked', !$(this).prop('checked'));
$('textarea').html($(this).prop('checked').toString());
}
});
<input type="checkbox" name="Colors" value="Bike" class="mycheckbox">My text<br>
$(document).on('keypress', function(event) {
if (event.keyCode == 13) {
$('#mycheckbox').prop('checked', true);
}
});
$('input:checkbox').keypress(function(e){
if((e.keyCode ? e.keyCode : e.which) == 13){
$(this).trigger('click');
}
});
use preventDefault
but pressing Enter would also submit the form.
Adding e.preventDefault(); prevents the default browser action when pressing enter on the checkbox.
$('input:checkbox').keypress(function(e){
e.preventDefault();
if((e.keyCode ? e.keyCode : e.which) == 13){
$(this).trigger('click');
}
});
if (keycode == 13) {
$(this).attr('checked', checked);
Checkbox_to_RadioButton(this);
alert("Enter key was pressed");
}
Set the checked state of a checkbox:
function check() { document.getElementById("myCheck").checked = true; }
function uncheck() { document.getElementById("myCheck").checked = false; }
Find out if a checkbox is checked or not:
var x = document.getElementById("myCheck").checked;
Use a checkbox to convert text in an input field to uppercase:
document.getElementById("fname").value = document.getElementById("fname").value.toUpperCase();
Several checkboxes in a form:
<form action="/action_page.php">
<input type="checkbox" name="coffee" value="cream">With cream<br>
<input type="checkbox" name="coffee" value="sugar">With sugar<br>
<br>
<input type="button" onclick="myFunction()" value="Send order">
<br><br>
<input type="text" id="order" size="50">
<input type="submit" value="Submit">
</form>
function myFunction() {
var coffee = document.forms[0];
var txt = "";
var i;
for (i = 0; i < coffee.length; i++) {
if (coffee[i].checked) { txt = txt + coffee[i].value + " "; }
}
document.getElementById("order").value = "You ordered a coffee with: " + txt;
}
click label check checkbox
Without jQuery code:
use: label for
<input type="checkbox" id="Checkbox1"><label for="Checkbox1">Check ME</label>
<select id="mySelect" onchange="checkboxes();" />
creates a URL encoded text string by serializing form values.
$("button").click(function(){
$("div").text($("form").serialize());
});
You can select one or more form elements (like input and/or text area), or the form element itself.
The serialized values can be used in the URL query string when making an AJAX request.
encodeURIComponent() and decodeURIComponent() Function
decodes a URI component
function myFunction() {
var uri = "https://w3schools.com/my test.asp?name=ståle&car=saab";
var uri_enc = encodeURIComponent(uri);
var uri_dec = decodeURIComponent(uri_enc);
var res = "Encoded URI: " + uri_enc + " " + "Decoded URI: " + uri_dec;
document.getElementById("demo").innerHTML = res;
}
Encoded URI: https%3A%2F%2Fw3schools.com%2Fmy%20test.asp%3Fname%3Dst%C3%A5le%26car%3Dsaab
Decoded URI: https://w3schools.com/my test.asp?name=ståle&car=saab
to evaluate minutes between time spans
var d = new Date();
var mins=d.getMinutes();
var hr=d.getHours();
hrdiff = hr - 9;
mindiff = mins -30;
timespan = hrdiff * 60 + mindiff;
if(timespan<60){imgwidth = timespan*22}
Using Web Workers
Web Workers are a simple means for web content to run scripts in background threads.
The worker thread can perform tasks without interfering with the user interface.
In addition, they can perform I/O using XMLHttpRequest (although the responseXML and channel attributes are always null) or fetch (with no such restrictions).
Once created, a worker can send messages to the JavaScript code that created it by posting messages to an event handler specified by that code (and vice versa).
the main page:
const myWorker = new Worker("my_task.js");
myWorker.onmessage = (event) => {
console.log(`Worker said : ${event.data}`);
};
myWorker.postMessage("ali");
my_task.js (the worker):
postMessage("I'm working before postMessage('ali').");
onmessage = (event) => {
postMessage(`Hi, ${event.data}`);
};
Improving Async functions with Web Workers
Separate the processing part in a different file (possibly
‘my_worker.js’),
create a worker with newWorker = new Worker('my_worker.js');
and offload the processing to it.
// my_worker.js
const do_a_lot_of_processing = (data) => {
....
}
onmessage = (e) => {
postMessage(do_a_lot_of_processing(e.data));
// main.js
const myWorker = new Worker('my_worker.js');
async function get_useful_data() {
const raw_data = await request(some_url);
myWorker.postmessage(raw_data);
const show_data => (e) {
const data = e.data;
...
myWorker.onmessage(show_data);
get_useful_data();
HTML5 Web Workers
A web worker is a JavaScript running in the background, without affecting the performance of the page.
Uncaught DOMException: Failed to construct 'Worker':
If you are seeing this in Chrome then the answer probably has to do with loading from a local filesystem rather than over HTTP.
The key is the message "cannot be accessed from origin 'null'"
It's because Chrome doesn't let you load web workers when running scripts from a local file.
run a server, Wampserver64, open browser, run:
http://localhost/test web worker.html
Limitations Of Web Workers
The Web Workers API is a very powerful tool, but it has a few limitations:
A worker can’t directly manipulate the DOM and has limited access to methods and properties of the window object.
A worker can not be run directly from the filesystem.
It can only be run via a server.
Example
The example below creates a simple web worker that count numbers in the background:
Count numbers: <output id="result"></output>
<button onclick="startWorker()">Start Worker</button>
<button onclick="stopWorker()">Stop Worker</button>
<script>
var w;
function startWorker() {
if(typeof(Worker)!=="undefined") {
if(typeof(w)=="undefined") {
w = new Worker("demo_workers.js");
}
w.onmessage = function(event) {
document.getElementById("result").innerHTML=event.data;
};
} else {
document.getElementById("result").innerHTML="Sorry, your browser does not support Web Workers...";
}
}
function stopWorker() {
w.terminate();
w = undefined;
}
</script>
Create a Web Worker File
Now, let's create our web worker in an external JavaScript.
Here, we create a script that counts.
The script is stored in the "demo_workers.js" file:
var i = 0;
function timedCount() {
i = i + 1;
postMessage(i);
setTimeout("timedCount()",500);
}
timedCount();
The important part of the code above is the postMessage() method - which is used to post a message back to the HTML page.
Note: Normally web workers are not used for such simple scripts, but for more CPU intensive tasks.
Create a Web Worker Object
Now that we have the web worker file, we need to call it from an HTML page.
The following lines checks if the worker already exists, if not - it creates a new web worker object and runs the code in
"demo_workers.js":
if (typeof(w) == "undefined") {
w = new Worker("demo_workers.js");
}
Then we can send and receive messages from the web worker.
Add an "onmessage" event listener to the web worker.
w.onmessage = function(event){
document.getElementById("result").innerHTML = event.data;
};
When the web worker posts a message, the code within the event listener is executed.
The data from the web worker is stored in event.data.
Terminate a Web Worker
When a web worker object is created, it will continue to listen for messages (even after the external script is finished) until it is terminated.
To terminate a web worker, and free browser/computer resources, use the
terminate() method:
w.terminate();
Reuse the Web Worker
If you set the worker variable to undefined, after it has been terminated,
you can reuse the code:
w = undefined;
Full Web Worker Example Code
We have already seen the Worker code in the .js file.
Below is the code for the HTML page:
Example
<!DOCTYPE html>
<html>
<body>
<p>Count numbers: <output id="result"></output></p>
<button onclick="startWorker()">Start Worker</button>
<button onclick="stopWorker()">Stop Worker</button>
<script>
var w;
function startWorker(){
if(typeof(Worker) !== "undefined") {
if(typeof(w) == "undefined") {
w = new Worker("demo_workers.js");
}
w.onmessage = function(event) {
document.getElementById("result").innerHTML = event.data;
};
}
else {
document.getElementById("result").innerHTML = "Sorry! No Web Worker support.";
}
}
function stopWorker() {
w.terminate();
w = undefined;
}
</script>
</body>
</html>
Web Workers and the DOM
Since web workers are in external files, they do not have access to the following JavaScript objects:
The window object
The document object
The parent object
building blocks of Web Workers
application cases for Web Workers
games, graphics, crypto
Another use is Web I/O - in other words, polling URLs in background.
That way you don't block the UI waiting for polling results.
syntax highlighting, which you wouldn’t want to block your code editing whilst you’re using the app.
processor-intensive calculations without blocking the user interface thread.
As a practical example, think of an app which has a large table
Types of Web Workers
It's worth noting that the specification discusses two kinds of Web Workers, Dedicated Workers and Shared Workers.
This article will only cover dedicated workers and I'll refer to them as 'web workers' or 'workers' throughout.
Web Workers run in an isolated thread.
As a result, the code that they execute needs to be contained in a separate file.
But before we do that, the first thing to do is create a new Worker object in your main page.
The constructor takes the name of the worker script:
var worker = new Worker('task.js');
If the specified file exists, the browser will spawn a new worker thread, which is downloaded asynchronously.
The worker will not begin until the file has completely downloaded and executed.
If the path to your worker returns an 404, the worker will fail silently.
After creating the worker, start it by calling the postMessage() method:
worker.postMessage(); // Start the worker.
Communicating with a Worker via Message Passing
Communication between a work and its parent page is done using an event model and the postMessage() method.
Depending on your browser/version, postMessage() can accept either a string or JSON object as its single argument.
The latest versions of the modern browsers support passing a JSON object.
Below is a example of using a string to pass 'Hello World' to a worker in doWork.js.
The worker simply returns the message that is passed to it.
Main script:
var worker = new Worker('doWork.js');
worker.addEventListener('message', function(e) {
console.log('Worker said: ', e.data);
}, false);
worker.postMessage('Hello World'); // Send data to our worker.
doWork.js (the worker):
self.addEventListener('message', function(e) {
self.postMessage(e.data);
}, false);
When postMessage() is called from the main page, our worker handles that message by defining an onmessage handler for the message event.
The message payload (in this case 'Hello World') is accessible in Event.data.
Although this particular example isn't very exciting, it demonstrates that postMessage() is also your means for passing data back to the main thread.
Convenient!
Messages passed between the main page and workers are copied, not shared.
For example, in the next example the 'msg' property of the JSON message is accessible in both locations.
It appears that the object is being passed directly to the worker even though it's running in a separate, dedicated space.
In actuality, what is happening is that the object is being serialized as it's handed to the worker, and subsequently, de-serialized on the other end.
The page and worker do not share the same instance, so the end result is that a duplicate is created on each pass.
Most browsers implement this feature by automatically JSON encoding/decoding the value on either end.
The following is a more complex example that passes messages using JSON objects.
Main script:
<button onclick="sayHI()">Say HI</button>
<button onclick="unknownCmd()">Send unknown command</button>
<button onclick="stop()">Stop worker</button>
<output id="result"></output>
<script>
function sayHI() {
worker.postMessage({'cmd': 'start', 'msg': 'Hi'});
}
function stop() {
// worker.terminate() from this script would also stop the worker.
worker.postMessage({'cmd': 'stop', 'msg': 'Bye'});
}
function unknownCmd() {
worker.postMessage({'cmd': 'foobard', 'msg': '???'});
}
var worker = new Worker('doWork2.js');
worker.addEventListener('message', function(e) {
document.getElementById('result').textContent = e.data;
}, false);
</script>
doWork2.js:
self.addEventListener('message', function(e) {
var data = e.data;
switch (data.cmd) {
case 'start':
self.postMessage('WORKER STARTED: ' + data.msg);
break;
case 'stop':
self.postMessage('WORKER STOPPED: ' + data.msg +
'.
(buttons will no longer work)');
self.close(); // Terminates the worker.
break;
default:
self.postMessage('Unknown command: ' + data.msg);
};
}, false);
Note: There are two ways to stop a worker: by calling worker.terminate() from the main page or by calling self.close() inside of the worker itself.
Example: Run this worker!
- Transferrable objects
Most browsers implement the structured cloning algorithm, which allows you to pass more complex types in/out of Workers such as File, Blob, ArrayBuffer, and JSON objects.
However, when passing these types of data using postMessage(), a copy is still made.
Therefore, if you're passing a large 50MB file (for example), there's a noticeable overhead in getting that file between the worker and the main thread.
Structured cloning is great, but a copy can take hundreds of milliseconds.
To combat the perf hit, you can use Transferable Objects.
With Transferable Objects, data is transferred from one context to another.
It is zero-copy, which vastly improves the performance of sending data to a Worker.
Think of it as pass-by-reference if you're from the C/C++ world.
However, unlike pass-by-reference, the 'version' from the calling context is no longer available once transferred to the new context.
For example, when transferring an ArrayBuffer from your main app to Worker, the original ArrayBuffer is cleared and no longer usable.
Its contents are (quiet literally) transferred to the Worker context.
To use transferrable objects, use a slightly different signature of postMessage():
worker.postMessage(arrayBuffer, [arrayBuffer]);
window.postMessage(arrayBuffer, targetOrigin, [arrayBuffer]);
The worker case, the first argument is the data and the second is the list of items that should be transferred.
The first argument doesn't have to be an ArrayBuffer by the way.
For example, it can be a JSON object:
worker.postMessage({data: int8View, moreData: anotherBuffer},
[int8View.buffer, anotherBuffer]);
The important point being: the second argument must be an array of ArrayBuffers.
This is your list of transferrable items.
To see the speed improvement of transferrables, check out this DEMO.
For more information on transferrables, see our HTML5Rock post.
- The Worker Environment
Worker Scope
In the context of a worker, both self and this reference the global scope for the worker.
Thus, the previous example could also be written as:
addEventListener('message', function(e) {
var data = e.data;
switch (data.cmd) {
case 'start':
postMessage('WORKER STARTED: ' + data.msg);
break;
case 'stop':
...
}, false);
Alternatively, you could set the onmessage event handler directly
(though addEventListener is always encouraged by JavaScript ninjas).
onmessage = function(e) {
var data = e.data;
...
};
Features Available to Workers
Due to their multi-threaded behavior, web workers only has access to a subset of JavaScript's features:
The navigator object
The location object (read-only)
XMLHttpRequestsetTimeout()/clearTimeout() and setInterval()/clearInterval()
The Application Cache
Importing external scripts using the importScripts() method
Spawning other web workers
Workers do NOT have access to:
The DOM (it's not thread-safe)
The window object
The document object
The parent object
Loading External Scripts
You can load external script files or libraries into a worker with the importScripts() function.
The method takes zero or more strings representing the filenames for the resources to import.
This example loads script1.js and script2.js into the worker:
worker.js:
importScripts('script1.js');
importScripts('script2.js');
Which can also be written as a single import statement:
importScripts('script1.js', 'script2.js');
Subworkers
Workers have the ability to spawn child workers.
This is great for further breaking up large tasks at runtime.
However, subworkers come with a few caveats:
Subworkers must be hosted within the same origin as the parent page.
URIs within subworkers are resolved relative to their parent worker's location (as opposed to the main page).
Keep in mind most browsers spawn separate processes for each worker.
Before you go spawning a worker farm, be cautious about hogging too many of the user's system resources.
One reason for this is that messages passed between main pages and workers are copied, not shared.
See Communicating with a Worker via Message Passing.
For an sample of how to spawn a subworker, see the example in the specification.
- Inline Workers
What if you want to create your worker script on the fly, or create a self-contained page without having to create separate worker files? With Blob(), you can "inline" your worker in the same HTML file as your main logic by creating a URL handle to the worker code as a string:
var blob = new Blob([
"onmessage = function(e) { postMessage('msg from worker'); }"]);
// Obtain a blob URL reference to our worker 'file'.
var blobURL = window.URL.createObjectURL(blob);
var worker = new Worker(blobURL);
worker.onmessage = function(e) {
// e.data == 'msg from worker'
};
worker.postMessage(); // Start the worker.
Blob URLs
The magic comes with the call to .
This method creates a simple URL string which can be used to reference data stored in a
DOM File or Blob object.
For example:
blob:http://localhost/c745ef73-ece9-46da-8f66-ebes574789b1
Blob URLs are unique and last for the lifetime of your application (e.g.
until the document is unloaded).
If you're creating many Blob URLs, it's a good idea to release references that are no longer needed.
You can explicitly release a Blob URLs by passing it to :
window.URL.revokeObjectURL(blobURL);
In Chrome, there's a nice page to view all of the created blob URLs: chrome://blob-internals/.
Full Example
Taking this one step further, we can get clever with how the worker's JS code is inlined in our page.
This technique uses a <script> tag to define the worker:
<!DOCTYPE html>
<html>
<head>
<meta charset="utf-8" />
</head>
<body>
<div id="log"></div>
<script id="worker1" type="javascript/worker">
// This script won't be parsed by JS engines
// because its type is javascript/worker.
self.onmessage = function(e) {
self.postMessage('msg from worker');
};
// Rest of your worker code goes here.
</script>
<script>
function log(msg) {
// Use a fragment: browser will only render/reflow once.
var fragment = document.createDocumentFragment();
fragment.appendChild(document.createTextNode(msg));
fragment.appendChild(document.createElement('br'));
document.querySelector("#log").appendChild(fragment);
}
var blob = new Blob([document.querySelector('#worker1').textContent]);
var worker = new Worker(window.URL.createObjectURL(blob));
worker.onmessage = function(e) {
log("Received: " + e.data);
}
worker.postMessage(); // Start the worker.
</script>
</body>
</html>
In my opinion, this new approach is a bit cleaner and more legible.
It defines a script tag with id="worker1" and type='javascript/worker' (so the browser doesn't parse the JS).
That code is extracted as a string using document.querySelector('#worker1').textContent and passed to Blob() to create the file.
Loading External Scripts
When using these techniques to inline your worker code, importScripts() will only work if you supply an absolute URI.
If you attempt to pass a relative URI, the browser will complain with a security error.
The reason being: the worker (now created from a blob URL) will be resolved with a blob: prefix, while your app will be running from a different (presumably http://) scheme.
Hence, the failure will be due to cross origin restrictions.
One way to utilize importScripts() in an inline worker is to "inject" the current url of your main script is running from by passing it to the inline worker and constructing the absolute URL manually.
This will insure the external script is imported from the same origin.
Assuming your main app is running from http://example.com/index.html:
...
<script id="worker2" type="javascript/worker">
self.onmessage = function(e) {
var data = e.data;
if (data.url) {
var url = data.url.href;
var index = url.indexOf('index.html');
if (index != -1) {
url = url.substring(0, index);
}
importScripts(url + 'engine.js');
}
...
};
</script>
<script>
var worker = new Worker(window.URL.createObjectURL(bb.getBlob()));
worker.postMessage({url: document.location});
</script>
- Handling Errors
As with any JavaScript logic, you'll want to handle any errors that are thrown in your web workers.
If an error occurs while a worker is executing, the an ErrorEvent is fired.
The interface contains three useful properties for figuring out what went wrong: filename - the name of the worker script that caused the error, lineno - the line number where the error occurred, and message - a meaningful description of the error.
Here is an example of setting up an onerror event handler to print the properties of the error:
<output id="error" style="color: red;"></output>
<output id="result"></output>
<script>
function onError(e) {
document.getElementById('error').textContent = [
'ERROR: Line ', e.lineno, ' in ', e.filename, ': ', e.message
].join('');
}
function onMsg(e) {
document.getElementById('result').textContent = e.data;
}
var worker = new Worker('workerWithError.js');
worker.addEventListener('message', onMsg, false);
worker.addEventListener('error', onError, false);
worker.postMessage(); // Start worker without a message.
</script>
Example: workerWithError.js tries to perform 1/x, where x is undefined.
workerWithError.js:
self.addEventListener('message', function(e) {
postMessage(1/x); // Intentional error.
};
- A Word on Security
Restrictions with Local Access
Due to Google Chrome's security restrictions, workers will not run locally (e.g.
from file://) in the latest versions of the browser.
Instead, they fail silently! To run your app from the file:// scheme, run Chrome with the --allow-file-access-from-files flag set.
NOTE: It is not recommended to run your primary browser with this flag set.
It should only be used for testing purposes and not regular browsing.
Other browsers do not impose the same restriction.
Same Origin Considerations
Worker scripts must be external files with the same scheme as their calling page.
Thus, you cannot load a script from a data: URL or javascript: URL, and an https: page cannot start worker scripts that begin with http: URLs.
- Use Cases
So what kind app would utilize web workers? Unfortunately, web workers are still relatively new and the majority of samples/tutorials out there involve computing prime numbers.
Although that isn't very interesting, it's useful for understanding the concepts of web workers.
Here are a few more ideas to get your brain churning:
Prefetching and/or caching data for later use
Code syntax highlighting or other real-time text formatting
Spell checker
Analyzing video or audio data
Background I/O or polling of webservices
Processing large arrays or humungous JSON responses
Image filtering in <canvas>
Updating many rows of a local web database
creates a new array by calling a function on each element.
var LongList = ['600004', '600007', '600008', '600009', '600010'];
function toACode(thecode) {if (thecode[0]=="6"){ thecode = thecode+".sh" }else { thecode = thecode+".sz" }return(thecode);
}
newList = LongList.map(item => toACode(item));
find object names:
var thisObj = [ { name: 'someName1' }, { name: 'someName2' },
{ name: 'someName4' }, { name: 'someName2' }
];
var objNames = thisObj.map(item => item.name);
Index inside map() function
get the current iteration's index through 2nd parameter.
Example:
var list = [ 'h', 'e', 'l', 'l', 'o'];
list.map((currElement, index) => { console.log(index, currElement); });
Other arguments of Array.prototype.map():
For example:
const array = [1, 2, 3, 4];
const thisObj = { prop1: 1 }
const map = array.map((x, index, array) => {
console.log(array);
console.log(this)
}, thisObj);
Syntax
array.map(function(currentValue, index, arr), thisValue)
Parametersb>
function() Required.
A function to be run for each array element.
currentValue Required.
The value of the current element.
index Optional.
The index of the current element.
arr Optional.
The array of the current element.
thisValue Optional.
Default value undefined.
A value passed to the function to be used as its this value.
example to find difference from prev value
arr = [1,2,3,2,4,5,6,4,3,2]
arr.slice(1).map(function(n, i) { return n - arr[i]; })
[1, 1, -1, 2, 1, 1, -2, -1, -1]
example to find difference from two arrays
// arr - arr1
var x = arr.map(function(item, index) { return item - arr1[index]; })
console.log(x)
right click
1.
window.oncontextmenu = function()
{ showCustomMenu(); return false; // cancel default menu }
2.
window.oncontextmenu = function() { alert('Right Click') }
// the context menu will still come up
// add return false; to stop context menu comes up
3.
use mousedown
$("img").mousedown(function(ev){
if(ev.which == 1) { alert("Left mouse button clicked on myId"); }
if(ev.which == 2) { alert("Middle mouse button clicked on myId"); }
if(ev.which == 3) { alert("Right mouse button clicked on myId"); }
});
The value of which will be:
1 for the left button
2 for the middle button
3 for the right button
4.
<div oncontextmenu="javascript:alert('success!');return false;">
Lorem Ipsum
</div>
onClick is not triggered through right click.
right click only trigger onMouseDown onMouseUp and onContextMenu.
So "onContextMenu" is the right click event.
<div oncontextmenu="myFunction()">
function myFunction() { alert("You right-clicked inside the div!");}
A context menu is a menu in a GUI that appears upon user interaction, such as a right-click mouse operation.
A context menu offers a limited set of choices that are available in the current state, or context, of the operating system or application.
Usually the available choices are actions related to the selected object.
create a clickable dropdown menu
<div class="dropdown">
<button onclick="myFunction()">Dropdown</button>
<div id="myDropdown" class="dropdown-content">
<a href="#home">Home</a>
<a href="#about">About</a>
<a href="#contact">Contact</a>
</div>
</div>
/* When the user clicks on the button,
toggle between hiding and showing the dropdown content */
function myFunction() {
document.getElementById("myDropdown").classList.toggle("show");
}
// Close the dropdown if the user clicks outside of it
window.onclick = function(event) {
if (!event.target.matches('.dropbtn')) {
var dropdowns = document.getElementsByClassName("dropdown-content");
var i;
for (i = 0; i < dropdowns.length; i++) {
var openDropdown = dropdowns[i];
if (openDropdown.classList.contains('show')) {
openDropdown.classList.remove('show');
}
}
}
}
convert unicode encoding to string
Technically doing:
String myString = "\u0048\u0065\u006C\u006C\u006F World";
In order to convert it to "Hello" you'll have to parse the text into the separate unicode digits, (take the \uXXXX and just get XXXX)
then do Integer.ParseInt(XXXX, 16) to get a hex value and then case that to char to get the actual character.
Some code to accomplish this:
String str = myString.split(" ")[0];
str = str.replace("\\","");
String[] arr = str.split("u");
String text = "";
for(int i = 1; i < arr.length; i++){
int hexVal = Integer.parseInt(arr[i], 16);
text += (char)hexVal;
}
// Text will now have Hello
transp = transpose(thedrawdata);
var mytab = $('#mytab'); // this is the element to show result
rowItem = $( '<tr>' );
mytab.append( rowItem );
for (var row=(transp.length-12); row < transp.length; row++) {
rowRange = transp[row].slice(3, 8);
rowMax = Math.max(...rowRange);
rowMin = Math.min(...rowRange);
rowDiff = rowMax - rowMin;
//cell = $('<td>' + (Math.round(rowMax*1000)/1000) + '</td>')
//rowItem.append( cell );
//cell = $('<td>' + (Math.round(rowMin*1000)/1000) + '</td>')
//rowItem.append( cell );
cell = $('<td>' + (Math.round(rowDiff*1000)/1000) + '</td>')
rowItem.append( cell );
}
Find difference between consecutive numbers in array
Use Array methods and Arrow functions:
var visitsArr = [38,29,18,29,28,18,24];
var diffs = visitsArr.slice(1).map((x,i)=> x-visitsArr[i]);
diffs.forEach((x,i) => console.log(
`Visits from day ${i+1} to day ${i+2} increased by ${x}`
));
or
function diff(visitsArr) {
return visitsArr.slice(1).map(function(n, i) { return n - visitsArr[i]; });
}
The estimate is ((yi+1)−(yi−1))/((xi+1)−(xi−1)).
This is just the slope between the (i−1)-th point and the the (i+1)-th point.
sorttable: Make tables sortable
sorttable: Make tables sortable
three steps:
Download the Javascript library
Include the Javascript library,
<script src="sorttable.js"></script>
Give your table a class of "sortable":
<table class="sortable">
Note that the library's JavaScript file is called sorttable (two Ts), but the class you add to the table is sortable (one T).
Convert array of numbers to string
arr.map(String)
add comments to stks chart by loading script with json data
load json data from external js file
by script src = stkComments.js
myjs.js var theCommentList = {item1: "some", item2: "other"}
Click to toggle block of message
<div onclick="myFunction()">Click to toggle appearTab!
<span id="myappearTab">A Simple appearTab!</span>
</div>
<script>
// When the user clicks on div, open the appearTab
function myFunction() {
var appearTab = document.getElementById("myappearTab");
appearTab.classList.toggle("show");
}
</script>
or onclick load script to show data
Access nested data structures
const data = { code: 42,
items: [{ id: 1, name: 'foo' }, { id: 2, name: 'bar' }]
};
to access the name of the second item.
data.items // data is an object, use dot
data.items[1] // The value is an array, use bracket
data.items[1].name // This value is an object, use dot
data['items'][1]['name']; //or use all brackets
thisObj =[{name:'name1'},{name:'name2'},{name:'name4'},{name:'name2'}];
objNames = thisObj.map(item => item.name);
objNames.filter((item, idx)=> objNames.indexOf(item) != idx ) // name2
unable to find repeating names in objects because Object.keys(thisObj) removes duplicates autoamtically
use R instead to tackle
currying function
Currying in JS Currying vs partial application
Currying and partial application are two ways of transforming a function into another function with a generally smaller arity.
currying function
currying 又称部分求值,currying 函数会接收一些参数,然后不会立即求值,而是继续返回一个新函数,将传入的参数通过闭包的形式保存,等到被真正求值的时候,再一次性把所有传入的参数进行求值。
// 普通函数
function add(x,y){ return x + y;}
add(1 , 2); // 3
// 函数currying
var add = function(x) { return function(y) { return x + y;};};
var increment = add(1);
increment(2); // 3
这里我们定义了一个 add 函数,它接受一个参数并返回一个新的函数。
调用 add 之后,返回的函数就通过闭包的方式记住了 add 的第一个参数。
那么,我们如何来实现一个简易的currying 函数呢?
function curryIt(fn) { // 参数fn函数的参数个数
var n = fn.length;
var args = [];
return function(arg) {
args.push(arg);
if (args.length < n) {
return arguments.callee; // 返回这个函数的引用 }
else { return fn.apply(this , args); }
};
}
function add(a, b, c) { return [a, b, c];}
var c = curryIt(add);
var c1 = c(1);
var c2 = c1(2);
var c3 = c2(3);
console.log(c3); //[1, 2, 3]
由此我们可以看出,currying 是一种“预加载”函数的方法,通过传递较少的参数,得到一个已经记住了这些参数的新函数,某种意义上讲,这是一种对参数的“缓存”,是一种非常高效的编写函数的方法!
add = (x, y) => x + y
add(2, 3) //=> 5
currying function
add = x => y => x + y
same code without arrow functions
add = function(x) {
return function(y) {
return x + y
}
}
In other words add of some number returns a function
The reduce() method
The reduce() method reduces the array to a single value.
It executes a provided function for each value of the array (from left-to-right).
The return value of the function is stored in an accumulator (result/total).
arr.reduce(callback, initialValue);
Note: reduce() does not execute the function for array elements without values.
Note: this method does not change the original array.
Subtract the numbers in the array, starting from the left:
var numbers = [175, 50, 25];
function myFunc(total, num) { return total - num; }
numbers.reduce(myFunc); // 100
var numbers = [15.5, 2.3, 1.1, 4.7];
function getSum(total, num) { return total + Math.round(num); }
numbers.reduce(getSum, 0); // 24
The reducer function takes four arguments:
arr.reduce(callback( accumulator, currentValue[, index[, array]] )[, initialValue])
Accumulator (acc)
Current Value (cur)
Current Index (idx)
Source Array (src)
Samples
var data = [29.76, 41.85, 46.5];
var sum = data.reduce( (total, amount)=>{ return total + amount });
sum // 118.11
Find the Maximum Value
dates.reduce((max, d) => d > max ? d : max, dates[0]);
Suppose you have an array of async functions that you want to execute in series.
There is a non-standard promise.series function for this, but you can also do this with reduce().
const functions = [
async function() { return 1; },
async function() { return 2; },
async function() { return 3; }
];
// Chain the function calls in order, starting with an empty promise.
// In the end, `res` is equivalent to
// `Promise.resolve().then(fn1).then(fn2).then(fn3)`
const res = await functions.
reduce((promise, fn) => promise.then(fn), Promise.resolve());
res; // 3
Sum of values in an object array
let initialValue = 0
let sum = [{x: 1}, {x: 2}, {x: 3}].reduce(
(accumulator, currentValue) => accumulator + currentValue.x
, initialValue
)
console.log(sum) // logs 6
Flatten an array of arrays
let flattened = [[0, 1], [2, 3], [4, 5]].reduce(
( accumulator, currentValue ) => accumulator.concat(currentValue),
[]
)
Counting instances of values in an object
let names = ['Alice', 'Bob', 'Tiff', 'Bruce', 'Alice']
let countedNames = names.reduce(function(allNames, name) {
if (name in allNames) {
allNames[name]++
}
else {
allNames[name] = 1
}
return allNames
}, {})
// countedNames is:
// { 'Alice': 2, 'Bob': 1, 'Tiff': 1, 'Bruce': 1 }
Grouping objects by a property
let people = [
{ name: 'Alice', age: 21 },
{ name: 'Max', age: 20 },
{ name: 'Jane', age: 20 }
];
function groupBy(objectArray, property) {
return objectArray.reduce(function(acc, obj) {
let key = obj[property]
if (!acc[key]) {
acc[key] = []
}
acc[key].push(obj)
return acc
}, {})
}
let groupedPeople = groupBy(people, 'age')
// groupedPeople is:
// {
// 20: [
// { name: 'Max', age: 20 },
// { name: 'Jane', age: 20 }
// ],
// 21: [{ name: 'Alice', age: 21 }]
// }
Bonding arrays contained in an array of objects using the spread operator and initialValue
// friends - an array of objects
// where object field "books" is a list of favorite books
let friends = [{
name: 'Anna',
books: ['Bible', 'Harry Potter'],
age: 21
}, {
name: 'Bob',
books: ['War and peace', 'Romeo and Juliet'],
age: 26
}, {
name: 'Alice',
books: ['The Lord of the Rings', 'The Shining'],
age: 18
}]
// allbooks - list which will contain all friends' books +
// additional list contained in initialValue
let allbooks = friends.reduce(function(accumulator, currentValue) {
return [...accumulator, ...currentValue.books]
}, ['Alphabet'])
// allbooks = [
// 'Alphabet', 'Bible', 'Harry Potter', 'War and peace',
// 'Romeo and Juliet', 'The Lord of the Rings',
// 'The Shining'
// ]
Remove duplicate items in an array
let myArray = ['a', 'b', 'a', 'b', 'c', 'e', 'e', 'c', 'd', 'd', 'd', 'd']
let myOrderedArray = myArray.reduce(function(accumulator, currentValue) {
if (accumulator.indexOf(currentValue) === -1) {
accumulator.push(currentValue)
}
return accumulator
}, [])
console.log(myOrderedArray)
Replace .filter().map() with .reduce()
Using Array.filter() then Array.map() traverses the array twice, but you can achieve the same effect while traversing only once with Array.reduce(), thereby being more efficient.
(If you like for loops, you can filter and map while traversing once with Array.forEach()).
const numbers = [-5, 6, 2, 0,];
const doubledPositiveNumbers = numbers.reduce((accumulator, currentValue) => {
if (currentValue > 0) {
const doubled = currentValue * 2;
accumulator.push(doubled);
}
return accumulator;
}, []);
console.log(doubledPositiveNumbers); // [12, 4]
Running Promises in Sequence
/**
* Runs promises from array of functions that can return promises
* in chained manner
*
* @param {array} arr - promise arr
* @return {Object} promise object
*/
function runPromiseInSequence(arr, input) {
return arr.reduce(
(promiseChain, currentFunction) => promiseChain.then(currentFunction),
Promise.resolve(input)
)
}
// promise function 1
function p1(a) {
return new Promise((resolve, reject) => {
resolve(a * 5)
})
}
// promise function 2
function p2(a) {
return new Promise((resolve, reject) => {
resolve(a * 2)
})
}
// function 3 - will be wrapped in a resolved promise by .then()
function f3(a) {
return a * 3
}
// promise function 4
function p4(a) {
return new Promise((resolve, reject) => {
resolve(a * 4)
})
}
const promiseArr = [p1, p2, f3, p4]
runPromiseInSequence(promiseArr, 10)
.then(console.log) // 1200
Function composition enabling piping
// Building-blocks to use for composition
const double = x => x + x
const triple = x => 3 * x
const quadruple = x => 4 * x
// Function composition enabling pipe functionality
const pipe = (...functions) => input => functions.reduce(
(acc, fn) => fn(acc),
input
)
// Composed functions for multiplication of specific values
const multiply6 = pipe(double, triple)
const multiply9 = pipe(triple, triple)
const multiply16 = pipe(quadruple, quadruple)
const multiply24 = pipe(double, triple, quadruple)
// Usage
multiply6(6) // 36
multiply9(9) // 81
multiply16(16) // 256
multiply24(10) // 240
Write map using reduce
if (!Array.prototype.mapUsingReduce) {
Array.prototype.mapUsingReduce = function(callback, thisArg) {
return this.reduce(function(mappedArray, currentValue, index, array) {
mappedArray[index] = callback.call(thisArg, currentValue, index, array)
return mappedArray
}, [])
}
}
[1, 2, , 3].mapUsingReduce(
(currentValue, index, array) => currentValue + index + array.length
) // [5, 7, , 10]
map() Method
The map() method calls the provided function once for each element in an array, in order.
Return an array with the square root of all the values in the original array:
var numbers = [4, 9, 16, 25];
numbers.map(Math.sqrt)
Multiply all the values in array with 10:
var numbers = [65, 44, 12, 4];
function myFunction(num) { return num * 10; }
numbers.map(myFunction)
Get the full name for each person in the array:
var persons = [
{firstname : "Malcom", lastname: "Reynolds"},
{firstname : "Kaylee", lastname: "Frye"},
{firstname : "Jayne", lastname: "Cobb"}
];
function getFullName(item) {
var fullname = [item.firstname, item.lastname].join(" ");
return fullname;
}
persons.map(getFullName);
filter() Method
The filter() method creates an array
filled with all array elements that pass a test (provided as a function).
Note: filter() does not execute the function for array elements without values.
Note: filter() does not change the original array.
Return an array of all the values in the ages array that are 18 or over:
var ages = [32, 33, 16, 40];
function checkAdult(age) { return age >= 18; }
ages.filter(checkAdult);
Return an array of all the values in the ages over 20:
var ages = [32, 33, 12, 40];
function checkAdult(age) { return age >= 20; }
ages.filter(checkAdult);
var myArray = ['a', 'b', 'c', 'd', 'e'];
using For loop to call a function
for (var i = 0; i < myArray.length; i++) {
currentLetter(myArray[i]);
}
function currentLetter(letter) {
console.log('The current letter is: ' + letter);
}
using forEach loop with a function
myArray.forEach(function(value) {
console.log('The current letter is: ' + value;
});
using the high order function
myArray.forEach(currentLetter);
forEach is an Array method that we can use to execute a function on each element in an array.
It can only be used on Arrays, Maps, and Sets.
arr = ['cat', 'dog', 'fish'];
arr.forEach(element => { console.log(element); });
// cat
// dog
// fish
arr = [5,4,8,7];
arr.forEach(function(item,index,arr) {
console.log("item: " + item + " at index: " + index + " in the array: " + arr);
})
const obj = {
name: "Alice",
friends: ["Bob", "Charlie", "Dave"],
printFriends: function() {
this.friends.forEach(function(friend) {
console.log(this.name + " is friends with " + friend);
});
},
};
obj.printFriends();
在这个例子中,我们定义了一个名为obj的对象,里面有一个printFriends方法。
我们使用forEach方法遍历friends数组,并使用常规函数来打印每个朋友的名字和obj对象的name属性。
然而,运行这段代码时,输出如下:
undefined is friends with Bob
undefined is friends with Charlie
undefined is friends with Dave
这是因为在forEach方法中使用常规函数时,该函数的作用域不是调用printFriends方法的对象,而是全局作用域。
因此,无法访问obj对象的属性。
const obj = {
name: "Alice",
friends: ["Bob", "Charlie", "Dave"],
printFriends: function() {
this.friends.forEach(
function(friend) {
console.log(this.name + " is friends with " + friend);
}.bind(this) // 使用bind方法绑定函数的作用域
);
},
};
obj.printFriends();
运行这段代码,输出如下:
Alice is friends with Bob
Alice is friends with Charlie
Alice is friends with Dave
通过使用bind方法绑定函数的作用域,我们可以正确地访问obj对象的属性。
const obj = {
name: "Alice",
friends: ["Bob", "Charlie", "Dave"],
printFriends: function() {
this.friends.forEach((friend) => {
console.log(this.name + " is friends with " + friend);
});
},
};
obj.printFriends();
运行这段代码,输出如下:
Alice is friends with Bob
Alice is friends with Charlie
Alice is friends with Dave
使用箭头函数,我们可以确保this关键字指向正确的对象,从而正确访问对象的属性。
6、forEach 的性能低于 for 循环
forEach 方法虽然使用方便,但在性能方面却逊色于传统的 for 循环。
原因在于 forEach 的函数签名包含参数和上下文,使得其性能低于 for 循环。
Use the window.screen Object: screen.width, screen.height
detect the native resolution of a mobile device display (e.g.
retina display):
multiply the screen width and height with the device pixel ratio:
window.screen.width * window.devicePixelRatio
window.screen.height * window.devicePixelRatio
function getResolution() {
alert("Your screen resolution is: " + screen.width + "x" + screen.height + " retina display " + Math.round(window.screen.width * window.devicePixelRatio) + " " + Math.round(window.screen.height * window.devicePixelRatio));
}
getResolution();
should leverage the manufacturer's hint via the
<meta name="viewport" content="width=device-width"/> or
@-ms-viewport {width:device-width} feature.
After that, call window.innerWidth
Avoid relying on window.devicePixelRatio for anything.
Its meaning and the value it returns is currently in a state of flux and anything you make right now based around it will most likely break very soon.
Note: Meta viewport only works on Android, iOS, and Windows Phone 8.
@-ms-viewport only works (properly) on IE10 Metro and can interfere with proper Meta viewport behavior on Windows Phone 8.
Useful JavaScript Tips, Tricks and Best Practices
1 - Don’t forget var keyword when assigning a variable’s value for the first time.
Assignment to an undeclared variable automatically results in a global variable being created.
Avoid global variables.
2 - use === instead of ==
The == (or !=) operator performs an automatic type conversion if needed.
The === (or !==) operator will not perform any conversion.
It compares the value and the type, which could be considered faster than ==.
[10] === 10 // is false
[10] == 10 // is true
'10' == 10 // is true
'10' === 10 // is false
[] == 0 // is true
[] === 0 // is false
'' == false // is true but true == "a" is false
'' === false // is false 3 - undefined, null, 0, false, NaN, '' (empty string) are all falsy. 4 - Use Semicolons for line termination
The use of semi-colons for line termination is a good practice.
You won't be warned if you forget it, because in most cases it will be inserted by the JavaScript parser.
For more details about why you should use semi-colons, take a look to this artice: http://davidwalsh.name/javascript-semicolons.
5 - Create an object constructorfunction Person(firstName, lastName){
this.firstName = firstName;
this.lastName = lastName;
}
var Saad = new Person("Saad", "Mousliki");6 - Be careful when using typeof, instanceof and constructor.typeof : a JavaScript unary operator used to return a string that represents the primitive type of a variable, don't forget that typeof null will return "object", and for the majority of object types (Array, Date, and others) will return also "object".
constructor : is a property of the internal prototype property, which could be overridden by code.
instanceof : is another JavaScript operator that check in all the prototypes chain the constructor it returns true if it's found and false if not.
var arr = ["a", "b", "c"];
typeof arr; // return "object"
arr instanceof Array // true
arr.constructor(); //[]
7 - Create a Self-calling Function
This is often called a Self-Invoked Anonymous Function or Immediately Invoked Function Expression (IIFE).
It is a function that executes automatically when you create it, and has the following form:
(function(){
// some private code that will be executed automatically
})();
(function(a,b){
var result = a+b;
return result;
})(10,20)8 - Get a random item from an arrayvar items = [12, 548 , 'a' , 2 , 5478 , 'foo' , 8852, , 'Doe' , 2145 , 119];
var randomItem = items[Math.floor(Math.random() * items.length)];9 - Get a random number in a specific range
This code snippet can be useful when trying to generate fake data for testing purposes, such as a salary between min and max.
var x = Math.floor(Math.random() * (max - min + 1)) + min;10 - Generate an array of numbers with numbers from 0 to maxvar numbersArray = [] , max = 100;
for( var i=1; numbersArray.push(i++) < max;); // numbers = [1,2,3 ...
100] 11 - Generate a random set of alphanumeric charactersfunction generateRandomAlphaNum(len) {
var rdmString = "";
for( ; rdmString.length < len; rdmString += Math.random().toString(36).substr(2));
return rdmString.substr(0, len);
}
12 - Shuffle an array of numbersvar numbers = [5, 458 , 120 , -215 , 228 , 400 , 122205, -85411];
numbers = numbers.sort(function(){ return Math.random() - 0.5});
/* the array numbers will be equal for example to [120, 5, 228, -215, 400, 458, -85411, 122205] */
A better option could be to implement a random sort order by code (e.g.
: Fisher-Yates shuffle), than using the native sort JavaScript function.
For more details take a look to this discussion.
13 - A string trim function
The classic trim function of Java, C#, PHP and many other language that remove whitespace from a string doesn’t exist in JavaScript, so we could add it to the String object.
String.prototype.trim = function(){return this.replace(/^s+|s+$/g, "");};
A native implementation of the trim() function is available in the recent JavaScript engines.
14 - Append an array to another arrayvar array1 = [12 , "foo" , {name "Joe"} , -2458];
var array2 = ["Doe" , 555 , 100];
Array.prototype.push.apply(array1, array2);
/* array1 will be equal to [12 , "foo" , {name "Joe"} , -2458 , "Doe" , 555 , 100] */15 - Transform the arguments object into an arrayvar argArray = Array.prototype.slice.call(arguments);16 - Verify that a given argument is a numberfunction isNumber(n){
return !isNaN(parseFloat(n)) && isFinite(n);
}17 - Verify that a given argument is an arrayfunction isArray(obj){
return Object.prototype.toString.call(obj) === '[object Array]' ;
}
Note that if the toString() method is overridden, you will not get the expected result using this trick.
Or use…
Array.isArray(obj); // its a new Array method
You could also use instanceof if you are not working with multiple frames.
However, if you have many contexts, you will get a wrong result.
var myFrame = document.createElement('iframe');
document.body.appendChild(myFrame);
var myArray = window.frames[window.frames.length-1].Array;
var arr = new myArray(a,b,10); // [a,b,10]
// instanceof will not work correctly, myArray loses his constructor
// constructor is not shared between frames
arr instanceof Array; // false18 - Get the max or the min in an array of numbersvar numbers = [5, 458 , 120 , -215 , 228 , 400 , 122205, -85411];
var maxInNumbers = Math.max.apply(Math, numbers);
var minInNumbers = Math.min.apply(Math, numbers);19 - Empty an arrayvar myArray = [12 , 222 , 1000 ];
myArray.length = 0; // myArray will be equal to [].20 - Don’t use delete to remove an item from array
Use splice instead of using delete to delete an item from an array.
Using delete replaces the item with undefined instead of the removing it from the array.
Instead of…
var items = [12, 548 ,'a' , 2 , 5478 , 'foo' , 8852, , 'Doe' ,2154 , 119 ];
items.length; // return 11
delete items[3]; // return true
items.length; // return 11
/* items will be equal to [12, 548, "a", undefined × 1, 5478, "foo", 8852, undefined × 1, "Doe", 2154, 119] */
Use…
var items = [12, 548 ,'a' , 2 , 5478 , 'foo' , 8852, , 'Doe' ,2154 , 119 ];
items.length; // return 11
items.splice(3,1) ;
items.length; // return 10
/* items will be equal to [12, 548, "a", 5478, "foo", 8852, undefined × 1, "Doe", 2154, 119] */
The delete method should be used to delete an object property.
21 - Truncate an array using length
Like the previous example of emptying an array, we truncate it using the length property.
var myArray = [12 , 222 , 1000 , 124 , 98 , 10 ];
myArray.length = 4; // myArray will be equal to [12 , 222 , 1000 , 124].
As a bonus, if you set the array length to a higher value, the length will be changed and new items will be added with undefined as a value.
The array length is not a read only property.
myArray.length = 10; // the new array length is 10
myArray[myArray.length - 1] ; // undefined22 - Use logical AND/ OR for conditionsvar foo = 10;
foo == 10 && doSomething(); // is the same thing as if (foo == 10) doSomething();
foo == 5 || doSomething(); // is the same thing as if (foo != 5) doSomething();
The logical OR could also be used to set a default value for function argument.
function doSomething(arg1){
arg1 = arg1 || 10; // arg1 will have 10 as a default value if it’s not already set
}23 - Use the map() function method to loop through an array's itemsvar squares = [1,2,3,4].map(function(val) {
return val * val;
});
// squares will be equal to [1, 4, 9, 16] 24 - Rounding number to N decimal placevar num =2.443242342;
num = num.toFixed(4); // num will be equal to 2.4432
NOTE : the toFixed() function returns a string and not a number.
25 - Floating point problems0.1 + 0.2 === 0.3 // is false
9007199254740992 + 1 // is equal to 9007199254740992
9007199254740992 + 2 // is equal to 9007199254740994
Why does this happen? 0.1 +0.2 is equal to 0.30000000000000004.
What you need to know is that all JavaScript numbers are floating points represented internally in 64 bit binary according to the IEEE 754 standard.
For more explanation, take a look to this blog post.
You can use toFixed() and toPrecision() to resolve this problem.
26 - Check the properties of an object when using a for-in loop
This code snippet could be useful in order to avoid iterating through the properties from the object’s prototype.
for (var name in object) {
if (object.hasOwnProperty(name)) {
// do something with name
}
}27 - Comma operatorvar a = 0;
var b = ( a++, 99 );
console.log(a); // a will be equal to 1
console.log(b); // b is equal to 9928 - Cache variables that need calculation or querying
In the case of a jQuery selector, we could cache the DOM element.
var navright = document.querySelector('#right');
var navleft = document.querySelector('#left');
var navup = document.querySelector('#up');
var navdown = document.querySelector('#down');29 - Verify the argument before passing it to isFinite()isFinite(0/0) ; // false
isFinite("foo"); // false
isFinite("10"); // true
isFinite(10); // true
isFinite(undefined); // false
isFinite(); // false
isFinite(null); // true !!! 30 - Avoid negative indexes in arraysvar numbersArray = [1,2,3,4,5];
var from = numbersArray.indexOf("foo") ; // from is equal to -1
numbersArray.splice(from,2); // will return [5]
Make sure that the arguments passed to splice are not negative.
31 - Serialization and deserialization (working with JSON)var person = {name :'Saad', age : 26, department : {ID : 15, name : "R&D"} };
var stringFromPerson = JSON.stringify(person);
/* stringFromPerson is equal to "{"name":"Saad","age":26,"department":{"ID":15,"name":"R&D"}}" */
var personFromString = JSON.parse(stringFromPerson);
/* personFromString is equal to person object */32 - Avoid the use of eval() or the Function constructor
Use of eval or the Function constructor are expensive operations as each time they are called script engine must convert source code to executable code.
var func1 = new Function(functionCode);
var func2 = eval(functionCode);33 - Avoid using with() (The good part)
Using with() inserts a variable at the global scope.
Thus, if another variable has the same name it could cause confusion and overwrite the value.
34 - Avoid using for-in loop for arrays
Instead of using…
var sum = 0;
for (var i in arrayNumbers) {
sum += arrayNumbers[i];
}
…it’s better to use…
var sum = 0;
for (var i = 0, len = arrayNumbers.length; i < len; i++) {
sum += arrayNumbers[i];
}
As a bonus, the instantiation of i and len is executed once because it’s in the first statement of the for loop.
Thsi is faster than using…
for (var i = 0; i < arrayNumbers.length; i++)
Why? The length of the array arrayNumbers is recalculated every time the loop iterates.
NOTE : the issue of recalculating the length in each iteration was fixed in the latest JavaScript engines.
35 - Pass functions, not strings, to setTimeout() and setInterval()
If you pass a string into setTimeout() or setInterval(), the string will be evaluated the same way as with eval, which is slow.
Instead of using…
setInterval('doSomethingPeriodically()', 1000);
setTimeout('doSomethingAfterFiveSeconds()', 5000);
…use…
setInterval(doSomethingPeriodically, 1000);
setTimeout(doSomethingAfterFiveSeconds, 5000);36 - Use a switch/case statement instead of a series of if/else
Using switch/case is faster when there are more than 2 cases, and it is more elegant (better organized code).
Avoid using it when you have more than 10 cases.
37 - Use switch/case statement with numeric ranges
Using a switch/case statement with numeric ranges is possible with this trick.
function getCategory(age) {
var category = "";
switch (true) {
case isNaN(age):
category = "not an age";
break;
case (age >= 50):
category = "Old";
break;
case (age <= 20):
category = "Baby";
break;
default:
category = "Young";
break;
};
return category;
}
getCategory(5); // will return "Baby"38 - Create an object whose prototype is a given object
It’s possible to write a function that creates an object whose prototype is the given argument like this…
function clone(object) {
function OneShotConstructor(){};
OneShotConstructor.prototype= object;
return new OneShotConstructor();
}
clone(Array).prototype ; // []39 - An HTML escaper functionfunction escapeHTML(text) {
var replacements= {"<": "<", ">": ">","&": "&", """: """};
return text.replace(/[<>&"]/g, function(character) {
return replacements[character];
});
}40 - Avoid using try-catch-finally inside a loop
The try-catch-finally construct creates a new variable in the current scope at runtime each time the catch clause is executed where the caught exception object is assigned to a variable.
Instead of using…
var object = ['foo', 'bar'], i;
for (i = 0, len = object.length; i <len; i++) {
try {
// do something that throws an exception
}
catch (e) {
// handle exception
}
}
…use…
var object = ['foo', 'bar'], i;
try {
for (i = 0, len = object.length; i <len; i++) {
// do something that throws an exception
}
}
catch (e) {
// handle exception
} 41 - Set timeouts to XMLHttpRequests
You could abort the connection if an XHR takes a long time (for example, due to a network issue), by using setTimeout() with the XHR call.
var xhr = new XMLHttpRequest ();
xhr.onreadystatechange = function() {
if (this.readyState == 4) {
clearTimeout(timeout);
// do something with response data
}
}
var timeout = setTimeout( function() {
xhr.abort(); // call error callback
}, 60*1000 /* timeout after a minute */ );
xhr.open('GET', url, true);
xhr.send();
As a bonus, you should generally avoid synchronous XHR calls completely.
42 - Deal with WebSocket timeout
Generally when a WebSocket connection is established, a server could time out your connection after 30 seconds of inactivity.
The firewall could also time out the connection after a period of inactivity.
To deal with the timeout issue you could send an empty message to the server periodically.
To do this, add these two functions to your code: one to keep alive the connection and the other one to cancel the keep alive.
Using this trick, you’ll control the timeout.
Add a timerID…
var timerID = 0;
function keepAlive() {
var timeout = 15000;
if (webSocket.readyState == webSocket.OPEN) {
webSocket.send('');
}
timerId = setTimeout(keepAlive, timeout);
}
function cancelKeepAlive() {
if (timerId) {
cancelTimeout(timerId);
}
}
The keepAlive() function should be added at the end of the onOpen() method of the webSocket connection and the cancelKeepAlive() at the end of the onClose() method.
43 - Keep in mind that primitive operations can be faster than function calls.
Use VanillaJS.
For example, instead of using…
var min = Math.min(a,b);
A.push(v);
…use…
var min = a < b ? a : b;
A[A.length] = v;44 - Don’t forget to use a code beautifier when coding.
Use JSLint and minification (JSMin, for example) before going live.45 - JavaScript is awesome: Best Resources To Learn JavaScript
Code Academy JavaScript tracks: http://www.codecademy.com/tracks/javascript
Eloquent JavaScript by Marjin Haverbeke: http://eloquentjavascript.net/
Advanced JavaScript by John Resig: http://ejohn.org/apps/learn/
make a beep
var audioCtx = new (window.AudioContext || window.webkitAudioContext || window.audioContext);
//All arguments are optional:
//duration of the tone in milliseconds.
Default is 500
//frequency of the tone in hertz.
default is 440
//volume of the tone.
Default is 1, off is 0.
//type of tone.
sine, square, sawtooth, triangle, and custom.
Default sine.
//callback to use on end of tone
function beep(duration, frequency, volume, type, callback) {
var oscillator = audioCtx.createOscillator();
var gainNode = audioCtx.createGain();
oscillator.connect(gainNode);
gainNode.connect(audioCtx.destination);
if (volume){gainNode.gain.value = volume;}
if (frequency){oscillator.frequency.value = frequency;}
if (type){oscillator.type = type;}
if (callback){oscillator.onended = callback;}
oscillator.start(audioCtx.currentTime);
oscillator.stop(audioCtx.currentTime + ((duration || 500) / 1000));
};
Generate Sounds Programmatically
https://marcgg.com/blog/2016/11/01/javascript-audio/
Produce a Simple Beep
First let’s create a very basic beep using a sinusoid.
We’ll initiate an audio context, which is the central object for generating sound.
Then we’ll create an oscillator producing the sine wave.
Finally we connect the oscillator to the context and start.
var context = new AudioContext()
var o = context.createOscillator()
o.type = "sine"
o.connect(context.destination)
o.start()
You’ll notice that the sound produced here is not great.
It seems like you let a phone off the hook and when you stop it, you hear a “click” and it’s not pleasant at all.
This is because the human hear reacts this way as explained in this great article.
Basically when you stop the sound anywhere else than the zero crossing point, you’ll hear this clicking sound.
Getting Rid Of The Clicking Sound
The best solution to get rid of this click is to ramp the sine wave down with an exponentional function, using AudioParam.exponentialRampToValueAtTime() as documented here.
This time we need to add a gain node to our oscillator.
A gain node allows us to change the volume of a signal as explained in this schema from the documentation:
The code to start the sound now looks like this:
var context = new AudioContext()
var o = context.createOscillator()
var g = context.createGain()
o.connect(g)
g.connect(context.destination)
o.start(0)
In order to stop the sound we change the gain value, effectively reducing the volume.
Note that we don’t ramp down to 0 since there is a limitation in this function where the value has to be positive.
g.gain.exponentialRampToValueAtTime(
0.00001, context.currentTime + 0.04
)
As you can hear, the clicking sound is gone! But that’s not the only interesting thing that you can do with this exponential ramp down.
Set A Ringing Effect
In the example above, we decided to stop the sound really quickly, in 0.04 seconds.
But what happens when we change this X value?
g.gain.exponentialRampToValueAtTime(0.00001, context.currentTime + X)
Hitting Notes
Giving more time to the sound to fade out gives it a totally different feel.
It gets more visible when we start and stop the signal right away:
Start and stop quickly Start and stop slowly
The first one sounds like a ticking noise when the other sounds like an actual note played on an instrument.
Various Oscilators
So far we’ve been using a sine wave for our main signal, but we have other options:
It’s enven more interesting when we start playing around with the type of oscilators by setting o.type = type.
Sine Square Triangle Sawtooth
Playing Actual Notes
With the previous code, it becomes fairly simple to have a nice sounding note, but what exactly were we playing? That’s when you have to take frequency into account.
For instance, the one people know is that A4 is 440Hz, but there are others.
Note Frequencies in Hz
With this table, you can easily create a mapping in your code to play any given note using its .
For the hackathon I used a simple hash mapping that is available in this gist.
Making Music in the Browser
You'll find a global constructor AudioContext (webkitAudioContext in Chrome 34/35) that unlocks this functionality.
Oscillators
One of the main components of this API is the oscillator.
If you've used a synthesizer before, you're likely already familiar with this concept.
An oscillator produces a sound wave at a set frequency and pattern.
This creates notes with different qualities and textures.
Many oscillators, including the ones in the Web Audio API, support 4 different waveforms out of the box: sine, triangle, square, and sawtooth.
Each has a unique quality that gives synthesizers their distinctive sound.
Let's set up an oscillator.
We'll set the frequency to 440 and use a sine wave:
const context = new AudioContext()
const oscillator = context.createOscillator()
oscillator.frequency.value = 440
oscillator.type = 'sine'
This won't do much without an audio source to output sound to, of course.
We can connect the oscillator to our computer's default audio output pretty simply:
oscillator.connect(context.destination)
We can start and stop our oscillator using oscillator.start() and oscillator.stop().
Not so fast, though! The browser won't allow us to call these methods unless they're triggered by some user interaction first.
This is meant to prevent any random website from making noises without users' permission.
We'll add a button to the page and trigger our oscillator to play for a second.
document.querySelector('button').addEventListener('click', () => {
oscillator.start(context.currentTime)
setTimeout(() => oscillator.stop(context.currentTime), 1000)
})
Clicking the button should produce a tone from your speakers for about a second.
If you click the button a second time, though, you won't hear anything.
Why not? You should see an error in your console saying that start can't be called more than once on an oscillator.
Ok, so now we have to deal with the fact that we can't start an oscillator multiple times.
One way to handle this is to create a new oscillator every time we click the button.
So, let's move that code into our event handler.
const context = new AudioContext()
document.querySelector('button').addEventListener('click', () => {
const oscillator = context.createOscillator()
oscillator.frequency.value = 440
oscillator.type = 'sine'
oscillator.connect(context.destination)
oscillator.start(context.currentTime)
setTimeout(() => oscillator.stop(context.currentTime), 500)
})
Envelopes (Gain)
Great! Now our button plays a tone every time we click it.
But it sounds a bit...
robotic.
Real instruments don't cut off their sound immediately; instead, they have a natural decrease in volume over time.
This is called decay.
So, how can we implement decay here? We need to control the volume! In audio synthesis, this is referred to as an envelope.
Let's create a volume envelope for our oscillator.
const context = new AudioContext()
document.querySelector('button').addEventListener('click', () => {
const oscillator = context.createOscillator()
const envelope = context.createGain()
const decayRate = 1.5 // seconds
oscillator.frequency.value = 440
oscillator.type = 'sine'
envelope.gain.value = 1
oscillator.connect(envelope)
envelope.connect(context.destination)
oscillator.start(context.currentTime)
envelope.gain.exponentialRampToValueAtTime(0.001, context.currentTime + decayRate)
setTimeout(() => oscillator.stop(context.currentTime), decayRate * 1000)
})
You'll notice that we've made a change to some of our existing code here.
Before, we connected the oscillator directly to the audio source.
Now, we first connect it to the envelope, and then connect the envelope to the audio source.
We've also added a call to exponentialRampToValueAtTime on the envelope's gain node.
This method progressively adjusts the gain to a given value over time.
The time it expects is a precise moment, in seconds, which we use the currentTime of our AudioContext instance to calculate.
Musicality
Now we've got something that sounds a bit more like an instrument than just a beeping noise.
So, how do we get from here to something we can play like an instrument? First, we'll need a broader range of notes.
Our button is currently playing at the frequency 440, which corresponds to the note A in the fourth octave.
If you're familiar with piano music, this is the A above middle C.
Mapping note names to frequencies is a bit tedious, so let's pull in a library to solve this problem for us.
I recommend .
This library has a few different handy features, but importantly for us, it has a module that can translate notes in a range of octaves to their corresponding frequencies.
You can use it like this:
import {Note} from 'octavian'
const {frequency} = new Note('A4')
console.log(frequency) // => 440
Making It Playable
The next step is to bind a few keyboard keys to play different notes.
We'll pull the contents of our previous click handler function into a new function, playNote, that takes a frequency argument.
We'll use that argument to set the oscillator's frequency instead of hard-coding it to 440:
function playNote(frequency) {
/* ...
*/
oscillator.frequency.value = frequency
/* ...
*/
}
Next, we'll set up a keypress event on the document to play a range of notes with this function depending on which key is pressed.
For simplicity, let's map the home row to the octave of middle C (C4):
const notes = {
a: 'C4',
s: 'D4',
d: 'E4',
f: 'F4',
g: 'G4',
h: 'A4',
j: 'B4',
k: 'C5'
}
document.addEventListener('keypress', ({key}) => {
const note = notes[key]
const {frequency} = new Note(note)
playNote(frequency)
})
Et voilà: a playable toy keyboard, right here in the browser!
Conclusion
This is a simplified example of what's possible with the Web Audio API, but there's a lot I didn't cover here.
This API gives us all the tools we need to build a fully functional synthesizer in JavaScript.
It supports filters, noise generation, and even custom waveform creation.
I highly recommend looking at MDN's article on using the Web Audio API as a source for more information.
With this API being JavaScript, it opens us up to a lot of potential for creativity.
What would it be like to combine Web Audio with websockets? What about adding a little randomization to your sounds? The possibilities are endless.
I look forward to seeing what you create!
Understanding typeof, instanceof and constructor in JavaScript
Some types in JavaScript are so-called “primitive types”, and they don't act like objects.
These types are:
Undefined
Null
Boolean
Number
String
The confusion comes from the fact that the boolean, number and string types can be treated like objects in a limited way.
For example, the expression "I'm no object".length returns the value 13.
This happens because when you attempt to access properties or methods on a primitive value, JavaScript instantiates a wrapper object temporarily, just so you can access its methods.
‘Cause JavaScript's nice like that.
I'm not going to go into more details here, but Angus Croll wrote about The Secret Life of JavaScript Primitives, so that would be a good place to learn more.
typeof
typeof is a unary operator, just like the ! operator.
It returns a string representing the type of its operand.
Here are some examples:
typeof 3; // returns "number"
typeof 'blah'; //returns "string"
typeof {}; //returns "object"
typeof []; //returns "object"
typeof function() {}; //returns "function"typeof has its idiosyncrasies.
For example, typeof null returns "object", and typeof /[a-z]/ returns "function".
Again, Angus Croll has written more on this subject than I have space for here.
So, basically typeof is used for telling apart the different primitive types (as long as you don't care about null).
It's no use for telling different types of object apart though – for most objects typeof will return "object".
constructor
constructor is a property available on all objects' prototypes, and it is a reference to the constructor function used to create the object.
So, ({}).constructor returns the Object constructor function(the parentheses are needed to clarify a syntactic ambiguity) and [].constructor returns the Array constructor function.
Likewise, it will return your custom constructor function:
function Person(name) {
this.name = name;
}
var dave = new Person('Dave');
dave.constructor === Person; //true
Remember that unlike the typeof operator, constructor returns a reference to the actual function.
Another gotcha: because constructor is part of the prototype, if you reassign the prototype to a constructor function, e.g.
Person.prototype = {};, you'll lose the constructor property.
instanceof
instanceof is a binary operator – its syntax is instance instanceof Constructor.
So, to continue the above example:
dave instanceof Person; //true
The difference between instanceof and the constructor property (apart from the obvious syntactic difference) is that instanceof inspects the object's prototype chain.
So, going back to our friend dave again:
dave instanceof Object; //true
This is because Person.prototype is an object, so Object is in dave‘s prototype chain, therefore dave is an instance of Object.
Wrap-up
So, if you're dealing with primitive objects, use typeof to distinguish them.
Because typeof returns "function" for functions, it can also be useful for checking if an object member or a function argument is a function.
If you're working out the constructor of an object, use its constructor property.
And if you're dealing with lengthy inheritance chains, and you want to find out whether an object inherits from a certain constructor, use instanceof.
window.onload vs document.onload
window.onload
By default, it is fired when the entire page loads, including its content (images, CSS, scripts, etc.).
document.onload
It is called when the DOM is ready which can be prior to images and other external content is loaded.
window.onload appears to be the most widely supported.
$(document).ready(function() { /* code here */ });
$(function() { /* code here */ });
These methods help in navigating from DOM element to another element in a parent child hierarchy e.g.
finding ancestors, descendants or sibling element of a specified element.
https://npmjs.org/package/getmac
get mac address
using windows operating system, following code may help you to get HDD and CPU serial number:
var sys = require('util')
var exec = require('child_process').exec;
function puts(error, stdout, stderr) {
console.log(stdout)
}
exec("wmic CPU get ProcessorId", puts);
exec("wmic DISKDRIVE get SerialNumber", puts);
to save this serial number to a variable
I want its value
If I try to console.log(stdout.SerialNumber) then it gives me undefined
Perhaps the fingerprintjs2 is one of the solutions for this issue:
http://valve.github.io/fingerprintjs2/
https://github.com/Valve/fingerprintjs2
Browser allows very limited access to hardware.
If you want to uniquely identify your clients, you can use the below chrome extension.
https://github.com/Antony007/ADNIdentifier
The require() function is not a client side function
Typically require() is used in server side NodeJS code, but there is a require.js library file
https://stackoverflow.com/questions/23603514/javascript-require-function-giving-referenceerror-require-is-not-defined
Client on node: require is not defined
You have three options:
1.
Use <script> tag.
2.
Use a CommonJS implementation.
Synchronous dependencies like Node.js
3.
Use an AMD implementation.
CommonJS client side-implementations include:
(most of them require a build step before you deploy)
1.
Browserify - You can use most Node.js modules in the browser.
This is my personal favorite.
2.
Webpack - Does everything (bundles JS, CSS, etc).
Made popular by the surge of React.js.
Notorious for its difficult learning curve.
3.
Rollup - New contender.
Leverages ES6 modules.
Includes tree-shaking abilities (removes unused code).
AMD implementations include:
RequireJS - Very popular amongst client-side JavaScript developers.
Not my taste because of its asynchronous nature.
Note, in your search for choosing which one to go with, you'll read about Bower.
Bower is only for package dependencies and is unopinionated on module definitions like CommonJS and AMD.
require()
When you're first starting out with Node js, it might be a bit confusing because you are most likely accustomed to writing JavaScript code for the web browser.
When Node js is the server, the syntax is similar but there are a few differences around how other JavaScript files and modules are included.
When writing on the server side you may include files as follows: require('./mysharedfile');.
This however is not valid on the client-side.
I've previously written an article about Include a JavaScript file in another file.
Another good thing to remember is that when you are writing your Node js server-side code you split it into multiple files; ideally one per module keeping the single responsibility principle in mind.
This is also good practice when you are doing client-side development as well.
Don't be afraid about making a lot of JavaScript files, just be sure that you implement a JavaScript minify so that all of your JavaScript is compiled into a single file and it actually removes the entire need to even used the require();.
var settings = {
user:"someuser",
password:"password",
country:"Country",
birthplace:country
}
settings.birthplace = settings.country;
You can't access the object inside of itself.
You can use variable:
var country = "country";
var settings = {
user:"someuser",
password:"password",
country:country,
birthplace:country
}
use a constructor function to reference an object during initialization
This example uses an anonymous function as a constructor.
The new object is reference with this.
var settings = new function() {
this.user = "someuser";
this.password = "password";
this.country = "Country";
this.birthplace = this.country;
};
Enumerate the properties of an object
there are three native ways to list/traverse object properties:
for...in loops
Object.keys(o)
Object.getOwnPropertyNames(o)
Accessing Nested Objects in JavaScript
Accessing Nested ObjectsCannot read property 'labels' of undefined
const user = {
id: 101,
email: 'jack@dev.com',
personalInfo: {
name: 'Jack',
address: {
line1: 'westwish st',
line2: 'washmasher',
city: 'wallas',
state: 'WX'
}
}
}
To access the name of the our user:
const name = user.personalInfo.name;
const userCity = user.personalInfo.address.city;
But, for some reason, if our user’s personal info is not available, the object structure will be like this,
const user = {
id: 101,
email: 'jack@dev.com'
}
The usual way how most devs deal with this scenario is,
const name = user && user.personalInfo ? user.personalInfo.name : null;
// undefined error will NOT be thrown as we check for existence before access
This is okay if your nested structure is simple, but if you have your data nested 5 or 6 levels deep, then your code will look really messy like this,
let city;
if (
data && data.user && data.user.personalInfo &&
data.user.personalInfo.addressDetails &&
data.user.personalInfo.addressDetails.primaryAddress
) {
city = data.user.personalInfo.addressDetails.primaryAddress;
}
There are a few tricks to deal with this messy object structures.
Oliver Steele’s Nested Object Access Pattern
This is my personal favorite as it makes the code look clean and simple.
I picked this style from stackoverflow a while back and it is pretty catchy once you understand how it works.
const name = ((user || {}).personalInfo || {}).name;
With this notation, you’ll never run into Cannot read property ‘name’ of undefined.
You basically check if user exists, if not, you create an empty object on the fly.
This way, the next level key will always be accessed from an object that exists or an empty object, but never from undefined.
Unfortunately, you cannot access nested arrays with this trick
Access Nested Objects Using Array Reduce
Array reduce method is very powerful and it can be used to safely access nested objects.
const getNestedObject = (nestedObj, pathArr) => {
return pathArr.reduce((obj, key) =>
(obj && obj[key] !== 'undefined') ? obj[key] : undefined, nestedObj);
}
// pass in your object structure as array elements
const name = getNestedObject(user, ['personalInfo', 'name']);
// to access nested array, just pass in array index as an element the path array.
const city = getNestedObject(user, ['personalInfo', 'addresses', 0, 'city']);
// this will return the city from the first address item.
RGraph AJAX functions
RGraph AJAX functionsrgraph ajax
With canvas charts, the functions are located in the RGraph.common.core.js file and since this file is necessarily included you don't have to include anything extra to what you normally include in your page.
Testing and Automation Tools
API
application programming interfaces (APIs)
API testing is performed at the message layer
API Testing Tutorial
Appium
Appium is an open source test automation framework for use with native, hybrid and mobile web apps.
It drives iOS, Android, and Windows apps using the WebDriver protocol.
Appium
Database Testing
Database Testing Complete Guide
ETL
ETL stands for Extract-Transform-Load
to ensure that the data that has been loaded from a source to the destination after business transformation is accurate.
It also involves the verification of data at various middle stages that are being used between source and destination.
ETL Testing or Data Warehouse Testing Tutorial
Informatica
Informatica Powercenter ETL/Data Integration tool is the most widely used tool and in the common term when we say Informatica, it refers to the Informatica PowerCenter tool for ETL.
Informatica
Mobile with Automation
Mobile automation can be done using many tools
Mobile automation
QC/ALM
HP Application LifeCycle Management (ALM) is the latest incarnation of flagship test management tool Quality Center(QC).
HP ALM /Quality Center Tutorial
UFT/QTP
test automation using QTP tool
QTP stands for QuickTest Professional
helps testers to perform an automated functional testing seamlessly, without monitoring, once script development is complete.
QTP
Scrum master
A scrum master is the facilitator for an agile development team.
Scrum is a methodology that allows a team to self-organize and make changes quickly, in accordance with agile principles.
The scrum master manages the process for how information is exchanged.
https://www.visual-paradigm.com/scrum/what-is-scrum-master/
Selenium
Selenium automates browsers
Primarily it is for automating web applications for testing purposes
web-based administration tasks can be automated
Selenium
SOAP UI
SoapUI is an open-source web service testing application for Simple Object Access Protocol (SOAP) and representational state transfers (REST).
web service inspection, invoking, development, simulation and mocking, functional testing, load and compliance testing.
SoapUI is cross-platform.
SOAP UI
var index = notvisitedList.indexOf(topicpointer);
notvisitedList.splice(index, 1);
get href value of an anchor tag
Use the .prop() method
var href = $('a').prop('href');
Use the .text() method.
var text = $('a').text();
Use the querySelector() which will return the first anchor tag within the document.
Then we can directly access the href property to get the exact value of the href attribute.
var href = document.querySelector('a').href;
theElement.match(/href="([^"]*)/)[1];
theElement.getAttribute("href");
document.getElementById("aaa").href;
var LibDocsList = [];
$('a[href*="LibDocs"]').each(function(i) {
var anchor = $(this).prop('href'); anchorNumber = i; anchorLength = anchorNumber;
LibDocsList.push(anchor);
});
random jump to some pages
function randomLinkTo() {
linkpointer = Math.floor(Math.random() * notvisitedList.length);
linkToAddr = LibDocsList[linkpointer]
var index = notvisitedList.indexOf(linkpointer);
notvisitedList.splice(index, 1);
window.open(linkToAddr, "_blank");
}
// following code must be at end to allow full page loaded OK
var LibDocsList = [];
$('a[href*="LibDocs"]').each(function(i) {
var anchor = $(this).prop('href'); anchorNumber = i; anchorLength = anchorNumber;
LibDocsList.push(anchor);
});
var totalLength = LibDocsList.length - 1
var notvisitedList = [...Array(totalLength).keys()];
The spread operator in JavaScript is a useful syntax for adding elements to an array, combining arrays into one larger one, spreading an array inside the arguments of a function, and more.
// Concatenating arrays and objects
let arr1 = [1,2,3];
let arr2 = [4,5];
let newArray = [...arr1,...arr2];
console.log(newArray);
// Output: [ 1, 2, 3, 4, 5 ]
// Copying array elements
let arr = ["a","b","c"];
let newArray = [...arr];
console.log(newArray);
// Output: ["a", "b", "c"]
// Expanding arrays
let arr = ["a","b"];
let newArray = [...arr,"c","d"];
console.log(newArray);
// Output: ["a", "b", "c", "d"]
// Merging objects
const userBasic = { name: "Jen", age: 22,
};
const userMoreInfo = { country: "Argentina", city: "Córdoba",
};
const user = {...
userBasic, ...
userMoreInfo};
// Output: { name: "Jen", age: 22, country: "Argentina", city: "Córdoba" }
Try fabric JS to convert canvas to svg
http://jsfiddle.net/Nofiden/3hcyjo0e/2/
fabric-introSVG.js lightweight library for manipulating and animating SVG
HTML
JS
var canvas = new fabric.Canvas('canvas', { isDrawingMode: true });
//var canvas = document.getElementById("canvas");
var ctx = canvas.getContext("2d");
$("#canvas2svg").click(function(){
canvas.isDrawingMode = false;
alert(canvas.toSVG());
});
LocalStorage, sessionStorage
Web storage objects localStorage and sessionStorage allow to save key/value pairs in the browser.
What’s interesting about them is that the data survives a page refresh (for sessionStorage) and even a full browser restart (for localStorage).
We already have cookies.
Why additional objects?
Unlike cookies, web storage objects are not sent to server with each request.
Because of that, we can store much more.
Most browsers allow at least 2 megabytes of data (or more) and have settings to configure that.
Also unlike cookies, the server can’t manipulate storage objects via HTTP headers.
Everything’s done in JavaScript.
The storage is bound to the origin (domain/protocol/port triplet).
That is, different protocols or subdomains infer different storage objects, they can’t access data from each other.
Both storage objects provide same methods and properties:
setItem(key, value) – store key/value pair.
getItem(key) – get the value by key.
removeItem(key) – remove the key with its value.
clear() – delete everything.
key(index) – get the key on a given position.
length – the number of stored items.
As you can see, it’s like a Map collection (setItem/getItem/removeItem), but also allows access by index with key(index).
localStorage demo
The main features of localStorage are:
Shared between all tabs and windows from the same origin.
The data does not expire.
It remains after the browser restart and even OS reboot.
For instance, if you run this code…
localStorage.setItem('test', 1);
…And close/open the browser or just open the same page in a different window, then you can get it like this:
alert( localStorage.getItem('test') ); // 1
We only have to be on the same origin (domain/port/protocol), the url path can be different.
The localStorage is shared between all windows with the same origin, so if we set the data in one window, the change becomes visible in another one.
Object-like access
We can also use a plain object way of getting/setting keys, like this:
// set key
localStorage.test = 2;
// get key
alert( localStorage.test ); // 2
// remove key
delete localStorage.test;
That’s allowed for historical reasons, and mostly works, but generally not recommended, because:
If the key is user-generated, it can be anything, like length or toString, or another built-in method of localStorage.
In that case getItem/setItem work fine, while object-like access fails:
let key = 'length';
localStorage[key] = 5; // Error, can't assign length
There’s a storage event, it triggers when we modify the data.
That event does not happen for object-like access.
We’ll see that later in this chapter.
Looping over keys
As we’ve seen, the methods provide “get/set/remove by key” functionality.
But how to get all saved values or keys?
Unfortunately, storage objects are not iterable.
One way is to loop over them as over an array:
for(let i=0; i<localStorage.length; i++) {
let key = localStorage.key(i);
alert(`${key}: ${localStorage.getItem(key)}`);
}
Another way is to use for key in localStorage loop, just as we do with regular objects.
It iterates over keys, but also outputs few built-in fields that we don’t need:
// bad try
for(let key in localStorage) {
alert(key); // shows getItem, setItem and other built-in stuff
}
…So we need either to filter fields from the prototype with hasOwnProperty check:
for(let key in localStorage) {
if (!localStorage.hasOwnProperty(key)) {
continue; // skip keys like "setItem", "getItem" etc
}
alert(`${key}: ${localStorage.getItem(key)}`);
}
…Or just get the “own” keys with Object.keys and then loop over them if needed:
let keys = Object.keys(localStorage);
for(let key of keys) {
alert(`${key}: ${localStorage.getItem(key)}`);
}
The latter works, because Object.keys only returns the keys that belong to the object, ignoring the prototype.
Strings only
Please note that both key and value must be strings.
If were any other type, like a number, or an object, it gets converted to string automatically:
sessionStorage.user = {name: "John"};
alert(sessionStorage.user); // [object Object]
We can use JSON to store objects though:
sessionStorage.user = JSON.stringify({name: "John"});
// sometime later
let user = JSON.parse( sessionStorage.user );
alert( user.name ); // John
Also it is possible to stringify the whole storage object, e.g.
for debugging purposes:
// added formatting options to JSON.stringify to make the object look nicer
alert( JSON.stringify(localStorage, null, 2) );
sessionStorage
The sessionStorage object is used much less often than localStorage.
Properties and methods are the same, but it’s much more limited:
The sessionStorage exists only within the current browser tab.
Another tab with the same page will have a different storage.
But it is shared between iframes in the same tab (assuming they come from the same origin).
The data survives page refresh, but not closing/opening the tab.
Let’s see that in action.
Run this code…
sessionStorage.setItem('test', 1);
…Then refresh the page.
Now you can still get the data:
alert( sessionStorage.getItem('test') ); // after refresh: 1
…But if you open the same page in another tab, and try again there, the code above returns null, meaning “nothing found”.
That’s exactly because sessionStorage is bound not only to the origin, but also to the browser tab.
For that reason, sessionStorage is used sparingly.
Storage event
When the data gets updated in localStorage or sessionStorage, storage event triggers, with properties:
key – the key that was changed (null if .clear() is called).
oldValue – the old value (null if the key is newly added).
newValue – the new value (null if the key is removed).
url – the url of the document where the update happened.
storageArea – either localStorage or sessionStorage object where the update happened.
The important thing is: the event triggers on all window objects where the storage is accessible, except the one that caused it.
Let’s elaborate.
Imagine, you have two windows with the same site in each.
So localStorage is shared between them.
You might want to open this page in two browser windows to test the code below.
If both windows are listening for window.onstorage, then each one will react on updates that happened in the other one.
// triggers on updates made to the same storage from other documents
window.onstorage = event => { // same as window.addEventListener('storage', event => {
if (event.key != 'now') return;
alert(event.key + ':' + event.newValue + " at " + event.url);
};
localStorage.setItem('now', Date.now());
Please note that the event also contains: event.url – the url of the document where the data was updated.
Also, event.storageArea contains the storage object – the event is the same for both sessionStorage and localStorage, so event.storageArea references the one that was modified.
We may even want to set something back in it, to “respond” to a change.
That allows different windows from the same origin to exchange messages.
Modern browsers also support Broadcast channel API, the special API for same-origin inter-window communication, it’s more full featured, but less supported.
There are libraries that polyfill that API, based on localStorage, that make it available everywhere.
Summary
Web storage objects localStorage and sessionStorage allow to store key/value in the browser.
Both key and value must be strings.
The limit is 5mb+, depends on the browser.
They do not expire.
The data is bound to the origin (domain/port/protocol).
localStorage
Shared between all tabs and windows with the same origin
Visible within a browser tab, including iframes from the same origin
sessionStorage
Survives browser restart
Survives page refresh (but not tab close)
API:
setItem(key, value) – store key/value pair.
getItem(key) – get the value by key.
removeItem(key) – remove the key with its value.
clear() – delete everything.
key(index) – get the key number index.
length – the number of stored items.
Use Object.keys to get all keys.
We access keys as object properties, in that case storage event isn’t triggered.
Storage event:
Triggers on setItem, removeItem, clear calls.
Contains all the data about the operation (key/oldValue/newValue), the document url and the storage object storageArea.
Triggers on all window objects that have access to the storage except the one that generated it (within a tab for sessionStorage, globally for localStorage).
Complete Guide To Node Client-Server Communication
This covers the following forms of client-server connection:
XMLHttpRequest
Server-Sent Events
WebSocket
HTTP/2
Server to server
You can check out the complete source code for each implementation here.
Before we begin, I should note that there is no one best protocol or API for client/server communication.
Every non-trivial application will require a mix of different transports based on a variety of requirements: interaction with the browser cache, protocol overhead, message latency, reliability, type of data transfer, and more.
Some protocols may offer low-latency delivery (e.g., Server-Sent Events, WebSocket), but may not meet other critical criteria, such as the ability to leverage the browser cache or support efficient binary transfers in all cases.
Here is visualization to help illustrate how XHR, SSE, and WebSockets differ in their implementations.
CLIENT SERVER RELATIONSHIP
XHR is optimized for “transactional” request-response communication: the client sends the full, well-formed HTTP request to the server, and the server responds with a full response.
There is no support for request streaming, and until the Streams API is available, no reliable cross-browser response streaming API.
SSE enables efficient, low-latency server-to-client streaming of text-based data: the client initiates the SSE connection, and the server uses the event source protocol to stream updates to the client.
The client can’t send any data to the server after the initial handshake.
WebSocket is the only transport that allows bidirectional communication over the same TCP connection (Figure 17–2): the client and server can exchange messages at will.
As a result, WebSocket provides low latency delivery of text and binary application data in both directions.
WebSockets is a technology, based on the ws protocol, that makes it possible to establish a continuous full-duplex connection stream between a client and a server.
A typical websocket client would be a user’s browser, but the protocol is platform independent.
It is the closest API to a raw network socket in the browser.
Except a WebSocket connection is also much more than a network socket, as the browser abstracts all the complexity behind a simple API and provides a number of additional services:
Connection negotiation and same-origin policy enforcement
Interoperability with existing HTTP infrastructure
Message-oriented communication and efficient message framing
Subprotocol negotiation and extensibility
This is a demo shows a demo of a client connecting to a websocket server and sharing data.
Here is the server.js of a websocket.
'use strict';
const WebSocketServer = require('ws').Server
const wss = new WebSocketServer({ port: 8081 });
wss.on('connection', ((ws) => {
ws.on('message', (message) => {
console.log(`received: ${message}`);
});
ws.on('end', () => {
console.log('Connection ended...');
});
ws.send('Hello Client');
}));
Here is the client.js of a websocket.
console.log('open: ');
var ws = new WebSocket("ws://127.0.0.1:8081");
ws.onopen = function(event) {
console.log('Connection is open ...');
ws.send("Hello Server");
};ws.onerror = function(err) {
console.log('err: ', err);
}ws.onmessage = function(event) {
console.log(event.data);
document.body.innerHTML += event.data + '<br>';
};ws.onclose = function() {
console.log("Connection is closed...");
}
SSEs are sent over traditional HTTP.
That means they do not require a special protocol or server implementation to get working.
WebSockets on the other hand, require full-duplex connections and new Web Socket servers to handle the protocol.
In addition, Server-Sent Events have a variety of features that WebSockets lack by design such as automatic reconnection, event IDs, and the ability to send arbitrary events.
Server-Sent Events vs.
WebSockets
Why would you choose Server-Sent Events over WebSockets? Good question.
One reason SSEs have been kept in the shadow is because later APIs like WebSockets provide a richer protocol to perform bi-directional, full-duplex communication.
Having a two-way channel is more attractive for things like games, messaging apps, and for cases where you need near real-time updates in both directions.
However, in some scenarios data doesn’t need to be sent from the client.
You simply need updates from some server action.
A few examples would be friends’ status updates, stock tickers, news feeds, or other automated data push mechanisms (e.g.
updating a client-side Web SQL Database or IndexedDB object store).
If you’ll need to send data to a server, XMLHttpRequest is always a friend.
Here is the server.js of our Server Sent Event, we will be sending out data to the client every 5 seconds with an updated timestamp via SSE.
'use strict';const http = require('http');
const util = require('util');
const fs = require('fs');http.createServer((req, res) => {
debugHeaders(req);if (req.headers.accept && req.headers.accept == 'text/event-stream') {
if (req.url == '/events') {
sendSSE(req, res);
} else {
res.writeHead(404);
res.end();
}
} else {
res.writeHead(200, {'Content-Type': 'text/html'});
res.write(fs.readFileSync(__dirname + '/index.html'));
res.end();
}
}).listen(8000);const sendSSE = (req, res) => {
res.writeHead(200, {
'Content-Type': 'text/event-stream',
'Cache-Control': 'no-cache',
'Connection': 'keep-alive'
});const id = (new Date()).toLocaleTimeString();setInterval(() => {
constructSSE(res, id, (new Date()).toLocaleTimeString());
}, 5000);constructSSE(res, id, (new Date()).toLocaleTimeString());
//res.end();
}const constructSSE = (res, id, data) => {
res.write('id: ' + id + '\n');
res.write("data: " + data + '\n\n');
}const debugHeaders = (req) => {
util.puts('URL: ' + req.url);
for (let key in req.headers) {
util.puts(key + ': ' + req.headers[key]);
}
util.puts('\n\n');
}
And here is the client.js which is reference by the index.html on the client side.
Notice how the client never sends out a formal request for data with SSE’s.
Once the intial connection has been made with the server then the plain text data can be sent to the client as needed!
var source = new EventSource('/events');
source.onmessage = function(e) {
document.body.innerHTML += e.data + ';
};
XMLHttpRequest (XHR) is a browser-level API that enables the client to script data transfers via JavaScript.
XHR made its first debut in Internet Explorer 5, became one of the key technologies behind the Asynchronous JavaScript and XML (AJAX) revolution, and is now a fundamental building block of nearly every modern web application.
XMLHTTP changed everything.
It put the “D” in DHTML.
It allowed us to asynchronously get data from the server and preserve document state on the client… The Outlook Web Access (OWA) team’s desire to build a rich Win32 like application in a browser pushed the technology into IE that allowed AJAX to become a reality.
— Jim Van Eaton Outlook Web Access: A catalyst for web evolution
Here I am running a simple Express server with a simple route to send requested data to the Client.
'use strict';var express = require('express');
var app = express();app.use(express.static(`${__dirname}/public`));app.get('/api', function(req, res){
res.send((new Date()).toLocaleTimeString());
});app.listen(3000);
Here is the javascript file linked to my index.html on the client side.
I am using the baked in XHR methods as opposed to jQuery since I love to use vanilla JavaScript whenever possible.
'use strict'
function reqListener (data) {
document.body.innerHTML += this.responseText + '<br>';
}setInterval(function() {
var oReq = new XMLHttpRequest();
oReq.addEventListener("load", reqListener);
oReq.open("GET", "/api");
oReq.send();
}, 3000);
In my Github repo, I cover two more use cases not referenced here, server to server communications and HTTP/2.
If you are curious about those forms of communication check it out.
One word about HTTP/2 before wrapping up.
HTTP/2 is the future of Client-Server communication, but it is a protocol built on top of HTTP/1.1 which means that all of these forms of communicating will be still be relevant in the future, just the means that they are transmitted will be updated.
As you can see there are a ton of different ways you can send data between a client and server.
Client-server communication in Node.js
I would use websockets for this.
Once you've set up the connection you can initiate messages from either side.
The WS npm package makes this pretty easy.
Server example (using the ws npm package):
const WebSocket = require('ws');
const wss = new WebSocket.Server({ port: 8080 }); // Set up server
wss.on('connection', function connection(ws) { // when client connects
// when client sends something
ws.on('message', function incoming(message) {
console.log('received: %s', message);
});
// Send a message
ws.send('Hello client!');
});
Client example (no need for any package, it's built-in) :
const socket = new WebSocket('ws://localhost:8080'); // Create WebSocket
socket.addEventListener('open', function(event) { // Connection opened
socket.send('Hello Server!');
});
socket.addEventListener('message', function(event) { // Listen for messages
console.log('Message from server ', event.data);
});
There are alternatives if you can't use websockets, such as polling (where the client periodically calls the server to see if theres a message), and long-polling (where the server holds a http request open for an artificially long period of time until a message is ready).
other method: Server side
http.createServer(function(req, res) {
if (req.method == 'GET') {
} else if (req.method == 'POST') {
var body = '';
req.on('data', function(data) {
body += data;
});
req.on('end', function() {
console.log("We have received your request successfully.");
});
}
res.end("ok");
})
four flavors of Object-Oriented Programming
There are four ways to write Object-Oriented Programming in JavaScript.
They are:
Using Constructor functions
Using Classes
Using Objects Linking to Other Objects (OLOO)
Using Factory functions
Using Constructor functions
Constructors are functions that contain a this keyword.
functionHuman(firstName, lastName){this.firstName = firstName
this.lastName = lastName
}this lets you store (and access) unique values created for each instance.
You can create an instance with the new keyword.
const chris =newHuman('Chris','Coyier')
console.log(chris.firstName)// Chris
console.log(chris.lastName)// Coyierconst zell =newHuman('Zell','Liew')
console.log(zell.firstName)// Zell
console.log(zell.lastName)// Liew
Class syntax
Classes are said to be the “syntactic sugar” of Constructor functions.
As in, Classes are an easier way of writing Constructor functions.
There’s serious contention about whether Classes are bad (like this and this).
We’re not going to dive into those arguments here.
Instead, we’re just going to look at how to write code with Classes and decide whether Classes are better than constructors based on the code we write.
Classes can be written with the following syntax:
classHuman{constructor(firstName, lastName){this.firstName = firstName
this.lastName = lastName
}}
Notice the constructor function contains the same code as the Constructor syntax above? We need to do this since we want to initialize values into this.
(We can skip constructor if we don’t need to initialize values.
More on this later under Inheritance).
At first glance, classes seem to be inferior to constructors — there’s more code to write! Hold your horses and don’t form a conclusion at this point.
We have a lot more to cover.
Classes begin to shine later.
As before, you can create an instance with the new keyword.
const chris =newHuman('Chris','Coyier')
console.log(chris.firstName)// Chris
console.log(chris.lastName)// Coyier
Objects Linking to Other Objects (OLOO)
OLOO was coined and popularized by Kyle Simpson.
In OLOO, you define the blueprint as a normal object.
You then use a method (often named init, but that isn’t required in the way constructor is to a Class) to initialize the instance.
const Human ={init(firstName, lastName){this.firstName = firstName
this.lastName = lastName
}}
You use Object.create to create an instance.
After creating the instance, you need to run your init function.
const chris = Object.create(Human)
chris.init('Chris','Coyier')
console.log(chris.firstName)// Chris
console.log(chris.lastName)// Coyier
You can chain init after Object.create if you returned this inside init.
const Human ={init(){// ...returnthis}}const chris = Object.create(Human).init('Chris','Coyier')
console.log(chris.firstName)// Chris
console.log(chris.lastName)// Coyier
Factory functions
Factory functions are functions that return an object.
You can return any object.
You can even return a Class instance or OLOO instance — and it’ll still be a valid Factory function.
Here’s the simplest way to create Factory functions:
functionHuman(firstName, lastName){return{
firstName,
lastName
}}
You don’t need new to create instances with Factory functions.
You simply call the function.
const chris =Human('Chris','Coyier')
console.log(chris.firstName)// Chris
console.log(chris.lastName)// Coyier
Now that we’ve seen these four OOP setup possibilities, let’s look at how you declare properties and methods on each of them so we can get a little better understanding of working with them before getting to the bigger comparisons we’re trying to make.
Declaring properties and methods
Methods are functions declared as an object’s property.
const someObject ={someMethod(){/* ...
*/}}
In Object-Oriented Programming, there are two ways to declare properties and methods:
Directly on the instance
In the Prototype
Let’s learn to do both.
Declaring properties and methods with Constructors
If you want to declare a property directly on an instance, you can write the property inside the constructor function.
Make sure to set it as the property for this.
functionHuman(firstName, lastName){// Declares propertiesthis.firstName = firstName
this.lastname = lastName
// Declares methodsthis.sayHello=function(){
console.log(`Hello, I'm ${firstName}`)}}const chris =newHuman('Chris','Coyier')
console.log(chris)
Methods are commonly declared on the Prototype because Prototype allows instances to use the same method.
It’s a smaller “code footprint.”
To declare properties on the Prototype, you need to use the prototype property.
functionHuman(firstName, lastName){this.firstName = firstName
this.lastname = lastName
}// Declaring method on a prototypeHuman.prototype.sayHello=function(){
console.log(`Hello, I'm ${this.firstName}`)}
It can be clunky if you want to declare multiple methods in a Prototype.
// Declaring methods on a prototypeHuman.prototype.method1=function(){/*...*/}Human.prototype.method2=function(){/*...*/}Human.prototype.method3=function(){/*...*/}
You can make things easier by using merging functions like Object.assign.
Object.assign(Human.prototype,{method1(){/*...*/},method2(){/*...*/},method3(){/*...*/}})Object.assign does not support the merging of Getter and Setter functions.
You need another tool.
Here’s why.
And here’s a tool I created to merge objects with Getters and Setters.
Declaring properties and methods with Classes
You can declare properties for each instance inside the constructor function.
classHuman{constructor(firstName, lastName){this.firstName = firstName
this.lastname = lastName
this.sayHello=function(){
console.log(`Hello, I'm ${firstName}`)}}}
It’s easier to declare methods on the prototype.
You write the method after constructor like a normal function.
classHuman(firstName, lastName){constructor(firstName, lastName){/* ...
*/}sayHello(){
console.log(`Hello, I'm ${this.firstName}`)}}
It’s easier to declare multiple methods on Classes compared to Constructors.
You don’t need the Object.assign syntax.
You just write more functions.
Note: there’s no , between method declarations in a Class.
classHuman(firstName, lastName){constructor(firstName, lastName){/* ...
*/}method1(){/*...*/}method2(){/*...*/}method3(){/*...*/}}
Declaring properties and methods with OLOO
You use the same process for declaring properties and methods on an instance.
You assign them as a property of this.
const Human ={init(firstName, lastName){this.firstName = firstName
this.lastName = lastName
this.sayHello=function(){
console.log(`Hello, I'm ${firstName}`)}returnthis}}const chris = Object.create(Human).init('Chris','Coyier')
console.log(chris)
To declare methods in the prototype, you write the method like a normal object.
const Human ={init(){/*...*/},sayHello(){
console.log(`Hello, I'm ${this.firstName}`)}}
Declaring properties and methods with Factory functions
You can declare properties and methods directly by including them in the returned object.
functionHuman(firstName, lastName){return{
firstName,
lastName,sayHello(){
console.log(`Hello, I'm ${firstName}`)}}}
You cannot declare methods on the Prototype when you use Factory functions.
If you really want methods on the prototype, you need to return a Constructor, Class, or OLOO instance.
(Don’t do this since it doesn’t make any sense.)
// Do not do thisfunctioncreateHuman(...args){returnnewHuman(...args)}
Creating and using constructors
What are Classes, Objects, and Constructors?
Constructors are like regular functions, but we use them with the new keyword.
There are two types of constructors: built-in constructors such as Array and Object, which are available automatically in the execution environment at runtime; and custom constructors, which define properties and methods for your own type of object.
A constructor is useful when you want to create multiple similar objects with the same properties and methods.
It’s a convention to capitalize the name of constructors to distinguish them from regular functions.
Consider the following code:
functionBook(){// unfinished code}var myBook =newBook();
The last line of the code creates an instance of Book and assigns it to a variable.
Although the Book constructor doesn’t do anything, myBook is still an instance of it.
As you can see, there is no difference between this function and regular functions except that it’s called with the new keyword and the function name is capitalized.
Determining the type of an instance
To find out whether an object is an instance of another one, we use the instanceof operator:
myBook instanceofBook// true
myBook instanceofString// false
Note that if the right side of the instanceof operator isn’t a function, it will throw an error:
myBook instanceof{};// TypeError: invalid 'instanceof' operand ({})
Another way to find the type of an instance is to use the constructor property.
Consider the following code fragment:
myBook.constructor === Book;// true
The constructor property of myBook points to Book, so the strict equality operator returns true.
Every object in JavaScript inherits a constructor property from its prototype, which points to the constructor function that has created the object:
var s =newString("text");
s.constructor === String;// true"text".constructor === String;// truevar o =newObject();
o.constructor === Object;// truevar o ={};
o.constructor === Object;// truevar a =newArray();
a.constructor === Array;// true[].constructor === Array;// true
Note, however, that using the constructor property to check the type of an instance is generally considered bad practice because it can be overwritten.
Custom constructor functions
A constructor is like a cookie-cutter for making multiple objects with the same properties and methods.
Consider the following example:
functionBook(name, year){this.name = name;this.year ='('+ year +')';}
The Book constructor expects two parameters: name and year.
When the constructor is called with the new keyword, it assigns the received parameters to the name and year property of the current instance, as shown below:
var firstBook =newBook("Pro AngularJS",2014);var secondBook =newBook("Secrets Of The JavaScript Ninja",2013);var thirdBook =newBook("JavaScript Patterns",2010);
console.log(firstBook.name, firstBook.year);
console.log(secondBook.name, secondBook.year);
console.log(thirdBook.name, thirdBook.year);
This code logs the following to the console:
As you can see, we can quickly build a large number of different book objects by invoking the Book constructor with different arguments.
This is exactly the same pattern that JavaScript uses in its built-in constructors like Array() and Date().
The Object.defineProperty() method
The Object.defineProperty() method can be used inside a constructor to help perform all necessary property setup.
Consider the following constructor:
functionBook(name){
Object.defineProperty(this,"name",{get:function(){return"Book: "+ name;},set:function(newName){
name = newName;},
configurable:false});}var myBook =newBook("Single Page Web Applications");
console.log(myBook.name);// Book: Single Page Web Applications// we cannot delete the name property because "configurable" is set to falsedelete myBook.name;
console.log(myBook.name);// Book: Single Page Web Applications// but we can change the value of the name property
myBook.name ="Testable JavaScript";
console.log(myBook.name);// Book: Testable JavaScript
This code uses Object.defineProperty() to define accessor properties.
Accessor properties don’t include any properties or methods, but they define a getter to call when the property is read, and a setter to call when the property is written to.
A getter is expected to return a value, while a setter receives the value being assigned to the property as an argument.
The constructor above returns an instance whose name property can be set or changed, but cannot be deleted.
When we get the value of name, the getter prepends the string Book: to the name and returns it.
Object literal notations are preferred to constructors
The JavaScript language has nine built-in constructors: Object(), Array(), String(), Number(), Boolean(), Date(), Function(), Error() and RegExp().
When creating values, we are free to use either object literals or constructors.
However, object literals are not only easier to read but also faster to run, because they can be optimize at parse time.
Thus, for simple objects it’s best to stick with literals:
// a number object// numbers have a toFixed() methodvar obj =newObject(5);
obj.toFixed(2);// 5.00// we can achieve the same result using literalsvar num =5;
num.toFixed(2);// 5.00// a string object// strings have a slice() method var obj =newString("text");
obj.slice(0,2);// "te"// same as abovevar string ="text";
string.slice(0,2);// "te"
As you can see, there’s hardly any difference between object literals and constructors.
What’s more intersting is that it’s still possible to call methods on literals.
When a method is called on a literal, JavaScript automatically converts the literal into a temporary object so that the method can perform the operation.
Once the temporary object is no longer needed, JavaScript discards it.
Using the new keyword is essential
It’s important to remember to use the new keyword before all constructors.
If you accidentally forget new, you will be modifying the global object instead of the newly created object.
Consider the following example:
functionBook(name, year){
console.log(this);this.name = name;this.year = year;}var myBook =Book("js book",2014);
console.log(myBook instanceofBook);
console.log(window.name, window.year);var myBook =newBook("js book",2014);
console.log(myBook instanceofBook);
console.log(myBook.name, myBook.year);
Here’s what this code logs to the console:
When we call the Book constructor without new, we are in fact calling a function without a return statement.
As a result, this inside the constructor points to Window (instead of myBook), and two global variables are created.
However, when we call the function with new, the context is switched from global (Window) to the instance.
So, this correctly points to myBook.
Note that in strict mode this code would throw an error because strict mode is designed to protect the programmer from accidentally calling a constructor without the new keyword.
Scope-safe constructors
As we have seen, a constructor is simply a function, so it can be called without the new keyword.
But, for inexperienced programmers, this can be a source of bugs.
A scope-safe constructor is designed to return the same result regardless of whether it’s called with or without new, so it doesn’t suffer from those issues.
Most built-in constructors, such as Object, Regex and Array, are scope-safe.
They use a special pattern to determine how the constructor is called.
If new isn’t used, they return a proper instance of the object by calling the constructor again with new.
Consider the following code:
functionFn(argument){// if "this" is not an instance of the constructor// it means it was called without new if(!(thisinstanceofFn)){// call the constructor again with newreturnnewFn(argument);}}
So, a scope-safe version of our constructor would look like this:
functionBook(name, year){if(!(thisinstanceofBook)){returnnewBook(name, year);}this.name = name;this.year = year;}var person1 =newBook("js book",2014);var person2 =Book("js book",2014);
console.log(person1 instanceofBook);// true
console.log(person2 instanceofBook);// true
Conclusion
It’s important to understand that the class declaration introduced in ES2015 simply works as syntactic sugar over the existing prototype-based inheritance and does not add anything new to JavaScript.
Constructors and prototypes are JavaScript’s primary way of defining similar and related objects.
Constructors are like regular functions, but they are used with the new keyword.
We saw how constructors enable us to quickly make multiple similar objects with the same properties and methods, and why the instanceof operator is the safest way to determine the type of an instance.
Finally, we looked at scope-safe constructors, which can be called with or without new.
Flappy bird in Javascript with 25 lines of code
You can write shell scripts in Javascript?!
Simple Javascript Reduce Tutorial - By making banana bread
Property Description
lineCap Sets or returns the style of the end caps for a line
lineJoin Sets or returns the type of corner created, when two lines meet
lineWidth Sets or returns the current line width
miterLimit Sets or returns the maximum miter length
Rectangles
Method Description
rect() Creates a rectangle
fillRect() Draws a "filled" rectangle
strokeRect() Draws a rectangle (no fill)
clearRect() Clears the specified pixels within a given rectangle
Paths
Method Description
fill() Fills the current drawing (path)
stroke() Actually draws the path you have defined
beginPath() Begins a path, or resets the current path
moveTo() Moves the path to the specified point in the canvas, without creating a line
closePath() Creates a path from the current point back to the starting point
lineTo() Adds a new point and creates a line to that point from the last specified point in the canvas
clip() Clips a region of any shape and size from the original canvas
quadraticCurveTo() Creates a quadratic Bézier curve
bezierCurveTo() Creates a cubic Bézier curve
arc() Creates an arc/curve (used to create circles, or parts of circles)
arcTo() Creates an arc/curve between two tangents
isPointInPath() Returns true if the specified point is in the current path, otherwise false
Property Description
font Sets or returns the current font properties for text content
textAlign Sets or returns the current alignment for text content
textBaseline Sets or returns the current text baseline used when drawing text
Method Description
fillText() Draws "filled" text on the canvas
strokeText() Draws text on the canvas (no fill)
measureText() Returns an object that contains the width of the specified text
Image Drawing
Method Description
drawImage() Draws an image, canvas, or video onto the canvas
Pixel Manipulation
Property Description
width Returns the width of an ImageData object
height Returns the height of an ImageData object
data Returns an object that contains image data of a specified ImageData object
Method Description
createImageData() Creates a new, blank ImageData object
getImageData() Returns an ImageData object that copies the pixel data for the specified rectangle on a canvas
putImageData() Puts the image data (from a specified ImageData object) back onto the canvas
Compositing
Property Description
globalAlpha Sets or returns the current alpha or transparency value of the drawing
globalCompositeOperation Sets or returns how a new image is drawn onto an existing image
Other
Method Description
save() Saves the state of the current context
restore() Returns previously saved path state and attributes
createEvent()
getContext()
toDataURL()
Simple linear regression method in javascript
linear regression
function findLineByLeastSquares(values_x, values_y) {
var sum_x = 0;
var sum_y = 0;
var sum_xy = 0;
var sum_xx = 0;
var count = 0;
//We'll use those variables for faster read/write access.
var x = 0;
var y = 0;
var values_length = values_x.length;
if (values_length != values_y.length) {
throw new Error('The parameters values_x and values_y need to have same size!');
}
if (values_length === 0) { return [ [], [] ]; } // Nothing to do.
// Calculate the sum for each of the parts necessary.
for (var v = 0; v < values_length; v++) {
x = values_x[v];
y = values_y[v];
sum_x += x;
sum_y += y;
sum_xx += x*x;
sum_xy += x*y;
count++;
}
// Calculate m and b for the formular: y = x * m + b
var m = (count*sum_xy - sum_x*sum_y) / (count*sum_xx - sum_x*sum_x);
var b = (sum_y/count) - (m*sum_x)/count;
// We will make the x and y result line now
var result_values_x = [];
var result_values_y = [];
for (var v = 0; v < values_length; v++) {
x = values_x[v];
y = x * m + b;
result_values_x.push(x);
result_values_y.push(y);
}
return [result_values_x, result_values_y];
}
convert string array to json object
first line is header
strArr =["first second third",
"function JSON parse",
"JavaScript function JSON",
"into a JavaScript",]
function tsvToJson(strArr) {
var header = strArr[0].split("\t")
var headerLength = header.length
var resultObj = []
for (var i = 1; i < strArr.length; i++ ) { // start from second line
var tempObj = {};
var data = strArr[i].split("\t")
for ( k = 0; k < headerLength; k++ ) {
tempObj[header[k]] = data[k];
}
resultObj.push(tempObj);
}
return resultObj;
}
var script = document.createElement('script');
script.src = 'data:text/javascript,' + encodeURI(myScript);
script.onload = function() {
//optional callback
};
document.body.appendChild(script);
This is inserting an actual script tag using a data uri as the source.
This way, it will appear under "scripts" on the resources tab of the dev tools.
When the script loads, the data uri (your code) will be executed.
store javascript in Local Storage
Here are two methods:
Method 1: eval()
eval(localStorage.myCode);
localStorage.myCode = "alert('just a test')";
eval(localStorage.myCode);
testScript = `function testadd() {....}`
localStorage.setItem("testScript", testScript)
eval(localStorage.testScript);
You can check if your code is stored like this:
if (!localStorage.myCode) {
// local storage code not exists, load from somewhere else
} else {// perform the eval using the code from local storage}
Method 2: the Function constructor
new Function(localStorage.myCode)();
Here are the jsfiddle demos showing that they all work:
Method 1: http://jsfiddle.net/markasoftware/3BkAV/
Method 2: http://jsfiddle.net/markasoftware/j6JAz/
The same origin policy is not enforced within server-to-server communication.
In addition, you eliminate the latency concern.
You don’t need to share the cors-anywhere proxy with other consumers, and you can dedicate as many resources as you need to your own servers.
Here’s some quick Node.js code that uses the express web framework to create a proxy server around the same https://joke-api-strict-cors.appspot.com/ from above:
const express = require('express');
const request = require('request');
const app = express();
app.use((req, res, next) => {
res.header('Access-Control-Allow-Origin', '*');
next();
});
app.get('/jokes/random', (req, res) => {
request(
{ url: 'https://joke-api-strict-cors.appspot.com/jokes/random' },
(error, response, body) => {
if (error || response.statusCode !== 200) {
return res.status(500).json({ type: 'error', message: err.message });
}
res.json(JSON.parse(body));
}
)
});
const PORT = process.env.PORT || 3000;
app.listen(PORT, () => console.log(`listening on ${PORT}`));
If you want to see this in action, head to the source code for the above, along with relevant steps in the README: https://github.com/15Dkatz/beat-cors-server How does this work? The proxy uses express middleware to apply a Access-Control-Allow-Origin: * header to every response from the server.
At its own jokes/random GET endpoint, the proxy requests a random joke from another server.
The same-origin policy doesn’t step in to block the request, even though the domains are different.
After all, this is a server-to-server request.
Finally, the proxy creates a response to the original requester (an app on the browser) consisting of the resulting data and the middleware-applied Access-Control-Allow-Origin: * header.
Build a Node.js Proxy Server
Tips
if then else
var age = 50
age < 21 ? console.log("child") : console.log("adult")
number to string
age = 50
console.log(typeof age)
age = 50 + ""
console.log(typeof age)
Fill arrays
users = Array(5); // 5 empty items
users = Array(5).fill(""); // 5 empty strings
users = Array(5).fill(5); // 5 numbers of value 5
Unique Arrays
users = ["a","b","c","d","e","b"]
unique = Array.from(new Set(users))
Dynamic Objects
dynamic = 'hobbies';
user = { name:"Ed", email:"abc@aol.com", [dynamic]:"sleep" }
Slicing Arrays
users = [1,2,3,4,5,6,7,8]
users.length = 3 // force only first 3 items included
Slicing Arrays end
users.slice(-1) // onlys last one selected
users.slice(-3) // onlys last 3 selected
CHange array to object
users = [1,2,3,4,5,6,7]
usersObject = {...users} // converted to objects
Object to arrays
user = { name:"Ed", email:"abc@aol.com", hobbies:"sleep" }
usersKeysArray = Object.keys(user)
usersValArray = Object.values(user)
Performance
startAt = performance.now()
// run a long loop
endAT = performance.now()
console.log(`take ${endAT - startAt} milliseconds`)
Load external source
<element onload="myFunction()" src= urlAddr> // body, iframe, img, object
function myFunction() { alert("Iframe is loaded."); }
<element id="myFrame" src="/default.asp">
document.getElementById("myFrame").addEventListener("load", myFunction);
function myFunction() {
alert("Iframe is loaded.");
}
function fetchImages(argument) {
var script = document.createElement('script');
script.onload = function(data) {
// do something with data
// Cross-Origin Read Blocking (CORB) blocked cross-origin response with MIME type text/html
};
script.src = argument;
document.getElementsByTagName('head')[0].appendChild(script);
// or use document.head.append(script);
}
fetchImages(urlAddr)
Node.js communicate with client side JavaScript
By making an HTTP request,
with the XMLHttpRequest object, or by generating a <form> and then submitting it, or a variety of other methods,
just like any other server side program in a web application.
find center point of multiple corordinates
function rad2degr(rad) { return rad * 180 / Math.PI; }
function degr2rad(degr) { return degr * Math.PI / 180; }
/**
* @param latLngInDeg array of arrays with latitude and longtitude
* pairs in degrees.
e.g.
[[latitude1, longtitude1], [latitude2
* [longtitude2] ...]
*
* @return array with the center latitude longtitude pairs in
* degrees.
*/
function getLatLngCenter(latLngInDegr) {
var LATIDX = 0;
var LNGIDX = 1;
var sumX = 0;
var sumY = 0;
var sumZ = 0;
for (var i=0; i<latLngInDegr.length; i++) {
var lat = degr2rad(latLngInDegr[i][LATIDX]);
var lng = degr2rad(latLngInDegr[i][LNGIDX]);
// sum of cartesian coordinates
sumX += Math.cos(lat) * Math.cos(lng);
sumY += Math.cos(lat) * Math.sin(lng);
sumZ += Math.sin(lat);
}
var avgX = sumX / latLngInDegr.length;
find center of multiple points
* @param array data 2 dimensional array of latitudes and longitudes
* For Example:
* $data = array
* (
* 0 = > array(45.849382, 76.322333),
* 1 = > array(45.843543, 75.324143),
* 2 = > array(45.765744, 76.543223),
* 3 = > array(45.784234, 74.542335)
* );
*/
function GetCenterFromDegrees(data)
{
if (!(data.length > 0)){
return false;
}
var num_coords = data.length;
var X = 0.0;
var Y = 0.0;
var Z = 0.0;
for(i = 0; i < data.length; i++){
var lat = data[i][0] * Math.PI / 180;
var lon = data[i][1] * Math.PI / 180;
Declaring global variable within function
To declare JavaScript global variables inside function, you need to use window object.
For example:
function m(){
//declaring global variable by window object
window.thisglovalue = 100;
}
Optional Chaining
If you have worked with JavaScript for any amount of time then you have probably seen code that looks just like this.
const street = person && person.address && person.address.street
The above code is pretty much the shortest and most elegant way to check if an object is undefined or null before accessing its properties.
This is obviously not very concise or clean code, though, which is why JavaScript is finally getting an optional chaining operator.
What Is Optional Chaining
If you have used other languages besides JavaScript you are probably already familiar with optional chaining since most languages have supported it for awhile.
Essentially the idea of optional chaining is to make it easy to write code where you need to access properties or values that are nested deep inside an object or array that may or may not be null/undefined.
Let’s take a look at the basic syntax for optional chaining to understand exactly how it works.
const name = person?.name
In the above code we have a variable person which may or may not be null/undefined.
Because we do not know if person is defined we cannot directly access the name property since if person is undefined we would get the following error.
Uncaught TypeError: Cannot read property 'name' of undefined
By using the optional chaining operator (?.), though, we are able to write our code as if we are directly accessing name.
If person is undefined our code will just return undefined instead of throwing an error.
Essentially the code above is the same as the following code.
const name = person == null ? undefined : person.name
The optional chaining operator is checking the person variable to ensure it is defined before access the name property and if it is not defined it will just return undefined.
This means we can write the original code for getting the street as follows.
const street = person?.address?.street
This code is much easier to read then the original code and is one of the greatest use cases for optional chaining.
JavaScript does have many additional uses for optional chaining, though, which most other languages do not implement.
Optional Chaining Functions
The first big additional use case for optional chaining is doing optional chaining with function calls.
Let’s first look at some code for calling a function on an object that may not be defined.
const windowCount = house.getWindowCount && house.getWindowCount()
This code is essentially checking the house variable to ensure it has a property called getWindowCount before trying to call that function.
This code is obviously pretty clunky and difficult to read which is where the optional chaining operator comes in.
const windowCount = house.getWindowCount?.()
Now at first it may seem weird to have a period (.) before the function parenthesis, but that is because the optional chaining operator is a question mark followed by a period (?.) and not just a question mark.
This new code that uses the optional chaining operator will now check if there is a function defined on the house variable called getWindowCount and if it exists it will call it.
If that function does not exist on the house variable then it will just return undefined instead of calling the function.
This ability to do optional chaining on functions is something that many other languages do not implement and is really handy, especially in JavaScript since functions are used everywhere.
Optional Chaining Arrays
The last main way that optional chaining can be used is with arrays.
If you want to access an element in an array by index, but are not sure if the array is defined then you need to use code that looks something like this.
const firstElement = arr && arr[0]
By using the optional chaining operator this code can be simplified to the following.
const firstElement = arr?.[0]
Again this probably looks weird with a period (.) before the brackets for accessing an array element, but it is just part of the syntax for the optional chaining operator.
This new code will work by first checking if the arr variable is defined and if it is it will attempt to access the index of the array specified.
If the arr variable is not defined then undefined will be returned instead of trying to access the index of the array.
This bracket notation optional chaining can also be used with objects as well.
const name = person?.['name']
This is really useful if you want to dynamically access a property of an object based on a string and are not sure if the object is defined.
Browser Support
With all great new JavaScript features the biggest thing to worry about is browser support.
Unfortunately, the optional chaining operator has very little support outside of the newest browsers.
At the time of writing this article the optional chaining operator only has 45% support across browsers.
Luckily, though, you can still use this operator by using tools like babel to transpile your JavaScript code so that older browsers can understand it.
Conclusion
The optional chaining operator is something that most other languages have had the luxury of using for years, but is only just now being introduced into JavaScript.
This means that most browsers still have not implemented this feature, but with the power of tools like babel this feature can be used right now without having to worry about browser support.
I highly recommend using this operator in all your new projects that have babel since it will make writing clean JavaScript much easier.
const str = "20210620";
function parse(str) {
var y = str.substr(0,4), m = str.substr(4,2) - 1,
d = str.substr(6,2);
var D = new Date(y,m,d);
return (D.getFullYear() == y && D.getMonth() == m && D.getDate() == d) ? D : 'invalid date';
}
const day = ["sun","mon","tue","wed","thu","fri","sat"][parse(str).getDay()]
console.log(day)
script to close a message on web page
<div class="alert">
<span onclick="this.parentElement.style.display='none';">×</span>
</div>
Use the HTML entity "×" to create the letter "x".
The try statement lets you test a block of code
for errors.
The catch statement lets you handle the error.
The throw statement lets you create custom
errors.
The finally statement lets you execute code,
after try and catch, regardless of the result.
This example demonstrates how to use catch to diplay an error.
adddlert is not defined
try { adddlert("Welcome guest!");}
catch(err) { document.getElementById("demo").innerHTML = err.message;}
check storage:
try{localStorage.setItem('check_storage','local storage');window.supportLS=true;}catch(e){window.supportLS=false;}
try it
setTimeout(() => { $("#ttt").append(" 1 sec"); }, 1000);
setTimeout( $("#ttt").append(" 5 sec"), 5000);
setTimeout( $("#ttt").append(" 8 sec"), 8000);
setTimeout(() => { $("#ttt").append(" 3 sec"); }, 3000);
setTimeout must run a function, not one direct line!
chain in setTimeout:
setTimeout(
function () {
$("#logbook").append("First");
setTimeout(
function () {
$("#logbook").append(" Second");
setTimeout(
function () {
$("#logbook").append(" Third");
}, 1000);
}, 2000);
}, 4000);
多次调用异步函数: "函数瀑布"
变得非常冗赘
use Promise to realize it:
new Promise(function (resolve, reject) {
setTimeout(function () {
console.log("First");
resolve();
}, 1000);
}).then(function () {
return new Promise(function (resolve, reject) {
setTimeout(function () {
console.log("Second");
resolve();
}, 4000);
});
}).then(function () {
setTimeout(function () {
console.log("Third");
}, 3000);
});
setTimeout with a shorter delay
setTimeout in most browsers doesn't allow a delay less than about 10 milliseconds (it forces any smaller delays to be longer, Chrome has changed this to 2 milliseconds, though, and apparently had some problems with it.)
the equivalent of setTimeout, with a real zero delay, using postMessage:
// Only add setZeroTimeout to the window object, and hide everything
// else in a closure.
(function() {
var timeouts = [];
var messageName = "zero-timeout-message";
Like setTimeout, but only takes a function argument.
There's no time argument (always zero) and no arguments (you have to use a closure).
function setZeroTimeout(fn) {
timeouts.push(fn);
window.postMessage(messageName, "*");
}
function handleMessage(event) {
if (event.source == window && event.data == messageName) {
event.stopPropagation();
if (timeouts.length > 0) {
var fn = timeouts.shift();
fn();
}
}
}
window.addEventListener("message", handleMessage, true);
// Add the one thing we want added to the window object.
window.setZeroTimeout = setZeroTimeout;
})();
jQuery UI message box
jQuery UIjqueryui dialog
<meta name="viewport" content="width=device-width, initial-scale=1">
<link rel="stylesheet" href="https://code.jquery.com/ui/1.12.1/themes/base/jquery-ui.css">
<script src="https://code.jquery.com/jquery-1.12.4.js"></script>
<script src="https://code.jquery.com/ui/1.12.1/jquery-ui.js"></script>
<div id="dialog" title="Basic dialog" style="display:none;">
<p>This is the default dialog which is useful for displaying information.
The dialog window can be moved, resized and closed with the 'x' icon.</p>
</div>
<div id="dialogForm" title="Create new user" style="display:none;">
<p>All form fields are required.</p>
<form>
<fieldset>
<label for="name">Name</label>
<input type="text" name="name" id="name" class="text">
<br>
<label for="email">Email</label>
<input type="text" name="email" id="email" value="" class="text">
<br>
<label for="password">Password</label>
<input type="password" name="password" id="password" value="" class="text">
</fieldset>
</form>
</div>
<br>
<button id="create-user" onclick="$('#dialogForm').toggle()">Create new user</button>
<br>
<span onclick="$('#dialog').dialog();">click to open dialog</span>
auto load page with infinite scroll until it gets to the bottom
var lastScrollHeight = 0;
function autoScroll() {
var sh = document.documentElement.scrollHeight;
if (sh != lastScrollHeight) {
lastScrollHeight = sh;
document.documentElement.scrollTop = sh;
}
}
window.setInterval(autoScroll, 100);
Infinite Scroll
jQuery load more data on scroll
In jQuery, check whether you have hit the bottom of page using scroll function.
Once you hit that, make an ajax call (you can show a loading image here till ajax response) and get the next set of data, append it to the div.
This function gets executed as you scroll down the page again.
$(window).scroll(function() {
if($(window).scrollTop() == $(document).height() - $(window).height()) {
// ajax call get data from server and append to the div
}
});
If you want to load content before reaching 100 pixel of bottom use
var loading= false;
$(window).scroll(function() {
if (!loading && ($(window).scrollTop() > $(document).height() - $(window).height() - 100)) {
loading= true;
// your content loading call goes here.
loading = false; // reset value of loading once content loaded
}
});
coordinates of the mouse pointer when clicked on an element:
var x = event.clientX; // Get the horizontal coordinate
var y = event.clientY; // Get the vertical coordinate
<span onclick="showCoords(event)">get the coordinates when clicked
coordinates of the mouse pointer when the mouse is moved:
addEventListener("mousemove", function(event) {
mouse.x = event.clientX; mouse.y = event.clientY;
});
requestAnimationFrame
There used to be just one way to do a timed loop in JavaScript: setInterval().
If you needed to repeat something pretty fast (but not as-fast-as-absolutely-possible like a for loop), you’d use that.
For the purposes of animation, the goal is sixty “frames” per second to appear smooth, so you’d run a loop like this:
setInterval(function() {
// animiate something
}, 1000/60);
There is a better alternative to this now.
Paul Irish introduced requestAnimationFrame over two years ago.
I don’t have a whole lot to add to it, I just had never actually used it before and now I have so I thought I’d help spread the word and write about its basic usage.
Why better?
The browser can optimize it, so animations will be smoother
Animations in inactive tabs will stop, allowing the CPU to chill
More battery-friendly
The Simplest Possible Example
function repeatOften() {
// Do whatever
requestAnimationFrame(repeatOften);
}
requestAnimationFrame(repeatOften);
Call it once to kick it off, and your function recursively calls itself.
Start and Stop
requestAnimationFrame returns an ID you can use to cancel it, just like setTimeout or setInterval does.
jQuery used here only to demonstrate a simple animation and bind events.
var globalID;
function repeatOften() { // repeat loop
$("<div />").appendTo("body");
globalID = requestAnimationFrame(repeatOften); }
$("#start").on("click", function() { // start button
globalID = requestAnimationFrame(repeatOften); });
$("#stop").on("click", function() { // stop button
cancelAnimationFrame(globalID); });
https://stackoverflow.com/questions/3514784/what-is-the-best-way-to-detect-a-mobile-device
/* Smartphones ----------- */
@media only screen and (max-width: 760px) {
#some-element { display: none; }
}
In jQuery/JavaScript file:
$( document ).ready(function() {
var is_mobile = false;
if( $('#some-element').css('display')=='none') {
is_mobile = true; }
// now I can use is_mobile to run javascript conditionally
if (is_mobile == true) { //Conditional script here }
});
There is a JavaScript API built-in for detecting media.
Rather than using the above solution simply use the following:
$(function() {
let isMobile = window.matchMedia("only screen and (max-width: 760px)").matches;
if (isMobile) { //Conditional script here }
});
The screen.width property is a global.
If the browser is on a desktop and the user resizes the window, $is_mobile is not going to be updated.
Why not: if( screen.width <= 480 ) { // is mobile }
⇧ Programming_Sprites_in_JavaScriptbuild a simple sprite animation in JavaScript
Set up your HTML file: Create an HTML file and include a <canvas> element where you want to display the sprite.
Give the canvas an id attribute to reference it in JavaScript.
<!DOCTYPE html>
<html>
<head>
<title>Sprite Display</title>
<style>
canvas {
border: 1px solid black;
}
</style>
</head>
<body>
<canvas id="myCanvas" width="800" height="600"></canvas>
<script src="script.js"></script>
</body>
</html>
Create your sprite image: Prepare an image file that represents your sprite.
You can use an existing image or create your own.
Save the image file in the same directory as your HTML file.
JavaScript code
⇧
Write JavaScript code: Create a JavaScript file (e.g., script.js) and link it to your HTML file.
In the JavaScript file, you will load the sprite image and draw it on the canvas.
// Get the canvas element
const canvas = document.getElementById("myCanvas");
const ctx = canvas.getContext("2d");
// Load the sprite image
const spriteImg = new Image();
spriteImg.src = "sprite.png";
// Draw the sprite on the canvas
spriteImg.onload = function() {
ctx.drawImage(spriteImg, 0, 0);
};
Run your code: Open the HTML file in a web browser, and you should see the sprite displayed on the canvas.
Make sure to replace "sprite.png" with the actual filename and extension of your sprite image.
Adjust the canvas dimensions (width and height) to match your desired size.
This basic example assumes that your sprite image is a single frame.
If you have a sprite sheet with multiple frames, you'll need additional logic to animate the sprite by updating the image source or manipulating the drawImage parameters.
To animate a sprite
⇧
To animate a sprite and create movement or interactivity, you can use JavaScript's requestAnimationFrame method along with the drawImage function.
// Get the canvas element
const canvas = document.getElementById("myCanvas");
const ctx = canvas.getContext("2d");
// Load the sprite image
const spriteImg = new Image();
spriteImg.src = "sprite.png";
// Sprite position and velocity
let spriteX = 0;
let spriteY = 0;
let spriteSpeed = 2;
// Update sprite position
function updateSprite() {
// Clear the canvas
ctx.clearRect(0, 0, canvas.width, canvas.height);
// Draw the sprite on the canvas
ctx.drawImage(spriteImg, spriteX, spriteY);
// Update sprite position
spriteX += spriteSpeed;
// Wrap the sprite around the canvas
if (spriteX > canvas.width) {
spriteX = -spriteImg.width;
}
// Request the next animation frame
requestAnimationFrame(updateSprite);
}
// Start the animation
spriteImg.onload = function() {
updateSprite();
};
In this example, we define the initial position of the sprite (spriteX and spriteY) and the speed at which it moves (spriteSpeed).
The updateSprite function is called repeatedly using requestAnimationFrame, which ensures smooth animation by syncing with the browser's refresh rate.
Inside the updateSprite function, we clear the canvas, draw the sprite at its current position using drawImage, update the sprite's position, and wrap it around the canvas if it goes beyond the canvas width.
You can modify the updateSprite function to add interactivity, such as responding to keyboard or mouse events to control the sprite's movement.
Additionally, you can use different frames from a sprite sheet to create animated sequences by adjusting the drawImage parameters.
Remember to replace "sprite.png" with the actual filename and extension of your sprite image.
different techniques and effects
⇧
Here are a few examples of sprite animations using different techniques and effects:
1.
Sprite Sheet Animation
⇧ :
This technique involves using a sprite sheet that contains multiple frames of the animation.
By updating the position of the sprite sheet and specifying the frame dimensions, you can create an animated sequence.
javascript:
// Get the canvas element
const canvas = document.getElementById("myCanvas");
const ctx = canvas.getContext("2d");
// Load the sprite sheet image
const spriteSheet = new Image();
spriteSheet.src = "spritesheet.png";
// Sprite sheet properties
const frameWidth = 64;
const frameHeight = 64;
const totalFrames = 8;
// Current frame index
let currentFrame = 0;
// Update sprite sheet position and draw the current frame
function updateSpriteSheet() {
// Clear the canvas
ctx.clearRect(0, 0, canvas.width, canvas.height);
// Draw the current frame of the sprite sheet
ctx.drawImage(
spriteSheet,
currentFrame * frameWidth,
0,
frameWidth,
frameHeight,
0,
0,
frameWidth,
frameHeight
);
// Increment the frame index
currentFrame = (currentFrame + 1) % totalFrames;
// Request the next animation frame
requestAnimationFrame(updateSpriteSheet);
}
// Start the animation
spriteSheet.onload = function() {
updateSpriteSheet();
};
```
2.
Sprite Scaling and Rotation
⇧ :
You can apply scaling and rotation transformations to the sprite to create effects like resizing or spinning.
javascript:
// Get the canvas element
const canvas = document.getElementById("myCanvas");
const ctx = canvas.getContext("2d");
// Load the sprite image
const spriteImg = new Image();
spriteImg.src = "sprite.png";
// Sprite position and properties
let spriteX = 200;
let spriteY = 200;
let spriteWidth = 100;
let spriteHeight = 100;
let rotationAngle = 0;
// Update sprite properties and draw it
function updateSprite() {
// Clear the canvas
ctx.clearRect(0, 0, canvas.width, canvas.height);
// Apply transformations to the sprite
ctx.save();
ctx.translate(spriteX, spriteY);
ctx.rotate((rotationAngle * Math.PI) / 180);
ctx.drawImage(spriteImg, -spriteWidth / 2, -spriteHeight / 2, spriteWidth, spriteHeight);
ctx.restore();
// Update sprite properties
spriteWidth += 1;
spriteHeight += 1;
rotationAngle += 1;
// Request the next animation frame
requestAnimationFrame(updateSprite);
}
// Start the animation
spriteImg.onload = function() {
updateSprite();
};
```
3.
Particle Effect using Sprites
⇧ :
You can create a particle effect by animating multiple sprites that represent particles.
Each particle can have its own position, velocity, and lifespan.
javascript:
// Get the canvas element
const canvas = document.getElementById("myCanvas");
const ctx = canvas.getContext("2d");
// Load the particle sprite image
const particleImg = new Image();
particleImg.src = "particle.png";
// Particle class
class Particle {
constructor(x, y, vx, vy) {
this.x = x;
this.y = y;
this.vx = vx;
this.vy = vy;
this.lifespan = 100;
}
update() {
// Update particle position
this.x += this.vx;
this.y += this.vy;
// Reduce particle lifespan
this.lifespan--;
// Draw the particle
ctx.drawImage(particleImg, this.x, this.y);
return this.lifespan > 0;
}
}
// Create an array of particles
const particles = [];
// Animation loop
function animateParticles() {
// Clear the canvas
ctx.clearRect(0, 0, canvas.width, canvas.height);
// Update and draw particles
for (let i = 0; i < particles.length; i++) {
const particle = particles[i];
if (particle.update()) {
// Particle is still alive, keep it
particles[i] = particle;
} else {
// Particle has expired, remove it
particles.splice(i, 1);
i--;
}
}
// Create new particles
if (Math.random() < 0.1) {
const x = Math.random() * canvas.width;
const y = Math.random() * canvas.height;
const vx = (Math.random() - 0.5) * 2;
const vy =Apologies for the incomplete response.
complete example
⇧
Here's the complete example for the particle effect using sprites:
javascript:
// Get the canvas element
const canvas = document.getElementById("myCanvas");
const ctx = canvas.getContext("2d");
// Load the particle sprite image
const particleImg = new Image();
particleImg.src = "particle.png";
// Particle class
class Particle {
constructor(x, y, vx, vy) {
this.x = x;
this.y = y;
this.vx = vx;
this.vy = vy;
this.lifespan = 100;
}
update() {
// Update particle position
this.x += this.vx;
this.y += this.vy;
// Reduce particle lifespan
this.lifespan--;
// Draw the particle
ctx.drawImage(particleImg, this.x, this.y);
return this.lifespan > 0;
}
}
// Create an array of particles
const particles = [];
// Animation loop
function animateParticles() {
// Clear the canvas
ctx.clearRect(0, 0, canvas.width, canvas.height);
// Update and draw particles
for (let i = 0; i < particles.length; i++) {
const particle = particles[i];
if (particle.update()) {
// Particle is still alive, keep it
particles[i] = particle;
} else {
// Particle has expired, remove it
particles.splice(i, 1);
i--;
}
}
// Create new particles
if (Math.random() < 0.1) {
const x = Math.random() * canvas.width;
const y = Math.random() * canvas.height;
const vx = (Math.random() - 0.5) * 2;
const vy = (Math.random() - 0.5) * 2;
particles.push(new Particle(x, y, vx, vy));
}
// Request the next animation frame
requestAnimationFrame(animateParticles);
}
// Start the animation
particleImg.onload = function() {
animateParticles();
};
In this example, we create a Particle class representing each particle in the particle effect.
The Particle class has properties for position (x and y), velocity (vx and vy), and lifespan.
The update method is responsible for updating the particle's position, reducing its lifespan, and drawing it on the canvas.
In the animateParticles function, we clear the canvas, update and draw each particle, remove expired particles from the array, and create new particles randomly.
The animation loop continues by recursively calling requestAnimationFrame.
Make sure to replace "particle.png" with the actual filename and extension of your particle sprite image.
Feel free to customize the particle effect by adjusting the particle properties or modifying the creation logic.
A Set is a collection of unique values.
Each value may occur only once in a Set.
A Set can hold any values of any data type.
// Create a Set
const letters = new Set();
// Add some values to the Set
letters.add("a");
letters.add("b");
letters.add("c");
// Create a new Set
const letters = new Set(["a","b","c"]);
For a Set, typeof returns object:
typeof letters; // Returns object
For a Set, instanceof Set returns true:
letters instanceof Set; // Returns true
Add equal elements to set, only the first will be saved:
letters.add("a");
letters.add("b");
letters.add("c");
letters.add("c");
letters.size; // 3
Set Object Methods and Properties
new Set() Creates a new Set object
add() Adds a new element to the Set
clear() Removes all elements from a Set
delete() Removes an element specified by its value.
entries() Returns an array of the values in a Set object
has() Returns true if a value exists
forEach() Invokes a callback for each element
keys() Returns an array of the values in a Set object
values() Same as keys()
size Returns the element count
Map and set
https://www.digitalocean.com/community/tutorials/understanding-map-and-set-objects-in-javascript
Map is a collection of keyed data items, just like an Object.
But the main difference is that Map allows keys of any type.
Methods and properties are:
new Map() – creates the map.
map.set(key, value) – stores the value by the key.
map.get(key) – returns the value by the key, undefined if key doesn’t exist in map.
map.has(key) – returns true if the key exists, false otherwise.
map.delete(key) – removes the value by the key.
map.clear() – removes everything from the map.
map.size – returns the current element count.
For instance:
let map = new Map();
map.set('1', 'str1'); // a string key
map.set(1, 'num1'); // a numeric key
map.set(true, 'bool1'); // a boolean key
map.set('firstName', 'Luke')
map.set('lastName', 'Skywalker')
map.set('occupation', 'Jedi Knight')
recreate the same Map
const map = new Map([
['firstName', 'Luke'],
['lastName', 'Skywalker'],
['occupation', 'Jedi Knight'],
])
// remember the regular Object? it would convert keys to string
// Map keeps the type, so these two are different:
alert( map.get(1) ); // 'num1'
alert( map.get('1') ); // 'str1'
alert( map.size ); // 3
Map can also use objects as keys.
For instance:
let john = { name: "John" };
// for every user, let's store their visits count
let visitsCountMap = new Map();
// john is the key for the map
visitsCountMap.set(john, 123);
alert( visitsCountMap.get(john) ); // 123
We can initialize a new Map to demonstrate the following methods and properties: delete(), has(), get(), and size.
// Initialize a new Map
const map = new Map([
['animal', 'otter'],
['shape', 'triangle'],
['city', 'New York'],
['country', 'Bulgaria'],
])
// Check if a key exists in a Map
map.has('shark') // false
map.has('country') // true
// Get an item from a Map
map.get('animal') // "otter"
// Get the count of items in a Map
map.size // 4
// Delete an item from a Map by key
map.delete('city') // true
// Empty a Map
map.clear()
The keys(), values(), and entries() methods all return a MapIterator, which is similar to an Array in that you can use for...of to loop through the values.
const map = new Map([
[1970, 'bell bottoms'],
[1980, 'leg warmers'],
[1990, 'flannel'],
])
The keys() method returns the keys:
map.keys()
The values() method returns the values:
map.values()
The entries() method returns an array of key/value pairs:
map.entries()
Map has a built-in forEach method, similar to an Array, for built-in iteration.
However, there is a bit of a difference in what they iterate over.
The callback of a Map’s forEach iterates through the value, key, and map itself, while the Array version iterates through the item, index, and array itself.
// Map
Map.prototype.forEach((value, key, map) = () => {})
// Array
Array.prototype.forEach((item, index, array) = () => {})
Map Properties and Methods
Properties/Methods Description Returns
set(key, value) Appends a key/value pair to a Map Map Object
delete(key) Removes a key/value pair from a Map by key Boolean
get(key) Returns a value by key value
has(key) Checks for the presence of an element in a Map by key Boolean
clear() Removes all items from a Map N/A
keys() Returns all keys in a Map MapIterator object
values() Returns all values in a Map MapIterator object
entries() Returns all keys and values in a Map as [key, value] MapIterator object
forEach() Iterates through the Map in insertion order N/A
size Returns the number of items in a Map Number
When to Use Map
Summing up, Maps are similar to Objects in that they hold key/value pairs, but Maps have several advantages over objects:
Size - Maps have a size property, whereas Objects do not have a built-in way to retrieve their size.
Iteration - Maps are directly iterable, whereas Objects are not.
Flexibility - Maps can have any data type (primitive or Object) as the key to a value, while Objects can only have strings.
Ordered - Maps retain their insertion order, whereas objects do not have a guaranteed order.
Due to these factors, Maps are a powerful data structure to consider.
However, Objects haves some important advantages as well:
JSON - Objects work flawlessly with JSON.parse() and JSON.stringify(), two essential functions for working with JSON, a common data format that many REST APIs deal with.
Working with a single element - Working with a known value in an Object, you can access it directly with the key without the need to use a method, such as Map’s get().
This list will help you decide if a Map or Object is the right data structure for your use case.
dat.gui
We all love trusted JavaScript frameworks like MooTools, jQuery, and Dojo, but there's a big push toward using focused micro-frameworks for smaller purposes.
dat.gui's niche is in listening to and controlling data such that it can be visualized into charts or other graphics.
Creating a new DAT.GUI instance provides a new sliding pane for which to add controls to:
// Create an instance, which also creates a UI pane
var gui = new DAT.GUI();
With the pane ready, new controls can be added.
Fields can be of type string, number, boolean, or function, with a number slider available depending on options passed to it.
Here's how you can create a field of each type:
// My sample abject
var obj = { name: "David Walsh", num: 23, winner: true };
// String field
gui.add(obj, "name");
// Number field with slider
gui.add(obj, "num").min(1).max(50).step(1);
// Checkbox field
gui.add(obj, "winner");
Since properties are changed directly on the object itself, there's not "setter" and so dat.gui provides a listen function to do just that -- list for changes:
// Listen to changes within the GUI
gui.add(obj, "name").onChange(function(newValue) {console.log("Value changed to: ", newValue);
});
// Listen to changes outside the GUI - GUI will update when changed from outside
gui.add(obj, "name").listen();
Those are the dead basics of the dat.gui library.
Note that I've not yet mentioned what the result looks like.
That's because it's up to you to create the visual aspects based on property values.
The demo that ships with dat.gui is a very creative dot-based constant animation.
The animation magic lies within the FizzyText function.
FizzyText is a more sizable function that does the animation, but let's take a look at the dat.gui code:
var fizzyText = new FizzyText("david walsh");
var gui = new DAT.GUI();
// Text field
gui.add(fizzyText, "message");
// Sliders with min + max
gui.add(fizzyText, "maxSize").min(0.5).max(7);
gui.add(fizzyText, "growthSpeed").min(0.01).max(1).step(0.05);
gui.add(fizzyText, "speed", 0.1, 2, 0.05); // shorthand for min/max/step
// Sliders with min, max and increment.
gui.add(fizzyText, "noiseStrength", 10, 100, 5);
// Boolean checkbox
gui.add(fizzyText, "displayOutline");
Tinker with the pane fields and the animation instantly changes!
JavaScript, more than any other language, seems to provide the most ability to make powerful changes with very little code.
dat.gui is proof of that.
The demo provided here is the same demo provided within the dat.gui repository, mostly because topping the effect would be a hell of a feat.
When you get a few moments, go play around with dat.gui -- it's really ...
dat ...
good.
</script>
// Define your database
var db = new Dexie("friend_database");
db.version(1).stores({ friends: 'name,shoeSize' });
// Put some data into it
db.friends.put({name: "Nicolas", shoeSize: 8}).then (function(){
// Then when data is stored, read from it
return db.friends.get('Nicolas');
}).then(function(friend) {
// Display the result
alert ("Nicolas has shoe size " + friend.shoeSize);
}).catch(function(error) {
// Finally don't forget to catch any error
// that could have happened anywhere in the
// code blocks above.
alert ("Ooops: " + error);
});
With HTML5 came the introduction of APIs with access to device hardware, including the MediaDevices API.
This API provides access to media input devices like audio and video.
With this API's help, developers can access audio and video devices to stream and display live video feeds in the browser.
In this tutorial, you'll access the video feed from the user's device and display it in the browser using the method.
The getUserMedia API makes use of the media input devices to produce a MediaStream.
This MediaStream contains the requested media types, whether audio or video.
Using the stream returned from the API, video feeds can be displayed on the browser, which is useful for real-time communication on the browser.
When used along with the MediaStream Recording API, you can record and store media data captured on the browser.
This API only works on secure origins like the rest of the newly introduced APIs, but it also works on localhost and file URLs.
Prerequisites
A basic knowledge of JavaScript.
If you are new to JavaScript, try checking out the How To Code in JavaScript series.
This tutorial will first explain concepts and demonstrate examples with Codepen.
In the final step, you will create a functioning video feed for the browser.
Step 1 — Checking Device Support
First, you will see how to check if the user's browser supports the mediaDevices API.
This API exists within the navigator interface and contains the current state and identity of the user agent.
The check is performed with the following code that can be pasted into Codepen:
if ('mediaDevices' in navigator && 'getUserMedia' in navigator.mediaDevices) {
console.log("Let's get this party started")
}
First, this checks if the mediaDevices API exists within the navigator and then checks if the getUserMedia API is available within the mediaDevices.
If this returns true, you can get started.
Step 2 — Requesting User Permission
After confirming the browser's support for getUserMedia, you need to request permission to make use of the media input devices on the user agent.
Typically, after a user grants permission, a Promise is returned which resolves to a media stream.
This Promise isn't returned when the permission is denied by the user, which blocks access to these devices.
Paste the following line into Codepen to request permission:
navigator.mediaDevices.getUserMedia({video: true})
The object provided as an argument for the getUserMedia method is called constraints.
This determines which of the media input devices you are requesting permissions to access.
For example, if the object contains audio: true, the user will be asked to grant access to the audio input device.
Step 3 — Understanding Media Constraints
This section will cover the general concept of contraints.
The constraints object is a object that specifies the types of media to request and the requirements of each media type.
You can specify requirements for the requested stream using the constraints object, like the resolution of the stream to use (front, back).
You must specify either audio or video when making the request.
A NotFoundError will be returned if the requested media types can't be found on the user's browser.
If you intend to request a video stream of 1280 x 720 resolution, you can update the constraints object to look like this:
{
video: {
width: 1280,
height: 720,
}
}
With this update, the browser will try to match the specified quality settings for the stream.
If the video device can't deliver this resolution, the browser will return other available resolutions.
To ensure that the browser returns a resolution not lower than the one provided you will have to make use of the min property.
Here is how you could update the constraints object to include the min property:
{
video: {
width: {
min: 1280,
},
height: {
min: 720,
}
}
}
This will ensure that the stream resolution returned will be at least 1280 x 720.
If this minimum requirement can't be met, the promise will be rejected with an OverconstrainedError.
In some cases you may be concerned about saving data and need the stream to not exceed a set resolution.
This can come in handy when the user is on a limited plan.
To enable this functionality, update the constraints object to contain a max field:
{
video: {
width: {
min: 1280,
max: 1920,
},
height: {
min: 720,
max: 1080
}
}
}
With these settings, the browser will ensure that the return stream doesn't go below 1280 x 720 and doesn't exceed 1920 x 1080.
Other terms that can be used includes exact and ideal.
The ideal setting is typically used along with the min and max properties to find the best possible setting closest to the ideal values provided.
You can update the constraints to use the ideal keyword:
{
video: {
width: {
min: 1280,
ideal: 1920,
max: 2560,
},
height: {
min: 720,
ideal: 1080,
max: 1440
}
}
}
To tell the browser to make use of the front or back (on mobile) camera on devices, you can specify a facingMode property in the video object:
{
video: {
width: {
min: 1280,
ideal: 1920,
max: 2560,
},
height: {
min: 720,
ideal: 1080,
max: 1440
},
facingMode: 'user'
}
}
This setting will make use of the front-facing camera at all times in all devices.
To make use of the back camera on mobile devices, you can alter the facingMode property to environment.
{
video: {
...
facingMode: {
exact: 'environment'
}
}
}
Step 4 — Using the enumerateDevices Method
When the enumerateDevices method is called, it returns all of the available input media devices available on the user's PC.
With the method, you can provide the user options on which input media device to use for streaming audio or video content.
This method returns a Promise resolved to a MediaDeviceInfo array containing information about each device.
An example of how to make a use of this method is shown in the snippet below:
async function getDevices() {
const devices = await navigator.mediaDevices.enumerateDevices();
}
A sample response for each of the devices would look like the following:
{
deviceId: "23e77f76e308d9b56cad920fe36883f30239491b8952ae36603c650fd5d8fbgj",
groupId: "e0be8445bd846722962662d91c9eb04ia624aa42c2ca7c8e876187d1db3a3875",
kind: "audiooutput",
label: "",
}
Note: A label won't be returned unless an available stream is available, or if the user has granted device access permissions.
Step 5 — Displaying the Video Stream on the Browser
You have gone through the process of requesting and getting access to the media devices, configured constraints to include required resolutions, and selected the camera you will need to record video.
After going through all these steps, you'll at least want to see if the stream is delivering based on the configured settings.
To ensure this, you will make use of the <video> element to display the video stream on the browser.
Like mentioned earlier, the getUserMedia method returns a Promise that can be resolved to a stream.
The returned stream can be converted to an object URL using the method.
This URL will be set as a video source.
You will create a short demo where we let the user choose from their available list of video devices.
using the method.
This is a navigator.mediaDevices method.
It lists the available media devices, such as microphones and cameras.
It returns a Promise resolvable to an array of objects detailing the available media devices.
Create an index.html file and update the contents with the code below:
index.html
<!doctype html>
<html lang="en">
<head>
<meta charset="UTF-8">
<meta name="viewport"
content="width=device-width, user-scalable=no, initial-scale=1.0, maximum-scale=1.0, minimum-scale=1.0">
<meta http-equiv="X-UA-Compatible" content="ie=edge">
<link rel="stylesheet" href="https://stackpath.bootstrapcdn.com/bootstrap/4.1.3/css/bootstrap.min.css">
<link rel="stylesheet" href="style.css">
<title>Document</title>
</head>
<body>
<div>
<video autoplay></video>
<canvas></canvas>
<div>
<select name="">
<option value="">Select camera</option>
</select>
</div>
<img>
<div>
<button title="Play"><i data-feather="play-circle"></i></button>
<button title="Pause"><i data-feather="pause"></i></button>
<button title="ScreenShot"><i data-feather="image"></i></button>
</div>
</div>
<script src="https://unpkg.com/feather-icons"></script>
<script src="script.js"></script>gt;
</body>
</html>
In the snippet above, you have set up the elements you will need and a couple of controls for the video.
Also included is a button for taking screenshots of the current video feed.
Now, let's style up these components a bit.
Create a style.css file and copy the following styles into it.
Bootstrap was included to reduce the amount of CSS you will need to write to get the components going.
style.css
.screenshot-image {
width: 150px;
height: 90px;
border-radius: 4px;
border: 2px solid whitesmoke;
box-shadow: 0 1px 2px 0 rgba(0, 0, 0, 0.1);
position: absolute;
bottom: 5px;
left: 10px;
background: white;
}
.display-cover {
display: flex;
justify-content: center;
align-items: center;
width: 70%;
margin: 5% auto;
position: relative;
}
video {
width: 100%;
background: rgba(0, 0, 0, 0.2);
}
.video-options {
position: absolute;
left: 20px;
top: 30px;
}
.controls {
position: absolute;
right: 20px;
top: 20px;
display: flex;
}
.controls > button {
width: 45px;
height: 45px;
text-align: center;
border-radius: 100%;
margin: 0 6px;
background: transparent;
}
.controls > button:hover svg {
color: white !important;
}
@media (min-width: 300px) and (max-width: 400px) {
.controls {
flex-direction: column;
}
.controls button {
margin: 5px 0 !important;
}
}
.controls > button > svg {
height: 20px;
width: 18px;
text-align: center;
margin: 0 auto;
padding: 0;
}
.controls button:nth-child(1) {
border: 2px solid #D2002E;
}
.controls button:nth-child(1) svg {
color: #D2002E;
}
.controls button:nth-child(2) {
border: 2px solid #008496;
}
.controls button:nth-child(2) svg {
color: #008496;
}
.controls button:nth-child(3) {
border: 2px solid #00B541;
}
.controls button:nth-child(3) svg {
color: #00B541;
}
.controls > button {
width: 45px;
height: 45px;
text-align: center;
border-radius: 100%;
margin: 0 6px;
background: transparent;
}
.controls > button:hover svg {
color: white;
}
The next step is to add functionality to the demo.
Using the enumerateDevices method, you will get the available video devices and set it as the options within the select element.
Create a file called script.js and update it with the following snippet:
script.js
feather.replace();
const controls = document.querySelector('.controls');
const cameraOptions = document.querySelector('.video-options>select');
const video = document.querySelector('video');
const canvas = document.querySelector('canvas');
const screenshotImage = document.querySelector('img');
const buttons = [...controls.querySelectorAll('button')];
let streamStarted = false;
const [play, pause, screenshot] = buttons;
const constraints = {
video: {
width: {
min: 1280,
ideal: 1920,
max: 2560,
},
height: {
min: 720,
ideal: 1080,
max: 1440
},
}
};
const getCameraSelection = async () => {
const devices = await navigator.mediaDevices.enumerateDevices();
const videoDevices = devices.filter(device => device.kind === 'videoinput');
const options = videoDevices.map(videoDevice => {
return `<option value="${videoDevice.deviceId}">${videoDevice.label}</option>`;
});
cameraOptions.innerHTML = options.join('');
};
play.onclick = () => {
if (streamStarted) {
video.play();
play.classList.add('d-none');
pause.classList.remove('d-none');
return;
}
if ('mediaDevices' in navigator && navigator.mediaDevices.getUserMedia) {
const updatedConstraints = {
...constraints,
deviceId: {
exact: cameraOptions.value
}
};
startStream(updatedConstraints);
}
};
const startStream = async (constraints) => {
const stream = await navigator.mediaDevices.getUserMedia(constraints);
handleStream(stream);
};
const handleStream = (stream) => {
video.srcObject = stream;
play.classList.add('d-none');
pause.classList.remove('d-none');
screenshot.classList.remove('d-none');
streamStarted = true;
};
getCameraSelection();
In the snippet above, there are a couple of things going on.
Let's break them down:
feather.replace(): this method call instantiates feather, which is an icon set for web development.
The constraints variable holds the initial configuration for the stream.
This will be extended to include the media device the user chooses.
getCameraSelection: this function calls the enumerateDevices method.
Then, you filter through the array from the resolved Promise and select video input devices.
From the filtered results, you create <option> for the <select> element.
Calling the getUserMedia method happens within the onclick listener of the play button.
Here, you will check if this method is supported by the user's browser before starting the stream.
Next, you will call the startStream function that takes a constraints argument.
It calls the getUserMedia method with the provided constraints.
handleStream is called using the stream from the resolved Promise.
This method sets the returned stream to the video element's srcObject.
Next, you will add click listeners to the button controls on the page to pause, stop, and take screenshots.
Also, you will add a listener to the <select> element to update the stream constraints with the selected video device.
Update the script.js file with the code below:
script.js
...
cameraOptions.onchange = () => {
const updatedConstraints = {
...constraints,
deviceId: {
exact: cameraOptions.value
}
};
startStream(updatedConstraints);
};
const pauseStream = () => {
video.pause();
play.classList.remove('d-none');
pause.classList.add('d-none');
};
const doScreenshot = () => {
canvas.width = video.videoWidth;
canvas.height = video.videoHeight;
canvas.getContext('2d').drawImage(video, 0, 0);
screenshotImage.src = canvas.toDataURL('image/webp');
screenshotImage.classList.remove('d-none');
};
pause.onclick = pauseStream;
screenshot.onclick = doScreenshot;
Now, when you open the index.html file in the browser, clicking the Play button will start the stream.
Here is a complete demo:
https://codepen.io/chrisbeast/pen/ebYwpX
Conclusion
This tutorial introduced the getUserMedia API.
It is an interesting addition to HTML5 that eases the process of capturing media on the web.
The API takes a parameter (constraints) that can be used to configure the access to audio and video input devices.
It can also be used to specify the video resolution required for your application.
You can extend the demo further to give the user an option to save the screenshots taken, as well as recording and storing video and audio data with the help of MediaStream Recording API.
https://stackoverflow.com/questions/12024770/access-camera-from-a-browser
to test if a popup was blocked and take action in case.
function pop(url,w,h) {
n=window.open(url,'_blank','toolbar=0,location=0,directories=0,status=1,menubar=0,titlebar=0,scrollbars=1,resizable=1,width='+w+',height='+h);
if(n==null) {
alert("popup blocked")
return true;
}
return false;
}
write to page
var html="";
html +='<div class="main clearFix inner new-center2">';
document.write(html);
The following example will demonstrate how a web page can fetch information from a database with AJAX
<h2>The XMLHttpRequest Object</h2>
<form action="">
<select name="customers" onchange="showCustomer(this.value)">
<option value="">Select a customer:</option>
<option value="ALFKI">Alfreds Futterkiste</option>
<option value="NORTS ">North/South</option>
<option value="WOLZA">Wolski Zajazd</option>
</select>
</form>
<br>
<div id="txtHint">Customer info will be listed here...</div>
<script>
function showCustomer(str) {
if (str == "") {
document.getElementById("txtHint").innerHTML = "";
return;
}
const xhttp = new XMLHttpRequest();
xhttp.onload = function() {
document.getElementById("txtHint").innerHTML = this.responseText;
}
xhttp.open("GET", "getcustomer.php?q="+str);
xhttp.send();
}
The showCustomer() Function
When a user selects a customer in the dropdown list, a function called showCustomer() is executed.
The function is triggered by the onchange event:
showCustomer
function showCustomer(str) {
if (str == "") {
document.getElementById("txtHint").innerHTML = "";
return;
}
const xhttp = new XMLHttpRequest();
xhttp.onload = function() {
document.getElementById("txtHint").innerHTML = this.responseText;
}
xhttp.open("GET", "getcustomer.php?q="+str);
xhttp.send();
}
The showCustomer() function does the following:
Check if a customer is selected
Create an XMLHttpRequest object
Create the function to be executed when the server response is ready
Send the request off to a file on the server
Notice that a parameter (q) is added to the URL (with the content of the dropdown list)
The AJAX Server Page
The page on the server called by the JavaScript above is a PHP file called "getcustomer.php".
The source code in "getcustomer.php" runs a query against a database, and returns the result in an HTML table:
<?php
$mysqli = new mysqli("servername", "username", "password", "dbname");
if($mysqli->connect_error) {
exit('Could not connect');
}
$sql = "SELECT customerid, companyname, contactname, address, city, postalcode, country
FROM customers WHERE customerid = ?";
$stmt = $mysqli->prepare($sql);
$stmt->bind_param("s", $_GET['q']);
$stmt->execute();
$stmt->store_result();
$stmt->bind_result($cid, $cname, $name, $adr, $city, $pcode, $country);
$stmt->fetch();
$stmt->close();
echo "<table>";
echo "<tr>";
echo "<th>CustomerID</th>";
echo "<td>" .
$cid .
"</td>";
echo "<th>CompanyName</th>";
echo "<td>" .
$cname .
"</td>";
echo "<th>ContactName</th>";
echo "<td>" .
$name .
"</td>";
echo "<th>Address</th>";
echo "<td>" .
$adr .
"</td>";
echo "<th>City</th>";
echo "<td>" .
$city .
"</td>";
echo "<th>PostalCode</th>";
echo "<td>" .
$pcode .
"</td>";
echo "<th>Country</th>";
echo "<td>" .
$country .
"</td>";
echo "</tr>";
echo "</table>";
?>
appending HTML into the DOM does not cause the browser to evaluate any script tags in said appended HTML.
If you really wanted to, you could evaluate the javascript by using eval():
eval($(this).find("script").text());
I know this is an old question but I've had a similar problem today.
The solution was using createContextualFragment.
My code looks something like this:
var tagString = '<script async type="text/javascript" src="path_to_script"></script>';
var range = document.createRange();
range.selectNode(document.getElementsByTagName("BODY")[0]);
var documentFragment = range.createContextualFragment(tagString);
document.body.appendChild(documentFragment);
This code works in my browser.
$('body').append('<script>alert("test");<' + '/' + 'script>');
so it might be that $(this) is what is actually causing your problem.
Can you replace it with 'body' and see if it works like that?
after append
jquery insert after
$( "<p>Test</p>" ).insertAfter( ".inner" );
jquery append after
<div class="container">
<h2>Greetings</h2>
<div class="inner">Hello</div>
<div class="inner">Goodbye</div>
</div>
<script>$( "<p>Test</p>" ).insertAfter( ".inner" );</script>
append after div
.after() puts the element after the element
using after:
$('.a').after($('.c'));
after execution:
<div class='a'>
<div class='b'>b</div>
</div>
<div class='c'>c</div> //<----this will be placed here
Run script after appending it to the HTML
jQuery provides the $.getScript(url [,success]) function.
You can then load and execute your code from a separate jquery file which helps to manage and control the flow of execution.
basically put your alert("testing!") script inside a separate file, for instance alert.js in the same directory.
Then you can run the script when adding your employee to the HTML.
var str = '
Examplee
';
var url = 'alert.js';
document.body.innerHTML += str;
$.getScript(url);
I know this may seem like more work, but it is better practice to keep your javascript out of your HTML.
You can also use a callback to gather user data after the alert or notify another process that the user has been alerted.
$.getScript(url, function(){
//do something after the alert is executed.
});
For instance maybe it would be a better design to add the employee after the alert is executed.
var str = '
Examplee
';
var url = 'alert.js';
$.getScript(url, function(){
document.body.innerHTML += str;
});
Edit: I know jQuery is not tagged, but I am also no petitioning to be the accepted answer to this question.
I am only offering another alternative for someone who may run into the same issue and may be using jQuery.
If that is the case $.getScript is a very useful tool designed for this exact problem.
Failed to load resource
net::ERR_BLOCKED_BY_CLIENT with Google chrome
These errors are usually generated from an ad blocking plugin, such as Adblock Plus.
To test this use either a different browser or uninstall the ad blocking plugin.
There is an easier way to temporarily disable an extension.
In Chrome, opening an Incognito tab will usually stop extensions running.
use ctrl+shift+N
Count frequency
var arr = [5, 5, 5, 2, 2, 2, 2, 2, 9, 4]
arr.reduce(function(acc, item) {
return acc[item] ? ++acc[item] : acc[item] = 1, acc
}, {});
console.log(arr) // => {2: 5, 4: 1, 5: 3, 9: 1}
or
arr.reduce((acc, item) => {
acc[item] = (acc[item] || 0) + 1
return acc
}, {})
to create an incremental range, pre sort the array
arr.sort();
to apply a filter within range
var res = arr.filter(function(item) {
return item <= range.max && item >= range.min;
});
arr.filter(function(item) { return item <= 5 && item >= 3; });
loop to find frequency distribution by bins
By default, the sort method sorts elements alphabetically.
To sort numerically just add a new method which handles numeric sorts
arr.sort(function(a, b) { return a - b; }) // note the minus operation
var arr = [5, 5, 5, 2, 2, 2, 2, 2, 9, 4, 3,6,6,8,7,1,2,4, 4,2,7,5,10,11,12]
arr.map(x => parseInt(x))
// arr.sort()
arr.sort(function(a, b) { return a - b; }) // note the minus operation
bins = 4
theMin = Math.min( ...arr )
theMax = Math.max( ...arr )
range = theMax - theMin
interval = range / bins
freq = []
for (i = theMin; i <= theMax; i += interval) {
if(i + interval == theMax){
var selected = arr.filter(function(item) {
return item >= i && item <= i + interval;
});
}else{
var selected = arr.filter(function(item) {
return item >= i && item < i + interval;
});
}
counts = selected.length
console.log(i, " selected ",selected, " counts ",counts)
freq.push(counts)
}
freq.pop() // the last one is not intended
find Mode, mean, std, variance
function findMode(arr) {
var modes = [], count = [], i, number, maxIndex = 0;
for (i = 0; i < arr.length; i += 1) {
number = arr[i];
count[number] = (count[number] || 0) + 1;
if (count[number] > maxIndex) {
maxIndex = count[number];
}
}
for (i in count)
if (count.hasOwnProperty(i)) {
if (count[i] === maxIndex) {
modes.push(Number(i));
}
}
return modes;
}
interquartile range
standard deviation
Cumulative Frequency Distributions
// sort array ascending
const asc = arr => arr.sort((a, b) => a - b);
const sum = arr => arr.reduce((a, b) => a + b, 0);
const mean = arr => sum(arr) / arr.length;
// sample standard deviation
const std = (arr) => {
const mu = mean(arr);
const diffArr = arr.map(a => (a - mu) ** 2);
return Math.sqrt(sum(diffArr) / (arr.length - 1));
};
const quantile = (arr, q) => {
const sorted = asc(arr);
const pos = (sorted.length - 1) * q;
const base = Math.floor(pos);
const rest = pos - base;
if (sorted[base + 1] !== undefined) {
return sorted[base] + rest * (sorted[base + 1] - sorted[base]);
} else {
return sorted[base];
}
};
const findVariance = (array = []) => {
if(!array.length){
return 0;
};
const sum = array.reduce((acc, val) => acc + val);
const { length: num } = array;
const median = sum / num;
let variance = 0;
array.forEach(num => {
variance += ((num - median) * (num - median));
});
variance /= num;
return variance;
};
const q25 = arr => quantile(arr, .25);
const q50 = arr => quantile(arr, .50);
const q75 = arr => quantile(arr, .75);
const median = arr => q50(arr);
to find q25 of an numArray
q25(numArray)
https://stackoverflow.com/questions/21335136/how-to-re-enable-right-click-so-that-i-can-inspect-html-elements-in-chrome/21335527
Open dev tools (Shift+Control+i).
Select the "Elements" tab,
and then the "Event Listeners" tab.
Hover over the elements/listener.
A "Remove" button will show up.
Click "Remove".
Another possible way, when the blocking function is made with jquery, use:
$(document).unbind();
It will clear all the onmousedown and contextmenu events attributed dynamically, that can't be erased with document.contextmenu=null; etc.
some code did a re-bind:
$(document).bind("contextmenu",function(e){if(!$('#easyy').length)e.preventDefault();});
If none of the other comments works, just do, open console line command and type:
document.oncontextmenu = null;
JavaScript can create, read, and delete cookies with the document.cookie
property.
With JavaScript, a cookie can be created like this:
document.cookie = "username=John Doe";
You can also add an expiry date (in UTC time).
By default, the cookie is deleted when the browser is closed:
document.cookie = "username=John Doe; expires=Thu, 18 Dec 2013 12:00:00 UTC";
With a path parameter, you can tell the browser what path the cookie belongs to.
By default, the cookie belongs to the current page.
document.cookie = "username=John Doe; expires=Thu, 18 Dec 2013 12:00:00 UTC; path=/";
Read a Cookie with JavaScript
With JavaScript, cookies can be read like this:
let x = document.cookie;
document.cookie will return all cookies in one string much like: cookie1=value; cookie2=value; cookie3=value;
Change a Cookie with JavaScript
With JavaScript, you can change a cookie the same way as you create it:
document.cookie = "username=John Smith; expires=Thu, 18 Dec 2013 12:00:00 UTC; path=/";
The old cookie is overwritten.
Delete a Cookie with JavaScript
Deleting a cookie is very simple.
You don't have to specify a cookie value when you delete a cookie.
Just set the expires parameter to a past date:
document.cookie = "username=; expires=Thu, 01
Jan 1970 00:00:00 UTC; path=/;";
You should define the cookie path to ensure that you delete the right cookie.
Some browsers will not let you delete a cookie if you don't specify the path.
The Cookie String
The document.cookie property looks like a normal text string.
But it is not.
Even if you write a whole cookie string to document.cookie, when you read it out again, you can only see the
name-value pair of it.
If you set a new cookie, older cookies are not overwritten.
The new cookie is added to document.cookie, so if you read document.cookie
again you will get something like:
cookie1 = value; cookie2 = value;
If you want to find the value of one specified cookie, you must write a JavaScript
function that searches for the cookie value in the cookie string.
JavaScript Cookie Example
In the example to follow, we will create a cookie that stores the name of a visitor.
The first time a visitor arrives to the web page, he/she will be asked to fill in his/her name.
The name is then stored in a cookie.
The next time the visitor arrives at the same page, he/she will get a welcome message.
For the example we will create 3 JavaScript functions:
A function to set a cookie value
A function to get a cookie value
A function to check a cookie value
A Function to Set a Cookie
First, we create a function that stores the name of the visitor in a cookie variable:
Example
function setCookie(cname, cvalue, exdays) {
const d = new Date();
d.setTime(d.getTime() + (exdays*24*60*60*1000));
let expires = "expires="+ d.toUTCString();
document.cookie = cname + "=" + cvalue + ";" + expires + ";path=/";
}
Example explained:
The parameters of the function above are the name of the cookie (cname), the value of the cookie
(cvalue), and the number of days until the cookie should expire (exdays).
The function sets a cookie by adding together the cookiename, the cookie
value, and the expires string.
A Function to Get a Cookie
Then, we create a function that returns the value of a specified cookie:
Example
function getCookie(cname) {
let name = cname + "=";
let decodedCookie = decodeURIComponent(document.cookie);
let ca = decodedCookie.split(';');
for(let i = 0; i <ca.length; i++) {
let c = ca[i];
while (c.charAt(0) == ' ') {
c = c.substring(1);
}
if (c.indexOf(name) == 0) {
return c.substring(name.length, c.length);
}
}
return "";
}
Function explained:
Take the cookiename as parameter (cname).
Create a variable (name) with the text to search for (cname + "=").
Decode the cookie string, to handle cookies with special characters, e.g.
'$'
Split document.cookie on semicolons into an array called ca (ca =
decodedCookie.split(';')).
Loop through the ca array (i = 0; i < ca.length; i++), and read out each value c = ca[i]).
If the cookie is found (c.indexOf(name) == 0), return the value of the cookie (c.substring(name.length, c.length).
If the cookie is not found, return "".
A Function to Check a Cookie
Last, we create the function that checks if a cookie is set.
If the cookie is set it will display a greeting.
If the cookie is not set, it will display a prompt box, asking for the name of the user,
and stores the username cookie for 365 days, by calling the setCookie function:
Example
function checkCookie() {
let username = getCookie("username");
if (username != "") {
alert("Welcome again " + username);
} else {
username = prompt("Please enter your name:", "");
if (username != "" && username != null) {
setCookie("username", username, 365);
}
}
}
All Together Now
Example
function setCookie(cname, cvalue, exdays) {
const d = new Date();
d.setTime(d.getTime() + (exdays * 24 * 60 * 60 * 1000));
let expires = "expires="+d.toUTCString();
document.cookie = cname + "=" + cvalue + ";" + expires + ";path=/";
}
function getCookie(cname) {
let name = cname + "=";
let ca = document.cookie.split(';');
for(let i = 0; i < ca.length; i++) {
let c = ca[i];
while (c.charAt(0) == ' ') {
c = c.substring(1);
}
if (c.indexOf(name) == 0) {
return c.substring(name.length, c.length);
}
}
return "";
}
function checkCookie() {
let user = getCookie("username");
if (user != "") {
alert("Welcome again " + user);
} else {
user = prompt("Please enter your name:", "");
if (user != "" && user != null) {
setCookie("username", user, 365);
}
}
}
Try it Yourself »
The example above runs the checkCookie() function when the page loads.
blank return
var x; // x is undefined
alert(x); // shows "undefined"
alert(!x); // shows "true"
alert(x==false); // shows "false"
So, It is a good practice to return "false" instead of a blank return.
That way you make it all uniform and make life easy for other programmers.
alert("type: " + typeof x+", value: "+x);
alert("type: " + typeof !x+", value: "+!x);
alert("type: " + typeof x==false +", value: "+ x==false);
speechSynthesis.speak()
speechSynthesis.speak() without user activation is no longer allowed
If you set your site address as "trusted" in chrome://settings/content/sound it seems to enable sound and speech synthesis even without user interactions.
User interaction means: click, dblclick, mouseup, pointerup, reset, submit etc.
So, if you want to run speechSynthesis.speak(); without real user interaction, then you just create temporary user interaction using a method like .click(), etc.
https://stackoverflow.com/questions/46551705/speechsynthesis-speaking-never-true
A simple hack, without needing a real user activity, is to execute a click event on a hidden button like so.
document.querySelector('button').click();
var msg = new SpeechSynthesisUtterance('Test');
window.onload = function(){
var u = new SpeechSynthesisUtterance('All is Ok');
u.text = 'Hello World';
u.lang = 'en-US';
u.rate = 1;
u.pitch = .4;
speechSynthesis.speak(u);
}
function doSpeech() {
var synth = window.speechSynthesis;
var utterance1 = new SpeechSynthesisUtterance('How about we say this now? This is quite a long sentence to say.
Make it longer !');
var utterance2 = new SpeechSynthesisUtterance('We should say another sentence too, just to be on the safe side.
even longer !');
synth.speak(utterance1);
// If you check immediately (js code executed in less than ms) the
// status won't be true
if (synth.speaking) {
console.log("This is usually printed, if the utterance uses the default voice of the browser (native)");
}
// Wait 500ms to check for the status of the utterance
setTimeout(function(){
if (synth.speaking) {
console.log("This will be printed if starts after 500ms :)");
}
}, 500);
}
doSpeech();
In my case, both of the console.log statements are being printed.
But if in your case it isn't being printed, execute your code only after the start event of the utterance:
function doSpeech() {
var synth = window.speechSynthesis;
var msg = new SpeechSynthesisUtterance();
msg.text = "We should say another sentence too, just to be on the safe side.
even longer !";
msg.addEventListener('start', function() {
if(synth.speaking){
console.log("This will be printed !");
}
});
synth.speak(msg);
}
doSpeech();
function doSpeech() {
var synth = window.speechSynthesis;
var utterance1 = new SpeechSynthesisUtterance('How about we say this now? This is quite a long sentence to say.
Make it longer !');
var utterance2 = new SpeechSynthesisUtterance('We should say another sentence too, just to be on the safe side.
even longer !');
synth.speak(utterance1);
// If you check immediately (js code executed in less than ms) the
// status won't be true
if (synth.speaking) {
console.log("This is usually printed, if the utterance uses the default voice of the browser (native)");
}
// Wait 500ms to check for the status of the utterance
setTimeout(function(){
if (synth.speaking) {
console.log("This will be printed if starts after 500ms :)");
}
}, 500);
}
doSpeech();
In my case, both of the console.log statements are being printed.
But if in your case it isn't being printed, execute your code only after the start event of the utterance:
function doSpeech() {
var synth = window.speechSynthesis;
var msg = new SpeechSynthesisUtterance();
msg.text = "We should say another sentence too, just to be on the safe side.
even longer !";
msg.addEventListener('start', function() {
if(synth.speaking){
console.log("This will be printed !");
}
});
synth.speak(msg);
}
doSpeech();
speak functions
function polyphone(str){
var findstr = ["應勿","則省","使更","不入","所好","所惡","號泣","喪","長呼","尊長","見能","遇長","長無","下車","待","朝起","便溺","切","冠服","不貴","循分","稱家","從容","跛倚","不問","還","擅為","為先","未的","地同載","同","行高","訾","不欲","不媚","不力","長浮","為限","滯塞","几","不敬","卷"];
var rplcstr = ["硬勿","則醒","使庚","轐入","所耗","所勿","毫泣","桑","掌呼","尊掌","現能","遇掌","掌無","下居","帶","招起","便尿","竊","官服","轐貴","循份","秤家","匆容","必倚","轐問","環","擅圍","圍先","未笛","弟銅在","銅","幸高","子","轐欲","轐媚","轐力","掌浮","圍限","滯色","雞","轐敬","倦"];
var regex;
for (var i = 0; i < findstr.length; i++) {
regex = new RegExp(findstr[i], "g");
str= str.replace(regex, rplcstr[i]);
}
return str;
}
function getSpeechParagraphs(){
var ret = "弟子規";
var pfs=document.getElementsByName('pf');
for (i = 0; i < pfs.length; i++) {
s=pfs[i].innerText.replace(/ /g, ",");
s=s.replace(/[\n\r]/g,',');
ret=ret+'。
'+s;
}
return polyphone(ret);
}
if ('speechSynthesis' in window) {
var paragraphs=getSpeechParagraphs();
var synth = window.speechSynthesis;
synth.cancel();
var u = new SpeechSynthesisUtterance();
u.rate=0.8;
u.pitch=1;
u.volume=1;
u.text=paragraphs;
u.lang = 'zh-TW';
var u2 = new SpeechSynthesisUtterance();
u2.rate=0.7;
u2.pitch=1;
u2.volume=1;
u2.lang = 'zh-TW';
function speak() {
speechSynthesis.speak(new SpeechSynthesisUtterance("hello world"));
speechSynthesis.speak(u);
}
var u = new SpeechSynthesisUtterance('All is Ok');
u.text = 'Hello World';
u.lang = 'en-US';
u.rate = 1;
u.pitch = .4;
function speech_selection(){
var selectedText = "";
if(window.getSelection){
selectedText = window.getSelection();
}else if(document.getSelection){
selectedText = document.getSelection();
}else if(document.selection){
selectedText = document.selection.createRange().text;
}
if(selectedText != ""){
selectedText = selectedText.toString();
if(synth.speaking){synth.cancel();}
var voices = synth.getVoices();
for(var i=0;i < voices.length;i++){
if ( voices[i].localService==true && voices[i].lang.toLowerCase() =='zh-tw'){
u2.voice=voices[i];
break;
}
}
u2.text=polyphone(selectedText);
synth.speak(u2);
}
}
function doSpeech() {
var synth = window.speechSynthesis;
var utterance1 = new SpeechSynthesisUtterance('How about we say this now? This is quite a long sentence to say.
Make it longer !');
var utterance2 = new SpeechSynthesisUtterance('We should say another sentence too, just to be on the safe side.
even longer !');
synth.speak(utterance1);
// If you check immediately (js code executed in less than ms) the
// status won't be true
if (synth.speaking) {
console.log("This is usually printed, if the utterance uses the default voice of the browser (native)");
}
// Wait 500ms to check for the status of the utterance
setTimeout(function(){
if (synth.speaking) {
console.log("This will be printed if starts after 500ms :)");
}
}, 500);
}
doSpeech();
showMov
function showMov() {
idstring = "#topic-" + topicpointer;
$(idstring).click()
}
table of table of contents
create div #totoc
put script at page bottom
var totoc = $('#totoc');
$("a span.orange").each(function(i) {
var totopic = $(this), totopicNumber = i; totopicLength = totopicNumber +1;
totoc.append(''+totopic.text()+''+" ");
totopic.attr('id', 'totopic-' + totopicNumber);
});
to write html
document.write('')
Modules, introduction
https://javascript.info/modules-intro
As our application grows bigger, we want to split it into multiple files, so called “modules”.
A module may contain a class or a library of functions for a specific purpose.
For a long time, JavaScript existed without a language-level module syntax.
That wasn’t a problem, because initially scripts were small and simple, so there was no need.
But eventually scripts became more and more complex, so the community invented a variety of ways to organize code into modules, special libraries to load modules on demand.
To name some (for historical reasons):
AMD – one of the most ancient module systems, initially implemented by the library require.js.
CommonJS – the module system created for Node.js server.
UMD – one more module system, suggested as a universal one, compatible with AMD and CommonJS.
Now all these slowly become a part of history, but we still can find them in old scripts.
The language-level module system appeared in the standard in 2015, gradually evolved since then, and is now supported by all major browsers and in Node.js.
So we’ll study the modern JavaScript modules from now on.
What is a module?
A module is just a file.
One script is one module.
As simple as that.
Modules can load each other and use special directives export and import to interchange functionality, call functions of one module from another one:
export keyword labels variables and functions that should be accessible from outside the current module.
import allows the import of functionality from other modules.
For instance, if we have a file sayHi.js exporting a function:
// 📁 sayHi.js
export function sayHi(user) {
alert(`Hello, ${user}!`);
}
…Then another file may import and use it:
// 📁 main.js
import {sayHi} from './sayHi.js';
alert(sayHi); // function...
sayHi('John'); // Hello, John!
The import directive loads the module by path ./sayHi.js relative to the current file, and assigns exported function sayHi to the corresponding variable.
Let’s run the example in-browser.
As modules support special keywords and features, we must tell the browser that a script should be treated as a module, by using the attribute <script type="module">.
Like this:
<iframe src="https://javascript.info/article/modules-intro/say/"></iframe>
export function sayHi(user) {
return `Hello, ${user}!`;
}<!doctype html>
<script type="module">
import {sayHi} from './say.js';
document.body.innerHTML = sayHi('John');
</script>
The browser automatically fetches and evaluates the imported module (and its imports if needed), and then runs the script.
Modules work only via HTTP(s), not locally
If you try to open a web-page locally, via file:// protocol, you’ll find that import/export directives don’t work.
Use a local web-server, such as static-server or use the “live server” capability of your editor, such as VS Code Live Server Extension to test modules.
Core module features
What’s different in modules, compared to “regular” scripts?
There are core features, valid both for browser and server-side JavaScript.
Always “use strict”
Modules always work in strict mode.
E.g.
assigning to an undeclared variable will give an error.
<script type="module">
a = 5; // error
</script>
Module-level scope
Each module has its own top-level scope.
In other words, top-level variables and functions from a module are not seen in other scripts.
In the example below, two scripts are imported, and hello.js tries to use user variable declared in user.js.
It fails, because it’s a separate module (you’ll see the error in the console):
<iframe src="https://javascript.info/article/modules-intro/scopes/"></iframe>
alert(user); // no such variable (each module has independent variables)let user = "John";<!doctype html>
<script type="module" src="user.js"></script>
<script type="module" src="hello.js"></script>
Modules should export what they want to be accessible from outside and import what they need.
user.js should export the user variable.
hello.js should import it from user.js module.
In other words, with modules we use import/export instead of relying on global variables.
This is the correct variant:
iframe src="https://javascript.info/article/modules-intro/scopes-working/"></iframe>
import {user} from './user.js';
document.body.innerHTML = user; // Johnexport let user = "John";<!doctype html>
<script type="module" src="hello.js"></script>
In the browser, if we talk about HTML pages, independent top-level scope also exists for each <script type="module">.
Here are two scripts on the same page, both type="module".
They don’t see each other’s top-level variables:
<script type="module">
// The variable is only visible in this module script
let user = "John";
</script>
<script type="module">
alert(user); // Error: user is not defined
</script>
Please note:
In the browser, we can make a variable window-level global by explicitly assigning it to a window property, e.g.
window.user = "John".
Then all scripts will see it, both with type="module" and without it.
That said, making such global variables is frowned upon.
Please try to avoid them.
A module code is evaluated only the first time when imported
If the same module is imported into multiple other modules, its code is executed only once, upon the first import.
Then its exports are given to all further importers.
The one-time evaluation has important consequences, that we should be aware of.
Let’s see a couple of examples.
First, if executing a module code brings side-effects, like showing a message, then importing it multiple times will trigger it only once – the first time:
// 📁 alert.js
alert("Module is evaluated!");// Import the same module from different files
// 📁 1.js
import `./alert.js`; // Module is evaluated!
// 📁 2.js
import `./alert.js`; // (shows nothing)
The second import shows nothing, because the module has already been evaluated.
There’s a rule: top-level module code should be used for initialization, creation of module-specific internal data structures.
If we need to make something callable multiple times – we should export it as a function, like we did with sayHi above.
Now, let’s consider a deeper example.
Let’s say, a module exports an object:
// 📁 admin.js
export let admin = {
name: "John"
};
If this module is imported from multiple files, the module is only evaluated the first time, admin object is created, and then passed to all further importers.
All importers get exactly the one and only admin object:
// 📁 1.js
import {admin} from './admin.js';
admin.name = "Pete";
// 📁 2.js
import {admin} from './admin.js';
alert(admin.name); // Pete
// Both 1.js and 2.js reference the same admin object
// Changes made in 1.js are visible in 2.js
As you can see, when 1.js changes the name property in the imported admin, then 2.js can see the new admin.name.
That’s exactly because the module is executed only once.
Exports are generated, and then they are shared between importers, so if something changes the admin object, other modules will see that.
Such behavior is actually very convenient, because it allows us to configure modules.
In other words, a module can provide a generic functionality that needs a setup.
E.g.
authentication needs credentials.
Then it can export a configuration object expecting the outer code to assign to it.
Here’s the classical pattern:
A module exports some means of configuration, e.g.
a configuration object.
On the first import we initialize it, write to its properties.
The top-level application script may do that.
Further imports use the module.
For instance, the admin.js module may provide certain functionality (e.g.
authentication), but expect the credentials to come into the config object from outside:
// 📁 admin.js
export let config = { };
export function sayHi() {
alert(`Ready to serve, ${config.user}!`);
}
Here, admin.js exports the config object (initially empty, but may have default properties too).
Then in init.js, the first script of our app, we import config from it and set config.user:
// 📁 init.js
import {config} from './admin.js';
config.user = "Pete";
…Now the module admin.js is configured.
Further importers can call it, and it correctly shows the current user:
// 📁 another.js
import {sayHi} from './admin.js';
sayHi(); // Ready to serve, Pete!
import.meta
The object import.meta contains the information about the current module.
Its content depends on the environment.
In the browser, it contains the URL of the script, or a current webpage URL if inside HTML:
<script type="module">
alert(import.meta.url); // script URL
// for an inline script - the URL of the current HTML-page
</script>
In a module, “this” is undefined
That’s kind of a minor feature, but for completeness we should mention it.
In a module, top-level this is undefined.
Compare it to non-module scripts, where this is a global object:
<script>
alert(this); // window
</script>
<script type="module">
alert(this); // undefined
</script>
Browser-specific features
There are also several browser-specific differences of scripts with type="module" compared to regular ones.
You may want to skip this section for now if you’re reading for the first time, or if you don’t use JavaScript in a browser.
Module scripts are deferred
Module scripts are always deferred, same effect as defer attribute (described in the chapter Scripts: async, defer), for both external and inline scripts.
In other words:
downloading external module scripts <script type="module" src="..."> doesn’t block HTML processing, they load in parallel with other resources.
module scripts wait until the HTML document is fully ready (even if they are tiny and load faster than HTML), and then run.
relative order of scripts is maintained: scripts that go first in the document, execute first.
As a side-effect, module scripts always “see” the fully loaded HTML-page, including HTML elements below them.
For instance:
<script type="module">
alert(typeof button); // object: the script can 'see' the button below
// as modules are deferred, the script runs after the whole page is loaded
</script>
Compare to regular script below:
<script>
alert(typeof button); // button is undefined, the script can't see elements below
// regular scripts run immediately, before the rest of the page is processed
</script>
<button id="button">Button</button>
Please note: the second script actually runs before the first! So we’ll see undefined first, and then object.
That’s because modules are deferred, so we wait for the document to be processed.
The regular script runs immediately, so we see its output first.
When using modules, we should be aware that the HTML page shows up as it loads, and JavaScript modules run after that, so the user may see the page before the JavaScript application is ready.
Some functionality may not work yet.
We should put “loading indicators”, or otherwise ensure that the visitor won’t be confused by that.
Async works on inline scripts
For non-module scripts, the async attribute only works on external scripts.
Async scripts run immediately when ready, independently of other scripts or the HTML document.
For module scripts, it works on inline scripts as well.
For example, the inline script below has async, so it doesn’t wait for anything.
It performs the import (fetches ./analytics.js) and runs when ready, even if the HTML document is not finished yet, or if other scripts are still pending.
That’s good for functionality that doesn’t depend on anything, like counters, ads, document-level event listeners.
<!-- all dependencies are fetched (analytics.js), and the script runs -->
<!-- doesn't wait for the document or other <script> tags -->
<script async type="module">
import {counter} from './analytics.js';
counter.count();
</script>
External scripts
External scripts that have type="module" are different in two aspects:
External scripts with the same src run only once:
<!-- the script my.js is fetched and executed only once -->
<script type="module" src="my.js"></script>
<script type="module" src="my.js"></script>
External scripts that are fetched from another origin (e.g.
another site) require CORS headers, as described in the chapter Fetch: Cross-Origin Requests.
In other words, if a module script is fetched from another origin, the remote server must supply a header Access-Control-Allow-Origin allowing the fetch.
<!-- another-site.com must supply Access-Control-Allow-Origin -->
<!-- otherwise, the script won't execute -->
<script type="module" src="http://another-site.com/their.js"></script>
That ensures better security by default.
No “bare” modules allowed
In the browser, import must get either a relative or absolute URL.
Modules without any path are called “bare” modules.
Such modules are not allowed in import.
For instance, this import is invalid:
import {sayHi} from 'sayHi'; // Error, "bare" module
// the module must have a path, e.g.
'./sayHi.js' or wherever the module is
Certain environments, like Node.js or bundle tools allow bare modules, without any path, as they have their own ways for finding modules and hooks to fine-tune them.
But browsers do not support bare modules yet.
Compatibility, “nomodule”
Old browsers do not understand type="module".
Scripts of an unknown type are just ignored.
For them, it’s possible to provide a fallback using the nomodule attribute:
<script type="module">
alert("Runs in modern browsers");
</script>
<script nomodule>
alert("Modern browsers know both type=module and nomodule, so skip this")
alert("Old browsers ignore script with unknown type=module, but execute this.");
</script>
Build tools
In real-life, browser modules are rarely used in their “raw” form.
Usually, we bundle them together with a special tool such as Webpack and deploy to the production server.
One of the benefits of using bundlers – they give more control over how modules are resolved, allowing bare modules and much more, like CSS/HTML modules.
Build tools do the following:
Take a “main” module, the one intended to be put in <script type="module"> in HTML.
Analyze its dependencies: imports and then imports of imports etc.
Build a single file with all modules (or multiple files, that’s tunable), replacing native import calls with bundler functions, so that it works.
“Special” module types like HTML/CSS modules are also supported.
In the process, other transformations and optimizations may be applied:
Unreachable code removed.
Unused exports removed (“tree-shaking”).
Development-specific statements like console and debugger removed.
Modern, bleeding-edge JavaScript syntax may be transformed to older one with similar functionality using Babel.
The resulting file is minified (spaces removed, variables replaced with shorter names, etc).
If we use bundle tools, then as scripts are bundled together into a single file (or few files), import/export statements inside those scripts are replaced by special bundler functions.
So the resulting “bundled” script does not contain any import/export, it doesn’t require type="module", and we can put it into a regular script:
<!-- Assuming we got bundle.js from a tool like Webpack -->
<script src="bundle.js"></script>
That said, native modules are also usable.
So we won’t be using Webpack here: you can configure it later.
Summary
To summarize, the core concepts are:
A module is a file.
To make import/export work, browsers need <script type="module">.
Modules have several differences:
Deferred by default.
Async works on inline scripts.
To load external scripts from another origin (domain/protocol/port), CORS headers are needed.
Duplicate external scripts are ignored.
Modules have their own, local top-level scope and interchange functionality via import/export.
Modules always use strict.
Module code is executed only once.
Exports are created once and shared between importers.
When we use modules, each module implements the functionality and exports it.
Then we use import to directly import it where it’s needed.
The browser loads and evaluates the scripts automatically.
In production, people often use bundlers such as Webpack to bundle modules together for performance and other reasons.
In the next chapter we’ll see more examples of modules, and how things can be exported/imported.
object constructor function
function Person(first, last, age, eye) {
this.firstName = first;
this.lastName = last;
this.age = age;
this.eyeColor = eye;
}
// Create a Person object
const myFather = new Person("John", "Doe", 50, "blue");
// Display age
document.getElementById("demo").innerHTML =
"My father is " + myFather.age + ".";
Object Types (Blueprints) (Classes)
The examples from the previous chapters are limited.
They only create single objects.
Sometimes we need a "blueprint" for creating many objects of the same "type".
The way to create an "object type", is to use an object constructor function.
In the example above, function Person() is an object constructor function.
Objects of the same type are created by calling the constructor function with the new keyword:
const myFather = new Person("John", "Doe", 50, "blue");
const myMother = new Person("Sally", "Rally", 48, "green");
Adding a Property to an Object
Adding a new property to an existing object is easy:
Example
myFather.nationality = "English";
The property will be added to myFather.
Not to myMother.
(Not to any other person objects).
Adding a Method to an Object
Adding a new method to an existing object is easy:
Example
myFather.name = function() {
return this.firstName + " " + this.lastName;
};
The method will be added to myFather.
Not to myMother.
(Not to any other person objects).
Adding a Property to a Constructor
You cannot add a new property to an object constructor the same way you add a new property to an existing object:
Example
Person.nationality = "English";
To add a new property to a constructor, you must add it to the constructor function:
Example
function Person(first, last, age, eyecolor) {
this.firstName = first;
this.lastName = last;
this.age = age;
this.eyeColor = eyecolor;
this.nationality = "English";
}
This way object properties can have default values.
Adding a Method to a Constructor
Your constructor function can also define methods:
Example
function Person(first, last, age, eyecolor) {
this.firstName = first;
this.lastName = last;
this.age = age;
this.eyeColor = eyecolor;
this.name = function() {
return this.firstName + " " + this.lastName;
};
}
You cannot add a new method to an object constructor the same way you add a new method to an existing object.
Adding methods to an object constructor must be done inside the constructor function:
Example
function Person(firstName, lastName, age, eyeColor) {
this.firstName = firstName;
this.lastName = lastName;
this.age = age;
this.eyeColor = eyeColor;
this.changeName = function(name) {
this.lastName = name;
};
}
The changeName() function assigns the value of name to the person's lastName property.
Now You Can Try:
myMother.changeName("Doe");
JavaScript knows which person you are talking about by "substituting" this with myMother.
Built-in JavaScript Constructors
JavaScript has built-in constructors for native objects:
new String() // A new String object
new Number() // A new Number object
new Boolean() // A new Boolean object
new Object() // A new Object object
new Array() // A new Array object
new RegExp() // A new RegExp object
new Function() // A new Function object
new Date() // A new Date object
The Math() object is not in the list.
Math is a global object.
The new keyword cannot be used on Math.
As you can see above, JavaScript has object versions of the primitive data types String, Number, and Boolean.
But there is no reason to create complex objects.
Primitive values are much faster:
Use string literals "" instead of new String().
Use number literals 50 instead of new Number().
Use boolean literals true / false instead of new Boolean().
Use object literals {} instead of new Object().
Use array literals [] instead of new Array().
Use pattern literals /()/ instead of new RegExp().
Use function expressions () {} instead of new Function().
Example
let x1 = ""; // new primitive string
let x2 = 0; // new primitive number
let x3 = false; // new primitive boolean
const x4 = {}; // new Object object
const x5 = []; // new Array object
const x6 = /()/ // new RegExp object
const x7 = function(){}; // new function
String Objects
Normally, strings are created as primitives: firstName = "John"
But strings can also be created as objects using the new keyword:
firstName = new String("John")
Number Objects
Normally, numbers are created as primitives: x = 30
But numbers can also be created as objects using the new keyword:
x = new Number(30)
Boolean Objects
Normally, booleans are created as primitives: x = false
But booleans can also be created as objects using the new keyword:
x = new Boolean(false)
get current scroll height
document.documentElement.scrollTop || document.body.scrollTop
scrollheight jquery
$('#toc').prop('scrollHeight')
Correct ways in jQuery are
$('#test')[0].scrollHeight OR
$('#test').prop('scrollHeight') OR
$('#test').get(0).scrollHeight
jquery on scroll
Trigger the scroll event for the selected elements:
$(selector).scroll()
Attach a function to the scroll event:
$(selector).scroll(function)
determine scrollHeight using jquery
$('#test').keyup(function() {
var height = $(this).scrollTop();
var initHeight = 5;
if(initHeight < height ) { $(this).css({'height':'8rem'}); }
})
Maps
https://www.w3schools.com/js/js_object_maps.asp
A Map holds key-value pairs where the keys can be any datatype.
A Map remembers the original insertion order of the keys.
A Map has a property that represents the size of the map.
Method Description
new Map() Creates a new Map object
set() Sets the value for a key in a Map
get() Gets the value for a key in a Map
clear() Removes all the elements from a Map
delete() Removes a Map element specified by a key
has() Returns true if a key exists in a Map
forEach() Invokes a callback for each key/value pair in a Map
entries() Returns an iterator object with the [key, value] pairs in a Map
keys() Returns an iterator object with the keys in a Map
values() Returns an iterator object of the values in a Map
Property Description
size Returns the number of Map elements
How to Create a Map
You can create a JavaScript Map by:
Passing an Array to new Map()
Create a Map and use Map.set()
new Map()
You can create a Map by passing an Array to the new Map() constructor:
Example
// Create a Map
const fruits = new Map([
["apples", 500],
["bananas", 300],
["oranges", 200]
]);
Map.set()
You can add elements to a Map with the set() method:
Example
// Create a Map
const fruits = new Map();
// Set Map Values
fruits.set("apples", 500);
fruits.set("bananas", 300);
fruits.set("oranges", 200);
The set() method can also be used to change existing Map values:
Example
fruits.set("apples", 500);
Map.get()
The get() method gets the value of a key in a Map:
Example
fruits.get("apples"); // Returns 500
// Creating a map object
var myMap = new Map();
// Adding [key, value] pair to the map
myMap.set(0, 'GeeksforGeeks');
// Displaying the element which is associated with
// the key '0' using Map.get() method
document.write(myMap.get(0));
Output:
"GeeksforGeeks"
Map.size
The size property returns the number of elements in a Map:
Example
fruits.size;
Map.delete()
The delete() method removes a Map element:
Example
fruits.delete("apples");
Map.clear()
The clear() method removes all the elements from a Map:
Example
fruits.clear();
Map.has()
The has() method returns true if a key exists in a Map:
Example
fruits.has("apples");
fruits.delete("apples");
fruits.has("apples");
Maps are Objects
typeof returns object:
Example
// Returns object:
typeof fruits;
instanceof Map returns true:
Example
// Returns true:
fruits instanceof Map;
JavaScript Objects vs Maps
Differences between JavaScript Objects and Maps:
Iterable
Object Not directly iterable
Map Directly iterable
Size
Object Do not have a size property
Map Have a size property
Key Types
Object Keys must be Strings (or Symbols)
Map Keys can be any datatype
Key Order
Object Keys are not well ordered
Map Keys are ordered by insertion
Defaults
Object Have default keys
Map Do not have default keys
Map.forEach()
The forEach() method invokes a callback for each key/value pair in a Map:
Example
// List all entries
let text = "";
fruits.forEach (function(value, key) {
text += key + ' = ' + value;
})
Map.keys()
The keys() method returns an iterator object with the keys in a Map:
Example
// List all keys
let veggies = "";
for (const x of fruits.keys()) {
veggies += x;
}
Map.values()
The values method returns an iterator object with the values in a Map:
Example
// Sum all values
let total = 0;
for (const x of fruits.values()) {
total += x;
}
Map.entries()
The entries() method returns an iterator object with the [key,values] in a Map:
Example
// List all entries
let text = "";
for (const x of fruits.entries()) {
text += x;
}
Objects as Keys
Being able to use objects as keys is an important Map feature.
Example
// Create Objects
const apples = {name: 'Apples'};
const bananas = {name: 'Bananas'};
const oranges = {name: 'Oranges'};
// Create a Map
const fruits = new Map();
// Add new Elements to the Map
fruits.set(apples, 500);
fruits.set(bananas, 300);
fruits.set(oranges, 200);
Remember: The key is an object (apples), not a string ("apples"):
Example
fruits.get("apples"); // Returns undefined
The way in which data is structured plays a vital role in our ability to efficiently perform certain operations on data, or to solve certain problems in relation to the data.
For example, you can delete any item from a doubly-linked list in constant time, whereas that could take linear time if the list is represented as an array.
Similarly, searching for the presence of a key in an array of keys can be done more efficiently in logarithmic time when the array is sorted, as opposed to when it is not sorted.
Some very popular programming languages like Java and Python provide lots of useful data structure implementations out of the box, whereas the ubiquitous JavaScript programming language appears to be pretty lean in that regard.
However, like most programming languages, JavaScript ships with some very basic data types — such as arrays, strings, objects, sets, maps, etc.
Keyed collections
Prior to the ECMAScript 2015 specification updates (popularly known as ES6), JavaScript provided Array objects as the only standard, inbuilt indexed collections — although there were other exotic objects such as the arguments and String objects, which behaved like arrays with special handling for integer index property keys, usually referred to as array-like objects, but were not really indexed collections.
Starting with ES2015, a handful of new standard inbuilt types have been added to JavaScript, such as:
SymbolPromiseProxy
A number of typed array objects were also added, which, just like arrays, are also indexed collections themselves.
In addition to these, a new category known as keyed collections has also been added to the language, with these inbuilt object types:
MapSetWeakMapWeakSet
Just as the name implies, every element (known as an entry) in a keyed collection can be identified by some kind of key, such that the keys in the collection are distinct — meaning that every key maps exactly to one entry in the collection.
If you are familiar with hash tables, then you may have already inferred their usefulness here in ensuring that the average access time is sublinear on the number of elements in the collection.
In this post, we’ll take a peek at how we can use JavaScript’s Map and Set objects to efficiently solve problems.
Before we jump right in, let’s consider a sample problem.
Below is a sample problem:
Contains Duplicates
Given an array of integers nums, return true if any element appears at least twice in the array, and return false if every element is distinct.
Pause for a moment and try solving this problem on your own, before you proceed.
If the nums array was sorted, will that simplify the solution?
Now, here is a working solution to the problem:
function hasDuplicates(nums) {
// 1.
Sort the array in-place (sorting makes it easier)
nums.sort((a, b) => a - b);
if (nums.length > 1) {
// 2.
Loop through the sorted array until a duplicate is found
for (let i = 1, len = nums.length; i < len; i++) {
// If a duplicate is found, return immediately
if (nums[i] == nums[i - 1]) return true;
}
}
// 3.
If it ever gets here, no duplicate was found
return false;
}
There is no doubt that this solution works, for the given constraints of our problem.
The reasoning behind why it should work is quite straightforward — if the array of integers is already sorted, then it is possible to check in a single pass whether or not two consecutive, equal integers exist in the array.
Since there isn’t any guarantee that the array of integers will already be sorted, the solution first tries to sort the array, before checking for duplicate integers.
Let’s analyze our solution.
The running time of the above solution will grow in a linearithmic fashion as the size of the input array grows.
While this isn’t a bad thing, it’s not so great either because, even for a pre-sorted array, it would still take a significant amount of time to process, as a lot of time is spent trying to sort the array first.
The solution also uses Array.prototype.sort to sort the input array in-place — modifying the original input array as a result.
Hence, no additional memory is required for the sort.
It is important to note that, if the problem required that the original order of the input array remain unchanged, then a copy of the input array must be made before using this solution.
This is tantamount to the use of additional memory that will grow in linear fashion as the size of the input array grows.
Now, whether this is an acceptable solution or not is subject to a number of factors — including but not limited to:
The constraints on the problem, such as the maximum size of the problem’s input
The constraints on computational resources, such as the machine’s available memory
Acceptable trade-offs, such as accepting the use of auxiliary space if that will potentially improve the running time, etc.
If we are certain that the array of integers might not already be sorted, and we also don’t mind using some auxiliary space — provided we can get a faster running time — then this solution is not the best.
As we progress, we will soon see that we can actually come up with a solution whose running time grows linearly, rather than linearithmically, with the size of the input.
Defining and understanding Map objects
We can summarize the ECMAScript 2015 specification definition of a Map object as follows:
It is a collection of key/value pairs where both the keys and values may be arbitrary ECMAScript language values
It is an ordered collection, which means that the insertion order of its elements matters and is followed when iterating the collection
Keys in the collection are distinct or unique, and may only occur in one key/value pair within the Map’s collection
Every key in the collection may occur only once with respect to the ECMAScript SameValueZero comparison algorithm
That means any valid JavaScript value — both primitive values and object references, including unseemly values like NaN and undefined — can be used as a key in a Map object collection.
Making equality comparisons with SameValueZero
To determine whether a key already exists in the Map object collection — in other words, ensuring that keys are distinct — the ECMAScript SameValueZero comparison algorithm is used.
We use this comparison algorithm because, if one of the listed algorithms were used:
Strict Equality comparison algorithm: this would make it impossible to determine whether a key of value NaN already exists in the collection, since NaN === NaN always evaluates to false
SameValue comparison algorithm: this makes it possible to determine whether a key of value NaN already exists in the collection, but the keys +0 and -0 are different keys and will be treated as such, despite that +0 === -0 always evaluates to true
The SameValueZero comparison algorithm, however, behaves like the SameValue comparison algorithm, except that it considers both +0 and -0 to be the same key.
If the SameValueZero comparison algorithm were to be implemented as a JavaScript function, it would look like this:
function SameValueZero(x, y) {
return x === y || (Number.isNaN(x) && Number.isNaN(y));
}
What are Map entries?
Each key/value pair contained in a Map object collection is usually referred to as an entry object, or entry.
An entry object is usually represented using a two-element array — more like a tuple in most other programming languages — whose first element is the key and whose second element is the value.
The type definition for a generic Map object entry should look like this (in TypeScript):
type MapEntry<Key, Value> = [Key, Value];
That said, you can use JavaScript syntax, such as a destructuring assignment, on a Map object entry like you would with an array, as demonstrated in the following for...of loop example:
/**
* Iterating over entries of `Map` object using a
* `for...of` loop — assuming that `map` has been
* defined already as a `Map` object.
*/
for (const [key, value] of map) {
console.log(key, value);
}
Both Map and Set objects inherit an entries() method from their corresponding constructors’ prototype objects.
This entries() method returns an iterator for all of the entries contained in the collection with respect to their insertion order.
For Map objects, however, the iterator returned by the entries() method also serves as the default iterator of the collection.
Creating a Map object in JavaScript
At the time of this article’s publication, the only way to create a Map object is by invoking the global Map constructor function.
The constructor function must be invoked with the new keyword — otherwise, a TypeError will be thrown.
When the Map constructor function is invoked without arguments, an empty Map object of 0 size is returned.
// Throws a`TypeError` — when invoked without `new` keyword
const throwTypeErrorMap = Map();
// Creates an empty `Map` object of 0 `size`
const mapA = new Map();
// Omitting the parentheses — when invoked without arguments
// Also creates an empty `Map` object of 0 `size`
const mapB = new Map;
console.log(mapA.size); // 0
console.log(mapB.size); // 0
The Map constructor function can also be invoked with an optional iterable argument.
When specified, iterable must be a JavaScript object that:
properly implements the iterable protocol — many inbuilt JavaScript objects implement this protocol, such as Array, String, and Set, as well as Map
returns an iterator object that produces a two-element, array-like (entry) object whose first element is a value that will be used as a Map key, and whose second element is the value to associate with that key
If the iterable argument does not meet these two requirements, a TypeError will be thrown — the only exception being when iterable is the value null or undefined, in which case the effect is the same as calling the Map constructor function without any argument, and an empty Map object of 0 size is created.
Let’s pay more attention to the second requirement stated above.
It is obvious that a new Map object cannot be created from a string primitive, even though String objects are iterable objects themselves.
// Map from String — throws a `TypeError`
const throwTypeErrorMap = new Map("programming");
When we create a new Map object from another iterable object, an empty Map object is first created, and then the following steps are taken for each entry object produced by the iterator object, which is returned by the iterable:
Extract the first and second elements from the entry object as key and value, respectively
Check if an entry with key already exists in the Map object collection using SameValueZero comparison
If it exists, update the entry’s current value to value
If it does not exist, append a new entry to the end of the Map object collection with that key and value (if the key is 0, change it to +0 before appending a new entry to the collection)
const pairs = [[1, 3], [3, 3], [4, 2], [2, 2]];
// (1) Map from Array or Set
// Here a set is created from the pairs array and
// used to create the map.
However, the map can also
// be created directly from the pairs array.
const mapA = new Map(new Set(pairs));
console.log(mapA.size); // 4
console.log(…mapA); // [1, 3] [3, 3] [4, 2] [2, 2]
// (2) Map from Map
// New map contains all the items of the original map
// However, both maps are entirely different objects.
// Think of it as creating a clone of a map.
const mapB = new Map(mapA);
console.log(…mapA); // [1, 3] [3, 3] [4, 2] [2, 2]
console.log(…mapB); // [1, 3] [3, 3] [4, 2] [2, 2]
console.log(mapA === mapB); // false
console.log(mapA.size === mapB.size); // true
// (3) Map from Object
// In ES6, the Object.entries() method was added,
// and it returns an array of entries representing
// key/value pairs for every key in an object.
const mapC = new Map(Object.entries({
language: “JavaScript”,
hello: “world”
}));
console.log(mapC.size); // 2
console.log(…mapC); // [“language”, “JavaScript”] [“hello”, “world”]
Now that we are able to create new Map objects, let’s go ahead to explore their instance properties and methods.
Map object instance properties and methods
Checking the size
We’ve already seen the size property in action a couple of times.
Just as the name implies, sizereturns the number of entries in the Map object at any instant.
It might interest you to know that the size property is an accessor property and not a data property.
Also, it only has a get accessor function, and not a set accessor function.
That’s the reason why its value cannot be overridden by an assignment operation.
Whenever you access the size property of a Map object, its get accessor function will be invoked, which basically counts and returns the number of elements (entries) currently in the Map object.
Looking up a key
There are several cases where it is sufficient to know only whether or not an entry with a particular key is present in a Map object.
Every Map object will originally have a has() method — which can be called to assert whether or not an entry with a specified key is present in the Map object.
The has() method returns a boolean value — true if the specified key is present, and false otherwise.
const M = new Map(Object.entries({
language: "JavaScript",
hello: "world"
}));
console.log(M.has("hello")); // true
console.log(M.has("Hello")); // false
console.log(M.has("language")); // true
console.log(M.has("world")); // false
Beyond checking whether a key exists in a Map object, being able to read the value of the entry associated with that key is also very important.
As such, every Map object initially has a get() method for this purpose.
When the get() method is called with a key for which no entry exists, it returns undefined.
const M = new Map(Object.entries({
language: "JavaScript",
hello: "world"
}));
console.log(M.get("hello")); // "world"
console.log(M.get("Hello")); // undefined
console.log(M.get("language")); // "JavaScript"
console.log(M.get("world")); // undefined
Although the get() method returns undefined for nonexistent keys, it should not be relied upon when checking for the existence of a key in a Map collection because it’s also possible for a key in the collection to have a value of undefined.
The most accurate way to determine the existence of a key in the collection is to use the has() method.
Adding, updating, and removing entries
The ability to add, update, or remove one or more entries from a Map object is essential, and every Map object will have set(), delete(), and clear() methods.
The set() method takes a JavaScript value as its argument and will append that value to the end of the Set object, provided it isn’t already in the Set object.
If the specified value is already in the Set object, it is ignored.
The add() method returns the same Set object with the added value, making it amenable to method chaining, or the process of invoking multiple add() calls at once.
The delete() method, on the other hand, will remove the entry associated with the specified key from the Map object — provided there is such an entry in the Map object.
If an entry is actually removed from the Map object as a result of this delete operation, it returns true; otherwise it returns false.
It might be useful in some cases to completely remove all of the entries in a given Map object.
While this can be achieved by making multiple delete() calls to the Map object, obviously it will make more sense if this is done in a single method call.
This is exactly what the clear() method does.
Calling the clear() method empties the Map object and returns undefined.
// Convert object to map
const M = new Map(Object.entries({
language: "JavaScript"
}));
console.log(M.size); // 1
console.log(...M); // ["language", "JavaScript"]
// (1) Add and update some map entries
M.set("year", 1991);
M.set("language", "Python");
console.log(M.size); // 2
console.log(...M); // \["language", "Python"\] ["year", 1991]
// (2) Add or update several values at once (using chaining)
M.set("version", 3)
.set("year", 2000)
.set("version", "2.0");
console.log(M.size); // 3
console.log(...M); // \["language", "Python"\] ["year", 2000] ["version", "2.0"]
// Delete some entries from the map
console.log(M.delete("Year")); // false
console.log(M.delete("year")); // true
console.log(M.delete("year")); // false
console.log(M.delete("version")); // true
console.log(M.size); // 1
console.log(...M); // ["language", "JavaScript"]
// Empty the map
M.clear();
console.log(M.size); // 0
Iterating the collection
One other thing we might want to do with a Map object is view the keys, values, or entries that are in it.
You can loop through each entry in a Map object (in insertion order) using the for...of loop.
This is because every iterable has a Symbol.iterator() method that returns its default iterator — which is responsible for producing the sequence of values for the loop.
Besides the for...of loop we looked at earlier, the same sequence of values returned by the default iterator is what the spread operator (...), the yield* statement, and destructuring assignment are based on.
We’ve already seen the entries() method, which returns an iterator for all the entries in a Map object with respect to their insertion order.
As stated earlier, the iterator returned by the entries() method also serves as the default iterator of a Map object.
That said, the two for...of loops shown in the following code snippet are the same and will produce the exact same sequence of values:
const M = new Map([[1, 3], [3, 3], [4, 2], [2, 2]]);
// (a) Iteration using the default iterator ([Symbol.iterator])
for (const [key, value] of M) {
console.log(key, value);
}
// (b) Iteration using the `entries()` iterator
for (const [key, value] of M.entries()) {
console.log(key, value);
}
It is important to note that an iterable object can provide other iterators besides the default iterator provided by its [Symbol.iterator] method.
This holds true for most inbuilt iterables in JavaScript, including Map objects.
In fact, every Map object originally has three methods that return iterators, namely:
entries()keys()values()
The keys() method, as the name implies, returns an iterator that yields the keys associated with each entry of the Map object (in insertion order).
The values() method returns an iterator that yields the values associated with each entry of the Map object.
The following code snippet demonstrates a couple of ways we can leverage the iterable behavior of a Map object to access the values or keys of each element in it.
const M = new Map([[1, 3], [3, 3], [4, 2], [2, 2]]);
// Using the spread operator (...) to pass values
// in the Map object as function arguments.
console.log(...M.values()); // 3 3 2 2
// Using the spread operator in building an array
// with the unique keys of the Map object.
const arr = [...M.keys()];
console.log(arr); // [1, 3, 4, 2]
console.log(arr[0]); // 1
console.log(arr[3]); // 2
console.log(arr.length); // 4
// Using destructuring assignment with a `Map` object
// to extract the first, second and remaining keys.
const [first, second, ...remainingKeys] = M.keys();
console.log(first); // 1
console.log(second); // 3
console.log(remainingKeys); // [4, 2]
console.log(remainingKeys.length); // 2
// Iteration using a for...of loop
// to read all the keys in the collection.
for (const key of M.keys()) {
console.log(key);
}
// 1
// 3
// 4
// 2
Iterating Map objects with the forEach() method
We’ve been able to explore quite a number of ways in which we can iterate over a Map object.
However, there remains one more very useful iteration method — the forEach() method.
Just as with arrays, the forEach() method of a Map object accepts a callback function as its first argument, which is triggered for each entry of the Map object.
The forEach() method also accepts an optional second argument, which represents the this value that will be used when executing the callback function.
The forEach() callback function is called with three arguments for every entry of the Map object:
The first argument is the value associated with the current entry in the iteration
The second argument is the key associated with the current entry in the iteration
The third argument is the Map object itself
const M = new Map([[1, 4], [3, 5], [4, 0], [2, 2]]);
M.forEach(function _callback(value, key, map) {
console.log([...map]);
const replacement = this[value];
if (replacement) map.set(key, replacement);
else if (Number.isInteger(value)) map.delete(key);
}, "hello");
console.log([...M]);
// [[1, 4], [3, 5], [4, 0], [2, 2]]
// [[1, "o"], [3, 5], [4, 0], [2, 2]]
// [[1, "o"], [4, 0], [2, 2]]
// [[1, "o"], [4, "h"], [2, 2]]
// [[1, "o"], [4, "h"], [2, "l"]]
To be clear, the forEach() method call in the previous code snippet results in the following _callback() calls:
_callback.call("hello", 1, 4, M);
_callback.call("hello", 3, 5, M);
_callback.call("hello", 4, 0, M);
_callback.call("hello", 2, 2, M);
What is a JavaScript Set object?
A Set object is an ordered collection of unique JavaScript values.
For every Set object, there exists the following invariants:
It is an ordered collection: The insertion order of its elements matters, and is followed when iterating the collection
Values in the collection are distinct or unique: Every value may occur only once in the collection with respect to the ECMAScript SameValueZero comparison algorithm
Any valid JavaScript value can be contained in the collection — both primitive values and object references, including unseemly values like NaN and undefined.
Maps vs.
Sets
Since we’ve already explored Map objects in the previous section, let’s look at how they compare with Set objects before we continue.
Set objects
Map objects
one-dimensional collections: they store only unique values
two-dimensional collections: they store records as key/value pairs, and each key is unique in the collection
Both key and value point to the same value or reference for every entry
Both key and value point to the same value or reference for every entry
The default iterator ([Symbol.iterator]) of a Set object is the one returned from its values() method
The default iterator is obtained from the entries() method
set() and get() methods are not defined in the Set.prototype object; the Set.prototype object defines an add () method
The set() and get() methods are defined in the Set.prototype object
As we progress in our exploration of JavaScript Set objects, we will find out more ways in which Set objects differ from Map objects and some ways in which they are similar.
Creating a Set object
Just as with Map objects, the only way to create a Set object is by invoking the global Set constructor function.
The constructor function must be invoked with the new keyword — otherwise, a TypeError will be thrown.
When the Set constructor function is invoked without arguments, an empty Set object of 0 size is returned.
// Throws a `TypeError` — when invoked without `new` keyword
const throwTypeErrorSet = Set();
// Creates an empty `Set` object of 0 `size`
const setA = new Set();
// Omitting the parentheses — when invoked without arguments
// Also creates an empty `Set` object of 0 `size`
const setB = new Set;
console.log(setA.size); // 0
console.log(setB.size); // 0
The Set constructor function can also be invoked with an optional iterable argument.
When specified, iterable must be a JavaScript object that properly implements the iterable protocol.
Many inbuilt JavaScript objects implement this protocol — such as Array, String, and Map, as well as Set — which means that these are all valid objects and can be passed to the Set constructor function as the iterable argument.
If the iterable is the value null or undefined, then the effect is the same as calling the Set constructor function without any argument — an empty Set object of 0 size will be created.
Otherwise, a TypeError will be thrown for any other iterable value that does not properly implement the iterable protocol.
Unlike with Map objects, creating a new Set object from another iterable object has the effect of de-duping, i.e., eliminating redundant duplicate values from the values yielded by the internal iterator of the iterable object.
This is because of one important attribute of a Set object, which is that it must contain only distinct, discrete values.
// (1) Set from String
// Set contains all the unique characters of the string
const testString = "programming";
const uniqueChars = new Set(testString);
console.log(testString.length); // 11
console.log(uniqueChars.size); // 8
console.log(...uniqueChars); // p r o g a m i n
// (2) Set from Array
// Set contains all the distinct elements of the array
const integers = [1,1,1,3,3,4,3,2,4,2];
const distinctIntegers = new Set(integers);
console.log(integers.length); // 10
console.log(distinctIntegers.size); // 4
console.log(...distinctIntegers); // 1 3 4 2
// (3) Set from Set
// New set contains all the items of the original set
// However, both sets are entirely different objects.
// Think of it as creating a clone of a set.
const setA = new Set([1,1,1,3,3,4,3,2,4,2]);
const setB = new Set(setA);
console.log(...setA); // 1 3 4 2
console.log(...setB); // 1 3 4 2
console.log(setA === setB); // false
console.log(setA.size === setB.size); // true
Let’s take another shot at our sample problem from earlier and employ what we’ve learned so far about Set objects.
This time, we will be creating a new Set object from the nums array, containing only distinct integers (no duplicates).
We can then determine whether the nums array contains duplicates by comparing the size of the Set object with the length of the nums array.
Here is what the new solution looks like:
function hasDuplicates(nums) {
// Create a new set from `nums` containing only its distinct
// integers (i.e de-duplicate the `nums` array).
const distinct = new Set(nums);
// If the size of the distinct set matches the length of the
// nums array, then there are no duplicates, and vice-versa.
return distinct.size != nums.length;
}
In using a Set object, we have been able to implement a solution whose running time is guaranteed to grow linearly with the size of the input array, even though it will require some additional memory to perform.
When it comes to storing unique items in memory, a set of items with duplicates will use less space than one without duplicates.
In other words, the worst case scenario in terms of memory usage happens when the set contains only unique items and no duplicates — in that case, the amount of space used matches the number of items.
Set object instance properties and methods
Checking the size
Just as with Map objects, the size property returns the number of values in a Set object at any instant.
Again, the size property of the Set.prototype object is an accessor property, not a data property.
Set also only has a get accessor function and not a set accessor function — hence, it cannot be overridden by an assignment operation.
Whenever you access the size property of a Set object, its get accessor function will be invoked, and it will count and return the number of elements (values) that are currently in the Set object.
Checking whether a value is present
Every Set object will originally have a has() method that can be called to assert whether or not an element with a specified value is present in the Set object.
Like with Map objects, the has() method returns a boolean value — true if the specified value is present, and false otherwise.
const uniqueChars = new Set("programming");
console.log(...uniqueChars); // p r o g a m i n
console.log(uniqueChars.has("p")); // true
console.log(uniqueChars.has("A")); // false
console.log(uniqueChars.has("a")); // true
console.log(uniqueChars.has("t")); // false
Since Set objects are one-dimensional (storing only unique values), it is impractical for them to have a get() method, unlike with Map objects.
As a result, the Set.prototype object does not define a get() method.
Adding and removing values
It is very important to be able to add or remove one or more values from a Set object, and every Set object will initially have add(), delete(), and clear() methods.
The add() method takes a JavaScript value as its argument, and will append that value to the end of the Set object, provided that it isn’t already in the Set object.
If the specified value is already in the Set object, it is ignored.
The add() method returns the same Set object, with the added value, which makes it amenable to method chaining, or the familiar process of invoking multiple add() calls at once.
Just like with Map objects, the delete() method of a Set object will remove the element associated with the specified value from the Set object, provided that such an element is present in the Set object.
If an element is actually removed from the Set object as a result of this delete operation, it returns true; otherwise it returns false.
Also, a call to the clear() method empties the Set object and returns undefined.
// Create new set of integers
const integers = new Set([1,1,1,3,3,4,3,2,4,2]);
console.log(integers.size); // 4
console.log(...integers); // 1 3 4 2
// Add some values to the set
integers.add(5);
integers.add(1);
console.log(integers.size); // 5
console.log(...integers); // 1 3 4 2 5
// Add several values at once (using chaining)
integers.add(7).add(2).add(9);
console.log(integers.size); // 7
console.log(...integers); // 1 3 4 2 5 7 9
// Delete some values from the set
console.log(integers.delete(3)); // true
console.log(integers.delete(8)); // false
console.log(integers.delete(3)); // false
console.log(integers.delete(1)); // true
console.log(integers.size); // 5
console.log(...integers); // 4 2 5 7 9
// Empty the set
integers.clear();
console.log(integers.size); // 0
Now that we’ve learned a few more things we can do with Set objects, let’s return to our previous solution to our original sample problem and see if we can optimize it even further.
(As you might have rightly guessed, we can.)
A careful examination of our previous solution will show that it’s doing a little too much.
It always considers every integer in the input array, adding them to the Set object (just like using the add() method multiple times) and then checking its size, which counts and returns the number of elements in the Set object by going through each element.
The problem with this solution is that it isn’t conservative.
It is very possible that a duplicate integer might be found by considering the first few integers in the array, and so the act of considering the remaining integers in the array becomes redundant.
To optimize this solution, we can decide to be lazy about adding integers to the Set object, and only continue as long as we haven’t encountered an integer that has already been added to the Set object.
Here is what the optimized solution looks like:
function hasDuplicates(nums) {
// 1.
Create an empty set to hold distinct integers
const distinct = new Set();
// 2.
Loop through the integers until a duplicate is found
for (const int of nums) {
// 2a.
If a duplicate is found, return immediately
if (distinct.has(int)) return true;
// 2b.
Otherwise, add the integer to the distinct set
distinct.add(int);
}
// 3.
If it ever gets here, no duplicate was found
return false;
}
Iterating keyed collections
It is often necessary to have a view into the values that are contained in a Set object.
This is very attainable with arrays or indexed collections — hence, we can easily access the element of an array (arr), at some index (i), using the property access bracket notation (arr[i]).
Unfortunately, this kind of element access is not directly possible with Set() objects because Set objects are keyed collections.
However, just like with arrays and other iterables, you can loop through the values for each element in a Set object (in insertion order) using the for...of loop, or you could use the sequence of values it produces with the spread operator (...), the yield* statement, or destructuring assignment.
The following code snippet demonstrates a couple of ways we can leverage the iterable behavior of a Set object to access the values of each element in it.
const integers = new Set([1,1,1,3,3,4,3,2,4,2]);
// Using the spread operator (...) to pass values
// in the Set object as function arguments.
console.log(...integers); // 1 3 4 2
// Using the spread operator in building an array
// with the unique values from the Set object.
const arr = [...integers];
console.log(arr); // [1, 3, 4, 2]
console.log(arr[0]); // 1
console.log(arr[3]); // 2
console.log(arr.length); // 4
// Using destructuring assignment with a `Set` object
const [first, second, ...remainingIntegers] = integers;
console.log(first); // 1
console.log(second); // 3
console.log(remainingIntegers); // [4, 2]
console.log(remainingIntegers.length); // 2
// Iteration using a `for...of` loop
for (const integer of integers) {
console.log(integer);
}
// 1
// 3
// 4
// 2
Just like with Map objects, every Set object originally has three methods that return iterators — values(), keys(), and entries().
The values() method, as the name implies, returns a new iterator that yields the values for each element in the Set object (in insertion order).
The iterator returned by the values() method yields the exact same sequence of values as the default iterator returned by the [Symbol.iterator] method.
For iteration purposes, the keys() method of a Set object behaves exactly like the values() method, and they can be used interchangeably.
In fact, the values, keys, and [Symbol.iterator] properties of a Set object all point to the same value (function) initially.
Hence, the following for...of loops will log the exact same sequence of values.
const integers = new Set([1,1,1,3,3,4,3,2,4,2]);
// (a) Iteration using the default iterator (`[Symbol.iterator]`)
for (const integer of integers) {
console.log(integer);
}
// (b) Iteration using the `values()` iterator
for (const integer of integers.values()) {
console.log(integer);
}
// (c) Iteration using the `keys()` iterator
for (const integer of integers.keys()) {
console.log(integer);
}
Some basic set operations can be implemented by iterating over one or more Set objects.
For example, the following code snippet shows how to implement the union and intersection set operations.
function union(setA, setB) {
const setUnion = new Set(setA);
for (const value of setB) {
setUnion.add(value);
}
return setUnion;
}
function intersection(setA, setB) {
const setIntersection = new Set();
for (const value of setB) {
if (setA.has(value)) {
setIntersection.add(value);
}
}
return setIntersection;
}
Just as with Map objects, Set objects also have a forEach() method with a similar call signature.
However, to account for the one-dimensional nature of Set objects, the forEach() callback function is called with three arguments:
The first argument is the value for the current element in the iteration
The second argument is always the same as the first argument
The third argument is the Set object itself
const S = new Set([1,1,1,3,3,4,3,2,4,2]);
S.forEach(function _callback(value, _, set) {
console.log([...set]);
const replacement = this[value];
if (replacement) set.add(${value}${replacement});
if (Number.isInteger(value)) set.delete(value);
}, "hello");
// [1, 3, 4, 2]
// [3, 4, 2, '1e']
// [4, 2, '1e', '3l']
// [2, '1e', '3l', '4o']
// ['1e', '3l', '4o', '2l']
// ['1e', '3l', '4o', '2l']
// ['1e', '3l', '4o', '2l']
// ['1e', '3l', '4o', '2l']
console.log(...S); // 1e 3l 4o 2l
To be clear, the forEach() method call in the previous code snippet results in the following _callback() calls:
_callback.call("hello", 1, 1, S);
_callback.call("hello", 3, 3, S);
_callback.call("hello", 4, 4, S);
_callback.call("hello", 2, 2, S);
_callback.call("hello", '1e', '1e', S);
_callback.call("hello", '3l', '3l', S);
_callback.call("hello", '4o', '4o', S);
_callback.call("hello", '2l', '2l', S);
Accidental undefined — what does it mean?
When the Set constructor function is called without any argument, you already know that it creates an empty Set object.
The same, however, does not hold true for the add() method.
When the add() method of a Set object is called without any argument, it actually adds an element to the collection with a value of undefined, if it does not already exist.
In other words, for a given Set object S, S.add() is exactly the same as S.add(undefined).
This is what I’d like to refer to as an accidental undefined — because it might not be intended.
You might have already inferred the behavior of the has() and delete() methods when they’re called without any argument.
As with the add() method, calling these methods without any argument is exactly the same as calling them with undefined as the first argument.
Hence, for a given Set object S, S.has() checks whether undefined exists as a value in the Set object, while S.delete() removes the value undefined from the collection, if it exists.
// Creates an empty set object
const S = new Set();
// Add some items to the set object
S.add(5);
S.add("hello"); console.log(...S); // 5 'hello'
// Adds undefined to the set object
S.add(); console.log(...S); // 5 'hello' undefined
console.log(S.has(5)); // true
console.log(S.has("world")); // false
// Logs `true` because `undefined` exists in the set
console.log(S.has()); // true
// Logs `true` because `undefined` was removed from the set
console.log(S.delete()); // true
// Logs `false` because `undefined` does not exist in the set
console.log(S.has()); // false
That said, always be sure to explicitly call the add(), delete(), and has() methods of a Set object with at least one argument to avoid dealing with an accidental undefined value.
Removing duplicates from Set objects
Before we finish this section on JavaScript Set objects, let’s see how we can solve a modified version of the sample problem from before, using all we’ve learned so far.
Contains Duplicates (2) Given an array of integers nums, return the number of elements that appear at least twice in the array, and return 0 if every element is distinct.
Pause for a moment and try solving this problem on your own, before you proceed.
The solution could be a little tricky — how can you ensure a duplicate integer is not counted more than once?
Now, here is a working solution to the problem:
function countDuplicates(nums) {
// Create an empty set for distinct integers
// (i.e integers appearing only once)
const distinct = new Set();
// Create an empty set for duplicate integers
const duplicates = new Set();
// Create a variable to keep track of the duplicates count
let count = 0;
// Loop through the integers while counting duplicates
for (const int of nums) {
// If duplicate integer is found (it has already been counted),
// continue with the iteration to the next integer.
if (duplicates.has(int)) continue;
if (distinct.delete(int)) {
// If integer was successfully deleted from the `distinct` set,
// that means it has been seen once before.
Hence add it, to
// the `duplicates` set and increment `count`.
duplicates.add(int);
count++;
} else {
// Integer is being seen for the first time and should be added
// to the `distinct` set.
distinct.add(int);
}
}
// Finally, return the duplicates count
return count;
}
Map or set?
So far, we have been able to explore JavaScript Map and Set objects in detail.
But in addition to that, we also need to be able to determine when it is sufficient to use one instead of the other in solving problems.
Earlier on, we saw that Set objects are one-dimensional collections, whereas Map objects are two-dimensional.
That could serve as a cue in determining which one is best suited for a particular problem.
In other words, a Map object should be used over a Set object in cases where additional information is needed aside from just the key.
Most times, that additional information is required to make decisions or to compute the final output of the program.
To further demonstrate this, let’s consider another popular problem.
Two Sum Given an array of integers and a specific target, return true if two numbers exist in the array that add up to the target, and false otherwise.
If the array were to be sorted, then it would be possible to come up with a linear time solution to this problem without any need for auxiliary space.
But since there is a possibility that the array is not already sorted, we need to use a Set object to provide some auxiliary space where we can solve the problem in linear time without taking on the expensive task of sorting the array first.
function twoSum(nums, target) {
// 1.
Create an empty set for complements
// (i.e complement = target - num)
const complements = new Set();
// 2.
Loop through integers until a complement is found
for (const num of nums) {
// 2a.
If a complement is found, return immediately
if (complements.has(target - num)) return true;
// 2b.
Otherwise, add the integer to the complements set
complements.add(num);
}
// 3.
If it ever gets here, no complement was found
return false;
}
Here, we are required to return true if there are two numbers that sum up to the specified target, and false otherwise.
As such, we are only interested in the numbers themselves, which is why we only need to use one Set object to solve the problem.
Now, let’s instead say we modify the problem to return the array indices of the two numbers.
We would be better off using a Map object.
That’s because, in addition to the numbers themselves, we are now also interested in their corresponding indices in the array — both of which cannot be contained in a singular Set object.
function twoSum(nums, target) {
// 1.
Create an empty map for integers against indices
// (i.e Map<integer, index>)
const indices = new Map();
// 2.
Loop through integers until a complement is found
for (let i = 0, len = nums.length; i < len; i++) {
// 2a.
Compute the complement of the current integer
const complement = target - nums[i];
// 2b.
If the complement already exists in the map,
// get the complement index from the indices map and
// return early ([complement index, current index])
if (indices.has(complement)) {
return [indices.get(complement), i];
}
// 2c.
Otherwise, add the current integer and index
// to the indices map
indices.set(nums[i], i);
}
// 3.
If it ever gets here, no complement was found
return null;
}
Other Map and Set uses
Map and Set objects can be very useful when modeling compound data structures to solve certain kinds of problems.
In general, whenever you need to be able to look up or check for the existence of an item with an average access time that is sublinear on the number of available items (approximately constant time), you should consider using a Set or Map object.
Data caching with Map objects
When modeling data structures for the purpose of caching data, a Map object can be used as a lookup table to check for the existence of a key in the cache before performing get() or put() operations.
Usually, cache implementations include some kind of strategy for removing items from the cache in order to free up space — the most popular cache eviction strategies being: least frequently used (LFU) and least recently used (LRU).
Consider the get() operation of an LRU cache, for example: the expectation is to be able to fetch a record from the cache using its cache key in approximately constant time, and in the process, the record gets ranked as the most recently used record because it is the most recently accessed.
In order to meet the above stated expectation, a fast lookup of the cache key is required — and that is where a Map object or any other form of hash table shines.
To maintain a proper ranking of recently accessed records, a priority queue can be used.
However, most implementations use a doubly-linked list instead, since it is capable of both removing the record from its current position in the list and re-inserting it to the head position of the list, all in constant time.
A minimalist implementation blueprint of a typical LRU cache could look somewhat like this (the full implementation details have been omitted for brevity):
interface ICache<K, V> {
get: (key: K) => V;
put: (key: K, data: V) => void;
}
class LRUCache<K, V> implements ICache<K, V> {
/**
* A DLL is used to maintain the order of the items
* in the cache according to how recently they were
* used (accessed or added).
*
* Using a DLL makes it possible to remove an item
* from any position in the list (in constant time).
*/
protected list = new DoublyLinkedList<V>();
/**
* A Map object is used as a lookup table to check
* for the existence of a key in the cache with an
* average access time that is sublinear on the
* number of cache items (approximately constant
* time).
*/
protected table = new Map<K, V>();
/**
* @param size {number} The number of items that
* can be stored in the cache.
*/
constructor(protected size: number) {}
get(key: K): V {}
put(key: K, data: V): void {}
}
Graphical representation with map and set
Most connectivity problems are better solved when the problem data is represented as a graph, using either of two forms of graph representation:
Adjacency Matrix
Adjacency List
For most problems, an adjacency list representation should suffice — and for that, Map and Set objects can be used.
Most adjacency list implementations use arrays and/or linked lists, but it is also possible to use Map and Set objects.
The Map object stores each vertex in the graph as its keys, with their corresponding list of neighboring vertices in Set objects as its values.
A typical implementation of an undirected graph represented as an Adjacency List (using Map and Set objects) should look somewhat like this:
interface IGraph<V> {
addVertex: (vertex: V) => void;
addEdge: (fromVertex: V, toVertex: V) => void;
removeVertex: (vertex: V) => void;
removeEdge: (fromVertex: V, toVertex: V) => void;
}
class UndirectedGraph<V> implements IGraph<V> {
/**
* A Map object is used to map each vertex in the
* graph to a set of vertices that are connected
* to it.
*/
protected list = new Map<V, Set<V>>();
addVertex(vertex: V): void {
if (!this.list.has(vertex)) {
// An array can be used to represent the set
// of vertices — but in this implementation,
// a Set object is used instead.
this.list.set(vertex, new Set<V>());
}
}
addEdge(fromVertex: V, toVertex: V): void {
this.addVertex(fromVertex);
this.addVertex(toVertex);
(this.list.get(fromVertex) as Set<V>).add(toVertex);
(this.list.get(toVertex) as Set<V>).add(fromVertex);
}
removeVertex(vertex: V): void {
if (this.list.has(vertex)) {
for (const toVertex of this.list.get(vertex) as Set<V>) {
this.removeEdge(vertex, toVertex);
}
this.list.delete(vertex);
}
}
removeEdge(fromVertex: V, toVertex: V): void {
if (this.list.has(fromVertex) && this.list.has(toVertex)) {
(this.list.get(fromVertex) as Set<V>).delete(toVertex);
(this.list.get(toVertex) as Set<V>).delete(fromVertex);
}
}
}
Disjoint-sets and dynamic connectivity
A niche of connectivity problems can be solved using special data structures called disjoint-sets.
A disjoint-set is used to maintain a set of elements (nodes) that are partitioned into a number of non-overlapping (disjointed) subsets, also known as connected components.
Disjoint-sets are structured in such a way as to efficiently perform two operations, namely:
find: checks for the subset an element or node belongs to
union: merges two subsets into a single subset; can also be used for detecting cycles in undirected graphs
The following Disjoint-Set implementation uses a Map object to maintain its non-overlapping subsets (the implementation is detailed):
interface IDisjointSet<T> {
find: (node: T) => T;
union: (nodeA: T, nodeB: T) => void;
}
class DisjointSet<T> implements IDisjointSet<T> {
/**
* A Map object is used to link each node to the
* root of its corresponding connected component
* subset (using a disjoint-set data structure).
*/
protected subsets = new Map<T, T | number>();
addNode(node: T): void {
if (!this.subsets.has(node)) {
this.subsets.set(node, -1);
}
}
find(node: T): T {
let root = node;
while (true) {
const parent = this.subsets.get(root) as T;
if (!this.subsets.has(parent)) {
if (node !== root) {
this.subsets.set(node, root);
}
return root;
}
root = parent;
}
}
union(nodeA: T, nodeB: T): void {
const rootA = this.find(nodeA);
const rootB = this.find(nodeB);
const sizeA = this.subsets.get(rootA) as number;
const sizeB = this.subsets.get(rootB) as number;
const sizeAB = sizeA + sizeB;
if (sizeA < sizeB) {
this.subsets.set(rootB, rootA);
this.subsets.set(rootA, sizeAB);
} else {
this.subsets.set(rootA, rootB);
this.subsets.set(rootB, sizeAB);
}
}
isConnected(nodeA: T, nodeB: T): boolean {
return this.find(nodeA) === this.find(nodeB);
}
}
Conclusion
Maps and sets in JavaScript can come in very handy for quite a number of applications and when trying to solve a number of problems efficiently — especially when efficient lookups are required.
In fact, they are specialized hash table implementations for JavaScript, akin to the HashMap and HashSet types in Java — albeit, with some subtle differences.
For safe garbage collection guarantees, consider using the even more restrictive WeakMap and WeakSet keyed collections.
LogRocket: Debug JavaScript errors more easily by understanding the context
Debugging code is always a tedious task.
But the more you understand your errors the easier it is to fix them.
LogRocket allows you to understand these errors in new and unique ways.
Our frontend monitoring solution tracks user engagement with your JavaScript frontends to give you the ability to find out exactly what the user did that led to an error.
LogRocket records console logs, page load times, stacktraces, slow network requests/responses with headers + bodies, browser metadata, and custom logs.
Understanding the impact of your JavaScript code will never be easier!
Introduction to Map Data Structure
https://flaviocopes.com/javascript-data-structures-map/
A Map is a collection of key — value pairs, similar to an object.
It stores the key — value pairs in the insertion order.
We can create a Map by passing an iterable object whose elements are in the form of key — value (Eg.
[ [1,”one”], [2,”two”] ] ),
or you can create an empty Map, then insert entries.
Why we need Map if we have Object s
1.
A Map is similar to Object, but any value can be used as key in maps, but keys in objects are only Strings and Symbols
2.
The key — value pairs in Map maintains the insertion order, whereas Object don’t.
3.
You can get the size of the Map, but we don’t have a built-in method to get size in Object (but we can do it manually).
4.
Maps are iterable, whereas an Object is not iterable by-default.
5.
Maps have additional methods not available to normal objects
Methods in Maps
Map cheatsheet
Example:
Different Ways to create maps
2.
Map methods
Let’s create simple Map:
// creating a map
var fruits = new Map();
fruits.set('🍎', "Apple");
fruits.set('🍋', "Mango");
fruits; //{"🍎" => "Apple", "🍋" => "Mango"}
Map has a property size which returns the current Map size (total number of entries).
// size
fruits.size; // 2
set(, value) → Set the value for the key in the Map and returns the Map.
If the key is already present in the map, then the value is overwritten.
// set(key , value) method
fruits.set( '🍇', "Grapes");
fruits; // {"🍎" => "Apple", "🍋" => "Mango", "🍇" => "Grapes"}
get() → Returns the value associated to the key, or returns undefined if there is no key on the Map that matches the passed key.
// get(key)
fruits.get('🍇'); // GRAPES.
fruits.get('🍊'); //undefined.
delete() → Delete the entry matching the key and returns true.
If the key is not found in the map, then it returns false.
// delete(key)
fruits.delete('🍊') //false
fruits.delete('🍇'); // true
has() → Returns true if the map has the key provided, else return false.
//HAS(key)
fruits.has('🍇'); // true
fruits.has('🍊'); //false
keys() → Returns a new iterator that contains the keys in insertion order.
//keys
fruits.keys() // MapIterator {"🍎", "🍋"}
values() → Returns a new iterator that contains the values in insertion order.
// values
fruits.values() // MapIterator {"Apple", "Mango"}
entries() → Returns an iterator which has an array of [-value] pair in insertion order.
//entries --> returns key value pair
fruits.entries() // MapIterator {"🍎" => "Apple", "🍋" => "Mango"}
clear() → Delete all key-value pairs from the Map.
// clear
fruits.clear(); // deletes all elementfruits; // Map(0) {}
Things you should know about Map
You can use any value (object or function or primitive ) as a key in the Map .
Map uses the SameValueZero algorithm.
It is similar to strict equality (===) but the difference is that NaN is considered equal to NaN (i.e, NaN === NaN → true.
In normal JS, this is not true.
In this case NaN can be used as key and we don’t have any duplicate NaN).
var map = new Map()var obj = {};
var arr = [];
var nan = NaN;
var fun = function() {}map.set(obj, "object");
map.set(arr , "array");
map.set(fun, "function");
map.set(nan, "Wrong number");
map.keys(); // MapIterator {{…}, Array(0), ƒ, NaN}map.values(); // MapIterator {"object", "array", "function","Wrong number"}
Iterating through Map
Using for…of
// creating a map
var fruits = new Map();
fruits.set('🍎', "Apple");
fruits.set('🍋', "Mango");
fruits; //{"🍎" => "Apple", "🍋" => "Mango"}
Method 1:
for(var [key, val] of fruits) { console.log(key, value);}
🍎 Apple
🍋 Mango
Method 4 --> using entriesfor (var [key, val] of
fruits.entries()) { console.log(key , val); }
🍎 Apple
🍋 Mango
Method 2 --> using keys
for(var key of fruits.keys()) {
console.log(key, fruits.get(key)); }
🍎 Apple
🍋 Mango
Method 3 --> using valuesfor(var val of
fruits.values()) { console.log(val); }Apple Mango
Iterables
Iterable objects are objects that can be iterated over with for..of.
Technically, iterables must implement the Symbol.iterator method.
Iterating Over a String
You can use a for..of loop to iterate over the elements of a string:
for (const x of "W3Schools") {
// code block to be executed
}
Iterating Over an Array
You can use a for..of loop to iterate over the elements of an Array:
for (const x of [1,2,3,4,5] {
// code block to be executed
}
JavaScript Iterators
The iterator protocol defines how to produce a sequence of values from an object.
An object becomes an iterator when it implements a next() method.
The next() method must return an object with two properties:
value (the next value)
done (true or false)
value
The value returned by the iterator (Can be omitted if done is true)
done
true if the iterator has completed
false if the iterator has produced a new value
Home Made Iterable
This iterable returns never ending: 10,20,30,40,....
Everytime next() is called:
// Home Made Iterable
function myNumbers() {
let n = 0;
return {
next: function() {
n += 10;
return {value:n, done:false};
}
};
}
// Create Iterable
const n = myNumbers();
n.next(); // Returns 10
n.next(); // Returns 20
n.next(); // Returns 30
The problem with a home made iterable:
It does not support the JavaScript for..of statement.
A JavaScript iterable is an object that has a Symbol.iterator.
The Symbol.iterator is a function that returns a next() function.
An iterable can be iterated over with the code: for (const x of iterable) { }
// Create an Object
myNumbers = {};
// Make it Iterable
myNumbers[Symbol.iterator] = function() {
let n = 0;
done = false;
return {
next() {
n += 10;
if (n == 100) {done = true}
return {value:n, done:done};
}
};
}
Now you can use for..of
for (const num of myNumbers) {
// Any Code Here
}
The Symbol.iterator method is called automatically by for..of.
But we can also do it "manually":
let iterator = myNumbers[Symbol.iterator]();
while (true) {
const result = iterator.next();
if (result.done) break;
// Any Code Here
}
use this to return object content
Think
place it at end of file
$("k").click(function() { alert($(this).text()) });
var url_string = location.href;
var url_string = "https://williamkpchan.github.io/LibDocs/Random%20Charts.html?okvalue=12&shatvalue=120"
paramsArray = url_string.split('?') // use ? to seperate
paramsArray.shift()
let params = {};
for (let i = 0; i < paramsArray.length; ++i) {
let param = paramsArray[i].split('=', 2);
if (param.length !== 2) continue;
params[param[0]] = decodeURIComponent(param[1].replace(/\+/g, " "));
}
params
var url_string = location.href;
var url_string = "https://williamkpchan.github.io/LibDocs/Random%20Charts.html&okvalue=12"
paramsArray = url_string.split('?') // note this has changed to array
paramsArray.shift()
if(paramsArray.length!=0){
param = paramsArray[0].split('=')[1]; // paramsArray is still array
} else{
initStkCode()
}
var url_string = location.href;
paramsArray = url_string.split('?') // html?00981
paramsArray.shift()
if(paramsArray.length!=0){
thecode = paramsArray[0]; // paramsArray is still array
} else{
if (localStorage.getItem("randomcode") === null) {
localStorage.randomcode = "07500";
} else{
thecode = localStorage.getItem("randomcode");
}
}
Redirect Methods
You can redirect a web page via JavaScript using a number of methods.
We will quickly list them and conclude with the recommended one.
In JavaScript, window.location or simply location object is used to get information about the location of the current web page (document) and also to modify it.
The following is a list of possible ways that can be used as a JavaScript redirect:
// Sets the new location of the current window.
window.location = "https://www.example.com";
// Sets the new href (URL) for the current window.
window.location.href = "https://www.example.com";
// Assigns a new URL to the current window.
window.location.assign("https://www.example.com");
// Replaces the location of the current window with the new one.
window.location.replace("https://www.example.com");
// Sets the location of the current window itself.
self.location = "https://www.example.com";
// Sets the location of the topmost window of the current window.
top.location = "https://www.example.com";
Though the above lines of JS code accomplish a similar job in terms of redirection, they have slight differences in their usage.
For example, if you use top.location redirect within an iframe, it will force the main window to be redirected.
Another point to keep in mind is that location.replace() replaces the current document by moving it from the history, hence making it unavailable via the Back button of the browser.
It is better to know your alternatives but if you want a cross-browser compliant JavaScript redirect script, our recommendation will be to use the following in your projects:
window.location.href = "https://www.example.com";
Simply insert your target URL that you want to redirect to in the above code.
You can also check this page to read more about how window.location works.
Now, let’s continue with our examples.
JavaScript Redirect: Redirect the Page on Page Load
In order to redirect the user to another website immediately after your website is opened, you can use the following code at the top of your page, within the <head> element.
Or, if you are using a separate .js file, put the following code into that file and remember to link to it from the head of your page.
<script>
window.location.href = "https://www.example.com";
</script>
Simply replace the example URL with the one you want to redirect to.
Note that, with this type of redirection, the visitors will not see your web page at all and be redirected to the target URL instantly.
JavaScript Redirect: Redirect the Page After a Certain Period
In order to redirect the user to another website after a certain time passes, you can use the following code:
<script>
setTimeout(function() {
window.location.href = "https://www.example.com";
}, 3000);
</script>
The above function will redirect the page 3 seconds after it fully loads.
You can change 3000 (3 x 1000 in milliseconds) as you wish.
JavaScript Redirect: Redirect the Page After an Event or User Action
Sometimes, you may want to send the user to another page after a certain event or action takes place, such as a button click, an option selection, a layout change, a form submission, a file upload, an image drag, a countdown timer expiration or things like that.
In such cases, you can either use a condition check or assign an event to an element for performing the redirect.
You can use the following two examples to give you a basic idea:
<script>
// Check if the condition is true and then redirect.
if ( ...
) {
window.location.href = "https://www.example.com";
}
</script>
The above code will do the redirection if the condition is true.
<script>
// onclick event is assigned to the #button element.
document.getElementById("button").onclick = function() {
window.location.href = "https://www.example.com";
};
</script>
The above code will do the redirection when the user clicks the #button element.
This is how JavaScript redirect basically works.
We hope that the above examples will help you while handling your web page redirects.
fetch(urladdr)
.then(x => x.text())
.then(function(response) {
alert(response);
})
// Note Fetch is based on async and await, use async
theurl = 'https://web.ifzq.gtimg.cn/appstock/app/usfqkline/get?_var=kline_dayqfq¶m=' + '00700' + ',day,,,5,qfq';
getText(theurl);
async function getText(urladdr) {
let x = await fetch(urladdr);
let y = await x.text();
document.getElementById("test").innerHTML = y;
}
Before we get to the CORS matter, it is essential to comprehend an underlying concept of web resources access protection.
I’m talking about the Same Origin Policy, also known for the acronym SOP.
As to avoid unauthorized use of resources by external parties, the browsers count on an origin-based restriction policy.
Formally, the said external parties are identified by their origin (domain) and accessed through URLs.
A document held by a given origin A will only be accessible by other documents from the SAME origin A.
This rule is valid if the SOP is effectively in place (and depends on the browser implementation).
This policy aims to reduce the chances of a possible attack vector.
But let’s depict what an origin looks like.
One origin could be understood as the tuple:
<schema (or protocol)> — <hostname> — <port>
So two URLs represent the same origin only if they share the same tuple.
Examples of origin variations and categories for the URL `http://hacking.cors.com/mr_robots.txt`:
Domain types differentiation
Additionally, keep in mind that the SOP allows inter-origin HTTP requests with GET and POST methods.
But it forbids inter-origin PUT and DELETE.
Besides that, sending custom HTTP headers is permitted only in the context of inter-origin requests, being denied to foreigners.
SOP variations
There are some different types of Same Origin Policy.
In practice, they are applied under particular rules given the technology in place.
The primary SOP policy developed was towards the DOM (Document Object Model) access.
It is a mechanism that handles JavaScript and other scripting languages’ ability to access DOM properties and methods across domains.
The DOM access is based mainly on the `document.domain` DOM’s property state.
But the same is not valid for the JavaScript’s XMLHttpRequest API, which does not take `document.domain` property into account.
For now, don’t worry too much about these details.
We should be back to this subject soon.
So if we take SOP as a sandboxing concept, it becomes reasonable to have the same origin implementations for other web technologies as well.
It is the case of cookies, Java, old-R.I.P Flash, and their respective SOP policy feature.
HTTP CORS Fundamentals
The SOP technology was certainly a considerable jump towards more secure web applications.
But it applies the deny rule by default.
The true nature of the World Wide Web is that pages could communicate with other resources all across the network.
Web applications are meant to access external resources.
So how do we relax the same-origin rules while maintaining the security access of restricted resources? You got it: CORS.
In simple terms, Cross-Origin Resource Sharing allows the pages from a specific domain/origin to consume the resources from another domain/origin.
The consent of who can access a resource is the resource’s owner (server) responsibility.
The browser-server trust relationship takes form through a family of CORS HTTP Headers.
In the average case, they are added to the HTTP requests and responses by the resource’s web server (like Nginx, Apache, IIS, etc.), by the application, or the browser.
The CORS headers then instruct the soliciting browser whether or not to trust the origin and proceed with the response processing.
Let’s take a breath here.
Note that the browser fully trusts the response returned from the server.
Keep this in mind.
Simple Request
In contrast to Preflight requests, there are simple ones.
Simple requests are those who respect the following conditions:
Simple requests composition
When making asynchronous HTTP requests, we often use the already presented XMLHttpRequest or the new Fetch JavaScript APIs.
Preflight HTTP Request
Sometimes a preflight HTTP request is launched by the browser.
It intents to query the server about what CORS attributes are authorized and supported by it.
However, this does not change the trustiness relationship between server and browser.
The preflight HTTP request (which takes the form of an HTTP OPTIONS request) results in an equally trusted HTTP response.
The only difference resides in the headers, that indicate the browser how to proceed to get the intended cross-origin resource.
Pre-request flight flow for deletion of avatar.org
As we move to the hands-on sections of this article, this will get more palatable.
CORS basic headers
Achieving origin control by the CORS involves the following headers’ family:
CORS headers family and their respective HTTP type
The headers marked with YES at the “Used for Preflight HTTP ” column play crucial preflight functions.
It goes from denoting which specific headers (Access-Control-Allow-Headers) and HTTP methods (Access-Control-Allow-Methods) are allowed, the maximum amount of seconds the browser should cache the Preflight request (Access-Control-Max-Age), request source (Origin), to the allowance (Access-Control-Allow-Credentials) of cookies to be sent by browsers in the actual request.
In the overall context, the Access-Control-Allow-Origin (ACAO) stands as the most relevant header regarding cross-origin authorization.
Through this header, the server is able to tell the browser which domains it should trust.
This great power comes with significant responsibilities, though.
Allowing too much is not cool at all
It is clear to us that CORS is a useful way to extend SOP policies.
However, we should take into account the impact of a full nonrestrictive rule.
Let’s take the following statement:
Access-Control-Allow-Origin: *
The above header means that every origin could access the desired resource.
This would be equivalent to the earlier configuration of older browsers before SOP was in place.
But be aware of the other side of the story, as cautiously depicted by the application security literature.
“Obviously there might be cases where a wildcard value for the Access-Control-Allow-Origin isn’t insecure.
For instance, if a permissive policy is only used to provide content that doesn’t contain sensitive information.”
The Browser Hacker’s Handbook 2nd Ed.
— Chapter 4 Bypassing the Same Origin Policy
You should be careful with the wildcards, though.
Indeed, the recommended approach is make the access permission explicit for the authorized origins.
If the server does not provide the CORS headers whatsoever, the browsers will assume the Same Origin Policy (SOP) posture.
The Docker-based proposed scenario
First, lets clone the `hacking-cors` repository so we can get this party started!
$ git clone git@github.com:lvrosa/hacking-cors.git
Tree directory representation of the hacking-cors docker project
The above structure breaks down the docker containers and files that compose the server images.
The `node_modules` directory (omitted from the `tree` command output above) is pushed to the `hacking-cors` repository as well.
It has a short size.
However, if you have any problems regarding JavaScript dependencies, please run the `npm` tool at the project root directory.
$ cd hacking-cors; npm install
It is also crucial to have `docker` and ` installed on your system.
The docker-compose file uses version 3 format.
My current versions for both dependencies are:
Docker and Docker Compose versions
Project structure
We have two distinct docker projects.
They are represented by their respective configuration Dockerfile at the root directory.
Docker files respective to each web server
Interesting files are at the `static` and `img` directories.
They hold the resources that will eventually be solicited by other web pages.
JavaScript files are under the `static` directory.
You can open them in your favorite code editor and play around.
The `img` directory from the Trusted Site stores the `owasp_bug.png` resource.
In our experiment, this image resource will be requested by the Evil Site, which will then try to load it.
The same applies to the `static/hello_script.js` file, but to execute/evaluate the script content, and not load an image.
Docker images and network settings overview
docker-compose.yml content
Take a look at the `docker-compose.yml` file above.
We can identify important things about the environment like:
We’ll create two containers (namely `evil_site` and `trusted_site`)
The containers are attached to the `cors_hack_net` bridged network interface
The `cors_hack_net` interface determines the subnet by the CIDR 10.5.0.0/16
As a useful link to the containers’ network addresses, I’d recommend setting your static lookup table for hostnames file (`/etc/hosts`) to the following settings:
/etc/hosts file mapping
A glance at the Apache Server CORS rules
★ Identify the Trusted Site container’s name:
docker-compose ps output
★ Log into the container:
$ docker exec -it trusted_site /bin/bash
★ Dump the Apache `.htaccess` configuration file to the screen:
.htaccess Apache CORS extension rules
As highlighted in the picture above, the Apache Web Server will serve the ACAO (Access-Control-Allow-Origin) header when the file-matching rule applies.
In other words, if the web browser requests an image (.gif, .png, .ico, etc.) or even a JavaScript .js file, the resource’s content will only be authorized to be loaded/consumed by the page if the origin matches `http://trustedsite.com`.
Note that the `.htaccess` file is sourced at `htdocs` directory, thus impacting all the files under its substructure.
Running the containerized environment
To get these environment live, follow the steps:
★ Build the container from the root project directory
$ docker-compose build — no-cache; (note the double minus before the no-cache argument)
★ Up the containers through `docker-compose`
$ docker-compose up
docker-compose up output
If you run into any trouble with the docker environment, I suggest you clean it by killing and removing the current active docker images.
Just ensure you don’t have other containers that should have their state saved before being killed.
$ docker kill $(docker ps -a -q)
$ docker rm $(docker ps -a -q)
Well, I hope everything has been ok so far.
Let’s take a look at the two created web servers.
Open your browser and drive to the `http://trustedsite.com` and `http://evilsite.com`.
Trusted Site
Trusted Site Web Server menu
Evil Site
Evil Site Web Server Menu
Playing with CORS rules using XHR and Fetch requests
CORS rules for XHR requests
The XMLHttpRequest Standard[11] defines an API that provides scripted client functionality for transferring data between a client and a server.
Regarding its security aspects, we should be aware of some warning facts, as stated by the Browser Security Handbook, part2[12].
“The set of security-relevant features provided by XMLHttpRequest, and not seen in other browser mechanisms, is as follows:
The ability to specify an arbitrary HTTP request method (via the open() method),
The ability to set custom HTTP headers on a request (via setRequestHeader()),
The ability to read back full response headers (via getResponseHeader() and getAllResponseHeaders()),
The ability to read back the full response body as a JavaScript string (via responseText property).
Since all requests sent via XMLHttpRequest include a browser-maintained set of cookies for the target site and given that the mechanism provides a far greater ability to interact with server-side components than any other feature available to scripts, it is extremely important to build in proper security controls.”
It’s essential to observe the following browser protections against origin tampering upon handling XHR requests.
When trying to change/poison the `origin` header via setRequestHeader(), the original header is preserved.
When trying to change/poison the additional headers (passed as arguments to the xhr.send()), the original header is preserved.
CORS rules for Fetch requests
“Numerous APIs provide the ability to fetch a resource, e.g.
HTML’s img and scriptelement, CSS’ cursor and list-style-image, the navigator.sendBeacon() and self.importScripts() JavaScript APIs.
The Fetch Standard provides a unified architecture for these features so they are all consistent when it comes to various aspects of fetching, such as redirects and the CORS protocol.” — https://fetch.spec.whatwg.org/
Although The Fetch Standard supersedes the `origin` element semantics (originally defined in The Web Origin Concept — RFC6454), the same effect of the XHR tampering protections applies here.
When trying to change/poison the `origin` header via fetch() arguments, the original header is preserved.
Understanding the requests cycle in practice
Now that you already know the fundamentals of SOP, CORS, XHR and Fetch requests, we’re ready to play with the proposed scenario.
Both Trusted Site and Evil Site pages have similar menus.
Firstly, try the four requests options of the Trusted Site.
Note that the requested resources, the OWASP bug image or the script that displays “All your base belong to us ;D”, are successfully loaded and consumed by the page.
This is a classical case of local resources invoked by one page belonging to the same domain.
The hello_script.js’ content executed after one same domain page request
Now, let’s change the scope to the Evil Site.
Open the `http://evilsite.com` website
Bring up the Web Developer Tools window (press F12 in Firefox or Chrome)
Click the anchor link associated with the OWASP image + JavaScript XHR
Click the anchor link associated with the Alert script + JavaScript Fetch
Get your focus on the Console tab from Web Developer Tools.
We should be looking at something like the screen below.
The third and fourth steps generate the messages from the screen above.
They are transcripted below for accessibility purposes.
From here, it’s possible to understand why the browser has prohibited the requested resource.
Remember the Apache Server .htaccess configuration, which adds the ACAO (Access-Control-Allow-Origin) CORS header to specific HTTP responses (image files and .js scripts).
Now, we are going to investigate the requests in more detail.
Click the Network tab from the Web Developer Tools.
Then, select the OPTIONS request for the `hello_script.js` resource.
On the right side of the screen, you should see the following HTTP request and response.
OPTIONS HTTP request and response for hello_script.js resource
Take note of the `Origin` header from above.
It reads `http://evilsite.com`.
But if we dive into the `script_fetch.js` implementation of the Evil Site, something stands out about the `Origin` header.
`evil_site_public_html/static/script_fetch.js` content
Although we try to overlap the `Origin` header (line 7) with the authorized address of Trusted Site‘s domain — `http://trustedite.com`, the Fetch API implemented by the browser prevents this from taking effect.
That’s why we see `http://evilsite.com` as `Origin` in the Web Developer Tools’ Network tab — HTTP OPTIONS request.
Bypassing CORS through proxy interception (Manual)
It’s been a long road so far.
So if you made it here, it’s time to put some salt in the soup.
The main principle behind the CORS (and policies like CSP — Content Security Policy) is the trust-based relationship between browser and web server.
The web server instructs the web browser about which domains it can further trust.
In practice, the HTTP security headers set this instruction.
Now, let’s think from a malicious perspective.
To bypass the CORS rules, the attacker has to intercept the server’s HTTP response, which contains the CORS ACAO (Access-Control-Allow-Origin)header.
Secondly, he/she changes its value to reflect the attacker’s page origin or to allow arbitrary domains (using the character *).
When it’s said “to intercept”, it can be a proxy server filtering the HTTP request-response cycle automatically (see the next section for more on this).
Or a manual approach through a proxy tool like Burp Suite, as we will do right after.
Setting up your snoopy proxy tool
If you are already familiarized with proxy tools like ZAP, Burp Suite, feel free to move to the next section.
Here we are going to use Burp Suite Community[14] from PortSwagger.
Install the Burp Suite according to your platform/architecture and run it.
★ At the Options tab, edit the Interface column at the Proxy Listeners settings as below (“127.0.0.1:10001”):
★ At the same tab, set the Intercept Client Requests settings as following:
★ Still at the Options tab, set the Intercept Server Responses settings as following:
★ Ensure that the “Intercept is on” button from Intercept tab is active
Finally, on your browser, you will configure it to pass the requests through our proxy.
Note that the proxy is listening on port 10001. Here we have two configuration options.
I usually set my proxies using the FoxyProxy extension[15].
But you can do it manually by the Network Settings[16] from your browser.
My Firefox’s FoxyProxy burp proxy settings
Ok, that’s all.
We’re ready to go.
Bypassing CORS by HTTP Response tampering
★ Open the Evil Site (`http://evilsite.com`)
As previously observed, resources from the Trusted Site requested by the Evil Site are not authorized to be consumed by the corresponding page.
It results from the fact that the CORS ACAO (Access-Control-Allow-Origin) header only allows the `http://trustedsite.com` domain.
★ Activate your Burp proxy at your browser
★ Click/request OWASP image resource via XHR Request
Stop and look to the Burp Suite dialog respective to the HTTP Request
★ Proceed with the request without further edition by clicking in “Forward”
★ Stop at the HTTP Response which contains the CORS headers
★ Edit the CORS ACAO header value to `*`
★ Submit the response to the browser by clicking in “Forward”
★ The protected resource (OWASP bug image) content is displayed (note the absence of the CORS error message):
Hacking homework
In the earlier scenario, we intercepted and tampered with one JavaScript XHR request via Burp proxy.
One important aspect of this outside the box approach is to analyze the HTTP request-response cycle thoroughly.
Which headers are demanded and what error messages you got at your browser console when they are missing or misconfigured.
Now it’s time to let you apply by yourself the knowledge exposed ‘till here.
The next section will also present some hints about the CORS bypassing for the Alert script + JavaScript FETCH combination.
Since the sky’s the limit, feel free to try the bypassing against the remaining options from the Evil Site menu.
Tips for bypassing the Alert script + JavaScript FETCH
Besides changing the Access-Control-Allow-Origin header, you will also have to add the Access-Control-Allow-Headers in the HTTP OPTIONS request (use the Add button from the Burp request edit dialog).
This is necessary because the client (the .js script which launches the XHR request) adds the headers `cache-control` and `pragma` in the subsequent GET request by default.
So you will want to reflect this in the HTTP OPTIONS response.
Remember, here we have a HTTP Preflight scenario (review the Preflight HTTP Request section when in doubts), where a HTTP OPTIONS request precedes the actual resource retrieval request.
HTTP Options response edited to reflect the CORS headers for bypassing
HTTP GET response from `hello_script.js` resource retrieval (note the ACAO CORS header)
Successful CORS hacking get us the nice dialog above
Automatic bypassing and other CORS interesting projects
In the previous section, we saw how to bypass the CORS rules protection manually.
However, this is not very efficient from a practical standpoint.
One feasible way to automate the bypassing process is by deploying a proxy server like CORS Anywhere API.
The proxy server will act as an intermediary, filtering the request and response headers to reflect the allow and deny rules specified at proxy configuration time.
Please, refer to the project’s Github page[18] for more details and precautions when setting a proxy facing the web (be careful with open proxies, friend).
You can test the live API here[19].
Concluding remarks
If you’ve got this far, congratulations.
HTTP Headers by itself is a very vast CORStopic, as the protocol tries to evolve to get close to web applications reality.
This reality becomes more and more pervasive, especially with the popularization of APIs through technologies like REST.
The set of CORS headers are intricate and full of nuances.
When implementing a solution that deals with inter-domain communication, pay attention to the common pitfalls that can arise.
The final message about CORS and its weaknesses is that the trust between browser and application should be explicitly guaranteed by secure configurations.
The right choice for which AJAX method and CORS headers to deploy will positively impact your APIs’ overall security.
Remember our four proposed resource consumption scenarios.
They are simple.
Indeed, there are other options and combinations for resource sharing.
But maybe (and I hope we got there) the theory and practice exposed here can be taken as a foundation to design more complex and secure by-default web applications.
crossorigin="anonymous"
script src="https://stackoverflow.com/foo.js" crossorigin="anonymous"
The "anonymous" keyword means that there will be no exchange of user credentials via cookies, client-side SSL certificates or HTTP authentication
example:
<link crossorigin="anonymous" media="all" integrity="sha512-iwdBeEEuDZbd2aAEzZti+bkBYQ2UKC6VEAhVMLKq5cCJnyeWVpgVqtgd3scKeZ63wYQTUQegRZwFGKlWOyr5Ew==" rel="stylesheet" href="https://github.githubassets.com/assets/frameworks-8b074178412e0d96ddd9a004cd9b62f9.css" />
<script crossorigin="anonymous" defer="defer" integrity="sha512-CzeY4A6TiG4fGZSWZU8FxmzFFmcQFoPpArF0hkH0/J/S7UL4eed/LKEXMQXfTwiG5yEJBI+9BdKG8KQJNbhcIQ==" type="application/javascript" src="https://github.githubassets.com/assets/environment-0b3798e0.js"></script>
connect SQL Server database from JavaScript in the browser
There is no common way to connect to SQL Server database from JavaScript client, every browser has it’s own API and packages to connect to SQL Server.
For example, in Windows operating system, Internet Explorer has a class name called ActiveXObject which is used to create instances of OLE Automation objects, and these objects help us to create an environment for SQL Driver connection.
var connection = new ActiveXObject("ADODB.Connection") ;
var connectionstring = "Data Source=<server>;Initial Catalog=<catalog>;User ID=<user>;Password=<password>;Provider=SQLOLEDB";
connection.Open(connectionstring);
var rs = new ActiveXObject("ADODB.Recordset");
rs.Open("SELECT * FROM table", connection);
rs.MoveFirst
while(!rs.eof)
{
document.write(rs.fields(1));
rs.movenext;
}
rs.close;
connection.close;
It is not recommended to use JavaScript clients to access databases.
Node.js provides us an environment to run JavaScript code outside the browser.
It’s strongly recommended to use any command-line tool(CLI) like terminal, cmd to run following queries and commands.
connect with SQL Server
sqlcmd -S localhost -U SA -P "<password>"
To create Node.js environment issue following command.
npm init
Express allows us to set up middlewares to respond to HTTP Requests.
npm install express --save
Microsoft SQL Server client give us functionality to connect with SQL server.
npm install mssql --save
To begin with Node.js part, we need to create our server file server.js in our local system.
javascript
// Requiring modules
const express = require('express');
const app = express();
const mssql = require("mysql");
// Get request
app.get('/', function(req, res) {
// Config your database credential
const config = {
user: 'SA',
password: 'Your_Password',
server: 'localhost',
database: 'geek'
};
// Connect to your database
mssql.connect(config, function(err) {
// Create Request object to perform
// query operation
var request = new mssql.Request();
// Query to the database and get the records
request.query('select * from student',
function(err, records) {
if (err) console.log(err)
// Send records as a response
// to browser
res.send(records);
});
});
});
var server = app.listen(5000, function() {
console.log('Server is listening at port 5000...');
});
Run server.js file using the following command:
node server.js
After executing the above command, you will see the following output on your console:
Server is listening at port 5000...
Now hit the url http://localhost:5000/ in the local browser.
This tip will help you to flatten a deeply nested array of arrays by using Infinity in flat.
var array = [123, 500, [1, 2, [34, 56, 67, [234, 1245], 900]], 845, [30257]]
//flatten array of array
array.flat(Infinity)
// output:
// [123, 500, 1, 2, 34, 56, 67, 234, 1245, 900, 845, 30257]
Easy Exchange Variables
You probably swap the two variables using a third variable temp.
But this tip will show you a new way to exchange variables using destructuring.
//example 1
var a = 6;
var b = 7;
[a,b] = [b,a]
console.log(a,b) // 7 6
Sort Alphabetically
Sorting is a common problem in programming and this tip will save your valuable time by writing a long code to sort a string alphabetically.
//sort alphabeticallyfunction alphabetSort(arr)
{
return arr.sort((a, b) => a.localeCompare(b));
}
let array = ["d", "c", "b", "a"]
console.log(alphabetSort(array)) // ["a", "b", "c", "d"]
Generate Range of Numbers
Suppose you want to generate a number between a specific range.
The first approach you will use is the loop.
But this tip will save you valuable time by doing it the easy way.
let Start = 10, End = 15;
//Generating
[...new Array(End + 1).keys()].slice(Start); // [10, 11....
15]
Array.from({length: End - Start + 1}, (_,i) => Start + i) // [10, 11....
15]
Shorten the Console log
Tired of writing console.log() again and again? This tip will show how to shorter your console log and speed up your coding.
var c = console.log.bind(document)
c(455)
c("hello world")
Shortening an Array in an easy way
This is an awesome tip for web developers to shorten an array in an easy way.
You just need to use the length method by passing a number that denotes the new size of your array.
let array = ["A", "B", "C", "D", "E", "F"]
array.length = 2
console.log(array) // ["A", "B"]
Use isNumber
This tip will show how to check whether a value or variable holding a number ( integer, float and etc ) or not.
function isNumber(n) { return !isNaN(parseFloat(n)) && isFinite(n); }
console.log(isNumber(900)) // true
console.log(isNumber(23.98)) // true
console.log(isNumber("JavaScript")) // false
Use isString
This useful tip will show you how to check whether a value or data is in string format or not.
This comes in handy when you request data from the server and want to check the data type.
const isString = value => typeof value === 'string';
isString('JavaScript'); // true
isString(345); // false
isString(true); // false
Check Null
In Programming, sometimes we need to check whether a result or data is null.
const CheckNull= value => value === null || value === undefined;
CheckNull(null) // true
CheckNull() // true
CheckNull(123) // false
CheckNull("J") // false
Merge Array into One
This tip will be useful when you need to combine the two arrays of any size into one.
You need to use the JavaScript concate method for this.
//Example Code
let arr1 = ["JavaScript", "Python", "C++"]
let arr2 = ["Dart", "Java", "C#"]
const mergeArr = arr1.concat(arr2)
console.log(mergeArr) // ["JavaScript", "Python", "C++", "Dart", "Java", "C#"]
Quick Calculate Performance
This tip is personally used most to calculate the performance of my JavaScript program.
const starttime = performance.now();
//some program
const endtime = performance.now();
const totaltime = startTime - endTime
console.log("function takes "+totaltime +" milisecond");
Remove Duplicates
You probably encounter an array with duplicate data and use a loop way to get rid of these duplicates.
This tip will help you remove duplicates in an easy way without using any loop.
const ReDuplicates = array => [...new Set(array)];
console.log(ReDuplicates([200,200,300,300,400,500,600,600])) // [200,300,400,600]
Convert Number to Binary
This tip is useful when you need to convert numbers into binary.
Take a look at the example code below.
var num = 200
console.log(num.toString(2)) // 11001000
num = 300
console.log(num.toString(2)) //100101100
Character “e” for excessive zeros
This is a time-saving tip for you.
You can rid of writing a lot of zeros in JavaScript by replacing all of them with the character “e”.
//normal way
var num = 20000000
//good way
var num2 = 2e7
console.log(num2) //20000000
Make Array Empty
This quick tip will save the time that you put to empty an array.
I will show you the quick method to empty in an array using the JavaScript length method.
let array = ["A", "B", "C", "D", "E", "F"]
array.length=0
console.log(array) // []
Final Thoughts
I hope you find this article useful and fun to learn these tips.
If you had a good JavaScript tip feel free to share it with other developers in response. Happy JavaScript Coding.
Pre-fill form with local storage
to create a single localStorage entry representing your saved values, rather than pollute LS with many entries for each field.
function save() {
const selects = document.querySelectorAll('select');
// select other element types
// ...
const selectValues = [...selects].map(select => select.value);
const textValues = [...textInputs].map(textInput => textInput.value);
const sliderValues = [...sliderInputs].map(sliderInput => sliderInput.value);
const savedObj = { selectValues, textValues, sliderValues };
localStorage.savedFormValues = JSON.stringify(savedObj);
}
use .get or .post to collect file from url
w3school HTTP Request .get, .post
$("button").click(function(){
url= 'https://web.ifzq.gtimg.cn/appstock/app/hkfqkline/get?_var=kline_dayqfq¶m=hk00700,day,,,1000,qfq'
$.get(url, function(data, status){
objdata = eval(data)
keys = Object.keys(objdata)
console.log(keys)
$("#cvs").text(JSON.stringify(objdata.data)) ;
});
});
// will be blocked
$("button").click(function(){
$.post("demo_test.asp", function(data, status){
alert("Data: " + data + "\nStatus: " + status);
});
});
Access to XMLHttpRequest from origin 'null' has been blocked by CORS
use server to bypass CORS
note that Mixed Content loaded over HTTPS will be blocked, the content must be served over HTTPS.
adding following code to the HTML page, since we are using the third party API which is not controlled by us.
<meta http-equiv="Content-Security-Policy" content="upgrade-insecure-requests">
avoid the specification of the username and password at every git push
1.
Associate the SSH key with the remote repository
This step varies, depending on how your remote is set up.
If it is a GitHub repository and you have administrative privileges, go to settings and click 'add SSH key'.
Copy the contents of your ~/.ssh/id_rsa.pub into the field labeled 'Key'.
If your repository is administered by somebody else, give the administrator your id_rsa.pub.
If your remote repository is administered by your, you can use this command for example:
scp ~/.ssh/id_rsa.pub YOUR_USER@YOUR_IP:~/.ssh/authorized_keys/id_rsa.pub
2.
Set your remote URL to a form that supports SSH 1
If you have done the steps above and are still getting the password prompt, make sure your repo URL is in the form
git+ssh://git@github.com/username/reponame.git
as opposed to
https://github.com/username/reponame.git
To see your repo URL, run:
git remote show origin
You can change the URL with:
git remote set-url origin git+ssh://git@github.com/username/reponame.git
Git - remote: Repository not found
Permanently authenticating with Git repositories,
Run the following command to enable credential caching.
git config credential.helper store
git push https://github.com/repo.git
For window
Delete the credentials from Credential Manager.
Open Control Panel from the Start menu.
Select User Accounts.
Select the "Credential Manager".
Click on "Manage Windows Credentials".
Delete any credentials related to Git or GitHub.
Once you deleted all then try to clone again.
I was also facing the same issue
remote: Repository not found
fatal: repository 'https://github.com/MyRepo/project.git/' not found
I uninstalled the git credentials manager and reinstalled it and then I could easily pull and push to the repository.
Here are the commands
Babel is a JavaScript compiler that can translate markup or programming languages into JavaScript.
With Babel, you can use the newest features of JavaScript (ES6 - ECMAScript 2015).
Babel is available for different conversions.
React uses Babel to convert JSX into JavaScript.
Please note that <script type="text/babel"> is needed for using Babel.
What is JSX?
JSX stands for JavaScript XML.
JSX is an XML/HTML like extension to JavaScript.
Example
const element = <h2>Hello World!</h2>
As you can see above, JSX is not JavaScript nor HTML.
JSX is a XML syntax extension to JavaScript that also comes with the full power of ES6 (ECMAScript 2015).
Just like HTML, JSX tags can have a tag names, attributes, and children.
If an attribute is wrapped in curly braces, the value is a JavaScript expression.
Note that JSX does not use quotes around the HTML text string.
React DOM Render
The method ReactDom.render() is used to render (display) HTML elements:
React applications are usually built around a single HTML element.
React developers often call this the root node (root element):
<div id="root"></div>
React elements look like this:
const element = <h2>Hello React!</h2>
Elements are rendered (displayed) with the ReactDOM.render() method:
ReactDOM.render(element, document.getElementById('root'));
React elements are immutable.
They cannot be changed.
The only way to change a React element is to render a new element every time:
Example
function tick() {
const element = (<h2>{new Date().toLocaleTimeString()}</h2>);
ReactDOM.render(element, document.getElementById('root'));
}
setInterval(tick, 1000);
React Components
React components are JavaScript functions.
This example creates a React component named "Welcome":
Example
function Welcome() {
return <h2>Hello React!</h2>;
}
ReactDOM.render(<Welcome />, document.getElementById('root'));
React can also use ES6 classes to create components.
This example creates a React component named Welcome with a render method:
This example creates a React component named "Welcome" with property arguments:
Example
function Welcome(props) {
return <h2>Hello {props.name}!</h2>;
}
ReactDOM.render(<Welcome name="John Doe"/>, document.getElementById('root'));
React can also use ES6 classes to create components.
This example also creates a React component named "Welcome" with property arguments:
The examples on this page compiles JSX in the browser.
For production code, the compilation should be done separately.
Create React Application
Facebook has created a Create React Application with everything you need to build a React app.
It is a development server that uses Webpack to compile React, JSX, and ES6, auto-prefix CSS files.
The Create React App uses ESLint to test and warn about mistakes in the code.
To create a React App run the following code on your terminal:
Example
npx create-react-app react-tutorial
Make sure you have Node.js 5.2 or higher.
Otherwise you must install npx:
Example
npm i npx
Start one folder up from where you want your application to stay:
npx: installed 63
in 10.359s
Creating a new React app in C:\Users\myUser\react-tutorial.
Installing packages.
This might take a couple of minutes.
Installing react,
react-dom, and react-scripts...
+ react-dom@16.5.2
+ react@16.5.2
+
react-scripts@2.0.4
added 1732 packages from 664 contributors and audited
31900 packages in 355.501s
found 0 vulnerabilities+ react@16.5.2
Success! Created react-tutorial at C:\Users\myUser\react-tutorial
Inside that directory, you can run several commands:
npm start
Starts the development server.
npm run build
Bundles the app into static files for production.
npm test
Starts the test runner.
npm run eject
Removes this tool and copies build dependencies, configuration files and scripts into the app directory.
If you do this, you can't go back!
We suggest that you begin by typing:
cd react-tutorial
npm start
calculate the centre of a circle given three points
https://stackoverflow.com/questions/32861804/how-to-calculate-the-centre-point-of-a-circle-given-three-points
Translate the three points to bring one of them at the origin
(subtract (X0,Y0)).
The equation of a circle through two points and the origin can be written
2X.Xc + 2Y.Yc = X² + Y²
(refer to: https://www.math-only-math.com/circle-passes-through-the-origin.html)
Plugging the coordinates of the two points, you get an easy system of two equations in two unknowns, and by Cramer
Xc = (Z1.Y2 - Z2.Y1) / D
Yc = (X1.Z2 - X2.Z1) / D
D = 2(X1.Y2 - X2.Y1), Z1 = X1²+Y1², Z2 = X2²+Y2²
to be translated back (add (X0,Y0)).
The formula fails when the three points are aligned, which is diagnosed by D = 0 (or small in comparison to the numerators).
X1-= X0; Y1-= Y0; X2-= X0; Y2-= Y0;
double Z1= X1 * X1 + Y1 * Y1;
double Z2= X2 * X2 + Y2 * Y2;
double D= 2 * (X1 * Y2 - X2 * Y1);
double Xc= (Z1 * Y2 - Z2 * Y1) / D + X0;
double Yc= (X1 * Z2 - X2 * Z1) / D + Y0;
function CalculateCircleCenter(A,B,C)
{
var yDelta_a = B.y - A.y;
var xDelta_a = B.x - A.x;
var yDelta_b = C.y - B.y;
var xDelta_b = C.x - B.x;
center = [];
var aSlope = yDelta_a / xDelta_a;
var bSlope = yDelta_b / xDelta_b;
center.x = (aSlope*bSlope*(A.y - C.y) + bSlope*(A.x + B.x) - aSlope*(B.x+C.x) )/(2* (bSlope-aSlope) );
center.y = -1*(center.x - (A.x+B.x)/2)/aSlope + (A.y+B.y)/2;
return center;
}
All you need to do is pass it 3 points :
var threePoints = [{x:1, y: 2},{x:4, y: 4},{x:6, y: 2} ]
console.log(CalculateCircleCenter(threePoints[0],threePoints[1],threePoints[2]))
to change the default voice in the browser
The speech API spec says that browsers can decide which voice to use by default, and that each utterance language may have a different default voice.
The default utterence language is decided by the HTML lang attribute:
This implies that, to use a British voice by default:
<html lang="en-GB">
<script>
var utterance = new SpeechSynthesisUtterance('Toodle pip');
window.speechSynthesis.speak(utterance);
</script>
However, this did not change the default voice for me in Chrome 46 (my default language is en-GB; I also get a German voice by default).
You could use navigator.language as the default utterance language, but according to this answer it is not a reliable indicator of browser settings (for me it evaluates to en-US, which is in my list of languages but is not my default).
Chrome seems to ignore the HTML lang property.
The solution is to set the property of the utterance:
<script>
var utterance = new SpeechSynthesisUtterance('Toodle pip');
utterance.lang='en-US'; // for US english, en-GR for british
window.speechSynthesis.speak(utterance);
</script>
SpeechSynthesis.getVoices() will return several options for English (United States, Australia, Nigeria, India, and United Kingdom) but only one is available at a time.
You can pick which one by going to the Settings app, then Controls->Language and input->Text-to-speech options.
The lang property of the SpeechSynthesisUtterance interface
gets and sets the language of the utterance.
If unset, the app's (i.e.
the lang value) lang will be used, or the user-agent default if that is unset too.
Syntax
var myLang = speechSynthesisUtteranceInstance.lang;
speechSynthesisUtteranceInstance.lang = 'en-US';
Examples
var synth = window.speechSynthesis;
var inputForm = document.querySelector('form');
var inputTxt = document.querySelector('input');
var voiceSelect = document.querySelector('select');
var voices = synth.getVoices();
...
inputForm.onsubmit = function(event) {
event.preventDefault();
var utterThis = new SpeechSynthesisUtterance(inputTxt.value);
var selectedOption = voiceSelect.selectedOptions[0].getAttribute('data-name');
for(i = 0; i < voices.length ; i++) {
if(voices[i].name === selectedOption) {
utterThis.voice = voices[i];
}
}
utterThis.lang = 'en-US';
synth.speak(utterThis);
inputTxt.blur();
}
SpeechSynthesisUtterance()
Properties
lang
pitch
rate
text
voice
volume
Events
boundary
end
error
mark
pause
resume
start
Inheritance:
EventTarget
Following is a simple code for creating a group of radio buttons.
<p> Choose your favroite season: </p>
<input type="radio" name="JTP" id="summer" value="summer">Summer<br>
<input type="radio" name="JTP" id="winter" value="winter">Winter<br>
<input type="radio" name="JTP" id="rainy" value="rainy">Rainy<br>
<input type="radio" name="JTP" id="autumn" value="autumn">Autumn<br>
Check a radio button
We do not need to write any specific code to check the radio button.
They can be checked once they are created or specified in HTML form.
However, we have to write the JavaScript code to get the value of the checked radio button, which we will see in the chapter below:
Check the radio button is selected or not
There are two ways in JavaScript to check the marked radio button or to identify which radio button is selected.
JavaScript offers two DOM methods for this.
getElementById
querySelector
The input radio checked property is used to check whether the checkbox is selected or not.
Use document.getElementById('id').checked method for this.
It will return the checked status of the radio button as a Boolean value.
It can be either true or false.
True - If radio button is selected.
False - If radio button is not selected/ checked.
See the JavaScript code below to know how it works:
Example
For example, we have a radio button named Summer and id = 'summer'.
Now, we will check using this button id that the radio button is marked or not.
if(document.getElementById('summer').checked == true) {
document.write("Summer radio button is selected");
} else {
document.write("Summer radio button is not selected");
}
querySelector()
The querySelector() function is a DOM method of JavaScript.
It uses the common name property of radio buttons inside it.
This method is used as given below to check which radio button is selected.
document.querySelector('input[name="JTP"]:checked')
Example
For example, we have a group of radio buttons having the name property name = 'season' for all buttons.
Now, between these buttons named season we will check which one is selected.
var getSelectedValue = document.querySelector( 'input[name="season"]:checked');
if(getSelectedValue != null) {
document.write("Radio button is selected");
} else {
document.write("Nothing has been selected");
}
Get the value of checked radio button:
Using getElementById ()
Following is the code to get the value of checked radio button using getElementById() method:
if(document.getElementById('summer').checked) {
var selectedValue = document.getElementById('summer').value;
alert("Selected Radio Button is: " + selectedValue);
}
Using querySelector()
Following is the code to get the value of checked radio button using querySelector() method:
var getSelectedValue = document.querySelector( 'input[name="season"]:checked');
if(getSelectedValue != null) {
alert("Selected radio button values is: " + getSelectedValue.value);
}
show all available languages
speechSynthesis.getVoices().forEach(voice => {
console.log(voice.name, voice.lang)
})
Microsoft David Desktop - English (United States) en-US
txt2speech.html:59 Microsoft Hazel Desktop - English (Great Britain) en-GB
txt2speech.html:59 Microsoft Zira Desktop - English (United States) en-US
txt2speech.html:59 Microsoft Huihui Desktop - Chinese (Simplified) zh-CN
txt2speech.html:59 Microsoft Tracy Desktop - Chinese(Traditional, HongKong SAR) zh-HK
txt2speech.html:59 Microsoft Hanhan Desktop - Chinese (Taiwan) zh-TW
txt2speech.html:59 Google Deutsch de-DE
txt2speech.html:59 Google US English en-US
txt2speech.html:59 Google UK English Female en-GB
txt2speech.html:59 Google UK English Male en-GB
txt2speech.html:59 Google español es-ES
txt2speech.html:59 Google español de Estados Unidos es-US
txt2speech.html:59 Google français fr-FR
txt2speech.html:59 Google हिन्दी hi-IN
txt2speech.html:59 Google Bahasa Indonesia id-ID
txt2speech.html:59 Google italiano it-IT
txt2speech.html:59 Google 日本語 ja-JP
txt2speech.html:59 Google 한국의 ko-KR
txt2speech.html:59 Google Nederlands nl-NL
txt2speech.html:59 Google polski pl-PL
txt2speech.html:59 Google português do Brasil pt-BR
txt2speech.html:59 Google русский ru-RU
txt2speech.html:59 Google 普通话(中国大陆) zh-CN
txt2speech.html:59 Google 粤語(香港) zh-HK
txt2speech.html:59 Google 國語(臺灣) zh-TW
Set selected radio from radio group with a value
var value = 5;
$("input[name=mygroup][value=" + value + "]").attr('checked', 'checked');
$("input[name=mygroup]").val([5]);
$('input:radio[name="mygroup"][value="5"]').attr('checked',true);
Since jQuery 1.6, you can also use the .prop method with a boolean value (this should be the preferred method):
$("input[name=mygroup][value=" + value + "]").prop('checked', true);
Code To Remove Checked Attribute from all radio buttons of one radio button group -
$('[name="radioSelectionName"]').removeAttr('checked');
If you’ve done any significant Node development in the past seven or eight years, you’ve probably used Express to build a web server at some point.
While you can create a server in Node without using a library, it doesn’t give you a lot out of the box and can be quite cumbersome to add functionality.
Express is a minimalist, “unopinionated” server library and has become the de facto standard for building web apps in Node.
To understand Express, you need to understand Express Middleware.
What is Express Middleware?
Middleware literally means anything you put in the middle of one layer of the software and another.
Express middleware are functions that execute during the lifecycle of a request to the Express server.
Each middleware has access to the HTTP request and response for each route (or path) it’s attached to.
In fact, Express itself is compromised wholly of middleware functions.
Additionally, middleware can either terminate the HTTP request or pass it on to another middleware function using next (more on that soon).
This “chaining” of middleware allows you to compartmentalize your code and create reusable middleware.
In this article I’ll explain what middleware is, why you would use it, how to use existing Express middleware, and how to write your own middleware for Express.
Requirements to Write Express Middleware
There are a few things you will need installed to create, use, and test Express middleware.
First, you will need Node and NPM.
To ensure you have them installed, you can run:
npm -v && node -v
You should see the Node and NPM versions you have installed.
If you get an error, you need to install Node.
I’m using the latest version of both as of the time of this article, which is Node 10.9.0 and NPM 6.4.1, but all the examples should work with Node versions 8+ and NPM versions 5+.
I will also be using Express version 4.x.
This is important because major changes were made from version 3.x to 4.x.
It will also be helpful to have Postman installed to test routes using any HTTP verbs other than GET.
Express Middleware: The Basics
To get started, you’ll use the most basic of Express’ built-in middleware.
This will give you the chance to see how middleware is used, and how Express middleware is structured.
Create a new project and npm init it…
npm init
npm install express --save
Create server.js and paste the following code:
const express = require('express');
const app = express();
app.get('/', (req, res, next) => {
res.send('Welcome Home');
});
app.listen(3000);
Run the server via node server.js, access http://localhost:3000, and you should see “Welcome Home” printed in your browser.
The app.get() function is Application-level Middleware.
You’ll notice the parameters passed to the method are req, res, and next.
These are the incoming request, the response being written, and a method to call to pass the call to the next middleware function once the current middleware is finished.
In this case, once the response is sent, the function exits.
You could also chain other middleware here by calling the next() method.
Let’s take a look at a few more examples of the different types of middleware.
Express Request Logging Middleware Example
In Express, you can set up middleware to be “global” middleware; meaning it will be called for every incoming request.
Change the contents of server.js to:
const express = require('express');
const app = express();
app.use((req, res, next) => {
console.log(req);
next();
});
app.get('/', (req, res, next) => {
res.send('Welcome Home');
});
app.listen(3000);
This time, when you go to http://localhost:3000 you should see the same thing in your browser window, but back in the console window you will see the output of the incoming request object.
The middleware logs out the request object and then calls next().
The next middleware in the pipeline handles the get request to the root URL and sends back the text response.
Using app.use() means that this middleware will be called for every call to the application.
Restrict Express Request Content Type Example
In addition to running middleware for all calls, you could also specify to only run middleware for specific calls.
Change the server.js file again to:
const express = require('express');
const app = express();
const requireJsonContent = () => {
return (req, res, next) => {
if (req.headers['content-type'] !== 'application/json') {
res.status(400).send('Server requires application/json')
} else {
next()
}
}
}
app.get('/', (req, res, next) => {
res.send('Welcome Home');
});
app.post('/', requireJsonContent(), (req, res, next) => {
res.send('You sent JSON');
})
app.listen(3000);
This time, start the server by running:
node server.js
To test this, open up Postman and create a post request to http://localhost:3000.
Don’t set any headers and run the request.
You will get back the “Server requires application/json” message.
Now go back and add the Content-Type header with a value of application/json and run the request again.
You will get the “You sent JSON” message back from the server.
This app.post() method call adds the requireJsonContent() middleware function to ensure the incoming request payload has a Content-Type header value set to application/json.
If it doesn’t pass the check, an error response is sent.
If it does, the request is then handed off to the next piece of middleware in the chain via the next() method.
Third-Party Express Middleware
You’ve built a couple of custom middlewares to far, but there are lots of packages already built to do the things you might normally want to do.
In fact, you’ve used the simple routing middleware library by using the app.get() or app.post() middleware functions.
There are thousands of middleware libraries for doing things like parsing incoming data, routing, and authorization.
Okta has an Express middleware for OIDC security that I’ll show you to demonstrate using third-party middleware libraries.
Why Okta for Express Applications
At Okta, our goal is to make identity management a lot easier, more secure, and more scalable than what you’re used to.
Okta is a cloud service that allows developers to create, edit, and securely store user accounts and user account data, and connect them with one or multiple applications.
Our API enables you to:
Authenticate and authorize your users
Store data about your users
Perform password-based and social login
Secure your application with multi-factor authentication
And much more! Check out our product documentation
Okta’s OIDC Express Middleware
To install Okta’s OIDC middleware for Express, run:
npm install @okta/oidc-middleware@0.1.3 --save
Then in the server.js file, you create an instance if the middleware with some configuration options so that Okta knows how to connect to your Okta application.
const oidc = new ExpressOIDC({
issuer: 'https://{yourOktaDomain}/oauth2/default',
client_id: '{yourClientId}',
client_secret: '{yourClientSecret}',
redirect_uri: 'http://localhost:3000/authorization-code/callback',
scope: 'openid profile'
});
You’ll also need to tell Express to use the OIDC middleware router instead of the default router.
app.use(oidc.router);
Then you use it like any other middleware:
app.get('/protected', oidc.ensureAuthenticated(), (req, res) => {
res.send('Top Secret');
});
The oidc.ensureAuthenticated() function is a middleware in the Okta library.
It runs a function to see if the current user is logged in.
If they are, it calls next() to let the app.get() function continue handling the request.
If they aren’t it will send back an HTTP 401 (Unauthorized) response.
Middleware Order is Important
When a request is received by Express, each middleware that matches the request is run in the order it is initialized until there is a terminating action (like a response being sent).
So if an error occurs, all middleware that is meant to handle errors will be called in order until one of them does not call the next() function call.
Error Handling in Express Middleware
Express has a built-in default error handler that is inserted at the end of the middleware pipeline that handles any unhandled errors that may have occurred in the pipeline.
Its signature adds an error parameter to the standard parameters of request, response, and next.
The basic signature looks like this:
app.use((err, req, res, next) => {
// middleware functionality here
})
In order to call an error-handling middleware, you simply pass the error to next(), like this:
app.get('/my-other-thing', (req, res, next) => {
next(new Error('I am passing you an error!'));
});
app.use((err, req, res, next) => {
console.log(err);
if(!res.headersSent){
res.status(500).send(err.message);
}
});
In this case, the error handling middleware at the end of the pipeline will handle the error.
You might also notice that I checked the res.headersSent property.
This just checks to see if the response has already sent the headers to the client.
If it hasn’t it sends a 500 HTTP status and the error message to the client.
You can also chain error-handling middleware.
This is common to handle different types of errors in different ways.
For instance:
app.get('/nonexistant', (req, res, next) => {
let err = new Error('I couldn\'t find it.');
err.httpStatusCode = 404;
next(err);
});
app.get('/problematic', (req, res, next) => {
let err = new Error('I\'m sorry, you can\'t do that, Dave.');
err.httpStatusCode = 304;
next(err);
});
// handles not found errors
app.use((err, req, res, next) => {
if (err.httpStatusCode === 404) {
res.status(400).render('NotFound');
}
next(err);
});
// handles unauthorized errors
app.use((err, req, res, next) => {
if(err.httpStatusCode === 304){
res.status(304).render('Unauthorized');
}
next(err);
})
// catch all
app.use((err, req, res, next) => {
console.log(err);
if (!res.headersSent) {
res.status(err.httpStatusCode || 500).render('UnknownError');
}
});
In this case, the middleware checks to see if a 404 (not found) error was thrown.
If so, it renders the ‘NotFound’ template page and then passes the error to the next item in the middleware.
The next middleware checks to see if a 304 (unauthorized) error was thrown.
If it was, it renders the ‘Unauthorized’ page, and passes the error to the next middleware in the pipeline.
Finally the “catch all” error handler just logs the error and if no response has been sent, it sends the error’s httpStatusCode (or an HTTP 500 status if none is provided) and renders the ‘UnknownError’ template.
Learn More About Express Middleware
For detailed instructions on setting up the Okta OIDC middleware, you can follow the ExpressJS Quickstart.
There is also a list of officially supported Express middleware in this GitHub repo you can try out and dig into to learn more
Finally, if you’re interested in learning more about how to use Okta, there’s an Okta Node SDK for implementing more user management functionality in your application.
Middleware is an often misunderstood Middlewaretopic since it sounds and appears very complicated, but in reality middleware is actually really straightforward.
The entire idea of middleware is to execute some code before the controller action that sends the response and after the server gets the request from the client.
Essentially it is code that executes in the middle of your request, hence the name middleware.
Before I get too in depth on the details of middleware, though, I want to setup a basic Express server with two routes.If you prefer to learn visually, check out the video version of this article.
Setting Up An Express Server
To get started working with a Node.js project you will need to run
npm init -y.
This will create a basic package.json file with all of the default values filled in for you.
From there the next thing to do is install Express by running npm i express.
Lastly, we need to create a server.js file with the following code.
const express = require('express')
const app = express()
app.get('/', (req, res) => {
res.send('Home Page')
})
app.get('/users', (req, res) => {
res.send('Users Page')
})
app.listen(3000, () => console.log('Server Started'))
This server.js file simply sets up a server on port 3000 that has two routes, a home page route and a users page route.
The last thing to do is run node server.js to start up the application and if everything worked you should see a message in the console saying Server Started.
You can then open up any browser to localhost:3000 and you should see the message Home Page.
If you go to localhost:3000/users you should then see the message Users Page.That is all the basic setup we will need for the rest of this article.
As we make changes you will need to restart your server in the console to see the changes take effect.
What Is Middleware?
I talked briefly about middleware as functions that execute after the server receives the request and before the controller action sends the response, but there are a few more things that are specific to middleware.
The biggest thing is that middleware functions have access to the response (res) and request (req) variables and can modify them or use them as needed.
Middleware functions also have a third parameter which is a next function.
This function is important since it must be called from a middleware for the next middleware to be executed.
If this function is not called then none of the other middleware including the controller action will be called.This is all a bit difficult to understand just from text so in the next section we are going to create a logging middleware that will log the url of the request a user makes.
How To Create Logging Middleware
As I mentioned in the previous section, middleware takes three parameters, req, res, and next, so in order to create middleware we need to create a function that has those three inputs.const express = require('express')
const app = express()
app.get('/', (req, res) => {
res.send('Home Page')
})
app.get('/users', (req, res) => {
res.send('Users Page')
})
function loggingMiddleware(req, res, next) {
console.log('Inside Middleware')
}
app.listen(3000, () => console.log('Server Started'))
We now have the shell of a basic middleware function defined with some placeholder content, but the application is not using it.
Express has a few different ways you can define middleware to be used, but for this example we will make this middleware execute before every single controller action by adding it to the application level.
This can be done by using the use function on the app variable like this.const express = require('express')
const app = express()
app.use(loggingMiddleware)
app.get('/', (req, res) => {
res.send('Home Page')
})
app.get('/users', (req, res) => {
res.send('Users Page')
})
function loggingMiddleware(req, res, next) {
console.log('Inside Middleware')
}
app.listen(3000, () => console.log('Server Started'))
The application is now using the middleware that we defined and if we restart our server and navigate to any of the pages in our app you will notice that in the console the message Inside Middleware appears.
This is great, but there is a slight problem.
The application now loads forever and never actually finishes the request.
This is because in our middleware we are not calling the next function so the controller action never gets called.
We can fix this by calling next after our logging.const express = require('express')
const app = express()
app.use(loggingMiddleware)
app.get('/', (req, res) => {
res.send('Home Page')
})
app.get('/users', (req, res) => {
res.send('Users Page')
})
function loggingMiddleware(req, res, next) {
console.log('Inside Middleware')
next()
}
app.listen(3000, () => console.log('Server Started'))
Now if you restart the server you will notice that everything is logging correctly, and the web page is properly loading.
The next thing to do is to actually log out the URL that the user is accessing inside the middleware.
This is where the req variable will come in handy.const express = require('express')
const app = express()
app.use(loggingMiddleware)
app.get('/', (req, res) => {
res.send('Home Page')
})
app.get('/users', (req, res) => {
res.send('Users Page')
})
function loggingMiddleware(req, res, next) {
console.log(`${new Date().toISOString()}: ${req.originalUrl}`)
next()
}
app.listen(3000, () => console.log('Server Started'))
The logging middleware is now working 100% correctly on all the routes in the application, but we have only scratched the surface on the usefulness of middleware.
In the next example we are going to take a look at creating a simple authorization middleware for the users page.
Advanced Middleware Example
To get started we need to create another function to use as middleware.const express = require('express')
const app = express()
app.use(loggingMiddleware)
app.get('/', (req, res) => {
res.send('Home Page')
})
app.get('/users', (req, res) => {
res.send('Users Page')
})
function loggingMiddleware(req, res, next) {
console.log(`${new Date().toISOString()}: ${req.originalUrl}`)
next()
}
function authorizeUsersAccess(req, res, next) {
console.log('authorizeUsersAccess Middleware')
next()
}
app.listen(3000, () => console.log('Server Started'))
This is just a shell of a function to be used as middleware, but we can add it to our users page route now in order to ensure that our middleware is only being executed on the users page route.
This can be done by adding the function as a parameter to the app.get function for the users page.const express = require('express')
const app = express()
app.use(loggingMiddleware)
app.get('/', (req, res) => {
res.send('Home Page')
})
app.get('/users', authorizeUsersAccess, (req, res) => {
res.send('Users Page')
})
function loggingMiddleware(req, res, next) {
console.log(`${new Date().toISOString()}: ${req.originalUrl}`)
next()
}
function authorizeUsersAccess(req, res, next) {
console.log('authorizeUsersAccess Middleware')
next()
}
app.listen(3000, () => console.log('Server Started'))
Now if you restart the server and go to the users page you should see the message authorizeUsersAccess Middleware, but if you go to the home page this message will not show up.
We now have middleware that only executes on a single route in the application.
The next thing to do is fill in the logic of this function so that if the user does not have access to the page they will get an error message instead.const express = require('express')
const app = express()
app.use(loggingMiddleware)
app.get('/', (req, res) => {
res.send('Home Page')
})
app.get('/users', authorizeUsersAccess, (req, res) => {
res.send('Users Page')
})
function loggingMiddleware(req, res, next) {
console.log(`${new Date().toISOString()}: ${req.originalUrl}`)
next()
}
function authorizeUsersAccess(req, res, next) {
if (req.query.admin === 'true') {
next()
} else {
res.send('ERROR: You must be an admin')
}
}
app.listen(3000, () => console.log('Server Started'))
This middleware now checks to see if the query parameter admin=true is in the URL and if it is not an error message is shown to the user.
You can test this by going to http://localhost:3000/users and you will see an error message explaining that you are not a admin.
If you instead go to http://localhost:3000/users?admin=true you will be sent the normal users page since you set the query parameter of admin to true.One other thing that is really useful with middleware is the ability to send data between middleware.
There is no way to do this with the next function, but you can modify the req or res variables to set your own custom data.
For example in the previous example if we wanted to set a variable to true if the user was a admin we could easily do that.const express = require('express')
const app = express()
app.use(loggingMiddleware)
app.get('/', (req, res) => {
res.send('Home Page')
})
app.get('/users', authorizeUsersAccess, (req, res) => {
console.log(req.admin)
res.send('Users Page')
})
function loggingMiddleware(req, res, next) {
console.log(`${new Date().toISOString()}: ${req.originalUrl}`)
next()
}
function authorizeUsersAccess(req, res, next) {
if (req.query.admin === 'true') {
req.admin = true
next()
} else {
res.send('ERROR: You must be an admin')
}
}
app.listen(3000, () => console.log('Server Started'))
This code sets an admin variable on the req object which is then accessed in the controller action for the users page.
Middleware Additional Information
This is the majority of everything you need to know about middleware functions, but there a few extra things that are important to know.
1.
Controller Actions Are Just Like Middleware
One thing you may have noticed is that controller actions which have a req, and res variable are very similar to middleware.
That is because they are essentially middleware, but with no other middleware that comes after them.
They are the end of the chain which is why there are never any next calls inside the controller action.
2.
Calling next Is Not The Same As Calling return
By far the biggest mistake I see developers make when working with middleware is that they treat the next function as if it exited out of the middleware.
Take for example this middleware.function middleware(req, res, next) {
if (req.valid) {
next()
}
res.send('Invalid Request')
}
At face value this code looks correct.
If the request is valid then the next function is called and if it isn't valid then it is sending an error message.
The problem is that the next function does not actually return from the middleware function.
This means that when next is called the next middleware will execute and that will continue until no more middleware is left to execute.
Then after all the middleware after this middleware is done executing the code will pick back up right after the next call in each of the middleware.
That means that in this middleware the error message will always be sent to the user which is obviously not what you want.
An easy way to prevent this is by simply returning when you call nextfunction middleware(req, res, next) {
if (req.valid) {
return next()
}
res.send('Invalid Request')
}
Now the code will no longer execute after calling next since it will return out of the function.
An easy way to see this issue in action is with the following code.const express = require('express')
const app = express()
app.get('/', middleware, (req, res) => {
console.log('Inside Home Page')
res.send('Home Page')
})
function middleware(req, res, next) {
console.log('Before Next')
next()
console.log('After Next')
}
app.listen(3000, () => console.log('Server Started'))
When you run this code and go to the home page the console will print out the following messages in order.Before Next
Inside Home Page
After NextEssentially what is happening is the middleware is called and it logs out the before statement.
Then next is called so the next set of middleware is called which is the controller action where the home page message is logged.
Lastly the controller action finishes executing so the middleware then executes the code after next which logs out the after statement.
3.
Middleware Will Execute In Order
This may seem self-explanatory but when you define middleware it will execute in the order it is used.
Take for example the following code.const express = require('express')
const app = express()
app.use(middlewareThree)
app.use(middlewareOne)
app.get('/', middlewareTwo, middlewareFour, (req, res) => {
console.log('Inside Home Page')
res.send('Home Page')
})
function middlewareOne(req, res, next) {
console.log('Middleware One')
next()
}
function middlewareTwo(req, res, next) {
console.log('Middleware Two')
next()
}
function middlewareThree(req, res, next) {
console.log('Middleware Three')
next()
}
function middlewareFour(req, res, next) {
console.log('Middleware Four')
next()
}
app.listen(3000, () => console.log('Server Started'))
Since the app.use statements come first the middleware in those statements will be executed first in the order they were added.
Next the app.get middleware is defined and again they will be executed in the order they are in the app.get function.
This will lead to the following console output if ran.Middleware Three
Middleware One
Middleware Two
Middleware Four
Conclusion
That is all there is to know about middleware.
Middleware is incredibly powerful for cleaning up code and making things like user authorization and authentication much easier, but it can be used for so much more than just that because of the incredible flexibility of middleware.
Tesseract.js: OCR Remote Images
Tesseract.js works with a <script> tag via local copy or CDN, with webpack via npm and on Node.js with npm/yarn.
CDN
<!-- v2 -->
<script src='https://unpkg.com/tesseract.js@v2.1.0/dist/tesseract.min.js'></script>
After including the script the Tesseract variable will be globally available.
Tesseract.js is a JavaScript OCR library based on the world’s most popular Optical Character Recognition engine.
It’s insanely easy to use on both the client-side and on the server with Node.js.
Server side, Tesseract.js only works with local images.
But, with a little help from the request Node package, we can download a remote image from a URL and then OCR it with Tesseract.js.
We’ll tackle this in three steps:
Write code to download a remote file with Node
Write code to OCR that local file with Tessearct
Put the two snippets together
The final product will take just fifteen lines of JavaScript to OCR images from a URL.
Sound good? Let’s get started.
Download a remote file with Node.js
Request “is designed to be the simplest way possible to make http calls” in Node.js.
We’ll use it to open a URL and then pipe the stream to the local file system using the Node.js standard library.
When finished, we’ll fire off a callback.
Paste this code into a new file called download.js:
var request = require('request')
var fs = require('fs')
var url = 'http://tesseract.projectnaptha.com/img/eng_bw.png'
var filename = 'pic.png'
var writeFileStream = fs.createWriteStream(filename)
request(url).pipe(writeFileStream).on('close', function() {
console.log(url, 'saved to', filename)
})
We’re using the sample image from the Tesseract documentation, which looks like this:
Install request and run the script:
npm install request
node download.js
Check your directory and you should see a new file.
Now let’s OCR that downloaded file.
OCR a local image with Tesseract.js and Node.js
Getting started with Tesseract.js is dead simple.
Paste this code into a file called ocr.js.
var Tesseract = require('tesseract.js')
var filename = 'pic.png'
Tesseract.recognize(filename)
.progress(function(p) { console.log('progress', p) })
.catch(err => console.error(err))
.then(function(result) {
console.log(result.text)
process.exit(0)
})
Install Tesseract.js and run the script:
npm install tesseract.js
node ocr.js
Once Tesseract starts up (~10 seconds on my MacBook Pro), we’ll see progress updates and then find the recognized text in result.text.
There’s a ton more data hiding in result if you’re inclined to go digging.
We now have code to download a remote file and code to OCR a local file — we just need to put them together.
OCR a remote image with Tesseract.js
Paste this code into a new file called download-and-ocr.js:
var Tesseract = require('tesseract.js')
var request = require('request')
var fs = require('fs')
var url = 'http://tesseract.projectnaptha.com/img/eng_bw.png'
var filename = 'pic.png'
var writeFile = fs.createWriteStream(filename)
request(url).pipe(writeFile).on('close', function() {
console.log(url, 'saved to', filename)
Tesseract.recognize(filename)
.progress(function(p) { console.log('progress', p) })
.catch(err => console.error(err))
.then(function(result) {
console.log(result.text)
process.exit(0)
})
});
All we’ve done here is:
Start with the script from download.js
Require Tesseract.js
Paste the the code from ocr.js into the callback that’s run when the file finishes downloading.
Give the script a run, swapping in your own picture URL if you so please:
node download-and-ocr.jsNext Steps
That’s it! Three simple steps and we’re using Tesseract.js to perform OCR on an image from a URL.
My personal motivation is to use Tesseract.js in conjunction with Twilio MMS to process photos that I snap while running around NYC.
Perhaps I’ll grep phone numbers out of ads and run them through our Lookup API to see if they’re Twilio numbers.
What are you going to build?
If you’d like to learn more, check out:
Docs for Request file streaming in Node.js
Full API docs for Tesseract.js
Twilio JavaScript quickstarts
If you enjoyed this post, give a shout-out to Guillermo Webster and Kevin Kwok for their heroic effort porting Tesseract to JS.
And, of course, feel free to drop me a line if you have any questions or build something you’d like to show off.
console.assert()
Log a message and stack trace to console if the first argument is false.
console.clear()
Clear the console.
console.count()
Log the number of times this line has been called with the given label.
console.countReset()
Resets the value of the counter with the given label.
console.debug()
Outputs a message to the console with the log level debug.
console.dir()
Displays an interactive listing of the properties of a specified JavaScript object.
This listing lets you use disclosure triangles to examine the contents of child objects.
console.dirxml()
Displays an XML/HTML Element representation of the specified object if possible or the JavaScript Object view if it is not possible.
console.error()
Outputs an error message.
You may use string substitution and additional arguments with this method.
console.exception()
An alias for error().
console.group()
Creates a new inline group, indenting all following output by another level.
To move back out a level, call groupEnd().
console.groupCollapsed()
Creates a new inline group, indenting all following output by another level.
However, unlike group() this starts with the inline group collapsed requiring the use of a disclosure button to expand it.
To move back out a level, call groupEnd().
console.groupEnd()
Exits the current inline group.
console.info()
Informative logging of information.
You may use string substitution and additional arguments with this method.
console.log()
For general output of logging information.
You may use string substitution and additional arguments with this method.
console.profile()
Starts the browser's built-in profiler (for example, the Firefox performance tool).
You can specify an optional name for the profile.
console.profileEnd()
Stops the profiler.
You can see the resulting profile in the browser's performance tool (for example, the Firefox performance tool).
console.table()
Displays tabular data as a table.
console.time()
Starts a timer with a name specified as an input parameter.
Up to 10,000 simultaneous timers can run on a given page.
console.timeEnd()
Stops the specified timer and logs the elapsed time in milliseconds since it started.
console.timeLog()
Logs the value of the specified timer to the console.
console.timeStamp()
Adds a marker to the browser's Timeline or Waterfall tool.
console.trace()
Outputs a stack trace.
console.warn()
Outputs a warning message.
You may use string substitution and additional arguments with this method.
Examples
Outputting text to the console
The most frequently-used feature of the console is logging of text and other data.
There are four categories of output you can generate, using the console.log(), console.info(), console.warn(), and console.error() methods respectively.
Each of these results in output styled differently in the log, and you can use the filtering controls provided by your browser to only view the kinds of output that interest you.
There are two ways to use each of the output methods; you can pass in a list of objects whose string representations get concatenated into one string, then output to the console, or you can pass in a string containing zero or more substitution strings followed by a list of objects to replace them.
Outputting a single object
The simplest way to use the logging methods is to output a single object:
var someObject = { str: "Some text", id: 5 };
console.log(someObject);
The output looks something like this:
[09:27:13.475] ({str:"Some text", id:5})
Outputting multiple objects
You can also output multiple objects by listing them when calling the logging method, like this:
var car = "Dodge Charger";
var someObject = { str: "Some text", id: 5 };
console.info("My first car was a", car, ".
The object is:", someObject);
This output will look like this:
[09:28:22.711] My first car was a Dodge Charger .
The object is: ({str:"Some text", id:5})
Using string substitutions
When passing a string to one of the console object's methods that accepts a string (such as log()), you may use these substitution strings:
%o or %O
Outputs a JavaScript object.
Clicking the object name opens more information about it in the inspector.
%d or %i
Outputs an integer.
Number formatting is supported, for example console.log("Foo %.2d", 1.1) will output the number as two significant figures with a leading 0: Foo 01
%s
Outputs a string.
%f
Outputs a floating-point value.
Formatting is supported, for example console.log("Foo %.2f", 1.1) will output the number to 2 decimal places: Foo 1.10
Note: Precision formatting doesn't work in Chrome
Each of these pulls the next argument after the format string off the parameter list.
For example:
for (var i=0; i<5; i++) {
console.log("Hello, %s.
You've called me %d times.", "Bob", i+1);
}
The output looks like this:
[13:14:13.481] Hello, Bob.
You've called me 1 times.
[13:14:13.483] Hello, Bob.
You've called me 2 times.
[13:14:13.485] Hello, Bob.
You've called me 3 times.
[13:14:13.487] Hello, Bob.
You've called me 4 times.
[13:14:13.488] Hello, Bob.
You've called me 5 times.
Styling console output
You can use the %c directive to apply a CSS style to console output:
console.log("This is %cMy stylish message", "color: yellow; font-style: italic; background-color: blue;padding: 2px");
The text before the directive will not be affected, but the text after the directive will be styled using the CSS declarations in the parameter.
You may use %c multiple times:
console.log("Multiple styles: %cred %corange", "color: red", "color: orange", "Additional unformatted message");
The properties usable along with the %c syntax are as follows (at least, in Firefox — they may differ in other browsers):
background and its longhand equivalents.
border and its longhand equivalents
border-radius
box-decoration-break
box-shadow
clear and float
color
cursor
display
font and its longhand equivalents
line-height
margin
outline and its longhand equivalents
padding
text-* properties such as text-transform
white-space
word-spacing and word-break
writing-mode
Note: The console message behaves like an inline element by default.
To see the effects of padding, margin, etc.
you should set it to for example display: inline-block.
Using groups in the console
You can use nested groups to help organize your output by visually combining related material.
To create a new nested block, call console.group().
The console.groupCollapsed() method is similar but creates the new block collapsed, requiring the use of a disclosure button to open it for reading.
To exit the current group, call console.groupEnd().
For example, given this code:
console.log("This is the outer level");
console.group("First group");
console.log("In the first group");
console.group("Second group");
console.log("In the second group");
console.warn("Still in the second group");
console.groupEnd();
console.log("Back to the first group");
console.groupEnd();
console.debug("Back to the outer level");
The output looks like this:
Timers
You can start a timer to calculate the duration of a specific operation.
To start one, call the console.time() method, giving it a name as the only parameter.
To stop the timer, and to get the elapsed time in milliseconds, just call the console.timeEnd() method, again passing the timer's name as the parameter.
Up to 10,000 timers can run simultaneously on a given page.
For example, given this code:
console.time("answer time");
alert("Click to continue");
console.timeLog("answer time");
alert("Do a bunch of other stuff...");
console.timeEnd("answer time");
Will log the time needed by the user to dismiss the alert box, log the time to the console, wait for the user to dismiss the second alert, and then log the ending time to the console:
Notice that the timer's name is displayed both when the timer is started and when it's stopped.
Note: It's important to note that if you're using this to log the timing for network traffic, the timer will report the total time for the transaction, while the time listed in the network panel is just the amount of time required for the header.
If you have response body logging enabled, the time listed for the response header and body combined should match what you see in the console output.
Stack traces
The console object also supports outputting a stack trace; this will show you the call path taken to reach the point at which you call console.trace().
Given code like this:
function foo() {
function bar() {
console.trace();
}
bar();
}
foo();
The output in the console looks something like this:
to hide url from browser using Javascript
<a href="#" onclick="location.href='https://actualwizard.com'">Mousing over this URL will display the current URL followed by a pound symbol.</a>
Create a circle out of three points
https://github.com/infusion/Circle.js
Circle.js
https://www.xarg.org/2018/02/create-a-circle-out-of-three-points/"
Create a circle out of three points
var circle = require('circle.js');
<script src="circle.js"></script>
<script>
var p1 = {x: 20, y: 10};
var p2 = {x: 10, y: 100};
var p3 = {x: 0, y: 50};
function circleFromThreePoints(p1, p2, p3) {
var x1 = p1.x;
var y1 = p1.y;
var x2 = p2.x;
var y2 = p2.y;
var x3 = p3.x;
var y3 = p3.y;
var a = x1 * (y2 - y3) - y1 * (x2 - x3) + x2 * y3 - x3 * y2;
var b = (x1 * x1 + y1 * y1) * (y3 - y2)
+ (x2 * x2 + y2 * y2) * (y1 - y3)
+ (x3 * x3 + y3 * y3) * (y2 - y1);
var c = (x1 * x1 + y1 * y1) * (x2 - x3)
+ (x2 * x2 + y2 * y2) * (x3 - x1)
+ (x3 * x3 + y3 * y3) * (x1 - x2);
var x = -b / (2 * a);
var y = -c / (2 * a);
return {
x: x,
y: y,
r: Math.hypot(x - x1, y - y1)
};
}
</script>
Functions
intersect(a, b)
Determines if two circles intersect
intersection(a, b)
Calculates the intersection points of two circles
intersectionArea(a, b)
Calculates the intersection area of two circles
area(a)
Calculates the area of a circle
height(a)
Calculates the height of a circle.
Obviously, this is the same as the width.
width(a)
Calculates the width of a circle.
Obviously, this is the same as the height.
perimater(a)
Calculates the perimeter of a circle
center(a)
Calculates the center point of a circle.
Simply it's coordinates.
insetBy(a)
Resizes the circle by a given value on the center
fromThreePoints(p1, p2, p3)
Caclulates a circle {x, y, r} with given three {x, y} points
auto scroll
function pageScroll() {
window.scrollBy(0,1);
scrolldelay = setTimeout(pageScroll,10);
}
pageScroll();
stop-scrolling
Do it simply by adding a class to the body:
.stop-scrolling { height: 100%; overflow: hidden; }
Add the class then remove when you want to re-enable scrolling
modify:
chkKey() {
if(testkey == " "){ randomScroll();}
add:
function randomScroll(){
// $('body').addClass('stop-scrolling')
// $("body").removeClass('stop-scrolling');
// $("body").toggleClass('stop-scrolling');
topicpointer = Math.floor(Math.random() * topicLength)
window.location = "#topic-" + topicpointer;
pageScroll();
}
function pageScroll() {
window.scrollBy(0,1);
scrolldelay = setTimeout(pageScroll,10);
}
call:
randomScroll()
Disable Scrolling on Body
https://linuxhint.com/disable-scrolling-javascript/
Set height and overflow:
html, body {margin: 0; height: 100%; overflow: hidden}
HTML css works fine
<body scroll="no">
Records and Tuples are an upcoming feature for Javascript, which may be familiar if you have used other languages except.
They are very similar to Arrays and Objects, the key difference being that they are immutable, meaning they can't be updated or changed.
They give us a brand new primitive type in Javascript, and let us do a lot of things we couldn't previously do, including comparing objects and arrays by value, rather than identity.
In this article, we'll cover how they work, and how you can use them today.
Support for Records and Tuples
Currently, records and tuples are a stage 2 proposal for Javascript.
Broadly speaking, this means that they are relatively stable, but not implemented as a standard spec.
As such, major browsers and backend Javascript like Node.JS do not implement them.
You can, however, use them, if you have Babel, by using this polyfill.
What are Records and Tuples in Javascript?
Records and Tuples introduce a brand new primitive type to Javascript, but ultimately follow the same syntax as Objects and Arrays.
When we want to define a new Record or Tuple, we use the syntax #{} or #[].
As such, we can define both as shown in the code below:
let myRecord = #{
name: "New Record",
tags: #['some', 'tags', 'go', 'here']
}
let myTuple = #['some', 'other', 'set', 'of', 'array', 'items'];
As you can see, the syntax is identical to objects and arrays, with the exception of the hash (#) at the start.
Note, that we can also put a Tuple in our Record, as shown in the first example.
Records and Tuples are immutable
Both Records and Tuples in Javascript are deeply immutable.
All that means is that they can't be changed, at any level.
If you try to change them, you'll get an error:
let myRecord = #{
name: "New Record",
tags: #['some', 'tags', 'go', 'here']
}
myRecord.name = 'Another Record'; // This will throw an error
That also means you can't insert something new into them.
In that way, they act as a source of truth - which brings us onto their main use case.
Both Tuples and Records allow us to compare Objects and Arrays based on their value, rather than their identity.
Records and Tuples compare Values, not Identity
If you try to run the following code, you'll get false back:
console.log({ a: 1 } === { a: 1 }) // returns false
console.log([1, 2, 3] === [1, 2, 3]) // returns false
That might be confusing, but it's because equality of Objects and Arrays work on the basis of identity.
When we define a new Object or Array, it is given a unique identity.
As such, when comparing the identity of two different Objects, the result is false.
Records and Tuples break that convention, and allow us to compare by value.
Deep comparisons of objects has been something that's been quite tricky in Javascript for a long time, but with Tuples and Records we can finally do that.
As such, the following code returns true:
console.log(#{ a: { b : 3 }} === #{ a: { b : 3 }}) // return true
console.log(#[1, 2, 3] === #[1, 2, 3]) // returns true
This means we can finally (and easily) make comparisons of the value between different objects, where we expect a very specific return value.
Converting Arrays to Tuples and Objects to Records in Javascript
Since Records and Tuples are compared by value, you may want to convert regular Objects and Arrays into them, so that you can make that comparison.
Fortunately, we can convert any Object or Array into a Record or Tuple using Record() and Tuple():
let newRecord = Record({ a: 1, b: 2 });
let newTuple = Tuple(...[1, 2, 3, 4, 5]);
let anotherTuple = Tuple.from([1, 2, 3, 4, 5]);
Both the above lines will produce the Record and Tuple version of each.
Future proposals also include a JSON.parseImmutable function, which will let us convert strings of Arrays or Objects straight into their Tuple or Record form.
This is not currently implemented.
Adding to a Tuple or Record
I am aware that I have just said that you can't add to or change a Tuple/Record - but you can produce a new Tuple or Record based on an old one.
This will be a totally different Tuple/Record - but it will use the data from the old and add something new.
We can do that as shown below:
let myTuple = #[1, 2, 3, 4, 5];
let myRecord = #{ a: 1, b: 1 };
// Produce a new record using original myRecord:
let newRecord = #{ ...myRecord, c: 1 } // #{ a: 1, b: 1, c: 1}
// Produce a new tuple using myTuple:
let newTuple = #[ ...myTuple, 6, 7];
// Or you can use Tuple.with():
let anotherTuple = myTuple.with(6, 7);
Interacting with Tuples and Records in Javascript
Tuples and Records work exactly the same as Objects and Arrays except they cannot be changed.
As such, you can iterate through them, or interact with them using the same methods as are available on Objects and Arrays.
For example, we could get all the keys of a particular Record:
let myRecord = #{ a: 1, b: 2, c: 2};
let recordKeys = Object.keys(myRecord); // Returns ['a', 'b', 'c'];
Or you could iterate over an array using a for loop:
let myTuple = #[1, 2, 3, 4, 5];
for(const i of myTuple) {
console.log(i);
}
// Console logs 1, 2, 3, 4, 5 on after each other
Conclusion
As Tuples and Records aren't widely supported, you will need the Babel polyfill to use them.
They allow us to compare data from Objects and Arrays in ways we couldn't before, making code much simpler where it once required complicated custom functions.
filter null values from array
let array = [0, 1, null, 2, 3];
function removeNull(array) {
return array.filter(x => x !== null)
};
equivalent of http-equiv redirect
use window.location.reload() to refresh
use setTimeout(function() { window.location.reload(); }, 35000); to fire after 35 seconds
use either window.location.replace('http://www.example.com') To redirect to another page
make sure the browser Back button skips the previous page, or window.location = 'http://www.example.com' to preserve the browser history.
console.log(`My name is ${topicId}`);
console.log('${topicId}');
javascript substitute value of variable
var name = "javascript";
console.log(`My name is ${name}`);
// My name is javascript
access href.text
window.location.href.text()
slide show
<img name="slide">
<script>
var i = 0; // Start Point
var time = 3000; // Time Between Switch
// Image List
images = [
"https://cdnimgzh.vietnamplus.vn/t870/uploaded/zokttb/2021_11_17/1_1.jpg",
"https://cdnimgzh.vietnamplus.vn/t870/uploaded/zokttb/2021_11_17/2avatar.jpg",
"https://cdnimgzh.vietnamplus.vn/t870/uploaded/zokttb/2021_11_17/3_1.jpg",
"https://cdnimgzh.vietnamplus.vn/t870/uploaded/zokttb/2021_11_17/4.jpg",
]
// Change Image
function changeImg(){
document.slide.src = images[i]; // element name is slide
if(i < images.length - 1){ // Check If Index Is Under Max
i++; // Add 1 to Index
} else {
i = 0; // Reset Back To O
}
setTimeout("changeImg()", time); // Run function every x seconds
}
window.onload=changeImg; // Run function when page loads
</script>
to pass variable in querySelector function()
https://www.codegrepper.com/code-examples/javascript/how+to+pass+variable+in+querySelector+function%28%29
querySelector with very long selector
document.querySelector('#site-modal > div > div > div > div.modal-body.bb-modal-body-tiled.pb-0 > div:nth-child(3) > div > section > div.bb-tile-content > div > div:nth-child(2) > div > div.collapse.toggleinfo > div:nth-child(5) > div.col-xs-6 > a').outerHTML
(variableInBROWSER => {
return document.querySelector(variableInBROWSER).innerHTML};
);
// This selects the first element with that name
document.querySelector('[name="your-selector-name-here"]');
scroll to bottom of div
// To scroll to the bottom of a div
const theElement = document.getElementById('elementID');
const scrollToBottom = (node) => {
node.scrollTop = node.scrollHeight;
}
scrollToBottom(theElement); // The specified node scrolls to the bottom.
// without smooth-scroll
const scrollToBottom = () => {
divRef.current.scrollTop = divRef.current.scrollHeight;
};
//with smooth-scroll
const scrollToBottomWithSmoothScroll = () => {
divRef.current.scrollTo({
top: divRef.current.scrollHeight,
behavior: 'smooth',
})
}
scrollToBottom()
scrollToBottomWithSmoothScroll()
//scroll to the bottom of "#myDiv"
var myDiv = document.getElementById("myDiv");
myDiv.scrollTop = myDiv.scrollHeight;
//scroll to the bottom of "#myDiv"
$("#mydiv").scrollTop($("#mydiv")[0].scrollHeight);
The replaceAll() method takes a string or regular expression, called the pattern, as its first argument.
The second argument is the pattern's replacement.
Given the first and second argument, replaceAll() returns a new string that will be the source string with all instances of the pattern swapped for the replacement.
The source string is not affected.In ECMAScript 2021, replaceAll() joins ECMAScript 2020’s matchAll() in improving the inherent capabilities of JavaScript’s built-in String object.The replaceAll() method works exactly like replace(), but applies to all occurrences in the string, instead of just the first one.
It’s a welcome addition after years of having to use a library or hand-coded solution.
Listing 1 shows a simple example, wherein we mangle some Shakespeare.
Listing 1.
replaceAll()
let quote = "all the world's a stage, and all the men and women merely players";
let newQuote = quote.replaceAll("all", "most of");
console.log(newQuote);
promise.any()
The promise.any() method takes a collection of promises and allows you to respond to the first one that completes successfully by returning a new promise.
If any promises are rejected, they are ignored.
(Note this method's contrast with promise.all(), which stops with any error or rejection; and with promise.allSettled(), which lets you observe all promises that resolved in a collection, even if there were intervening errors.)
If any of the promises error out, promise.any() will still act upon the first resolved promise in the collection.
The promise.any() method returns a rejected promise if none of the passed-in promises resolves.
The error it returns is AggregateError, which is a new error type also introduced by ECMAScript 2021.
AggregateError represents the summary of all errors encountered.You can use promise.any() to roll up many promises into a single one.
This promise will resolve to whichever of the collection resolves first, ignoring errors and rejections.
Listing 2 has a simple example.
Listing 2.
promise.any()—all resolved
const promise1 = new Promise((resolve, reject) => {
setTimeout(resolve, 1000, "1 second");
});
const promise2 = new Promise((resolve, reject) => {
setTimeout(resolve, 2000, "2 second");
});
let promises = [promise1, promise2];
Promise.any(promises).then((firstResolved) => {
console.log(firstResolved); // outputs “1 second”
})
Now consider Listing 3, wherein all promises eventually fail as rejected.
Listing 3.
promise.any()—all rejected
const promise1 = new Promise((resolve, reject) => {
setTimeout(reject, 1000, "1 second");
});
const promise2 = new Promise((resolve, reject) => {
setTimeout(reject, 2000, "2 second");
});
let promises = [promise1, promise2];
Promise.any(promises).then((firstResolved) => {
console.log(firstResolved);
}).catch((err) => { console.log("error: " + err) }) // outputs error: AggregateError: All promises were rejected
In Listing 3, we add a catch handler, which fires after both promises are rejected.
Notice that AggregateError is an object holding information about the failed promises.
Let's get a closer look at AggregateError, which is another new feature in ECMAScript 2021.
AggregateError
AggregateError is a special kind of error subclass that combines many errors into a summary object.
As you saw, the promise.any() method in Listing 3 created an AggregateError.In that example, all promises passed to promise.any() failed, so the method returned an AggregateError.
The error contained a message describing the error and an array with details about each error.
Listing 4 shows the contents of the error returned.
Listing 4.
AggregateError
AggregateError: All promises were rejected
errors: Array(2)
0: "1 second"
1: "2 second"
length: 2
message: "All promises were rejected"
stack: "AggregateError: All promises were rejected"
As shown, AggregateError gives you access to the promise messages that contributed to the error, via AggregateError.errors.
New logical assignment operators
JavaScript has familiar math assignment operators such as +=, which perform the operation and assignment in one go, as a kind of convenience.
ECMAScript 2021 adds similar support to the logical operators ||, ??, and &&.Let’s take a look at each of these.
Nullish assignment (??=)
You can use the nullish assignment operator to test a variable for being null or undefined.
If the variable is null or undefined, you can assign the right side of the expression to the variable.
Listing 5 is an example.
Listing 5.
The ??= assignment in action
let quote = "When goodness is lost there is morality.";
let existingQuote = "A leader is best when people barely know he exists";
let nonExistingQuote = null;
existingQuote ??= quote;
nonExistingQuote ??= quote;
console.log(existingQuote); // A leader is best when people barely know he exists
console.log(nonExistingQuote); // When goodness is lost there is morality.
Notice that when used on a variable that exists, like existingQuote, the nullish assignment operator does nothing.
When used on nonExistingQuote, however, it assigns the quote a new value.
Even if the string were empty for existingQuote (which is a falsy value in JavaScript), the nullish assignment will not replace it; it will remain an empty string.
That is the essence of the operator: it only tests for null or undefined.
And assignment (&&=)
The and assignment operator (&&=) tests the left side of an expression.
If the left side is truthy, it assigns the right side of the expression.
If it is falsy, the operator does nothing.
Listing 6 shows a simple example.
Listing 6.
The &&= assignment in action
let emptyString = "";
emptyString &&= "bar";
console.log (emptyString); // “”
let nonEmptyString = "foo";
nonEmptyString &&= "bar";
console.log(nonEmptyString); // “bar”
In Listing 6, the first console log outputs an empty string.
This is because the empty string is falsy, so the &&= operator does not assign it a new value.
The second console outputs "bar".
This is because nonEmptyString is “foo”, which is a truthy value.&&= is a kind of edge case operator, but useful when you need it.
Or assignment (||=)
The or assignment operator is the opposite of the and assignment operator you just saw.
We can use the same example from Listing 6, this time replacing &&= with ||=.
Listing 7.
The ||= assignment in action
let emptyString = "";
emptyString ||= "bar";
console.log (emptyString); // “bar”
let nonEmptyString = "foo";
nonEmptyString ||= "bar";
console.log(nonEmptyString); // “foo”
If the left side of the expression is falsy, the ||= assignment operator resolves to the right side.
Therefore, in this case, the emptyString becomes “bar”.
The nonEmptyString variable stays with its truthy value of “foo”.
WeakRef
WeakRef is used to refer to a target object without preserving it from garbage collection.
It is a rather esoteric language feature, not much used by the working coder.
The one common use case for WeakRef is in implementing caches or mappings for large objects, "where it’s desired that a large object is not kept alive solely because it appears in a cache or mapping.”So, if you find yourself building a caching solution for large entities, remember that WeakRef exists.
Otherwise, if you are not sure about needing a WeakRef variable reference, you probably should avoid using it.
(The spec itself recommends avoidance.)
FinalizationRegistry
It is a bit of programming irony that JavaScript introduced FinalizationRegistry almost simultaneously with Java’s deprecation of Object.finalize().
The features are practically analogous.
Like WeakRef, the specification warns developers away from user-defined finalizers.
For some use cases, however, the new FinalizationRegistry could be just what you need.
The specification offers the example of long-running processes consuming many file handles.
In such a case, using FinalizationRegistry could ensure no handles are leaked.Along with WeakRef, FinalizationRegistry fits better into the toolbox of platform and framework developers, rather than application developers.
Numeric literal separators
Numeric separators are a nicety that make looking at large number easier on the eyes.
JavaScript can’t use commas like natural languages, because that symbol is already taken.
So, ECMAScript 2021 introduced the underscore.Instead of typing
let distanceToSun = 91772000000;
you can type
let distanceToSun = 91_772_000_000;
The new form is quite a bit easier to read.
The Definition element
The HTML element is used to indicate the term being defined within the context of a definition phrase or sentence.
The element, the <dt>/<dd> pairing, or the element which is the nearest ancestor of the is considered to be the definition of the term.
A validator is a program that checks for syntax errors in code or documents.
window[className]
// Would only work in browsers, not NodeJS
let className = "Paintbrush";
console.log( window[className] );
Big.js tutorial shows how to work with arbitrary precision big decimal
arithmetic in JavaScript with Big.js module.
Big.js
Big.js is a small, fast JavaScript library for arbitrary-precision
decimal arithmetic.
In this article we work with Big.js in a Node application.
Setting up Big.js
First, we install Big.js.
$ node -v
v18.2.0
We use Node version 18.2.0.
$ npm init -y
We initiate a new Node application.
$ npm i big.js
We install Big.js with npm i big.js command.
JavaScript Number precision error
In the first example, we show that JavaScript Numbers are not precise for doing
arbitrary precision arithmetic.
count_currency.js
var sum = 0;
// two euros fifty-five cents
var amount = 2.55;
for (let i = 0; i < 100000; i++) {
sum += amount;
}
console.log(sum);
In the example, we add two euros fifty-five cents one hundred thousand times.
$ nodejs numbers.js
254999.9999995398
We have an error in the calculation.
Big.js example
In the next example we correct the error with Big.js.
main.js
import Big from 'big.js';
let val = new Big(0.0);
let amount = new Big(2.55);
let sum = val.plus(amount).times(100000);
console.log(sum.toFixed(2));
With Big.js library, the calculation is precise.
import Big from 'big.js';
We import Big from the big.js module.
let val = new Big(0.0);
let amount = new Big(2.55);
We create two big decimal values.
let sum = val.plus(amount).times(100000);
We add the value 100000 times.
Note that the big decimal values are immutable,
so we generate a new variable.
$ node main.js
255000.00
Big.js pow
The pow provides a high-precision power operation.
main.js
import Big from 'big.js';
let val = new Big(0.9);
let res = val.pow(3);
console.log(res);
console.log(0.9 ** 3);
The example raises the 0.9 to the power of 3 using Big.js and vanilla JS.
$ node main.js
0.729
0.7290000000000001
In this article, we have worked with arbitrary precision arithmetic in
JavaScript with the Big.js library.
Use the keyword class to create a class.
Always add a method named constructor():
A JavaScript class is not an object.
It is a template for JavaScript objects.
Syntax
class ClassName {
constructor() { ...
}
}
Example
class Car {
constructor(name, year) {
this.name = name;
this.year = year;
}
}
The example above creates a class named "Car".
The class has two initial properties: "name" and "year".
Using a Class
When you have a class, you can use the class to create objects:
Example
let myCar1 = new Car("Ford", 2014);
let myCar2 = new Car("Audi", 2019);
The example above uses the Car class to create two Car objects.
The constructor method is called automatically when a new object is created.
The Constructor Method
The constructor method is a special method:
It has to have the exact name "constructor"
It is executed automatically when a new object is created
It is used to initialize object properties
If you do not define a constructor method, JavaScript
will add an empty constructor method.
Class Methods
Class methods are created with the same syntax as object methods.
Use the keyword class to create a class.
Always add a constructor() method.
Then add any number of methods.
Syntax
class ClassName {
constructor() { ...
}
method_1() { ...
}
method_2() { ...
}
method_3() { ...
}
}
Create a Class method named "age", that returns the Car age:
class Car {
constructor(name, year) {
this.name = name;
this.year = year;
}
age() {
let date = new Date();
return date.getFullYear() - this.year;
}
}
let myCar = new Car("Ford", 2014);
document.getElementById("demo").innerHTML =
"My car is " + myCar.age() + " years old.";
You can send parameters to Class methods:
class Car {
constructor(name, year) {
this.name = name;
this.year = year;
}
age(x) {
return x - this.year;
}
}
let date = new Date();
let year = date.getFullYear();
let myCar = new
Car("Ford", 2014);
document.getElementById("demo").innerHTML="My car is " + myCar.age(year) + " years old.";
Convert Array to String Without Commas
.join method
arr.join("")
join() Method With Blank Value or Blank Space
array.join(separator)
let array = ['Le', 'sn', 'er'];
let join = array.join(""); // 'Lesner'
join() Method With Blank Space
let array = ['Linux', 'hint'];
let join = array.join(" "); // 'Linux hint'
Using pop() and push() Methods
array.push(item1, item2)
the "array.pop()" method extracts the added elements from an array.
let array = ['Script', 'va', 'Ja']
let arrayNew = []
a=array.pop(0) // 'Ja'
b=array.pop(1) // 'va'
c=array.pop(2) // 'Script'
arrayNew.push(a, b, c)
let join = arrayNew.join("")
the Combination of split() Method and join()
The "split()" method splits a string into a substring array.
This method can be used along with the "join()" method to split the commas in the joined string values by formatting them to comma-separated merged string values.
string.split(separator, limit)
let array = ['We,b', 'si,te'];
let arrayNew = []
let join = array.join(''); // 'We,bsi,te'
let join2 = join.split(",").join('') // 'Website'
Since these methods are global, and global the object is the browser window, these methods are actually window methods:
isNaN() is the same as window.isNaN().
select multiple array elements
var myArray = ["a", "b", "c", "d", "e", "f"];
var myIndices = [0, 2, 4, 6, 8];
var result = [];
myIndices.forEach(i => result.push(myArray[i]));
You cannot query html pseudo-elements with jQuery
to clone an array in JavaScript
When we need to copy an array, we often times used slice.
const sheeps = ['🐑', '🐑', '🐑'];
// Old way
const cloneSheeps = sheeps.slice();
// ES6 way
const cloneSheepsES6 = [...sheeps];
numbers = [1, 2, 3];
numbersCopy = [...numbers];
Note: This doesn’t safely copy multi-dimensional arrays.
Array/object values are copied by reference instead of by value.
Don't Use = to Copy an Array
Because arrays in JS are reference values, so when you try to copy it using the = it will only copy the reference to the original array and not the value of the array.
To create a real copy of an array, you need to copy over the value of the array under a new value variable.
That way this new array does not reference to the old array address in memory.
using the unary plus operator (+)
quantity = "12";
+quantity
convert array of string to a number
var arr = ["1", "2", "3"];
var nums = arr.map(unaryOp);
// Function that converts string to number
function unaryOp(value) { return +value; }
Mozilla 程序从 Gecko 1.8 (Firefox 1.5 \(en-US\)[2]) 开始支持 <canvas>。
它首先是由 Apple 引入的,用于 OS X Dashboard 和 Safari。
Internet Explorer 从 IE9 开始支持<canvas> ,更旧版本的 IE 中,页面可以通过引入 Google 的 Explorer Canvas[3] 项目中的脚本来获得<canvas>支持。
Google Chrome 和 Opera 9+ 也支持 <canvas>。
forEach() 被调用时,不会改变原数组,也就是调用它的数组。
但是那个对象可能会被传入的回调函数改变
// 例子一
const array = [1, 2, 3, 4];
array.forEach(ele => { ele = ele * 3 })
console.log(array); // [1,2,3,4]
// 解决方式,改变原数组
const numArr = [33,4,55];
numArr.forEach((ele, index, arr) => {
if (ele === 33) {
arr[index] = 999
}
})
console.log(numArr); // [999, 4, 55]
// 例子二
const changeItemArr = [{
name: 'wxw',
age: 22
}, {
name: 'wxw2',
age: 33
}]
changeItemArr.forEach(ele => {
if (ele.name === 'wxw2') {
ele = {
name: 'change',
age: 77
}
}
})
console.log(changeItemArr); // [{name: "wxw", age: 22},{name: "wxw2", age: 33}]
// 解决方式
const allChangeArr = [{ name: 'wxw', age: 22}, { name: 'wxw2', age: 33}]
allChangeArr.forEach((ele, index, arr) => {
if (ele.name === 'wxw2') {
arr[index] = {
name: 'change',
age: 77
}
}
})
console.log(allChangeArr); // // [{name: "wxw", age: 22},{name: "change", age: 77}]
还是使用for...of 去替代forEach 吧
fs.readFile('myjsonfile.json', 'utf8', function readFileCallback(err, data){
if (err){
console.log(err);
} else {
obj = JSON.parse(data); //now it an object
obj.date.push({id: 2, square:3}); //add some data
json = JSON.stringify(obj); //convert it back to json
fs.writeFile('myjsonfile.json', json, 'utf8', callback); // write it back
}});
This will work for data that is up to 100 MB effectively.
Over this limit, you should use a database engine.
UPDATE:
Create a function which returns the current date (year+month+day) as a string.
Create the file named this string + .json.
the fs module has a function which can check for file existence named fs.stat(path, callback).
With this, you can check if the file exists.
If it exists, use the read function if it's not, use the create function.
Use the date string as the path cuz the file will be named as the today date + .json.
the callback will contain a stats object which will be null if the file does not exist.
anothe simple method:
var fs = require('fs');
var data = {}
data.date = []
for (i=0; i <26 ; i++){
var obj = {
id: i,
square: i * i
}
data.date.push(obj)
}
fs.writeFile ("input.json", JSON.stringify(data), function(err) {
if (err) throw err;
console.log('complete');
}
);
some_function = function(username, password) {
return new Promise(
function(resolve, reject) {
if (/* everything turned out fine */) {
resolve("Stuff worked!");
} else {
reject(Error("It broke"));
}
}
);
};
Then, use it:
some_module.some_function(username, password).then(function(uid) {
// stuff
});
example3: dayOfTheYear
function dayOfTheYear() {
return new Promise((resolve) => {
const now = new Date();
const start = new Date(now.getFullYear(), 0, 0);
const diff = now - start;
const oneDay = 1000 * 60 * 60 * 24;
const day = Math.floor(diff / oneDay);
resolve(day); // this is you resolving the promise you return
});
}
//If we were to use the above function,
//there would be two different ways to do it:
dayOfTheYear()
.then( (resolvedValue) => console.log(resolvedValue) )
//The resolvedValue is what was resolved in your function in the call to resolve(day).
Or instead of using the then function to pass in a callback, you could instead use await:
// assuming this code is in a function declared as async
const resolvedValue = await dayOfTheYear();
So from the above, you can see that the return statement from an async function does the same thing as the resolve call from a Promise callback.
const value = await (the promise) to assign a value to a variable
await stops executing until the Promise has resolved (ie, has a value).
Unlike using .then() you can just keep awaiting values as you run various functions that return promises, and execution continues onto the next line (this is called 'direct style).
It's also much nicer to look at than .then() everywhere, since it's consistent with the rest of JavaScript.
example4: async
// Example function that returns a Promise that will resolve after 2 seconds
var getGenres = function() {
return new Promise(
function(resolve) {
setTimeout(
function(){
resolve(['comedy', 'drama', 'action'])
}, 2000
);
}
);
}
// We start an 'async' function to use the 'await' keyword
(async function(){
var result = await getGenres()
console.log('Woo done!', result)
// But the best part is, we can just keep awaiting different stuff, without ugly .then()s
var somethingElse = await getSomethingElse()
var moreThings = await getMoreThings()
})()
The way I like to do it is to create a let variable and assign the 'then' result to that variable.
Const won't work because it will give you an error.
It will be like let value_result = function_that_returns_promise.then(result => value_result = result)
For your example, I made the method into a function for simplicity:
const genres = ['comedy', 'drama', 'action'];
function getGenres() {
var promise = new Promise( (resolve, reject) => {
let result = genres[0] //just picking out the first one as example
resolve(result)
})
return promise
}
const result_as_promise = getGenres()
console.log(result_as_promise);
//output:
//Promise { 'comedy' }
let result_as_value = getGenres().then(result => result_as_value = result)
setTimeout(function() {
console.log(result_as_value);
}, 0);
//output:
//comedy
https://sliceofdev.com/posts/promises-with-loops-and-array-methods-in-javascript
Promises are objects that represent the eventual completion (or failure) of an asynchronous operation and allow you to handle the result of that operation when it completes.
Loops are used to execute a block of code multiple times.
However, when working with asynchronous code, it’s important to understand how loops behave and how to use promises to control the flow of execution.
Usage with for..of loop
One common use case for using promises with loops is when you need to perform an operation multiple times, but each operation depends on the result of the previous one.
In this case, you can use a loop to iterate over the data and a promise to control the flow of execution.
Let’s take a look at an example:
const items = [1, 2, 3, 4, 5];
function processItem(item) {
return new Promise((resolve, reject) => {
setTimeout(() => {
console.log(`Processing item ${item}`);
resolve(item);
}, Math.random() * 1000);
});
}
async function processItems() {
let result = 0
for (const item of items) {
result = await processItem(result + item);
}
console.log('All items processed');
}
processItems();
Executing this code will work sequentially as expected adding the result of the previous item to the current item.
But, if waiting for the previous result is not required or the order of execution doesn’t matter, it is best not to wait for the results and remove the keywords async and await .
This way, the code can execute concurrently without blocking the main thread.
function processItems() {
for (const item of items) {
processItem(item);
}
}
processItems();
console.log('All items sent for processing');
Sometimes it is required to wait for all the concurrent tasks before returning from the function or exiting the code.
Promise.all can be used in this case to wait for the result.
async function processItems() {
const promiseArray = []
for (const item of items) {
promiseArray.push(processItem(item));
}
const result = await Promise.all(promiseArray);
console.log(result);
}
processItems();
console.log('All items sent for processing');
Usage of Promises with traditional for(let i=0;i<10;i++) loops will also behave like the above examples.
Usage with Array Methods
Often there are times when an asynchronous operation needs to be carried out for each item of an array.
Let’s take a look at the different ways of doing that.
Using forEach
We can use the forEach() method to iterate over the array, and use Promises to execute the asynchronous operation for each object concurrently.
Here's how it might look:
async function processItems() {
items.forEach((item) => {
processItem(item);
})
}
processItems();
As forEach takes a function as an argument, each item is processed separately in the function.
So even if the async and await keywords are added to the function, forEach will still run the asynchronous code concurrently.
// still runs concurrently
async function processItems() {
items.forEach(async (item) => {
await processItem(item);
})
}
It’s recommended to use for..of loop if it is required to wait for each promise to complete or to run the asynchronous operations sequentially for each item.
The promises can be executed sequentially by chaining the promises but it's generally not a good practice.
See the following example for the promise chain trick.
function processItems() {
let chainedPromise = Promise.resolve();
items.forEach((item) => {
chainedPromise = chainedPromise.then(() => {
return processItem(item);
})
});
}
processItems();
Using map
map method behaves very similarly to forEach with the difference being it allows to return a value for each item of an array.
Let’s rewrite the above examples with map .
function processItems() {
items.map((item) => {
processItem(item);
})
}
processItems();
The above example runs concurrently.
map makes it easier for using Promise.all as it allows us to return a value so that we can wait for the results of the promises.
Let’s return the promise from the map function and use it in a Promise.all
async function processItems() {
const promiseArray = items.map((item) => {
return processItem(item);
})
const result = await Promise.all(promiseArray);
console.log(result);
}
processItems();
The code still runs concurrently and then awaited for all the Promises to settle.
The promise chain trick we saw previously can be used with map if the Promises need to be executed sequentially.
async function processItems() {
let chainedPromise = Promise.resolve();
const promiseArray = items.map((item) => {
return chainedPromise = chainedPromise.then(() => {
return processItem(item)
});
})
const result = await Promise.all(promiseArray);
console.log(result);
}
processItems();
Error Handling
When working with Promises, there’s always the possibility of an error occurring.
It’s important to handle these errors to prevent the program from crashing or behaving unexpectedly.
The following error is generally thrown when a Promise rejection error is not handled properly.
UnhandledPromiseRejectionWarning: Unhandled promise rejection ...
Handling with the .catch method
The errors should be handled with the .catch method on a Promise object.
Otherwise, the process will be terminated with a non-zero exit code.
The examples above for .forEach and .map can be modified to handle the errors with the .catch method.
function processItem(item) {
return new Promise((resolve, reject) => {
setTimeout(() => {
console.log(`Processing item ${item}`);
Math.random() > 0.5
? resolve(item)
: reject(`error occurred for ${item}`);
}, Math.random() * 1000);
});
}
function processItems() {
items.forEach((item) => {
processItem(item).catch(err => {
console.log(err);
})
})
}
This will gracefully handle the errors and log them to the console.
Otherwise, it would have crashed the program.
Handling errors in Promise.all
If any promise is rejected from the promise array passed to Promise.all , Promise.all will also reject and throw an error.
To fix this, again, every promise should end with a .catch method.
async function processItems() {
const promiseArray = items.map((item) => {
return processItem(item)
.catch(err => console.log(err));
})
const result = await Promise.all(promiseArray);
console.log(result);
}
Promise.allSettled can also be used as an alternative, it will always resolve even if any or all of the promises throw an error.
async function processItems() {
const promiseArray = items.map((item) => {
return processItem(item);
})
const result = await Promise.allSettled(promiseArray);
console.log(result);
}
[
{ status: 'rejected', reason: 'error occurred for 1' },
{ status: 'fulfilled', value: 2 },
{ status: 'fulfilled', value: 3 },
{ status: 'fulfilled', value: 4 },
{ status: 'rejected', reason: 'error occurred for 5' }
]
Handling errors using try/catch block
An alternative to .catch method is using traditional try {...} catch() {...} blocks.
But this should only be used if the promise is awaited using the await keyword.
try/catch will have no effect if the promise is not awaited.
function processItems() {
items.forEach(async (item) => {
try {
await processItem(item);
} catch(err) {
console.log(err);
}
})
}
Note that the following code would still throw an error because try/catch block only handles promises awaited with the await keyword.
function processItems() {
items.forEach((item) => {
try {
processItem(item); // error
} catch(err) {
console.log(err);
}
})
}
Promises (like callbacks) allow us to wait on certain code to finish execution prior to running the next bit of code.
Our Promise can have one of three states:
Pending — Asynchronous operation has not completed yet
Fulfilled — Operation has completed and the Promise has a value
Rejected — Operation has completed with an error or failed.
A promise is settled if it is not pending.
Once a Promise has settled, it is settled for good.
It cannot transition to any other state.
Working With Promises
Most of the time when working with Promises, you will be consuming already-created promises that have been returned from functions.
However, you can also create a promise with it’s constructor.
Here’s what a simple Promise might look like:
runFunction().then(successFunc, failureFunc);
In the above example, we first invoke the runFunction() function.
Since runFunction() returns a promise, only when the Promise is settled can our successFunc, or failureFunc function run.
If the Promise is Fulfilled, our sucessFunc is invoked.
If the Promise fails, our failureFunc is invoked.
A Promise Example
It’s okay if this doesn’t make sense yet:
function delay(t){
return new Promise(function(resolve){
return setTimeout(resolve, t)
});
}
function logHi(){
console.log('hi');
}
delay(2000).then(logHi);
Above we have two functions — a delay() function and a logHi() function.
The logHi() function simply logs 'hi' to the console.
The delay() function is a little more complicated.
It returns a Promise that will resolve after a supplied time frame.
We use the then() method to register callbacks to receive either the eventual fulfilled or rejected value.
With this in mind, we can use delay(2000).then(logHi) to pass in 2000 milliseconds (2 seconds) into our delay function.
After 2 seconds have passed, our Promise will resolve, and only then will our logHi function be invoked.
You can try this out yourself by opening up the Google Chrome Developer Tools and typing the above code into your console!
Chaining Promises
One of the main benefits of Promises is that they allow us to chain asynchronous operations together.
This means we can specify subsequent operations to start only when the previous operation has succeeded.
This is called a Promise Chain.
Here’s an example:
new Promise(function(resolve, reject) {
setTimeout(() => resolve(1), 2000);
}).then((result) => {
alert(result);
return result + 2;
}).then((result) => {
alert(result);
return result + 2;
}).then((result) => {
alert(result);
return result + 2;
});
Above, our initial promise is going to resolve in 2000 milliseconds with a value of 1.
After resolving, the then() handler is called and the value of 1 is alerted to the screen.
Finally, the value is added to 2, and our new value of 3 is returned.
This value is passed on to the next then() handler, and the process repeats.
Obviously this is not a real world example, but it should illustrate for you how Promises can be chained together.
This is very useful with certain tasks in JavaScript such as loading external resources, or for waiting for API data before processing it.
Error Handling
Up until this point, we’ve only dealt with resolved promises.
That’s about to change.
We can use .catch() to catch all of our errors in our Promise chain.
Lets look at what a .catch() might look like:
// ....
})
.catch((e) => {
console.log('error: ', e)
}
Above I’ve created a simple .catch() that will take the returned error message and log it to the console.
Lets add in error handling to the previous example now.
Below, there are only two changes.
After the second .then() I’ve added in an error and an error message.
I’ve also added our .catch() to the end of the chain.
What do you expect to happen when this code is run:
new Promise(function(resolve, reject) {
setTimeout(() => resolve(1), 2000);
}).then((result) => {
alert(result);
return result + 2;
}).then((result) => {
throw new Error('FAILED HERE');
alert(result);
return result + 2;
}).then((result) => {
alert(result);
return result + 2;}).catch((e) => {
console.log('error: ', e)
});
Here’s what happens:
Our Promise resolves after 2 seconds with a value of 1
This value is passed to the first .then() and alerted to the screen.
2 is added and a new value of 3 is passed to the second .then()
A new Error is thrown.
Execution stops immediately and the Promise resolves to a rejected state.
.catch() receives our error value and logs it to the screen.
The then() method in JavaScript is used with promises to handle asynchronous operations.
It accepts two callback functions: one for handling a promise’s resolved value and one for handling its rejection.
It returns a new promise, allowing for method chaining.
Why we use then() method
-Handle Results: then() processes promise outcomes, allowing actions based on successful resolution or errors.
-Callback Functions: Provides callbacks for success and failure, ensuring proper handling of asynchronous tasks.
-Method Chaining: Enables chaining multiple then() calls for sequential asynchronous operations, simplifying code readability and flow.
Syntax
demo().then(
(onResolved) => {
// Some task on success
},
(onRejected) => {
// Some task on failure
}
)
Note: demo is a function that returns a promise prototype.
Parameters:onFulfilled: This is a function that is called upon to the success of the promise.
This is an optional parameter.
onRejected: This is a function that is called upon the rejection of the promise.
This is an optional parameter.
Return Value: This method can either return a Promise (if further another then() is called) or nothing.
Example 1:
In this example, we have not passed any arguments.
function demo() {
console.log("Function called!!<br>")
return Promise.resolve("Success");
// or
// return Promise.reject("Failure");
}
demo().then()
Function called!!
Example 2:
In this example, we are Passing only the first callback.
function demo() {
console.log("Function called!!")
return Promise.resolve("Success");
// or
// return Promise.reject("Failure");
}
demo().then(
(message) => {
console.log("Then success:" + message);
}
)
Function called!!
Then success:Success
Note: If the demo function returns a reject then it will generate an error.
Example 3:
In this example, we are Passing both the arguments.
function demo() {
console.log("Function called!!")
return Promise.resolve("Success");
// or
// return Promise.reject("Failure");
}
demo().then(
(message) => {
console.log("Then success:" + message);
},
(message) => {
console.log("Then failure:" + message);
}
)
Function called!!
Then success:Success
Example 4:
In this example, we are using Chaining Multiple then() methods.
Each then() can return a promise (a resolve or a reject) and therefore multiple then() methods can be chained together.
function demo() {
console.log("Function called!!")
return Promise.resolve(1);
// or
// return Promise.reject("Failure");
}
demo().then(
(value) => {
console.log(value);
return ++value;
},
(message) => {
console.log(message);
}
).then(
(value) => {
console.log(value);
},
(message) => {
console.log(message);
}
)
Function called!!
Example 5:
In this example, we are using then() as an asynchronous function.
let demo = new Promise((resolve, reject) => {
resolve(1);
})
let call = demo.then(
(value) => {
console.log(value);
return ++value;
},
(message) => {
console.log(message);
});
console.log(call);
setTimeout(() => {
console.log(call);
});
Promise {status: "pending"}
1
Promise {status: "resolved", result: 2}
让我们以 async 这个关键字开始。
它可以被放置在一个函数前面,如下所示:
async function f() {
return 1;
}
在函数前面的 “async” 这个单词表达了一个简单的事情:即这个函数总是返回一个 promise。
其他值将自动被包装在一个 resolved 的 promise 中。
例如,下面这个函数返回一个结果为 1 的 resolved promise,让我们测试一下:
async function f() {
return 1; // note that the return value will be set to a promise!
}
f().then(alert); // 1, since the returned value is a promise, so we can use the .then() function
……我们也可以显式地返回一个 promise,结果是一样的:
async function f() {
return Promise.resolve(1);
}
f().then(alert); // 1
所以说,async 确保了函数返回一个 promise,也会将非 promise 的值包装进去。
还有另外一个叫 await 的关键词,它只在 async 函数内工作。
await
语法如下: // 只在 async 函数内工作
let value = await promise;
关键字 await 让 JavaScript 引擎等待直到 promise 完成(settle)并返回结果。
这里的例子就是一个 1 秒后 resolve 的 promise:
async function f() {
let promise = new Promise((resolve, reject) => {
setTimeout(() => resolve("done!"), 1000)
});
let result = await promise; // 等待,直到 promise resolve (*)
alert(result); // "done!"
}
f();
这个函数在执行的时候,“暂停”在了 (*) 那一行,并在 promise settle 时,拿到 result 作为结果继续往下执行。
所以上面这段代码在一秒后显示 “done!”。
让我们强调一下:await 实际上会暂停函数的执行,直到 promise 状态变为 settled,然后以 promise 的结果继续执行。
这个行为不会耗费任何 CPU 资源,因为 JavaScript
引擎可以同时处理其他任务:执行其他脚本,处理事件等。
相比于 promise.then,它只是获取 promise 的结果的一个更优雅的语法。
并且也更易于读写。
!!! 不能在普通函数中使用 await
如果我们尝试在非 async 函数中使用 await,则会报语法错误:
function f() {
let promise = Promise.resolve(1);
let result = await promise; // Syntax error
}
如果我们忘记在函数前面写 async 关键字,我们可能会得到一个这个错误。
就像前面说的,await 只在 async 函数中有效。
让我们拿 Promise 链 那一章的 showAvatar() 例子,并将其改写成 async/await 的形式:
我们需要用 await 替换掉 .then 的调用。
另外,我们需要在函数前面加上 async 关键字,以使它们能工作。
async function showAvatar() {
// 读取我们的 JSON
let response = await fetch('/article/promise-chaining/user.json');
let user = await response.json();
// 读取 github 用户信息
let githubResponse = await fetch(`https://api.github.com/users/${user.name}`);
let githubUser = await githubResponse.json();
// 显示头像
let img = document.createElement('img');
img.src = githubUser.avatar_url;
img.className = "promise-avatar-example";
document.body.append(img);
// 等待 3 秒
await new Promise((resolve, reject) => setTimeout(resolve, 3000));
img.remove();
return githubUser;
}
showAvatar();
!!! 现代浏览器在 modules 里允许顶层的 await
在现代浏览器中,当我们处于一个 module 中时,那么在顶层使用 await 也是被允许的。
我们将在 模块 (Module) 简介 中详细学习 modules。
例如:
// 我们假设此代码在 module 中的顶层运行
let response = await fetch('/article/promise-chaining/user.json');
let user = await response.json();
console.log(user);
如果我们没有使用 modules,或者必须兼容 旧版本浏览器 ,那么这儿还有一个通用的方法:包装到匿名的异步函数中。
像这样:
(async () => {
let response = await fetch('/article/promise-chaining/user.json');
let user = await response.json();
...
})();
!!! await 接受 “thenables”
像 promise.then 那样,await 允许我们使用 thenable 对象(那些具有可调用的 then 方法的对象)。
这里的想法是,第三方对象可能不是一个 promise,但却是 promise 兼容的:如果这些对象支持 .then,那么就可以对它们使用 await。
这有一个用于演示的 Thenable 类,下面的 await 接受了该类的实例:
class Thenable {
constructor(num) {
this.num = num;
}
then(resolve, reject) {
alert(resolve);
// 1000ms 后使用 this.num*2 进行 resolve
setTimeout(() => resolve(this.num * 2), 1000); // (*)
}
}
async function f() {
// 等待 1 秒,之后 result 变为 2
let result = await new Thenable(1);
alert(result);
}
f();
如果 await 接收了一个非 promise 的但是提供了 .then 方法的对象,它就会调用这个 .then 方法,并将内建的函数 resolve 和 reject 作为参数传入(就像它对待一个常规的 Promise executor 时一样)。
然后 await 等待直到这两个函数中的某个被调用(在上面这个例子中发生在 (*) 行),然后使用得到的结果继续执行后续任务。
!!! Class 中的 async 方法
要声明一个 class 中的 async 方法,只需在对应方法前面加上 async 即可:
class Waiter {
async wait() {
return await Promise.resolve(1);
}
}
new Waiter()
.wait()
.then(alert); // 1(alert 等同于 result => alert(result))
这里的含义是一样的:它确保了方法的返回值是一个 promise 并且可以在方法中使用 await。
JavaScript Async
"async and await make promises easier to write"
async makes a function return a Promiseawait makes a function wait for a Promise
async function myFunction() {
return "Hello";
}
myFunction().then(
function(value) {myDisplayer(value);}
);
Await Syntax
The keyword await before a function makes the function wait for a promise:
let value = await promise;
The await keyword can only be used inside an async function.
Example
async function myDisplay() {
let myPromise = new Promise(
function(myResolve, myReject) {
myResolve("I love You !!");
}
);
document.getElementById("demo").innerHTML = await myPromise;
}
myDisplay();
Waiting for a Timeout
async function myDisplay() {
let myPromise = new Promise(
function(myResolve, myReject) {
setTimeout(
function() { myResolve("I love You !!"); },
3000);
}
);
document.getElementById("demo").innerHTML = await myPromise;
}
myDisplay();
Waiting for a File
async function getFile() {
let myPromise = new Promise(
function(myResolve, myReject) {
let req = new XML
req.open('GET', "mycar.html");
req.onload = function() {
if (req.status == 200) {myResolve(req.response);}
else {myResolve("File not Found");}
};
req.send();
}
);
document.getElementById("demo").innerHTML = await myPromise;
}
getFile();
Async/await
Async/await
Async functions
Let’s start with the async keyword.
It can be placed before a function, like this:
async function f() {
return 1;
}
The word “async” before a function means one simple thing: a function always returns a promise.
Other values are wrapped in a resolved promise automatically.
For instance, this function returns a resolved promise with the result of 1;
let’s test it:
async function f() {
return 1;
}
f().then(alert); // 1
…We could explicitly return a promise, which would be the same:
async function f() {
return Promise.resolve(1);
}
f().then(alert); // 1
So, async ensures that the function returns a promise, and wraps non-promises in it.
There’s another keyword, await, that works only inside async functions.
Await // works only inside async functions
let value = await promise;
The keyword await makes JavaScript wait until that promise settles and returns its result.
Here’s an example with a promise that resolves in 1 second:
async function f() {
let promise = new Promise( (resolve, reject) => {
setTimeout(
() => resolve("done!"), 1000 )
});
let result = await promise; // wait until the promise resolves (*)
alert(result); // "done!"
}
f();
The function execution “pauses” at the line (*) and resumes when the promise settles, with result becoming its result.
So the code above shows “done!” in one second.
Let’s emphasize: await literally suspends the function execution until the promise settles, and then resumes it with the promise result.
That doesn’t cost any CPU resources, because the JavaScript engine can do other jobs in the meantime: execute other scripts, handle events, etc.
It’s just a more elegant syntax of getting the promise result than promise.then.
And, it’s easier to read and write.
Can’t use await in regular functions
If we try to use await in a non-async function, there would be a syntax error:
function f() {
let promise = Promise.resolve(1);
let result = await promise; // Syntax error
}
We may get this error if we forget to put async before a function.
As stated earlier, await only works inside an async function.
Let’s take the showAvatar() example from the chapter Promises chaining and rewrite it using async/await:
We’ll need to replace .then calls with await.
Also we should make the function async for them to work.
async function showAvatar() {
// read our JSON
let response = await fetch('/article/promise-chaining/user.json');
let user = await response.json();
// read github user
let githubResponse = await fetch(` let githubUser = await githubResponse.json();
// show the avatar
let img = document.createElement('img');
img.src = githubUser.avatar_url;
img.className = "promise-avatar-example";
document.body.append(img);
// wait 3 seconds
await new Promise((resolve, reject) => setTimeout(resolve, 3000));
img.remove();
return githubUser;
}
showAvatar();
Pretty clean and easy to read, right? Much better than before.
await won’t work in the top-level code
People who are just starting to use await tend to forget the fact that we can’t use await in top-level code.
For example, this will not work:
// syntax error in top-level code
let response = await fetch('/article/promise-chaining/user.json');
let user = await response.json();
But we can wrap it into an anonymous async function, like this:
(async () => {
let response = await fetch('/article/promise-chaining/user.json');
let user = await response.json();
...
})();
P.S.
New feature: starting from V8 engine version 8.9+, top-level await works in modules.
await accepts “thenables”
Like promise.then, await allows us to use thenable objects (those with a callable then method).
The idea is that a third-party object may not be a promise, but promise-compatible: if it supports .then, that’s enough to use it with await.
Here’s a demo Thenable class; the await below accepts its instances:
class Thenable {
constructor(num) {
this.num = num;
}
then(resolve, reject) {
alert(resolve);
// resolve with this.num*2 after 1000ms
setTimeout(() => resolve(this.num * 2), 1000); // (*)
}
}
async function f() {
// waits for 1 second, then result becomes 2
let result = await new Thenable(1);
alert(result);
}
f();
If await gets a non-promise object with .then, it calls that method providing the built-in functions resolve and reject as arguments (just as it does for a regular Promise executor).
Then await waits until one of them is called (in the example above it happens in the line (*)) and then proceeds with the result.
Async class methods
To declare an async class method, just prepend it with async:
class Waiter {
async wait() {
return await Promise.resolve(1);
}
}
new Waiter()
.wait()
.then(alert); // 1 (this is the same as (result => alert(result)))
The meaning is the same: it ensures that the returned value is a promise and enables await.
Error handling
If a promise resolves normally, then await promise returns the result.
But in the case of a rejection, it throws the error, just as if there were a throw statement at that line.
This code:
async function f() {
await Promise.reject(new Error("Whoops!"));
}
…is the same as this:
async function f() {
throw new Error("Whoops!");
}
In real situations, the promise may take some time before it rejects.
In that case there will be a delay before await throws an error.
We can catch that error using try..catch, the same way as a regular throw:
async function f() {
try {
let response = await fetch(' } catch(err) {
alert(err); // TypeError: failed to fetch
}
}
f();
In the case of an error, the control jumps to the catch block.
We can also wrap multiple lines:
async function f() {
try {
let response = await fetch('/no-user-here');
let user = await response.json();
} catch(err) {
// catches errors both in fetch and response.json
alert(err);
}
}
f();
If we don’t have try..catch, then the promise generated by the call of the async function f() becomes rejected.
We can append .catch to handle it:
async function f() {
let response = await fetch('}
// f() becomes a rejected promise
f().catch(alert); // TypeError: failed to fetch // (*)
If we forget to add .catch there, then we get an unhandled promise error (viewable in the console).
We can catch such errors using a global unhandledrejection event handler as described in the chapter Error handling with promises.
async/await and promise.then/catch
When we use async/await, we rarely need .then, because await handles the waiting for us.
And we can use a regular try..catch instead of .catch.
That’s usually (but not always) more convenient.
But at the top level of the code, when we’re outside any async function, we’re syntactically unable to use await, so it’s a normal practice to add .then/catch to handle the final result or falling-through error, like in the line (*) of the example above.
async/await works well with Promise.all
When we need to wait for multiple promises, we can wrap them in Promise.all and then await:
// wait for the array of results
let results = await Promise.all([
fetch(url1),
fetch(url2),
...
]);
In the case of an error, it propagates as usual, from the failed promise to Promise.all, and then becomes an exception that we can catch using try..catch around the call.
Summary
The async keyword before a function has two effects:
Makes it always return a promise.
Allows await to be used in it.
The await keyword before a promise makes JavaScript wait until that promise settles, and then:
If it’s an error, the exception is generated — same as if throw error were called at that very place.
Otherwise, it returns the result.
Together they provide a great framework to write asynchronous code that is easy to both read and write.
With async/await we rarely need to write promise.then/catch, but we still shouldn’t forget that they are based on promises, because sometimes (e.g.
in the outermost scope) we have to use these methods.
Also Promise.all is nice when we are waiting for many tasks simultaneously.
Tasks
Rewrite using async/await
Rewrite this example code from the chapter Promises chaining using async/await instead of .then/catch:
function loadJson(url) {
return fetch(url)
.then(response => {
if (response.status == 200) {
return response.json();
} else {
throw new Error(response.status);
}
});
}
loadJson('no-such-user.json')
.catch(alert); // Error: 404
solution
Rewrite "rethrow" with async/await
Below you can find the “rethrow” example.
Rewrite it using async/await instead of .then/catch.
And get rid of the recursion in favour of a loop in demoGithubUser:
with async/await that becomes easy to do.
class
constructor(response) {
super(`${response.status} for ${response.url}`);
this.name = '
this.response = response;
}
}
function loadJson(url) {
return fetch(url)
.then(response => {
if (response.status == 200) {
return response.json();
} else {
throw new }
});
}
// Ask for a user name until github returns a valid user
function demoGithubUser() {
let name = prompt("Enter a name?", "iliakan");
return loadJson(` .then(user => {
alert(`Full name: ${user.name}.`);
return user;
})
.catch(err => {
if (err instanceof alert("No such user, please reenter.");
return demoGithubUser();
} else {
throw err;
}
});
}
demoGithubUser();
solution
Call async from non-async
We have a “regular” function called f.
How can you call the async function wait() and use its result inside of f?
async function wait() {
await new Promise(resolve => setTimeout(resolve, 1000));
return 10;
}
function f() {
// ...what should you write here?
// we need to call async wait() and wait to get 10
// remember, we can't use "await"
}
P.S.
The task is technically very simple, but the question is quite common for developers new to async/await.
Asynchronous - True or False?
To send the request asynchronously, the async parameter of the open()
method has to be set to true:
xmlhttp.open("GET", "xmlhttp_info.txt", true);
Sending asynchronously requests is a huge improvement for web developers.
Many of the tasks
performed on the server are very time consuming.
By sending asynchronously, the
JavaScript does not have to wait for the server response, but can instead:
execute other scripts while waiting for server response
deal with the response when the response is ready
Async = true
When using async = true, specify a function to execute when the response is ready in the onreadystatechange event:
To use async = false, change the third parameter in the open() method to false:
xmlhttp.open("GET", "xmlhttp_info.txt", false);
Using async = false is not recommended, but for a few small requests this can be ok.
Remember that the JavaScript will NOT continue to execute,
until the server response is ready.
If the server is busy or slow, the
application will hang or stop.
Note: When you use async = false, do NOT write an onreadystatechange
function - just put the code after the send() statement:
Example
xmlhttp.open("GET", "xmlhttp_info.txt", false);
xmlhttp.send();
document.getElementById("demo").innerHTML = xmlhttp.responseText;Try it Yourself »
variables in asynchronous callback functions
What’s the problem?
First let’s assume you have declared a variable called myVar:
var myVar;
If you immediately log the contents of the variable, it will return undefined.
Now if you define any of the following:
setTimeout(function() { myVar = "some value"; }, 0);
or:
$.ajax({ url: '...', success: function(response) { myVar = response; }
});
or:
var script = document.createElement("script");
script.type = "text/javascript";
script.src = "myscript.js";
script.onload = function(){ myVar = "some value"; };
document.body.appendChild(script);
and immediately afterwards display the contents of myVar, you will also get undefined as result.
Why is the variable not set?
In all examples above, the function defined are what’s called asynchronous callbacks.
This means that they are immediately created but not immediately executed.
setTimeout pushes it into the event queue, the AJAX calls will execute it once the call returns and onload will be executed when the DOM element is loaded.
In all three cases, the function does not execute right away but rather whenever it is triggered asynchronously.
So when you log or display the contents of the variable, the function has not yet run and the content has not yet been set.
So even though JavaScript actually works with a single-thread model, you’ve landed in the asynchronous problem zone.
Synchronous vs.
Asynchronous
Basically the difference between a synchronous function call and an asynchronous one can be shown with these 2 pieces of code:
var myVar;
function doSomething() { myVar = "some value"; }
doSomething(); //synchronous call
log(myVar);
And:
var myVar;
function doSomething() { myVar = "some value"; }
log(myVar);
doSomething(); //asynchronous call
In the asynchronous case, our function is also defined before logging the variable but is call some time later.
How to make it work?
You will need to rewrite your code in order to use callbacks which will be called when the processing (in this case setting the value of myVar) is done.
First example: Instead of using the following:
var myVar;
setTimeout(function() { myVar = "some value"; }, 0);
alert(myVar);
You should rather do the following:
var myVar;
function callback() { alert(myVar); }
setTimeout(function() {
myVar = "some value";
callback(); }, 0);
Instead of this:
var myVar;
var script = document.createElement("script");
script.type = "text/javascript";
script.src = "d3.min.js";
script.onload = function(){ myVar = "some value"; };
document.body.appendChild(script);
alert(myVar);
Use this:
function callback(response) { alert("loaded"); }
var script = document.createElement("script");
script.type = "text/javascript";
script.src = "d3.min.js";
script.onload = callback;
document.body.appendChild(script);
And instead of doing the following:
var myVar;
$.ajax({ url: '...', success: function(response) { myVar = response; }
});
alert(myVar);
Do the following:
function callback(response) { alert(response); }
$.ajax({ url: '...', success: callback
});
Of course, here another solution is to make the AJAX call synchronous by adding the following to the options:
async: false
Also if you use $.get or $.post, you’ll need to rewrite it to use $.ajax instead.
But this is not a good idea.
First if the call lasts longer than expected, you will block the UI making your browser window unresponsive.
And at some point in the time the browser will ask your user whether you want to stop the unresponsive script.
So, even though programing everything in an asynchronous way with callbacks is not always trivial, doing everything in a synchronous way will cause more sporadic and difficult to handle issues.
So to summarize, you should either use a callback or directly call a function after processing and not only rely on setting a variable in the asynchronous part.
variables in asynchronous callback functionsonload function with returnMy function does not return value
In JavaScript, the <k>this</k> keyword refers to an object.
The <k>this</k> keyword refers to different objects depending on how it is used:
Methods like call(), apply(), and bind() can refer this to any object.
Example
const person = {
firstName: "John",
lastName : "Doe",
id : 5566,
fullName : function() {
return this.firstName + " " + this.lastName;
}
};
When used alone, this refers to the global object.
<k>this</k> in Event Handlers
Example
<button onclick="this.style.display='none'">
Click to Remove Me!
</button>
Example
const person = {
firstName : "John",
lastName : "Doe",
id : 5566,
myFunction : function() {
return this;
}
};
Example
const person = {
firstName: "John",
lastName : "Doe",
id : 5566,
fullName : function() {
return this.firstName + " " + this.lastName;
}
};
Example
const person1 = {
fullName: function() {
return this.firstName + " " + this.lastName;
}
}
const person2 = {
firstName:"John",
lastName: "Doe",
}
// Return "John Doe":
person1.fullName.call(person2);
to list all memory variavles
for(var b in window) {
if(window.hasOwnProperty(b)) console.log(b);
}
codes to be studied
appendChild()
select()
execCommand()
remove();
all = $('*').not('script, meta, link, style, noscript, title')
(document).on('mousemove', function(e) {
let cordinate_x = e.pageX;
let cordinate_y = e.pageY;
let windowWidth = $(window).width();
if (cordinate_y < tooltip.outerHeight()) { tooltip.css({'top': (cordinate_y + 10) + 'px'});
tooltip.addClass(tooltipClass);
$(window).on('keyup', function(e) { let keyCode = e.keyCode ? e.keyCode : e.which;
if (keyCode == 44) {stopPrntScr();
audio_play();
$(document).on('contextmenu', function(e) { let target = $(event.target);
if (target.is("img") || target.is("div.ays_tooltip_class")) {let t = e || window.event;
let n = t.target || t.srcElement;
if (n.nodeName !== "A") { show_tooltip(1 );
$(document).on('dragstart', function() { let target = $(event.target);
if (!target.is("")) {show_tooltip(1 );
$(window).on('keydown', function(event) { var sccp_selObj = window.getSelection();
if (!sccp_selObj.rangeCount < 1) {var sccp_selRange = sccp_selObj.getRangeAt(0);
sccp_selection_selector = sccp_selRange.startContainer.parentElement;
check_selectors = !$(sccp_selection_selector).is("");
if (check_selectors) {var isOpera = (BrowserDetect.browser === "Opera");
var isFirefox = (BrowserDetect.browser === 'Firefox');
var isSafari = (BrowserDetect.browser === 'Safari');
var isIE = (BrowserDetect.browser === 'Explorer');
var isChrome = (BrowserDetect.browser === 'Chrome');
var isMozilla = (BrowserDetect.browser === 'Mozilla');
if (BrowserDetect.OS === 'Windows') {
if (isChrome) { if (((event.ctrlKey && event.shiftKey) && ( event.keyCode === 73 || event.keyCode === 74 || event.keyCode === 68 || event.keyCode === 67))) { show_tooltip(1);
if (isFirefox) { if (((event.ctrlKey && event.shiftKey) && ( event.keyCode === 73 || event.keyCode === 74 || event.keyCode === 67 || event.keyCode === 75 || event.keyCode === 69)) || event.keyCode === 118 || (event.keyCode === 112 && event.shiftKey) || (event.keyCode === 115 && event.shiftKey) || (event.keyCode === 118 && event.shiftKey) || (event.keyCode === 120 && event.shiftKey)) { show_tooltip(1);
if (isOpera) { if (((event.ctrlKey && event.shiftKey) && ( event.keyCode === 73 || event.keyCode === 74 || event.keyCode === 67 || event.keyCode === 88 || event.keyCode === 69))) { show_tooltip(1);
if (isIE) { if ((event.keyCode === 123 && event.shiftKey)) { show_tooltip(1);
if (isMozilla) { if ((event.ctrlKey && event.keyCode === 73) || (event.altKey && event.keyCode === 68)) { show_tooltip(1);
if (BrowserDetect.OS === 'Linux') {
if (BrowserDetect.OS === 'Mac') {
if (isChrome || isSafari || isOpera || isFirefox)
function disableSelection(e) {
if (typeof e.onselectstart !== "undefined")e.onselectstart = function() { show_tooltip( );
audio_play();
return false};
else if (typeof e.style.MozUserSelect !== "undefined")e.style.MozUserSelect = "none";
else e.onmousedown = function() { show_tooltip();
e.style.cursor = "default"}
$('#ays_tooltip').fadeOut();
function copyToClipboard(text) { var textarea = document.createElement("textarea");
catch (ex) {console.warn("Copy to clipboard failed.", ex);
document.body.removeChild(textarea);
function htmlDecode(input) { var doc = new DOMParser().parseFromString(input, "text/html");
return doc.documentElement.textContent;
this.version = this.searchVersion(navigator.userAgent)
this.OS = this.searchString(this.dataOS)
parseFloat(dataString.substring(index + this.versionSearchString.length + 1));
execCommand()
Year 2022 answer: The execCommand() is officially obsolete/deprecated but there's no alternative.
So if you must have rich text support, you have to keep using execCommand() and figure out yourself what actually works with browsers that you want to support.
Note that real world user agents (browsers such as Chrome, Firefox and Safari) cannot drop support for execCommand() because so many services require support for it.
The sad state of things is that HTML5 cannot specify any common ground.
This is because browser vendors do not agree how execCommand() should work.
So nothing can be specified for HTML5, which has the overall objective to specify all stuff – and only stuff – that's needed for full interoperability for any new browser to enter market.
HTML5 fails here because execCommand() compatibility is actually required for any new browser to enter market.
So it would make sense to standardize at least one of the browser specific implementations as the official one.
All the current standardization efforts (Input Events 2, Clipboard API) fail to even try to cover the features that execCommand() actually does (for example, undo/redo, actually changing content within the selection range).
The hardest part to solve is the caret movement, selecting text, different IME (Input Method Editor) behavior and handling native clipboard.
These all interact with each other in various ways depending on browser and operating system.
For example, the behavior that iOS Safari has on iPad while writing Traditional Chinese is totally different from Firefox on Windows with Thai IME.
Which is again totally different from Chrome running on Chromebook while writing Finnish or entering emoji characters with multiple UNICODE point encoding.
And as none of the available JS APIs disclose all the details, you MUST use contenteditable and possibly execCommand(), too, for most browsers to get correct input from the IME.
Also note that e.g.
Android GBoard needs to also know about the surrounding text within the same editable content because it uses AI logic to correctly figure out which word suggestions to give to the user while inputting text, so you cannot fake this with a single empty invisible textarea under the caret because that would be missing the required context.
That hasn't prevented people from trying to do exactly that but it fails in practice in various ways.
Syntax
Timer
var shell = WScript.CreateObject("WScript.Shell");
// 定义定时器持续时间(毫秒)
var timerDuration = 5000; // 5秒
// 定义重复次数
var repeatCount = 3; // 重复3次
// 循环执行指定次数
for (var i = 1; i <= repeatCount; i++) {
// 显示消息框
shell.Popup("定时器已到期!", 0, "定时器");
// 等待指定的持续时间
WScript.Sleep(timerDuration);
}
在这个 JavaScript 示例中,我们使用 WScript.CreateObject 方法创建了 WScript.Shell 对象,然后使用该对象的 Popup 方法显示一个消息框。
使用 WScript.Sleep 方法来实现定时器的延迟。
将代码保存为 .js 文件,并使用 Windows Script Host (WSH) 运行该文件。
它会在指定的时间间隔后弹出消息框,并按照设置的重复次数重复显示。
请注意,这段代码使用的是 Windows Script Host (WSH),而不是在浏览器中运行的标准 JavaScript。
因此,在命令行或通过脚本运行该文件时,确保系统中已安装并配置了 WSH。
要在浏览器中运行 JavaScript 编写定时闹钟
使用 setTimeout 函数来实现定时器功能。
function setAlarm(alarmTime) {
var currentTime = new Date().getTime();
var alarmDateTime = new Date(alarmTime).getTime();
var timeDifference = alarmDateTime - currentTime;
if (timeDifference > 0) {
setTimeout(function() {
alert("闹钟时间到!");
}, timeDifference);
} else {
alert("闹钟时间必须晚于当前时间!");
}
}
// 设置闹钟时间
var alarmTime = "2023-11-13T08:00:00"; // 闹钟时间,格式为 "YYYY-MM-DDTHH:mm:ss"
// 调用设置闹钟函数
setAlarm(alarmTime);
在这个示例中,setAlarm 函数接受一个闹钟时间作为参数。
它首先获取当前时间和闹钟时间的时间戳,并计算它们之间的时间差(以毫秒为单位)。
如果时间差大于零,则使用 setTimeout 函数在时间差之后触发弹窗提醒。
如果时间差小于等于零,则显示一个错误提示。
您可以将闹钟时间作为字符串传递给 setAlarm 函数,并按照 "YYYY-MM-DDTHH:mm:ss" 的格式设置时间。
请注意,日期和时间之间使用 "T" 分隔。
在浏览器的控制台中运行这段代码,它将设置一个定时闹钟,并在指定的闹钟时间到达时触发弹窗提醒。
var tempArray = testArray.slice();
creating a reference to testArray:
var tempArray = testArray;
Basically tempArray is just another name for the same object.
to create a copy of the array
use slice() which copies the data in testArray.
This is an issue of pass by reference, vs pass by value -- it very much varies language to language.
⇧
It is possible to pass data from one application to a browser through shared memory or inter-process communication (IPC) mechanisms.
Here are a few common approaches:
Shared Memory:⇧ Applications can create a shared memory region that is accessible by multiple processes.
One application can write data to this shared memory, and the browser can read it.
The data can be structured in a specific format, such as JSON or binary, to ensure compatibility between the applications.
WebSocket:⇧ WebSocket is a communication protocol that provides full-duplex communication channels over a single TCP connection.
An application can establish a WebSocket connection with the browser, allowing bidirectional communication.
The application can then send data to the browser in real-time.
Local Server:⇧ An application can act as a local server and expose an API or web service.
The browser can send HTTP requests to this local server, passing the data as part of the request payload or query parameters.
The application can then process the request and respond with the necessary data.
Inter-Process Communication (IPC):⇧ IPC mechanisms like named pipes, Unix domain sockets, or message queues can be used to facilitate communication between the application and the browser.
The application can send messages or data to the browser using the chosen IPC mechanism, and the browser can receive and process them accordingly.
It's important to note that the specific implementation details may vary depending on the operating system, programming languages, and frameworks being used.
Each approach has its own advantages and considerations, so the choice of method depends on the specific requirements and constraints of your application.
using Python
⇧
Here's an example using Python to demonstrate how to pass data from one application to a browser through shared memory:
Application (Data Producer): python
import mmap
# Open or create a shared memory region
shm = mmap.mmap(-1, 1024, "SharedMemName")
# Write data to the shared memory
data = b"Hello, browser!"
shm.write(data)
# Close the shared memory
shm.close()
Browser (Data Consumer): javascript
// Create an XMLHttpRequest object
var xhr = new XMLHttpRequest();
// Open a GET request to the server endpoint that reads the shared memory
xhr.open('GET', '/readSharedMemory', true);
// Set the response type to 'arraybuffer'
xhr.responseType = 'arraybuffer';
// Handle the response
xhr.onload = function() {
// Retrieve the shared memory data
var sharedData = new Uint8Array(xhr.response);
// Convert the shared memory data to a string
var text = String.fromCharCode.apply(null, sharedData);
// Display the data in the browser console
console.log(text);
};
// Send the request
xhr.send();
In this example, the application (Data Producer) creates a shared memory region using the mmap module in Python.
It writes the data (in this case, the string "Hello, browser!") to the shared memory region.
On the browser side (Data Consumer), an XMLHttpRequest is used to send a GET request to a server endpoint (e.g., /readSharedMemory).
The server reads the shared memory and returns the data as an ArrayBuffer in the response.
The response data is then converted to a string and displayed in the browser console.
Please note that this is a simplified example for demonstration purposes, and the actual implementation may vary based on your specific requirements and programming environment.
using R
⇧
Here's an example using R to demonstrate how to pass data from R to a browser through shared memory:
Application (Data Producer) - R script:
# Install required packages if not already installed
if (!require("Rcpp")) install.packages("Rcpp")
# Load the required libraries
library(Rcpp)
library(RcppParallel)
# Define a function to write data to shared memory
writeToSharedMemory <- function(data) {
# Convert the data to raw bytes
raw_data <- charToRaw(data)
# Create a shared memory object
shared_memory <- SharedMemory$new("SharedMemName", length(raw_data))
# Write the data to shared memory
shared_memory$write(0, raw_data)
# Release the shared memory object
shared_memory$detach()
}
# Call the function to write data to shared memory
writeToSharedMemory("Hello, browser!")
Browser (Data Consumer) - JavaScript:
// Create an XMLHttpRequest object
var xhr = new XMLHttpRequest();
// Open a GET request to the server endpoint that reads the shared memory
xhr.open('GET', '/readSharedMemory', true);
// Set the response type to 'arraybuffer'
xhr.responseType = 'arraybuffer';
// Handle the response
xhr.onload = function() {
// Retrieve the shared memory data
var sharedData = new Uint8Array(xhr.response);
// Convert the shared memory data to a string
var text = String.fromCharCode.apply(null, sharedData);
// Display the data in the browser console
console.log(text);
};
// Send the request
xhr.send();
In this example, the R script (Data Producer) uses the Rcpp and RcppParallel libraries to create a shared memory object and write data to it.
The writeToSharedMemory function converts the data (in this case, the string "Hello, browser!") to raw bytes and writes it to the shared memory region.
On the browser side (Data Consumer), an XMLHttpRequest is used to send a GET request to a server endpoint (e.g., /readSharedMemory).
The server reads the shared memory and returns the data as an ArrayBuffer in the response.
The response data is then converted to a string and displayed in the browser console.
Please note that this example assumes you have the necessary R packages (Rcpp and RcppParallel) installed.
Additionally, the server-side implementation that reads the shared memory and serves it to the browser needs to be implemented separately based on your specific web framework or server environment.
using JavaScript
⇧
In JavaScript, there is no built-in mechanism for directly sharing memory between different browser tabs or windows.
However, you can use other techniques to pass data between JavaScript instances running in different tabs or windows of the same browser.
One such technique is using the localStorage object to share data.
Here's an example:
Sending data from JavaScript in one tab/window:
javascript
// Set the data in localStorage
localStorage.setItem('sharedData', 'Hello, other tab!');
Receiving data in JavaScript in another tab/window:
javascript
// Listen for changes to localStorage
window.addEventListener('storage', function(event) {
if (event.key === 'sharedData') {
// Retrieve the shared data
var sharedData = event.newValue;
// Do something with the shared data
console.log(sharedData);
}
});
In this example, the first JavaScript instance sets the data in the localStorage object using the setItem method.
The key for the data is 'sharedData', and the value is 'Hello, other tab!'.
The second JavaScript instance listens for changes to the localStorage object using the storage event.
When the event is triggered, it checks if the event key is 'sharedData'.
If it matches, it retrieves the shared data from event.newValue and can then perform any necessary operations with the shared data.
Please note that this technique is limited to sharing data within the same browser, and it has some limitations such as storage capacity restrictions and the requirement for the events to be triggered by changes in the localStorage object.
using Node.js
⇧
In Node.js, you can use the shared-memory package to create and manage shared memory regions, allowing you to pass data from Node.js to a browser.
Here's an example:
Install the required package:
shell
npm install shared-memory
Node.js Server (Data Producer): javascript
const sharedMemory = require('shared-memory');
// Create or open a shared memory region
const shm = sharedMemory.create('SharedMemName', 1024);
// Write data to the shared memory
const data = 'Hello, browser!';
shm.write(data);
// Close the shared memory
shm.close();
Browser (Data Consumer) - JavaScript:
// Create an XMLHttpRequest object
var xhr = new XMLHttpRequest();
// Open a GET request to the server endpoint that reads the shared memory
xhr.open('GET', '/readSharedMemory', true);
// Set the response type to 'arraybuffer'
xhr.responseType = 'arraybuffer';
// Handle the response
xhr.onload = function() {
// Retrieve the shared memory data
var sharedData = new Uint8Array(xhr.response);
// Convert the shared memory data to a string
var text = String.fromCharCode.apply(null, sharedData);
// Display the data in the browser console
console.log(text);
};
// Send the request
xhr.send();
In this example, the Node.js server (Data Producer) uses the shared-memory package to create or open a shared memory region with the name 'SharedMemName' and a size of 1024 bytes.
It then writes the data (in this case, the string 'Hello, browser!') to the shared memory region.
On the browser side (Data Consumer), an XMLHttpRequest is used to send a GET request to a server endpoint (e.g., /readSharedMemory).
The server reads the shared memory and returns the data as an ArrayBuffer in the response.
The response data is then converted to a string and displayed in the browser console.
Please note that this example assumes you have installed the shared-memory package and have a Node.js server set up to handle the HTTP requests.
The server-side implementation that reads the shared memory and serves it to the browser needs to be implemented separately based on your specific server environment.
call a function when a javascript variable changed
In JavaScript, there is no built-in mechanism to directly detect changes in a variable.
However, you can create a custom setter function or use a JavaScript Proxy object to achieve this behavior.
Here's an example using a setter function:
javascript
// Create a variable with an initial value
let myVariable = 0;
// Create a setter function for the variable
function setMyVariable(value) {
myVariable = value;
// Call your function here
yourFunction();
}
// Assign the setter function to the variable
myVariable = setMyVariable;
// Your function to be called when the variable changes
function yourFunction() {
console.log('Variable has changed!');
}
// Update the variable's value
myVariable = 10; // This will trigger the setter function and call yourFunction()
In this example, we define a variable myVariable and a setter function setMyVariable to update its value.
Whenever you assign a new value to myVariable, it will actually call the setMyVariable function, which in turn updates the value and calls yourFunction.
This way, you can ensure that yourFunction is invoked whenever the variable changes.
You may need to adapt this approach depending on your specific use case and how the variable is being accessed or modified in your code.
To run a function after an element has changed without continuously running the function
Make use of JavaScript's MutationObserver API.
The MutationObserver allows you to watch for changes in a specific DOM element and trigger a callback function when the changes occur.
Here's an example of how you can use the MutationObserver to achieve this:
javascript
// Select the target element
const targetElement = document.getElementById('your-element-id');
// Create a new MutationObserver
const observer = new MutationObserver(function(mutationsList, observer) {
// Check if the mutations include the desired changes
for (let mutation of mutationsList) {
if (mutation.type === 'attributes' && mutation.attributeName === 'class') {
// Call your function here
yourFunction();
// Disconnect the observer after the change is detected
observer.disconnect();
break;
}
}
});
// Start observing the target element for changes
observer.observe(targetElement, { attributes: true });
// Your function to be called when the element changes
function yourFunction() {
console.log('Element has changed!');
}
In this example, the MutationObserver is created and attached to the target element using the observe method.
In the callback function, you can check for specific types of mutations (in this case, attribute changes) and execute your desired function.
Once the change is detected, you can disconnect the observer using the disconnect method to stop further observations.
Make sure to replace 'your-element-id' with the actual ID of the element you want to monitor, and customize the yourFunction function to perform the desired actions when the element changes.
Use browser javascript to write file to local drive
In a web browser environment, JavaScript doesn't have direct access to the local file system for security reasons.
However, you can achieve file writing functionality using a combination of JavaScript and other web technologies.
One common approach is to use the File API and the download attribute on an anchor tag.
Here's an example:
html
<!DOCTYPE html>
<html>
<head><title>File Writing Example</title></head>
<body>
<button onclick="saveToFile()">Save Text to File</button>
<script>
function saveToFile() {
var textToWrite = "This is the content of the file.";
var element = document.createElement('a');
element.setAttribute('href', 'data:text/plain;charset=utf-8,' + encodeURIComponent(textToWrite));
element.setAttribute('download', 'myfile.txt');
element.style.display = 'none';
document.body.appendChild(element);
element.click();
document.body.removeChild(element);
}
</script>
</body>
</html>
In this example, we create a button with the onclick event that triggers the saveToFile function.
Inside the function, we create a new anchor element using document.createElement('a').
We set the href attribute to a data URL that contains the text content we want to save.
The download attribute specifies the filename for the downloaded file.
We then append the anchor element to the document body, trigger a click event on it programmatically using element.click(), and finally remove the element from the document.
When the user clicks the button, their browser will download the file with the specified content as a text file.
The user will be prompted to save the file to their local drive.
If you have a web page running locally on your computer, you can use JavaScript to write a file to the local drive.
However, it requires additional steps and is not as straightforward as the previous example.
To write a file to the local drive, you can use the File System API, which is available in some modern browsers.
Here's an example of how you can use the File System API to write a file:
html
<!DOCTYPE html>
<html>
<head>
<title>Local File Writing Example</title>
</head>
<body>
<button onclick="saveToFile()">Save Text to File</button>
<script>
function errorHandler(err) {
console.error('Error:', err);
}
function saveToFile() {
var textToWrite = "This is the content of the file.";
window.requestFileSystem = window.requestFileSystem || window.webkitRequestFileSystem;
window.requestFileSystem(
window.PERSISTENT,
5 * 1024 * 1024, // 5MB storage space
function(fs) {
fs.root.getFile(
'myfile.txt',
{ create: true },
function(fileEntry) {
fileEntry.createWriter(
function(fileWriter) {
fileWriter.onwriteend = function() {
console.log('File saved successfully.');
};
fileWriter.onerror = errorHandler;
var blob = new Blob([textToWrite], { type: 'text/plain' });
fileWriter.write(blob);
},
errorHandler
);
},
errorHandler
);
},
errorHandler
);
}
</script>
</body>
</html>
In this example, we use the requestFileSystem method to request access to the file system.
We then specify the storage space size (5MB in this case) and provide a success callback function and an error callback function.
Inside the success callback, we use fs.root.getFile to create or access the file.
We pass the filename as 'myfile.txt', and { create: true } to ensure the file is created if it doesn't exist.
Once we have the fileEntry, we call fileEntry.createWriter to create a FileWriter object.
We set up event handlers for onwriteend and onerror to handle the write operation's success or failure.
We create a Blob object containing the text content to be written, specifying the MIME type as 'text/plain'.
Then we call fileWriter.write to write the Blob to the file.
When the user clicks the button, the JavaScript code will attempt to write the file to the local drive using the File System API.
Please note that the availability and support for the File System API may vary among different browsers, and it may require specific permissions or additional configurations to work properly.
To save a file from a web browser by making a request to a Node.js server
Set up a Node.js server: Create a Node.js server using a framework like Express.js or the built-in http module.
Set up a route to handle the file-saving request.
Handle the file-saving request on the server: In the server route handler, receive the file content from the browser request and save it to the server's file system using Node.js's built-in fs module.
Send a response to the browser: Once the file is saved successfully or encounters an error, send a response back to the browser to indicate the status of the file-saving operation.
Here's an example to illustrate this process:
Node.js Server:
javascript
const express = require('express');
const fs = require('fs');
const app = express();
const PORT = 3000;
app.post('/savefile', (req, res) => {
let fileData = '';
req.on('data', (chunk) => {
fileData += chunk;
});
req.on('end', () => {
// Save the file to the server's file system
fs.writeFile('path/to/save/file.txt', fileData, (err) => {
if (err) {
console.error('Error saving file:', err);
res.status(500).send('Error saving file');
} else {
console.log('File saved successfully');
res.send('File saved successfully');
}
});
});
});
app.listen(PORT, () => {
console.log(`Server is running on port ${PORT}`);
});
In this example, we set up an Express.js server listening on port 3000.
The /savefile route is configured to handle POST requests.
Inside the route handler, we listen to the data event of the request object to receive the file content sent by the browser.
We concatenate the received chunks of data into a single string variable fileData.
When the request ends (end event), we use fs.writeFile to save the file to the server's file system.
Adjust the file path in the writeFile function to the desired location where you want to save the file.
If the file saving is successful, we send a response with status code 200 and the message "File saved successfully" back to the browser.
If an error occurs during the file-saving operation, we send a response with status code 500 and the message "Error saving file".
On the browser side, you need to make an HTTP POST request to the server's /savefile route, sending the file content.
You can use JavaScript's fetch API or other AJAX libraries to accomplish this.
Here's an example using fetch:
Browser JavaScript:
javascript
function saveFileToServer() {
var fileContent = 'This is the content of the file.';
fetch('/savefile', {
method: 'POST',
body: fileContent
})
.then(response => {
if (response.ok) {
console.log('File saved on the server');
} else {
console.error('Error saving file on the server');
}
})
.catch(error => {
console.error('Error:', error);
});
}
saveFileToServer();
In this example, we define the saveFileToServer function, which sends an HTTP POST request to the server's /savefile route.
We pass the file content as the request body.
When the server responds, we check the response's status code.
If it's successful (status code 200), we log the message "File saved on the server".
Otherwise, we log the error message "Error saving file on the server" in case of an unsuccessful response or connection failure.
Make sure to adjust the server URL ('/savefile') in the fetch request based on your server's configuration.
With these steps, you can save a file from a web browser by making a request to a Node.js server.
To draw stock OHLC charts using JavaScript
One popular library for this purpose is Chart.js.
Here's a step-by-step guide on how to use Chart.js to draw OHLC charts:
Step 1: Include Chart.js Library
Add the Chart.js library to your HTML file by including the following script tag:
html
<script src="https://cdn.jsdelivr.net/npm/chart.js"></script>
Step 2: Prepare HTML Canvas Element
Create an HTML canvas element where the chart will be rendered.
Make sure to give it an ID for easy reference:
html
<canvas id="ohlcChart"></canvas>
Step 3: Retrieve Stock Data
Fetch or retrieve the stock data that contains OHLC values.
You can use an API or a data source of your choice to obtain the required data.
Step 4: Prepare Data for Chart.js
Convert the retrieved stock data into a format that Chart.js can understand.
The data should be organized as an array of objects, with each object representing a data point.
Each object should have properties for t (timestamp), o (open), h (high), l (low), and c (close).
For example:
javascript
const stockData = [
{ t: 1630518000000, o: 100, h: 110, l: 90, c: 105 },
{ t: 1630604400000, o: 105, h: 115, l: 95, c: 112 },
// Add more data points...
];
example:
const ohlcData = [
{ x: Date.parse('2023-08-01'), o: 221.13, h: 222.99, l: 222.13, c: 221.31 },
{ x: Date.parse('2023-08-02'), o: 221.13, h: 222.99, l: 222.13, c: 222.31 },
// Add more data points...
];
Step 5: Create OHLC Chart
Initialize a new Chart.js chart instance and configure its options and data using the stock data prepared in the previous step:
javascript
// Get the canvas element
const canvas = document.getElementById('ohlcChart');
// Create the OHLC chart
const ohlcChart = new Chart(canvas, {
type: 'candlestick',
data: {
datasets: [{
label: 'Stock Data',
data: stockData,
borderColor: 'rgba(0, 0, 0, 1)',
borderWidth: 1
}]
},
options: {
// Configure chart options as needed
// For example, you can set the chart title, axis labels, etc.
// Refer to Chart.js documentation for available options
}
});
Step 6: Customize and Style the Chart
You can further customize the chart's appearance and style by modifying the options object passed to the Chart.js chart instance.
For example, you can change the colors, add tooltips, set axis labels, and more.
Refer to the Chart.js documentation for a comprehensive list of available options and customization possibilities.
That's it! With these steps, you can draw stock OHLC charts using JavaScript and Chart.js.
Remember to adjust the code according to your specific data and requirements.
Cross-Origin Resource Sharing
In a web browser, the JavaScript CORS (Cross-Origin Resource Sharing) policy restricts requests made from a webpage to resources located on a different domain.
This policy exists for security reasons and cannot be bypassed directly from JavaScript code.
However, if you have control over the server hosting the JavaScript file and can modify its configuration, you can enable CORS on the server to allow requests from the domain where your webpage is hosted.
This requires making changes on the server-side, not within the JavaScript code itself.
Assuming you have control over the server, here's how you can enable CORS for a JavaScript file:
Configure the server: Modify the server configuration to include the appropriate CORS headers.
This process depends on the server technology you are using.
For example, if you're using Apache, you can set the CORS headers in the .htaccess file or the server configuration file.
Here's an example of setting CORS headers in Apache:
apache
Header set Access-Control-Allow-Origin "*"
The above example allows requests from any domain (*).
You can replace * with the specific domain(s) from where you want to allow requests.
Restart the server: After making the configuration changes, restart the server for the changes to take effect.
Once CORS is enabled on the server, you should be able to load the JavaScript file from a different domain without encountering CORS restrictions.
Keep in mind that bypassing the CORS policy may have security implications, so it's essential to understand the risks and only enable CORS when necessary and with the appropriate security measures in place.
Inspect autoload
Right-click on the webpage and select "Inspect" or "Inspect Element" from the context menu.
This will open the browser's developer tools.
Navigate to the Network tab: In the developer tools, locate the "Network" tab.
This tab will display the network activity of the webpage.
Scroll to trigger the autoload: Scroll down on the webpage until the additional images are loaded or until you reach the end of the page where the autoload should occur.
Observe network requests: As you scroll, keep an eye on the Network tab.
Look for any new network requests that appear in the list while you're scrolling.
These requests could indicate the autoload URL or other related requests.
Filter and analyze requests: If you see new requests appearing in the Network tab, you can filter the requests by different types (e.g., XHR, Fetch, or Images) to focus on the ones that are relevant.
Look for requests that correspond to the loading of images or any requests that seem related to the autoload functionality.
Examine request details: Click on the relevant request in the Network tab to view its details.
Look for the URL field, which will contain the URL of the autoload request.
Additionally, you can inspect the request headers and parameters to understand how the autoload functionality is implemented.
By following these steps, you should be able to identify the autoload URL used by the website to load more images at the end of the page.
Keep in mind that the exact process may vary slightly depending on the browser you are using, but the general concept remains the same.
sprite animations
SPRITE ANIMATIONS
drawImage() method:
context.drawImage(img,x,y,width,height);
define the source rectangle of the image,
then define the destination rectangle
context.drawImage(img,sx,sy,swidth,sheight,x,y,width,height);
context.drawImage(img, 100, 0, 200, 50, 10, 30, 200, 50);
a fragment of the image is picked from (100, 0),
with a width of 200 and height of 50.
The fragment is drawn to (10, 30),
with the same width and height as the source.
sub image in sprites can be seen as a frame
// Define the size of a frame
let frameWidth = 50;
let frameHeight = 61;
// Rows and columns start from 0
let row = 1;
let column = 3;
context.drawImage(sprite, column*frameWidth, row*frameHeight, frameWidth, frameHeight, 10, 30, frameWidth, frameHeight);
Create a sprite animation
// Define the number of columns and rows in the sprite
let numColumns = 5;
let numRows = 2;
// Define the size of a frame
let frameWidth = sprite.width / numColumns;;
let frameHeight = sprite.height / numRows;;
// The sprite image frame starts from 0
let numColumns = 1;
let numRows = 1;
let currentFrame = 0;
setInterval(function()
{
// Pick a new frame
currentFrame++;
// Make the frames loop
let maxFrame = numColumns * numRows - 1;
if (currentFrame > maxFrame){ currentFrame = 0; }
// Update rows and columns
let column = currentFrame % numColumns;
let row = Math.floor(currentFrame / numColumns);
// Clear and draw
context.clearRect(0, 0, canvas.width, canvas.height);
context.drawImage(sprite, column * frameWidth, row * frameHeight, frameWidth, frameHeight, 10, 30, frameWidth, frameHeight);
//Wait for next step in the loop
}, 100);
// single row sprite
let currentFrame = 0;
let maxFrame = 10;
setInterval(function()
{
// Pick a new frame
currentFrame++;
// Make the frames loop
if (currentFrame > maxFrame){ currentFrame = 0; }
// Clear and draw
context.clearRect(0, 0, canvas.width, canvas.height);
context.drawImage(sprite, currentFrame * frameWidth, frameHeight, frameWidth, frameHeight, 10, 30, frameWidth, frameHeight);
//Wait for next step in the loop
}, 100);
hide cursor
document.body.style.cursor = "none"
videojs
videojs
<script src="https://cdn1d-static-shared.phncdn.com/html5player/videoPlayer/es6player/7.3.3/basic-player.min.js"></script>
<video
id="my-video"
class="video-js"
controls
preload="auto"
width="640"
height="264"
poster="MY_VIDEO_POSTER.jpg"
data-setup="{}"
>
<source src="MY_VIDEO.mp4" type="video/mp4" />
<source src="MY_VIDEO.webm" type="video/webm" />
<p class="vjs-no-js">
To view this video please enable JavaScript, and consider upgrading to a
web browser that
<a href="https://videojs.com/html5-video-support/" target="_blank"
>supports HTML5 video</a
>
</p>
</video>
swap images
$("img").mouseenter(function(){ $(this).attr('src','sample2.png'); });
$("img").mouseleave(function(){ $(this).attr('src','sample1.png'); });
var src = elem.attr('data-original');
var src = elem.attr('src');
Download
There is a new library that makes things easier - xCharts.
Today, we are going to use it along with the daterange picker for Twitter Bootstrap, to build a pretty, AJAX-powered chart for your web application that fetches data from a MySQL table.
The HTML
The HTML structure of the demo is pretty simple - we have to add elements on the page for the initialization of the chart, and for the date picker.
As we are including bootstrap in the page anyway, we can make use of its form styling abilities and icons to make it look good.
index.php
<!DOCTYPE html>
<html>
<head>
<meta charset="utf-8" />
<title>Pretty Charts with jQuery and AJAX | Tutorialzine Demo</title>
<link href="assets/css/xcharts.min.css" rel="stylesheet">
<link href="assets/css/style.css" rel="stylesheet">
<!-- Include bootstrap css -->
<link href="assets/css/daterangepicker.css" rel="stylesheet">
<link href="//cdnjs.cloudflare.com/ajax/libs/twitter-bootstrap/2.2.2/css/bootstrap.min.css" rel="stylesheet" />
</head>
<body>
<div id="content">
<form class="form-horizontal">
<fieldset>
<div class="input-prepend">
<span class="add-on"><i class="icon-calendar"></i></span>
<input type="text" name="range" id="range" />
</div>
</fieldset>
</form>
<div id="placeholder">
<figure id="chart"></figure>
</div>
</div>
<script src="https://ajax.googleapis.com/ajax/libs/jquery/1.8.3/jquery.min.js"></script>
<!-- xcharts includes -->
<script src="//cdnjs.cloudflare.com/ajax/libs/d3/2.10.0/d3.v2.js"></script>
<script src="assets/js/xcharts.min.js"></script>
<!-- The daterange picker bootstrap plugin -->
<script src="assets/js/sugar.min.js"></script>
<script src="assets/js/daterangepicker.js"></script>
<!-- Our main script file -->
<script src="assets/js/script.js"></script>
</body>
</html>
We are including a good deal of external resources here.
In the head section, we have the css files for xcharts, the datepicker, bootstrap (included from cloudflare's super fast cdn), and our style.css file.
Before the closing body tag, we have the jQuery library, d3.js (required by xcharts), xcharts, the elegant sugar.js library (required by the date range plugin), the date range plugin and our script.js.
In the next steps you will see how all of these work together.
The MySQL Table
As I mentioned in the intro, the script we are writing will fetch its data from a MySQL table and display it on the chart.
You can find the SQL code that will create the table in schema.sql in the zip file, available for download from the buttons above.
This is what the table looks like:
It has only three fields.
The date field is assigned a unique index, which means that there cannot be duplicate records for the same day.
The sales_ord field holds the number of sales for the day.
Your database will surely differ, but as long as you return the correct JSON response from your PHP script, there won't be any problems (more on that in the next section).
Note: Remember to enter your MySQL connection details in setup.php.
You will then have to create a new MySQL database, and import schema.sql from phpMyAdmin or your management system of choice.
The PHP Code
In our PHP script, we will select the records from the table that correspond to the passed start and end date, assemble an array, and output it as a JSON:
ajax.php
header('Content-Type: application/json');
// Set up the ORM library
require_once('setup.php');
if (isset($_GET['start']) AND isset($_GET['end'])) {
$start = $_GET['start'];
$end = $_GET['end'];
$data = array();
// Select the results with Idiorm
$results = ORM::for_table('chart_sales')
->where_gte('date', $start)
->where_lte('date', $end)
->order_by_desc('date')
->find_array();
// Build a new array with the data
foreach ($results as $key => $value) {
$data[$key]['label'] = $value['date'];
$data[$key]['value'] = $value['sales_order'];
}
echo json_encode($data);
}
Here I am using a favorite library of mine - Idiorm.
I have used it before in tutorials in the site (and in many personal projects).
It is only one file (located in the lib/ folder) and makes working with databases a pure joy.
All I am doing is selecting all the results from the database, which have a date value between the start and end timestamps passed with the request.
The resulting JSON response looks similar to this:
[{"label": "2013-01-07", "value": "4"},
{"label": "2013-01-06","value": "65"},
{"label": "2013-01-05","value": "96"}]
The label properties contain the MySQL date values for the respective row, and the values - the number of sales for that day.
It is up to our JavaScript code to correctly handle this data and turn it into a format suitable for use with the xCharts plugin.
The JavaScript
All of our JS code lies in assets/js/script.js.
The code is a bit long, and to make it easier to follow I will present it to you in chunks.
First we will declare a few variables and initialize the date range picker plugin.
Notice that the date range I linked to is a fork of the original plugin.
I decided to go with this version, as the original depends on date.js - a very old date/time library that conflicts with xCharts.
The fork instead uses sugar.js which is a nice utility library with powerful date and time support.
assets/js/script.js
$(function() {
// Set the default dates, uses sugarjs' methods
var startDate = Date.create().addDays(-6), // 6 days ago
endDate = Date.create(); // today
var range = $('#range');
// Show the dates in the range input
range.val(startDate.format('{MM}/{dd}/{yyyy}') + ' -
' + endDate.format('{MM}/{dd}/{yyyy}'));
// Load chart
ajaxLoadChart(startDate,endDate);
range.daterangepicker({
startDate: startDate,
endDate: endDate,
ranges: {'Today': ['today', 'today'],
'Yesterday': ['yesterday', 'yesterday'],
'Last 7 Days': [Date.create().addDays(-6), 'today'],
'Last 30 Days': [Date.create().addDays(-29), 'today']
// You can add more entries here
}
},function(start, end){
ajaxLoadChart(start, end);
});
As you can see, we are making good use of sugar.js' date and time methods to define the start and end point of the range.
I am initializing the script with the results from the last 7 days, and updating the range input field.
Now let's create the chart:
// The tooltip shown over the chart
var tt = $('<div class="ex-tooltip">').appendTo('body'),
topOffset = -32;
var data = {"xScale" : "time", "yScale" : "linear",
"main" : [{className : ".stats",
"data" : []}]
};
var opts = {
paddingLeft : 50, paddingTop : 20,
paddingRight : 10, axisPaddingLeft : 25,
tickHintX: 9, // How many ticks to show horizontally
dataFormatX : function(x) {
// This turns converts the timestamps coming from
// ajax.php into a proper JavaScript Date object
return Date.create(x);
},
tickFormatX : function(x) {
// Provide formatting for the x-axis tick labels.
// This uses sugar's format method of the date object.
return x.format('{MM}/{dd}');
},
"mouseover": function(d, i) {
var pos = $(this).offset();
tt.text(d.x.format('{Month} {ord}') + ': ' + d.y).css({
top: topOffset + pos.top,
left: pos.left }).show(); },
"mouseout": function(x) { tt.hide(); }
};
// Create a new xChart instance, passing the type
// of chart a data set and the options object
var chart = new xChart('line-dotted', data, '#chart' , opts);
First I define a configuration object for xCharts, with properties and callback functions.
In the dataFormatX property, I am transforming the yyyy-mm-dd strings returned from the AJAX request, into proper JavaScript Date objects, so that the plugin can correctly display them and do its calculations.
I am also passing an event handler for the mouseover/mouseout plugin events, and use them to show a tooltip (the plugin doesn't come with one out of the box).
Lastly, here is the JavaScript function for loading data with AJAX:
// Function for loading data via AJAX and showing it on the chart
function ajaxLoadChart(startDate,endDate) {
// If no data is passed (the chart was cleared)
if(!startDate || !endDate){
chart.setData({ "xScale" : "time", "yScale" : "linear",
"main" : [{ className : ".stats", data : [] }] });
return;
}
// Otherwise, issue an AJAX request
$.getJSON('ajax.php', {
start: startDate.format('{yyyy}-{MM}-{dd}'),
end: endDate.format('{yyyy}-{MM}-{dd}')
}, function(data) {
var set = [];
$.each(data, function() {
set.push({ x : this.label, y : parseInt(this.value, 10) });
});
chart.setData({ "xScale" : "time", "yScale" : "linear",
"main" : [{ className : ".stats", data : set }] });
});
}
});
xCharts exposes the setData method so you can easily replace the displayed data.
The className attribute is important, as this is what the plugin uses to identify your chart.
If you omit this property, all kinds of strange bugs will occur (trust me, I know).
With this our pretty charts are complete!
We're done!
You can use this example to enhance your admin areas and to visualize statistical data in a beautiful interface.
The most basic concept of jQuery is to "select some elements and do something with them." jQuery supports most CSS3 selectors, as well as some non-standard selectors.
For a complete selector reference, visit the Selectors documentation on api.jquery.com.
Selecting Elements by ID
$( "#myId" ); // Note IDs must be unique per page.
Selecting Elements by Class Name
$( ".myClass" );
Selecting Elements by Attribute
$( "input[name='first_name']" );
Selecting Elements by Compound CSS Selector
$( "#contents ul.people li" );
Selecting Elements with a Comma-separated List of Selectors
$( "div.myClass, ul.people" );
Pseudo-Selectors
$( "a.external:first" );
$( "tr:odd" );
// Select all input-like elements in a form (more on this below).
$( "#myForm :input" );
$( "div:visible" );
// All except the first three divs.
$( "div:gt(2)" );
// All currently animated divs.
$( "div:animated" );Note: When using the :visible and :hidden pseudo-selectors, jQuery tests the actual visibility of the element, not its CSS visibility or display properties.
jQuery looks to see if the element's physical height and width on the page are both greater than zero.
However, this test doesn't work with <tr> elements.
In the case of <tr> jQuery does check the CSS display property, and considers an element hidden if its display property is set to none.
Elements that have not been added to the DOM will always be considered hidden, even if the CSS that would affect them would render them visible.
See the Manipulating Elements section to learn how to create and add elements to the DOM.
Choosing Selectors
Choosing good selectors is one way to improve JavaScript's performance.
Too much specificity can be a bad thing.
A selector such as #myTable thead tr th.special is overkill if a selector such as #myTable th.special will get the job done.
Does My Selection Contain Any Elements?
Once you've made a selection, you'll often want to know whether you have anything to work with.
A common mistake is to use:
// Doesn't work!
if ( $( "div.foo" ) ) {
...
}
This won't work.
When a selection is made using $(), an object is always returned, and objects always evaluate to true.
Even if the selection doesn't contain any elements, the code inside the if statement will still run.
The best way to determine if there are any elements is to test the selection's .length property, which tells you how many elements were selected.
If the answer is 0, the .length property will evaluate to false when used as a boolean value:
// Testing whether a selection contains elements.
if ( $( "div.foo" ).length ) {
...
}
Saving Selections
jQuery doesn't cache elements for you.
If you've made a selection that you might need to make again, you should save the selection in a variable rather than making the selection repeatedly.
var divs = $( "div" );
Once the selection is stored in a variable, you can call jQuery methods on the variable just like you would have called them on the original selection.
A selection only fetches the elements that are on the page at the time the selection is made.
If elements are added to the page later, you'll have to repeat the selection or otherwise add them to the selection stored in the variable.
Stored selections don't magically update when the DOM changes.
Refining & Filtering Selections
Sometimes the selection contains more than what you're after.
jQuery offers several methods for refining and filtering selections.
// Refining selections.
$( "div.foo" ).has( "p" ); // div.foo elements that contain <p> tags
$( "h1" ).not( ".bar" ); // h1 elements that don't have a class of bar
$( "ul li" ).filter( ".current" ); // unordered list items with class of current
$( "ul li" ).first(); // just the first unordered list item
$( "ul li" ).eq( 5 ); // the sixth
Selecting Form Elements
jQuery offers several pseudo-selectors that help find elements in forms.
These are especially helpful because it can be difficult to distinguish between form elements based on their state or type using standard CSS selectors.
:checked
Not to be confused with :checkbox, :checked targets checked checkboxes, but keep in mind that this selector works also for checked radio buttons, and <select> elements (for <select> elements only, use the :selected selector):
$( "form :checked" );
The :checked pseudo-selector works when used with checkboxes, radio buttons and selects.
:disabled
Using the :disabled pseudo-selector targets any <input> elements with the disabled attribute:
$( "form :disabled" );
In order to get the best performance using :disabled, first select elements with a standard jQuery selector, then use .filter( ":disabled" ), or precede the pseudo-selector with a tag name or some other selector.
:enabled
Basically the inverse of the :disabled pseudo-selector, the :enabled pseudo-selector targets any elements that do not have a disabled attribute:
$( "form :enabled" );
In order to get the best performance using :enabled, first select elements with a standard jQuery selector, then use .filter( ":enabled" ), or precede the pseudo-selector with a tag name or some other selector.
:input
Using the :input selector selects all <input>, <textarea>, <select>, and <button> elements:
$( "form :input" );
:selected
Using the :selected pseudo-selector targets any selected items in <option> elements:
$( "form :selected" );
In order to get the best performance using :selected, first select elements with a standard jQuery selector, then use .filter( ":selected" ), or precede the pseudo-selector with a tag name or some other selector.
Selecting by type
jQuery provides pseudo selectors to select form-specific elements according to their type:
:password
:reset
:radio
:text
:submit
:checkbox
:button
:image
:file
For all of these there are side notes about performance, so be sure to check out the API docs for more in-depth information.
Passing variable to another html page
window.open("MusicMe.html?variable=value", "_self");
In next page, check for queryParam by getting window.location.href and using regex to split the params after ? and get that data.
window.open("Charts.html?26069", "_blank");
url = window.location.href
url = "asdaf ?=ddf"
thecode = url.split("?=")
thecode[1]
Math.random Normal distribution
function randn_bm() {
let u = 0, v = 0;
while(u === 0) u = Math.random(); //Converting [0,1) to (0,1)
while(v === 0) v = Math.random();
let num = Math.sqrt( -2.0 * Math.log( u ) ) * Math.cos( 2.0 * Math.PI * v );
num = num / 10.0 + 0.5; // Translate to 0 -> 1
if (num > 1 || num < 0) return randn_bm() // resample between 0 and 1
return num
}
Normal Distribution With Min, Max, Skew
function randn_bm(min, max, skew) {
let u = 0, v = 0;
while(u === 0) u = Math.random() //Converting [0,1) to (0,1)
while(v === 0) v = Math.random()
let num = Math.sqrt( -2.0 * Math.log( u ) ) * Math.cos( 2.0 * Math.PI * v )
num = num / 10.0 + 0.5 // Translate to 0 -> 1
if (num > 1 || num < 0)
num = randn_bm(min, max, skew) // resample between 0 and 1 if out of range
else{
num = Math.pow(num, skew) // Skew
num *= max - min // Stretch to fill range
num += min // offset to min
}
return num
}
randn_bm(-500, 1000, 1);
randn_bm(10, 20, 0.25);
randn_bm(10, 20, 3);
look at xmlHttpRequests or an equivalent.
e.g.
var xmlhttp = new XMLHttpRequest();
<div id="demo"></div>
<script>
const xmlhttp = new XMLHttpRequest();
theCode = 388
theCode = "00000"+theCode;
codewidth = theCode.length;
theCode = theCode.slice(codewidth-5, codewidth);
codewidth = theCode.length; //update to be used later
theStartCode = theCode
imageCode = theCode
theurl = 'https://web.ifzq.gtimg.cn/appstock/app/hkfqkline/get?_var=kline_dayqfq¶m=hk' + theCode + ',day,,,1000,qfq';
// Define a callback function
xmlhttp.onload = function() {
// this.responseText is a string
document.getElementById("demo").innerHTML = this.responseText;
// JSON.stringify; convert string to json
var jsonData = JSON.stringify(this.responseText);
// document.getElementById("json").innerHTML = jsonData;
// eval(this.responseText); another way to convert string to json
myObj = eval(this.responseText)
// document.getElementById("json").innerHTML = myObj;
console.log(Object.keys(myObj)) // show the keys
console.log(kline_dayqfq) // kline_dayqfq is name of object
console.log(Object.keys(kline_dayqfq.data)) // show the keys
console.log(kline_dayqfq.data["hk00388"])
}
// Send a request
xmlhttp.open("GET", theurl);
xmlhttp.send();
let trace1 = {
x: [],
y: [],
mode: "lines"
};
let trace2 = {
x: [],
y: [],
mode: "lines"
};
data.forEach(function(val) {
trace1.x.push(val["time"]);
trace1.y.push(val["pm25"]);
trace2.x.push(val["time"]);
trace2.y.push(val["pm10"]);
});
Plotly.newPlot('AQI', [trace1, trace2]);
</script>
Convert String to JSON Using json.stringify()
The basic syntax:
JSON.stringify(source_of_data)
let jsonData = JSON.stringify(source_of_data);
console.log(jsonData);
Convert String to JSON Using eval()
The eval() function in JavaScript is used to take an expression and return the string.
As a result, it can be used to convert the string into JSON.
The string or an expression can be the value of eval(), and even if you pass multiple statements as an expression, the result will still work.
The simple syntax for using eval() is as follows:
eval(string_value)
Parent:layoutType: object containing one or more of the keys listed below.
automargin
Parent:layout.titleType: boolean
Determines whether the title can automatically push the figure margins.
If `yref='paper'` then the margin will expand to ensure that the title doesn’t overlap with the edges of the container.
If `yref='container'` then the margins will ensure that the title doesn’t overlap with the plot area, tick labels, and axis titles.
If `automargin=true` and the margins need to be expanded, then y will be set to a default 1 and yanchor will be set to an appropriate default to ensure that minimal margin space is needed.
Note that when `yref='paper'`, only 1 or 0 are allowed y values.
Invalid values will be reset to the default 1.
font
Parent:layout.titleType: object containing one or more of the keys listed below.
Sets the title font.
Note that the title's font used to be customized by the now deprecated `titlefont` attribute.
color
Parent:layout.title.fontType: color
family
Parent:layout.title.fontType: string
HTML font family - the typeface that will be applied by the web browser.
The web browser will only be able to apply a font if it is available on the system which it operates.
Provide multiple font families, separated by commas, to indicate the preference in which to apply fonts if they aren't available on the system.
The Chart Studio Cloud (at https://chart-studio.plotly.com or on-premise) generates images on a server, where only a select number of fonts are installed and supported.
These include "Arial", "Balto", "Courier New", "Droid Sans", "Droid Serif", "Droid Sans Mono", "Gravitas One", "Old Standard TT", "Open Sans", "Overpass", "PT Sans Narrow", "Raleway", "Times New Roman".
lineposition
Parent:layout.title.fontType: flaglist string.
Any combination of "under", "over", "through" joined with a "+" OR "none".
Examples:"under", "over", "under+over", "under+over+through", "none"Default:"none"
Sets the kind of decoration line(s) with text, such as an "under", "over" or "through" as well as combinations e.g.
"under+over", etc.
shadow
Parent:layout.title.fontType: string
Default:"none"
Sets the shape and color of the shadow behind text.
"auto" places minimal shadow and applies contrast text font color.
See https://developer.mozilla.org/en-US/docs/Web/CSS/text-shadow for additional options.
size
Parent:layout.title.fontType: number greater than or equal to 1
style
Parent:layout.title.fontType: enumerated , one of ( "normal" | "italic" )
Default:"normal"
Sets whether a font should be styled with a normal or italic face from its family.
textcase
Parent:layout.title.fontType: enumerated , one of ( "normal" | "word caps" | "upper" | "lower" )
Default:"normal"
Sets capitalization of text.
It can be used to make text appear in all-uppercase or all-lowercase, or with each word capitalized.
variant
Parent:layout.title.fontType: enumerated , one of ( "normal" | "small-caps" | "all-small-caps" | "all-petite-caps" | "petite-caps" | "unicase" )
Default:"normal"
Sets the variant of the font.
weight
Parent:layout.title.fontType: integer between or equal to 1 and 1000
Default:normal
Sets the weight (or boldness) of the font.
pad
Parent:layout.titleType: object containing one or more of the keys listed below.
Sets the padding of the title.
Each padding value only applies when the corresponding `xanchor`/`yanchor` value is set accordingly.
E.g.
for left padding to take effect, `xanchor` must be set to "left".
The same rule applies if `xanchor`/`yanchor` is determined automatically.
Padding is muted if the respective anchor value is "middle"/"center".
b
Parent:layout.title.padType: number
Default:0
The amount of padding (in px) along the bottom of the component.
l
Parent:layout.title.padType: number
Default:0
The amount of padding (in px) on the left side of the component.
r
Parent:layout.title.padType: number
Default:0
The amount of padding (in px) on the right side of the component.
t
Parent:layout.title.padType: number
Default:0
The amount of padding (in px) along the top of the component.
subtitle
Parent:layout.titleType: object containing one or more of the keys listed below.
font
Parent:layout.title.subtitleType: object containing one or more of the keys listed below.
Sets the subtitle font.
color
Parent:layout.title.subtitle.fontType: color
family
Parent:layout.title.subtitle.fontType: string
HTML font family - the typeface that will be applied by the web browser.
The web browser will only be able to apply a font if it is available on the system which it operates.
Provide multiple font families, separated by commas, to indicate the preference in which to apply fonts if they aren't available on the system.
The Chart Studio Cloud (at https://chart-studio.plotly.com or on-premise) generates images on a server, where only a select number of fonts are installed and supported.
These include "Arial", "Balto", "Courier New", "Droid Sans", "Droid Serif", "Droid Sans Mono", "Gravitas One", "Old Standard TT", "Open Sans", "Overpass", "PT Sans Narrow", "Raleway", "Times New Roman".
lineposition
Parent:layout.title.subtitle.fontType: flaglist string.
Any combination of "under", "over", "through" joined with a "+" OR "none".
Examples:"under", "over", "under+over", "under+over+through", "none"Default:"none"
Sets the kind of decoration line(s) with text, such as an "under", "over" or "through" as well as combinations e.g.
"under+over", etc.
shadow
Parent:layout.title.subtitle.fontType: string
Default:"none"
Sets the shape and color of the shadow behind text.
"auto" places minimal shadow and applies contrast text font color.
See https://developer.mozilla.org/en-US/docs/Web/CSS/text-shadow for additional options.
size
Parent:layout.title.subtitle.fontType: number greater than or equal to 1
style
Parent:layout.title.subtitle.fontType: enumerated , one of ( "normal" | "italic" )
Default:"normal"
Sets whether a font should be styled with a normal or italic face from its family.
textcase
Parent:layout.title.subtitle.fontType: enumerated , one of ( "normal" | "word caps" | "upper" | "lower" )
Default:"normal"
Sets capitalization of text.
It can be used to make text appear in all-uppercase or all-lowercase, or with each word capitalized.
variant
Parent:layout.title.subtitle.fontType: enumerated , one of ( "normal" | "small-caps" | "all-small-caps" | "all-petite-caps" | "petite-caps" | "unicase" )
Default:"normal"
Sets the variant of the font.
weight
Parent:layout.title.subtitle.fontType: integer between or equal to 1 and 1000
Default:normal
Sets the weight (or boldness) of the font.
text
Parent:layout.title.subtitleType: string
Sets the plot's subtitle.
text
Parent:layout.titleType: string
Sets the plot's title.
Note that before the existence of `title.text`, the title's contents used to be defined as the `title` attribute itself.
This behavior has been deprecated.
x
Parent:layout.titleType: number between or equal to 0 and 1
Default:0.5
Sets the x position with respect to `xref` in normalized coordinates from "0" (left) to "1" (right).
xanchor
Parent:layout.titleType: enumerated , one of ( "auto" | "left" | "center" | "right" )
Default:"auto"
Sets the title's horizontal alignment with respect to its x position.
"left" means that the title starts at x, "right" means that the title ends at x and "center" means that the title's center is at x.
"auto" divides `xref` by three and calculates the `xanchor` value automatically based on the value of `x`.
xref
Parent:layout.titleType: enumerated , one of ( "container" | "paper" )
Default:"container"
Sets the container `x` refers to.
"container" spans the entire `width` of the plot.
"paper" refers to the width of the plotting area only.
y
Parent:layout.titleType: number between or equal to 0 and 1
Default:"auto"
Sets the y position with respect to `yref` in normalized coordinates from "0" (bottom) to "1" (top).
"auto" places the baseline of the title onto the vertical center of the top margin.
yanchor
Parent:layout.titleType: enumerated , one of ( "auto" | "top" | "middle" | "bottom" )
Default:"auto"
Sets the title's vertical alignment with respect to its y position.
"top" means that the title's cap line is at y, "bottom" means that the title's baseline is at y and "middle" means that the title's midline is at y.
"auto" divides `yref` by three and calculates the `yanchor` value automatically based on the value of `y`.
yref
Parent:layout.titleType: enumerated , one of ( "container" | "paper" )
Default:"container"
Sets the container `y` refers to.
"container" spans the entire `height` of the plot.
"paper" refers to the height of the plotting area only.
showlegend
Parent:layoutType: boolean
Determines whether or not a legend is drawn.
Default is `true` if there is a trace to show and any of these: a) Two or more traces would by default be shown in the legend.
b) One pie trace is shown in the legend.
c) One trace is explicitly given with `showlegend: true`.
legend
Parent:layoutType: object containing one or more of the keys listed below.
bgcolor
Parent:layout.legendType: color
Sets the legend background color.
Defaults to `layout.paper_bgcolor`.
bordercolor
Parent:layout.legendType: color
Default:"#444"
Sets the color of the border enclosing the legend.
borderwidth
Parent:layout.legendType: number greater than or equal to 0
Default:0
Sets the width (in px) of the border enclosing the legend.
entrywidth
Parent:layout.legendType: number greater than or equal to 0
Sets the width (in px or fraction) of the legend.
Use 0 to size the entry based on the text width, when `entrywidthmode` is set to "pixels".
entrywidthmode
Parent:layout.legendType: enumerated , one of ( "fraction" | "pixels" )
Default:"pixels"
Determines what entrywidth means.
font
Parent:layout.legendType: object containing one or more of the keys listed below.
Sets the font used to text the legend items.
color
Parent:layout.legend.fontType: color
family
Parent:layout.legend.fontType: string
HTML font family - the typeface that will be applied by the web browser.
The web browser will only be able to apply a font if it is available on the system which it operates.
Provide multiple font families, separated by commas, to indicate the preference in which to apply fonts if they aren't available on the system.
The Chart Studio Cloud (at https://chart-studio.plotly.com or on-premise) generates images on a server, where only a select number of fonts are installed and supported.
These include "Arial", "Balto", "Courier New", "Droid Sans", "Droid Serif", "Droid Sans Mono", "Gravitas One", "Old Standard TT", "Open Sans", "Overpass", "PT Sans Narrow", "Raleway", "Times New Roman".
lineposition
Parent:layout.legend.fontType: flaglist string.
Any combination of "under", "over", "through" joined with a "+" OR "none".
Examples:"under", "over", "under+over", "under+over+through", "none"Default:"none"
Sets the kind of decoration line(s) with text, such as an "under", "over" or "through" as well as combinations e.g.
"under+over", etc.
shadow
Parent:layout.legend.fontType: string
Default:"none"
Sets the shape and color of the shadow behind text.
"auto" places minimal shadow and applies contrast text font color.
See https://developer.mozilla.org/en-US/docs/Web/CSS/text-shadow for additional options.
size
Parent:layout.legend.fontType: number greater than or equal to 1
style
Parent:layout.legend.fontType: enumerated , one of ( "normal" | "italic" )
Default:"normal"
Sets whether a font should be styled with a normal or italic face from its family.
textcase
Parent:layout.legend.fontType: enumerated , one of ( "normal" | "word caps" | "upper" | "lower" )
Default:"normal"
Sets capitalization of text.
It can be used to make text appear in all-uppercase or all-lowercase, or with each word capitalized.
variant
Parent:layout.legend.fontType: enumerated , one of ( "normal" | "small-caps" | "all-small-caps" | "all-petite-caps" | "petite-caps" | "unicase" )
Default:"normal"
Sets the variant of the font.
weight
Parent:layout.legend.fontType: integer between or equal to 1 and 1000
Default:normal
Sets the weight (or boldness) of the font.
groupclick
Parent:layout.legendType: enumerated , one of ( "toggleitem" | "togglegroup" )
Default:"togglegroup"
Determines the behavior on legend group item click.
"toggleitem" toggles the visibility of the individual item clicked on the graph.
"togglegroup" toggles the visibility of all items in the same legendgroup as the item clicked on the graph.
grouptitlefont
Parent:layout.legendType: object containing one or more of the keys listed below.
Sets the font for group titles in legend.
Defaults to `legend.font` with its size increased about 10%.
color
Parent:layout.legend.grouptitlefontType: color
family
Parent:layout.legend.grouptitlefontType: string
HTML font family - the typeface that will be applied by the web browser.
The web browser will only be able to apply a font if it is available on the system which it operates.
Provide multiple font families, separated by commas, to indicate the preference in which to apply fonts if they aren't available on the system.
The Chart Studio Cloud (at https://chart-studio.plotly.com or on-premise) generates images on a server, where only a select number of fonts are installed and supported.
These include "Arial", "Balto", "Courier New", "Droid Sans", "Droid Serif", "Droid Sans Mono", "Gravitas One", "Old Standard TT", "Open Sans", "Overpass", "PT Sans Narrow", "Raleway", "Times New Roman".
lineposition
Parent:layout.legend.grouptitlefontType: flaglist string.
Any combination of "under", "over", "through" joined with a "+" OR "none".
Examples:"under", "over", "under+over", "under+over+through", "none"Default:"none"
Sets the kind of decoration line(s) with text, such as an "under", "over" or "through" as well as combinations e.g.
"under+over", etc.
shadow
Parent:layout.legend.grouptitlefontType: string
Default:"none"
Sets the shape and color of the shadow behind text.
"auto" places minimal shadow and applies contrast text font color.
See https://developer.mozilla.org/en-US/docs/Web/CSS/text-shadow for additional options.
size
Parent:layout.legend.grouptitlefontType: number greater than or equal to 1
style
Parent:layout.legend.grouptitlefontType: enumerated , one of ( "normal" | "italic" )
Default:"normal"
Sets whether a font should be styled with a normal or italic face from its family.
textcase
Parent:layout.legend.grouptitlefontType: enumerated , one of ( "normal" | "word caps" | "upper" | "lower" )
Default:"normal"
Sets capitalization of text.
It can be used to make text appear in all-uppercase or all-lowercase, or with each word capitalized.
variant
Parent:layout.legend.grouptitlefontType: enumerated , one of ( "normal" | "small-caps" | "all-small-caps" | "all-petite-caps" | "petite-caps" | "unicase" )
Default:"normal"
Sets the variant of the font.
weight
Parent:layout.legend.grouptitlefontType: integer between or equal to 1 and 1000
Default:normal
Sets the weight (or boldness) of the font.
indentation
Parent:layout.legendType: number greater than or equal to -15
Default:0
Sets the indentation (in px) of the legend entries.
itemclick
Parent:layout.legendType: enumerated , one of ( "toggle" | "toggleothers" | false )
Default:"toggle"
Determines the behavior on legend item click.
"toggle" toggles the visibility of the item clicked on the graph.
"toggleothers" makes the clicked item the sole visible item on the graph.
"false" disables legend item click interactions.
itemdoubleclick
Parent:layout.legendType: enumerated , one of ( "toggle" | "toggleothers" | false )
Default:"toggleothers"
Determines the behavior on legend item double-click.
"toggle" toggles the visibility of the item clicked on the graph.
"toggleothers" makes the clicked item the sole visible item on the graph.
"false" disables legend item double-click interactions.
itemsizing
Parent:layout.legendType: enumerated , one of ( "trace" | "constant" )
Default:"trace"
Determines if the legend items symbols scale with their corresponding "trace" attributes or remain "constant" independent of the symbol size on the graph.
itemwidth
Parent:layout.legendType: number greater than or equal to 30
Default:30
Sets the width (in px) of the legend item symbols (the part other than the title.text).
orientation
Parent:layout.legendType: enumerated , one of ( "v" | "h" )
Default:"v"
Sets the orientation of the legend.
title
Parent:layout.legendType: object containing one or more of the keys listed below.
font
Parent:layout.legend.titleType: object containing one or more of the keys listed below.
Sets this legend's title font.
Defaults to `legend.font` with its size increased about 20%.
color
Parent:layout.legend.title.fontType: color
family
Parent:layout.legend.title.fontType: string
HTML font family - the typeface that will be applied by the web browser.
The web browser will only be able to apply a font if it is available on the system which it operates.
Provide multiple font families, separated by commas, to indicate the preference in which to apply fonts if they aren't available on the system.
The Chart Studio Cloud (at https://chart-studio.plotly.com or on-premise) generates images on a server, where only a select number of fonts are installed and supported.
These include "Arial", "Balto", "Courier New", "Droid Sans", "Droid Serif", "Droid Sans Mono", "Gravitas One", "Old Standard TT", "Open Sans", "Overpass", "PT Sans Narrow", "Raleway", "Times New Roman".
lineposition
Parent:layout.legend.title.fontType: flaglist string.
Any combination of "under", "over", "through" joined with a "+" OR "none".
Examples:"under", "over", "under+over", "under+over+through", "none"Default:"none"
Sets the kind of decoration line(s) with text, such as an "under", "over" or "through" as well as combinations e.g.
"under+over", etc.
shadow
Parent:layout.legend.title.fontType: string
Default:"none"
Sets the shape and color of the shadow behind text.
"auto" places minimal shadow and applies contrast text font color.
See https://developer.mozilla.org/en-US/docs/Web/CSS/text-shadow for additional options.
size
Parent:layout.legend.title.fontType: number greater than or equal to 1
style
Parent:layout.legend.title.fontType: enumerated , one of ( "normal" | "italic" )
Default:"normal"
Sets whether a font should be styled with a normal or italic face from its family.
textcase
Parent:layout.legend.title.fontType: enumerated , one of ( "normal" | "word caps" | "upper" | "lower" )
Default:"normal"
Sets capitalization of text.
It can be used to make text appear in all-uppercase or all-lowercase, or with each word capitalized.
variant
Parent:layout.legend.title.fontType: enumerated , one of ( "normal" | "small-caps" | "all-small-caps" | "all-petite-caps" | "petite-caps" | "unicase" )
Default:"normal"
Sets the variant of the font.
weight
Parent:layout.legend.title.fontType: integer between or equal to 1 and 1000
Default:normal
Sets the weight (or boldness) of the font.
side
Parent:layout.legend.titleType: enumerated , one of ( "top" | "left" | "top left" | "top center" | "top right" )
Determines the location of legend's title with respect to the legend items.
Defaulted to "top" with `orientation` is "h".
Defaulted to "left" with `orientation` is "v".
The "top left" options could be used to expand top center and top right are for horizontal alignment legend area in both x and y sides.
text
Parent:layout.legend.titleType: string
Default:""
Sets the title of the legend.
tracegroupgap
Parent:layout.legendType: number greater than or equal to 0
Default:10
Sets the amount of vertical space (in px) between legend groups.
traceorder
Parent:layout.legendType: flaglist string.
Any combination of "reversed", "grouped" joined with a "+" OR "normal".
Examples:"reversed", "grouped", "reversed+grouped", "normal"
Determines the order at which the legend items are displayed.
If "normal", the items are displayed top-to-bottom in the same order as the input data.
If "reversed", the items are displayed in the opposite order as "normal".
If "grouped", the items are displayed in groups (when a trace `legendgroup` is provided).
if "grouped+reversed", the items are displayed in the opposite order as "grouped".
uirevision
Parent:layout.legendType: number or categorical coordinate string
Controls persistence of legend-driven changes in trace and pie label visibility.
Defaults to `layout.uirevision`.
valign
Parent:layout.legendType: enumerated , one of ( "top" | "middle" | "bottom" )
Default:"middle"
Sets the vertical alignment of the symbols with respect to their associated text.
visible
Parent:layout.legendType: boolean
Default:true
Determines whether or not this legend is visible.
x
Parent:layout.legendType: number
Sets the x position with respect to `xref` (in normalized coordinates) of the legend.
When `xref` is "paper", defaults to "1.02" for vertical legends and defaults to "0" for horizontal legends.
When `xref` is "container", defaults to "1" for vertical legends and defaults to "0" for horizontal legends.
Must be between "0" and "1" if `xref` is "container".
and between "-2" and "3" if `xref` is "paper".
xanchor
Parent:layout.legendType: enumerated , one of ( "auto" | "left" | "center" | "right" )
Default:"left"
Sets the legend's horizontal position anchor.
This anchor binds the `x` position to the "left", "center" or "right" of the legend.
Value "auto" anchors legends to the right for `x` values greater than or equal to 2/3, anchors legends to the left for `x` values less than or equal to 1/3 and anchors legends with respect to their center otherwise.
xref
Parent:layout.legendType: enumerated , one of ( "container" | "paper" )
Default:"paper"
Sets the container `x` refers to.
"container" spans the entire `width` of the plot.
"paper" refers to the width of the plotting area only.
y
Parent:layout.legendType: number
Sets the y position with respect to `yref` (in normalized coordinates) of the legend.
When `yref` is "paper", defaults to "1" for vertical legends, defaults to "-0.1" for horizontal legends on graphs w/o range sliders and defaults to "1.1" for horizontal legends on graph with one or multiple range sliders.
When `yref` is "container", defaults to "1".
Must be between "0" and "1" if `yref` is "container" and between "-2" and "3" if `yref` is "paper".
yanchor
Parent:layout.legendType: enumerated , one of ( "auto" | "top" | "middle" | "bottom" )
Sets the legend's vertical position anchor This anchor binds the `y` position to the "top", "middle" or "bottom" of the legend.
Value "auto" anchors legends at their bottom for `y` values less than or equal to 1/3, anchors legends to at their top for `y` values greater than or equal to 2/3 and anchors legends with respect to their middle otherwise.
yref
Parent:layout.legendType: enumerated , one of ( "container" | "paper" )
Default:"paper"
Sets the container `y` refers to.
"container" spans the entire `height` of the plot.
"paper" refers to the height of the plotting area only.
margin
Parent:layoutType: object containing one or more of the keys listed below.
autoexpand
Parent:layout.marginType: boolean
Default:true
Turns on/off margin expansion computations.
Legends, colorbars, updatemenus, sliders, axis rangeselector and rangeslider are allowed to push the margins by defaults.
b
Parent:layout.marginType: number greater than or equal to 0
Default:80
Sets the bottom margin (in px).
l
Parent:layout.marginType: number greater than or equal to 0
Default:80
Sets the left margin (in px).
pad
Parent:layout.marginType: number greater than or equal to 0
Default:0
Sets the amount of padding (in px) between the plotting area and the axis lines
r
Parent:layout.marginType: number greater than or equal to 0
Default:80
Sets the right margin (in px).
t
Parent:layout.marginType: number greater than or equal to 0
Default:100
Sets the top margin (in px).
autosize
Parent:layoutType: boolean
Determines whether or not a layout width or height that has been left undefined by the user is initialized on each relayout.
Note that, regardless of this attribute, an undefined layout width or height is always initialized on the first call to plot.
width
Parent:layoutType: number greater than or equal to 10
Default:700
Sets the plot's width (in px).
height
Parent:layoutType: number greater than or equal to 10
Default:450
Sets the plot's height (in px).
font
Parent:layoutType: object containing one or more of the keys listed below.
Sets the global font.
Note that fonts used in traces and other layout components inherit from the global font.
color
Parent:layout.fontType: color
Default:"#444"
family
Parent:layout.fontType: string
Default:""Open Sans", verdana, arial, sans-serif"
HTML font family - the typeface that will be applied by the web browser.
The web browser will only be able to apply a font if it is available on the system which it operates.
Provide multiple font families, separated by commas, to indicate the preference in which to apply fonts if they aren't available on the system.
The Chart Studio Cloud (at https://chart-studio.plotly.com or on-premise) generates images on a server, where only a select number of fonts are installed and supported.
These include "Arial", "Balto", "Courier New", "Droid Sans", "Droid Serif", "Droid Sans Mono", "Gravitas One", "Old Standard TT", "Open Sans", "Overpass", "PT Sans Narrow", "Raleway", "Times New Roman".
lineposition
Parent:layout.fontType: flaglist string.
Any combination of "under", "over", "through" joined with a "+" OR "none".
Examples:"under", "over", "under+over", "under+over+through", "none"Default:"none"
Sets the kind of decoration line(s) with text, such as an "under", "over" or "through" as well as combinations e.g.
"under+over", etc.
shadow
Parent:layout.fontType: string
Default:"none"
Sets the shape and color of the shadow behind text.
"auto" places minimal shadow and applies contrast text font color.
See https://developer.mozilla.org/en-US/docs/Web/CSS/text-shadow for additional options.
size
Parent:layout.fontType: number greater than or equal to 1
Default:12
style
Parent:layout.fontType: enumerated , one of ( "normal" | "italic" )
Default:"normal"
Sets whether a font should be styled with a normal or italic face from its family.
textcase
Parent:layout.fontType: enumerated , one of ( "normal" | "word caps" | "upper" | "lower" )
Default:"normal"
Sets capitalization of text.
It can be used to make text appear in all-uppercase or all-lowercase, or with each word capitalized.
variant
Parent:layout.fontType: enumerated , one of ( "normal" | "small-caps" | "all-small-caps" | "all-petite-caps" | "petite-caps" | "unicase" )
Default:"normal"
Sets the variant of the font.
weight
Parent:layout.fontType: integer between or equal to 1 and 1000
Default:normal
Sets the weight (or boldness) of the font.
uniformtext
Parent:layoutType: object containing one or more of the keys listed below.
minsize
Parent:layout.uniformtextType: number greater than or equal to 0
Default:0
Sets the minimum text size between traces of the same type.
mode
Parent:layout.uniformtextType: enumerated , one of ( false | "hide" | "show" )
Determines how the font size for various text elements are uniformed between each trace type.
If the computed text sizes were smaller than the minimum size defined by `uniformtext.minsize` using "hide" option hides the text; and using "show" option shows the text without further downscaling.
Please note that if the size defined by `minsize` is greater than the font size defined by trace, then the `minsize` is used.
separators
Parent:layoutType: string
Sets the decimal and thousand separators.
For example, ".
" puts a '.' before decimals and a space between thousands.
In English locales, dflt is ".," but other locales may alter this default.
paper_bgcolor
Parent:layoutType: color
Default:"#fff"
Sets the background color of the paper where the graph is drawn.
plot_bgcolor
Parent:layoutType: color
Default:"#fff"
Sets the background color of the plotting area in-between x and y axes.
autotypenumbers
Parent:layoutType: enumerated , one of ( "convert types" | "strict" )
Default:"convert types"
Using "strict" a numeric string in trace data is not converted to a number.
Using "convert types" a numeric string in trace data may be treated as a number during automatic axis `type` detection.
This is the default value; however it could be overridden for individual axes.
colorscale
Parent:layoutType: object containing one or more of the keys listed below.
diverging
Parent:layout.colorscaleType: colorscale
Default:[[0, rgb(5,10,172)], [0.35, rgb(106,137,247)], [0.5, rgb(190,190,190)], [0.6, rgb(220,170,132)], [0.7, rgb(230,145,90)], [1, rgb(178,10,28)], ]
Sets the default diverging colorscale.
Note that `autocolorscale` must be true for this attribute to work.
sequential
Parent:layout.colorscaleType: colorscale
Default:[[0, rgb(220,220,220)], [0.2, rgb(245,195,157)], [0.4, rgb(245,160,105)], [1, rgb(178,10,28)], ]
Sets the default sequential colorscale for positive values.
Note that `autocolorscale` must be true for this attribute to work.
sequentialminus
Parent:layout.colorscaleType: colorscale
Default:[[0, rgb(5,10,172)], [0.35, rgb(40,60,190)], [0.5, rgb(70,100,245)], [0.6, rgb(90,120,245)], [0.7, rgb(106,137,247)], [1, rgb(220,220,220)], ]
Sets the default sequential colorscale for negative values.
Note that `autocolorscale` must be true for this attribute to work.
Parent:layoutType: object containing one or more of the keys listed below.
activecolor
Parent:layout.modebarType: color
Sets the color of the active or hovered on icons in the modebar.
add
Parent:layout.modebarType: string or array of strings
Default:""
Determines which predefined modebar buttons to add.
Please note that these buttons will only be shown if they are compatible with all trace types used in a graph.
Similar to `config.modeBarButtonsToAdd` option.
This may include "v1hovermode", "hoverclosest", "hovercompare", "togglehover", "togglespikelines", "drawline", "drawopenpath", "drawclosedpath", "drawcircle", "drawrect", "eraseshape".
bgcolor
Parent:layout.modebarType: color
Sets the background color of the modebar.
color
Parent:layout.modebarType: color
Sets the color of the icons in the modebar.
orientation
Parent:layout.modebarType: enumerated , one of ( "v" | "h" )
Default:"h"
Sets the orientation of the modebar.
remove
Parent:layout.modebarType: string or array of strings
Default:""
Determines which predefined modebar buttons to remove.
Similar to `config.modeBarButtonsToRemove` option.
This may include "autoScale2d", "autoscale", "editInChartStudio", "editinchartstudio", "hoverCompareCartesian", "hovercompare", "lasso", "lasso2d", "orbitRotation", "orbitrotation", "pan", "pan2d", "pan3d", "reset", "resetCameraDefault3d", "resetCameraLastSave3d", "resetGeo", "resetSankeyGroup", "resetScale2d", "resetViewMapbox", "resetViews", "resetcameradefault", "resetcameralastsave", "resetsankeygroup", "resetscale", "resetview", "resetviews", "select", "select2d", "sendDataToCloud", "senddatatocloud", "tableRotation", "tablerotation", "toImage", "toggleHover", "toggleSpikelines", "togglehover", "togglespikelines", "toimage", "zoom", "zoom2d", "zoom3d", "zoomIn2d", "zoomInGeo", "zoomInMapbox", "zoomOut2d", "zoomOutGeo", "zoomOutMapbox", "zoomin", "zoomout".
uirevision
Parent:layout.modebarType: number or categorical coordinate string
Controls persistence of user-driven changes related to the modebar, including `hovermode`, `dragmode`, and `showspikes` at both the root level and inside subplots.
Defaults to `layout.uirevision`.
hovermode
Parent:layoutType: enumerated , one of ( "x" | "y" | "closest" | false | "x unified" | "y unified" )
Default:"closest"
Determines the mode of hover interactions.
If "closest", a single hoverlabel will appear for the "closest" point within the `hoverdistance`.
If "x" (or "y"), multiple hoverlabels will appear for multiple points at the "closest" x- (or y-) coordinate within the `hoverdistance`, with the caveat that no more than one hoverlabel will appear per trace.
If "x unified" (or "y unified"), a single hoverlabel will appear multiple points at the closest x- (or y-) coordinate within the `hoverdistance` with the caveat that no more than one hoverlabel will appear per trace.
In this mode, spikelines are enabled by default perpendicular to the specified axis.
If false, hover interactions are disabled.
hoversubplots
Parent:layoutType: enumerated , one of ( "single" | "overlaying" | "axis" )
Default:"overlaying"
Determines expansion of hover effects to other subplots If "single" just the axis pair of the primary point is included without overlaying subplots.
If "overlaying" all subplots using the main axis and occupying the same space are included.
If "axis", also include stacked subplots using the same axis when `hovermode` is set to "x", "x unified", "y" or "y unified".
clickmode
Parent:layoutType: flaglist string.
Any combination of "event", "select" joined with a "+" OR "none".
Examples:"event", "select", "event+select", "none"Default:"event"
Determines the mode of single click interactions.
"event" is the default value and emits the `plotly_click` event.
In addition this mode emits the `plotly_selected` event in drag modes "lasso" and "select", but with no event data attached (kept for compatibility reasons).
The "select" flag enables selecting single data points via click.
This mode also supports persistent selections, meaning that pressing Shift while clicking, adds to / subtracts from an existing selection.
"select" with `hovermode`: "x" can be confusing, consider explicitly setting `hovermode`: "closest" when using this feature.
Selection events are sent accordingly as long as "event" flag is set as well.
When the "event" flag is missing, `plotly_click` and `plotly_selected` events are not fired.
dragmode
Parent:layoutType: enumerated , one of ( "zoom" | "pan" | "select" | "lasso" | "drawclosedpath" | "drawopenpath" | "drawline" | "drawrect" | "drawcircle" | "orbit" | "turntable" | false )
Default:"zoom"
Determines the mode of drag interactions.
"select" and "lasso" apply only to scatter traces with markers or text.
"orbit" and "turntable" apply only to 3D scenes.
selectdirection
Parent:layoutType: enumerated , one of ( "h" | "v" | "d" | "any" )
Default:"any"
When `dragmode` is set to "select", this limits the selection of the drag to horizontal, vertical or diagonal.
"h" only allows horizontal selection, "v" only vertical, "d" only diagonal and "any" sets no limit.
activeselection
Parent:layoutType: object containing one or more of the keys listed below.
fillcolor
Parent:layout.activeselectionType: color
Default:"rgba(0,0,0,0)"
Sets the color filling the active selection' interior.
opacity
Parent:layout.activeselectionType: number between or equal to 0 and 1
Default:0.5
Sets the opacity of the active selection.
newselection
Parent:layoutType: object containing one or more of the keys listed below.
line
Parent:layout.newselectionType: object containing one or more of the keys listed below.
color
Parent:layout.newselection.lineType: color
Sets the line color.
By default uses either dark grey or white to increase contrast with background color.
dash
Parent:layout.newselection.lineType: string
Default:"dot"
Sets the dash style of lines.
Set to a dash type string ("solid", "dot", "dash", "longdash", "dashdot", or "longdashdot") or a dash length list in px (eg "5px,10px,2px,2px").
width
Parent:layout.newselection.lineType: number greater than or equal to 1
Default:1
Sets the line width (in px).
mode
Parent:layout.newselectionType: enumerated , one of ( "immediate" | "gradual" )
Default:"immediate"
Describes how a new selection is created.
If `immediate`, a new selection is created after first mouse up.
If `gradual`, a new selection is not created after first mouse.
By adding to and subtracting from the initial selection, this option allows declaring extra outlines of the selection.
hoverdistance
Parent:layoutType: integer greater than or equal to -1
Default:20
Sets the default distance (in pixels) to look for data to add hover labels (-1 means no cutoff, 0 means no looking for data).
This is only a real distance for hovering on point-like objects, like scatter points.
For area-like objects (bars, scatter fills, etc) hovering is on inside the area and off outside, but these objects will not supersede hover on point-like objects in case of conflict.
spikedistance
Parent:layoutType: integer greater than or equal to -1
Default:-1
Sets the default distance (in pixels) to look for data to draw spikelines to (-1 means no cutoff, 0 means no looking for data).
As with hoverdistance, distance does not apply to area-like objects.
In addition, some objects can be hovered on but will not generate spikelines, such as scatter fills.
hoverlabel
Parent:layoutType: object containing one or more of the keys listed below.
align
Parent:layout.hoverlabelType: enumerated , one of ( "left" | "right" | "auto" )
Default:"auto"
Sets the horizontal alignment of the text content within hover label box.
Has an effect only if the hover label text spans more two or more lines
bgcolor
Parent:layout.hoverlabelType: color
Sets the background color of all hover labels on graph
bordercolor
Parent:layout.hoverlabelType: color
Sets the border color of all hover labels on graph.
font
Parent:layout.hoverlabelType: object containing one or more of the keys listed below.
Sets the default hover label font used by all traces on the graph.
color
Parent:layout.hoverlabel.fontType: color
family
Parent:layout.hoverlabel.fontType: string
Default:"Arial, sans-serif"
HTML font family - the typeface that will be applied by the web browser.
The web browser will only be able to apply a font if it is available on the system which it operates.
Provide multiple font families, separated by commas, to indicate the preference in which to apply fonts if they aren't available on the system.
The Chart Studio Cloud (at https://chart-studio.plotly.com or on-premise) generates images on a server, where only a select number of fonts are installed and supported.
These include "Arial", "Balto", "Courier New", "Droid Sans", "Droid Serif", "Droid Sans Mono", "Gravitas One", "Old Standard TT", "Open Sans", "Overpass", "PT Sans Narrow", "Raleway", "Times New Roman".
lineposition
Parent:layout.hoverlabel.fontType: flaglist string.
Any combination of "under", "over", "through" joined with a "+" OR "none".
Examples:"under", "over", "under+over", "under+over+through", "none"Default:"none"
Sets the kind of decoration line(s) with text, such as an "under", "over" or "through" as well as combinations e.g.
"under+over", etc.
shadow
Parent:layout.hoverlabel.fontType: string
Default:"none"
Sets the shape and color of the shadow behind text.
"auto" places minimal shadow and applies contrast text font color.
See https://developer.mozilla.org/en-US/docs/Web/CSS/text-shadow for additional options.
size
Parent:layout.hoverlabel.fontType: number greater than or equal to 1
Default:13
style
Parent:layout.hoverlabel.fontType: enumerated , one of ( "normal" | "italic" )
Default:"normal"
Sets whether a font should be styled with a normal or italic face from its family.
textcase
Parent:layout.hoverlabel.fontType: enumerated , one of ( "normal" | "word caps" | "upper" | "lower" )
Default:"normal"
Sets capitalization of text.
It can be used to make text appear in all-uppercase or all-lowercase, or with each word capitalized.
variant
Parent:layout.hoverlabel.fontType: enumerated , one of ( "normal" | "small-caps" | "all-small-caps" | "all-petite-caps" | "petite-caps" | "unicase" )
Default:"normal"
Sets the variant of the font.
weight
Parent:layout.hoverlabel.fontType: integer between or equal to 1 and 1000
Default:normal
Sets the weight (or boldness) of the font.
grouptitlefont
Parent:layout.hoverlabelType: object containing one or more of the keys listed below.
Sets the font for group titles in hover (unified modes).
Defaults to `hoverlabel.font`.
color
Parent:layout.hoverlabel.grouptitlefontType: color
family
Parent:layout.hoverlabel.grouptitlefontType: string
HTML font family - the typeface that will be applied by the web browser.
The web browser will only be able to apply a font if it is available on the system which it operates.
Provide multiple font families, separated by commas, to indicate the preference in which to apply fonts if they aren't available on the system.
The Chart Studio Cloud (at https://chart-studio.plotly.com or on-premise) generates images on a server, where only a select number of fonts are installed and supported.
These include "Arial", "Balto", "Courier New", "Droid Sans", "Droid Serif", "Droid Sans Mono", "Gravitas One", "Old Standard TT", "Open Sans", "Overpass", "PT Sans Narrow", "Raleway", "Times New Roman".
lineposition
Parent:layout.hoverlabel.grouptitlefontType: flaglist string.
Any combination of "under", "over", "through" joined with a "+" OR "none".
Examples:"under", "over", "under+over", "under+over+through", "none"Default:"none"
Sets the kind of decoration line(s) with text, such as an "under", "over" or "through" as well as combinations e.g.
"under+over", etc.
shadow
Parent:layout.hoverlabel.grouptitlefontType: string
Default:"none"
Sets the shape and color of the shadow behind text.
"auto" places minimal shadow and applies contrast text font color.
See https://developer.mozilla.org/en-US/docs/Web/CSS/text-shadow for additional options.
size
Parent:layout.hoverlabel.grouptitlefontType: number greater than or equal to 1
style
Parent:layout.hoverlabel.grouptitlefontType: enumerated , one of ( "normal" | "italic" )
Default:"normal"
Sets whether a font should be styled with a normal or italic face from its family.
textcase
Parent:layout.hoverlabel.grouptitlefontType: enumerated , one of ( "normal" | "word caps" | "upper" | "lower" )
Default:"normal"
Sets capitalization of text.
It can be used to make text appear in all-uppercase or all-lowercase, or with each word capitalized.
variant
Parent:layout.hoverlabel.grouptitlefontType: enumerated , one of ( "normal" | "small-caps" | "all-small-caps" | "all-petite-caps" | "petite-caps" | "unicase" )
Default:"normal"
Sets the variant of the font.
weight
Parent:layout.hoverlabel.grouptitlefontType: integer between or equal to 1 and 1000
Default:normal
Sets the weight (or boldness) of the font.
namelength
Parent:layout.hoverlabelType: integer greater than or equal to -1
Default:15
Sets the default length (in number of characters) of the trace name in the hover labels for all traces.
-1 shows the whole name regardless of length.
0-3 shows the first 0-3 characters, and an integer >3 will show the whole name if it is less than that many characters, but if it is longer, will truncate to `namelength - 3` characters and add an ellipsis.
transition
Parent:layoutType: object containing one or more of the keys listed below.
Sets transition options used during Plotly.react updates.
duration
Parent:layout.transitionType: number greater than or equal to 0
Default:500
The duration of the transition, in milliseconds.
If equal to zero, updates are synchronous.
Parent:layout.transitionType: enumerated , one of ( "layout first" | "traces first" )
Default:"layout first"
Determines whether the figure's layout or traces smoothly transitions during updates that make both traces and layout change.
datarevision
Parent:layoutType: number or categorical coordinate string
If provided, a changed value tells `Plotly.react` that one or more data arrays has changed.
This way you can modify arrays in-place rather than making a complete new copy for an incremental change.
If NOT provided, `Plotly.react` assumes that data arrays are being treated as immutable, thus any data array with a different identity from its predecessor contains new data.
uirevision
Parent:layoutType: number or categorical coordinate string
Used to allow user interactions with the plot to persist after `Plotly.react` calls that are unaware of these interactions.
If `uirevision` is omitted, or if it is given and it changed from the previous `Plotly.react` call, the exact new figure is used.
If `uirevision` is truthy and did NOT change, any attribute that has been affected by user interactions and did not receive a different value in the new figure will keep the interaction value.
`layout.uirevision` attribute serves as the default for `uirevision` attributes in various sub-containers.
For finer control you can set these sub-attributes directly.
For example, if your app separately controls the data on the x and y axes you might set `xaxis.uirevision="time"` and `yaxis.uirevision="cost"`.
Then if only the y data is changed, you can update `yaxis.uirevision="quantity"` and the y axis range will reset but the x axis range will retain any user-driven zoom.
editrevision
Parent:layoutType: number or categorical coordinate string
Controls persistence of user-driven changes in `editable: true` configuration, other than trace names and axis titles.
Defaults to `layout.uirevision`.
selectionrevision
Parent:layoutType: number or categorical coordinate string
Controls persistence of user-driven changes in selected points from all traces.
template
Parent:layoutType: number or categorical coordinate string
Default attributes to be applied to the plot.
Templates can be created from existing plots using `Plotly.makeTemplate`, or created manually.
They should be objects with format: `{layout: layoutTemplate, data: {[type]: [traceTemplate, ...]}, ...}` `layoutTemplate` and `traceTemplate` are objects matching the attribute structure of `layout` and a data trace.
Trace templates are applied cyclically to traces of each type.
Container arrays (eg `annotations`) have special handling: An object ending in `defaults` (eg `annotationdefaults`) is applied to each array item.
But if an item has a `templateitemname` key we look in the template array for an item with matching `name` and apply that instead.
If no matching `name` is found we mark the item invisible.
Any named template item not referenced is appended to the end of the array, so you can use this for a watermark annotation or a logo image, for example.
To omit one of these items on the plot, make an item with matching `templateitemname` and `visible: false`.
meta
Parent:layoutType: number or categorical coordinate string
Assigns extra meta information that can be used in various `text` attributes.
Attributes such as the graph, axis and colorbar `title.text`, annotation `text` `trace.name` in legend items, `rangeselector`, `updatemenus` and `sliders` `label` text all support `meta`.
One can access `meta` fields using template strings: `%{meta[i]}` where `i` is the index of the `meta` item in question.
`meta` can also be an object for example `{key: value}` which can be accessed %{meta[key]}.
computed
Parent:layoutType: number or categorical coordinate string
Placeholder for exporting automargin-impacting values namely `margin.t`, `margin.b`, `margin.l` and `margin.r` in "full-json" mode.
grid
Parent:layoutType: object containing one or more of the keys listed below.
columns
Parent:layout.gridType: integer greater than or equal to 1
The number of columns in the grid.
If you provide a 2D `subplots` array, the length of its longest row is used as the default.
If you give an `xaxes` array, its length is used as the default.
But it's also possible to have a different length, if you want to leave a row at the end for non-cartesian subplots.
domain
Parent:layout.gridType: object containing one or more of the keys listed below.
x
Parent:layout.grid.domainType: array
Default:[0, 1]
Sets the horizontal domain of this grid subplot (in plot fraction).
The first and last cells end exactly at the domain edges, with no grout around the edges.
y
Parent:layout.grid.domainType: array
Default:[0, 1]
Sets the vertical domain of this grid subplot (in plot fraction).
The first and last cells end exactly at the domain edges, with no grout around the edges.
pattern
Parent:layout.gridType: enumerated , one of ( "independent" | "coupled" )
Default:"coupled"
If no `subplots`, `xaxes`, or `yaxes` are given but we do have `rows` and `columns`, we can generate defaults using consecutive axis IDs, in two ways: "coupled" gives one x axis per column and one y axis per row.
"independent" uses a new xy pair for each cell, left-to-right across each row then iterating rows according to `roworder`.
roworder
Parent:layout.gridType: enumerated , one of ( "top to bottom" | "bottom to top" )
Default:"top to bottom"
Is the first row the top or the bottom? Note that columns are always enumerated from left to right.
rows
Parent:layout.gridType: integer greater than or equal to 1
The number of rows in the grid.
If you provide a 2D `subplots` array or a `yaxes` array, its length is used as the default.
But it's also possible to have a different length, if you want to leave a row at the end for non-cartesian subplots.
subplots
Parent:layout.gridType: array
Used for freeform grids, where some axes may be shared across subplots but others are not.
Each entry should be a cartesian subplot id, like "xy" or "x3y2", or "" to leave that cell empty.
You may reuse x axes within the same column, and y axes within the same row.
Non-cartesian subplots and traces that support `domain` can place themselves in this grid separately using the `gridcell` attribute.
xaxes
Parent:layout.gridType: array
Used with `yaxes` when the x and y axes are shared across columns and rows.
Each entry should be an x axis id like "x", "x2", etc., or "" to not put an x axis in that column.
Entries other than "" must be unique.
Ignored if `subplots` is present.
If missing but `yaxes` is present, will generate consecutive IDs.
xgap
Parent:layout.gridType: number between or equal to 0 and 1
Horizontal space between grid cells, expressed as a fraction of the total width available to one cell.
Defaults to 0.1 for coupled-axes grids and 0.2 for independent grids.
xside
Parent:layout.gridType: enumerated , one of ( "bottom" | "bottom plot" | "top plot" | "top" )
Default:"bottom plot"
Sets where the x axis labels and titles go.
"bottom" means the very bottom of the grid.
"bottom plot" is the lowest plot that each x axis is used in.
"top" and "top plot" are similar.
yaxes
Parent:layout.gridType: array
Used with `yaxes` when the x and y axes are shared across columns and rows.
Each entry should be an y axis id like "y", "y2", etc., or "" to not put a y axis in that row.
Entries other than "" must be unique.
Ignored if `subplots` is present.
If missing but `xaxes` is present, will generate consecutive IDs.
ygap
Parent:layout.gridType: number between or equal to 0 and 1
Vertical space between grid cells, expressed as a fraction of the total height available to one cell.
Defaults to 0.1 for coupled-axes grids and 0.3 for independent grids.
yside
Parent:layout.gridType: enumerated , one of ( "left" | "left plot" | "right plot" | "right" )
Default:"left plot"
Sets where the y axis labels and titles go.
"left" means the very left edge of the grid.
"left plot" is the leftmost plot that each y axis is used in.
"right" and "right plot" are similar.
calendar
Parent:layoutType: enumerated , one of ( "chinese" | "coptic" | "discworld" | "ethiopian" | "gregorian" | "hebrew" | "islamic" | "jalali" | "julian" | "mayan" | "nanakshahi" | "nepali" | "persian" | "taiwan" | "thai" | "ummalqura" )
Default:"gregorian"
Sets the default calendar system to use for interpreting and displaying dates throughout the plot.
minreducedheight
Parent:layoutType: number greater than or equal to 2
Default:64
Minimum height of the plot with margin.automargin applied (in px)
minreducedwidth
Parent:layoutType: number greater than or equal to 2
Default:64
Minimum width of the plot with margin.automargin applied (in px)
newshape
Parent:layoutType: object containing one or more of the keys listed below.
drawdirection
Parent:layout.newshapeType: enumerated , one of ( "ortho" | "horizontal" | "vertical" | "diagonal" )
Default:"diagonal"
When `dragmode` is set to "drawrect", "drawline" or "drawcircle" this limits the drag to be horizontal, vertical or diagonal.
Using "diagonal" there is no limit e.g.
in drawing lines in any direction.
"ortho" limits the draw to be either horizontal or vertical.
"horizontal" allows horizontal extend.
"vertical" allows vertical extend.
fillcolor
Parent:layout.newshapeType: color
Default:"rgba(0,0,0,0)"
Sets the color filling new shapes' interior.
Please note that if using a fillcolor with alpha greater than half, drag inside the active shape starts moving the shape underneath, otherwise a new shape could be started over.
fillrule
Parent:layout.newshapeType: enumerated , one of ( "evenodd" | "nonzero" )
Default:"evenodd"
Determines the path's interior.
For more info please visit https://developer.mozilla.org/en-US/docs/Web/SVG/Attribute/fill-rule
label
Parent:layout.newshapeType: object containing one or more of the keys listed below.
font
Parent:layout.newshape.labelType: object containing one or more of the keys listed below.
Sets the new shape label text font.
color
Parent:layout.newshape.label.fontType: color
family
Parent:layout.newshape.label.fontType: string
HTML font family - the typeface that will be applied by the web browser.
The web browser will only be able to apply a font if it is available on the system which it operates.
Provide multiple font families, separated by commas, to indicate the preference in which to apply fonts if they aren't available on the system.
The Chart Studio Cloud (at https://chart-studio.plotly.com or on-premise) generates images on a server, where only a select number of fonts are installed and supported.
These include "Arial", "Balto", "Courier New", "Droid Sans", "Droid Serif", "Droid Sans Mono", "Gravitas One", "Old Standard TT", "Open Sans", "Overpass", "PT Sans Narrow", "Raleway", "Times New Roman".
lineposition
Parent:layout.newshape.label.fontType: flaglist string.
Any combination of "under", "over", "through" joined with a "+" OR "none".
Examples:"under", "over", "under+over", "under+over+through", "none"Default:"none"
Sets the kind of decoration line(s) with text, such as an "under", "over" or "through" as well as combinations e.g.
"under+over", etc.
shadow
Parent:layout.newshape.label.fontType: string
Default:"none"
Sets the shape and color of the shadow behind text.
"auto" places minimal shadow and applies contrast text font color.
See https://developer.mozilla.org/en-US/docs/Web/CSS/text-shadow for additional options.
size
Parent:layout.newshape.label.fontType: number greater than or equal to 1
style
Parent:layout.newshape.label.fontType: enumerated , one of ( "normal" | "italic" )
Default:"normal"
Sets whether a font should be styled with a normal or italic face from its family.
textcase
Parent:layout.newshape.label.fontType: enumerated , one of ( "normal" | "word caps" | "upper" | "lower" )
Default:"normal"
Sets capitalization of text.
It can be used to make text appear in all-uppercase or all-lowercase, or with each word capitalized.
variant
Parent:layout.newshape.label.fontType: enumerated , one of ( "normal" | "small-caps" | "all-small-caps" | "all-petite-caps" | "petite-caps" | "unicase" )
Default:"normal"
Sets the variant of the font.
weight
Parent:layout.newshape.label.fontType: integer between or equal to 1 and 1000
Default:normal
Sets the weight (or boldness) of the font.
padding
Parent:layout.newshape.labelType: number greater than or equal to 0
Default:3
Sets padding (in px) between edge of label and edge of new shape.
text
Parent:layout.newshape.labelType: string
Default:""
Sets the text to display with the new shape.
It is also used for legend item if `name` is not provided.
textangle
Parent:layout.newshape.labelType: angle
Default:"auto"
Sets the angle at which the label text is drawn with respect to the horizontal.
For lines, angle "auto" is the same angle as the line.
For all other shapes, angle "auto" is horizontal.
textposition
Parent:layout.newshape.labelType: enumerated , one of ( "top left" | "top center" | "top right" | "middle left" | "middle center" | "middle right" | "bottom left" | "bottom center" | "bottom right" | "start" | "middle" | "end" )
Sets the position of the label text relative to the new shape.
Supported values for rectangles, circles and paths are "top left", "top center", "top right", "middle left", "middle center", "middle right", "bottom left", "bottom center", and "bottom right".
Supported values for lines are "start", "middle", and "end".
Default: "middle center" for rectangles, circles, and paths; "middle" for lines.
texttemplate
Parent:layout.newshape.labelType: string
Default:""
Template string used for rendering the new shape's label.
Note that this will override `text`.
Variables are inserted using %{variable}, for example "x0: %{x0}".
Numbers are formatted using d3-format's syntax %{variable:d3-format}, for example "Price: %{x0:$.2f}".
See https://github.com/d3/d3-format/tree/v1.4.5#d3-format for details on the formatting syntax.
Dates are formatted using d3-time-format's syntax %{variable|d3-time-format}, for example "Day: %{x0|%m %b %Y}".
See https://github.com/d3/d3-time-format/tree/v2.2.3#locale_format for details on the date formatting syntax.
A single multiplication or division operation may be applied to numeric variables, and combined with d3 number formatting, for example "Length in cm: %{x0"2.54}", "%{slope"60:.1f} meters per second." For log axes, variable values are given in log units.
For date axes, x/y coordinate variables and center variables use datetimes, while all other variable values use values in ms.
Finally, the template string has access to variables `x0`, `x1`, `y0`, `y1`, `slope`, `dx`, `dy`, `width`, `height`, `length`, `xcenter` and `ycenter`.
xanchor
Parent:layout.newshape.labelType: enumerated , one of ( "auto" | "left" | "center" | "right" )
Default:"auto"
Sets the label's horizontal position anchor This anchor binds the specified `textposition` to the "left", "center" or "right" of the label text.
For example, if `textposition` is set to "top right" and `xanchor` to "right" then the right-most portion of the label text lines up with the right-most edge of the new shape.
yanchor
Parent:layout.newshape.labelType: enumerated , one of ( "top" | "middle" | "bottom" )
Sets the label's vertical position anchor This anchor binds the specified `textposition` to the "top", "middle" or "bottom" of the label text.
For example, if `textposition` is set to "top right" and `yanchor` to "top" then the top-most portion of the label text lines up with the top-most edge of the new shape.
layer
Parent:layout.newshapeType: enumerated , one of ( "below" | "above" | "between" )
Default:"above"
Specifies whether new shapes are drawn below gridlines ("below"), between gridlines and traces ("between") or above traces ("above").
legend
Parent:layout.newshapeType: subplotid
Default:legend
Sets the reference to a legend to show new shape in.
References to these legends are "legend", "legend2", "legend3", etc.
Settings for these legends are set in the layout, under `layout.legend`, `layout.legend2`, etc.
legendgroup
Parent:layout.newshapeType: string
Default:""
Sets the legend group for new shape.
Traces and shapes part of the same legend group hide/show at the same time when toggling legend items.
legendgrouptitle
Parent:layout.newshapeType: object containing one or more of the keys listed below.
font
Parent:layout.newshape.legendgrouptitleType: object containing one or more of the keys listed below.
Sets this legend group's title font.
color
Parent:layout.newshape.legendgrouptitle.fontType: color
family
Parent:layout.newshape.legendgrouptitle.fontType: string
HTML font family - the typeface that will be applied by the web browser.
The web browser will only be able to apply a font if it is available on the system which it operates.
Provide multiple font families, separated by commas, to indicate the preference in which to apply fonts if they aren't available on the system.
The Chart Studio Cloud (at https://chart-studio.plotly.com or on-premise) generates images on a server, where only a select number of fonts are installed and supported.
These include "Arial", "Balto", "Courier New", "Droid Sans", "Droid Serif", "Droid Sans Mono", "Gravitas One", "Old Standard TT", "Open Sans", "Overpass", "PT Sans Narrow", "Raleway", "Times New Roman".
lineposition
Parent:layout.newshape.legendgrouptitle.fontType: flaglist string.
Any combination of "under", "over", "through" joined with a "+" OR "none".
Examples:"under", "over", "under+over", "under+over+through", "none"Default:"none"
Sets the kind of decoration line(s) with text, such as an "under", "over" or "through" as well as combinations e.g.
"under+over", etc.
shadow
Parent:layout.newshape.legendgrouptitle.fontType: string
Default:"none"
Sets the shape and color of the shadow behind text.
"auto" places minimal shadow and applies contrast text font color.
See https://developer.mozilla.org/en-US/docs/Web/CSS/text-shadow for additional options.
size
Parent:layout.newshape.legendgrouptitle.fontType: number greater than or equal to 1
style
Parent:layout.newshape.legendgrouptitle.fontType: enumerated , one of ( "normal" | "italic" )
Default:"normal"
Sets whether a font should be styled with a normal or italic face from its family.
textcase
Parent:layout.newshape.legendgrouptitle.fontType: enumerated , one of ( "normal" | "word caps" | "upper" | "lower" )
Default:"normal"
Sets capitalization of text.
It can be used to make text appear in all-uppercase or all-lowercase, or with each word capitalized.
variant
Parent:layout.newshape.legendgrouptitle.fontType: enumerated , one of ( "normal" | "small-caps" | "all-small-caps" | "all-petite-caps" | "petite-caps" | "unicase" )
Default:"normal"
Sets the variant of the font.
weight
Parent:layout.newshape.legendgrouptitle.fontType: integer between or equal to 1 and 1000
Default:normal
Sets the weight (or boldness) of the font.
text
Parent:layout.newshape.legendgrouptitleType: string
Default:""
Sets the title of the legend group.
legendrank
Parent:layout.newshapeType: number
Default:1000
Sets the legend rank for new shape.
Items and groups with smaller ranks are presented on top/left side while with "reversed" `legend.traceorder` they are on bottom/right side.
The default legendrank is 1000, so that you can use ranks less than 1000 to place certain items before all unranked items, and ranks greater than 1000 to go after all unranked items.
legendwidth
Parent:layout.newshapeType: number greater than or equal to 0
Sets the width (in px or fraction) of the legend for new shape.
line
Parent:layout.newshapeType: object containing one or more of the keys listed below.
color
Parent:layout.newshape.lineType: color
Sets the line color.
By default uses either dark grey or white to increase contrast with background color.
dash
Parent:layout.newshape.lineType: string
Default:"solid"
Sets the dash style of lines.
Set to a dash type string ("solid", "dot", "dash", "longdash", "dashdot", or "longdashdot") or a dash length list in px (eg "5px,10px,2px,2px").
width
Parent:layout.newshape.lineType: number greater than or equal to 0
Default:4
Sets the line width (in px).
name
Parent:layout.newshapeType: string
Sets new shape name.
The name appears as the legend item.
opacity
Parent:layout.newshapeType: number between or equal to 0 and 1
Default:1
Sets the opacity of new shapes.
showlegend
Parent:layout.newshapeType: boolean
Determines whether or not new shape is shown in the legend.
visible
Parent:layout.newshapeType: enumerated , one of ( true | false | "legendonly" )
Default:true
Determines whether or not new shape is visible.
If "legendonly", the shape is not drawn, but can appear as a legend item (provided that the legend itself is visible).
activeshape
Parent:layoutType: object containing one or more of the keys listed below.
fillcolor
Parent:layout.activeshapeType: color
Default:"rgb(255,0,255)"
Sets the color filling the active shape' interior.
opacity
Parent:layout.activeshapeType: number between or equal to 0 and 1
Default:0.5
Sets the opacity of the active shape.
selections
Parent:layoutType: array of object where each object has one or more of the keys listed below.
This will break if there ever more than one type of item in in items - but for now it's just "shape" and "annotation"
line
Parent:layout.selections[]Type: object containing one or more of the keys listed below.
color
Parent:layout.selections[].lineType: color
Sets the line color.
dash
Parent:layout.selections[].lineType: string
Default:"dot"
Sets the dash style of lines.
Set to a dash type string ("solid", "dot", "dash", "longdash", "dashdot", or "longdashdot") or a dash length list in px (eg "5px,10px,2px,2px").
width
Parent:layout.selections[].lineType: number greater than or equal to 1
Default:1
Sets the line width (in px).
name
Parent:layout.selections[]Type: string
When used in a template, named items are created in the output figure in addition to any items the figure already has in this array.
You can modify these items in the output figure by making your own item with `templateitemname` matching this `name` alongside your modifications (including `visible: false` or `enabled: false` to hide it).
Has no effect outside of a template.
opacity
Parent:layout.selections[]Type: number between or equal to 0 and 1
Default:0.7
Sets the opacity of the selection.
path
Parent:layout.selections[]Type: string
For `type` "path" - a valid SVG path similar to `shapes.path` in data coordinates.
Allowed segments are: M, L and Z.
templateitemname
Parent:layout.selections[]Type: string
Used to refer to a named item in this array in the template.
Named items from the template will be created even without a matching item in the input figure, but you can modify one by making an item with `templateitemname` matching its `name`, alongside your modifications (including `visible: false` or `enabled: false` to hide it).
If there is no template or no matching item, this item will be hidden unless you explicitly show it with `visible: true`.
type
Parent:layout.selections[]Type: enumerated , one of ( "rect" | "path" )
Specifies the selection type to be drawn.
If "rect", a rectangle is drawn linking (`x0`,`y0`), (`x1`,`y0`), (`x1`,`y1`) and (`x0`,`y1`).
If "path", draw a custom SVG path using `path`.
x0
Parent:layout.selections[]Type: number or categorical coordinate string
Sets the selection's starting x position.
x1
Parent:layout.selections[]Type: number or categorical coordinate string
Sets the selection's end x position.
xref
Parent:layout.selections[]Type: enumerated , one of ( "paper" | "/^x([2-9]|[1-9][0-9]+)?( domain)?$/" )
Sets the selection's x coordinate axis.
If set to a x axis id (e.g.
"x" or "x2"), the `x` position refers to a x coordinate.
If set to "paper", the `x` position refers to the distance from the left of the plotting area in normalized coordinates where "0" ("1") corresponds to the left (right).
If set to a x axis ID followed by "domain" (separated by a space), the position behaves like for "paper", but refers to the distance in fractions of the domain length from the left of the domain of that axis: e.g., "x2 domain" refers to the domain of the second x axis and a x position of 0.5 refers to the point between the left and the right of the domain of the second x axis.
y0
Parent:layout.selections[]Type: number or categorical coordinate string
Sets the selection's starting y position.
y1
Parent:layout.selections[]Type: number or categorical coordinate string
Sets the selection's end y position.
yref
Parent:layout.selections[]Type: enumerated , one of ( "paper" | "/^y([2-9]|[1-9][0-9]+)?( domain)?$/" )
Sets the selection's x coordinate axis.
If set to a y axis id (e.g.
"y" or "y2"), the `y` position refers to a y coordinate.
If set to "paper", the `y` position refers to the distance from the bottom of the plotting area in normalized coordinates where "0" ("1") corresponds to the bottom (top).
If set to a y axis ID followed by "domain" (separated by a space), the position behaves like for "paper", but refers to the distance in fractions of the domain length from the bottom of the domain of that axis: e.g., "y2 domain" refers to the domain of the second y axis and a y position of 0.5 refers to the point between the bottom and the top of the domain of the second y axis.
hidesources
Parent:layoutType: boolean
Determines whether or not a text link citing the data source is placed at the bottom-right cored of the figure.
Has only an effect only on graphs that have been generated via forked graphs from the Chart Studio Cloud (at https://chart-studio.plotly.com or on-premise).
scattergap
Parent:layoutType: number between or equal to 0 and 1
Sets the gap (in plot fraction) between scatter points of adjacent location coordinates.
Defaults to `bargap`.
scattermode
Parent:layoutType: enumerated , one of ( "group" | "overlay" )
Default:"overlay"
Determines how scatter points at the same location coordinate are displayed on the graph.
With "group", the scatter points are plotted next to one another centered around the shared location.
With "overlay", the scatter points are plotted over one another, you might need to reduce "opacity" to see multiple scatter points.
barcornerradius
Parent:layoutType: number or categorical coordinate string
Sets the rounding of bar corners.
May be an integer number of pixels, or a percentage of bar width (as a string ending in %).
extendpiecolors
Parent:layoutType: boolean
Default:true
If `true`, the pie slice colors (whether given by `piecolorway` or inherited from `colorway`) will be extended to three times its original length by first repeating every color 20% lighter then each color 20% darker.
This is intended to reduce the likelihood of reusing the same color when you have many slices, but you can set `false` to disable.
Colors provided in the trace, using `marker.colors`, are never extended.
hiddenlabels
Parent:layoutType: data array
hiddenlabels is the funnelarea & pie chart analog of visible:'legendonly' but it can contain many labels, and can simultaneously hide slices from several pies/funnelarea charts
piecolorway
Parent:layoutType: colorlist
Sets the default pie slice colors.
Defaults to the main `colorway` used for trace colors.
If you specify a new list here it can still be extended with lighter and darker colors, see `extendpiecolors`.
violingap
Parent:layoutType: number between or equal to 0 and 1
Default:0.3
Sets the gap (in plot fraction) between violins of adjacent location coordinates.
Has no effect on traces that have "width" set.
violingroupgap
Parent:layoutType: number between or equal to 0 and 1
Default:0.3
Sets the gap (in plot fraction) between violins of the same location coordinate.
Has no effect on traces that have "width" set.
violinmode
Parent:layoutType: enumerated , one of ( "group" | "overlay" )
Default:"overlay"
Determines how violins at the same location coordinate are displayed on the graph.
If "group", the violins are plotted next to one another centered around the shared location.
If "overlay", the violins are plotted over one another, you might need to set "opacity" to see them multiple violins.
Has no effect on traces that have "width" set.
bargroupgap
Parent:layoutType: number between or equal to 0 and 1
Default:0
Sets the gap (in plot fraction) between bars of the same location coordinate.
barmode
Parent:layoutType: enumerated , one of ( "stack" | "group" | "overlay" | "relative" )
Default:"group"
Determines how bars at the same location coordinate are displayed on the graph.
With "stack", the bars are stacked on top of one another With "relative", the bars are stacked on top of one another, with negative values below the axis, positive values above With "group", the bars are plotted next to one another centered around the shared location.
With "overlay", the bars are plotted over one another, you might need to reduce "opacity" to see multiple bars.
barnorm
Parent:layoutType: enumerated , one of ( "" | "fraction" | "percent" )
Default:""
Sets the normalization for bar traces on the graph.
With "fraction", the value of each bar is divided by the sum of all values at that location coordinate.
"percent" is the same but multiplied by 100 to show percentages.
boxgap
Parent:layoutType: number between or equal to 0 and 1
Default:0.3
Sets the gap (in plot fraction) between boxes of adjacent location coordinates.
Has no effect on traces that have "width" set.
boxgroupgap
Parent:layoutType: number between or equal to 0 and 1
Default:0.3
Sets the gap (in plot fraction) between boxes of the same location coordinate.
Has no effect on traces that have "width" set.
boxmode
Parent:layoutType: enumerated , one of ( "group" | "overlay" )
Default:"overlay"
Determines how boxes at the same location coordinate are displayed on the graph.
If "group", the boxes are plotted next to one another centered around the shared location.
If "overlay", the boxes are plotted over one another, you might need to set "opacity" to see them multiple boxes.
Has no effect on traces that have "width" set.
waterfallgap
Parent:layoutType: number between or equal to 0 and 1
Sets the gap (in plot fraction) between bars of adjacent location coordinates.
waterfallgroupgap
Parent:layoutType: number between or equal to 0 and 1
Default:0
Sets the gap (in plot fraction) between bars of the same location coordinate.
waterfallmode
Parent:layoutType: enumerated , one of ( "group" | "overlay" )
Default:"group"
Determines how bars at the same location coordinate are displayed on the graph.
With "group", the bars are plotted next to one another centered around the shared location.
With "overlay", the bars are plotted over one another, you might need to reduce "opacity" to see multiple bars.
funnelgap
Parent:layoutType: number between or equal to 0 and 1
Sets the gap (in plot fraction) between bars of adjacent location coordinates.
funnelgroupgap
Parent:layoutType: number between or equal to 0 and 1
Default:0
Sets the gap (in plot fraction) between bars of the same location coordinate.
funnelmode
Parent:layoutType: enumerated , one of ( "stack" | "group" | "overlay" )
Default:"stack"
Determines how bars at the same location coordinate are displayed on the graph.
With "stack", the bars are stacked on top of one another With "group", the bars are plotted next to one another centered around the shared location.
With "overlay", the bars are plotted over one another, you might need to reduce "opacity" to see multiple bars.
extendfunnelareacolors
Parent:layoutType: boolean
Default:true
If `true`, the funnelarea slice colors (whether given by `funnelareacolorway` or inherited from `colorway`) will be extended to three times its original length by first repeating every color 20% lighter then each color 20% darker.
This is intended to reduce the likelihood of reusing the same color when you have many slices, but you can set `false` to disable.
Colors provided in the trace, using `marker.colors`, are never extended.
funnelareacolorway
Parent:layoutType: colorlist
Sets the default funnelarea slice colors.
Defaults to the main `colorway` used for trace colors.
If you specify a new list here it can still be extended with lighter and darker colors, see `extendfunnelareacolors`.
bargap
Parent:layoutType: number between or equal to 0 and 1
Default:0.1
Sets the gap between bars of adjacent location coordinates.
Values are unitless, they represent fractions of the minimum difference in bar positions in the data.
extendsunburstcolors
Parent:layoutType: boolean
Default:true
If `true`, the sunburst slice colors (whether given by `sunburstcolorway` or inherited from `colorway`) will be extended to three times its original length by first repeating every color 20% lighter then each color 20% darker.
This is intended to reduce the likelihood of reusing the same color when you have many slices, but you can set `false` to disable.
Colors provided in the trace, using `marker.colors`, are never extended.
sunburstcolorway
Parent:layoutType: colorlist
Sets the default sunburst slice colors.
Defaults to the main `colorway` used for trace colors.
If you specify a new list here it can still be extended with lighter and darker colors, see `extendsunburstcolors`.
extendtreemapcolors
Parent:layoutType: boolean
Default:true
If `true`, the treemap slice colors (whether given by `treemapcolorway` or inherited from `colorway`) will be extended to three times its original length by first repeating every color 20% lighter then each color 20% darker.
This is intended to reduce the likelihood of reusing the same color when you have many slices, but you can set `false` to disable.
Colors provided in the trace, using `marker.colors`, are never extended.
treemapcolorway
Parent:layoutType: colorlist
Sets the default treemap slice colors.
Defaults to the main `colorway` used for trace colors.
If you specify a new list here it can still be extended with lighter and darker colors, see `extendtreemapcolors`.
extendiciclecolors
Parent:layoutType: boolean
Default:true
If `true`, the icicle slice colors (whether given by `iciclecolorway` or inherited from `colorway`) will be extended to three times its original length by first repeating every color 20% lighter then each color 20% darker.
This is intended to reduce the likelihood of reusing the same color when you have many slices, but you can set `false` to disable.
Colors provided in the trace, using `marker.colors`, are never extended.
iciclecolorway
Parent:layoutType: colorlist
Sets the default icicle slice colors.
Defaults to the main `colorway` used for trace colors.
If you specify a new list here it can still be extended with lighter and darker colors, see `extendiciclecolors`.
Access Array of Objects
Using the Brackets notation
arrayName[arrayIndex]
console.log(objArr[0]);
Using the DOT notation
arrayName[arrayIndex].propertyName
console.log(objArr[1].gender);
Using the for..in loop
for (var key in arrayName) {
console.log(arrayName[key].name);
//Or we can access the specific properties using
console.log(arrayName[arrayIndex].propertyName);
}
for (let key in objArr) {
// Console logs all the values in the objArr Array:
console.log(objArr[key]);
}
Using forEach Loop
arrayName.forEach(function(item) { console.log(item); });
objArr.forEach(function(item) { console.log(item); });
Using map() method
arrayName.map((item) => { console.log(item); });
objArr.map((item) => { console.log(item); });
Using filter() method
arrayName.filter(function(item) { console.log(item); });
objArr.filter(function(item) { console.log(item); });
console.log("Using the Filer method to acces value")
const search = objArr.filter(function(item) { return item.name === 'jane'; });
console.log(search);
The self-invoking functions are JavaScript functions that execute immediately as they are defined.
A self-invoking expression is invoked (started) automatically, without being called.
Function expressions will execute automatically if the expression is followed by ().
You cannot self-invoke a function declaration.
Syntax(function() {
// function body
})();
Example
(function() {
let x = "Hello!!";
})();
output
Hello!!
The function definition is enclosed inside the pair of parentheses.
The second pair of parentheses at the end executes the function.
Example
We print the message in the output using the self-executing function.
(function() {
document.getElementById("output").innerHTML =
"Self-invoked function is executed!";
}());
Output:
Self-invoked function is executed!
Self-Invoking Functions with Parameters
It is common practice to pass references to global objects such as window, etc.
(function(paras) {
// function body
})(args);
Example
We created an anonymous function with a parameter name.
We have passed an argument to it.
const output = document.getElementById("demo");
(function(name) {
output.innerHTML = `Welcome to ${name}`;
})("Tutorials Point !");
Output
Welcome to Tutorials Point !
Private Scope of Self-Invoking Functions
Whatever code is defined inside the self-executing function remains in the private scope and doesn't pollute the global scope.
So, developers can make code clear and remove the errors like naming conflicts, etc.
Also, the code of the self-invoking function remains hidden and can't be accessible by other parts of the code.
Benefits of Using the Self-Invoking Functions
1.
Avoiding the global scope
2.
Initialization − The self-executing functions can be used for the initialization of variables.
3.
Code privacy − Programmers can avoid accessing the code of the self-executing function by other parts of the code.
Closures
A closure is a function having access to the parent scope, even after the parent function has closed.
The function defined in the closure ‘remembers’ the environment in which it was created.
JavaScript variables can belong to the local or global scope.
Global variables can be made local (private) with closures.
A function can also access variables defined outside the function.
In a web page, global variables belong to the page.
Global variables can be used (and changed) by all other scripts in the page.
A local variable can only be used inside the function where it is defined.
It is hidden from other functions and other scripting code.
Global and local variables with the same name are different variables.
Modifying one, does not modify the other.
Variable Lifetime
Global variables live until the page is discarded, like when you navigate to another page or close the window.
Local variables have short lives.
They are created when the function is invoked, and deleted when the function is finished.
A Counter Dilemma
Suppose you want to use a variable for counting something, and you want this counter to be available to all functions.
You could use a global variable, and a function to increase the counter:
// Initiate counter
let counter = 0;
// Function to increment counter
function add() {
counter += 1;
}
// Call add() 3 times
add();
add();
add();
// The counter should now be 3
There is a problem with the solution above: Any code on the page can change the counter, without calling add().
The counter should be local to the add() function, to prevent other code from changing it.
We can remove the global counter and access the local counter by letting the function return it.
JavaScript Closures
use self-invoking functions:
const add = (function() {
let counter = 0;
return function() {counter += 1; return counter}
})();
add();
add();
add();
// the counter is now 3
The variable add is assigned to the return value of a self-invoking function.
The self-invoking function only runs once.
It sets the counter to zero (0), and returns a function expression.
This way add becomes a function.
The "wonderful" part is that it can access the counter in the parent scope.
This is called a JavaScript closure.
It makes it possible for a function to have "private" variables.
The counter is protected by the scope of the anonymous function, and can only be changed using the add function.
count the number of times user clicked a button on a webpage.
<button onclick="updateClickCount()">click me</button>
You could use a global variable, and a function to increase the counter:
var counter = 0;
function updateClickCount() {
++counter;
// Do something with counter
}
But, the pitfall is that any script on the page can change the counter, without calling updateClickCount().
Now, you might be thinking of declaring the variable inside the function:
function updateClickCount() {
var counter = 0;
++counter;
// Do something with counter
}
But, hey! Every time updateClickCount() function is called, the counter is set to 1 again.
Thinking about nested functions?
Nested functions have access to the scope "above" them.
In this example, the inner function updateClickCount() has access to the counter variable in the parent function countWrapper():
function countWrapper() {
var counter = 0;
function updateClickCount() {
++counter;
// Do something with counter
}
updateClickCount();
return counter;
}
This could have solved the counter dilemma, if you could reach the updateClickCount() function from the outside and you also need to find a way to execute counter = 0 only once not everytime.
Closure to the rescue! (self-invoking function):
var updateClickCount = (function(){
var counter = 0;
return function(){
++counter;
// Do something with counter
}
})();
The self-invoking function only runs once.
It sets the counter to zero (0), and returns a function expression.
This way updateClickCount becomes a function.
The "wonderful" part is that it can access the counter in the parent scope.
This is called a JavaScript closure.
It makes it possible for a function to have "private" variables.
The counter is protected by the scope of the anonymous function, and can only be changed using the updateClickCount() function!
A more lively example on closures
var updateClickCount = (function(){
var counter = 0;
return function(){
++counter;
document.getElementById("spnCount").innerHTML = counter;
}
})();
<button onclick="updateClickCount()">click me</button>
<div> you've clicked
<span id="spnCount"> 0 </span> times!
</div>
use closures to implement throttle and debounce functionalityThrottling
Throttling puts a limit on as a maximum number of times a function can be called over time.
As in "execute this function at most once every 100 milliseconds."
Code:
const throttle = (func, limit) => {
let isThrottling
return function() {
const args = arguments
const context = this
if (!isThrottling) {
func.apply(context, args)
isThrottling = true
setTimeout(() => isThrottling = false, limit)
}
}
}
Debouncing
Debouncing puts a limit on a function not be called again until a certain amount of time has passed without it being called.
As in "execute this function only if 100 milliseconds have passed without it being called."
Code:
const debounce = (func, delay) => {
let debouncing
return function() {
const context = this
const args = arguments
clearTimeout(debouncing)
debouncing = setTimeout(() => func.apply(context, args), delay)
}
}
As you can see closures helped in implementing two beautiful features which every web application should have to provide smooth UI experience functionality.
在纯JavaScript中,你可以通过设置location对象的href属性来重定向用户到新页面。
function redirect() {
window.location.href = "newPage.html";
}
调用redirect函数时,浏览器将导航到newPage.html。
验证电子邮件
每当我想验证电子邮件时,我总是寻找一个完美的代码片段。
你可能也见过在一些库中默认提供的电子邮件验证函数,例如Zod。
以下代码片段可以用完整的逻辑验证任何电子邮件:
function validateEmail(email) {
var re = /^(([^<>()\[\]\\.,;:\s@"]+(\.[^<>()\[\]\\.,;:\s@"]+)*)|(".+"))@((\[[0-9]{1,3}\.[0-9]{1,3}\.[0-9]{1,3}\.[0-9]{1,3}\])|(([a-zA-Z\-0-9]+\.)+[a-zA-Z]{2,}))$/;
return re.test(String(email).toLowerCase());
}
如果你想要一个也接受Unicode字符的简单版本,可以使用下面的代码:
function validateEmailUnicode(email) {
var re = /^[^\s@]+@[^\s@]+\.[^\s@]+$/;
return re.test(String(email).toLowerCase());
}
这个简化版本可以匹配大多数有效的电子邮件地址,同时避免了过于复杂的正则表达式的一些缺陷。
The Node.js file system module allows you to work with the file system on your computer.
To include the File System module, use the require() method:
var fs = require('fs');
Common use for the File System module:
Read files
Create files
Update files
Delete files
Rename files
Read Files
The fs.readFile() method is used to read files on your computer.
Assume we have the following HTML file (located in the same folder as Node.js):
demofile1.html
<html>
<body>
<h1>My Header</h1>
<p>My paragraph.</p>
</body>
</html>
Create a Node.js file that reads the HTML file,
and return the content:
Example Get your own Node.js Server
var http = require('http');
var fs = require('fs');
http.createServer(function (req, res) {
fs.readFile('demofile1.html', function(err, data) {
res.writeHead(200, {'Content-Type': 'text/html'});
res.write(data);
return res.end();
});
}).listen(8080);
Save the code above in a file called "demo_readfile.js", and initiate the file:
Initiate demo_readfile.js:
C:\Users\Your Name>node demo_readfile.js
If you have followed the same steps on your computer, you will see the same result as the example: http://localhost:8080
Create Files
The File System module has methods for creating new files:
fs.appendFile()
fs.open()
fs.writeFile()
The fs.appendFile() method appends specified content to a file.
If the file does not exist, the file will be created:
Example
Create a new file using the appendFile() method:
var fs = require('fs');
fs.appendFile('mynewfile1.txt', 'Hello
content!', function(err) {
if (err) throw err;
console.log('Saved!');
});
The fs.open() method takes a "flag" as the second argument, if the flag is "w" for "writing", the specified file is opened for writing.
If the file does not exist, an empty file is created:
Example
Create a new, empty file using the open() method:
var fs = require('fs');
fs.open('mynewfile2.txt', 'w', function(err,
file) {
if (err) throw err;
console.log('Saved!');
});
The fs.writeFile() method replaces the specified file and content if it exists.
If the file does not exist, a new file, containing the specified content, will be created:
Example
Create a new file using the writeFile() method:
var fs = require('fs');
fs.writeFile('mynewfile3.txt', 'Hello
content!', function(err) {
if (err) throw err;
console.log('Saved!');
});
Update Files
The File System module has methods for updating files:
fs.appendFile()
fs.writeFile()
The fs.appendFile() method appends the specified content at the end of the specified file:
Example
Append "This is my text." to the end of the file "mynewfile1.txt":
var fs = require('fs');
fs.appendFile('mynewfile1.txt', ' This is my
text.', function(err) {
if (err) throw err;
console.log('Updated!');
});
The fs.writeFile() method replaces the specified file and content:
Example
Replace the content of the file "mynewfile3.txt":
var fs = require('fs');
fs.writeFile('mynewfile3.txt', 'This is my text', function(err) {
if (err) throw err;
console.log('Replaced!');
});
Delete Files
To delete a file with the File System module, use the fs.unlink()
method.
The fs.unlink() method deletes the specified file:
Example
Delete "mynewfile2.txt":
var fs = require('fs');
fs.unlink('mynewfile2.txt', function(err) {
if (err) throw err;
console.log('File deleted!');
});
Rename Files
To rename a file with the File System module, use the fs.rename()
method.
The fs.rename() method renames the specified file:
Example
Rename "mynewfile1.txt" to "myrenamedfile.txt":
var fs = require('fs');
fs.rename('mynewfile1.txt', 'myrenamedfile.txt', function(err) {
if (err) throw err;
console.log('File Renamed!');
});
Upload Files
You can also use Node.js to upload files to your computer.
get commands and perform your action in the callback
import os from "os";
setInterval(function() {
console.log("Process running");
}, 3000);
process.stdin.setEncoding("utf8");
process.stdin.on("readable", function() {
const chunk = process.stdin.read() as string;
chunk
.split(os.EOL)
.forEach(str => {
if (str === null || !str.length) {
return;
}
console.log("data: " + str);
});
});
Node.js formatted console output
Examples from the mdn page:
'abc'.padStart(10); // " abc"
'abc'.padStart(10, "foo"); // "foofoofabc"
'abc'.padStart(6,"123465"); // "123abc"
'abc'.padStart(8, "0"); // "00000abc"
'abc'.padStart(1); // "abc"
'abc'.padEnd(10); // "abc "
'abc'.padEnd(10, "foo"); // "abcfoofoof"
'abc'.padEnd(6, "123456"); // "abc123"
'abc'.padEnd(1); // "abc"
For indenting a json onto the console try using JSON.stringify.
The third parameter provides the indention required.
JSON.stringify({ a:1, b:2, c:3 }, null, 4);
// {
// "a": 1,
// "b": 2,
// "c": 3
// }
The debugger Keyword
The debugger keyword stops the execution of JavaScript, and calls (if available) the debugging function.
This has the same function as setting a breakpoint in the debugger.
If no debugging is available, the debugger statement has no effect.
With the debugger turned on, this code will stop executing before it executes the third line.
Example
let x = 15 * 5;
debugger;
document.getElementById("demo").innerHTML = x;
function repeat(fn, times, delay) {
return async function(...args) {
for (let i = 0; i < times; i++) {
await new Promise((resolve, reject) => {
setTimeout(() => {
fn.call(this, ...args)
resolve()
}, delay)
})
}
}
}
const repeatFn = repeat(console.log, 4, 1000)
// 函数调用四次,每次间隔 1s 打印 hello
repeatFn('hello')
实现 Promise.all/race/allSettled/any
Promise 身上的这些方法返回的都是一个 Promise
Promise.resolve 接受一个 Promise,若非 promise 则将其变成功状态的 Promise
// 有一个失败则返回失败的结果,全部成功返回全成功的数组
Promise.all = function(promiseList = []) {
return new Promise((resolve, reject) => {
const result = []
let count = 0
if (promiseList.length === 0) {
resolve(result)
return
}
for (let i = 0; i < promiseList.length; i++) {
Promise.resolve(promiseList[i]).then(res => {
result[i] = res
count++
// 不能直接通过 result.length 进行比较,因为 会存在下标大的先赋值
// 例如 i = 3 第一个返回结果,此时数组变为[empty,empty,empty,res]
if (count === promiseList.length) {
resolve(result)
}
}).catch(e => {
reject(e)
})
}
})
}
// 返回第一个成功或失败的结果
Promise.race = function(promiseList = []) {
return new Promise((resolve, reject) => {
if (promiseList.length === 0) {
return resolve([])
}
for (let i = 0; i < promiseList.length; i++) {
Promise.resolve(promiseList[i]).then(res => {
resolve(res)
}).catch(e => {
reject(e)
})
}
})
}
// 无论成功约否都返回,但是会添加一个 status 字段用于标记成功/失败
Promise.allSettled = function(promiseList = []) {
return new Promise((resolve, reject) => {
const result = []
let count = 0
const addRes = (i, data) => {
result[i] = data
count++
if (count === promiseList.length) {
resolve(result)
}
}
if (promiseList.length === 0) return resolve(result)
for (let i = 0; i < promiseList.length; i++) {
Promise.resolve(promiseList[i]).then(res => {
addRes(i, { status: 'fulfilled', data: res })
}).catch(e => {
addRes(i, { status: 'rejected', data: e })
})
}
})
}
// AggregateError,当多个错误需要包装在一个错误中时,该对象表示一个错误。
// 和 Promise.all 相反,全部失败返回失败的结果数组,有一个成功则返回成功结果
Promise.any = function(promiseList = []) {
return new Promise((resolve, reject) => {
if (promiseList.length === 0) return resolve([])
let count = 0
const result = []
for (let i = 0; i < promiseList.length; i++) {
Promise.resolve(promiseList[i]).then(res => {
resolve(res)
}).catch(e => {
count++
result[i] = e
if (count === promiseList.length) {
reject(new AggregateError(result))
}
})
}
})
}
整数千分位加逗号
1234567 -> 1,234,567
function toThousands(num) {
num = num.toString()
let result = ''
while (num.length > 3) {
result = ',' + num.substring(num.length - 3) + result
num = num.substring(0, num.length - 3)
}
result = num + result
return result
}
console.log(toThousands(1234567)) // 1,234,567
console.log(toThousands(123456)) // 123,456
WebRTC Real-time communication for the web
Try using cookies.
It's the simplest way I can think of.
This website might seem helpful: https://www.w3schools.com/js/js_cookies.asp
You can't do this with just JavaScript.
The point is: JS is a client-side language which means that it is downloaded by a client (a browser) and is run by it (not by server).
For the 2 pages to communicate, you have establish the communication somehow, via some medium.
The medium can be:
web itself.
2 clients can communicate directly, but only if they know each others' address.
How would they get those? By the help of the server (which brings us to the second option below) or by manual configuration which is very impractical (some more details may be found in context of WebRTC)
your server.
Ok, that's the most common approach but that involves more than just JS: this requires a server-side language (PHP, Python, C++, Java, whatever)
your browser.
There's a special case where you can establish such a communication: if you open your second page in the same browser from your first page in a special way so that the second one is "under control" of the first one, you can "command" the second one to do some stuff from the first one
So, if you're interested in the third option, you should read about window.open, window.opener, window.parent.
var newWindow = window.open(url, name, params);
will open a new window (say your second page) and bring you a variable newWindow which is a reference to the window object of the opened window.
Try for instance
newWindow.write("haha, I'm controlling this stuff!");
Likewise, in the second window you can use
var oldWindow = window.opener;
There's also a number of methods you can use (window``.close, .moveBy, .moveTo, .resizeBy, .resizeTo etc etc).
Remember, however, that this interaction will be limited to your browser: if you change something as it is displayed in your browser (like add some text to a page) this won't affect the actual pages stored on your server because this requires your server do something via some server-side scripts.
PS to advance this technique, you may want to read about window.postMessage but that's mostly designed for communication between pages that are cross-domain.
PPS Actually, there's more!
One thing to note is and have setItem method which generates 'storage' events on window (try localStorage.setItem('key', 'value'); and window.addEventListener('storage', event => console.log(event.key));).
Another, like Anderson Green has noted, is Broadcast Channel API (try const channel = new BroadcastChannel('my_channel'), channel.postMessage('Hi there!') and channel.addEventListener('message', event => console.log(event))).
There's also SharedWorkers and Service Workers.
Finally, you can use some off-the-shelve solutions like .
Those who speak Russian may also find more useful details in this article (wow!).
One of the most important skills of a web developer is DOM traversal and being able to select HTML elements with JavaScript. This will be a guide on my top 10 of the must know methods and hopefully this will help you master DOM traversal by the end of the guide.
Fair warning!
This is a guide for developers with at least some basic knowledge in HTML & JavaScript
DOM Nodes
Before we dive into the traversal methods, let’s look at the brief explanation of the DOM and Node Relationships from W3school.
According to the W3C HTML DOM standard, everything in an HTML document is a node:
-HTML node tree
The entire document is a document node
Every HTML element is an element node
The text inside HTML elements are text nodes
All comments are comment nodes
Node Relationships
The nodes in the node tree have a hierarchical relationship to each other. The terms parent, child, and sibling are used to describe the relationships.
In a node tree, the top node is called the root (or root node)
Every node has exactly one parent, except the root (which has no parent)
A node can have a number of children
Siblings (brothers or sisters) are nodes with the same parent
Navigating Between Nodes
Here’s a chart I drew up showing the following node properties to navigate between nodes
-html mockup of profile cards with an image and some info
parentNode
previousSibling
nextSibling
firstChild
lastChild
childNodes[nodeNumber]
Traversal Methods
Before we get into the methods, below is a HTML node tree I drew up with a div representing a grandparent nodewhich has two parent divsand finally each parent div has two children nodes each
parent-1, parent-2 belongs to grandparentchild-1, child-2 belongs to parent-1child-3, child-4 belongs to parent-2
<body>
<div class="grandparent" id="grandparent">
<!-- "parent-1" & "parent-2" belongs to "grandparent"-->
<div class="parent" id="parent-1">
<!-- "child-1" & "child-2" belongs to "parent-1"-->
<div class="child" id="child-1">
</div>
<div class="child" id="child-2">
</div>
</div>
<div class="parent" id="parent-2">
<!-- "child-3" & "child-4" belongs to "parent-2"-->
<div class="child" id="child-3">
</div>
<div class="child" id="child-4">
</div>
</div>
</div>
</body>
getElementById - This one is a classic, find a single element node by targeting the id
const grandparent = document.getElementById("grandparent")
//or
const parent2 = grandparent.getElementById("parent-2")
2. getElementsByClassName - This is our second classic way to select multiple elements at once, let’s say to target both our parent divs
3. querySelector - This is my favorite by far, a lot easier to use a single method to target classes or ids
4. querySelectorAll - similar to querySelector but used to select multiple element nodes
5. parentElement - used to target one level up the DOM tree to target the parent node
6. previousElementSibling - used to target one node to the left in terms of DOM tree
7. nextElementSibling - used to target one node to the right in terms of DOM tree
8. firstElementChild - used to target the first node down the DOM tree
9. lastElementChild - used to target the last node down the DOM tree
10. childNodes[node #] - last on my list but another one of my favorites, the childNodes method takes in a number to target child nodes of a parent
DOM遍历 Traversal
DOM 遍历是指在 HTML 文档中导航和定位元素的过程。
通过 DOM 遍历,您可以在文档中移动并查找特定的元素,以便对其进行操作或者检索信息。
将值转换为字符串有多种方式,其中最常见的是通过调用String()函数或使用加号运算符(+)与空字符串相加。
let num = 123;
let str = String(num); // 显式转换
let str2 = num + ''; // 隐式转换
console.log(str); // "123"
console.log(str2); // "123"
转换为数字
将值转换为数字也有多种方式,可以使用Number()函数、加号运算符(+)、parseInt()或parseFloat()等。
let str = "456";
let num = Number(str); // 显式转换
let num2 = +str; // 隐式转换
console.log(num); // 456
console.log(num2); // 456
需要注意的是,parseInt()和parseFloat()用于解析字符串中的数字,但它们与Number()有所不同,因为它们不会处理非数值字符并且可以解析带有小数点的字符串。
let str = "3.14";
console.log(parseInt(str)); // 3
console.log(parseFloat(str)); // 3.14
The createObjectURL()method creates a DOMString containing a URL representing the object given in the parameter of the method.
The new object URL represents the specified File object or Blob object.
Note: The URL lifetime is tied to the document in which it was created and To release an object URL, call revokeObjectURL().
Syntax:
const url = URL.createObjectURL(object);
Usage:
When using createObjectURL() in your code, remember to call URL.revokeObjectURL() for each object URL created when it’s no longer needed.
This helps manage memory efficiently.
While browsers release object URLs automatically when the document is unloaded, manually revoking them at safe times can improve performance and reduce memory usage.
Example: In this example, we will create an object URL for the image object using this method.
html
<!DOCTYPE html>
<html>
<head>
<meta charset="utf-8">
<title>URL.createObjectURL example</title>
</head>
<body>
<input type="file">
<img>
<p class="p">The URL of this image is : </p>
</body>
<script>
let Element = document.querySelector('input');
let img = document.querySelector('img');
Element.addEventListener('change', function() {
let url = URL.createObjectURL(Element.files[0]);
img.src = url;
console.log(url);
let d = document.querySelector(".p");
d.textContent += url;
});
</script>
</html>
Output
next() function
JavaScript AsyncGenerator.prototype.next() method is used with the asynchronous generators to retrieve the next value in the sequence produced by the generator.
It returns a Promise that resolves to the object with two properties: value and done.
Syntax:
AsyncGenerator.prototype.next(value);
The below examples will explain the practical implementation of the AsyncGenerator.prototype.next() method.
Example 1:
create a generator function and then use the next() method on it by creating an instance of it.
async function* asyncGenerator() {
yield 3;
yield 5;
yield 3;
}
const generator = asyncGenerator();
generator.next().then(result => {
console.log(result.value);
console.log(result.done);
});
generator.next().then(result => {
console.log(result.value);
console.log(result.done);
});
generator.next().then(result => {
console.log(result.value);
console.log(result.done);
});
Output
3
false
5
false
3
false
Example 2: This example will illustrate the use of the asyncGenerator function and the next() method with the string values.
async function* asyncGenerator() {
yield 'HI';
yield 'Async';
yield 'Generator';
}
const generator = asyncGenerator();
generator.next().then(result => {
console.log(result.value);
console.log(result.done);
});
generator.next().then(result => {
console.log(result.value);
console.log(result.done);
});
generator.next().then(result => {
console.log(result.value);
console.log(result.done);
});
Output
HI
false
Async
false
Generator
false
<img src="URL" loading="eager|lazy">
<iframe loading="lazy" src="video-player.html" title="..."></iframe>
eager Default. Loads an image immediately
lazy Defer loading of images until some conditions are met
KaTeX 是一个集成速度快且功能丰富的数学公式渲染库,专为 Web 设计。
它由 Khan Academy 开发,提供接近印刷品质的数学公式展示,同时保持与浏览器的高效互动性。
KaTeX 特点包括快速渲染速度、高质量的输出、独立运行、跨平台兼容以及丰富的功能集。
它支持服务器端渲染,可以预渲染公式并作为纯 HTML 发送,减轻客户端负担。
<script src='https://cdn.jsdelivr.net/npm/tesseract.js@5/dist/tesseract.min.js'></script>
<script>
(async () => {
const worker = await createWorker('eng');
const ret = await worker.recognize('https://tesseract.projectnaptha.com/img/eng_bw.png');
console.log(ret.data.text);
await worker.terminate();
})();
(async () => {
const worker = await Tesseract.createWorker('chi_sim'); // chi_tra, eng
//const ret = await worker.recognize('https://tesseract.projectnaptha.com/img/eng_bw.png');
const ret = await worker.recognize('https://media.istockphoto.com/id/1701859331/zh/%E5%90%91%E9%87%8F/set-of-numbers-written-by-brush.jpg?s=1024x1024&w=is&k=20&c=s_Khcm5ovYBy3APVOO9kfpZp6cYdF2pX5iU15KCCxuM=');
console.log(ret.data.text);
await worker.terminate();
})();
// A worker is created once and used every time a user uploads a new file.
</script>
When recognizing multiple images, users should create a worker once, run worker.recognize for each image, and then run worker.terminate() once at the end (rather than running the above snippet for every image).
str = "your string";
str.match(/(our|ing)/g);
['our', 'ing']
terms = ["term1", "term2", "term3"]
const str = "string to check for term1, term2"
// check if the string has some of the terms
result = terms.some(term => str.includes(term))
true
// check if the string has all the terms
result2 = terms.every(term => str.includes(term))
false
A JavaScript bundler can be used when your project becomes too large for a single file or when you're working with libraries that have multiple dependencies.
Module bundlers are the way to organize and combine many files of JavaScript code into one file.
What is a JavaScript module bundler?
A bundler is a development tool that combines many JavaScript code files into a single one that is production-ready loadable in the browser.
A fantastic feature of a bundler is that it generates a dependency graph as it traverses your first code files.
This implies that beginning with the entry point you specified, the module bundler keeps track of both your source files’ dependencies and third-party dependencies.
Keeping all of the files and their dependencies up to date and ready was a herculean task for web developers.
Consider a basic JavaScript CRUD (Create, Read, Update, and Delete) app like a grocery list.
In the pre-bundler era, you might have constructed these functions in separate JS files.
You could even opt to make your app a little more fancy by incorporating third-party libraries, and this would need your file to make several queries upon loading, like in this example.
However, using a bundler will merge the files and their dependencies into a single file.
Suppose you’re developing or maintaining a large app like an e-commerce site that provides access to thousands of products to several users.
For a use case like this, you most likely will need to employ custom or third-party libraries to power some of your more complex tasks.
In that case, developing without a JavaScript module bundler would make keeping all the dependencies updated to the latest version an exhaustive process.
Apart from providing a consistent tooling environment that saves you from the pain of dependencies, many popular module bundlers also come with performance optimization features.
Code splitting and hot module replacement are examples of these functionalities.
JavaScript bundlers also have productivity-enhancing features such as robust error logging, which lets developers easily debug and repair errors.
How does a bundler work?
After discussing what bundlers are and how crucial they are in today's web development ecosystem, let's look at how these dependency management tools work.
Overall, a bundler's operation is divided into two stages: dependency graph generation and eventual bundling.
Mapping a Dependency Graph
The first thing a module bundler does is generate a relationship map of all the served files.
This process is called Dependency Resolution.
To do this, the bundler requires an entry file which should ideally be your main file.
It then parses through this entry file to understand its dependencies.
Following that, it traverses the dependencies to determine the dependencies of these dependencies.
Tricky, eh? It assigns unique IDs to each file it sees throughout this process.
Finally, it extracts all dependencies and generates a dependency graph that depicts the relationship between all files.
Why is this process necessary?
It enables the module to construct a dependency order, vital for retrieving functions when a browser requests them.
return { id, filename, dependencies, code, };
It prevents naming conflicts since the JS bundler has a good source map of all the files and their dependencies.
It detects unused files allowing us to get rid of unnecessary files.
Bundling
After receiving inputs and traversing its dependencies during the Dependency Resolution phase, a bundler delivers static assets that the browser can successfully process.
This output stage is called Packing.
During this process, the bundler will leverage the dependency graph to integrate our multiple code files, inject the required function and module.exports object, and return a single executable bundle that the browser can load successfully.
Top 5 JavaScript module bundlers
Now that we’ve discussed the importance of JavaScript module bundlers and how they work, you might be wondering which kind of bundler is best for you.
There are many different module bundlers in the JavaScript ecosystem and each with its unique bundling method.
We'll look at five of the most popular module bundlers in the Javascript ecosystem, exploring how they function as well as their benefits and drawbacks.
Webpack
With over 18 million weekly downloads and 60k GitHub stars, Webpack is currently the most popular JavaScript module bundler.
As a static module bundler, it comes with a host of sophisticated and highly customizable features, making it a module bundler for JavaScript files and a transformer, minifier, and optimizer of all types of file resources and assets.
That’s not all.
Webpack has a very rich plugin and loaders ecosystem as well.
How does it work?
Like all modern JavaScript bundlers, Webpack begins the bundling process by assembling a dependency graph.
To understand how it performs the dependency resolution step, you must first grasp six key concepts:
Entry: specifies where Webpack should initiate its dependency graph.
You can have one or more entry points depending on your app’s architecture.
Webpack iterates through the module(s) listed in the webpack.config.js config file identifying the entry point’s direct and indirect dependencies.
module.exports = { entry: './app/index.js', };
Output: specifies the desired destination for the final output after Webpack completes the packing process.
The Output property contains two sub-values: the file path, usually the /dist folder, and the desired filename.
const path = require('path'); module.exports = { entry: './app/index.js', output: { path: path.resolve(__dirname, 'dist'), filename: 'webpack-app.bundle.js', }, };
Loaders: allow Webpack to transform and bundle non-JS files.
Plugins: allow Webpack to perform more advanced actions like custom resource optimization and management.
Mode: allows Webpack to configure its operations to production or development modes dynamically.
Browser Compatibility: allow Webpack to build bundles that support modern and old browsers with features like promises and polyfills.
After creating the internal modules map, Webpack then uses functions to wrap the associated modules bundling all together to be invoked by one singular runtime function called webpackStart.
Getting started is as simple as running npm i webpack
Pros
Multi-resource support
In addition to providing out-of-the-box support for JS files, Webpack has a rich Plugin ecosystem it relies on to bundle other files like CSS and Images.
Asset optimization
Features like code-splitting allow you to break code files into chunks, thereby reducing load time.
There’s the Hot module replacement that helps you to manage modules without fully reloading the browser.
Developers can employ Loaders in preprocessing their files, resulting in a faster app runtime.
These and more highly customizable optimization features have made Webpack the most popular JS bundler.
Developers’ productivity
When working with a complicated task like Module bundling as a developer, it’s crucial to have:
Extensive documentation.
A solid ecosystem of third-party tools you can lean on.
Efficient error debugging process that makes your work easier.
Webpack fulfills these three requirements by offering a massive ecosystem of plugins and loaders, as well as source map-powered debugging.
That’s not all.
Webpack has an internal caching system that empowers developers to build apps in a short time.
Cons
Complex
Webpack’s sophistication is a double-edged sword for many developers who have a love-hate relationship with it.
It also is complex and has a steep learning curve.
Buggy and Slow
Webpack’s all batteries included approach can sometimes cause Webpack app integrations to be overengineered.
Over-reliance on plugins to do simple functions can cause the bundler to slow W necessitating technical debugging to make it well-optimized.
Browserify
Browserify is an open-source Javascript bundler that allows you to bundle Node.js files that the browser can run.
With Browserify, developers can use node-style require() to load npm modules in the browser.
Initially released in 2010, the JS bundler has enjoyed decent success amongst developers.
It’s downloaded nearly 2 million times every week and has over 13k GitHub stars.
How does it work?
Like all other JavaScript bundlers, Browserify goes through defined stages when bundling modules.
The first is the Dependency graph formation.
In this stage, Browserify starts from the specified entry point files and then recursively searches for all require() calls in your files.
Each require() call is resolved with a file path, and each file path is further traversed for more require() calls.
After the entire app’s dependency graph has been fully mapped, it creates a self-contained bundle comprising files that have been merged and mapped to unique IDs.
It's worth noting that Browserfy also offers advanced customizations, such as the ability to replace these IDs with hashed ones.
You can then place the final bundle in a single <script> for eventual browser loading.
Getting started with Browserify is as simple as running npm i webpack and running Browserify against your entry file.
$ browserify main.js > bundle.js
The bundler also provides some inbuilt options like --debug and --ignore-missing.
Pros
Simplicity
For most applications with fewer features, many developers find Browserify perfect for their needs.
It provides straightforward npm integrations that allow you to re-use your node code without needing a native CLI.
Developers productivity
Browserify’s most significant selling point is that it allows you to take advantage of the rich npm ecosystem.
It's easy to learn and has excellent documentation.
Furthermore, it comes with an inbuilt automatic build system that makes building modules fast and straightforward.
All of this adds up to a great experience while developing your application.
Cons
No multi-resource support
Unlike Webpack, Browserify doesn’t provide multi-asset support.
You can, however, use a Gulp workflow to find your way around this.
The process nevertheless introduces unnecessary complexity.
Lack of advanced management features
Browserify limits you to the Node.js npm ecosystem and lacks powerful asset management tools that can assist you in optimizing your modules.
This includes a lack of support for dynamic loading.
Parcel
Parcel is a plug-and-play, zero-configuration build tool that allows developers to configure multi-assets quickly (e.g., JS, CSS, and HTML) modules necessary for development.
It has over 39k stars on Github, making it the second most popular JS bundler behind Webpack.
How does it work?
Parcel’s bundling process involves three steps:
Asset Tree construction: In this stage, Parcel takes an entry point asset and traverses through the file to identify the dependencies used to create a tree of assets similar to the dependency graph.
Bundle Tree construction: Here, individual assets in the Asset Tree are combined with their linked dependencies to form a bundle tree.
Packaging: This is the final stage where each bundle on the bundle tree is associated with its specific packager file types and transformed into a final compiled file.
After that, you can then provide a single entry asset against Parcel.
Make sure to note that Parcel supports multiple entry points.
To get started, run npm i parcel.
Let’s say you have a sample HTML boilerplate.
<html>
<body>
<script src="./index.js"></script>
</body>
</html>
You can then use Parcel to build the HTML file by running: parcel index.html.
What’s impressive is that Parcel will compile the HTML file pointed to it and the index.js that the HTML links to.
Pros
Zero configuration
Parcel solves the configuration issues faced with Webpack and Browserify providing developers with a performant architecture needed for rapid web development.
There’s also multi-asset support like Webpack enabling bundles for all kinds of non-JavaScript assets like CSS, HTML, and images.
Fast
Parcel is fast providing premium resource optimization features like hot module replacement and lazy loading of split code.
According to the most recent benchmarks, Parcel's bundling speed is 9.98s, compared to Browserify's 22.98s and Webpack's 20.71s.
Using Parcel's built-in caching technique can even deliver quicker results, with a benchmark time of 2.64s.
Cons
Lack of advanced customizations
As a highly-opinionated bundler, Parcel is perfect for small and medium-sized applications.
Nonetheless, making it work for complex applications where you need to modify the configurations might be tedious.
In this situation, most developers prefer to use Webpack.
Fusebox
Fusebox is an open-source Javascript and Typescript bundler and loader.
It combines Webpack's best optimization techniques into a fast, lightweight bundler that gives a rich API experience.
How does it work?
The Fusebox bundling process provides a couple of defaults that keep things easy to get started without requiring extensive modifications.
To get started, install Fusebox with the command: npm i fuse-box.
After that, you need to create the main configuration script file, usually titled fuse.js or fuse.ts.
Here's an example code snippet that includes the entry point and destination file, as well as the required mode.
import { fusebox } from 'fuse-box'; fusebox({ target: 'browser', entry: 'src/index.tsx', webIndex: { template: 'src/index.html', }, devServer: true, }).runDev();
Fusebox initiates the bundling process by building a virtual file structure that mimics a dependency graph.
These files are then emitted and bundled together.
Pros
Excellent developer experience
Fusebox has a minimum defaults style resulting in a simple learning curve for beginners.
This allows for a quick start without much configuration.
Fast
It provides a fast experience due to a couple of asset optimization features it has.
Features like HMR (Hot Module Replacement) allow the bundler to manage assets without fully refreshing the browser.
There’s a powerful cache system and inbuilt code-spilling, resulting in faster browser loads.
Cons
Poor multi-asset support
Fusebox is Javascript and Typescript-centric, rendering inbuilt support for both files.
Working with other files like CSS would require integrating the CSSPlugin or the SassPlugin.
Because it is a newer bundler, it lacks the robust ecosystem seen in Webpack.
Rollup
Released in 2018, Rollup is a next-generation JavaScript bundler whose primary selling point is its tree-shaking feature, enabling it to sieve out unused resources before bundling single, smaller modules into larger ones.
Because of this capability has gained some traction among developers and has been downloaded over 4 million times every week, and it also has more than 20,000 GitHub stars.
How does it work?
Rollup uses the main configuration file, usually named rollup.config.js, to define bundling specifications.
Next, it analyzes the entry point file and then sorts the dependencies while creating a dependency order.
During this parsing process, the tree shaking feature is also implemented.
Finally, all the declared functions encountered in the specified modules are compiled into a single global scope while paying attention to potential name collision.
To get started, run npm i rollup to install rollup.
You can perform the bundling process either through a CLI with the aid of a config file or via the bundling JavaScript API.
Here’s a sample config file containing the entry point, output file destination, and format type.
export default { input: 'src/app.js', output: { file: 'bundle.js', format: 'cjs' } };
Like many other JavaScript bundlers, Rollup also supports multiple entry points.
Pros
Asset optimization
Rollup provides rich asset management features allowing you to code-split your bundles for faster browser loads.
There’s also the Tree-shaking feature that helps developers get rid of unnecessary variables or functions.
Native ES6 support
For better browser compatibility in sharing imports and exports, Javascript’s ES6 version was released.
Rollups supports this new ES6 module system keeping existing import and export functions while allowing you to transform them to other module formats like CommonJS and AMD.
Cons
Budding developer ecosystem
One of the growing pains of a new development tool is the time it takes to build a fully-fledged ecosystem.
While Rollup is ideal for quick tasks, developers may be disappointed when creating large, complex apps due to a lack of plugins for required functionalities.
Honorary Mention: Vite.js
Vite.js
Vite.js is a next-generation, open-source frontend building tool.
Vite.js is a next-generation, open-source frontend building tool. Vue.js creator Evan You created Vite.js in 2020 to enhance the bundling ecosystem by exploiting the latest ES modules improvements to solve some of the building performance issues prior bundlers encountered.
Currently, Vite.js has over 33.9k stars on Github and has over 340,000 downloads every week.
How Does It Work?
One of Vite.js's unique features is that it comes with a dev server and a bundling build command.
The Dev server parses your application modules and separates them into two groups: The dependencies which are mostly not frequently updated are pre-bunded using esbuild, a JavaScript bundler that's extremely faster than Webpack, Rollup, and Parcel.
The application source code's other group requires frequent updates and is served on-demand without bundling to the browser leveraging the browser's powerful ESM module capability.
On the other hand, the build command bundles your code using Rollup, a JS bundler we've examined earlier.
Vite.js starts from an entry point when traversing your codebase to convert them into production-ready static assets.
Like several other JS bundlers, Vite.js also supports multiple entry points.
// vite.config.js
const { resolve } = require('path')
const { defineConfig } = require('vite')
module.exports = defineConfig({
build: {
rollupOptions: {
input: {
main: resolve(__dirname, 'index.html'),
nested: resolve(__dirname, 'nested/index.html')
}
}
}
})
Pros
Lean and Fast
By leveraging the Native ES6 module system, Vite.js can serve application code faster by reducing the number of browser requests it makes.
That's not all.
Vite.js also comes with Hot Module Replacement (HMR), making editing a quicker, near-instant process.
Multi-Framework Support
Vite.js is framework-agnostic with out-of-box support for many popular Javascript frameworks like React.js, Vue.js, Typescript, and Preact.
Recent releases have also integrated support for CSS modules, pre-processors, and other static assets.
For example, you can quickly set up a Vue.js app with Vite using the following command:
npm init vite@latest my-vue-app -- --template vue
It also has a rich plugin ecosystem that leverages other bundlers like esbuild and Rollup plugin ecosystems to provide developers with an extensive set of options.
Cons
Reliance on ESM Modules
Vite.js heavily relies on the browser's native ESM system to produce the mindblowing speed it's known for.
This means developers might run into issues when dealing with older browsers that don't support these upgrades.
Closing thoughts
Honestly, it's tough to determine which of these bundlers is the best overall because each offers distinctive features that may be ideal for your requirements.
For example, if you're creating a large app with complex features, such as an e-commerce app, and want complete control over your configurations, Webpack is a fantastic option.
On the other hand, Fusebox might be an attractive alternative if you're developing a hobby project and enjoy working with Typescript.
I’d say that regardless of the option you take, performance and development workflow metrics should be your north star.
https://medium.com/@likovalevl/video-streaming-with-javascript-the-easy-way-45ecd7ec3f08
client creates video =>
client sends video to server =>
server stores video =>
client asks server for video =>
server loads the video from storage =>
server sends video to client =>
client plays video
Everything happens with HTTP and doesn’t involve any superfluous code.
Let’s start with the client-side.
The root of the whole project will be the <video> HTML tag.
create index.html
like this:
<!DOCTYPE html>
<html lang="en">
<head>
<meta charset="UTF-8">
<title>Streaming</title>
</head>
<body>
<video autoplay></video>
<script src="index.js"></script>
</body>
</html>
We’ve added <video> tag with autoplay attribute and <script> to hook our index.js from the directory root.
Place the index.js in the same directory.
To enable the camera
we need to ask the browser if it has a proper API.
For this we use the following function:
function permittedGetUserMedia() {
return !!(navigator.mediaDevices &&
navigator.mediaDevices.getUserMedia);
}
So at the top level of the index.js we make a trigger:
if (permittedGetUserMedia()) {
const video = document.querySelector('video');
const mediaSource = new MediaSource();
video.src = URL.createObjectURL(mediaSource);
navigator.mediaDevices.getUserMedia({
video: true
}).then((stream) => processStream(stream, mediaSource));
}
In this part of code, we check if we have access to the camera, then we get the node of <video> tag.
This node has the src attribute.
Typically it should be a URL of the video file, but today we will provide a virtual URL of some object in the browser memory.
We create MediaSource and create its URL, that we set as video.url property.
This MediaSource will provide the proper interface for <video> node.
With the last directive, we will ask the user for permission to enable the camera.
Users will see a notification in a browser and can allow video recording.
If she or he did it, the promise that is returned by this method will be resolved and we will receive MediaStream object.
In this example, we will pass it to the processStream function along with the MediaSource instance.
In fact, all the rest of the actions here are in vain if you just want to make a cyberpunk mirror.
You can just make (stream) => {video.srcObject = stream} without even bothering about MediaSource.
This is also a viable approach.
But here we are going to simulate the later connection to the server.
processStream
In processStream we write:
function processStream(stream, mediaSource) {
const mediaRecorder = new MediaRecorder(stream)
const videoBuffer = mediaSource.addSourceBuffer('video/webm;codecs=vp8');
mediaRecorder.ondataavailable = (data) => {
let fileReader = new FileReader();
let arrayBuffer;
fileReader.onloadend = () => {
arrayBuffer = fileReader.result;
videoBuffer.appendBuffer(arrayBuffer)
}
fileReader.readAsArrayBuffer(data.data);
}
mediaRecorder.start()
setInterval(() => {
mediaRecorder.requestData()
}, 1000)
}
Here we define MediaRecord instance that will create a kind of media file that we can send to the server later.
MediaRecord must be started before use.
VideoBuffer
VideoBuffer is a special object that works as an input to MediaSource.
It is an instance of MediaBuffer.
You can have several MediaBuffers for one MediaSource.
Right now MediaRecord just creates a bunch of video information.
We can pull if from time to time to send to the server /video player.
For this, we invoke requestData method that activates a built-in method of MediaRecorder called ondataavailable.
It also cleans previous data so we can call it several times and receive non-overlapping bunches of video.
For periodical loads of data, we can use setInterval.
All the further magic will happen in MediaRecorder.ondataavailable.
This method receives old data.
We will feed it to our videoBuffer — and everything works.
Except for one little thing: we need to convert the data into arrayBuffer using FileReader instance.
This is basically it.
We received the same cyberpunk mirror but with a little lag.
Please, don’t try to shave or apply makeup using it.
<
server-side
Now we can move to create the server-side.
Let’s be lazy here and use docker-compose for faster connection of all services.
For me the project structure looks like this:
The rest of the files are autogenerated.
I will not go deeper into the environment implementation, I just will show you the contents of the supporting files.
Docker-compose creates 3 services: frontend, backend, and nginx.
The last one makes sure that we have the same domain name for API and client:
version: '3'
services:
nginx:
image: nginx
ports:
- 80:80
restart: always
volumes:
- ./nginx/nginx.conf:/etc/nginx/nginx.conf
- ./nginx/default.conf:/etc/nginx/conf.d/default.conf
frontend:
image: nginx
volumes:
- ../frontend:/usr/share/nginx/html
backend:
build: ./backend
volumes:
- ../backend:/app
working_dir: /app
command: nodemon index.js
Nginx configurations are pretty standard, except I’ve made max body size a little bigger:
user nginx;
worker_processes 1;
error_log /var/log/nginx/error.log warn;
pid /var/run/nginx.pid;
events {
worker_connections 1024;
}
http {
include /etc/nginx/mime.types;
default_type application/octet-stream;
client_max_body_size 50m;
sendfile on;
keepalive_timeout 65;
gzip on;
include /etc/nginx/conf.d/*.conf;
}
The default site config is like this:
upstream frontend-upstream {
server frontend:80;
}
upstream backend-upstream {
server backend:3000;
}
server {
listen 80 default;
server_name _;
root /var/www/html;
location ~ ^/api {
rewrite ^/api/?(.*) /$1 break;
proxy_pass http://backend-upstream;
}
location / {
proxy_pass http://frontend-upstream;
}
}
We set up upstreams for API and client here.
Docekrfile for backend looks like this:
FROM node
RUN npm install nodemon -g
For the sake of development simplicity, I set up nodemon here for hot-reloading the code.
Now to the backend.
I’ve used this package.json:
{
"name": "stream-test",
"version": "1.0.0",
"description": "",
"main": "index.js",
"dependencies": {
"express": "^4.17.1",
"express-fileupload": "^1.1.6-alpha.6"
},
"devDependencies": {},
"scripts": {
"test": "echo \"Error: no test specified\" && exit 1"
},
"author": "",
"license": "ISC"
}
express
It has only 2 dependencies: express and express-fileupload.
With a pure node making the same will be a more painful process.
Believe me, I’ve tried.
Put empty index.js file into the backend directory, so on the first start backend container wouldn’t exit with an error.
Use docker-compose up to set up the server and access the backend with docker-compose exec backend bash.
From there execute npm install and we’re ready for coding.
Prerequisites:
For the frontend part, we will have the same functions permittedGetUserMedia, processStream, and the same if clause that we used before.
We will change only processStream.
For the backend we will need an obligatory part of express.js:
const fs = require('fs')
const bodyParser = require('body-parser')
const express = require('express')
const fileUpload = require('express-fileupload')
const app = express()
app.use(bodyParser.urlencoded())
app.use(bodyParser.json())
app.use(fileUpload({
useTempFiles: true,
tempFileDir: '/tmp/'
}))
const hostname = '0.0.0.0'
const port = 3000
// CODE GOES HERE
app.listen(port, hostname, () => {
console.log('Starting development server')
})
file upload
Let’s start with file upload.
From the frontend point of view, we need to grab the video and send it to the server.
We can delete all contents of processStream function now and leave only a call of a new function called registerRecord.
This function will look like this:
function registerRecord(stream) {
const mediaRecorder = new MediaRecorder(stream)
let countUploadChunk = 0
mediaRecorder.ondataavailable = (data) => {
sendFile(data.data, countUploadChunk)
countUploadChunk++
}
mediaRecorder.start()
setInterval(() => {
mediaRecorder.requestData()
}, 2000)
}
We’re creating the same MediaRecorder instance and define a counter.
The counter will be used to mark a new part of the video we send to the server.
We’re using MediaRecorder instance the same way as before, except now we don’t put the result directly to the player, but send it to the server.
We grow counter here to make a new chunk name every time.
One step aside here.
We will need to name our stream somehow.
The name must be unique and the easiest way is to define it on the client-side.
I’ve defined it as a global constant:
function sendFile(file, chunkNumber) {
const formData = new FormData();
formData.append('file', file);
formData.append('name', STREAM_NAME);
formData.append('chunk', chunkNumber);
fetch('/api/upload', {
method: 'PUT',
body: formData
});
}
sendFile
The sendFile function will look like this:
function sendFile(file, chunkNumber) {
const formData = new FormData();
formData.append('file', file);
formData.append('name', STREAM_NAME);
formData.append('chunk', chunkNumber);
fetch('/api/upload', {
method: 'PUT',
body: formData
});
}
Nothing special here: we’re just sending a bunch of form-data including the file itself, name of stream and number of a chunk.
Now we are sending video to the server at last.
On backend let’s define a helper function:
const makeDirnameFilename = (name, chunk) => {
const dirname = `/app/uploads/${name}`
const filename = `${dirname}/${chunk}.webm`
return [dirname, filename]
}
It will help us to define the name of saving/loading files.
Now we can work with uploading file:
app.put('/upload', (req, res) => {
const file = req.files.file
const [dirname, filename] = makeDirnameFilename(req.body.name, req.body.chunk)
fs.promises.mkdir(dirname, {recursive: true})
.then(
file.mv(filename)
)
res.statusCode = 200
res.setHeader('Content-Type', 'text/plain')
res.end('Upload\n')
})
First, we define some helper constants.
Then, we make sure that the directory for the new file really exists.
Our file is saved in temporary storage and we just move it to the permanent directory.
This all happens asynchronously so we return the response before the file is actually saved.
Now, if you will try the code, it will start saving files, but won’t show you anything.
We proceed with playing functionality.
For the frontend part, we will add a call of registerPlayer function in processStream function.
Finally the later will look like this:
function processStream(stream, mediaSource) {
registerRecord(stream)
registerPlayer(mediaSource)
}
And here is the whole code of the registerPlayer:
function registerPlayer(mediaSource) {
const videoBuffer = mediaSource.addSourceBuffer('video/webm;codecs=vp8');
let countDownloadChunk = 0
setInterval(() => {
fetch(`/api/download?name=${STREAM_NAME}&chunk=${countDownloadChunk}`)
.then((response) => {
if (response.status !== 200) {
throw Error('no such file')
}
return response.arrayBuffer()
}).then((buffer) => {
countDownloadChunk++
videoBuffer.appendBuffer(buffer)
}).catch(() => {})
}, 1000)
}
We’re defining videoBuffer as before.
And adding one more counter, this time for downloading.
Downloading intervals will be less then uploading to make sure that we catch all new chunks of video without video freezes.
With fetch, we grab the file on a specific route using the GET query.
Then, if a response is 200 (we actually can have 204 here if a new file is not ready), we make arrayBuffer from file and return it as a next promise resolution.
The resulting arrayBuffer we will send into videoBuffer.
We increment the counter here only on a successful download.
The last catch is used to prevent littering console with error messages.
For the backend we define a new endpoint:
app.get('/download', (req, res) => {
const query = req.query
const [dirname, filename] = makeDirnameFilename(query.name, query.chunk)
fs.promises.readFile(filename)
.then((file) => {
res.statusCode = 200
res.write(file, 'binary')
res.end()
}).catch(() => {
res.statusCode = 204
res.end()
})
})
First, we create helper constants here and then trying to read the file.
On success, we just send it to the client, but if we don’t find it — we return 204 for the client like a call to try it later.
If you will return 404, which looks logical, the Chrome browser will show lots of errors in a console later.
Keep in mind that we’re working with a file as with binary everywhere, so we provide binary flag on file save and response.
Now you can open localhost/ in the browser and try the code yourself.
If this didn’t work and you don’t see your picture in 3 seconds, just refresh the page.
With current code may exist a little bug when the first chunk of code was not created and your player just can't load any further part.
This bug can be fixed with 2 techniques that I recommend to use: using WebSocket for both uploading and downloading instead of HTTP requests and adding some file mapping that will tell the client which files it can download right now.
But this goes far from the actual goal of this article.
We’ve just created the real simple streaming workflow.
This structure, workflow and, especially, work with browser API can be handy to understand the whole background of how modern streaming services work.
To see the complete code visit the GitHub repo:https://github.com/hgato/streaming-article.
stream from camera to web page
The Live Streaming either need Streaming Video Server or HTTP Streaming.
Streaming Video Server
IT is the server from which you will stream your video.
They have to be extremely fast, able to handle many connections at a time, depending on user's connection speed etc.
To have this, you can Buy your own, or
Sign up for a hosted streaming plan with an ISP (Internet Service Provider)
HTTP Streaming
Or, you need HTTP Streaming
To make it as simple as it can be
Create a video file in a common streaming media format
Upload the file to your web server
Make a simple hyperlink to the video file, or use special HTML tags to embed the video in a web page.
It doesn’t require any library or module to be installed.
you can do this by just writing a small code.
add a html5 video tag
First, you have to add a html5 video tag to your index.html
<video id="video"></video>
In your camera.js file add the following code snippet.
First, check if your browser is supporting navigator.mediaDevices
if(navigator && navigator.mediaDevices){
//Your browser is supporting camera API.
}else{
console.log("camera API is not supported by your browser")
}
add the camera API code
In the next step, we will add the camera API code.
if(navigator && navigator.mediaDevices){
navigator.mediaDevices.getUserMedia(options)
.then(function(stream) {
//use the stream to you code
})
.catch(function(err) {
//Handle error here
});
}else{
console.log("camera API is not supported by your browser")
}
parameter options
as you can see that in the above code there are parameter options.
It's a configuration object which we will pass to restrict or allow some of its features.
For example, to allow the audio:
{ audio: true }
to access the front camera:
{ video: { facingMode: "user" } }
to access the back camera:
{ video: { facingMode: { exact: "environment" } } }
For more information about configuration, visit this doc.
assign a stream
We are almost done with the configuration, Now will assign a stream to the video tag.
if(navigator && navigator.mediaDevices){
const options = { audio: false, video: { facingMode: "user", width: 200, height: 200 } }
navigator.mediaDevices.getUserMedia(options)
.then(function(stream) {
var video = document.querySelector('video');
video.srcObject = stream;
video.onloadedmetadata = function(e) {
video.play();
};
})
.catch(function(err) {
//Handle error here
});
}else{
console.log("camera API is not supported by your browser")
}
capture the image
So, We are almost done till now, now we will add a button to capture the image from the video and display it on canvas.
final camera.js file
This is our final camera.js file.
var video, canvas, ctx;
if(navigator && navigator.mediaDevices){
const options = { audio: false, video: { facingMode: "user", width: 300, height: 300 } }
navigator.mediaDevices.getUserMedia(options)
.then(function(stream) {
video = document.querySelector('video');
video.srcObject = stream;
video.onloadedmetadata = function(e) {
video.play();
};
canvas = document.getElementById("myCanvas");
ctx = canvas.getContext('2d');
})
.catch(function(err) {
//Handle error here
});
}else{
console.log("camera API is not supported by your browser")
}
function clickPhoto() {
ctx.drawImage(video, 0,0, canvas.width, canvas.height);
}
Here is our final index.html file.
<body>
<div style="text-align: center;">
<video id="video" style="text-align: center; border-radius: 20px;"></video>
</div>
<div style="text-align: center;">
<button type="button" class="btn btn-warning" onclick="clickPhoto();">Take Photo</button>
</div>
<div style="text-align: center;">
<canvas id="myCanvas" width="300" height="300" style="text-align: center; border-radius: 20px;"></canvas>
</div>
</body>
Download the final codebase repo.
See the demo here.
Clone this repository or download the source code.
git clone https://github.com/thesmartcoder7/video-streaming-server.git
From here, navigate to the project directory
cd video-streaming-server
Install the npm packages
npm install
Usage
Place your video file (e.g., Chris-Do.mp4) in the root directory of the project.
Start the server by running the following command:
node server.js
This will start the server, and you will see the message "Listening on port 8000!" in the console, indicating that the server is running.
To access the video stream, open a web browser and navigate to http://localhost:8000/video. You should be able to stream the video.
select column from a two dimensional array
Use Array.prototype.map() with an arrow function:
newObj = [ [1, 2, 3], [4, 5, 6], [7, 8, 9],];
arrayColumn = (newObj, n) => newObj.map(x => x[n]);
arrayColumn(newObj, 1)
crossorigin="anonymous"
crossorigin attribute has only two possible values:
anonymous or use-credentials.
Any value other than anonymous, including empty value, will be translated to anonymous.
video controlslist
to customize Chrome's native media controls such as the download, fullscreen and remoteplayback buttons.
The current implementation for now is a blocklist mechanism on native controls with the ability to set them directly from HTML content using the new attribute controlsList.
controlslist Examples
Usage in Javascript:
var video = document.querySelector('video');
video.controls; // true
video.controlsList; // "nofullscreen nodownload noremoteplayback noplaybackrate" - "foobar" not present
video.controlsList.remove('noremoteplayback');
video.controlsList; // "nofullscreen nodownload noplaybackrate" - "noremoteplayback" not present
video.getAttribute('controlslist'); // "nofullscreen nodownload noplaybackrate"
detect triple click
window.addEventListener('click', function(evt) {
if (evt.detail === 3) {
alert('triple click!');
$("body").toggleClass('stop-scrolling');
}
});
No native event exists to capture 3 clicks in a row.
Check the value of click property and see if it is 3:
window.addEventListener('click', function(evt) {
if (evt.detail === 3) {
alert('triple click!');
}
});
The best approach is to capture a double-click, followed by a triple-click for example:
var timer, // timer required to reset
timeout = 200; // timer reset in ms
window.addEventListener("dblclick", function(evt) {
timer = setTimeout(function() {
timer = null;
}, timeout);
});
window.addEventListener("click", function(evt) {
if (timer) {
clearTimeout(timer);
timer = null;
executeTripleClickFunction();
}
});
And you can even catch single, double, triple, ... clicks as you like.
customizable click delay (timeout):
var clicks = 0;
var timer, timeout = 350;
var doubleClick = function(e) {
console.log('doubleClick');
}
var tripleClick = function(e) {
console.log('tripleClick');
}
// click timer
yourcontainer.addEventListener('click', function(e) {
clearTimeout(timer);
clicks++;
var evt = e;
timer = setTimeout(function() {
if(clicks==2) doubleClick(evt);
if(clicks==3) tripleClick(evt);
clicks = 0;
}, timeout);
});
Working demo: http://jsfiddle.net/L6d0p4jo/
to enable/disable elements
The disabled attribute can be used on the following elements:
button, fieldset, input, optgroup, option, select, textarea
Return the disabled property:
buttonObject.disabled
Set the disabled property:
buttonObject.disabled = true|false
var x = document.getElementById("myBtn").disabled;
$('button').disabled = true;
var nodes = $('button')
button[5].disabled=true;
$('button').attr('disabled')
$(this).attr({'disabled': 'disabled'});
nodes[3].disabled = 'disabled';
var nodes = $('button')
nodes[5].style.display='none';
to chop a string by space character
str = '123 r'
myArray = str.split(" "); // ['123', 'r']
to chop an array of strings by space character:
str = ['123 r', '456 t']
myArray = str.map(item => item.split(' ')[0]); // ['123', '456']
Range Sliders
<input type="range" min="1" max="100" value="50" id="sliderRange">
Value: <span id="output"></span>
var slider = document.getElementById("sliderRange"); // must use document.getElementById, jquery $ cannot work
$("#output").text(slider.value)
slider.oninput = function() { $("#output").text(slider.value)}
JavaScript is a versatile language with many hidden features that can make your development process more efficient and your code cleaner.
Here are 10 advanced JavaScript tricks that you might not know, but which can significantly enhance your coding skills.
1. Destructuring with Aliasing
Destructuring allows you to unpack values from arrays or properties from objects into distinct variables.
Aliasing enables you to rename the variables during this process, which is particularly useful when dealing with data from external sources like APIs.
Use Case: When fetching data from an API, and you want to give more meaningful names to the properties for better code readability and maintainability.
const apiResponse = { first_name: 'John', user_age: 30, address: { city: 'New York', zip: '10001' } };
const { first_name: firstName, user_age: age, address: { city: hometown, zip: postalCode } } = apiResponse;
console.log(firstName); // John
console.log(age); // 30
console.log(hometown); // New York
console.log(postalCode); // 10001
Why Use It: It helps in making the variable names more self-explanatory and intuitive, which improves code readability and maintenance.
By using aliasing, you can avoid name clashes and enhance the clarity of your code, making it easier to work with complex data structures.
2. Currying
Currying is the process of transforming a function that takes multiple arguments into a series of functions that each take a single argument.
This technique allows you to create more flexible and reusable functions, which can be particularly useful in functional programming.
Use Case: Create reusable and configurable functions for applying discounts.
Instead of writing separate functions for different discount percentages, you can create a single curried function.
const applyDiscount = (discount) => (price) => price - (price * discount / 100);
const tenPercentOff = applyDiscount(10);
const twentyPercentOff = applyDiscount(20);
console.log(tenPercentOff(100)); // 90
console.log(twentyPercentOff(100)); // 80
const applyTax = (taxRate) => (price) => price + (price * taxRate / 100);
const applyTenPercentTax = applyTax(10);
console.log(applyTenPercentTax(100)); // 110
console.log(applyTenPercentTax(twentyPercentOff(100))); // 88
Why Use It: It enables you to preset arguments in functions, leading to more modular and composable code.
This can greatly simplify the creation of highly reusable utility functions, making your codebase cleaner and easier to maintain.
Currying is especially useful in scenarios where functions need to be partially applied or reused with different configurations.
3. Debouncing and Throttling
Debouncing and throttling are techniques to control how often a function is executed.
They are particularly useful for optimizing event handlers to prevent excessive function calls that can degrade performance.
Debouncing:
Debouncing ensures that a function is not called again until a certain amount of time has passed since the last call.
This is useful for scenarios like search input fields where you want to wait until the user has stopped typing before making an API call.
Use Case: Optimizing a search input field to reduce the number of API calls.
This can prevent server overload and improve the user experience by only initiating the search once the user has finished typing.
function debounce(func, delay) {
let timeoutId;
return function(...args) {
clearTimeout(timeoutId);
timeoutId = setTimeout(() => func.apply(this, args), delay);
};
}
const search = debounce((query) => {
console.log(`Searching for ${query}`);
// Imagine an API call here
}, 300);
document.getElementById('searchInput').addEventListener('input', (event) => {
search(event.target.value);
});
Why Use It: Reduces the number of unnecessary function calls, improving performance and user experience by ensuring that the function is only called after the user has stopped performing the triggering action.
This is particularly useful for actions that involve network requests or heavy computations.
Throttling:
Throttling ensures that a function is called at most once in a specified time period.
This is useful for scenarios like scroll events where you want to limit the frequency of function calls.
Use Case: Optimizing scroll event handling to improve performance.
This can prevent the browser from being overwhelmed by too many event calls, ensuring smoother and more responsive interactions.
function throttle(func, interval) {
let lastCall = 0;
return function(...args) {
const now = Date.now();
if (now - lastCall >= interval) {
lastCall = now;
func.apply(this, args);
}
};
}
const handleScroll = throttle(() => {
console.log('Scrolled');
// Imagine complex calculations or DOM updates here
}, 300);
window.addEventListener('scroll', handleScroll);
Why Use It: Prevents performance issues by ensuring a function is called at controlled intervals, reducing the load on the browser and providing a better user experience.
Throttling is particularly useful for event listeners that can be triggered frequently, such as scroll or resize events.
4. Memoization
Memoization is an optimization technique that involves caching the results of expensive function calls and returning the cached result when the same inputs occur again.
This can significantly improve performance for functions with heavy computation, particularly those that are called frequently with the same arguments.
Use Case: Improve performance of recursive functions like Fibonacci calculation.
Without memoization, each call to the Fibonacci function would redundantly compute the same values multiple times, leading to exponential time complexity.
const memoize = (fn) => {
const cache = {};
return (...args) => {
const key = JSON.stringify(args);
if (!cache[key]) {
cache[key] = fn(...args);
}
return cache[key];
};
};
const fibonacci = memoize((n) => {
if (n <= 1) return n;
return fibonacci(n - 1) + fibonacci(n - 2);
});
console.log(fibonacci(40)); // 102334155
Why Use It: Avoids redundant calculations, significantly improving performance for functions with repeated inputs.
Memoization can transform an inefficient, repetitive computation into a manageable, linear-time operation, making it an essential technique for optimizing performance-intensive tasks.
5. Proxy
The Proxy object allows you to create a proxy for another object, enabling you to intercept and redefine fundamental operations such as property lookup, assignment, enumeration, function invocation, etc.
This provides a powerful way to add custom behavior to objects.
Use Case: Validation and logging on object property access and assignment.
For instance, you can enforce type constraints and log access attempts, providing better control and debugging capabilities.
const user = {
name: 'John',
age: 30
};
const handler = {
get: (target, prop) => {
console.log(`Getting ${prop}`);
return target[prop];
},
set: (target, prop, value) => {
if (prop === 'age' & typeof value !== 'number') {
throw new TypeError('Age must be a number');
}
console.log(`Setting ${prop} to ${value}`);
target[prop] = value;
return true;
}
};
const proxyUser = new Proxy(user, handler);
console.log(proxyUser.name); // Getting name, John
proxyUser.age = 35; // Setting age to 35
// proxyUser.age = '35'; // Throws TypeError
Why Use It: Allows custom behavior for object operations, such as validation, logging, and more, enhancing control over object manipulation.
Proxies can also be used to implement complex logic like access control and data binding.
This makes them a versatile tool for managing and extending the behavior of objects.
6. Generators
Generators are functions that can be exited and later re-entered, maintaining their context and variable bindings across re-entrances.
They are useful for implementing iterators and handling asynchronous tasks in a synchronous-like manner.
Use Case: Implementing an iterator for custom object traversal.
Generators provide a simple way to define custom iteration behavior, making it easier to traverse complex data structures.
function* objectEntries(obj) {
for (let key of Object.keys(obj)) {
yield [key, obj[key]];
}
}
const user = { name: 'John', age: 30, city: 'New York' };
for (let [key, value] of objectEntries(user)) {
console.log(`${key}: ${value}`);
}
// name: John
// age: 30
// city: New York
Why Use It: Provides a powerful tool for implementing custom iterators and simplifying asynchronous workflows.
Generators make it easier to handle complex iteration logic and asynchronous processes, leading to more readable and maintainable code.
They can also be used for tasks like managing asynchronous operations in a more straightforward, linear fashion using libraries like co.
7. Making Good Use of Console
Use Case: Improve logging for debugging complex objects.
The console methods like console.table, console.group, and console.time can provide more structured and informative debug information.
// Basic logging
console.log('Simple log');
console.error('This is an error');
console.warn('This is a warning');
// Logging tabular data
const users = [
{ name: 'John', age: 30, city: 'New York' },
{ name: 'Jane', age: 25, city: 'San Francisco' },
];
console.table(users);
// Grouping logs
console.group('User Details');
console.log('User 1: John');
console.log('User 2: Jane');
console.groupEnd();
// Timing code execution
console.time('Timer');
for (let i = 0; i < 1000000; i++) {
// Some heavy computation
}
console.timeEnd('Timer');
Why Use It: Enhances the visibility and organization of debugging information, making it easier to diagnose and fix issues.
Proper use of console methods can significantly improve the efficiency of your debugging process by providing clear, organized, and detailed logs.
8. Structured Cloning with structuredClone
Deep clone objects using the new structuredClone.
Unlike the traditional shallow copy, structured cloning creates a deep copy of the object, ensuring that nested objects are also copied.
This method avoids the limitations of JSON.parse(JSON.stringify(obj)), which cannot handle certain data types like functions, undefined, and circular references.
Use Case: Creating a deep copy of complex objects.
This is useful when you need to duplicate objects for operations that should not mutate the original data.
const obj = {
a: 1,
b: { c: 2 },
date: new Date(),
arr: [1, 2, 3],
nestedArr: [{ d: 4 }]
};
const clonedObj = structuredClone(obj);
console.log(clonedObj);
// { a: 1, b: { c: 2 }, date: 2023-06-08T00:00:00.000Z, arr: [1, 2, 3], nestedArr: [{ d: 4 }] }
console.log(clonedObj === obj); // false
console.log(clonedObj.b === obj.b); // false
console.log(clonedObj.date === obj.date); // false
console.log(clonedObj.arr === obj.arr); // false
console.log(clonedObj.nestedArr[0] === obj.nestedArr[0]); // false
Why Use It: Provides a built-in, efficient way to perform deep cloning of objects, avoiding the pitfalls and complexities of manual deep copy implementations.
This method is more reliable and handles complex data structures better than alternatives like JSON.parse(JSON.stringify(obj)).
9. Self-Invoking Functions
Self-invoking functions, also known as Immediately Invoked Function Expressions(IIFE), are executed automatically after they are created.
They are useful for encapsulating code to avoid polluting the global scope, which is essential in maintaining clean and modular code.
Use Case: Encapsulating code to avoid polluting the global scope.
This technique is particularly useful in older JavaScript environments where block scope (let and const) is not available, or in scenarios where immediate execution is needed for initialization logic.
(function() {
const privateVar = 'This is private';
console.log('Self-invoking function runs immediately');
// Initialization code here
})();
// Private variables are not accessible from outside
// console.log(privateVar); // ReferenceError: privateVar is not defined
Why Use It: Helps in maintaining clean code by avoiding global variables and executing initialization code without leaving traces in the global scope.
This approach can prevent conflicts in larger codebases and ensure better encapsulation of functionality, improving code maintainability and avoiding side effects.
10. Tagged Template Literals
Tagged template literals allow you to customize the way template literals are processed.
They are useful for creating specialized templates, such as for internationalization, sanitizing HTML, or generating dynamic SQL queries.
Use Case: Sanitizing user input in HTML templates to prevent XSS attacks.
This technique ensures that user-generated content is safely inserted into the DOM without executing any malicious scripts.
function sanitize(strings, ...values) {
return strings.reduce((result, string, i) => {
let value = values[i - 1];
if (typeof value === 'string') {
value = value.replace(/&/g, '&')
.replace(/</g, '<')
.replace(/>/g, '>')
.replace(/"/g, '"')
.replace(/'/g, ''');
}
return result + value + string;
});
}
const userInput = '<script>alert("xss")</script>';
const message = sanitize`User input: ${userInput}`;
console.log(message); // User input: <script>alert("xss")</script>
Why Use It: Provides a powerful mechanism to control and customize the output of template literals, enabling safer and more flexible template creation.
Tagged template literals can be used to enforce security, format strings, and generate dynamic content, enhancing the robustness and versatility of your code.
disable or enable buttons using javascript and jquery
To enable or disable buttons using javascript and jQuery based on whether the input field is filled or empty.
Introduction to disabling/enabling buttons
Often while filling out web forms have you noticed how the submit button just won't work unless we have filled all the required fields?
This is done by controlling the state of the button (enabled/disabled) based on whether the input field is filled or empty.
The same principle applies to checkboxes and radio buttons.
Logic behind toggling between disabled and enabled states of buttons
Set button to disabled state in the beginning
If the input value of the required field is empty, let the button remain disabled.
(Disabled state = TRUE)
If the input value of the required field is not empty, change the state of the button to enabled.
(Or set disabled state = FALSE)
Code Implementation for changing the state of the button
1. Using Javascript
A) HTML
Add the following HTML Code to your editor
//defining button and input field
<input type="text" placeholder="fill me">
<button>Click Me</button>
Code Explanation
Using the above code we have defined two HTML elements namely an input text field and a button.
B) Javascript Code
//Program to disable or enable a button using javascript
<script >
let input = document.querySelector(".input");
let button = document.querySelector(".button");
button.disabled = true; //setting button state to disabled
input.addEventListener("change", stateHandle);
function stateHandle() {
if (document.querySelector(".input").value === "") {
button.disabled = true; //button remains disabled
} else {
button.disabled = false; //button is enabled
}
}
</script>
Code Explanation
1. Now, using javascript we store a reference to each element, namely input, and button.
2. By default a button's state is enabled in HTML so by setting disabled = true, we have disabled the button for the user.
3. Then we add an event handler (addEventListener) to the input field with the event property change which monitors the interaction with elements.
4. Here we use the change property to monitor when the user types text inside the input field and run a function accordingly.
5. The function we run here is called the stateHandle() that gets activated every time there is a change in the status of the input field.
6. The function compares the value of the input field (the text field) with an empty string.
7. If the user has not typed anything, then the text field will be equal ( === ) to the empty string and the button will remain disabled (disabled = true).
8. If the user inputs text in the input field, then the button will get enabled (disabled = false).
2. Using jQuery to enable/disable a button
<html>
<head>
<title>jQuery - Enable or Disable Button</title>
<script src="https://ajax.googleapis.com/ajax/libs/jquery/1.10.2/jquery.min.js"></script>
</head>
<body> Name:
<input type="text" />
<input type="submit" disabled="disabled" /> </body>
<script>
$(document).ready(function() {
$('#tbName').on('input change', function() {
if($(this).val() != '') {
$('#submit').prop('disabled', false);
} else {
$('#submit').prop('disabled', true);
}
});
});
</script>
</html>
1. For the jQuery method too, we start by creating an HTML button and text field (submit and tbName respectively) and setting the button to disabled state initially.
2. Here the ready() function is used to make the function available once the document has been loaded.
3. The .on() method in jquery attaches the event handler to the input field (tbName).
4. The change event will check for changes in the input field and run the function accordingly.
5. Just like in javascript, if the text field is empty the button remains disabled, else it gets enabled.
6. Here the .prop() method is used to change the state of the button.
Visualization
You can play around with the above code using this editor and see which part of the code does what.
You can also try out different CSS options for the button etc.
Toggle (Hide/Show) an Element
<div id="myDIV">my DIV element</div>
function toggleElement() {
var myDIV = document.getElementById("myDIV");
if (myDIV.style.display === "none") {
myDIV.style.display = "block";
} else {
myDIV.style.display = "none";
}
}
function showElement() {
var myDIV = document.getElementById("myDIV");
myDIV.style.display = "block";
}
function hideElement() {
var myDIV = document.getElementById("myDIV");
myDIV.style.display = "none";
}
to locate string pattern in array of strings
// Sample array of strings
stringArr = [
"Hello, this is a sample string.",
"Another h2 string here.",
"Yet another string to search.",
"<h2> string to search."
];
// Function to locate the substring
function findSubstring(arr, substring) {
indexarr = []
for (i = 0; i < arr.length; i++) {
index = arr[i].indexOf(substring);
if (index !== -1) {
indexarr.push(i)
}
}
return indexarr;
}
// Substring to search for
targetpattern = "h2";
// Find the array of strings
result = findSubstring(stringArr, targetpattern);
to locate string pattern in object of strings
obj = {
str1: "Hello, this is a sample string.",
str2: "Another example string here.",
str3: "Yet another string to search."
};
// Function to locate the substring index in the object of strings
function findSubstring(obj, substring) {
indexarr = []
for (key in obj) {
if (obj.hasOwnProperty(key)) {
index = obj[key].indexOf(substring);
if (index !== -1) {
indexarr.push(i)
}
}
}
return indexarr;
}
// Substring to search for
targetpattern = "example";
// Find the index of the substring in the object of strings
result = findSubstring(obj, targetpattern);
When working with asynchronous operations in JavaScript, such as API calls, there are times when you need to limit the number of concurrent operations to prevent overloading your system or third-party services.
A common scenario is executing a large number of promises in manageable batches.
We’ll explore how to achieve this by writing a simple yet effective `throttleAsync` function.
The Problem: Managing Concurrent Asynchronous Operations
Imagine you have an array of tasks where each task is an asynchronous operation, such as making API calls.
Executing all these operations simultaneously could overwhelm the system or lead to rate limiting.
Instead, it’s often better to throttle these operations — processing them in smaller batches.
The Solution: throttleAsync
Let’s break down the code step-by-step.
// Array of promises generated by the task function
const callAPIs = [task(100), task(200), task(300), task(400), task(500), task(600)];
Here, we have an array of tasks.
Each task simulates an asynchronous operation that resolves after a specified amount of time.
// Function that returns a promise that resolves after a set time
async function task(time) {
return new Promise((resolve, reject) => {
setTimeout( () => {
resolve(`Resolved promise in time: ${time}`);
}, time);
});
}
The `task` function returns a promise that resolves after a given number of milliseconds.
This simulates a delay, similar to what you might encounter in real-world API calls.
Now, let’s look at the core of this post: the `throttleAsync` function.
// Function to execute promises in batches
async function throttleAsync(promises, batchSize) {
let result = [];
for (let i = 0; i < promises.length; i += batchSize) {
const batch = promises.slice(i, i + batchSize);
// Execute the current batch and wait for all of them to complete
let batchResult = await Promise.all(batch.map(p => p));
result.push(...batchResult);
}
return result;
}
How `throttleAsync` Works
1. Batching Promises:
— The function accepts an array of promises (`callAPIs`) and a `batchSize`, indicating how many promises should be processed concurrently.
— It slices the array into smaller batches of the specified size.
2. Executing Batches:
— Inside the loop, each batch is processed by `Promise.all()`, which waits for all promises in the current batch to resolve.
— The results of each batch are collected and stored in the `result` array.
3. Returning the Results:
— After all batches have been processed, the accumulated results are returned.
Using `throttleAsync`
Finally, let’s see how to use the `throttleAsync` function:
// Calling the function with the API promises array and batch size of 2
throttleAsync(callAPIs, 2).then((resolve) => {
console.log(resolve);
}).catch((error) => {
console.log(error);
});
In this example, we call `throttleAsync` with the `callAPIs` array and a batch size of `2`.
This means the promises will be executed in pairs, ensuring that no more than two are processed simultaneously.
Once all batches are processed, the results are logged to the console.
Why Use `throttleAsync`?
- Resource Management: Limits the number of concurrent operations, which is crucial when dealing with APIs that have rate limits or when system resources are constrained.
- Better Performance: By controlling the flow of operations, you can achieve better performance, especially in environments where concurrency might otherwise lead to issues like rate limiting or memory exhaustion.
Conclusion
The `throttleAsync` function is a powerful yet straightforward tool for managing the execution of multiple asynchronous operations in JavaScript.
By processing promises in batches, you can control the flow of operations, preventing overloads and ensuring smoother performance.
Whether you’re dealing with API calls, file processing, or any other asynchronous tasks, this pattern is versatile and easy to implement.
LocalStorage and sessionStorage allow developers to store data persistently and temporarily.
The localStorage object can be accessed shown below:
localStorage.setItem("myDataKey", "My data");localStorage.getItem("myDataKey"); // "My data"localStorage.removeItem("myDataKey");
The data stored in the localStorage object from a domain can only be accessed or modified by pages of the same origin, which — in this case — stands for protocol, domain, and port collectively.
The localStorage object stores the data with no expiration date.
The data will not be deleted even when the user leaves the page or closes the browser window; it will be available for future sessions.
Using sessionStorage vs. localStorage
SessionStorage, is nearly identical to localStorage but differs in two ways: it temporarily stores data for the specified (or current) tab and does so for only a limited period.
The sessionStorage object stays active as long as the corresponding tab is open and persists data through page reloads and restorations.
When a webpage is loaded into a browser tab, sessionStorage, if used, creates a new page session and assigns it to that tab.
That page session is only valid for that particular origin accessed in that specific tab.
Note: Data stored in each kind of Web Storage is distinct for each protocol of a given page.
This means that data stored on a site accessed via HTTP is stored on a different sessionStorage object than data stored on the same site accessed via HTTPS.
Using Chrome DevTools, you can view the data in both localStorage and sessionStorage objects and observe the distinctions.
Here’s a screenshot depicting locating both objects in the Application tab of DevTools:
Note: When the last private tab is closed, data stored in the localStorage object of a site opened in a private tab or incognito mode is cleared, which makes sense because it’s a private browsing session.
Web Storage vs. HTTP cookies
HTTP cookies are a conventional mechanism for storing small bits of data exchanged between the client and the server during each HTTP request.
Once connected to a client, the server generates certain bits of information, saves them in a cookie file, and sends them to the client’s browser.
This information is labeled with a unique ID for each user and their computer, which helps the server identify the user whenever a connection is established.
However, they can be a privacy nightmare.
How to store a JavaScript object in localStorage
setItem(): Adds data to a Web Storage object using its two arguments, a key, and a value: localStorage.setItem("key", "value")
getItem(): Returns the value of the key name that’s passed to it: localStorage.getItem("key")
removeItem(): Removes a key that’s passed to it with its corresponding value: localStorage.removeItem("key")
clear(): Clears all the key-value pairs in the associated storage and should be used with caution: localStorage.clear()
key(): Returns the key at the specified index in the storage: localStorage.key(0)
length: Returns the total number of key-value pairs stored in the associated storage: localStorage.length
JavaScript object serialization
Storing JavaScript object data in Web Storage is a bit tricky, as it allows you to store only string values.
If we try to store a JavaScript object without first converting it to a string, we will get an [object Object] response, as shown in the image below:
[object Object] is a string representation of an object instance whose value was never read at the time of storing the data, which will result in data loss.
The correct way to store object data to localStorage is to first convert it to a string.
This object-to-string conversion of object data is known as serialization, and turning this converted string back to object data is called deserialization.
Let’s briefly discuss two important JSON methods that are responsible for object data serialization and deserialization:
JSON.stringify : Converts any object value into a string JSON (serialization)
JSON.parse : Turns a JSON string into its corresponding object or value (deserialization)
Now, utilizing the setItem method with JSON stringify, we can easily convert a JavaScript object to a JSON string and push it to the localStorage object.
Here’s a quick example to demonstrate this:
const userObj = {
name: "John Doe",
age: 32,
gender: "Male",
profession: "Optician"
};
localStorage.setItem("userObj", JSON.stringify(myObject));
Now, if we try to retrieve the object data without deserializing it, we will receive a JSON string instead of an object, which makes sense, as it is what we stored to localStorage.
We need to deserialize this JSON string data using the JSON parse method to turn it back into a JavaScript object:
let newObject = localStorage.getItem("myObject");
console.log(JSON.parse(newObject));
Here, we retrieved our previously set JavaScript object using the getItem method on the localStorage object and saved it into a variable.
More examples of storing objects in localStorage
Storing Date objects : Constructing an object using the current timestamp using the Date object and a random value, and saving it to or clearing it from the localStorage using button inputs
Persisting remote data : Fetching remote data from a dummy API and storing it in localStorage; the network fetch in this example is only triggered when no associated data in localStorage is found
Storing multiple objects in localStorage
Let’s say we have a bunch of similar objects, and we want to group all of them and store them as one JSON string in the localStorage.
We can turn them into an object array and then serialize them as shown below:
const todos = [todo1, todo2, todo3];
localStorage.setItem("todos", JSON.stringify(todos));
If you have bigger chunks of data to work with, you might want to store each of them with separate keys, but accessing all of them quickly can be done using this namespace approach:
// Storing
localStorage.setItem('todos:1', JSON.stringify(todo1));localStorage.setItem('todos:2', JSON.stringify(todo2));
// Retrieving
const keys = Object.keys(localStorage).filter(key => key.startsWith('todos:'));
const todos = keys.map(key => JSON.parse(localStorage.getItem(key)));
Limitations of storing objects to localStorage
The API provides 5-10MB of storage per origin, and the exact storage may vary depending on the browser.
Keep in mind that Web Storage API operations are synchronous and block the main thread, therefore performing heavy operations using it may block other resources from loading in the browser.
Types of data that can be stored as a JSON string
Primitive data types like numbers, Booleans, and strings are JSON-safe, while values like functions, undefined, symbols, and Date objects are not JSON-safe.
If no JSON-safe values are found during conversion, they are either excluded from an object or changed to null in an array.
Note: Some of these such values can be made JSON-safe, for example, we used the toISOstring method with the Date object in this example to make it JSON-safe before pushing it to Web Storage.
There is not a simple Array.remove method.
The Array filter method remove unwanted elements by creating a new array with desired items.
Using Splice
The first argument specifies the begin location.
The second argument specifies the number of elements to remove.
The third and subsequent arguments are optional; they specify elements to be added to the array.
Here we use the splice method to remove two elements starting from position three (zero based index):
var arr = [1, 2, 3, 4, 5, 6, 7, 8, 9, 0];
var removed = arr.splice(2,2);
An array containing the removed elements is returned by the splice method.
You can see the removed array contains [3, 4] and the original array contains the remaining values.
The splice method can also be used to remove a range of elements from an array.
var list = ["bar", "baz", "foo", "qux"];
list.splice(0, 2);
// Starting at index position 0, remove two elements ["bar", "baz"] and retains ["foo", "qux"].
Remove Array Items By Value Using Splice
If you know the value you want to remove from an array you can use the splice method.
First you must identify the index of the target item.
You then use the index as the start element and remove just one element.
var arr = [1, 2, 3, 4, 5, 6, 7, 8, 9, 0];
for( var i = 0; i < arr.length; i++){
if ( arr[i] === 5) {
arr.splice(i, 1);
}
}
//=> [1, 2, 3, 4, 6, 7, 8, 9, 0]
This is a simple example where the elements are integers.
If you have an array of objects you would need a more sophisticated routine.
This works if you only want to remove a single item.
If you want to remove multiple items that match your criteria there is a glitch.
As the items are removed from the array the index still increments and the next item after your matched value is skipped.
The simple solution is to modify the above example to decrement the index variable so it does not skip the next item in the array.
var arr = [1, 2, 3, 4, 5, 5, 6, 7, 8, 5, 9, 0];
for( var i = 0; i < arr.length; i++){
if ( arr[i] === 5) {
arr.splice(i, 1);
i--;
}
}
//=> [1, 2, 3, 4, 6, 7, 8, 9, 0]
In the modified example I added 2 additional 5 values to the array.
I also added 'i--;' after the splice call.
Now when you execute the loop it will remove every matching item.
Thanks to Kristian Sletten for pointing out the issue with the loop skipping the following item.
Removing One Element Using splice()
The splice() method is a versatile way of removing, replacing, and/or adding elements in an array.
It works similarly to splice() functions in other languages.
Basically, you take an array and selectively remove portions of it (aka “splice”).
The inputs to the splice() function are the index point to start at and the number of elements to remove.
Also, remember that arrays are zero-indexed in JavaScript.
To remove one element from a specific index in an array:
["bar", "baz", "foo", "qux"]
list.splice(2, 1)
// Starting at index position 2, remove one element
["bar", "baz", "qux"]
list.splice(2,2)
// Starting at index position 2, remove two elements
["bar", "baz"]
The splice() call will return any removed elements, so you know what was actually removed.
Removing a Range of Elements Using splice()
Just to make sure you didn’t miss it in the previous example, it is worth calling out specifically that you can remove several consecutive elements with splice().
To remove several consecutive elements from an array:
["bar", "baz", "foo", "qux"]
list.splice(0, 2)
// Starting at index position 0, remove two elements
["foo", "qux"]
Removing One Element Using pop()
The array methods push() and pop() work on the the end of an array.
The terms push() and pop() come from the idea of a stack in memory from the early days of microprocessors.
This implements the idea of a Last-In-First-Out data structure (LIFO).
The push() method will ADD an element to the array and the pop() method will remove one.
To remove the last element of an array:
["bar", "baz", "foo", "qux"]
list.pop()
["bar", "baz", "foo"]
Removing One Element Using shift()
The array methods shift() and unshift() work on the beginning of an array instead of the end of an array, as is the case with push() and pop().
The shift() command will remove the first element of the array and the unshift() command will add an element to the beginning of the array.
To remove the first element of an array:
["bar", "baz", "foo", "qux"]
list.shift()
["baz", "foo", "qux"]
Searching and Removing a Specific Element by Value
The indexOf() command returns the first index at which a given element can be found in the array, or -1 if it is not present.
This can be used along with splice() to search for an element and then remove it, even if you don’t know where it is in the array.
Let’s remove the “foo” element:
["bar", "baz", "foo", "qux"]
list.splice( list.indexOf('foo'), 1 );
// Find the index position of "foo," then remove one element from that position
Removing Multiple Specific Elements
If to remove multiple repeating items that match the criteria.
Here two 5s in array:
var arr = [1, 2, 3, 4, 5, 5, 6, 7, 8, 5, 9, 0];
for( var i = 0; i < arr.length; i++){
if ( arr[i] === 5) {
arr.splice(i, 1);
i--;
}
}
//=> [1, 2, 3, 4, 6, 7, 8, 9, 0]
added 'i--;' after the splice call.
OR:
Let’s add an extra “foo” element to our array, and then remove all occurrences of “foo”:
["bar", "baz", "foo", "foo", "qux"]
for( var i = list.length-1; i--;){
if ( list[i] === 'foo') list.splice(i, 1);
}
["bar", "baz", "qux"]
Remove Elements from End of Array
Setting the length property to a value less than the current value remove from the end of an array.
var ar = [1, 2, 3, 4, 5, 6];
ar.length = 4; // set length to remove elements
The pop method removes the last element.
var ar = [1, 2, 3, 4, 5, 6];
ar.pop(); // returns 6
console.log( ar ); // [1, 2, 3, 4, 5]
Remove Elements from Beginning of Array
The shift method removes the first element of array.
var ar = ['zero', 'one', 'two', 'three'];
ar.shift(); // returns "zero"
console.log( ar ); // ["one", "two", "three"]
Using the Array filter Method to Remove Items By Value
Unlike the splice method, filter creates a new array.
filter() does not mutate the array on which it is called, but returns a new array.
filter() has a single parameter, a callback method.
The callback is triggered as the filter method iterates through the array elements.
It will pass three values to the callback: the current value or element, the current array index and the full array.
The callback method should return either true or false.
It is your responsibility to test the value (element) to see if it meets your criteria.
If it does you can return true.
Elements that return true are added to the new, filtered array.
var array = [1, 2, 3, 4, 5, 6, 7, 8, 9, 0];
var filtered = array.filter(
function(value, index, arr){ return value > 5;}
);
//filtered => [6, 7, 8, 9]
//array => [1, 2, 3, 4, 5, 6, 7, 8, 9, 0]
You should note a new array containing matching values is returned.
The original array is left untouched.
I find this useful because I often want to retain an original data source, but retrieve subsets based on different logic sets.
Sometimes utility libraries are the best way to solve more complex problems.
Lodash provides a rich set of array manipulation methods, one being remove.
The Lodash remove method works much like the array filter method, but sort of in reverse.
It does not save the original array values, but removes matching elements.
It returns the matching elements as a new array.
var array = [1, 2, 3, 4];var evens = _.remove(array, function(n) { return n % 2 === 0;});console.log(array);// => [1, 3]console.log(evens);// => [2, 4]
Making a Remove Method
function arrayRemove(arr, value) {
return arr.filter(function(ele){ return ele != value; });
}
var result = arrayRemove(array, 6);
// result = [1, 2, 3, 4, 5, 7, 8, 9, 0] This method is simple, it assumes simple values like numbers or strings.
You could modify this method to use a customcomparison method, but I think it would be easier to just use the filter method directly.
Explicitly Remove Array Elements Using the Delete Operator
You can remove specific array elements using the delete operator:
var ar = [1, 2, 3, 4, 5, 6];
delete ar[4]; // delete element with index 4
console.log( ar );
// [1, 2, 3, 4, undefined, 6]
alert( ar );
// 1,2,3,4,,6
Using the delete operator does not affect the length property.
Nor does it affect the indexes of subsequent elements.
The array becomes sparse, which is a fancy way of saying the deleted item is not removed but becomes undefined.
Compare using delete with the splice method described below.
The delete operator is designed to remove properties from JavaScript objects, which arrays are objects.
The reason the element is not actually removed from the array is the delete operator is more about freeing memory than deleting an element.
The memory is freed when there are no more references to the value.
Clear or Reset a JavaScript Array
What if you want to empty an entire array and just dump all of it's elements?
There are a couple of techniques you can use to create an empty or new array.
The simplest and fastest technique is to set an array variable to an empty array:
var ar = [1, 2, 3, 4, 5, 6];
//do stuffar = [];
//a new, empty array!
The problem this can create is when you have references to the variable.
The references to this variable will not change, they will still hold the original array's values.
This of course can create a bug🐛.
This is an over simplified example of this scenario:
var arr1 = [1, 2, 3, 4, 5, 6];
var arr2 = arr1;
// Reference arr1 by another variable arr1 = [];
console.log(arr2);
// Output [1, 2, 3, 4, 5, 6]
A simple trick to clear an array is to set its length property to 0.
var ar = [1, 2, 3, 4, 5, 6];
console.log(ar);
// Output [1, 2, 3, 4, 5, 6]
ar.length = 0;
console.log(ar);
// Output []
Another, sort of unnatural technique, is to use the splice method, passing the array length as the 2nd parameter.
This will return a copy of the original elements, which may be handy for your scenario.
var ar = [1, 2, 3, 4, 5, 6];
console.log(ar);
// Output [1, 2, 3, 4, 5, 6]
ar.splice(0, ar.length);
console.log(ar);
// Output []
The last two techniques don't create a new array, but change the array's elements.
This means references should also update.
There is another way, using a while loop.
It feels a little odd to me, but at the same time looks fancy, so it may impress some friends!
var ar = [1, 2, 3, 4, 5, 6];
console.log(ar);
// Output [1, 2, 3, 4, 5, 6]
while (ar.length) {
ar.pop();
}
console.log(ar);
// Output []
Not a way I would go about clearing a JavaScript array, but it works and it is readable.
Some performance test have also shown this to be the fastest technique, so maybe it is better than I originally thought!
Summary
Removing JavaScript Array items is important to managing your data.
There is not a single 'remove' method available, but there are different methods and techniques you can use to purge unwanted array items.
Load scripts
jsURL = "abc" // js name
loadScript(jsURL)
function loadScript(jsURL) {
var script = document.createElement('script');
script.src = "./aPath/scripts/" + jsURL + ".js";
script.onload = function() { // this is callback function
linksArray = eval(jsURL)
itemLength = linksArray.length
alert(jsURL + " put into linksArray, usr r to randomOpen")
}
document.getElementsByTagName('head')[0].appendChild(script);
}
// Get the first script element on the page
var ref = w.document.getElementsByTagName( 'script' )[ 0 ];
// Create a new script element
var script = w.document.createElement( 'script' );
// Set the script element `src`
script.src = 'path-to-your-javascript-file.js';
// Inject the script into the DOM
ref.parentNode.insertBefore( script, ref );
This simply append to head
var script = document.createElement('script');
script.src = urladdr;
script.onload = function() {
....// remember to put all awaiting jobs inside here, otherwise awaiting jobs will be omited
}
document.getElementsByTagName('head')[0].appendChild(script);
 And the server:
 Notice the log Client connected: 1607163222261 which means that the connection has been established and we can use the channel to send events.
Click on the Send button on the UI (which POSTs 5 random characters to the /message endpoint) and notice how they appear in the list:
Notice the log Client connected: 1607163222261 which means that the connection has been established and we can use the channel to send events.
Click on the Send button on the UI (which POSTs 5 random characters to the /message endpoint) and notice how they appear in the list:

 The server can specify a recommended delay by specifying the retry at the beginning of an event:
 Important note: the id should be appended by the server after the data to ensure that the eventSource.lastEventId is updated after the message is received.
 The following code can be used to check if the browser supports the feature:
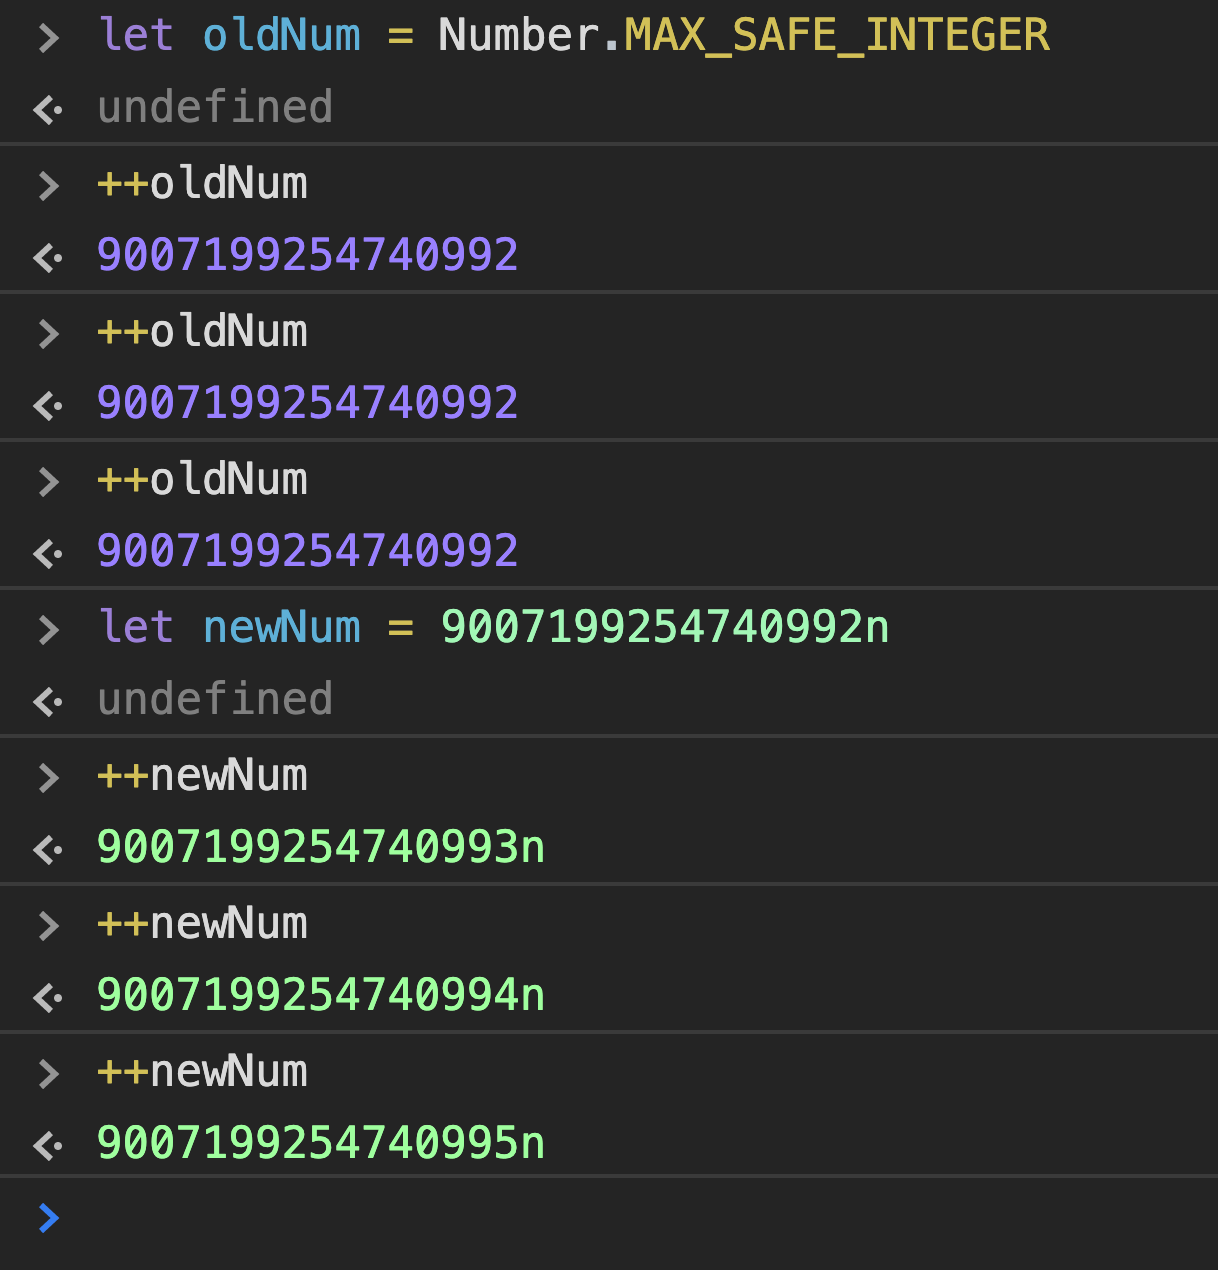 However, you need to have an
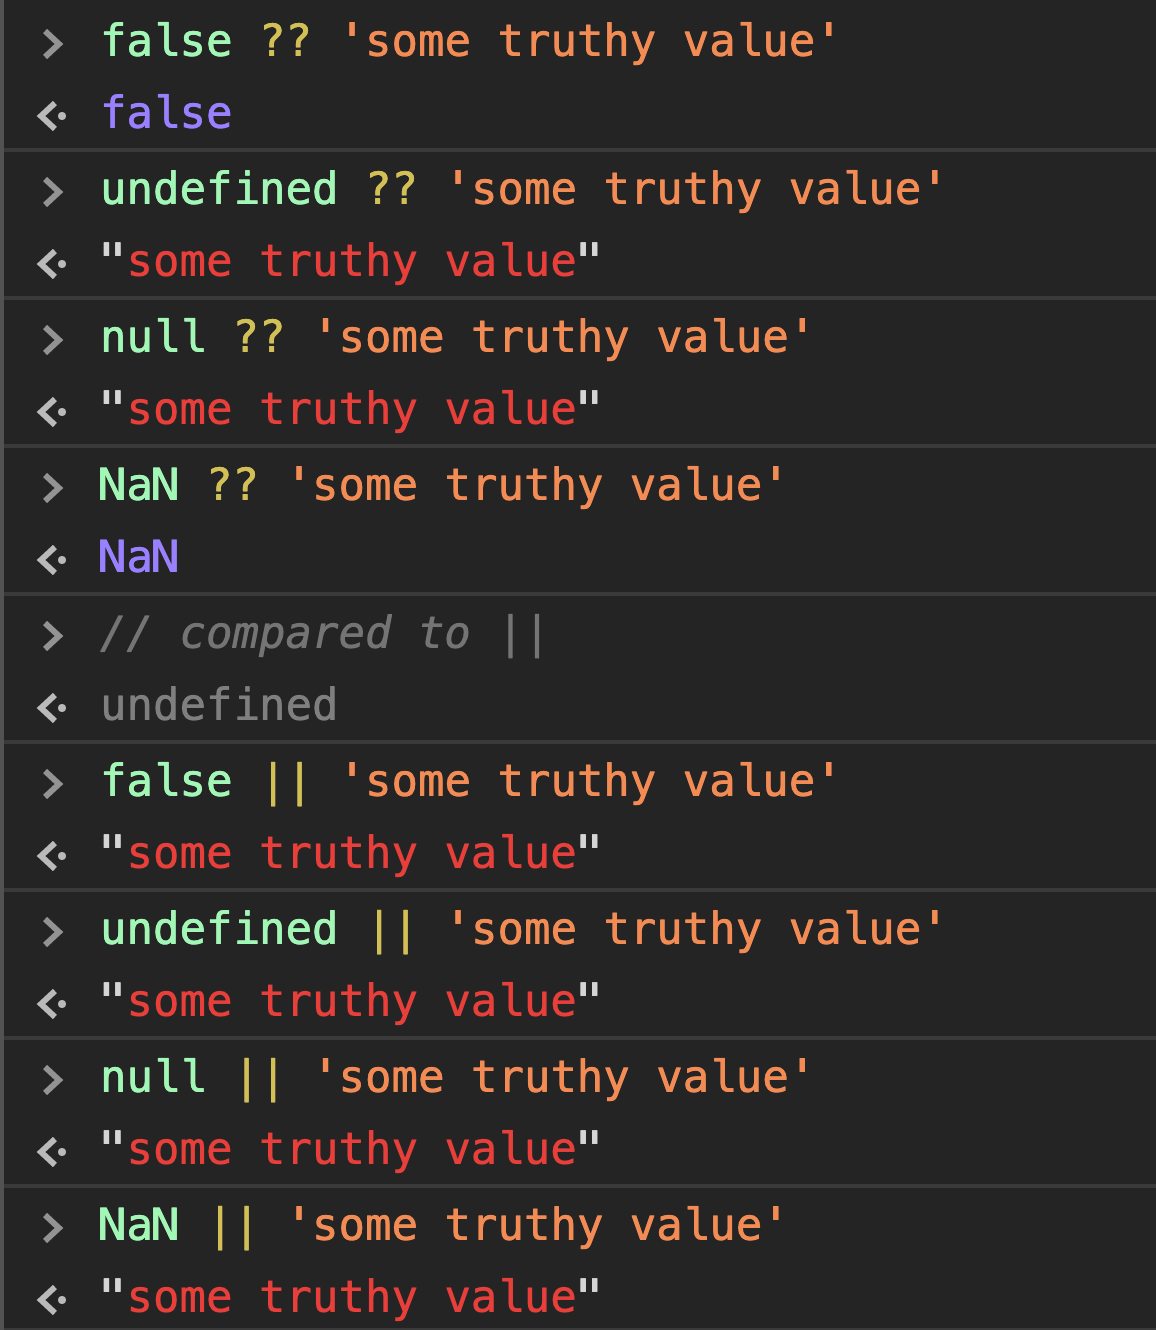 You can clearly see how the OR operator always returns a truthy value, whereas the nullish operator returns a non-nulllish value.
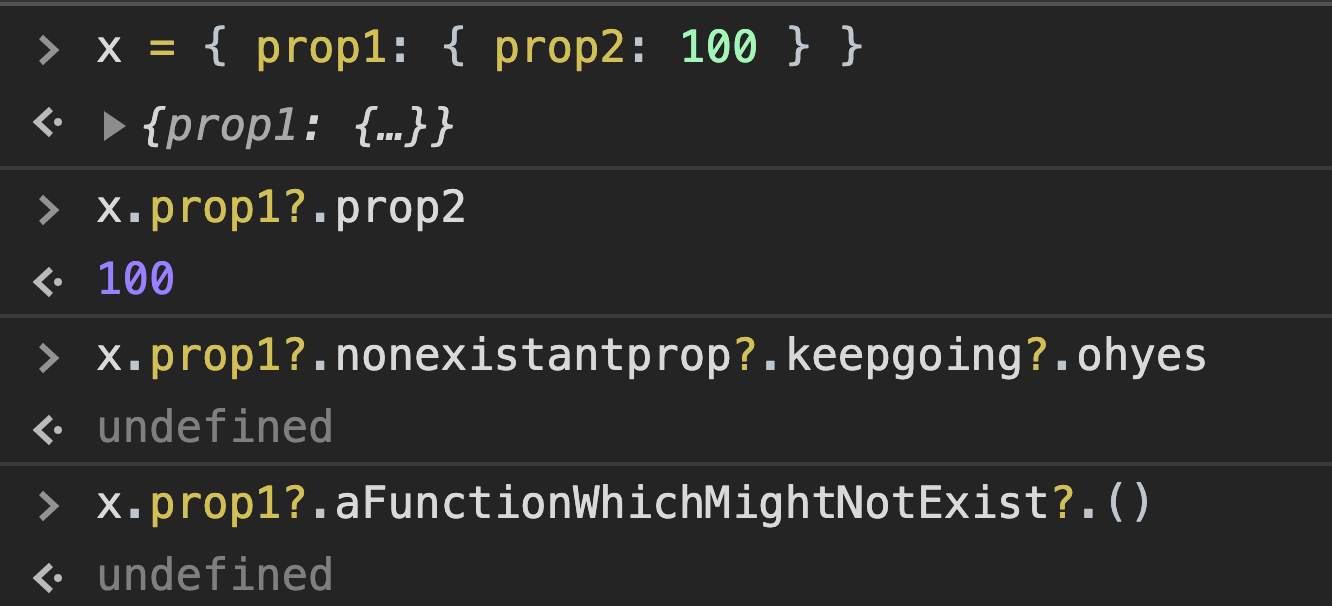
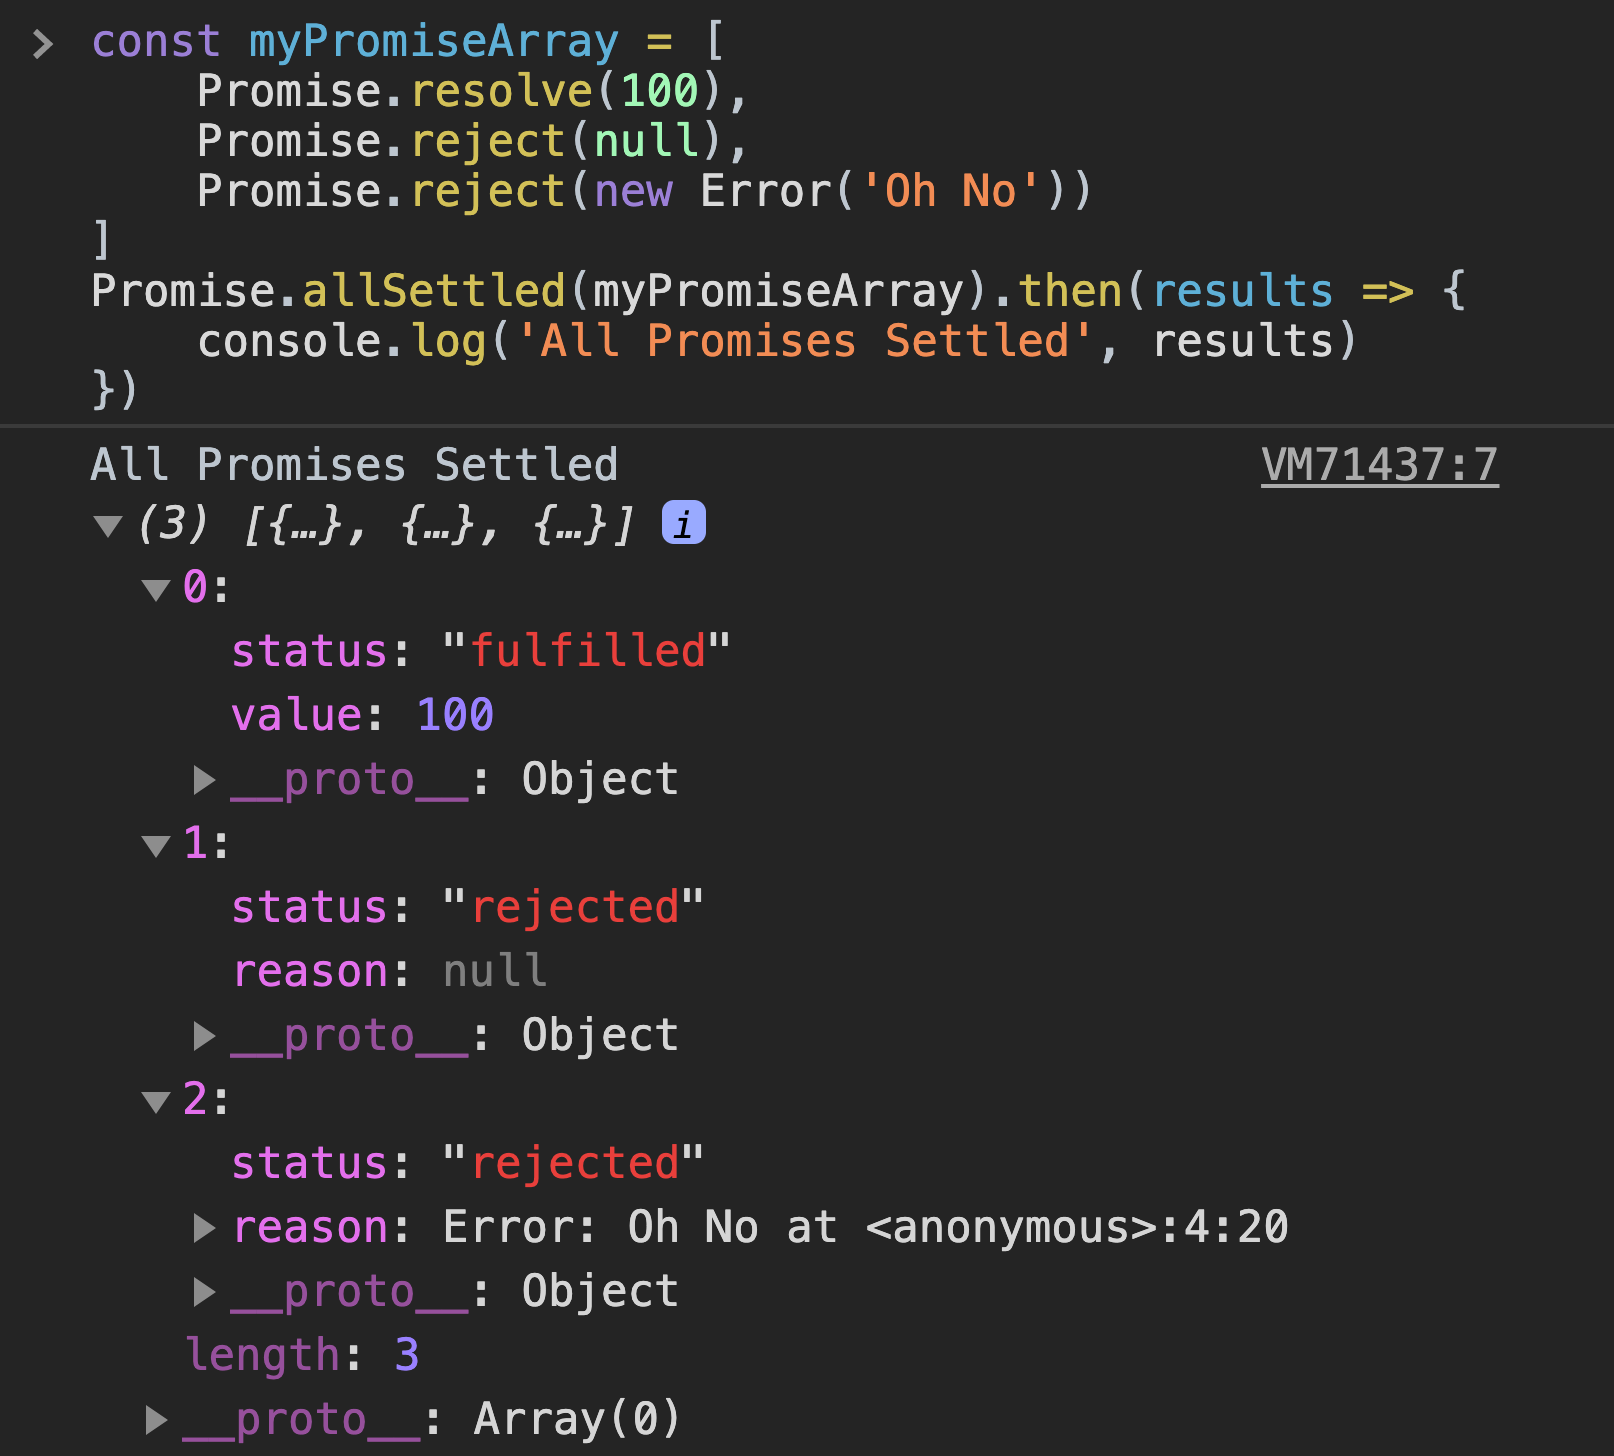
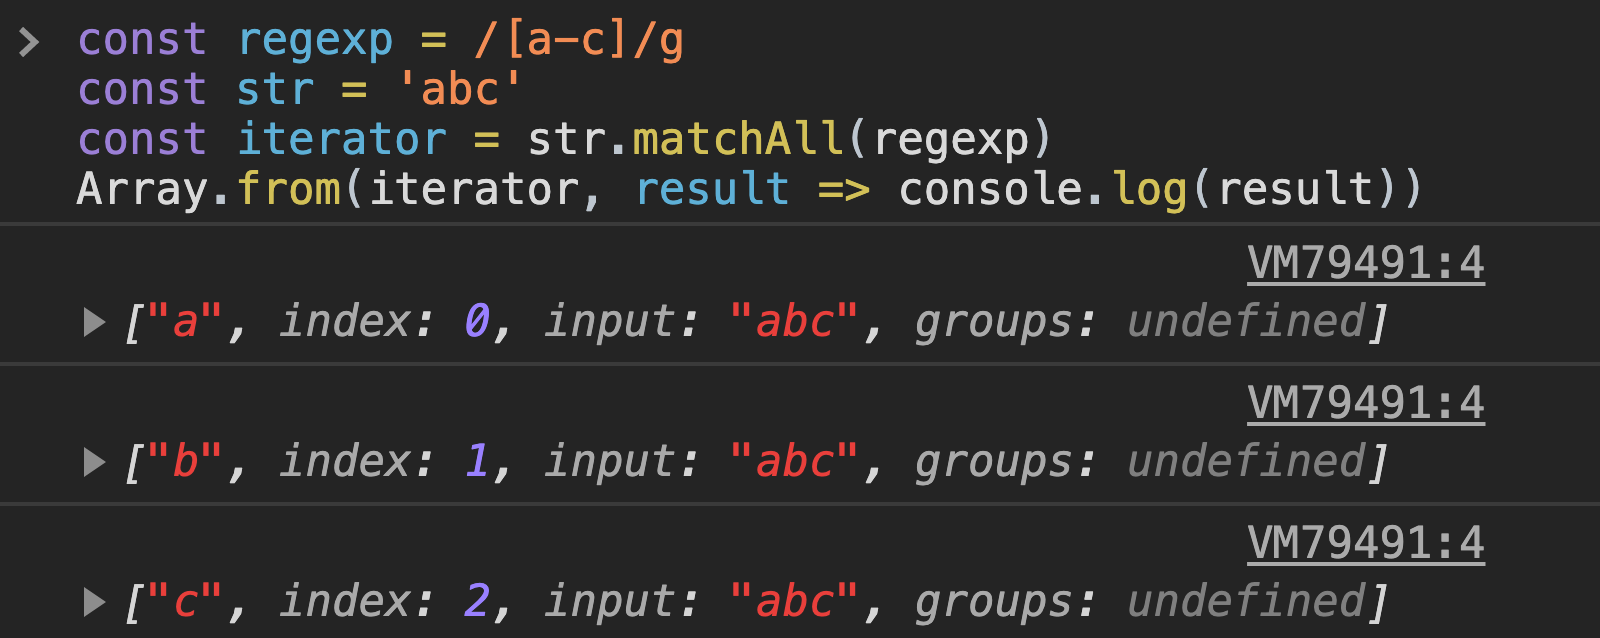

 Contains Duplicates
Given an array of integers
Contains Duplicates
Given an array of integers  4.函数组合 (Composition)
前面提到过,函数式编程的一个特点是通过串联函数来求值。
然而,随着串联函数数量的增多,代码的可读性就会不断下降。
函数组合就是用来解决这个问题的方法。
假设有一个 compose 函数,它可以接受多个函数作为参数,然后返回一个新的函数。
当我们为这个新函数传递参数时,该参数就会「流」过其中的函数,最后返回结果。
//两个函数的组合
var compose = function(f, g) { return function(x) { return f(g(x)); };};
//或者
var compose = (f, g) => (x => f(g(x)));
var add1 = x => x + 1
var mul5 = x => x * 5
compose(mul5, add1)(2); // =>15
4.函数组合 (Composition)
前面提到过,函数式编程的一个特点是通过串联函数来求值。
然而,随着串联函数数量的增多,代码的可读性就会不断下降。
函数组合就是用来解决这个问题的方法。
假设有一个 compose 函数,它可以接受多个函数作为参数,然后返回一个新的函数。
当我们为这个新函数传递参数时,该参数就会「流」过其中的函数,最后返回结果。
//两个函数的组合
var compose = function(f, g) { return function(x) { return f(g(x)); };};
//或者
var compose = (f, g) => (x => f(g(x)));
var add1 = x => x + 1
var mul5 = x => x * 5
compose(mul5, add1)(2); // =>15

 The code to start the sound now looks like this:
 It’s enven more interesting when we start playing around with the type of oscilators by setting
  CLIENT SERVER RELATIONSHIP
XHR is optimized for “transactional” request-response communication: the client sends the full, well-formed HTTP request to the server, and the server responds with a full response.
There is no support for request streaming, and until the Streams API is available, no reliable cross-browser response streaming API.
SSE enables efficient, low-latency server-to-client streaming of text-based data: the client initiates the SSE connection, and the server uses the event source protocol to stream updates to the client.
The client can’t send any data to the server after the initial handshake.
WebSocket is the only transport that allows bidirectional communication over the same TCP connection (Figure 17–2): the client and server can exchange messages at will.
As a result, WebSocket provides low latency delivery of text and binary application data in both directions.
CLIENT SERVER RELATIONSHIP
XHR is optimized for “transactional” request-response communication: the client sends the full, well-formed HTTP request to the server, and the server responds with a full response.
There is no support for request streaming, and until the Streams API is available, no reliable cross-browser response streaming API.
SSE enables efficient, low-latency server-to-client streaming of text-based data: the client initiates the SSE connection, and the server uses the event source protocol to stream updates to the client.
The client can’t send any data to the server after the initial handshake.
WebSocket is the only transport that allows bidirectional communication over the same TCP connection (Figure 17–2): the client and server can exchange messages at will.
As a result, WebSocket provides low latency delivery of text and binary application data in both directions.
 Here I am running a simple Express server with a simple route to send requested data to the Client.
'use strict';var express = require('express');
var app = express();app.use(express.static(`${__dirname}/public`));app.get('/api', function(req, res){
res.send((new Date()).toLocaleTimeString());
});app.listen(3000);
Here is the javascript file linked to my index.html on the client side.
I am using the baked in XHR methods as opposed to jQuery since I love to use vanilla JavaScript whenever possible.
'use strict'
function reqListener (data) {
document.body.innerHTML += this.responseText + '<br>';
}setInterval(function() {
var oReq = new XMLHttpRequest();
oReq.addEventListener("load", reqListener);
oReq.open("GET", "/api");
oReq.send();
}, 3000);
In my Github repo, I cover two more use cases not referenced here, server to server communications and HTTP/2.
If you are curious about those forms of communication check it out.
One word about HTTP/2 before wrapping up.
HTTP/2 is the future of Client-Server communication, but it is a protocol built on top of HTTP/1.1 which means that all of these forms of communicating will be still be relevant in the future, just the means that they are transmitted will be updated.
As you can see there are a ton of different ways you can send data between a client and server.
Here I am running a simple Express server with a simple route to send requested data to the Client.
'use strict';var express = require('express');
var app = express();app.use(express.static(`${__dirname}/public`));app.get('/api', function(req, res){
res.send((new Date()).toLocaleTimeString());
});app.listen(3000);
Here is the javascript file linked to my index.html on the client side.
I am using the baked in XHR methods as opposed to jQuery since I love to use vanilla JavaScript whenever possible.
'use strict'
function reqListener (data) {
document.body.innerHTML += this.responseText + '<br>';
}setInterval(function() {
var oReq = new XMLHttpRequest();
oReq.addEventListener("load", reqListener);
oReq.open("GET", "/api");
oReq.send();
}, 3000);
In my Github repo, I cover two more use cases not referenced here, server to server communications and HTTP/2.
If you are curious about those forms of communication check it out.
One word about HTTP/2 before wrapping up.
HTTP/2 is the future of Client-Server communication, but it is a protocol built on top of HTTP/1.1 which means that all of these forms of communicating will be still be relevant in the future, just the means that they are transmitted will be updated.
As you can see there are a ton of different ways you can send data between a client and server.


 Another possible way, when the blocking function is made with jquery, use:
$(document).unbind();
It will clear all the onmousedown and contextmenu events attributed dynamically, that can't be erased with document.contextmenu=null; etc.
some code did a re-bind:
$(document).bind("contextmenu",function(e){if(!$('#easyy').length)e.preventDefault();});
If none of the other comments works, just do, open console line command and type:
document.oncontextmenu = null;
Another possible way, when the blocking function is made with jquery, use:
$(document).unbind();
It will clear all the onmousedown and contextmenu events attributed dynamically, that can't be erased with document.contextmenu=null; etc.
some code did a re-bind:
$(document).bind("contextmenu",function(e){if(!$('#easyy').length)e.preventDefault();});
If none of the other comments works, just do, open console line command and type:
document.oncontextmenu = null;
 2.
The
2.
The Map cheatsheet
Example:
Different Ways to create maps
Map cheatsheet
Example:
Different Ways to create maps
 2.
Map methods
Let’s create simple Map:
// creating a map
var fruits = new Map();
fruits.set('🍎', "Apple");
fruits.set('🍋', "Mango");
fruits; //{"🍎" => "Apple", "🍋" => "Mango"}
Map has a property
2.
Map methods
Let’s create simple Map:
// creating a map
var fruits = new Map();
fruits.set('🍎', "Apple");
fruits.set('🍋', "Mango");
fruits; //{"🍎" => "Apple", "🍋" => "Mango"}
Map has a property  Domain types differentiation
Additionally, keep in mind that the SOP allows inter-origin HTTP requests with GET and POST methods.
But it forbids inter-origin PUT and DELETE.
Besides that, sending custom HTTP headers is permitted only in the context of inter-origin requests, being denied to foreigners.
Domain types differentiation
Additionally, keep in mind that the SOP allows inter-origin HTTP requests with GET and POST methods.
But it forbids inter-origin PUT and DELETE.
Besides that, sending custom HTTP headers is permitted only in the context of inter-origin requests, being denied to foreigners.
 Simple requests composition
When making asynchronous HTTP requests, we often use the already presented XMLHttpRequest or the new Fetch JavaScript APIs.
Simple requests composition
When making asynchronous HTTP requests, we often use the already presented XMLHttpRequest or the new Fetch JavaScript APIs.
 CORS headers family and their respective HTTP type
The headers marked with YES at the “Used for Preflight HTTP ” column play crucial preflight functions.
It goes from denoting which specific headers (Access-Control-Allow-Headers) and HTTP methods (Access-Control-Allow-Methods) are allowed, the maximum amount of seconds the browser should cache the Preflight request (Access-Control-Max-Age), request source (Origin), to the allowance (Access-Control-Allow-Credentials) of cookies to be sent by browsers in the actual request.
In the overall context, the Access-Control-Allow-Origin (ACAO) stands as the most relevant header regarding cross-origin authorization.
Through this header, the server is able to tell the browser which domains it should trust.
This great power comes with significant responsibilities, though.
CORS headers family and their respective HTTP type
The headers marked with YES at the “Used for Preflight HTTP ” column play crucial preflight functions.
It goes from denoting which specific headers (Access-Control-Allow-Headers) and HTTP methods (Access-Control-Allow-Methods) are allowed, the maximum amount of seconds the browser should cache the Preflight request (Access-Control-Max-Age), request source (Origin), to the allowance (Access-Control-Allow-Credentials) of cookies to be sent by browsers in the actual request.
In the overall context, the Access-Control-Allow-Origin (ACAO) stands as the most relevant header regarding cross-origin authorization.
Through this header, the server is able to tell the browser which domains it should trust.
This great power comes with significant responsibilities, though.
 Docker files respective to each web server
Interesting files are at the `static` and `img` directories.
They hold the resources that will eventually be solicited by other web pages.
JavaScript files are under the `static` directory.
You can open them in your favorite code editor and play around.
The `img` directory from the Trusted Site stores the `owasp_bug.png` resource.
In our experiment, this image resource will be requested by the Evil Site, which will then try to load it.
The same applies to the `static/hello_script.js` file, but to execute/evaluate the script content, and not load an image.
Docker files respective to each web server
Interesting files are at the `static` and `img` directories.
They hold the resources that will eventually be solicited by other web pages.
JavaScript files are under the `static` directory.
You can open them in your favorite code editor and play around.
The `img` directory from the Trusted Site stores the `owasp_bug.png` resource.
In our experiment, this image resource will be requested by the Evil Site, which will then try to load it.
The same applies to the `static/hello_script.js` file, but to execute/evaluate the script content, and not load an image.
 So if an error occurs, all middleware that is meant to handle errors will be called in order until one of them does not call the
  Install request and run the script:
 We now have code to download a remote file and code to OCR a local file — we just need to put them together.
 You may use %c multiple times:
console.log("Multiple styles: %cred %corange", "color: red", "color: orange", "Additional unformatted message");
The properties usable along with the %c syntax are as follows (at least, in Firefox — they may differ in other browsers):
background and its longhand equivalents.
border and its longhand equivalents
border-radius
box-decoration-break
box-shadow
clear and float
color
cursor
display
font and its longhand equivalents
line-height
margin
outline and its longhand equivalents
padding
text-* properties such as text-transform
white-space
word-spacing and word-break
writing-mode
Note: The console message behaves like an inline element by default.
To see the effects of padding, margin, etc.
you should set it to for example display: inline-block.
You may use %c multiple times:
console.log("Multiple styles: %cred %corange", "color: red", "color: orange", "Additional unformatted message");
The properties usable along with the %c syntax are as follows (at least, in Firefox — they may differ in other browsers):
background and its longhand equivalents.
border and its longhand equivalents
border-radius
box-decoration-break
box-shadow
clear and float
color
cursor
display
font and its longhand equivalents
line-height
margin
outline and its longhand equivalents
padding
text-* properties such as text-transform
white-space
word-spacing and word-break
writing-mode
Note: The console message behaves like an inline element by default.
To see the effects of padding, margin, etc.
you should set it to for example display: inline-block.

 Notice that the timer's name is displayed both when the timer is started and when it's stopped.
Note: It's important to note that if you're using this to log the timing for network traffic, the timer will report the total time for the transaction, while the time listed in the network panel is just the amount of time required for the header.
If you have response body logging enabled, the time listed for the response header and body combined should match what you see in the console output.
Notice that the timer's name is displayed both when the timer is started and when it's stopped.
Note: It's important to note that if you're using this to log the timing for network traffic, the timer will report the total time for the transaction, while the time listed in the network panel is just the amount of time required for the header.
If you have response body logging enabled, the time listed for the response header and body combined should match what you see in the console output.

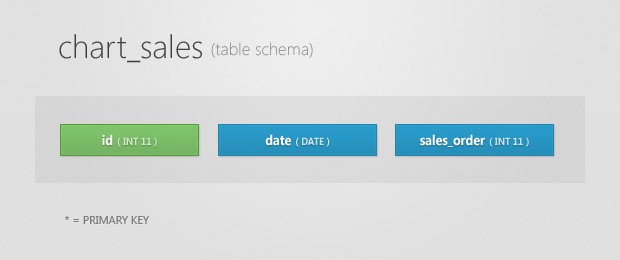 It has only three fields.
The date field is assigned a unique index, which means that there cannot be duplicate records for the same day.
The sales_ord field holds the number of sales for the day.
Your database will surely differ, but as long as you return the correct JSON response from your PHP script, there won't be any problems (more on that in the next section).
It has only three fields.
The date field is assigned a unique index, which means that there cannot be duplicate records for the same day.
The sales_ord field holds the number of sales for the day.
Your database will surely differ, but as long as you return the correct JSON response from your PHP script, there won't be any problems (more on that in the next section).

 randn_bm(-500, 1000, 1);
 randn_bm(10, 20, 0.25);
 randn_bm(10, 20, 3);
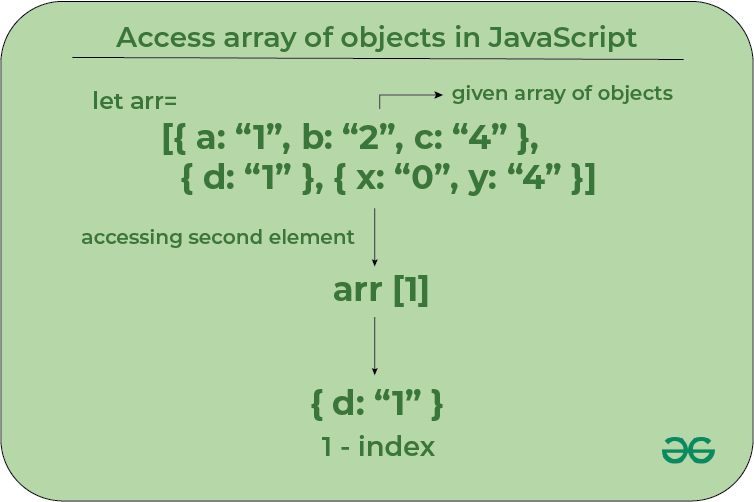
 -HTML node tree
The entire document is a document node
Every HTML element is an element node
The text inside HTML elements are text nodes
All comments are comment nodes
-HTML node tree
The entire document is a document node
Every HTML element is an element node
The text inside HTML elements are text nodes
All comments are comment nodes
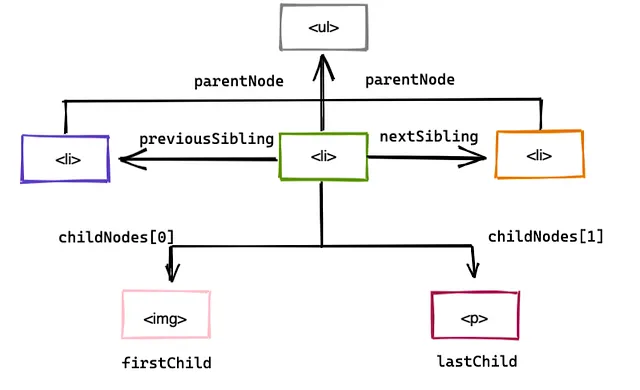 -html mockup of profile cards with an image and some info
parentNode
previousSibling
nextSibling
firstChild
lastChild
childNodes[
-html mockup of profile cards with an image and some info
parentNode
previousSibling
nextSibling
firstChild
lastChild
childNodes[ next() function
JavaScript
next() function
JavaScript  However, using a bundler will merge the files and their dependencies into a single file.
 Suppose you’re developing or maintaining a large app like an e-commerce site that provides access to thousands of products to several users.
For a use case like this, you most likely will need to employ custom or third-party libraries to power some of your more complex tasks.
In that case, developing without a JavaScript module bundler would make keeping all the dependencies updated to the latest version an exhaustive process.
Apart from providing a consistent tooling environment that saves you from the pain of dependencies, many popular module bundlers also come with performance optimization features.
Suppose you’re developing or maintaining a large app like an e-commerce site that provides access to thousands of products to several users.
For a use case like this, you most likely will need to employ custom or third-party libraries to power some of your more complex tasks.
In that case, developing without a JavaScript module bundler would make keeping all the dependencies updated to the latest version an exhaustive process.
Apart from providing a consistent tooling environment that saves you from the pain of dependencies, many popular module bundlers also come with performance optimization features.
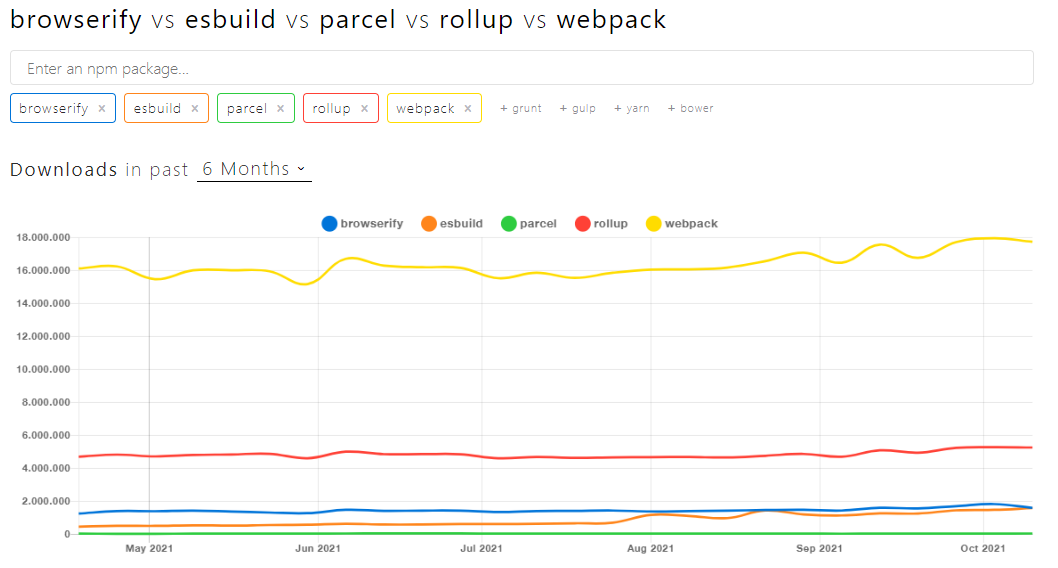
 With over 18 million weekly downloads and 60k GitHub stars,
 Released in 2018,
 The rest of the files are autogenerated.
I will not go deeper into the environment implementation, I just will show you the contents of the supporting files.
Docker-compose creates 3 services:
The rest of the files are autogenerated.
I will not go deeper into the environment implementation, I just will show you the contents of the supporting files.
Docker-compose creates 3 services:  Note: When the last private tab is closed, data stored in the localStorage object of a site opened in a private tab or incognito mode is cleared, which makes sense because it’s a private browsing session.
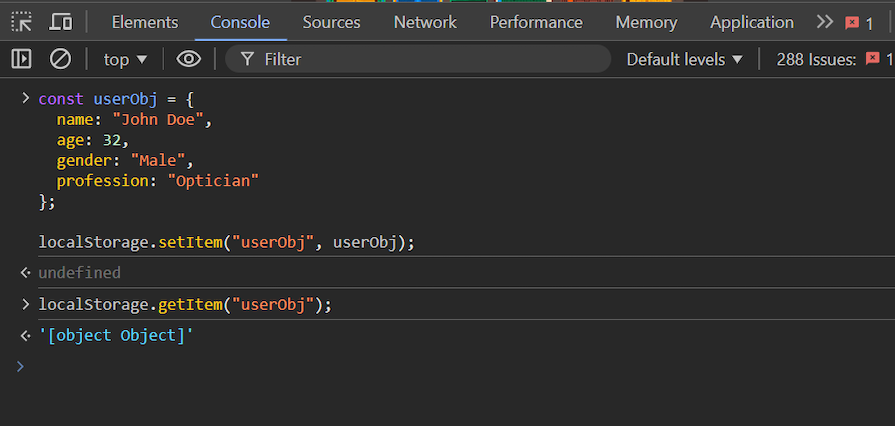 [object Object] is a string representation of an object instance whose value was never read at the time of storing the data, which will result in data loss.
The correct way to store object data to localStorage is to first convert it to a string.
This object-to-string conversion of object data is known as serialization, and turning this converted string back to object data is called deserialization.
Let’s briefly discuss two important JSON methods that are responsible for object data serialization and deserialization:
JSON.stringify : Converts any object value into a string JSON (serialization)
JSON.parse : Turns a JSON string into its corresponding object or value (deserialization)
Now, utilizing the setItem method with JSON stringify, we can easily convert a JavaScript object to a JSON string and push it to the localStorage object.
Here’s a quick example to demonstrate this:
const userObj = {
name: "John Doe",
age: 32,
gender: "Male",
profession: "Optician"
};
[object Object] is a string representation of an object instance whose value was never read at the time of storing the data, which will result in data loss.
The correct way to store object data to localStorage is to first convert it to a string.
This object-to-string conversion of object data is known as serialization, and turning this converted string back to object data is called deserialization.
Let’s briefly discuss two important JSON methods that are responsible for object data serialization and deserialization:
JSON.stringify : Converts any object value into a string JSON (serialization)
JSON.parse : Turns a JSON string into its corresponding object or value (deserialization)
Now, utilizing the setItem method with JSON stringify, we can easily convert a JavaScript object to a JSON string and push it to the localStorage object.
Here’s a quick example to demonstrate this:
const userObj = {
name: "John Doe",
age: 32,
gender: "Male",
profession: "Optician"
};