"Blog" is an abbreviated version of "weblog," which is a term used to describe websites that maintain an ongoing chronicle of information. A blog features diary-type commentary and links to articles on other websites, usually presented as a list of entries in reverse chronological order. Blogs range from the personal to the political, and can focus on one narrow subject or a whole range of subjects.
Many blogs focus on a particular topic, such as web design, home staging, sports, or mobile technology. Some are more eclectic, presenting links to all types of other sites. And others are more like personal journals, presenting the author's daily life and thoughts.
Generally speaking (although there are exceptions), blogs tend to have a few things in common:
Some blogs may have additional features beyond these. Watch this short video for a simple explanation for what a blog is.
Here are some professional bloggers' point of view on what is a blog.
A blogger is a person who owns or runs a blog or a person who maintains the blog. That is, posting articles or new posts, information, sharing the most up-to-date news, opinions and case studies to name but a few. Such entries are known as blog posts.
Content is the raison d'être for any website. Retail sites feature a catalog of products. University sites contain information about their campuses, curriculum, and faculty. News sites show the latest news stories. For a personal blog, you might have a bunch of observations, or reviews. Without some sort of updated content, there is little reason to visit a website more than once.
On a blog, the content consists of articles (also sometimes called "posts" or "entries") that the author(s) writes. Yes, some blogs have multiple authors, each writing his/her own articles. Typically, blog authors compose their articles in a web-based interface, built into the blogging system itself. Some blogging systems also support the ability to use stand-alone "weblog client" software , which allows authors to write articles offline and upload them at a later time.
Want an interactive website? Wouldn't it be nice if the readers of a website could leave comments, tips or impressions about the site or a specific article? With blogs, they can! Posting comments is one of the most exciting features of blogs.
Most blogs have a method to allow visitors to leave comments . There are also nifty ways for authors of other blogs to leave comments without even visiting the blog! Called " pingbacks " or " trackbacks ", they can inform other bloggers whenever they cite an article from another site in their own articles. All this ensures that online conversations can be maintained painlessly among various site users and websites.
Software that provides a method of managing your website is commonly called a CMS or "Content Management System" . Many blogging software programs are considered a specific type of CMS. They provide the features required to create and maintain a blog, and can make publishing on the internet as simple as writing an article, giving it a title, and organizing it under (one or more) categories. While some CMS programs offer vast and sophisticated features, a basic blogging tool provides an interface where you can work in an easy and, to some degree, intuitive manner while it handles the logistics involved in making your composition presentable and publicly available. In other words, you get to focus on what you want to write, and the blogging tool takes care of the rest of the site management.
WordPress is one such advanced blogging tool and it provides a rich set of features . Through its Administration Screen , you can set options for the behavior and presentation of your weblog. Via these Administration Screen , you can easily compose a blog post , push a button, and be published on the internet, instantly! WordPress goes to great pains to see that your blog posts look good, the text looks beautiful, and the html code it generates conforms to web standards.
If you're just starting out, read Getting Started with WordPress , which contains information on how to get WordPress set up quickly and effectively, as well as information on performing basic tasks within WordPress, like creating new posts or editing existing ones.
In addition to understanding how your specific blogging software works, such as WordPress , there are some terms and concepts you need to know.
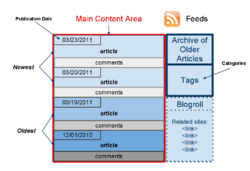
A blog is also a good way to keep track of articles on a site. A lot of blogs feature an archive based on dates (like a monthly or yearly archive). The front page of a blog may feature a calendar of dates linked to daily archives. Archives can also be based on categories featuring all the articles related to a specific category.
It does not stop there; you can also archive your posts by author or alphabetically. The possibilities are endless. This ability to organize and present articles in a composed fashion is much of what makes blogging a popular personal publishing tool.
A Feed is a function of special software that allows "Feedreaders" to access a site automatically looking for new content and then post updates about that new content to another site. This provides a way for users to keep up with the latest and hottest information posted on different blogging sites. Some Feeds include RSS (alternately defined as "Rich Site Summary" or "Really Simple Syndication"), Atom or RDF files. Dave Shea, author of the web design weblog Mezzoblue has written a comprehensive summary of feeds.
A feed is a machine readable (usually XML) content publication that is updated regularly. Many weblogs publish a feed (usually RSS, but also possibly Atom and RDF and so on, as described above). There are tools out there that call themselves "feedreaders". What they do is they keep checking specified blogs to see if they have been updated, and when the blogs are updated, they display the new post, and a link to it, with an excerpt (or the whole contents) of the post. Each feed contains items that are published over time. When checking a feed, the feedreader is actually looking for new items. New items are automatically discovered and downloaded for you to read, so you don't have to visit all the blogs you are interested in. All you have to do with these feedreaders is to add the link to the RSS feed of all the blogs you are interested in. The feedreader will then inform you when any of the blogs have new posts in them. Most blogs have these "Syndication" feeds available for the readers to use.
One of the most exciting features of blogging tools are the comments. This highly interactive feature allows users to comment upon article posts, link to your posts, and comment on and recommend them. These are known as trackbacks and pingbacks. We'll also discuss how to moderate and manage comments and how to deal with the annoying trend in "comment spam", when unwanted comments are posted to your blog.
Trackbacks were originally developed by SixApart , creators of the MovableType blog package. SixApart has a good introduction to trackbacks :
In a nutshell, TrackBack was designed to provide a method of notification between websites: it is a method of person A saying to person B, "This is something you may be interested in." To do that, person A sends a TrackBack ping to person B.
A better explanation is this:
The idea here is that more people are introduced to the conversation (both Person A's and Person B's readers can follow links to the other's post), and that there is a level of authenticity to the trackback comments because they originated from another weblog. Unfortunately, there is no actual verification performed on the incoming trackback, and indeed they can even be faked.
Most trackbacks send to Person A only a small portion (called an "excerpt") of what Person B had to say. This is meant to act as a "teaser", letting Person A (and his readers) see some of what Person B had to say, and encouraging them all to click over to Person B's site to read the rest (and possibly comment).
Person B's trackback to Person A's blog generally gets posted along with all the comments. This means that Person A can edit the contents of the trackback on his own server, which means that the whole idea of "authenticity" isn't really solved. (Note: Person A can only edit the contents of the trackback on his own site. He cannot edit the post on Person B's site that sent the trackback.)
SixApart has published an official trackback specification .
Pingbacks were designed to solve some of the problems that people saw with trackbacks. That is why the official pingback documentation sounds so much like the description of a trackback:
For example, Yvonne writes an interesting article on her Web log. Kathleen reads Yvonne's article and comments about it, linking back to Yvonne's original post. Using pingback, Kathleen's software can automatically notify Yvonne that her post has been linked to, and Yvonne's software can then include this information on her site.
The best way to think about pingbacks is as remote comments:
The pingback is generally displayed on Person A's blog as simply a link to Person B's post. It is commonly believed that pingbacks do not send any content, as trackbacks do. This is not correct. If you get a pingback, you will see an excerpt from that blog in the Edit Comments section of your dashboard. The issue is that very few themes display these excerpts from pingbacks. The default Wordpress themes, for example, do not display pingback excerpts.
In fact, there is only one significant difference between pingbacks and trackbacks: Pingbacks and trackbacks use drastically different communication technologies (XML-RPC and HTTP POST, respectively). But that difference is important because trackbacks have become the target of so much spam. The automatic verification process introduces a level of authenticity, making it harder to fake a pingback.
Some feel that trackbacks are superior because readers of Person A's blog can at least see some of what Person B has to say, and then decide if they want to read more (and therefore click over to Person B's blog). Others feel that pingbacks are superior because they create a verifiable connection between posts.
Comments on blogs are often criticized as lacking authority, since anyone can post anything using any name they like: there's no verification process to ensure that the person is who they claim to be. Trackbacks and Pingbacks both aim to provide some verification to blog commenting.
To enable trackbacks and pingbacks, in the Discussion Settings of your Administration Screen, select these items under 'Default article settings':
Attempt to notify any blogs linked to from the article.
Allow link notifications from other blogs (pingbacks and trackbacks) on new articles.
Selecting one option and not the other would not be very neighborly ;)
Once enabled, trackbacks and pingbacks from other sites will appear in your Administration Screen just like other comments, but on your post pages, they will appear according to your theme's design.
Once enabled, pingbacks are sent automatically when you publish your post, you don't have to do anything. To send trackbacks, you will need to find the trackback URL somewhere on the post page you are linking to. If you can't find one, try to determine if the site supports pingbacks. If it does, you should not send trackbacks as well. Copy/paste the trackback URL into the Send Trackbacks field on your Add New Post screen. If you don't see this field, go to the screen options and select the Send Trackbacks option. Note that selecting this does not send trackbacks, it only displays the field called Send Trackbacks. When you publish your post, trackbacks will be sent to the URLs you pasted into the field. This field will also show the status of trackbacks and pingbacks on your Edit Post screen.
If there is someone that wants to send a trackback to your WordPress blog because their blogging software does not support pingbacks, your trackback URL they should insert into their post edit screen is your blog post's permalink with "trackback/" appended to the end. If their software supports pingbacks, they do not need to do anything, the process is automatic.
Comment Moderation is a feature which allows the website owner and author to monitor and control the comments on the different article posts, and can help in tackling comment spam. It lets you moderate comments, & you can delete unwanted comments, approve cool comments and make other decisions about the comments.
Comment Spam refers to useless comments (or trackbacks, or pingbacks) to posts on a blog. These are often irrelevant to the context value of the post. They can contain one or more links to other websites or domains. Spammers use Comment Spam as a medium to get higher page rank for their domains in Google, so that they can sell those domains at a higher price sometime in future or to obtain a high ranking in search results for an existing website.
Spammers are relentless; because there can be substantial money involved, they work hard at their "job." They even build automated tools (robots) to rapidly submit their spam to the same or multiple weblogs. Many webloggers, especially beginners, sometimes feel overwhelmed by Comment Spam.
There are solutions, though, to avoiding Comment Spam. WordPress includes many tools for combating Comment Spam . With a little up front effort, Comment Spam can be manageable, and certainly no reason to give up weblogging.
Permalinks are the permanent URLs to your individual weblog posts, as well as categories and other lists of weblog postings. A permalink is what another weblogger will use to refer to your article (or section), or how you might send a link to your story in an e-mail message. Because others may link to your individual postings, the URL to that article shouldn't change. Permalinks are intended to be permanent (valid for a long time).
"Pretty" Permalinks is the idea that URLs are frequently visible to the people who click them, and should therefore be crafted in such a way that they make sense, and not be filled with incomprehensible parameters. The best Permalinks are "hackable," meaning a user might modify the link text in their browser to navigate to another section or listing of the weblog. For example, this is how the default Permalink to a story might look in a default WordPress installation:
/index.php?p=423
How is a user to know what "p" represents? Where did the number 423 come from?
In contrast, here is a well-structured, "Pretty" Permalink which could link to the same article, once the installation is configured to modify permalinks:
/archives/2003/05/23/my-cheese-sandwich/
One can easily guess that the Permalink includes the date of the posting, and the title, just by looking at the URL. One might also guess that hacking the URL to be /archives/2003/05/ would get a list of all the postings from May of 2003 (pretty cool). For more information on possible Permalink patterns in WordPress, see Using Permalinks .
Some blogging tools offer the ability to email your posts directly to your blog, all without direct interaction through the blogging tool interface. WordPress offers this cool feature. Using email, you can now send in your post content to a pre-determined email address & voila! Your post is published!
If you're using Pretty Permalinks, the Post Slug is the title of your article post within the link. The blogging tool software may simplify or truncate your title into a more appropriate form for using as a link. A title such as "I'll Make A Wish" might be truncated to "ill-make-a-wish". In WordPress, you can change the Post Slug to something else, like "make-a-wish", which sounds better than a wish made when sick.
Excerpts are condensed summaries of your blog posts, with blogging tools being able to handle these in various ways. In WordPress, Excerpts can be specifically written to summarize the post, or generated automatically by using the first few paragraphs of a post or using the post up to a specific point, assigned by you.
Plugins are cool bits of programming scripts that add additional functionality to your blog. These are often features which either enhance already available features or add them to your site.
WordPress offers simple and easy ways of adding Plugins to your blog. From the Administration Screen , there is a Plugins Screen. You can easily search, install and activate Plugins from this Screen.
Starting a new blog is difficult and this can put many people off. Some may get off to a good start only to become quickly discouraged because of the lack of comments or visits. You want to stand out from this crowd of millions of bloggers, you want to be one of the few hundred thousand blogs that are actually visited. Here are some simple tips to help you on your way to blogging mastery:
You’ve just completed the 5 Minute Installation of WordPress or one-click install from your web host. Now what?
Let’s take a step-by-step tour through your WordPress site and see how the different functions work and how to make your new site your own. During the first part of this tutorial, please don’t change anything within the program unless it is part of the tutorial. After following these steps, you’ll soon be changing everything.
At the top of the screen is the area called the “ toolbar .” Click on the link that is your site name. This will take you to a view of your new WordPress site. Like it? Don’t like it? Doesn’t matter, just look at it. This is where you are going to be spending a lot of time!
Take time to look at the site before you get into the changing of things and figuring out how all of this works ; it’s important to see how the WordPress Twenty Seventeen theme is laid out and how it works. Consider this the test drive before you start adding on all the special features.
The layout you are looking at is called a WordPress Theme . It is the appearance of your website, styling the look of the site and the framing of the content. The WordPress Twenty Seventeen theme features a “header” at the top with the title and tagline for your site. Below this is your Menu . Along the side you will see some titles and links. This comprises Widgets . Within the main middle section of the page is the content area. At the bottom of the page is the footer.
Let’s look at the post for a moment. There is a “title,” and below the title is the date the post was written, then the body of the post, and finally some information about the post. This is called the post meta data and contains information about the post such as the category assigned to that post.
Scroll down the page and notice the bar at the end of the page. This is called the “footer.” It says “Proudly powered by WordPress.”
Back to the sidebar, you will see different sections with information. Among these you may find a list of Recent Posts, Recent Comments, Archives, Categories , and links to the Administration Screens, Log Out, and RSS feeds. This is part of the menu or navigation Screen that people will use to move around your site, visiting posts from different categories or time periods.
Take time to notice the smaller details of this web page layout and design. Move your mouse over the title of the article post. Notice how it changes color. This is called a hover. Most Themes feature a distinctive color or underline when you move your mouse over a link. Move your mouse over any of the links in the sidebar. Do they change? Is the change the same? You can change your link hovers to look different in different sections of your page. Also look at the color of the links. How are they colored or underlined to stand out from the rest of the text?
Observe the small design details and where they are placed within the page. In the near future, you may want to change some of these details, such as the color of the title in the white box at the top of the page. If you remember that it is called the header, then you will know to look within the header section of your style sheet (the file that controls the look of your web page), when you want to make changes to it.
For now you only have one post. It is residing within a page that is laid out as your home page or the front page. If you click on the title of the post, it will take you to the specific page for that post. The first page or home page of your site features the most recent posts on your site. Each post title will link to the actual page of the post. Some Theme designers design their single post pages to look different from the home page. By clicking on the title, you are taken to another web page that looks different from the home page.
Again, in the single post, pay attention to the layout and notice what is now different about the design elements. Is the header different? Smaller, larger, or a different color? Is there a sidebar?
Posts are usually stored in Categories and/or Tags so you can keep related topics together. Right now you only have one category, but will soon want more. Click on the single category that appears in the sidebar of the home page. You are now in a page that has been generated to display only the posts within that category. Again, take a look at the layout and see how it may be different from the home page and the single post.
Do the same with the Archives. You may only have one post, but look at how the page is laid out.
All of these changes are created from only a few files called template files and you can learn more about how they work in Stepping Into Templates . For now, however, let’s get on with how the rest of WordPress works.
Now that you have an idea of how your site looks and what the different layout sections are called, it’s time to test drive the WordPress Administration . This is like familiarizing yourself with the backend of your new website. In fact, the first page you see after logging in is called the Dashboard , a collection of information and data about the activities and actions on your WordPress site.
The Dashboard helps to keep you up to date on new and interesting bits of information from the many WordPress resources. In the corner, it also features a list of the most recent activity you’ve accomplished on your site.
On the left side of the screen is the main navigation menu detailing each of the administrative functions you can perform. Move your mouse down the list and the sub-menus will “fly out” for you to move your mouse to and click. Once you choose a “parent” navigation section, it will open up to reveal the options within that section.
The various menu items are as follows:
The links in the above list will take you to a series of articles that will guide you step-by-step through every aspect of the Admin Screens. You are anxious to get started, so for now, let's start with the Users Screen .
Click on the Users tab. The screen will change and you will see the Screen called All Users that shows a list of all your users; from here you can add or change existing users and authors accounts. In the navigation menu, click on the Your Profile menu choice. This is where you will enter information about you, the author and administrator of the site. Fill in the information and click Update Profile when done.Now, let’s look at some other powerful features of the WordPress Admin.
The Appearance, Themes Screen allows you to change the look of your site using different Themes . Themes are presentation styles that completely change the look of your site. Designed by WordPress developers and users, there are hundreds of themes available for you to choose from. In your Appearance Screen, you will see a list of currently installed themes, including the WordPress Twenty Seventeen theme . To quickly change the theme, simply click on the Activate button under one of the themes listed, then click on your site name in the top toolbar to see how it looks. Wow, you have another look and nothing else on the site has changed. It's that easy.
Go back to the Appearance > Theme Screen and click the Activate button under the WordPress Twenty Seventeen theme to bring the design back to what you had. To see it again, click your site name in the toolbar, and there it is.
If the screen looks a little intimidating, the Codex article on Writing a Post will take you step-by-step through the process of writing a post. Take a moment to read through the article and post your first entry and then return to this article and we’ll take you onto the next step.
If you are in a hurry, then simply fill in the blanks, one by one, in the post beginning with the title and then write a little test message in the post window. This is just for a test, so you can write anything you want. When you are done, click the Publish button that is to the right of the post entry window and it is done. You will then see a blank Write a Post screen and you're ready to write another post. Go ahead. But do only three to four entries. There’s more exciting work ahead!
Now that you’ve gotten a feel for writing posts, you can view your posts by clicking your site name in the toolbar on top of the screen. Now it’s time to get down to the real work.
If you want to create a good and solid website, you need a good and solid plan. I know it’s hard to do, and I know you want to keep playing with your new website, but it's time to take a break away from your computer and turn to pen and paper.
On a piece of paper, describe your site. Take five to twenty minutes to come up with a purpose for your site, or better yet, call it your Mission Statement.
Answer the following questions:
Now, compile this information into a paragraph so it looks like this:
and cover the topics of A, B, and C. The audience will
be __________ ________________ _______. I will be adding
posts every _____________ about ________ _______ ______________.
From this exercise, we’ve gathered a lot of information. We’ve uncovered information on how you might layout and design your site. If you know your audience is mostly made up of young people under the age of 25, you will probably want a fashionable look ranging from wild colors and crazy graphics to dark foreboding tones. If you are providing factual information about a serious subject, then you will probably want a more conservative look where the information is more important than a lot of pop and flash.
You may already have a design idea in mind, or perhaps you will be copying over from your previous site, but take a moment to use this information to reconsider your design, and to see how what you want will work with the WordPress options.
You have also uncovered the possible categories for your site. The topics and subjects you will be covering are listed in your purpose statement. Let’s say your purpose statement said,
Your topics are your categories. Write your categories down below your purpose paragraph and notes about your web page design.
Now, what subcategories might be under these topics? Under Computer Tips, you might want to segregate them by Windows, Linux, and Mac. Or maybe Software and Hardware. You can have sub-sub-categories, but let’s stop with subcategories for right now. Write these down.
Remember the question about why you are doing this? Is it because you have valuable and timely information or knowledge to share, because you want to talk about a subject that interests you, or maybe because you just think it will be fun to do.
Understanding the timeliness of the information you want to present on your site helps you organize the information on your website. Your website is organized by several different methods. If the date of when you posted the information is critical to the success of the page, then having links to your posts referenced by date is important. If the information itself is more important and timeless, then having your posts referenced by category is the best choice.
Have you noticed that you are starting to lay out your website? If you remember our earlier test drive of your new WordPress website, we examined the sidebar menu. This is the area where your past posts are organized. If you take another look, you will see the sidebar is laid out in a list , including Archives by date and Categories by category. It may even feature a calendar.
As you lay out your website on paper, consider whether you want both categories and dates, or just one of them in your sidebar. What information you have and how you want to help the user find the information is critical to your website design.
As you think about what information the user will need to know, you have to consider what information you are willing to share with them. That information may include how to contact you, what the purpose of the site is, who you are, and what your expertise is.
A WordPress feature called Pages makes the process of presenting this information easier. Pages, similar to posts, are most commonly used to present unchanging information such as About Us, Contact Us, Sign Up for Our Mailing List, and other static information. Before creating your individual Pages , you need to think about what information you would like the Page to hold. Write down the possible Page titles and describe the information you want to share on each Page.
Part of the fun of WordPress is the ability to have viewers leave comments on your site. It creates a dynamic interchange between you and the viewer. Do you want comments on your posts? Comments on posts come in a variety of forms, from pats on the back (Good job! Like the post!) to extensive conversations and commentary about the posts. Or maybe you are seeking comments that add to the information you’ve posted.
Responding to comments and moderating them can also take up a lot of time. If they are critical to your site, then include them and consider how you want them presented. Go back to your test site; the first post created at the time of installation included a sample comment. You can even make a few comments yourself on the posts you created. Take a look at how they are laid out and consider how you might want them to look to fit into the design and layout of your site.
When you have reached your decision about how you want to handle comments, take time to read through the article on comments and WordPress discussion options to help you set those features.
With this basic information, you are ready to return to your computer and start setting up your site.
You may want to install plugins such as Jetpack by WordPress.com to supercharge your website, and don’t forget to activate the Akismet WordPress Plugin that is available with all WordPress sites to help protect it from comment spam.
But now, let's start with making those categories you wrote down before.
In the Posts > Categories tab, in the Add New Category area, fill in the information about your category. Continue to add your parent categories, going down the list. Hold off on entering subcategories until all the main categories are entered.
When you have the parent categories entered, enter your subcategories. In the pull down menu for Parent Category, you can select the parent to the subcategory you are adding. When you view your categories in the Manage > Categories Screen, you will see the categories listed like this:
Computer Tips
Internet News
Web Page Design
Let’s put some of your test posts into categories so you can see how this works.
From the Posts > Category Screen, click on the tab for All Posts . You should see the test posts you entered here. When you hover your mouse over each post title, under the title, you should see the Edit | Quick Edit | Trash | View links. Click on Edit to edit one of the posts. On the right side of the Edit Post screen you will now see your Categories. Choose one of them by clicking in the box next to it. Then in the Publish module above, click the Update button. Repeat this for your other test posts, putting each one in a different category.Now view your page by clicking on your site name in the toolbar at the top of your Administration Screen. Do you see the categories listed in the sidebar now? Great. If you are missing a category, that usually means that there are no posts in it. This is the default function of WordPress, so not to worry. When you add a post to the “missing” category, it will appear on your web pages. Click on one of the categories and you will be taken to a page for just that category. You should see the posts that went into that category. This is a generated Category page.
Now, click on the Archives for the month showing. Now you are visiting a generated page of your posts listed in chronological order for this month - well, specifically for today only. Two methods of finding the same information.
There is more to think about when it comes to having comments on your site. Unfortunately we live in a world where spam is a fact of life. It is recommended that you begin battling the comment spammers with the helpful article, Introduction to Dealing with Comment Spam .
You’ve now done all the basics for your new WordPress website. You know how to write a post, create a category, and how to view your site’s information by category and archive. You can start the customization process, and when you are done, don’t forget to delete your test posts! Then start writing some wonderful information to share with your new-found public!
Once you are familiar with how WordPress works, it's time to get creative and start customizing. The tutorial now splits into different subjects that require no order. From here on you can do whatever you want, adding and subtracting, perfecting and scrambling your site at will. The amount of effort you put into the site is now up to you. You can work with the two WordPress Themes that came with the installation, or seek out another Theme that better meets your needs. Or you can create your own Child Theme . You can totally customize all the links and information, or get serious and completely re-design the entire site to do whatever you want. You have the basics, the rest is up to your imagination.
There are hundreds of WordPress Themes to choose from. All do basically the same thing but graphically present the information in a myriad of ways. Choose a few that look interesting to you, and meet your audience's needs and your desires, and then test drive them following the test drive instructions above. Click through the whole site, the categories and archives as well as the individual posts to see how the Theme handles each one. The look may be nice on the front page, but if it handles things in a way you don't like in the single post, then you will have to dig into the code and make changes. Not ready for that, try another theme.
If you run into problems, check out the Codex's Troubleshooting Themes article.
If you are familiar with CSS, HTML, and even PHP and MySQL, consider either customizing the Theme to your own needs, or creating your own Child Theme. This is not for the timid, this is for the informed and experienced. That said, a Child Theme is an easy, safe way to tinker under the hood/bonnet of WordPress. If things go badly with your customizations, simply activate an approved, unmodified theme and your site is up and running and looking perfectly again. If you want to expand your website design and development skills, the Codex can help:
If you are familiar with PHP, HTML, and maybe even MySQL, you may be able to customize WordPress to work the way you want. Again this is not for the timid, this is for the informed and experienced. And again, a simple basic Plugin is an easy, safe way to tinker under the hood of WordPress. If things go badly with your customizations, simply deactivate your balky Plugin and your site is up and running perfectly again. If you want to expand your website development skills, the Codex can help:
The exciting thing about WordPress is that there are few limits. Thousands of people are using WordPress for blogging and for running their websites. For example, look at some of the entries under the WordPress.org Theme Showcase . All have a different look and different functions on their sites.
What you do from here is up to you, but here are a few places to take that first step beyond the basics:
WordPress was created by the developers as weblogging or blogging software. A blog , as defined in the Codex Glossary , is an online journal, diary, or serial, published by a person or group of people. Many blogs are personal in nature, reflecting the opinions and interests of the owner. But, blogs are now important tools in the world of news, business, politics, and entertainment.
Blogs are a form of a Content Management System (CMS) which Wikipedia calls "a system used to organize and facilitate collaborative content creation." Both blogs and Content Management Systems can perform the role of a website (site for short). A website can be thought of as a collection of articles and information about a specific subject, service, or product, which may not be a personal reflection of the owner. More recently, as the role of WordPress has expanded, WordPress developers have begun using the more general term site, in place of blog.
The term Word in WordPress refers to the words used to compose posts . Posts are the principal element (or content ) of a blog. The posts are the writings, compositions, discussions, discourses, musings, and, yes, the rantings of the blog's owner and guest authors. Posts, in most cases, are the reason a blog exists; without posts, there is no blog!
To facilitate the post writing process, WordPress provides a full featured authoring tool with modules that can be moved, via drag-and-drop , to fit the needs of all authors. The Dashboard QuickPress module makes it easy to quickly write and publish a post. There's no excuse for not writing.
Integral to a blog are the pictures, images, sounds, and movies, otherwise know as media . Media enhances, and gives life to a blog's content. WordPress provides an easy to use method of inserting Media directly into posts, and a method to upload Media that can be later attached to posts, and a Media Manager to manage those various Media.
An important part of the posting process is the act of assigning those posts to categories . Each post in WordPress is filed under one or more categories. Categories can be hierarchical in nature, where one category acts as a parent to several child, or grandchild, categories. Thoughtful categorization allows posts of similar content to be grouped, thereby aiding viewers in the navigation, and use of a site. In addition to categories, terms or keywords called tags can be assigned to each post. Tags act as another navigation tool, but are not hierarchical in nature. Both categories and tags are part of a system called taxonomies . If categories and tags are not enough, users can also create custom taxonomies that allow more specific identification of posts or pages or custom post types .
In turn, post categories and tags are two of the elements of what's called post meta data . Post meta data refers to the information associated with each post and includes the author's name and the date posted as well as the post categories. Post meta data also refers to Custom Fields where you assign specific words, or keys, that can describe posts. But, you can't mention post meta data without discussing the term meta.
Generally, meta means "information about"; in WordPress, meta usually refers to administrative-type information. So, besides post meta data, Meta is the HTML tag used to describe and define a web page to the outside world, like meta tag keywords for search engines. Also, many WordPress-based sites offer a Meta section, usually found in the sidebar , with links to login or register at that site. And, don't forget Meta Rules : The rules defining the general protocol to follow in using this Codex, or Meta, as in the MediaWiki namespace that refers to administrative functions within Codex. That's a lot of Meta!
After a post is made public, a blog's readers will respond, via comments , to that post, and in turn, authors will reply. Comments enable the communication process, that give-and-take, between author and reader. Comments are the life-blood of most blogs.
Finally, WordPress also offers two other content management tools called Pages and custom post types . Pages often present static information, such as "About Me", or "Contact Us", Pages. Typically "timeless" in nature, Pages should not be confused with the time-oriented objects called posts. Interestingly, a Page is allowed to be commented upon , but a Page cannot be categorized . A custom post type refers to a type of structured data that is different from a post or a page. Custom post types allow users to easily create and manage such things as portfolios, projects, video libraries, podcasts, quotes, chats, and whatever a user or developer can imagine.
A WordPress Theme is the overall design of a site and encompasses color, graphics, and text. A Theme is sometimes called the skin or template, but it isn't really. A skin and template are really website paint jobs. A WordPress Theme is where code meets design, allowing a site to change based upon specific conditions set by the site administrator.
Installation of WordPress Themes is made easy with the Themes Menu on the Administration Panels. Simply search for a new Theme from within the official WordPress Theme Directory and activate it with a few clicks. You can also preview your site before installing and activating the Theme to see what your site will look like with that WordPress Theme.
The flexibility of WordPress is apparent when discussing terminology related to the design of a WordPress site. At the core of WordPress, developers created a programming structure named The Loop to handle the processing of posts. The Loop is the critical PHP program code used to display posts. Anyone wanting to enhance and customize WordPress will need to understand the mechanics of The Loop .
Along with The Loop, WordPress developers have created Template Tags which are a group of PHP functions that can be invoked by designers to perform an action or display specific information. It is the Template Tags that form the basis of the Template Files. Templates (files) contain the programming pieces, such as Template Tags, that control the structure and flow of a WordPress site. These files draw information from your WordPress MySQL database and generate the HTML code which is sent to the web browser. A Template Hierarchy , in essence the order of processing, dictates how Templates control almost all aspects of the output, including Headers , Sidebars , and Archives . Archives are a dynamically generated list of posts, and are typically grouped by date , category , tag , or author .
As the capabilities of WordPress have improved, developers have added tools that allow users to easily manage a site's look and functionality:
Developers and users are encouraged to explore the latest default WordPress Themes named by the year in which they are released. Twenty-Eleven WordPress Theme , rightly called a showcase Theme, introduced many of the above features. It emphasized the use of the Child Theme concept to shield a theme from getting overwritten during a WordPress update. The Twenty-Thirteen Theme was designed to take advantage of Formats . The Twenty-Fourteen WordPress Theme is a magazine-style Theme. It includes a customizable, grid front-page template, custom author Page template, and the use of tags to feature content on the front page of the site rather than sticky posts or categories, further stretching the boundaries of the possible with WordPress Themes.
Plugins are custom functions created to extend the core functionality of WordPress. The WordPress developers have maximized flexibility and minimized code bloat by allowing outside developers the opportunity to create their own useful add-on features. As evidenced by the WordPress Plugin Directory , there's a Plugin to enhance virtually every aspect of WordPress.
A Plugin management tool makes it extremely easy to find and install Plugins directly from the official directory.
Another set of terms to examine are those involving the Administration of a WordPress site. A comprehensive set of Administration Panels enables users to easily administer and monitor their blog. A WordPress administrator has a number of powers which include requiring a visitor to register in order to participate in the blog, who can create new posts, whether comments can be left, and if files can be uploaded to the blog. An Administrator also defines Links and the associated Link Categories which are an important part of a blog's connection to the outside world.
Some of the main administrative responsibilities of a WordPress blog involve adding, deleting, and managing Registered Users . Administering users means controlling Roles and Capabilities , or permissions. Roles control what functions a registered user can perform as those functions can range from just being able to login at a blog to performing the role administrator.
Another chief concern for the blog administrator is Comment Moderation . Comments , also called discussions , are responses to posts left for the post author by the visitor and represent an important part of "the give and take" of a blog. But Comments must be patrolled for Spam and other malicious intentions. The WordPress Administration Comments SubPanel simplifies that process with easy-to-use screens which add, change, and delete Comments.
And not to be forgotten is the obligation for an administrator to keep their WordPress current to insure that the latest features, bugs, and security fixes are in effect. To accommodate administrators, WordPress has a simple Upgrade Tool to download and install the latest version of WordPress. There's no excuse to not upgrade!
The final set of jargon relates to helping you with WordPress. First and foremost is the hanging Help tab that is displayed under each of the Administration SubPanels . That contextual help describes the function and use of the current SubPanel and provides links to other help topics. And, there are other help resources available to WordPress users; Getting More Help , Finding WordPress Help , Troubleshooting , and WordPress FAQ (frequently asked questions) are good starting points. Also Getting Started with WordPress will jump-start readers into the world of WordPress and the excellent WordPress Lessons provide in-depth tutorials on many of the aspects of using WordPress. Among the most important resources is the WordPress Support Forum where knowledgeable volunteers answer your questions and help solve any problems related to WordPress. And, of course, this Codex which is filled with hundreds of articles designed to make your WordPress experience a success!
Besides the technical terminology of WordPress, it is also interesting to know the history of the name, WordPress. The name "WordPress" was originally coined by Christine Tremoulet ( see related post ) in response to developer Matthew Mullenweg's desire to associate his new software project with printing presses . In this sense, press refers to the world of reporters, journalists, columnists, and photographers. An aptly chosen name, because WordPress serves as the printing press that enables its users to publish their words.
WordPress is a great product. It's easy-to-use, powerful, and flexible. Creating a website, and maintaining a website, is a science and art that has quickly evolved. In order to fully appreciate this it is important to be well read on the subject. One major thing to keep in mind is your investment of time. Being knowledgeable will without a doubt save you much time in the long run. With that in mind, before you invest your valuable time and energy into installing WordPress, there are some documents you need to read to help you get started.
Suggested reading includes,
Based upon the information you've just read, including instructions on installing WordPress, you should have a list of the things you need and things to do. If not, make that list now. You'll want to make sure it includes the following information:
The following documents will help you understand more about how WordPress works and how to make a plan for your WordPress site:
It is important to make a plan about how you want to use WordPress on your site. Here are some questions to ask yourself:
With this information and your plan, it's time to install WordPress.
With your installation complete, it's time to set up WordPress so it will work the way you want it to work.
To help you understand how all the various features and screens on the WordPress Administration Panels work, check out the Administration Screens guide for a detailed walkthrough.
For help on creating your user profile information, of which some or all may appear on your WordPress Theme, see the Users > Your Profile pages for guidance.
To set the site name and other information, go to Administration > Settings > General .
After you've published a few posts, you can experiment with the full edit or quick edit features in the Administration > Posts > Posts panel.
Add your "About," "Contact," and other information Pages by going to Administration > Pages > Add New.
Want to change the look and feel of your WordPress site? Go to Administration > Appearance > Themes .
Take time to explore the WordPress Codex site, the official documentation site for WordPress. You'll find helpful information by reading WordPress Lessons , and these helpful documents:
Changing the look of your WordPress website is easy with just a few clicks.
At this point, there may be something about your chosen Theme that is bothering you, or, you really want to get your hands dirty understanding how your WordPress Theme works. These simple guides will help you learn about customizing your WordPress Theme:
If you want to create a new WordPress Theme from scratch, or do major renovations, or even design WordPress Themes for public release, you will need to be familiar with HTML, XHTML, and CSS . The following documents will get you started:
If you want a custom-made WordPress Theme created especially for you by expert web-designers, it is recommended you search for qualified web designers on the Internet, or look in your local community.
There are many "add-on" scripts and programs for WordPress called Plugins that add more capabilities, choices, and options to your WordPress site. WordPress Plugins do many things, including customizing the results of your site information, adding weather reports, adding spell check capability, and presenting custom lists of posts and acronyms. For more on how to work with Plugins and where to find WordPress Plugins for your site:
Now that you are familiar with the basic features and functions of how WordPress works, it might be time for you to plunge deeper into the power of WordPress. The links below will expand your familiarity with PHP, HTML, XHTML, and CSS:
As simple and easy as it is to use WordPress, if troubles arise, if something is confusing, if things aren't working, don't despair because help is available! Even though WordPress is free and open source, there are literally hundreds of volunteers eager to help you. Here are some helpful official resources for WordPress:
Now that you're a full fledged WordPress user, consider contributing to the WordPress Codex, Support Forum, Development, and other volunteer efforts that keep WordPress going. WordPress is free and totally supported by volunteers, and your help is needed.
Adding images in WordPress is very easy. All of your images will be stored and can be managed in the Media Library, but you can take several different paths to get there.
The most common path is adding an image directly to a post or page. This automatically saves the image in the Media Library and displays the image wherever you inserted it.
You can also add images directly to the Media Library through the multi-file loader or the single-file loader. For advanced user, you can upload images directly using an FTP Client .
When writing or editing a post, you can add an image using the Add Media button above the editor box. This opens a window that displays the multi-file uploader. From here you can drag and drop your picture or select it using the file selector.
The images you add here will be automatically added to the Media Library.
If you want to upload an image for a future post, from the dashboard go to Media --> Add New. From here you can bulk upload multiple images before you know which post you want them to go into.
If you know what an FTP program is, you can upload images directly to the /wp-content/uploads folder.
For more information, see FTP Client .
WordPress can resize images and create thumbnails.
Refer to the following for more information:

|
| Theme featuring Image in Header. |
You can add images to your WordPress site through the use of template tags , Plugins, and in the stylesheet of your Theme as background images. It is really up to your imagination and web design skills on how you include images in WordPress.
| |
| Gravatar in comments |
In order to take advantage of these new CSS classes for image alignment and the text wrapping around the image, the WordPress Theme must include the following in the style.css found in the WordPress Theme directory.
img.alignright { float: right; margin: 0 0 1em 1em; }
img.alignleft { float: left; margin: 0 1em 1em 0; }
img.aligncenter { display: block; margin-left: auto; margin-right: auto; }
.alignright { float: right; }
.alignleft { float: left; }
.aligncenter { display: block; margin-left: auto; margin-right: auto; }
When adding the image in your WordPress blog, select the image alignment as right, left, or center in the Image/Media Panel.
The image will be embedded into your blog post with the selected style for alignment such as:
<img src="
http://example.com/images/leaf.jpg
"
 alt="leaf graphic"
 title="leaf graphic"
class="alignright size-medium wp-image-3109"
height="25" width="30"/>
Let's start from the beginning with a simple guide to using images in your WordPress blog.
First, here is a look at a typical image tag in your post, without the instructions for wrapping the text around the image. Note that we've added both the title and alt attributes to the tag; alt is important for accessibility, title is for the image tooltip.
<img src="
http://example.com/images/leaf.jpg
"
 alt="leaf graphic"
 title="leaf graphic" />
To begin the process of setting your image up to be wrapped, there are a few changes that you may need to make to the style sheet that controls your WordPress site. CSS offers a great list of resources for creating and editing Cascading Style Sheets.
From your WordPress Theme folder, open the style.css file in a text-editor. Important! Save a back up copy somewhere before you do any edits! Now, do a search for img. Hopefully, all your image selectors will be grouped together. If not, find them all and cut and paste them into one group to make this process easier.
You'll need to decide if you want a border around your images and, if you do, what size, color, and type it should be. For no border, you would use the following:
img {border:0}
![]()
For 1 pixel solid red line border, add:
img {border:solid red 1px}
If you create a link around an image, some browsers will put a border around the image to let the visitor know it's a link. If you don't want that, use the following:
a img {border:0}
You can still add a hover around the image so when the visitor moves their mouse over the image, not only will the mouse pointer turn into a hand, the image will get a colorful border:
a:hover img { border:solid red 1px; }
Let's clean up one more thing to make the image in your content work better with the rest of the styles we will use.
We want to clear all the padding around the images within your content and make sure that the whole width of the image shows up rather than just a part of it. If it isn't in your style sheet, add the following:
p img { padding: 0; max-width: 100%; }
When an image sits on the sides of your text, it helps to have space between the text and the image so the words aren't right up against the edge. As some browsers treat the margins and padding differently, the following styles will accommodate most browser's "space requirements" so the image doesn't overlap the text or any lists that appear inline with the image.
img.alignright { padding: 4px; margin: 0 0 2px 7px; display: inline; }
img.alignleft { padding: 4px; margin: 0 7px 2px 0; display: inline; }
The declaration of display:inline keeps the image inline with the text that you placed it with.
Now, it is time to add the float declaration to the images. BUT WAIT. Why should we waste our left and right floats on just images? Why not use them on anything that we want to sit on the right or left of the page and have the text float around it? You can do that, you know. But that's for another tutorial. We're not going to waste this, so if it isn't there in your style sheet already, add the following:
.alignright { float: right; }
.alignleft { float: left; }
So what about centering the image? Yes, you can still do that too. The center tag isn't valid any more, so you can create a style for centering things:
img.aligncenter { display: block; margin-left: auto; margin-right: auto; }
This sounds like a lot of complicated stuff, but once this is done, you will never have to mess with it again. We hope. To use it, create the link to your image and add class="alignright", class="alignleft", or class="aligncenter" and the image will move to the right, left, or center and the text will wrap around it. It's just that simple.
Some browsers will now allow you to control the size of the text created by the ALT tag. This is the text that appears when you hold your mouse over an image or when the the image fails to load. You can set it to any size, but something much smaller than your content's font size would be a good idea.
img {font-size:60%}
Images tend to just sit there, looking pretty. The alt and title properties say a little something about what the image looks like, but other than that, unless you add some text around it, it just sits there. So create a caption style that adds some "spice."
.wp-caption { margin: 5px; padding: 5px; border: solid 1px #E5E5FF; background: #E5F2FF; font-size:90%; color: black }
In the above example, we've added a border and a little hint of background color, but you can style it however you want. We recommend that you at least make the text a difference size and padding to the overall container so it is distinguished from the rest of the post's content.
<div class="wp-caption alignright">
<img src="
http://example.com/images/leaf.jpg
" alt="leaf graphic" title="leaf graphic">
Red Leaf</div>
In the example above, we just added the alignright class to the container which will position it as a float to the right, allowing the text to flow around it. Using the alignleft class would float it to the left, and aligncenter would give you the text, image centered, text effect.
In the event that the image is larger than the amount of text that would otherwise surround it, causing the image to hang like a flag over some element below it, then at some point in the text, you'll want to clear the display. Note that there is no text inside this division. However, if you use the WYSIWYG editor, it's necessary to put something inside the division (like a hard rule), otherwise the WYSIWYG editor will remove the div entirely (due to an idosyncracy/bug in TinyMCE editor that the WYSIWYG editor uses).
<div style="clear:both;"><br /></div>
To clear the display in a way that works for both the "Text" and "Visual" editors, add this while in the text tab:
<br style="clear: both;" />
The settings under "Avatars" control the images your site displays next to comments. For an introduction to Gravatars, read the WordPress Lesson about How to Use Gravatars in WordPress .
Because spam is pervasive on the Web, some of the comments you receive will most likely be spam. However, WordPress developers and administrators have already developed a number of successful strategies to help you prevent spam comments from appearing on your site. In addition to experimenting with different options in Settings > Discussion , you can install a WordPress Plugin like Akismet or make other changes to help you keep spam comments under control.
Once you have decided on your discussion options, you are ready to enable comments. If you chose not to enable comments on all articles automatically, you can turn on comments for a specific post or Page in several ways.

After navigating to the editing screen for the post or Page you wish to add comments to, find the “Discussion” box and check “Allow Comments.” (If you do not see the “Discussion” box on the edit Page, click “Screen Options” in the upper right corner of the browser window. Make sure the box next to “Discussion” is checked.) Save your changes by clicking “Publish”, “Save Draft” or “Update."

Navigate to the Posts or Pages screen. In the list of Pages or posts, find the one you want and hover your cursor over the title of the post. You will see several links appear underneath the title. Click "Quick Edit" and check “Allow Comments.” Click “Update” to turn comments on for that post.

From the Posts/Pages screen, check the boxes next to the posts or Pages on which you want to enable comments. Select "Edit" from the "Bulk Edit" Dropdown box and click Apply. Then, select "Allow" next in the Comments dropdown box and finish by clicking "update."

Once you start receiving comments on your site, you can check the status of comments quickly by looking at the dashboard, the admin bar, or the left navigation menu. When you log in, the dashboard's "Activity" box will show you the status of your comments. Hover over a comment to see your moderation options. From "Activity - Comments" you can approve, reply, edit, mark as spam, or trash comments. Alternatively, you can look to see if there is a number next to the comment bubble in the admin bar or "Comments" in the left navigation. This number represents how many pending comments require your attention.
WordPress makes moderating your users' comments a simple process. The Comments Screen lays out the basic information about each comment and lets you decide what to do with it.
The Comments screen is divided into three columns: Author, Comment and In Response To. Each of these columns provide you with a different category of information about a particular comment.


Like the posts and Pages screens, the Comments screen supplies a Bulk Action dropdown box. Select the comments you want to edit, and then select Unapprove, Approve, Mark as Spam, or Move to Trash from the dropdown and click "Apply."
Sometimes you can use error messages to generate the keywords needed in your help search. For example:
Warning: main(/home/atlantis/public_html/wp-includes/
functions.php): failed to open stream: No such
file or directory in /home/stargateatlantis/
public_html/wp-settings.php on line 67

Fatal error: main(): Failed opening required
'/home/atlantis/public_html/wp-includes/
functions.php' (include_path='.:/usr/lib/php:
/usr/local/lib/php') in /home/stargateatlantis/
public_html/wp-settings.php on line 67
The keywords you need to help solve the problem are hidden within this information. In particular, the error specifically references the files that are causing the issue: functions.php and wp-settings.php. The names of these files will make up part of your search.
You could try opening the files directly to examine them. However, this may be of limited use. Due to the way that WordPress processes .php files, the given line numbers may not correspond to the actual source of the error.
The specific errors are failed to open stream and failed opening required, with both happening inside the wp-settings.php file. This indicates that the problem is likely with wp-settings.php rather than functions.php. The fact that both errors contain the words "failed" and "open" is another clue.
Armed with this information, create a search in your favorite search engine that includes the words:
wordpress failed open wp-settings.php
This should get you started on narrowing down the problem.
Not all keywords can be found so easily. If the problem is a CSS or HTML issue, you can include the specific tag or selector with which the problem seems to lie. However, it is still advisable to include actual words in your search, as it can be difficult to figure out which tag is causing the actual issue.
You may need to analyze the problem for a minute or two to in order to find the right terms. For example, if your web page layout looks noticeably different in Internet Explorer than it does in another browser, then search for information on Internet Explorer layout bugs. On the other hand, if you have a layout error that remains consistent among browsers, identify the part of the layout that is affected. Is it the sidebar, header, post content, or comments? Likewise, if the header image is not showing up or is not displaying correctly, begin by searching for wordpress header image and then add specifics such as wordpress header image missing to narrow things down.
Brainstorming is a useful technique to use if you are struggling to find suitable keywords. To start, write down the problem you are experiencing, trying to be as descriptive as possible. For example:
I'm having trouble with the nested list in the sidebar of my layout. It isn't lining up the items under the titles right. It is keeping things on the left margin when I want them to be indented.
Your description can be a good source of potential keywords. In the above example, you can find:
All of these terms could be used as search keywords.
Alternatively, explain your problem to a non-WordPress user. Stating the issue in simple terms is an excellent way to get to the heart of a problem and find the right keywords to summarize the issue.
Once you have selected your keywords, it's time to put them to work. As you sort through the search results, you may end up replacing your initial keywords with more specific ones, in order to narrow down the results. For example, while searching for "wordpress sidebar layout nested links", you may discover that the problem lies within the specific theme you are using. Add the name of the theme to your keywords in order to narrow down your search.
Another way to improve the quality of your search results is to search a specific site, rather than the entire internet. Most search engines allow you to run a search across one specific web address, helping you to avoid irrelevant results.
Google, Yahoo, and Bing all support use of the "site:" function while searching. To search a specific domain via one of these search engines, type your keywords and specify the site you want to search using the format "site:[domain]". For example:
keyword1 keyword2 site:wordpress.org
This instructs the search engine to search all wordpress.org sites, such as codex.wordpress.org, wordpress.org/support, and make.wordpress.org.
To narrow your search down to a specific site, such as codex.wordpress.org, enter:
keyword1 keyword2 site:codex.wordpress.org
This instructs the search engine to search only the codex.wordpress.org site, which won't include results from the Support Forums.
Other search engines provide different ways to narrow down searches. Check to see if there is an advanced search option for your favorite search engine, and take your search from there.
You can narrow your search by grouping different keywords together. For example, instead of looking for:
sidebar layout nested list left margin indented
you could group key phrases together with quote marks:
sidebar layout "nested list" "left margin" indented
This would limit your search to anything with the words sidebar, layout, and indented, and the phrases "nested list" and "left margin."
Most search engines also allow you to use Boolean references such as AND, OR and NOT to group keywords together. For example, searching for:
"left margin" OR "nested list"
would return a list of pages containing either the phrase "left margin" or "nested list", as well as pages containing both of those terms.
The best way to find accurate and concise WordPress information is to get it directly from WordPress.org sites. The main places to go for WordPress help and support are:
In short, with a theme that supports Post Formats, a blogger can change how each post looks by choosing a Post Format from a radio-button list.
Using Asides as an example, in the past, a category called Asides was created, and posts were assigned that category, and then displayed differently based on styling rules from post_class() or from in_category('asides') . With Post Formats, the new approach allows a theme to add support for a Post Format (e.g. add_theme_support('post-formats', array('aside')) ), and then the post format can be selected in the Publish meta box when saving the post. A function call of get_post_format($post->ID) can be used to determine the format, and post_class() will also create the "format-asides" class, for pure-css styling.
The following Post Formats are available for users to choose from, if the theme enables support for them.
Note that while the actual post content entry won't change, the theme can use this user choice to display the post differently based on the format chosen. For example, a theme could leave off the display of the title for a "Status" post. How things are displayed is entirely up to the theme, but here are some general guidelines.
John: foo
Mary: bar
John: foo 2
Note: When writing or editing a Post, Standard is used to designate that no Post Format is specified. Also if a format is specified that is invalid then standard (no format) will be used.
|
|
Themes need to use add_theme_support() in the functions.php file to tell WordPress which post formats to support by passing an array of formats like so:
add_theme_support( 'post-formats', array( 'aside', 'gallery' ) );
Note that you must call this before the init hook gets called! A good hook to use is the after_setup_theme hook.
Post Types need to use add_post_type_support() in the functions.php file to tell WordPress which post formats to support:
// add post-formats to post_type 'page'
add_action('init', 'my_theme_slug_add_post_formats_to_page', 11);

function my_theme_slug_add_post_formats_to_page(){
    add_post_type_support( 'page', 'post-formats' );
    register_taxonomy_for_object_type( 'post_format', 'page' );
}
Next example registers custom post type 'my_custom_post_type', and add Post Formats.
// register custom post type 'my_custom_post_type'
add_action( 'init', 'create_my_post_type' );
function create_my_post_type() {
    register_post_type( 'my_custom_post_type',
      array(
        'labels' => array( 'name' => __( 'Products' ) ),
        'public' => true
    )
  );
}

//add post-formats to post_type 'my_custom_post_type'
add_post_type_support( 'my_custom_post_type', 'post-formats' );
Or in the function register_post_type() , add 'post-formats', in 'supports' parameter array. Next example is equivalent to above one.
// register custom post type 'my_custom_post_type' with 'supports' parameter
add_action( 'init', 'create_my_post_type' );
function create_my_post_type() {
    register_post_type( 'my_custom_post_type',
      array(
        'labels' => array( 'name' => __( 'Products' ) ),
        'public' => true,
        'supports' => array('title', 'editor', 'post-formats')
    )
  );
}
In the theme, make use of get_post_format() to check the format for a post, and change its presentation accordingly. Note that posts with the default format will return a value of FALSE. Or make use of the has_post_format() conditional tag :
if ( has_post_format( 'video' )) {
  echo 'this is the video format';
}
An alternate way to use formats is through styling rules. Themes should use the post_class() function in the wrapper code that surrounds the post to add dynamic styling classes. Post formats will cause extra classes to be added in this manner, using the "format-foo" name.
For example, one could hide post titles from status format posts by putting this in your theme's stylesheet:
.format-status .post-title {
display:none;
}
Although you can style and design your formats to be displayed any way you see fit, each of the formats lends itself to a certain type of "style", as dictated by modern usage. It is well to keep in mind the intended usage for each format, as this will lend them towards being easily recognized as a specific type of thing visually by readers.
For example, the aside, link, and status formats will typically be displayed without title or author information. They are simple, short, and minor. The aside could contain perhaps a paragraph or two, while the link would probably be only a sentence with a link to some URL in it. Both the link and aside might have a link to the single post page (using the_permalink() ) and would thus allow comments, but the status format very likely would not have such a link.
An image post, on the other hand, would typically just contain a single image, with or without a caption/text to go along with it. An audio/video post would be the same but with audio/video added in. Any of these three could use either plugins or standard Embeds to display their content. Titles and authorship might not be displayed for them either, as the content could be self-explanatory.
The quote format is especially well suited to posting a simple quote from a person with no extra information. If you were to put the quote into the post content alone, and put the quoted person's name into the title of the post, then you could style the post so as to display the_content() by itself but restyled into a blockquote format, and use the_title() to display the quoted person's name as the byline.
A chat in particular will probably tend towards a monospaced type display, in many cases. With some styling on the .format-chat, you can make it display the content of the post using a monospaced font, perhaps inside a gray background div or similar, thus distinguishing it visually as a chat session.
Child Themes inherit the post formats defined by the parent theme. Calling add_theme_support() for post formats in a child theme must be done at a later priority than that of the parent theme and will override the existing list, not add to it.
add_action( 'after_setup_theme', 'childtheme_formats', 11 );
function childtheme_formats(){
     add_theme_support( 'post-formats', array( 'aside', 'gallery', 'link' ) );
}
Calling remove_theme_support('post-formats') will remove it all together.
If your plugin or theme needs to be compatible with earlier versions of WordPress, you need to add terms named post-format-$format to the "post_format" taxonomy. For example,
wp_insert_term( 'post-format-aside', 'post_format' );
You must also register the post_format taxonomy with register_taxonomy() .
Post Formats: set_post_format() , get_post_format() , has_post_format() , get_post_format_link() , get_post_format_string() , the_post_format_audio() , get_the_post_format_media() , get_content_audio() , the_post_format_chat() , get_the_post_format_chat() , get_content_chat() , add_chat_detection_format() , the_post_format_gallery() , get_content_galleries() , get_post_gallery_images() , the_post_format_image() , get_the_post_format_image() , get_content_images() , the_post_format_quote() , get_the_post_format_quote() , get_content_quote() , the_post_format_url() , get_the_post_format_url() , get_content_url() , the_post_format_video() , get_content_video() , the_remaining_content() , get_the_remaining_content() , get_post_format_meta() , post_format_content_class() , get_post_format_content_class() , post_formats_compat()
Theme Support
:
add_theme_support()
,
remove_theme_support()
,
current_theme_supports()
Theme Features
:
sidebar
,
menus
,
post-formats,
title-tag
,
custom-background
,
custom-header
,
custom-logo
,
post-thumbnails
,
automatic-feed-links
,
html5
,
editor-style
,
content_width
If you are not using Permalinks, how do you link to your posts, categories and Pages?
Using the numeric values such as Post ID, Category ID and Page ID, you can create links as follows.
The Post ID is revealed as part of the URL in the form of "...?post=89", and that URL is displayed in the browser status bar by hovering the mouse over the Post Title of the target Post in the Posts Screen . Insert it in place of the '123' in this link:
<a href="/index.php?p=123">Post Title</a>
The Category ID is revealed as part of the URL in the form of "...&tag_ID=3", and that URL is displayed in the browser status bar by hovering the mouse over the Category Name of the target Category in the Categories Screen . Insert it in place of the '7' in this link:
<a href="/index.php?cat=7">Category Title</a>
The Page ID is revealed as part of the URL in the form of "...?post=15", and that URL is displayed in the browser status bar by hovering the mouse over the Page Title of the target Page in the Pages Screen . Insert it in place of the '42' in this link:
<a href="/index.php?page_id=42">Page title</a>
To link to a given year of a date-based archive, replace the '2015' part of the below link with the required year.
<a href="/index.php?m=2015">2015</a>
You can also link to a specific month by appending the month to the year in the format YYYYMM, or link to a specific day using the format YYYYMMDD.
<a href="/index.php?m=201501">Jan 2015</a>
<a href="/index.php?m=20150101">Jan 1, 2015</a>
If you are providing a link to your site from outside of your site, be sure to specify a full URL to the correct location:
<a href="http://example.com/index.php?p=123">post title</a>
If you have installed WordPress to a subfolder, such as wordpress, don't forget to add the folder to the link URL:
<a href="http://example.com/wordpress/index.php?p=123">post title</a>
If you are using permalinks, you can use all of the above non-permalink techniques, which will work with permalinks enabled or not. If you have enabled permalinks, you have a few additional options for providing links that readers of your site will find a bit more user-friendly than the cryptic numbers.
The complexity of the URL depends on the complexity of your permalink configuration. If your permalink configuration (set on the Options > Permalinks Administration Screen) contains many Structure Tags , then the URL will be more difficult to construct.
For posts, replace each Structure Tag in your permalink structure with the data appropriate to a post to construct a URL for that post. For example, if the permalink structure is:
/index.php/archives/%year%/%monthnum%/%day%/%postname%/
Replacing the Structure Tags with appropriate values may produce a URL that looks like this:
<a href="/index.php/archives/2005/04/22/my-sample-post/">My Sample Post</a>
To obtain an accurate URL for a post it may be easier to navigate to the post within the WordPress blog and then copy the URL from one of the blog links that WordPress generates.
Review the information at Using Permalinks for more details on constructing URLs for individual posts.
To produce a link to a Category using permalinks, obtain the Category Base value from the Options > Permalinks Administration Screen, and append the category name to the end.
For example, to link to the category "testing" when the Category Base is "/index.php/categories", use the following link:
<a href="/index.php/categories/testing/">category link</a>
You can specify a link to a subcategory by using the subcategory directly (as above), or by specifying all parent categories before the category in the URL, like this:
<a href="/index.php/categories/parent_category/sub_category/">subcategory link</a>
Pages have a hierarchy like Categories, and can have parents. If a Page is at the root level of the hierarchy, you can specify just the Page's "page slug" after the static part of your permalink structure:
<a href="/index.php/a-test-page">a test page</a>
Once again, the best way to verify that this is the correct URL is to navigate to the target Page on the blog and compare the URL to the one you want to use in the link.
To permalink to a given year of a date-based archive, append that year to the archive's base link. For example, to link to the year 2015 in an archive with the base link /index.php/archives/ you would use:
<a href="/index.php/archives/2015">2015</a>
You can also permalink to a given month or date by appending month and day values to the corresponding year.
<a href="/index.php/archives/2015/01/">Jan 2015</a>
<a href="/index.php/archives/2015/01/01/">Jan 1, 2015</a>
Permalink structures should begin with a slash, meaning that they are anchored at the root of the site's URL. You should be able to prepend the protocol and server name to any link that begins with a slash to build a successful full URL.
For example, this category link:
<a href="/index.php/categories/parent_category/sub_category/">subcategory link</a>
Becomes this category link using a full URL:
<a href="http://example.com/index.php/categories/parent_category/sub_category/">subcategory link</a>
You can customize your links in the header, footer, or sidebar to be combinations of link types. This example features links to two categories, the main index page, a post, a static page, and uses the Pages template tag.
Note carefully that the wp_list_pages() template tag generates its own List Item (LI) so it doesn't need to be wrapped in a LI tag. This template tag is also set to list only the parent Pages and not their subPages or "children".
<ul id="linklist">
 <li>
  <?php _e('Check It Out'); ?>
  <ul id="pageslist">
   <li>
    <a title="Home Page" href="index.php">Home</a>
   </li>
   <li>
    <a title="Blog" href="index.php?cat=7">Blog</a>
   </li>
   <li>
    <a title="Life Story" href="index.php?p=12">My Life Story</a>
   </li>
   <?php wp_list_pages('exclude=4&depth=1&sort_column=menu_order&title_li='); ?>
   <li>
    <a title="Links and Resources" href="index.php?cat=33">Links</a>
   </li>
   <li>
    <a title="Site Map" href="sitemap.php">Site Map</a>
   </li>
  </ul>
 </li>
</ul>
Using such a customized list, you can also add CSS classes to change the look of each of the links, or style the entire section. It's up to you.
Absolute links define absolutely where to find the target of the link.
Relative links define the location of another document in relation to the current document.
Full URIs of the form http://example.com/wordpress/index.php are absolute links.
Absolute links can also point to your own server. When doing so, you may safely omit the http://domain.com prefix, and link to the target with a full path:
/wordpress/index.php
The leading slash means "At the very top of this domain is a directory named wordpress, and inside this directory is a file named index.php".
A document at
http://example.com/wordpress/index.php
contains a link of the form
/wordpress/index.php
The link above, when clicked, will take the viewer to
http://example.com/wordpress/index.php
Relative links do not start with a slash:
wordpress/index.php
The lack of a leading slash means "Inside the current directory is a sub-directory named wordpress, and inside that directory is a file named index.php".
A document at
http://example.com/wordpress/index.php
contains a link of the form
wordpress/index.php
The link above, when clicked, will take the viewer to
http://example.com/wordpress/wordpress/index.php
Let us consider the case where in our blog where we are editing
http://example.org/blog/2015/01/04/nurds-on-the-loose
From it we can make links
Note 1, 2, and 3 are all valid to achieve the same link. However with 4 there is no shortcut, as we must "climb" all the way into the previous year.
The links are all relative and we need not hardwire in any more knowledge than is necessary, which also will help portability if one day we export the blog elsewhere. (What happens if one day we however pick a different permalink structure via the administration screens is unknown...)
However, the above assumes we are always viewing a single post. If in fact we are viewing that same post in an archive, well, then all our assumptions of where we are now are wrong! So we see that however smart relative linking looks, it has a fatal flaw and cannot be chosen!
For more information on absolute and relative links, see the WebReference Tutorial on Absolute and Relative Links .
Whether you use permalinks or not, in templates you can link to pages or posts dynamically by referring to its unique numerical ID (seen in several pages in the admin interface) with <a href="<?php echo get_permalink(ID); ?>">This is a link</a>. (as shown in Template_Tags/get_permalink )
This is a convenient way to create page menus as you can later change page slugs without breaking links, as IDs will stay the same. However, this might increase database queries.
Dynamic page menus can also be created by utilizing Template_Tags/wp_list_pages child_of parameter or some of the many available plugins.
It seems that only fully qualified links (http:...) are guaranteed to work in all RSS reading environments...
src="/images/c/c0/icon_smile.gif" width="15" height="15" />Text smileys are created by typing two or more punctuation marks. Some examples are:
;-) is equivalent to
![]()
:-) is equivalent to
![]()
:-( is equivalent to
![]()
:-? is equivalent to
![]()
To learn more about emoticons and their history, see the Wikipedia entry on Emoticons .
Although smileys and emoji can both display smiley faces and such, emoji are a newer development and have a much wider range of images that can be displayed. (They are also created differently.) For more information on emoji and how to use them, see the Emoji page.
By default, WordPress automatically converts text smileys to graphic images. When you type ;-) in your post you see
![]() when you preview or publish your post.
when you preview or publish your post.
As of WordPress 4.3, the option to disable graphic smileys was removed from new installs. There is a plugin if you want to retain the option.
Smiley images and the text used to produce them*:
| icon | text | text | full text | icon | full text |
|---|---|---|---|---|---|
|
|
:) | :-) | :smile: |
|
:lol: |
|
|
:D | :-D | :grin: |
|
:oops: |
|
|
:( | :-( | :sad: |
|
:cry: |
|
|
:o | :-o | :eek: |
|
:evil: |
|
|
8O | 8-O | :shock: |
|
:twisted: |
|
|
:? | :-? | :???: |
|
:roll: |
|
|
8) | 8-) | :cool: |
|
:!: |
|
|
:x | :-x | :mad: |
|
:?: |
|
|
:P | :-P | :razz: |
|
:idea: |
|
|
:| | :-| | :neutral: |
|
:arrow: |
|
|
;) | ;-) | :wink: |
|
:mrgreen: |
* In some instances, multiple text options are available to display the same smiley.
Smileys may have been disabled by your Wordpress admin. Another possibility is the smiley image files have been deleted from /wp-includes/images/smilies.
If smileys work for others at your site but not for you:
Type a space before and after your smiley text. That prevents the smiley being accidentally included in the text around it.
![]()
Make sure not to use quotes or other punctuation marks before and after the smiley text.
![]()
The smiley or emoticon image graphics are found in the /wp-includes/images/smilies directory.
Note that smileys is spelled 'eys' in this documentation and the directory name for the smiley images is 'smilies, spelled 'ies'.
![]()
The easiest way is to filter the smilies.
Upload the images you want with the same name to your server (say in wp-content/images/smilies) and put this in your theme's function.php:
add_filter( 'smilies_src', 'my_custom_smilies_src', 10, 3 );
function my_custom_smilies_src( $img_src, $img, $siteurl )
{
    return $siteurl.'/wp-content/images/smilies/'.$img;
}
That will replace http://example.com/wp-includes/images/smilies/icon_question.gif with http://example.com/wp-content/images/smilies/icon_question.gif
If you recently uploaded the images, it could be that the images have been uploaded in ASCII format by your FTP program. Re-upload the smileys ensuring that they are transferred in BINARY format.
Some FTP programs have an auto-detect setting which will upload files in the correct format without user intervention. If you have such a setting, turn it on.
The smiley images in WordPress are automatically given a CSS class of wp-smiley when they are displayed in a post. You can use this class to style your smileys differently from other post images.
For example, it's not uncommon to set up images in a post to appear on the left-hand side of the content with text flowing around the image. The CSS for that might look like this:
.post img {
    float: left;
}
This would typically affect all images in a post, including your smiley images. To override this so that smileys stay inline, you could add this to your CSS:
img.wp-smiley {
    float: none;
}
For more on CSS in WordPress, you might want to start here .
A feed is a function of special software that allows feedreaders to access a site, automatically looking for new content and then posting the information about new content and updates to another site. This provides a way for users to keep up with the latest and hottest information posted on different blogging sites.
There are several different kinds of feeds, read by different feedreaders. Some feeds include RSS (alternately defined as "Rich Site Summary" or "Really Simple Syndication"), Atom or RDF files.
By default, WordPress comes with various feeds. They are generated by template tag for bloginfo() for each type of feed and are typically listed in the sidebar and/or footer of most WordPress Themes. They look like this:
The first four feeds display recent updates and changes to your site's content for the different feedreaders. Of these, the RSS feeds are the most well known. The last feed example is used by RSS 2.0 feedreaders and does not show your site's content. It only shows the comments made on your site.
To track the comments on a specific post, the post_comments_feed_link() template tag is used on single post pages like this:
<?php post_comments_feed_link('RSS 2.0'); ?>
There are ways to modify these feeds, and these are covered in the article on Customizing Feeds .
There are times when you want to tell someone your site's feed address or URL, or you need it to submit it to search engines and directories, many of which now accept feed URL submissions. There are four possible URLs for each of your feeds. Any of these will work.
http://example.com/?feed=rss
http://example.com/?feed=rss2
http://example.com/?feed=rdf
http://example.com/?feed=atom
If you are using custom permalinks , you should be able to reach them through this usage:
http://example.com/feed/
http://example.com/feed/rss/
http://example.com/feed/rss2/
http://example.com/feed/rdf/
http://example.com/feed/atom/
Your site has feeds for all comments on the site, and each post has its own comment feed.
Permalink format:
http://example.com/comments/feed/
Default format:
http://example.com/?feed=comments-rss2
Permalink format:
http://example.com/post-name/feed/
Default format:
http://example.com/?p=33&feed=rss2
You can also provide feeds to only specific categories or tags on your site by adding the following to the end of the link:
http://www.example.com/?cat=42&feed=rss2
or
http://www.example.com/?tag=tagname&feed=rss2
or
http://www.example.com/category/categoryname/feed
or
http://www.example.com/tag/tagname/feed
You can include posts from one of multiple categories or tags in a feed by comma-separating their values. For example:
http://www.example.com/?cat=42,43&feed=rss2
or
http://www.example.com/?tag=tag1,tag2&feed=rss2
or
http://www.example.com/category/cat1,cat2/feed
You can include posts from all of multiple categories or tags in a feed by adding to the end of the link. For example:
http://www.example.com/category/cat1/category/cat2/feed
or
http://www.example.com/tag/tag1/tag/tag2/feed
You can exclude categories from the feed by using something like this:
http://www.example.com/?cat=-123&feed=rss2
Older versions of WordPress used a format such as but this has been deprecated in newer versions.
http://example.com/wp-rss2.php?cat=42
Every author has an RSS feed for their posts. Here is the format:
http://example.com/author/authorname/feed/
Search results can also have their own feed. Here is the format:
http://example.com/?s=searchterm&feed=rss2
Not all WordPress Themes feature all of the RSS Feed types that are available through WordPress. To add a feed to your site, find the location of where the other feeds are, typically in your sidebar.php or footer.php template files of your Theme. Then add one of the tags listed above to the list, like this example:
<ul class="feeds">
    <li><a href="<?php bloginfo('rss2_url'); ?>" title="<?php _e('Syndicate this site using RSS'); ?>"><?php _e('<abbr title="Really Simple Syndication">RSS</abbr>'); ?></a></li>
    <li><a href="<?php bloginfo('atom_url'); ?>" title="<?php _e('Syndicate this site using Atom'); ?>"><?php _e('Atom'); ?></a></li>
    <li><a href="<?php bloginfo('comments_rss2_url'); ?>" title="<?php _e('The latest comments to all posts in RSS'); ?>"><?php _e('Comments <abbr title="Really Simple Syndication">RSS</abbr>'); ?></a></li>
</ul>
Many people like to have a graphic representing the feed instead of words. There are now
standards
for these graphics or "buttons", but you can
make your own
to match the look and colors on your site.
![]()
To add a graphic to your feed link, simply wrap the link around the graphic such as:
<a href="<?php bloginfo('rss2_url'); ?>" title="<?php _e('Syndicate this site using RSS'); ?>"><img src="http://www.mozilla.org/images/feed-icon-14x14.png" alt="RSS Feed" title="RSS Feed" /></a>
If you are currently using other webblog software and are changing to WordPress, or are moving your weblog to a new location, you can "forward" RSS readers to your new RSS feeds using file rewrites and redirects in your .htaccess file.
Edit the .htaccess file in your root folder; if no file exists, create one.
Here is an example for a b2 feed:
RewriteRule ^b2rss2.php(.*)? /wordpress/?feed=rss2 [QSA]
Here is an example for MovableType Users:
RewriteRule ^index.xml(.*)? /wordpress/?feed=rss2 [QSA]
Feed Director provides rewrite rules for common feed filenames used by other blogging platforms, such as index.xml, index.rdf, rss.xml, rss2.xml, atom.xml, *.xml, via an easy-to-use "install it and forget it" plugin.
WordPress adheres to the RSS specifications . This means that the time and date format will NOT use your blog time/date format as set in your settings, instead it uses the time and date format from the RFC822 specification . This looks for example like this: Sun, 06 Sep 2009 16:10:34 +0000
Note: The time/date format of feed should NOT be localized since the the current RSS specifications are referring to RFC822 specification which specifies English as a default. This implies that every RSS consumer should take care of translating time/date according to its locale.
A feed is a stream of data meant to be interpreted by a feed reader, like NewsBlur or RSSOwl . Not all browsers have the capability to interpret feeds, and one of the most popular browsers lacking this feature is Google Chrome.
Users of Chrome and other similar browsers will notice a "This XML file does not appear to have any style information associated with it. The document tree is shown below." error followed by the raw feed. This is normal, as Chrome was not built to interpret feeds. Instead, subscribe to the feed in a real feed reader, or install Google's RSS Subscription Extension .
The following feed templates are included with WordPress:
There are a variety of ways to customize your feeds, through the use of third-party software you install and add-on to your WordPress site, or by manually changing the feed templates to meet your needs.
Editing your feed templates is much the same as editing your theme templates. However, feed templates are not integrated into the WordPress theme system; if you would like different versions of your feeds, you'll need to create extra feed templates.
The Feed templates are located in the /wp-includes/feed-{type}.php files and include formats for rdf, rss, rss2 and atom. They are triggered by feed rewrite rules using a series of actions defined in
wp-includes/functions.php
and attached using
add_action
in
wp-includes/default-filters.php
.
In order to override with your own templates it will be required to clear the default actions, then take appropriate steps to call get_template_part .
An example of using a template for the default RSS2 feed as well as a custom post type named "photos":
/**
 * Deal with the custom RSS templates.
 */
function my_custom_rss() {

	if ( 'photos' === get_query_var( 'post_type' ) ) {
		get_template_part( 'feed', 'photos' );
	} else {
		get_template_part( 'feed', 'rss2' );
	}
}
remove_all_actions( 'do_feed_rss2' );
add_action( 'do_feed_rss2', 'my_custom_rss', 10, 1 );
Many specialized template tags exist specifically to format your content in a way that complies with the RSS standards. They include:
Some third-party web services can help you manage and customize your feeds. Using such services can be a simple way to do things like counting the number of people who read your feed, or combining your blog's feed with your Flickr photostream.
Such services include:
To see your new feed, you can use any of the many feed readers available on the Internet. While your feed might look good to you in the different readers, it might still have problems.
Feed formats are designed to be read and manipulated by machines; errors in your feed template can make your feed unreadable to some or all feedreaders. So after you make all your changes, it's a good idea to check that your feed meets the relevant standards. Validation services include:
![]()
WordPress integrates Gravatars into every WordPress site. Once registered with Gravatar , the service matches your WordPress profile information to the email address registered with Gravatar and displays your custom Gravatar image next to comments and (optionally) elsewhere on the WordPress site. If you choose not to sign up with Gravatar, the default icon set by the Administrator appears next to your name.
Providing your users with avatars has become a convention in web-publishing. Enabling Gravatars on your WordPress site simplifies the process for everyone involved. While it is possible to use a WordPress Plugin to manage user avatars on your WordPress-run site, using Gravatars on your site makes less work for both you and your site’s users.
To start using Gravatars on your site:
Starting with WordPress 2.7, when you retrieve the comments on a post or page using wp_list_comments , WordPress will automatically retrieve your users' Gravatars. If you would like to retrieve a user's Gravatar without retrieving comments, you can use get_avatar .
Using wp_list_comments allows you to customize how WordPress outputs your comments in your theme. It also controls the size of the Gravatar attached to the comments. By default, Gravatars are displayed at 32px x 32px. To change the size of the Gravatar, you can use the ‘avatar_size’ argument with wp_list_comments .
For example, to return a 50px x 50px Gravatar, you would call wp_list_comments like this:
<?php wp_list_comments( array( 'avatar_size' => '50' ) ); ?>
get_avatar works slightly different. The first argument you pass it must be a user's ID, email address or the comment object. You can then specify the size of the returned Gravatar, the URL for the default image you want to display if a user does not have a Gravatar, and the alternate text for the Gravatar image.
This will return a 50px x 50px Gravatar:
<?php echo get_avatar( 'email@example.com', 50 ); ?>
Because you can retrieve Gravatars with or without comments, you need to be specific with your CSS classes when styling Gravatars. When WordPress returns Gravatars, it assigns them the .avatar class. However, you don’t want to only target the class .avatar because it is generated in different contexts. For example, when you hover over the Gravatar in the WordPress admin bar, the Gravatar that appears has the .avatar class. If you were to change the CSS for the .avatar class, you would alter the style of both the Gravatar in your theme's comments and admin bar.
As the Twenty Eleven theme demonstrates, you can simply use an additional class to target a specific instance of a Gravatar.
This will change the display of Gravatars only in the Twenty Eleven theme's comments:
.comment-list .avatar {
	/*Insert
	Your
	Styling
	Here */
}
If you don’t want to use any of the default images for users not registered with Gravatar, you can easily add your own by adding a filter to the avatar_defaults hook.
After uploading the new image to your theme files, add this to your theme’s function.php file:
<?php
add_filter( 'avatar_defaults', 'new_default_avatar' );

function new_default_avatar ( $avatar_defaults ) {
		//Set the URL where the image file for your avatar is located
		$new_avatar_url = get_bloginfo( 'template_directory' ) . '/images/new_default_avatar.png';
		//Set the text that will appear to the right of your avatar in Settings>>Discussion
		$avatar_defaults[$new_avatar_url] = 'Your New Default Avatar';
		return $avatar_defaults;
}
?>
Now, go to Settings > Discussion and select your new avatar from the list.
![]()
From now on, all your users that don't use Gravatar will have this avatar next to their comments.
![]()
If you want to use Gravatar’s Hovercard feature, like on WordPress.com, you can install the Jetpack Plugin.

This is an example which mentions code within a paragraph,
namely the functions <code>wp_title()</code>,
<code>wp_content()</code> and <code>wp_footer()</code>,
which are very useful in WordPress.
This is great for making a piece of non-HTML text look like code, but what about HTML tags that you want to showcase?
In the header.php template file,
look for the <code><div class="header"></code>
section to change the <code><h1></code> heading.
Using the <code> tag doesn't tell WordPress to encode HTML markup within the tag or strip it from the post. WordPress thinks that you are using this markup for formatting, leaving it untouched. A web browser then sees a <code> tag followed by a <div> tag and so it responds by creating a new container in your web page. Similarly afterwards, it sees the start of an <h1> tag which will screw up your entire web page layout and design, like this:
To avoid this behavior, use character entities or extended characters to represent the left and right arrow characters in a way that is not recognized as the beginning and end of an HTML tag by a web browser, like this:
In the header.php template file, look for the <code><div class="header"></code> section to change the <code><h1></code> heading.
By default, WordPress will turn any phrase that begins with http: into a link. If you are giving an example of how to link to a specific post within a WordPress site, instead of using the link with http://example.com/index.php?p=453 and having it turn into a link, you can use extended characters for the slashes, so WordPress won't "see" the link.
...link to a specific WordPress post using <code>http://example.com/index.php?p=453</code> in your post....
Here is a list of some HTML character entities related to the topic of this article:
< = < or < > = > or > / = / ] = ] [ = [ " = " or " ' = ' “ = “ or “ ” = ” or “ ‘ = ‘ or ‘ ’ = ’ or ’ & = & or &
There is a list of resources below which will help you turn HTML tags into character entities automatically, so you don't have to memorize these character codes.
To set your code aside so that it looks like a box of code which may be copied and pasted within other code or template file, you can use the <pre> HTML tag.
The <pre> tag instructs the browser to use a monospaced font, but to exactly reproduce whatever is inside of the <pre> tags. Every space, line break, every bit of code is exactly reproduced.
<h3>Section Three Title</h3>
<p>This is the start of a
<a title="article on relationships" href="goodtalk.php">
good relationship</a> between you and me....
Using the <pre> tag isn't very "pretty" but it does the job. Examples of how to style it can be found in the next section. Still, it showcases the code exactly.
By exactly, we mean EXACTLY. If you have a long line of code, it will run off the page because there are no instructions which tell the code to wrap. It won't. Here is an example:
<h3>Section Three Title</h3><p>This is the start of a <a title="article on relationships" href="goodtalk.php">good relationship</a> between you and I and I think you should read it because it is important that we have these little <a title="article on communication" href="communication.php">conversations</a> once in a while to let each other know how we feel....
Not pretty, is it. To avoid this screen run-off, put in line breaks. Unfortunately, deciding where to put those line breaks in when you are showcasing code that will be copied makes it a difficult decision.
If you are familiar with programming language, you will know when a line break won't mess up a line of code, so choose there. If you are unfamiliar with where to put line breaks, experiment. Put the code in, make the line breaks, and then test the code. If it works, then use the line break there. If not, change the line break position.
If you have long lines of code, consider showcasing only excerpts and providing a link to the full code placed on your site in a text or PHP file, or using one of the many online pastebins which are available for temporarily showcasing code.
Writing code within a WordPress post can be a challenge, maybe forcing you to override the WordPress default styles and to use filters which "fix" what we write. If you are having trouble with writing code within your WordPress post, this section might help.
A frequent problem when using codes within your post is the quotes auto-correction feature of WordPress, mostly known from word processing software. By default, when serving a web page, WordPress converts the "straight" quotes into the opening and closing “curly” quotation marks according to your WordPress installation language set in the wp-config.php file. Note that the auto-correction (also called smart quotes) feature is applied regardless of whether you have written the quotes in visual or HTML post editor.
In HTML post editor, you can avoid this problem by wrapping the quotes with the <code>, <tt> or <pre> tags. Other solution is replacing quotes with their respective character entities, e.g. using:
<code><p class="red"></code>
instead of:
<p class="red">
Note that in some older versions of WordPress, if you edited a page again after publishing it, the HTML editor replaced all these entities with their literal equivalents. For example, if you carefully used " for your quotes, they would have come back as ", and if saved, the auto-correction feature would have an effect on them.
By default, using the <code>, <tt> and <pre> tags will put the text in a monospaced font and use the font-size from the <body> tag. What if you want the font-size to be different, and the look of these tags to also have a different color or style to them?
Add styles for these two tags to your style.css stylesheet file located in your current WordPress theme directory. You can use these styles:
pre, code{
	direction: ltr;
	text-align: left;
}
pre {border: solid 1px blue;
	font-size: 1.3 em;
 	color: blue;
	margin: 10px;
	padding:10px;
	background: #FFFFB3}
code {font-size:1.2em;
	color: #008099}
Using the <code> tag would then look like this and the <pre> tag would look like this:
pre, code{
direction: ltr;
text-align: left;
}
pre {border: solid 1px blue;
font-size: 1.3 em;
color: blue;
margin: 10px;
padding:10px;
background: #FFFFB3}
code {font-size:1.2em;
If you consistently use a lot of formulas, functions, and programming code in your posts, consider using a plugin or PHP tool to make the entire process easier. If you tend to post a LOT of code blocks, consider pasting the code in a Paste Bin and linking to it on your site.
WordPress also offers two less public options for your post's Content Visibility . Clicking the "Edit" link next to Visibility: Public reveals three radio buttons:
When you're done editing the post's visibility, click the "OK" button. You should now see your post's new setting, e.g., Visibility: Password Protected. Remember: a setting change does not take effect until you click the "Publish" button (or "Update" if the post is already published.)
Only an Administrator, Editor, or the post's Author can change a post's password or visibility setting. To do so, use the "Visibility: Edit" link again. These settings are also available using the post's Quick Edit link in the All Posts Screen.
The Visibility "Edit" link (or "Quick Edit") is also a good way to reveal a forgotten post password.
So, a password-protected post with a title of "My Post" would display like this:

WordPress stores this password in a browser cookie so readers don't have to re-enter passwords if they visit the same page multiple times. Furthermore, if multiple posts use the same password, the reader will only have to enter the password once to access every post (see caveat below).
WordPress will only track one password at a time. Therefore, if two posts use two different passwords, entering the password for post A, then entering the password for post B means that revisiting post A (or any post which shares its password) will require the user to re-enter the password for post A.
WordPress does not print a password-protected post's Content or Excerpt until the correct password is entered. But a post's Custom Field(s) data is not protected, and can still show. To stop CFs from printing, wrap your get_post_meta calls (e.g., in single.php or page.php) with a conditional statement using: post_password_required . This one WordPress function checks both whether your post requires a password and whether the correct password has been provided:
<?php
if ( ! post_password_required() ) {
    // Code to fetch and print CFs, such as:
    $key_1_value_1 = get_post_meta( $post->ID, 'key_1', true );
        echo $key_1_value_1;
}
?>
The post_password_required function within in an if statement is also handy for other customizations, such as preventing password-protected posts from displaying in a list.
With WordPress Filters you can: change the default text in the password form, change the default text for the password-protected post Excerpt, and insert the password form into the post Excerpt. To do so, add the following code to your custom plugin file.
The password form displays this default message: "This post is password protected. To view it please enter your password below:" The following code will return the form with different text and different html structure — in this example the custom message is: "To view this protected post, enter the password below:"
<?php
function my_password_form() {
    global $post;
    $label = 'pwbox-'.( empty( $post->ID ) ? rand() : $post->ID );
    $o = '<form action="' . esc_url( site_url( 'wp-login.php?action=postpass', 'login_post' ) ) . '" method="post">
    ' . __( "To view this protected post, enter the password below:" ) . '
    <label for="' . $label . '">' . __( "Password:" ) . ' </label><input name="post_password" id="' . $label . '" type="password" size="20" maxlength="20" /><input type="submit" name="Submit" value="' . esc_attr__( "Submit" ) . '" />
    </form>
    ';
    return $o;
}
add_filter( 'the_password_form', 'my_password_form' );
?>
Please note: the my_password_form function must return a value: don't use print or echo.
Make sure to set the maxlength parameter to a value of 20 when replacing the password protection form as WordPress will only save the first 20 characters due to database constraints.
The default Excerpt of a password-protected post is: "There is no excerpt because this is a protected post." This code will replace that text with your own — HTML allowed:
<?php
function my_excerpt_protected( $excerpt ) {
    if ( post_password_required() )
        $excerpt = '<em>[This is password-protected.]</em>';
    return $excerpt;
}
add_filter( 'the_excerpt', 'my_excerpt_protected' );
?>
Replace "<em>[This is password-protected.]</em>" with your custom password-protected Excerpt message.
Another option for your protected Excerpts is to print out the password form instead of the Excerpt message. That way people enter the password right from an index or archive page. Then, when they click the Title link, they'll see the Content. With the get_the_password_form function, you can make the password form be the Excerpt for a password-protected post:
<?php
function my_excerpt_password_form( $excerpt ) {
    if ( post_password_required() )
        $excerpt = get_the_password_form();
    return $excerpt;
}
add_filter( 'the_excerpt', 'my_excerpt_password_form' );
?>
This will get the default Wordpress password form and text or
any customizations
you've made. For a better understanding of how post_password_required() and get_the_password_form() work, read their function definitions in
wp-includes/post-template.php
.
In this same WordPress core file you'll also find the the_excerpt and the_password_form filters, and the functions get_the_excerpt() , get_the_title() , and get_the_content() . These functions control how a post's title, excerpt and content display, depending on its visibility setting.
Sometimes, you don't want your password protected posts to show up on other places around your site, like on the home page or archive pages. To effectively hide them from these pages without affecting your pagination, place the following code in your custom plugin file:
<?php

// Filter to hide protected posts
function exclude_protected($where) {
	global $wpdb;
	return $where .= " AND {$wpdb->posts}.post_password = '' ";
}

// Decide where to display them
function exclude_protected_action($query) {
	if( !is_single() && !is_page() && !is_admin() ) {
		add_filter( 'posts_where', 'exclude_protected' );
	}
}

// Action to queue the filter at the right time
add_action('pre_get_posts', 'exclude_protected_action');

?>
This code works in two parts: the first part effectively removes any password protected posts directly from any SQL query that WordPress is running, using the posts_where filter . The second part adds this filter to all pages except single posts, pages, and admin pages.
For more information on why pre_get_posts is the right action for this function, see the pre_get_posts action reference .
See https://developer.wordpress.org/reference/hooks/post_password_expires/
First Steps With WordPress • Stepping Into Template Tags • Lessons: Designing Your WordPress Site • Template Tag Lessons • Lessons on WordPress Features and Functions • Template Lessons • WordPress Tech Lessons • Website Development Lessons • Validating a Website • Know Your Sources • WordPress Housekeeping • WordPress Site Maintenance • More WordPress Lessons
https://codex.wordpress.org/Administration_Panels" title="Administration Panels" class="mw-redirect">Administration > Settings > General panel, and WordPress does the rest.In its simplest form, the WordPress Classic Theme features the header code like this in the wp-content/themes/classic/header.php template file:
<h1 id="header">
<a href="<?php bloginfo('url'); ?>"><?php bloginfo('name'); ?></a>
</h1>
The header is set in an h1 HTML tag and features one template tag used with two different options or parameters. You can learn more about these parameters in the documentation for bloginfo() . Basically, the first one displays the URL of the website in a link, and the second one displays the name of the blog or website as set in the Administration > Settings > General panel. When the user moves the mouse over the header title, the header can be clicked to return back to the main or front page of the site as set in the Administration > Settings > General panel.
The WordPress Default Theme features an image in the background and presents the header like this in wp-content/themes/default/header.php:
<div id="header">
 <div id="headerimg">
   <h1>
    <a href="<?php echo get_option('home'); ?>">
       <?php bloginfo('name'); ?></a>
   </h1>
     <div class="description">
       <?php bloginfo('description'); ?>
     </div>
  </div>
</div>
Again, the template tag featuring the name of the blog or website is in a link, but this shows another usage similar to the URL request above. It gets the same information, just in a different way. It also adds the description of the site from the Administration > Settings > General panel.
Basically, these two header examples do the same thing in different ways. They provide information in the header, with the potential for an image, and make the header title clickable to help navigation on the site. It is just a matter of how much information you want in your header, and how that information is displayed.
Using the first example from the Classic Theme, an image can still be used in the background, set within the style sheet in the h1 selector, but the second one gives more control to the use of an image in the header by giving it its own division. How these look are totally controlled by the style sheet.
As listed in the two above examples, the styles for the header are contained within the h1, header, headerimg, and description CSS selectors. These are all found within the style.css, though may be found in the styles in the header.php of the Theme you are using. You will have to check both places.
In the Classic Theme, the CSS for the header are found in one selector, the #header.
#header {
	background: #90a090;
	border-bottom: double 3px #aba;
	border-left: solid 1px #9a9;
	border-right: solid 1px #565;
	border-top: solid 1px #9a9;
	font: italic normal 230% 'Times New Roman', Times, serif;
	letter-spacing: 0.2em;
	margin: 0;
	padding: 15px 10px 15px 60px;
}
The background color is set to a green shade and there is a border all the way around the header which changes colors creating a recessed, shadow effect. The Times font is set with a size of 230% with a wider than normal letter spacing. The padding on the left side indents the text in from the left.
All of these can be easily changed, giving the border a thicker width and making it all the same color, changing the background color, the font size and style, the letter spacing, and more by modifying the information in each style attribute.
The same is true of the Default WordPress Theme header, except there are more styles to think about and they are found within the header.php's "head" tag and the style.css, though once you have your styles set, you can move the information into your style sheet.
The styles that control the header's look is found within the h1, header, headerimg, and description CSS selectors. Just like the Classic Theme, find these references and make your modifications there to change the look.
Changing the header image of the Default WordPress Theme has been simplified with the introduction of a utility called Kubrickr . It simply asks you to supply a new image file name for the header and then switches it for you, so you do not have to dig into the code. If all you want to change is the header image, this is an extremely useful and easy tool.
If you do want to get your hands into the code, dig into your header styles and make the changes. Below is a simple tutorial on changing just the header image manually.
There are many different header images and header art available for you to use to change the image in the header. The styles for the header image for the Default or Kubrick WordPress Theme, and any Theme based upon that Theme, are more complicated to change than those for the Classic Theme. The styles are found within the styles in the header.php "head" section, as well as in the styles.css. To change only the header image reference, open the header.php template file and look for the styles like this:
#header {
  background: url("<?php bloginfo('stylesheet_directory'); ?>/images/wc_header.jpg")
  no-repeat bottom center; }
#headerimg  {
  margin: 7px 9px 0;
  height: 192px;
  width: 740px; }
To change the image file, replace the "kubrickheader.jpg" with the name of the new graphic image you have uploaded to your site to replace it. If it is in a different directory, change that by replacing the bloginfo() tag with the specific address of the graphic's location.
If you are using an image that is the same size, then simply replace the image. If it is a different size, fill in the height and width of the image in the next section called #headerimg. If you do not know, and are using Windows, view the folder in which the image resides on your computer in Thumbnail view mode. Click View > Thumbnail from the Windows Explorer menu. In Thumbnail view mode, find your image and hold the mouse over it. A small balloon tip will pop up listing the dimensions. Use that information in the styles. Otherwise, just right click on the image file and choose Properties and it should give you the file size and dimensions.
Save the template file and upload it and the image to your website and take a look . Some changes may need to be made to fine-tune the placement and look.
With the header image in place, it is time to tackle the rest of the header. Open your style.css style sheet file and look for the following:
Your Theme may or may not have all of these, but the Default Theme has all of them in different places within the style sheet. All or some of these may need to have the attributes changed to change the look of your header.
If you change the size of the header image or header art, be sure and change the other structural CSS selectors like content and sidebar to accommodate the change in the header size.
A header image that fits within the Default WordPress Theme is about 192 x 740 pixels. If you are replacing the header within any WordPress Theme, check the size of the header image and then find a replacement that matches that size. If you choose a header image that is smaller or wider or taller than the replacement, you may have to modify the other structural elements of the web page to allow for the change in size of the header.
If you are modifying the entire site's Theme, the width of the overall page or content area needs to be taken into consideration for the header image's size. The two most common screen sizes are 1024x768 and 800x600 pixels. Yet, wide screen monitors are gaining ground and web designers now need to prepare for screen widths of 1280x1024 and 1600x1200.
If you set your website to "float," positioned in the middle of the browser window with space on either side, then you can set your header width to whatever you want. If you are designing a Theme with a flexible or "elastic" screen width, then the width of your header becomes important.
If you are using a header image that can be repeated, and you are using elastic widths, you can set the styles within the header to repeat to fill the space:
#header {
background: url("/images/kubrickheader.jpg")
repeat-x top left; }
This sets the header image to repeat horizontally beginning from the top left corner and going across. You can adjust these to whatever background position your header design and layout needs.
A new term growing in the web design field is header art. These are header images that are usually handmade using combinations of color, shapes, symbols, images, and text. They can take some time and labor to create. While there are some free header art sites , some sites sell their handmade header art. Although a photograph may be unique in its own way and convey the needed visual style, handmade header artwork is easier to match to other web page colors and is usually more aesthetically pleasing because of its distinctive nature.
Choosing pre-made header art has some benefits. The artists have already done the work and all you have to do is choose the design that best matches your website. And the graphic is ready to use, already sized and saved as a small file size.
Digital Westex's WordPress Header Art features a wide range of header art sized and ready for free download specifically for WordPress.
The best header art to use, if you do not want to generate your own, is any that bear the Creative Commons License that specifically allows its public use. Read the individual license for the image's use to make sure that you have permission to use the header art on your site. Usually you must attribute the author, share alike and not use it for commercial purposes. If in doubt, always ask permission from the author before use.
As header art is made and licensed "as is" by the designer/artist, some header art cannot be modified without the artist's permission. Check the website copyrights and licenses and ask if you are in doubt and wish to modify the artwork.
You can also design your own header art. Any graphic design software program will work. Popular ones include Adobe Photoshop, Adobe Elements, JASC PaintShop Pro, The Gimp and Macromedia Fireworks. The graphic design software should have the ability to resize and control the resolution and type of the image when saved. The size of your header art should be the size of the header container you're going to put it in.
You can use your own photographs, artwork, fonts, and any combination of images to create your header art. When done, save it "for the web" as a jpg, gif, or .png file. For an explanation on which to use read Sitepoint's GIF-JPG-PNG What's the Difference article. These file types will compress the image's resolution, reducing the file's size. In general, avoid file sizes larger than 50K as larger sizes tend to slow a site access times.
Many Themes and Theme designers want to feature their header with a picture only, no text. Some will put the text in the graphic image, therefore not requiring the actual use of the text. One option is to remove the template tags that generate the title and description. The other option is to leave it in, but hide it.
To hide the header text while leaving it in the code, do not change anything in your template files. Only change the CSS. Add display:none to the CSS selectors you do not want to appear. For example, to hide the text within the h1 selector:
h1 {display:none; font-size: 230%; color: blue;.......
It is still there, but the browser has been commanded to not show it in any way. The container literally is "not there."
It might be hidden, but some web page screen readers and search engines will still find the information. If you are serious about making your site be accessible, some newer text readers access the style sheet and do not read the elements marked display:none. There are two popular methods for working around this. One is to use the display:none as outlined above, but also include an aural style sheet that changes that selector to display:block, "turning the visibility" back on. The other method is to position the content literally "off the page" by a negative indent. Here is an example:
h1 {
   font-size: 0;
   text-indent: -1000px; }
This technique moves the entire h1 tag and its contents physically off the web page. The screen reader will still "read" the text because it is there, but it will not display on the page. Extensive testing has proven so far that this technique works across most browsers and with all screen readers.
For more information on either technique and aural style sheets:
To make the entire header, graphic and all, clickable, you must put the header graphic inside of a link. There are two ways to do this. You can put the graphic directly into the WordPress Theme manually, or you can use the stylesheet to define the link size area to encompass the header art area.
To make the header art clickable by embedding it into the header, in the wp-content/themes/classic/header.php template file of your WordPress Theme, change the following:
<div id="header">
     <h1><a href="<?php bloginfo('url'); ?>/">
     <?php bloginfo('name'); ?></a>
</h1>
</div>
to this code snippet:
  <div id="header">
    <a href="<?php bloginfo('url'); ?>">
  <img src="http://example.com/headerimage.jpg" alt="<?php bloginfo('name'); ?>" />
    </a>
     <h1><a href="<?php bloginfo('url'); ?>">" title="<?php bloginfo('name'); ?>">
         <?php bloginfo('name'); ?></a>
     </h1>
You can style the h1 heading to overlap or sit below, or not even be visible in the header.
To make the overall area of the header clickable, the header must have a width area set for the h1 anchor HTML tag to make the clickable area cover the header image in the background. The styles are set in the stylesheet.
The HTML and WordPress Template Tags look like this, the same as above:
<pre><div id="header">
     <h1><a href="<?php bloginfo('url'); ?>/">
     <?php bloginfo('name'); ?></a>
</h1>
</div>
The CSS would then be styled something like this to enlarge the clickable link area and hide the header text (optional), customized to your own design needs.
#header h1 a {
	width: 400px;
	height: 100px;
	display: block;
	background: url(images/headerimage.gif) no-repeat top left;
	}
#header h1 a span { display: none; }
Another option is to add a script to make the header section clickable, which may not work for all browsers. This is showcased in the Default WordPress Theme (Kubrick) with its clickable header:
<div id="header" onclick="location.href='http://example.com/';" style="cursor: pointer;">
If you want both text areas of the header to be clickable and not the entire header image, use the following to make the header art and the blog title and description clickable.
<div id="header">
 <div id="headerimg">
   <h1>
     <a href="<?php echo get_option('home'); ?>">
       <?php bloginfo('name'); ?>
     </a>
   </h1>
 <div class="description">
   <a href="<?php echo get_option('home'); ?>">
     <?php bloginfo('description'); ?>
   </a>
  </div>
 </div>
</div>
There are several scripts available that will allow you to rotate images within the header, sidebar, or on any template file. We will examine the use of one of these, the Random Image Rotator .
Save the script to a separate folder in which you have the header images you wish to rotate in your header. For this example, call it rotate.php. To use this as a background image that changes or rotates with every load of the web page:
#header {
background: url("/images/headerimgs/rotate.php")
no-repeat bottom center; }
To actually put this in your header, or elsewhere on your site, add an image link like this within the header division:
<img src="/images/headerimgs/rotate.php" alt="A Random Header Image" />
Image rotating scripts include:
Headers are another area where you can add navigation elements to your website. Typically these are horizontal menus at the top or bottom of your header. To add these, create a new division within the header to style your header navigation elements.
This can be as simple as displaying your categories across the top of the header using one of the List Categories template tags . Let us look at one example using the list_cats() tag.
In this example, the list_cats() template tag is set to sort the list of categories by ID in an unordered list (<ul><li>) without dates or post counts, does not hide empty categories, uses category "description" for the title in the links, does not show the children of the parent categories, and excludes categories 1 and 33. It sits in its own "category" division. Notice that a link to the "home" page or front page has been included manually at the start of the list.
<div id="header">
<div id="categorylist">
<ul><li>
<a title="Home Page" href="index.php">HOME</a></li>
<?php list_cats(FALSE, '', 'ID', 'asc', '', TRUE, FALSE,
FALSE, FALSE, TRUE, FALSE, FALSE, '', FALSE,
'', '', '1,33', TRUE); ?>
</ul>
</div><!-- end of categorylist -->
<h1><a href="<?php bloginfo('url'); ?>"><?php bloginfo('name'); ?></a></h1>
</div><!-- end of header -->
To style this list, the #categorylist in the style.css might be:
#categorylist {font-size:12px; font-style:normal;
        text-transform:uppercase; }
#categorylist ul {list-style-type: none; list-style-image:none;
        margin:0; padding-bottom: 20px; }
#categorylist li { display: inline; padding: 0px 5px;}
#categorylist a:link, #category a:visited {color:blue}
#categorylist a:hover {color:red}
It might look like this:
You can also add your Pages , archives, and other links within your header navigation. For more information on navigation menus:
Here are some tips and information to help you choose and customize your WordPress site's header.
Many WordPress Themes come with header image graphics you can use because they are released for free use under the GPL - General Public License . Or you can use one of the many resources available for free on the Internet, or design your own.
Here are a few resources for header images:
Below is the simple list for our horizontal menu. We recommend you keep your list small as too many will stretch wide across the screen and may cause some layout problems. We've enclosed the list in a division called navmenu.
<div id="navmenu">
<ul>
	<li><a href="<?php echo get_settings('home'); ?>">HOME</a></li>
	<li><a href="wordpress/recipes/">RECIPES</a></li>
	<li><a href="wordpress/travel/">TRAVEL</a></li>
	<li><a href="http://www.wordpress.org">WORDPRESS</a></li>
</ul>
</div>
As you can see, within our list we've included a PHP tag for the "home page" and several categories, as well as a link to WordPress, those helpful folks. The list would look like this, in its simplest form (as styled by the Codex):
You can also use the wp_list_categories() template tag to list your categories. If you just want categories 1, 3, 4, and 5 listed and the rest excluded, your list might look like this:
<div id="navmenu">
<ul>
 <li><a href="<?php echo get_settings('home'); ?>">HOME</a></li>
<?php wp_list_categories('orderby=name&include=1,3,4,5'); ?>
 <li><a href="http://www.wordpress.org">WORDPRESS</a></li>
</ul>
</div>
The place to put your new list might be just under the header. In WordPress v1.5, open the header.php file in the WordPress Theme folder you are using. Paste the code at the bottom of the file after the header DIV and then save the file.
In WordPress v1.2, open the index.php file and look for the end of the header section and place your list code there.
By default, a list runs vertically, each item on its own line. It also includes an image, known as a bullet, before each line. In your stylesheet, we need to add a reference to the navmenu and the first step is to remove the bullet and set our margins and padding to zero for the whole list.
#navmenu ul {margin: 0; padding: 0;
	list-style-type: none; list-style-image: none; }
If you save and upload your stylesheet, then refresh the test page in your web page browser, you would see that your list now has no bullets and no indents, if everything is working right.
Now, we need to add the technique that will set this list into a horizontal line. We need to add a style reference to the list item itself.
#navmenu ul {margin: 0; padding: 0;
	list-style-type: none; list-style-image: none; }
#navmenu li {display: inline; }
Because these are links, we have to take a moment to clean up the look of the links. There are many things you can do to style this list, but for now, let's add some space to the list of links so they aren't crowded together and remove the default link underline and have the link change colors when the mouse moves over it.
#navmenu ul {margin: 0; padding: 0;
	list-style-type: none; list-style-image: none; }
#navmenu li {display: inline; padding: 5px 20px 5px 20px}
#navmenu a {text-decoration:none; color: blue; }
#navmenu a:hover {color: purple; }
Okay, we can't resist. Let's take this another step further and give our new horizontal menu list some real jazz. See if you can tell what is being done to change the look.
#navmenu ul {margin: 0; padding: 0;
	list-style-type: none; list-style-image: none; }
#navmenu li {display: inline; }
#navmenu ul li a {text-decoration:none;  margin: 4px;
	padding: 5px 20px 5px 20px; color: blue;
	background: pink;}
#navmenu ul li a:hover {color: purple;
	background: yellow; }
If we did this all correctly, your list should look like this:
One should note that the all the above will fail in browsers with CSS turned off: the <li> lists will still be formatted vertically, not horizontally.
Therefore, if one wishes to be portable to such browsers, one might use e.g.,
<p>Archives:<?php wp_get_archives('format=custom&show_post_count=1&type=yearly&after=;'); ?>
Categories:<?php echo str_replace('<br />',';', wp_list_categories('style=&show_count=1&echo=0'));?></p>
There are many different ways to style lists. Use your imagination and come up with your own design, alternating colors, or whatever you want. Here are a few resources that will help you get started and learn more about Horizontal and other special effects menus:
Languages : English • العربية • Български • Bosanski • Čeština • Deutsch • Español • فارسی • suomi • Français • עברית • Hrvatski • Magyar • Bahasa Indonesia • Italiano • 日本語 • ქართული • ភាសាខ្មែរ • 한국어 • Македонски • myanmar • Nederlands • Polski • Português • Português do Brasil • Русский • Română • Slovenčina • Slovenščina • Српски • Shqip • Svenska • ไทย • Türkçe • Українська • Tiếng Việt • 中文(简体) • 中文(繁體) • ( Add your language )
With the introduction of WordPress v1.5, Pages were available to help the administrator create individual Pages outside of the WordPress Loop such as Contact Us, About Us, and What's New. The template tags used to display the list of individual Pages is wp_list_pages() .
<?php wp_list_pages(); ?>
There are many ways of customizing the wp_list_pages() tag to be more useful to your users. A long list of Pages and sub-Pages can go on for quite a while, so you might want to only feature the most important Pages in your sidebar.
To exclude some Pages from your list, you can set the parameters for exclude. The following example excludes Pages with the Page-ID numbers of 17 and 38.
<ul>
<?php wp_list_pages('exclude=17,38' ); ?>
</ul>
To learn more about customizing the wp_list_pages() template tag, visit the Template Tag page for wp_list_pages() .
The best template tag for creating a category list in your navigation menu is wp_list_categories() .
The default usage of the category list tag is:
<?php wp_list_categories(); ?>
Again, like the Pages template tag , you can use exclude to limit the categories you want listed, making it easier for the user to pick from only a few instead of twenty or thirty categories. The following example excludes category-IDs 10 and 15.
<ul>
<?php wp_list_categories('exclude=10, 15'); ?>
</ul>
If you would like only to feature the children or sub-categories of one or more categories in your category list, you can use the child_of parameter.
<ul>
<?php wp_list_categories('child_of=8, 14'); ?>
</ul>
To learn more about customizing the these template tags, visit the Template Tag page for wp_list_categories() .
Like the categories template tag, there is an Archives date-based Template Tag called wp_get_archives() . The tag allows you to display links to archives by year, day, week, day, or individual posts. You can limit the number of actual links to show in your Archives template tags.
The default usage of wp_get_archives will show a link for each month of posts:
<?php wp_get_archives(); ?>
To show the most recent three months of posts by month, you would use the following:
<ul>
<?php wp_get_archives('monthly&limit=3'); ?>
</ul>
Displaying the archives by date, you can show the most recent 15 days:
<ul>
<?php wp_get_archives('type=daily&limit=15'); ?>
</ul>
If you would like to show the actual posts, you can use the parameter postbypost which displays the most recent posts, with the number set by the limit parameter. To show the last 25 posts by post title:
<ul>
<?php wp_get_archives('type=postbypost&limit=25'); ?>
</ul>
To learn more about customizing this template tag, visit the Template Tag page for wp_get_archives() .
The Links feature of WordPress, managed via Administration > Links , allows displaying of external links, such as a blogroll, a user would like to feature on his or her blog. These links are generated by the template tag , wp_list_bookmarks() . For examples and more information on the specific use of each of this template tag, see wp_list_bookmarks() .
The Admin or Meta list of links in the WordPress sidebar are the links which are used by the Administrator, if logged in, to access the administration panels of the site. They may also feature RSS Feeds and other information related to the administration or use of the site. Check the following tags for more information on which ones you might want on your site to assist yourself and other registered users:
In addition to the sidebar, you can help your users navigate through your site with navigation tags used elsewhere, such as in the header and footer of your site. Using the above template tags for navigation links, you can style the link lists as horizontal menus instead of vertical lists.
Often in these narrow areas, you may want to only highlight specific posts or Pages to save space and direct the user to specific areas to continue their browsing. To include a specific link to a post or Page, you can use the get_permalink() template tag.
The following example presents links to post-ID numbers 1 and 10 and lists the categories on the site, excluding category-ID 2 and 4.
<li><a href="<?php echo get_permalink(1); ?>">About My Blog</a></li>
<li><a href="<?php echo get_permalink(10); ?>">About Me</a></li>
<?php wp_list_cats('exclude=2, 4'); ?>
The list might look like this:
There are two other sets of navigational aids to consider as you design your site. Both of these sets involve moving a user through your site from one post to another.
The first set is featured only on the non-single/non-permalink web pages and is the template tag posts_nav_link() . This tag creates two links at the bottom of the page within the WordPress Loop to display the next and previous pages of the index, archives, searches, and categories.
By default, the posts_nav_link looks like this:
To learn more about changing the look of this link, visit the Template Tag page for posts_nav_link() .
The other set of navigational aids for moving through your site control the next post and previous post links typically found at the bottom of your single/permalink post. These direct the user to move to the next chronologically created post or the previous.
The template tags are previous_post_link() and next_post_link() . These can be styled in several different ways, using the next post and previous post titles or using the actual titles of the next and previous posts.
The following example displays the next and previous post titles with arrows to emphasis the direction the user may choose.
<?php previous_post_link('« « %', '', 'yes'); ?>
| <?php next_post_link('% » » ', '', 'yes'); ?>
To learn more about changing the look of these links, visit the Template Tag page for previous_post_link() and next_post_link() .
As you have seen, there are a lot of ways WordPress uses to help the user move through a WordPress Site. We've shown you some of the WordPress template tags, but there are also many Plugins available which also assist with site navigation such as providing related posts, customized post lists, and more to customize your site's navigation.
The following are some of the resources that may help you in stylizing and customizing your navigation lists.
Note: Some WordPress Theme authors may have already thought ahead and included print styles for their Theme. Check the Theme folder for a print.css style sheet file and in the style.css for references to print before proceeding.
Styles for printing can be set within the style sheet itself. The browser must be "instructed" to look for the print styles in the style sheet, and they must be in their own section.
To instruct the browser to look for the print styles within the style sheet, change your style sheet link in the head section of your header.php template file from this:
<link rel="stylesheet" href="<?php bloginfo('stylesheet_url'); ?>"
type="text/css" media="screen" />
to this, instructing the browser to look for print styles in the style sheet:
<link rel="stylesheet" href="<?php bloginfo('stylesheet_url'); ?>"
type="text/css" media="screen, print" />
In your style sheet, usually at the very bottom, add the following to start your print styles:
/* Print Styles */
@media print {
body { background:white; color:black; margin:0; }
}
To create an independent style sheet featuring all of your print styles:
/* Print Style Sheet */
@media print {
body { background:white; color:black; margin:0; }
}
<link rel="stylesheet" type="text/css" media="print"
href="<?php bloginfo('stylesheet_directory'); ?>/print.css" />
Within the Print Styles section on your style sheet or in your print style sheet, add your site's structure selectors (names) like this (yours may be different):
/* Print Style Sheet */
@media print {
body { background:white; color:black; margin:0; }
#header { }
#content { }
#comments { }
#sidebar { }
#footer { }
}
To include each section, simply add display:block to the selector's declarations or attributes.
#content { display:block; }
To not include a section, so it will not print, add display:none to the selector's declarations.
#footer { display:none; }
Using display:none, any element on your web page can disappear when printed. If you have advertising or other elements you do not want to appear when printed, then add the display:none to their selector under the print section.
Just because you have set part of the structure of your site to "disappear" when printed does not mean that the structure moves around to accommodate it. Many Themes feature a corner of their content container anchored to a specific spot, like 150 pixels from the left of the screen. Even though the sidebar may be set to display:none, unless the positions and margins are changed in the content, it may bring with a 150 pixel gap on the left. You will also need to change the positioning of the content section to accommodate the loss of the sidebar.
Since, most users want to drop the sidebar and position the content so it stretches across the page in a comfortable reading layout, use this example:
#sidebar { display:none; }
#content{ margin-left:0;
     float:none;
     width:auto; }
This makes the sidebar disappear and instructs the browser to use whatever the margin settings are by default for the printer.
You can control the printed font sizes by using points instead of pixels or em as these related to information the printer can understand.
#header { height:75px;
     font-size: 24pt;
     color:black; }
#content { margin-left:0;
     float:none;
     width:auto;
     color:black;
     font-size:12pt; }
In general, most people want to read the comments, but they certainly do not want to see the comment form when a page is printed. The comment form is for use on the screen and can take up most of a sheet of paper when printed.
Look inside your WordPress Theme's folder for the comments.php or comments-popup.php template files and open whichever one you use. Look through the template for the start of the comment form and find the ID selector or name. It might look like this:
<form action="<?php echo get_option('siteurl'); ?>/wp-comments-post.php"
method="post" id="commentform">
The CSS ID for the form is commentform. To not display the comment form when printing, add this to the printing style section of your style sheet.
#commentform { display:none }
While these do not work for every browser or printer, you can instruct them not to "break" your photographs or graphics in two pieces, or break apart blockquotes, or not to have a page break after a heading but to force it to break before the heading. This is not a perfect science, but if you are really particular about how your printed web page looks, you might want to use these.
h1, h2, h3, h4, h5, h6 { page-break-after:avoid;
     page-break-inside:avoid; }
img { page-break-inside:avoid;
     page-break-after:avoid; }
blockquote, table, pre { page-break-inside:avoid; }
ul, ol, dl  { page-break-before:avoid; }
There are many aspects of your web page design you can control when printing, including the size, colors, and looks of links, headings, titles, author information, the post meta data, any part of your web page. Here is an example of one usage that you can use as a reference.
@media print {
body {background:white;
     font-size:10pt;
     margin:0; }
#sidebar { display:none; }
#header { height:75px; }
#content{ margin-left:0;
     float:none;
     width:auto; }
.demo .red { color:black;
     font-weight:bold; }
#content a { font-weight:bold;
     color:#000066;
     text-decoration:underline; }
#content{ margin-left:0;
     float:none;
     width:auto; }
#footer, .ad { display:none; }
h1, h2, h3, h4, h5, h6 { page-break-after:avoid;
     page-break-inside:avoid; }
h3 { margin-left:10px;
     margin-bottom:0px;
     padding-bottom:0px; }
blockquote, table, pre { page-break-inside:avoid; }
ul, ol, dl  { page-break-before:avoid; }
img.centered { display: block;
     margin-left: auto;
     margin-right: auto; }
img.right { padding: 4px;
     margin: 0 0 2px 7px;
     display: inline; }
img.left { padding: 4px;
     margin: 0 7px 2px 0;
     display: inline; }
.right { float: right; }
.left { float: left; }
img { page-break-inside:avoid;
     page-break-after:avoid; }
}
If you have translated this article, or have a similar one on your blog, post a link here. Please mark fully translated articles with (t) and similar ones with (s).
The output result looks like this:
There are three template tags used in the post meta data. One, the_time() , is used twice with different results. The other two tags get the information about the categories and the link to the RSS feed from the database.
The template tag for the_time() can be set up with a variety of parameters to tell the time and date of the post from information drawn from the database. In the first usage, the parameters l, F jS, Y pull the post's date into a format that gives the weekday, month, date, and year. In the second usage, there are no parameters, therefore it just returns the time when the post was saved. You will experiment with these below in Changing the Time and Date .
The template tag the_category() displays the categories that the post belongs to. This template tag can be modified to feature different text, graphics and symbols between the graphics, and may even use a plugin to display graphics in place of the words. There are many ways to style these. In this example, the categories are listed with a comma to separate them .
The last tag is the comments_rss_link() which uses the parameter RSS 2.0 to identify the type of feed being used. You can also customize the feed tag , changing the way it displays the link information about the feed and type, or even have it feature feed icons instead of text.
Let's start to rearrange your post meta data with small steps. The first step is to change the text but not the tags. After all, this is your website and you want it to say things your way, right? This example makes the post meta data a little more conversational:
<small>I slaved away at the computer on <?php the_time('l, F jS, Y') ?>
at the ridiculous time of <?php the_time() ?> when I could have
been doing something much more productive.  I slapped this
thing into the <?php the_category(' and ') ?> categories, just
to make you think I have some organizational skills.  If you
can really be bothered, you can keep track of what people
have to say about my silly writings through the
<?php comments_rss_link('RSS 2.0'); ?> feed, but I
wouldn't bother.  No one else who reads this babble has
anything worthwhile to say.</small>
This would result in:
Okay, there is a small change. Did you catch it?
The usage of the_category() template tag, the parameter that sets the separator between the list of categories where the post belongs, was changed from a comma (,) to the word "and". It makes more sense in this situation.
Now, you can also cut the chatter and make your post meta data short and sweet:
POSTED: <?php the_time('m/j/y g:i A') ?><br />
FILED AS: <?php the_category(', ') ?><br />
COMMENTS FEED: <?php comments_rss_link('RSS 2.0'); ?>
Here is a very short list of your post meta data:
There are many ways to change the time and date within your post meta data to reflect a more appropriate use for your website or your cultural timekeeping methods. For example, in much of the world, the date is not month day, year but day month year. In the post meta data, you would change the template tag the_time() so the parameters would show "Monday, 21 February 2005":
<?php the_time('1, jS F Y') ?>
To add more interesting information to your post meta data there are several plugins available which generate the date the post was last modified. Two such plugins are Kaf Oseo's Post Updated and Nick Momrik's Last Modified . In the following example, using various ways of manipulating time with PHP tags, we'll add Nick Momrik's plugin to the mix, mdv_last_modified():
<div class="postmetadata">This post was written on what I
think was a <?php the_time('l'); ?>, but I know it was
the <?php the_time('jS'); ?> day in the month
of <?php the_time('F'); ?> in the year of
<?php the_time('Y'); ?>, though I messed around
with this on the <?php mdv_last_modified('dS'); ?> day
of <?php mdv_last_modified('F'); ?> in
<?php mdv_last_modified('Y'); ?>, a not-so-busy
<?php mdv_last_modified('l'); ?> when I had nothing
better to do.</p></div>
Which would result in:
So far, you've covered only three of the many template tags you can add to your post meta data. You can add the the_title() to get the title of the post. If you want the author's name, you can add the_author() and even the author's email with the_author_email() . Want a link to all the posts written by a specific author? That can be arranged with the the_author_posts_link() .
What if you want to include more basic information like the title of the website using bloginfo() , or navigation help like the previous_post() and next_post() ? We're using the next and previous post template tags to list posts within the same category, available to users of WordPress 1.5.1.3+. These are just a few examples of the many possible uses of template tags in your post meta data
In the most simplest of usages, the post meta data could be listed as:
POST TITLE: <?php the_title(); ?><br />
AUTHOR: <?php the_author(); ?><br />
POSTED: <?php the_time('jS F Y') ?><br />
FILED AS: <?php the_category(', ') ?><br />
COMMENT FEED: <?php comments_rss_link('RSS 2.0'); ?><br />
PREVIOUS: <?php previous_post('%', '', 'yes', 'yes'); ?><br />
NEXT: <?php next_post('%', '', 'yes', 'yes'); ?>
And would look like this:
AUTHOR:
Harriet Smith
POSTED: 20 April 2004
FILED AS:
WordPress
,
News
COMMENT FEED:
RSS 2.0
PREVIOUS:
Things to Do With WordPress
If you want this in your sidebar, and you want a more conversational style, then in your template file , sidebar.php, find a good spot to put the following:
<div class="postmetadata"><p>You are reading the article,
<?php the_title(); ?>, on our website, <?php bloginfo('name'); ?>.
This article was written on <?php the_time('jS F Y') ?>, in
Seattle, Washington, and you can find similar articles in
the <?php the_category(' and ') ?> categories, or more articles
by <?php the_author_posts_link() ?>, if you enjoyed this article.
If you have any comments about this article, you can contact
<?php the_author() ?> by <a href="mailto:<?php the_author_email(); ?>">
email</a>, or leave a comment below.  You can also follow comments
made on this article via our <?php comments_rss_link('RSS 2.0'); ?>
feed.</p>
<p>If you would like to continue reading more,
<?php previous_post('the previous article on our site is called %', ' ', 'yes', 'yes'); ?>
<?php next_post(' and the next article is called %', ' ', 'yes', 'yes'); ?>.
  Thank you for visiting our site.</p></div>
This example, if styled in a narrow column found on most sidebars, would look like this:
This is just the beginning. There are many ways you can style your post meta data ; by putting it in a box, by making it part of the text, by having it in a list...it's up to your imagination how you want to style your post meta data, and what information you want to share with your public about your posts.
The post meta data featuring your categories tag in your Theme is usually found on the index.php, single.php, or sometimes in the sidebar.php template files . Open one or more of these template files and search for:
<?php the_category() ?>
Once you have found it, take another look at a generated web page of your site and determine how exactly you might want to change this information.
The the_category() template tag instructs the database to get the information regarding the post categories and display it at that point in your template file . By default, it displays the list of categories with a space between each one. You can change this by adding the parameter inside of the tag. Let's begin with simple separators by playing with the category names: WordPress, Computers, and Internet News.
If you would like to have commas between the categories, the tag should read:
<?php the_category(',') ?>
And it would look like this:
If you would like to have an arrow, the tag would look like this:
<?php the_category(' > ') ?>
If you would like to have a bullet , the tag would look like this:
<?php the_category(' • ') ?>
If you would like the "pipe" ( | ) between the categories, the tag would look like this:
<?php the_category(' | ') ?>
Would you like to make your post meta data look a little more textual, informal and part of a paragraph rather than a list. You can add an "and" to go between the categories like this:
<p>You can read related subjects in
the <?php the_category(' and ') ?> categories.</p>
Or you can give them more of a choice and change the "and" to an "or":
The possibilities are endless. Have fun and use your imagination!
the_content() template tag with the_excerpt() .In both cases, if you have set anything in the Excerpt meta box on the post editor screen, that text will be used. Otherwise, the excerpt will be automatically trimmed.
The most commonly used method is the first one, because the user editing the post can choose between showing the whole content or just the excerpt, individually for each post. However, using the_excerpt() in your template file can also get a teaser from the first 55 words of the post content, without the need to place a more quicktag in the post.
To add a more quicktag in your post, put your cursor where you want to end the excerpted content of your post and click the more quicktag button. quicktags are the little buttons found above the editing window in your Administration > Post > Add New Post . They include bold, italic, links, and others, and the famous more.

It will insert a code at that point that looks like this:
and I told him that he should get moving or I'd be
on him like a limpet.  He looked at me with shock on
his face and said

<!--more-->
The rest of the post continues in the editing window, but when viewed on the non-single/non-permalink web page such as archives, categories, front page, and searches, the post is shown as an excerpt to the more point.
Users can then continue reading more as you have enticed them with your summary introduction, by clicking on a link to the full article. Themes usually include this link in the title and the above methods will generate it by default trailing your teaser, as the example below.
The parameters within the template tag the_content() are as follows:
<?php the_content( $more_link_text , $strip_teaser ); ?>
The $more_link_text sets the link text like "Read More". The second one, $strip_teaser, sets whether or not the teaser part or excerpt part before the more text should be stripped (TRUE) or included (FALSE). The default is FALSE, which shows the teaser part.
To remove the teaser part:
the_content( '', TRUE );
By default, clicking the .more-link anchor opens the web document and scrolls the page to section of the document containing the named anchor (#more-000). This section is where writers choose to place the <!--more--> tag within a post type.
Users can prevent the scroll by filtering the_content_more_link with a simple regular expression.
function remove_more_link_scroll( $link ) {
	$link = preg_replace( '|#more-[0-9]+|', '', $link );
	return $link;
}
add_filter( 'the_content_more_link', 'remove_more_link_scroll' );
Simply add the above code to the theme's functions.php file and the named anchors are no more.
Adding this code to your functions.php file enables you to customize the read more link text.
function modify_read_more_link() {
    return '<a class="more-link" href="' . get_permalink() . '">Your Read More Link Text</a>';
}
add_filter( 'the_content_more_link', 'modify_read_more_link' );
Code reference: https://developer.wordpress.org/reference/hooks/the_content_more_link/
Sometimes you can't afford adding a more quicktag to all your posts, so the only way to show an excerpt is modifying the template, changing the_content() to the_excerpt(). It will show the text "Read More" ( Version 4.1 and later) or "[...]" (older versions).
To customize this text, add the following code to your functions.php file.
// Replaces the excerpt "Read More" text by a link
function new_excerpt_more($more) {
       global $post;
	return '<a class="moretag" href="'. get_permalink($post->ID) . '"> Read the full article...</a>';
}
add_filter('excerpt_more', 'new_excerpt_more');
If you are using a Child Theme , the above code will not work without modification if the parent theme has its own filters setting its own "more" link. You will need to use the remove_filter() function to remove the parent's filters for yours to work. The problem is your functions.php file is loaded before the parent's functions.php, so at the time of your file's execution, there is no filter to remove yet, and your remove_filter() code will fail without warning.
The key is to put your remove_filter() code in a function that executes from an action hook that triggers after the parent theme is loaded. The following code is an example of the additional code needed to get the above code to work from a child theme of the parent theme Twenty Eleven . You will need to examine your actual parent theme's code for the correct parameters in the remove_filter() code, they must exactly match the add_filter() parameters used by the parent.
function child_theme_setup() {
	// override parent theme's 'more' text for excerpts
	remove_filter( 'excerpt_more', 'twentyeleven_auto_excerpt_more' );
	remove_filter( 'get_the_excerpt', 'twentyeleven_custom_excerpt_more' );
}
add_action( 'after_setup_theme', 'child_theme_setup' );
Seeing that you know how it works, now look at how we can make this little invitation to continue reading your post be more inviting.
By design, the the_content() template tag includes a parameter for setting the text to be displayed in the the "more…" link which allows you to continue reading.
By default, it looks like this:
If you want to change the words from more.... to something else, just type in the new words into the template tag:
<?php the_content('Read on...'); ?>
Or get more sophisticated and make it fun:
<?php the_content('...on the edge of your seat? Click
here to solve the mystery.'); ?>
You can style the text in the template tag, too.
<?php the_content('<span class="moretext">...on the edge of
your seat? Click here to solve the mystery.</span>'); ?>
Then set the moretext class in your style.css style sheet to whatever you want. Here is an example of the style which features bold, italic text that is slightly smaller than the default text:
Some people do not want the text and prefer to use an extended character or HTML character entity to move the reader on to the full post.
<?php the_content('» » » »'); ?>
Would look like this:
If you want to include the title of the post in the more text, use the_title() template tag::
<?php the_content("...continue reading the story
called " . the_title('', '', false)); ?>
Although the_content() is usually called from the template with a standard text as described above, it is possible to have an individual text for certain posts. In the text editor, simply write <!--more Your custom text -->.
So, you may have something like this:
<!--more But wait, there's more! -->
The design possibilities with CSS are practically unlimited, and WordPress allows you to use images in many of their Template Tags , including the more tag. To add an image, there are two ways to do it. Begin with the most simple -- listing it in the_content() template tag.
This examples features the image of a leaf after the "Read More" text and assumes that the image file is within your theme's images folder.
<?php the_content('Read more...<img src="' . get_bloginfo('template_directory'). '/images/leaf.gif" alt="read more" title="Read more..." />'); ?>
Notice that the code uses an ALT and TITLE in the image tag. This is in compliance with accessibility and web standards, since the image is both an image and a link. Here is what it might look like.
You could even add a style to the image and more tag, as mentioned above, to style it even more. To use the image without the "Read More" text, just delete the text.
The second example uses the CSS background image. We have described how to use style classes in the above examples. This is a little tricker. The container's style must be set to allow the background image to show out from behind the text. If you were to use the above example as a background image, the style.css style sheet for this might look like this:
.moretext {
   width: 100px;
   height: 45px;
   background:url(/images/leaf.gif) no-repeat right middle;
   padding: 10px 50px 15px 5px}
The 50px padding against the right margin should make sure the text is pushed over away from the image as to not overlap it. The height ensures that the container will expand wide enough so the image is visible within the container, since a background image isn't "really there" and can not push against the container's borders. You may have to experiment with this to fit the size and shape of your own image.
You have gotten the basics. From here, it is up to your imagination.
Please remember that the "Read More" tag is used only on the Home page which shows the latest posts. It does not work in " Pages ". If you want to turn it on in Pages too for showing a set of partial posts, use the following code inside the loop for the dynamic content:
<?php
global $more;
$more = 0;
?>
//The code must be inserted ahead of the call the_content(), but AFTER the_post()

<?php the_content('Continue Reading'); ?>
It's important that if you're going to over-ride the default $more global variable you do it inside The Loop, but after your setup the post. If you're working with the standard Loop and using the_post(), make sure you set $more after the_post (but before the_content().
See More tag ignored on static front page forum topic.
If you are looking to retrieve the content that is before or after the (<!--more-->), the get_extended() function will provide this content for you. It returns an array with the content before the more link, the more link, and the content after the more link.
If you set the $more variable to -1, the More tag will not be displayed. This can be useful in a "mullet loop", which displays the full content for only the first post, and then displays only excerpts for all remaining posts. Like this:
<?php global $more; $more = -1; //declare and set $more before The Loop ?>
<?php if (have_posts()) : while (have_posts()) : the_post(); //begin The Loop ?>
<?php
    if ($more == -1) { //do not use the more tag on the first one.
        the_content();
        $more = 0; //prevent this from happening again. use the more tag from now on.
    }
    else { //use the more tag
        the_content(__('Read more...'));
    }
?>
<?php endwhile; //end of The Loop ?>
codex.wordpress.org/Template_Tags/the_time" title="Template Tags/the time" class="mw-redirect">the_time()
are examples of this. Some of these functions accept a parameter called a format string that allows you to determine how the date is going to be displayed. The format string is a template in which various parts of the date are combined (using "format characters") to generate a date in the format specified.
For example, the format string:
l, F j, Y
creates a date that look like this:
Friday, September 24, 2004
Here is what each format character in the string above represents:
l = Full name for day of the week (lower-case L).F = Full name for the month.j = The day of the month.Y = The year in 4 digits. (lower-case y gives the year's last 2 digits)WordPress is written in the programming language PHP . The date formatting functions in WordPress use PHP's built-in date formatting functions. You can use the table of date format characters on the PHP website as a reference for building date format strings for use in WordPress. Here is a table of some of the more useful items found there:
| Day of Month | ||
|---|---|---|
| d | Numeric, with leading zeros | 01–31 |
| j | Numeric, without leading zeros | 1–31 |
| S | The English suffix for the day of the month | st, nd or th in the 1st, 2nd or 15th. |
| Weekday | ||
| l | Full name (lowercase 'L') | Sunday – Saturday |
| D | Three letter name | Mon – Sun |
| Month | ||
| m | Numeric, with leading zeros | 01–12 |
| n | Numeric, without leading zeros | 1–12 |
| F | Textual full | January – December |
| M | Textual three letters | Jan - Dec |
| Year | ||
| Y | Numeric, 4 digits | Eg., 1999, 2003 |
| y | Numeric, 2 digits | Eg., 99, 03 |
| Time | ||
| a | Lowercase | am, pm |
| A | Uppercase | AM, PM |
| g | Hour, 12-hour, without leading zeros | 1–12 |
| h | Hour, 12-hour, with leading zeros | 01–12 |
| G | Hour, 24-hour, without leading zeros | 0-23 |
| H | Hour, 24-hour, with leading zeros | 00-23 |
| i | Minutes, with leading zeros | 00-59 |
| s | Seconds, with leading zeros | 00-59 |
| T | Timezone abbreviation | Eg., EST, MDT ... |
| Full Date/Time | ||
| c | ISO 8601 | 2004-02-12T15:19:21+00:00 |
| r | RFC 2822 | Thu, 21 Dec 2000 16:01:07 +0200 |
| U | Unix timestamp (seconds since Unix Epoch) | 1455880176 |
Here are some examples of date format and result output.
F j, Y g:i a - November 6, 2010 12:50 amF j, Y - November 6, 2010F, Y - November, 2010g:i a - 12:50 amg:i:s a - 12:50:48 aml, F jS, Y - Saturday, November 6th, 2010M j, Y @ G:i - Nov 6, 2010 @ 0:50Y/m/d \a\t g:i A - 2010/11/06 at 12:50 AMY/m/d \a\t g:ia - 2010/11/06 at 12:50amY/m/d g:i:s A - 2010/11/06 12:50:48 AMY/m/d - 2010/11/06Combined with the_time() template tag, the code below in the template file:
This entry was posted on <?php the_time('l, F jS, Y') ?> and is filed under <?php the_category(', ') ?>.
will be shown on your site as following:
This entry was posted on Friday, September 24th, 2004 and is filed under WordPress and WordPress Tips.
To localize dates, use the date_i18n() function.
You can probably safely localize these date format strings with the __(), _e(), etc. functions (demonstrated with get_the_date(__(…))):
You can escape custom characters using the \letter format. For example you would escape the text at with \a\t.
Different Themes format lists in different ways. The most common lists users often want to modify in WordPress are the sidebar menu lists. Since many sidebars feature nested lists, let's look at those in more depth.
Begin by examining the style.css file found within the Theme's folder you are using. Most WordPress Themes label their sidebar menu section with the words sidebar, menu, or a combination of both. So, look for the sidebar Template file, typically called sidebar.php. This is a sample sidebar.php layout; your version may be different, but the concept will be the same.
<div id="sidebar">
<ul>
  <li id="search"><form method="get" id="searchform"
      action="/wordpress/index.php">
    <div><input type="text" value="" name="s" id="s" />
	<input type="submit" id="searchsubmit" value="Search" />
    </div></form></li>
  <li id="pagenav"><h2>Pages</h2>
    <ul>
    <li class="page_item">
       <a href="http://www.examplesite.com/wordpress/?page_id=2"
	title="About Us">About Us</a></li>
    <li class="page_item">
       <a href="http://www.examplesite.com/wordpress/?page_id=4"
        title="Contact">Contact</a></li>
    <li class="page_item">
       <a href="http://www.examplesite.com/wordpress/?page_id=8"
        title="Site Map">Site Map</a></li>
	</ul></li>
  <li><h2>Archives</h2>
      <ul>
	<li><a href='http://www.examplesite.com/wordpress/?m=200502'
	 title='February 2005'>February 2005</a></li>
	<li><a href='http://www.examplesite.com/wordpress/?m=200501'
	 title='January 2005'>January 2005</a></li>
	<li><a href='http://www.examplesite.com/wordpress/?m=200412'
	 title='December 2004'>December 2004</a></li>
	<li><a href='http://www.examplesite.com/wordpress/?m=200411'
	 title='November 2004'>November 2004</a></li>
      </ul></li>
  <li><h2>Categories</h2>
     <ul>
	<li><a href="http://www.examplesite.com/wordpress/?cat=47"
	 title="Stories of our life">Stories</a></li>
	<li><a href="http://www.examplesite.com/wordpress/?cat=48"
	 title="Computer Tips">Computer Tips</a></li>
	<li><a href="http://www.examplesite.com/wordpress/?cat=6"
	 title="WordPress Tips">WordPress Tips</a></li>
	<li><a href="http://www.examplesite.com/wordpress/?cat=28"
	 title="Web Page Design Advice">Web Page Design</a></li>
     </ul></li>
  </ul>
</div>
When you are working with nested lists and you want an individual style for each list, you have to recreate the "nest" in the stylesheet (style.css).
#sidebar ul {attributes}
#sidebar li {attributes}
#sidebar ul li {attributes}
#sidebar ul ul li {attributes}
#sidebar ul ul ul li {attributes}
#pagenav {attributes}
#pagenav ul {attributes}
#pagenav ul li {attributes}
Do you want your Categories List to look different from your Archives List? Then open up the index.php or sidebar.php and carefully add the following style references to the appropriate list item:
To customize the Categories and Archives list, add the following to your stylesheet to customize these individually:
#categories {attributes}
#categories ul {attributes}
#categories ul li {attributes}
#archives {attributes}
#archives ul {attributes}
#archives ul li {attributes}
Go through any other sections of your list and give them a style reference name and add them to your style sheet. When you've identified which part of the list controls which aspect of the list, it's time to start changing the look of the list.
If you want to use image replacement techniques to style your list, each <li> tag will need its own class or ID. Try the Classy wp_list_pages plugin.
An important part of a list is the bullet - an eye catching dot, spot, or graphic that tells viewers "this is a list". The style of bullet or numbering for a list is determined by a list-style-type property in the style sheet. The default value is disc. Other basic values are circle, square, decimal, decimal-leading-zero, lower-roman, upper-roman, and none. Let's change the default value to something else, like a square.
#sidebar li {
   list-style: square;
}
Instead of typing list-style-type, you see a shorthand form of list-style, and instead of using the default disc, the list now features small squares.
But not all lists need bullets. By their overall layout, you just know a list is a list. To eliminate the bullet, change the stylesheet to this:
#sidebar li {
   list-style: none;
}
Now, anything tagged with <li>, within the DIV of the ID of #sidebar, would have no bullet. Experiment with different values to see the results you can achieve.
HINT: In terms of accessibility, an ordered list is easier to navigate than an unordered list.
Tired of boring bullets? Let's get rid of the boring with a few CSS techniques. In this case, use list-style-image to instruct the browser to use your bullet image instead of the old boring default bullets.
Find some interesting bullet graphics and add the following code in your style sheet to add some jazzy bullets to your lists:
#sidebar ul {
 list-style-image: url(/wp-images/image.gif);
 }
Note that you could also use an absolute link rather than a relative link. Simply change the url(/wp-images/image.gif ) to url(http://example.com/wp-images/image.gif).
To add a border, like an underline, after your title, you can simply add a border style to the top of the <ul> under the title, rather than on the title itself.
#sidebar ul ul {...; border-top: solid 1px blue; ....}
Go a step further and add a whole box around your list with the title sitting atop it:
#sidebar ul ul {...; border: solid 1px blue; ....}
Add a colored background to your list along with its new border:
#sidebar ul ul {...; border-top: solid 1px blue;
     background:#CCFFFF; ....}
And your end result would look like this:
Category Two
Category ThreeOr really expand the possibilities to something like this:
Category Two
Category Three
You can have a lot of fun with your list bullets and list layouts. If you are having trouble with your bullets and lists, check out the resources listed below and then visit the
WordPress support forums
to get more help.
If you are having trouble with your nested lists, the following might provide the solution. Also check CSS Troubleshooting for more styling help issues.
The number one cause of errors or non-validation within a nested list is the lack of proper list structure. Here is a very simplified and correct nested list layout. Note that when a (new) nested list begins, the <li> tag of the current list item is not closed yet. It is left open until the nested list is completed, and then closed.
<ul>
   <li>Category One</li>
   <li>Category Two     <----Note: No Closing List Tag
      <ul>
          <li>Sub-Category One</li>
          <li>Sub-Category Two     <----Note: No Closing List Tag
              <ul>
                 <li>Sub-Sub-Category One</li>
                 <li>Sub-Sub-Category Two</li>     <----Note: Closing List Tag
              </ul></li>           <----Note: Nested List Closed
           <li>Sub-Category Three</li>
      </ul></li>       <----Note: Nested List Closed
    <li>Category Three</li>
</ul>      <----Note: End of entire list
Different Template Tags used for displaying lists have different ways of using and relying upon HTML list tags. Some template tags automatically include the <ul> and <li> tags so all you have to do is include the tag in the list by itself and it will do all the work. Other tags require the <ul> to be in place followed by the template tag and it generates its own <li> tags. Other template tags require designating which type of list tags are needed or use none at all if not listed in the tag's parameters.
If you are having trouble with your nested lists when using template tags like wp_list_cats or wp_list_pages , check their parameters to see how they use the list tags and compare it with your usage.
Discussed in The CSS Parent and Child Relationship , lists are one of the big culprits. Styles in the child list items are influenced by its "parents". If the parent's list style features the color "red" and you want the children to be in "blue", then you need to specify the color in the children's list styles to be "blue" so they will override the parent's style
Nested lists within the WordPress Sidebar typically contain links. Therefore, while you can style the list as much as you want, the style for links will override the list style. You can control the way the links in the list work by giving them a specific style class of their own, including their hover attributes:
#sidebar a {attributes}
#sidebar a:hover {attributes}
#categories a {attributes}
#categories a:hover {attributes}
#archives a {attributes}
#archives a:hover {attributes}
<h1><?php bloginfo('name'); ?></h1>
You will find its style information in the style.css file in your Theme folder. It is usually listed as:
h1 {attributes}

or

#header h1 {attributes}
Here you could change the look of the heading inside the #header of your web page.
Many people want to replace their header with an image, but still leave the text there to meet accessibility standards and for search engines. You can leave the h1 and description in place by adding the following to your style.css header references or in the header.php template file style listed in the head section:
h1 {display: none; font-size: 150%; color: white....}
The display:none instructs the browser not to display the content within the h1 tag.
The H2 headings are found throughout the various WordPress Themes . It can be found most commonly in the post title, in the comment title, and in the sidebar or menu. Styling these many H2 headings can get a little complicated.
Let's look at what might be the styles in your style.css for the different H2 headings:
h2 {font-family: Verdana, Arial, Helvetica, sans-serif;
       font-size: 110%; color: green; font-weight: bold; }

#comments h2 {font-size: 90%; color: yellow; font-weight: bold;
       padding: 2px; background: green; border: solid 1px navy; }

#sidebar h2 {font-size: 85%; color: navy; background: transparent;
       font-weight: bold; border-bottom: dashed 2px yellow; }
Each of these sections features an H2 heading in WordPress, but each one is styled completely differently.
By default, using the first example, any time the H2 is listed, it would look that way. By putting an ID or Class selector in front of the H2 tag, you can modify the look. But, and there is always a but with CSS styles, outside of an identifying ID or Class selector, it acts like a parent , influencing the other H2 headings.
For instance, if we hadn't designated the font color for the #comments H2, then the color would be that of the parent H2, which is green. Be careful to list all the different attributes you want changed, and remember that the parent H2 will fill in any blanks you leave out.
You can learn more about the CSS parent/child relationship in the Codex article on CSS Troubleshooting called The CSS Parent and Child Relationship
If you tend to write long posts, using headings can separate the sections, announce a change in subject or just add a little artistic "space" or graphic element. Post section headings are created by you as you write your post. Generally, the h3 and h4 heading tags are used, though sometimes the h5 might also be included.
Your Theme may or may not include h3 and h4 headings. In some Themes, h3 tags are used within the comments. You can easily check in your style.css with a search for h3. If it isn't used, you can create your own, or if it is, use the h4 tags.
To use them, you manually type in the tags around the section titles with double spaces before and after, if you are not using HTML in your posts. This way, WordPress will know to automatically add the paragraph tags when generating the post. It might look like this in your Write Post screen:
...uses with WordPress that I enjoy using.

<h4>More Talk About WordPress Features</h4>

We enjoy talking more about the many
features WordPress has to offer the blogger....
Web standards features the h3 tag with type that is by default slightly smaller than the h2 tag but larger than the h4 tag font. You can control the size differences within the style.css style sheet. But you are not limited there.
Dividing up your content within a post can feature more than colorful and larger fonts. You can add graphics and styles to these section dividers to enhance the look of your site. Let's look at two examples.
In the first example, we are using a graphic of a leaf set in the background of the heading to the left of the text. The padding is adjusted so that the heading's text will move over 45px to make room for the background graphic. Note that we've also set the background graphic to no-repeat so only one leaf with appear. Otherwise we'd have a whole heading filled with leaves.
The CSS in the style.css for this might look like this:
h3 {font-size:130%; color:#A30000; font-weight:bold;
background:url(leaf.gif) left no-repeat;
padding: 10px 10px 10px 45px}
In the second heading example, we've moved the leaf graphic so it is above the heading, which makes it look like it is floating between the sections. This adds more space between the sections. The CSS in the style.css for this might look like this:
h3 {font-size:130%; color:#A30000; font-weight:bold;
background:url(leaf.gif) no-repeat top center;
padding: 60px 10px 10px; text-align:center}
Headings can add a lot to the overall design of your site, so use your imagination and have fun with these.
In WordPress, many post titles feature information in addition to just the title of the post. Many titles include the time, date, author, and categories that the post is in. You can choose what elements to include or exclude in your title headings.
Here is an example of a fully loaded post title.
<h2>
<a href="<?php the_permalink() ?>"
     rel="bookmark" title="Permanent Link to
     <?php the_title_attribute(); ?>">
     <?php the_title(); ?></a>
</h2>
<small>
Posted <?php the_time('F jS, Y') ?>
by <?php the_author() ?>
in <?php the_category(', ') ?></small>
It begins with the h2 heading tag, and then includes a link to the title of the post. In the next section, controlled by the <small> tag, is the template tags for the time, author, and categories. It might look something like this:
Telling Tales in WordPress
Posted Monday, 21 February 2005 by Harriet Smith in WordPress, Tales
You can change the author tag to the_author_posts_link() , or add more information like the time to the post title information. Or remove these tags. You can learn more about the post meta data section in the article on Customizing Your Post Meta Data Section .
Now that you've learned where to find the basic headings in WordPress Themes, it's time to have some fun with them designing or modifying your own theme . There are many ways to the control the design of your headings. You can change font sizes, colors, font families, or add graphics and interesting backgrounds. Let your imagination take over!
To help you design your headings, here are a few resources.
Fonts come in a wide variety of types and styles, but unfortunately, unless the user actually has that font installed on their machine, they will see something that is only "close", such as a generic serif or sans-serif, to what you wanted to present. If you want to see a list of what you have installed on your machine, visit several of the font sites listed below or this font test . If your font is there, you will see it. If not, you will see a generic Courier font.
In your Theme's style sheet (style.css usually) you can control the font-family (the list of fonts to display), the color, the size, and other aspects of your font. The following example sets the fonts for your sidebar menu, sets the size to 1em high, and sets the color to blue:
#menu {font-family: Verdana, Arial, Helvetica,
   sans-serif; font-size:1em; color:blue; }
As you can see, you've set more than one font in the font-family. If the user doesn't have Verdana, Arial will take over. If Verdana and Arial are missing, they have a chance to use Helvetica. If all else fails, the user's system fonts take over and uses the default font for sans-serif. This list of choices helps the designer control the fonts and insures a more consistent "look and feel".
Font families tend to be single words, but on occasion you will find a phrase to represent a font such as Lucida Console. This is set in the style selector surrounded with quote marks such as:
#menu {font-family: Verdana, Arial, Helvetica,
     "Lucida Console", sans-serif;.....
WordPress Themes use fonts in many different ways, and not always consistently. It depends upon the Theme author's decisions and needs in designing a Theme. Different fonts can be found in different areas of the website, one type in the header, another in the sidebar (or maybe two or three), and another font style or type in the post content area. Finding those fonts in order to change them, can give a user grief.
Since fonts can be anywhere, finding the font you want to change can be a challenge. Generally, an overall font is set in the body of a website.
body {font-family: Verdana, Arial, Helvetica,
     Futura, sans-serif;
     font-size: 1em;
     padding:0;
     margin:0; }
This covers the definition of the fonts found within the site that are not defined by a specific tag, class or div. It's the "fall-back font".
Fonts found within the header of a site are normally found within the header div and same for the sidebar or menu and footer style divisions. The content, though, may be more challenging to track down.
Fonts within the post content area are often found within the following, but not always, CSS classes:
They may have the font information in the specific class or in a paragraph tag:
.content p { margin:5px;
    padding:5px;
    font-family: Tahoma, Verdana, Helvetica, sans-serif;
    font-size: 110%;
    color: black; }
Fonts within the sidebar or menu nested lists can be very difficult to narrow down. For a step-by-step guide of all the nested lists found within many WordPress sites, see Styling Lists with CSS .
If you are still having trouble tracking down a specific font code, consider using some of the tips and techniques in Finding Your CSS Styles .
Determining which font will work best on your site is a personal choice, but there are articles that will help you decide. We recommend that you begin with fonts that are most commonly found on most people's computers, and that are easy to read.
To find out what fonts are most popular, check out the following:
Besides using pre-existing fonts - the fonts which normally come with operating systems when installing, such as Arial, Verdana, Tahoma, Georgia - using CSS in styles.css, you can define a font-family for an element on the page. Also, you can use external fonts - this means users don't need to have that font on their system. To use the @font-face rule to define your own font family you can put it in the top of style.css like this:
@font-face {
	font-family: Museo300;
	src: local('Museo300-Regular'),
		url("fonts/Museo300-Regular.ttf") format('truetype');
	font-weight: normal;
}
Then later on, you can write:
.post-item {font-family: Museo300}
You can get more information about @font-face rule in following links:
You can also change the font size your viewers see. In the days of the typewriter and even with today's word processors and desktop publishing software, the "point" system is still in use. You should be familiar with things like "12pt Times Roman" and "8pt Arial". Point sizes don't work well on web pages because most browsers can't interpret what a "point" is. They understand pixels and percentages of a base size, but typewriter point sizes are interpreted differently on different browsers. You can use point size but there are better alternatives.
You can set your fonts to be absolute, which means they are fixed in size, but that too, has disadvantages. The problem with absolute font size is that if a user has their browser set to "see" larger fonts (View > Text Size) or are using special software for the visually or physically disabled , you may have taken away their rights to "see" larger fonts. If you have to set the font to a specific size in order for your layout to work, make sure you don't use that font for your site's more important information. This example shows how to set an absolute font size:
#menu ul li {font-size: 12px; color: green; }
The more popular method is to set your font-size for the whole document, then, base everything on a relative size from there. A percentage of the base font is used, allowing the font to resize itself based upon the user's preferences, too:
body { font-size: 1em; }
#menu ul li { font-size: 110%; color: green; }
There are a lot of fun things you can do with fonts! You can make your fonts italic, you can make them bold, and you can make the first letter of a paragraph larger than the rest of the text. The list of variations goes on and on. This lesson is just a peek into how to style and size fonts on your WordPress site. There is a lot more that goes into deciding which font to use, how to use it, how many to use, what sizes, and...well, which fonts will look best on your site. Different browsers interpret fonts in different ways, too. You can find more information to help you make your font decisions below.
WordPress Version 4.3 implemented Site Icon feature that enables favicon in your web site. It is recommended that you use the Site Icon feature, instead of following the guidance below. When you use it, you don't need to prepare the favicon.ico file by yourself or modify your template file, just specifying square image that has at least 512 pixels wide and tall from Customizer screen.
Follow the below steps to set favicon in your site.

A favicon can be created using any graphics/image editing software, such as GIMP , that allows the saving of .ico files. There are also online services that will allow you to create a favicon for free.
The image should be clear and is usually designed to match your site's image and/or content, a big task for something so small.
To prepare the image to be saved as favicon.ico:
If you're using an online service to create your favicon, such as Faviconer.com (creates 24bit favicon.ico with a transparent background) or Dynamic Drive , follow the instructions provided by the site and then download the favicon.ico image to your computer.
If there is already an old favicon.ico file in your current theme's main folder , delete it using FTP Clients .
In order for your favicon to show up in some older browsers, you will need to edit your page header. Remember, the best way to edit your theme's files is via a Child Theme . For the purpose of the following instructions you will need to create a copy of your parent theme's header.php file in your child theme.
<link rel="shortcut icon" href="<?php echo get_stylesheet_directory_uri(); ?>/favicon.ico" />
This method needs you to make sure your source image already has a transparent background, which means it should be a GIF or a PNG. The rest of steps are as above. The one difference in the code is instead of favicon.ico use favicon.png or favicon.gif.
<link rel="shortcut icon" href="<?php echo get_stylesheet_directory_uri(); ?>/favicon.png" />
To see your new favicon, clear your browser's cache . You may need to restart your browser in order to see the new favicon.
Starting with WordPress 4.7, you can now add custom CSS to your own theme from Appearance Customize Screen , without the need for additional plugins or directly editing themes and child themes. Just choose the Additional CSS tab when customizing your current theme to get started!
Any CSS changes you make will appear in the preview, just like other changes made in the customizer, this means you have time to tweak and perfect the look of your site, without actually changing anything until you are happy with it all!
Keep in mind that the CSS changes are tied in with your theme. This means that if you change to a new theme, your custom CSS styles will no longer be active (of course, if you change back to your previous theme, they will once again be there).
There are a few reasons why:
Several classes for aligning images and block elements (div, p, table etc.) were introduced in WordPress 2.5: aligncenter, alignleft and alignright. In addition the class alignnone is added to images that are not aligned, so they can be styled differently if needed.
The same classes are used to align images that have a caption (as of WordPress 2.6). Three additional CSS classes are needed for the captions, and one more for accessibility. Together, the classes are:
/* =WordPress Core
-------------------------------------------------------------- */
.alignnone {
    margin: 5px 20px 20px 0;
}

.aligncenter,
div.aligncenter {
    display: block;
    margin: 5px auto 5px auto;
}

.alignright {
    float:right;
    margin: 5px 0 20px 20px;
}

.alignleft {
    float: left;
    margin: 5px 20px 20px 0;
}

a img.alignright {
    float: right;
    margin: 5px 0 20px 20px;
}

a img.alignnone {
    margin: 5px 20px 20px 0;
}

a img.alignleft {
    float: left;
    margin: 5px 20px 20px 0;
}

a img.aligncenter {
    display: block;
    margin-left: auto;
    margin-right: auto;
}

.wp-caption {
    background: #fff;
    border: 1px solid #f0f0f0;
    max-width: 96%; /* Image does not overflow the content area */
    padding: 5px 3px 10px;
    text-align: center;
}

.wp-caption.alignnone {
    margin: 5px 20px 20px 0;
}

.wp-caption.alignleft {
    margin: 5px 20px 20px 0;
}

.wp-caption.alignright {
    margin: 5px 0 20px 20px;
}

.wp-caption img {
    border: 0 none;
    height: auto;
    margin: 0;
    max-width: 98.5%;
    padding: 0;
    width: auto;
}

.wp-caption p.wp-caption-text {
    font-size: 11px;
    line-height: 17px;
    margin: 0;
    padding: 0 4px 5px;
}

/* Text meant only for screen readers. */
.screen-reader-text {
	border: 0;
	clip: rect(1px, 1px, 1px, 1px);
	clip-path: inset(50%);
	height: 1px;
	margin: -1px;
	overflow: hidden;
	padding: 0;
	position: absolute !important;
	width: 1px;
	word-wrap: normal !important; /* Many screen reader and browser combinations announce broken words as they would appear visually. */
}

.screen-reader-text:focus {
	background-color: #eee;
	clip: auto !important;
	clip-path: none;
	color: #444;
	display: block;
	font-size: 1em;
	height: auto;
	left: 5px;
	line-height: normal;
	padding: 15px 23px 14px;
	text-decoration: none;
	top: 5px;
	width: auto;
	z-index: 100000;
	/* Above WP toolbar. */
}
Each Theme should have these or similar styles in its style.css file to be able to display images and captions properly. The exact HTML elements and class and ID values will depend on the structure of the Theme you are using.
To help you understand more about how CSS works in relationship to your web page, you may wish to read some of the articles cited in these lists:
If you are having some problems or questions about your WordPress Theme or layout, begin by checking the website of the Theme author to see if there is an upgrade or whether there are answers to your questions. Here are some other resources:
Let's begin by playing CSS detective. You know where the problem is, you just can't find the problem. In the above example, you need to hunt for an errant border.
Begin by carefully examining a generated page (or test page) and look for some identifying text in the sidebar, near the errant border. Let's say that listed in the sidebar, you have a post title called "All About Harry". You know you'll find that title in your sidebar when you view the page's source code.
To view a page's source code, go up to the menu bar of your browser and choose VIEW > PAGE SOURCE or VIEW > SOURCE. A page will pop up featuring the source code of the page.
Use your handy detective tool, Ctrl+F, to activate your search. Type in "all about harry" and click FIND. Odds are, unless you have the words "all about harry" in your post, it will take you to the first showing of the phrase "all about harry" which is probably in your sidebar. If not, hit FIND again until you've found the right phrase in the right area.
If you are using Internet Explorer, an alternate method is to use the Internet Explorer Developer Toolbar, which allows you to visually see and select the elements, IDs, and classes on the page. It displays the elements within the hierarchy of the page, their CSS attributes, and can outline DIVs, tables, etc. You can download the Toolbar from Microsoft .
Once you've found the phrase, it's time to play CSS detective. Look up through the code from the phrase "All About Harry" for one of two things. It will look something like either of these, using words like sidebar, menu, or sidecolumn:
<div id="sidebar">

or

<div class="sidebar">
This is the main section that contains your sidebar menu. You've found the first suspect.
Now, open your style.css file and do another search for sidebar or whatever the resulting name was that you uncovered. It is usually identified in two ways:
#sidebar

or

.sidebar
Look in the styles under these CSS selectors and see if there is a mention of border, often looking something like this:
#sidebar {position: relative; float: right; width: 170px;
    color: blue; font-size: 90%; border-right: solid 1px blue; }
There is your border, the criminal! If this is the guilty party, delete the reference to the border and you are good to go.
If it isn't, the hunt continues.
Sometimes the culprit is the one you least suspect. Maybe the border is not caused by the obvious suspect, the sidebar, but by the content section. Return to the generated page source code and search for the first words of your post. Look above that for something like:
<div id="content">
It could be called content, page. post, maincolumn, widecolumn, or have another alias, but it should be the CSS container that holds your post information. Now, go back to the style sheet and check to see if there is a border in that section.
If all of these fail, the CSS detective never gives up the hunt. Return to the hiding place of all styles, the style.css file, and frisk it by doing a search for "border" and look carefully at each suspect. Note the selector ID name, like sidebar, menu, content and page, and then go back to the generated page source to see if that might be your culprit.
You can also select the border suspect you've found on the style sheet and cut and paste it into a TXT file (like Notepad) that just sits open on your computer like a scratch notepad. Make a note of which selector name you removed it from like this:
Removed border: solid 2px green from #content
Then save the edited style.css and upload it to your site. Refresh the generated test post and see if the unwanted border is gone. If so, you found the culprit. If not, return to the Notepad and copy the code and put it back into your style.css in the "content" section, putting things back where you found it.
If you do find your culprit, do a little dance, squeal and cheer, and make others suspicious and nervous when they are around you. The CSS detective solves another CSS crime!
Just as you can have subcategories within your Categories, you can also have subpages within your Pages, creating a hierarchy of pages.
For example, a WordPress site for a travel agent may feature an individual Page for each continent and country to which the agency can make travel arrangements. Under the Page titled "Africa" would be subpages for Cameroon, Lesotho, Swaziland and Togo. Another parent Page "South America" would feature subpages of Argentina, Brazil and Chile.
The structure of the pages on the site would then look like this.
When your Pages are listed , the Child Page will be nested under the Parent Page. The Permalinks of your Pages will also reflect this Page hierarchy.
In the above example, the Permalink for the Cameroon Page would be:
http://example.com/africa/cameroon/
To change the URL part (also referred to as "slug") containing the name of your Page, use the "Edit" (or "Change Permalinks" in older WordPress versions) button under the Page title on the Edit screen of the particular Page, accessible from Pages tab of WordPress Administration Screen .
WordPress is able to automatically generate a list of Pages on your site within the sidebar or footer, for example, using a Template Tag called wp_list_pages(). See the wp_list_pages page for information on how to customize how WordPress displays the list of Pages on your site.
There are also WordPress Plugins that will help you display a list of Pages within in Posts and in other areas of your WordPress Theme.
Individual Pages can be set to use a specific custom Page Template (a WordPress Theme PHP template file, e.g., my-custom-page.php) you create within your Theme. See Custom Page Templates for instructions on how to create a custom template file for a Page. This new Page Template will then override the default page.php Page Template included with your Theme.
A web page can be static or dynamic. Static pages, such as a regular HTML page that you might create with Dreamweaver, are those which have been created once and do not have to be regenerated every time a person visits the page. In contrast, dynamic pages, such as those you create with WordPress, do need to be regenerated every time they are viewed; code for what to generate on the page has been specified by the author, but not the actual page itself. These use extensive PHP code which is evaluated each time the page is visited, and the content is thus generated upon each new visit.
Almost everything in WordPress is generated dynamically, including Pages. Everything published in WordPress (Posts, Pages, Comments, Blogrolls, Categories, etc...) is stored in the MySQL database. When the site is accessed, the database information is used by your WordPress Templates from your current Theme to generate the web page being requested.
An example of a static page might be an HTML document (without any PHP code). The problem with purely static pages is that they are difficult to maintain. Changes you make to your WordPress settings, Themes and Templates will not be propagated to pages coded only in HTML. The Page feature of WordPress was developed to alleviate this problem. By using Pages, you no longer have to update your static pages every time you change the style of your site. If written properly, your dynamic Pages will update along with the rest of your blog.
Despite the dynamic nature of Pages, many people refer to them as being static. They are actually called "pseudo-static" web pages. In other words, a Page contains static information but is generated dynamically. Thus, either "static," "dynamic," or "pseudo-static" may be validly used to describe the nature of the WordPress Page feature.
To upload files, you can use WordPress's online interface, the Dashboard or one of the recommended editors and upload your files via FTP.
This article tells you how to upload files using the Dashboard. To upload files via FTP, read Uploading WordPress to a Remote Host .
After you log in to WordPress and click on the Dashboard menu at the top of the screen, you can upload files with the Flash uploader.
Dashboard lets you upload files in the following ways:WordPress supports uploading the following file types:
Images
Documents
Audio
Video
Not all webhosts permit these files to be uploaded. Also, they may not permit large file uploads. If you are having issues, please check with your host first.
Note: If you are having problems uploading files with the default Flash uploader, you may want to use the Browser uploader instead.

Note: If the file does not open, then the file type is not supported, the chosen format may not match the file’s true format or the file may be damaged.

Using Images
Using Image and File Attachments
Inserting Images into Posts and Pages
Media Library Screen
Changing File Permissions
Dashboard Screen
Sometimes a problem can arise when you make a small change to your site, and the browser doesn't recognize it as a significant change. Since the browser hasn't registered your adjustment as an actual change, it opts to reload the exact same page that you previously looked at. The solution in this case is to clear or empty your browser's cache.
Normally, to see the changes on your page, you click the Refresh button on the browser toolbar or press the F5 key on your keyboard. In many cases, this simply reloads the page without clearing the browser's cache. Here are some techniques to wipe clean the browser's cache, so that you will see the changes when your page reloads.
The way you clear the browser cache depends on the particular browser you are using. Here is how you clear the cache on a few common browsers:
In addition to clearing the cache, each browser may have a way of stopping or minimizing the caching of web pages. Using this technique will definitely slow down your web page viewing, and it isn't a perfect solution, because some caching may still occur. However, in a small way it does still help. Check your internet browser's help files for specifics on how to turn off the cache feature.
Be aware that some web hosting services use caching plugins on the backend without letting the user know explicitly. You may be able to turn this off via your webhost's configuration panel. Just to be sure, you can ask a webhost support member if any caching plugins are used, and request to have them turned off if needed.
This situation may also occur if you are using a managed WordPress hosting plan. Many managed WordPress hosting plans use server-side caching. If you are using a managed WordPress service from your hosting provider and you are seeing this issue, you may want to see if they have an option to manually flush the cache. In many cases, your changes will immediately show up after flushing the cache.
If you are using a caching HTTP reverse proxy such as Varnish on your web server, edits to your files may not appear right away. Edits may become visible after some length of time when the cached version expires. You many need to tune your caching system in order to eliminate this issue.
Some WordPress plugins also add cache functionality to your WordPress site. This helps your site load faster, because WordPress can retrieve the pages of your blog from the cache instead of generating them all over again.
Any good cache plugin will clear the cache when a post, page, or comment is published. However, if you make other changes (e.g. to your theme), the cache may not be cleared and the old version will still appear. In this case, check the plugin's instructions to find out how to clear its cache.
Note that WordPress does not come with a cache by default, so the above would only apply if you installed a cache plugin yourself.
Sometimes even the very best web page designers, developers, and programmers make a mistake. It's the little details that can mess things up. Let's look at some of the most commonly overlooked details that happen when you aren't paying attention.
Is the name and folder for the file you "fixed" the same as the one you are viewing? Look at the following two addresses (URLs).
In this case, you can probably see the difference, but when viewed in an address bar or in a text editor, you might miss the word test that specifies a specific folder location.
Pay very close attention to the difference between style1.css and stylel.css if you are using different style names, too. The first filename is style followed by the digit one, while the second filename is style followed by a lowercase L. If you are working with different but similar files, make sure you give them distinctive names like style-red.css and style-800.css so you can clearly see the difference.
If you're editing a template, are you sure that the page you're viewing is being generated from that template? Remember that many templates contain very similar text. For example, a post header may appear on a single post page, an index page, a search page, or an archive page, to name a few.
See Template Hierarchy if you're having trouble figuring out which template is in use.
When you make a change to a file, it is often on your computer's hard drive, and you have to upload the file to your host server in order to view it on the internet. Did you actually upload it? Did you put it in the right folder? Is it really there? When overwriting the exact same file, it doesn't always do a complete overwrite, so consider deleting the original from the host server and then uploading a new version, to make sure that the correct file is there in its entirety.
Let's say that:
a) You're working with the correct file, and
b) It's in the right place with the right name, but you still can't see the changes you've made.
At this point, it's time to complete the following steps:
You can check out the following resources for more help:
Fundamentally, the WordPress Theme system is a way to "skin" your weblog. Yet, it is more than just a "skin." Skinning your site implies that only the design is changed. WordPress Themes can provide much more control over the look and presentation of the material on your website.
A WordPress Theme is a collection of files that work together to produce a graphical interface with an underlying unifying design for a weblog. These files are called template files . A Theme modifies the way the site is displayed, without modifying the underlying software. Themes may include customized template files, image files (*.jpg, *.gif), style sheets (*.css), custom Pages , as well as any necessary code files (*.php). For an introduction to template files, see Stepping Into Templates .
Let's say you write a lot about cheese and gadgets. Through the use of the WordPress Loop and template files , you can customize your Cheese category posts to look different from your Gadgets category posts. With this powerful control over what different pages and categories look like on your site, you are limited only by your imagination. For information on how to use different Themes for different categories or posts, see The Loop in Action and Category Templates . <script async src="//pagead2.googlesyndication.com/pagead/js/adsbygoogle.js"></script> <script>
 (adsbygoogle = window.adsbygoogle || []).push({
   google_ad_client: "ca-pub-1902768349283473",
   enable_page_level_ads: true
 });
</script>
The WordPress Theme Directory is the official site for WordPress Themes which have been checked and inspected, and are free for downloading. The site features the ability to search by type and style, and offers a demonstration of the page view elements of the Theme.
WordPress currently comes with three themes: the default Twenty Fifteen theme , and previous defaults Twenty Fourteen theme and Twenty Thirteen theme . You can switch between Themes using the Appearance admin panel. Themes that you add to the theme directory will appear in the Administration Screen > Appearance > Themes as additional selections.
There are many Themes available for download that will work with your WordPress installation.
If the Theme that you are installing provides instructions, be sure to read through and follow those instructions for the successful installation of the Theme. It is recommended that Theme developers provide installation instructions for their own Themes, because Themes can provide special optional functionality that may require more steps than the basic installation steps covered here. If your Theme does not work after following any provided instructions, please contact the Theme author for help.
You can download Themes directly to your blog by using the Add New Themes option in the Appearance sub-menu.
If your host offers the cPanel control panel, and the Theme files are in a .zip or .gz archive follow these instructions. Note: This assumes the Theme you download is a compressed (.zip) file containing a folder under which all the Theme files reside.
To add a new Theme to your WordPress installation, follow these basic steps:
To select a Theme for your site:
Your selection will immediately become active.
Note: If the Theme preview is blank, do not activate the new Theme without investigating further. Your site may not be displayed correctly, otherwise.
If you are interested in creating your own Theme for distribution, or learning more about the architecture of Themes, please review the documentation regarding Theme Development .
If you simply want to customize your current Theme for your own use, consider creating a Child Theme .
Since the introduction of HTML5, WordPress and most themes support HTML5. XHTML is considered obsolete.
WordPress, as a system, is based on documents written in the XHTML scripting language. XHTML 1.0 (which is currently the most widely supported version and stands for eXtensible Hyper Text Markup Language) became a W3C recommendation in the year 2000, and was intended to serve as an interim technology until XHTML 2.0 could be finalized. Eight years later XHTML 2.0 still isn't finished. This document therefore uses the phrase XHTML to refer to XHTML 1.0 only.
XHTML is very similar to HTML as both are descendants of a language called SGML. However, XHTML is also descended from XML, which is a scripting language with much stricter grammar rules than HTML, and XHTML has inherited some of that discipline. XHTML is mainly differentiated from HTML by its use of a new MIME TYPE and the addition of some new syntax rules which are explained below.
WordPress prints XHTML from all its internal functions, all themes therefore are now in XHTML and so too are most plugins. So, if you want to use WordPress, you should buckle down and learn some XHTML as that's where it is right now.
If you are familiar with HTML, you will be glad to know that the majority of what you know about HTML is still relevant in XHTML. The main differences are that XHTML forces webpage authors to be more consistent and to write more legible code. There are a few syntax and grammar differences and a few HTML tags have been dropped and, really, that's about it. If you know HTML then you'll be surprised at how easy it is to switch to XHTML, and the new XHTML rules will force you to become a better programmer too!
Well, here's a quick check list of the important requirements of XHTML and the differences between it and HTML. This is NOT a comprehensive XHTML language reference. Please look here for that.
In these examples some code has been omitted for clarity
Right:
<a href="www.kilroyjames.co.uk" >
Wrong:
<A HREF="www.kilroyjames.co.uk" >
Right:
<a href="www.kilroyjames.co.uk">
Wrong:
<a href=www.kilroyjames.co.uk>
Right:
<em>this emphasis just keeps getting <strong>stronger and stronger</strong></em>
Wrong:
<em>this emphasis just keeps getting <strong>stronger and stronger</em></strong>
The DOCTYPE is an intimidating looking piece of code that must appear at the start of every XHTML document, it tells the browser how to render the document.
Rules for the DOCTYPE tag:
* I am, of course, perfectly serious...
There are three types of valid XHTML 1.0 document: Strict, Transitional, and Frameset. If you can get your document to validate with "Strict" then do so, however some legacy tags and attributes aren't allowed in Strict so you can use "Transitional" instead.
Note: you might have a problem getting WordPress to validate as Strict because, as of version 2.6.2, some of the internally generated <form> elements still use the "name" attribute, which is not allowed under the Strict DTD, ie. <input name="my_button" />
Note also that using a Transitional DTD takes most browsers out of "Standards" mode. It is much trickier to get your web pages to look consistent across different browsers when the browsers are not in Standards mode. I'm not going to explain the minutiae of the DOCTYPE tag as it gets deeper and more complicated, just know that for best results you should use one of the following, preferably the first one (Strict):
<!DOCTYPE html PUBLIC "-//W3C//DTD XHTML 1.0 Strict//EN"
"
http://www.w3.org/TR/xhtml1/DTD/xhtml1-strict.dtd
">
<!DOCTYPE html PUBLIC "-//W3C//DTD XHTML 1.0 Transitional//EN"
"
http://www.w3.org/TR/xhtml1/DTD/xhtml1-transitional.dtd
">
You don't need to understand the "XML namespace" attribute, except to know that it is required in all XHTML documents. Here is an example of how to write it:
<html xmlns="
http://www.w3.org/1999/xhtml
">
In HTML it is possible to write a webpage that contains none of the above tags; in XHTML it is not. The above tags must be included and they must be nested and ordered correctly, as follows (the DOCTYPE has been omitted):
<html xmlns="
http://www.w3.org/1999/xhtml
">
 <head>
  <title></title>
 </head>

 <body>
  <p>
    See how the TITLE must be placed in the document HEAD – the TITLE is considered
to be a "required child" element of the HEAD.
 Notice that the HEAD must also appear before the document BODY.
Notice also how both the HEAD and the BODY must be contained
 within the HTML tag. Again, HEAD and BODY are "required child"
 elements of the HTML tag. Finally, notice that this text is
written within a <p>paragraph</p> tag; in XHTML you may
not write text directly in the BODY tag without using a suitable
container tag, such as <p> or <div>.
  </p>
 </body>
</html>
<p>Mary had a little lamb
<p>It's fleece was white as snow
This code is not valid XHTML as the closing </p> tags have been left out. The following example is correct.
<p>Mary had a little lamb</p>
<p>It's fleece was white as snow</p>
In XHTML even single tags have to be closed - absolutely NO tag may be left open.
<p>
 Mary had a little lamb <br>
 It's fleece was white as snow
</p>
Therefore the above example is wrong because the <br> tag is not closed. To close a single tag like <br> and <hr> you simply add a forward slash before the final bracket, like so: <br /> and <hr /> (the white space is optional). To correct the above example we'd write:
<p>
 Mary had a little lamb <br />
 It's fleece was white as snow
</p>
This is correct XHTML.
In HTML, attributes can be strung together almost like they were keywords, ie. <dl compact>, this is called attribute minimisation. In XHTML that is not allowed, attributes and values must be explicit, ie.
<dl compact="compact">
In HTML it was legal to use ID and NAME attributes interchangeably. In XHTML the NAME attribute is formally deprecated and cannot be used. In all cases where you would think to use a NAME attribute you must now use ID instead. e.g.
correct HTML
<input type="submit" name="s" value=" Search " >
and now the correct XHTML version
<input type="submit" id="s" value=" Search " />
XHTML does not allow STYLE declarations within the body of a document they must be placed in the document HEAD instead.
Write all literal ampersands as & or they will be assumed to be part of an entity reference. e.g. ® is the entity reference for the symbol ®. Therefore M&S is invalid XHTML because &S is not an entity reference, you must write it as M&S.
As was previously mentioned, this is not a comprehensive reference but it should be enough to get you up and running with XHTML pretty quickly. Good luck!
Most people don't realise that to use XHTML properly it must be served using the new MIME TYPE "application/xhtml+xml". A MIME TYPE is simply a description that the web server sends to a browser to tell it what sort of document is coming. For instance a JPG image is sent with a MIME TYPE of "image/jpeg" and an HTML document with a MIME TYPE of "text/html". Sending an XHTML document with a MIME TYPE of "text/html" results in the document being parsed and validated as HTML, not as you would no doubt hope, as XHTML. You must use the correct MIME TYPE if you want to use XHTML otherwise you are simply using non-standard HTML. In order to avoid this problem and output standards compliant code you can use the XHTML to HTML wordpress plugin .
Because of seemingly intractable problems with the development of XHTML (mainly that XHTML 2 is incompatible with previous versions of XHTML and HTML and also the MIME TYPE issue), a competing standard supported by Mozilla (Firefox), Apple (Safari), Opera, Microsoft (Internet Explorer) and some other key Internet players has become the new favourite to succeed the old HTML 4.01 standard.
HTML5 was passed as a working draft by the W3C in January 2008 and became a candidate recommendation in December 2012.
Post in WordPress is a post type that is typical for and most used by blogs. Posts are normally displayed in a blog in reverse sequential order by time (newest posts first). Posts are also used for creating the feeds .
Page in WordPress is like post, but it lives outside the normal time-based listings of posts. Pages can use different page templates to display them. Pages can also be organized in a hierarchical structure, with pages being parents to other pages, but they normally cannot be assigned categories and tags . If permalinks are enabled, the permalink of a page is always composed solely of the main site URL and the user-friendly and URL-valid names (also referred to as slug ) of the page and its parents if they exist. See the Pages article for more information about the differences.
Attachment is a special post that holds information about a file uploaded through the WordPress media upload system, such as its description and name. For images, this is also linked to metadata information, stored in the wp_postmeta table, about the size of the images, the thumbnails generated from the images, the location of the image files, the HTML alt text, and even information obtained from EXIF data embedded in the images.
Revision is used to hold a draft post as well as any past revisions of a published post. Revisions are basically identical to the published post which they belong to, but have that post set as their parent using the post_parent column of the wp_posts table.
Navigation Menu is a type that holds information about a single item in the WordPress navigation menu system. These are the first examples of entries in the wp_posts table to be used for something other than an otherwise displayable content on the blog.
Custom CSS is a theme specific post used to store CSS saved from The Customizer's "Additional CSS" screen. Each theme could have their own post but only the active themes `custom_css` post is used when displaying the theme.
Changesets is similar to auto-saves but specifically for The Customizer. This is to keep The Customizer in a persistent state. WordPress will attempt to keep content changes made through The Customizer during the user session in a `customize_changeset` post and attempt to pull them back up should your cat close your browser.
Custom post types are new post types you can create. A custom post type can be added to WordPress via the register_post_type() function. This function allows you to define a new post type by its labels, supported features, availability and other specifics.
Note that you must call register_post_type() before the admin_menu and after the after_setup_theme action hooks . A good hook to use is the init hook.
Here's a basic example of adding a custom post type:
function create_post_type() {
  register_post_type( 'acme_product',
    array(
      'labels' => array(
        'name' => __( 'Products' ),
        'singular_name' => __( 'Product' )
      ),
      'public' => true,
      'has_archive' => true,
    )
  );
}
add_action( 'init', 'create_post_type' );
This creates a post type named Product identified as acme_product. The register_post_type() function receives two major arguments. The first one is labels which define the name of the post type in both plural and singular forms. The second one is public which is a predefined flag to show the post type on the administration screens and to make it show up in the site content itself, if it's queried for.
There are many more arguments you can pass to the register_post_type() function, to do things like set up hierarchy (to behave like pages), show the new post type in searches, change the URLs of the new posts, and hide or show meta boxes in the post edit screen. These parameters are optional, and you can use them to configure your post type on a detailed level.
For your index or archive page to be accessible (at /acme-product in the above example) you will need to update (or "flush") the permalink structure as described in the Custom Post Type Templates section. The template file used for the index is explained here .
In order to avoid breaking a site on theme switching, try to define custom post types as a plugin, or, better as a Must Use Plugins . This way you won't force users into using a certain theme.
While it is convenient to use a simple custom post type identifier like product which is consistent with the identifiers of the default post types (post, page, revision, attachment and nav_menu_item), it is better if you prefix your identifier with a short namespace that identifies your plugin, theme or website that implements the custom post type.
For example:
Without namespacing your custom post type identifier, other post types in your website will more likely conflict with custom post types defined in a theme you fall in love with later or a plugin you realize that you absolutely need to use. Or if you are developing custom post types or themes there is a much greater chance your plugin or theme will conflict with custom post types defined in other plugins or themes and/or custom post types defined in your prospective user's website. Namespacing your custom post type identifier will not guarantee against conflicts but will certainly minimize their likelihood.
Do pay close attention to not having your custom post type identifier exceed 20 characters though, as the post_type column in the database is currently a VARCHAR field of that length.
Although the core development team has yet to make a final decision on this, it has been proposed on the wp-hackers mailing list that future core post type identifiers will be namespaced with wp_, i.e. if the core team decides to add an event post type then according to this suggestion they would use the wp_event identifier. Even though this has not been finalized, it will be a good idea to avoid any custom post types whose identifier begins with wp_.
(or How to Add Custom Posts)
When a custom post type is created like in the example above , it gets a new top-level administration menu to create and manage posts of that new post type. New administration screens will be accessible from that menu, such as post edit screen where you will have a full post editor and everything that comes along with it according to what features you set that your custom post type should support by the supports argument of the register_post_type() function. You can customize the screens with several action and filter hooks, see this Custom Post Type Snippets post by Yoast for an explanation and code examples on how to change a custom post type overview screen.
A custom post type will also get its own slug within the site URL structure. In the above example, a post of this product custom post type can be displayed at http://example.com/acme_product/%product_name% where acme_product is the slug of your custom post type and %product_name% is the slug of your particular product, so a permalink could be e.g. http://example.com/product/foobrozinator. You can see this permalink appear on the edit post screen for your custom post type, just like with default post types.
When you namespace a custom post type identifier and still want to use a clean URL structure, you need to set the rewrite argument of the register_post_type() function. For example, assuming the ACME Widgets example from above:
function create_posttype() {
  register_post_type( 'acme_product',
    array(
      'labels' => array(
        'name' => __( 'Products' ),
        'singular_name' => __( 'Product' )
      ),
      'public' => true,
      'has_archive' => true,
      'rewrite' => array('slug' => 'products'),
    )
  );
}
add_action( 'init', 'create_posttype' );
The above will result in post URLs in the form http://example.com/products/%product_name%. Note that we used a plural word for the slug here which is a form that some people prefer because it implies a more logical URL for a page that embeds a list of products, i.e. http://example.com/products/.
Also note that using a generic slug like products here can potentially conflict with other plugins or themes that use the same slug, but most people would dislike longer and more obscure URLs like http://example.com/acme_products/foobrozinator and resolving the URL conflict between two plugins is easier simply because the URL structure is not stored persistently in each post's database record the same way custom post type identifiers are stored.
The WordPress theme system supports custom templates for custom post types too. A custom template for a single display of posts belonging to a custom post type is supported since WordPress Version 3.0 and the support for a custom template for an archive display was added in Version 3.1 .
Note: In some cases, the permalink structure must be updated in order for the new template files to be accessed when viewing posts of a custom post type. To do this, go to Administration Panels > Settings > Permalinks , change the permalink structure to a different structure, save the changes, and change it back to the desired structure.
In the same way single posts and their archives can be displayed using the single.php and archive.php template files, respectively,
where {post_type} is the $post_type argument of the register_post_type() function.
So for the above example, you could create single-acme_product.php and archive-acme_product.php template files for single product posts and their archives.
Alternatively, you can use the is_post_type_archive() function in any template file to check if the query shows an archive page of a given post types(s), and the post_type_archive_title() to display the post type title.
In any template file of the WordPress theme system, you can also create new queries to display posts from a specific post type. This is done via the post_type argument of the WP_Query object.
Example:
$args = array( 'post_type' => 'product', 'posts_per_page' => 10 );
$loop = new WP_Query( $args );
while ( $loop->have_posts() ) : $loop->the_post();
  the_title();
  echo '<div class="entry-content">';
  the_content();
  echo '</div>';
endwhile;
This simply loops through the latest 10 product posts and displays the title and content of them one by one.
Registering a custom post type does not mean it gets added to the main query automatically.
If you want your custom post type posts to show up on standard archives or include them on your home page mixed up with other post types, use the pre_get_posts action hook .
// Show posts of 'post', 'page' and 'movie' post types on home page
function add_my_post_types_to_query( $query ) {
  if ( is_home() && $query->is_main_query() )
    $query->set( 'post_type', array( 'post', 'page', 'movie' ) );
  return $query;
}
add_action( 'pre_get_posts', 'add_my_post_types_to_query' );
Post Types: register_post_type() , add_post_type_support() , remove_post_type_support() , post_type_supports() , post_type_exists() , set_post_type() , get_post_type() , get_post_types() , get_post_type_object() , get_post_type_capabilities() , get_post_type_labels() , is_post_type_hierarchical() , is_post_type_archive() , post_type_archive_title()
A simple WordPress web page structure is made up of three basic building "blocks": a header, the content, and a footer. Each of these blocks is generated by a template file in your current WordPress Theme.
Header
Content
Footer
To generate such a structure within a WordPress Theme , start with an index.php template file in your Theme's directory. This file has two main functions:
For our simple structure, we only need to include two other template files: the header and the footer. These must be named header.php and footer.php. The Template Tags that include them look like this:
<?php get_header(); ?>


<?php get_footer(); ?>
In order to display the posts and pages of your blog (and to customize how they are being displayed), your index.php file should run the WordPress Loop between the header and footer calls.
Header
Content
Sidebar
Footer
Many WordPress themes include one or several Sidebars that contains navigation features and more information about your website. The sidebar is generated by a template file called sidebar.php. It can be included in your index.php template file with the following template tag :
<?php get_sidebar(); ?>
Notice that we have not included a template tag to "get" the content of our web page. That is because the content is generated in the WordPress Loop , inside index.php.
Also note that the Theme's style sheet determines the look and placement of the header, footer, sidebar, and content in the user's browser screen. For more information on styling your WordPress Themes and web pages, see Blog Design and Layout .
You have seen how WordPress includes standard template files (header, footer, and sidebar) within the index.php template file. You can also include other template files within any of your template files.
For example, sidebar.php might contain a template file that generates a search form — searchform.php. Because this is not one of WordPress's standard template files, the code to include it is a little different:
<?php get_search_form(); ?>
We should no longer be using include and TEMPLATEPATH to get our search forms into themes as WordPress supplies the above template tag.
Header
Content
Comment Form
Sidebar
Search Form
Footer
Most WordPress Themes include a variety of template files within other templates to generate the web pages on the site. The following template files are typical for the main template (index.php) of a WordPress site:
However, this structure can be changed. For instance, you could put the search form in your header. Perhaps your design does not need a footer, so you could leave that template out entirely.
WordPress features two core page views of web pages in a WordPress site. The single post view is used when the web pages displays a single post. The multi-post view lists multiple posts or post summaries, and applies to category archives, date archives, author archives, and (usually) the "normal" view of your blog's home page. You can use the index.php template file to generate all of these types of pages or rely on WordPress' template hierarchy to choose different template files depending on the situation.
The WordPress Template Hierarchy answers the following question:
What template file will WordPress use when a certain type of page is displayed?
WordPress automatically recognizes template files with certain standard names and uses them for certain types of web pages. For example, when a user clicks on the title of a blog post, WordPress knows that they want to view just that article on its own web page. The WordPress template hierarchy will use the single.php template file rather than index.php to generate the page — if your Theme has a single.php file. Similarly, if the user clicks on a link for a particular category, WordPress will use the category.php template if it exists; if it doesn't, it looks for archive.php, and if that template is also missing, WordPress will go ahead and use the main index.php template. You can even make special template files for specific categories (see Category Templates for more information). You can also make Custom Page Templates for specific Pages.
Here are some tips for creating WordPress template files:
For a comprehensive list of resources related to Template Files, see Templates . You may also wish to view the other articles in Category:Templates and Category:Template Tags .
it looks like this:<h1><?php bloginfo('name'); ?></h1>
The template tag is <?php bloginfo(); ?> wrapped in an H1 heading tag. The bloginfo() tag gets information from your User Profile and Options > General in the Administration Panels . In the example here, the word name inside of the quote marks in the tag instructs the tag to "get the blog's site name". This is called a parameter.
In addition to the name parameter in the <?php bloginfo(); ?> template tag, there is other information that can be displayed. Let's look at a few of these parameters - and you can find more information and examples on the bloginfo() Codex page.
<?php bloginfo('name'); ?><?php bloginfo('description'); ?><?php bloginfo('url'); ?><?php bloginfo('admin_email'); ?><?php bloginfo('version'); ?>To show the WordPress version, the template tag would look like this:
<p>Powered by WordPress version <?php bloginfo('version'); ?></p>
Notice that only the version number is generated by the version parameter, not the words "Powered by WordPress version". Those were written in before the tag so they would be visible on the web page.
To learn more about template tag parameters, see Anatomy of a Template Tag and How to Pass Tag Parameters .
Going through the various template tags in the Template Tags menu on the Codex, you will see that many of them are very simple, like the bloginfo() template tag, but many look very complicated to use. Let's look at some examples of how they are used to help you understand the "language" of the template tag codes.
As we saw in the bloginfo() template tag, all it took was one word to change the output of the tag. This word is called a parameter and it instructs the template tag to do or get something. In this case, the instruction is to get name which displays the site's name.
The template tag the_title() displays the title of the post , usually at the top of your post article. This tag gets the post title and displays it, by default, but it also has a do with the parameters which will help you change the look and presentation of the post title.
By default, the tag looks like this:
<?php the_title(); ?>
And the results look something like this:
Let's say you want to put some kind of reference that highlights the title in some way, like a graphic or character entity like an arrow or bullet. Let's put a yen sign, ¥ ,the sign for Japanese money, in front of our title.
If you look carefully at the instructions for the tag the_title(), you will see that the parameters are:
<?php the_title('before', 'after', display); ?>
We want the yen sign to be before the title, with a space after the yen sign and before the title, so let's add it to the parameters:
<?php the_title('¥ '); ?>
Which, when the page is generated, would look like this:
Now, let's take this a little further and put something after the post title. Let's say you want to encourage people to read so we'll add a little incentive arrow ( » ) to motivate them.
<?php the_title('¥ ', ' »'); ?>
Notice, we added another space before the arrow to separate it from the post title when the page is generated for viewing.
You can also style your title heading in many different ways. Here is another example using heading tags.
<h2><?php the_title('Post Title: '); ?></h2>
We've put the entire post title into an H2 heading and added the phrase "Post Title" to the beginning of the post title.
Note: Not all template tags take before and after arguments, though the_title does. Check the codex page for the specific tag you're using to see what arguments it accepts.
The above template tag example uses simple parameters separated from each other with quote marks and commas. Now consider examples of Boolean Template Tags that connect more than one parameter together using boolean math techniques. One common boolean expression uses the "and (&)" logic to connect the parameters.
The template tag wp_list_cats() is commonly found in the WordPress sidebar or menu template file. It lists the site's Categories .
<?php wp_list_cats(); ?>
By default, some of the template tags' parameters are:
An example of this category list might be:
The indented list with "About WordPress", "About Writing", and "About Story Telling" are the children or sub-Categories of the parent Category "Things I Want To Share". These titles, by default, are not the actual titles of the Categories, they are the descriptions of the Category you set in the Administration > Manage > Categories panel.
If you would like to show the actual title of the Category, instead of the Category description, change the template tag to:
<?php wp_list_cats('use_desc_for_title=0'); ?>
The zero sets the parameter to false, turning off the use of the description as the title. Now the Category titles would appear:
Let's say that you don't want the sub-Categories for "Sharing" to appear on your list. You would then add the parameter to not show the children, along with the parameter for showing only titles and not descriptions, with the boolean "and" using the ampersand ( & ).
<?php wp_list_cats('use_desc_for_title=0&children=0'); ?>
Notice there are no spaces around the ampersand. All the parameters run together without any spaces or quote marks in between, just around the whole parameter. Now the Category titles would appear as:
As another example, if you want to display the Category links as the Category title, sort the list alphabetically by name, show the number of posts within each Category, and only show the children (sub-Categories) of Category ID number 3 ("Sharing"), the template tag would look like this:
<?php wp_list_cats('sort_column=name&sort_order=asc&optioncount=1&use_desc_for_title=0&child_of=3'); ?>
Many of WordPress' template tags work within the WordPress Loop . This means that they are included in the template files as part of the php "loop" that generates the pages the viewer sees based upon the instructions inside of the Loop.
The WordPress Loop begins with:
<?php if ( have_posts() ) : while ( have_posts() ) : the_post(); ?>
Template tags that work within the loop must be in the middle area here, before the ending section of the Loop below:
<?php endwhile; else: ?>
<p><?php _e('Sorry, no posts matched your criteria.'); ?></p>
<?php endif; ?>
Template tags that need to be inside of the loop include the_content() , the_excerpt() , next_post() , and previous_post() . If the template tag you want to use doesn't have to be within the Loop, like wp_list_cats() and wp_list_pages() , then you can put it anywhere you like, for instance in the sidebar, header, or footer template files .
This is just a tiny step into learning about the various powerful template tags WordPress uses to generate your website. You can learn more about the different template tags WordPress uses in the following articles and resources.
As discussed, template files are modular, reusable files, used to generate the web pages on your WordPress site. Some template files (such as the header and footer template) are used on all of your site’s pages, while others are used only under specific conditions.
This article explains how WordPress determines which template file(s) to use on individual pages. If you want to customize an existing WordPress theme it will help you decide which template file needs to be edited.
Tip: You can also use Conditional Tags to control which templates are loaded on a specific page.
WordPress uses the query string to decide which template or set of templates should be used to display the page. The query string is information that is contained in the link to each part of your website. It comes after the initial question mark and may contain a number of parameters separated by ampersands.
Put simply, WordPress searches down through the template hierarchy until it finds a matching template file. To determine which template file to use, WordPress:
With the exception of the basic index.php template file, you can choose whether you want to implement a particular template file or not.
If WordPress cannot find a template file with a matching name, it will skip to the next file in the hierarchy. If WordPress cannot find any matching template file, the theme’s index.php file will be used.
If your blog is at http://example.com/blog/ and a visitor clicks on a link to a category page such as http://example.com/blog/category/your-cat/, WordPress looks for a template file in the current theme’s directory that matches the category’s ID to generate the correct page. More specifically, WordPress follows this procedure:
category-unicorns.php.category-unicorns.php is missing and the category’s ID is 4, WordPress looks for a template file named category-4.php.category-4.php is missing, WordPress will look for a generic category template file, category.php.category.php does not exist, WordPress will look for a generic archive template, archive.php.archive.php is also missing, WordPress will fall back to the main theme template file, index.php.The following diagram shows which template files are called to generate a WordPress page based on the WordPress template hierarchy.
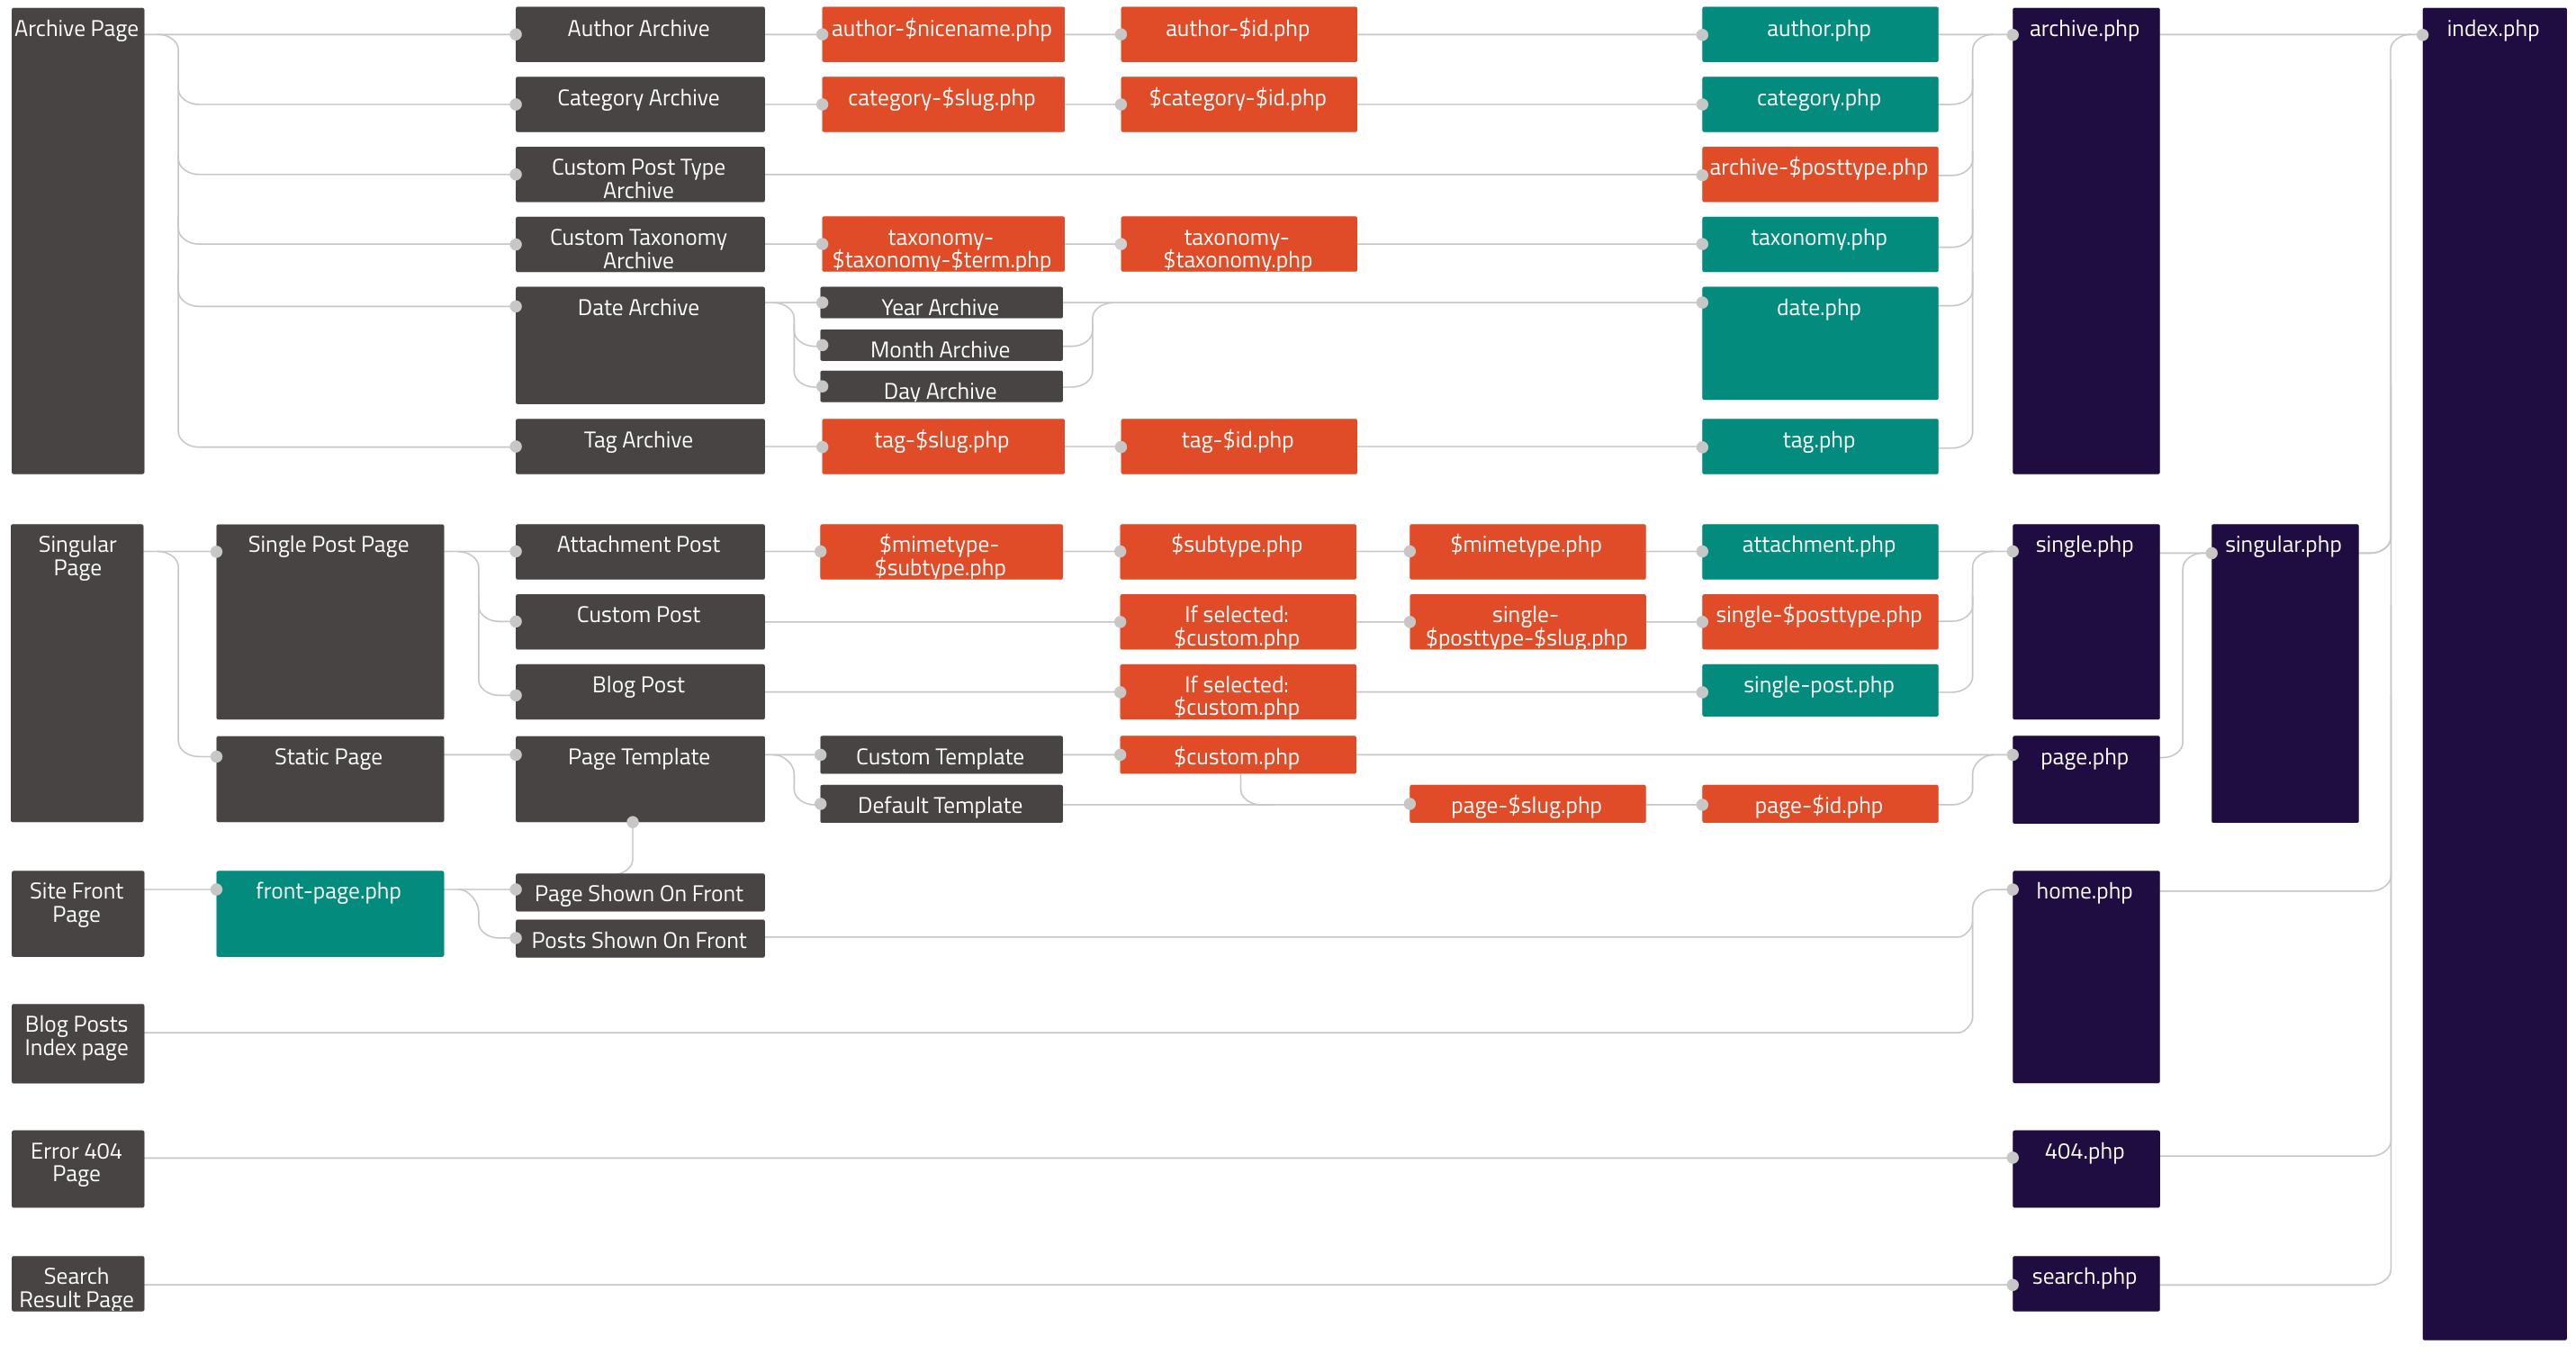
You can also interact with this diagram .
While the template hierarchy is easier to understand as a diagram, the following sections describe the order in which template files are called by WordPress for a number of query types.
By default, WordPress sets your site’s home page to display your latest blog posts. This page is called the blog posts index. You can also set your blog posts to display on a separate static page. The template file home.php is used to render the blog posts index, whether it is being used as the front page or on separate static page. If home.php does not exist, WordPress will use index.php.
home.phpindex.php
Note: If front-page.php exists, it will override the home.php template.
The front-page.php template file is used to render your site’s front page, whether the front page displays the blog posts index (mentioned above) or a static page. The front page template takes precedence over the blog posts index (home.php) template. If the front-page.php file does not exist, WordPress will either use the home.php or page.php files depending on the setup in Settings → Reading. If neither of those files exist, it will use the index.php file.
front-page.php – Used for both “your latest posts” or “a static page” as set in the front page displays section of Settings → Reading.home.php – If WordPress cannot find front-page.php and “your latest posts” is set in the front page displays section, it will look for home.php. Additionally, WordPress will look for this file when the posts page is set in the front page displays section.page.php – When “front page” is set in the front page displays section.index.php – When “your latest posts” is set in the front page displays section but home.php does not exist or when front page is set but page.php does not exist.As you can see, there are a lot of rules to what path WordPress takes. Using the chart above is the best way to determine what WordPress will display.
The single post template file is used to render a single post. WordPress uses the following path:
single-{post-type}-{slug}.php – (Since 4.4) First, WordPress looks for a template for the specific post. For example, if
post type
is product and the post slug is dmc-12, WordPress would look for single-product-dmc-12.php.single-{post-type}.php – If the post type is product, WordPress would look for single-product.php.single.php – WordPress then falls back to single.php.singular.php – Then it falls back to singular.php.index.php – Finally, as mentioned above, WordPress ultimately falls back to index.php.The template file used to render a static page (page post-type). Note that unlike other post-types, page is special to WordPress and uses the following path:
custom template file – The
page template
assigned to the page. See
get_page_templates()
.page-{slug}.php – If the page slug is recent-news, WordPress will look to use page-recent-news.php.page-{id}.php – If the page ID is 6, WordPress will look to use page-6.php.page.phpsingular.phpindex.phpRendering category archive index pages uses the following path in WordPress:
category-{slug}.php – If the category’s slug is news, WordPress will look for category-news.php.category-{id}.php – If the category’s ID is 6, WordPress will look for category-6.php.category.phparchive.phpindex.phpTo display a tag archive index page, WordPress uses the following path:
tag-{slug}.php – If the tag’s slug is sometag, WordPress will look for tag-sometag.php.tag-{id}.php – If the tag’s ID is 6, WordPress will look for tag-6.php.tag.phparchive.phpindex.phpCustom taxonomies use a slightly different template file path:
taxonomy-{taxonomy}-{term}.php – If the taxonomy is sometax, and taxonomy’s term is someterm, WordPress will look for taxonomy-sometax-someterm.php. In the case of
post formats
, the taxonomy is ‘post_format’ and the terms are ‘post-format-{format}. i.e. taxonomy-post_format-post-format-link.php for the link post format.taxonomy-{taxonomy}.php – If the taxonomy were sometax, WordPress would look for taxonomy-sometax.php.taxonomy.phparchive.phpindex.phpCustom Post Types use the following path to render the appropriate archive index page.
archive-{post_type}.php – If the post type is product, WordPress will look for archive-product.php.archive.phpindex.php(For rendering a single post type template, refer to the single post display section above.)
Based on the above examples, rendering author archive index pages is fairly explanatory:
author-{nicename}.php – If the author’s nice name is matt, WordPress will look for author-matt.php.author-{id}.php – If the author’s ID were 6, WordPress will look for author-6.php.author.phparchive.phpindex.phpDate-based archive index pages are rendered as you would expect:
date.phparchive.phpindex.phpSearch results follow the same pattern as other template types:
search.phpindex.phpLikewise, 404 template files are called in this order:
404.phpindex.phpRendering an attachment page (attachment post-type) uses the following path:
{MIME-type}.php – can be any
MIME type
(For example: image.php, video.php, pdf.php). For text/plain, the following path is used (in order):
text-plain.phpplain.phptext.phpattachment.phpsingle-attachment-{slug}.php – For example, if the attachment slug is holiday, WordPress would look for single-attachment-holiday.php.single-attachment.phpsingle.phpsingular.phpindex.phpThe embed template file is used to render a post which is being embedded. Since 4.5, WordPress uses the following path:
embed-{post-type}-{post_format}.php – First, WordPress looks for a template for the specific post. For example, if its post type is post and it has the audio format, WordPress would look for embed-post-audio.php.embed-{post-type}.php – If the post type is product, WordPress would look for embed-product.php.embed.php – WordPress then falls back to embed.php.wp-includes/theme-compat/embed.php template.Since WordPress 4.7, any dynamic part of a template name which includes non-ASCII characters in its name actually supports both the un-encoded and the encoded form, in that order. You can choose which to use.
Here’s the page template hierarchy for a page named “Hello World 😀” with an ID of 6:
page-hello-world-😀.phppage-hello-world-%f0%9f%98%80.phppage-6.phppage.phpsingular.phpThe same behaviour applies to post slugs, term names, and author nicenames.
The WordPress template system lets you filter the hierarchy. This means that you can insert and change things at specific points of the hierarchy. The filter (located in the
get_query_template()
function) uses this filter name: "{$type}_template" where $type is the template type.
Here is a list of all available filters in the template hierarchy:
embed_template404_templatesearch_templatefrontpage_templatehome_templatetaxonomy_templateattachment_templatesingle_templatepage_templatesingular_templatecategory_templatetag_templateauthor_templatedate_templatearchive_templateindex_templateFor example, let’s take the default author hierarchy:
author-{nicename}.phpauthor-{id}.phpauthor.phpTo add author-{role}.php before author.php, we can manipulate the actual hierarchy using the ‘author_template’ template type. This allows a request for /author/username where username has the role of editor to display using author-editor.php if present in the current themes directory.
function author_role_template( $templates = '' ) {
	$author = get_queried_object();
	$role = $author->roles[0];

	if ( ! is_array( $templates ) && ! empty( $templates ) ) {
		$templates = locate_template( array( "author-$role.php", $templates ), false );
	} elseif ( empty( $templates ) ) {
		$templates = locate_template( "author-$role.php", false );
	} else {
		$new_template = locate_template( array( "author-$role.php" ) );
		if ( ! empty( $new_template ) ) {
			array_unshift( $templates, $new_template );
		}
	}

	return $templates;
}
add_filter( 'author_template', 'author_role_template' );
The Loop should be placed in the Theme 's index.php and in any other Templates used to display post information.
Be sure to include the call for the header template at the top of your Theme 's templates. If you are using The Loop inside your own design (and your own design is not a template), set WP_USE_THEMES to false:
<?php define( 'WP_USE_THEMES', false ); get_header(); ?>
The loop starts here:
<?php if ( have_posts() ) : while ( have_posts() ) : the_post(); ?>
and ends here:
<?php endwhile; else : ?>
	<p><?php esc_html_e( 'Sorry, no posts matched your criteria.' ); ?></p>
<?php endif; ?>
This is using PHP's alternative syntax for control structures, and could also be expressed as:
<?php
if ( have_posts() ) {
	while ( have_posts() ) {
		the_post();
		//
		// Post Content here
		//
	} // end while
} // end if
?>
This example displays each post with its Title (which is used as a link to the Post's Permalink ), Categories, and Content. It also allows posts in a category with Category ID '3' to be styled differently. To accomplish this, the in_category() Template Tag is used. Read the comments carefully to see what each part of the code is doing.
 <!-- Start the Loop. -->
 <?php if ( have_posts() ) : while ( have_posts() ) : the_post(); ?>

 	<!-- Test if the current post is in category 3. -->
 	<!-- If it is, the div box is given the CSS class "post-cat-three". -->
 	<!-- Otherwise, the div box is given the CSS class "post". -->

 	<?php if ( in_category( '3' ) ) : ?>
 		<div class="post-cat-three">
 	<?php else : ?>
 		<div class="post">
 	<?php endif; ?>


 	<!-- Display the Title as a link to the Post's permalink. -->

 	<h2><a href="<?php the_permalink(); ?>" rel="bookmark" title="Permanent Link to <?php the_title_attribute(); ?>"><?php the_title(); ?></a></h2>


 	<!-- Display the date (November 16th, 2009 format) and a link to other posts by this posts author. -->

 	<small><?php the_time('F jS, Y'); ?> by <?php the_author_posts_link(); ?></small>


 	<!-- Display the Post's content in a div box. -->

 	<div class="entry">
 		<?php the_content(); ?>
 	</div>


 	<!-- Display a comma separated list of the Post's Categories. -->

 	<p class="postmetadata"><?php _e( 'Posted in' ); ?> <?php the_category( ', ' ); ?></p>
 	</div> <!-- closes the first div box -->


 	<!-- Stop The Loop (but note the "else:" - see next line). -->

 <?php endwhile; else : ?>


 	<!-- The very first "if" tested to see if there were any Posts to -->
 	<!-- display.  This "else" part tells what do if there weren't any. -->
 	<p><?php esc_html_e( 'Sorry, no posts matched your criteria.' ); ?></p>


 	<!-- REALLY stop The Loop. -->
 <?php endif; ?>
Note: All HTML code must be outside the <?php ?> tags. And, PHP code (even things as simple as curly braces: } ) must be inside the <?php ?> tags. You can start and stop blocks of PHP code to intersperse HTML code within if and else statements, as shown in the above example.
This example demonstrates how to hide a specific Category or Categories from being displayed. In this case, posts from Categories 3 and 8 are excluded. The example is different than the example above in that it makes a change to the query itself.
 <?php $query = new WP_Query( 'cat=-3,-8' ); ?>
 <?php if ( $query->have_posts() ) : while ( $query->have_posts() ) : $query->the_post(); ?>

 <div class="post">

 <!-- Display the Title as a link to the Post's permalink. -->
 <h2><a href="<?php the_permalink() ?>" rel="bookmark" title="Permanent Link to <?php the_title_attribute(); ?>"><?php the_title(); ?></a></h2>

 <!-- Display the date (November 16th, 2009 format) and a link to other posts by this posts author. -->
 <small><?php the_time( 'F jS, Y' ); ?> by <?php the_author_posts_link(); ?></small>

  <div class="entry">
  	<?php the_content(); ?>
  </div>

  <p class="postmetadata"><?php esc_html_e( 'Posted in' ); ?> <?php the_category( ', ' ); ?></p>
 </div> <!-- closes the first div box -->

 <?php endwhile;
 wp_reset_postdata();
 else : ?>
 <p><?php esc_html_e( 'Sorry, no posts matched your criteria.' ); ?></p>
 <?php endif; ?>
Note: If you use this example for your main page, you should use a different Template for your Category archives ; otherwise, WordPress will exclude all posts in Category 3 and Category 8, even when viewing that Category Archive! However, if you want to use the same template file, you can avoid this by using the is_home() tag to ensure that posts from Category 3 and Category 8 will only be excluded from the main page:
...
<?php if ( is_home() ) {
$query = new WP_Query( 'cat=-3,-8' );
if ( $query->have_posts() ) : while ( $query->have_posts() ) : $query->the_post();
} else {
...
?>
...
There are other Conditional Tags that can be used to control the output depending on whether or not a particular condition is true with respect to the requested page.
Loops are a combination of object oriented and global behaviour. This is confusing at first.
The two important global variables for loops are:
have_posts() and the_post() are global functions calling the corresponding $wp_query->have_posts() and $wp_query->the_post() methods of the $wp_query global variable.
the_post() looks like a template tag, but it isn't. It does not produce output, but instead changes the state of the $wp_query and $post global variables: the_post() tells WordPress to move to the next post. It changes $wp_query->current_position, and initialises the $post global variable to the next post contained in $wp_query->posts array.
Remember: All the template tags rely on the $post global variable by default and the $post global variable is set/modified by the_post() , which gets its data from the $wp_query global variable. $post is also set/modified by WP_Query::the_post() as used in secondary loops.
This section deals with advanced use of The Loop. It's a bit technical, but don’t let that scare you. We’ll start with an easy example and work up from there. With a little common sense, patience, and enthusiasm, you too can do multiple loops.
First off, why would one want to use multiple loops? In general, the answer is that you might want to do something with one group of posts, and do something different to another group of posts, but display both groups on the same page. "Something" could mean almost anything; you are only limited by your PHP skill and your imagination.
We will get into examples below, but first you should read about the basics. Take a look at the basic Loop. It consists of:
<?php if ( have_posts() ) : ?>
	<?php while ( have_posts() ) : the_post(); ?>
	<!-- do stuff ... -->
	<?php endwhile; ?>
<?php endif; ?>
In English (PHP types and people familiar with code speak can skip to below), the above would be read: If we are going to be displaying posts, then get them, one at a time. For each post in the list, display it according to <!-- do stuff ... -->. When you hit the last post, stop. The do stuff line(s), are template dependent.
A little aside on Do stuff: in this example it is simply a placeholder for a bunch of code that determines how to format and display each post on a page. This code can change depending on how you want your WordPress to look. If you look at the Kubrick theme’s index.php the do stuff section would be everything below:
<?php while ( have_posts() ) : the_post(); ?>
To above:
<?php comments_popup_link( 'No Comments »', '1 Comment »', '% Comments »' ); ?>
An explanation for the coders out there: The have_posts() and the_post() are convenience wrappers around the global $wp_query object, which is where all of the action is. The $wp_query is called in the blog header and fed query arguments coming in through GET and PATH_INFO. The $wp_query takes the arguments and builds and executes a DB query that results in an array of posts. This array is stored in the object and also returned back to the blog header where it is stuffed into the global $posts array (for backward compatibility with old post loops).
Once WordPress has finished loading the blog header and is descending into the template, we arrive at our post Loop. The have_posts() simply calls into $wp_query->have_posts() which checks a loop counter to see if there are any posts left in the post array. And the_post() calls $wp_query->the_post() which advances the loop counter and sets up the global $post variable as well as all of the global post data. Once we have exhausted the loop, have_posts() will return false and we are done.
Below are three examples of using multiple loops. The key to using multiple loops is that $wp_query can only be called once. In order to get around this it is possible to re-use the query by calling rewind_posts() or by creating a new query object. This is covered in example 1. In example 2, using a variable to store the results of a query is covered. Finally, ‘multiple loops in action’ brings a bunch of ideas together to document one way of using multiple loops to promote posts of a certain category on your blog’s homepage.
In order to loop through the same query a second time, call rewind_posts(). This will reset the loop counter and allow you to do another loop.
<?php rewind_posts(); ?>

<?php while ( have_posts() ) : the_post(); ?>
	<!-- Do stuff... -->
<?php endwhile; ?>
If you are finished with the posts in the original query, and you want to use a different query, you can reuse the $wp_query object by calling query_posts() and then looping back through. The query_posts() will perform a new query, build a new posts array, and reset the loop counter.
// Get the last 10 posts in the special_cat category.
<?php query_posts( 'category_name=special_cat&posts_per_page=10' ); ?>

<?php while ( have_posts() ) : the_post(); ?>
	<!-- Do special_cat stuff... -->
<?php endwhile; ?>
If you need to keep the original query around, you can create a new query object.
<?php $my_query = new WP_Query( 'category_name=special_cat&posts_per_page=10' ); ?>

<?php while ( $my_query->have_posts() ) : $my_query->the_post(); ?>
	<!-- Do special_cat stuff... -->
<?php endwhile; ?>
The query object my_query is used because you cannot use the global have_posts() and the_post() since they both use $wp_query. Instead, call into your new $my_query object.
Another version of using multiple Loops takes another tack for getting around the inability to use have_posts() and the_post(). To solve this, you need to store the original query in a variable, then re-assign it with the other Loop. This way, you can use all the standard functions that rely on all the globals.
For example:
// going off on my own here
<?php $temp_query = $wp_query; ?>
<!-- Do stuff... -->

<?php query_posts( 'category_name=special_cat&posts_per_page=10' ); ?>

<?php while ( have_posts() ) : the_post(); ?>
	<!-- Do special_cat stuff... -->
<?php endwhile; ?>

// now back to our regularly scheduled programming
<?php $wp_query = $temp_query; ?>
Note: In PHP 5, objects are referenced with the "= clone" operator instead of "=" like in PHP 4. To make Example 2 work in PHP 5 you need to use the following code:
// going off on my own here
<?php $temp_query = clone $wp_query; ?>
<!-- Do stuff... -->

<?php query_posts( 'category_name=special_cat&posts_per_page=10' ); ?>

<?php while ( have_posts() ) : the_post(); ?>
	<!-- Do special_cat stuff... -->
<?php endwhile; ?>
<?php endif; ?>

// now back to our regularly scheduled programming
<?php $wp_query = clone $temp_query; ?>
However, this second example does not work in WordPress 2.1.
The best way to understand how to use multiple loops is to actually show an example of its use. Perhaps the most common use of multiple loops is to show two (or more) lists of posts on one page. This is often done when a webmaster wants to feature not only the very latest post written, but also posts from a certain category.
Leaving all formatting and CSS issues aside, let us assume we want to have two lists of posts. One which would list the most recent posts (the standard 10 posts most recently added), and another which would contain only one post from the category ‘featured’. Posts in the ‘featured’ category should be shown first, followed by the second listing of posts (the standard). The catch is that no post should appear in both categories.
Step 1. Get only one post from the ‘featured’ category.
<?php $my_query = new WP_Query( 'category_name=featured&posts_per_page=1' );
while ( $my_query->have_posts() ) : $my_query->the_post();
$do_not_duplicate = $post->ID; ?>
	<!-- Do stuff... -->
<?php endwhile; ?>
In English the above code would read:
Set $my_query equal to the result of querying all posts where the category is named featured and by the way, get me one post only. Also, set the variable $do_not_duplicate equal to the ID number of the single post returned. Recall that the Do stuff line represents all the formatting options associated for the post retrieved.
Note that we will need the value of $do_not_duplicate in the next step to ensure that the same post doesn't appear in both lists.
Step 2. The second loop, get the X latest posts (except one).
The following code gets X recent posts (as defined in WordPress preferences) save the one already displayed from the first loop and displays them according to Do stuff.
<?php if ( have_posts() ) : while ( have_posts() ) : the_post();
if ( $post->ID == $do_not_duplicate ) continue;?>
	<!-- Do stuff... -->
<?php endwhile; endif; ?>
In English the above code would read:
Get all posts, where a post equals $do_not_duplicate then just do nothing (continue), otherwise display all the other the posts according to Do stuff. Also, update the cache so the tagging and keyword plugins play nice. Recall, $do_not_duplicate variable contains the ID of the post already displayed.
The End Result
Here is what the final piece of code looks like without any formatting:
<?php $my_query = new WP_Query( 'category_name=featured&posts_per_page=1' );
while ( $my_query->have_posts() ) : $my_query->the_post();
$do_not_duplicate = $post->ID; ?>
	<!-- Do stuff... -->
<?php endwhile; ?>
	<!-- Do other stuff... -->
<?php if ( have_posts() ) : while ( have_posts() ) : the_post();
if ( $post->ID == $do_not_duplicate ) continue; ?>
	<!-- Do stuff... -->
<?php endwhile; endif; ?>
The end result would be a page with two lists. The first list contains only one post -- the most recent post from the 'feature' category. The second list will contain X recent posts (as defined in WordPress preferences) except the post that is already shown in the first list. So, once the feature post is replaced with a new one, the previous feature will show up in standard post list section below (depending on how many posts you choose to display and on the post frequency). This technique (or similar) has been used by many in conjunction with knowledge of the Template Hierarchy to create a different look for home.php and index.php. See associated resources at the bottom of this page.
Note for Multiple Posts in the First Category
If posts_per_page=2 or more, you will need to alter the code a bit. The variable $do_not_duplicate needs to be changed into an array as opposed to a single value. Otherwise, the first loop will finish and the variable $do_not_duplicate will equal only the id of the latest post. This will result in duplicated posts in the second loop. To fix the problem replace
<?php $my_query = new WP_Query( 'category_name=featured&posts_per_page=1' );
while ( $my_query->have_posts() ) : $my_query->the_post();
$do_not_duplicate = $post->ID; ?>
with
<?php $my_query = new WP_Query( 'category_name=featured&posts_per_page=2' );
while ( $my_query->have_posts() ) : $my_query->the_post();
$do_not_duplicate[] = $post->ID; ?>
Note that "posts_per_page" can be any number. This changes $do_not_duplicate into an array. Then replace
<?php if ( have_posts() ) : while ( have_posts() ) : the_post();
if ( $post->ID == $do_not_duplicate ) continue; ?>
with
<?php if ( have_posts() ) : while ( have_posts() ) : the_post();
if ( in_array( $post->ID, $do_not_duplicate ) ) continue; ?>
Where you continue the pattern for whatever posts_per_page is set equal to (2 in this case).
Alternatively you can pass the entire $do_not_duplicate array to $wp_query and only entries that match your criteria will be returned:
<?php query_posts( array( 'post__not_in' => $do_not_duplicate ) );
if ( have_posts() ) : while ( have_posts() ) : the_post(); ?>
Note that instead of a string, the query parameter was an associative array setting the post__not_in option.
Nesting loops means that you are running a second loop before finishing the first one. This can be useful to display a post list with a shortcode for example.
$my_query = new WP_Query( 'cat=3' );
if ( $my_query->have_posts() ) {
	while ( $my_query->have_posts() ) {
		$my_query->the_post();
		the_content();
	}
}
wp_reset_postdata();
It is necessary to reset the main loop data after a nested loop so that some global variables hold the correct values again.
The section on multiple loops is a combination of Ryan Boren and Alex King's discussion about the Loop on the Hackers Mailing List . The nested loops example was inspired by another discussion on the mailing list and a post by Nicolas Kuttler .
To learn more about the WordPress Loop, and the various template tags that work only within the Loop, here are more resources:
"The Loop" is the main process of WordPress. You use The Loop in your template files to show posts to visitors. You could make templates without The Loop, but you could only display data from one post.
Before The Loop goes into action, WordPress verifies that all the files it needs are present. Then it collects the default settings, as defined by the blog administrator , from the database. This includes the number of posts to display per page, whether commenting is enabled, and more. Once these defaults are established, WordPress checks to see what the user asked for. This information is used to determine which posts to fetch from the database.
If the user didn't ask for a specific post, category, page, or date, WordPress uses the previously collected default values to determine which posts to prepare for the user. For example, if the blog administrator has selected to display 5 posts per page in Administration > Settings > Reading , then WordPress will fetch the five most recent posts from the database. If the user did ask for a specific post, category, page, or date, then WordPress will use that information to specify which post(s) to fetch from the database.
After all this is done, WordPress connects to the database, retrieves the specified information, and stores the results in a variable. The Loop uses this variable's value for display in your templates.
By default, if the visitor did not select a specific post, page, category, or date, WordPress uses index.php to display everything. For the first part of this discussion of The Loop we'll focus only on index.php, and the default display of your blog. Later on, once you understand how things work, we'll investigate tricks with The Loop in other template files.
The following is a functional index file (index.php), which displays the contents (and only the contents) of each post, according to the conditions used to prepare The Loop. This example demonstrates how little is actually necessary for the functioning of The Loop.
<?php
get_header();
if (have_posts()) :
   while (have_posts()) :
      the_post();
         the_content();
   endwhile;
endif;
get_sidebar();
get_footer();
?>
The following is a step-by-step look at the default usage of the Loop that comes with the default and classic theme in the standard installation of WordPress v1.5.
Found at the top of the default index.php template file is the starting code for The Loop .
<?php if (have_posts()) : ?>
<?php while (have_posts()) : the_post(); ?>
The function have_posts() simply checks for a next item in the current collection of posts. Internally, this is based on a posts counter, which is compared to the total number of posts in the collection. The the_post() function then retrieves that next post and updates the internal posts counter. At the next evaluation of have_posts() in the while clause, if another item is present, the while loop body is executed again for the next post. When the posts collection is exhausted (the posts counter matches the total number of posts), the while loop ends and The Loop moves on to whatever instructions it has beyond the while statement, still within the if test. For example, the if might have an else clause with statements to be executed if the posts collection did not contain any data in the first place.
The function the_post() takes the current item in the collection of posts and makes it available for use inside this iteration of The Loop. Without the_post(), many of the Template Tags used in your theme would not work.
Once the post data is made available, the template can start converting it into HTML to send to the visitor.
The following template tags get the current post's title, the time it was posted, and who posted it.
<h2 id="post-<?php the_ID(); ?>">
<a href="<?php the_permalink() ?>" rel="bookmark" title="Permanent Link to <?php the_title_attribute(); ?>">
<?php the_title(); ?></a></h2>
<small><?php the_time('F jS, Y') ?> <!-- by <?php the_author() ?> --></small>
The the_content() template tag fetches the content of the post, filters it, and then displays it. This is the meat and potatoes of each pass through The Loop:
<div class="entry">
<?php the_content('Read the rest of this entry »'); ?>
</div>
As the the_content() documentation states, the <!--more--> quicktag is used to specify an excerpt for the_content() to display on multi-post pages. The string passed to the_content() is used for the "Read More" link after the excerpt. For more about excerpts, the <!--more--> quicktag, and the "Read More" link see Template Tags/the_content and Customizing the Read More .
The post meta data section is located beneath each post's content in the index.php template file, and is used to display more information about the post, such as the categories, date, and comment information. By placing the edit_post_link() template tag function, logged in users of sufficient privilege (or the post's author) will also see an "Edit This" link.
<p class="postmetadata">
Posted in <?php the_category(', ') ?>
<strong>|</strong>
<?php edit_post_link('Edit','','<strong>|</strong>'); ?>
<?php comments_popup_link('No Comments »', '1 Comment »', '% Comments »'); ?></p>
If commenting is enabled, or if the post has comments, the comments_popup_link() template tag will display a link to the comments. If you're using the comments popup window , this link will open the comments window; otherwise it will jump right to this post's comments.
If the visitor is viewing an index of posts (i.e.: more than one post in The Loop), the comments_popup_link() link will take the reader to this post's individual page.
The trackback_rdf template tag's function is to output machine-readable code used for trackback auto-discovery.
<!--
<?php trackback_rdf(); ?>
-->
Note: The trackback_rdf() tag is intentionally used within an HTML comment ; it is not being "turned off". The reason for this is that, otherwise, RDF breaks validation in non-XML documents, and in XHTML documents it is parsed incorrectly by most browsers.
The following ends The Loop. After this, the various post-related template tags will not work as expected (or if they do, they will use the last post from The Loop). This means, that if you need to use a template tag that works within The Loop, you need to put it in before this point.
<?php endwhile; ?>
This section, immediately after the end of The Loop, displays navigation controls to move forward and backward by each web page. More information is available in function reference for posts_nav_link() .
<div class="navigation">
<div class="alignleft"><?php previous_posts_link('« Previous Entries') ?></div>
<div class="alignright"><?php next_posts_link('Next Entries »','') ?></div>
</div>
If the blog is set to display 10 posts per page, and the conditions used by The Loop collect 25 posts, there will be three pages to navigate: two pages of 10 posts each, and one page of 5 posts. The navigation links will allow the visitor to move forward and backward through the collection of posts.
The navigation controls are included outside The Loop, but inside the if condition, so that they only show up if there are any posts. The navigation functions themselves also check whether or not there is anything to which they will link, based on the current Loop, and only display links if there's something to link.
<?php else : ?>
 <h2 class="center">Not Found</h2>
 <p class="center">
<?php _e("Sorry, but you are looking for something that isn't here."); ?></p>
The else : clause determines what to do if have_posts() (from way up at the top) is false. That is to say, the stuff after the else will only be executed/displayed if The Loop had zero posts. No posts show up if, for example, the visitor requested a specific day for which no posts were made or a search was performed that produced no results.
<?php endif; ?>
This ends the conditional test of "if there are posts do this, else if there are no posts, do that". Once the conditional test is finished, the default index.php template next includes the sidebar, and finally the footer.
WordPress can use different template files for displaying your blog in different ways. In the default WordPress theme, there are template files for the index view, category view, and archive view, as well as a template for viewing individual posts. Each of these uses The Loop , but does so with slightly different formatting, as well as different uses of the template tags .
For any view which does not have a separate template file, WordPress will use index.php by default. If a visitor requests a single post, WordPress will first look for a file named single.php. If that file exists, it will be used to present the post to the visitor. If that file does not exist, WordPress will use index.php to present the post to the visitor. This is called the Template Hierarchy .
If you are making your own Theme , it's often helpful to look at the template files from the default Theme as a point of reference. It's also helpful to use your theme's index.php as a template for your other template files. Doing so may give you a known and working page from which to begin making changes as you create more template files.
An archive is a collection of historical posts. In the default usage, the posts displayed on your main index are recent chronological postings. When a visitor clicks on one of your archive links, or if they manually request a specific date (http://www.example.com/blog/index.php?m=200504 or http://www.example.com/blog/2005/04 to select all posts from April, 2005), WordPress will display an archive view. By default, the archive will use index.php, and thus look the same as your front page, just displaying the posts from April 2005.
When WordPress prepares an archive view for a visitor, it specifically looks for a file named archive.php in your current theme's directory. If you'd like to visually disambiguate archives from your front page, simply copy index.php to archive.php, and edit archive.php as necessary!
For example, if you want to show only post titles, and no post content, for your list of archives, you could use something like this:
<?php get_header(); ?>
<div id="content" class="narrowcolumn">
<?php if (have_posts()) : ?>
<?php while (have_posts()) : the_post(); ?>
<div class="post">
<h2 id="post-<?php the_ID(); ?>">
<a href="<?php the_permalink() ?>" rel="bookmark" title="Permanent Link to <?php the_title_attribute(); ?>"><?php the_title(); ?></a></h2>
<small><?php the_time('F jS, Y') ?> <!-- by <?php the_author() ?> --></small>
</div>
<?php endwhile; ?>
<div class="navigation">
<div class="alignleft">
<?php posts_nav_link('','','« Previous Entries') ?>
</div>
<div class="alignright">
<?php posts_nav_link('','Next Entries »','') ?>
</div>
</div>
<?php else : ?>
<h2 class="center">Not Found</h2>
<p class="center"><?php _e("Sorry, but you are looking for something that isn't here."); ?></p>
<?php endif; ?>
</div>
<?php get_sidebar(); ?>
<?php get_footer(); ?>
Like the archive views, WordPress looks for a separate template file for category views . If a visitor clicks on a link for a category in your blog, they will be taken to the category view. WordPress will prepare The Loop with posts from that category only, limiting the number of posts per the blog's default settings.
To make your category view different from your index view, copy index.php and rename it category.php. For a category view, it's probably not necessary to list the categories to which a post is assigned, so let's remove that portion. Instead, let's announce the category at the top of the page:
<?php get_header(); ?>
<div id="content" class="narrowcolumn">
<p>
<strong>
<?php single_cat_title('Currently browsing '); ?>
</strong><br />
<?php echo category_description(); ?>
</p>
<?php if (have_posts()) : ?>
<?php while (have_posts()) : the_post(); ?>
<div class="post">
<h2 id="post-<?php the_ID(); ?>">
<a href="<?php the_permalink() ?>" rel="bookmark" title="Permanent Link to <?php the_title_attribute(); ?>">
<?php the_title(); ?></a></h2>
<small>
<?php the_time('F jS, Y') ?>
<!-- by <?php the_author() ?> -->
</small>
</div>
<?php endwhile; ?>
<div class="navigation">
<div class="alignleft">
<?php posts_nav_link('','','« Previous Entries') ?>
</div>
<div class="alignright">
<?php posts_nav_link('','Next Entries »','') ?>
</div>
</div>
<?php else : ?>
<h2 class="center">Not Found</h2>
<p class="center"><?php _e("Sorry, but you are looking for something that isn't here."); ?></p>
<?php endif; ?>
</div>
<?php get_sidebar(); ?>
<?php get_footer(); ?>
As explained in the Template Hierarchy , it is possible to create separate template files for each category . Simply name the file category-X.php, where X is the numerical ID of the category. Consider carefully whether you need a whole new template for a specific category.
Let's look at two categories, "Plants" and "Flowers", with category IDs 3 and 4, respectively. Next to each post title in the output you want to have picture of either a plant, or a flower, depending on which category is being displayed. You could:
<?php if (is_category('3') ):
 // we're in the Plants category, so show a plant ?>
 <img src='/images/plant.png' alt='a plant' />
<?php } elseif (is_category('4') ):
 // we're in the Flowers category, so show a flower ?>
 <img src='/images/flower.png' alt='a pretty flower' />
<?php endif; // end the if, no images for other other categories ?>
If you added another category, "Cars", which you wanted to display in a significantly different way, then a separate category-X.php would be more appropriate.
Many users want to create separate CSS files for a specific category. This, too, can be easily accomplished. It is important to remember that stylesheets are defined and loaded in the <head> section of the HTML document. WordPress uses the header.php file for this. In the default header.php, find this line:
<link rel="stylesheet" href="<?php bloginfo('stylesheet_url'); ?>" type="text/css" media="screen" />
And change it to something like this:
<?php if ( is_category('5') ) { // Load special CSS for "Cars" category ?>
  <link rel="stylesheet" href="<?php bloginfo('template_url'); ?>/category-5.css" type="text/css" media="screen" />;
<?php } else { ?>
   <link rel="stylesheet" href="<?php bloginfo('stylesheet_url'); ?>" type="text/css" media="screen" />
<?php } ?>
Note: The Cars template uses the category-5.css file to override the default layout. In this example the CSS file is named after the category template file to which it will be applied, rather than the actual name of the category. Thus, you know that category-5.css goes with category-5.php.
When viewing any single post (or permalink ), WordPress will use single.php, if present.
This portion, from the WordPress default single.php, provides the post meta data information about the current post:
<p class="postmetadata alt">
<small>
This entry was posted on <?php the_time('l, F jS, Y') ?> at <?php the_time() ?>
and is filed under <?php the_category(', ') ?>.
You can follow any responses to this entry through
the <?php comments_rss_link('RSS 2.0'); ?> feed.
<?php
if ( comments_open() && pings_open() ) {
// Both Comments and Pings are open
?>
  You can <a href="#respond">leave a response</a>, or
  <a href="<?php trackback_url(display); ?>">trackback</a>
from your own site.
<?php
} elseif ( !comments_open() && pings_open() ) {
// Only Pings are Open
?>
  Responses are currently closed, but you can
  <a href="<?php trackback_url(display); ?> ">trackback</a>
from your own site.
<?php
} elseif ( comments_open() && !pings_open() ) {
// Comments are open, Pings are not
?>
  You can skip to the end and leave a response. Pinging is currently not allowed.
<?php
} else {
// Neither Comments, nor Pings are open
?>
  Both comments and pings are currently closed.
<?php
}
edit_post_link('Edit this entry.','',''); ?>
</small>
</p>
This sort of information -- whether comments are open or closed -- is largely inappropriate on an index, archive, or category view; which is why it's only included in the single.php template file.
Now that you have a good introduction to the basic uses for the WordPress Loop, let's introduce you to some more Loop effects and tricks.
How can you display something special only on the front page of your blog? That's right, only on the front page or home page, and have it not be seen anywhere else on your site. Easy! We call this the static front page. The front or first page of your site isn't really static. It's just using the Loop to make it look that way.
To make this Loop trick work, use the is_home() conditional template tag function.
In your index.php, use an if () test to conditionally output additional content:
<?php get_header(); ?>
<?php if (is_home()) {
 // we're on the home page, so let's show a picture of our new kitten!
 echo "<img src='/images/new_kitty.jpg' alt='Our new cat, Rufus!' />";
 // and now back to our regularly scheduled home page
} ?>
The function is_home() will only produce a true value if the visitor is not requesting a specific post, page, category, or date, so it only shows up on the "home" page.
For more information, see Creating a Static Front Page .
The easiest way to display excerpts, instead of the full content of posts, is to replace all instances of the_content () with the_excerpt() . If you have not created explicit excerpts for your posts, this function will automatically display the first 55 words of the post.
<div class="entry">
<?php the_excerpt(); ?>
</div>
In some circumstances, for example on archive pages, you may want to show the full post if there is only one post or excerpts if there are multiple posts. You can customize the loop to do this.
<?php if (have_posts()) : ?>

  <?php if (($wp_query->post_count) > 1) : ?>
     <?php while (have_posts()) : the_post(); ?>
       <!-- Do your post header stuff here for excerpts-->
          <?php the_excerpt() ?>
       <!-- Do your post footer stuff here for excerpts-->
     <?php endwhile; ?>

  <?php else : ?>

     <?php while (have_posts()) : the_post(); ?>
       <!-- Do your post header stuff here for single post-->
          <?php the_content() ?>
       <!-- Do your post footer stuff here for single post-->
     <?php endwhile; ?>

  <?php endif; ?>

<?php else : ?>
     <!-- Stuff to do if there are no posts-->

<?php endif; ?>
WordPress offers the get_header() , get_sidebar() , and get_footer() Include Tags for use in your template files . These functions make it easy to define a standard header/sidebar/footer which is easily editable. Any changes made to these files will immediately be made visible to viewers, without any work on your part.
But sometimes you might not want a sidebar. If you don't want a sidebar, simply exclude the call to the get_sidebar() function from your template. For example, the single.php template in the WordPress default theme does not include a sidebar.
To create your own different sidebar, you have two choices:
<?php include(TEMPLATEPATH . '/sideleft.php'); ?>
In WordPress Version 2.5 and above you can also call a sidebar like this:
<?php get_sidebar('right'); ?>
This causes the template TEMPLATEPATH . 'sidebar-right.php' to be included.
Using the WordPress default Template Hierarchy , if you want to use the same elements on multiple or different templates, it's probably best to put them in separate template files and use the PHP include() function. If the element you're adding is specifically for one template file, it's probably best to include it directly in that template file.
We've just scratched the surface of what can be done with the Loop. As a reminder, the following are resources that will help you customize your own WordPress Loop .
This document provides a brief examination of the animal known as the WordPress template tag , to help those who may be new to WordPress and PHP understand what template tags are and how they're used.
A WordPress template tag is made up of three components:
These are explained below.
WordPress is built with the PHP scripting language. Though you certainly don't need to be a PHP developer to use it, knowing a little about the language can go a long way in getting the most out of WordPress. Here we provide a tiny bit of that PHP knowledge:
<?php ?>
The above shows the opening (<?php) and closing (?>) tag elements used to embed PHP functions and code in a HTML document, i.e. web page. There are a number of ways to embed PHP within a page, but this is the most "portable," in that it works on nearly every web server —as long as the server supports PHP (typically a document's filename also needs to end with the extension .php, so the server recognizes it as a PHP document).
Anything within this tag is parsed and handled by the PHP interpreter, which runs on the web server (the interpreter is the PHP engine that figures out what the various functions and code do, and returns their output). For our purposes, the PHP tag lets you place WordPress functions in your page template, and through these generate the dynamic portions of your blog.
A WordPress or template function is a PHP function that performs an action or displays information specific to your blog. And like a PHP function, a WordPress function is defined by a line of text (of one or more words, no spaces), open and close brackets (parentheses), and typically a semi-colon, used to end a code statement in PHP. An example of a WordPress function is:
the_ID();
the_ID() displays the ID number for a blog entry or post. To use it in a page template, you slip it into the PHP tag shown above:
<?php the_ID(); ?>
This is now officially a WordPress template tag, as it uses the PHP tag with a WordPress function.
The final item making up a template tag is one you won't necessarily make use of unless you want to customize the tag's functionality. This, or rather these, are the parameters or arguments for a function. Here is the template function bloginfo() , with the show parameter being passed the 'name' value:
<?php bloginfo('name'); ?>
If your blog's name is Super Weblog, the bloginfo() template tag, when using 'name' as the show parameter value, will display that name where it's embedded in your page template.
Not all template tags accept parameters (the_ID() is one), and those which do accept different ones based on their intended use, so that the_content() accepts parameters separate from those which get_calendar() can be passed.
See the following Codex pages for more information on WordPress templates and template tags:
Templates
How to Pass Tag Parameters
Validators detect problems in your web page and style sheet. It could be a tag that was opened and never closed. It could be a misspelled piece of code or forgotten element the tag or style requires to work properly. You become a detective, hunting and solving the little problems occurring in your web page. The resources and articles on validation below will help you learn more about validating your web page.
Validating your WordPress site means more than just checking the front page for errors. With the modular Themes and template files in WordPress, while you may fix all the errors associated with the index.php and sidebar.php when viewing your front page, errors may still lie within any other template files such as single.php, page.php, archives.php, or category.php. Validate these page views as well to make sure you cover all the template files.
Validation errors aren't limited to your template files. They can also happen inside of a post. When you are writing a post and using HTML, WordPress might not recognize the HTML and convert it to a character entity , or you may have entered it wrong. If you have a page with a lot of HTML coding, validate it to make sure you have it all correct. And occasionally check random posts to make sure everything is still okay from time to time as part of your general housekeeping .
Validation doesn't just mean putting your pages through some web driven testers. It also means test-driving it with friends, relatives, co-workers, and strangers. Everyone has a different system and way of working, so ask for others to test-drive your styles or themes before you make them public.
To help you validate your WordPress site, here is a quick checklist:
If you want to learn more about CSS, especially cutting edge CSS and web page designs, visit one of these forums and mailing lists to share your thoughts and learn from others.
The following are some of the best books to help you learn more about CSS and web page design.
If a new release of WordPress is out, we recommend that you upgrade . These new releases often include new and improved features and fixes. You don't have to install a new release the very day it comes out. You can wait. It is recommended to check in with WordPress for updates and upgrades at least every three months, six months at the most. Check WordPress or WordPress Downloads for latest version available.
Plugins are an exciting feature of WordPress. They add functions and features to your WordPress site such as adding customized post listings to featuring a local weather forecast on your site.
With the hundreds of plugins available, it's fun to test drive them, trying out different ones to see what they will do, if you need them, and if they really add to your site or clutter things up. Once in a while, you should do a little housekeeping on your plugins.
Every three to six months, check for the latest plugin version. This is easy to do from the Administration > Plugin Panel. If an update is available, WordPress will notify you with a banner below the plugin. Just click the "upgrade automatically" link, or click the "Download" link if you would prefer to upgrade manually.
To uninstall a WordPress Plugin:
The Plugin will initiate the deactivation.
Most WordPress Plugins have an option to completely uninstall themselves, though not all. If you wish to remove a WordPress Plugin permanently:
WordPress plugins are being added constantly. Maybe there is a new plugin that will do what one of your older plugins do, but better? Maybe there is a plugin out there that will add functionality that will benefit your WordPress site?
Every three to six months search the Internet or visit the WordPress plugin sites to see if there are any new plugins available that will improve your site. If they replace the functions of a plugin you already have installed, be sure and follow the plugin author's instructions for removal or the tips in the Delete Old or Unwanted Plugins section in this article.
Please note that you should never delete the default WordPress theme.
Just like plugins, many users love test driving all the different WordPress Themes available. Some users might have twenty or more Themes in their theme list. If you aren't using them, why not do a little housekeeping on your themes?
To remove a theme from your WordPress site:If you have been developing and designing your own theme to tweak it to exactly what you want, and it's been working well for a while, it might be time to do a little housekeeping on your theme templates and style sheet.
While you were designing your template files, you probably added a few things you commented out because they didn't work right or you weren't sure you really needed them, but left them there just in case you wanted them later. If you still don't want them, go through your template files and delete those commented out codes and tags.
Optimizing your templates and style sheet is part of the normal activity of website designers and developers. While you have your template files open, take a moment to clean out some unwanted spaces. Having spaces before a code is fine, but there may be hidden ones after your code lines that just make the file size larger. There also might be three blank lines before some of the code when a single blank line might be all you need to separate some code from the pack. Delete those blank lines, but take care not to remove any spacing that should be left. Familiarity with PHP and HTML helps with this process.
Just as with your template files, it may be time to do a little housekeeping on your style.css file in your Theme folder. There is more information on optimizing your stylesheet below, but start first by cleaning out the unwanted stuff in your stylesheet.
Look for comments you've made to remind you of the things you did and changed. Do you still need them to remind you of modifications you made, or can they be deleted?
Look for empty lines and extra line endings and delete those down to one blank line to clean up your file size.
Is your stylesheet a jumble of style references? Is it grouped alphabetically and are you tired of hunting through lines of code to find everything in your core structure (header, content, sidebar, footer) when it might be more convenient to group these together? Or maybe you have it grouped by section and similarity and you want it sorted alphabetically. Either way, it might be time to do a little housekeeping and arrange your stylesheet the way that works best for your needs.
Tired of your old theme's look? Maybe it's time to do a little presentation housekeeping and change the look of your WordPress site. Thanks to WordPress's support for themes , changing your site's look is easy.
Check out the various resources for WordPress Themes . If you find one you like, install it and then activate it.
Don't worry, your old theme will still be there. Test drive the new one for a while. You can always go back to the old one. If you are really determined to turn your theme housekeeping efforts into some serious work, check out the article on Theme Development to create your own unique theme.
Many users upload a lot of graphics to their site that they end up never using. If you find yourself with a lot of unused graphics and images, consider going through them and cleaning house by deleting them.
If you aren't sure you will never need them again, but you aren't using them now and want to remove them from your site if server site space is limited, move them to a folder in your hard drive WordPress folder called backupimages or something similar and store them there, just in case.
Over time, your WordPress database can generate what's called "overhead." This condition is similar to a defragmented hard drive. Use this plugin to optimize your database.
If you are using a WordPress Theme you haven't modified, you shouldn't have to worry about optimizing your website. Still, it might help. Site optimization means creating a "lean and mean" website that loads fast, is easy on the bandwidth, validates, and meets web standards.
WordPress stresses that code and style files should validate and be laid out with a lot of tabs so they are easy to read. The World Wide Web Consortium and the Web Standards Organization stresses that all web page code be compliant with their standards. If you are going to get into this, you should familiarize yourself with the most basic of these standards .
One of those standards is to present a clean and optimized style sheet and XHTML code . We've covered some of the housekeeping cleaning chores associated with WordPress files and functions, but if you really want to streamline your site's code, take it a step further and look into your site optimization options.
Basically, total site optimization means validating your site's HTML and CSS , testing the site's design across browsers, ensuring web standards are met, including standards for accessibility - but let's start with some simple cleaning.
Every space, character, and bit in your code and style sheets add up to bytes. That sentence came to about 64 bytes. Each byte of information adds up, and the larger they are, the longer they take to load. Do yourself and your users a favor by keeping your file sizes to a minimum. So where do all these bandwidth wasters hide?
If you have set your code to look pretty with lots of indents, have you checked to see if there are any TAB codes at the end of the line before the line break? In some themes, there tend to be a lot of those. You don't need a TAB before a line break, only after, but somehow, these sneak into the code.
Using spaces to line up code adds to the size. A TAB is considered one character in most editors, but the five spaces that copy the TAB indent takes up five characters. Using double spaces instead of single spaces in your code and styles adds up, too.
Using a good search and replace capable text editor, you can quickly clean these up, making your styles and code optimized for fast loading.
There are a lot of ways of optimizing your code and styles, and here are some resources for more information on creating lean and mean code:
In the article, Lessons: WordPress Site Maintenance , we cover website maintenance, but take a moment now to go through this list of WordPress housekeeping chores and add them to your calendar so you can clean up your site on a regular basis, keeping your WordPress site a lean and clean site to visit.
tips and resources are given to clean house in WordPress. These include cleaning out old plugins, cleaning template files and the theme's style sheet, upgrading WordPress, and other helpful tips for cleaning up and optimizing your WordPress Site.To ensure you keep your WordPress site up-to-date and working in prime condition, consider adding these Housekeeping steps to your calendar, typically every three to six months.
WordPress is quickly growing and expanding as more features and functions are included and perfected. It is recommended that you check in with WordPress for updates and upgrades at least every three months, six months at the most. Check WordPress org and Download WordPress for information on the latest version available.
Note: For WordPress 3.7+, minor and security updates are automatically applied in the background process.
One of the most complained about aspect of using the Internet is the dead link. This is a link on a page or search engine that goes nowhere. It results in the dreaded 404 Page Error - Page Not Found. These can come from links to external sites that have changed their address or closed, or it can come from internal links. When you link between posts in your post articles, you might have misspelled a permalink address or put in the wrong post-ID, resulting in a page not found on your site. If you've recently made a change in your permalink structure, you might have some 404 page errors that might need cleaning up.
Add to your WordPress maintenance list regularly scheduled visits to your site's statistic logs to check on reports of 404 errors on your site, and take time to run a links check on your external, and internal, links to make sure everything is still connected. Dependent upon the site and number of links on your site, you should check your site for dead links every six months to a year.
The WordPress Dashboard , part of the Administration Screens , help to keep you up-to-date on the WordPress Community and activities, but check the WordPress website to find out if there have been any upgrades, news, events, or information you may need to know as a WordPress user.
If you aren't an active participant in the WordPress Forums , check in once in a while to see what is going on and what topics are being discussed. There might be a topic that might interest you or news you should know.
Also visit the WordPress Codex here to find out if there is new documentation, events, information, or resources that will help you better run and manage your WordPress site.
There are other WordPress sites that keep an eye on all WordPress activities. These sites can be visited or added to your RSS feeder to help you stay on top of what is going on with WordPress.
If you are using one of the many different Comment Spam WordPress Plugins with your WordPress blog, spam can collect in your database. Comment spam is stored in the database as a "just in case" so you can restore a comment incorrectly marked at comment spam. It also serves as a resource to track down recurrent comment spammers, if you need to.
In general, while some plugins will delete comment spam from your database after a specific period of time, not all do. These entries are dead-weight and unnecessary, and they can accumulate. To delete all current comment spam entries run this query on your Wordpress database with phpMyAdmin in the SQL page:
DELETE FROM wp_comments WHERE comment_approved = 'spam'
Make it a part of your regularly scheduled maintenance to backup your WordPress site, both on the website host server and on your computer. For detailed information see WordPress Backups . Consider scheduling this, depending upon the volume of new posts or articles you add to your site, three to twelve times a year.
Backing Up Your Database describes how to save a backup copy of your database tables that contain all your blog data, and Restoring Your Database From Backup guides you through the process of restoring data using one of your backups should you ever have to do so.
If you haven't been adding posts or articles lately, make a schedule to remind you to add new material on a regular basis. If you have, then take a look at what you've posted in the past and maybe do a little checking for proper grammar, bad spelling, information that needs updating, rewriting and editing a little, checking for any adjustments that should be made to make the information you've released to the public better.
Website looks change with time and maybe you are tired of your old look. It might need a little tweaking to improve its presentation and performance, or maybe it's time for a new WordPress Theme .
Schedule site updates, depending upon how frequently you post new posts and articles, about every six months so your site will stay fresh and alive.
Make it a website maintenance policy to validate your site after making any code or style sheet changes. This way, you can keep on top of guaranteeing users won't run into problems and trouble that might be brewing under the surface.
You can also regularly schedule validation tests on your site to keep it in top working condition and keep up with any changes or deprecations of the CSS and HTML standards. Typically, this should be done about once a year or when you make significant modifications to your site.
For the serious blogger or website administrator, there are some site maintenance tasks you should do to keep up with your site based on site statistics data so that it improves hit ratio from search engine. Here are some suggestions to keep your site in top shape.
We've put together a sample calendar for your site maintenance to help you schedule time to keep your WordPress site tuned up and running smoothly.
| January | Upgrade or Update WordPress Check in with WordPress |
| February | Add New Content Check for new Plugins |
| March | Clean up and/or Try New Theme Check in with WordPress |
| April | Clean Out Graphics and Photographs Add New Content |
| May | Check for Dead Links Check in with WordPress |
| June | Backup Database and Site Add New Content |
| July | Upgrade or Update WordPress Check in with WordPress |
| August | Check for New Plugins Clean Out Old Plugins |
| September | Clean or Renew Themes Check in with WordPress |
| October | Backup Database and Site Validate Web Pages and CSS |
| November | Check in with WordPress Add New Content |
| December | Backup Database and Site Check Site Statistics |
WordPress, as a system, is based on documents written in the XHTML scripting language. XHTML 1.0 (which is currently the most widely supported version and stands for eXtensible Hyper Text Markup Language) became a W3C recommendation in the year 2000, and was intended to serve as an interim technology until XHTML 2.0 could be finalized. Eight years later XHTML 2.0 still isn't finished. This document therefore uses the phrase XHTML to refer to XHTML 1.0 only.
XHTML is very similar to HTML as both are descendants of a language called SGML. However, XHTML is also descended from XML, which is a scripting language with much stricter grammar rules than HTML, and XHTML has inherited some of that discipline. XHTML is mainly differentiated from HTML by its use of a new MIME TYPE and the addition of some new syntax rules which are explained below.
WordPress prints XHTML from all its internal functions, all themes therefore are now in XHTML and so too are most plugins. So, if you want to use WordPress, you should buckle down and learn some XHTML as that's where it is right now.
If you are familiar with HTML, you will be glad to know that the majority of what you know about HTML is still relevant in XHTML. The main differences are that XHTML forces webpage authors to be more consistent and to write more legible code. There are a few syntax and grammar differences and a few HTML tags have been dropped and, really, that's about it. If you know HTML then you'll be surprised at how easy it is to switch to XHTML, and the new XHTML rules will force you to become a better programmer too!
Well, here's a quick check list of the important requirements of XHTML and the differences between it and HTML. This is NOT a comprehensive XHTML language reference. Please look here for that.
In these examples some code has been omitted for clarity
Right:
<a href="www.kilroyjames.co.uk" >
Wrong:
<A HREF="www.kilroyjames.co.uk" >
Right:
<a href="www.kilroyjames.co.uk">
Wrong:
<a href=www.kilroyjames.co.uk>
Right:
<em>this emphasis just keeps getting <strong>stronger and stronger</strong></em>
Wrong:
<em>this emphasis just keeps getting <strong>stronger and stronger</em></strong>
The DOCTYPE is an intimidating looking piece of code that must appear at the start of every XHTML document, it tells the browser how to render the document.
Rules for the DOCTYPE tag:
* I am, of course, perfectly serious...
There are three types of valid XHTML 1.0 document: Strict, Transitional, and Frameset. If you can get your document to validate with "Strict" then do so, however some legacy tags and attributes aren't allowed in Strict so you can use "Transitional" instead.
Note: you might have a problem getting WordPress to validate as Strict because, as of version 2.6.2, some of the internally generated <form> elements still use the "name" attribute, which is not allowed under the Strict DTD, ie. <input name="my_button" />
Note also that using a Transitional DTD takes most browsers out of "Standards" mode. It is much trickier to get your web pages to look consistent across different browsers when the browsers are not in Standards mode. I'm not going to explain the minutiae of the DOCTYPE tag as it gets deeper and more complicated, just know that for best results you should use one of the following, preferably the first one (Strict):
<!DOCTYPE html PUBLIC "-//W3C//DTD XHTML 1.0 Strict//EN"
"
http://www.w3.org/TR/xhtml1/DTD/xhtml1-strict.dtd
">
<!DOCTYPE html PUBLIC "-//W3C//DTD XHTML 1.0 Transitional//EN"
"
http://www.w3.org/TR/xhtml1/DTD/xhtml1-transitional.dtd
">
You don't need to understand the "XML namespace" attribute, except to know that it is required in all XHTML documents. Here is an example of how to write it:
<html xmlns="
http://www.w3.org/1999/xhtml
">
In HTML it is possible to write a webpage that contains none of the above tags; in XHTML it is not. The above tags must be included and they must be nested and ordered correctly, as follows (the DOCTYPE has been omitted):
<html xmlns="
http://www.w3.org/1999/xhtml
">
 <head>
  <title></title>
 </head>

 <body>
  <p>
    See how the TITLE must be placed in the document HEAD – the TITLE is considered
to be a "required child" element of the HEAD.
 Notice that the HEAD must also appear before the document BODY.
Notice also how both the HEAD and the BODY must be contained
 within the HTML tag. Again, HEAD and BODY are "required child"
 elements of the HTML tag. Finally, notice that this text is
written within a <p>paragraph</p> tag; in XHTML you may
not write text directly in the BODY tag without using a suitable
container tag, such as <p> or <div>.
  </p>
 </body>
</html>
<p>Mary had a little lamb
<p>It's fleece was white as snow
This code is not valid XHTML as the closing </p> tags have been left out. The following example is correct.
<p>Mary had a little lamb</p>
<p>It's fleece was white as snow</p>
In XHTML even single tags have to be closed - absolutely NO tag may be left open.
<p>
 Mary had a little lamb <br>
 It's fleece was white as snow
</p>
Therefore the above example is wrong because the <br> tag is not closed. To close a single tag like <br> and <hr> you simply add a forward slash before the final bracket, like so: <br /> and <hr /> (the white space is optional). To correct the above example we'd write:
<p>
 Mary had a little lamb <br />
 It's fleece was white as snow
</p>
This is correct XHTML.
In HTML, attributes can be strung together almost like they were keywords, ie. <dl compact>, this is called attribute minimisation. In XHTML that is not allowed, attributes and values must be explicit, ie.
<dl compact="compact">
In HTML it was legal to use ID and NAME attributes interchangeably. In XHTML the NAME attribute is formally deprecated and cannot be used. In all cases where you would think to use a NAME attribute you must now use ID instead. e.g.
correct HTML
<input type="submit" name="s" value=" Search " >
and now the correct XHTML version
<input type="submit" id="s" value=" Search " />
XHTML does not allow STYLE declarations within the body of a document they must be placed in the document HEAD instead.
Write all literal ampersands as & or they will be assumed to be part of an entity reference. e.g. ® is the entity reference for the symbol ®. Therefore M&S is invalid XHTML because &S is not an entity reference, you must write it as M&S.
As was previously mentioned, this is not a comprehensive reference but it should be enough to get you up and running with XHTML pretty quickly. Good luck!
Most people don't realise that to use XHTML properly it must be served using the new MIME TYPE "application/xhtml+xml". A MIME TYPE is simply a description that the web server sends to a browser to tell it what sort of document is coming. For instance a JPG image is sent with a MIME TYPE of "image/jpeg" and an HTML document with a MIME TYPE of "text/html". Sending an XHTML document with a MIME TYPE of "text/html" results in the document being parsed and validated as HTML, not as you would no doubt hope, as XHTML. You must use the correct MIME TYPE if you want to use XHTML otherwise you are simply using non-standard HTML. In order to avoid this problem and output standards compliant code you can use the XHTML to HTML wordpress plugin .
Because of seemingly intractable problems with the development of XHTML (mainly that XHTML 2 is incompatible with previous versions of XHTML and HTML and also the MIME TYPE issue), a competing standard supported by Mozilla (Firefox), Apple (Safari), Opera, Microsoft (Internet Explorer) and some other key Internet players has become the new favourite to succeed the old HTML 4.01 standard.
HTML5 was passed as a working draft by the W3C in January 2008 and became a candidate recommendation in December 2012.
In each of your existing WordPress installations, go Tools > Export in WordPress. Download the WXR files that contain all your posts and pages for each site. See the instructions on the Tools Export SubPanel .
Make sure that your export file actually has all the posts and pages. You can verify this by looking at the last entry of the exported file using a text editor. The last entry should be the most recent post.
Some plugins can conflict with the export process, generating an empty file, or a partially complete file. To be on the safe side, you should probably disable all plugins before doing the exports.
It's also a good idea to first delete all quarantined spam comments as these will also be exported, making the file unnecessarily large.
Note: widget configuration and blog/plugin settings are NOT exported in this method. If you are migrating within a single hosting account, make note of those settings at this stage, because when you delete the old domain, they will disappear.
Install WordPress. Follow the instructions for Installing WordPress from the Codex.
Activate multi-site in your WordPress 5.0.1 install. This involves editing wp-config.php a couple of times. You need to use the subdomain, not the subdirectory, option. See the instructions in the codex on how to Create A Network .
Create blogs for each of the sites you want to host at separate domains. For example, importedblogdotorg.mydomain.com.
Note: choose the name carefully, because changing it causes admin redirection issues. This is particularly important if you are migrating a site within the same hosting account.
Go to the backend of each blog, and import the exported WXR file for each blog. Map the authors to the proper users, or create new ones. Be sure to check the box that will pull in photos and other attachments. See the instructions on Tools Import SubPanel.
Note: if you choose to import images from the source site into the target site, make sure they have been uploaded into the right place and are displayed correctly in the respective post or page.
Before you start, check that your plugins will work in the network installation. If a plugin is not supported, do not install it. Find suitable alternatives for it by searching for the plugin's function with "multisite" or even "mu", as in "social bookmarking plugin wordpress multisite".
Copy the theme and plugin files from your old WP installs to their respective directories in the new wp-content. You can activate themes for the network, or you can go to Superadmin > Sites, then click edit on the site you want, and enable a given theme for just that site.
Note: if you are using a child theme, copy both parent and child themes to the new site.
Edit the configuration settings, widget, etc. for each site. By the end of this step, each site should look exactly as it did before, only with the URL subdomain.example.com or example.com/subsite rather than its correct, final URL.
Optional: If you want your new sites to have their own domain, you can Map Domains
You may run into trouble with the PHP configuration on your host. There are two potential problems. One is that PHP's max_upload_size will be too small for the WXR file. The other problem is that the PHP memory limit might be too small for importing all the posts.
There are a couple ways to solve it. One is to ask your hosting provider to up the limits, even temporarily. The other is to put a php.ini file in your /wp-admin/ and /wp-includes directories that ups the limits for you (php.ini files are not recursive, so it has to be in those directories). Something like a 10 MB upload limit and a 128 MB memory limit should work, but check with your hosting provider first so that you don't violate the terms of your agreement.
Search the WordPress forum support for help with PHP configuration problems.
Deleting add-on domains in cPanel and replacing them with parked domains will also delete any domain forwarders and e-mail forwarders associated with those domains. Be aware of this, so that you can restore those forwarders once you've made the switch.
As there is the above way to import the content into an instance of the Multisite-blog, you are running into massive troubles, when it gets to import multiple users. Users are generated during the import, but you won't get any roles or additional information into the new blog.
If the old site is no longer available and you find you have forgotten to copy some setting or you want to make sure you have configured everything correctly, run a google search for your site and then click to view the cached version. This option is available only until your new site has been crawled, so you'd better be quick.
Another option might be the Internet Archive Wayback Machine .They may have a copy of the site (or some part of it) archived.
The word meta means information about. Meta Tags were created early on to provide concise information about a website. Meta tags list information about the web page, such as the author, keywords, description, type of document, copyright, and other core information.
This is an example of a meta tag for description:
<meta name="description" content="This is the
description sentence or short paragraph about
the article or post." />
The most common meta tags examples include:
<meta name="resource-type" content="document" />
<meta http-equiv="content-type" content="text/html; charset=US-ASCII" />
<meta http-equiv="content-language" content="en-us" />
<meta name="author" content="Harriet Smith" />
<meta name="contact" content="harrietsmith@harrietsmith.us" />
<meta name="copyright" content="Copyright (c)1997-2004
Harriet Smith. All Rights Reserved." />
<meta name="description" content="Story about my dog
giving birth to puppies." />
<meta name="keywords" content="stories, tales, harriet, smith,
harriet smith, storytelling, day, life, dog, birth, puppies, happy" />
In the default installation, WordPress does not include meta tags such as description and keywords. Why? Well, let's look at the above tags.
The second tag sets the character set for the page and the third tag sets the language. Specifically, this example sets the character set to be in the English language style as found in the United States, using the ASCII character set. This means that the page will probably feature spellings like "center" instead of "centre" and "humor", not "humour". It also gives information to the browser to recognize the characters as not being Chinese.
The author and contact information lists a specific person. The description tag lists a description of the post that is unique to that post. The keywords also list words found within that post. Are you seeing the pattern?
All of this is unique information. WordPress may do some magical things, but it can't read your mind. If you want to supply search engines better information that is more specific to your web pages, you have to add the meta tag data yourself.
A good question to ask is if meta tags are still necessary. They used to be more helpful, providing important information to the Internet browser. As browsers became more sophisticated, they stopped needing a lot of hand holding in order to figure out if your site is in English or Chinese.
Google no longer uses the meta keyword in search result ranking and they confirm this in their Webmaster Central Blog . Some search engines don't use the meta tag information any more because many people abused it. In fact, meta tags may not represent the content of your site, but, it still doesn't hurt your status with search engines if you make use of these little bits of information, and do so truthfully. Furthermore, Google does still use the meta description tag in some situations as part of the snippet of your site displayed in search results.
Without a doubt, content is the biggest contributor to search engine page ranking, so if you want to raise your rankings, make sure you have quality content.
Covering all the reasons meta tags are and aren't important to search engines is beyond the scope of this article. In the Resource section below are some links to more information on meta tags and their impact on search engines.
To add meta tags to your site, simply add them to the header.php template file in your WordPress Theme , specifically in the head section near the link for the style sheet. At the top you will see the DOCTYPE tag and below that you will see a couple more tags and then the <title> tag, looking something like this:
<title><?php bloginfo('name'); ?><?php wp_title(); ?></title>
Below this line you can add your meta tags. You can add meta tag information such as the content, language, author, contact, and copyright, since these are basically the same on every page of your site.
But what about the 'dynamic' types of information such as description and keywords? This information is unique to every web page on your site. Putting them in the header.php means the information won't change throughout your site.
What you need is something to dynamically add keywords and descriptions on a per-post basis. To add a description, keywords, and other meta tags that are unique to each post or Page generated, you have two choices: you can add them as generic references or you can use plugins.
If you have a clear purpose for your website , then you can use that information to create generic meta tags and place these in your header. Let's say Harriet Smith is a veterinarian, and enjoys sharing her animal stories on her WordPress blog.
A description meta tag that would describe all of her posts might be:
<meta name="description" content="Special stories and
tales about dogs, cats, birds, ferrets, and other
domestic animals as told by Harriet Smith,
veterinarian. Stories include tales of animal
bravery and courage, life and death, companionship,
and the wonderful joy animals and pets bring to
their human partners." />
If Harriet writes a story about a dog giving birth in the middle of a hurricane, and accompanying the dog were two humans who risked their lives to stay with the dog during the delivery, the descriptive words of bravery and courage, life and death, pets and human, would surely apply. Another story about an animal that returns home to its owner after missing for 5 years might also be described with the words of bravery, courage, life, death, and companionship.
From these two stories, Harriet could create a good generic set of keywords:
<meta name="keywords" content="stories, tales,
harriet, smith, harriet smith, storytelling, veterinarian,
vets, animal doctor, bravery, brave, courage, life, lives,
death, dying, pets, human, companionship, dog, cat, birds,
ferrets, pets, pet, birth, puppies" />
With these generic description and keywords meta tags, Harriet's website would be accurately described and that should please just about any search engine.
This is the manual style of adding a description, but WordPress can make this easier for you. Add your description, similar to above, in your Admin > Options > General panel. The description is entered in the line designated as Tagline. Then paste in the following in your head area.
<meta name="description" content="<?php bloginfo('description'); ?>" />
WordPress will automatically generate the description. Note: Some Themes use this tag in the header just below the title of the blog or site. If you don't want it there, remove or comment out the tag in the header area .
To get more sophisticated, you can add a conditional tag query that asks "If this is a single post view, show the post title; if this is a multi-post view, show the blog name and description." The conditional tag query looks like this:
<meta name="description" content="<?php if ( is_single() ) {
        single_post_title('', true);
    } else {
        bloginfo('name'); echo " - "; bloginfo('description');
    }
    ?>" />
There are several Plugins that allow the blog administrator to set the keywords, description, and other meta tags to be unique on each post. These plugins make use of the Custom Fields in the Write Post Screen . You can find meta tag Plugins in the Official WordPress Plugin Directory .
Using Meta Tag Plugins allows you to customize each of your meta tags, and to choose the ones you want to add, or not, on a per-post basis. This allows your meta information to better describe each page.
Here are some sites that will help you learn more about meta tags, how they work, and why you should or shouldn't use them.
Read more on How to Get Your Blog Indexed in Google Search
There are many resources that will "help" you submit your site to search engines. Some are free, some for a fee. Or you can manually submit your site to search engines yourself. Whatever method you choose to use, once your site has been checked for errors and is ready to go, search engines will welcome your WordPress site.
Here are some tips for successful site submissions:
Directory Sites
It is also useful for traffic generation and search optimization purposes to submit your site to directories. Both comprehensive directory sites and those specific to the subject or localisation of your site can be used.
While WordPress comes ready for search engines, the following are more resources and information you may want to know about preparing and maintaining your site for search engines' robots and crawlers.
Meta Tags contain information that describes your site's purpose, description, and keywords used within your site. The meta tags are stored within the head of your header.php template file. By default, they are not included in WordPress, but you can manually include them and the article on Meta Tags in WordPress takes you through the process of adding meta tags to your WordPress site.
The WordPress Custom Fields option can also be used to include keywords and descriptions for posts and Pages . There are also several WordPress Plugins that can also help you to add meta tags and keyword descriptions to your site found within the Official WordPress Plugin Directory .
Search Engines read a file at yourdomain.com/robots.txt to get information on what they should and shouldn't check.
Adding entries to robots.txt to help SEO is popular misconception. Google says you are welcome to use robots.txt to block parts of your site but these days prefers you don't. Use page-level noindex tags instead, to tackle low-quality parts of your site. Since 2009, Google has been evermore vocal in its advice to avoid blocking JS & CSS files, and Google's Search Quality Team has been evermore active in promoting a policy of transparency by webmasters, to help Google verify we're not "cloaking" or linking to unsightly spam on blocked pages. Therefore the ideal robots file disallows nothing whatsoever, and may link to an XML Sitemap if an accurate one has been constructed (which itself is rare though!).
WordPress by default only blocks a couple of JS files but is nearly compliant with Google's guidance here.
WordPress comes built-in with various feeds , allowing your site to be viewed by various feed readers. Many search engines are now accepting feed submissions, and there are many site which specialize in directories of feeds and feed services.
To submit your site's feeds, you need to know the link to the various feeds your site provides. The article WordPress Feeds lists the various links of the feeds that come built into WordPress.
For information on customizing these links, see the article on Customizing Feeds .
Technorati is a "real-time search engine that keeps track of what is going on in the blogosphere — the world of weblogs." According to the site, "Technorati tracks the number of links, and the perceived relevance of blogs, as well as the real-time nature of blogging. Because Technorati automatically receives notification from weblogs as soon as they are updated, it can track the thousands of updates per hour that occur in the blogosphere, and monitor the communities (who's linking to whom) underlying these conversations."
Technorati tags are used to categorize the different topics and information used by blogs. Technorati uses WordPress categories as tags automatically. You can add more tags by adding a rel="tag" to any link on your site. For example:
<a href="http://wordpress.org/" rel="tag">WordPress</a>
<a href="http://codex.wordpress.org/" rel="tag">Codex</a>
There are also several WordPress plugins for maximizing Technorati tags.
Note: In WordPress v1.5.x, Technorati will automatically recognize your category names as tags.
Note: For optimal Technorati listing, you should include the Atom feed in the header of your theme. For this you may use the following code, which you can add somewhere between the <head> and </head> tags:
<link rel="alternate" type="application/atom+xml"
title="Atom 0.3" href="<?php bloginfo('atom_url'); ?>" />
Without adding the Atom feed to your header, your posts in Technorati will most likely be displayed wrongly. Which can result in the post content on Technorati duplicating the post title and listing other (meta) information, which is displayed between the post title and the real post content on your weblog.
Permalinks are enhancements to your existing URLs which can improve search engine optimization by presenting your post, page, and archive URLs as something like http://example.com/2003/05/23/my-cheese-sandwich/ rather than http://example.com/index.php?p=423. See Using Permalinks for more information.
As search engines use links and the title as part of their information gathering, links to posts and articles within your site gain importance with Permalinks.
As an added bonus, enable the Permalink Redirect plugin . This plugin "replies a 301 permanent redirect, if request URI is different from entry’s (or archive’s) permalink. It is used to ensure that there is only one URL associated with each blog entry."
A sitemap or "site map" is a single page listing of all the posts on your website. It is intended for your visitors to get a good overview on what your site is about and to find a blog post quickly but it also has great benefits in the search engines as a good link is always pointing to all your blog posts. By having a link to your sitemap on all your sites pages both visitors and search engines will easily get to it and find all your posts.
Here is a tutorial with three different examples of sitemaps with demos and how to set them up:
See also:
As of June 2005, Google is now accepting sitemaps of your site as part of their website submissions. Google needs to have this sitemap formatted in a special way using XML. You can find more information about Google's Sitemap Submissions from Google, and the discussion on the WordPress Forum about WordPress and Google Site maps .
Some utilities have been created to help the WordPress user to create a Google site map of their site for submission to Google. For more information on these and Google sitemaps:
There is some debate over whether listing the link relations actually effect search engine ranking however it is simple to implement.
There is a lot to learn about search engine optimization and site submission. Here are just a few sites to help you learn more about how this works:
If you have translated this article or have some similar one on your blog post a link here. Please mark Full Translated articles with (t) and similar ones with (s).
Read the Theme Handbook on Accessibility Guidelines and learn about controls, forms, heading structure, use of colour, skip links and use of media.
On the Make WordPress Accessible site you can find a list of Useful tools for accessibility testing .
Sometimes, the simplest thing you can do is to create a more readable page. Reading from a screen is much harder than reading a printed page. Crowded text, lots of images, a jumble of font styles, and too much information makes a page very difficult to read.
While developing your WordPress site, take extra time to pay attention to the white space or "empty" space around the different elements on the page. Make sure the fonts are large enough to be readable. Position navigation elements in logical and consistent places.
Also bear in mind that some your visitors may have dyslexia or may not use the same first language as you do. Keep sentences short and simple. Try to avoid abbreviations unless you explain them first.
Is your page still readable when you increase the text size using the browser's text zoom options? Do any of the non-text elements on the page create a distraction?
If there are animations or movement on the page, consider stopping these elements' movement. Distractions from animation can be a serious issues for many visitors.
On Make WordPress Accessible you can find information about the team and the work they do.
How you can help:
If you want to know more, ask your questions in Slack or fill out the form at the teams contact page .


