When we talk about Regression, we often end up discussing Linear and Logistics Regression. But, that’s not the end. Do you know there are 7 types of Regressions ?
Linear and logistic regression is just the most loved members from the family of regressions. Last week, I saw a recorded talk at NYC Data Science Academy from Owen Zhang, current Kaggle rank 3 and Chief Product Officer at DataRobot. He said, ‘if you are using regression without regularization, you have to be very special!’. I hope you get what a person of his stature referred to.
I understood it very well and decided to explore regularization techniques in detail.
In this article, I have explained the complex science behind ‘Ridge Regression‘ and ‘Lasso Regression‘ which are the most fundamental regularization techniques, sadly still not used by many.
The overall idea of regression remains the same. It’s the way in which the model coefficients are determined which makes all the difference. I strongly encourage you to go through multiple regression before reading this. You can take help from this article or any other preferred material.
Ridge and Lasso regression are powerful techniques generally used for creating parsimonious models in presence of a ‘large’ number of features. Here ‘large’ can typically mean either of two things:
Though Ridge and Lasso might appear to work towards a common goal, the inherent properties and practical use cases differ substantially. If you’ve heard of them before, you must know that they work by penalizing the magnitude of coefficients of features along with minimizing the error between predicted and actual observations. These are called ‘regularization’ techniques. The key difference is in how they assign penalty to the coefficients:
Note that here ‘LS Obj’ refers to ‘least squares objective’, i.e. the linear regression objective without regularization.
If terms like ‘penalty’ and ‘regularization’ seem very unfamiliar to you, don’t worry we’ll talk about these in more detail through the course of this article. Before digging further into how they work, lets try to get some intuition into why penalizing the magnitude of coefficients should work in the first place.
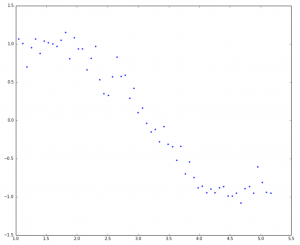
Lets try to understand the impact of model complexity on the magnitude of coefficients. As an example, I have simulated a sine curve (between 60° and 300°) and added some random noise using the following code:
#Importing libraries. The same will be used throughout the article.
import numpy as np
import pandas as pd
import random
import matplotlib.pyplot as plt
%matplotlib inline
from matplotlib.pylab import rcParams
rcParams['figure.figsize'] = 12, 10

#Define input array with angles from 60deg to 300deg converted to radians
x = np.array([i*np.pi/180 for i in range(60,300,4)])
np.random.seed(10)  #Setting seed for reproducability
y = np.sin(x) + np.random.normal(0,0.15,len(x))
data = pd.DataFrame(np.column_stack([x,y]),columns=['x','y'])
plt.plot(data['x'],data['y'],'.')
The input-output looks like:
This resembles a sine curve but not exactly because of the noise. We’ll use this as an example to test different scenarios in this article. Lets try to estimate the sine function using polynomial regression with powers of x form 1 to 15. Lets add a column for each power upto 15 in our dataframe. This can be accomplished using the following code:
for i in range(2,16):  #power of 1 is already there
    colname = 'x_%d'%i      #new var will be x_power
    data[colname] = data['x']**i
print data.head()
The dataframe looks like:
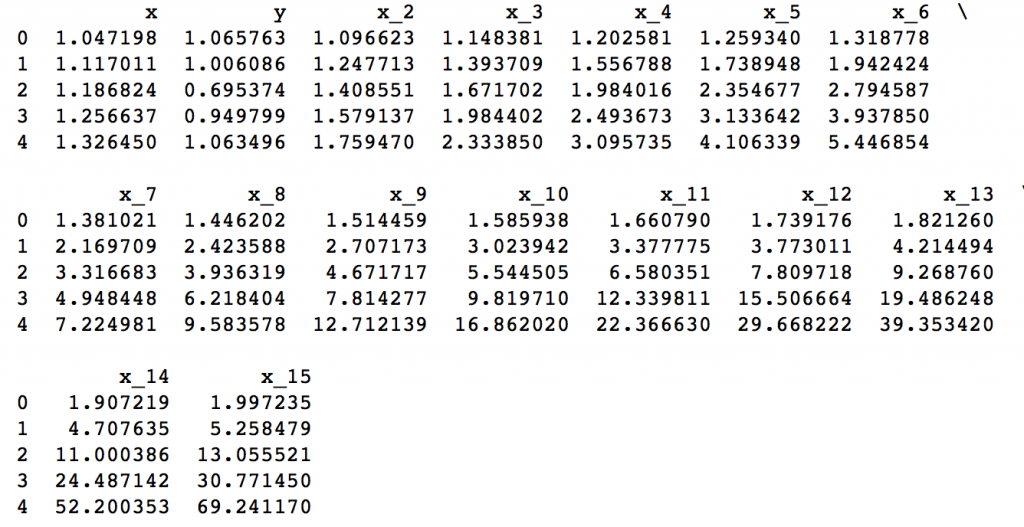
Now that we have all the 15 powers, lets make 15 different linear regression models with each model containing variables with powers of x from 1 to the particular model number. For example, the feature set of model 8 will be – {x, x_2, x_3, … ,x_8}.
First, we’ll define a generic function which takes in the required maximum power of x as an input and returns a list containing – [ model RSS, intercept, coef_x, coef_x2, … upto entered power ]. Here RSS refers to ‘Residual Sum of Squares’ which is nothing but the sum of square of errors between the predicted and actual values in the training data set. The python code defining the function is:
#Import Linear Regression model from scikit-learn.
from sklearn.linear_model import LinearRegression
def linear_regression(data, power, models_to_plot):
    #initialize predictors:
    predictors=['x']
    if power>=2:
        predictors.extend(['x_%d'%i for i in range(2,power+1)])

    #Fit the model
    linreg = LinearRegression(normalize=True)
    linreg.fit(data[predictors],data['y'])
    y_pred = linreg.predict(data[predictors])

    #Check if a plot is to be made for the entered power
    if power in models_to_plot:
        plt.subplot(models_to_plot[power])
        plt.tight_layout()
        plt.plot(data['x'],y_pred)
        plt.plot(data['x'],data['y'],'.')
        plt.title('Plot for power: %d'%power)

    #Return the result in pre-defined format
    rss = sum((y_pred-data['y'])**2)
    ret = [rss]
    ret.extend([linreg.intercept_])
    ret.extend(linreg.coef_)
    return ret
Note that this function will not plot the model fit for all the powers but will return the RSS and coefficients for all the models. I’ll skip the details of the code for now to maintain brevity. I’ll be happy to discuss the same through comments below if required.
Now, we can make all 15 models and compare the results. For ease of analysis, we’ll store all the results in a Pandas dataframe and plot 6 models to get an idea of the trend. Consider the following code:
#Initialize a dataframe to store the results:
col = ['rss','intercept'] + ['coef_x_%d'%i for i in range(1,16)]
ind = ['model_pow_%d'%i for i in range(1,16)]
coef_matrix_simple = pd.DataFrame(index=ind, columns=col)

#Define the powers for which a plot is required:
models_to_plot = {1:231,3:232,6:233,9:234,12:235,15:236}

#Iterate through all powers and assimilate results
for i in range(1,16):
    coef_matrix_simple.iloc[i-1,0:i+2] = linear_regression(data, power=i, models_to_plot=models_to_plot)
We would expect the models with increasing complexity to better fit the data and result in lower RSS values. This can be verified by looking at the plots generated for 6 models:
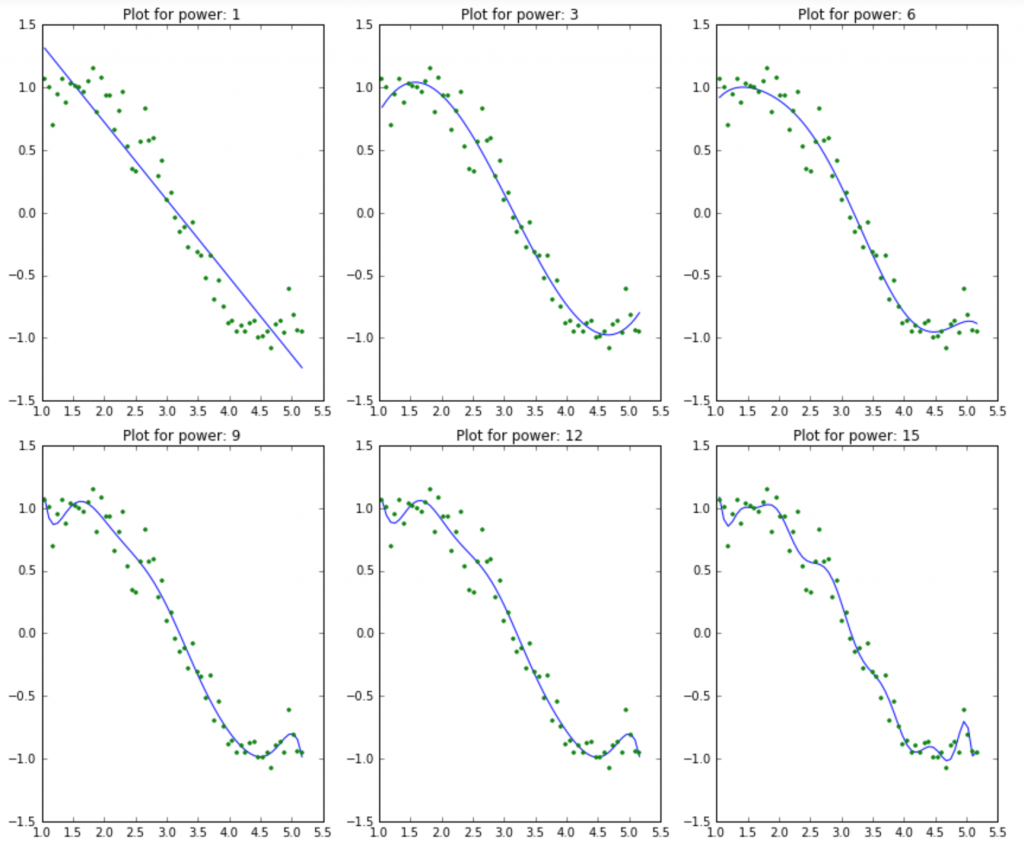
This clearly aligns with our initial understanding. As the model complexity increases, the models tends to fit even smaller deviations in the training data set. Though this leads to overfitting, lets keep this issue aside for some time and come to our main objective, i.e. the impact on the magnitude of coefficients. This can be analysed by looking at the data frame created above.
Python Code:
#Set the display format to be scientific for ease of analysis
pd.options.display.float_format = '{:,.2g}'.format
coef_matrix_simple
The output looks like:
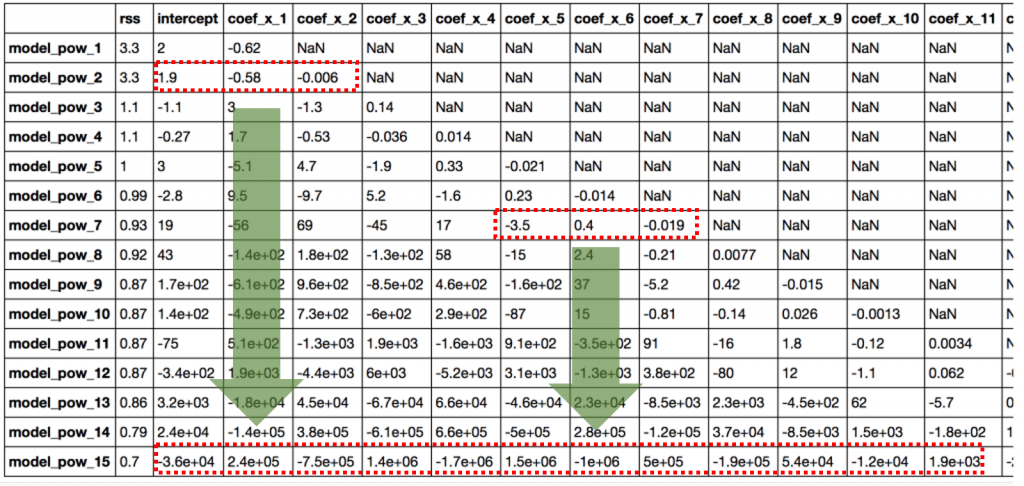
It is clearly evident that the size of coefficients increase exponentially with increase in model complexity. I hope this gives some intuition into why putting a constraint on the magnitude of coefficients can be a good idea to reduce model complexity.
Lets try to understand this even better.
What does a large coefficient signify? It means that we’re putting a lot of emphasis on that feature, i.e. the particular feature is a good predictor for the outcome. When it becomes too large, the algorithm starts modelling intricate relations to estimate the output and ends up overfitting to the particular training data.
I hope the concept is clear. I’ll be happy to discuss further in comments if needed. Now, lets understand ridge and lasso regression in detail and see how well they work for the same problem.
As mentioned before, ridge regression performs ‘L2 regularization‘, i.e. it adds a factor of sum of squares of coefficients in the optimization objective. Thus, ridge regression optimizes the following:
Here, α (alpha) is the parameter which balances the amount of emphasis given to minimizing RSS vs minimizing sum of square of coefficients. α can take various values:
I hope this gives some sense on how α would impact the magnitude of coefficients. One thing is for sure that any non-zero value would give values less than that of simple linear regression. By how much? We’ll find out soon. Leaving the mathematical details for later, lets see ridge regression in action on the same problem as above.
First, lets define a generic function for ridge regression similar to the one defined for simple linear regression. The Python code is:
from sklearn.linear_model import Ridge
def ridge_regression(data, predictors, alpha, models_to_plot={}):
    #Fit the model
    ridgereg = Ridge(alpha=alpha,normalize=True)
    ridgereg.fit(data[predictors],data['y'])
    y_pred = ridgereg.predict(data[predictors])

    #Check if a plot is to be made for the entered alpha
    if alpha in models_to_plot:
        plt.subplot(models_to_plot[alpha])
        plt.tight_layout()
        plt.plot(data['x'],y_pred)
        plt.plot(data['x'],data['y'],'.')
        plt.title('Plot for alpha: %.3g'%alpha)

    #Return the result in pre-defined format
    rss = sum((y_pred-data['y'])**2)
    ret = [rss]
    ret.extend([ridgereg.intercept_])
    ret.extend(ridgereg.coef_)
    return ret
Note the ‘Ridge’ function used here. It takes ‘alpha’ as a parameter on initialization. Also, keep in mind that normalizing the inputs is generally a good idea in every type of regression and should be used in case of ridge regression as well.
Now, lets analyze the result of Ridge regression for 10 different values of α ranging from 1e-15 to 20. These values have been chosen so that we can easily analyze the trend with change in values of α. These would however differ from case to case.
Note that each of these 10 models will contain all the 15 variables and only the value of alpha would differ. This is different from the simple linear regression case where each model had a subset of features.
Python Code:
#Initialize predictors to be set of 15 powers of x
predictors=['x']
predictors.extend(['x_%d'%i for i in range(2,16)])

#Set the different values of alpha to be tested
alpha_ridge = [1e-15, 1e-10, 1e-8, 1e-4, 1e-3,1e-2, 1, 5, 10, 20]

#Initialize the dataframe for storing coefficients.
col = ['rss','intercept'] + ['coef_x_%d'%i for i in range(1,16)]
ind = ['alpha_%.2g'%alpha_ridge[i] for i in range(0,10)]
coef_matrix_ridge = pd.DataFrame(index=ind, columns=col)

models_to_plot = {1e-15:231, 1e-10:232, 1e-4:233, 1e-3:234, 1e-2:235, 5:236}
for i in range(10):
    coef_matrix_ridge.iloc[i,] = ridge_regression(data, predictors, alpha_ridge[i], models_to_plot)
This would generate the following plot:
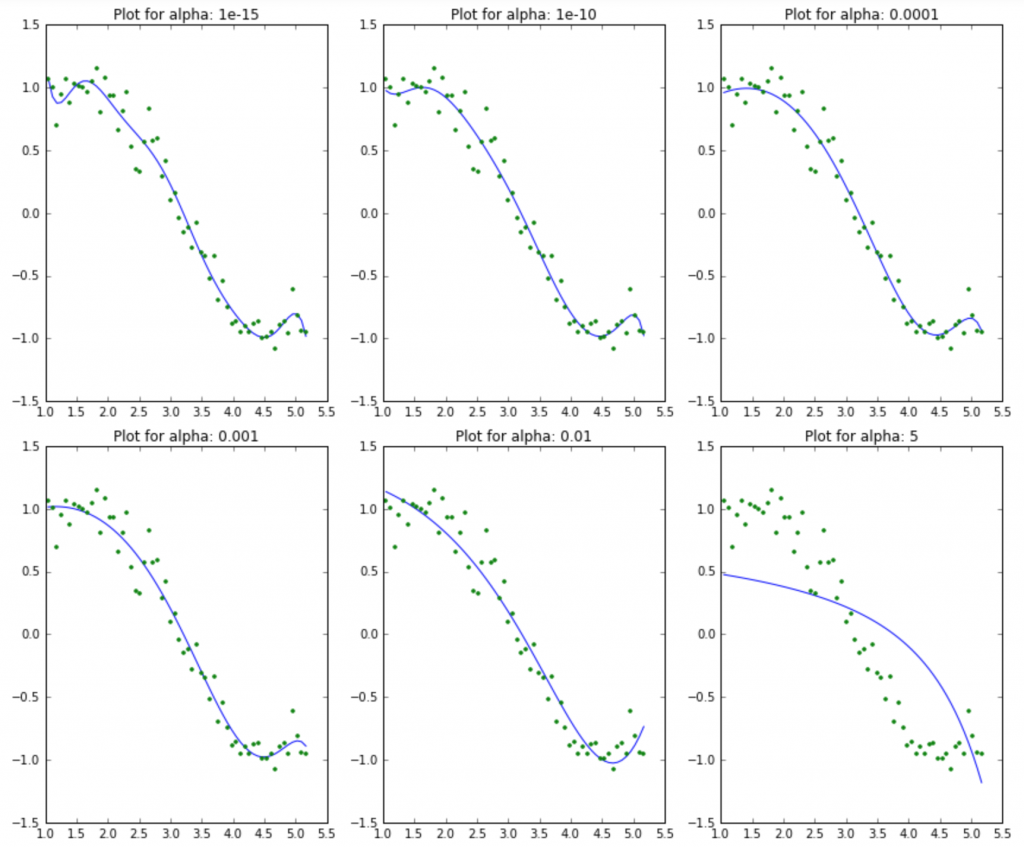
Here we can clearly observe that as the value of alpha increases, the model complexity reduces. Though higher values of alpha reduce overfitting, significantly high values can cause underfitting as well (eg. alpha = 5). Thus alpha should be chosen wisely. A widely accept technique is cross-validation, i.e. the value of alpha is iterated over a range of values and the one giving higher cross-validation score is chosen.
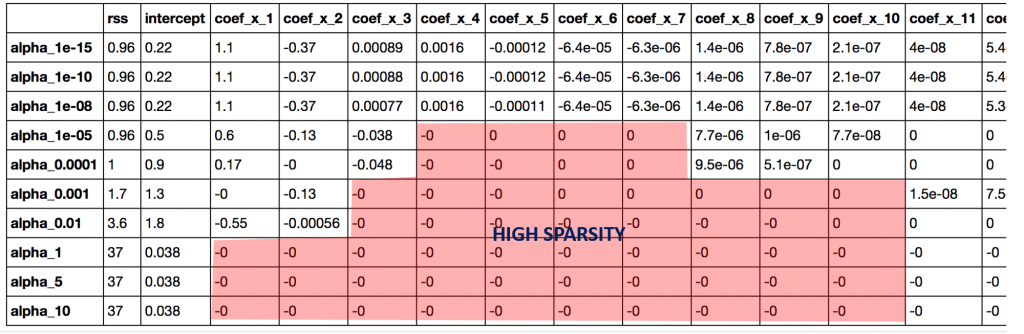
Lets have a look at the value of coefficients in the above models:
Python Code:
#Set the display format to be scientific for ease of analysis
pd.options.display.float_format = '{:,.2g}'.format
coef_matrix_ridge
The table looks like:
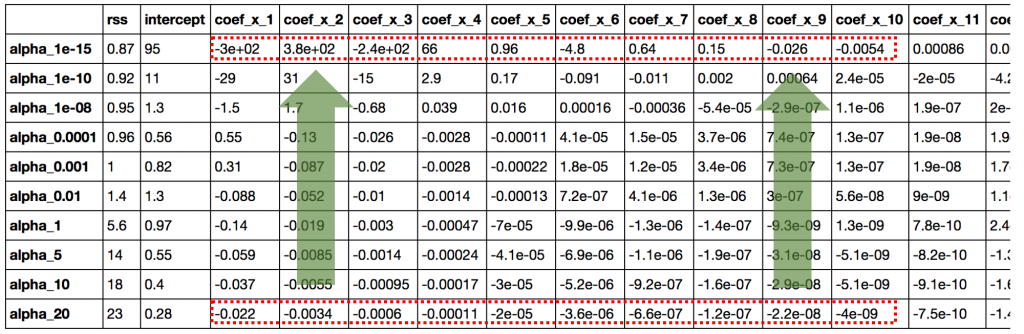
This straight away gives us the following inferences:
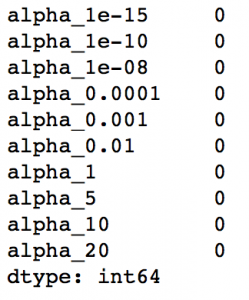
The first 3 are very intuitive. But #4 is also a crucial observation. Let’s reconfirm the same by determining the number of zeros in each row of the coefficients data set:
Python Code:
coef_matrix_ridge.apply(lambda x: sum(x.values==0),axis=1)
This confirms that all the 15 coefficients are greater than zero in magnitude (can be +ve or -ve). Remember this observation and have a look again until its clear. This will play an important role in later while comparing ridge with lasso regression.
LASSO stands for Least Absolute Shrinkage and Selection Operator. I know it doesn’t give much of an idea but there are 2 key words here – ‘absolute‘ and ‘selection‘.
Lets consider the former first and worry about the latter later.
Lasso regression performs L1 regularization, i.e. it adds a factor of sum of absolute value of coefficients in the optimization objective. Thus, lasso regression optimizes the following:
Here, α (alpha) works similar to that of ridge and provides a trade-off between balancing RSS and magnitude of coefficients. Like that of ridge, α can take various values. Lets iterate it here briefly:
Yes its appearing to be very similar to Ridge till now. But just hang on with me and you’ll know the difference by the time we finish. Like before, lets run lasso regression on the same problem as above. First we’ll define a generic function:
from sklearn.linear_model import Lasso
def lasso_regression(data, predictors, alpha, models_to_plot={}):
    #Fit the model
    lassoreg = Lasso(alpha=alpha,normalize=True, max_iter=1e5)
    lassoreg.fit(data[predictors],data['y'])
    y_pred = lassoreg.predict(data[predictors])

    #Check if a plot is to be made for the entered alpha
    if alpha in models_to_plot:
        plt.subplot(models_to_plot[alpha])
        plt.tight_layout()
        plt.plot(data['x'],y_pred)
        plt.plot(data['x'],data['y'],'.')
        plt.title('Plot for alpha: %.3g'%alpha)

    #Return the result in pre-defined format
    rss = sum((y_pred-data['y'])**2)
    ret = [rss]
    ret.extend([lassoreg.intercept_])
    ret.extend(lassoreg.coef_)
    return ret
Notice the additional parameters defined in Lasso function – ‘max_iter‘. This is the maximum number of iterations for which we want the model to run if it doesn’t converge before. This exists for Ridge as as well but setting this to a higher than default value was required in this case. Why? I’ll come to this in next section, just keep it in the back of the envelope.
Lets check the output for 10 different values of alpha using the following code:
#Initialize predictors to all 15 powers of x
predictors=['x']
predictors.extend(['x_%d'%i for i in range(2,16)])

#Define the alpha values to test
alpha_lasso = [1e-15, 1e-10, 1e-8, 1e-5,1e-4, 1e-3,1e-2, 1, 5, 10]

#Initialize the dataframe to store coefficients
col = ['rss','intercept'] + ['coef_x_%d'%i for i in range(1,16)]
ind = ['alpha_%.2g'%alpha_lasso[i] for i in range(0,10)]
coef_matrix_lasso = pd.DataFrame(index=ind, columns=col)

#Define the models to plot
models_to_plot = {1e-10:231, 1e-5:232,1e-4:233, 1e-3:234, 1e-2:235, 1:236}

#Iterate over the 10 alpha values:
for i in range(10):
    coef_matrix_lasso.iloc[i,] = lasso_regression(data, predictors, alpha_lasso[i], models_to_plot)
This gives us the following plots:
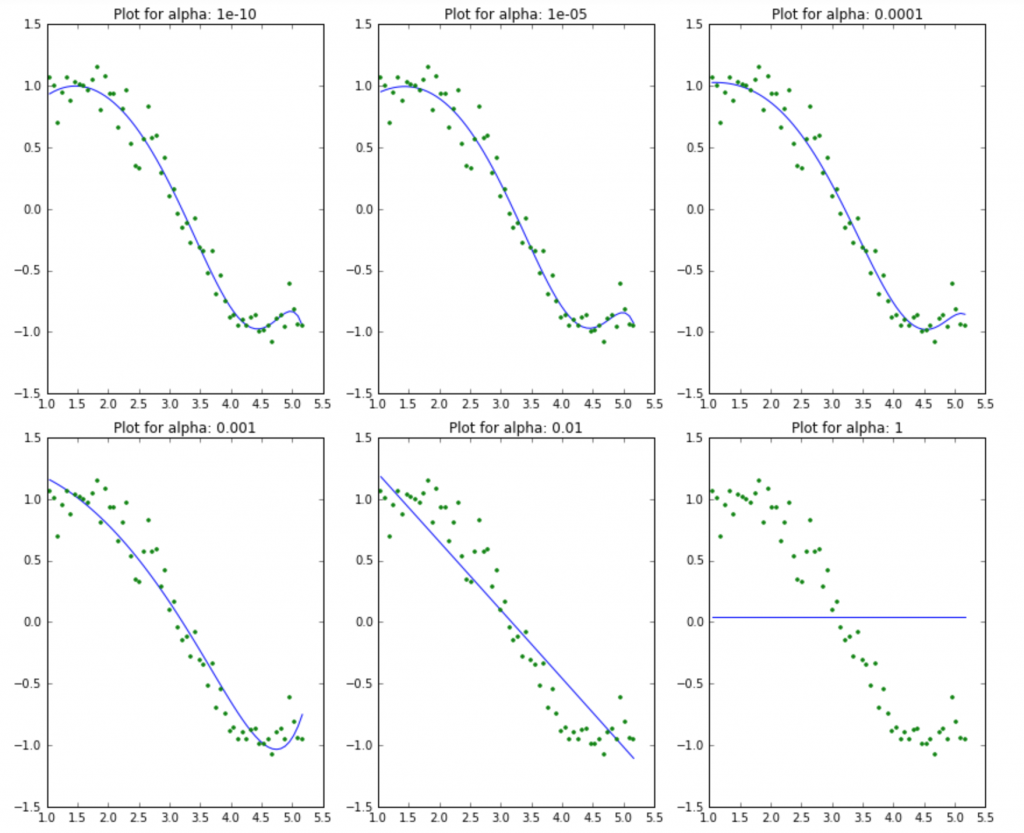
This again tells us that the model complexity decreases with increase in the values of alpha. But notice the straight line at alpha=1. Appears a bit strange to me. Let’s explore this further by looking at the coefficients:
Apart from the expected inference of higher RSS for higher alphas, we can see the following:
Inferences #1,2 might not generalize always but will hold for many cases. The real difference from ridge is coming out in the last inference. Lets check the number of coefficients which are zero in each model using following code:
coef_matrix_lasso.apply(lambda x: sum(x.values==0),axis=1)
Output:

We can observe that even for a small value of alpha, a significant number of coefficients are zero. This also explains the horizontal line fit for alpha=1 in the lasso plots, its just a baseline model! This phenomenon of most of the coefficients being zero is called ‘sparsity‘. Although lasso performs feature selection, this level of sparsity is achieved in special cases only which we’ll discuss towards the end.
This has some really interesting implications on the use cases of lasso regression as compared to that of ridge regression. But before coming to the final comparison, lets take a bird’s eye view of the mathematics behind why coefficients are zero in case of lasso but not ridge.
I personally love statistics but many of you might not. That’s why I have specifically marked this section as ‘OPTIONAL‘. If you feel you can handle the algorithms without going into the maths behind them, I totally respect the decision and you can feel free to skip this section.
But I personally feel that getting some elementary understanding of how the thing works can be helpful in the long run.
As promised, I’ll keep it to a bird’s eye view. If you wish to get into the details, I recommend taking a good statistics textbook. One of my favorites is the Elements of Statistical Learning. The best part about this is that it has been made available for free by the authors.
Let’s start by reviewing the basic structure of data in a regression problem.
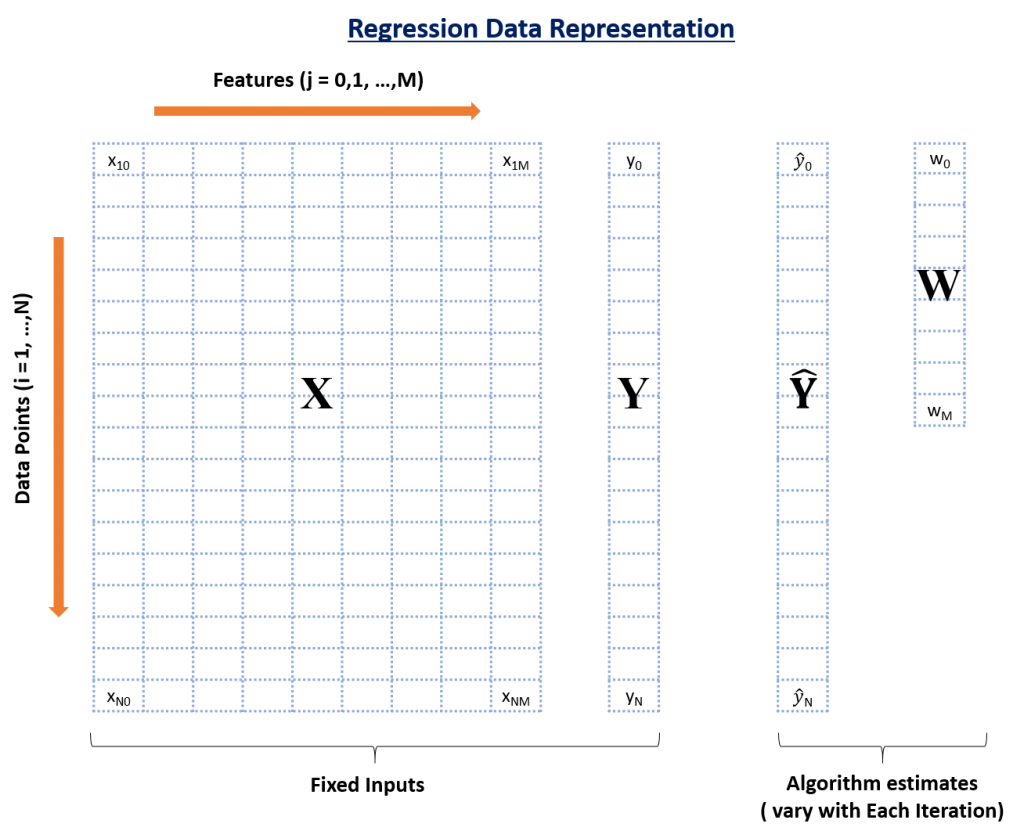
In this infographic, you can see there are 4 data elements:
Here, N is the total number of data points available and M is the total number of features. X has M+1 columns because of M features and 1 intercept.
The predicted outcome for any data point i is:

It is simply the weighted sum of each data point with coefficients as the weights. This prediction is achieved by finding the optimum value of weights based on certain criteria, which depends on the type of regression algorithm being used. Lets consider all 3 cases:
The objective function (also called as the cost) to be minimized is just the RSS (Residual Sum of Squares), i.e. the sum of squared errors of the predicted outcome as compared to the actual outcome. This can be depicted mathematically as:

In order to minimize this cost, we generally use a ‘gradient descent’ algorithm. I’ll not go into the details right now but you can refer this. The overall algorithm works as:
1. initialize weights (say w=0)
2. iterate till not converged
   2.1 iterate over all features (j=0,1...M)
       2.1.1 determine the gradient
       2.1.2 update the jth weight by subtracting learning rate times the gradient
             w(t+1) = w(t) - learning rate * gradient
Here the important step is #2.1.1 where we compute the gradient. Gradient is nothing but a partial differential of the cost with respect to a particular weight (denoted as wj). The gradient for the jth weight will be:

This is formed from 2 parts:
Step #2.1.2 involves updating the weights using the gradient. This update step for simple linear regression looks like:

I hope you are able to follow along. Note the +ve sign in the RHS is formed after multiplication of 2 -ve signs. I would like to explain point #2 of the gradient descent algorithm mentioned above ‘iterate till not converged‘. Here convergence refers to attaining the optimum solution within pre-defined limit.
It is checked using the value of gradient. If the gradient is small enough, that means we are very close to optimum and further iterations won’t have a substantial impact on coefficients. The lower-limit on gradient can be changed using the ‘tol‘ parameter.
Lets consider the case of ridge regression now.
The objective function (also called the cost) to be minimized is the RSS plus the sum of square of the magnitude of weights. This can be depicted mathematically as:

In this case, the gradient would be:

Again in the regularization part of gradient, only wj remains and all other would become zero. The corresponding update rule is:

Here we can see that second part of the RHS is same as that of simple linear regression. Thus, ridge regression is equivalent to reducing the weight by a factor of (1-2λη) first and then applying the same update rule as simple linear regression. I hope this gives some intuition into why the coefficients get reduced to small numbers but never become zero.
Note that the criteria for convergence in this case remains similar to simple linear regression, i.e. checking the value of gradients. Lets discuss Lasso regression now.
The objective function (also called the cost) to be minimized is the RSS plus the sum of absolute value of the magnitude of weights. This can be depicted mathematically as:

In this case, the gradient is not defined as the absolute function is not differentiable at x=0. This can be illustrated as:
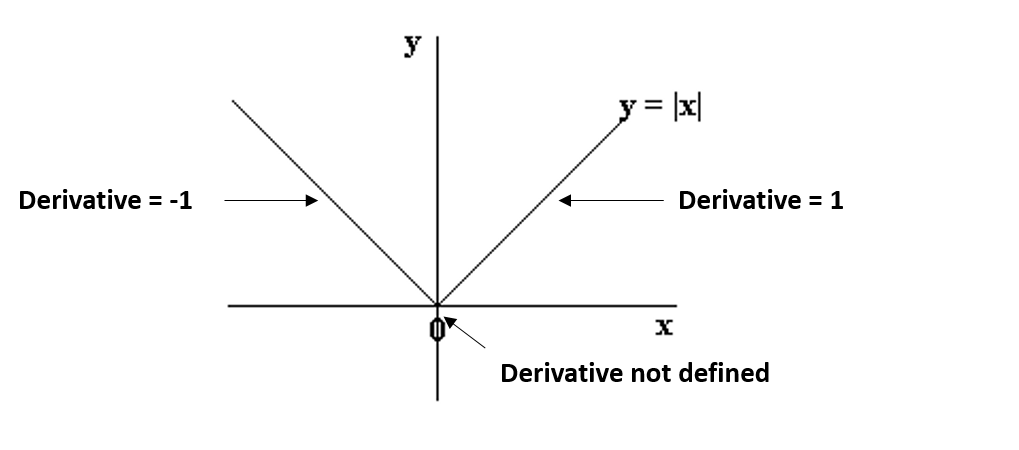
We can see that the parts on the left and right side of 0 are straight lines with defined derivates but the function can’t be differentiated at x=0. In this case, we have to use a different technique called as coordinate descent which is based on the concept of sub-gradients. One of the coordinate descent follows the following algorithms (this is also the default in sklearn):
1. initialize weights (say w=0)
2. iterate till not converged
   2.1 iterate over all features (j=0,1...M)
       2.1.1 update the jth weight with a value which minimizes the cost
#2.1.1 might look too generalized. But I’m intentionally leaving the details and jumping to the update rule:

Here g(w-j) represents (but not exactly) the difference between actual outcome and the predicted outcome considering all EXCEPT the jth variable. If this value is small, it means that the algorithm is able to predict the outcome fairly well even without the jth variable and thus it can be removed from the equation by setting a zero coefficient. This gives us some intuition into why the coefficients become zero in case of lasso regression.
In coordinate descent, checking convergence is another issue. Since gradients are not defined, we need an alternate method. Many alternatives exist but the simplest one is to check the step size of the algorithm. We can check the maximum difference in weights in any particular cycle over all feature weights (#2.1 of algo above).
If this is lower than ‘tol’ specified, algo will stop. The convergence is not as fast as gradient descent and we might have to set the ‘max_iter’ parameter if a warning appears saying that the algo stopped before convergence. This is why I specified this parameter in the Lasso generic function.
Lets summarize our understanding by comparing the coefficients in all the three cases using the following visual, which shows how the ridge and lasso coefficients behave in comparison to the simple linear regression case.
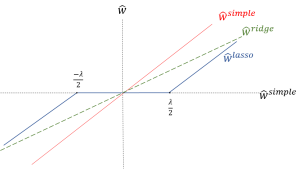
Apologies for the lack of visual appeal. But I think it is good enough to re-inforced the following facts:
Before going further, one important issue in case of both ridge and lasso regression is intercept handling. Generally, regularizing the intercept is not a good idea and it should be left out of regularization. This requires slight changes in the implementation, which I’ll leave for you to explore.
If you’re still confused and things are a bit fuzzy, I recommend taking the course on Regression which is part of the Machine Learning Specialization by University of Washington at Coursera.
Now, lets come to the concluding part where we compare the Ridge and Lasso techniques and see where these can be used.
Now that we have a fair idea of how ridge and lasso regression work, lets try to consolidate our understanding by comparing them and try to appreciate their specific use cases. I will also compare them with some alternate approaches. Lets analyze these under three buckets:
Traditionally, techniques like stepwise regression were used to perform feature selection and make parsimonious models. But with advancements in Machine Learning, ridge and lasso regression provide very good alternatives as they give much better output, require fewer tuning parameters and can be automated to a large extend.
Its not hard to see why the stepwise selection techniques become practically very cumbersome to implement in high dimensionality cases. Thus, lasso provides a significant advantage.
This disadvantage of lasso can be observed in the example we discussed above. Since we used a polynomial regression, the variables were highly correlated. ( Not sure why? Check the output of data.corr() ). Thus, we saw that even small values of alpha were giving significant sparsity (i.e. high #coefficients as zero).
Along with Ridge and Lasso, Elastic Net is another useful techniques which combines both L1 and L2 regularization. It can be used to balance out the pros and cons of ridge and lasso regression. I encourage you to explore it further.
In this article, I gave an overview of regularization using ridge and lasso regression. Then, I focused on reasons behind penalizing the magnitude of coefficients should give us parsimonious models. Next, we went into details of ridge and lasso regression and saw their advantages over simple linear regression. We got some intuition into why they should work and also how they work. If you read the optional mathematical part, you probably understood the underlying fundamentals.
Regularization techniques are really useful and I encourage you to implement them. If you’re ready to take the challenge, why not try them on the BigMart Sales Prediction problem and share your results in the discussion forum.
Did you find the article useful? Was it was too convoluted for you or just a walk in the park? Is there something you would like me to improve upon. Please share your valuable feedback and help me treat you with better content in future.