Setting Up Sublime Text 3 for Python Development
Table of Contents
Sublime Text 3 (ST3) is a lightweight, cross-platform code editor known for its speed, ease of use, and strong community support. It’s an incredible editor right out of the box, but the real power comes from the ability to enhance its functionality using Package Control and creating custom settings.
In this article, we’ll look at how to setup Sublime Text for full stack Python development (from front to back), enhance the basic functionality with custom themes and packages, and use many of the commands, features, and keyword shortcuts that make ST3 so powerful.
Note: This tutorial assumes you’re using a Mac and are comfortable with the terminal. If you’re using Windows or Linux, many of the commands will vary, but you should be able to use Google to find the answers quickly given the info in this tutorial.
Before we start, let’s address what I mean exactly by “full stack.”
In today’s world of HTML5 and mobile development, JavaScript is literally everywhere. EVERYWHERE. Python coupled with a framework such as Django or Flask is not enough. To really develop a website from end-to-end, you must be familiar with JavaScript (and the various JavaScript frameworks), REST APIs, responsive design, and of course HTML and CSS, and so on.
Let’s face it: as a programmer, you are like any other craftsman. If you want to be the best you can be, then you need your tools to be sharp. Your development environment must be set up for full stack development—which is exactly what we are going to do right now.
Features
Let’s start by looking at a few of the default features of Sublime Text 3:
-
Split Layouts allow you to arrange your files in various split screens. This is useful when you are doing test driven development (Python code on one screen, test scripts on another) or working on the front end (HTML on one screen, CSS and/or JavaScript on another).

-
Vintage Mode provides you with vi commands for use within ST3.
- Chrome-like Tabs make navigating and editing several files much simpler.
- Automatic loading of the last session re-opens all files and folders you had open when you closed the editor the last time. I leave ST3 open all the time, with various projects open, so if I reset the computer, it opens the files and folders right back up.
- Code Snippets increase your productivity by giving you the ability to create common pieces of code with a single keyword. There are a number of default snippets. To try one for yourself, open a new file, type in
lorem, and press Tab. You should get a paragraph of lorem ipsum text. Also, if you type defs and then press Tab in a Python file, it will setup a generic function.
Note: You can also create your own snippets: Tools > New Snippet. Refer to the documentation for help, and also check out some of my snippets here.
Customizing Sublime Text 3
After you download ST3, you can customize it.
Just Like TextMate has the mate command, Sublime Text has a command line tool called subl that allows you to open one file, or an entire directory of files and folders, from the terminal.
To enable this command, create a symbolic link to the subl binary:
$ sudo ln -s /Applications/Sublime\ Text.app/Contents/SharedSupport/bin/subl /usr/bin/subl
Ensure that the link works by opening Sublime:
If that didn’t work, you probably need to add /bin to your path:
$ echo "export PATH=~/bin:$PATH" >> ~/.profile
Then repeat step one.
Note: If you are still having trouble, check out this article for help. You can also read up on creating the symbolic links in Windows and Linux.
Now you can open a file or directory using the following commands:
# Open the current directory.
$ subl .

# Open a directory called tests.
$ subl ~/Documents/test

# Open a file called text.txt.
$ subl test.txt
If there are spaces in the path, you must surround the entire path in double quotes:
$ subl "~/Documents/test/my test file.txt"
To view all the commands, open up the help file:
Install Package Control
To begin taking advantage of the various packages for extending Sublime’s functionality, you need to manually install the package manager called Package Control. Once you have it installed, you can use it to install, remove, and upgrade all other ST3 packages.
- To install, copy the Python code for Sublime Text 3 found here. Click View > Show Console to open the ST3 console. Paste the code into the console. Press Enter. Reboot ST3.
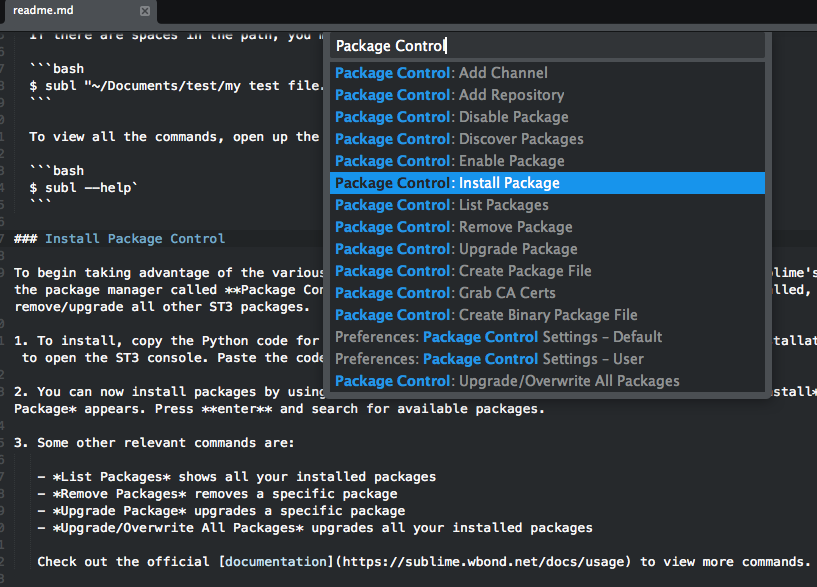
- You can now install packages by using the keyboard shortcut Cmd+Shift+P. Start typing
install until Package Control: Install Package appears. Press Enter and search for available packages.
Here are some other relevant commands:
List Packages shows all your installed packages.Remove Package removes a specific package.Upgrade Package upgrades a specific package.Upgrade/Overwrite All Packages upgrades all your installed packages.
Check out the official documentation to view more commands.
Create a Custom Settings File
You can fully configure Sublime Text using JSON-based settings files, so it’s easy to transfer or synchronize your customized settings to another system. First, we need to create our customized settings. It’s best to create a base file for all environments as well as language-specific settings files.
To set up a base file, click Sublime Text > Preferences > Settings - User. Add an empty JSON object to the file and add your settings like so:
{
  // base settings
  "auto_complete": false,
  "sublimelinter": false,
  "tab_size": 2,
  "word_wrap": true
}
- For language specific settings, click Sublime Text > Preferences > Settings - More > Syntax Specific - User. Then save the file using the following format: LANGUAGE.sublime-settings. For Python-specific settings, save the file as Python.sublime-settings.
- You can obviously configure your settings to your liking. However, I highly recommend starting with my base and Python-specific settings and then making changes as you see fit.
- Optional: You can use Dropbox to sync all your settings. Simply upload your settings files to Dropbox and load them from there to sync the Sublime environments on all your machines.
- A good reference for settings can be found at the Sublime Text Unofficial Documentation.
Themes
ST3 also gives you the option to change the overall theme to better suit your personality. Design your own. Or, if you’re not artistically inclined, you can download one of the various custom themes designed by the Sublime community through Package Control. Check out ColorSublime to preview themes before installing them.
The ever popular Soda Dark Theme and the minimal Flatland are two of my personal favorites.
After installing a theme, make sure to update your base settings through Sublime Text > Preferences > Settings - User:
{
  "theme": "Flatland Dark.sublime-theme",
  "color_scheme": "Packages/Theme - Flatland/Flatland Dark.tmTheme"
}
Packages
Besides the packaged themes, I take advantage of the following packages to speed up my workflow.
SideBarEnhancements extends the number of menu options in the sidebar, speeding up your overall workflow. Options such as New File and Duplicate are essential and should be part of ST3 out of the box. The Delete option alone makes it worth downloading. This feature simply sends files to the Trash, which may seem trivial, but if you delete a file without it, then it’s very difficult to recover unless you’re using a version control system.
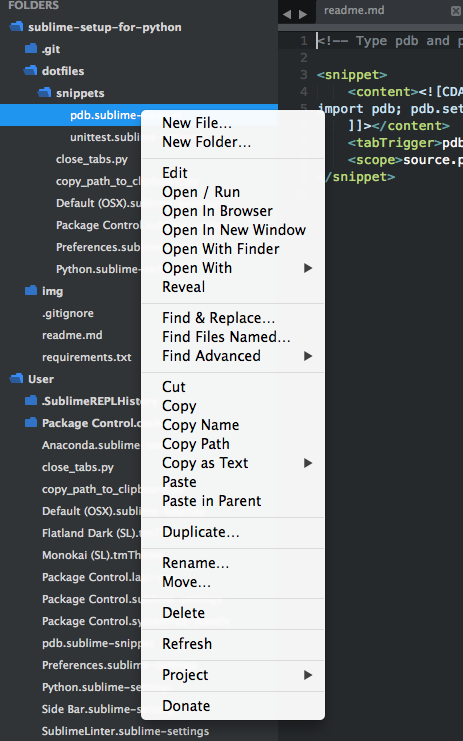
Download this now!
Anaconda
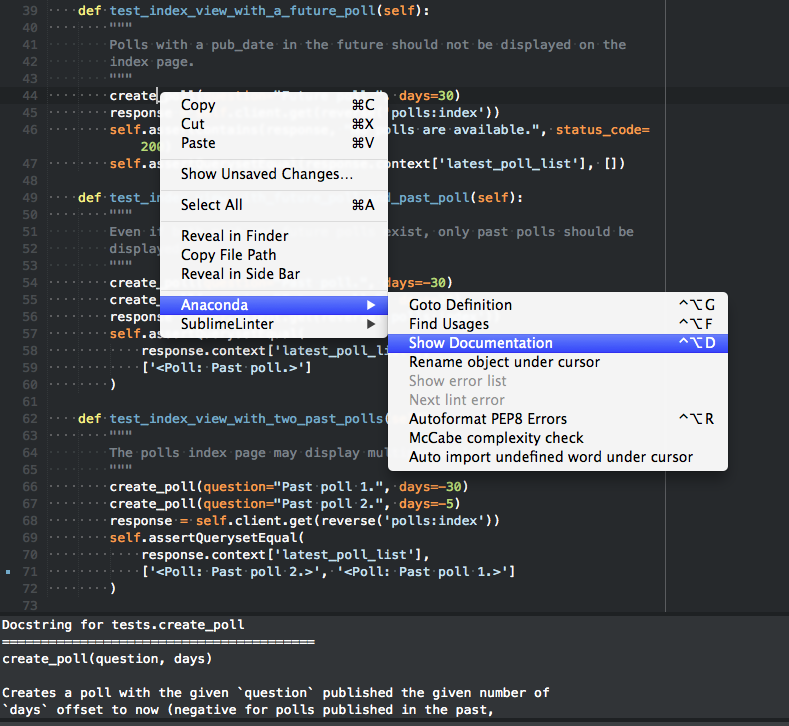
Anaconda is the ultimate Python package. It adds a number of IDE-like features to ST3 including the following:
- Autocompletion works by default, but there are a number of configuration options.
- Code linting uses either PyLint or PyFlakes with PEP 8. I personally use a different linting package, as I will explain shortly, so I disable linting altogether within the user-defined Anaconda settings file, Anaconda.sublime-settings, via the file menu: Sublime > Preferences > Package Settings > Anaconda > Settings - User:
{"anaconda_linting": false}
- McCabe code complexity checker runs the McCabe complexity checker tool within a specific file. If you’re not familiar with what complexity is, be sure to visit the link above.
- Goto Definitions finds and displays the definition of any variable, function, or class throughout your entire project.
- Find Usage quickly searches where a variable, function, or class has been used in a specific file.
- Show Documentation shows the docstring for functions or classes (if defined, of course).
You can view all of the features here or within the README file in ST3’s Package Settings: Sublime Text > Preferences > Package Settings > Anaconda > README.
Note: SublimeCodeIntel is another popular package that has many of the same features as Anaconda. I suggest testing them both out.
Djaneiro
Djaneiro supports Django templating and keyword highlighting and provides useful code snippets (tab completions) for Sublime Text. The snippet system is an incredible time-saver. You can create common Django blocks with only a few keystrokes for templates, models, forms, and views. Check out the official documentation to see a list of snippets.
My personal favorites are for templating: var creates {{ }} and tag creates {% %}.
requirementstxt
requirementstxt provides autocompletion and syntax highlighting as well as a nice version management system for your requirements.txt files.
SublimeLinter
SublimeLinter is a framework for ST3 linters. The package itself does not include any actual linters; those must be installed separately via Package Control using the SublimeLinter-[linter_name] naming syntax. You can view official linters here. There are also a number of third party linters, which can be viewed in Package Control. Check out the installation instructions here.
For Python linting, I recommend using SublimeLinter-pyflakes and SublimeLinter-pep8.
I also use SublimeLinter-jshint, SublimeLinter-pyyaml, SublimeLinter-csslint, SublimeLinter-html-tidy, and SublimeLinter-json.
Note: Most of these linters have dependencies associated with them, so please read the installation instructions before installing.
You can customize each linter in the user-defined SublimeLinter.sublime-settings file: Sublime Text > Preferences > Package Settings > SublimeLinter > Settings - User. For example, I ignore the following PEP 8 errors and warnings:
"pep8": {
    "@disable": false,
    "args": [],
    "excludes": [],
    "ignore": "E501,C0301,W0142,W0402,R0201,E1101,E1102,C0103,R0901,R0903,R0904,C1001,W0223,W0232,W0201,E1103,R0801,C0111",
    "max-line-length": 100,
    "select": ""
},
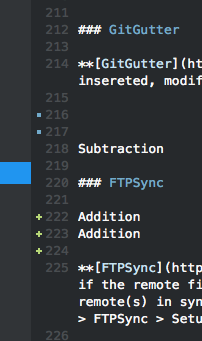
GitGutter
GitGutter shows little icons in ST3’s gutter area that indicate whether a line has been inserted, modified, or deleted since the last commit.
Note: If you want support for a number of distributed version control systems (Git, SVN, Bazaar, and Mercurial), check out Modific.
FTPSync
FTPSync syncs your project with your remote files. Simply open the file to download it (if the remote file is newer than your local file) and upload it to your remote server with every save. That’s a great way to keep your local and remote(s) in sync. You’ll want to make sure to add at least one remote connection by clicking Sublime Text > Preferences > Package Settings > FTPSync > Setup FTPSync.
Sample settings:
{
  "primary": {
    host: "ftp.mywebsite.com",
    username: "johnsmith",
    password: "secretpassword",
    path: "/www/",

    upload_on_save: true,
    tls: true
  }
}
I personally set the password to null because I don’t want it visible in that file. FTPSync just asks for my password after each save.
AdvancedNewFile
AdvancedNewFile is used to create a new folder or file from within ST3 with key bindings alone.
Simply bring up the AdvancedNewFile input through the appropriate key binding. Then, enter the path, along with the file name into the input field. Upon pressing Enter, the file will be created. In addition, if the directories specified do not yet exist, they will be created. By default, the path to the file being created will be filled shown in the status bar as you enter the path information.
For a more detailed explanation on its usage, check out the documentation on GitHub. Be sure to read about Tab Completion as well as Predefined Aliases.
I replaced the normal Cmd+N command to create a new file with AdvancedNewFile by adding the following code to the Key Bindings - User file: Sublime Text > Preferences > Package Settings > AdvancedNewFile > Key Bindings - User:
[
  { "keys": ["cmd+n"], "command": "advanced_new_file_new"}
]
You can also setup a default directory to start with: Sublime Text > Preferences > Package Settings > AdvancedNewFile > Settings - User
{"default_initial": "/Users/michaelherman/Documents/repos"}
Now when I create a new file, the /Users/michaelherman/Documents/repos string is automatically inserted first, since 99% of the time I store all my scripts in that directory.
Emmet
Emmet, previously known as Zen Coding, uses simple abbreviations to generate HTML or CSS code snippets.
For example, if you type a bang, !, and press Tab in an HTML file, then the HTML5 doctype and a few basic tags will be generated:
<!doctype html>
<html lang="en">
<head>
  <meta charset="UTF-8">
  <title>Document</title>
</head>
<body>

</body>
</html>
Check out the official documentation as well as this handy cheat sheet for more info.
Markdown Preview
Markdown Preview is used for previewing and building markdown files.
To use, open the Package Manager and type Markdown Preview to show the available commands:
- Markdown Preview: Python Markdown: Preview in Browser
- Markdown Preview: Python Markdown: Export HTML in Sublime Text
- Markdown Preview: Python Markdown: Copy to Clipboard
- Markdown Preview: GitHub Flavored Markdown: Preview in Browser
- Markdown Preview: GitHub Flavored Markdown: Export HTML in Sublime Text
- Markdown Preview: GitHub Flavored Markdown: Copy to Clipboard
- Markdown Preview: Open Markdown Cheat Sheet
Once converted, the output file will be updated on each subsequent save.
Keyboard Shortcuts
- Goto Anything Cmd+P is used for quickly finding and opening files. Just type in a part of a path and filename within a project and you can easily open that file. This is great for quickly opening files in large Django projects.
- Goto Line Number Ctrl+G takes you to a specific line number in an active file.
- Goto Symbol Cmd+R lists all functions and classes within a file to make them easier to find. Simply start typing the one you want.
- Go to beginning of line Cmd+Left and Go to end of line Cmd+Right help you navigate within lines.
- Delete current line Ctrl+Shift+K deletes the current line.
- Multi-Edit is by far my favorite shortcut:
- Select a word and press Cmd+D to select the next same word. Then press Cmd+D again to select the next same word again, and so on.
- Press Cmd+Left Button to create a cursor for editing everywhere you click.
- Block select Option+Left Button is used to select a block of text. It’s perfect for removing blank space when formatting a CSV file.
Note: For more shortcuts, take a look at this article.
Custom Commands
It’s easy to write your own custom commands and key bindings with Python. I currently use this workflow:
- Copy the path of the current file to the clipboard (link).
- Close all tabs except the active one (link).
Install these by adding the Python files to your /Sublime Text 3/Packages/User directory via the file menu (Sublime > Preferences > Browse Packages) and then opening the User directory. To complete the setup, bind them from the Key Bindings - User file (Sublime Text > Preferences > Package Settings > AdvancedNewFile > Key Bindings - User).
[
  // Copy file name
  {
    "keys": ["cmd+shift+c"],
    "command": "copy_path_to_clipboard"
  },
  // Close all other tabs
  {
    "keys": ["cmd+alt+w"],
    "command": "close_tabs"
  }
]
Additional Resources
- Community-maintained documentation
- Package Manager documentation
- Unofficial documentation reference
- Pimp my Editor - Presentation
Conclusion
I hope that this article was helpful to you and that you were able to integrate some of the above packages and custom settings along with your own based on your personal preferences to improve your workflow.
If you have any questions or suggestions of your own, please let me know in the comments below. Finally, check out the dotfiles folder in this repo to view all the resources that I created. Cheers!