Introduction to Databases: LibreOffice BaseMySQL stored procedures TutorialLearn SQL In 60 MinutesMySQL stored procedures TutorialSQL DatabaseMySQL 8.0 TutorialSelect first row in MySQL
SELECT * FROM englishwords ORDER BY id ASC LIMIT ;
Select last row in MySQL
SELECT * FROM englishwords ORDER BY id DESC LIMIT 1;
You can use an OFFSET in a LIMIT command:
SELECT * FROM englishwords LIMIT 1 OFFSET 99
in case your table has 100 rows this return the last row without relying on a primary_key
Count table rows
SELECT COUNT(*) FROM englishwords;
mysql #1054 - Unknown column error
While inserting a varchar value, if you will forget to add single quotes, then this error will arise.
run mysql in command mode
SQLTools and Sublime Text - Executing SQL, directly in your editorSQLZoo practise SQLMySQL by Examples1
To log in mysql:
shell> mysql --user=root --password=asdf1234 db_name
mysql -u user_name -p then press_enter_key
then type password
i.e.
line-1 : mysql -u root -p
line-2 : admin
USE sampleDB;
show tables;
eg. mysql -u root -p
show the structure of the table
desc world;
show keys from world;
SELECT population FROM world WHERE name = "Germany"
Listing all databases inside mysql
mysql> show databases;
Listing all databases according to a specific name.
mysql> SHOW DATABASES LIKE '%customer%';
Listing tables and their structure with the MySQL Command Line
select a database
list all the tables in the selected database with the following command:
mysql> show tables;
We can show the structure of the table using the "desc" command:
mysql> desc tableName;
show the indexes from a particular table:
mysql> show keys from tableName;
rename and duplicate table
RENAME TABLE tb1 TO tb2;
CREATE TABLE newtable LIKE oldtable;
INSERT INTO newtable SELECT * FROM oldtable;
import SQL file using the command line
mysql -u username -p database_name < file.sql
A common use of mysqldump is for making a backup of an entire database:
mysqldump db_name > backup-file.sql
backup of an entire database
mysql -p -u [user] [database] < backup-file.sql
MySQL command line
mysql> use db_name;
mysql> source backup-file.sql;
source C:\\Users\\User\\Desktop\\mysqlsampledatabase.sql;
desc example;
desc t_test;
use classicmodels;
desc classicmodels;
http://www.mysqltutorial.org/mysql-sample-database.aspx
http://www.mysqltutorial.org/getting-started-with-mysql/
http://www.mysqltutorial.org/
DML (Data Manipulation Language) Commands in MySQL
Some commands of DML are:
SELECT: retrieve data from a database
INSERT: insert data into a table
UPDATE: updates existing data within a table
DELETE: deletes all records from a table, the space for the records remain
MERGE: UPSERT operation (insert or update)
CALL: call a PL/SQL or Java subprogram
LOCK TABLE: control concurrency
- Insert :
The insert statement is used to add new row to a table.
INSERT INTO <table name> VALUES (<value 1>, ... <value n>);
Example:
INSERT INTO STUDENT VALUES (1001,‘Ram’);
The inserted values must match the table structure exactly in the number of attributes and the data type of each attribute.
Character type values are always enclosed in single quotes; number values are never in quotes; date values are often (but not always) in the format ‘yyyy-mm-dd’ (for example, ‘2006-11- 30’).
- UPDATE :
The update statement is used to change values that are already in a table.
UPDATE <table name> SET <attribute> = <expression> WHERE <condition>;
Example:
UPDATE STUDENT SET Name = ‘Amar’ WHERE StudID=1001;
The update expression can be a constant, any computed value, or even the result of a SELECT statement that returns a single row and a single column.
- DELETE :
The delete statement deletes row(s) from a table.
DELETE FROM <table name> WHERE <condition>;
Example:
DELETE FROM STUDENT WHERE StudID=1001;
If the WHERE clause is omitted, then every row of the table is deleted that matches with the specified condition.
- SELECT :
The SELECT statement is used to form queries for extracting information out of the database.
SELECT <attribute>, ….., <attribute n> FROM <table name>;
Example:
SELECT StudID, Name FROM STUDENT;
Apart from these statements, some statements are also used to control the transaction made by DML statements.
The commands used for this purpose are called Transaction Control (TCL) statements.
It allows statements to be grouped together into logical transactions.
Some commands of TCL are:
COMMIT: save work done.
SAVEPOINT: identify a point in a transaction to which you can later roll back.
ROLLBACK: restore database to original since the last COMMIT.
Query
SQL queries will help you sort through a massive dataset, to retrieve only the information that you need.
We'll begin by using the keywords SELECT, FROM, and WHERE to get data from specific columns based on conditions you specify.
For clarity, we'll work with a small imaginary dataset pet_records which contains just one table, called pets.
SELECT ... FROM
The most basic SQL query selects a single column from a single table.
To do this,
specify the column you want after the word SELECT, and then
specify the table after the word FROM.
For instance, to select the Name column (from the pets table in the pet_records database in the bigquery-public-data project), our query would appear as follows:
Note that when writing an SQL query, the argument we pass to FROM is not in single or double quotation marks (' or "). It is in backticks (`).
WHERE ...
BigQuery datasets are large, so you'll usually want to return only the rows meeting specific conditions. You can do this using the WHERE clause.
The query below returns the entries from the Name column that are in rows where the Animal column has the text 'Cat'.
Example: What are all the U.S. cities in the OpenAQ dataset?
Now that you've got the basics down, let's work through an example with a real dataset. We'll use an
OpenAQ dataset about air quality.
First, we'll set up everything we need to run queries and take a quick peek at what tables are in our database. (
Since you learned how to do this in the previous tutorial, we have hidden the code.
But if you'd like to take a peek, you need only click on the "Code" button below.)
Code
In [1]:
from google.cloud import bigquery
# Create a "Client" object
client = bigquery.Client()
# Construct a reference to the "openaq" dataset
dataset_ref = client.dataset("openaq",project="bigquery-public-data")
# API request - fetch the dataset
dataset=client.get_dataset(dataset_ref)
# List all the tables in the "openaq" dataset
tables = list(client.list_tables(dataset))
# Print names of all tables in the dataset (there's only one!)
for table in tables :
print(table.table_id)
Using Kaggle's public dataset BigQuery integration.
global_air_quality
The dataset contains only one table, called global_air_quality.
We'll fetch the table and take a peek at the first few rows to see what sort of data it contains. (Again, we have hidden the code.
To take a peek, click on the "Code" button below.)
Code
In [2]:
# Construct a reference to the "global_air_quality" table table_ref=dataset_ref.
table ("global_air_quality")
# API request - fetch the table table=client.
get_table(table_ref)
# Preview the first five lines of the "global_air_quality" table client.
list_rows(table , max_results=5).to_dataframe ()
Out[2]:
location
city
country
pollutant
value
timestamp
unit
source_name
latitude
longitude
averaged_over_in_hours
0
BTM Layout, Bengaluru - KSPCB
Bengaluru
IN
co
910.00
2018-02-22 03:00:00+00:00
µg/m³
CPCB
12.912811
77.60922
0.25
1
BTM Layout, Bengaluru - KSPCB
Bengaluru
IN
no2
131.87
2018-02-22 03:00:00+00:00
µg/m³
CPCB
12.912811
77.60922
0.25
2
BTM Layout, Bengaluru - KSPCB
Bengaluru
IN
o3
15.57
2018-02-22 03:00:00+00:00
µg/m³
CPCB
12.912811
77.60922
0.25
3
BTM Layout, Bengaluru - KSPCB
Bengaluru
IN
pm25
45.62
2018-02-22 03:00:00+00:00
µg/m³
CPCB
12.912811
77.60922
0.25
4
BTM Layout, Bengaluru - KSPCB
Bengaluru
IN
so2
4.49
2018-02-22 03:00:00+00:00
µg/m³
CPCB
12.912811
77.60922
0.25
Everything looks good! So, let's put together a query. Say we want to select all the values from the city column that are in rows where the country column is 'US' (for "United States").
In [3]:
# Query to select all the items from the "city" column where the "country" column is 'US'
query ="""
SELECT city
FROM `bigquery-public-data.openaq.global_air_quality`
WHERE country = 'US'
"""
Take the time now to ensure that this query lines up with what you learned above.
Submitting the query to the dataset
We're ready to use this query to get information from the OpenAQ dataset.
As in the previous tutorial, the first step is to create a Client object.
In [4]:
# Create a "Client" object client=bigquery.Client ()
Using Kaggle's public dataset BigQuery integration.
We begin by setting up the query with the query() method.
We run the method with the default parameters, but this method also allows us to specify more complicated settings that you can read about in the documentation.
We'll revisit this later.
In [5]:
# Set up the query query_job=client.
query(query)
Next, we run the query and convert the results to a pandas DataFrame.
In [6]:
# API request - run the query, and return a pandas DataFrame us_cities=query_job.
to_dataframe ()
Now we've got a pandas DataFrame called us_cities, which we can use like any other DataFrame.
In [7]:
# What five cities have the most measurements? us_cities.city.value_counts ().head ()
Out[7]:
Phoenix-Mesa-Scottsdale 87
Houston 80
New York-Northern New Jersey-Long Island 60
Los Angeles-Long Beach-Santa Ana 60
Riverside-San Bernardino-Ontario 59
Name: city, dtype: int64
More queries
If you want multiple columns, you can select them with a comma between the names:
In [8]:
query ="""
SELECT city, country
FROM `bigquery-public-data.openaq.global_air_quality`
WHERE country = 'US'
"""
You can select all columns with a * like this:
In [9]:
query="""
SELECT *
FROM `bigquery-public-data.openaq.global_air_quality`
WHERE country = 'US'
"""
Q&A: Notes on formatting
The formatting of the SQL query might feel unfamiliar. If you have any questions, you can ask in the comments section at the bottom of this page.
Here are answers to two common questions:
Question: What's up with the triple quotation marks (""")?
Answer: These tell Python that everything inside them is a single string, even though we have line breaks in it. The line breaks aren't necessary, but they make it easier to read your query.
Question: Do you need to capitalize SELECT and FROM?
Answer: No, SQL doesn't care about capitalization. However, it's customary to capitalize your SQL commands, and it makes your queries a bit easier to read.
Working with big datasets
BigQuery datasets can be huge. We allow you to do a lot of computation for free, but everyone has some limit.
Each Kaggle user can scan 5TB every 30 days for free. Once you hit that limit, you'll have to wait for it to reset.
The biggest dataset currently on Kaggle is 3TB, so you can go through your 30-day limit in a couple queries if you aren't careful.
Don't worry though: we'll teach you how to avoid scanning too much data at once, so that you don't run over your limit.
To begin,you can estimate the size of any query before running it. Here is an example using the (
very large!) Hacker News dataset. To see how much data a query will scan, we create a QueryJobConfig object and set the dry_run parameter to True.
In [10]:
# Query to get the score column from every row where the type column has value "job" query
=
""" SELECT score, title
FROM `bigquery-public-data.hacker_news.full`
WHERE type = "job"
"""
# Create a QueryJobConfig object to estimate size of query without running it dry_run_config=bigquery.
QueryJobConfig ( dry_run= True)
# API request - dry run query to estimate costs dry_run_query_job=client.
query(query ,
job_config= dry_run_config) print (
"This query will process
{}
bytes.".
format(dry_run_query_job.
total_bytes_processed))
This query will process 399514186 bytes.
You can also specify a parameter when running the query to limit how much data you are willing to scan. Here's an example with a low limit.
n [11]:
# Only run the query if it's less than 1 MB ONE_MB
=
1000 *
1000 safe_config=bigquery.
QueryJobConfig ( maximum_bytes_billed= ONE_MB)
# Set up the query (will only run if it's less than 1 MB) safe_query_job=client.
query(query ,
job_config= safe_config)
# API request - try to run the query, and return a pandas DataFrame safe_query_job.
to_dataframe ()
Out[11]:
score
title
0
51.0
Justin.tv is looking for a Product Manager
1
5.0
WePay - Designer
2
14.0
Greplin is looking for an iPhone developer
3
46.0
Senior Software Engineer - Comprehend Systems ...
4
15.0
Justin.tv is still hiring Software Engineering...
5
5.0
Backend Developer at Listia
6
6.0
[DISQUS - San Francisco] Hiring: Back-end deve...
7
7.0
Lead iOS Developer - HighlightCam
8
7.0
Mixpanel - Designer
9
72.0
thesixtyone (YC W09) is hiring software engineers
10
70.0
Weebly is hiring a front-end web developer in ...
11
32.0
Work at Socialcam and help the world share mob...
12
44.0
Posterous - Frontend Design Engineer
13
47.0
drchrono is looking for Healthcare Hackers. Jo...
14
24.0
Justin.tv looking for a Head of Communications
15
20.0
Wundrbar seeking iPhone developer
16
4.0
WePay - Operations Associate
17
11.0
Scoopler is Hiring: Join the real-time Revolut...
18
5.0
Listia (YC S09) needs a great Rails Developer/...
19
5.0
Justin.tv is hiring the smartest hackers from ...
20
44.0
Graphic Designer needed for stealth/VC funded ...
21
21.0
Work on something millions use: Intern at Just...
22
39.0
Posterous is hiring UI Designers and Software ...
23
70.0
BackType (YC S08) is hiring an Engineer (3rd T...
24
34.0
Heysan looking for Java-developer [San Franc...
25
6.0
Mixpanel - Hardcore Engineer
26
14.0
[Mountain View/Vancouver] SocialPicks Looking ...
27
7.0
Airbnb hiring SEM specialist
28
8.0
Mixpanel (S09) hiring a Software Engineer
29
53.0
Optimizely is hiring software engineers!
...
...
...
12129
3.0
YC startup looking for short-term contract help
12130
3.0
Frontend Engineer - Mixpanel Analytics [SF]
12131
3.0
Airbnb hiring analytics specialist
12132
3.0
Airbnb - Frontend Engineer
12133
3.0
Airbnb - Fraud Management Engineer
12134
3.0
Web developer intern - Mertado
12135
3.0
BackType is hiring front and back-end developers
12136
3.0
Software Architect at Mertado
12137
3.0
WePay - Lead Designer
12138
3.0
Front-end developers: hack your way around the...
12139
3.0
BackType is hiring a BD engineer
12140
3.0
BackType Is Hiring Search And Software Engineers
12141
3.0
Weebly [W07] hiring a System Administrator - T...
12142
3.0
Mertado (venture funded) is hiring web engineers
12143
3.0
BackType is hiring designers and product engin...
12144
3.0
Airbnb - Frontend Engineer
12145
3.0
Airbnb - SEM Specialist
12146
3.0
Mixpanel needs a frontend engineer (Python/JS)
12147
3.0
Airbnb hiring 3 front-end engineers
12148
3.0
Men wanted for hazardous journey: AdGrok (YC S...
12149
3.0
Rails Programmer at Inkling
12150
3.0
Javascript badass - Mixpanel
12151
3.0
Mixpanel is looking for a great frontend devel...
12152
3.0
BackType - Interns - SF
12153
3.0
Tuxebo - Hiring London based hacker
12154
3.0
Software Engineers Wanted (bounty: iPad for ea...
12155
3.0
Airbnb - User Acquisition Engineer
12156
3.0
Mixpanel is looking for a front-end engineer
12157
3.0
Nowmov (YC 2010W) looking for Rails rockstars
12158
3.0
WePay - Senior Backend Engineer
12159 rows × 2 columns
In this case, the query was cancelled, because the limit of 1 MB was exceeded.
However, we can increase the limit to run the query successfully!
n [12]:
# Only run the query if it's less than 1 GB ONE_GB
=
1000 *
1000 *
1000 safe_config=bigquery.
QueryJobConfig ( maximum_bytes_billed= ONE_GB)
# Set up the query (will only run if it's less than 1 GB) safe_query_job=client.
query(query ,
job_config= safe_config)
# API request - try to run the query, and return a pandas DataFrame job_post_scores=safe_query_job.
to_dataframe ()
# Print average score for job posts job_post_scores.
score.
mean ()
Out[12]:
1.95482369169756
A procedure
A procedure (often called a stored procedure) is a subroutine stored in database.
A trigger
Trigger: A trigger is a stored procedure in database which automatically invokes whenever a special event in the database occurs. For example, a trigger can be invoked when a row is inserted into a specified table or when certain table columns are being updated.
The CREATE TRIGGER statement allows you to create a new trigger that is fired automatically whenever an event such as INSERT, DELETE, or UPDATE occurs against a table.
The following illustrates the syntax of the CREATE TRIGGER statement:
CREATE TRIGGER [schema_name.]trigger_name
ON table_name
AFTER {[INSERT],[UPDATE],[DELETE]}
[NOT FOR REPLICATION]
AS
{sql_statements}
In this syntax:
The schema_name is the name of the schema to which the new trigger belongs. The schema name is optional.
The trigger_name is the user-defined name for the new trigger.
The table_name is the table to which the trigger applies.
The event is listed in the AFTER clause. The event could be INSERT, UPDATE, or DELETE. A single trigger can fire in response to one or more actions against the table.
The NOT FOR REPLICATION option instructs SQL Server not to fire the trigger when data modification is made as part of a replication process.
The sql_statements is one or more Transact-SQL used to carry out actions once an event occurs.
Syntax:
create trigger [trigger_name]
[before | after]
{insert | update | delete}
on [table_name]
[for each row]
[trigger_body]
Explanation of syntax:
create trigger [trigger_name]: Creates or replaces an existing trigger with the trigger_name.
[before | after]: This specifies when the trigger will be executed.
{insert | update | delete}: This specifies the DML operation.
on [table_name]: This specifies the name of the table associated with the trigger.
[for each row]: This specifies a row-level trigger, i.e., the trigger will be executed for each row being affected.
[trigger_body]: This provides the operation to be performed as trigger is fired
BEFORE and AFTER of Trigger:
BEFORE triggers run the trigger action before the triggering statement is run.
AFTER triggers run the trigger action after the triggering statement is run.
Example:
Given Student Report Database, in which student marks assessment is recorded. In such schema, create a trigger so that the total and average of specified marks is automatically inserted whenever a record is insert.
Here, as trigger will invoke before record is inserted so, BEFORE Tag can be used.
Suppose the database Schema –
mysql> desc Student;
+-------+-------------+------+-----+---------+----------------+
| Field | Type | Null | Key | Default | Extra |
+-------+-------------+------+-----+---------+----------------+
| tid | int(4) | NO | PRI | NULL | auto_increment |
| name | varchar(30) | YES | | NULL | |
| subj1 | int(2) | YES | | NULL | |
| subj2 | int(2) | YES | | NULL | |
| subj3 | int(2) | YES | | NULL | |
| total | int(3) | YES | | NULL | |
| per | int(3) | YES | | NULL | |
+-------+-------------+------+-----+---------+----------------+
7 rows in set (0.00 sec)
SQL Trigger to problem statement.
create trigger stud_marks
before INSERT
on
Student
for each row
set Student.total = Student.subj1 + Student.subj2 + Student.subj3, Student.per = Student.total * 60 / 100;
Above SQL statement will create a trigger in the student database in which whenever subjects marks are entered, before inserting this data into the database, trigger will compute those two values and insert with the entered values. i.e.,
mysql> insert into Student values(0, "ABCDE", 20, 20, 20, 0, 0);
Query OK, 1 row affected (0.09 sec)
mysql> select * from Student;
+-----+-------+-------+-------+-------+-------+------+
| tid | name | subj1 | subj2 | subj3 | total | per |
+-----+-------+-------+-------+-------+-------+------+
| 100 | ABCDE | 20 | 20 | 20 | 60 | 36 |
+-----+-------+-------+-------+-------+-------+------+
1 row in set (0.00 sec)
In this way trigger can be creates and executed in the databases.
SQL Views
Views in SQL are kind of virtual tables.
A view also has rows and columns as they are in a real table in the database.
We can create a view by selecting fields from one or more tables present in the database.
A View can either have all the rows of a table or specific rows based on certain condition.
In this article we will learn about creating , deleting and updating Views. Sample Tables:
StudentDetails
StudentMarks
CREATING VIEWS
We can create View using CREATE VIEW statement.
A View can be created from a single table or multiple tables.
Syntax:
CREATE VIEW view_name AS
SELECT column1, column2.....
FROM table_name
WHERE condition;
view_name: Name for the View
table_name: Name of the table
condition: Condition to select rows
Examples:
Creating View from a single table:
In this example we will create a View named DetailsView from the table StudentDetails.
Query:
CREATE VIEW DetailsView AS
SELECT NAME, ADDRESS
FROM StudentDetails
WHERE S_ID < 5;
To see the data in the View, we can query the view in the same manner as we query a table.
SELECT * FROM DetailsView;
Output:
In this example, we will create a view named StudentNames from the table StudentDetails.
Query:
CREATE VIEW StudentNames AS
SELECT S_ID, NAME
FROM StudentDetails
ORDER BY NAME;
If we now query the view as,
SELECT * FROM StudentNames;
Output:
Creating View from multiple tables: In this example we will create a View named MarksView from two tables StudentDetails and StudentMarks.
To create a View from multiple tables we can simply include multiple tables in the SELECT statement.
Query:
CREATE VIEW MarksView AS
SELECT StudentDetails.NAME, StudentDetails.ADDRESS, StudentMarks.MARKS
FROM StudentDetails, StudentMarks
WHERE StudentDetails.NAME = StudentMarks.NAME;
To display data of View MarksView:
SELECT * FROM MarksView;
Output:
DELETING VIEWS
We have learned about creating a View, but what if a created View is not needed any more? Obviously we will want to delete it.
SQL allows us to delete an existing View.
We can delete or drop a View using the DROP statement.
Syntax:
DROP VIEW view_name;
view_name: Name of the View which we want to delete.
For example, if we want to delete the View MarksView, we can do this as:
DROP VIEW MarksView;
UPDATING VIEWS
There are certain conditions needed to be satisfied to update a view.
If any one of these conditions is not met, then we will not be allowed to update the view.
The SELECT statement which is used to create the view should not include GROUP BY clause or ORDER BY clause.
The SELECT statement should not have the DISTINCT keyword.
The View should have all NOT NULL values.
The view should not be created using nested queries or complex queries.
The view should be created from a single table.
If the view is created using multiple tables then we will not be allowed to update the view.
We can use the CREATE OR REPLACE VIEW statement to add or remove fields from a view. Syntax:
CREATE OR REPLACE VIEW view_name AS
SELECT column1,coulmn2,..
FROM table_name
WHERE condition;
For example, if we want to update the view MarksView and add the field AGE to this View from StudentMarks Table, we can do this as:
CREATE OR REPLACE VIEW MarksView AS
SELECT StudentDetails.NAME, StudentDetails.ADDRESS, StudentMarks.MARKS, StudentMarks.AGE
FROM StudentDetails, StudentMarks
WHERE StudentDetails.NAME = StudentMarks.NAME;
If we fetch all the data from MarksView now as:
SELECT * FROM MarksView;
Output:
Inserting a row in a view:
We can insert a row in a View in a same way as we do in a table.
We can use the INSERT INTO statement of SQL to insert a row in a View.Syntax:
INSERT view_name(column1, column2 , column3,..)
VALUES(value1, value2, value3..);
view_name: Name of the View
Example:
In the below example we will insert a new row in the View DetailsView which we have created above in the example of "creating views from a single table".
INSERT INTO DetailsView(NAME, ADDRESS)
VALUES("Suresh","Gurgaon");
If we fetch all the data from DetailsView now as,
SELECT * FROM DetailsView;
Output:
Deleting a row from a View:
Deleting rows from a view is also as simple as deleting rows from a table.
We can use the DELETE statement of SQL to delete rows from a view.
Also deleting a row from a view first delete the row from the actual table and the change is then reflected in the view.Syntax:
DELETE FROM view_name
WHERE condition;
view_name:Name of view from where we want to delete rows
condition: Condition to select rows
Example:
In this example we will delete the last row from the view DetailsView which we just added in the above example of inserting rows.
DELETE FROM DetailsView
WHERE NAME="Suresh";
If we fetch all the data from DetailsView now as,
SELECT * FROM DetailsView;
Output:
WITH CHECK OPTION
The WITH CHECK OPTION clause in SQL is a very useful clause for views.
It is applicable to a updatable view.
If the view is not updatable, then there is no meaning of including this clause in the CREATE VIEW statement.
The WITH CHECK OPTION clause is used to prevent the insertion of rows in the view where the condition in the WHERE clause in CREATE VIEW statement is not satisfied.
If we have used the WITH CHECK OPTION clause in the CREATE VIEW statement, and if the UPDATE or INSERT clause does not satisfy the conditions then they will return an error.
Example:
In the below example we are creating a View SampleView from StudentDetails Table with WITH CHECK OPTION clause.
CREATE VIEW SampleView AS
SELECT S_ID, NAME
FROM StudentDetails
WHERE NAME IS NOT NULL
WITH CHECK OPTION;
In this View if we now try to insert a new row with null value in the NAME column then it will give an error because the view is created with the condition for NAME column as NOT NULL.
For example,though the View is updatable but then also the below query for this View is not valid:
INSERT INTO SampleView(S_ID)
VALUES(6);
NOTE: The default value of NAME column is null.
How to use phpMyAdmin
This article will explain how you can use PHPMyAdmin and how to create a database dump.
By default it is accessible at http://appname.hypernode.io/phpmyadmin
For protection, phpMyAdmin by default is only accessible through the appname.hypernode.io/phpmyadmin URL, on Vagrant via the appname.hypernode.local/phpmyadmin url and on Docker through YourBaseURL/dbadmin after you followed these instructions.
You can adjust this behaviour to your own preference.
Working with phpMyAdmin
Access phpMyAdmin
Credentials
PHPMyAdmin uses the same user and password your database uses.
You can find them safely stored in /data/web/.my.cnf.
All customers: via URL
Did you order a trial via Hypernode.com? Please be aware you do not have access to a control panel yet.
Access phpMyAdmin only via http://appname.hypernode.io/phpmyadmin.
You can log in using the credentials supplied in your .my.cnf file or through the user/password you might have created.
Dutch customers: via Service Panel
As a Dutch customer you can access phpMyAdmin via your Service Panel as well:
Log in to the Byte Service Panel
Select your Hypernode plan
Click on the Hypernode tab.
Click phpMyAdmin
Use phpMyAdmin on Hypernode
Create a database dump using phpMyAdmin
Go To http://appname.hypernode.io/phpmyadmin
Click on “Databases” and select the database.
Click on “Export”.
Click on “Go” and the export/backup will be available.
If you have a large database, making a database dump through phpMyAdmin is not very reliable.
Before importing it, make sure the integrity of your database dump is sane!
When you redirect all traffic to HTTPS, you might experience a SSL browser error when connecting to PHPMyAdmin as the SSL certificate of your domain does not match the .hypernode.io domain name.
To avoid this, there are 2 possible solutions:
Use Let’s Encrypt and create an SSL certificate for appname.hypernode.io.
Adjust your Nginx config to make phpMyAdmin accessible through another url then appname.hypernode.io.
For the latter, use the instructions below.
Reroute /phpmyadmin to /dbadmin and add a whitelist
When you want to use phpMyAdmin over SSL, or you want to add a whitelist with IP’s that are allowed to access phpMyAdmin, you can do so by moving phpMyAdmin to another URL that we can adjust to our needs:
First, create a symlink in /data/web/public:
1
ln -s /usr/share/phpmyadmin/ /data/web/public/dbadmin
For Magento 2, depending on your symlink settings you can use the same command as for a Magento 1 environment or you can use this command for the symlink:
1
ln -s /usr/share/phpmyadmin/ /data/web/magento2/pub/dbadmin
Next, create a snippet in /data/web/nginx called server.phpmyadmin with the following content:
12345678910111213
location /dbadmin {# Only allow IP addresses defined in /data/web/include.whitelistinclude /etc/nginx/app/include.whitelist;
# Uncomment to secure phpMyAdmin with additional basic_auth# include /etc/nginx/app/include.basic_auth;
try_files $uri $uri/ /dbadmin/index.php last;
location ~ \.php$ {echo_exec @phpfpm;}}
Next, create the include.whitelist in /data/web/nginx and add your IP(s) to the snippet
12
allow XXX.XXX.XXX.XXX;deny all;
And finally visit phpMyAdmin on https://yourdomain.nl/dbadmin
This will only add another URL where phpMyAdmin is accessible.
If you only want to use this endpoint, block all access to /phpmyadmin too
Blocking all access to phpMyAdmin
If you want to fully disable phpMyAdmin, create the following snippet as /data/web/nginx/server.phpmyadmin:
1234
## Block PHPMyAdminlocation ~* phpmyadmin {deny all;}
Troubleshooting phpMyAdmin
The phpMyAdmin button in the control panel redirects to https:// and gives a 404 in Nginx
This is probably because you redirect ALL traffic over HTTPS.
Try using PHPMyAdmin over ssl as explained above.
I’m receiving an error while dumping the database
Most of the time this happens when a database is large and you exceed the max_execution_time or memory_limit in php.
If this happens try dumping your database on the command line
My phpMyAdmin does not show any images
This happens when you redirect all traffic to HTTPS, causing mixed content errors in your browser.
To solve this, use phpMyAdmin over SSL.
Static content doesn’t (fully) display
This happens if you define a regex location block in your nginx config that matches phpmyadmin’s static files; This will override the existing config for static files under /phpmyadmin/.
To solve this, you will have to change your custom location block to not match files in the /phpmyadmin/ location.
SQL_Zoo answers
LOAD DATA from text file:
not work: LOAD DATA INFILE 'world.txt' INTO TABLE world;
work: LOAD DATA LOCAL INFILE "C:\\Users\\User\\Desktop\\world.txt" INTO TABLE world;
The MySQL server is running with the --secure-file-priv option so it cannot execute this statement
Your MySQL server has been started with --secure-file-priv option which basically limits from which directories you can load files using LOAD DATA INFILE.
You may use SHOW VARIABLES LIKE "secure_file_priv"; to see the directory that has been configured.
USE sampleDB;
show tables;
show the structure of the table
desc world;
show keys from world;
SELECT population FROM world WHERE name = "Germany"
SELECT population FROM world WHERE name = 'Germany'
uses a WHERE clause to select population of 'France'. Note that strings should be in 'single quotes';
SELECT name, population FROM world WHERE name IN ('Sweden', 'Norway', 'Denmark');
The IN operator allows you to specify multiple values in a WHERE clause.
Show the name and the population for 'Sweden', 'Norway' and 'Denmark'.
SELECT name, area FROM world WHERE area BETWEEN 250000 AND 300000
shows countries with an area of 250,000-300,000 sq. km
SELECT name FROM world WHERE name LIKE 'Y%'
find the countries that start with "B".
The % is a wild-card it can match any characters
SELECT name FROM world WHERE name LIKE '%Y'
Find the countries that end with y
SELECT name FROM world WHERE name LIKE '%x%'
Find the countries that contain the letter x
SELECT name FROM world WHERE name LIKE '%land'
Find the countries that end with land
SELECT name FROM world WHERE name LIKE 'c%ia'
Find the countries that start with C and end with ia
SELECT name FROM world WHERE name LIKE '%oo%'
Find the country that has oo in the name
SELECT name FROM world WHERE name LIKE '%a%a%a%'
Find the countries that have three or more a in the name
SELECT name FROM world WHERE name LIKE '_t%' ORDER BY name
Find the countries that have "t" as the second character.
the underscore is a single character wildcard.
SELECT name FROM world WHERE name LIKE '%o__o%'
Find the countries that have two "o" characters separated by two others.
SELECT name FROM world WHERE name LIKE '____'
Find the countries that have exactly four characters.
The capital of Luxembourg is Luxembourg. Show all the countries where the capital is the same as the name of the country
SELECT name, capital, continent FROM world WHERE (name = capital)
sql Find the country where the name is the capital city.
SELECT name FROM world WHERE name LIKE capital
Find the country where the name is the capital city.
SELECT name FROM world WHERE capital = concat(name, ' City');
Find the country where the capital is the country plus "City".
concat function combine two or more strings.
SELECT capital,name FROM world WHERE capital LIKE concat('%', name, '%')
Find the capital and the name where the capital includes the name of the country.
SELECT name, capital FROM world WHERE capital LIKE concat('%', name, '%') AND capital > name
Find the capital and the name where the capital is an extension of name of the country.
SELECT name, REPLACE(capital, name, '') FROM world WHERE capital LIKE concat('%', name, '%') AND capital > name
Show the name and the extension where the capital is an extension of name of the country.
mysql path:
D:\wamp64\bin\mysql\mysql5.7.23\bin
Cannot log in to the MySQL server:
shell> mysql -u root
mysql> FLUSH PRIVILEGES;
mysql> SET PASSWORD FOR 'root'@'localhost' = PASSWORD('asdf1234');
check the version info:
shell> mysqladmin -u root -p version
change the connect_type parameter from tcp to socket and added the parameter socket in config.inc.php:
$cfg['Servers'][$i]['host'] = 'localhost';
$cfg['Servers'][$i]['connect_type'] = 'socket';
$cfg['Servers'][$i]['socket'] = '/tmp/mysql.sock';
How to run SQL script in MySQL?
use the MySQL command line client:
mysql -h hostname -u user database < path/to/test.sql
OR:
execute mysql statements that have been written in a text file using the following command:
mysql -u yourusername -p yourpassword yourdatabase < text_file
if yourdatabase has not been created yet, log into your mysql first using:
mysql -u yourusername -p yourpassword yourdatabase
then:
mysql>CREATE DATABASE a_new_database_name
then:
mysql -u yourusername -p yourpassword a_new_database_name < text_file
that should do it!
AND save results to a file:
mysql -u yourusername -p yourpassword yourdatabase < text_file > results_file
to run a single MySQL query from your regular shell instead of from MySQL's interactive command line you would do this:
mysql -u [username] -p [dbname] -e [query]
to create the database
mysql -u [username] -p -e "create database somedb"
running the query from the MySQL command line:
$ mysql -u root -p somedb -e "select * from mytable"
Enter password:
Multiple-line Support
In SQL mode multiple line mode starts when the command \ is issued.
Once multiple-line mode is started, the subsequently entered statements are cached.
For example:
mysql-sql> \
... create procedure get_actors()
... begin
... select first_name from sakila.actor;
... end
Invoke mysql:
shell> mysql db_name
Or:
shell> mysql --user=user_name --password db_name
Enter password: your_password
mysql -u user_name -p then press_enter_key
then type password
i.e.
line-1 : mysql -u root -p
line-2 : admin
USE sampleDB;
show tables;
show the structure of the table
desc world;
show keys from world;
SELECT population FROM world WHERE name = "Germany"
https://dev.mysql.com/doc/refman/8.0/en/mysql-commands.html
mysql Client Commands
mysql> help
List of all MySQL commands:
Note that all text commands must be first on line and end with ';'
? (\?) Synonym for `help'.
clear (\c) Clear the current input statement.
connect (\r) Reconnect to the server. Optional arguments are db and host.
delimiter (\d) Set statement delimiter.
edit (\e) Edit command with $EDITOR.
ego (\G) Send command to mysql server, display result vertically.
exit (\q) Exit mysql. Same as quit.
go (\g) Send command to mysql server.
help (\h) Display this help.
nopager (\n) Disable pager, print to stdout.
notee (\t) Don't write into outfile.
pager (\P) Set PAGER [to_pager]. Print the query results via PAGER.
print (\p) Print current command.
prompt (\R) Change your mysql prompt.
quit (\q) Quit mysql.
rehash (\#) Rebuild completion hash.
source (\.) Execute an SQL script file. Takes a file name as an argument.
status (\s) Get status information from the server.
system (\!) Execute a system shell command.
tee (\T) Set outfile [to_outfile]. Append everything into given
outfile.
use (\u) Use another database. Takes database name as argument.
charset (\C) Switch to another charset. Might be needed for processing
binlog with multi-byte charsets.
warnings (\W) Show warnings after every statement.
nowarning (\w) Don't show warnings after every statement.
resetconnection(\x) Clean session context.
For server side help, type 'help contents'
Create MySQL Database, Table & User From Command Line Guide
To create MySQL database and users, follow these steps:
At the command line, log in to MySQL as the root user:
mysql -u root -p
Type the MySQL root password, and then press Enter.
To create a database user, type the following command. Replace username with the user you want to create, and replace password with the user's password: GRANT ALL PRIVILEGES ON *.* TO 'username'@'localhost' IDENTIFIED BY 'password';
This command grants the user all permissions. However, you can grant specific permissions to maintain precise control over database access. For example, to explicitly grant the SELECT permission, you would use the following command:
GRANT SELECT ON *.* TO 'username'@'localhost';
For more information about setting MySQL database permissions, please visit https://dev.mysql.com/doc/refman/5.5/en/grant.html.
Type \q to exit the mysql program.
To log in to MySQL as the user you just created, type the following command. Replace username with the name of the user you created in step 3: mysql -u username -p
Type the user's password, and then press Enter.
To create a database, type the following command. Replace dbname with the name of the database that you want to create: CREATE DATABASE dbname;
To work with the new database, type the following command. Replace dbname with the name of the database you created in step 7: USE dbname;
You can now work with the database. For example, the following commands demonstrate how to create a basic table named example, and how to insert some data into it: CREATE TABLE example ( id smallint unsigned not null auto_increment, name varchar(20) not null, constraint pk_example primary key (id) );
INSERT INTO example ( id, name ) VALUES ( null, 'Sample data' );
Using SQL script files
The previous procedure demonstrates how to create and populate a MySQL database by typing each command interactively with the mysql program. However, you can streamline the process by combining commands into a SQL script file.
The following procedure demonstrates how to use a SQL script file to create and populate a database:
As in the previous procedure, you should first create a user for the database. To do this, type the following commands:
mysql -u root -p
GRANT ALL PRIVILEGES ON *.* TO 'username'@'localhost' IDENTIFIED BY 'password';
\q
Create a file named example.sql and open it in your preferred text edtior. Copy and paste the following text into the file: CREATE DATABASE dbname;
USE dbname;
CREATE TABLE tablename ( id smallint unsigned not null auto_increment, name varchar(20) not null, constraint pk_example primary key (id) );
INSERT INTO tablename ( id, name ) VALUES ( null, 'Sample data' );
Replace dbname with the name of the database that you want to create, and tablename with the name of the table that you want to create.
You can modify the sample script file to create multiple databases and tables all at once. Additionally, the sample script creates a very simple table. You will likely have additional data requirements for your tables.
Save the changes to the example.sql file and exit the text editor.
To process the SQL script, type the following command. Replace username with the name of the user you created in step 1: mysql -u username -p < example.sql
The mysql program processes the script file statement by statement. When it finishes, the database and table are created, and the table contains the data you specified in the INSERT statements.
Delete MySQL Tables and Databases
To delete a table, type the following command from the mysql> prompt. Replace tablename with the name of the table that you want to delete:
DROP TABLE tablename;
This command assumes that you have already selected a database by using the USE statement.
Similarly, to delete an entire database, type the following command from the mysql> prompt. Replace dbname with the name of the database that you want to delete:
DROP DATABASE dbname;
The mysql program does not ask for confirmation when you use this command. As soon as you press Enter, MySQL deletes the database and all of the data it contains.
Delete MySQL Users
To view a list of all users, type the following command from the mysql> prompt:
SELECT user FROM mysql.user GROUP BY user;
To delete a specific user, type the following command from the mysql> prompt. Replace username with the name of the user that you want to delete:
DELETE FROM mysql.user WHERE user = 'username';
Connecting to MySQL from the command line
Learn how to connect to MySQL from the command line using the mysql program with this guide including detailed instructions, code snippets and links to related articles.
Reset MySQL root password
You can reset your MySQL root password if you have forgotten it. This article shows you how to change it. Note that you must have root access to your server to accomplish this.
SQLTools
Install SQLTools plugin
Configure Connections file (sublime command ST: Setup Connection or look in menu Package Settings - SQLTools - Connections)
Execute SQL or other SQLTools command using shortcuts or Commands (ST: Execute, ST: Table Description, etc)
Auto complete (PostgreSQL & MySQL) && Run SQL Queries
execute_auto_complete.gif?raw=true
Formatting SQL Queries (CTRL+e, CTRL+b) Formatting SQL Queries
List and Run saved queries (CTRL+e, CTRL+a)
Remove saved queries (CTRL+e, CTRL+r)
Run SQL Queries (CTRL+e, CTRL+e) Auto complete (PostgreSQL & MySQL) && Run SQL Queries
Save queries (CTRL+e, CTRL+q)
Show explain plan for queries (PostgreSQL, MySQL, Oracle, Vertica, SQLite) (CTRL+e, CTRL+x)
Show table records (CTRL+e, CTRL+s) Show table records
View Queries history (CTRL+e, CTRL+h)
View table schemas (CTRL+e, CTRL+d) View table schemas
Works with PostgreSQL, MySQL, Oracle, MSSQL, SQLite, Vertica, Firebird and Snowflake
Smart completions (except SQLite)
Run SQL Queries CTRL+e, CTRL+e
View table description CTRL+e, CTRL+d
Show table records CTRL+e, CTRL+s
Show explain plan for queries CTRL+e, CTRL+x
Formatting SQL Queries CTRL+e, CTRL+b
View Queries history CTRL+e, CTRL+h
Save queries CTRL+e, CTRL+q
List and Run saved queries CTRL+e, CTRL+l
Remove saved queries CTRL+e, CTRL+r
Below you can see an example of the SQLToolsConnections.sublime-settings:
{
"connections": {
"Connection MySQL": {
"type" : "mysql",
"host" : "127.0.0.1",
"port" : 3306,
"database": "dbname",
"username": "user",
"password": "password", // you will get a security warning in the output
// "defaults-extra-file": "/path/to/defaults_file_with_password", // use [client] or [mysql] section
// "login-path": "your_login_path", // login path in your ".mylogin.cnf"
"encoding": "utf-8"
},
"Connection PostgreSQL": {
"type" : "pgsql",
"host" : "127.0.0.1",
"port" : 5432,
"database": "dbname",
"username": "anotheruser",
// for PostgreSQL "password" is optional (setup "pgpass.conf" file instead)
"password": "password",
"encoding": "utf-8"
},
"Connection Oracle": {
"type" : "oracle",
"host" : "127.0.0.1",
"port" : 1522,
"database": "dbname",
"username": "anotheruser",
"password": "password",
"service" : "servicename",
"encoding": "utf-8"
},
"Connection SQLite": {
"type" : "sqlite",
"database": "d:/sqlite/sample_db/chinook.db",
"encoding": "utf-8"
}
},
"default": "Connection MySQL"
}
Auto Complete
After you select one connection, SQLTools will prepare auto completions for you.
PS: For a better experience, add this line to your sublime settings file
CTRL+SHIFT+p, select “Preferences: Settings - User”
add this option:
{
"auto_complete_triggers": [
{"selector": "text.html", "characters": "<" },
{"selector": "source.sql", "characters": "."}
]
}
R SQLite
Embeds the SQLite database engine in R, providing a DBI-compliant interface. SQLite is a public-domain, single-user, very light-weight database engine that implements a decent subset of the SQL 92 standard, including the core table creation, updating, insertion, and selection operations, plus transaction management.
You can install the latest released version of RSQLite from CRAN with:
install.packages("RSQLite")
Or install the latest development version from GitHub with:
# install.packages("devtools")
devtools::install_github("rstats-db/RSQLite")
To install from GitHub, you’ll need a development environment.
Basic usage
library(DBI)
# Create an ephemeral in-memory RSQLite database
con <- dbConnect(RSQLite::SQLite(), ":memory:")

dbListTables(con)
## character(0)dbWriteTable(con, "mtcars", mtcars)
dbListTables(con)## [1] "mtcars"dbListFields(con, "mtcars")## [1] "mpg" "cyl" "disp" "hp" "drat" "wt" "qsec" "vs" "am" "gear"
## [11] "carb"dbReadTable(con, "mtcars")## mpg cyl disp hp drat wt qsec vs am gear carb
## 1 21.0 6 160.0 110 3.90 2.620 16.46 0 1 4 4
## 2 21.0 6 160.0 110 3.90 2.875 17.02 0 1 4 4
## 3 22.8 4 108.0 93 3.85 2.320 18.61 1 1 4 1
.....
## 30 19.7 6 145.0 175 3.62 2.770 15.50 0 1 5 6
## 31 15.0 8 301.0 335 3.54 3.570 14.60 0 1 5 8
## 32 21.4 4 121.0 109 4.11 2.780 18.60 1 1 4 2# You can fetch all results:
res <- dbSendQuery(con, "SELECT * FROM mtcars WHERE cyl = 4")
dbFetch(res)## mpg cyl disp hp drat wt qsec vs am gear carb
## 1 22.8 4 108.0 93 3.85 2.320 18.61 1 1 4 1
## 2 24.4 4 146.7 62 3.69 3.190 20.00 1 0 4 2
## 3 22.8 4 140.8 95 3.92 3.150 22.90 1 0 4 2
.....
## 10 30.4 4 95.1 113 3.77 1.513 16.90 1 1 5 2
## 11 21.4 4 121.0 109 4.11 2.780 18.60 1 1 4 2dbClearResult(res)
# Or a chunk at a time
res <- dbSendQuery(con, "SELECT * FROM mtcars WHERE cyl = 4")
while(!dbHasCompleted(res)){
chunk <- dbFetch(res, n = 5)
print(nrow(chunk))
}## [1] 5
## [1] 5
## [1] 1# Clear the result
dbClearResult(res)
# Disconnect from the database
dbDisconnect(con)
Database Queries With R
There are many ways to query data with R.
This article shows you three of the most common ways:
Using DBI
Using dplyr syntax
Using R Notebooks
Background
Several recent package improvements make it easier for you to use databases with R.
The query examples below demonstrate some of the capabilities of these R packages.
DBI.
The DBI specification has gone through many recent improvements.
When working with databases, you should always use packages that are DBI-compliant.
dplyr & dbplyr.
The dplyr package now has a generalized SQL backend for talking to databases, and the new dbplyr package translates R code into database-specific variants.
As of this writing, SQL variants are supported for the following databases: Oracle, Microsoft SQL Server, PostgreSQL, Amazon Redshift, Apache Hive, and Apache Impala.
More will follow over time.
odbc.
The odbc R package provides a standard way for you to connect to any database as long as you have an ODBC driver installed.
The odbc R package is DBI-compliant, and is recommended for ODBC connections.
RStudio also made recent improvements to its products so they work better with databases.
RStudio Professional Drivers.
If you are using RStudio professional products, you can download RStudio Professional Drivers for no additional cost.
The examples below use the Oracle ODBC driver.
If you are using open-source tools, you can bring your own driver or use community packages – many open-source drivers and community packages exist for connecting to a variety of databases.
Using databases with R is a broad subject and there is more work to be done.
An earlier blog post discussed our vision.
Example: Query bank data in an Oracle database
In this example, we will query bank data in an Oracle database.
We connect to the database by using the DBI and odbc packages.
This specific connection requires a database driver and a data source name (DSN) that have both been configured by the system administrator.
Your connection might use another method.
library(DBI)
library(dplyr)
library(dbplyr)
library(odbc)
con <- dbConnect(odbc::odbc(), "Oracle DB")
1. Query using DBI
You can query your data with DBI by using the dbGetQuery() function.
Simply paste your SQL code into the R function as a quoted string.
This method is sometimes referred to as pass through SQL code, and is probably the simplest way to query your data.
Care should be used to escape your quotes as needed.
For example, 'yes' is written as \'yes\'.
dbGetQuery(con,'
  select "month_idx", "year", "month",
  sum(case when "term_deposit" = \'yes\' then 1.0 else 0.0 end) as subscribe,
  count(*) as total
  from "bank"
  group by "month_idx", "year", "month"
')
2. Query using dplyr syntax
You can write your code in dplyr syntax, and dplyr will translate your code into SQL.
There are several benefits to writing queries in dplyr syntax: you can keep the same consistent language both for R objects and database tables, no knowledge of SQL or the specific SQL variant is required, and you can take advantage of the fact that dplyr uses lazy evaluation.
dplyr syntax is easy to read, but you can always inspect the SQL translation with the show_query() function.
q1 <- tbl(con, "bank") %>%
  group_by(month_idx, year, month) %>%
  summarise(
    subscribe = sum(ifelse(term_deposit == "yes", 1, 0)),
    total = n())
show_query(q1)
<SQL>
SELECT "month_idx", "year", "month", SUM(CASE WHEN ("term_deposit" = 'yes') THEN (1.0) ELSE (0.0) END) AS "subscribe", COUNT(*) AS "total"
FROM ("bank")
GROUP BY "month_idx", "year", "month"
3. Query using an R Notebooks
Did you know that you can run SQL code in an R Notebook code chunk? To use SQL, open an R Notebook in the RStudio>File > New File menu.
Start a new code chunk with {sql}, and specify your connection with the connection=con code chunk option.
If you want to send the query output to an R dataframe, use output.var = "mydataframe" in the code chunk options.
When you specify output.var, you will be able to use the output in subsequent R code chunks.
In this example, we use the output in ggplot2.
```{sql, connection=con, output.var = "mydataframe"}
SELECT "month_idx", "year", "month", SUM(CASE WHEN ("term_deposit" = 'yes') THEN (1.0) ELSE (0.0) END) AS "subscribe",
COUNT(*) AS "total"
FROM ("bank")
GROUP BY "month_idx", "year", "month"
```
```{r}
library(ggplot2)
ggplot(mydataframe, aes(total, subscribe, color = year)) +
geom_point() +
xlab("Total contacts") +
ylab("Term Deposit Subscriptions") +
ggtitle("Contact volume")
```
The benefits to using SQL in a code chunk are that you can paste your SQL code without any modification.
For example, you do not have to escape quotes.
If you are using the proverbial spaghetti code that is hundreds of lines long, then a SQL code chunk might be a good option.
Another benefit is that the SQL code in a code chunk is highlighted, making it very easy to read.
For more information on SQL engines, see this page on knitr language engines.
Summary
There is no single best way to query data with R.
You have many methods to chose from, and each has its advantages.
Here are some of the advantages using the methods described in this article.
Method
Advantages
DBI::dbGetQuery
Fewer dependencies required
dplyr syntax
Use the same syntax for R and database objects
No knowledge of SQL required
Code is standard across SQL variants
Lazy evaluation
R Notebook SQL engine
Copy and paste SQL – no formatting required
SQL syntax is highlighted
SQL in R
SQL is a database query language - a language designed specifically for interacting with a database.
It offers syntax for extracting data, updating data, replacing data, creating data, etc.
For our purposes, it will typically be used when accessing data off a server database.
If the database isn’t too large, you can grab the entire data set and stick it in a data.frame.
However, often the data are quite large so you interact with it piecemeal via SQL.
There are various database implementations (SQLite, Microsoft SQL Server, PostgreSQL, etc) which are database management software which use SQL to access the data.
The method of connecting with each database may differ, but they support SQL (specifically they support ANSI SQL) and often extend it in subtle ways.
This means that in general, SQL written to access a SQLite database may not work to access a PostgreSQL database.
Thankfully, most of these differences are on more fringe operations, and standard commands tend to be equivalent.
SQL in this
The first (and in my opinion, biggest) hurdle in using SQL is accessing the actual data.
If you are accessing data which someone else is hosting, they will (hopefully) have IT administrators who can assist you with this task.
The exact method and settings used with differ greatly by project, so we will not be covering it in this>
For these notes, we will cover only the syntax of SQL queries, using the sqldf package which enables SQL queries on a data.frame.
We will not cover connecting to a SQL server, nor modifying an existing database, only extracting the data to analyze in R with normal methods.
sqldf package
library(sqldf)
The sqldf package is incredibly simple, from R’s point of view.
There is a single function are concerned about: sqldf.
Passed to this function is a SQL statement, such as
sqldf('SELECT age, circumference FROM Orange WHERE Tree = 1 ORDER BY circumference ASC')
## Warning: Quoted identifiers should have>
##    age circumference
## 1  118            30
## 2  484            58
## 3  664            87
## 4 1004           115
## 5 1231           120
## 6 1372           142
## 7 1582           145
(Note: The above warning is due to some compatibility issues between sqldf and RSQLite and shouldn’t affect anything.)
SQL Queries
There are a large number of SQL major commands.
Queries are accomplished with the SELECT command.
First a note about convention:
By convention, SQL syntax is written in all UPPER CASE and variable names/database names are written in lower case.
Technically, the SQL syntax is case insensitive, so it can be written in lower case or otherwise.
Note however that R is not case insensitive, so variable names and data frame names must have proper capitalization.
Hence
sqldf("SELECT * FROM iris")
sqldf("select * from iris")
are equivalent, but this would fail (assuming you haven’t created a new object called “IRIS”):
sqldf("SELECT * from IRIS")
The basic syntax for SELECT is
SELECT variable1, variable2 FROM data
For example,
data(BOD)
BOD
## Time demand
## 1 1 8.3
## 2 2 10.3
## 3 3 19.0
## 4 4 16.0
## 5 5 15.6
## 6 7 19.8sqldf('SELECT demand FROM BOD')## demand
## 1 8.3
## 2 10.3
## 3 19.0
## 4 16.0
## 5 15.6
## 6 19.8sqldf('SELECT Time, demand from BOD')## Time demand
## 1 1 8.3
## 2 2 10.3
## 3 3 19.0
## 4 4 16.0
## 5 5 15.6
## 6 7 19.8
A quick sidenote: SQL does not like variables with . in their name.
If you have any, refer to the variable wrapped in quotes, such as
iris1 <- sqldf('SELECT Petal.Width FROM iris')## Error in rsqlite_send_query(conn@ptr, statement): no such column: Petal.Widthiris2 <- sqldf('SELECT "Petal.Width" FROM iris')
Wildcard
A wild card can be passed to extract everything.
bod2 <- sqldf('SELECT * FROM BOD')
bod2
## Time demand
## 1 1 8.3
## 2 2 10.3
## 3 3 19.0
## 4 4 16.0
## 5 5 15.6
## 6 7 19.8
LIMIT
To control the number of results returned, use LIMIT #.
sqldf('SELECT * FROM iris LIMIT 5')## Sepal.Length Sepal.Width Petal.Length Petal.Width Species
## 1 5.1 3.5 1.4 0.2 setosa
## 2 4.9 3.0 1.4 0.2 setosa
## 3 4.7 3.2 1.3 0.2 setosa
## 4 4.6 3.1 1.5 0.2 setosa
## 5 5.0 3.6 1.4 0.2 setosa
ORDER BY
To order variables, use the syntax
ORDER BY var1 {ASC/DESC}, var2 {ASC/DESC}
where the choice of ASC for ascending or DESC for descending is made per variable.
sqldf("SELECT * FROM Orange ORDER BY age ASC, circumference DESC LIMIT 5")## Tree age circumference
## 1 2 118 33
## 2 4 118 32
## 3 1 118 30
## 4 3 118 30
## 5 5 118 30
WHERE
Conditional statements can be added via WHERE:
sqldf('SELECT demand FROM BOD WHERE Time < 3')## demand
## 1 8.3
## 2 10.3
Both AND and OR are valid, along with paranthese to affect order of operations.
sqldf('SELECT * FROM rock WHERE (peri > 5000 AND shape < .05) OR perm > 1000')## area peri shape perm
## 1 5048 941.543 0.328641 1300
## 2 1016 308.642 0.230081 1300
## 3 5605 1145.690 0.464125 1300
## 4 8793 2280.490 0.420477 1300
There are few more complicated ways to use WHERE:
IN
WHERE IN is used similar to R’s %in%.
It also supports NOT.
sqldf('SELECT * FROM BOD WHERE Time IN (1,7)')## Time demand
## 1 1 8.3
## 2 7 19.8sqldf('SELECT * FROM BOD WHERE Time NOT IN (1,7)')## Time demand
## 1 2 10.3
## 2 3 19.0
## 3 4 16.0
## 4 5 15.6
LIKE
LIKE can be thought of as a weak regular expression command.
It only allows the single wildcard % which matches any number of characters.
For example, to extract the data where the feed ends with “bean”:
sqldf('SELECT * FROM chickwts WHERE feed LIKE "%bean" LIMIT 5')## weight feed
## 1 179 horsebean
## 2 160 horsebean
## 3 136 horsebean
## 4 227 horsebean
## 5 217 horsebeansqldf('SELECT * FROM chickwts WHERE feed NOT LIKE "%bean" LIMIT 5')## weight feed
## 1 309 linseed
## 2 229 linseed
## 3 181 linseed
## 4 141 linseed
## 5 260 linseed
Aggregated data
Select statements can create aggregated data using AVG, MEDIAN, MAX, MIN, and SUM as functions in the list of variables to select.
The GROUP BY statement can be added to aggregate by groups.
AS can name the
sqldf("SELECT AVG(circumference) FROM Orange")## AVG(circumference)
## 1 115.8571sqldf("SELECT tree, AVG(circumference) AS meancirc FROM Orange GROUP BY tree")## Tree meancirc
## 1 1 99.57143
## 2 2 135.28571
## 3 3 94.00000
## 4 4 139.28571
## 5 5 111.14286
Counting data
SELECT COUNT() returns the number of observations.
Passing * or nothing returns total rows, passing a variable name returns the number of non-NA entries.
AS works as well.
d <- data.frame(a = c(1,1,1), b = c(1,NA,NA))
d
## a b
## 1 1 1
## 2 1 NA
## 3 1 NAsqldf("SELECT COUNT() as numrows FROM d")## numrows
## 1 3sqldf("SELECT COUNT(b) FROM d")## COUNT(b)
## 1 1
Conclusion
This is only the tip of the iceberg which is SQL.
There are far more advanced commands available, from DELETE or UPDATE to modify a database, to various JOIN commands for merging.
If the database is large enough that you cannot store the entire dataset on your computer, you may need to learn more commands.
For some tutorials into more advanced SQL see the following:
@ symbol
The @ symbol in front of a function silences it. Meaning, you won't get any types of error messages when executing it, even if it fails. So I suggest: don't use it
in addition: dont use mysql_* functions at all since it deprecated
Storage Sizes for MySQL TEXT Data Types
SQL Server supported data types (Data Types (Transact-SQL) )
large-value data types (VARCHAR(MAX), NVARCHAR(MAX) and VARBINARY(MAX))
store up to 2^31-1 bytes of data.
The LONGTEXT data object is for use in extreme text string storage use cases.
It is a viable option when the MEDIUMTEXT object is not big enough.
Computer programs and applications often reach text lengths in the LONGTEXT range.
These data objects can be as large as 4 GB (expressed as 2^32 -1) and store up to 4,294,967,295 characters with 4 bytes of overhead storage,
TEXT vs. BLOB
BLOBs are an alternative type of data storage that share matching naming and capacity mechanisms with TEXT objects.
However, BLOBs are binary strings with no character set sorting, so they are treated as numeric values while TEXT objects are treated as character strings.
This differentiation is important for sorting information.
BLOBs are used to store data files like images, videos, and executables.
Usage Notes
Using TEXT fields for select and search queries will incur performance hits because the server will call the objects individually and scan them during the query instead of paging data stored in the memory.
Enabling strict SQL will enforce the maximum character lengths and truncate any entered data that exceeds those limits.
TEXT columns require an index prefix length and can’t have DEFAULT values, unlike CHAR and VARCHAR objects.
Estimating size by word count: assume average English word is 4.5 letters long and needs 1 extra character for spacing.
Example, a site that consists of 500 word articles would use about 2,750 characters on average for the article text data.
TINYTEXT’s 255 character capacity is insufficient for this use case, while TEXT’s 65535 character capacity offers storage for articles that hit over 11,900 words based on the average criteria.
SQL Data Types for MySQL, SQL Server, and MS Access
The data type of a column defines what value the column can hold:
integer, character, money, date and time, binary,
and so on.
SQL Data Types
Each column in a database table is required to have a name and a data type.
An SQL developer must decide what type of data that will be stored inside each
column when creating a table.
The data type is a
guideline for SQL to understand what type of data is expected inside of each
column, and it also identifies how SQL will interact with the stored data.
Note: Data types might have different names in different database.
And even if the name is the same, the size and other details may be different!
Always check the
documentation!\
MySQL Data Types (Version 8.0)
In MySQL there are three main data types: string, numeric, and date and time.
String data types:
Data type
Description
CHAR(size)
A FIXED length string (can contain letters, numbers, and special characters).
The
size parameter specifies the column length in characters - can be
from 0 to 255.
Default is 1
VARCHAR(size)
A VARIABLE length string (can contain letters, numbers, and special
characters).
The size parameter specifies the maximum column
length in characters - can be from 0 to 65535
BINARY(size)
Equal to CHAR(), but stores binary byte strings.
The size
parameter specifies the column length in bytes.
Default is 1
VARBINARY(size)
Equal to VARCHAR(), but stores binary byte strings.
The size
parameter specifies the maximum column length in bytes.
TINYBLOB
For BLOBs (Binary Large OBjects).
Max length: 255 bytes
TINYTEXT
Holds a string with a maximum length of 255 characters
TEXT(size)
Holds a string with a maximum length of 65,535 bytes
BLOB(size)
For BLOBs (Binary Large OBjects).
Holds up to 65,535 bytes of data
MEDIUMTEXT
Holds a string with a maximum length of 16,777,215 characters
MEDIUMBLOB
For BLOBs (Binary Large OBjects).
Holds up to 16,777,215 bytes of data
LONGTEXT
Holds a string with a maximum length of 4,294,967,295 characters
LONGBLOB
For BLOBs (Binary Large OBjects).
Holds up to 4,294,967,295 bytes of data
ENUM(val1, val2, val3, ...)
A string object that can have only one value, chosen from a list of possible values.
You can list up to 65535 values in an ENUM list.
If a value is inserted that is not in the list, a blank value will be inserted.
The values are sorted in the order you enter them
SET(val1, val2, val3, ...)
A string object that can have 0 or more values, chosen from a list of
possible values.
You can list up to 64 values in a SET list
Numeric data types:
Data type
Description
BIT(size)
A bit-value type.
The number of bits per value is specified in size.
The size parameter can hold a value from 1 to 64.
The default
value for size is 1.
TINYINT(size)
A very small integer.
Signed range is from -128 to 127.
Unsigned range
is from 0 to 255.
The size parameter specifies the maximum
display width (which is 255)
BOOL
Zero is considered as false, nonzero values are considered as true.
BOOLEAN
Equal to BOOL
SMALLINT(size)
A small integer.
Signed range is from -32768 to 32767.
Unsigned range
is from 0 to 65535.
The size parameter specifies the maximum
display width (which is 255)
MEDIUMINT(size)
A medium integer.
Signed range is from -8388608 to 8388607.
Unsigned
range is from 0 to 16777215.
The size parameter specifies the
maximum display width (which is 255)
INT(size)
A medium integer.
Signed range is from -2147483648 to 2147483647.
Unsigned range is from 0 to 4294967295.
The size parameter
specifies the maximum display width (which is 255)
INTEGER(size)
Equal to INT(size)
BIGINT(size)
A large integer.
Signed range is from -9223372036854775808 to
9223372036854775807.
Unsigned range is from 0 to 18446744073709551615.
The
size parameter specifies the maximum display width (which is 255)
FLOAT(size, d)
A floating point number.
The total number of digits is specified in
size.
The number of digits after the decimal point is specified
in the d parameter.
This syntax is deprecated in MySQL 8.0.17,
and it will be removed in future MySQL versions
FLOAT(p)
A floating point number.
MySQL uses the p value to determine
whether to use FLOAT or DOUBLE for the resulting data type.
If p
is from 0 to 24, the data type becomes FLOAT().
If p is from 25 to
53, the data type becomes DOUBLE()
DOUBLE(size, d)
A normal-size floating point number.
The total number of digits is specified in
size.
The number of digits after the decimal point is specified
in the d parameter
DOUBLE PRECISION(size, d)
DECIMAL(size, d)
An exact fixed-point number.
The total number of digits is specified in
size.
The number of digits after the decimal point is specified
in the d parameter.
The maximum number for size is 65.
The maximum number for d is 30.
The default value for size
is 10.
The default value for d is 0.
DEC(size, d)
Equal to DECIMAL(size,d)
Note: All the numeric data types may have an extra option: UNSIGNED
or ZEROFILL.
If you add the UNSIGNED option, MySQL disallows negative values for
the column.
If you add the ZEROFILL option, MySQL automatically also adds the
UNSIGNED attribute to the column.
Date and Time data types:
Data type
Description
DATE
A date.
Format: YYYY-MM-DD.
The supported range is from '1000-01-01' to '9999-12-31'
DATETIME(fsp)
A date and time combination.
Format: YYYY-MM-DD hh:mm:ss.
The supported range is from '1000-01-01 00:00:00' to '9999-12-31 23:59:59'.
Adding DEFAULT and ON UPDATE in the column definition to get automatic
initialization and updating to the current date and time
TIMESTAMP(fsp)
A timestamp.
TIMESTAMP values are stored as the number of seconds since the Unix epoch ('1970-01-01 00:00:00' UTC).
Format: YYYY-MM-DD
hh:mm:ss.
The supported range is from '1970-01-01 00:00:01' UTC to '2038-01-09 03:14:07' UTC.
Automatic initialization and updating to the current date and time can be
specified using DEFAULT CURRENT_TIMESTAMP and ON UPDATE CURRENT_TIMESTAMP
in the column definition
TIME(fsp)
A time.
Format: hh:mm:ss.
The supported range is from '-838:59:59' to '838:59:59'
YEAR
A year in four-digit format.
Values allowed in four-digit format: 1901 to 2155, and 0000.
MySQL 8.0 does not support year in two-digit format.
SQL Server Data Types
String data types:
Data type
Description
Max size
Storage
char(n)
Fixed width character string
8,000 characters
Defined width
varchar(n)
Variable width character string
8,000 characters
2 bytes + number of chars
varchar(max)
Variable width character string
1,073,741,824 characters
2 bytes + number of chars
text
Variable width character string
2GB of text data
4 bytes + number of chars
nchar
Fixed width Unicode string
4,000 characters
Defined width x 2
nvarchar
Variable width Unicode string
4,000 characters
nvarchar(max)
Variable width Unicode string
536,870,912 characters
ntext
Variable width Unicode string
2GB of text data
binary(n)
Fixed width binary string
8,000 bytes
varbinary
Variable width binary string
8,000 bytes
varbinary(max)
Variable width binary string
2GB
image
Variable width binary string
2GB
Numeric data types:
Data type
Description
Storage
bit
Integer that can be 0, 1, or NULL
tinyint
Allows whole numbers from 0 to 255
1 byte
smallint
Allows whole numbers between -32,768 and 32,767
2 bytes
int
Allows whole numbers between -2,147,483,648 and 2,147,483,647
4 bytes
bigint
Allows whole numbers between -9,223,372,036,854,775,808 and 9,223,372,036,854,775,807
8 bytes
decimal(p,s)
Fixed precision and scale numbers.
Allows numbers from -10^38 +1 to 10^38 –1.
The p parameter indicates the maximum total number of digits that can be stored (both to the left and to the right of the decimal point).
p must be a value from 1 to 38.
Default is 18.
The s parameter indicates the maximum number of digits stored to the right of the decimal point.
s must be a value from 0 to p.
Default value is 0\
5-17 bytes
numeric(p,s)
Fixed precision and scale numbers.
Allows numbers from -10^38 +1 to 10^38 –1.
The p parameter indicates the maximum total number of digits that can be stored (both to the left and to the right of the decimal point).
p must be a value from 1 to 38.
Default is 18.
The s parameter indicates the maximum number of digits stored to the right of the decimal point.
s must be a value from 0 to p.
Default value is 0\
5-17 bytes
smallmoney
Monetary data from -214,748.3648 to 214,748.3647
4 bytes
money
Monetary data from -922,337,203,685,477.5808 to 922,337,203,685,477.5807
8 bytes
float(n)
Floating precision number data from -1.79E + 308 to 1.79E + 308.The n parameter indicates whether the field should hold 4 or 8 bytes.
float(24) holds a 4-byte field and float(53) holds an 8-byte field.
Default value of n is 53.
4 or 8 bytes
real
Floating precision number data from -3.40E + 38 to 3.40E + 38
4 bytes
Date and Time data types:
Data type
Description
Storage
datetime
From January 1, 1753 to December 31, 9999 with an accuracy of 3.33 milliseconds
8 bytes
datetime2
From January 1, 0001 to December 31, 9999 with an accuracy of 100 nanoseconds
6-8 bytes
smalldatetime
From January 1, 1900 to June 6, 2079 with an accuracy of 1 minute
4 bytes
date
Store a date only.
From January 1, 0001 to December 31, 9999
3 bytes
time
Store a time only to an accuracy of 100 nanoseconds
3-5 bytes
datetimeoffset
The same as datetime2 with the addition of a time zone offset
8-10 bytes
timestamp
Stores a unique number that gets updated every time a row gets created or modified.
The timestamp value is based upon an internal clock and does not correspond to real time.
Each table may have only one timestamp variable
Other data types:
Data type
Description
sql_variant
Stores up to 8,000 bytes of data of various data types, except text, ntext, and timestamp
uniqueidentifier
Stores a globally unique identifier (GUID)
xml
Stores XML formatted data.
Maximum 2GB
cursor
Stores a reference to a cursor used for database operations
table
Stores a result-set for later processing
Microsoft Access Data Types
Data type
Description
Storage
Text
Use for text or combinations of text and numbers.
255 characters maximum
Memo
Memo is used for larger amounts of text.
Stores up to 65,536 characters.
Note: You cannot sort a memo field.
However, they are searchable
Byte
Allows whole numbers from 0 to 255
1 byte
Integer
Allows whole numbers between -32,768 and 32,767
2 bytes
Long
Allows whole numbers between -2,147,483,648 and 2,147,483,647
4 bytes
Single
Single precision floating-point.
Will handle most decimals
4 bytes
Double
Double precision floating-point.
Will handle most decimals
8 bytes
Currency
Use for currency.
Holds up to 15 digits of whole dollars, plus 4 decimal places.
Tip: You can choose which country's currency to use
8 bytes
AutoNumber
AutoNumber fields automatically give each record its own number, usually starting at 1
4 bytes
Date/Time
Use for dates and times
8 bytes
Yes/No
A logical field can be displayed as Yes/No, True/False, or On/Off.
In code, use the constants True and False (equivalent to -1 and 0).
Note: Null values are not allowed in Yes/No fields
1 bit
Ole Object
Can store pictures, audio, video, or other BLOBs (Binary Large OBjects)
up to 1GB
Hyperlink
Contain links to other files, including web pages
Lookup Wizard
Let you type a list of options, which can then be chosen from a drop-down list
4 bytes
reset autoincrement id
Alter table syntax provides a way to reset autoincrement column.
ALTER TABLE table_name AUTO_INCREMENT = 1;
MySQL Regular expressions (Regexp)
SQL pattern matching enables you to use _ to match any single character and % to match an arbitrary number of characters (including zero characters).
In MySQL, SQL patterns are case-insensitive by default.
Some examples are shown here.
Do not use = or <> when you use SQL patterns.
Use the LIKE or NOT LIKE comparison operators instead.
To find names beginning with b:
mysql> SELECT * FROM pet WHERE name LIKE 'b%';
name owner species sex birth death
Buffy Harold dog f 1989-05-13 NULL
Bowser Diane dog m 1989-08-31 1995-07-29
To find names ending with fy:
mysql> SELECT * FROM pet WHERE name LIKE '%fy';
name owner species sex birth death
Fluffy Harold cat f 1993-02-04 NULL
Buffy Harold dog f 1989-05-13 NULL
To find names containing a w:
mysql> SELECT * FROM pet WHERE name LIKE '%w%';
name owner species sex birth death
Claws Gwen cat m 1994-03-17 NULL
Bowser Diane dog m 1989-08-31 1995-07-29
Whistler Gwen bird NULL 1997-12-09 NULL
To find names containing exactly five characters, use five instances of the _ pattern character:
mysql> SELECT * FROM pet WHERE name LIKE '_____';
name owner species sex birth death
Claws Gwen cat m 1994-03-17 NULL
Buffy Harold dog f 1989-05-13 NULL
The other type of pattern matching provided by MySQL uses extended regular expressions.
When you test for a match for this type of pattern, use the REGEXP_LIKE() function (or the REGEXP or RLIKE operators, which are synonyms for REGEXP_LIKE()).
The following list describes some characteristics of extended regular expressions:
. matches any single character.
A character class [...] matches any character within the brackets.
For example, [abc] matches a, b, or c.
To name a range of characters, use a dash.
[a-z] matches any letter, whereas [0-9] matches any digit.
* matches zero or more instances of the thing preceding it.
For example, x* matches any number of x characters, [0-9]* matches any number of digits, and .* matches any number of anything.
A regular expression pattern match succeeds if the pattern matches anywhere in the value being tested.
(This differs from a LIKE pattern match, which succeeds only if the pattern matches the entire value.)
To anchor a pattern so that it must match the beginning or end of the value being tested, use ^ at the beginning or $ at the end of the pattern.
To demonstrate how extended regular expressions work, the LIKE queries shown previously are rewritten here to use REGEXP_LIKE().
To find names beginning with b, use ^ to match the beginning of the name:
mysql> SELECT * FROM pet WHERE REGEXP_LIKE(name, '^b');
name owner species sex birth death
Buffy Harold dog f 1989-05-13 NULL
Bowser Diane dog m 1979-08-31 1995-07-29
To force a regular expression comparison to be case sensitive, use a case-sensitive collation, or use the BINARY keyword to make one of the strings a binary string, or specify the c match-control character.
Each of these queries matches only lowercase b at the beginning of a name:
SELECT * FROM pet WHERE REGEXP_LIKE(name, '^b' COLLATE utf8mb4_0900_as_cs);
SELECT * FROM pet WHERE REGEXP_LIKE(name, BINARY '^b');
SELECT * FROM pet WHERE REGEXP_LIKE(name, '^b', 'c');
To find names ending with fy, use $ to match the end of the name:
mysql> SELECT * FROM pet WHERE REGEXP_LIKE(name, 'fy$');
name owner species sex birth death
Fluffy Harold cat f 1993-02-04 NULL
Buffy Harold dog f 1989-05-13 NULL
To find names containing a w, use this query:
mysql> SELECT * FROM pet WHERE REGEXP_LIKE(name, 'w');
name owner species sex birth death
Claws Gwen cat m 1994-03-17 NULL
Bowser Diane dog m 1989-08-31 1995-07-29
Whistler Gwen bird NULL 1997-12-09 NULL
Because a regular expression pattern matches if it occurs anywhere in the value, it is not necessary in the previous query to put a wildcard on either side of the pattern to get it to match the entire value as would be true with an SQL pattern.
To find names containing exactly five characters, use ^ and $ to match the beginning and end of the name, and five instances of .
in between:
mysql> SELECT * FROM pet WHERE REGEXP_LIKE(name, '^.....$');
name owner species sex birth death
Claws Gwen cat m 1994-03-17 NULL
Buffy Harold dog f 1989-05-13 NULL
You could also write the previous query using the {n} (“repeat-n-times”) operator:
mysql> SELECT * FROM pet WHERE REGEXP_LIKE(name, '^.{5}$');
name owner species sex birth death
Claws Gwen cat m 1994-03-17 NULL
Buffy Harold dog f 1989-05-13 NULL
MySQL supports another type of pattern matching operation based on the regular expressions and the REGEXP operator.
REGEXP is the operator used when performing regular expression pattern matches.
RLIKE is the synonym.
The backslash is used as an escape character.
It’s only considered in the pattern match if double backslashes have used.
Not case sensitive.
PATTERN WHAT THE PATTERN MATCHES
* Zero or more instances of string preceding it
+ One or more instances of strings preceding it
. Any single character
? Match zero or one instances of the strings preceding it.
^ caret(^) matches Beginning of string
$ End of string
[abc] Any character listed between the square brackets
[^abc] Any character not listed between the square brackets
[A-Z] match any upper case letter.
[a-z] match any lower case letter
[0-9] match any digit from 0 through to 9.
[[:<:]] matches the beginning of words.
[[:>:]] matches the end of words.
[:class:] matches a character class i.e.
[:alpha:] to match letters, [:space:] to match white space, [:punct:] is match punctuations and [:upper:] for upper class letters.
p1|p2|p3 Alternation; matches any of the patterns p1, p2, or p3
{n} n instances of preceding element
{m,n} m through n instances of preceding element
Examples with explanation :
Match beginning of string(^):
Gives all the names starting with ‘sa’.Example- sam,samarth.
SELECT name FROM student_tbl WHERE name REGEXP '^sa';
Match the end of a string($):
Gives all the names ending with ‘on’.Example – norton,merton.
SELECT name FROM student_tbl WHERE name REGEXP 'on$';
Match zero or one instance of the strings preceding it(?):
Gives all the titles containing ‘com’.Example – comedy , romantic comedy.
SELECT title FROM movies_tbl WHERE title REGEXP 'com?';
matches any of the patterns p1, p2, or p3(p1|p2|p3):
Gives all the names containing ‘be’ or ‘ae’.Example – Abel, Baer.
SELECT name FROM student_tbl WHERE name REGEXP 'be|ae' ;
Matches any character listed between the square brackets([abc]):
Gives all the names containing ‘j’ or ‘z’.Example – Lorentz, Rajs.
SELECT name FROM student_tbl WHERE name REGEXP '[jz]' ;
Matches any lower case letter between ‘a’ to ‘z’- ([a-z]) ([a-z] and (.)):
Retrieve all names that contain a letter in the range of ‘b’ and ‘g’, followed by any character, followed by the letter ‘a’.Example – Tobias, sewall.
Matches any single character(.)
SELECT name FROM student_tbl WHERE name REGEXP '[b-g].[a]' ;
Matches any character not listed between the square brackets.([^abc]):
Gives all the names not containing ‘j’ or ‘z’.
Example – nerton, sewall.
SELECT name FROM student_tbl WHERE name REGEXP '[^jz]' ;
Matches the end of words[[:>:]]:
Gives all the titles ending with character “ack”.
Example – Black.
SELECT title FROM movies_tbl WHERE REGEXP 'ack[[:>:]]';
Matches the beginning of words[[:<:]]:
Gives all the titles starting with character “for”.
Example – Forgetting Sarah Marshal.
SELECT title FROM movies_tbl WHERE title REGEXP '[[:<:]]for';
Matches a character class[:class:]:
i.e [:lower:]- lowercase character ,[:digit:] – digit characters etc.
Gives all the titles containing alphabetic character only.
Example – stranger things, Avengers.
SELECT title FROM movies_tbl WHERE REGEXP '[:alpha:]' ;
SQL Server Sample Database
The following illustrates the BikeStores database diagram:
As you can see from the diagram, the BikeStores sample database has two schemas sales and production, and these schemas have nine tables.
Database Tables
Table sales.stores
The sales.stores table includes the store's information. Each store has a store name, contact information such as phone and email, and an address including street, city, state, and zip code.
CREATE TABLE sales.stores (
	store_id INT IDENTITY (1, 1) PRIMARY KEY,
	store_name VARCHAR (255) NOT NULL,
	phone VARCHAR (25),
	email VARCHAR (255),
	street VARCHAR (255),
	city VARCHAR (255),
	state VARCHAR (10),
	zip_code VARCHAR (5)
);
Code language: SQL (Structured Query Language) (sql)
Table sales.staffs
The sales.staffs table stores the essential information of staffs including first name, last name. It also contains the communication information such as email and phone.
A staff works at a store specified by the value in the store_id column. A store can have one or more staffs.
A staff reports to a store manager specified by the value in the manager_id column. If the value in the manager_id is null, then the staff is the top manager.
If a staff no longer works for any stores, the value in the active column is set to zero.
CREATE TABLE sales.staffs (
	staff_id INT IDENTITY (1, 1) PRIMARY KEY,
	first_name VARCHAR (50) NOT NULL,
	last_name VARCHAR (50) NOT NULL,
	email VARCHAR (255) NOT NULL UNIQUE,
	phone VARCHAR (25),
	active tinyint NOT NULL,
	store_id INT NOT NULL,
	manager_id INT,
	FOREIGN KEY (store_id)
        REFERENCES sales.stores (store_id)
        ON DELETE CASCADE ON UPDATE CASCADE,
	FOREIGN KEY (manager_id)
        REFERENCES sales.staffs (staff_id)
        ON DELETE NO ACTION ON UPDATE NO ACTION
);
Code language: SQL (Structured Query Language) (sql)
Table production.categories
The production.categories table stores the bike's categories such as children bicycles, comfort bicycles, and electric bikes.
CREATE TABLE production.categories (
	category_id INT IDENTITY (1, 1) PRIMARY KEY,
	category_name VARCHAR (255) NOT NULL
);
Code language: SQL (Structured Query Language) (sql)
Table production.brands
The production.brands table stores the brand's information of bikes, for example, Electra, Haro, and Heller.
CREATE TABLE production.brands (
	brand_id INT IDENTITY (1, 1) PRIMARY KEY,
	brand_name VARCHAR (255) NOT NULL
);
Code language: SQL (Structured Query Language) (sql)
Table production.products
The production.products table stores the product's information such as name, brand, category, model year, and list price.
Each product belongs to a brand specified by the brand_id column. Hence, a brand may have zero or many products.
Each product also belongs a category specified by the category_id column. Also, each category may have zero or many products.
CREATE TABLE production.products (
	product_id INT IDENTITY (1, 1) PRIMARY KEY,
	product_name VARCHAR (255) NOT NULL,
	brand_id INT NOT NULL,
	category_id INT NOT NULL,
	model_year SMALLINT NOT NULL,
	list_price DECIMAL (10, 2) NOT NULL,
	FOREIGN KEY (category_id)
        REFERENCES production.categories (category_id)
        ON DELETE CASCADE ON UPDATE CASCADE,
	FOREIGN KEY (brand_id)
        REFERENCES production.brands (brand_id)
        ON DELETE CASCADE ON UPDATE CASCADE
);
Code language: SQL (Structured Query Language) (sql)
Table sales.customers
The sales.customers table stores customer's information including first name, last name, phone, email, street, city, state and zip code.
CREATE TABLE sales.customers (
	customer_id INT IDENTITY (1, 1) PRIMARY KEY,
	first_name VARCHAR (255) NOT NULL,
	last_name VARCHAR (255) NOT NULL,
	phone VARCHAR (25),
	email VARCHAR (255) NOT NULL,
	street VARCHAR (255),
	city VARCHAR (50),
	state VARCHAR (25),
	zip_code VARCHAR (5)
);
Code language: SQL (Structured Query Language) (sql)
Table sales.orders
The sales.orders table stores the sales order's header information including customer, order status, order date, required date, shipped date.
It also stores the information on where the sales transaction was created (store) and who created it (staff).
Each sales order has a row in the sales_orders table. A sales order has one or many line items stored in the sales.order_items table.
CREATE TABLE sales.orders (
	order_id INT IDENTITY (1, 1) PRIMARY KEY,
	customer_id INT,
	order_status tinyint NOT NULL,
	-- Order status: 1 = Pending; 2 = Processing; 3 = Rejected; 4 = Completed
	order_date DATE NOT NULL,
	required_date DATE NOT NULL,
	shipped_date DATE,
	store_id INT NOT NULL,
	staff_id INT NOT NULL,
	FOREIGN KEY (customer_id)
        REFERENCES sales.customers (customer_id)
        ON DELETE CASCADE ON UPDATE CASCADE,
	FOREIGN KEY (store_id)
        REFERENCES sales.stores (store_id)
        ON DELETE CASCADE ON UPDATE CASCADE,
	FOREIGN KEY (staff_id)
        REFERENCES sales.staffs (staff_id)
        ON DELETE NO ACTION ON UPDATE NO ACTION
);
Code language: SQL (Structured Query Language) (sql)
Table sales.order_items
The sales.order_items table stores the line items of a sales order. Each line item belongs to a sales order specified by the order_id column.
A sales order line item includes product, order quantity, list price, and discount.
CREATE TABLE sales.order_items(
	order_id INT,
	item_id INT,
	product_id INT NOT NULL,
	quantity INT NOT NULL,
	list_price DECIMAL (10, 2) NOT NULL,
	discount DECIMAL (4, 2) NOT NULL DEFAULT 0,
	PRIMARY KEY (order_id, item_id),
	FOREIGN KEY (order_id)
        REFERENCES sales.orders (order_id)
        ON DELETE CASCADE ON UPDATE CASCADE,
	FOREIGN KEY (product_id)
        REFERENCES production.products (product_id)
        ON DELETE CASCADE ON UPDATE CASCADE
);
Code language: SQL (Structured Query Language) (sql)
Table production.stocks
The production.stocks table stores the inventory information i.e. the quantity of a particular product in a specific store.
CREATE TABLE production.stocks (
	store_id INT,
	product_id INT,
	quantity INT,
	PRIMARY KEY (store_id, product_id),
	FOREIGN KEY (store_id)
        REFERENCES sales.stores (store_id)
        ON DELETE CASCADE ON UPDATE CASCADE,
	FOREIGN KEY (product_id)
        REFERENCES production.products (product_id)
        ON DELETE CASCADE ON UPDATE CASCADE
);
Code language: SQL (Structured Query Language) (sql)
Click the following link to download the sample database script:
Download SQL Server Sample Database
Now, you should be familiar with the BikeStores sample database and ready to load it into the SQL Server.
SQL examples: SQL SELECT statement usage
SQLSELECT statements are used to retrieve data from the database and also, they populate the result of the query into the result-sets.
The SQL examples of this article discourse and explain the fundamental usage of the SELECT statement in the queries.
SQL (Structured Query Language) queries can be used to select, update and delete data from the database.
If anyone desires to learn SQL, to learn the SELECT statements can be the best starting point.
On the other hand, we can use T-SQL query language particularly for SQL Server databases and it is a proprietary extension form of the SQL.
SELECT statement overview
The most basic form of the SQL SELECT statement must be include SELECT, FROM clauses.
In addition, if we want to filter the result set of the query, we should use the WHERE clause.
SELECT column1, column2 FROM table
The above query template specifies a very basic SQL SELECT statement.
As you can see, column names are placed after the SELECT clause and these columns are separated with a comma sign with (,).
After the FROM clause, we add the table name in which we want to populate the data into the result set.
In addition, the following query template illustrates the usage of the WHERE clause in the SELECT query.
SELECT column1, column2 FROM table WHERE column1='value'
With the WHERE clause, we can filter the result set of the select statement.
Filtering patterns are used after the WHERE clause.
Now, we will make some SQL examples of the SQL SELECT statement and reinforce these theoretical notions.
Basic SQL examples: Your first step into a SELECT statement
Assume that, we have a fruits table which likes the below and includes the following rows;
IDFruit_NameFruit_Color
1 Banana Yellow
2 Apple Red
3 Lemon Yellow
4 Strawberry Red
5 Watermelon Green
6 Lime Green
We want to get all data of the Fruit_Name from the Fruits table.
In this case, we must write a SQL SELECT statement which looks like the below.SQL Server database engine processes this query and then returns the result-set of the query.
SELECT Fruit_Name FROM Fruits
As you can see, the query returns only Fruit_Name column data.
Now, we will practice other SQL examples which are related to the SELECT statement.
In this example first example, we will retrieve all columns of the table.
If we want to return all columns of the table, we can use a (*) asterisk sign instead of writing whole columns of the table.
Through the following query, we can return all columns of the table.
SELECT * FROM Fruits
At the same time, to retrieve all columns, we can do this by writing them all separately.
However, this will be a very cumbersome operation.
SELECT ID,Fruit_Name ,Fruit_Color FROM Fruits
SQL examples: How to filter a SELECT statement
In this section, we will take a glance at simple clause usage of the WHERE clause.
If we want to filter the result set of the SQL SELECT statement, we have to use the WHERE clause.
For example, we want to filter the fruits whose colors are red.
In order to filter results of the query, at first we add the column name which we want to filter and then specify the filtering condition.
In the below SQL example, we will filter the red fruits of the Fruits table.
SELECT * FROM Fruits WHERE Fruit_Color='Red'
As you can see that, the result set only includes the red fruits data.
However, in this example, we filter the exact values of the columns with (=) equal operator.
In some circumstances, we want to compare the similarity of the filtered condition.
LIKE clause and (%) percent sign operator combination helps us to overcome these type of issues.
For example, we can filter the fruits who start with the letter “L” character.
The following query will apply a filter to Fruit_Name and this filter enables to retrieve fruits who start with “L” chracter.
SELECT * FROM Fruits WHERE Fruit_Name LIKE 'L%'
At the same time, we can apply (%) percentageoperator at any place or multiple times to thw filter pattern.
In the following example, we will filter the fruits name which includes ‘n’ chracter.
SELECT * FROM Fruits WHERE Fruit_Name LIKE '%n%'
Another commonly used operator is (_)the underscore operator.
This operator represents any character in the filter pattern.
Assume that, we want to apply a filter to the fruit names which meet the following criterias:
The first character of the fruit name could be any character
The second character of the fruit name must be ‘a’
The remaining part of the fruit name can contain any character
The following SQL example will meet all criteria.
SELECT * FROM Fruits WHERE Fruit_Name LIKE '_a%'
SQL examples: SELECT TOP statement
The SELECT TOP statement is used to limit the number of rows which returns the result of the query.
For example, if want to retrieve only two rows from the table we can use the following query.
Therefore, we can limit the result set of the query.
In the following SQL examples, we will limit the result set of the query.
Normally, the result of the query without TOP operator can returns much more rows but we force to limit returning row numbers of the query with TOP clause.
SELECT TOP (2) * FROM Fruits
At the same time, we can limit the result set of the SQL SELECT statement with a percent value.
Such as, the following query returns only %60 percentage of result set.
SELECT TOP (60) PERCENT * FROM Fruits
As you can see we added PERCENT expression to TOP operator and limit the result set of the query.
Make sure to include the "using" directive for System.Data and DDTek.SQLServer in your project:
using System.Data;
using DDTek.SQLServer;
Sample Tables
Many of the samples in this product brief use the emp and dept tables.
You can create the tables using an ISQL script, or by using the data provider.
Creating the sample tables using an ISQL script
The following script can be run in ISQL.
See the Microsoft SQL Server documentation for details.
CREATE TABLE emp (
empno INT PRIMARY KEY,
ename VARCHAR(10),
job VARCHAR(9),
mgr INT NULL,
hiredate DATETIME,
sal NUMERIC(7,2),
comm NUMERIC(7,2) NULL,
dept INT)
begin
insert into emp values
(1,'JOHNSON','ADMIN',6,'12-17-1990',18000,NULL,4)
insert into emp values
(2,'HARDING','MANAGER',9,'02-02-1998',52000,300,3)
insert into emp values
(3,'TAFT','SALES I',2,'01-02-1996',25000,500,3)
insert into emp values
(4,'HOOVER','SALES I',2,'04-02-1990',27000,NULL,3)
insert into emp values
(5,'LINCOLN','TECH',6,'06-23-1994',22500,1400,4)
insert into emp values
(6,'GARFIELD','MANAGER',9,'05-01-1993',54000,NULL,4)
insert into emp values
(7,'POLK','TECH',6,'09-22-1997',25000,NULL,4)
insert into emp values
(8,'GRANT','ENGINEER',10,'03-30-1997',32000,NULL,2)
insert into emp values
(9,'JACKSON','CEO',NULL,'01-01-1990',75000,NULL,4)
insert into emp values
(10,'FILLMORE','MANAGER',9,'08-09-1994',56000,NULL,2)
insert into emp values
(11,'ADAMS','ENGINEER',10,'03-15-1996',34000,NULL,2)
insert into emp values
(12,'WASHINGTON','ADMIN',6,'04-16-1998',18000,NULL,4)
insert into emp values
(13,'MONROE','ENGINEER',10,'12-03-2000',30000,NULL,2)
insert into emp values
(14,'ROOSEVELT','CPA',9,'10-12-1995',35000,NULL,1)
end
CREATE TABLE dept (
deptno INT NOT NULL,
dname VARCHAR(14),
loc VARCHAR(13))
begin
insert into dept values (1,'ACCOUNTING','ST LOUIS')
insert into dept values (2,'RESEARCH','NEW YORK')
insert into dept values (3,'SALES','ATLANTA')
insert into dept values (4, 'OPERATIONS','SEATTLE')
end
Creating the sample tables using the data provider
The sample tables used in this Product Brief can be created with the data provider, as shown in the following code example: SQLServerConnection Conn;
Conn = new SQLServerConnection("host=nc-star;port=1433;
User ID=test01;Password=test01; Database Name=Test");
try
{ Conn.Open(); }
catch (SQLServerException ex)
{ // Connection failed
Console.WriteLine(ex.Message);
return; }
string[] DropTableSQL = {"drop table emp", "drop table dept"};
for (int x=0; x<=1; x++)
{ try
{ // Drop the tables, don't care if they don't exist
SQLServerCommand DBCmd = new SQLServerCommand(DropTableSQL[x], Conn);
DBCmd.ExecuteNonQuery(); }
catch (SQLServerException ex)
{ }
// Create the tables
string CreateEmpTableSQL = "CREATE TABLE emp
(empno INT PRIMARY KEY NOT NULL,"
+"ename VARCHAR(10) NOT NULL,"
+"job VARCHAR(9) NOT NULL,"
+"mgr INT,"
+"hiredate DATETIME NOT NULL,"
+"sal NUMERIC(7,2) NOT NULL,"
+"comm NUMERIC(7,2),"
+"dept INT NOT NULL)";
string CreateDeptTableSQL = "CREATE TABLE dept ("
+"deptno INT NOT NULL,"
+"dname VARCHAR(14),"
+"loc VARCHAR(13))";
try
{ SQLServerCommand DBCmd = new SQLServerCommand(CreateEmpTableSQL, Conn);
DBCmd.ExecuteNonQuery();
DBCmd.CommandText = CreateDeptTableSQL;
DBCmd.ExecuteNonQuery(); }
catch (Exception ex)
{ //Create tables failed
Console.WriteLine (ex.Message);
return; }
// Now insert the records
string[] InsertEmpRecordsSQL = { "insert into emp values
(1,'JOHNSON','ADMIN',6,'12-17-1990',18000,NULL,4)",
"insert into emp values
(2,'HARDING','MANAGER',9,'02-02-1998',52000,300,3)",
"insert into emp values
(3,'TAFT','SALES I',2,'01-02-1996',25000,500,3)",
"insert into emp values
(4,'HOOVER','SALES I',2,'04-02-1990',27000,NULL,3)",
"insert into emp values
(5,'LINCOLN','TECH',6,'06-23-1994',22500,1400,4)",
"insert into emp values
(6,'GARFIELD','MANAGER',9,'05-01-1993',54000,NULL,4)",
"insert into emp values
(7,'POLK','TECH',6,'09-22-1997',25000,NULL,4)",
"insert into emp values
(8,'GRANT','ENGINEER',10,'03-30-1997',32000,NULL,2)",
"insert into emp values
(9,'JACKSON','CEO',NULL,'01-01-1990',75000,NULL,4)",
"insert into emp values
(10,'FILLMORE','MANAGER',9,'08-09-1994',56000, NULL,2)",
"insert into emp values
(11,'ADAMS','ENGINEER',10,'03-15-1996',34000, NULL,2)",
"insert into emp values
(12,'WASHINGTON','ADMIN',6,'04-16-1998',18000,NULL,4)",
"insert into emp values
(13,'MONROE','ENGINEER',10,'12-03-2000',30000,NULL,2)",
"insert into emp values
(14,'ROOSEVELT','CPA',9,'10-12-1995',35000,NULL,1)"};
string[] InsertDeptRecordsSQL = { "insert into dept values (1,'ACCOUNTING','ST LOUIS')",
"insert into dept values (2,'RESEARCH','NEW YORK')",
"insert into dept values (3,'SALES','ATLANTA')",
"insert into dept values (4, 'OPERATIONS','SEATTLE')"};
// Insert dept table records first
for (int x = 0; x<InsertDeptRecordsSQL.Length; x++)
{ try
{ SQLServerCommand DBCmd =
new SQLServerCommand(InsertDeptRecordsSQL[x], Conn);
DBCmd.ExecuteNonQuery(); }
catch (Exception ex)
{ Console.WriteLine (ex.Message);
return; } }
// Now the emp table records
for (int x = 0; x<InsertEmpRecordsSQL.Length; x++)
{ try
{ SQLServerCommand DBCmd =
new SQLServerCommand(InsertEmpRecordsSQL[x], Conn);
DBCmd.ExecuteNonQuery(); }
catch (Exception ex)
{ Console.WriteLine (ex.Message);
return; } }
Console.WriteLine ("Tables created Successfully!");
// Close the connection
Conn.Close();
Retrieving Data Using a DataReader
The DataReader provides the fastest but least flexible way to retrieve data from the database.
Data is returned as a read-only, forward-only stream of data that is returned one record at a time.
If you need to retrieve many records rapidly, using a DataReader would require fewer resources than using a DataSet, which would need large amounts of memory to hold the results.
In the following code example, you execute a simple query on a Microsoft SQL Server database and read the results using a DataReader.
This example uses the emp table.Open connection to SQL Server database
SQLServerConnection Conn;
try
{ Conn = new SQLServerConnection("host=nc-star;port=1433;
User ID=test01;Password=test01; Database Name=Test");
Conn.Open();
Console.WriteLine ("Connection successful!"); }
catch (Exception ex)
{ // Connection failed
Console.WriteLine(ex.Message);
return; }
try
{ // Create a SQL command
string strSQL = "SELECT ename FROM emp WHERE sal>50000";
SQLServerCommand DBCmd = new SQLServerCommand(strSQL, Conn);
SQLServerDataReader myDataReader;
myDataReader = DBCmd.ExecuteReader();
while (myDataReader.Read())
{ Console.WriteLine("High salaries: " + myDataReader["ename"].ToString()); }
myDataReader.Close();
// Close the connection
Conn.Close(); }
catch (Exception ex)
{ Console.WriteLine(ex.Message);
return; }
Using a Local Transaction
The following code example uses the emp table to show how to use a local transaction:SQLServerConnection Conn;
Conn = new SQLServerConnection("host=nc-star;port=1433; User ID=test01;
Password=test01;Database Name=Test");
try
{ Conn.Open();
Console.WriteLine ("Connection successful!"); }
catch (Exception ex)
{ // Connection failed
Console.WriteLine(ex.Message);
return; }
SQLServerCommand DBCmd = new SQLServerCommand();
SQLServerTransaction DBTxn = null;
try
{ DBTxn = Conn.BeginTransaction();
// Set the Connection property of the Command object
DBCmd.Connection = Conn;
// Set the text of the Command to the INSERT statement
DBCmd.CommandText = "insert into emp VALUES
(16,'HAYES','ADMIN',6,'17-APR-2002',18000,NULL,4)";
// Set the transaction property of the Command object
DBCmd.Transaction = DBTxn;
// Execute the statement with ExecuteNonQuery, because we are not
// returning results
DBCmd.ExecuteNonQuery();
// Now commit the transaction
DBTxn.Commit();
// Display any exceptions
Console.WriteLine ("Transaction Committed!"); }
catch (Exception ex)
{ // Display any exceptions
Console.WriteLine (ex.Message);
// If anything failed after the connection was opened, roll back the
// transaction
if (DBTxn != null)
{ DBTxn.Rollback(); } }
// Close the connection
Conn.Close();
Using the Distributed Transaction
The following code shows how to use a distributed transaction across two connections to two different Microsoft SQL Server servers.
The example uses the emp table.
NOTES:
When you use distributed transactions, you must add System.EnterpriseServices to the Solution Reference list.
In addition, the application must be strongly named.
To do this:
Open a command window and go to the application directory.
Then, run the following command:
sn –k SolutionName.snk
Delete the AssemblyInfo.cs file from the Solution.
Microsoft Distributed Transaction Coordinator must be running on all clients and servers.
using System;
using System.EnterpriseServices;
using System.Reflection;
using DDTek.SQLServer;
[assembly: ApplicationName("yourapplicationname")]
[assembly: AssemblyKeyFileAttribute(@"..\..\yourapplicationname.snk")]
namespace DistTransaction
{ /// <summary>
/// Summary description for Class1.
/// </summary>
public class Class1
{ /// <summary>
/// The main entry point for the application.
/// </summary>
[STAThread]
static void Main(string[] args)
{ SQLServerConnection Conn1;
Conn1 = new SQLServerConnection("host=nc-star;port=1433;
User ID=test01;Password=test01;
Database Name=Test;Enlist=true");
SQLServerConnection Conn2;
Conn2 = new SQLServerConnection("host=nc-star;port=1433;
User ID=test07;Password= test07;
Database Name=test;Enlist=true");
try
{ DistributedTran myDistributedTran = new DistributedTran();
myDistributedTran.TestDistributedTransaction(Conn1, Conn2);
Console.WriteLine("Success!!"); }
catch (Exception e)
{ System.Console.WriteLine("Error returned: " + e.Message); } } }
/// <summary>
/// To use distributed transactions in .NET, we need a ServicedComponent
/// derived class with transaction attribute declared as "Required".
/// </summary>
[Transaction(TransactionOption.Required) ]
public class DistributedTran : ServicedComponent
{ /// <summary>
/// This method executes two SQL statements.
/// If both are successful, both are committed by DTC after the
/// method finishes.
However, if an exception is thrown, both will be
/// rolled back by DTC.
/// </summary>
[AutoComplete]
public void TestDistributedTransaction(SQLServerConnection Conn1,
SQLServerConnection Conn2)
{ // The following Insert statement goes to the first server, orca.
// This Insert statement does not produce any errors.
string DBCmdSql1 = "Insert into emp VALUES
(16,'HAYES','ADMIN',6,'17-NOV-2002',18000,
NULL,4)";
string DBCmdSql2 = "Delete from emp WHERE sal > 100000";
try
{ Conn1.Open();
Conn2.Open();
Console.WriteLine ("Connection successful!"); }
catch (Exception ex)
{ // Connection failed
Console.WriteLine(ex.Message);
return; }
SQLServerCommand DBCmd1 = new SQLServerCommand(DBCmdSql1, Conn1);
SQLServerCommand DBCmd2 = new SQLServerCommand(DBCmdSql2, Conn2);
DBCmd1.ExecuteNonQuery();
DBCmd2.ExecuteNonQuery();
Conn1.Close();
Conn2.Close();
Console.WriteLine("Success!! "); } } }
Using the CommandBuilder
A CommandBuilder object can be used to generate the Insert, Update, and Delete statements for a DataAdapter.
The following code example uses the emp sample table with the CommandBuilder to update a DataSet:SQLServerConnection Conn;
Conn = new SQLServerConnection("host=nc-star; port=4100;User ID=test01;
Password=test01;Database Name=Test ");
try
{ Conn.Open();
Console.WriteLine ("Connection successful!"); }
catch (Exception ex)
{ // Connection failed
Console.WriteLine(ex.Message);
return; }
SQLServerDataAdapter myDataAdapter = new SQLServerDataAdapter();
SQLServerCommand DBCmd = new SQLServerCommand("select * from emp",Conn);
myDataAdapter.SelectCommand = DBCmd;
// Set up the CommandBuilder
SQLServerCommandBuilder CommBuild =
new SQLServerCommandBuilder(myDataAdapter);
DataSet myDataSet = new DataSet();
try
{ myDataAdapter.Fill(myDataSet);
// Now change the salary of the first employee
DataRow myRow;
myRow = myDataSet.Tables["Table"].Rows[0];
myRow["sal"] = 95000;
// Tell the DataAdapter to resync with the SQL Server server.
// Without the CommandBuilder, this line would fail.
myDataAdapter.Update(myDataSet);
Console.WriteLine ("Update with CommandBuilder Successful!"); }
catch (Exception ex)
{ // Display any exceptions
Console.WriteLine (ex.Message); }
// Close the connection
Conn.Close();
Updating Data in a DataSet
When updating a row at the data source, the DataSet uses the SQL provided in UpdateCommand of the Data Adapter.
The Update statement can use parameters that contain the unique identifier, such as the primary key, and the columns to be updated, as shown in the following example:
[C#]
string updateSQL As String = "UPDATE emp SET sal = ?, job = ? +
= WHERE empno = ?;
The parameterized query statements define the parameters that will be created.
Refer to the
DataDirect Connect for ADO.NET User's Guide and Reference for more information about using parameters with the SQL Server data provider.
The following code example shows how to provide an UpdateCommand to a DataAdapter for use in synchronizing changes made to a DataSet with the actual data on the SQL Server server, using data from the emp table.
The example uses the Parameters.Add method to create the parameters for the Update statement, fills a DataSet, programmatically makes changes to the DataSet, then synchronizes the changes back to the database.
SQLServerConnection Conn =
new SQLServerConnection("host=nc-star;port=4100;User ID=test01;
Password=test01;Database Name=Test");
try
{ string selectText = "select sal, job, empno from emp";
string updateText = "update emp set sal = ?, job = ? where empno = ?";
SQLServerDataAdapter adapter = new SQLServerDataAdapter(selectText, Conn);
SQLServerCommand updateCommand = new SQLServerCommand(updateText, Conn);
adapter.UpdateCommand = updateCommand;
updateCommand.Parameters.Add("@sal", SQLServerDbType.Int, 15, "SAL");
updateCommand.Parameters.Add("@job", SQLServerDbType.VarChar, 9, "JOB");
updateCommand.Parameters.Add("@empno", SQLServerDbType.Int, 15, "empno");
DataSet myDataSet = new DataSet("emp");
adapter.Fill(myDataSet, "emp");
// Give employee number 11 a promotion and a raise
DataRow changeRow = myDataSet.Tables["emp"].Rows[11];
changeRow["sal"] = "35000";
changeRow["job"] = "MANAGER";
// Send back to database
adapter.Update(myDataSet, "emp");
myDataSet.Dispose(); }
catch (Exception ex)
{ // Display any exceptions
Console.WriteLine (ex.Message); }
Console.WriteLine("DataSet Updated Successfully!");
// Close the connection
Conn.Close();
Calling a Stored Procedure for SQL Server
You call stored procedures using a Command object.
When you issue a command on a stored procedure, you must set the CommandType of the Command object to StoredProcedure, or use the ODBC/JDBC escape syntax.
For information on using the ODBC/JDBC escape syntax with the data provider, refer to the the DataDirect Connect for ADO.NET User's Guide.
The following code shows how to execute a stored procedure on a SQL Server database and read the results using a DataReader.
The sample data is in the emp table.
Creating the stored procedure
First, execute the following code to create the stored procedure:
// Open connection to SQL Server database
SQLServerConnection Conn;
Conn = new SQLServerConnection("host=nc-star;port=4100;User ID=test01;
Password=test01;Database Name=Test");
try
{ Conn.Open();
Console.WriteLine ("Connection successful!"); }
catch (Exception ex)
{ // Connection failed
Console.WriteLine(ex.Message);
return; }
string spCreate = "CREATE PROCEDURE GetEmpSalary(@empno int,@sal
numeric(7,2) output)AS SELECT @sal = sal from emp where empno = @empno";
try
{ SQLServerCommand DBCmd=new SQLServerCommand(spCreate, Conn);
DBCmd.ExecuteNonQuery(); }
catch (Exception ex)
{ //Create procedure failed
Console.WriteLine (ex.Message);
return; }
Console.WriteLine ("Procedure Created Successfully!");
Executing the stored procedure
Now, use the following code example to execute the GetEmpSalary stored procedure:
// Open connection to SQL Server database
SQLServerConnection Conn;
try
{ Conn = new SQLServerConnection("host=nc-star;port=4100;User ID=test01;
Password=test01;Database Name=Test");
Conn.Open();
Console.WriteLine ("Connection successful!"); }
catch (Exception ex)
{ // Connection failed
Console.WriteLine(ex.Message);
return; }
// Make a command object for the stored procedure
// You must set the CommandType of the Command object
// to StoredProcedure
SQLServerCommand DBCmd = new SQLServerCommand("GetEmpSalary",Conn);
DBCmd.CommandType = CommandType.StoredProcedure;
// The stored procedure expects one input and one output parameter
// Define the parameters for the stored procedure
// We don't need to specify the direction of the parameter, since the
default is INPUT
DBCmd.Parameters.Add("@empno", SQLServerDbType.Int, 10).Value = 5;
// Output parameter
DBCmd.Parameters.Add("@sal", SQLServerDbType.Numeric, 10).Direction =
ParameterDirection.Output;
SQLServerDataReader myDataReader;
try
{ myDataReader = DBCmd.ExecuteReader();
myDataReader.Close(); }
catch (Exception ex)
{ // Display any exceptions
Console.WriteLine (ex.Message); }
Console.WriteLine("Procedure Executed Successfully!");
// Close the connection
Conn.Close();
Retrieving a Scalar Value
You can use the ExecuteScalar method of the Command object to return a single value, such as a sum or a count, from the database.
The ExecuteScalar method returns the value of the first column of the first row of the result set.
If you know the result set has only one row and one column, you can use this method to speed up retrieval of the value.
The following code example retrieves the number of employees who make more than $50000.
This example uses the emp table.// Open connection to SQL Server database
SQLServerConnection Conn;
Conn = new SQLServerConnection("host=nc-star;port=4100;User ID=test01;
Password=test01;Database Name=Test");
try
{ Conn.Open();
Console.WriteLine ("Connection successful!"); }
catch (Exception ex)
{ // Connection failed
Console.WriteLine(ex.Message);
return; }
// Make a command object
SQLServerCommand salCmd = new SQLServerCommand("select count(sal) from emp
where sal>50000",Conn);
try
{ int count = (int)salCmd.ExecuteScalar();
Console.WriteLine("Count of Salaries >$50,000 : "
+ Convert.ToString(count)); }
catch (Exception ex)
{ // Display any exceptions
Console.WriteLine(ex.Message); }
// Close the connection
Conn.Close();
Retrieving Warning Information
The data provider handles database server warnings through the InfoMessage delegates on the Connection objects.
The following example shows how to retrieve a warning generated by a Microsoft SQL Server server:
// Define an event handler
public void myHandler(object sender, SQLServerInfoMessageEventArgs e)
{ // Display any warnings
Console.WriteLine ("Warning Returned: " + e.Message);Add the following code to a method and call it:// Define an event handler
public void myHandler(object sender, SQLServerInfoMessageEventArgs e)
{ // Display any warnings
Console.WriteLine ("Warning Returned: " + e.Message); }
Add the following code to a method and call it:
SQLServerConnection Conn;
Conn = new SQLServerConnection("host=nc-star;port=4100;User ID=test01;
Password=test01;Database Name=Test");
SQLServerCommand DBCmd = new SQLServerCommand
("print 'This is a Warning.'",Conn);
SQLServerDataReader myDataReader;
try
{ Conn.InfoMessage += new SQLServerInfoMessageEventHandler(myHandler);
Conn.Open();
myDataReader = DBCmd.ExecuteReader();
// This will throw a SQLServerInfoMessageEvent as the print
// statement generates a warning. }
catch (Exception ex)
{ // Display any exceptions in a messagebox
MessageBox.Show (ex.Message); }
// Close the connection
Conn.Close();
The Best SQL Examples
Basic SQL Syntax Example
This guide provides a basic, high level description of the syntax for SQL statements.SQL is an international standard (ISO), but you will find many differences between implementations.
This guide uses MySQL as an example.
If you use one of the many other Relational Database Managers (DBMS) you’ll need to check the manual for that DBMS if needed.
What we will cover
Use (sets what database the statement will use)
Select and From clauses
Where Clause (and / or, IN, Between, LIKE)
Order By (ASC, DESC)
Group by and Having
How to use this
This is used to select the database containing the tables for your SQL statements:
use fcc_sql_guides_database; -- select the guide sample database
Select and From clauses
The Select part is normally used to determine which columns of the data you want to show in the results.
There are also options you can use to show data that is not a table column.This example shows two columns selected from the “student” table, and two calculated columns.
The first of the calculated columns is a meaningless number, and the other is the system date.
select studentID, FullName, 3+2 as five, now() as currentDate
from student;
syntax01.JPG767×241
Where Clause (and / or, IN, Between and LIKE)
The WHERE clause is used to limit the number of rows returned.In this case all five of these will be used is a somewhat ridiculous Where clause.Compare this result to the above SQL statement to follow this logic.Rows will be presented that:
Have Student IDs between 1 and 5 (inclusive)
or studentID = 8
or have “Maxmimo” in the name
The following example is similar, but it further specifies that if any of the students have certain SAT scores (1000, 1400), they will not be presented:
select studentID, FullName, sat_score, recordUpdated
from student
where (
studentID between 1 and 5
or studentID = 8
or FullName like '%Maximo%'
)
and sat_score NOT in (1000, 1400);
Order By (ASC, DESC)
Order By gives us a way to sort the result set by one or more of the items in the SELECT section.
Here is the same list as above, but sorted by the students Full Name.
The default sort order is ascending (ASC), but to sort in the opposite order (descending) you use DESC, as in the example below:
select studentID, FullName, sat_score
from student
where (studentID between 1 and 5 -- inclusive
or studentID = 8
or FullName like '%Maximo%')
and sat_score NOT in (1000, 1400)
order by FullName DESC;
Group By and Having
Group By gives us a way to combine rows and aggregate data.
The Having clause is like the above Where clause, except that it acts on the grouped data.This data is from the campaign contributions data we’ve been using in some of these guides.This SQL statement answers the question: “which candidates recieved the largest number of contributions (not $ amount, but count (*)) in 2016, but only those who had more than 80 contributions?”Ordering this data set in a descending (DESC) order places the candidates with the largest number of contributions at the top of the list.
select Candidate, Election_year, sum(Total_$), count(*)
from combined_party_data
where Election_year = 2016
group by Candidate, Election_year
having count(*) > 80
order by count(*) DESC;
As with all of these SQL things there is MUCH MORE to them than what’s in this introductory guide.
I hope this at least gives you enough to get started.
Please see the manual for your database manager and have fun trying different options yourself.
Learn SQL
Setup
First drop your existing database that was created in the tutorial.
`DROP DATABASE record_company;`
Copy the code inside the [schema.sql](schema.sql) file, paste it into MySQL Workbench, and run it.
CREATE DATABASE record_company;
USE record_company;
CREATE TABLE bands (
id INT NOT NULL AUTO_INCREMENT,
name VARCHAR(255) NOT NULL,
PRIMARY KEY (id)
);
CREATE TABLE albums (
id INT NOT NULL AUTO_INCREMENT,
name VARCHAR(255) NOT NULL,
release_year INT,
band_id INT NOT NULL,
PRIMARY KEY (id),
FOREIGN KEY (band_id) REFERENCES bands(id)
);
1. Create a Songs Table
This table should be called `songs` and have four properties with these exact names.
1.
`id`: An integer that is the primary key, and auto increments.
2.
`name`: A string that cannot be null.
3.
`length`: A float that represents the length of the song in minutes that cannot be null.
4.
`album_id`: An integer that is a foreign key referencing the albums table that cannot be null.
After successfully creating the table copy the code from [data.sql](data.sql see end of file) into MySQL Workbench, and run it to populate all of the data for the rest of the exercises.
If you do not encounter any errors, then your answer is most likely correct.
Solution:
CREATE TABLE songs (
id INT NOT NULL AUTO_INCREMENT,
name VARCHAR(255) NOT NULL,
length FLOAT NOT NULL,
album_id INT NOT NULL,
PRIMARY KEY (id),
FOREIGN KEY (album_id) REFERENCES albums(id)
);
2. Select only the Names of all the Bands
Change the name of the column the data returns to `Band Name`
| Band Name |
|-------------------|
| Seventh Wonder |
| Metallica |
| The Ocean |
| Within Temptation |
| Death |
| Van Canto |
| Dream Theater |
Solution:
SELECT bands.name AS 'Band Name'
FROM bands;
3. Select the Oldest Album
Make sure to only return one result from this query, and that you are not returning any albums that do not have a release year.
| id | name | release_year | band_id |
|----|------------------------|--------------|---------|
| 5 | ...And Justice for All | 1988 | 2 |
Solution:
SELECT * FROM albums
WHERE release_year IS NOT NULL
ORDER BY release_year
LIMIT 1;
4. Get all Bands that have Albums
There are multiple different ways to solve this problem, but they will all involve a join.
Return the band name as `Band Name`.
| Band Name |
|-------------------|
| Seventh Wonder |
| Metallica |
| The Ocean |
| Within Temptation |
| Death |
| Van Canto |
Solution:
/* This assummes all bands have a unique name */
SELECT DISTINCT bands.name AS 'Band Name'
FROM bands
JOIN albums ON bands.id = albums.band_id;
/* If bands do not have a unique name then use this query */
/*
SELECT bands.name AS 'Band Name'
FROM bands
JOIN albums ON bands.id = albums.band_id
GROUP BY albums.band_id
HAVING COUNT(albums.id) > 0;
*/
5. Get all Bands that have No Albums
This is very similar to #4 but will require more than just a join.
Return the band name as `Band Name`.
| Band Name |
|---------------|
| Dream Theater |
Solution:
SELECT bands.name AS 'Band Name'
FROM bands
LEFT JOIN albums ON bands.id = albums.band_id
GROUP BY albums.band_id
HAVING COUNT(albums.id) = 0;
6. Get the Longest Album
This problem sounds a lot like #3 but the solution is quite a bit different.
I would recommend looking up the SUM aggregate function.
Return the album name as `Name`, the album release year as `Release Year`, and the album length as `Duration`.
| Name | Release Year | Duration |
|----------------|--------------|-------------------|
| Death Magnetic | 2008 | 74.76666593551636 |
Solution:
SELECT
albums.name as Name,
albums.release_year as 'Release Year',
SUM(songs.length) as 'Duration'
FROM albums
JOIN songs on albums.id = songs.album_id
GROUP BY songs.album_id
ORDER BY Duration DESC
LIMIT 1;
7. Update the Release Year of the Album with no Release Year
Set the release year to 1986.
You may run into an error if you try to update the release year by using `release_year IS NULL` in the WHERE statement of your UPDATE.
This is because MySQL Workbench by default will not let you update a table that has a primary key without using the primary key in the UPDATE statement.
This is a good thing since you almost never want to update rows without using the primary key, so to get around this error make sure to use the primary key of the row you want to update in the WHERE of the UPDATE statement.
Solution:
/* This is the query used to get the id */
/*
SELECT * FROM albums where release_year IS NULL;
*/
UPDATE albums
SET release_year = 1986
WHERE id = 4;
8. Insert a record for your favorite Band and one of their
Albums
If you performed this correctly you should be able to now see that band and album in your tables.
Solution:
INSERT INTO bands (name)
VALUES ('Favorite Band Name');
/* This is the query used to get the band id of the band just added */
/*
SELECT id FROM bands
ORDER BY id DESC LIMIT 1;
*/
INSERT INTO albums (name, release_year, band_id)
VALUES ('Favorite Album Name', 2000, 8);
9. Delete the Band and Album you added in #8
The order of how you delete the records is important since album has a foreign key to band.
Solution:
/* This is the query used to get the album id of the album added in #8 */
/*
SELECT id FROM albums
ORDER BY id DESC LIMIT 1;
*/
DELETE FROM albums
WHERE id = 19;
/* This is the query used to get the band id of the band added in #8 */
/*
SELECT id FROM bands
ORDER BY id DESC LIMIT 1;
*/
DELETE FROM bands
WHERE id = 8;
10. Get the Average Length of all Songs
Return the average length as `Average Song Duration`.
| Average Song Duration |
|-----------------------|
| 5.352472513259112 |
Solution:
SELECT AVG(length) as 'Average Song Duration'
FROM songs;
11. Select the longest Song off each Album
Return the album name as `Album`, the album release year as `Release Year`, and the longest song length as `Duration`.
| Album | Release Year | Duration |
|-----------------------------|--------------|----------|
| Tiara | 2018 | 9.5 |
| The Great Escape | 2010 | 30.2333 |
| Mercy Falls | 2008 | 9.48333 |
| Master of Puppets | 1986 | 8.58333 |
| ...And Justice for All | 1988 | 9.81667 |
| Death Magnetic | 2008 | 9.96667 |
| Heliocentric | 2010 | 7.48333 |
| Pelagial | 2013 | 9.28333 |
| Anthropocentric | 2010 | 9.4 |
| Resist | 2018 | 5.85 |
| The Unforgiving | 2011 | 5.66667 |
| Enter | 1997 | 7.25 |
| The Sound of Perseverance | 1998 | 8.43333 |
| Individual Thought Patterns | 1993 | 4.81667 |
| Human | 1991 | 4.65 |
| A Storm to Come | 2006 | 5.21667 |
| Break the Silence | 2011 | 6.15 |
| Tribe of Force | 2010 | 8.38333 |
Solution:
SELECT
albums.name AS 'Album',
albums.release_year AS 'Release Year',
MAX(songs.length) AS 'Duration'
FROM albums
JOIN songs ON albums.id = songs.album_id
GROUP BY songs.album_id;
12. Get the number of Songs for each Band
This is one of the toughest question on the list.
It will require you to chain together two joins instead of just one.
Return the band name as `Band`, the number of songs as `Number of Songs`.
| Band | Number of Songs |
|-------------------|-----------------|
| Seventh Wonder | 35 |
| Metallica | 27 |
| The Ocean | 31 |
| Within Temptation | 30 |
| Death | 27 |
| Van Canto | 32 |
Solution:
SELECT
bands.name AS 'Band',
COUNT(songs.id) AS 'Number of Songs'
FROM bands
JOIN albums ON bands.id = albums.band_id
JOIN songs ON albums.id = songs.album_id
GROUP BY albums.band_id;
data.sql
INSERT INTO bands(id,name) VALUES (1,'Seventh Wonder');
INSERT INTO bands(id,name) VALUES (2,'Metallica');
INSERT INTO bands(id,name) VALUES (3,'The Ocean');
INSERT INTO bands(id,name) VALUES (4,'Within Temptation');
INSERT INTO bands(id,name) VALUES (5,'Death');
INSERT INTO bands(id,name) VALUES (6,'Van Canto');
INSERT INTO bands(id,name) VALUES (7,'Dream Theater');
INSERT INTO albums(id,name,release_year,band_id) VALUES (1,'Tiara',2018,1);
INSERT INTO albums(id,name,release_year,band_id) VALUES (2,'The Great Escape',2010,1);
INSERT INTO albums(id,name,release_year,band_id) VALUES (3,'Mercy Falls',2008,1);
INSERT INTO albums(id,name,release_year,band_id) VALUES (4,'Master of Puppets',NULL,2);
INSERT INTO albums(id,name,release_year,band_id) VALUES (5,'...And Justice for All',1988,2);
INSERT INTO albums(id,name,release_year,band_id) VALUES (6,'Death Magnetic',2008,2);
INSERT INTO albums(id,name,release_year,band_id) VALUES (7,'Heliocentric',2010,3);
INSERT INTO albums(id,name,release_year,band_id) VALUES (8,'Pelagial',2013,3);
INSERT INTO albums(id,name,release_year,band_id) VALUES (9,'Anthropocentric',2010,3);
INSERT INTO albums(id,name,release_year,band_id) VALUES (10,'Resist',2018,4);
INSERT INTO albums(id,name,release_year,band_id) VALUES (11,'The Unforgiving',2011,4);
INSERT INTO albums(id,name,release_year,band_id) VALUES (12,'Enter',1997,4);
INSERT INTO albums(id,name,release_year,band_id) VALUES (13,'The Sound of Perseverance',1998,5);
INSERT INTO albums(id,name,release_year,band_id) VALUES (14,'Individual Thought Patterns',1993,5);
INSERT INTO albums(id,name,release_year,band_id) VALUES (15,'Human',1991,5);
INSERT INTO albums(id,name,release_year,band_id) VALUES (16,'A Storm to Come',2006,6);
INSERT INTO albums(id,name,release_year,band_id) VALUES (17,'Break the Silence',2011,6);
INSERT INTO albums(id,name,release_year,band_id) VALUES (18,'Tribe of Force',2010,6);
INSERT INTO songs(id,name,length,album_id) VALUES (1,'Arrival',1+(30/60),1);
INSERT INTO songs(id,name,length,album_id) VALUES (2,'The Everones',6+(13/60),1);
INSERT INTO songs(id,name,length,album_id) VALUES (3,'Dream Machines',5+(38/60),1);
INSERT INTO songs(id,name,length,album_id) VALUES (4,'Against the Grain',6+(58/60),1);
INSERT INTO songs(id,name,length,album_id) VALUES (5,'Victorious',4+(55/60),1);
INSERT INTO songs(id,name,length,album_id) VALUES (6,'Tiara''s Song (Farewell Pt. 1)',7+(16/60),1);
INSERT INTO songs(id,name,length,album_id) VALUES (7,'Goodnight (Farewell Pt. 2)',7+(10/60),1);
INSERT INTO songs(id,name,length,album_id) VALUES (8,'Beyond Today (Farewell Pt. 3)',5+(06/60),1);
INSERT INTO songs(id,name,length,album_id) VALUES (9,'The Truth',4+(17/60),1);
INSERT INTO songs(id,name,length,album_id) VALUES (10,'By the Light of the Funeral Pyres',3+(54/60),1);
INSERT INTO songs(id,name,length,album_id) VALUES (11,'Damnation Below',6+(44/60),1);
INSERT INTO songs(id,name,length,album_id) VALUES (12,'Procession',0+(45/60),1);
INSERT INTO songs(id,name,length,album_id) VALUES (13,'Exhale',9+(30/60),1);
INSERT INTO songs(id,name,length,album_id) VALUES (14,'Wiseman',5+(42/60),2);
INSERT INTO songs(id,name,length,album_id) VALUES (15,'Alley Cat',6+(06/60),2);
INSERT INTO songs(id,name,length,album_id) VALUES (16,'The Angelmaker',8+(29/60),2);
INSERT INTO songs(id,name,length,album_id) VALUES (17,'King of Whitewater',7+(20/60),2);
INSERT INTO songs(id,name,length,album_id) VALUES (18,'Long Way Home',4+(26/60),2);
INSERT INTO songs(id,name,length,album_id) VALUES (19,'Move on Through',5+(04/60),2);
INSERT INTO songs(id,name,length,album_id) VALUES (20,'The Great Escape',30+(14/60),2);
INSERT INTO songs(id,name,length,album_id) VALUES (21,'A New Beginning',3+(05/60),3);
INSERT INTO songs(id,name,length,album_id) VALUES (22,'There and Back',3+(02/60),3);
INSERT INTO songs(id,name,length,album_id) VALUES (23,'Welcome to Mercy Falls',5+(11/60),3);
INSERT INTO songs(id,name,length,album_id) VALUES (24,'Unbreakable',7+(19/60),3);
INSERT INTO songs(id,name,length,album_id) VALUES (25,'Tears for a Father',1+(58/60),3);
INSERT INTO songs(id,name,length,album_id) VALUES (26,'A Day Away',3+(43/60),3);
INSERT INTO songs(id,name,length,album_id) VALUES (27,'Tears for a Son',1+(42/60),3);
INSERT INTO songs(id,name,length,album_id) VALUES (28,'Paradise',5+(46/60),3);
INSERT INTO songs(id,name,length,album_id) VALUES (29,'Fall in Line',6+(09/60),3);
INSERT INTO songs(id,name,length,album_id) VALUES (30,'Break the Silence',9+(29/60),3);
INSERT INTO songs(id,name,length,album_id) VALUES (31,'Hide and Seek',7+(46/60),3);
INSERT INTO songs(id,name,length,album_id) VALUES (32,'Destiny Calls',6+(18/60),3);
INSERT INTO songs(id,name,length,album_id) VALUES (33,'One Last Goodbye',4+(21/60),3);
INSERT INTO songs(id,name,length,album_id) VALUES (34,'Back in Time',1+(14/60),3);
INSERT INTO songs(id,name,length,album_id) VALUES (35,'The Black Parade',6+(57/60),3);
INSERT INTO songs(id,name,length,album_id) VALUES (36,'Battery',5+(13/60),4);
INSERT INTO songs(id,name,length,album_id) VALUES (37,'Master of Puppets',8+(35/60),4);
INSERT INTO songs(id,name,length,album_id) VALUES (38,'The Thing That Should Not Be',6+(36/60),4);
INSERT INTO songs(id,name,length,album_id) VALUES (39,'Welcome Home (Sanitarium)',6+(27/60),4);
INSERT INTO songs(id,name,length,album_id) VALUES (40,'Disposable Heroes',8+(17/60),4);
INSERT INTO songs(id,name,length,album_id) VALUES (41,'Leper Messiah',5+(40/60),4);
INSERT INTO songs(id,name,length,album_id) VALUES (42,'Orion',8+(27/60),4);
INSERT INTO songs(id,name,length,album_id) VALUES (43,'Damage Inc.',5+(32/60),4);
INSERT INTO songs(id,name,length,album_id) VALUES (44,'Blackened',6+(41/60),5);
INSERT INTO songs(id,name,length,album_id) VALUES (45,'...And Justice for All',9+(47/60),5);
INSERT INTO songs(id,name,length,album_id) VALUES (46,'Eye of the Beholder',6+(30/60),5);
INSERT INTO songs(id,name,length,album_id) VALUES (47,'One',7+(27/60),5);
INSERT INTO songs(id,name,length,album_id) VALUES (48,'The Shortest Straw',6+(36/60),5);
INSERT INTO songs(id,name,length,album_id) VALUES (49,'Harvester of Sorrow',5+(46/60),5);
INSERT INTO songs(id,name,length,album_id) VALUES (50,'The Frayed Ends of Sanity',7+(44/60),5);
INSERT INTO songs(id,name,length,album_id) VALUES (51,'To Live Is to Die',9+(49/60),5);
INSERT INTO songs(id,name,length,album_id) VALUES (52,'Dyers Eve',5+(13/60),5);
INSERT INTO songs(id,name,length,album_id) VALUES (53,'That Was Just Your Life',7+(08/60),6);
INSERT INTO songs(id,name,length,album_id) VALUES (54,'The End of the Line',7+(52/60),6);
INSERT INTO songs(id,name,length,album_id) VALUES (55,'Broken Beat & Scarred',6+(25/60),6);
INSERT INTO songs(id,name,length,album_id) VALUES (56,'The Day That Never Comes',7+(56/60),6);
INSERT INTO songs(id,name,length,album_id) VALUES (57,'All Nightmare Long',7+(58/60),6);
INSERT INTO songs(id,name,length,album_id) VALUES (58,'Cyanide',6+(40/60),6);
INSERT INTO songs(id,name,length,album_id) VALUES (59,'The Unforgiven III',7+(47/60),6);
INSERT INTO songs(id,name,length,album_id) VALUES (60,'The Judas Kiss',8+(01/60),6);
INSERT INTO songs(id,name,length,album_id) VALUES (61,'Suicide & Redemption',9+(58/60),6);
INSERT INTO songs(id,name,length,album_id) VALUES (62,'My Apocalypse',5+(01/60),6);
INSERT INTO songs(id,name,length,album_id) VALUES (63,'Shamayim',1+(53/60),7);
INSERT INTO songs(id,name,length,album_id) VALUES (64,'Firmament',7+(29/60),7);
INSERT INTO songs(id,name,length,album_id) VALUES (65,'The First Commandment of the Luminaries',6+(47/60),7);
INSERT INTO songs(id,name,length,album_id) VALUES (66,'Ptolemy Was Wrong',6+(28/60),7);
INSERT INTO songs(id,name,length,album_id) VALUES (67,'Metaphysics of the Hangman',5+(41/60),7);
INSERT INTO songs(id,name,length,album_id) VALUES (68,'Catharsis of a Heretic',2+(08/60),7);
INSERT INTO songs(id,name,length,album_id) VALUES (69,'Swallowed by the Earth',4+(59/60),7);
INSERT INTO songs(id,name,length,album_id) VALUES (70,'Epiphany',3+(37/60),7);
INSERT INTO songs(id,name,length,album_id) VALUES (71,'The Origin of Species',7+(23/60),7);
INSERT INTO songs(id,name,length,album_id) VALUES (72,'The Origin of God',4+(33/60),7);
INSERT INTO songs(id,name,length,album_id) VALUES (73,'Epipelagic',1+(12/60),8);
INSERT INTO songs(id,name,length,album_id) VALUES (74,'Mesopelagic: Into the Uncanny',5+(56/60),8);
INSERT INTO songs(id,name,length,album_id) VALUES (75,'Bathyalpelagic I: Impasses',4+(24/60),8);
INSERT INTO songs(id,name,length,album_id) VALUES (76,'Bathyalpelagic II: The Wish in Dreams',3+(18/60),8);
INSERT INTO songs(id,name,length,album_id) VALUES (77,'Bathyalpelagic III: Disequilibrated',4+(27/60),8);
INSERT INTO songs(id,name,length,album_id) VALUES (78,'Abyssopelagic I: Boundless Vasts',3+(27/60),8);
INSERT INTO songs(id,name,length,album_id) VALUES (79,'Abyssopelagic II: Signals of Anxiety',5+(05/60),8);
INSERT INTO songs(id,name,length,album_id) VALUES (80,'Hadopelagic I: Omen of the Deep',1+(07/60),8);
INSERT INTO songs(id,name,length,album_id) VALUES (81,'Hadopelagic II: Let Them Believe',9+(17/60),8);
INSERT INTO songs(id,name,length,album_id) VALUES (82,'Demersal: Cognitive Dissonance',9+(05/60),8);
INSERT INTO songs(id,name,length,album_id) VALUES (83,'Benthic: The Origin of Our Wishes',5+(55/60),8);
INSERT INTO songs(id,name,length,album_id) VALUES (84,'Anthropocentric',9+(24/60),9);
INSERT INTO songs(id,name,length,album_id) VALUES (85,'The Grand Inquisitor I: Karamazov Baseness',5+(02/60),9);
INSERT INTO songs(id,name,length,album_id) VALUES (86,'She Was the Universe',5+(39/60),9);
INSERT INTO songs(id,name,length,album_id) VALUES (87,'For He That Wavereth...',2+(07/60),9);
INSERT INTO songs(id,name,length,album_id) VALUES (88,'The Grand Inquisitor II: Roots & Locusts',6+(33/60),9);
INSERT INTO songs(id,name,length,album_id) VALUES (89,'The Grand Inquisitor III: A Tiny Grain of Faith',1+(56/60),9);
INSERT INTO songs(id,name,length,album_id) VALUES (90,'Sewers of the Soul',3+(44/60),9);
INSERT INTO songs(id,name,length,album_id) VALUES (91,'Wille zum Untergang',6+(03/60),9);
INSERT INTO songs(id,name,length,album_id) VALUES (92,'Heaven TV',5+(04/60),9);
INSERT INTO songs(id,name,length,album_id) VALUES (93,'The Almightiness Contradiction',4+(34/60),9);
INSERT INTO songs(id,name,length,album_id) VALUES (94,'The Reckoning',4+(11/60),10);
INSERT INTO songs(id,name,length,album_id) VALUES (95,'Endless War',4+(09/60),10);
INSERT INTO songs(id,name,length,album_id) VALUES (96,'Raise Your Banner',5+(34/60),10);
INSERT INTO songs(id,name,length,album_id) VALUES (97,'Supernova',5+(34/60),10);
INSERT INTO songs(id,name,length,album_id) VALUES (98,'Holy Ground',4+(10/60),10);
INSERT INTO songs(id,name,length,album_id) VALUES (99,'In Vain',4+(25/60),10);
INSERT INTO songs(id,name,length,album_id) VALUES (100,'Firelight',4+(46/60),10);
INSERT INTO songs(id,name,length,album_id) VALUES (101,'Mad World',4+(57/60),10);
INSERT INTO songs(id,name,length,album_id) VALUES (102,'Mercy Mirror',3+(49/60),10);
INSERT INTO songs(id,name,length,album_id) VALUES (103,'Trophy Hunter',5+(51/60),10);
INSERT INTO songs(id,name,length,album_id) VALUES (104,'Why Not Me',0+(34/60),11);
INSERT INTO songs(id,name,length,album_id) VALUES (105,'Shot in the Dark',5+(02/60),11);
INSERT INTO songs(id,name,length,album_id) VALUES (106,'In the Middle of the Night',5+(11/60),11);
INSERT INTO songs(id,name,length,album_id) VALUES (107,'Faster',4+(23/60),11);
INSERT INTO songs(id,name,length,album_id) VALUES (108,'Fire and Ice',3+(57/60),11);
INSERT INTO songs(id,name,length,album_id) VALUES (109,'Iron',5+(40/60),11);
INSERT INTO songs(id,name,length,album_id) VALUES (110,'Where Is the Edge',3+(59/60),11);
INSERT INTO songs(id,name,length,album_id) VALUES (111,'Sinéad',4+(23/60),11);
INSERT INTO songs(id,name,length,album_id) VALUES (112,'Lost',5+(14/60),11);
INSERT INTO songs(id,name,length,album_id) VALUES (113,'Murder',4+(16/60),11);
INSERT INTO songs(id,name,length,album_id) VALUES (114,'A Demon''s Fate',5+(30/60),11);
INSERT INTO songs(id,name,length,album_id) VALUES (115,'Stairway to the Skies',5+(32/60),11);
INSERT INTO songs(id,name,length,album_id) VALUES (116,'Restless',6+(08/60),12);
INSERT INTO songs(id,name,length,album_id) VALUES (117,'Enter',7+(15/60),12);
INSERT INTO songs(id,name,length,album_id) VALUES (118,'Pearls of Light',5+(15/60),12);
INSERT INTO songs(id,name,length,album_id) VALUES (119,'Deep Within',4+(30/60),12);
INSERT INTO songs(id,name,length,album_id) VALUES (120,'Gatekeeper',6+(43/60),12);
INSERT INTO songs(id,name,length,album_id) VALUES (121,'Grace',5+(10/60),12);
INSERT INTO songs(id,name,length,album_id) VALUES (122,'Blooded',3+(38/60),12);
INSERT INTO songs(id,name,length,album_id) VALUES (123,'Candles',7+(07/60),12);
INSERT INTO songs(id,name,length,album_id) VALUES (124,'Scavenger of Human Sorrow',6+(56/60),13);
INSERT INTO songs(id,name,length,album_id) VALUES (125,'Bite the Pain',4+(29/60),13);
INSERT INTO songs(id,name,length,album_id) VALUES (126,'Spirit Crusher',6+(47/60),13);
INSERT INTO songs(id,name,length,album_id) VALUES (127,'Story to Tell',6+(34/60),13);
INSERT INTO songs(id,name,length,album_id) VALUES (128,'Flesh and the Power It Holds',8+(26/60),13);
INSERT INTO songs(id,name,length,album_id) VALUES (129,'Voice of the Soul',3+(43/60),13);
INSERT INTO songs(id,name,length,album_id) VALUES (130,'To Forgive Is to Suffer',5+(55/60),13);
INSERT INTO songs(id,name,length,album_id) VALUES (131,'A Moment of Clarity',7+(25/60),13);
INSERT INTO songs(id,name,length,album_id) VALUES (132,'Painkiller',6+(02/60),13);
INSERT INTO songs(id,name,length,album_id) VALUES (133,'Overactive Imagination',3+(30/60),14);
INSERT INTO songs(id,name,length,album_id) VALUES (134,'In Human Form',3+(57/60),14);
INSERT INTO songs(id,name,length,album_id) VALUES (135,'Jealousy',3+(41/60),14);
INSERT INTO songs(id,name,length,album_id) VALUES (136,'Trapped in a Corner',4+(14/60),14);
INSERT INTO songs(id,name,length,album_id) VALUES (137,'Nothing Is Everything',3+(19/60),14);
INSERT INTO songs(id,name,length,album_id) VALUES (138,'Mentally Blind',4+(49/60),14);
INSERT INTO songs(id,name,length,album_id) VALUES (139,'Individual Thought Patterns',4+(01/60),14);
INSERT INTO songs(id,name,length,album_id) VALUES (140,'Destiny',4+(06/60),14);
INSERT INTO songs(id,name,length,album_id) VALUES (141,'Out of Touch',4+(22/60),14);
INSERT INTO songs(id,name,length,album_id) VALUES (142,'The Philosopher',4+(13/60),14);
INSERT INTO songs(id,name,length,album_id) VALUES (143,'Flattening of Emotions',4+(28/60),15);
INSERT INTO songs(id,name,length,album_id) VALUES (144,'Suicide Machine',4+(23/60),15);
INSERT INTO songs(id,name,length,album_id) VALUES (145,'Together as One',4+(10/60),15);
INSERT INTO songs(id,name,length,album_id) VALUES (146,'Secret Face',4+(39/60),15);
INSERT INTO songs(id,name,length,album_id) VALUES (147,'Lack of Comprehension',3+(43/60),15);
INSERT INTO songs(id,name,length,album_id) VALUES (148,'See Through Dreams',4+(39/60),15);
INSERT INTO songs(id,name,length,album_id) VALUES (149,'Cosmic Sea',4+(27/60),15);
INSERT INTO songs(id,name,length,album_id) VALUES (150,'Vacant Planets',3+(52/60),15);
INSERT INTO songs(id,name,length,album_id) VALUES (151,'Stora Rövardansen',1+(33/60),16);
INSERT INTO songs(id,name,length,album_id) VALUES (152,'King',3+(44/60),16);
INSERT INTO songs(id,name,length,album_id) VALUES (153,'The Mission',4+(18/60),16);
INSERT INTO songs(id,name,length,album_id) VALUES (154,'Lifetime',4+(49/60),16);
INSERT INTO songs(id,name,length,album_id) VALUES (155,'Rain',4+(03/60),16);
INSERT INTO songs(id,name,length,album_id) VALUES (156,'She''s Alive',4+(12/60),16);
INSERT INTO songs(id,name,length,album_id) VALUES (157,'I Stand Alone',4+(44/60),16);
INSERT INTO songs(id,name,length,album_id) VALUES (158,'Starlight',4+(40/60),16);
INSERT INTO songs(id,name,length,album_id) VALUES (159,'Battery',5+(13/60),16);
INSERT INTO songs(id,name,length,album_id) VALUES (160,'If I Die in Battle',4+(46/60),17);
INSERT INTO songs(id,name,length,album_id) VALUES (161,'The Seller of Souls',3+(24/60),17);
INSERT INTO songs(id,name,length,album_id) VALUES (162,'Primo Victoria',3+(44/60),17);
INSERT INTO songs(id,name,length,album_id) VALUES (163,'Dangers in My Head',4+(05/60),17);
INSERT INTO songs(id,name,length,album_id) VALUES (164,'Black Wings of Hate',4+(41/60),17);
INSERT INTO songs(id,name,length,album_id) VALUES (165,'Bed of Nails',3+(37/60),17);
INSERT INTO songs(id,name,length,album_id) VALUES (166,'Spelled in Waters',4+(26/60),17);
INSERT INTO songs(id,name,length,album_id) VALUES (167,'Neuer Wind',3+(21/60),17);
INSERT INTO songs(id,name,length,album_id) VALUES (168,'The Higher Flight',5+(00/60),17);
INSERT INTO songs(id,name,length,album_id) VALUES (169,'Master of the Wind',6+(09/60),17);
INSERT INTO songs(id,name,length,album_id) VALUES (170,'Lost Forever',4+(44/60),18);
INSERT INTO songs(id,name,length,album_id) VALUES (171,'To Sing a Metal Song',3+(24/60),18);
INSERT INTO songs(id,name,length,album_id) VALUES (172,'One to Ten',4+(06/60),18);
INSERT INTO songs(id,name,length,album_id) VALUES (173,'I Am Human',3+(56/60),18);
INSERT INTO songs(id,name,length,album_id) VALUES (174,'My Voice',5+(30/60),18);
INSERT INTO songs(id,name,length,album_id) VALUES (175,'Rebellion',4+(05/60),18);
INSERT INTO songs(id,name,length,album_id) VALUES (176,'Last Night of the Kings',3+(52/60),18);
INSERT INTO songs(id,name,length,album_id) VALUES (177,'Tribe of Force',3+(17/60),18);
INSERT INTO songs(id,name,length,album_id) VALUES (178,'Water Fire Heaven Earth',3+(32/60),18);
INSERT INTO songs(id,name,length,album_id) VALUES (179,'Master of Puppets',8+(23/60),18);
INSERT INTO songs(id,name,length,album_id) VALUES (180,'Magic Taborea',3+(22/60),18);
INSERT INTO songs(id,name,length,album_id) VALUES (181,'Hearted',4+(00/60),18);
INSERT INTO songs(id,name,length,album_id) VALUES (182,'Frodo''s Dream',3+(06/60),18);
to read MYI, MYD, frm
(from the mysql commandline tool) CREATE DATABASE mytest; -- .
(in the filesystem) copy those files (foo.MYD, foo.MYI, foo.frm) into the directory called mytest.
(from the mysql commandline tool) SELECT * FROM mytest.foo;
Then gripe at the user who gave you those files; that is not the way to pass MySQL data around.
SQL Script
In programming, scripts are the series of commands (sequence of instructions) or a program that will be executed in another program rather than by the computer processor (compiled programs are executed by computer processor –> please notice that the script is not compiled).
Same stands for SQL scripts.
The only thing that is specific is that commands in such scripts are SQL commands.
And these commands could be any combination of DDL (Data Definition Language) or DML (Data Manipulation Language) commands.
Therefore, you could change the database structure (CREATE, ALTER, DROP objects) and/or change the data (perform INSERT/UPDATE/DELETE commands).
It’s desired that you use scripts, especially when you’re deploying a new version and you want to keep current data as they were before that change.
Backup and restore
Using scripts is usually related to making significant changes in the database.
I might be paranoid about this, but
I prefer to backup the database before these changes.
Tip: If you expect major changes in your databases, either in structure, either data changes, creating a backup is always a good idea.
You could backup the entire database or only 1 table.
That’s completely up to you and the changes you’re making.
SQL Script – example
Now we’re ready to take a look at our script.
We want to do two different things:
Create new database objects (tables and relations) – DDL commands, and
Populate these tables with data – DML commands
Of course, we’ll run DDL commands first and then run DML commands.
Trying to insert data into a table that doesn’t exist would result in errors.
So, let’s take a look at our script now:
-- tables
-- Table: call
CREATE TABLE call (
id int NOT NULL IDENTITY(1, 1),
employee_id int NOT NULL,
customer_id int NOT NULL,
start_time datetime NOT NULL,
end_time datetime NULL,
call_outcome_id int NULL,
CONSTRAINT call_ak_1 UNIQUE (employee_id, start_time),
CONSTRAINT call_pk PRIMARY KEY (id)
);
-- Table: call_outcome
CREATE TABLE call_outcome (
id int NOT NULL IDENTITY(1, 1),
outcome_text char(128) NOT NULL,
CONSTRAINT call_outcome_ak_1 UNIQUE (outcome_text),
CONSTRAINT call_outcome_pk PRIMARY KEY (id)
);
-- Table: customer
CREATE TABLE customer (
id int NOT NULL IDENTITY(1, 1),
customer_name varchar(255) NOT NULL,
city_id int NOT NULL,
customer_address varchar(255) NOT NULL,
next_call_date date NULL,
ts_inserted datetime NOT NULL,
CONSTRAINT customer_pk PRIMARY KEY (id)
);
-- Table: employee
CREATE TABLE employee (
id int NOT NULL IDENTITY(1, 1),
first_name varchar(255) NOT NULL,
last_name varchar(255) NOT NULL,
CONSTRAINT employee_pk PRIMARY KEY (id)
);
-- foreign keys
-- Reference: call_call_outcome (table: call)
ALTER TABLE call ADD CONSTRAINT call_call_outcome
FOREIGN KEY (call_outcome_id)
REFERENCES call_outcome (id);
-- Reference: call_customer (table: call)
ALTER TABLE call ADD CONSTRAINT call_customer
FOREIGN KEY (customer_id)
REFERENCES customer (id);
-- Reference: call_employee (table: call)
ALTER TABLE call ADD CONSTRAINT call_employee
FOREIGN KEY (employee_id)
REFERENCES employee (id);
-- Reference: customer_city (table: customer)
ALTER TABLE customer ADD CONSTRAINT customer_city
FOREIGN KEY (city_id)
REFERENCES city (id);
-- insert values
INSERT INTO call_outcome (outcome_text) VALUES ('call started');
INSERT INTO call_outcome (outcome_text) VALUES ('finished - successfully');
INSERT INTO call_outcome (outcome_text) VALUES ('finished - unsuccessfully');
INSERT INTO employee (first_name, last_name) VALUES ('Thomas (Neo)', 'Anderson');
INSERT INTO employee (first_name, last_name) VALUES ('Agent', 'Smith');
INSERT INTO customer (customer_name, city_id, customer_address, next_call_date, ts_inserted) VALUES ('Jewelry Store', 4, 'Long Street 120', '2020/1/21', '2020/1/9 14:1:20');
INSERT INTO customer (customer_name, city_id, customer_address, next_call_date, ts_inserted) VALUES ('Bakery', 1, 'Kurfürstendamm 25', '2020/2/21', '2020/1/9 17:52:15');
INSERT INTO customer (customer_name, city_id, customer_address, next_call_date, ts_inserted) VALUES ('Café', 1, 'Tauentzienstraße 44', '2020/1/21', '2020/1/10 8:2:49');
INSERT INTO customer (customer_name, city_id, customer_address, next_call_date, ts_inserted) VALUES ('Restaurant', 3, 'Ulica lipa 15', '2020/1/21', '2020/1/10 9:20:21');
INSERT INTO call (employee_id, customer_id, start_time, end_time, call_outcome_id) VALUES (1, 4, '2020/1/11 9:0:15', '2020/1/11 9:12:22', 2);
INSERT INTO call (employee_id, customer_id, start_time, end_time, call_outcome_id) VALUES (1, 2, '2020/1/11 9:14:50', '2020/1/11 9:20:1', 2);
INSERT INTO call (employee_id, customer_id, start_time, end_time, call_outcome_id) VALUES (2, 3, '2020/1/11 9:2:20', '2020/1/11 9:18:5', 3);
INSERT INTO call (employee_id, customer_id, start_time, end_time, call_outcome_id) VALUES (1, 1, '2020/1/11 9:24:15', '2020/1/11 9:25:5', 3);
INSERT INTO call (employee_id, customer_id, start_time, end_time, call_outcome_id) VALUES (1, 3, '2020/1/11 9:26:23', '2020/1/11 9:33:45', 2);
INSERT INTO call (employee_id, customer_id, start_time, end_time, call_outcome_id) VALUES (1, 2, '2020/1/11 9:40:31', '2020/1/11 9:42:32', 2);
INSERT INTO call (employee_id, customer_id, start_time, end_time, call_outcome_id) VALUES (2, 4, '2020/1/11 9:41:17', '2020/1/11 9:45:21', 2);
INSERT INTO call (employee_id, customer_id, start_time, end_time, call_outcome_id) VALUES (1, 1, '2020/1/11 9:42:32', '2020/1/11 9:46:53', 3);
INSERT INTO call (employee_id, customer_id, start_time, end_time, call_outcome_id) VALUES (2, 1, '2020/1/11 9:46:0', '2020/1/11 9:48:2', 2);
INSERT INTO call (employee_id, customer_id, start_time, end_time, call_outcome_id) VALUES (2, 2, '2020/1/11 9:50:12', '2020/1/11 9:55:35', 2);
Our script is a series of CREATE TABLE commands (creating 4 new tables), ALTER TABLE commands (adding foreign keys to these tables) and INSERT INTO commands (populating tables with the data).
For INSERT commands, I’ve once more used Excel to create commands from the set of values:
Everything should go smoothly and you should see this under “Messages” (a lot of (1 row affected messages)) as well the message “Query executed successfully” (and everything shall be green).
In case something wouldn’t be OK, you’ll notice that 🙂
On the other hand, in the database list, when you expand our_first_database tables, you should see all the new tables.
Now, we’re sure that we have new objects (tables) in our database.
But what about the data?
We’ll check the contents of these tables with simple SELECT statements.
SQL Script – Comment
As you’ve seen, in our SQL script we’ve combined DDL and DML commands.
That will usually be the case when you’re deploying the new version of the database on the system that is currently live.
You can’t simply delete everything and create new objects (tables & relations) because you would lose existing data and nobody really wants that
(losing the data is probably the worst thing you could do about databases).
Therefore, you’ll need to create a script that performs changes and inserts new data (usually data for new dictionaries).
In our script, we’ve only created new objects and inserted data.
All other commands are also allowed.
For example, you could alter the existing table (adding or removing columns, adding properties) or even delete the table if it’s not needed anymore.
Same stands for the data.
You could perform not only INSERTs but also UPDATEs and DELETEs.
In case you need to do that, you’ll make changes to the existing logic, so double-check everything (even things that you’ve already double-checked).
run SQL script in MySQL
mysql> source \home\user\Desktop\test.sql;
mysql -h hostname -u user database < path/to/test.sql
set up a simple test database and table using the mysql Command-Line Client or MySQL Workbench.
Commands for the mysql Command-Line Client are given here:
CREATE DATABASE TestDB;
USE TestDB;
CREATE TABLE TestTable (id INT NOT NULL PRIMARY KEY
AUTO_INCREMENT, name VARCHAR(100));
Creating a MySQL Script
A SQL script in MySQL is a series of SQL statements in a file with a .SQL extension.
You can use any SQL statement under the sun like:
CREATE DATABASE,
USE ,
SELECT,
INSERT,
UPDATE,
DELETE,
CALL
and others
The file is readable from any text editor because it is a text file.
And when MySQL reads the file, it will execute each statement.
So, instead of typing each statement, save the commands in a file for later execution.
But like any statement with the wrong syntax, MySQL will throw an error if it encounters an error in your .SQL file.
Here's an example of a MySQL script that will add a new record in a table and query it afterward:
USE sakila;
INSERT INTO actor (first_name, last_name, last_update)
VALUES ('Chris', 'Evans', NOW());
SELECT * FROM actor ORDER BY actor_id DESC LIMIT 1;
The script above uses the actor table in the sakila database.
The USE statement switches to that database.
Then, MySQL adds a record to the actor table.
And finally, it queries the record to verify the successful insert.
Creating a file with the statements above is easy using your favorite text editor.
Here's an example using the GNU nano text editor in Ubuntu 22.04.
And I named the script insert-actor.sql.
Let's try running this script later when we get to the different methods.
Another option in various operating systems is to use MySQL Workbench.
Here's a screenshot of the same script:
Better yet, you can use dbForge Studio for MySQL.
Here's a screenshot of the same script using this GUI tool:
When the file is ready, it's time to run the script.
How to Run a .SQL Script File in MySQL
There are various ways to run the SQL script we made earlier.
You can run it from any operating system's Terminal.
MySQL also has a command-line utility in different operating systems supported.
You can run the script from there.
But if you are not a fan of the command-line interface, you can use
MySQL database editor.
You can run the script with a few clicks using GUI tools.
Next, let's discuss the 3 methods to see how this works.
Method 1: Run MySQL Script From the Terminal
It's easy to run a script in a terminal.
You can use this in repetitive runs in batch mode.
So, here's how to do it.
First, open the Terminal of your operating system where you installed MySQL.
Then, type and run:
$ mysql -u mysql_user -p < sql_script_file
Supply the mysql_user with a valid MySQL user in your database server.
And use an existing .SQL file with the full path and filename for the sql_script_file. And because of the -p option, MySQL will ask you for the password for the local server.
Then, after you supply the correct password, the script will run.
See a sample below using Ubuntu 22.04:
The output is the new row in the actor table.
If you need to run a script against another host, use the -h option.
Here's an example:
$ mysql -h host -u mysql_user -p < sql_script_file
Where the host is an IP address or a hostname.
Let's have another example.
The output will also display the statement to run using the -verbose option.
You can also output the rows into an XML file with the -X option.
Here's the code:
$ mysql -u root -p -X < ~/Source/sql/script.sql > ~/Source/sql/actors.xml
Here it is in action:
The final frames show the XML file opened from a text editor.
Finally, if your SQL script has a lot of text output, you can use a pager to avoid scrolling off the top of your screen.
See an example below:
$ mysql < batch-file-with-lots-of-output.sql | more
Method 2: Run a Script From the MySQL Prompt
This method still uses the Terminal.
But the difference is running the MySQL Client command-line utility first.
And then run the script from there using the source command.
This method is useful if you want to run further MySQL commands to check your output.
First, open the Terminal then run:
$ mysql -u mysql_user -p
Replace mysql_user with a valid user in the MySQL server.
Then, enter the password.
Once you see the MySQL prompt, run:
mysql> source sql_script_file
Replace sql_script_file with the full path and filename of the SQL script.
Here's an example:
Notice the difference in the output compared to Method #1.
Result sets are within a table.
Method #3: Use a MySQL GUI Client
In this method, we will use 2 known MySQL GUI tools: MySQL Workbench and dbForge Studio for MySQL.
Using MySQL Workbench
This is the MySQL GUI tool by Oracle.
MySQL Workbench has basic features needed by administrators, developers, and designers.
It would be best if you use the MySQL Workbench that will work for your version of MySQL server.
The following are the steps to run SQL scripts in MySQL Workbench:
Open MySQL Workbench.
Connect to your MySQL Server.
You can create a new MySQL connection or click an existing connection.
Open the .SQL file.
Finally, press CTRL-Shift-Enter to run.
Or click the Query menu then select Execute (All or Selection).
Or click the lightning icon of the SQL window.
See it in action below:
Using dbForge Studio for MySQL
dbForge Studio for MySQL is a top-of-the-line GUI tool from Devart.
Creating SQL scripts is a breeze with this tool.
You have autocompletion and code suggestions.
Also, a data generator, a query profiler, and more.
This tool is a lifesaver for administrators, developers, and database designers.
The following are the steps to run scripts in dbForge Studio for MySQL:
Open dbForge Studio for MySQL.
You have 2 options to run a SQL script:
From the Start Page
Click SQL Development -> Execute Script...
Specify the MySQL connection, database (optional), and the SQL file you want.
Click Execute.
From the File menu
Click File -> Open File
Select the folder and .SQL file.
Click Open.
Press F5 or click Execute from the toolbar.
See it in action using the File menu.
Scripting, Data Types, Examples
Prepared Statements and Bound Parameters
A prepared statement is a feature used to execute the same (or similar) SQL statements repeatedly with high efficiency.
Prepared statements basically work like this:
Prepare: An SQL statement template is created and sent to the database.
Certain values are left unspecified, called parameters (labeled "?").
Example: INSERT INTO MyGuests VALUES(?, ?, ?)
The database parses, compiles, and performs query optimization on the SQL statement template, and stores the result without executing it
Execute: At a later time, the application binds the values to the parameters, and the database executes the statement.
The application may execute the statement as many times as it wants with different values
Compared to executing SQL statements directly, prepared statements have three main advantages:
Prepared statements reduce parsing time as the preparation on the query is done only once (although the statement is executed multiple times)
Bound parameters minimize bandwidth to the server as you need send only the parameters each time, and not the whole query
Prepared statements are very useful against SQL injections, because parameter values, which are transmitted later using a different protocol, need not be correctly escaped.
If the original statement template is not derived from external input, SQL injection cannot occur.
<?php
$servername = "localhost";
$username = "username";
$password = "password";
$dbname = "myDB";
// Create connection
$conn = new mysqli($servername, $username, $password, $dbname);
// Check connection
if ($conn->connect_error) {
die("Connection failed: " . $conn->connect_error);
}
// prepare and bind
$stmt = $conn->prepare("INSERT INTO MyGuests (firstname, lastname, email) VALUES (?, ?, ?)");
$stmt->bind_param("sss", $firstname, $lastname, $email);
// set parameters and execute
$firstname = "John";
$lastname = "Doe";
$email = "john@example.com";
$stmt->execute();
$firstname = "Mary";
$lastname = "Moe";
$email = "mary@example.com";
$stmt->execute();
$firstname = "Julie";
$lastname = "Dooley";
$email = "julie@example.com";
$stmt->execute();
echo "New records created successfully";
$stmt->close();
$conn->close();
?>

 Note that when writing an SQL query, the argument we pass to FROM is not in single or double quotation marks (' or "). It is in backticks (`).

 StudentMarks
 CREATING VIEWS
We can create View using CREATE VIEW statement.
A View can be created from a single table or multiple tables.
Syntax:
CREATE VIEW view_name AS
SELECT column1, column2.....
FROM table_name
WHERE condition;
view_name: Name for the View
table_name: Name of the table
condition: Condition to select rows
Examples:
CREATING VIEWS
We can create View using CREATE VIEW statement.
A View can be created from a single table or multiple tables.
Syntax:
CREATE VIEW view_name AS
SELECT column1, column2.....
FROM table_name
WHERE condition;
view_name: Name for the View
table_name: Name of the table
condition: Condition to select rows
Examples:


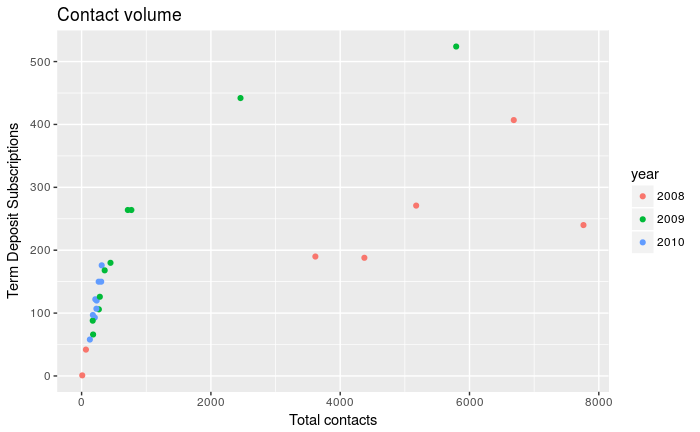 The benefits to using SQL in a code chunk are that you can paste your SQL code without any modification.
For example, you do not have to escape quotes.
If you are using the proverbial spaghetti code that is hundreds of lines long, then a SQL code chunk might be a good option.
Another benefit is that the SQL code in a code chunk is highlighted, making it very easy to read.
For more information on SQL engines, see this page on knitr language engines.
The benefits to using SQL in a code chunk are that you can paste your SQL code without any modification.
For example, you do not have to escape quotes.
If you are using the proverbial spaghetti code that is hundreds of lines long, then a SQL code chunk might be a good option.
Another benefit is that the SQL code in a code chunk is highlighted, making it very easy to read.
For more information on SQL engines, see this page on knitr language engines.
 As you can see from the diagram, the BikeStores sample database has two schemas sales and production, and these schemas have nine tables.
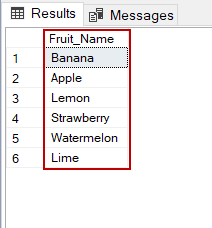 As you can see, the query returns only Fruit_Name column data.
Now, we will practice other SQL examples which are related to the SELECT statement.
In this example first example, we will retrieve all columns of the table.
If we want to return all columns of the table, we can use a (*) asterisk sign instead of writing whole columns of the table.
Through the following query, we can return all columns of the table.
SELECT * FROM Fruits
As you can see, the query returns only Fruit_Name column data.
Now, we will practice other SQL examples which are related to the SELECT statement.
In this example first example, we will retrieve all columns of the table.
If we want to return all columns of the table, we can use a (*) asterisk sign instead of writing whole columns of the table.
Through the following query, we can return all columns of the table.
SELECT * FROM Fruits
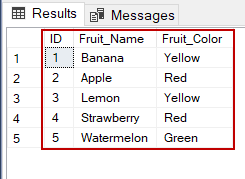 At the same time, to retrieve all columns, we can do this by writing them all separately.
However, this will be a very cumbersome operation.
SELECT ID,Fruit_Name ,Fruit_Color FROM Fruits
At the same time, to retrieve all columns, we can do this by writing them all separately.
However, this will be a very cumbersome operation.
SELECT ID,Fruit_Name ,Fruit_Color FROM Fruits
 As you can see that, the result set only includes the red fruits data.
However, in this example, we filter the exact values of the columns with (=) equal operator.
In some circumstances, we want to compare the similarity of the filtered condition.
LIKE clause and (%) percent sign operator combination helps us to overcome these type of issues.
For example, we can filter the fruits who start with the letter “L” character.
The following query will apply a filter to Fruit_Name and this filter enables to retrieve fruits who start with “L” chracter.
SELECT * FROM Fruits WHERE Fruit_Name LIKE 'L%'
As you can see that, the result set only includes the red fruits data.
However, in this example, we filter the exact values of the columns with (=) equal operator.
In some circumstances, we want to compare the similarity of the filtered condition.
LIKE clause and (%) percent sign operator combination helps us to overcome these type of issues.
For example, we can filter the fruits who start with the letter “L” character.
The following query will apply a filter to Fruit_Name and this filter enables to retrieve fruits who start with “L” chracter.
SELECT * FROM Fruits WHERE Fruit_Name LIKE 'L%'
 At the same time, we can apply (%) percentage operator at any place or multiple times to thw filter pattern.
In the following example, we will filter the fruits name which includes ‘n’ chracter.
SELECT * FROM Fruits WHERE Fruit_Name LIKE '%n%'
At the same time, we can apply (%) percentage operator at any place or multiple times to thw filter pattern.
In the following example, we will filter the fruits name which includes ‘n’ chracter.
SELECT * FROM Fruits WHERE Fruit_Name LIKE '%n%'
 Another commonly used operator is (_) the underscore operator.
This operator represents any character in the filter pattern.
Assume that, we want to apply a filter to the fruit names which meet the following criterias:
Another commonly used operator is (_) the underscore operator.
This operator represents any character in the filter pattern.
Assume that, we want to apply a filter to the fruit names which meet the following criterias:
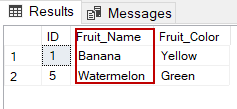
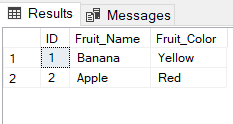 At the same time, we can limit the result set of the SQL SELECT statement with a percent value.
Such as, the following query returns only %60 percentage of result set.
SELECT TOP (60) PERCENT * FROM Fruits
At the same time, we can limit the result set of the SQL SELECT statement with a percent value.
Such as, the following query returns only %60 percentage of result set.
SELECT TOP (60) PERCENT * FROM Fruits
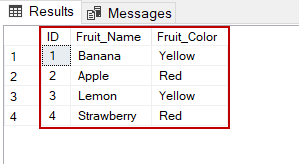 As you can see we added PERCENT expression to TOP operator and limit the result set of the query.
 syntax01.JPG767×241
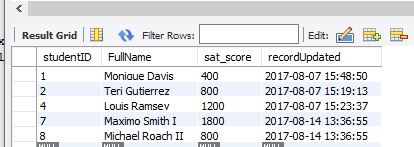
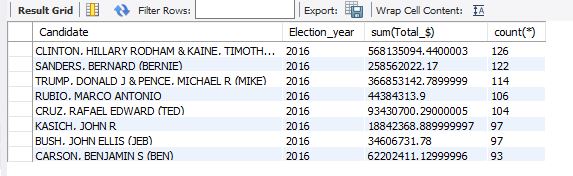 As with all of these SQL things there is MUCH MORE to them than what’s in this introductory guide.
I hope this at least gives you enough to get started.
Please see the manual for your database manager and have fun trying different options yourself.
As with all of these SQL things there is MUCH MORE to them than what’s in this introductory guide.
I hope this at least gives you enough to get started.
Please see the manual for your database manager and have fun trying different options yourself.
 Everything should go smoothly and you should see this under “Messages” (a lot of (1 row affected messages)) as well the message “Query executed successfully” (and everything shall be green).
In case something wouldn’t be OK, you’ll notice that 🙂
On the other hand, in the database list, when you expand
Everything should go smoothly and you should see this under “Messages” (a lot of (1 row affected messages)) as well the message “Query executed successfully” (and everything shall be green).
In case something wouldn’t be OK, you’ll notice that 🙂
On the other hand, in the database list, when you expand 
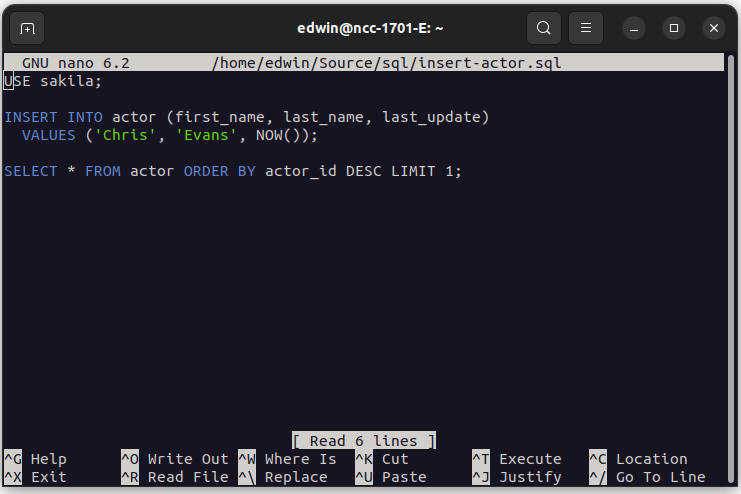 And I named the script insert-actor.sql.
Let's try running this script later when we get to the different methods.
Another option in various operating systems is to use MySQL Workbench.
Here's a screenshot of the same script:
And I named the script insert-actor.sql.
Let's try running this script later when we get to the different methods.
Another option in various operating systems is to use MySQL Workbench.
Here's a screenshot of the same script:
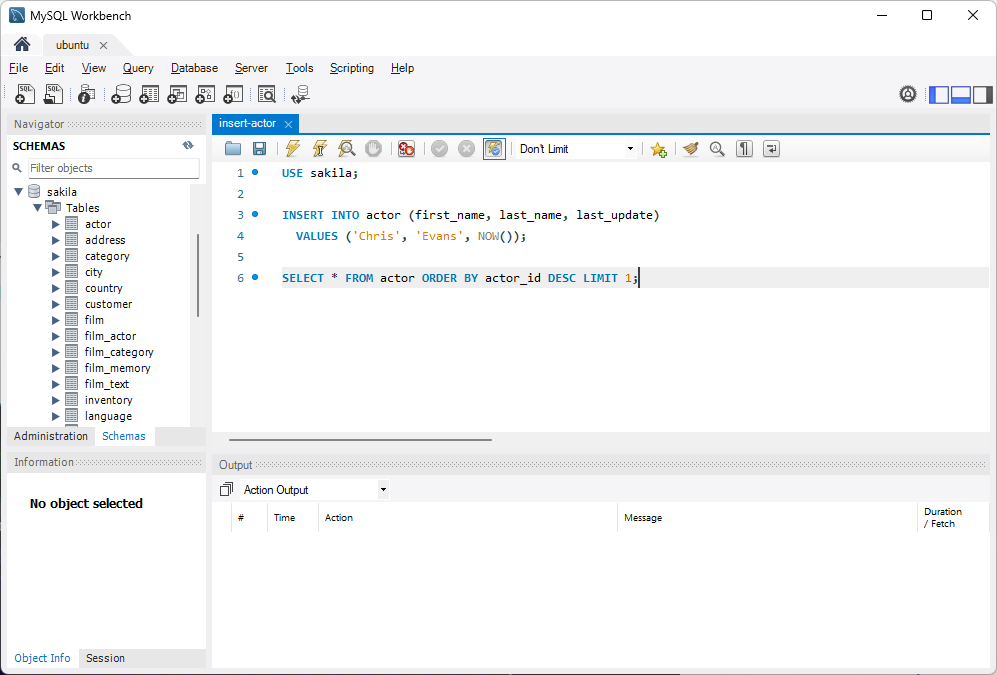 Better yet, you can use dbForge Studio for MySQL.
Here's a screenshot of the same script using this GUI tool:
Better yet, you can use dbForge Studio for MySQL.
Here's a screenshot of the same script using this GUI tool:
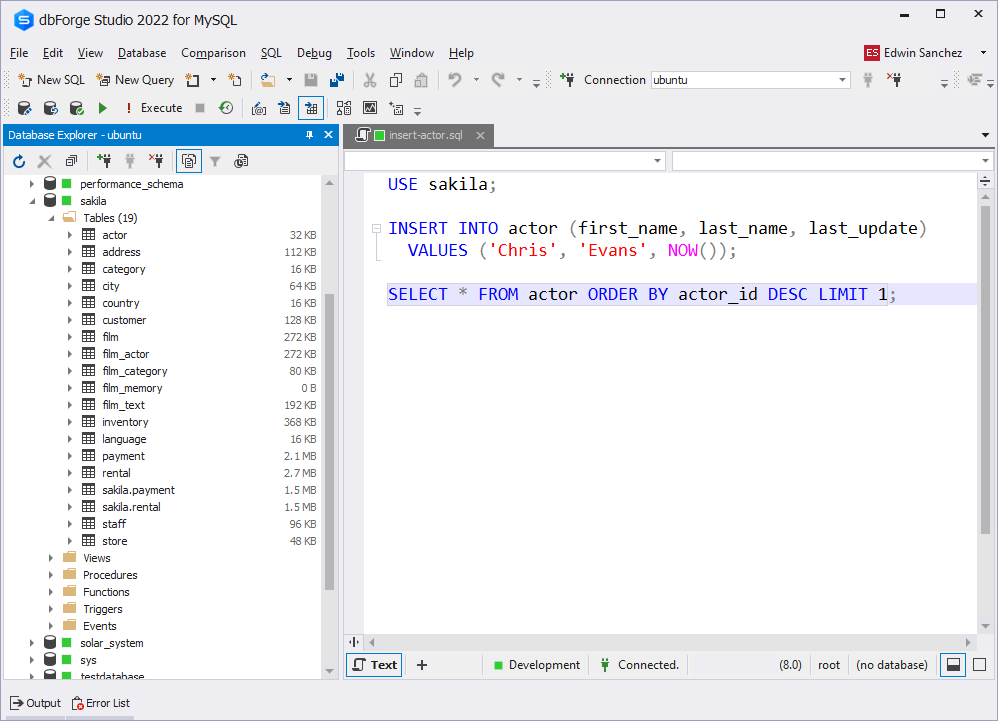 When the file is ready, it's time to run the script.
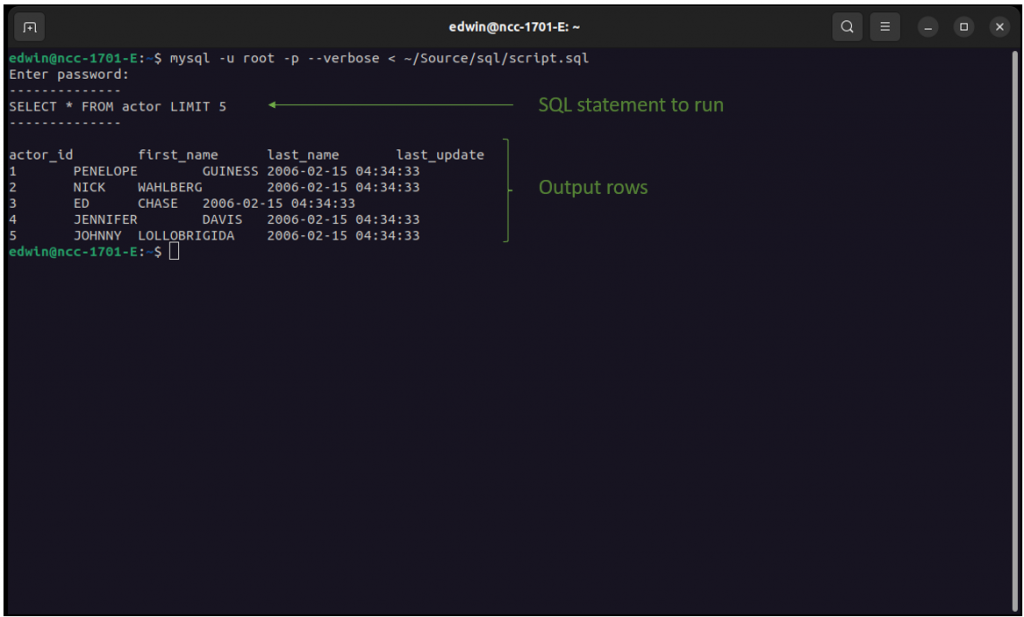 You can also output the rows into an XML file with the -X option.
Here's the code:
You can also output the rows into an XML file with the -X option.
Here's the code: