In this "Python Projects" blog, let us have a look at 3 levels of Python projects that you should learn to master Python and test your project analysis, development and handling skills on the whole. Many people would agree if I say Python is really fun to learn and fiddle around with.
Let"s begin this Python Projects blog by checking out the following list of topics:
It will only be fair if I give you a small introduction to Python.
Python is a high-level, object-oriented, interpreted programming language, which has garnered worldwide attention. Stack Overflow found out that 38.8% of its users mainly use Python for their projects.
Python was created by a developer called Guido Van Rossum.
Python is and always has been easy to learn and master. It is very beginner friendly and the syntax is extremely simple to read and follow through. This definitely makes us all happy and what"s amazing is that python has millions of happy learners across the globe!
According to the website’s survey, Python’s popularity surpassed that of C# in 2018 – just like it surpassed PHP in 2017. On the GitHub platform, Python surpassed Java as the second-most used programming language, with 40% more pull requests opened in 2017 than in 2016.
This makes Python certification one of the most sought-after programming certifications.
The answer to this question is fairly simple and straightforward. It all starts with learning the basics and all the fundamentals of Python. This is basically a measurement index to know how comfortable you are working with Python.
The next prime step involves taking a look at the basic and easy code to familiarize yourself with the syntax and the flow of logic in the code. This is a very important step and helps set a strong foundation for later on as well.
After this, you should definitely look at what python is being used for in real life. This will play a major role in finding out why you want to learn Python in the first place.
If that"s not the case then you will learn about the projects and you can implement certain strategies for the projects that you will consider starting on your own.
Followed by this is definitely to look at what projects you can tackle your current knowledge of Python. Diving into the depth of Python will help you assess yourself at every stage.
Projects are basically used to solve a problem at hand. If providing solutions to the various simple and complex problems are your kind of a thing, then you should definitely consider working on Python projects.
After you’ve got your hands dirty with a couple of projects, you will be one step closer to mastering python. This is important because you will be able to spontaneously implement what you’ve learned on something as simple as writing a calculator program all the way till helping achieve artificial intelligence.
Let"s begin by checking out the first level of Python projects.
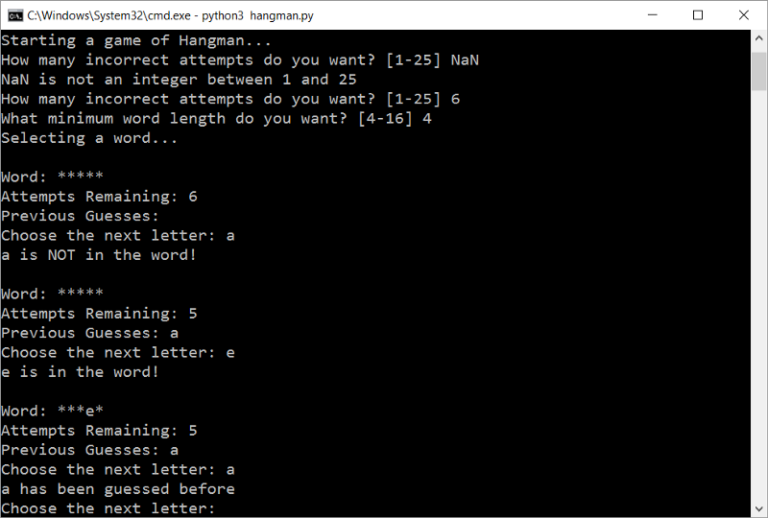
The best beginner project we can consider is the game of Hangman. I am sure the majority of you reading this Python Projects blog has played Hangman at one point of time in your life. To put it in just one single statement, the main goal here is to create a “guess the word” game. As simple as it sounds, it has certain key things you need to note.
This means you’ll need a way to grab a word to use for guessing. Let us keep it simple and use a text file for the input. The text file consits of the words from which we have to guess.
You will also need functions to check if the user has actually inputted a single letter, to check if the inputted letter is in the hidden word (and if it is, how many times it appears), to print letters, and a counter variable to limit guesses.
Key Concepts to keep in mind for this Python Project:
from string import ascii_lowercase
from words import get_random_word


def get_num_attempts():
    """Get user-inputted number of incorrect attempts for the game."""
    while True:
        num_attempts = input(
            'How many incorrect attempts do you want? [1-25] ')
        try:
            num_attempts = int(num_attempts)
            if 1 <= num_attempts <= 25:
                return num_attempts
            else:
                print('{0} is not between 1 and 25'.format(num_attempts))
        except ValueError:
            print('{0} is not an integer between 1 and 25'.format(
                num_attempts))


def get_min_word_length():
    """Get user-inputted minimum word length for the game."""
    while True:
        min_word_length = input(
            'What minimum word length do you want? [4-16] ')
        try:
            min_word_length = int(min_word_length)
            if 4 <= min_word_length <= 16:                 return min_word_length             else:                 print('{0} is not between 4 and 16'.format(min_word_length))         except ValueError:             print('{0} is not an integer between 4 and 16'.format(                 min_word_length)) def get_display_word(word, idxs):     """Get the word suitable for display."""     if len(word) != len(idxs):         raise ValueError('Word length and indices length are not the same')     displayed_word = ''.join(         [letter if idxs[i] else '*' for i, letter in enumerate(word)])     return displayed_word.strip() def get_next_letter(remaining_letters):     """Get the user-inputted next letter."""     if len(remaining_letters) == 0:         raise ValueError('There are no remaining letters')     while True:         next_letter = input('Choose the next letter: ').lower()         if len(next_letter) != 1:             print('{0} is not a single character'.format(next_letter))         elif next_letter not in ascii_lowercase:             print('{0} is not a letter'.format(next_letter))         elif next_letter not in remaining_letters:             print('{0} has been guessed before'.format(next_letter))         else:             remaining_letters.remove(next_letter)             return next_letter def play_hangman():     """Play a game of hangman.     At the end of the game, returns if the player wants to retry.     """     # Let player specify difficulty     print('Starting a game of Hangman...')     attempts_remaining = get_num_attempts()     min_word_length = get_min_word_length()     # Randomly select a word     print('Selecting a word...')     word = get_random_word(min_word_length)     print()     # Initialize game state variables     idxs = [letter not in ascii_lowercase for letter in word]     remaining_letters = set(ascii_lowercase)     wrong_letters = []     word_solved = False     # Main game loop     while attempts_remaining > 0 and not word_solved:
        # Print current game state
        print('Word: {0}'.format(get_display_word(word, idxs)))
        print('Attempts Remaining: {0}'.format(attempts_remaining))
        print('Previous Guesses: {0}'.format(' '.join(wrong_letters)))

        # Get player's next letter guess
        next_letter = get_next_letter(remaining_letters)

        # Check if letter guess is in word
        if next_letter in word:
            # Guessed correctly
            print('{0} is in the word!'.format(next_letter))

            # Reveal matching letters
            for i in range(len(word)):
                if word[i] == next_letter:
                    idxs[i] = True
        else:
            # Guessed incorrectly
            print('{0} is NOT in the word!'.format(next_letter))

            # Decrement num of attempts left and append guess to wrong guesses
            attempts_remaining -= 1
            wrong_letters.append(next_letter)

        # Check if word is completely solved
        if False not in idxs:
            word_solved = True
        print()

    # The game is over: reveal the word
    print('The word is {0}'.format(word))

    # Notify player of victory or defeat
    if word_solved:
        print('Congratulations! You won!')
    else:
        print('Try again next time!')

    # Ask player if he/she wants to try again
    try_again = input('Would you like to try again? [y/Y] ')
    return try_again.lower() == 'y'


if __name__ == '__main__':
    while play_hangman():
        print()
2. Words.py
"""Function to fetch words."""

import random

WORDLIST = 'wordlist.txt'


def get_random_word(min_word_length):
    """Get a random word from the wordlist using no extra memory."""
    num_words_processed = 0
    curr_word = None
    with open(WORDLIST, 'r') as f:
        for word in f:
            if '(' in word or ')' in word:
                continue
            word = word.strip().lower()
            if len(word) < min_word_length:
                continue
            num_words_processed += 1
            if random.randint(1, num_words_processed) == 1:
                curr_word = word
    return curr_word
The output is as follows:
Now that we saw how we can tackle a beginner project like Hangman, let us step it up a little and check out an intermediate Python Project next.
The best way to get started with learning intermediate stages of programming in Python is to definitely start working with the libraries that Python supports.
There is literally "n" number of libraries that you can make use of while coding in Python. Some are very easy and straightforward while some might take some time to grasp and master.
Here are some of the top libraries you can consider starting out with:
NumPy is for scientific computing on a whole.
Scipy uses arrays like basic data structure used for linear algebra, calculus, and other similar concepts.
Pandas are used for dataframes and Matplotlib is to visualize data in the form of graphs and notations.
The best possible usage of Python is for data visualization. As helpful as numeric data output is, there are many requirements of a visual representation of the data.
By visual representation, it is just a generalization. Anything ranging from creating your front-end or a Graphical User Interface (GUI) to plotting numeric data as points on a graph.
Matplotlib is used to plot data points on a graph. And M atplotlib is a plotting library for the Python programming language and its numerical mathematics extension NumPy. It provides an object-oriented API for embedding plots into applications using general-purpose GUI toolkits like Tkinter, wxPython, Qt, or GTK+.
There are many options for doing 3D plots in Python, but here are some common and easy ways using Matplotlib.
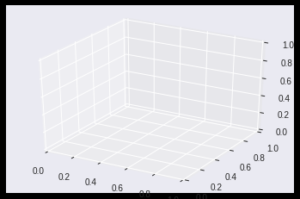
In general, the first step is to create a 3D axes, and then plot any of the 3D graphs that best illustrates the data for a particular need. In order to use Matplotlib, the mplot3d toolkit that is included with the Matplotlib installation has to be imported:
from mpl_toolkits import mplot3d
Then, to create a 3D axes you can execute this code:
<pre id="3346" class="graf graf--pre graf-after--p">%matplotlib inline
import numpy as np
import matplotlib.pyplot as plt
fig = plt.figure()
ax = plt.axes(projection=’3d’)</pre>
It is inside this 3D axes that a plot can be drawn, it is important to know what type of plot (or combination of plots) will be better to describe the data.
At this point in time, you need to note that this comprises our base for further plotting.
Points and Lines:
The following image combines 2 plots, one with a line that goes through every point of the data, and others that draw a point on each of the particular 1000 values on this example.
The code is actually very simple when you try to analyze it. We have made use of standard trigonometric functions to plot a set of random values to obtain our projection in 3 dimensions.
Code:
ax = plt.axes(projection=’3d’)# Data for a three-dimensional line
zline = np.linspace(0, 15, 1000)
xline = np.sin(zline)
yline = np.cos(zline)
ax.plot3D(xline, yline, zline, ‘gray’)# Data for three-dimensional scattered points
zdata = 15 * np.random.random(100)
xdata = np.sin(zdata) + 0.1 * np.random.randn(100)
ydata = np.cos(zdata) + 0.1 * np.random.randn(100)
ax.scatter3D(xdata, ydata, zdata, c=zdata, cmap=’Greens’);

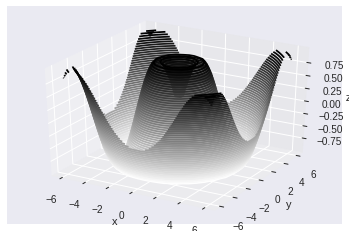
3D Contour Plots:
The input for the contour plot is a bit different than for the previous plot, as it needs the data on a two-dimensional grid.
Note that on the following example that after assigning values for x and y, they are combined on a grid by executing “np.meshgrid(x, y)” and then the Z values are created from executing the function f(X,Y) with the values of the grid (Z=f(X,Y)).
Again, basic 3d plot simplified in the following code:
def f(x, y):
    return np.sin(np.sqrt(x ** 2 + y ** 2))

x = np.linspace(-6, 6, 30)
y = np.linspace(-6, 6, 30)

X, Y = np.meshgrid(x, y)
Z = f(X, Y)fig = plt.figure()
ax = plt.axes(projection='3d')
ax.contour3D(X, Y, Z, 50, cmap='binary')
ax.set_xlabel('x')
ax.set_ylabel('y')
ax.set_zlabel('z');
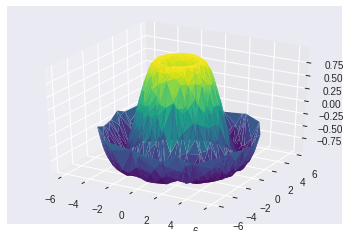
On the previous graphs, the data was generated in order, but in real life sometimes the data is not ordered, for those cases, the surface triangulation is very useful as it creates surfaces by finding sets of triangles formed between adjacent points.
Surface Triangulation:
theta = 2 * np.pi * np.random.random(1000)
r = 6 * np.random.random(1000)
x = np.ravel(r * np.sin(theta))
y = np.ravel(r * np.cos(theta))
z = f(x, y)
ax = plt.axes(projection=’3d’)
ax.plot_trisurf(x, y, z,cmap=’viridis’, edgecolor=’none’);
Now that we are familiar with how we can expand our reach on learning Python by looking at external libraries, we can go ahead and check out the next level of Python Projects which is the Advanced Level.
Python has vast applications – Everything from “Hello World” all the way to achieving Artificial Intelligence.
There are virtually unlimited projects you can work on using Python but here are the major ones that you can consider if you want to dive into the heart of Python.
Among all of these, my favorite is definitely to work on Machine Learning and Deep Learning. Let us look at a very nice use-case to learn Python in-depth.
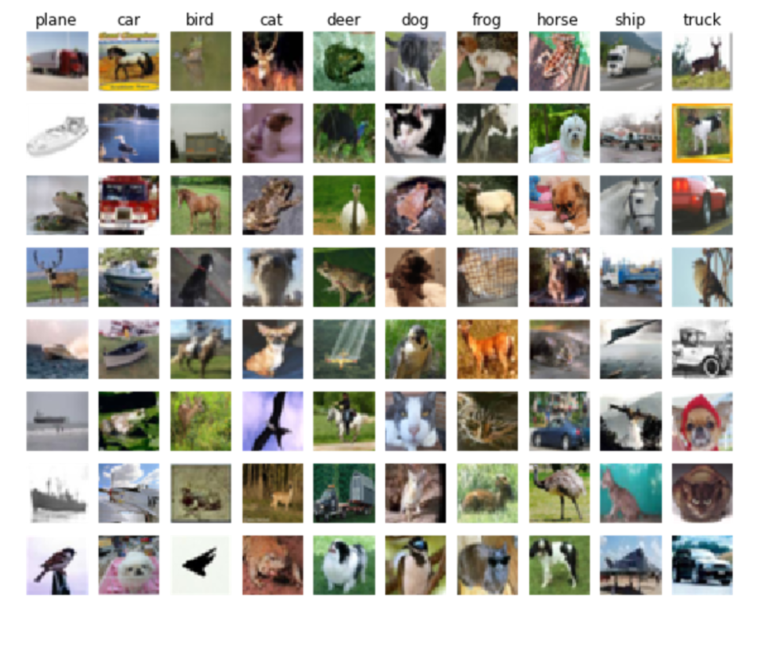
Let’s train a network to classify images from the CIFAR10 Dataset using a Convolution Neural Network built-in TensorFlow.
Consider the following Flowchart to understand the working of the use-case:
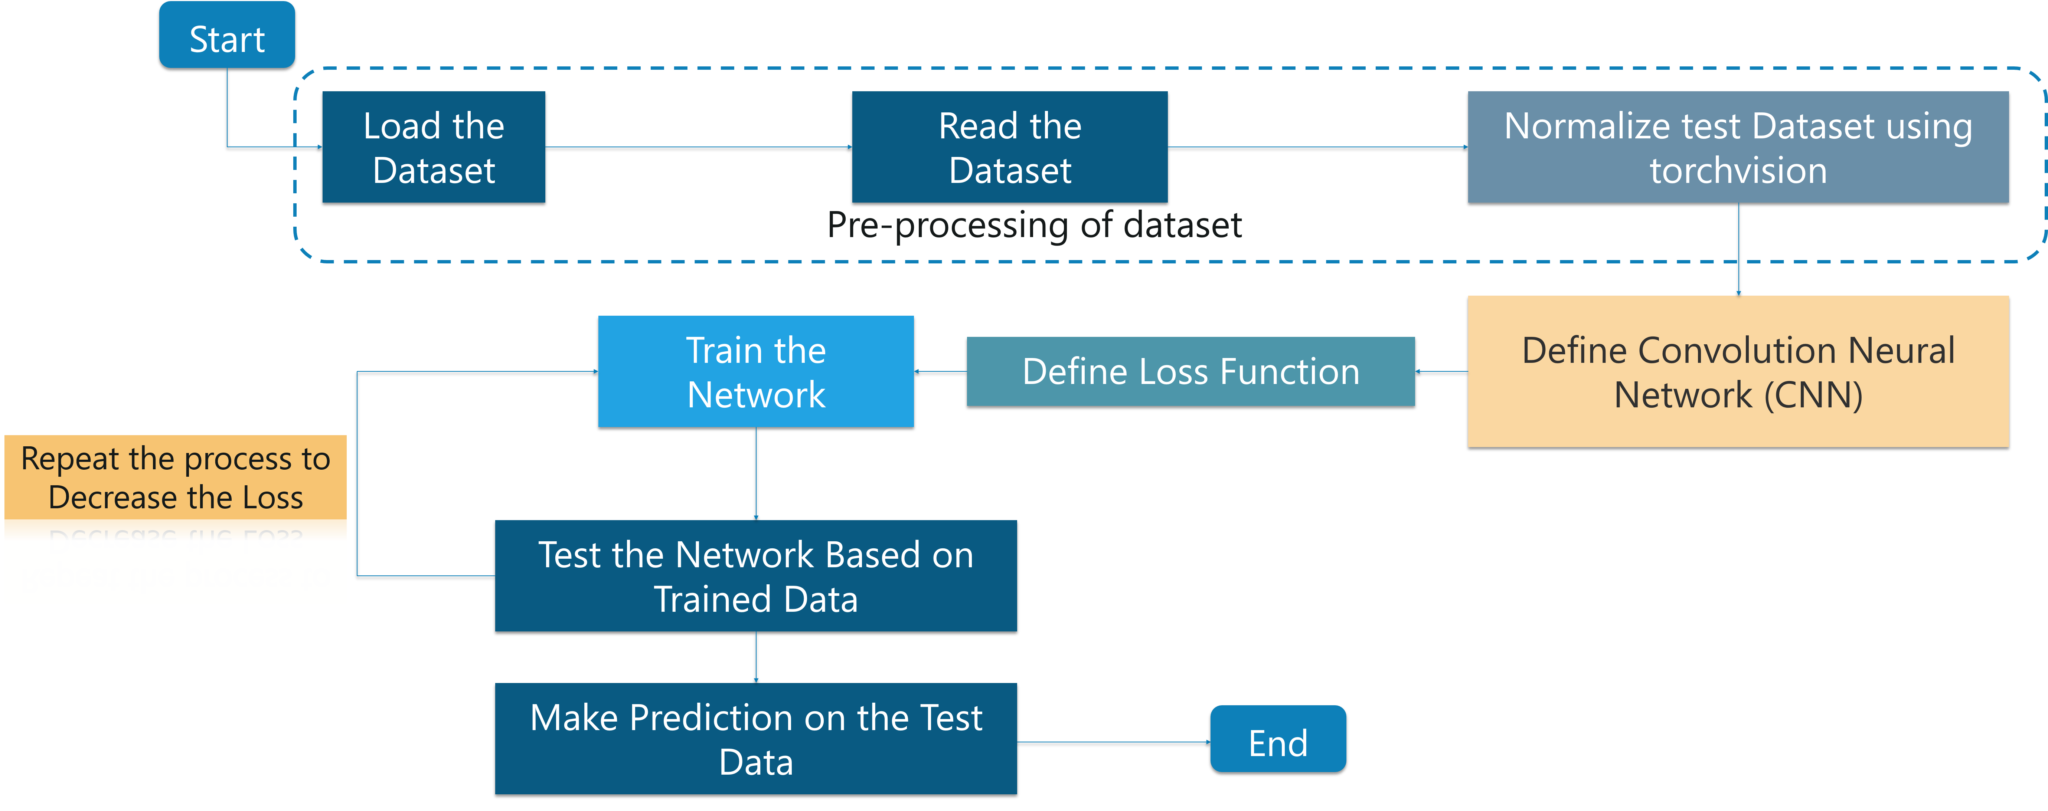
Let us break down this flowchart into simple terms:
This use-case is broken into 2 programs. One is to Train the network and other is to test the network.
Let us first train the network.
Training the network:
import numpy as np

import tensorflow as tf

from time import time

import math

from include.data import get_data_set

from include.model import model, lr

train_x, train_y = get_data_set("train")

test_x, test_y = get_data_set("test")

tf.set_random_seed(21)

x, y, output, y_pred_cls, global_step, learning_rate = model()

global_accuracy = 0

epoch_start = 0

# PARAMS

_BATCH_SIZE = 128

_EPOCH = 60

_SAVE_PATH = "./tensorboard/cifar-10-v1.0.0/"

# LOSS AND OPTIMIZER

loss = tf.reduce_mean(tf.nn.softmax_cross_entropy_with_logits_v2(logits=output, labels=y))

optimizer = tf.train.AdamOptimizer(learning_rate=learning_rate,

                                   beta1=0.9,

                                   beta2=0.999,

                                   epsilon=1e-08).minimize(loss, global_step=global_step)

# PREDICTION AND ACCURACY CALCULATION

correct_prediction = tf.equal(y_pred_cls, tf.argmax(y, axis=1))

accuracy = tf.reduce_mean(tf.cast(correct_prediction, tf.float32))

# SAVER

merged = tf.summary.merge_all()

saver = tf.train.Saver()

sess = tf.Session()

train_writer = tf.summary.FileWriter(_SAVE_PATH, sess.graph)

try:

    print("
Trying to restore last checkpoint ...")

    last_chk_path = tf.train.latest_checkpoint(checkpoint_dir=_SAVE_PATH)

    saver.restore(sess, save_path=last_chk_path)

    print("Restored checkpoint from:", last_chk_path)

except ValueError:

    print("
Failed to restore checkpoint. Initializing variables instead.")

    sess.run(tf.global_variables_initializer())

def train(epoch):

    global epoch_start

    epoch_start = time()

    batch_size = int(math.ceil(len(train_x) / _BATCH_SIZE))

    i_global = 0

    for s in range(batch_size):

        batch_xs = train_x[s*_BATCH_SIZE: (s+1)*_BATCH_SIZE]

        batch_ys = train_y[s*_BATCH_SIZE: (s+1)*_BATCH_SIZE]


        start_time = time()

        i_global, _, batch_loss, batch_acc = sess.run(

            [global_step, optimizer, loss, accuracy],

            feed_dict={x: batch_xs, y: batch_ys, learning_rate: lr(epoch)})

        duration = time() - start_time

        if s % 10 == 0:

            percentage = int(round((s/batch_size)*100))


            bar_len = 29

            filled_len = int((bar_len*int(percentage))/100)

            bar = '=' * filled_len + '>' + '-' * (bar_len - filled_len)


            msg = "Global step: {:>5} - [{}] {:>3}% - acc: {:.4f} - loss: {:.4f} - {:.1f} sample/sec"

            print(msg.format(i_global, bar, percentage, batch_acc, batch_loss, _BATCH_SIZE / duration))


    test_and_save(i_global, epoch)


def test_and_save(_global_step, epoch):

    global global_accuracy

    global epoch_start


    i = 0

    predicted_class = np.zeros(shape=len(test_x), dtype=np.int)

    while i < len(test_x): j = min(i + _BATCH_SIZE, len(test_x)) batch_xs = test_x[i:j, :] batch_ys = test_y[i:j, :] predicted_class[i:j] = sess.run( y_pred_cls, feed_dict={x: batch_xs, y: batch_ys, learning_rate: lr(epoch)} ) i = j correct = (np.argmax(test_y, axis=1) == predicted_class) acc = correct.mean()*100 correct_numbers = correct.sum() hours, rem = divmod(time() - epoch_start, 3600) minutes, seconds = divmod(rem, 60) mes = "
Epoch {} - accuracy: {:.2f}% ({}/{}) - time: {:0>2}:{:0>2}:{:05.2f}"

    print(mes.format((epoch+1), acc, correct_numbers, len(test_x), int(hours), int(minutes), seconds))


    if global_accuracy != 0 and global_accuracy < acc: summary = tf.Summary(value=[ tf.Summary.Value(tag="Accuracy/test", simple_value=acc), ]) train_writer.add_summary(summary, _global_step) saver.save(sess, save_path=_SAVE_PATH, global_step=_global_step) mes = "This epoch receive better accuracy: {:.2f} > {:.2f}. Saving session..."

        print(mes.format(acc, global_accuracy))

        global_accuracy = acc


    elif global_accuracy == 0:

        global_accuracy = acc


    print("###########################################################################################################")


def main():

    train_start = time()


    for i in range(_EPOCH):

        print("
Epoch: {}/{}
".format((i+1), _EPOCH))

        train(i)


    hours, rem = divmod(time() - train_start, 3600)

    minutes, seconds = divmod(rem, 60)

    mes = "Best accuracy pre session: {:.2f}, time: {:0>2}:{:0>2}:{:05.2f}"

    print(mes.format(global_accuracy, int(hours), int(minutes), seconds))


if __name__ == "__main__":

    main()


sess.close()
Output:
Epoch: 60/60

Global step: 23070 - [
>-----------------------------]   0% - acc: 0.9531 - loss: 1.5081 - 7045.4 sample/sec
Global step: 23080 - [
>-----------------------------]   3% - acc: 0.9453 - loss: 1.5159 - 7147.6 sample/sec
Global step: 23090 - [
=>----------------------------]   5% - acc: 0.9844 - loss: 1.4764 - 7154.6 sample/sec
Global step: 23100 - [
==>---------------------------]   8% - acc: 0.9297 - loss: 1.5307 - 7104.4 sample/sec
Global step: 23110 - [
==>---------------------------]  10% - acc: 0.9141 - loss: 1.5462 - 7091.4 sample/sec
Global step: 23120 - [
===>--------------------------]  13% - acc: 0.9297 - loss: 1.5314 - 7162.9 sample/sec
Global step: 23130 - [
====>-------------------------]  15% - acc: 0.9297 - loss: 1.5307 - 7174.8 sample/sec
Global step: 23140 - [
=====>------------------------]  18% - acc: 0.9375 - loss: 1.5231 - 7140.0 sample/sec
Global step: 23150 - [
=====>------------------------]  20% - acc: 0.9297 - loss: 1.5301 - 7152.8 sample/sec
Global step: 23160 - [
======>-----------------------]  23% - acc: 0.9531 - loss: 1.5080 - 7112.3 sample/sec
Global step: 23170 - [
=======>----------------------]  26% - acc: 0.9609 - loss: 1.5000 - 7154.0 sample/sec
Global step: 23180 - [
========>---------------------]  28% - acc: 0.9531 - loss: 1.5074 - 6862.2 sample/sec
Global step: 23190 - [
========>---------------------]  31% - acc: 0.9609 - loss: 1.4993 - 7134.5 sample/sec
Global step: 23200 - [
=========>--------------------]  33% - acc: 0.9609 - loss: 1.4995 - 7166.0 sample/sec
Global step: 23210 - [
==========>-------------------]  36% - acc: 0.9375 - loss: 1.5231 - 7116.7 sample/sec
Global step: 23220 - [
===========>------------------]  38% - acc: 0.9453 - loss: 1.5153 - 7134.1 sample/sec
Global step: 23230 - [
===========>------------------]  41% - acc: 0.9375 - loss: 1.5233 - 7074.5 sample/sec
Global step: 23240 - [
============>-----------------]  43% - acc: 0.9219 - loss: 1.5387 - 7176.9 sample/sec
Global step: 23250 - [
=============>----------------]  46% - acc: 0.8828 - loss: 1.5769 - 7144.1 sample/sec
Global step: 23260 - [
==============>---------------]  49% - acc: 0.9219 - loss: 1.5383 - 7059.7 sample/sec
Global step: 23270 - [
==============>---------------]  51% - acc: 0.8984 - loss: 1.5618 - 6638.6 sample/sec
Global step: 23280 - [
===============>--------------]  54% - acc: 0.9453 - loss: 1.5151 - 7035.7 sample/sec
Global step: 23290 - [
================>-------------]  56% - acc: 0.9609 - loss: 1.4996 - 7129.0 sample/sec
Global step: 23300 - [
=================>------------]  59% - acc: 0.9609 - loss: 1.4997 - 7075.4 sample/sec
Global step: 23310 - [
=================>------------]  61% - acc: 0.8750 - loss: 1.5842 - 7117.8 sample/sec
Global step: 23320 - [
==================>-----------]  64% - acc: 0.9141 - loss: 1.5463 - 7157.2 sample/sec
Global step: 23330 - [
===================>----------]  66% - acc: 0.9062 - loss: 1.5549 - 7169.3 sample/sec
Global step: 23340 - [
====================>---------]  69% - acc: 0.9219 - loss: 1.5389 - 7164.4 sample/sec
Global step: 23350 - [
====================>---------]  72% - acc: 0.9609 - loss: 1.5002 - 7135.4 sample/sec
Global step: 23360 - [
=====================>--------]  74% - acc: 0.9766 - loss: 1.4842 - 7124.2 sample/sec
Global step: 23370 - [
======================>-------]  77% - acc: 0.9375 - loss: 1.5231 - 7168.5 sample/sec
Global step: 23380 - [
======================>-------]  79% - acc: 0.8906 - loss: 1.5695 - 7175.2 sample/sec
Global step: 23390 - [
=======================>------]  82% - acc: 0.9375 - loss: 1.5225 - 7132.1 sample/sec
Global step: 23400 - [
========================>-----]  84% - acc: 0.9844 - loss: 1.4768 - 7100.1 sample/sec
Global step: 23410 - [
=========================>----]  87% - acc: 0.9766 - loss: 1.4840 - 7172.0 sample/sec
Global step: 23420 - [
==========================>---]  90% - acc: 0.9062 - loss: 1.5542 - 7122.1 sample/sec
Global step: 23430 - [
==========================>---]  92% - acc: 0.9297 - loss: 1.5313 - 7145.3 sample/sec
Global step: 23440 - [
===========================>--]  95% - acc: 0.9297 - loss: 1.5301 - 7133.3 sample/sec
Global step: 23450 - [
============================>-]  97% - acc: 0.9375 - loss: 1.5231 - 7135.7 sample/sec
Global step: 23460 - [
=============================>] 100% - acc: 0.9250 - loss: 1.5362 - 10297.5 sample/sec

Epoch 60 - accuracy: 78.81% (7881/10000)
This epoch receive better accuracy: 78.81
> 78.78. Saving session...

###########################################################################################################
Run Network on Test DataSet:
import numpy as np

import tensorflow as tf


from include.data import get_data_set

from include.model import model


test_x, test_y = get_data_set("test")

x, y, output, y_pred_cls, global_step, learning_rate = model()


_BATCH_SIZE = 128

_CLASS_SIZE = 10

_SAVE_PATH = "./tensorboard/cifar-10-v1.0.0/"


saver = tf.train.Saver()

sess = tf.Session()


try:

    print("
Trying to restore last checkpoint ...")

    last_chk_path = tf.train.latest_checkpoint(checkpoint_dir=_SAVE_PATH)

    saver.restore(sess, save_path=last_chk_path)

    print("Restored checkpoint from:", last_chk_path)

except ValueError:

    print("
Failed to restore checkpoint. Initializing variables instead.")

    sess.run(tf.global_variables_initializer())


def main():

    i = 0

    predicted_class = np.zeros(shape=len(test_x), dtype=np.int)

    while i < len(test_x):

        j = min(i + _BATCH_SIZE, len(test_x))

        batch_xs = test_x[i:j, :]

        batch_ys = test_y[i:j, :]

        predicted_class[i:j] = sess.run(y_pred_cls, feed_dict={x: batch_xs, y: batch_ys})

        i = j


    correct = (np.argmax(test_y, axis=1) == predicted_class)

    acc = correct.mean() * 100

    correct_numbers = correct.sum()

    print()

    print("Accuracy on Test-Set: {0:.2f}% ({1} / {2})".format(acc, correct_numbers, len(test_x)))

if __name__ == "__main__":

    main()

sess.close()
Simple Output:
Trying to restore last checkpoint ...
Restored checkpoint from: ./tensorboard/cifar-10-v1.0.0/-23460

Accuracy on Test-Set: 78.81% (7881 / 10000)
That was a very interesting use-case, wasn"t it? Thus, we saw how machine learning works and developed a basic program to implement it using the TensorFlow library in Python.
Conclusion
The Python projects discussed in this blog should help you kickstart your learning about Python and it will indulge you and push you to learn more about Python practically. This will be very handy when you are trying to consider a problem and providing a solution for that using Python.
Python will help you solve multiple real-life projects as well and these concepts will get you up to speed with how you can begin exploring and understanding the art of project design, development, and handling.
After reading this blog on Python Projects, I am pretty sure you want to know more about Python. To know more about Python you can refer the following blogs:
I hope you have enjoyed this post on Python Projects. If you have any questions regarding this tutorial, please let me know in the comments.