Create your first GUI application
First, we will import Tkinter package and create a window and set its title: ======== from tkinter import * window = Tk() window.title("Welcome to LikeGeeks app") window.mainloop() The result will be like this: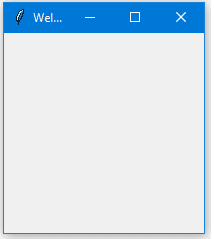 Awesome!! Our application just works.
The last line which calls mainloop function, this function calls the endless loop of the window, so the window will wait for any user interaction till we close it.
If you forget to call the mainloop function, nothing will appear to the user.
Awesome!! Our application just works.
The last line which calls mainloop function, this function calls the endless loop of the window, so the window will wait for any user interaction till we close it.
If you forget to call the mainloop function, nothing will appear to the user.
Create a label widget
To add a label to our previous example, we will create a label using the label class like this: lbl = Label(window, text="Hello") Then we will set its position on the form using the grid function and give it the location like this: lbl.grid(column=0, row=0) So the complete code will be like this: ======== from tkinter import * window = Tk() window.title("Welcome to LikeGeeks app") lbl = Label(window, text="Hello") lbl.grid(column=0, row=0) window.mainloop() ======== from tkinter import * window = Tk() lbl.grid(column=0, row=0) window.mainloop() And this is the result: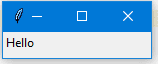 Without calling the grid function for the label, it won’t show up.
Set label font size
You can set the label font so you can make it bigger and maybe bold. You can also change the font style. To do so, you can pass the font parameter like this: lbl = Label(window, text="Hello", font=("Arial Bold", 50))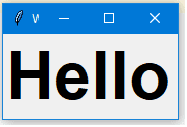 Note that the font parameter can be passed to any widget to change its font not labels only.
Great, but the window is so small, we can even see the title, what about setting the window size?
Note that the font parameter can be passed to any widget to change its font not labels only.
Great, but the window is so small, we can even see the title, what about setting the window size?
Setting window size
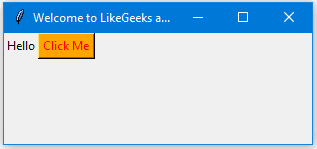
We can set the default window size using geometry function like this: window.geometry('350x200') The above line sets the window width to 350 pixels and the height to 200 pixels. Let’s try adding more GUI widgets like buttons and see how to handle button click event.Let’s start by adding the button to the window, the button is created and added to the window the same as the label: btn.grid(column=1, row=0) So our window will be like this: ======== from tkinter import * window = Tk() window.title("Welcome to LikeGeeks app") window.geometry('350x200') lbl = Label(window, text="Hello") lbl.grid(column=0, row=0) btn = Button(window, text="Click Me") btn.grid(column=1, row=0) window.mainloop() ======== from tkinter import * window = Tk() window.geometry('350x200') lbl.grid(column=0, row=0) btn.grid(column=1, row=0) window.mainloop() The result looks like this:
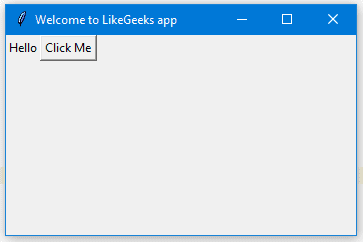 Note that we place the button on the second column of the window which is 1. If you forget and place the button on the same column which is 0, it will show the button only, since the button will be on the top of the label.
You can change foreground for a button or any other widget using fg property. Also, you can change the background color for any widget using bg property. btn = Button(window, text="Click Me", bg="orange", fg="red")
 Now, if you tried to click on the button, nothing happens because the click event of the button isn’t written yet.
Handle button click event
First, we will write the function that we need to execute when the button is clicked: def clicked(): lbl.configure(text="Button was clicked !!") def clicked(): Then we will wire it with the button by specifying the function like this: btn = Button(window, text=“Click Me”, command=clicked) Note that, we typed clicked only not clicked() with parentheses. Now the full code will be like this: ======== from tkinter import * window = Tk() window.title("Welcome to LikeGeeks app") window.geometry('350x200') lbl = Label(window, text="Hello") lbl.grid(column=0, row=0) def clicked(): lbl.configure(text="Button was clicked !!") btn = Button(window, text="Click Me", command=clicked) btn.grid(column=1, row=0) window.mainloop() ======== from tkinter import * window = Tk() window.geometry('350x200') lbl.grid(column=0, row=0) def clicked(): btn.grid(column=1, row=0) window.mainloop() And when we click the button, the result as expected: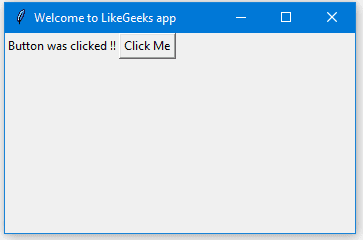 Cool!!
Get input using Entry class (Tkinter textbox)
In the previous Python GUI examples, we saw how to add simple widgets, now let’s try getting the user input using Tkinter Entry class (Tkinter textbox). You can create a textbox using Tkinter Entry class like this: txt = Entry(window,width=10) Then you can add it to the window using grid function as usual So our window will be like this: ======== from tkinter import * window = Tk() window.title("Welcome to LikeGeeks app") window.geometry('350x200') lbl = Label(window, text="Hello") lbl.grid(column=0, row=0) txt = Entry(window,width=10) txt.grid(column=1, row=0) def clicked(): lbl.configure(text="Button was clicked !!") btn = Button(window, text="Click Me", command=clicked) btn.grid(column=2, row=0) window.mainloop() ======== from tkinter import * window = Tk() window.geometry('350x200') lbl.grid(column=0, row=0) txt = Entry(window,width=10) txt.grid(column=1, row=0) def clicked(): btn.grid(column=2, row=0) window.mainloop() And the result will be like this: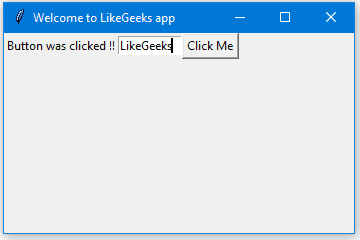 Now, if you click the button, it will show the same old message, what about showing the entered text on the Entry widget?
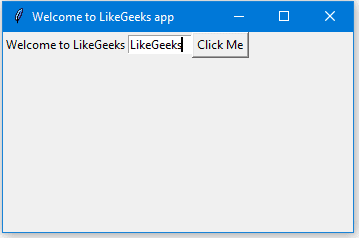
First, you can get entry text using get function. So we can write this code to our clicked function like this:
def clicked():
res = "Welcome to " + txt.get()
lbl.configure(text= res)
def clicked():
lbl.configure(text= res)
If you click the button and there is a text on the entry widget, it will show “Welcome to” concatenated with the entered text.
And this is the complete code:
========
from tkinter import *
window = Tk()
window.title("Welcome to LikeGeeks app")
window.geometry('350x200')
lbl = Label(window, text="Hello")
lbl.grid(column=0, row=0)
txt = Entry(window,width=10)
txt.grid(column=1, row=0)
def clicked():
res = "Welcome to " + txt.get()
lbl.configure(text= res)
btn = Button(window, text="Click Me", command=clicked)
btn.grid(column=2, row=0)
window.mainloop()
========
from tkinter import *
window = Tk()
window.geometry('350x200')
lbl.grid(column=0, row=0)
txt = Entry(window,width=10)
txt.grid(column=1, row=0)
def clicked():
lbl.configure(text= res)
btn.grid(column=2, row=0)
window.mainloop()
Run the above code and check the result:
Now, if you click the button, it will show the same old message, what about showing the entered text on the Entry widget?
First, you can get entry text using get function. So we can write this code to our clicked function like this:
def clicked():
res = "Welcome to " + txt.get()
lbl.configure(text= res)
def clicked():
lbl.configure(text= res)
If you click the button and there is a text on the entry widget, it will show “Welcome to” concatenated with the entered text.
And this is the complete code:
========
from tkinter import *
window = Tk()
window.title("Welcome to LikeGeeks app")
window.geometry('350x200')
lbl = Label(window, text="Hello")
lbl.grid(column=0, row=0)
txt = Entry(window,width=10)
txt.grid(column=1, row=0)
def clicked():
res = "Welcome to " + txt.get()
lbl.configure(text= res)
btn = Button(window, text="Click Me", command=clicked)
btn.grid(column=2, row=0)
window.mainloop()
========
from tkinter import *
window = Tk()
window.geometry('350x200')
lbl.grid(column=0, row=0)
txt = Entry(window,width=10)
txt.grid(column=1, row=0)
def clicked():
lbl.configure(text= res)
btn.grid(column=2, row=0)
window.mainloop()
Run the above code and check the result:
 Awesome!!
Every time we run the code, we need to click on the entry widget to set focus to write the text, what about setting the focus automatically?
Awesome!!
Every time we run the code, we need to click on the entry widget to set focus to write the text, what about setting the focus automatically?
Set focus to entry widget
That’s super easy, all we need to do is to call focus function like this: txt.focus() And when you run your code, you will notice that the entry widget has the focus so you can write your text right away.Disable entry widget
To disable entry widget, you can set the state property to disabled: txt = Entry(window,width=10, state='disabled')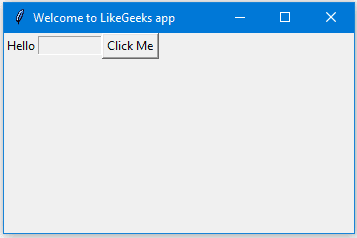 Now, you won’t be able to enter any text.
Add a combobox widget
To add a combobox widget, you can use the Combobox class from ttk library like this: from tkinter.ttk import * combo = Combobox(window) from tkinter.ttk import * combo = Combobox(window) Then you can add your values to the combobox. ======== from tkinter import * from tkinter.ttk import * window = Tk() window.title("Welcome to LikeGeeks app") window.geometry('350x200') combo = Combobox(window) combo['values']= (1, 2, 3, 4, 5, "Text") combo.current(1) #set the selected item combo.grid(column=0, row=0) window.mainloop() ======== from tkinter import * from tkinter.ttk import * window = Tk() window.geometry('350x200') combo = Combobox(window) combo.current(1) #set the selected item combo.grid(column=0, row=0) window.mainloop()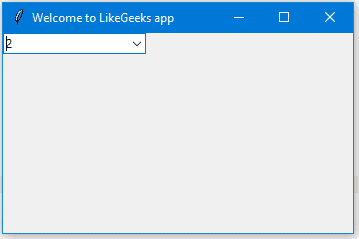 As you can see, we add the combobox items using the tuple.
To set the selected item, you can pass the index of the desired item to the current function.
To get the select item, you can use the get function like this:
combo.get()
As you can see, we add the combobox items using the tuple.
To set the selected item, you can pass the index of the desired item to the current function.
To get the select item, you can use the get function like this:
combo.get()
To create a checkbutton widget, you can use Checkbutton class like this: chk = Checkbutton(window, text='Choose') Also, you can set the checked state by passing the check value to the Checkbutton like this: ======== from tkinter import * from tkinter.ttk import * window = Tk() window.title("Welcome to LikeGeeks app") window.geometry('350x200') chk_state = BooleanVar() chk_state.set(True) #set check state chk = Checkbutton(window, text='Choose', var=chk_state) chk.grid(column=0, row=0) window.mainloop() ======== from tkinter import * from tkinter.ttk import * window = Tk() window.geometry('350x200') chk_state = BooleanVar() chk_state.set(True) #set check state chk = Checkbutton(window, text='Choose', var=chk_state) chk.grid(column=0, row=0) window.mainloop() Check the result:
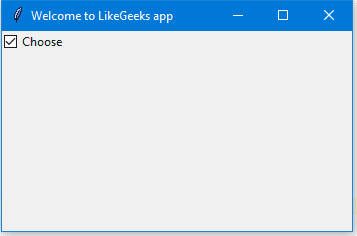
Here we create a variable of type BooleanVar which is not a standard Python variable, it’s a Tkinter variable, and then we pass it to the Checkbutton class to set the check state as the highlighted line in the above example. You can set the Boolean value to false to make it unchecked. Also, you can use IntVar instead of BooleanVar and set the value to 0 or 1. chk_state = IntVar() chk_state.set(0) #uncheck chk_state.set(1) #check chk_state = IntVar() chk_state.set(0) #uncheck chk_state.set(1) #check These examples give the same result as the BooleanVar.
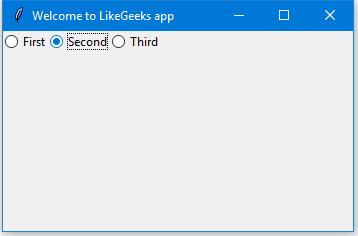
To add radio buttons, simply you can use RadioButton class like this: rad1 = Radiobutton(window,text='First', value=1) Note that you should set the value for every radio button with a different value, otherwise, they won’t work. ======== from tkinter import * from tkinter.ttk import * window = Tk() window.title("Welcome to LikeGeeks app") window.geometry('350x200') rad1 = Radiobutton(window,text='First', value=1) rad2 = Radiobutton(window,text='Second', value=2) rad3 = Radiobutton(window,text='Third', value=3) rad1.grid(column=0, row=0) rad2.grid(column=1, row=0) rad3.grid(column=2, row=0) window.mainloop() ======== from tkinter import * from tkinter.ttk import * window = Tk() window.geometry('350x200') rad1 = Radiobutton(window,text='First', value=1) rad2 = Radiobutton(window,text='Second', value=2) rad3 = Radiobutton(window,text='Third', value=3) rad1.grid(column=0, row=0) rad2.grid(column=1, row=0) rad3.grid(column=2, row=0) window.mainloop() The result of the above code looks like this:
 Also, you can set the command of any of these radio buttons to a specific function, so if the user clicks on any one of them, it runs the function code.
This is an example:
rad1 = Radiobutton(window,text='First', value=1, command=clicked)
def clicked():
# Do what you need
rad1 = Radiobutton(window,text='First', value=1, command=clicked)
def clicked():
# Do what you need
Pretty simple!!
Also, you can set the command of any of these radio buttons to a specific function, so if the user clicks on any one of them, it runs the function code.
This is an example:
rad1 = Radiobutton(window,text='First', value=1, command=clicked)
def clicked():
# Do what you need
rad1 = Radiobutton(window,text='First', value=1, command=clicked)
def clicked():
# Do what you need
Pretty simple!!
To get the currently selected radio button or the radio button value, you can pass the variable parameter to the radio buttons and later you can get its value. ======== from tkinter import * from tkinter.ttk import * window = Tk() window.title("Welcome to LikeGeeks app") selected = IntVar() rad1 = Radiobutton(window,text='First', value=1, variable=selected) rad2 = Radiobutton(window,text='Second', value=2, variable=selected) rad3 = Radiobutton(window,text='Third', value=3, variable=selected) def clicked(): print(selected.get()) btn = Button(window, text="Click Me", command=clicked) rad1.grid(column=0, row=0) rad2.grid(column=1, row=0) rad3.grid(column=2, row=0) btn = Button(window,text='Click Me', command=clicked) btn.grid(column=3, row=0) window.mainloop() ======== from tkinter import * from tkinter.ttk import * window = Tk() window.title("Welcome to LikeGeeks app") selected = IntVar() rad1 = Radiobutton(window,text='First', value=1, variable=selected) rad2 = Radiobutton(window,text='Second', value=2, variable=selected) rad3 = Radiobutton(window,text='Third', value=3, variable=selected) def clicked(): print(selected.get()) btn = Button(window, text="Click Me", command=clicked) rad1.grid(column=0, row=0) rad2.grid(column=1, row=0) rad3.grid(column=2, row=0) btn = Button(window,text='Click Me', command=clicked) btn.grid(column=3, row=0) window.mainloop()
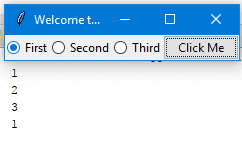 Every time you select a radio button, the value of the variable will be changed to the value of the selected radio button.
Add a ScrolledText widget (Tkinter textarea)
report this adTo add a ScrolledText widget, you can use the ScrolledText class like this: ======== from tkinter import scrolledtext txt = scrolledtext.ScrolledText(window,width=40,height=10) ======== from tkinter import scrolledtext txt = scrolledtext.ScrolledText(window,width=40,height=10) Here we specify the width and the height of the ScrolledText widget, otherwise, it will fill the entire window. ======== from tkinter import * ======== from tkinter import scrolledtext window = Tk() window.title("Welcome to LikeGeeks app") window.geometry('350x200') txt = scrolledtext.ScrolledText(window,width=40,height=10) txt.grid(column=0,row=0) window.mainloop() ======== from tkinter import * from tkinter import scrolledtext window = Tk() window.geometry('350x200') txt = scrolledtext.ScrolledText(window,width=40,height=10) txt.grid(column=0,row=0) window.mainloop() The result as you can see: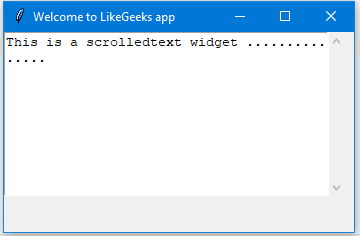
Set scrolledtext content
To set scrolledtext content, you can use the insert method like this: txt.insert(INSERT,'You text goes here')Delete/Clear scrolledtext content
To clear the contents of a scrolledtext widget, you can use delete method like this: txt.delete(1.0,END) Great!!Create a MessageBox
To show a message box using Tkinter, you can use messagebox library like this: ======== from tkinter import messagebox messagebox.showinfo('Message title','Message content') ======== from tkinter import messagebox messagebox.showinfo('Message title','Message content') Pretty easy!! Let’s show a message box when the user clicks a button. ======== from tkinter import * ======== from tkinter import messagebox window = Tk() window.title("Welcome to LikeGeeks app") window.geometry('350x200') def clicked(): messagebox.showinfo('Message title', 'Message content') btn = Button(window,text='Click here', command=clicked) btn.grid(column=0,row=0) window.mainloop() ======== from tkinter import * from tkinter import messagebox window = Tk() window.geometry('350x200') def clicked(): messagebox.showinfo('Message title', 'Message content') btn = Button(window,text='Click here', command=clicked) btn.grid(column=0,row=0) window.mainloop()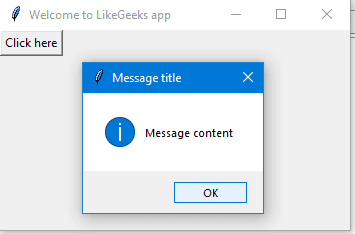 When you click the button, an info messagebox will appear.
Show warning and error messages
You can show a warning message or error message the same way. The only thing that needs to be changed is the message function messagebox.showwarning('Message title', 'Message content') #shows warning message messagebox.showerror('Message title', 'Message content') #shows error message messagebox.showwarning('Message title', 'Message content') #shows warning message messagebox.showerror('Message title', 'Message content') #shows error messageShow askquestion dialogs
To show a yes no message box to the user, you can use one of the following messagebox functions: ======== from tkinter import messagebox res = messagebox.askquestion('Message title','Message content') res = messagebox.askyesno('Message title','Message content') res = messagebox.askyesnocancel('Message title','Message content') res = messagebox.askokcancel('Message title','Message content') res = messagebox.askretrycancel('Message title','Message content') ======== from tkinter import messagebox res = messagebox.askquestion('Message title','Message content') res = messagebox.askyesno('Message title','Message content') res = messagebox.askyesnocancel('Message title','Message content') res = messagebox.askokcancel('Message title','Message content') res = messagebox.askretrycancel('Message title','Message content') You can choose the appropriate message style according to your needs. Just replace the showinfo function line from the previous line and run it. Also, you can check what button was clicked using the result variable If you click OK or yes or retry, it will return True value, but if you choose no or cancel, it will return False. The only function that returns one of three values is askyesnocancel function, it returns True or False or None.Add a SpinBox (numbers widget)
To create a Spinbox widget, you can use Spinbox class like this: spin = Spinbox(window, from_=0, to=100) Here we create a Spinbox widget and we pass the from_ and to parameters to specify the numbers range for the Spinbox. Also, you can specify the width of the widget using the width parameter: spin = Spinbox(window, from_=0, to=100, width=5) Check the complete example: ======== from tkinter import * window = Tk() window.title("Welcome to LikeGeeks app") window.geometry('350x200') spin = Spinbox(window, from_=0, to=100, width=5) spin.grid(column=0,row=0) window.mainloop() ======== from tkinter import * window = Tk() window.geometry('350x200') spin = Spinbox(window, from_=0, to=100, width=5) spin.grid(column=0,row=0) window.mainloop()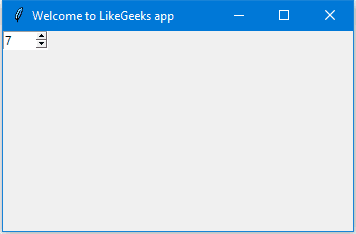 You can specify the numbers for the Spinbox instead of using the whole range like this:
spin = Spinbox(window, values=(3, 8, 11), width=5)
Here the Spinbox widget only shows these 3 numbers only 3, 8 and 11.
You can specify the numbers for the Spinbox instead of using the whole range like this:
spin = Spinbox(window, values=(3, 8, 11), width=5)
Here the Spinbox widget only shows these 3 numbers only 3, 8 and 11.
Set default value for Spinbox
To set the Spinbox default value, you can pass the value to the textvariable parameter like this: var =IntVar() var.set(36) spin = Spinbox(window, from_=0, to=100, width=5, textvariable=var) var =IntVar() var.set(36) spin = Spinbox(window, from_=0, to=100, width=5, textvariable=var) Now, if you run the program, it will show 36 as a default value for the Spinbox.Add a Progressbar widget
To create a progress bar, you can use the progressbar class like this: from tkinter.ttk import Progressbar bar = Progressbar(window, length=200) from tkinter.ttk import Progressbar bar = Progressbar(window, length=200) You can set the progress bar value like this: bar['value'] = 70 You can set this value based on any process you want like downloading a file or completing a task.Change Progressbar color
Changing Progressbar color is a bit tricky, but super easy. First, we will create a style and set the background color and finally set the created style to the Progressbar. Check the following example: ======== from tkinter import * from tkinter.ttk import Progressbar ======== from tkinter import ttk window = Tk() window.title("Welcome to LikeGeeks app") window.geometry('350x200') style = ttk.Style() style.theme_use('default') style.configure("black.Horizontal.TProgressbar", background='black') bar = Progressbar(window, length=200, style='black.Horizontal.TProgressbar') bar['value'] = 70 bar.grid(column=0, row=0) window.mainloop() ======== from tkinter import * from tkinter.ttk import Progressbar from tkinter import ttk window = Tk() window.geometry('350x200') style = ttk.Style() style.theme_use('default') bar = Progressbar(window, length=200, style='black.Horizontal.TProgressbar') bar['value'] = 70 bar.grid(column=0, row=0) window.mainloop() And the result will be like this: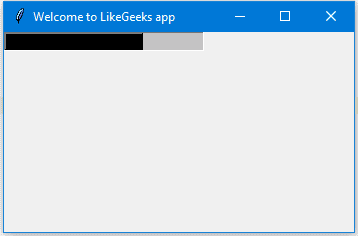
Add a filedialog (file & directory chooser)
To create a file dialog (file chooser), you can use the filedialog class like this: ======== from tkinter import filedialog file = filedialog.askopenfilename() ======== from tkinter import filedialog file = filedialog.askopenfilename() After you choose a file and click open, the file variable will hold that file path. Also, you can ask for multiple files like this: files = filedialog.askopenfilenames()Specify file types (filter file extensions)
You can specify the file types for a file dialog using filetypes parameter, just specify the extensions in tuples. file = filedialog.askopenfilename(filetypes = (("Text files","*.txt"),("all files","*.*"))) You can ask for a directory using askdirectory method: dir = filedialog.askdirectory() You can specify the initial directory for the file dialog by specifying the initialdir like this: from os import path file = filedialog.askopenfilename(initialdir= path.dirname(__file__)) from os import path file = filedialog.askopenfilename(initialdir= path.dirname(__file__)) Easy!!Add a Menu bar
To add a menu bar, you can use menu class like this: ======== from tkinter import Menu menu = Menu(window) menu.add_command(label='File') window.config(menu=menu) ======== from tkinter import Menu menu = Menu(window) menu.add_command(label='File') window.config(menu=menu) First, we create a menu, then we add our first label, and finally, we assign the menu to our window. You can add menu items under any menu by using add_cascade() function like this: menu.add_cascade(label='File', menu=new_item) So our code will be like this: ======== from tkinter import * ======== from tkinter import Menu window = Tk() window.title("Welcome to LikeGeeks app") menu = Menu(window) new_item = Menu(menu) new_item.add_command(label='New') menu.add_cascade(label='File', menu=new_item) window.config(menu=menu) window.mainloop() ======== from tkinter import * from tkinter import Menu window = Tk() menu = Menu(window) new_item = Menu(menu) new_item.add_command(label='New') menu.add_cascade(label='File', menu=new_item) window.config(menu=menu) window.mainloop()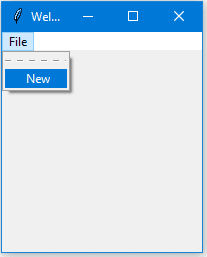 Using this way, you can add many menu items as you want.
========
from tkinter import *
========
from tkinter import Menu
window = Tk()
window.title("Welcome to LikeGeeks app")
menu = Menu(window)
new_item = Menu(menu)
new_item.add_command(label='New')
new_item.add_separator()
new_item.add_command(label='Edit')
menu.add_cascade(label='File', menu=new_item)
window.config(menu=menu)
window.mainloop()
========
from tkinter import * from tkinter import Menu
window = Tk()
menu = Menu(window)
new_item = Menu(menu)
new_item.add_command(label='New')
new_item.add_separator()
new_item.add_command(label='Edit')
menu.add_cascade(label='File', menu=new_item)
window.config(menu=menu)
window.mainloop()
Using this way, you can add many menu items as you want.
========
from tkinter import *
========
from tkinter import Menu
window = Tk()
window.title("Welcome to LikeGeeks app")
menu = Menu(window)
new_item = Menu(menu)
new_item.add_command(label='New')
new_item.add_separator()
new_item.add_command(label='Edit')
menu.add_cascade(label='File', menu=new_item)
window.config(menu=menu)
window.mainloop()
========
from tkinter import * from tkinter import Menu
window = Tk()
menu = Menu(window)
new_item = Menu(menu)
new_item.add_command(label='New')
new_item.add_separator()
new_item.add_command(label='Edit')
menu.add_cascade(label='File', menu=new_item)
window.config(menu=menu)
window.mainloop()
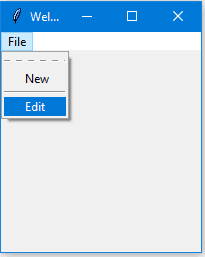 Here we add another menu item called Edit with a menu separator.
You may notice a dashed line at the beginning, well, if you click that line, it will show the menu items in a small separate window.
You can disable this feature by disabling the tearoff feature like this:
new_item = Menu(menu, tearoff=0)
Just replace the new_item in the above example with this one and it won’t show the dashed line anymore.
I don’t need to remind you that you can type any code that works when the user clicks on any menu item by specifying the command property.
new_item.add_command(label='New', command=clicked)
Here we add another menu item called Edit with a menu separator.
You may notice a dashed line at the beginning, well, if you click that line, it will show the menu items in a small separate window.
You can disable this feature by disabling the tearoff feature like this:
new_item = Menu(menu, tearoff=0)
Just replace the new_item in the above example with this one and it won’t show the dashed line anymore.
I don’t need to remind you that you can type any code that works when the user clicks on any menu item by specifying the command property.
new_item.add_command(label='New', command=clicked)
Add a Notebook widget (tab control)
To create a tab control, there are 3 steps to do so.- First, we create a tab control using Notebook class
- Create a tab using Frame class.
- Add that tab to the tab control.
- Pack the tab control so it becomes visible in the window.
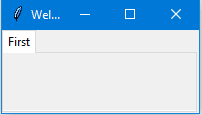 You can add many tabs as you want the same way.
Add widgets to Notebooks
After creating tabs, you can put widgets inside these tabs by assigning the parent property to the desired tab. ======== from tkinter import * ======== from tkinter import ttk window = Tk() window.title("Welcome to LikeGeeks app") tab_control = ttk.Notebook(window) tab1 = ttk.Frame(tab_control) tab2 = ttk.Frame(tab_control) tab_control.add(tab1, text='First') tab_control.add(tab2, text='Second') lbl1 = Label(tab1, text= 'label1') lbl1.grid(column=0, row=0) lbl2 = Label(tab2, text= 'label2') lbl2.grid(column=0, row=0) tab_control.pack(expand=1, fill='both') window.mainloop() ======== from tkinter import * from tkinter import ttk window = Tk() tab_control = ttk.Notebook(window) tab1 = ttk.Frame(tab_control) tab2 = ttk.Frame(tab_control) tab_control.add(tab1, text='First') tab_control.add(tab2, text='Second') lbl1 = Label(tab1, text= 'label1') lbl1.grid(column=0, row=0) lbl2 = Label(tab2, text= 'label2') lbl2.grid(column=0, row=0) tab_control.pack(expand=1, fill='both') window.mainloop()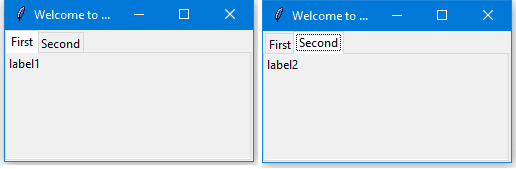
Add spacing for widgets (padding)
You can add padding for your controls to make it looks well organized using padx and pady properties. Just pass padx and pady to any widget and give them a value. lbl1 = Label(tab1, text= 'label1', padx=5, pady=5) Just that simple!! In this tutorial, we saw many Python GUI examples using Tkinter library and we saw how easy it’s to develop graphical interfaces using it. This tutorial covers main aspects of Python GUI development not all of them. There is no tutorial or a book can cover everything.Build Python Graphic User Interface by Tkinter
Build Python Graphic User Interface by Tkinter# https://www.youtube.com/watch?v=ddoPYppcppc # Build Python Graphic User Interface (GUI) by Tkinter # first import everything from tkinter import * # create window object window=Tk() # define 4 labels l1= Label(window, text = "書名") l1.grid(row= 0,column=0) l1= Label(window, text = "作者") l1.grid(row= 0,column=2) l1= Label(window, text = "年份") l1.grid(row= 1,column=0) l1= Label(window, text = "ISBN書號") l1.grid(row= 1,column=2) # define entries title_text=StringVar() el=Entry(window,textvariable=title_text) el.grid(row=0, column=1) author_text=StringVar() el=Entry(window,textvariable=author_text) el.grid(row=0, column=3) year_text=StringVar() el=Entry(window,textvariable=year_text) el.grid(row=1, column=1) isbn_text=StringVar() el=Entry(window,textvariable=isbn_text) el.grid(row=1, column=3) # define a listbox list1=Listbox(window,height=6, width=35) list1.grid(row=2,column=0,rowspan=3,columnspan=2) sb1= Scrollbar(window) sb1.grid(row=2,column=2,rowspan=6) list1.configure(yscrollcommand=sb1.set) sb1.configure(command=list1.yview) # define 6 buttons b1=Button(window, text = "view All", width=12) b1.grid(row=2,column=3) b1=Button(window, text = "search", width=12) b1.grid(row=3,column=3) b1=Button(window, text = "add entry", width=12) b1.grid(row=4,column=3) b1=Button(window, text = "update selected", width=12) b1.grid(row=5,column=3) b1=Button(window, text = "delete selected", width=12) b1.grid(row=6,column=3) b1=Button(window, text = "close", width=12) b1.grid(row=7,column=3) window.mainloop()
Python Backend script for Graphic User Interface - SQL Functions
Python Backend script for Graphic User Interface - SQL Functions Tkinter Event Handling with Buttons Tkinter Menu bar & Event handling import sqlite3 def connect(): conn=sqlite3.connect("books.db") cur=conn.cursor() cur.execute("CREATE TABLE IF NOT EXIST books (id INTERGER PRIMARY KEY, title text, author text, year INTERGER, isbn INTERGER)") conn.commit() conn.close() def insert(title, author, year, isbn): conn=sqlite3.connect("books.db") cur=conn.cursor() cur.execute("INSERT INTO books VALUES (NULL, ?, ?, ?, ?)", (title, author, year, isbn)) conn.commit() conn.close() def view(): conn=sqlite3.connect("books.db") cur=conn.cursor() cur.execute("SELECT * FROM books") rows=cur.fetchall() conn.close() return rows def search(title="", author="", year="", isbn=""): conn=sqlite3.connect("books.db") cur=conn.cursor() cur.execute("SELECT * FROM books WHERE title=? OR author=? OR year=? OR isbn=?",(title, author, year, isbn)) rows=cur.fetchall() conn.close() return rows def delete(id): conn=sqlite3.connect("books.db") cur=conn.cursor() cur.execute("DELETE FROM books WHERE id=?)",(id,)) conn.close() return rows def update(id, title, author, year, isbn): conn=sqlite3.connect("books.db") cur=conn.cursor() cur.execute("UPDATE books SET title=?, author=?, year=?, isbn=? WHERE id=?",(title, author, year, isbn, id)) conn.commit() conn.close() # to attach function to button # https://www.tutorialspoint.com/python/tk_button.htm # Python - Tkinter Button def ytd(): print("hello") b1.config(command=ytd)Events and Bindings
Events and BindingsTkinter application spends most of its time inside an event loop (entered via the mainloop method). Events can come from various sources, including key presses and mouse operations by the user, and redraw events from the window manager (indirectly caused by the user, in manycases). Tkinter provides a powerful mechanism to let you deal with events yourself. For each widget, you can bind Python functions and methods to events.
widget.bind(event, handler)If an event matching the event description occurs in the widget, the given handler is called with an object describing the event. Here’s a simple example: Capturing clicks in a window
from Tkinter import *
root = Tk()
def callback(event):
print "clicked at", event.x, event.y
frame = Frame(root, width=100, height=100)
frame.bind("<Button-1>", callback)
frame.pack()
root.mainloop()
In this example, we use the bind method of the frame widget
to bind a callback function to an event called <Button-1>.
Run this program and click in the window that appears.
Each time you click, a message like “clicked at 44 63” is printed to the console window.
Keyboard events are sent to the widget that currently owns the keyboard focus.
You can use the focus_set method to move focus to a widget:
Capturing keyboard events
from Tkinter import *
root = Tk()
def key(event):
print "pressed", repr(event.char)
def callback(event):
frame.focus_set()
print "clicked at", event.x, event.y
frame = Frame(root, width=100, height=100)
frame.bind("<Key>", key)
frame.bind("<Button-1>", callback)
frame.pack()
root.mainloop()
If you run this script, you’ll find that you have to click in the frame before it starts receiving any keyboard events.
Events
Events are given as strings, using a special event syntax:<modifier-type-detail>The type field is the most important part of an event specifier. It specifies the kind of event that we wish to bind, and can be user actions like Button, and Key, or window manager events like Enter, Configure, and others. The modifier and detail fields are used to give additional information, and can in many cases be left out. There are also various ways to simplify the event string; for example, to match a keyboard key, you can leave out the angle brackets and just use the key as is. Unless it is a space or an angle bracket, of course. Instead of spending a few pages on discussing all the syntactic shortcuts, let’s take a look on the most common event formats:
Event Formats
- <Button-1>
- A mouse button is pressed over the widget. Button 1 is the leftmost button, button 2 is the middle button (where available), and button 3 the rightmost button. When you press down a mouse button over a widget, Tkinter will automatically “grab” the mouse pointer, and subsequent mouse events (e.g. Motion and Release events) will then be sent to the current widget as long as the mouse button is held down, even if the mouse is moved outside the current widget. The current position of the mouse pointer (relative to the widget) is provided in the x and y members of the event object passed to the callback. You can use ButtonPress instead of Button, or even leave it out completely: <Button-1>, <ButtonPress-1>, and <1> are all synonyms. For clarity, I prefer the <Button-1> syntax.
- <B1-Motion>
- The mouse is moved, with mouse button 1 being held down (use B2 for the middle button, B3 for the right button). The current position of the mouse pointer is provided in the x and y members of the event object passed to the callback.
- <ButtonRelease-1>
- Button 1 was released. The current position of the mouse pointer is provided in the x and y members of the event object passed to the callback.
- <Double-Button-1>
- Button 1 was double clicked. You can use Double or Triple as prefixes. Note that if you bind to both a single click (<Button-1>) and a double click, both bindings will be called.
- <Enter>
- The mouse pointer entered the widget (this event doesn’t mean that the user pressed the Enter key!).
- <Leave>
- The mouse pointer left the widget.
- <FocusIn>
- Keyboard focus was moved to this widget, or to a child of this widget.
- <FocusOut>
- Keyboard focus was moved from this widget to another widget.
- <Return>
- The user pressed the Enter key. You can bind to virtually all keys on the keyboard. For an ordinary 102-key PC-style keyboard, the special keys are Cancel (the Break key), BackSpace, Tab, Return(the Enter key), Shift_L (any Shift key), Control_L (any Control key), Alt_L (any Alt key), Pause, Caps_Lock, Escape, Prior (Page Up), Next (Page Down), End, Home, Left, Up, Right, Down, Print, Insert, Delete, F1, F2, F3, F4, F5, F6, F7, F8, F9, F10, F11, F12, Num_Lock, and Scroll_Lock.
- <Key>
- The user pressed any key. The key is provided in the char member of the event object passed to the callback (this is an empty string for special keys).
- a
- The user typed an “a”. Most printable characters can be used as is. The exceptions are space (<space>) and less than (<less>). Note that 1 is a keyboard binding, while <1> is a button binding.
- <Shift-Up>
- The user pressed the Up arrow, while holding the Shift key pressed. You can use prefixes like Alt, Shift, and Control.
- <Configure>
- The widget changed size (or location, on some platforms). The new size is provided in the width and height attributes of the event object passed to the callback.
The Event Object
The event object is a standard Python object instance, with a number of attributes describing the event.Event Attributes
- widget
- The widget which generated this event. This is a valid Tkinter widget instance, not a name. This attribute is set for all events.
- x, y
- The current mouse position, in pixels.
- x_root, y_root
- The current mouse position relative to the upper left corner of the screen, in pixels.
- char
- The character code (keyboard events only), as a string.
- keysym
- The key symbol (keyboard events only).
- keycode
- The key code (keyboard events only).
- num
- The button number (mouse button events only).
- width, height
- The new size of the widget, in pixels (Configure events only).
- type
- The event type.
Instance and Class Bindings
The bind method we used in the above example creates an instance binding. This means that the binding applies to a single widget only; if you create new frames, they will not inherit the bindings. But Tkinter also allows you to create bindings on the class and application level; in fact, you can create bindings on four different levels:- the widget instance, using bind.
- the widget’s toplevel window (Toplevel or root), also using bind.
- the widget class, using bind_class (this is used by Tkinter to provide standard bindings).
- the whole application, using bind_all.
def ignore(event):
pass
text.bind("<Return>", ignore)
or, if you prefer one-liners:
text.bind("<Return>", lambda e: None)
(the lambda function used here takes one argument, and
returns None)
Unfortunately, the newline is still inserted, since the above
binding applies to the instance level only, and the standard
behavior is provided by a class level bindings.
You could use the bind_class method to modify the
bindings on the class level, but that would change the behavior of
all text widgets in the application.
An easier solution is
to prevent Tkinter from propagating the event to other handlers;
just return the string “break” from your
event handler:
def ignore(event):
return "break"
text.bind("<Return>", ignore)
or
text.bind("<Return>", lambda e: "break")
By the way, if you really want to change the behavior of all text
widgets in your application, here’s how to use the bind_class
method:
top.bind_class("Text", "<Return>", lambda e: None)
But there are a lot of reasons why you shouldn’t do this.
For
example, it messes things up completely the day you wish to extend
your application with some cool little UI component you downloaded
from the net.
Better use your own Text widget
specialization, and keep Tkinter’s default bindings intact:
class MyText(Text):
def __init__(self, master, **kw):
apply(Text.__init__, (self, master), kw)
self.bind("<Return>", lambda e: "break")Protocols #
In addition to event bindings, Tkinter also supports a mechanism called protocol handlers. Here, the term protocol refers to the interaction between the application and the window manager. The most commonly used protocol is called WM_DELETE_WINDOW, and is used to define what happens when the user explicitly closes a window using the window manager. You can use the protocol method to install a handler for this protocol (the widget must be a root or Toplevel widget):
widget.protocol("WM_DELETE_WINDOW", handler)
Once you have installed your own handler, Tkinter will no longer
automatically close the window.
Instead, you could for example
display a message box asking the user if the current data should be
saved, or in some cases, simply ignore the request.
To close the
window from this handler, simply call the destroy method
of the window:
Capturing destroy events
from Tkinter import *
import tkMessageBox
def callback():
if tkMessageBox.askokcancel("Quit", "Do you really wish to quit?"):
root.destroy()
root = Tk()
root.protocol("WM_DELETE_WINDOW", callback)
root.mainloop()
Note that even you don’t register an handler for
WM_DELETE_WINDOW on a toplevel window, the window itself will
be destroyed as usual (in a controlled fashion, unlike X).
However, as
of Python 1.5.2, Tkinter will not destroy the corresponding widget
instance hierarchy, so it is a good idea to always register a handler
yourself:
top = Toplevel(...)
# make sure widget instances are deleted
top.protocol("WM_DELETE_WINDOW", top.destroy)
Future versions of Tkinter will most likely do this by
default.
Other Protocols
Window manager protocols were originally part of the X window system (they are defined in a document titled Inter-Client Communication Conventions Manual, or ICCCM). On that platform, you can install handlers for other protocols as well, like WM_TAKE_FOCUS and WM_SAVE_YOURSELF.How to bind a keyboard key to a tkinter button
you have to bind your widget to an event to your function: Keyboard events are sent to the widget that currently owns the keyboard focus. You can use the focus_set method to move focus to a widget: Capturing keyboard events from Tkinter import * root = Tk() def key(event): print "pressed", repr(event.char) def callback(event): frame.focus_set() print "clicked at", event.x, event.y frame = Frame(root, width=100, height=100) frame.bind("<Key>", key) frame.bind("<Button-1>", callback) frame.pack() root.mainloop() If you run this script, you’ll find that you have to click in the frame before it starts receiving any keyboard events. I followed this guide to implement a ctrl+f binding to one of my functions a while ago: toolmenu.add_command(label="Search Ctrl+f", command=self.cntrlf) root.bind('<Control-f>', self.searchbox) def cntrlf(self, event): self.searchbox() for your file menu, you might want to consider implementing accelerators: menubar.add_cascade(label="File", menu=fileMenu) fileMenu.add_command(label="Exit", command=quit, accelerator="Ctrl+Q") config(menu=menubar) for Menu options remember to use ALT followed by the first letter of the OptionName file Menu = ALT followed by f Tool Menu = ALT followed by t and so on There are two ways to share a function between a bind keypress a command button. Method 1: Use an optional event parameter As you have already discovered yourself, you can use an optional event parameter that you don't depend on. Since the parameter is unused, you can prefix it with an underscore (_event) to prevent warnings. self.button = Button(frame, text="Hello", command=self.func) master.bind('f', self.func) def func(self, _event=None): print("Hello, world") Full Example: # from tkinter import Button, Frame, Tk # Python 3 from Tkinter import Button, Frame, Tk # Python 2 class MyClass: def __init__(self, master): frame = Frame(master) frame.pack() self.button = Button(frame, text="Hello", command=self.func) self.button.pack(side='left') master.bind('f', self.func) def func(self, _event=None): print("Hello, world") root = Tk() abc = MyClass(root) root.mainloop() Method 2: Use lambdas If the event parameter isn't being used, you can discard it by binding your key to a lambda function. self.button = Button(frame, text="Hello", command=self.func) master.bind('f', lambda event: self.func()) def func(self): print("Hello, world") Full Example: # from tkinter import Button, Frame, Tk # Python 3 from Tkinter import Button, Frame, Tk # Python 2 class MyClass: def __init__(self, master): frame = Frame(master) frame.pack() self.button = Button(frame, text="Hello", command=self.func) self.button.pack(side='left') master.bind('f', lambda event: self.func()) def func(self): print("Hello, world!") root = Tk() abc = MyClass(root) root.mainloop()What is PyQt5?
This PyQt5 tutorial shows how to use Python 3 and Qt to create a GUI. It even covers creating an installer for your app. PyQt is a library that lets you use the Qt GUI framework from Python. Qt itself is written in C++. By using it from Python, you can build applications much more quickly while not sacrificing much of the speed of C++. PyQt5 refers to the most recent version 5 of Qt. You may still find the occasional mention of (Py)Qt4 on the web, but it is old and no longer supported. An interesting new competitor to PyQt is Qt for Python. Its API is virtually identical. Unlike PyQt, it is licensed under the LGPL and can thus be used for free in commercial projects. It's backed by the Qt company, and thus likely the future. We use PyQt here because it is more mature. Since the APIs are so similar, you can easily switch your apps to Qt for Python later.Install PyQt
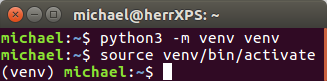
The best way to manage dependencies in Python is via a virtual environment. A virtual environment is simply a local directory that contains the libraries for a specific project. This is unlike a system-wide installation of those libraries, which would affect all of your other projects as well. To create a virtual environment in the current directory, execute the following command:
python3 -m venv venv
This creates the venv/ folder. To activate the
virtual environment on Windows, run:
call venv/scripts/activate.bat
On Mac and Linux, use:
source venv/bin/activate
You can see that the virtual environment is active by the
(venv) prefix in your shell:
To now install PyQt, issue the following command:
pip install PyQt5==5.9.2
The reason why we're using version
5.9.2 is that not all (Py)Qt
releases are equally stable. This version is guaranteed to
work. Besides this subtlety –
Congratulations! You've successfully set up PyQt5.
Create a GUI
Time to write our very first GUI app! With the virtual environment still active, start Python. We will execute the following commands:
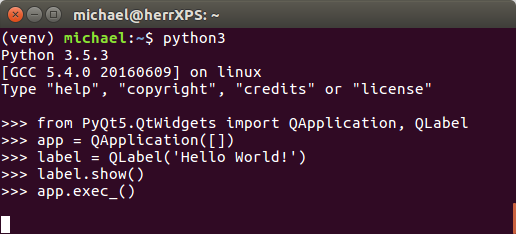
First, we tell Python to load PyQt via the import statement:
from PyQt5.QtWidgets import QApplication, QLabel
Next, we create a
QApplication
with the command:
app = QApplication([])
This is a requirement of Qt: Every GUI app must have exactly
one instance of QApplication. Many parts of Qt
don't work until you have executed the above line. You will
therefore need it in virtually every (Py)Qt app you write.
The brackets [] in the above line represent the
command line arguments passed to the application. Because
our app doesn't use any parameters, we leave the brackets
empty.
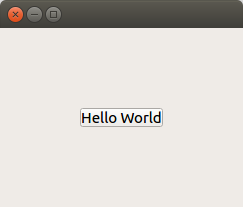
Now, to actually see something, we create a simple label:
label = QLabel('Hello World!')
Then, we tell Qt to show the label on the screen:
label.show()
Depending on your operating system, this already opens a tiny little window:

The last step is to hand control over to Qt and ask it to "run the application until the user closes it". This is done via the command:
app.exec_()
If all this worked as expected then well done! You've just built your first GUI app with Python and Qt.
Widgets
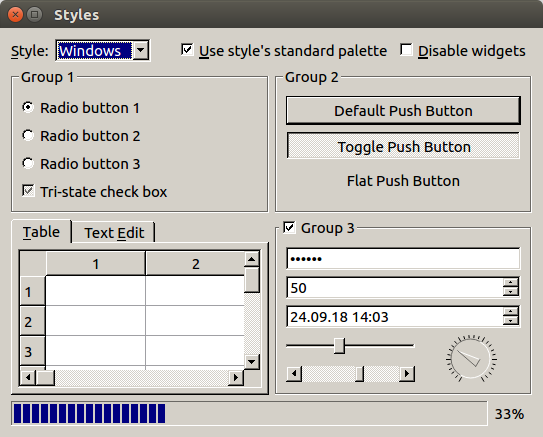
Everything you see in a (Py)Qt app is a widget: Buttons, labels, windows, dialogs, progress bars etc. Like HTML elements, widgets are often nested. For example, a window can contain a button, which in turn contains a label. The following screenshot shows the most common Qt widgets:
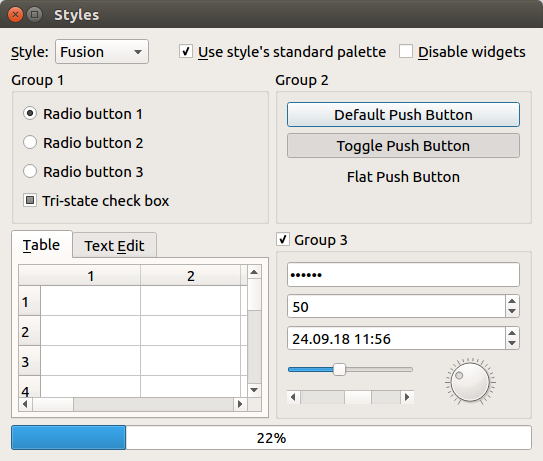
Top-to-bottom, left-to-right, they are:
You can download the code for the app shown in the screenshot here, if you are interested.
Layouts
Like the example above, your GUI will most likely consist of multiple widgets. In this case, you need to tell Qt how to position them. For instance, you can use QVBoxLayout to stack widgets vertically:
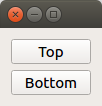
The code for this screenshot is:
from PyQt5.QtWidgets import QApplication, QWidget, QPushButton, QVBoxLayout
app = QApplication([])
window = QWidget()
layout = QVBoxLayout()
layout.addWidget(QPushButton('Top'))
layout.addWidget(QPushButton('Bottom'))
window.setLayout(layout)
window.show()
app.exec_()
As before, we instantiate a QApplication. Then,
we create a window. We use the most basic type
QWidget for it because it merely acts as a
container and we don't want it to have any special behavior.
Next, we create the layout and add two
QPushButtons to it. Finally, we tell the window
to use this layout (and thus its contents). As in our first
application, we end with calls to .show() and
app.exec_().
There are of course many other kinds of layouts (eg.
QHBoxLayout to lay out items in a row). See
Qt's documentation
for an overview.
Custom styles
One of Qt's strengths is its support for custom styles. There are many mechanisms that let you customize the look and feel of your application. This section outlines a few.
Built-in styles
The coarsest way to change the appearance of your application is to set the global Style. Recall the widgets screenshot above:
This uses a style called Fusion. If you use
the Windows style instead, then it looks as
follows:
To apply a style, use app.setStyle(...):
from PyQt5.QtWidgets import *
app = QApplication([])
app.setStyle('Fusion')
...
The available styles depend on your platform but are usually
'Fusion', 'Windows',
'WindowsVista' (Windows only) and
'Macintosh' (Mac only).
Custom colors
If you like a style, but want to change its colors (eg. to a
dark theme), then you can use
QPalette
and app.setPalette(...). For example:
from PyQt5.QtCore import Qt
from PyQt5.QtGui import QPalette
from PyQt5.QtWidgets import QApplication, QPushButton
app = QApplication([])
app.setStyle('Fusion')
palette = QPalette()
palette.setColor(QPalette.ButtonText, Qt.red)
app.setPalette(palette)
button = QPushButton('Hello World')
button.show()
app.exec_()
This changes the text color in buttons to red:

For a dark theme of the Fusion style, see here.
Style sheets
In addition to the above, you can change the appearance of your application via style sheets. This is Qt's analogue of CSS. We can use this for example to add some spacing:
from PyQt5.QtWidgets import QApplication, QPushButton
app = QApplication([])
app.setStyleSheet("QPushButton { margin: 10ex; }")
button = QPushButton('Hello World')
button.show()
app.exec_()
For more information about style sheets, please see Qt's documentation.
Signals / slots
Qt uses a mechanism called signals to let you react to events such as the user clicking a button. The following example illustrates this. It contains a button that, when clicked, shows a message box:
from PyQt5.QtWidgets import *
app = QApplication([])
button = QPushButton('Click')
def on_button_clicked():
alert = QMessageBox()
alert.setText('You clicked the button!')
alert.exec_()
button.clicked.connect(on_button_clicked)
button.show()
app.exec_()
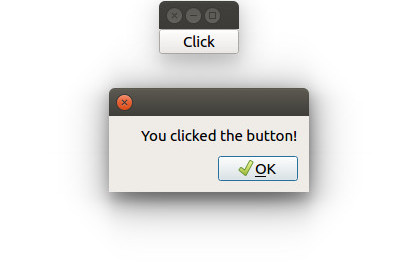
The interesting line is highlighted above:
button.clicked is a signal,
.connect(...) lets us install a so-called
slot on it. This is simply a function that gets
called when the signal occurs. In the above example, our
slot shows a message box.
The term slot is important when using Qt from C++, because
slots must be declared in a special way in C++. In Python
however, any function can be a slot – we saw this
above. For this reason, the distinction between slots and
"normal" functions has little relevance for us.
Signals are ubiquitous in Qt. And of course, you can also
define your own. This however is beyond the scope of this
tutorial.
Compile your app
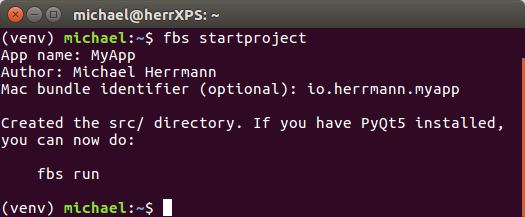
You now have the basic knowledge for creating a GUI that responds to user input. Say you've written an app. It runs on your computer. How do you give it to other people, so they can run it as well? You could ask the users of your app to install Python and PyQt like we did above, then give them your source code. But that is very tedious (and usually impractical). What we want instead is a standalone version of your app. That is, a binary executable that other people can run on their systems without having to install anything. In the Python world, the process of turning source code into a self-contained executable is called freezing. Although there are many libraries that address this issue – such as PyInstaller, py2exe, cx_Freeze, bbfreze, py2app, ... – freezing PyQt apps has traditionally been a surprisingly hard problem. We will use a new library called fbs that lets you create standalone executables for PyQt apps. To install it, enter the command:
pip install fbs
Then, execute the following:
fbs startproject
This prompts you for a few values:
When you type in the suggested run command,
an empty window should open:
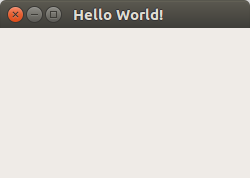
This is a PyQt5 app just like the ones we have seen before.
Its source code is in src/main/python/main.py
in your current directory. But here's the cool part: We can
use fbs to turn it into a standalone executable!
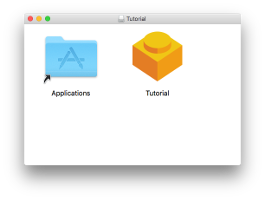
fbs freeze
This places a self-contained binary in the
target/MyApp/ folder of your current directory.
You can send it to your friends (with the same OS as yours)
and they will be able to run your app!
(Please note that fbs currently targets Python 3.5 or 3.6.
If you have a different version and the above does not work,
please
install Python 3.6
and try again. On macOS, you can also
install Python 3.5 with Homebrew.)
Bonus: Create an installer
fbs also lets you create an installer for your app via the
command fbs installer:
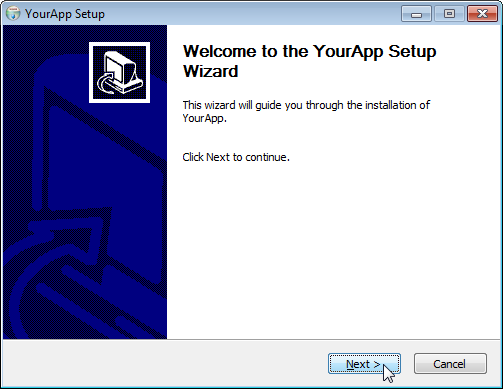
(If you are on Windows, you first need to install
NSIS and
place it on your PATH.)
For more information on how you can use fbs for your existing application, please see this article. Or fbs's tutorial.
Summary
If you have made it this far, then big congratulations. Hopefully, you now have a good idea of how PyQt (and its various parts) can be used to write a desktop application with Python. We also saw how fbs lets you create standalone executables and installers.
PyQt5 tutorial – Python GUI programming examples
In a previous tutorial, we talked about the Tkinter module and we saw how to build GUI apps using it. In this tutorial, we will continue building graphical interfaces in Python and this time we will use PyQt5.PyQt5 is one of the most used modules in building GUI apps in Python and that’s due to its simplicity as you will see.
Another great feature that encourages developers to use PyQt5 is the PyQt5 designer which makes it so easy to develop complex GUI apps in a short time. You just drag your widgets to build your form.
In this PyQt5 tutorial, I will use Python 3.6 on Windows 10 and I assume that you know some Python basics.
Sound great! So let’s get started and install PyQt5 at first then we will see how to develop GUI apps with examples.
Table of Contents
- 1 Install PyQt5
- 2 Install PyQt5 designer
- 3 How to use PyQt5 designer
- 4 Difference between QDialog, QMainWindow, and QWidget
- 5 Load .ui VS convert .ui to .py
- 6 QLabel widget
- 7 QLineEdit widget
- 8 QPushButton Widget
- 9 Visual signal/slot editor
- 10 How to emit a signal
- 11 QComboBox widget
- 12 QTableWidget
- 13 Packaging Python files (Converting to executable)
Install PyQt5
PyQt5 has two versions, the commercial version and the free GPL version that we will use in this tutorial.
To install PyQt5, you have two ways:
- Using pip
- Using source
Using pip
To install PyQt5 using pip, run the following command:
To ensure the successful installation, run the following Python code:
import PyQt5If no errors appeared, that means you have successfully installed PyQt5, but if you got errors, you may be using an unsupported version of Python.
Using source (On Linux)
To install PyQt5 from source, you have to do the following:
- Install SIP.
- Download PyQt5 source.
- Configure & install.
As you might know, PyQt5 is a Python binding for the famous library Qt that is written in C++.
The tool that makes this binding is called SIP. So in order to install PyQt5 from source, you need at first to install SIP.
To install SIP, run the following command:
$ pip3 install PyQt5-sipNow you are ready to download and install PyQt5 source.
Download PyQt5 source from here.
Then unpack the compressed source and run the following commands inside the root of the uncompressed folder:
$ make
$ make install
1 2 3 4 5 | $ python3 configure.py $ make $ make install |
To ensure that everything is fine, try to import PyQt5 as we did before and everything should be OK.
Using source (On Windows)
Since SIP needs GCC compiler, you need to install MinGW which is a Windows port of Linux GCC compiler.
The only thing needs to be changed is the configuration step; you need to tell Python about the platform.
This can be done like this:
1 2 3 4 5 | $ python configure.py --platform win32-g++ $ make $ make install |
Congratulations! Now you have successfully installed PyQt5 from source.
There are two ways to build GUI apps using PyQt5:
In this PyQt5 tutorial, we will use the PyQt5 designer which makes it so easy to finish a lot of work in a matter of seconds.
PyQt5 designer is shipped with PyQt5 tools. To install it, you need to install PyQt5 tools.
After successful installation, you can find the PyQt5 designer on this location:
Also, If you installed Python for your current user only, you will find the PyQt5 designer on this location:
You can make a shortcut for it instead of going into this location every time you want to run the PyQt5 designer.
How to use PyQt5 designer
Open designer.exe and you will see a dialog asking you about the form template you want.
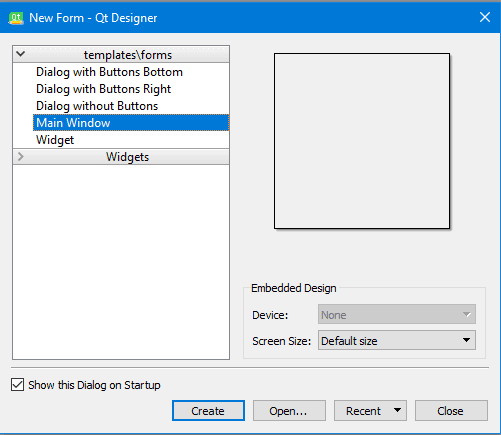
There are five templates available:
- Dialog with Buttons Bottom: Creates a form with OK and Cancel buttons at the bottom right of the form.
- Dialog with Buttons Right: Creates a form with OK and Cancel buttons at the top right of the form.
- Dialog without Buttons: Creates a blank form.
- Main Window: Creates a window with a menu bar and a toolbar and inherited from QMainWindow.
- Widget: Creates a widget which is inherited from QWidget class, unlike the Dialogs templates which inherit from QDialog class.
So we have three types of templates, what is the difference?
Difference between QDialog, QMainWindow, and QWidget
- QWidget is the base class for all GUI elements in the PyQt5.
- QDialog is used for asking the user about something, like asking the user to accept or reject something or maybe asking for an input and is based on QWidget.
- QMainWindow is the bigger template where you can place your toolbar, menu bar, status bar, and other widget and it doesn’t have a built-in allowance for buttons like those in QDialog.
Load .ui VS convert .ui to .py
In this tutorial, we will use the PyQt5 designer, but before we dig deeper, let’s see how we will use the generated design from the PyQt5 designer.
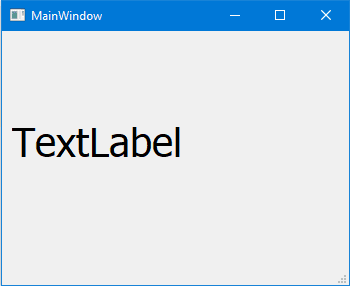
Open PyQt5 designer, and choose Main Window template and click create button.
Then from the file menu, click save; PyQt5 designer will export your form into XML file with .ui extension. Now, in order to use this design, you have two ways:
- Loading the .ui file in your Python code.
- Converting the .ui file to a .py file using pyuic5.
Loading the .ui file in your Python code
To load the .ui file in your Python code, you can use the loadUI() function from uic like this:
1 2 3 4 5 6 7 8 9 10 11 | from PyQt5 import QtWidgets, uic import sys app = QtWidgets.QApplication([]) win = uic.loadUi("mydesign.ui") #specify the location of your .ui file win.show() sys.exit(app.exec()) |
If you run your code, you should see a window with nothing but a label.
That means the ui file loaded successfully!
We used sys.exit(app.exec()) instead of using app.exec() directly to send the correct status code the parent process or the calling process.
If you used app.exec() directly, the application will send zero which means success and this will happen even if the application crashed.
Converting the .ui file to a .py file using pyuic5
Now, let’s try the second way by converting the .ui file to a Python code:
Yes! A new file was created with the name mydesign.py. Now, let’s import that file to show our window.
The pyuic5 stands for Python user interface converter version 5.
1 2 3 4 5 6 7 8 9 10 11 12 13 14 15 16 17 18 19 20 21 22 23 | from PyQt5 import QtWidgets from mydesign import Ui_MainWindow # importing our generated file import sys class mywindow(QtWidgets.QMainWindow): def __init__(self): super(mywindow, self).__init__() self.ui = Ui_MainWindow() self.ui.setupUi(self) app = QtWidgets.QApplication([]) application = mywindow() application.show() sys.exit(app.exec()) |
If you run this code, you should see the same window again as we did in the first method.
The benefit of using the second method is the auto-completion that the IDE will provide since all of your widgets are imported, while the first method you just load the .ui file and you need to be aware of your widgets names.
Another benefit of using the second method. The speed, since you don’t need XML parsing to load the UI.
So we can say that converting the .ui file to a .py file is safer in coding and faster in loading!Click To TweetNow, let’s get our hands dirty and play with the PyQt5 widgets.
QLabel widget
To add a QLabel widget to your form, do the following:
- Open PyQt5 designer and choose Main Window template.
- Drag a label widget from the widget box on the left.
Now, save the design to a .ui file and convert it to a .py file and let’s play with the label widget using code.
Change Font
To change the QLabel font, use the setFont() method and pass a QFont to it like this:
1 2 3 4 5 6 7 8 9 10 11 12 13 14 15 16 17 18 19 20 21 22 23 24 25 26 | from PyQt5 import QtWidgets, QtGui from mydesign import Ui_MainWindow import sys class mywindow(QtWidgets.QMainWindow): def __init__(self): super(mywindow, self).__init__() self.ui = Ui_MainWindow() self.ui.setupUi(self) self.ui.label.setFont(QtGui.QFont('SansSerif', 30)) # change font type and size app = QtWidgets.QApplication([]) application = mywindow() application.show() sys.exit(app.exec()) |
If you run this code, you will note that the label does not appear correctly because the size is smaller than the font size we used. So we need to set the label size.
Change size
To change the QLabel size, you need to set its geometry using setGeometry() method like this:
1 2 3 4 5 6 7 8 9 10 11 12 13 14 15 16 17 18 19 20 21 22 23 24 25 26 27 28 | from PyQt5 import QtWidgets, QtGui,QtCore from mydesign import Ui_MainWindow import sys class mywindow(QtWidgets.QMainWindow): def __init__(self): super(mywindow, self).__init__() self.ui = Ui_MainWindow() self.ui.setupUi(self) self.ui.label.setFont(QtGui.QFont('SansSerif', 30)) self.ui.label.setGeometry(QtCore.QRect(10, 10, 200, 200)) # change label geometry app = QtWidgets.QApplication([]) application = mywindow() application.show() sys.exit(app.exec()) |
Change text
To change the QLabel text, you can use the setText() method like this:
1 2 3 4 5 6 7 8 9 10 11 12 13 14 15 16 17 18 19 20 21 22 23 24 25 26 27 28 29 30 | from PyQt5 import QtWidgets, QtGui,QtCore from mydesign import Ui_MainWindow import sys class mywindow(QtWidgets.QMainWindow): def __init__(self): super(mywindow, self).__init__() self.ui = Ui_MainWindow() self.ui.setupUi(self) self.ui.label.setFont(QtGui.QFont('SansSerif', 30)) self.ui.label.setGeometry(QtCore.QRect(10, 10, 200, 200)) self.ui.label.setText("LikeGeeks") #change label text app = QtWidgets.QApplication([]) application = mywindow() application.show() sys.exit(app.exec()) |
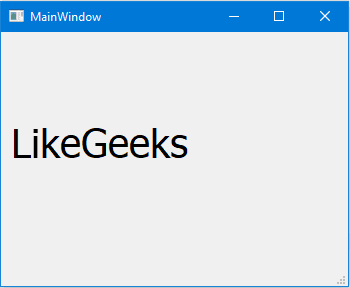
That was easy! Let’s check some other widgets.
QLineEdit widget
The QLineEdit is an editable place where you can accept input from the user. LineEdit has many methods to work with.
I will create a new design with the PyQt5 designer and I’ll add six QLineEdit widgets and I’ll export it to .py file.
Now, let’s see some QLineEdit methods:
1 2 3 4 5 6 7 8 9 10 11 12 13 14 15 16 17 18 19 20 21 22 23 24 25 26 27 28 29 30 31 32 33 34 35 36 | from PyQt5 import QtWidgets,QtCore from mydesign import Ui_MainWindow import sys class mywindow(QtWidgets.QMainWindow): def __init__(self): super(mywindow, self).__init__() self.ui = Ui_MainWindow() self.ui.setupUi(self) self.ui.lineEdit.setText("Welcome to LikeGeeks website") #change text self.ui.lineEdit_2.setMaxLength(10) #set maximum length self.ui.lineEdit_3.setEchoMode(QtWidgets.QLineEdit.Password) # password input self.ui.lineEdit_4.setReadOnly(True) #QLineEdit readonly self.ui.lineEdit_5.setStyleSheet("color: rgb(28, 43, 255);") #change text color self.ui.lineEdit_6.setStyleSheet("background-color: rgb(28, 43, 255);") #change QLineEdit background color app = QtWidgets.QApplication([]) application = mywindow() application.show() sys.exit(app.exec()) |
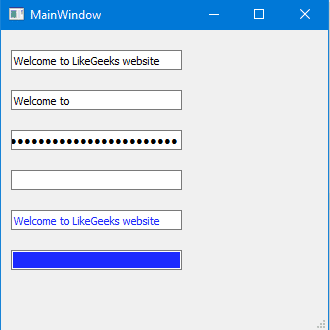
The second QlineEdit, we set the maximum allowed characters to 10 so nothing more is accepted.
The third QlineEdit, we set it to password mode so all your input appears as asterisks.
The fourth QlineEdit, we set it to read-only so you can’t edit its content.
The fifth QlineEdit, we changed the font color using the setStyleSheet() method and we insert the color like web pages CSS values.
The sixth QlineEdit, we changed the background color using the setStyleSheet() method.
The setStyleSheet() method
The setStyleSheet() method can be used with all PyQt5 widgets to change the style.
You can change the following using setStyleSheet() method:
- Font type and size
- Text Color
- Background color
- Border color
- Border top color
- Border bottom color
- Border right color
- Border left color
- Selection color
- Selection background color
QPushButton Widget
Most of your Python programs will have this QPushButton widget. You click the button and some code is executed.
If you have a programming background, you may hear about event handling where you interact with a widget and a function is executed.
The idea in PyQt5 is the same but the definitions are a bit different.
The click event in PyQt5 is called a signal and the method which gets executed is called a slot.Click To TweetSo when you click a QPushButton, a signal is emitted. The signal name in this case is called clicked().
In order to bind the emitted signal with a slot, you need to use the connect() method as you will see now.
This event handling process continues to work until you close your form or main widget.
Let’s build a form with a QLabel and a QPushButton and export it to a .py file.
Now, We will connect the clicked() signal with a slot using connect() method like this:
The btnClicked here is the slot or the function that will be executed when you click the QPushButton.
So your code will be like this:
1 2 3 4 5 6 7 8 9 10 11 12 13 14 15 16 17 18 19 20 21 22 23 24 25 26 27 28 29 30 | from PyQt5 import QtWidgets from mydesign import Ui_MainWindow import sys class mywindow(QtWidgets.QMainWindow): def __init__(self): super(mywindow, self).__init__() self.ui = Ui_MainWindow() self.ui.setupUi(self) self.ui.pushButton.clicked.connect(self.btnClicked) # connecting the clicked signal with btnClicked slot def btnClicked(self): self.ui.label.setText("Button Clicked") app = QtWidgets.QApplication([]) application = mywindow() application.show() sys.exit(app.exec()) |
Awesome!
Visual signal/slot editor
We saw how to connect the widget signal to a slot using the connect() method, but this is not the only way.
Actually, there are some predefined slots for each widget. You can connect a signal to any predefined slot without coding in the PyQt5 designer.
Drag a QPushButton and a QLineEdit on your form.
Press F4 and drag the mouse from the QPushButton and release it on the top of the QLineEdit.
The signal/slot editor will show up.
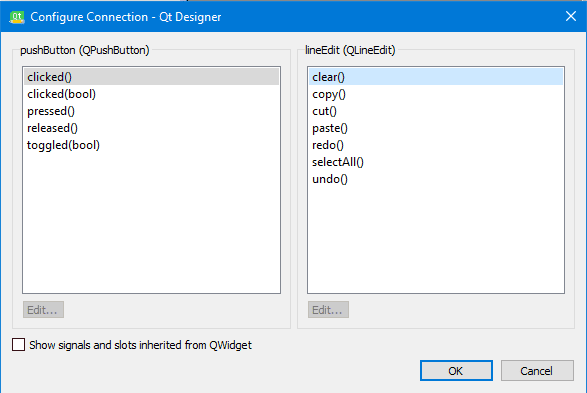
On the left, the predefined signals while on the right the predefined slots. Let’s say that we want to connect the clicked() signal with the clear slot.
Choose the clicked from the left and choose clear from the right and click OK.
Now, if you run this form and click the QPushButton, any text on the QLineEdit will be cleared. You can edit or delete this connection from the signal/slot editor panel.
How to emit a signal
We saw how signals and slots work. All signals we worked with are predefined for us.
What about emitting our own custom signal?
Very easy! You can do that by using the pyqtSignal class as follows:
- Define your event with type pyqtSignal.
- Call emit() method at the place you want your event to be fired.
Let’s say we have a nut class and we want to fire the cracked signal to be emitted when we crack it.
1 2 3 4 5 6 7 8 9 10 11 12 13 | from PyQt5.QtCore import pyqtSignal,QObject class nut(QObject): cracked = pyqtSignal() def __init__(self): QObject.__init__(self) def crack(self): self.cracked.emit() |
How to use a signal
Now, let’s make our example more practical by instantiating an instance of the nut class and emitting the cracked signal:
1 2 3 4 5 6 7 8 9 | def crackit(): print("hazelnut cracked!") hazelnut = nut() hazelnut.cracked.connect(crackit) # connecting the cracked signal with crackit slot hazelnut.crack() |
The cracked signal was successfully emitted.
Signal (event) overriding
Sometimes, you need to override the default behavior for a specific signal or event.
Let’s see a practical example for that. If you want to close the main window when the user presses a specific key, you can override the keyPressEvent inside your main window like this:
1 2 3 4 5 | def keyPressEvent(self, e): if e.key() == Qt.Key_F12: self.close() |
Now if the user presses the F12 key, the main window will be closed.
Here we override the key press signal of the main window and close the window.
QComboBox widget
Instead of letting the user enter values in a QLineEdit or any editable widget, we can use a QCombobBox widget to give the user a list of choices to select from.
Let’s drag a combo box to our form and take a look at some of its methods.
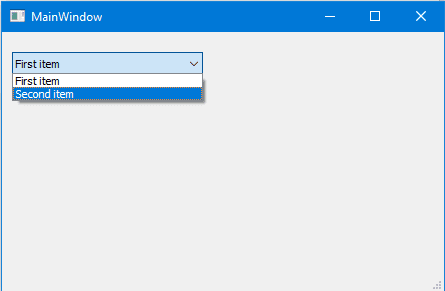
If you run the app now, you will note that the QComboBox is empty. To add items to the QComboBox, use the addItem() method:
1 2 3 4 5 6 7 8 9 10 11 12 13 14 15 16 17 18 19 20 21 22 23 24 25 26 27 28 | from PyQt5 import QtWidgets from mydesign import Ui_MainWindow import sys class mywindow(QtWidgets.QMainWindow): def __init__(self): super(mywindow, self).__init__() self.ui = Ui_MainWindow() self.ui.setupUi(self) self.ui.comboBox.addItem("First item") #add item self.ui.comboBox.addItem("Second item") app = QtWidgets.QApplication([]) application = mywindow() application.show() sys.exit(app.exec()) |
Get all items
There is no direct method to get all items from a QComboBox, but you can use a for loop to do that.
1 2 3 | for i in range(self.ui.comboBox.count()): print(self.ui.comboBox.itemText(i)) |
Select an item
To select an item from the QComboBox, you have two methods:
1 2 3 | self.ui.comboBox.setCurrentIndex(1) #select by index which is zero-based self.ui.comboBox.setCurrentText("Second item") #select by text |
Note that when selecting an item by text; make sure you write the correct text otherwise. The QComboBox will stay at the first element.
QTableWidget
If you want to view your database data in a tabular format, PyQt5 provides the QTableWidget for that.
QTableWidget consists of cells, each cell is an instance of QTableWidgetItem class.
Let’s design a form that contains a QTableWidget and a QPushButton. Drag a table widget and a push button from the widget box. Then save and convert the design to use it.
To add rows to the QTableWidget, you can use the setRowCount() method.
To add columns to the QTableWidget, you can use the setColumnCount() method.
1 2 3 4 5 6 7 8 9 10 11 12 13 14 15 16 17 18 19 20 21 22 23 24 25 26 27 28 | from PyQt5 import QtWidgets from mydesign import Ui_MainWindow import sys class mywindow(QtWidgets.QMainWindow): def __init__(self): super(mywindow, self).__init__() self.ui = Ui_MainWindow() self.ui.setupUi(self) self.ui.tableWidget.setColumnCount(2) self.ui.tableWidget.setRowCount(4) app = QtWidgets.QApplication([]) application = mywindow() application.show() sys.exit(app.exec()) |
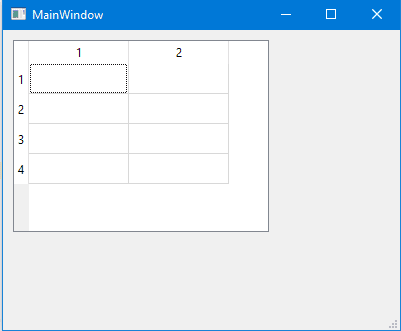
Now you can type text manually inside QTableWidget cells.
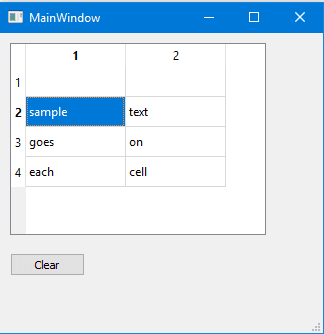
Clear QtableWidget content
To clear QTableWidget content, you can use the clear method like this:
1 2 3 4 5 | def clear(): self.ui.tableWidget.clear() self.ui.pushButton.clicked.connect(clear) |
Populate QTableWidget by code
To fill QTableWidget programmatically, you should use the setItem() method for each QTableWidgetItem.
1 2 3 4 5 6 7 8 9 10 11 12 13 14 15 16 17 18 19 20 21 22 23 24 25 26 27 28 29 30 31 32 33 34 35 36 37 38 39 40 41 42 43 44 45 46 47 48 49 50 51 52 53 | from PyQt5.QtWidgets import QTableWidgetItem from mydesign import * import sys data = [] data.append(('Populating', 'QtableWidget')) data.append(('With data', 'In Python')) data.append(('Is easy', 'Job')) class mywindow(QtWidgets.QMainWindow): def __init__(self): super().__init__() self.ui = Ui_MainWindow() self.ui.setupUi(self) self.ui.tableWidget.setRowCount(3) self.ui.tableWidget.setColumnCount(2) row=0 for tup in data: col=0 for item in tup: cellinfo=QTableWidgetItem(item) self.ui.tableWidget.setItem(row, col, cellinfo) col+=1 row += 1 app = QtWidgets.QApplication([]) win = mywindow() win.show() sys.exit(app.exec()) |
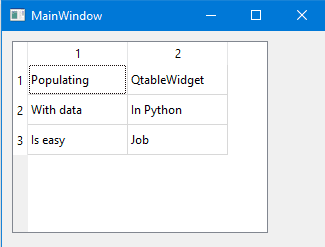
- First, we create a Python list of three tuples.
- Inside the constructor of the main window, we set the rows and columns count.
- Then we iterate over the list and get every tuple on the list to fill the table cells using setItem() method.
- Finally, we show the main window.
Make QTableWidget not editable (read-only)
You may not like leaving your table cells editable for the user in some cases. Like showing a read-only data and any editing process makes no sense.
To make QTableWidget not editable, you can use setFlags() method to set each QTableWidgetItem not editable.
You must set the flags before setting your cell content.
Therefore, your code will be like this:
1 2 3 4 5 6 7 8 9 10 11 12 13 14 15 16 17 18 19 20 21 22 23 24 25 26 27 28 29 30 31 32 33 34 35 36 37 38 39 40 41 42 43 44 45 46 47 48 49 50 51 52 53 54 55 | from PyQt5.QtWidgets import QTableWidgetItem from mydesign import * import sys data = [] data.append(('Populating', 'QtableWidget')) data.append(('With data', 'In Python')) data.append(('Is easy', 'Job')) class mywindow(QtWidgets.QMainWindow): def __init__(self): super().__init__() self.ui = Ui_MainWindow() self.ui.setupUi(self) self.ui.tableWidget.setRowCount(3) self.ui.tableWidget.setColumnCount(2) row=0 for tup in data: col=0 for item in tup: cellinfo=QTableWidgetItem(item) cellinfo.setFlags(QtCore.Qt.ItemIsSelectable | QtCore.Qt.ItemIsEnabled) # make cell not editable self.ui.tableWidget.setItem(row, col, cellinfo) col+=1 row += 1 app = QtWidgets.QApplication([]) win = mywindow() win.show() sys.exit(app.exec()) |
Now, if you try to edit any cell, you can’t; because the QTableWidgetItem is not editable.
Set QTableWidget column (header) name
Until now, the column names of the QTableWidget are numbers. What about setting the column names to something else.
To set QTableWidget header text, you can use setHorizontalHeaderLabels() method like this:
1 2 3 4 5 6 7 8 9 10 11 12 13 14 15 16 17 18 19 20 21 22 23 24 25 26 27 28 29 30 31 32 33 34 35 36 37 38 39 40 41 42 43 44 45 46 47 48 49 50 51 52 53 54 55 | from PyQt5.QtWidgets import QTableWidgetItem from mydesign import * import sys data = [] data.append(('Populating', 'QtableWidget')) data.append(('With data', 'In Python')) data.append(('Is easy', 'Job')) class mywindow(QtWidgets.QMainWindow): def __init__(self): super().__init__() self.ui = Ui_MainWindow() self.ui.setupUi(self) self.ui.tableWidget.setRowCount(3) self.ui.tableWidget.setColumnCount(2) self.ui.tableWidget.setHorizontalHeaderLabels(('Column 1', 'Column 2')) # set header text row=0 for tup in data: col=0 for item in tup: cellinfo=QTableWidgetItem(item) self.ui.tableWidget.setItem(row, col, cellinfo) col+=1 row += 1 app = QtWidgets.QApplication([]) win = mywindow() win.show() sys.exit(app.exec()) |
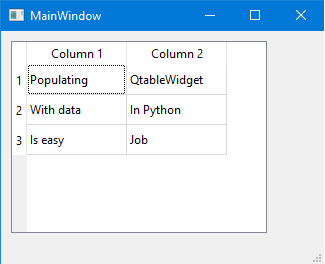
The same way, you can change the row header by using setVerticalHeaderLabels() method:
You can make your QTableWidget sortable by using the setSortingEnabled() method.
Now, if the user clicks on any column header, he can sort the data in ascending or descending order.
You can use this method before or after populating the QTableWidget with data.
What about sorting the QTableWidget to a specific column only?
You can use the sortByColumn() method and set the column index and the sorting order like this:
1 2 3 4 5 6 7 8 9 10 11 12 13 14 15 16 17 18 19 20 21 22 23 24 25 26 27 28 29 30 31 32 33 34 35 36 37 38 39 40 41 42 43 44 45 46 47 48 49 50 51 52 53 54 55 | from PyQt5.QtWidgets import QTableWidgetItem from mydesign import * import sys data = [] data.append(('Populating', 'QtableWidget')) data.append(('With data', 'In Python')) data.append(('Is easy', 'Job')) class mywindow(QtWidgets.QMainWindow): def __init__(self): super().__init__() self.ui = Ui_MainWindow() self.ui.setupUi(self) self.ui.tableWidget.setRowCount(3) self.ui.tableWidget.setColumnCount(2) row=0 for tup in data: col=0 for item in tup: cellinfo=QTableWidgetItem(item) self.ui.tableWidget.setItem(row, col, cellinfo) col+=1 row += 1 self.ui.tableWidget.sortByColumn(0, QtCore.Qt.AscendingOrder) # sort by the first column app = QtWidgets.QApplication([]) win = mywindow() win.show() sys.exit(app.exec()) |
Also, you can use the sortItems() method to sort QTableWidget in ascending order by default.
Or you can specify the sorting order:
Keep in mind that if you want to sort your columns programmatically, you must use the sorting methods after populating the QTableWidget with data otherwise, your data won’t be sorted.
Add QComboBox in QTableWidget
You may need the user to choose a value inside the QTableWidget instead of entering a text.
What about adding a QComboBox inside QTableWidgetItem?
To add a QComboBox inside QTableWidgetItem, you can use the setCellWidget() method:
1 2 3 4 5 6 7 8 9 10 11 12 13 14 15 16 17 18 19 20 21 22 23 24 25 26 27 28 29 30 31 32 33 34 35 36 37 38 39 40 41 42 43 44 45 46 47 48 | from PyQt5.QtWidgets import QTableWidgetItem from mydesign import * import sys data = ['PyQt5','Is','Awesome'] class mywindow(QtWidgets.QMainWindow): def __init__(self): super().__init__() self.ui = Ui_MainWindow() self.ui.setupUi(self) self.ui.tableWidget.setRowCount(3) self.ui.tableWidget.setColumnCount(2) row=0 for item in data: cellinfo=QTableWidgetItem(item) combo = QtWidgets.QComboBox() combo.addItem("First item") combo.addItem("Second item") self.ui.tableWidget.setItem(row, 0, cellinfo) self.ui.tableWidget.setCellWidget(row, 1, combo) row += 1 app = QtWidgets.QApplication([]) win = mywindow() win.show() sys.exit(app.exec()) |
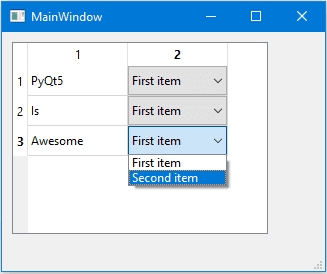
Cool!
Don’t stop your mind from imagination and try to insert different widgets like a QCheckbox or even a QProgressBar.
The above code will be the same except the line where you create the QComboBox, you will add the widget you want.
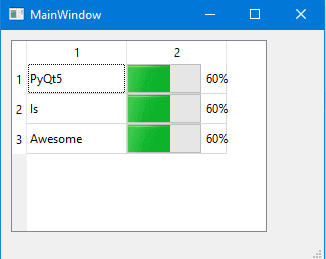
The only limit is your imagination.
Packaging Python files (Converting to executable)
You can convert your Python programs into binary executables using many tools.
For me, I will use pyinstaller which is capable of packaging or freezing Python code into executable under Windows, Linux, Mac OS X, FreeBSD, and Solaris. All this with full support for 32,64-bit architecture.
The best part about pyinstaller the full support for PyQt5.
Great! First, install pyinstaller:
After you installed it, you can convert your Python programs like this:
Your executable will be generated on a folder called dist on your Python program directory.
As you will be, a lot of dependencies generated beside the executable. What about making it one file?
You can generate one executable file using one file mode like this:
Each time you run your executable a console window appears, what about hiding this window?
You can use -w or –noconsole to hide the console window:
This option for Windows and Mac OS X only.
Pyinstaller provides a lot of options to pack your app, to list all options, use –help:
I tried to keep everything as simple as possible. I hope you find the tutorial useful.