Powershell Notes
Must Watch!
MustWatch
Windows PowerShell Scripting Tutorial
start learning
Handpicked related content:Free Download: PowerShell Scripting Tutorial for Beginners
So let's start learning PowerShell.
PowerShell offers both a command-line option and an integrated scripting environment (ISE):
To launch the PowerShell command line, type powershell.exe in the Windows Start menu.
You'll see a screen like the following:
 To launch the PowerShell ISE, type powershell_ise.exe in the Start menu.
Using the PowerShell ISE is the preferred way to work with the scripting language, because it provides syntax highlighting, auto-filling of commands and other automation features that simplify script development and testing.
To launch the PowerShell ISE, type powershell_ise.exe in the Start menu.
Using the PowerShell ISE is the preferred way to work with the scripting language, because it provides syntax highlighting, auto-filling of commands and other automation features that simplify script development and testing.
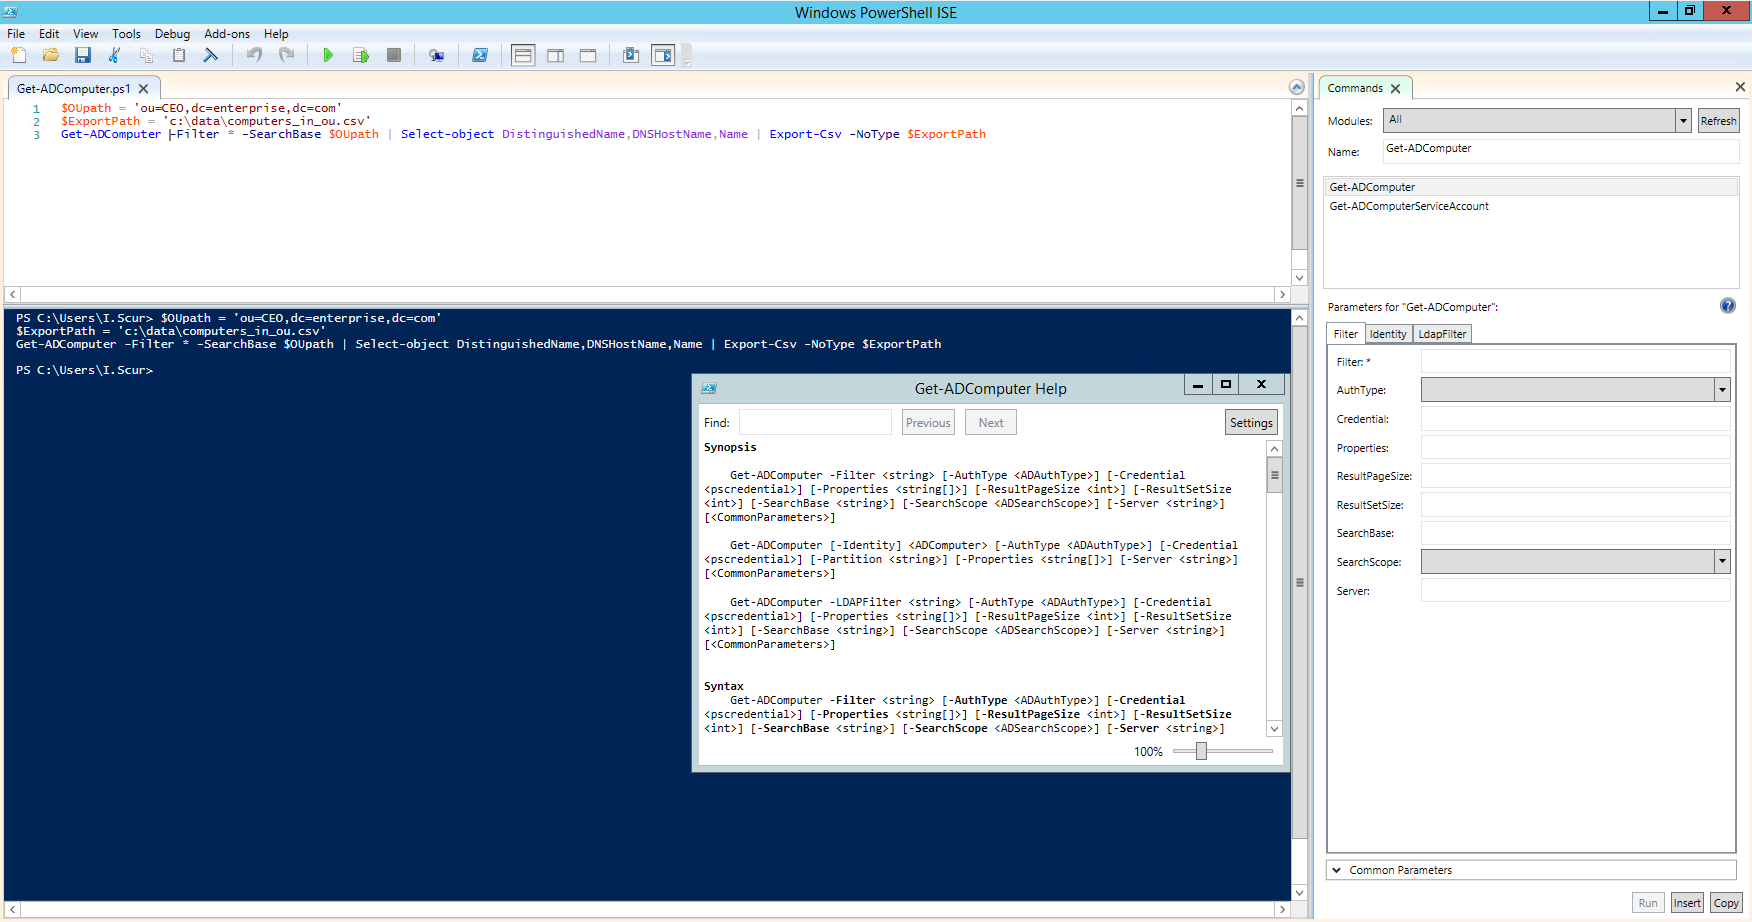
Preparing to Run PowerShell Scripts
PowerShell scripts are stored in.ps1 files.
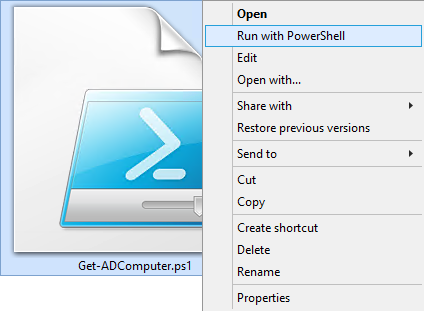
By design, you cannot run a script by simply double-clicking a file; this helps avoid accidental harm to your systems.
Instead, to execute a script, right-click it and click “Run with PowerShell”:
 In addition, there is policy that restricts script execution.
You can check this policy by running the Get-ExecutionPolicy command in PowerShell:
In addition, there is policy that restricts script execution.
You can check this policy by running the Get-ExecutionPolicy command in PowerShell:
 You will get one of the following values:
Restricted— No scripts are allowed.
This is the default setting, so you will see it the first time you run the command.
AllSigned— You can run scripts signed by a trusted developer.
With this setting in place, before executing, a script will ask you to confirm that you want to run it.
RemoteSigned— You can run your own scripts or scripts signed by a trusted developer.
Unrestricted— You can run any script you want.
To start working with PowerShell, you'll need to change the policy setting from Restricted to RemoteSigned using the Set-ExecutionPolicy RemoteSigned command:
You will get one of the following values:
Restricted— No scripts are allowed.
This is the default setting, so you will see it the first time you run the command.
AllSigned— You can run scripts signed by a trusted developer.
With this setting in place, before executing, a script will ask you to confirm that you want to run it.
RemoteSigned— You can run your own scripts or scripts signed by a trusted developer.
Unrestricted— You can run any script you want.
To start working with PowerShell, you'll need to change the policy setting from Restricted to RemoteSigned using the Set-ExecutionPolicy RemoteSigned command:

PowerShell Cmdlets
-- About Cmdlets
A cmdlet is a PowerShell command with a predefined function, similar to an operator in a programming language.
Here are some key things to know about cmdlets:
There are system, user and custom cmdlets.
Cmdlets output results as an object or as an array of objects.
Cmdlets can get data for analysis or transfer data to another cmdlet using pipes (I'll discuss pipes more in a moment).
Cmdlets are case-insensitive.
For example, it doesn't matter whether you type “Get-ADUser”, “get-aduser” or “gEt-AdUsEr”.
If you want to use several cmdlets in one string, you must separate them with a semicolon (;).
-- Cmdlet Format
A cmdlet always consists of a verb (or a word that functions as a verb) and a noun, separated with a hyphen (the “verb-noun” rule).
For example, some of the verbs include:
Get — To get something
Set — To define something
Start — To run something
Stop — To stop something that is running
Out — To output something
New — To create something (“new” is not a verb, of course, but it functions as one)
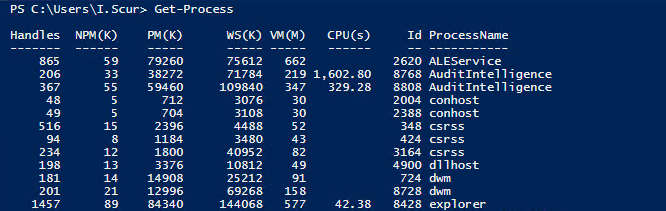
For practice, try executing the following cmdlets:
Get-Process — Shows the processes currently running on your computer:
 Get-Service — Shows the list of services with their status
Get-Content — Shows the content of the file you specify (for example, Get-Content C:\Windows\System32\drivers\etc\hosts)
Get-Service — Shows the list of services with their status
Get-Content — Shows the content of the file you specify (for example, Get-Content C:\Windows\System32\drivers\etc\hosts)
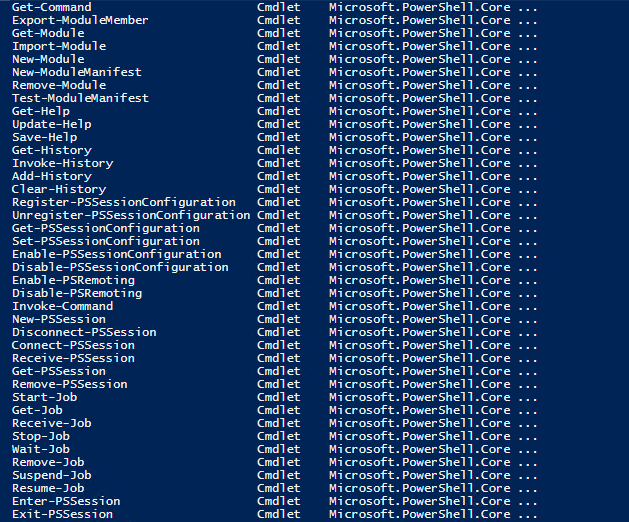
-- Available Cmdlets
Good news — you don't need to memorize all cmdlets.
You can list all cmdlets by executing the Get-Help -Category cmdlet, which will return the following:
 You can also create your own custom cmdlets.
-- Parameters
Each cmdlet has several parameters that customize what it does.
The PowerShell ISE will automatically suggest all valid parameters and their types after you type a cmdlet and a hyphen (-):
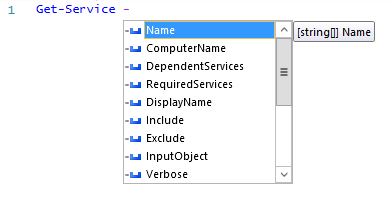 For example, the following cmdlet shows all services whose names start with “W”: Get-Service -Name W*
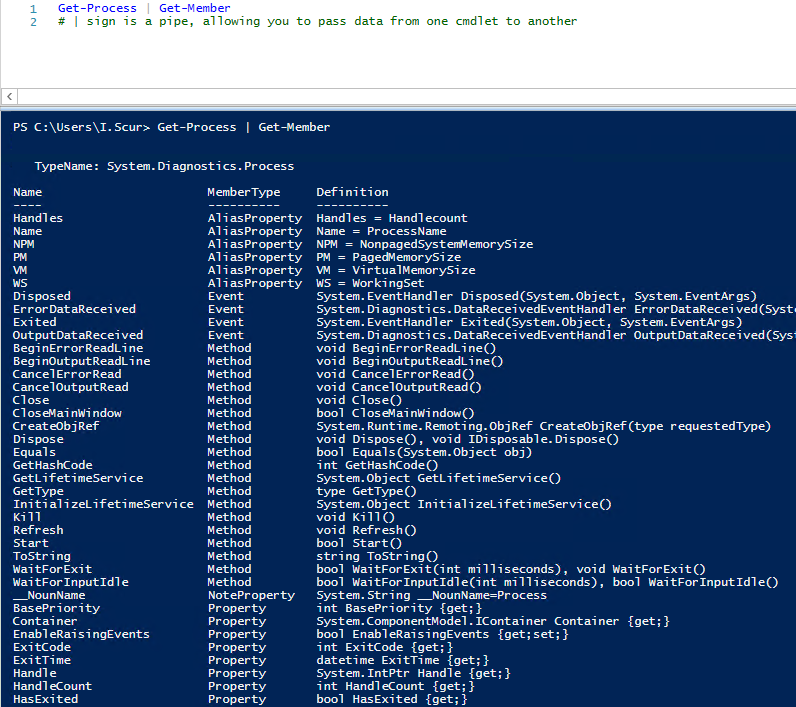
If you forget a cmdlet's parameters, just use a script like the following, which will display the parameters for the Get-Process cmdlet:
Get-Process | Get-Member
For example, the following cmdlet shows all services whose names start with “W”: Get-Service -Name W*
If you forget a cmdlet's parameters, just use a script like the following, which will display the parameters for the Get-Process cmdlet:
Get-Process | Get-Member
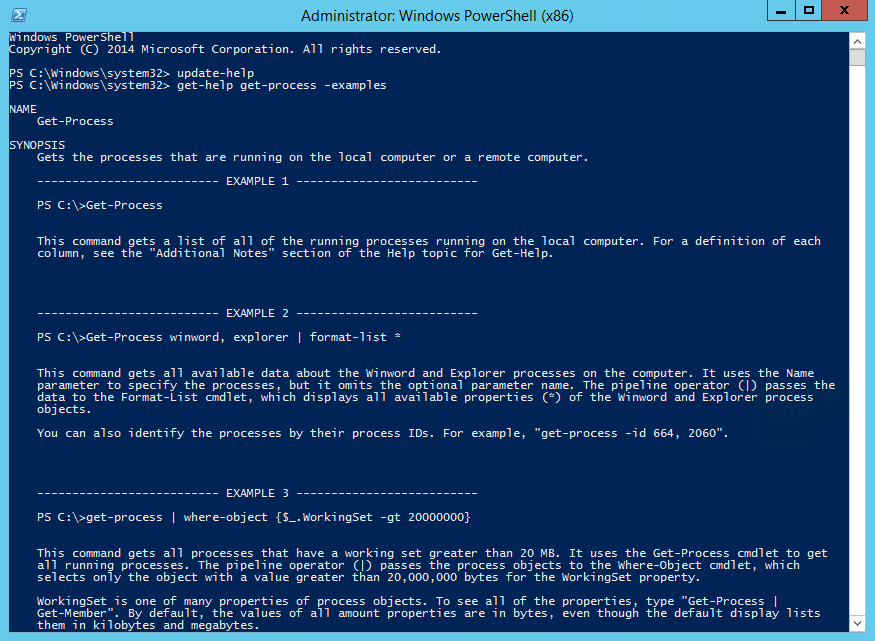
 If you still don't find the cmdlet you need, you can make sure the help is current and then get examples for a cmdlet (such as Get-Process) using a script like this:
Update-Help #to update the help data
Get-Help Get-Process -Examples
If you still don't find the cmdlet you need, you can make sure the help is current and then get examples for a cmdlet (such as Get-Process) using a script like this:
Update-Help #to update the help data
Get-Help Get-Process -Examples
-- Aliases
You can also use aliases, which are shortened cmdlet names.
For instance, instead of “Get-Help” you can use just “Help”.
Try running the following two commands and see whether you get the same result:
Start-Process notepad
start notepad
Similarly, to stop this process, you can use either of the following commands:
Stop-Process -Name notepad
spps -Name notepad
To see all aliases, execute the Get-Alias cmdlet.
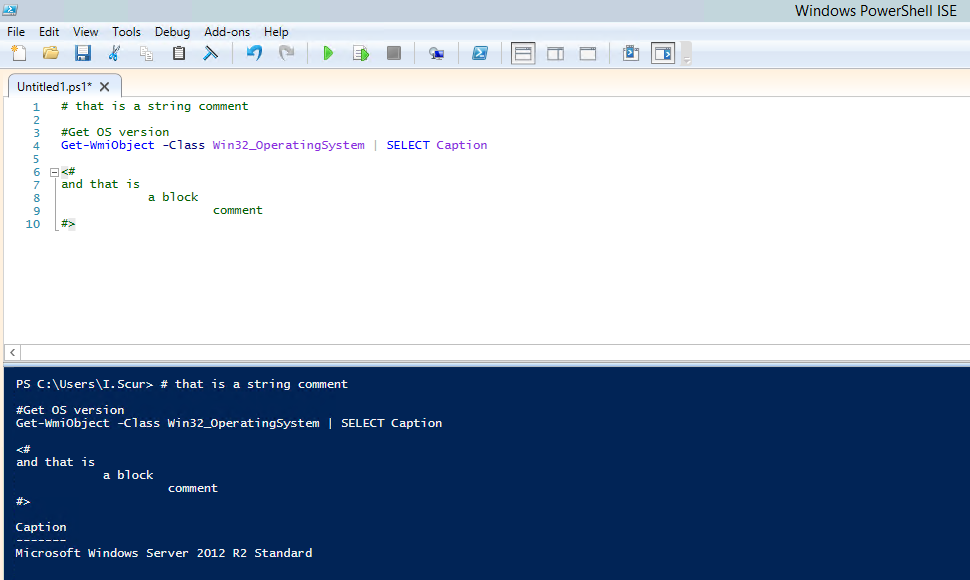
-- Comments
Leaving comments in a script will help you — and your colleagues — better understand what the script does.
A string comment is a single line that starts with a number sign (#), and block comments start and end with number signs and angle brackets and spread across multiple lines.
-- Pipes
A pipe passes data from one cmdlet to another.
I used a pipe earlier to get all properties of an object.
For example, if you execute the following script, you'll get all services sorted by their status:
Get-Service | Sort-Object -property Status
You can also use a pipe to output text to a file using a script like the following:
"Hello, World!" | Out-File C:\ps\test.txt
You can use multiple pipes.
For instance, the following script lists all services, with the first pipe excluding stopped services and the second pipe limiting the list to display names only:
Get-Service | WHERE {$_.status -eq "Running"} | SELECT displayname
# “$_.” defines current element in the pipe
-- Summary
Let's quickly summarize the key points of this Windows PowerShell tutorial.
Now you know how to run PowerShell, how to change execution policy, what a cmdlet is, how to pass data using pipe and how to get object properties.
Keep in mind that if you forget something, you can always use the Get-Help cmdlet.
I hope you found this PowerShell for beginners useful!
In the next parts of this free PowerShell tutorial, I'll cover variables, arrays and cycles, which are used in PowerShell scripting to simplify the administration of Windows Servers.
In the meantime, you might want to check out the following PowerShell scripts used by IT professionals to address specific cases:
How to get AD user group membership reports
How to find disabled or inactive users in Active Directory
How to find inactive computers in Active Directory
How to get a list of expired user accounts in AD
How to find locked out user accounts in Active Directory
How to list all user accounts on a Windows system
Monitoring event logs with PowerShell
How to set up notification of local administrator group changes with PowerShell
How to get notified of an expired password in Active Directory with PowerShell
Event log querying with PowerShell
Windows event log forwarding in Windows Server 2008
Keyboard shortcuts for system administrators
How to discover new users in Active Directory using PowerShell
Office 365: Configuring user passwords to never expire
How to find inactive computers in Active Directory using PowerShell
Windows PowerShell vs command prompt (cmd)
How to manage file system ACLs with PowerShell
PowerShell File Management
How to create new Active Directory users with PowerShell
How to add and remove AD groups and objects in groups with PowerShell
Managing OUs and moving their objects with PowerShell
How to automate PowerShell scripts with Task Scheduler
How to create, delete, rename, disable and join computers in AD ssing PowerShell
And if you are just getting started with PowerShell, I recommend the following resources:
Introduction to PowerShell
PowerShell documentation
”Hey, Scripting Guy!” blog
,
Select a Theme and Build a User Profile
The first thing I suggest doing is setting up the color theme for productive coding.
The default theme is "Dark Console, Light Editor" which is pleasant enough for starting off, but I prefer the "Dark Console, Dark Editor" theme to give code greater contrast and also emulate the natural PowerShell CLI.
To make this change, navigate to Tools > Options > Colors and Fonts > Manage Themes.
This is also where you can tweak other colors if desired, but the font coloring is pretty decent out of the box.
 While you're here, you can also toggle over to the General Settings tab to adjust the AutoSave interval.
It's set to 2 minutes by default, which I find to be enough to keep me honest, but you can adjust it up or down to suit your taste.
If you want to get fancier, I've actually taken a shine to the Oblivion theme on the Eclipse Color Themes website.
While not usable in its native form, the XML file can be converted to a PowerShell ISE theme using a converter provided by akawhoami on GitHub.
While you're here, you can also toggle over to the General Settings tab to adjust the AutoSave interval.
It's set to 2 minutes by default, which I find to be enough to keep me honest, but you can adjust it up or down to suit your taste.
If you want to get fancier, I've actually taken a shine to the Oblivion theme on the Eclipse Color Themes website.
While not usable in its native form, the XML file can be converted to a PowerShell ISE theme using a converter provided by akawhoami on GitHub.
 To load an XML color theme, head back over to the PowerShell ISE Theme Manager from my earlier example and choose to import a theme file.
Oddly enough, there's no simple "import my theme" cmdlet.
You can set the colors once per workstation, bake in the specific color options in your profile, or use someone's third party scripts.
I don't mind doing it manually, or perhaps a reader will show me a better way.
🙂
To load an XML color theme, head back over to the PowerShell ISE Theme Manager from my earlier example and choose to import a theme file.
Oddly enough, there's no simple "import my theme" cmdlet.
You can set the colors once per workstation, bake in the specific color options in your profile, or use someone's third party scripts.
I don't mind doing it manually, or perhaps a reader will show me a better way.
🙂
Presenting Code
If you're going to present code on a projector screen, I'd go back to a light background with dark text.
Because most projector screens are a white screen, it's not possible to make the background color truly dark – the projector simply projects "nothing" for black and you end up getting a funky washed out look.
Build a User Profile
A profile is a script that is called when PowerShell or PowerShell ISE opens.
Profile information can live in two locations:
Current User: %USERPROFILE%\Documents\WindowsPowerShell\
All Users: %WINDIR%\System32\WindowsPowerShell\v1.0\
Additionally, there are three types of profile files:
ISE and Console: profile.ps1
ISE only: Microsoft.PowerShellISE_profile.ps1
Console only: Microsoft.PowerShell_profile.ps1
Seems a tad overkill.
I personally select the current user path and drop in a profile.ps1, then just check for the $psISE variable to determine if the host is running the ISE.
Here's the path where it sits:
C:\Users\Chris.GLACIER\Documents\WindowsPowerShell\profile.ps1
My profile file is short and sweet, including a fun little message to myself for when I launch the ISE:
Set-ExecutionPolicy Bypass
Set-Location C:\Dropbox\Code
if ($psISE)
{
Start-Steroids
Clear-Host
Write-Host 'BEAST MODE (╯°□°)╯︵ ┻━┻'
}
This is a very simple profile.
Here's what it does:
Make sure the execution policy is effectively disabled (requires Running as Administrator)
Set the console location to my Dropbox\Code folder, because that's where I work on PowerShell code in most cases.
Test to see if the $psISE variable exists, meaning that I'm launching the ISE.
If it does, I start ISESteroids and pump myself up with a little table throwing action.
If I'm in the console, the logic test fails and nothing else happens.
Here's what a fresh ISE session looks like when loaded up:
 The PowerShell console is simpler.

Run as Administrator
I run both the ISE and Console as Administrator by changing the shortcut.
This avoids issues with the execution policy and gives me unfettered authority over the scripting editor.
Nothing more annoying than running into errors due to permissions on my own computer.
🙂
To do so, find the shortcut for PowerShell or PowerShell ISE, open the Properties > Shortcut > Advanced > and check the Run as administrator box.

Thoughts
At this point I have what I consider to be a usable copy of PowerShell ISE at my disposal.
While it may look like a lot has happened, it isn't that much and only happens on a new system.
I have a master copy of the profile, colors, and portable modules that I clone to my workstations via Dropbox.
I'm also a huge fan of ISESteroids, which I plan to go over in greater depth in the future.
Learn Powershell in 1 Day
What is PowerShell?
Windows PowerShell is object-oriented automation engine and scripting language.
It is designed mainly for the system administrators.
It helps IT, professionals, to control & automate the administration of the Window OS and other applications.
It introduced some compelling new concepts that enable you to extend the
the knowledge you have gained and the scripts that you have created within the Windows Command Prompt and Windows Script Host environments.
It combines the flexibility of scripting, command-line speed, and the power of a GUI-based admin tool.
It allows you to solve problems efficiently by helping system admin to eliminate future manual labor hours.
We will go through all the important aspect which you should know to learn PowerShell.
In this training course, you will learn
What is PowerShell?
Why Use Powershell?
PowerShell History
Features of Powershell
How to launch PowerShell
PowerShell Cmdlet
Cmdlet vs Command:
Powershell Data types:
Special Variables
PowerShell Scripts
First PowerShell Script
What is PowerShell ISE?
PowerShell Concepts
PowerShell Vs Command Prompt
Applications of Powershell
This is a complete guide to PowerShell… let's begin! Why Use Powershell?
Here, are some important reason for using Powershell:
Powershell offers a well-integrated command-line experience for the operation system
PowerShell allows complete access to all of the types in the .NET framework
Trusted by system administrators.
PowerShell is a simple way to manipulate server and workstation components
It's geared toward system administrators by creating a more easy syntax
PowerShell is more secure than running VBScript or other scripting languages
PowerShell History
PowerShell first version 1.0 was released in 2006.
Today, PowerShell is at version 5.1.
As the year and version gone by, PowerShell's capabilities and hosting environments grew significantly.
Let See Version wise History of Powershell:
PowerShell version 1 supported the local administration of Windows Server 2003
PowerShell 2.0 was integrated with Windows 7 and Windows Server 2008 R2.
This version supports for remoting and enhances the capabilities of PowerShell like transactions, background jobs, events, debugging, etc.
PowerShell 3.0 was released as an internal part of the Windows management framework.
It was installed on Windows 8 and Windows Server 2012.
You can add and scheduled jobs, session connectivity, automatic module loading, etc.
PowerShell 4.0 was shipped with Windows 8.1 and Windows Server 2012 R2.
In this version added support for desired state configuration, enhanced debugging, network diagnostics.
PowerShell 5.0 was released as internal part of Windows management framework 5.
The feature offers in this version are remote debugging, class definitions, .NET enumerations, , etc.
Features of Powershell
PowerShell Remoting: PowerShell allows scripts and cmdlets to be invoked on a remote machine.
Background Jobs: It helps you to invoked script or pipeline asynchronously.
You can run your jobs either on the local machine or multiple remotely operated machines.
Transactions: Enable cmdlet and allows developers to perform
Evening: This command helps you to listen, forwarding, and acting on management and system events.
Network File Transfer: Powershell offers native support for prioritized, asynchronous, throttled, transfer of files between machines using the Background Intelligent Transfer Service (BITS) technology.
How to launch PowerShell
PowerShell is pre-installed in all latest versions of Windows.
We need to launch PowerShell for that we need to follow the given steps:
Step 1) Search for PowerShell in Windows.
Select and Click
Step 2) Power Shell Window Opens
PowerShell Cmdlet
A cmdlet which is also called Command let is a is a lightweight command used in the Window base PowerShell environment.
PowerShell invokes these cmdlets in the command prompt.
You can create and invoke cmdlets command using PowerShell APIS.
Cmdlet vs. Command:
Cmdlets are different from commands in other command-shell environments in the following manners −
Cmdlets are .NET Framework class objects It can't be executed separately
Cmdlets can construct from as few as a dozen lines of code
Parsing, output formatting, and error presentation are not handled by cmdlets
Cmdlets process works on objects.
So text stream and objects can't be passed as output for pipelining
Cmdlets are record-based as so it processes a single object at a time
Most of the PowerShell functionality comes from Cmdlet's which is always in verb-noun format and not plural.
Moreover, Cmdlet's return objects not text.
A cmdlet is a series of commands, which is more than one line, stored in a text file with a .ps1 extension.
A cmdlet always consists of a verb and a noun, separated with a hyphen.
Some of the verbs use for you to learn PowerShell is:
Get — To get something
Start — To run something
Out — To output something
Stop — To stop something that is running
Set — To define something
New — To create something
PowerShell commands
Following is a list of important PowerShell Commands:
Get-Help: Help about PowerShell commands and topics
Example: Display help information about the command Format-Table Get-Help Format-Table
Get-Command: Get information about anything that can be invoked
Example: To generate a list of cmdlets, functions installed in your machine Get-Command
Get-Service: Finds all cmdlets with the word 'service' in it.
Example: Get all services that begin with "vm" Get-Service "vm*"
Get- Member: Show what can be done with an object
Example: Get members of the vm processes.
Get-Service "vm*" | Get-Member
Other Commands:
Get Module Shows packages of commands
Get Content This cmdlet can take a file and process its contents and do something with it
Get- get Finds all cmdlets starting with the word 'get-
Example: Create a Folder New-Item -Path 'X:\Guru99' -ItemType Directory
Output Powershell Data types: Special Variables
| Special Variable | Description |
| $Error | An array of error objects which display the most recent errors |
| $Host | Display the name of the current hosting application |
| $Profile | Stores entire path of a user profile for the default shell |
| $PID | Stores the process identifier |
| $PSUICulture | It holds the name of the current UI culture.
|
| $NULL | Contains empty or NULL value.
|
| $False | Contains FALSE value |
| $True | Contains TRUE value |
PowerShell Scripts
Powershell scripts are store in .ps1 file.
By default, you can't run a script by just double-clicking a file.
This protects your system from accidental harm.
To execute a script:
Step 1: right-click it and click "Run with PowerShell."
Moreover, there is a policy which restricts script execution.
You can see this policy by running the Get-ExecutionPolicy command.
You will get one of the following output:
Restricted— No scripts are allowed.
This is the default setting, so it will display first time when you run the command.
AllSigned— You can run scripts signed by a trusted developer.
With the help of this setting, a script will ask for confirmation that you want to run it before executing.
RemoteSigned— You can run your or scripts signed by a trusted developer.
Unrestricted— You can run any script which you wants to run
Steps to Change Execution Policy
Step 1) Open an elevated PowerShell prompt.
Right Click on PowerShell and "Run as Administrator"
Step 2) Enter the Following commands Get-ExecutionPolicy
Set-execution policy unrestricted
Enter Y in the prompt
Get-ExecutionPolicy
First PowerShell Script
In a notepad write the following command Write-Host "Hello, Guru99!"
PowerShell Scripts have an extension ps1.
Save the file as FirstScript.ps1
In Powershell, call the script using the command & "X:\FirstScript.ps1"
What is PowerShell ISE?
The Windows PowerShell Integrated Scripting Environment(ISE) is the default editor for Windows PowerShell.
In this ISE, you can run commands, writer test, and debug scripts in an in a window base GUI environment.
You can do multiline editing, syntax coloring, tab completion, selective execution and lots of other things.
Windows PowerShell ISE also allows you to run commands in a console pane.
However, it also supports panes that you can use to simultaneously view the source code of your script and other tools which you can plug into the ISE.
You can even open up multiple script windows at the same time.
This is specifically useful when you are debugging a script which uses functions defined in other scripts or modules.
The same script we created in notepad, can be created in ISE Paste code into the editor
Save Script
Use F5 to run the script
Observe output in the console
Sample 2:
The following code will give the Free Virtual Memory in your machine
Get-WmiObject -Class Win32_OperatingSystem –ComputerName localhost |
Select-Object -Property CSName,FreeVirtualMemory
PowerShell Concepts| Cmdlets | Cmdlet are build-command written in .net languages like VB or C#.
It allows developers to extend the set of cmdlets by loading and write PowerShell snap-ins.
|
| Functions | Functions are commands which is written in the PowerShell language.
It can be developed without using other IDE like Visual Studio and devs. |
| Scripts | Scripts are text files on disk with a .ps1 extension |
| Applications | Applications are existing windows programs. |
| What if | Tells the cmdlet not to execute, but to tell you what would happen if the cmdlet were to run. |
| Confirm | Instruct the cmdlet to prompt before executing the command. |
| Verbose | Gives a higher level of detail. |
| Debug | Instructs the cmdlet to provide debugging information. |
| ErrorAction | Instructs the cmdlet to perform a specific action when an error occurs.
Allowed actions continue, stop, silently- continue and inquire. |
| ErrorVariable | It specifies the variable which holds error information. |
| OutVariable | Tells the cmdlet to use a specific variable to hold the output information |
| OutBuffer | Instructs the cmdlet to hold the specific number of objects before calling the next cmdlet in the pipeline. |
Advantages of using PowerShell script
PowerShell scripts are really powerful and could do much stuff in fewer lines.
Variables are declared in the form $<variable>
Variables could be used to hold the output of command, objects, and values.
"Type" of a variable need not be specified.
PowerShell Vs. Command Prompt|
PowerShell |
Command Prompt |
|
PowerShell deeply integrates with the Windows OS.
It offers an interactive command line interface and scripting language.
|
Command Prompt is a default command line interface which provided by Microsoft.
It is a simple win32 application that can interact and talk with any win32 objects in the Windows operating system.
|
|
PowerShell uses what are known as cmdlets.
It can be invoked either in the runtime environment or the automation scripts.
|
No such features offer by command prompt.
|
|
PowerShell considers them as objects.
So the output can be passed as an input to other cmdlets through the pipeline.
|
Command Prompt or even the *nix shell, the output generated from a cmdlet is not just a stream of text but a collection of objects.
|
|
The PowerShell is very advanced regarding features, capabilities and inner functioning.
|
Command prompt is very basic.
|
Applications of Powershell
Today, PowerShell has become an ideal choice for IT administrators as it eases management operation and effort in large corporate networks.
For example, let's assume that you are managing a large network which contains more than four hundred servers.
Now you want to implement a new security solution.
This security solution depends on a certain service which needs to run on those servers.
You can surely log in to each server and see if they have that service install and running or not.
However, it certainly takes a lot of human errors as your staff needs to spend lots of time on this non-productive process.
However, if you use PowerShell, then you could complete this task in just a few minutes.
That's because the entire operation is done with a single script which gathers information about the services running on the servers.
Summary
Windows PowerShell is object-oriented automation engine and scripting language
Powershell offers a well-integrated command-line experience for the operation system
PowerShell first version 1.0 was released in 2006
PowerShell allows scripts and cmdlets to be invoked on a remote machine
PowerShell is pre-installed in all latest versions of Windows
A cmdlet is a lightweight command used in the Window base PowerShell environment
Get, Start, Out, Stop, Set, New are important PowerShell commands
Boolean, Byte, Chat, Decimal, Decimal, Long are important Data Type of PowerShell
$Error.
$Host, $Profile, $PID, $PSUICulture, $NULL are some special variable used in PowerShell
The Windows PowerShell Integrated Scripting Environment(ISE) is the default editor for PowerShell
PowerShell deeply integrates with the Windows OS whereas Command Prompt is a default command line interface which provided by Microsoft
PowerShell has become an ideal choice for IT administrators as it eases management operation and effort in large corporate networks
Sample scripts for system administration
A collection of examples walks through scenarios for administering systems with PowerShell.
Working with objects
How-To Guide
Viewing object structure
Selecting parts of object
Filtering objects in the pipeline
Sorting objects
Repeating a task for multiple objects
Creating .NET and COM objects
Using static classes and methods
Getting WMI objects - Get-CimInstance
Managing computers
How-To Guide
Changing computer state
Collecting information about computers
Creating Get-WinEvent queries with FilterHashtable
Managing processes & services
How-To Guide
Managing processes with process cmdlets
Managing services
Managing Windows PowerShell drives
Working with printers
Performing networking tasks
Working with software installations
Decode a PowerShell command from a running process
Working with output
Concept
Redirecting data with Out-* cmdlets
Using format commands to change output view
Managing drives & files
How-To Guide
Managing current location
Working with files and folders
Working with files folders and registry keys
Working with registry entries
Working with registry keys
Creating UI elements
How-To Guide
Creating a custom input box
Creating a graphical date picker
Multiple selection list boxes
Selecting items from a list box
PowerShell Examples
This page lists some sample scripts I wrote in PowerShell.
Unless stated otherwise, these scripts run in Windows as well as in PowerShell on Linux (tested in Windows 7 SP1 and Ubuntu Linux 16.04)
Many of these scripts return their results or status as errorlevel.
Help is available for some of the scripts (the most recent ones) with the -h switch.
PowerShell itself provides "help" for a script with the -? switch, but this help will only list the allowed parameters without explaining them.
In that case you can check the source code for help on command line arguments (parameters and switches) and to check the meaning of return codes/errorlevels.
|
 |
 |
Name |
Version |
Description |
Last modified |
Remarks |
|---|
| * |
|
2ASCII |
1.00 |
Convert any text file to ASCII |
2006-09-26 |
|
| * |
|
2Unicode |
1.00 |
Convert any text file to Unicode |
2006-09-26 |
|
| * |
|
2UTF8 |
1.00 |
Convert any text file to UTF-8 |
2006-09-26 |
|
| * |
|
AirReg |
1.01 |
Demo script using Airport-data.com's API to lookup airplane data by its registration number |
2016-11-11 |
|
| * |
|
AirRegCCmd |
1.00 |
Search downloaded Canadian aircraft database (C-***) for specific aircraft(s) |
2020-05-10 |
This program requires a downloaded Canadian aircraft registration file, located in the subdirectory "C" |
| * |
|
AirRegEICmd |
1.00 |
Search downloaded Irish aircraft database (EI-***) for specific aircraft(s) |
2020-05-10 |
This program requires a downloaded Irish aircraft registration file in Excel format, located in the subdirectory "EI", and Excel |
| * |
|
AirRegFCmd |
1.00 |
Search downloaded French aircraft database (F-***) for specific aircraft(s) |
2020-05-16 |
This program requires a downloaded French aircraft registration file, located in the subdirectory "F" |
| * |
|
AirRegGUI |
2.13 |
Demo GUI script using Airport-data.com's API to lookup airplane data by its registration number |
2020-05-16 |
|
| * |
|
AirRegNCmd |
1.00 |
Search downloaded FAA aircraft database (N***) for specific aircraft(s) |
2020-05-09 |
This program requires a downloaded copy of the FAA Aircraft Registry's Releasable Aircraft Database, located in the subdirectory "N" |
| * |
|
AirRegOECmd |
1.00 |
Search downloaded Austrian aircraft database (OE-***) for specific aircraft(s) |
2020-05-12 |
This program requires a downloaded copy of the Austrian aircraft registry database, located in the subdirectory "OE", and GhostScript to convert the downloaded PDF to plain text |
| * |
|
AirRegOpenSkyCmd |
1.00 |
Search downloaded OpenSky Network aircraft database for specific aircraft(s) |
2020-05-15 |
This program requires a downloaded OpenSky Network aircraft registration file, located in the subdirectory "OpenSky" |
| * |
|
AirRegPHCmd |
1.02 |
Search downloaded Dutch aircraft database (PH-***) for specific aircraft(s) |
2020-05-10 |
This program requires a downloaded Dutch aircraft registration file in Excel format, located in the subdirectory "PH", and Excel |
| * |
|
AirRegTFCmd |
1.00 |
Search online Icelandic aircraft database (TF-***) for specific aircraft(s) |
2020-05-09 |
This program uses the Icelandic Transport Authority online aircraft registry |
| * |
|
AirRegVHCmd |
1.00 |
Search downloaded Australian aircraft database (VH-***) for specific aircraft(s) |
2020-05-19 |
This program requires a downloaded copy of the Australian aircraft registry database, located in the subdirectory "VH" |
| * |
|
AirRegZKCmd |
1.00 |
Search downloaded New Zealand aircraft database (ZK-***) for specific aircraft(s) |
2020-05-19 |
This program requires a downloaded copy of the New Zealand aircraft registry database, located in the subdirectory "ZK" |
| * |
|
APIPA |
1.00 |
Get or set the IP AutoConfiguration status (a.k.a. APIPA) for all network adapters |
2016-11-14 |
Make sure you understand what this script will do before using it!
This is a Windows-only script. |
| * |
|
Asc |
1.00 |
Get the numeric ASCII value for the specified character |
2016-10-25 |
|
| * |
|
BIOS |
1.00 |
Display BIOS properties |
2006-09-11 |
Generated by WMIGen.
Since the script uses WMI it is Windows-only. |
| * |
|
BootState |
1.00 |
Show Windows' boot state, e.g. Normal, Safe mode, Windows PE |
2017-10-19 |
Windows only |
| * |
|
CapsLockIcon |
1.01 |
CapsLock key indicator in the System Tray |
2020-04-14 |
Windows only |
| * |
|
CDEject |
1.01 |
Eject all CDROMs |
2016-11-12 |
Requires Windows Media Player in Windows, native "eject" command is used in Linux.
Windows code based on VBScript code posted by Christoph Fricke in the microsoft.public.de.german.scripting.wsh newsgroup |
| * |
|
ChineseYear |
1.00 |
Get the Chinese name for the year, e.g. 2016 is the year of the Monkey |
2016-11-02 |
|
| * |
|
Chr |
1.01 |
Get the ASCII character for the specified numeric value |
2016-10-30 |
|
| * |
|
DHCPBackup |
1.00 |
Backup daily DHCP logs |
2007-08-30 |
"Third party" Windows-only script by Jason Carter, Marshall University Computing Services. |
| * |
|
Disks |
1.00 |
List physical harddisks and their manufacturer, model, size, bus type, physical location and more |
2020-04-10 |
Windows only. |
| * |
|
Drives |
1.01 |
List available and/or used drive letters |
2016-11-04 |
Useless on Linux, which doesn't work with drive letters. |
| * |
|
GetDotNETVersion |
1.00 |
List the .NET Framework versions installed in Windows |
2016-11-13 |
Windows-only. |
| * |
|
GetHDDStatus |
2.03 |
Get the S.M.A.R.T. status for all local harddisks |
2019-03-20 |
Uses WMI in Windows, or lshw, smartctl, df and notify-send in Linux. |
| * |
|
GetHDDStatusGUI |
1.04 |
Get the S.M.A.R.T. status for all local harddisks |
2020-06-09 |
Windows-only GUI version of GetHDDStatus.ps1 |
| * |
|
GetRes |
2.00 |
Show screen resolution |
2016-11-01 |
Uses WMI in Windows, or XRANDR in Linux. |
| * |
|
GetTitle |
1.00 |
Read the console window title |
2011-05-10 |
|
| * |
|
IsCDWriter |
1.00 |
Check whether the specified drive is a CD/DVD writer or not |
2017-08-15 |
Windows-only |
| * |
|
LeapYear |
1.00 |
Check if the specified year is a leap year |
2006-10-25 |
|
| * |
|
LoginDialog |
1.01 |
Present a login dialog and return username and password |
2016-11-04 |
In Windows a GUI style dialog box is used, in Linux the prompt for (user name and) password is in the console. |
| * |
|
LoginDialogWinForm |
1.00 |
Demo login dialog script using Windows Forms |
2019-03-19 |
Windows only.
Built with PoshGUI Editor.
For demonstration purposes only, LoginDialog.ps1 provides a much better login dialog. |
| * |
|
Memory |
2.01 |
Display total and free amounts of physical memory |
2016-11-01 |
Uses WMI in Windows, or /proc/meminfo in Linux. |
| * |
|
MonitorPing |
1.00 |
Ping a device at a fixed interval and show the connection status in the Notification Area (a.k.a. System Tray) |
2020-05-14 |
|
| * |
|
NumLockIcon |
1.00 |
NumLock key indicator in the System Tray |
2020-04-25 |
Windows only |
| * |
|
Ping |
2.00 |
Ping multiple computers and return the combined results |
2016-11-11 |
|
| * |
|
PrintWord |
1.00 |
Print a Word document |
2020-04-21 |
Requires Word. |
| * |
|
PSVer |
2.00 |
Display PowerShell version |
2016-10-24 |
|
| * |
|
ReadExcel |
1.00 |
Read an Excel file and show all cells and content for every sheet |
2020-04-16 |
Requires Excel. |
| * |
|
Reboot |
1.00 |
Reboot the computer immediately |
2016-11-02 |
Uses shutdown -r in Linux, or WMI in Windows. |
| * |
|
ShowCpuH |
1.00 |
Display CPU details in an HTML page |
2006-09-01 |
Generated by WMIGen.
Since the script uses WMI it is Windows-only. |
| * |
|
ShowPRN |
1.10 |
Display all printers |
2006-09-10 |
Generated by WMIGen.
Since the script uses WMI it is Windows-only. |
| * |
|
ShowPrnH |
1.01 |
Display all printers in an HTML page |
2006-08-31 |
Generated by WMIGen.
Since the script uses WMI it is Windows-only. |
| * |
|
ShutDown |
1.00 |
Shutdown and power-off the computer |
2016-11-02 |
Uses shutdown -P in Linux, or WMI in Windows. |
| * |
|
Today |
1.00 |
Display today's yesterday's and tomorrow's date in 2 formats |
2006-07-05 |
This script combines the functions of my SortDate, Yesterday and Tomorrow scripts as available in other scripting languages. |
| * |
|
TxtComp |
1.01 |
Compare two text files and display the differences |
2016-11-01 |
|
| * |
|
Week |
1.00 |
Display current week number |
2006-06-26 |
|
| * |
|
Which |
1.00 |
Locate the specified program file |
2006-07-27 |
See my UNIX ports page. |
| * |
|
WMIGen |
10.0.13 |
Generate Batch, C, C++, C#, Delphi, F#, Java, JScript, KiXtart, Lua, Object Pascal, Object Rexx, Perl, PHP, PowerShell, Python, Ruby, Tcl, VB .NET and VBScript code for WMI queries |
2019-08-11 |
WMIGen is a compiled Windows GUI program which generates WMI code to be used in PowerShell or other languages. |
Invoke-Command to run scripts on remote computers
The Invoke-Command cmdlet is one way to leverage PowerShell Remoting.
In today’s post, I will give you an overview of Invoke-Command.
Note: To follow this guide, you have first have to enable PowerShell remoting.
Read our guide that describes all the different ways of how you can enable remoting locally and remotely.
You will learn how to enable remoting remotely with various tools, how to allow non-admins to use remoting, and to configure remoting in workgroup environments.
Introducing PowerShell Remoting ^
When it comes to managing remote computers with PowerShell, you have essentially three options.
You can open an interactive session with the Enter-PSSession cmdlet (One-to-One Remoting).
An alternative is the Invoke-Command cmdlet, which allows you to run remote commands on multiple computers (which is why it is called One-to-Many Remoting).
The third option is to use one of those cmdlets that offer a ComputerName parameter.
In most cases, PowerShell Remoting isn’t involved then.
To list those cmdlets, you can use this command:
Get-Command -ParameterName ComputerName
![]() Cmdlets with the ComputerName parameter
In addition to the built-in cmdlets, quite a few PowerShell modules exist that support remote management.
For instance, you can manage Active Directory from your workstation after installing the Active Directory module.
Whenever one of these options exists, I would avoid enabling PowerShell Remoting on the remote machine.
Because PowerShell Remoting presents a security risk, it has to be enabled even within an Active Directory domain.
You can also use Remoting on workgroup computers, but you will have to take care of a few extra configurations.
If you don’t configure Remoting properly, you will run into errors such as WinRM cannot process the request or Access denied.
In the latter case, you probably failed to provide admin credentials.
PowerShell Remoting depends on Windows Remote Management (WinRM), which is Microsoft’s implementation of the WS-Management (WS-Man) protocol.
The protocol relies on HTTP or HTTPS and uses the TCP ports 5985 and 5986, respectively.
WS-Management encrypts all PowerShell communication even if you only work with HTTP.
However, this kind of encryption is vulnerable to man-in-the middle attacks.
I therefore recommended to use HTTPS instead of HTTP in insecure networks.
I will say more about this topic in a follow-up post.
Cmdlets with the ComputerName parameter
In addition to the built-in cmdlets, quite a few PowerShell modules exist that support remote management.
For instance, you can manage Active Directory from your workstation after installing the Active Directory module.
Whenever one of these options exists, I would avoid enabling PowerShell Remoting on the remote machine.
Because PowerShell Remoting presents a security risk, it has to be enabled even within an Active Directory domain.
You can also use Remoting on workgroup computers, but you will have to take care of a few extra configurations.
If you don’t configure Remoting properly, you will run into errors such as WinRM cannot process the request or Access denied.
In the latter case, you probably failed to provide admin credentials.
PowerShell Remoting depends on Windows Remote Management (WinRM), which is Microsoft’s implementation of the WS-Management (WS-Man) protocol.
The protocol relies on HTTP or HTTPS and uses the TCP ports 5985 and 5986, respectively.
WS-Management encrypts all PowerShell communication even if you only work with HTTP.
However, this kind of encryption is vulnerable to man-in-the middle attacks.
I therefore recommended to use HTTPS instead of HTTP in insecure networks.
I will say more about this topic in a follow-up post.
Executing cmdlets with Invoke-Command ^
Perhaps the most interesting form of PowerShell remote management is One-to-Many Remoting with the Invoke-Command cmdlet.
This cmdlet allows you to execute PowerShell commands on multiple remote computers that contain cmdlets that don’t feature the -ComputerName parameter.
Two ways exist to connect to remote computers with Invoke-Command.
You usually use the ‑ComputerName parameter to manage Windows machines.
Alternatively, you can pass the ‑ConnectionUri parameter to manage backend applications, such as Exchange, or cloud services such as Azure.
In the remainder of this article, I will focus on managing remote Windows machines that are Active Directory domain members.
The command below executes the Get-ChildItem cmdlet on the machine whose computer name is stored in the $RemoteComputer variable:
Invoke-Command -Computername $RemoteComputer -ScriptBlock { Get-ChildItem "C:\Program Files" }
PowerShell automatically creates a so-called PSSession on the remote computer, which essentially is a user-created PowerShell session as opposed to a session that a PowerShell host such as the PowerShell console or PowerShell ISE creates.
The output of the executed commands in the script block is automatically relayed to your local session.
As usual, you can interrupt the displaying of the output with CTRL+C.
As with the Enter-PSSession cmdlet, you have to be an administrator on the remote machine.
Otherwise, you will receive an Access denied error message.
If you are not logged on as domain administrator on your local machine, you have to provide sufficient credentials with the -Credential parameter.
You can pass multiple computers to the -ComputerName parameter by separating their names with commas.
If you also want to include the local computer, you add “localhost” or simply “.” to the list.
To run multiple commands, you can separate them with semicolons in the script block.
However, a better option is to use the -FilePath parameter instead of the -ScriptBlock parameter, which allows you to execute an entire PowerShell script:
Invoke-Command -ComputerName PC1,PC2,PC3 -FilePath C:\myFolder\myScript.ps1
By default, PowerShell will send the script immediately to all computers if 32 or fewer computer names are passed.
If more than 32 computer names are passed, PowerShell will queue the surplus computers until the script completes in one of the first 32 PSSessions.
You can change this default behavior with the -ThrottleLimit parameter.
However, you should be aware of the implications on the load of your computer and the network when the results come pouring in.
Testing if Remoting is enabled ^
In particular, if you plan to execute commands on many machines, you might want to test their availability with the Test-Connection cmdlet first.
This cmdlet sends ICMP echo request packets (pings, that is) to the remote computers:
If (Test-Connection -ComputerName $RemoteComputers -Quiet)
{
Invoke-Command -ComputerName $RemoteComputers -ScriptBlock {Get-ChildItem “C:\Program Files”}
}
The -Quiet parameter suppresses the output of the cmdlet and returns $True if the remote machine answers the pings.
This method is fine if you can be sure that Remoting is enabled on the remote machines.
If you want a more bullet-proof test, you could use the Test-WSMan cmdlet to check whether the WinRM service can be accessed on the remote machine.
However, a downside of this method is that the cmdlet’s timeout can be several seconds and can’t be configured.
If you have many computers in your list, this can slow down your control script on the local machine significantly.
An alternative is to work with a try-catch block:
$RemoteComputers = @("PC1","PC2")
ForEach ($Computer in $RemoteComputers)
{
Try
{
Invoke-Command -ComputerName $Computer -ScriptBlock {Get-ChildItem "C:\Program Files"} -ErrorAction Stop
}
Catch
{
Add-Content Unavailable-Computers.txt $Computer
}
}
If Invoke-Command fails to execute the command on the computer, the corresponding computer name is added to a text file (line 10).
This enables you to repeat the command later.
Passing local variables to the remote session ^
If you want to pass variables from your control script on the local computer to the commands that run on the remote computers, you can work with the -ArgumentList parameter:
$Name = "svchost"
$CPU = 100
Invoke-Command –ComputerName $RemoteComputer –ScriptBlock { param($RName,$RCPU) Get-Process -Name $RName | Where -Property CPU -gt $RCPU } -ArgumentList $Name,$CPU
In the example, the values of the $Name and $CPU variables are passed to the $RName and $RCPU variables, which the Get-Process cmdlet will use on the remote computer to determine all processes with the name “svchost” where the CPU usage (CPU property of Get-Process) is greater than 100.
By the way, this example also demonstrates that PowerShell Remoting is sometimes your only option even if the cmdlet you want to use offers a -ComputerName parameter.
The Get-Process cmdlet cannot retrieve the CPU usage from a remote computer if you run it in a local session.
However, if you use the Invoke-Command cmdlet, Get-Process runs in a remote session and you can then read the CPU usage.
Accessing methods in PowerShell Remoting ^
Using Invoke-Command also has a downside.
The objects that PowerShell returns as output differ depending on whether you run the command in a PSSession or in a session that the PowerShell host creates.
The objects even differ if you run Invoke-Command on the local computer.
The first thing you notice is that the returned objects have an additional property: the PSComputerName property.
You guessed it—it contains the name of the computer where the corresponding PSSession ran.
Invoke-Command -ComputerName .
-Scriptblock {Get-Process}
![]() The PSComputerName property
You need this additional property to ascribe the results to computers if you executed commands on multiple machines.
Okay, an additional property is not really a downside, but the result objects also lack a crucial feature.
Try this:
Get-Process | Get-Member -MemberType Method
The PSComputerName property
You need this additional property to ascribe the results to computers if you executed commands on multiple machines.
Okay, an additional property is not really a downside, but the result objects also lack a crucial feature.
Try this:
Get-Process | Get-Member -MemberType Method
![]() The methods of the Process object
And then this:
Invoke-Command -ComputerName localhost -Scriptblock {Get-Process} | Get-Member -MemberType Method
The methods of the Process object
And then this:
Invoke-Command -ComputerName localhost -Scriptblock {Get-Process} | Get-Member -MemberType Method
![]() The methods of a deserialized object
Obviously, PowerShell stripped off all the interesting methods.
In this case, this means that you can’t use the object that Invoke-Command returns to kill a remote process because the Kill() method is unavailable.
Another thing you notice is that the TypeNames are different.
In the first case, it is System.Diagnostics.Process, and the second command returns Deserialized.System.Diagnostics.Process.
If you execute a command with Invoke-Command, it packs the result object in XML, transmits it to the calling session, and creates a so-called static object that lacks all methods except GetType() and ToString().
The conversion to XML is called serialization; the opposite process is deserialization.
This is why TypeName is “Deserialized.” The lack of methods makes sense because the objects to which you could apply the methods (in our example, the processes) are only available in the remote session, and you therefore can’t manipulate them in the local session.
The one remaining question is how you can use methods of objects on remote machines.
Let’s stay with our example from above.
Because the Kill() method is unavailable in the deserialized static object, you have to kill the process in the remote session before the result object is transmitted to your local session.
The following command kills Notepad on the remote computer:
Invoke-Command -ComputerName $RemoteComputer -ScriptBlock {(Get-Process | Where -Property ProcessName -eq notepad).Kill()}
Thus, you can access methods of PSSessions objects.
All you have to do is build the logic that needs the methods, not in your control script on the local computer but in the script that runs on the remote machine.
In one of my next posts, I will talk about running PowerShell commands remotely in disconnected sessions.
PowerShell Remoting
Enable PowerShell Remoting
Enable PowerShell Remoting on a standalone (workgroup) computer
Use PowerShell Invoke-Command to run scripts on remote computers
PowerShell remote jobs - InDisconnectedSession, AsJob, and Start-Job
PowerShell Remoting over HTTPS with a self-signed SSL certificate
PowerShell disconnected remote sessions
PowerShell Remoting without administrator rights
Restricting the rights of PowerShell users with a constrained session configuration
Constrained PowerShell endpoints - Visible cmdlets, session types, and language modes
Enabling PowerShell remoting fails due to Public network connection type
The methods of a deserialized object
Obviously, PowerShell stripped off all the interesting methods.
In this case, this means that you can’t use the object that Invoke-Command returns to kill a remote process because the Kill() method is unavailable.
Another thing you notice is that the TypeNames are different.
In the first case, it is System.Diagnostics.Process, and the second command returns Deserialized.System.Diagnostics.Process.
If you execute a command with Invoke-Command, it packs the result object in XML, transmits it to the calling session, and creates a so-called static object that lacks all methods except GetType() and ToString().
The conversion to XML is called serialization; the opposite process is deserialization.
This is why TypeName is “Deserialized.” The lack of methods makes sense because the objects to which you could apply the methods (in our example, the processes) are only available in the remote session, and you therefore can’t manipulate them in the local session.
The one remaining question is how you can use methods of objects on remote machines.
Let’s stay with our example from above.
Because the Kill() method is unavailable in the deserialized static object, you have to kill the process in the remote session before the result object is transmitted to your local session.
The following command kills Notepad on the remote computer:
Invoke-Command -ComputerName $RemoteComputer -ScriptBlock {(Get-Process | Where -Property ProcessName -eq notepad).Kill()}
Thus, you can access methods of PSSessions objects.
All you have to do is build the logic that needs the methods, not in your control script on the local computer but in the script that runs on the remote machine.
In one of my next posts, I will talk about running PowerShell commands remotely in disconnected sessions.
PowerShell Remoting
Enable PowerShell Remoting
Enable PowerShell Remoting on a standalone (workgroup) computer
Use PowerShell Invoke-Command to run scripts on remote computers
PowerShell remote jobs - InDisconnectedSession, AsJob, and Start-Job
PowerShell Remoting over HTTPS with a self-signed SSL certificate
PowerShell disconnected remote sessions
PowerShell Remoting without administrator rights
Restricting the rights of PowerShell users with a constrained session configuration
Constrained PowerShell endpoints - Visible cmdlets, session types, and language modes
Enabling PowerShell remoting fails due to Public network connection type
How to Run PowerShell Commands on Remote Computers
PowerShell Remoting lets you run PowerShell commands or access full PowerShell sessions on remote Windows systems.
It’s similar to SSH for accessing remote terminals on other operating systems.
PowerShell is locked-down by default, so you’ll have to enable PowerShell Remoting before using it.
This setup process is a bit more complex if you’re using a workgroup instead of a domain - for example, on a home network - but we'll walk you through it.
Enable PowerShell Remoting on the PC You Want to Access Remotely
Your first step is to enable PowerShell Remoting on the PC to which you want to make remote connections.
On that PC, you'll need to open PowerShell with administrative privileges.
In Windows 10, press Windows+X and then choose PowerShell (Admin) from the Power User menu.
![]() In Windows 7 or 8, hit Start, and then type "powershell." Right-click the result and choose "Run as administrator."
In Windows 7 or 8, hit Start, and then type "powershell." Right-click the result and choose "Run as administrator."
![]() In the PowerShell window, type the following cmdlet (PowerShell's name for a command), and then hit Enter:
Enable-PSRemoting -Force
In the PowerShell window, type the following cmdlet (PowerShell's name for a command), and then hit Enter:
Enable-PSRemoting -Force
![]() This command starts the WinRM service, sets it to start automatically with your system, and creates a firewall rule that allows incoming connections.
The
This command starts the WinRM service, sets it to start automatically with your system, and creates a firewall rule that allows incoming connections.
The -Force part of the cmdlet tells PowerShell to perform these actions without prompting you for each step.
If your PCs are part of a domain, that's all the setup you have to do.
You can skip on ahead to testing your connection.
If your computers are part of a workgroup - which they probably are on a home or small business network - you have a bit more setup work to do.
Note: Your success in setting up remoting in a domain environment depends entirely on your network's setup.
Remoting might be disabled - or even enabled - automatically by group policy configured by an admin.
You might also not have the permissions you need to run PowerShell as an administrator.
As always, check with your admins before you try anything like this.
They might have good reasons for not allowing the practice, or they might be willing to set it up for you.
Set Up Your Workgroup
If your computers aren’t on a domain, you need to perform a few more steps to get things set up.
You should have already enabled Remoting on the PC to which you want to connect, as we described in the previous section.
Note: For PowerShell Remoting to work in a workgroup environment, you must configure your network as a private, not public, network.
For more on the difference - and how to change to a private network if you already have a public network set up - check out our guide on private vs.
public networks.
Next, you need to configure the TrustedHosts setting on both the PC to which you want to connect and the PC (or PCs) you want to connect from, so the computers will trust each other.
You can do this in one of two ways.
If you're on a home network where you want to go ahead and trust any PC to connect remotely, you can type the following cmdlet in PowerShell (again, you'll need to run it as Administrator).
Set-Item wsman:\localhost\client\trustedhosts *
The asterisk is a wildcard symbol for all PCs.
If instead you want to restrict computers that can connect, you can replace the asterisk with a comma-separated list of IP addresses or computer names for approved PCs.
After running that command, you'll need to restart the WinRM service so your new settings take effect.
Type the following cmdlet and then hit Enter:
Restart-Service WinRM
![]() And remember, you'll need to run those two cmdlets on the PC to which you want to connect, as well as on any PCs you want to connect from.
And remember, you'll need to run those two cmdlets on the PC to which you want to connect, as well as on any PCs you want to connect from.
Test the Connection
Now that you've got your PCs set up for PowerShell Remoting, it's time to test the connection.
On the PC you want to access the remote system from, type the following cmdlet into PowerShell (replacing "COMPUTER" with the name or IP address of the remote PC), and then hit Enter:
Test-WsMan COMPUTER
This simple command tests whether the WinRM service is running on the remote PC.
If it completes successfully, you'll see information about the remote computer’s WinRM service in the window - signifying that WinRM is enabled and your PC can communicate.
If the command fails, you’ll see an error message instead.
![]()
Execute a Single Remote Command
To run a command on the remote system, use the Invoke-Command cmdlet using the following syntax:
Invoke-Command -ComputerName COMPUTER -ScriptBlock { COMMAND } -credential USERNAME
"COMPUTER" represents the remote PC's name or IP address.
"COMMAND" is the command you want to run.
"USERNAME" is the username you want to run the command as on the remote computer.
You’ll be prompted to enter a password for the username.
Here's an example.
I want to view the contents of the C:\ directory on a remote computer with the IP address 10.0.0.22.
I want to use the username "wjgle," so I would use the following command:
Invoke-Command -ComputerName 10.0.0.22 -ScriptBlock { Get-ChildItem C:\ } -credential wjgle
![]()
Start a Remote Session
If you have several cmdlets you want to run on the remote PC, instead of repeatedly typing the Invoke-Command cmdlet and the remote IP address, you can start a remote session instead.
Just type the following cmdlet and then hit Enter:
Enter-PSSession -ComputerName COMPUTER -Credential USER
Again, replace "COMPUTER" with the name or IP address of the remote PC and replace "USER" with the name of the user account you want to invoke.
![]() Your prompt changes to indicate the remote computer to which you're connected, and you can execute any number of PowerShell cmdlets directly on the remote system.
Your prompt changes to indicate the remote computer to which you're connected, and you can execute any number of PowerShell cmdlets directly on the remote system.
Difference Between Private and Public Networks in Windows
Windows lets you set each network you connect to as either a "Private" or "Public" network.
When you connect to a network the first time, Windows 10 asks if you want your computer to be discoverable or not by other computers.
This option helps Windows understand the type of network you're connecting to so it can select the correct settings.
For example, Windows will behave much more conservatively on public networks than it will on your home network, boosting your security.
Public vs.
Private
You can customize how Windows treats Private and Public networks, but here's how it works by default.
On Private networks, Windows enables network discovery features.
Other devices can see your Windows computer on the network, allowing for easy file sharing and other networked features.
Windows will also use the Homegroup feature to share files and media between your PCs.
On Public networks - like those in coffee shops - you don't want your computer to be seen by others, though, or share your files with them.
So Windows turns off these discovery features.
it won't appear to other devices on the network and won't try to discover them.
Even if you've set up a Homegroup on your PC, it won't be enabled on a public network.
It's simple, really.
Windows assumes that your private networks - like your home or work networks - are trusted networks full of other devices you may want to connect to.
Windows assumes that public networks are full of other people's devices you don't want to connect to, so it uses different settings.
How to Switch a Network From Public to Private or Private to Public
You normally make this decision the first time you connect to a network.
Windows will ask whether you want your PC to be discoverable on that network.
if you select Yes, Windows sets the network as Private.
If you select No, Windows sets the network as public.
You can see whether a network is private or public from the Network and Sharing Center window in the Control Panel.
On Windows 7, you can click the link right below the network's name here and set the network to either "Home Network," "Work Network," or "Public Network." A Home network is a Private network, while a Work network is like a Private network where discovery is enabled but Homegroup sharing isn't.
![]() To switch a network to public or private on Windows 10, you'll need to use the Settings app.
If you're using a Wi-Fi connection, first connect to the Wi-Fi network you want to change.
Launch the Settings app, select "Network & Internet," select "Wi-Fi," scroll down, and click "Advanced options."
If you're using a wired Ethernet connection, connect to that network.
Launch the Settings app, select "Network & Internet," select "Ethernet," and click the name of your Ethernet connection.
To switch a network to public or private on Windows 10, you'll need to use the Settings app.
If you're using a Wi-Fi connection, first connect to the Wi-Fi network you want to change.
Launch the Settings app, select "Network & Internet," select "Wi-Fi," scroll down, and click "Advanced options."
If you're using a wired Ethernet connection, connect to that network.
Launch the Settings app, select "Network & Internet," select "Ethernet," and click the name of your Ethernet connection.
![]() You'll see a few options for whichever Wi-Fi or Ethernet network you're currently connected to.
The "Make this PC discoverable" option controls whether a network is public or private.
Set it to "On" and Windows will treat the network as a private one.
Set it to "Off" and Windows will treat the network as a public one.
It's a bit confusing because the Control Panel still refers to "Public" and "Private" networks, while the Settings app just refers to whether a PC is "discoverable".
However, these are the same setting - it's just worded and exposed in a different way.
Toggling this switch in the Settings app will switch a network between Public and Private in the Control Panel.
You'll see a few options for whichever Wi-Fi or Ethernet network you're currently connected to.
The "Make this PC discoverable" option controls whether a network is public or private.
Set it to "On" and Windows will treat the network as a private one.
Set it to "Off" and Windows will treat the network as a public one.
It's a bit confusing because the Control Panel still refers to "Public" and "Private" networks, while the Settings app just refers to whether a PC is "discoverable".
However, these are the same setting - it's just worded and exposed in a different way.
Toggling this switch in the Settings app will switch a network between Public and Private in the Control Panel.
![]()
How to Customize Discovery and Firewall Settings
Windows 10 is clearly trying to simplify things by omitting any further options from the Settings app and just referring to whether a network is "discoverable" or not.
However, there are still a variety of options in the Control Panel that take effect differently on public and private networks.
To adjust discovery settings, open the Control Panel, select "View network status and tasks" under Network and Internet, and click "Change advanced sharing settings." From here, you can control network discovery, file sharing, and Homegroup settings for public and private networks.
You could even enable discovery on public networks, if you wanted to do this for some reason.
Or, you could disable discovery on private networks.
By default, older-style Windows "file and printer sharing" is disabled on both types of networks, but you can enable it on either or both.
![]() The Windows Firewall also has different settings for private and public networks.
In the Control Panel, you can click "System and Security" and then click "Windows Firewall" configure the built-in firewall's options.
For example, you could have Windows disable the firewall on private networks but enable it on public ones, if you liked - but we definitely don't recommend this.
You can also click "Allow an app or feature through Windows Firewall" and you'll be able to adjust firewall rules to behave differently on public networks or private ones.
The Windows Firewall also has different settings for private and public networks.
In the Control Panel, you can click "System and Security" and then click "Windows Firewall" configure the built-in firewall's options.
For example, you could have Windows disable the firewall on private networks but enable it on public ones, if you liked - but we definitely don't recommend this.
You can also click "Allow an app or feature through Windows Firewall" and you'll be able to adjust firewall rules to behave differently on public networks or private ones.
![]() Set publicly accessible networks to public and ones at your home or workplace to private.
if you're not sure which - for example, if you're at a friend's house - you can always just set the network to public.
You'd only need to set a network to private if you planned on using network discovery and file-sharing features.
Set publicly accessible networks to public and ones at your home or workplace to private.
if you're not sure which - for example, if you're at a friend's house - you can always just set the network to public.
You'd only need to set a network to private if you planned on using network discovery and file-sharing features.
Performing Networking Tasks
Performing Networking Tasks
Because TCP/IP is the most commonly used network protocol, most low-level network protocol administration tasks involve TCP/IP.
In this section, we use PowerShell and WMI to do these tasks.
Listing IP Addresses for a Computer
To get all IP addresses in use on the local computer, use the following command:
Get-CimInstance -Class Win32_NetworkAdapterConfiguration -Filter IPEnabled=$true |
   Select-Object -ExpandProperty IPAddress
Since the IPAddress property of a Win32_NetworkAdapterConfiguration object is an array, you must use the ExpandProperty parameter of Select-Object to see the entire list of addresses.
Output
10.0.0.1
fe80::60ea:29a7:a233:7cb7
2601:600:a27f:a470:f532:6451:5630:ec8b
2601:600:a27f:a470:e167:477d:6c5c:342d
2601:600:a27f:a470:b021:7f0d:eab9:6299
2601:600:a27f:a470:a40e:ebce:1a8c:a2f3

2601:600:a27f:a470:613c:12a2:e0e0:bd89
2601:600:a27f:a470:444f:17ec:b463:7edd
2601:600:a27f:a470:10fd:7063:28e9:c9f3
2601:600:a27f:a470:60ea:29a7:a233:7cb7
2601:600:a27f:a470::2ec1
Using the Get-Member cmdlet, you can see that the IPAddress property is an array:
Get-CimInstance -Class Win32_NetworkAdapterConfiguration -Filter IPEnabled=$true |
    Get-Member -Name IPAddress
   TypeName: Microsoft.Management.Infrastructure.CimInstance#root/cimv2/Win32_NetworkAdapterConfiguration
Name      MemberType Definition
----      ---------- ----------
IPAddress Property   string[] IPAddress {get;}
The IPAddress property for each network adapter is actually an array.
The braces in the definition indicate that IPAddress is not a System.String value, but an array of System.String values.
Listing IP Configuration Data
To display detailed IP configuration data for each network adapter, use the following command:
Get-CimInstance -Class Win32_NetworkAdapterConfiguration -Filter IPEnabled=$true
The default display for the network adapter configuration object is a very reduced set of the available information.
For in-depth inspection and troubleshooting, use Select-Object or a formatting cmdlet, such as Format-List, to specify the properties to be displayed.
In modern TCP/IP networks you are probably not interested in IPX or WINS properties.
You can use the ExcludeProperty parameter of Select-Object to hide properties with names that begin with "WINS" or "IPX".
Get-CimInstance -Class Win32_NetworkAdapterConfiguration -Filter IPEnabled=$true |

    Select-Object -ExcludeProperty IPX*,WINS*
This command returns detailed information about DHCP, DNS, routing, and other minor IP configuration properties.
Pinging Computers
You can perform a simple ping against a computer using by Win32_PingStatus.
The following command performs the ping, but returns lengthy output:
Get-CimInstance -Class Win32_PingStatus -Filter "Address='127.0.0.1'"
A more useful form for summary information a display of the Address, ResponseTime, and StatusCode properties, as generated by the following command.
The Autosize parameter of Format-Table resizes the table columns so that they display properly in PowerShell.
Get-CimInstance -Class Win32_PingStatus -Filter "Address='127.0.0.1'" |
  Format-Table -Property Address,ResponseTime,StatusCode -Autosize
Address   ResponseTime StatusCode
-------   ------------ ----------

127.0.0.1            0          0
A StatusCode of 0 indicates a successful ping.
You can use an array to ping multiple computers with a single command.
Because there is more than one address, use the ForEach-Object to ping each address separately:
'127.0.0.1','localhost','bing.com' |
  ForEach-Object -Process {
    Get-CimInstance -Class Win32_PingStatus -Filter ("Address='$_'") |
      Select-Object -Property Address,ResponseTime,StatusCode
  }
You can use the same command format to ping all of the computers on a subnet, such as a private network that uses network number 192.168.1.0 and a standard Class C subnet mask (255.255.255.0).,
Only addresses in the range of 192.168.1.1 through 192.168.1.254 are legitimate local addresses (0 is always reserved for the network number and 255 is a subnet broadcast address).
To represent an array of the numbers from 1 through 254 in PowerShell, use the expression 1..254.
A complete subnet ping can be performed by adding each value in the range to a partial address in the ping statement:
1..254| ForEach-Object -Process {
  Get-CimInstance -Class Win32_PingStatus -Filter ("Address='192.168.1.$_'") } |
    Select-Object -Property Address,ResponseTime,StatusCode
Note that this technique for generating a range of addresses can be used elsewhere as well.
You can generate a complete set of addresses in this way:
$ips = 1..254 | ForEach-Object -Process {'192.168.1.' + $_}
Retrieving Network Adapter Properties
Earlier, we mentioned that you could retrieve general configuration properties using the
Win32_NetworkAdapterConfiguration class.
Although not strictly TCP/IP information, network adapter information such as MAC addresses and adapter types can be useful for understanding what is going on with a computer.
To get a summary of this information, use the following command:
Get-CimInstance -Class Win32_NetworkAdapter -ComputerName .
Assigning the DNS Domain for a Network Adapter
To assign the DNS domain for automatic name resolution, use the SetDNSDomain method of the
Win32_NetworkAdapterConfiguration.
The Query parameter of Invoke-CimMethod takes a WQL query string.
The cmdlet calls the method specified on each instance returned by the query.
$wql = 'SELECT * FROM Win32_NetworkAdapterConfiguration WHERE IPEnabled=True'
$args = @{ DnsDomain = 'fabrikam.com'}
Invoke-CimMethod -MethodName SetDNSDomain -Arguments $args -Query $wql
Filtering on IPEnabled=True is necessary, because even on a network that uses only TCP/IP, several of the network adapter configurations on a computer are not true TCP/IP adapters.
They are general software elements supporting RAS, VPN, QoS, and other services for all adapters and thus do not have an address of their own.
Performing DHCP Configuration Tasks
Modifying DHCP details involves working with a set of network adapters, just as the DNS configuration does.
There are several distinct actions you can perform using WMI, and we will step through a few of the common ones.
Determining DHCP-Enabled Adapters
To find the DHCP-enabled adapters on a computer, use the following command:
Get-CimInstance -Class Win32_NetworkAdapterConfiguration -Filter "DHCPEnabled=$true"
To exclude adapters with IP configuration problems, you can retrieve only IP-enabled adapters:
Get-CimInstance -Class Win32_NetworkAdapterConfiguration -Filter "IPEnabled=$true and DHCPEnabled=$true"
Retrieving DHCP Properties
Because DHCP-related properties for an adapter generally begin with DHCP, you can use the Property parameter of Format-Table to display only those properties:
Get-CimInstance -Class Win32_NetworkAdapterConfiguration -Filter  "IPEnabled=$true and DHCPEnabled=$true" |
  Format-Table -Property DHCP*
Enabling DHCP on Each Adapter
To enable DHCP on all adapters, use the following command:
$wql = 'SELECT * from Win32_NetworkAdapterConfiguration WHERE IPEnabled=True and DHCPEnabled=False'
Invoke-CimMethod -MethodName ReleaseDHCPLease -Query $wql
Using the filter statement IPEnabled=True and DHCPEnabled=False avoids enabling DHCP where it's already enabled.
Releasing and Renewing DHCP Leases on Specific Adapters
Instances of the Win32_NetworkAdapterConfiguration class has ReleaseDHCPLease and
RenewDHCPLease methods.
Both are used in the same way.
In general, use these methods if you only need to release or renew addresses for an adapter on a specific subnet.
The easiest way to filter adapters on a subnet is to choose only the adapter configurations that use the gateway for that subnet.
For example, the following command releases all DHCP leases on adapters on the local computer that are obtaining DHCP leases from 192.168.1.254:
$wql = 'SELECT * from Win32_NetworkAdapterConfiguration WHERE DHCPServer="192.168.1.1"'
Invoke-CimMethod -MethodName ReleaseDHCPLease -Query $wql
The only change for renewing a DHCP lease is to use the RenewDHCPLease method instead of the
ReleaseDHCPLease method:
$wql = 'SELECT * from Win32_NetworkAdapterConfiguration WHERE DHCPServer="192.168.1.1"'
Invoke-CimMethod -MethodName RenewDHCPLease -Query $wql
Note
When using these methods on a remote computer, be aware that you can lose access to the remote system if you are connected to it through the adapter with the released or renewed lease.
Releasing and Renewing DHCP Leases on All Adapters
You can perform global DHCP address releases or renewals on all adapters by using the
Win32_NetworkAdapterConfiguration methods, ReleaseDHCPLeaseAll and RenewDHCPLeaseAll.
However, the command must apply to the WMI class, rather than a particular adapter, because releasing and renewing leases globally is performed on the class, not on a specific adapter.
The Invoke-CimMethod cmdlet can call the methods of a class.
Invoke-CimMethod -ClassName Win32_NetworkAdapterConfiguration -MethodName ReleaseDHCPLeaseAll
You can use the same command format to invoke the RenewDHCPLeaseAll method:
Invoke-CimMethod -ClassName Win32_NetworkAdapterConfiguration -MethodName RenewDHCPLeaseAll
Creating a Network Share
To create a network share, use the Create method of Win32_Share:
Invoke-CimMethod -ClassName Win32_Share -MethodName Create -Arguments @{
    Path = 'C:\temp'
    Name = 'TempShare'
    Type = [uint32]0 #Disk Drive
    MaximumAllowed = [uint32]25
    Description = 'test share of the temp folder'
}
This is equivalent to the following net share command on Windows:
net share tempshare=c:\temp /users:25 /remark:"test share of the temp folder"
To call a method of a WMI class that takes parameters you must know what parameters are available and the types of those parameters.
For example, you can list the methods of the Win32_Class with the following commands:
(Get-CimClass -ClassName Win32_Share).CimClassMethods
Name          ReturnType Parameters                                   Qualifiers
----          ---------- ----------                                   ----------
Create            UInt32 {Access, Description, MaximumAllowed, Name…} {Constructor, Implemented, MappingStrings, Stati…

SetShareInfo      UInt32 {Access, Description, MaximumAllowed}        {Implemented, MappingStrings}
GetAccessMask     UInt32 {}                                           {Implemented, MappingStrings}
Delete            UInt32 {}                                           {Destructor, Implemented, MappingStrings}
Use the following command to list the parameters of the Create method.
(Get-CimClass -ClassName Win32_Share).CimClassMethods['Create'].Parameters
Name            CimType Qualifiers                                  ReferenceClassName
----            ------- ----------                                  ------------------
Access         Instance {EmbeddedInstance, ID, In, MappingStrings…}

Description      String {ID, In, MappingStrings, Optional}
MaximumAllowed   UInt32 {ID, In, MappingStrings, Optional}
Name             String {ID, In, MappingStrings}
Password         String {ID, In, MappingStrings, Optional}

Path             String {ID, In, MappingStrings}
Type             UInt32 {ID, In, MappingStrings}
You can also read the documentation for
Create method of the
Win32_Share class.
Removing a Network Share
You can remove a network share with Win32_Share, but the process is slightly different from creating a share, because you need to retrieve the specific instance to be removed, rather than the
Win32_Share class.
The following example deletes the share TempShare:
$wql = 'SELECT * from Win32_Share WHERE Name="TempShare"'
Invoke-CimMethod -MethodName Delete -Query $wql
Connecting a Windows Accessible Network Drive
The New-PSDrive cmdlet can create a PowerShell drive that is mapped to a network share.
New-PSDrive -Name "X" -PSProvider "FileSystem" -Root "\\Server01\Public"
However, drives created this way are only available to PowerShell session where they are created.
To map a drive that is available outside of PowerShell (or to other PowerShell sessions), you must use the Persist parameter.
New-PSDrive -Persist -Name "X" -PSProvider "FileSystem" -Root "\\Server01\Public"
Note
Persistently mapped drives may not be available when running in an elevated context.
This is the default behavior of Windows UAC.
For more information, see the following article:
Mapped drives are not available from an elevated prompt when UAC is configured to Prompt for credentials
check the PowerShell version
Get-Host
The Get-Host command and $host commands
The basic ‘client-server’ dynamic that PowerShell uses is the concept of a host.
A host is a program that is hosting PowerShell.
You can have multiple versions of PowerShell hosts installed on a computer, so each engine of PowerShell is its own host.
You can use the Get-Host command to get an idea of the version of PowerShell you’re running.
Get-Host
The $host variable is an automatic variable that returns the same output as the above ‘Get-Host’ command.
$host
$host.Version
The $host and $host.Version commands
The $PSVersionTable command
The $PSVersionTable command not only returns the version of PowerShell, but also the ‘Edition’.
Incidentally, this command will also report if you’re running PowerShell Core or PowerShell Desktop.
$PSVersionTable
 Step 2) Power Shell Window Opens
 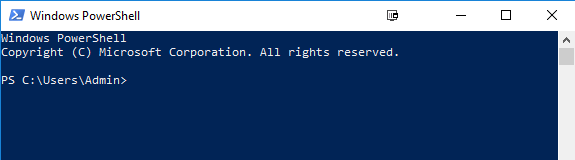 PowerShell Cmdlet
A cmdlet which is also called Command let is a is a lightweight command used in the Window base PowerShell environment.
PowerShell invokes these cmdlets in the command prompt.
You can create and invoke cmdlets command using PowerShell APIS.
Cmdlet vs. Command:
Cmdlets are different from commands in other command-shell environments in the following manners −
Cmdlets are .NET Framework class objects It can't be executed separately
Cmdlets can construct from as few as a dozen lines of code
Parsing, output formatting, and error presentation are not handled by cmdlets
Cmdlets process works on objects.
So text stream and objects can't be passed as output for pipelining
Cmdlets are record-based as so it processes a single object at a time
Most of the PowerShell functionality comes from Cmdlet's which is always in verb-noun format and not plural.
Moreover, Cmdlet's return objects not text.
A cmdlet is a series of commands, which is more than one line, stored in a text file with a .ps1 extension.
A cmdlet always consists of a verb and a noun, separated with a hyphen.
Some of the verbs use for you to learn PowerShell is:
Get — To get something
Start — To run something
Out — To output something
Stop — To stop something that is running
Set — To define something
New — To create something
PowerShell commands
Following is a list of important PowerShell Commands:
Get-Help: Help about PowerShell commands and topics
Example: Display help information about the command Format-Table Get-Help Format-Table
PowerShell Cmdlet
A cmdlet which is also called Command let is a is a lightweight command used in the Window base PowerShell environment.
PowerShell invokes these cmdlets in the command prompt.
You can create and invoke cmdlets command using PowerShell APIS.
Cmdlet vs. Command:
Cmdlets are different from commands in other command-shell environments in the following manners −
Cmdlets are .NET Framework class objects It can't be executed separately
Cmdlets can construct from as few as a dozen lines of code
Parsing, output formatting, and error presentation are not handled by cmdlets
Cmdlets process works on objects.
So text stream and objects can't be passed as output for pipelining
Cmdlets are record-based as so it processes a single object at a time
Most of the PowerShell functionality comes from Cmdlet's which is always in verb-noun format and not plural.
Moreover, Cmdlet's return objects not text.
A cmdlet is a series of commands, which is more than one line, stored in a text file with a .ps1 extension.
A cmdlet always consists of a verb and a noun, separated with a hyphen.
Some of the verbs use for you to learn PowerShell is:
Get — To get something
Start — To run something
Out — To output something
Stop — To stop something that is running
Set — To define something
New — To create something
PowerShell commands
Following is a list of important PowerShell Commands:
Get-Help: Help about PowerShell commands and topics
Example: Display help information about the command Format-Table Get-Help Format-Table
 Get-Command: Get information about anything that can be invoked
Example: To generate a list of cmdlets, functions installed in your machine Get-Command
Get-Command: Get information about anything that can be invoked
Example: To generate a list of cmdlets, functions installed in your machine Get-Command
 Get-Service: Finds all cmdlets with the word 'service' in it.
Example: Get all services that begin with "vm" Get-Service "vm*"
Get-Service: Finds all cmdlets with the word 'service' in it.
Example: Get all services that begin with "vm" Get-Service "vm*"
 Get- Member: Show what can be done with an object
Example: Get members of the vm processes.
Get-Service "vm*" | Get-Member
Get- Member: Show what can be done with an object
Example: Get members of the vm processes.
Get-Service "vm*" | Get-Member
 Other Commands:
Get Module Shows packages of commands
Get Content This cmdlet can take a file and process its contents and do something with it
Get- get Finds all cmdlets starting with the word 'get-
Example: Create a Folder New-Item -Path 'X:\Guru99' -ItemType Directory
Output
Other Commands:
Get Module Shows packages of commands
Get Content This cmdlet can take a file and process its contents and do something with it
Get- get Finds all cmdlets starting with the word 'get-
Example: Create a Folder New-Item -Path 'X:\Guru99' -ItemType Directory
Output  Powershell Data types:
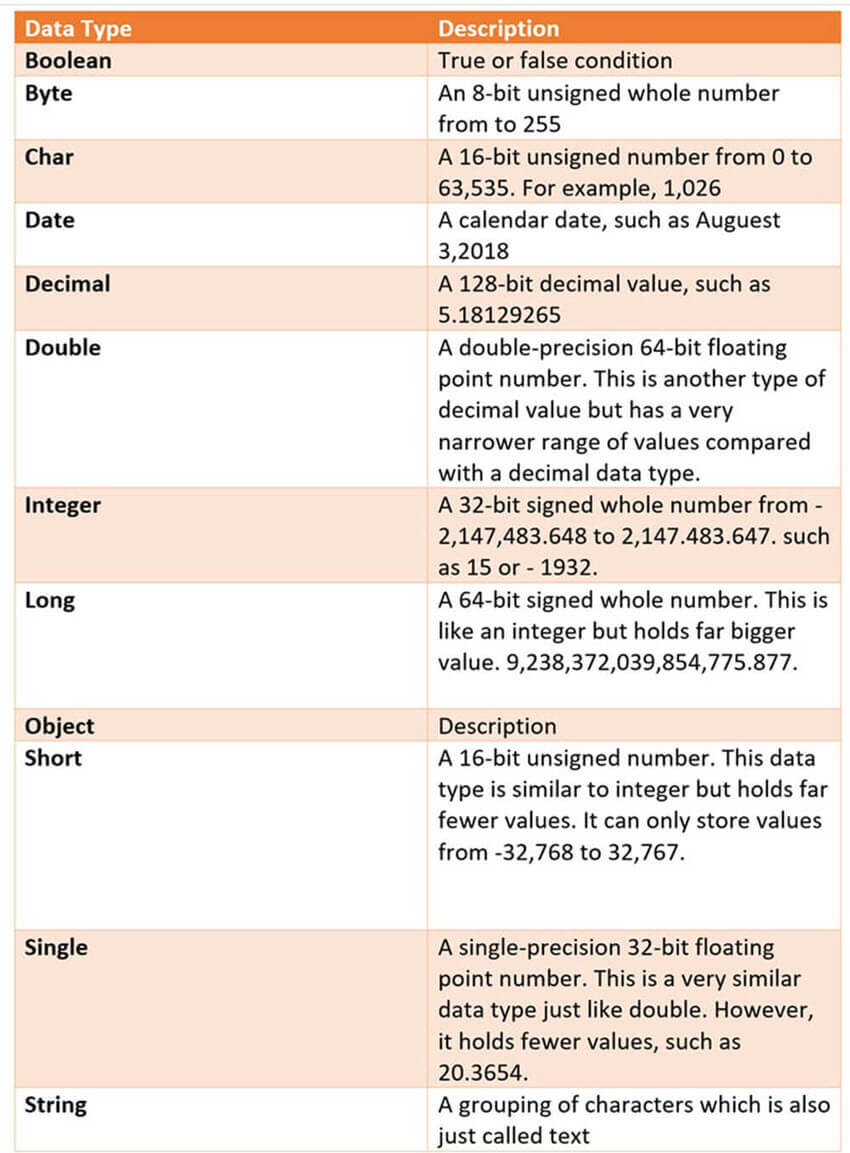 Special Variables


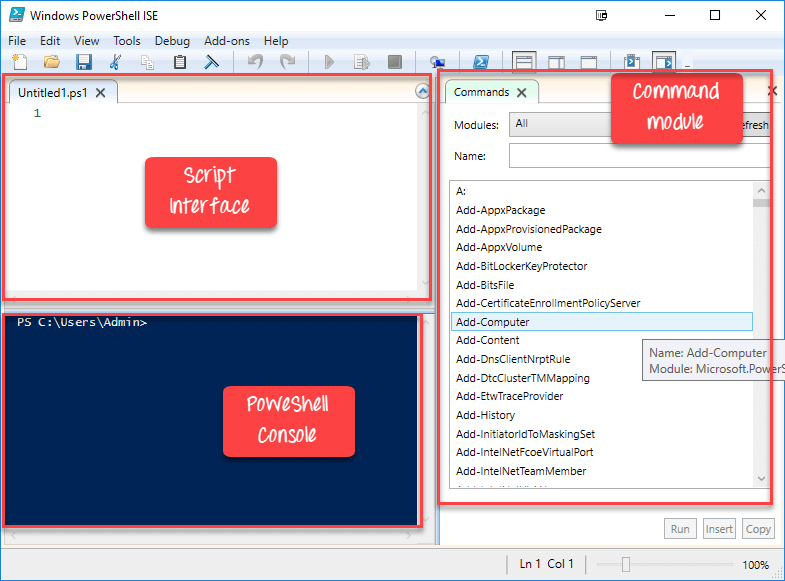
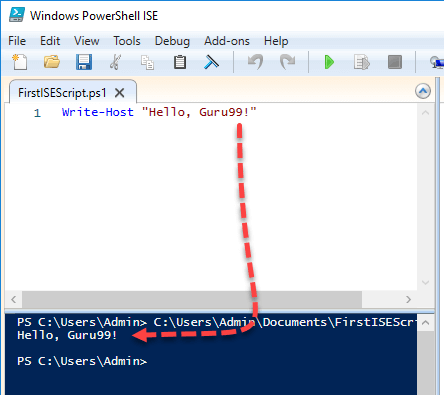

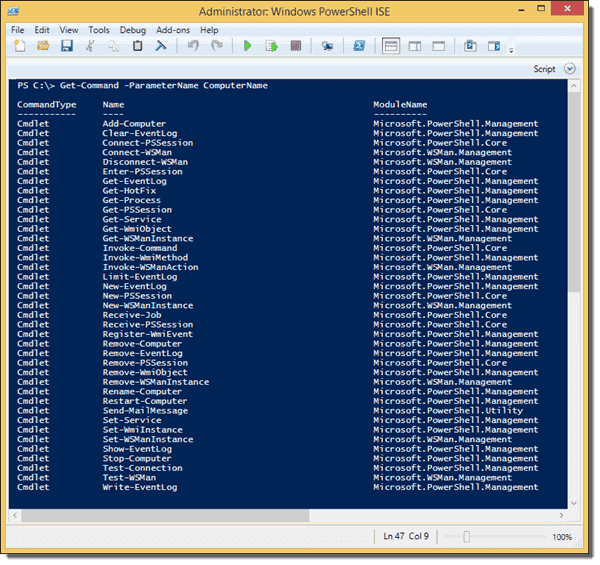 Cmdlets with the ComputerName parameter
In addition to the built-in cmdlets, quite a few PowerShell modules exist that support remote management.
For instance, you can manage Active Directory from your workstation after installing the Active Directory module.
Whenever one of these options exists, I would avoid enabling PowerShell Remoting on the remote machine.
Because PowerShell Remoting presents a security risk, it has to be enabled even within an Active Directory domain.
You can also use Remoting on workgroup computers, but you will have to take care of a few extra configurations.
If you don’t configure Remoting properly, you will run into errors such as WinRM cannot process the request or Access denied.
In the latter case, you probably failed to provide admin credentials.
PowerShell Remoting depends on Windows Remote Management (WinRM), which is Microsoft’s implementation of the WS-Management (WS-Man) protocol.
The protocol relies on HTTP or HTTPS and uses the TCP ports 5985 and 5986, respectively.
WS-Management encrypts all PowerShell communication even if you only work with HTTP.
However, this kind of encryption is vulnerable to man-in-the middle attacks.
I therefore recommended to use HTTPS instead of HTTP in insecure networks.
I will say more about this topic in a follow-up post.
Cmdlets with the ComputerName parameter
In addition to the built-in cmdlets, quite a few PowerShell modules exist that support remote management.
For instance, you can manage Active Directory from your workstation after installing the Active Directory module.
Whenever one of these options exists, I would avoid enabling PowerShell Remoting on the remote machine.
Because PowerShell Remoting presents a security risk, it has to be enabled even within an Active Directory domain.
You can also use Remoting on workgroup computers, but you will have to take care of a few extra configurations.
If you don’t configure Remoting properly, you will run into errors such as WinRM cannot process the request or Access denied.
In the latter case, you probably failed to provide admin credentials.
PowerShell Remoting depends on Windows Remote Management (WinRM), which is Microsoft’s implementation of the WS-Management (WS-Man) protocol.
The protocol relies on HTTP or HTTPS and uses the TCP ports 5985 and 5986, respectively.
WS-Management encrypts all PowerShell communication even if you only work with HTTP.
However, this kind of encryption is vulnerable to man-in-the middle attacks.
I therefore recommended to use HTTPS instead of HTTP in insecure networks.
I will say more about this topic in a follow-up post.
 The PSComputerName property
You need this additional property to ascribe the results to computers if you executed commands on multiple machines.
Okay, an additional property is not really a downside, but the result objects also lack a crucial feature.
Try this:
Get-Process | Get-Member -MemberType Method
The PSComputerName property
You need this additional property to ascribe the results to computers if you executed commands on multiple machines.
Okay, an additional property is not really a downside, but the result objects also lack a crucial feature.
Try this:
Get-Process | Get-Member -MemberType Method
 The methods of the Process object
And then this:
Invoke-Command -ComputerName localhost -Scriptblock {Get-Process} | Get-Member -MemberType Method
The methods of the Process object
And then this:
Invoke-Command -ComputerName localhost -Scriptblock {Get-Process} | Get-Member -MemberType Method
 The methods of a deserialized object
Obviously, PowerShell stripped off all the interesting methods.
In this case, this means that you can’t use the object that Invoke-Command returns to kill a remote process because the Kill() method is unavailable.
Another thing you notice is that the TypeNames are different.
In the first case, it is System.Diagnostics.Process, and the second command returns Deserialized.System.Diagnostics.Process.
If you execute a command with Invoke-Command, it packs the result object in XML, transmits it to the calling session, and creates a so-called static object that lacks all methods except GetType() and ToString().
The conversion to XML is called serialization; the opposite process is deserialization.
This is why TypeName is “Deserialized.” The lack of methods makes sense because the objects to which you could apply the methods (in our example, the processes) are only available in the remote session, and you therefore can’t manipulate them in the local session.
The one remaining question is how you can use methods of objects on remote machines.
Let’s stay with our example from above.
Because the Kill() method is unavailable in the deserialized static object, you have to kill the process in the remote session before the result object is transmitted to your local session.
The following command kills Notepad on the remote computer:
Invoke-Command -ComputerName $RemoteComputer -ScriptBlock {(Get-Process | Where -Property ProcessName -eq notepad).Kill()}
Thus, you can access methods of PSSessions objects.
All you have to do is build the logic that needs the methods, not in your control script on the local computer but in the script that runs on the remote machine.
In one of my next posts, I will talk about running PowerShell commands remotely in disconnected sessions.
PowerShell Remoting
Enable PowerShell Remoting
Enable PowerShell Remoting on a standalone (workgroup) computer
Use PowerShell Invoke-Command to run scripts on remote computers
PowerShell remote jobs - InDisconnectedSession, AsJob, and Start-Job
PowerShell Remoting over HTTPS with a self-signed SSL certificate
PowerShell disconnected remote sessions
PowerShell Remoting without administrator rights
Restricting the rights of PowerShell users with a constrained session configuration
Constrained PowerShell endpoints - Visible cmdlets, session types, and language modes
Enabling PowerShell remoting fails due to Public network connection type
The methods of a deserialized object
Obviously, PowerShell stripped off all the interesting methods.
In this case, this means that you can’t use the object that Invoke-Command returns to kill a remote process because the Kill() method is unavailable.
Another thing you notice is that the TypeNames are different.
In the first case, it is System.Diagnostics.Process, and the second command returns Deserialized.System.Diagnostics.Process.
If you execute a command with Invoke-Command, it packs the result object in XML, transmits it to the calling session, and creates a so-called static object that lacks all methods except GetType() and ToString().
The conversion to XML is called serialization; the opposite process is deserialization.
This is why TypeName is “Deserialized.” The lack of methods makes sense because the objects to which you could apply the methods (in our example, the processes) are only available in the remote session, and you therefore can’t manipulate them in the local session.
The one remaining question is how you can use methods of objects on remote machines.
Let’s stay with our example from above.
Because the Kill() method is unavailable in the deserialized static object, you have to kill the process in the remote session before the result object is transmitted to your local session.
The following command kills Notepad on the remote computer:
Invoke-Command -ComputerName $RemoteComputer -ScriptBlock {(Get-Process | Where -Property ProcessName -eq notepad).Kill()}
Thus, you can access methods of PSSessions objects.
All you have to do is build the logic that needs the methods, not in your control script on the local computer but in the script that runs on the remote machine.
In one of my next posts, I will talk about running PowerShell commands remotely in disconnected sessions.
PowerShell Remoting
Enable PowerShell Remoting
Enable PowerShell Remoting on a standalone (workgroup) computer
Use PowerShell Invoke-Command to run scripts on remote computers
PowerShell remote jobs - InDisconnectedSession, AsJob, and Start-Job
PowerShell Remoting over HTTPS with a self-signed SSL certificate
PowerShell disconnected remote sessions
PowerShell Remoting without administrator rights
Restricting the rights of PowerShell users with a constrained session configuration
Constrained PowerShell endpoints - Visible cmdlets, session types, and language modes
Enabling PowerShell remoting fails due to Public network connection type
 In Windows 7 or 8, hit Start, and then type "powershell." Right-click the result and choose "Run as administrator."
 In the PowerShell window, type the following cmdlet (PowerShell's name for a command), and then hit Enter:
Enable-PSRemoting -Force
In the PowerShell window, type the following cmdlet (PowerShell's name for a command), and then hit Enter:
Enable-PSRemoting -Force
 This command starts the WinRM service, sets it to start automatically with your system, and creates a firewall rule that allows incoming connections.
The
This command starts the WinRM service, sets it to start automatically with your system, and creates a firewall rule that allows incoming connections.
The  And remember, you'll need to run those two cmdlets on the PC to which you want to connect, as well as on any PCs you want to connect from.


 Your prompt changes to indicate the remote computer to which you're connected, and you can execute any number of PowerShell cmdlets directly on the remote system.
 To switch a network to public or private on Windows 10, you'll need to use the Settings app.
If you're using a Wi-Fi connection, first connect to the Wi-Fi network you want to change.
Launch the Settings app, select "Network & Internet," select "Wi-Fi," scroll down, and click "Advanced options."
If you're using a wired Ethernet connection, connect to that network.
Launch the Settings app, select "Network & Internet," select "Ethernet," and click the name of your Ethernet connection.
To switch a network to public or private on Windows 10, you'll need to use the Settings app.
If you're using a Wi-Fi connection, first connect to the Wi-Fi network you want to change.
Launch the Settings app, select "Network & Internet," select "Wi-Fi," scroll down, and click "Advanced options."
If you're using a wired Ethernet connection, connect to that network.
Launch the Settings app, select "Network & Internet," select "Ethernet," and click the name of your Ethernet connection.
 You'll see a few options for whichever Wi-Fi or Ethernet network you're currently connected to.
The "Make this PC discoverable" option controls whether a network is public or private.
Set it to "On" and Windows will treat the network as a private one.
Set it to "Off" and Windows will treat the network as a public one.
It's a bit confusing because the Control Panel still refers to "Public" and "Private" networks, while the Settings app just refers to whether a PC is "discoverable".
However, these are the same setting - it's just worded and exposed in a different way.
Toggling this switch in the Settings app will switch a network between Public and Private in the Control Panel.
You'll see a few options for whichever Wi-Fi or Ethernet network you're currently connected to.
The "Make this PC discoverable" option controls whether a network is public or private.
Set it to "On" and Windows will treat the network as a private one.
Set it to "Off" and Windows will treat the network as a public one.
It's a bit confusing because the Control Panel still refers to "Public" and "Private" networks, while the Settings app just refers to whether a PC is "discoverable".
However, these are the same setting - it's just worded and exposed in a different way.
Toggling this switch in the Settings app will switch a network between Public and Private in the Control Panel.

 The Windows Firewall also has different settings for private and public networks.
In the Control Panel, you can click "System and Security" and then click "Windows Firewall" configure the built-in firewall's options.
For example, you could have Windows disable the firewall on private networks but enable it on public ones, if you liked - but we definitely don't recommend this.
You can also click "Allow an app or feature through Windows Firewall" and you'll be able to adjust firewall rules to behave differently on public networks or private ones.
The Windows Firewall also has different settings for private and public networks.
In the Control Panel, you can click "System and Security" and then click "Windows Firewall" configure the built-in firewall's options.
For example, you could have Windows disable the firewall on private networks but enable it on public ones, if you liked - but we definitely don't recommend this.
You can also click "Allow an app or feature through Windows Firewall" and you'll be able to adjust firewall rules to behave differently on public networks or private ones.
 Set publicly accessible networks to public and ones at your home or workplace to private.
if you're not sure which - for example, if you're at a friend's house - you can always just set the network to public.
You'd only need to set a network to private if you planned on using network discovery and file-sharing features.
Set publicly accessible networks to public and ones at your home or workplace to private.
if you're not sure which - for example, if you're at a friend's house - you can always just set the network to public.
You'd only need to set a network to private if you planned on using network discovery and file-sharing features.