https://docs.lmms.io/user-manual/getting-started/faq
FAQ
About
What is LMMS anyway? LMMS is part of a family of softwares known as digital audio workstations, or DAWs. It is a sound generation system, synthesizer, beat/bassline editor and MIDI control system that can power an entire home music studio. With LMMS, sounds and tones can be generated, played, and artfully arranged to create entire tracks with ease. The tools needed to arrange sounds and rhythms to create tracks, layer tracks to create songs, and save songs to an output format are all there, ready for you to use. With a MIDI keyboard, you can also play your music live while composing or performing. Is LMMS comparable to any commercially available software? Users may find LMMS has much in common, at least in principle, with Apple's Garage Band, FL Studio (formerly Fruity Loops), Logic Studio, Beat Machine Pro and similar powerful audio tools. In terms of capability, LMMS easily matches the lower to middle-tier professional software available. This makes LMMS a great introduction to audio production. LMMS is also constantly developing. Is LMMS offered in my language? Possibly. See currently supported languages. Is it free? Yes. LMMS is free and open source. This means that as long as there are people coding for LMMS on their own free time, LMMS will become better and better!2.1.2 Usage
How do I create an instrument track in the Beat/Bassline Editor? Drag it in from the sidebar as you would with the Song Editor! You can open My Samples or My Presets (buttons on the far left side of the window) and double click on the preset to get it there too. How do I change the note an instrument plays in the Beat/Bassline Editor? Click on the instrument button on the track. There's a green bar just above the keyboard at the bottom, an orange square indicates the key that is played. Click on the blue bar to change the note. How do I enable and adjust looping points? Click on the enable/disable loop points button in the song editor or piano roll. It is disabled by default. Two blue arrows will appear in the upper tracking area of the window. You can adjust these loop points by right-clicking and dragging them or pressing middle and right button. I made some piano chords in the Song-Editor but now I want to loop them. How to get them to the Beat+Bassline Editor? Simply hold Ctrl while dragging the instrument handle into the Beat+Bassline Editor. Only the first pattern will follow. How do I import a drums beat I'd made in Hydrogen? As of LMMS 0.4.14, you can import your Hydrogen file directly into LMMS. If you exported it as a MIDI, it can be easily imported with Project > Import. Remember to specify a SoundFont file! If on the other hand, you exported it to WAV, you'll have to use the AudioFileProcessor plugin and import it from there. You can import your MIDI the same way too. How do I import a FLAC, WAV or OGG file? Through the AudioFileProcessor plugin. Can I sell my song that I made in LMMS? Yes. As long as you have just used samples, instruments and effects from LMMS, or know that the external material has correct licenses, you can sell your song created in LMMS. How do I edit the locations in the sidebar when you open a file in LMMS? Highlight the folder that you want to be on the sidebar, select it, and drag it to the sidebar. What do I do when it is pops and clicks at the beginning or end of a note? Turn up the attack or the release knob.2.1.3 Settings
I want to use another soundcard than the default one with LMMS. How to achieve this? It's recommended to set your preferred audio-interface and it's parameters using the setup-dialog. If this doesn't work for some reason, you can also set the environment-variable "AUDIODEV" to whatever your audio-device is (e.g. /dev/dsp for OSS or surround40:1,0 for ALSA). I want to import MIDI files but it tells me I need to specify a default soundfont? First download a soundfont for free from the internet. Then in LMMS go to Edit > Settings > Paths (folder icon). Under the "default soundfont file"-section, you can browse for the downloaded file. What is LMMS anyway? LMMS is part of a family of softwares known as digital audio workstations, or DAWs. It is a sound generation system, synthesizer, beat/bassline editor and MIDI control system that can power an entire home music studio. With LMMS, sounds and tones can be generated, played, and artfully arranged to create entire tracks with ease. \nThe tools needed to arrange sounds and rhythms to create tracks, layer tracks to create songs, and save songs to an output format are all there, ready for you to use. \nWith a MIDI keyboard, you can also play your music live while composing or performing. Is LMMS comparable to any commercially available software? Users may find LMMS has much in common, at least in principle, with Apple's Garage Band, FL Studio (formerly Fruity Loops), Logic Studio, Beat Machine Pro and similar powerful audio tools. In terms of capability, LMMS easily matches the lower to middle-tier professional software available. This makes LMMS a great introduction to audio production. LMMS is also constantly developing. Is LMMS offered in my language? Possibly. See currently supported languages. Is it free? Yes. LMMS is free and open source. This means that as long as there are people coding for LMMS on their own free time, LMMS will become better and better! 2.1.2 Usage How do I create an instrument track in the Beat/Bassline Editor? Drag it in from the sidebar as you would with the Song Editor! You can open My Samples or My Presets (buttons on the far left side of the window) and double click on the preset to get it there too. How do I change the note an instrument plays in the Beat/Bassline Editor? Click on the instrument button on the track. There's a green bar just above the keyboard at the bottom, an orange square indicates the key that is played. Click on the blue bar to change the note. How do I enable and adjust looping points? Click on the enable/disable loop points button in the song editor or piano roll. It is disabled by default. Two blue arrows will appear in the upper tracking area of the window. You can adjust these loop points by right-clicking and dragging them or pressing middle and right button. I made some piano chords in the Song-Editor but now I want to loop them. How to get them to the Beat+Bassline Editor? Simply hold Ctrl while dragging the instrument handle into the Beat+Bassline Editor. Only the first pattern will follow. How do I import a drums beat I'd made in Hydrogen? As of LMMS 0.4.14, you can import your Hydrogen file directly into LMMS. If you exported it as a MIDI, it can be easily imported with Project \u003e Import. Remember to specify a SoundFont file! If on the other hand, you exported it to WAV, you'll have to use the AudioFileProcessor plugin and import it from there. You can import your MIDI the same way too. How do I import a FLAC, WAV or OGG file? Through the AudioFileProcessor plugin. Can I sell my song that I made in LMMS? Yes. As long as you have just used samples, instruments and effects from LMMS, or know that the external material has correct licenses, you can sell your song created in LMMS. How do I edit the locations in the sidebar when you open a file in LMMS? Highlight the folder that you want to be on the sidebar, select it, and drag it to the sidebar. What do I do when it is pops and clicks at the beginning or end of a note? Turn up the attack or the release knob. 2.1.3 Settings I want to use another soundcard than the default one with LMMS. How to achieve this? It's recommended to set your preferred audio-interface and it's parameters using the setup-dialog. If this doesn't work for some reason, you can also set the environment-variable \"AUDIODEV\" to whatever your audio-device is (e.g. /dev/dsp for OSS or surround40:1,0 for ALSA). I want to import MIDI files but it tells me I need to specify a default soundfont?Installation
Minimum System Requirements
OS: Windows 7, MacOS X Lion, Linux CPU: 1.5 GHz x86, x86_64, or ARM-based CPU with 2 cores RAM: 1 GB Available Storage Space: 100 MB LMMS may run on systems that do not meet these requirements, but its performance or stability is not guaranteed.Recommended System Requirements
OS: Windows 10, MacOS X High Sierra, Linux CPU: 2 GHz x86, x86_64, or ARM-based CPU with 4 cores RAM: 4 GB Available Storage Space: 512 MB More CPU cores, higher CPU clock speed, and additional RAM will increase LMMS's capacity to handle large projects and more plugins.Installing LMMS
LMMS is available for Windows, macOS, and Linux. While packages are available for many Linux distros, the AppImage provided at lmms.io/download is the preferred installation method.Building LMMS from Source Code
Visit the LMMS development wiki on GitHub for instructions on how to compile LMMS for Linux. Recommended System Requirements Installing LMMS LMMS is available for Windows , macOS , and Linux . Building LMMS from Source Code Visit the LMMS development wiki on GitHubSettings
The Settings window can be accessed from the Main Menu Bar by clicking "Edit" and then "Settings".General Settings
 The General Settings dialog
Buffer Size
Buffer size determines the latency of the audio coming out of LMMS, but values too low for your computer may cause unwanted audio artifacts that render the program unusable (Faster computers will be able to handle smaller buffer sizes). If you experience pops, crackles, or stuttering audio, an insufficient buffer size is likely the culprit (see 2.3.1.1). As of 1.3, Buffer size settings are listed under Audio Settings.Misc
Enable tooltips: This option enables informational tooltips to appear when hovering over controls. Show restart warning after changing settings: This option enables or disables the warning pop-up window that appears after changing settings. Display volume as dBFS: This option changes volume displays to use dBFS, a standard unit across many digital audio workstations, instead of the default 0-100. Compress project files per default: This option saves storage space by using the compressed.mmpz save file format rather than the larger .mmp format.
One instrument track window mode: This option allows only one open instrument window at a time, meaning LMMS will close the previous instrument window when you open another one.
HQ-mode for output audio-device: This option improves the quality of playback sound for some output devices.
Compact track buttons: This option visually compacts tracks in the Song Editor by hiding track names and rearranging the solo & mute controls for each track.
Sync VST plugins to host playback: This option allows VST plugins to utilize the project tempo, effectively allowing them to synchronize with LMMS.
Enable note labels in piano roll: This option labels notes with their note name in the piano roll when enabled.
Enable waveform display by default: This option allows the master output oscilloscope to be enabled by default.
Keep effects running even without input: This option prevents effects from sleeping when they don't have input.
Create backup file when saving a project: This option creates a backup save file whenever you save a project, when enabled.
Reopen last project file on start: This option opens the last project you worked on when opening LMMS, rather than a blank project, when enabled.
As of 1.3, "Sync VST Plugins to host playback" and "Keep effects running even without input" have been moved to Performance settings, and "HQ-mode for output audio-device" has been moved to Audio settings.
Plugin Embedding
No embedding: display plugins outside of LMMS, as seperate windows. Embed using Qt API: display plugins within LMMS using Qt API. Embed using Win32 API: display plugins within LMMS using Win32 API. As of 1.3, Plugin embedding is listed under Performance Settings.Language
This selects the language in which text is displayed. If your language is not included in the available options, learn how you can contribute to localization efforts here.Directories
.png?alt=media&token=26db6eb5-9cef-484e-9b56-9dd85cb1b068) The Directories dialog
The Directories dialog
Working Directory
This is where the user's own samples, projects, presets, etc. are stored.GIG Directory
This is where the user's own.gig files are stored.
This is typically somewhere in the working directory.
SF2 Directory
This is where the user's own.sf2 files are stored.
This is typically somewhere in the working directory.
VST Plugin Directory
This is where the user's VST plugins are stored. These can be either 32 or 64 bit plugins. LMMS does not yet support VST3 plugins.LADSPA Plugin Directories
This is where the user's LADSPA plugins are stored.STK RawWave Directory
This is where the user's STK RawWave files are stored.Default Soundfont File
This is the location of.sf2 files.
If one is specified, the SF2 Player (see 5.13) will automatically load a default SoundFont when an instance is created.
Themes Directory
Despite the name, this is actually points to where the current theme is stored. To change themes, set this path to the location of the desired theme.Background Artwork
This points to an image used for the background of the main LMMS window. Leave it blank to use the image provided by the current theme.Performance Settings
.png?alt=media&token=0357c8d7-7479-48fc-9488-15c4cdee9558) The Performance Settings dialog
The Performance Settings dialog
Autosave
AUTO SAVE: This slider determines the time between auto-saves. Enable auto-save: This setting allows LMMS to periodically save a backup of your project. Allow auto-save while playing: This setting allows auto-saving during playback.UI Effects vs. Performance
Smooth scroll in Song Editor: This setting enables smooth scrolling in song editor. Show playback cursor in AudioFileProcessor: This setting enables the display of the playback cursor in AudioFileProcessor.Audio Settings
.png?alt=media&token=a338127a-74a2-40fc-b1ff-1a9a73d1f854) The Audio Settings dialog
The Audio Settings dialog
Audio Interface
This option selects how LMMS outputs sound. On macOS and Windows, SDL is the recommended interface. Dummy (no sound output): This option disables audio output. ALSA (Advanced Linux Sound Architecture)*: With this interface, you can choose Devices and Channels. JACK (JACK Audio Connection Kit)†: With this interface, you can choose Clients and Channels. OSS (the Open Sound System)*: With this interface, you can choose Devices and Channels. PortAudio: With this interface, you can choose Backends and Devices. SDL (Simple DirectMedia Layer): SDL only has one option, a text box where you can specify the device. If you leave this blank, a device will be selected automatically. * This setting is only available on Linux operating systems. † This setting is only available on Linux and macOS operating systems. MIDI Settings
.png?alt=media&token=9e496490-ca96-403e-b9fa-dd345e394c3d) The MIDI settings dialog
The MIDI settings dialog
MIDI Interface
This option selects how LMMS receives MIDI input. Dummy (no MIDI support): This option disables MIDI support. WinMM MIDI* Apple MIDI† Jack-MIDI‡: Jack-MIDI only has one option, a text box where you can specify the device. This islmms by default.
* This setting is only available on Windows operating systems.
† This setting is only available on macOS operating systems.
‡ This setting is only available on Linux and macOS operating systems.
General Settings
Buffer Size
Buffer size determines the latency of the audio coming out of LMMS, but values too low for your computer may cause unwanted audio artifacts that render the program unusable (Faster computers will be able to handle smaller buffer sizes).
\nIf you experience pops, crackles, or stuttering audio, an insufficient buffer size is likely the culprit
(see 2.3.1.1)
.
As of 1.3, Buffer size settings are listed under Audio Settings.
Misc
This option saves storage space by using the compressed
.mmpz save file format rather than the larger
.mmp
As of 1.3, \"
Sync VST Plugins to host playback
\" and \"
Keep effects running even without input
\" have been moved to Performance settings, and \"
HQ-mode for output audio-device
\" has been moved to Audio settings.
Plugin Embedding
As of 1.3, Plugin embedding is listed under Performance Settings.
Language
This selects the language in which text is displayed.
Directories
Working Directory
This is where the user's own samples, projects, presets, etc.
are stored.
GIG Directory
This is where the user's own
.gig files are stored.
This is typically somewhere in the working directory.
SF2 Directory
This is where the user's own
.sf2 files are stored.
This is typically somewhere in the working directory.
VST Plugin Directory
This is where the user's VST plugins are stored.
These can be either 32 or 64 bit plugins.
LADSPA Plugin Directories
This is where the user's LADSPA plugins are stored.
STK RawWave Directory
This is where the user's STK RawWave files are stored.
Default Soundfont File
This is the location of
.sf2 files.
If one is specified, the SF2 Player
(see 5.13) will automatically load a default SoundFont when an instance is created.
Themes Directory
Despite the name, this is actually points to where the
current theme is stored.
To change themes, set this path to the location of the desired theme.
Background Artwork
This points to an image used for the background of the main LMMS window.
Leave it blank to use the image provided by the current theme.
Performance Settings
Autosave
UI Effects vs.
Performance
Audio Settings
Audio Interface
This option selects how LMMS outputs sound.
SDL
*
:
†
:
*
:
MIDI Settings
MIDI Interface
This option selects how LMMS receives MIDI input.
‡
:
lmms
† This setting is only available on macOS operating systems.
Troubleshooting
Make sure you are running the latest version of LMMS before troubleshooting issues. The latest version can be found at https://lmms.io/download.General Troubleshooting
My settings won't save
Some users report that they can't save their settings. This is a recurring Windows issue, with reason not known in depth. To solve this problem, follow these steps: Close LMMS. Make sure nothing from LMMS is running in the background. You can look for this in your "Task Manager". (If you don't know how to use "Task Manager", restarting your PC is a good alternative.) In versions older than Windows 8, "Documents and Settings" is the folder you are looking for. In Windows 10, look in your "C:\Users\<Username>\. There is a file called.lmmsrc.xml.
Use the search tool to find this file.
.lmmsrc.xmlYou can't rename this file, but you can move it.
Move it to one of the folders you have there, e.g.
plugins.
Now restart LMMS.
You should be now asked to enter new settings, and these settings should be persistent.
A terminal command version of this process exists:
Run CMD as administrator
Paste this command:
move %USERPROFILE%|.lmmsrc.xml %USERPROFILE%|.lmmsrc.xml.bak
LMMS is taking forever to load a project
Try adding exceptions in your antivirus for files the project depends on, such as: LMMS.exe RemoteVstPlugin.exe Plugins and their related dataAudio Troubleshooting
My Audio is Crackling
Buffer Size
Your buffer size may be too small, resulting in buffer underruns. To fix this, increase your buffer size. Note that this will increase latency.Audio Interface
Certain audio interface configurations don't play nice with LMMS on some systems. If you are on macOS or Windows, make sure you have SDL selected. On Linux, if PulseAudio is producing these unwanted artifacts, try ALSA instead.Track Volume
Your audio within LMMS may be too loud, resulting in digital clipping. This can be fixed by reducing the volume of the instruments in LMMS (either with the "VOL" knobs or through the mixer).Volume Envelopes
If an instrument has attack or release values small enough, the rapid change in volume can sound like clicks or pops at the beginning or end of each note. Increasing the attack and release values for the culprit instrument's volume envelope can fix this kind of clicking.I Can't Hear Anything
Dummy
Certain audio interface configurations (specifically Dummy) just don't work. If you are on macOS or Windows, make sure you have SDL selected. Try to avoid PortAudio if possible.JACK-transport
If you have JACK selected as your audio interface and you are experiencing no audio output, JACK-transport might not be running. Start an application likeqjackctl and click on "play" or its equivalent.
LMMS should automatically should start JACK-transport on startup, but this fails on some systems.
You may also need to connect LMMS to your sound card, using the patch bay in qjackctl.
The Audio Lags or is Delayed
Buffer Size
Buffer size is directly related to latency. If you can, try decreasing your buffer size to minimize latency.Video Troubleshooting
LMMS has very small windows
LINUX Try using a shell script: #!/bin/bash export QT_AUTO_SCREEN_SCALE_FACTOR="0" export QT_SCREEN_SCALE_FACTORS="eDP-1=2.5;HDMI-1=2.5;DP-0=2.5".<absolute path to lmms AppImage> Setchmod +x <script name> and then make a symlink in a desired location.
You have to add all your connected monitors to QT_SCREEN_SCALE_FACTORS in order to make it work with all connected monitors.
Development Troubleshooting
LMMS Segfaults and There are No Error Messages on the Console
Use the GNU Debugger to run LMMS again, and try to replicate the crash: $ gdb lmms GNU gdb 6.X Copyright (C) 2006 Free Software Foundation, Inc. ... (gdb) r Starting program: lmms ... If a segfault happens, LMMS will freeze and you'll get some information on the terminal. Enteringbt or bt full will show a backtrace you can report.
Make sure you have debugging symbols in LMMS.
That usually means compiling with the -g flag and not stripping the symbols afterwards.
I Compiled LMMS With VST-Support, but it Doesn't Work at All
Make sure you didn't pass-fomit-frame-pointer in a FLAG-parameter to configure.
This is known to lead to an unusable LVSL (LMMS VST Support Layer).
General Troubleshooting
My settings won't save
Some users report that they can't save their settings.
This is a recurring Windows issue, with reason not known in depth.
To solve this problem, follow these steps:
, look in your \"C:\\Users\\\u003cUsername\u003e\\.
There is a file called
.lmmsrc.xml
.lmmsrc.xml
You
can't rename this file, but you
can move
plugins
move %USERPROFILE%|.lmmsrc.xml %USERPROFILE%|.lmmsrc.xml.bak
LMMS is taking forever to load a project
Try adding exceptions in your antivirus for files the project depends on, such as:
Audio Troubleshooting
My Audio is Crackling
Buffer Size
Your
buffer size may be too small, resulting in buffer underruns.
To fix this, increase your buffer size.
Note that this will increase latency.
Audio Interface
Certain
audio interface configurations don't play nice with LMMS on some systems.
If you are on macOS or Windows, make sure you have SDL selected.
On Linux, if PulseAudio is producing these unwanted artifacts, try ALSA instead.
Track Volume
Your audio within LMMS may be too loud, resulting in digital clipping.
This can be fixed by reducing the volume of the instruments in LMMS (either with the \"VOL\" knobs or through the mixer).
Volume Envelopes
If an instrument has attack or release values small enough, the rapid change in volume can sound like clicks or pops at the beginning or end of each note.
Increasing the attack and release values for the culprit instrument's volume envelope can fix this kind of clicking.
I Can't Hear Anything
Dummy
Certain
audio interface configurations (specifically Dummy) just don't work.
If you are on macOS or Windows, make sure you have SDL selected.
Try to avoid PortAudio if possible.
JACK-transport
If you have JACK selected as your audio interface and you are experiencing no audio output, JACK-transport might not be running.
Start an application like
qjackctl and click on \"play\" or its equivalent.
LMMS should automatically should start JACK-transport on startup, but this fails on some systems.
You may also need to connect LMMS to your sound card, using the patch bay in
qjackctl
.
The Audio Lags or is Delayed
Buffer Size
Buffer size is directly related to latency.
If you can, try decreasing your buffer size to minimize latency.
Video Troubleshooting
LMMS has very small windows
LINUX
Try using a shell script:
export QT_AUTO_SCREEN_SCALE_FACTOR=\"0\"
Set
chmod +x \u003cscript name\u003e and then make a symlink in a desired location.
Development Troubleshooting
LMMS Segfaults and There are No Error Messages on the Console
Use the GNU Debugger to run LMMS again, and try to replicate the crash:
GNU gdb 6.X
Copyright (C) 2006 Free Software Foundation, Inc.
...
(gdb) r
Starting program: lmms
If a segfault happens, LMMS will freeze and you'll get some information on the terminal.
Entering
bt or
bt full will show a backtrace you can report.
Make sure you have debugging symbols in LMMS.
That usually means compiling with the
-g flag and not stripping the symbols afterwards.
I Compiled LMMS With VST-Support, but it Doesn't Work at All
Make sure you didn't pass
-fomit-frame-pointer
Reporting a Bug
Bug Tracker
For reporting any kind of bugs, use the GitHub issue tracker. Please take a look at other submitted bugs before opening a new item as someone else might have reported the same bug.Reporting Bugs with gdb
If you are using LMMS and encounter a segmentation fault (crash), please include a full backtrace:
Linux
Linux
gdb /usr/bin/lmms
r
Then attempt to replicate the crash.
Once LMMS crashes:
thread apply all backtrace
The output of this command is interesting for us! Please either report it to the issue tracker or email it to the mailing list.
How to Report Bugs without GDB
Linux Linux $ ulimit -l unlimited $ lmms Now when LMMS crashes, there will be a file called "core" in your working directory. The file may be large enough to be worth zipping. For reporting any kind of bugs, use the GitHub issue tracker . Please take a look at other submitted bugs before opening a new item as someone else might have reported the same bug. Reporting Bugs with gdb If you are using LMMS and encounter a segmentation fault (crash), please include a full backtrace: Then attempt to replicate the crash. Once LMMS crashes: The output of this command is interesting for us! Please either report it to the issue tracker or email it to the mailing list . How to Report Bugs without GDB3.1 Interface Overview
There are 11 main parts to the LMMS interface. These are described in detail in their respective pages. For information on the Settings window, refer to this page.Menus
The Main Menu Bar serves as a general menu for LMMS. Main Menu Bar
The Toolbar contains options for managing project files, showing/hiding interface windows, and altering master controls for projects.
Main Menu Bar
The Toolbar contains options for managing project files, showing/hiding interface windows, and altering master controls for projects.
 Tool Bar
The Sidebar is used to introduce resources to a project.
Tool Bar
The Sidebar is used to introduce resources to a project.
 Sidebar (Instrument Plugins tab)
Windows
A majority of the interface contains a number of windows, each serves a different purpose. The Instrument Window contains settings for an instrument. Instrument Window (AudioFileProcessor)
The Song Editor contains all the different sound-generating elements and automation clips in a project file.
Instrument Window (AudioFileProcessor)
The Song Editor contains all the different sound-generating elements and automation clips in a project file.
 Song Editor
The Beat+Baseline Editor is where repetitive loops (such as drum/basslines) can be created and contained.
Song Editor
The Beat+Baseline Editor is where repetitive loops (such as drum/basslines) can be created and contained.
 Beat+Baseline Editor
The Piano Roll allows you to create and edit note sequences.
Beat+Baseline Editor
The Piano Roll allows you to create and edit note sequences.
 Piano Roll
The Automation Editor allows you to create a profile that any connected parameter can follow.
Piano Roll
The Automation Editor allows you to create a profile that any connected parameter can follow.
 Automation Editor
The FX-Mixer is where FX channel routing and manipulation takes place.
Automation Editor
The FX-Mixer is where FX channel routing and manipulation takes place.
 FX-Mixer
The Project Notes window allows you to create notes for yourself in a project file (For example, "B+B is only to be used for drumlines in this project".)
FX-Mixer
The Project Notes window allows you to create notes for yourself in a project file (For example, "B+B is only to be used for drumlines in this project".)
 Project Notes
The Controller Rack is where controllers are added/configured, these controllers allow you to make alterations to connected parameters (like an Automation Clip would).
Project Notes
The Controller Rack is where controllers are added/configured, these controllers allow you to make alterations to connected parameters (like an Automation Clip would).
 Menus
The
Main Menu Bar serves as a general menu for LMMS.
The
Toolbar contains options for managing project files, showing/hiding interface windows, and altering master controls for projects.
The
Sidebar is used to introduce resources to a project.
Windows
A majority of the interface contains a number of windows, each serves a different purpose.
The
Instrument Window contains settings for an instrument.
The
Song Editor contains all the different sound-generating elements and automation clips in a project file.
The
Beat+Baseline Editor is where repetitive loops (such as drum/basslines) can be created and contained.
The
Piano Roll allows you to create and edit note sequences.
The
Automation Editor allows you to create a profile that any connected parameter can follow.
The
FX-Mixer is where FX channel routing and manipulation takes place.
The
Project Notes window allows you to create notes for yourself in a project file (For example, \"B+B is only to be used for drumlines in this project\".)
The
Controller Rack is where controllers are added/configured, these controllers allow you to make alterations to connected parameters (like an Automation Clip would).
Menus
The
Main Menu Bar serves as a general menu for LMMS.
The
Toolbar contains options for managing project files, showing/hiding interface windows, and altering master controls for projects.
The
Sidebar is used to introduce resources to a project.
Windows
A majority of the interface contains a number of windows, each serves a different purpose.
The
Instrument Window contains settings for an instrument.
The
Song Editor contains all the different sound-generating elements and automation clips in a project file.
The
Beat+Baseline Editor is where repetitive loops (such as drum/basslines) can be created and contained.
The
Piano Roll allows you to create and edit note sequences.
The
Automation Editor allows you to create a profile that any connected parameter can follow.
The
FX-Mixer is where FX channel routing and manipulation takes place.
The
Project Notes window allows you to create notes for yourself in a project file (For example, \"B+B is only to be used for drumlines in this project\".)
The
Controller Rack is where controllers are added/configured, these controllers allow you to make alterations to connected parameters (like an Automation Clip would).
3.3 Main Menu Bar
3.3.1 File Menu
The file menu allows you to load, save, and export projects and import MIDI files and Hydrogen files. File menu
New creates a new project
New from template creates a new project from a selected template
Open gives you a dialog to choose an existing project file to open
Recently opened projects opens up a sub-menu listing all the recently opened project files.
In LMMS, you can save projects to two formats:
<myname.mmp> - creates an XML file that can be read in any text editor.
<myname.mmpz> - creates a coded and compressed file (these cannot be read in any text editor).
Save saves the current project.
(For a new project, this functions as "Save As").
Save As gives you a dialog to choose a location to name and save your project in.
(You can also save your project as a template by clicking on the file-type drop-down menu within the dialog.)
Save as new version saves the current project to a new file by adding numbers to the end of the original project name, starting with 01.
Save as default template replaces the default template that LMMS opens upon initialization.
Import allows you to import MIDI and Hydrogen files as new instrument and B+B patterns.
Export allows you to record your project to a file.
(Currently, only .wav, .ogg, and .mp3 are supported for Audio exports.)
Export Tracks allows you to export stems of your project file to a selected folder.
Export MIDI allows you to export your project's midi data as a .mid file.
Quit exits LMMS.
You will be asked if you want to save your project if changes were made since
File menu
New creates a new project
New from template creates a new project from a selected template
Open gives you a dialog to choose an existing project file to open
Recently opened projects opens up a sub-menu listing all the recently opened project files.
In LMMS, you can save projects to two formats:
<myname.mmp> - creates an XML file that can be read in any text editor.
<myname.mmpz> - creates a coded and compressed file (these cannot be read in any text editor).
Save saves the current project.
(For a new project, this functions as "Save As").
Save As gives you a dialog to choose a location to name and save your project in.
(You can also save your project as a template by clicking on the file-type drop-down menu within the dialog.)
Save as new version saves the current project to a new file by adding numbers to the end of the original project name, starting with 01.
Save as default template replaces the default template that LMMS opens upon initialization.
Import allows you to import MIDI and Hydrogen files as new instrument and B+B patterns.
Export allows you to record your project to a file.
(Currently, only .wav, .ogg, and .mp3 are supported for Audio exports.)
Export Tracks allows you to export stems of your project file to a selected folder.
Export MIDI allows you to export your project's midi data as a .mid file.
Quit exits LMMS.
You will be asked if you want to save your project if changes were made since
3.3.2 Edit Menu
 Edit Menu
Undo/Redo do exactly as their names imply, they can also be accessed via the keyboard shortcuts
Edit Menu
Undo/Redo do exactly as their names imply, they can also be accessed via the keyboard shortcuts Ctrl+Z and Shift+Ctrl+Z, respectively.
The Undo/Redo feature only works correctly for some forms of editing.
In particular, in the Piano Roll Editor the bulk move, copy and paste facilities using the selection tool and/or clipboard do not get undone or redone correctly.
The developers are aware of this problem.
The third option is Settings, which opens the Settings dialog.
3.3.3 View Menu
 View Menu
Song Editor, Beat+Baseline Editor, Piano Roll, Automation Editor, FX Mixer, Project Notes, and Controller Rack all focus/open their respective windows.
Volume as dBFS toggles between the default LMMS percentage system and the industry standard dBFS system.
Smooth scroll toggles between instantly snapping to the playerhead position when playing the project, and a smooth transition.
Enable note labels in piano roll toggles labeling notes with their note name in the piano roll.
As of 1.3, the window toggles are:
Song-Editor (Ctrl+1)
Beat & Bassline Editor (Ctrl+2)
Piano-Roll (Ctrl+3)
Automation-Editor (Ctrl+4)
Mixer (Ctrl+5)
Project-Notes (Ctrl+7)
Controller-Rack (Ctrl+6)
View Menu
Song Editor, Beat+Baseline Editor, Piano Roll, Automation Editor, FX Mixer, Project Notes, and Controller Rack all focus/open their respective windows.
Volume as dBFS toggles between the default LMMS percentage system and the industry standard dBFS system.
Smooth scroll toggles between instantly snapping to the playerhead position when playing the project, and a smooth transition.
Enable note labels in piano roll toggles labeling notes with their note name in the piano roll.
As of 1.3, the window toggles are:
Song-Editor (Ctrl+1)
Beat & Bassline Editor (Ctrl+2)
Piano-Roll (Ctrl+3)
Automation-Editor (Ctrl+4)
Mixer (Ctrl+5)
Project-Notes (Ctrl+7)
Controller-Rack (Ctrl+6)
3.3.4 Tools Menu
 Tools Menu
The only option currently in this menu is the LADSPA Plugin Browser.
It can be used to view information about available LADSPA Plugins.
Tools Menu
The only option currently in this menu is the LADSPA Plugin Browser.
It can be used to view information about available LADSPA Plugins.
3.3.5 Help Menu
 Help Menu
There are three items:
Online Help opens the manual (you are here).
What's This? changes your cursor into a help cursor that you can use to click on any part of a LMMS window to see its function/purpose.
About gives you a dialog that lists: LMMS program version, its home page, its key developers, translation information if you are using LMMS in a language other than English, and the GNU GPL license that the software is released under.
The file menu allows you to load, save, and export projects and import MIDI files and Hydrogen files.
creates a new project
mmp
mmpz
saves the current project.
(For a new project, this functions as \"
Save As
gives you a dialog to choose a location to name and save your project in.
(You can also save your project as a
template
allows you to import MIDI and
Hydrogen
allows you to record your project to a file.
(Currently, only .wav, .ogg, and .mp3 are supported for Audio exports.)
allows you to export your project's midi data as a
.mid
3.3.2 Edit Menu
Undo/Redo do exactly as their names imply, they can also be accessed via the keyboard shortcuts
Ctrl+Z and
Shift+Ctrl+Z
, respectively.
The third option is
Settings
, which opens the
Settings dialog.
3.3.3 View Menu
Song Editor, Beat+Baseline Editor, Piano Roll, Automation Editor, FX Mixer, Project Notes, and Controller Rack all focus/open their respective windows.
Volume as dBFS
toggles between the default LMMS percentage system and the industry standard dBFS system.\n
Smooth scroll toggles between instantly snapping to the playerhead position when playing the project, and a smooth transition.\n
Enable note labels in piano roll toggles labeling notes with their note name in the piano roll.
As of 1.3, the window toggles are:
3.3.4 Tools Menu
The only option currently in this menu is the
LADSPA Plugin Browser
.
It can be used to view information about available LADSPA Plugins.
3.3.5 Help Menu
There are three items:
Help Menu
There are three items:
Online Help opens the manual (you are here).
What's This? changes your cursor into a help cursor that you can use to click on any part of a LMMS window to see its function/purpose.
About gives you a dialog that lists: LMMS program version, its home page, its key developers, translation information if you are using LMMS in a language other than English, and the GNU GPL license that the software is released under.
The file menu allows you to load, save, and export projects and import MIDI files and Hydrogen files.
creates a new project
mmp
mmpz
saves the current project.
(For a new project, this functions as \"
Save As
gives you a dialog to choose a location to name and save your project in.
(You can also save your project as a
template
allows you to import MIDI and
Hydrogen
allows you to record your project to a file.
(Currently, only .wav, .ogg, and .mp3 are supported for Audio exports.)
allows you to export your project's midi data as a
.mid
3.3.2 Edit Menu
Undo/Redo do exactly as their names imply, they can also be accessed via the keyboard shortcuts
Ctrl+Z and
Shift+Ctrl+Z
, respectively.
The third option is
Settings
, which opens the
Settings dialog.
3.3.3 View Menu
Song Editor, Beat+Baseline Editor, Piano Roll, Automation Editor, FX Mixer, Project Notes, and Controller Rack all focus/open their respective windows.
Volume as dBFS
toggles between the default LMMS percentage system and the industry standard dBFS system.\n
Smooth scroll toggles between instantly snapping to the playerhead position when playing the project, and a smooth transition.\n
Enable note labels in piano roll toggles labeling notes with their note name in the piano roll.
As of 1.3, the window toggles are:
3.3.4 Tools Menu
The only option currently in this menu is the
LADSPA Plugin Browser
.
It can be used to view information about available LADSPA Plugins.
3.3.5 Help Menu
There are three items:
3.4 Toolbar
The toolbar is located at the top of the LMMS interface underneath the Main Menu bar. Toolbar
The toolbar has four sections:
On the left hand side are two rows of buttons which can be controlled by clicking and keyboard shortcuts.
The buttons are arranged in 2 rows.
The top row contains buttons that handle the project (file controls).
The bottom row has buttons that toggle the different windows of the LMMS GUI (window controls).
In the center are three numerical displays for a timer, tempo controls, and time signature controls.
To the right of the numerical displays are two sliders, one for master volume and the other for master pitch.
To the far right is a Wave and Cpu usage display which shows the current audio waveform being played and CPU usage.
Toolbar
The toolbar has four sections:
On the left hand side are two rows of buttons which can be controlled by clicking and keyboard shortcuts.
The buttons are arranged in 2 rows.
The top row contains buttons that handle the project (file controls).
The bottom row has buttons that toggle the different windows of the LMMS GUI (window controls).
In the center are three numerical displays for a timer, tempo controls, and time signature controls.
To the right of the numerical displays are two sliders, one for master volume and the other for master pitch.
To the far right is a Wave and Cpu usage display which shows the current audio waveform being played and CPU usage.
3.4.1 File Controls
The six buttons in the top row deal with opening and saving files. The Create New Project button creates a new project. The Create New Project From Template button creates a new project using a selected template. The Open Existing Project button opens an existing project file from your LMMS Working Directory (you are also able to point to other directories). The Recently Opened Project button lists files that you have saved recently. You can then choose a project to open from this list. The Save Current Project button saves the current project. If you have yet to save the current project, you will be asked to name it and select a directory to store it in. The Export Current Project button is a shortcut to export the current project as a .wav, .ogg, or .mp3 file (.flac is also avaliable for export as of 1.3). This opens the same dialog box as the file menu's Export option.3.4.2 Window Controls
The seven buttons in the second row show or hide various workspace windows. These are toggle buttons for the workspace windows, allowing you to work in a tabbed GUI. The toggle buttons are: The Song-Editor toggle button shows/hides the Song Editor. The Beat+Bassline Editor button shows/hides the Beat+Bassline Editor. The Piano Roll Editor Window button shows/hides the Piano Roll Editor. (Must be linked to a Piano Roll Clip before it can be used) The Automation Window button shows/hides the global-song Automation Editor window. The FX-Mixer toggle-button shows/hides the FX-Mixer. The Project Notes button shows/hides the Project Notes window. The Controller-rack toggle button shows/hides the Controller-rack. These buttons can be toggled on or off by clicking or by using keyboard shortcuts. The keyboard shortcuts are as follows, from left to right: Song-Editor (F5) Beat & Bassline Editor (F6) Piano-Roll (F7) Automation-Editor (F8) Mixer (F9) Project-Notes (F10) Controller-Rack (F11) As of LMMS 1.3, the shortcuts are: Song-Editor (Ctrl+1) Beat & Bassline Editor (Ctrl+2) Piano-Roll (Ctrl+3) Automation-Editor (Ctrl+4) Mixer (Ctrl+5) Project-Notes (Ctrl+7) Controller-Rack (Ctrl+6) In addition to these toolbar controls, all windows have a margin from which a Context Menu can be opened: Stay On Top keeps that window on top of all other windows. Maximize displays that window in fullscreen if possible. Move makes the window follow the cursor until the left mouse button is pressed. Size resizes the window (following the cursor) until the left mouse button is pressed.3.4.3 Tempo Control
 Tempo control
The tempo control displays the current tempo of the song.
The tempo can be adjusted in three ways:
By left-clicking on the numerical display and, while continuing to hold the left mouse button down, moving the mouse up or down.
By left-clicking on the numerical display and, while continuing to hold the left mouse button down, rolling the mouse wheel up or down.
By double-clicking on the numerical display, a window will open which will allow you to type in a new numerical value for the tempo.
The tempo can also be automated like any other parameter.
Tempo control
The tempo control displays the current tempo of the song.
The tempo can be adjusted in three ways:
By left-clicking on the numerical display and, while continuing to hold the left mouse button down, moving the mouse up or down.
By left-clicking on the numerical display and, while continuing to hold the left mouse button down, rolling the mouse wheel up or down.
By double-clicking on the numerical display, a window will open which will allow you to type in a new numerical value for the tempo.
The tempo can also be automated like any other parameter.
3.4.4 Timer
 Timer
The timer shows the time from the beginning of the song to the current position of play-head.
Clicking on the timer toggles it to instead show how many bars, beats, and ticks from the beginning of the song to the current position of the play-head.
(Ticks subdivide beats, depending on the time-signature you have chosen.)
Timer
The timer shows the time from the beginning of the song to the current position of play-head.
Clicking on the timer toggles it to instead show how many bars, beats, and ticks from the beginning of the song to the current position of the play-head.
(Ticks subdivide beats, depending on the time-signature you have chosen.)
3.4.5 Time Signature Controls
 Time signature controls
The default time signature is 4/4.
You can change the time signature by holding the left mouse button down on the value you wish to change and dragging up or down with the mouse.
You can also double-click to open a window which will allow you to type in a new value.
The top number dictates the number of beats per measure, and the bottom number dictates the value (eighth, sixteenth, etc.) of each beat.
Time signature controls
The default time signature is 4/4.
You can change the time signature by holding the left mouse button down on the value you wish to change and dragging up or down with the mouse.
You can also double-click to open a window which will allow you to type in a new value.
The top number dictates the number of beats per measure, and the bottom number dictates the value (eighth, sixteenth, etc.) of each beat.
3.4.6 Master Volume and Pitch Controls
To the right of the tempo control are the master volume and pitch controls. The Master Volume control sets the master volume for the entire project. The Master Pitch control transposes all instruments except those with the Master Pitch toggle disabled. Both are controlled by holding the left mouse button down on the slider and dragging it up or down with the mouse.3.4.6 Wave and CPU Usage Display
 Wave and CPU usage display
The Wave/CPU display shows both the current waveform being played and the current CPU usage of all LMMS instruments, effects, and sequencing.
You can turn the wave display off or on by left-clicking it.
When it is disabled, it will read "Click to enable".
For the waveform display color:
Green indicates no clipping
Orange indicates clipping is a risk
Red indicates clipping
The toolbar has four sections:
file controls
).
The bottom row has buttons that toggle the different windows of the LMMS GUI (
window controls
timer
,
tempo controls
, and
time signature controls
master volume and the other for
master pitch
Wave and Cpu usage display
3.4.1 File Controls
The six buttons in the top row deal with opening and saving files.
The
Create New Project
The
Create New Project From Template
The
Open Existing Project
The
Recently Opened Project
The
Save Current Project
The
Export Current Project button is a shortcut to export the current project as a .wav, .ogg, or .mp3 file (.flac is also avaliable for export as of 1.3).
3.4.2 Window Controls
The seven buttons in the second row show or hide various workspace windows.
These are toggle buttons for the workspace windows, allowing you to work in a tabbed GUI.
The toggle buttons are:
The
Song-Editor
The
Beat+Bassline Editor
The
Piano Roll Editor Window
The
Automation Window
The
FX-Mixer
The
Project Notes
The
Controller-rack
These buttons can be toggled on or off by clicking or by using keyboard shortcuts.
The keyboard shortcuts are as follows, from left to right:
As of LMMS 1.3, the shortcuts are:
In addition to these toolbar controls, all windows have a margin from which a Context Menu can be opened:
3.4.3 Tempo Control
The tempo control displays the current tempo of the song.
The tempo can be adjusted in three ways:
The tempo can also be automated like any other parameter.
3.4.4 Timer
The timer shows the time from the beginning of the song to the current position of play-head.
Clicking on the timer toggles it to instead show how many bars, beats, and ticks from the beginning of the song to the current position of the play-head.
(Ticks subdivide beats, depending on the time-signature you have chosen.)
3.4.5 Time Signature Controls
The default
time signature is 4/4.
You can change the time signature by holding the left mouse button down on the value you wish to change and dragging up or down with the mouse.
You can also double-click to open a window which will allow you to type in a new value.
3.4.6 Master Volume and Pitch Controls
To the right of the tempo control are the master volume and pitch controls.
The
Master Volume control sets the master volume for the entire project.
The
Master Pitch control transposes all instruments except those with the Master Pitch toggle disabled.
Both are controlled by holding the left mouse button down on the slider and dragging it up or down with the mouse.
3.4.6 Wave and CPU Usage Display
The
Wave/CPU display shows both the current waveform being played and the current CPU usage of all LMMS instruments, effects, and sequencing.
You can turn the wave display off or on by left-clicking it.
When it is disabled, it will read \"Click to enable\".\nFor the waveform display color:
Wave and CPU usage display
The Wave/CPU display shows both the current waveform being played and the current CPU usage of all LMMS instruments, effects, and sequencing.
You can turn the wave display off or on by left-clicking it.
When it is disabled, it will read "Click to enable".
For the waveform display color:
Green indicates no clipping
Orange indicates clipping is a risk
Red indicates clipping
The toolbar has four sections:
file controls
).
The bottom row has buttons that toggle the different windows of the LMMS GUI (
window controls
timer
,
tempo controls
, and
time signature controls
master volume and the other for
master pitch
Wave and Cpu usage display
3.4.1 File Controls
The six buttons in the top row deal with opening and saving files.
The
Create New Project
The
Create New Project From Template
The
Open Existing Project
The
Recently Opened Project
The
Save Current Project
The
Export Current Project button is a shortcut to export the current project as a .wav, .ogg, or .mp3 file (.flac is also avaliable for export as of 1.3).
3.4.2 Window Controls
The seven buttons in the second row show or hide various workspace windows.
These are toggle buttons for the workspace windows, allowing you to work in a tabbed GUI.
The toggle buttons are:
The
Song-Editor
The
Beat+Bassline Editor
The
Piano Roll Editor Window
The
Automation Window
The
FX-Mixer
The
Project Notes
The
Controller-rack
These buttons can be toggled on or off by clicking or by using keyboard shortcuts.
The keyboard shortcuts are as follows, from left to right:
As of LMMS 1.3, the shortcuts are:
In addition to these toolbar controls, all windows have a margin from which a Context Menu can be opened:
3.4.3 Tempo Control
The tempo control displays the current tempo of the song.
The tempo can be adjusted in three ways:
The tempo can also be automated like any other parameter.
3.4.4 Timer
The timer shows the time from the beginning of the song to the current position of play-head.
Clicking on the timer toggles it to instead show how many bars, beats, and ticks from the beginning of the song to the current position of the play-head.
(Ticks subdivide beats, depending on the time-signature you have chosen.)
3.4.5 Time Signature Controls
The default
time signature is 4/4.
You can change the time signature by holding the left mouse button down on the value you wish to change and dragging up or down with the mouse.
You can also double-click to open a window which will allow you to type in a new value.
3.4.6 Master Volume and Pitch Controls
To the right of the tempo control are the master volume and pitch controls.
The
Master Volume control sets the master volume for the entire project.
The
Master Pitch control transposes all instruments except those with the Master Pitch toggle disabled.
Both are controlled by holding the left mouse button down on the slider and dragging it up or down with the mouse.
3.4.6 Wave and CPU Usage Display
The
Wave/CPU display shows both the current waveform being played and the current CPU usage of all LMMS instruments, effects, and sequencing.
You can turn the wave display off or on by left-clicking it.
When it is disabled, it will read \"Click to enable\".\nFor the waveform display color:
3.5 Sidebar
The Sidebar is permanently attached to the left side of the window. It has 2 modes: retracted and extended. In retracted mode it looks like this: Retracted mode
It has six sections that provide easy access to the various elements (instruments, samples files, and presets) that you will use in LMMS.
When you click on any one section label, the side bar will extend and show you the contents of that section.
Click the section label again to retract the bar.
Retracted mode
It has six sections that provide easy access to the various elements (instruments, samples files, and presets) that you will use in LMMS.
When you click on any one section label, the side bar will extend and show you the contents of that section.
Click the section label again to retract the bar.
3.5.1 Instrument Plugins
When you click on the Instrument Plugins button (), the sidebar expands to show you the available instrument plugins: Instrument Plugins
Instruments:
AudioFileProcessor - playing audio files
BitInvader - "simple and dirty" wavetable synthesis
Freeboy - an emulator of the sound chip of the Nintendo Game Boy
Kicker - drum synthesis
LB302 - a monophonic implementation of the TB303 sound
Mallets - a struck-instrument synthesizer
Monstro - a 3-oscillator synth with pulse sync and a modulation matrix
Nescaline - a synth emulation of NES audio chip
Opulenz - an FM synth emulation of Yamaha YM3812, a.k.a.
OPL2
Organic - an additive organ synthesizer
PatMan - a GUS-compatible patch instrument
SF2 Player - the official SoundFont2 player
SFXR - a simple sound generator
SID - an emulator of the sound chips used by the C64
TripleOscillator - the "standard" subtractive synthesis module
VeSTige - VSTi-hosting plugin
Vibed - vibrating-string synthesis module
Watsyn - a 4-oscillator wavetable synth
ZynAddSubFX - a powerful hybrid synthesizer
By default, no instrument plugin is selected.
When you hover the mouse over one, its box will expand to include a description of the plugin: you can then drag an instrument plugin to either the Song Editor or the Beat+Bassline Editor, or double-click an instrument plugin label to add it directly to the Beat+Bassline Editor.
Instrument Plugins
Instruments:
AudioFileProcessor - playing audio files
BitInvader - "simple and dirty" wavetable synthesis
Freeboy - an emulator of the sound chip of the Nintendo Game Boy
Kicker - drum synthesis
LB302 - a monophonic implementation of the TB303 sound
Mallets - a struck-instrument synthesizer
Monstro - a 3-oscillator synth with pulse sync and a modulation matrix
Nescaline - a synth emulation of NES audio chip
Opulenz - an FM synth emulation of Yamaha YM3812, a.k.a.
OPL2
Organic - an additive organ synthesizer
PatMan - a GUS-compatible patch instrument
SF2 Player - the official SoundFont2 player
SFXR - a simple sound generator
SID - an emulator of the sound chips used by the C64
TripleOscillator - the "standard" subtractive synthesis module
VeSTige - VSTi-hosting plugin
Vibed - vibrating-string synthesis module
Watsyn - a 4-oscillator wavetable synth
ZynAddSubFX - a powerful hybrid synthesizer
By default, no instrument plugin is selected.
When you hover the mouse over one, its box will expand to include a description of the plugin: you can then drag an instrument plugin to either the Song Editor or the Beat+Bassline Editor, or double-click an instrument plugin label to add it directly to the Beat+Bassline Editor.
3.5.2 Section Navigation
In all sections, except for the Instrument Plugins section, the listing you get is like a directory tree. Folders are marked with a folder icon. If you click in the check-box to the left of the folder-icon, the folder opens and displays its contents indented to the right of the folder name. To close it, click the check-box again. My Samples
These folders are the same as on your computer, allowing you a convenient way to open sounds and presets on your hard disk from within LMMS.
Open folders can be smart-searched, so you can find an item with a token search.
Use the small input-field in the bottom.
Just enter a few characters from the item's filename, and the smart-search in LMMS will filter the names in the currently open folder.
Smart-search does not search sub-folders!
To the right of the input-field there is an Update button.
If you can't find a newly created file, click the Update button: all the folders are updated and the tree will collapse (this is also an easy way to close all open folders).
Let's take a closer look at the tabs.
My Samples
These folders are the same as on your computer, allowing you a convenient way to open sounds and presets on your hard disk from within LMMS.
Open folders can be smart-searched, so you can find an item with a token search.
Use the small input-field in the bottom.
Just enter a few characters from the item's filename, and the smart-search in LMMS will filter the names in the currently open folder.
Smart-search does not search sub-folders!
To the right of the input-field there is an Update button.
If you can't find a newly created file, click the Update button: all the folders are updated and the tree will collapse (this is also an easy way to close all open folders).
Let's take a closer look at the tabs.
3.5.3 My Projects
 My Projects
The second option in the sidebar; a shortcut to the project folder-browser.
Depending on your user-created sub-folders, there will be a browser-tree.
Double-click on the name of the project you want to load.
Wait for the project to load completely, before using other features in LMMS!
The next 2 tabs on the side-bar contain your instruments.
They are the Samples and the Instruments.
Both have similar behavior.
My Projects
The second option in the sidebar; a shortcut to the project folder-browser.
Depending on your user-created sub-folders, there will be a browser-tree.
Double-click on the name of the project you want to load.
Wait for the project to load completely, before using other features in LMMS!
The next 2 tabs on the side-bar contain your instruments.
They are the Samples and the Instruments.
Both have similar behavior.
3.5.4 My Samples
My Samples
My samples gives you easy access to LMMS samples collection.
Samples can be WAV, OGG and FLAC sound files.
You have smart-search and can update the display.
To preview the sample, left-click and hold on its name.
Drag the sample to the Song-Editor or the Beat+Bassline Editor to add it as a new track.
When you drag-and-drop a sample into either editor, the new track will be added at the bottom of the track list.
You can drag the grip dots on the left end of the track to move the track to where you want it in the track list.
Double-click the sample to add it to the Beat+Bassline Editor as a new track.
The mouse cursor symbol will show a reject-sign as you drag if the sample can't be dropped into that window.
3.5.5 My Presets
 My Presets
My presets gives you easy access to a collection of predefined instruments.
Presets are instrument plugins with pre-saved settings and tuned controls.
You have search field at the bottom, and can update the display by clicking the refresh button.
Warning: you should make it a habit to save your project before you preview a preset (i.e.
before you left-click and hold on a preset), because sometimes previewing can crash LMMS.
Another thing you must remember is to never preview VeSTige preset! VSTs are not build by the LMMS-team, and they can't be handled as our own instruments can.
I repeat: never preview VSTs!
Drag the preset to the Song-Editor or the Beat+Bassline Editor to add it as a new track.
If you drag a preset into (i.e.
on top of) an existing preset in either of the editors, it will replace the previous preset.
Otherwise, when you drag-and-drop a preset into either editor, the new track will be added at the bottom of the track list.
You can drag the grip dots on the left end of the track to move the track to where you want it in the track list.
Double-click the preset to add it to the Beat+Bassline Editor as a new track.
The mouse cursor symbol will show a null sign as you drag if the preset can't be dropped into that window.
You can also right-click any preset, and use the context-menu, to add it to the editors.
This way of adding presets, gives you very good control, and you should always use this method, when you handle VSTs.
My Presets
My presets gives you easy access to a collection of predefined instruments.
Presets are instrument plugins with pre-saved settings and tuned controls.
You have search field at the bottom, and can update the display by clicking the refresh button.
Warning: you should make it a habit to save your project before you preview a preset (i.e.
before you left-click and hold on a preset), because sometimes previewing can crash LMMS.
Another thing you must remember is to never preview VeSTige preset! VSTs are not build by the LMMS-team, and they can't be handled as our own instruments can.
I repeat: never preview VSTs!
Drag the preset to the Song-Editor or the Beat+Bassline Editor to add it as a new track.
If you drag a preset into (i.e.
on top of) an existing preset in either of the editors, it will replace the previous preset.
Otherwise, when you drag-and-drop a preset into either editor, the new track will be added at the bottom of the track list.
You can drag the grip dots on the left end of the track to move the track to where you want it in the track list.
Double-click the preset to add it to the Beat+Bassline Editor as a new track.
The mouse cursor symbol will show a null sign as you drag if the preset can't be dropped into that window.
You can also right-click any preset, and use the context-menu, to add it to the editors.
This way of adding presets, gives you very good control, and you should always use this method, when you handle VSTs.
3.5.6 My Home
 My Home
The 5th tab in the sidebar, My home is a shortcut to a specific folder on your system.
On Windows systems this corresponds to the %HOMEPATH% folder (i.e.
the current user's profile) containing folders such as Desktop, Favorites, MyDocuments, etc.
My Home
The 5th tab in the sidebar, My home is a shortcut to a specific folder on your system.
On Windows systems this corresponds to the %HOMEPATH% folder (i.e.
the current user's profile) containing folders such as Desktop, Favorites, MyDocuments, etc.
3.5.7 Root directory
 The last tab on the sidebar is a shortcut to the root of your computer's folder tree.
You can browser the tree and even use token-search.
Quite handy for general purposes.
It has six sections that provide easy access to the various
elements (instruments, samples files, and presets) that you will use in LMMS.
When you click on any one section label, the side bar will extend and show you the contents of that section.
Click the section label again to retract the bar.
3.5.1 Instrument Plugins
When you click on the Instrument Plugins button (
), the sidebar expands to show you the available instrument plugins:
Instruments:
By default, no instrument plugin is selected.
When you hover the mouse over one, its box will expand to include a description of the plugin: you can then drag an instrument plugin to either the Song Editor or the Beat+Bassline Editor, or double-click an instrument plugin label to add it directly to the Beat+Bassline Editor.
3.5.2 Section Navigation
In all sections, except for the Instrument Plugins section, the listing you get is like a directory tree.
Folders are marked with a folder icon.
If you click in the check-box to the left of the folder-icon, the folder opens and displays its contents indented to the right of the folder name.
To close it, click the check-box again.
These folders are the same as on your computer, allowing you a convenient way to open sounds and presets on your hard disk from within LMMS.
Open folders can be smart-searched, so you can find an item with a token search.
Use the small input-field in the bottom.
Just enter a few characters from the item's filename, and the smart-search in LMMS will filter the names in the currently open folder.
Smart-search does
not search sub-folders!
To the right of the input-field there is an Update button.
If you can't find a newly created file, click the Update button: all the folders are updated and the tree will collapse (this is also an easy way to close all open folders).
Let's take a closer look at the tabs.
3.5.3 My Projects
The second option in the sidebar; a shortcut to the project folder-browser.
Depending on your user-created sub-folders, there will be a browser-tree.
Double-click on the name of the project you want to load.
Wait for the project to load
completely
, before using other features in LMMS!
The next 2 tabs on the side-bar contain your instruments.
They are the Samples and the Instruments.
Both have similar behavior.
3.5.4 My Samples
My samples gives you easy access to LMMS samples collection.
Samples can be WAV, OGG and FLAC sound files.
You have smart-search and can update the display.
To preview the sample,
left-click and hold on its name.
Drag the sample to the Song-Editor or the Beat+Bassline Editor to add it as a new track.
When you drag-and-drop a sample into either editor, the new track will be added at the bottom of the track list.
You can drag the grip dots on the left end of the track to move the track to where you want it in the track list.
Double-click the sample to add it to the Beat+Bassline Editor as a new track.
The mouse cursor symbol will show a reject-sign as you drag if the sample can't be dropped into that window.
3.5.5 My Presets
My presets gives you easy access to a collection of predefined instruments.
Presets are instrument plugins with pre-saved settings and tuned controls.
You have search field at the bottom, and can update the display by clicking the refresh button.
Warning: you should make it a habit to save your project
before you preview a preset (i.e.
before you left-click and hold on a preset), because sometimes previewing can crash LMMS.
Another thing you must remember is to never preview VeSTige preset! VSTs are not build by the LMMS-team, and they can't be handled as our own instruments can.
I repeat: never preview VSTs!
Drag the preset to the Song-Editor or the Beat+Bassline Editor to add it as a new track.
If you drag a preset into (i.e.
on top of) an existing preset in either of the editors, it will replace the previous preset.
Otherwise, when you drag-and-drop a preset into either editor, the new track will be added at the bottom of the track list.
You can drag the grip dots on the left end of the track to move the track to where you want it in the track list.
Double-click the preset to add it to the Beat+Bassline Editor as a new track.
The mouse cursor symbol will show a null sign as you drag if the preset can't be dropped into that window.
You can also right-click any preset, and use the context-menu, to add it to the editors.
This way of adding presets, gives you very good control, and you should always use this method, when you handle VSTs.
3.5.6 My Home
The 5th tab in the sidebar, My home is a shortcut to a specific folder on your system.
On Windows systems this corresponds to the %HOMEPATH% folder (i.e.
the current user's profile) containing folders such as Desktop, Favorites, MyDocuments, etc.
3.5.7 Root directory
The last tab on the sidebar is a shortcut to the root of your computer's folder tree.
You can browser the tree and even use token-search.
Quite handy for general purposes.
It has six sections that provide easy access to the various
elements (instruments, samples files, and presets) that you will use in LMMS.
When you click on any one section label, the side bar will extend and show you the contents of that section.
Click the section label again to retract the bar.
3.5.1 Instrument Plugins
When you click on the Instrument Plugins button (
), the sidebar expands to show you the available instrument plugins:
Instruments:
By default, no instrument plugin is selected.
When you hover the mouse over one, its box will expand to include a description of the plugin: you can then drag an instrument plugin to either the Song Editor or the Beat+Bassline Editor, or double-click an instrument plugin label to add it directly to the Beat+Bassline Editor.
3.5.2 Section Navigation
In all sections, except for the Instrument Plugins section, the listing you get is like a directory tree.
Folders are marked with a folder icon.
If you click in the check-box to the left of the folder-icon, the folder opens and displays its contents indented to the right of the folder name.
To close it, click the check-box again.
These folders are the same as on your computer, allowing you a convenient way to open sounds and presets on your hard disk from within LMMS.
Open folders can be smart-searched, so you can find an item with a token search.
Use the small input-field in the bottom.
Just enter a few characters from the item's filename, and the smart-search in LMMS will filter the names in the currently open folder.
Smart-search does
not search sub-folders!
To the right of the input-field there is an Update button.
If you can't find a newly created file, click the Update button: all the folders are updated and the tree will collapse (this is also an easy way to close all open folders).
Let's take a closer look at the tabs.
3.5.3 My Projects
The second option in the sidebar; a shortcut to the project folder-browser.
Depending on your user-created sub-folders, there will be a browser-tree.
Double-click on the name of the project you want to load.
Wait for the project to load
completely
, before using other features in LMMS!
The next 2 tabs on the side-bar contain your instruments.
They are the Samples and the Instruments.
Both have similar behavior.
3.5.4 My Samples
My samples gives you easy access to LMMS samples collection.
Samples can be WAV, OGG and FLAC sound files.
You have smart-search and can update the display.
To preview the sample,
left-click and hold on its name.
Drag the sample to the Song-Editor or the Beat+Bassline Editor to add it as a new track.
When you drag-and-drop a sample into either editor, the new track will be added at the bottom of the track list.
You can drag the grip dots on the left end of the track to move the track to where you want it in the track list.
Double-click the sample to add it to the Beat+Bassline Editor as a new track.
The mouse cursor symbol will show a reject-sign as you drag if the sample can't be dropped into that window.
3.5.5 My Presets
My presets gives you easy access to a collection of predefined instruments.
Presets are instrument plugins with pre-saved settings and tuned controls.
You have search field at the bottom, and can update the display by clicking the refresh button.
Warning: you should make it a habit to save your project
before you preview a preset (i.e.
before you left-click and hold on a preset), because sometimes previewing can crash LMMS.
Another thing you must remember is to never preview VeSTige preset! VSTs are not build by the LMMS-team, and they can't be handled as our own instruments can.
I repeat: never preview VSTs!
Drag the preset to the Song-Editor or the Beat+Bassline Editor to add it as a new track.
If you drag a preset into (i.e.
on top of) an existing preset in either of the editors, it will replace the previous preset.
Otherwise, when you drag-and-drop a preset into either editor, the new track will be added at the bottom of the track list.
You can drag the grip dots on the left end of the track to move the track to where you want it in the track list.
Double-click the preset to add it to the Beat+Bassline Editor as a new track.
The mouse cursor symbol will show a null sign as you drag if the preset can't be dropped into that window.
You can also right-click any preset, and use the context-menu, to add it to the editors.
This way of adding presets, gives you very good control, and you should always use this method, when you handle VSTs.
3.5.6 My Home
The 5th tab in the sidebar, My home is a shortcut to a specific folder on your system.
On Windows systems this corresponds to the %HOMEPATH% folder (i.e.
the current user's profile) containing folders such as Desktop, Favorites, MyDocuments, etc.
3.5.7 Root directory
3.6 Instrument Window
Various instrument windows look like this: TripleOscillator
 AudioFileProcessor
 OpulenZ
The window is divided up into three main sections:
the instrument controls at the top
the sound controls in the middle
the piano keys at the bottom
OpulenZ
The window is divided up into three main sections:
the instrument controls at the top
the sound controls in the middle
the piano keys at the bottom
3.6.1 Instrument Controls
 General instrument controls
Preset name dialogue.
By default this is the name of the instrument.
An instrument volume knob
A pan knob
A pitch knob.
100% means that the pitch is changed a semitone.
Pitch range.
Changes how many semitones the pitch knob spans.
If it is set to 3, 100% on the pitch knob means 3 semitones.
FX channel.
A link to the FX-Mixer.
Remember to always set this uniquely.
A save button.
Saves the settings of this instrument as a preset.
The pitch range dial is not available on all instruments.
All other of these controls are present on all LMMS factory instruments.
General instrument controls
Preset name dialogue.
By default this is the name of the instrument.
An instrument volume knob
A pan knob
A pitch knob.
100% means that the pitch is changed a semitone.
Pitch range.
Changes how many semitones the pitch knob spans.
If it is set to 3, 100% on the pitch knob means 3 semitones.
FX channel.
A link to the FX-Mixer.
Remember to always set this uniquely.
A save button.
Saves the settings of this instrument as a preset.
The pitch range dial is not available on all instruments.
All other of these controls are present on all LMMS factory instruments.
3.6.2 Sound Controls
Plugin: shows the controls for how this particular plugin generates sound. This is the only tab that changes per plugin. ENV/LFO: shows the controls for the sound's envelope (its expression in respect to loudness cutoff and resonance, all with individual settings, over time), its use of the Low Frequency Oscillator (LFO), and also lets you access 15 built-in filters. This tab is not supported by ZynAddSubFX, VeSTige and LB302. Func: shows the controls for making the instrument automatically play arpeggios or chords. A huge number of different chords can be selected. FX: shows the chain of effects plugins operating on this instrument. You can use LADSPA and/or VST effect plugins. MIDI: shows which MIDI channels this instrument will receive and send events on Let's take a closer look at these tabs.3.6.2.1 Plugin
The plugin tab contains all the controls that set how this plugin actually generates sound. For more information, read the individual plugin's page.3.6.2.2 ENV/LFO
 ENV/LFO tab
3.6.2.2.1 Envelopes
Envelope of an instrument is how loud or soft it is from the moment the note is pressed, over after it it released, to when the sound is completely silent. Immediately before the note is pressed, the envelope is at zero and the instrument produces no sound. The note goes through an attack from when the note is pressed until it reaches its maximum loudness. From then there is an initial hold period when the note remains at maximum loudness. The note then decays to a softer pitch which is the sustain level. Finally when note is released, it fades away to silence. There may also be a pre-delay between when the note is pressed and when the volume starts rising. The ENV/LFO/Filter section has three sub-tabs that select the target for three separate envelopes. The default one, and the one discussed above, is the volume target. You can select the target in the same way that you select the tab in the instrument, by clicking on the label. To control the envelope, you have six knobs to set each of the above parameters - pre-delay (DEL), attack, hold, decay, sustain, release - and a 7. one to control the amount (AMT) of the effect that the envelope has on the parameter. For the volume envelope, this "amount" does not actually affect the sound - the envelope only works if the amount control is 100% on. Note that you can either set the amount using its knob or click on the envelope graph in order to turn it completely on or off. The graph is green when it's turned on, grey when off and a shade between those two colors when the control is between fully on (1) and fully off (0). The amount can also be turned down to negative one, a feature which is only useful for the Cutoff and Q/Reso targets.3.6.2.2.2 Filters
In order to enable the filter, press the filter titlebar and the light at the left will turn on. When this light is on, the filter is active. Keep in mind that filtering the sound of an instrument adds a small calculation overhead and can add a slight delay to the sound, so if you're not using the filter then keep it off. The types of filters in LMMS: Lowpass: this filter lets low frequencies through Highpass: this filter lets high frequencies through Bandpass csg and Bandpass czpg: these filters let only a certain band frequencies through Notch: the inverse of the Bandpass filter, this cuts only a certain frequency band Allpass: a filter that lets all frequencies through but has the same phase shifts, time delays and resonance properties as other filters Moog: a modification to the normal Lowpass filter made popular by Moog synthesizers 2x Lowpass: a lowpass filter with twice the Q factor Each type of filter lets you control the cutoff frequency and the Q/Resonance amount. You can experiment with this by choosing a plugin that generates multiple frequencies - using anything other than a sine wave will do that - and then set the cutoff and Q factor and see how it changes the sound.3.6.2.2.2.1 Filters with envelopes
Filters do not have to be static and unchanged throughout the entire note. LMMS allows you to control both the cutoff frequency and the Q factor via an envelope. Nor does this envelope have to be the same as the volume envelope for the note - each parameter can have an independent envelope. The envelope sets the value from its maximum or minimum to the set control level; for example, if a lowpass filter has the cutoff control set to 1kHz and an envelope is used to sweep this value up in a long attack and long decay, the value of the control will go from 14kHz (the maximum) down to 1kHz and then back up. This will make the instrument sound like it's been damped down and then the damping removed.3.6.2.2.3 LFO
All LFO effects takes place through a filter, so the first thing is to activate the filter (light ON) and choose one from the drop-down. The LFO provided by LMMS allows you to control the value of the volume, cutoff and Q factor targets independently - the LFO for each is shown under the same tab as the envelope for the same target. Each has four parameters that you can set: The delay before the oscillator starts The attack or fade-in rate of the oscillator - the rate at which it goes from starting to having full effect The speed of oscillation. This is probably the parameter you are most likely to use. It is measured in milliseconds per oscillation, because often one knows the time taken for a complete cycle rather than the rate in Hz (this is also because the accuracy of setting the LFO in fractions of a Hz is less than setting it in fractions of a second). If right-click the knob, LMMS opens a contex menu, and you will have the option to beat-synchronize the speed. This is a b feature and very useful for wobble or dubstep instruments. The amount that the LFO affects the given target. Like an envelope, you can either set the amoun control manually or click on the waveform display at the left of the LFO to turn it on or off. LMMS also has an LFO plugin. This is inserted in the Controller rack.3.6.2.3 FUNC
 FUNC tab
Normally, each "note down" command plays one note in the instrument.
With the Arp/Chord controls, you can change this so that it plays a chord (with the root note being the note played) and/or and arpeggio (i.e.
the notes of the chord played one after another rather than simultaneously).
To control this, the Arp/Chord tab is divided into two sections, one for the chords and the other for arpeggios.
You turn them on by clicking on their title bar and the light at the left will turn on.
By default they will be turned off.
Both sections have two common controls - the list of chords that can be played and the range in octaves over which the chord will be played.
Since some chords span more than one octave, some chords or arpeggios will overlap.
The list of chords available is vast, ranging from standard chords through jazz to regional chords and natural modes such as Lydian and Dorian.
FUNC tab
Normally, each "note down" command plays one note in the instrument.
With the Arp/Chord controls, you can change this so that it plays a chord (with the root note being the note played) and/or and arpeggio (i.e.
the notes of the chord played one after another rather than simultaneously).
To control this, the Arp/Chord tab is divided into two sections, one for the chords and the other for arpeggios.
You turn them on by clicking on their title bar and the light at the left will turn on.
By default they will be turned off.
Both sections have two common controls - the list of chords that can be played and the range in octaves over which the chord will be played.
Since some chords span more than one octave, some chords or arpeggios will overlap.
The list of chords available is vast, ranging from standard chords through jazz to regional chords and natural modes such as Lydian and Dorian.
3.6.2.3.1 Chords
The chords section has no other controls than the ones listed above. When a note down signal is received, that note will be the base for the rest of the chord. All the notes of the chord will play simultaneously until the note is released.3.6.2.3.2 Arpeggios
The arpeggios section has a number of extra controls: The direction that the arpeggio is played in can be selected from up, down, both directions (up then down) and random notes from the chord. The time (in milliseconds) between each note. Right-click opens context menu to set tempo sync. The gate time (as a percentage of the note time above). At 100%, each note will be played for the full time between each note. At less, each note will be cut short and the rest will be filled with silence. At more than this, each note will overlap the next note and will finish later than the start of the nest. The mode of playing arpeggio In free mode, an arpeggio will be started when the note starts. If a second note is played later, a second arpeggio will start at that (later) time and play independently of the first. In sort mode, no matter when another note is pressed, the arpeggios will be played in the same order, with only one note being played at any given time. For example, if the key for C is played with an ascending Major chord arpeggio, the arpeggio of C-E-G will be played repeatedly. If the key for F is then held down, the arpeggio will play C-E-G-F-A-C one after the other - the arpeggio for C then the arpeggio for F. In sync mode, any notes held down at the same time will play a chord arpeggio in that interval. To take the above example, when F was held down the arpeggio would play CF-EA-GC repeatedly - the notes C and F simultaneously, then the notes E and A, then the notes G and C.3.6.2.4 FX
 FX tab
The LADSPA effects allow many ways to control the sound of an instrument.
These can vary from simple effects like delays and echos to complex phasers, distortion and reverbation.
Effects can also be chained one after the other to produce very complex sounds.
When you add an effect the green light will automatically turn on.
When it is off the sound isn't processed by the effect.
You can easily check the "dry" sound of the instrument without effects, against the "wet" sound with the effects in place, by turning the green light off.
Click the "add" button to select a new LADSPA/VST effect to add to the chain.
This then gives you several controls over the process of sending sound to and receiving it from the effect:
The W/D (wet/dry) knob sets the ratio between the input signal and the effect signal that forms the output
The decay control sets how much silence must pass before the effect turns off completely.
Turning the effect off reduces the amount of CPU time used processing silence and reduces the chance of unwanted noise.
However, if the effect turns off too soon it may introduce a "clipped" sound to the effect: for instance, in the case of a reverb, if the reverb time is longer than the decay time then the reverb will be cut off before it has fully died away.
You should make it a habit to always match the decay of effects and this decay knob.
The gate threshold controls the level of noise in which below the instrument will be considered to be silent.
A flanger effect placed on an instrument with a very long fade-out (say a ride cymball) will be almost inaudible at the end of the tail of the cymball.
Cutting the effect off early may reduce the CPU requirements and the chance of unwanted effect noise being heard.
The controls button displays (or removes) the separate window giving the controls specific to this effect.
Note that some effects will also have ways to set their internal wet/dry level.
This sometimes takes the form of a wet/dry knob, but can also be two knobs to set the level of the wet output and the level of the dry, bypassed, output.
To remove an effect, select its context menu (right-click) and choose "Remove effect".
You can also change the order of any effect in the effect rack by moving it up or down.
FX tab
The LADSPA effects allow many ways to control the sound of an instrument.
These can vary from simple effects like delays and echos to complex phasers, distortion and reverbation.
Effects can also be chained one after the other to produce very complex sounds.
When you add an effect the green light will automatically turn on.
When it is off the sound isn't processed by the effect.
You can easily check the "dry" sound of the instrument without effects, against the "wet" sound with the effects in place, by turning the green light off.
Click the "add" button to select a new LADSPA/VST effect to add to the chain.
This then gives you several controls over the process of sending sound to and receiving it from the effect:
The W/D (wet/dry) knob sets the ratio between the input signal and the effect signal that forms the output
The decay control sets how much silence must pass before the effect turns off completely.
Turning the effect off reduces the amount of CPU time used processing silence and reduces the chance of unwanted noise.
However, if the effect turns off too soon it may introduce a "clipped" sound to the effect: for instance, in the case of a reverb, if the reverb time is longer than the decay time then the reverb will be cut off before it has fully died away.
You should make it a habit to always match the decay of effects and this decay knob.
The gate threshold controls the level of noise in which below the instrument will be considered to be silent.
A flanger effect placed on an instrument with a very long fade-out (say a ride cymball) will be almost inaudible at the end of the tail of the cymball.
Cutting the effect off early may reduce the CPU requirements and the chance of unwanted effect noise being heard.
The controls button displays (or removes) the separate window giving the controls specific to this effect.
Note that some effects will also have ways to set their internal wet/dry level.
This sometimes takes the form of a wet/dry knob, but can also be two knobs to set the level of the wet output and the level of the dry, bypassed, output.
To remove an effect, select its context menu (right-click) and choose "Remove effect".
You can also change the order of any effect in the effect rack by moving it up or down.
3.6.2.5 MIDI
 MIDI tab
These controls allow you to set which MIDI channel the instrument receives MIDI events on, and which it sends events to.
Both these controls work in similar ways:
Click the Receive MIDI-events or Send MIDI-events title next to the light to turn the reception or sending of MIDI events on or off
The channel setting controls which MIDI channel events will be received or sent on
The Default velocity control clamps all incoming or outgoing notes to once velocity when set
The Device selector button shows a list of which devices in your system can act as sources or sinks for MIDI events
MIDI tab
These controls allow you to set which MIDI channel the instrument receives MIDI events on, and which it sends events to.
Both these controls work in similar ways:
Click the Receive MIDI-events or Send MIDI-events title next to the light to turn the reception or sending of MIDI events on or off
The channel setting controls which MIDI channel events will be received or sent on
The Default velocity control clamps all incoming or outgoing notes to once velocity when set
The Device selector button shows a list of which devices in your system can act as sources or sinks for MIDI events
3.6.3 Piano Keys
At the bottom of the instrument window is a small section of a piano keyboard. This will display the notes that are playing by greying out the key or keys as they're played. The scroll bar at the bottom of the screen allows you to move up and down, i.e. left and right, the keyboard to see different ranges of notes. Piano keys in instrument window
3.6.3.1 Base Note
In addition, the green mark just above the keys shows the base note of the keyboard. Whichever note you select with this mark will be played as A4, i.e. the concert pitch of 440Hz. For instance, moving this to A3 will make all the notes played move up by an octave (since A3 is now A4 and so forth). This allows you to adjust an individual instrument to be pitched correctly in relation to all the others. This is mostly unimportant for synthesizers where the A4 note is programmed to be 440Hz. However, for the AudioFileProcessor pugin, this is extremely useful, as it allows you to adjust the note to be played back at its correct pitch. As an example, if you recorded a saxophone playing a B♭, you would adjust the base note to be B♭, so that the saxophone was played in the same pitch as your other instruments.3.6.3.2 Keyboard
When the instrument window is selected, you can use the keyboard of your computer to play notes in a two-octave range. In addition, any MIDI keyboard can be used to send MIDI command to this instrument when it's selected. Keyboard as piano
The window is divided up into three main sections:
instrument controls
sound controls
piano keys
3.6.1 Instrument Controls
The pitch range dial is not available on all instruments.
All other of these controls are present on all LMMS factory instruments.
3.6.2 Sound Controls
Let's take a closer look at these tabs.
3.6.2.1 Plugin
The plugin tab contains all the controls that set how this plugin actually generates sound.
For more information, read the individual plugin's page.
3.6.2.2 ENV/LFO
3.6.2.2.1 Envelopes
Envelope of an instrument is how loud or soft it is from the moment the note is pressed, over after it it released, to when the sound is completely silent.
Immediately before the note is pressed, the envelope is at zero and the instrument produces no sound.
The note goes through an
attack from when the note is pressed until it reaches its maximum loudness.
From then there is an initial
hold period when the note remains at maximum loudness.
The note then
decay
s to a softer pitch which is the
sustain level.
Finally when note is
release
d, it fades away to silence.
There may also be a
pre-delay between when the note is pressed and when the volume starts rising.
The ENV/LFO/Filter section has three sub-tabs that select the target for three separate envelopes.
The default one, and the one discussed above, is the volume target.
You can select the target in the same way that you select the tab in the instrument, by clicking on the label.
To control the envelope, you have six knobs to set each of the above parameters -
pre-delay (DEL),
attack
,
hold
,
decay
,
sustain
,
release - and a 7.
one to control the
amount (AMT) of the effect that the envelope has on the parameter.
For the volume envelope, this \"amount\" does not actually affect the sound - the envelope only works if the amount control is 100% on.
Note that you can either set the amount using its knob or click on the envelope graph in order to turn it completely on or off.
The graph is green when it's turned on, grey when off and a shade between those two colors when the control is between fully on (1) and fully off (0).
The amount can also be turned down to negative one, a feature which is only useful for the Cutoff and Q/Reso targets.
3.6.2.2.2 Filters
In order to enable the filter, press the filter titlebar and the light at the left will turn on.
When this light is on, the filter is active.
Keep in mind that filtering the sound of an instrument adds a small calculation overhead and can add a slight delay to the sound, so if you're not using the filter then keep it off.
The types of filters in LMMS:
Lowpass:
Highpass:
Bandpass csg and
Bandpass czpg:
Notch:
Allpass:
Moog:
2x Lowpass:
Each type of filter lets you control the
cutoff frequency and the
Q/Reso
nance amount.
You can experiment with this by choosing a plugin that generates multiple frequencies - using anything other than a sine wave will do that - and then set the cutoff and Q factor and see how it changes the sound.
3.6.2.2.2.1 Filters with envelopes
Filters do not have to be static and unchanged throughout the entire note.
LMMS allows you to control both the cutoff frequency and the Q factor via an envelope.
Nor does this envelope have to be the same as the volume envelope for the note - each parameter can have an independent envelope.
The envelope sets the value from its maximum or minimum to the set control level; for example, if a lowpass filter has the cutoff control set to 1kHz and an envelope is used to sweep this value up in a long attack and long decay, the value of the control will go from 14kHz (the maximum) down to 1kHz and then back up.
This will make the instrument sound like it's been damped down and then the damping removed.
3.6.2.2.3 LFO
All LFO effects takes place through a filter, so the first thing is to activate the filter (light ON) and choose one from the drop-down.
The LFO provided by LMMS allows you to control the value of the volume, cutoff and Q factor targets independently - the LFO for each is shown under the same tab as the envelope for the same target.
Each has four parameters that you can set:
delay
attack
speed
amount
LMMS also has an LFO plugin.
This is inserted in the Controller rack.
3.6.2.3 FUNC
Normally, each \"note down\" command plays one note in the instrument.
With the
Arp/Chord controls, you can change this so that it plays a
chord (with the root note being the note played) and/or and
arpeggio (i.e.
the notes of the chord played one after another rather than simultaneously).
To control this, the Arp/Chord tab is divided into two sections, one for the chords and the other for arpeggios.
You turn them on by clicking on their title bar and the light at the left will turn on.
By default they will be turned off.
Both sections have two common controls - the
list of chords that can be played and the
range in octaves over which the chord will be played.
Since some chords span more than one octave, some chords or arpeggios will overlap.
The list of chords available is vast, ranging from standard chords through jazz to regional chords and natural modes such as Lydian and Dorian.
3.6.2.3.1 Chords
The chords section has no other controls than the ones listed above.
When a note down signal is received, that note will be the base for the rest of the chord.
All the notes of the chord will play simultaneously until the note is released.
3.6.2.3.2 Arpeggios
The arpeggios section has a number of extra controls:
direction
time (in milliseconds) between each note.
Right-click opens context menu to set
gate
mode of playing arpeggio
free
sort
sync
3.6.2.4 FX
The LADSPA effects allow many ways to control the sound of an instrument.
These can vary from simple effects like delays and echos to complex phasers, distortion and reverbation.
Effects can also be chained one after the other to produce very complex sounds.
When you add an effect the green light will automatically turn on.
When it is off the sound isn't processed by the effect.
You can easily check the \"dry\" sound of the instrument without effects, against the \"wet\" sound with the effects in place, by turning the green light off.
Click the \"add\" button to select a new LADSPA/VST effect to add to the chain.
This then gives you several controls over the process of sending sound to and receiving it from the effect:
W/D (wet/dry)
decay
gate
controls
Note that some effects will also have ways to set their internal wet/dry level.
This sometimes takes the form of a wet/dry knob, but can also be two knobs to set the level of the wet output and the level of the dry, bypassed, output.
To remove an effect, select its context menu (right-click) and choose \"Remove effect\".\nYou can also change the order of any effect in the effect rack by moving it up or down.
3.6.2.5 MIDI
These controls allow you to set which MIDI channel the instrument receives MIDI events on, and which it sends events to.
Both these controls work in similar ways:
Receive MIDI-events or
Send MIDI-events
channel
Default velocity
Device selector
3.6.3 Piano Keys
At the bottom of the instrument window is a small section of a piano keyboard.
This will display the notes that are playing by greying out the key or keys as they're played.
The scroll bar at the bottom of the screen allows you to move up and down, i.e.
left and right, the keyboard to see different ranges of notes.
3.6.3.1 Base Note
In addition, the green mark just above the keys shows the base note of the keyboard.
Whichever note you select with this mark will be played as A4, i.e.
the concert pitch of 440Hz.
For instance, moving this to A3 will make all the notes played move up by an octave (since A3 is now A4 and so forth).
This allows you to adjust an individual instrument to be pitched correctly in relation to all the others.
This is mostly unimportant for synthesizers where the A4 note is programmed to be 440Hz.
However, for the AudioFileProcessor pugin, this is extremely useful, as it allows you to adjust the note to be played back at its correct pitch.
As an example, if you recorded a saxophone playing a B♭, you would adjust the base note to be B♭, so that the saxophone was played in the same pitch as your other instruments.
3.6.3.2 Keyboard
When the instrument window is selected, you can use the keyboard of your computer to play notes in a two-octave range.
In addition, any MIDI keyboard can be used to send MIDI command to this instrument when it's selected.
Keyboard as piano
The window is divided up into three main sections:
instrument controls
sound controls
piano keys
3.6.1 Instrument Controls
The pitch range dial is not available on all instruments.
All other of these controls are present on all LMMS factory instruments.
3.6.2 Sound Controls
Let's take a closer look at these tabs.
3.6.2.1 Plugin
The plugin tab contains all the controls that set how this plugin actually generates sound.
For more information, read the individual plugin's page.
3.6.2.2 ENV/LFO
3.6.2.2.1 Envelopes
Envelope of an instrument is how loud or soft it is from the moment the note is pressed, over after it it released, to when the sound is completely silent.
Immediately before the note is pressed, the envelope is at zero and the instrument produces no sound.
The note goes through an
attack from when the note is pressed until it reaches its maximum loudness.
From then there is an initial
hold period when the note remains at maximum loudness.
The note then
decay
s to a softer pitch which is the
sustain level.
Finally when note is
release
d, it fades away to silence.
There may also be a
pre-delay between when the note is pressed and when the volume starts rising.
The ENV/LFO/Filter section has three sub-tabs that select the target for three separate envelopes.
The default one, and the one discussed above, is the volume target.
You can select the target in the same way that you select the tab in the instrument, by clicking on the label.
To control the envelope, you have six knobs to set each of the above parameters -
pre-delay (DEL),
attack
,
hold
,
decay
,
sustain
,
release - and a 7.
one to control the
amount (AMT) of the effect that the envelope has on the parameter.
For the volume envelope, this \"amount\" does not actually affect the sound - the envelope only works if the amount control is 100% on.
Note that you can either set the amount using its knob or click on the envelope graph in order to turn it completely on or off.
The graph is green when it's turned on, grey when off and a shade between those two colors when the control is between fully on (1) and fully off (0).
The amount can also be turned down to negative one, a feature which is only useful for the Cutoff and Q/Reso targets.
3.6.2.2.2 Filters
In order to enable the filter, press the filter titlebar and the light at the left will turn on.
When this light is on, the filter is active.
Keep in mind that filtering the sound of an instrument adds a small calculation overhead and can add a slight delay to the sound, so if you're not using the filter then keep it off.
The types of filters in LMMS:
Lowpass:
Highpass:
Bandpass csg and
Bandpass czpg:
Notch:
Allpass:
Moog:
2x Lowpass:
Each type of filter lets you control the
cutoff frequency and the
Q/Reso
nance amount.
You can experiment with this by choosing a plugin that generates multiple frequencies - using anything other than a sine wave will do that - and then set the cutoff and Q factor and see how it changes the sound.
3.6.2.2.2.1 Filters with envelopes
Filters do not have to be static and unchanged throughout the entire note.
LMMS allows you to control both the cutoff frequency and the Q factor via an envelope.
Nor does this envelope have to be the same as the volume envelope for the note - each parameter can have an independent envelope.
The envelope sets the value from its maximum or minimum to the set control level; for example, if a lowpass filter has the cutoff control set to 1kHz and an envelope is used to sweep this value up in a long attack and long decay, the value of the control will go from 14kHz (the maximum) down to 1kHz and then back up.
This will make the instrument sound like it's been damped down and then the damping removed.
3.6.2.2.3 LFO
All LFO effects takes place through a filter, so the first thing is to activate the filter (light ON) and choose one from the drop-down.
The LFO provided by LMMS allows you to control the value of the volume, cutoff and Q factor targets independently - the LFO for each is shown under the same tab as the envelope for the same target.
Each has four parameters that you can set:
delay
attack
speed
amount
LMMS also has an LFO plugin.
This is inserted in the Controller rack.
3.6.2.3 FUNC
Normally, each \"note down\" command plays one note in the instrument.
With the
Arp/Chord controls, you can change this so that it plays a
chord (with the root note being the note played) and/or and
arpeggio (i.e.
the notes of the chord played one after another rather than simultaneously).
To control this, the Arp/Chord tab is divided into two sections, one for the chords and the other for arpeggios.
You turn them on by clicking on their title bar and the light at the left will turn on.
By default they will be turned off.
Both sections have two common controls - the
list of chords that can be played and the
range in octaves over which the chord will be played.
Since some chords span more than one octave, some chords or arpeggios will overlap.
The list of chords available is vast, ranging from standard chords through jazz to regional chords and natural modes such as Lydian and Dorian.
3.6.2.3.1 Chords
The chords section has no other controls than the ones listed above.
When a note down signal is received, that note will be the base for the rest of the chord.
All the notes of the chord will play simultaneously until the note is released.
3.6.2.3.2 Arpeggios
The arpeggios section has a number of extra controls:
direction
time (in milliseconds) between each note.
Right-click opens context menu to set
gate
mode of playing arpeggio
free
sort
sync
3.6.2.4 FX
The LADSPA effects allow many ways to control the sound of an instrument.
These can vary from simple effects like delays and echos to complex phasers, distortion and reverbation.
Effects can also be chained one after the other to produce very complex sounds.
When you add an effect the green light will automatically turn on.
When it is off the sound isn't processed by the effect.
You can easily check the \"dry\" sound of the instrument without effects, against the \"wet\" sound with the effects in place, by turning the green light off.
Click the \"add\" button to select a new LADSPA/VST effect to add to the chain.
This then gives you several controls over the process of sending sound to and receiving it from the effect:
W/D (wet/dry)
decay
gate
controls
Note that some effects will also have ways to set their internal wet/dry level.
This sometimes takes the form of a wet/dry knob, but can also be two knobs to set the level of the wet output and the level of the dry, bypassed, output.
To remove an effect, select its context menu (right-click) and choose \"Remove effect\".\nYou can also change the order of any effect in the effect rack by moving it up or down.
3.6.2.5 MIDI
These controls allow you to set which MIDI channel the instrument receives MIDI events on, and which it sends events to.
Both these controls work in similar ways:
Receive MIDI-events or
Send MIDI-events
channel
Default velocity
Device selector
3.6.3 Piano Keys
At the bottom of the instrument window is a small section of a piano keyboard.
This will display the notes that are playing by greying out the key or keys as they're played.
The scroll bar at the bottom of the screen allows you to move up and down, i.e.
left and right, the keyboard to see different ranges of notes.
3.6.3.1 Base Note
In addition, the green mark just above the keys shows the base note of the keyboard.
Whichever note you select with this mark will be played as A4, i.e.
the concert pitch of 440Hz.
For instance, moving this to A3 will make all the notes played move up by an octave (since A3 is now A4 and so forth).
This allows you to adjust an individual instrument to be pitched correctly in relation to all the others.
This is mostly unimportant for synthesizers where the A4 note is programmed to be 440Hz.
However, for the AudioFileProcessor pugin, this is extremely useful, as it allows you to adjust the note to be played back at its correct pitch.
As an example, if you recorded a saxophone playing a B♭, you would adjust the base note to be B♭, so that the saxophone was played in the same pitch as your other instruments.
3.6.3.2 Keyboard
When the instrument window is selected, you can use the keyboard of your computer to play notes in a two-octave range.
In addition, any MIDI keyboard can be used to send MIDI command to this instrument when it's selected.
3.7 Song Editor
The Song Editor displays the structure of the song. Song Editor
The left side of the window displays the instrument and beat/bassline tracks
The right side of the window displays the actual content - the note blocks, or segments of each track at each bar in the project
Song Editor
The left side of the window displays the instrument and beat/bassline tracks
The right side of the window displays the actual content - the note blocks, or segments of each track at each bar in the project
3.7.1 Working with Segments
Each track has content in the form of segments or elements, often you will hear other users using the term "blocks". Instrument track block
For instrument tracks, the display is a miniature piano roll.
Double-clicking on it will open the Piano Roll Editor window where you can add, delete, or modify individual notes.
Instrument track block
For instrument tracks, the display is a miniature piano roll.
Double-clicking on it will open the Piano Roll Editor window where you can add, delete, or modify individual notes.
 Sample track block
For sample tracks, the display is a miniature waveform of the sample.
Double-clicking on it will open a File-Open dialog where you can choose a new sample for that element.
LMMS can't edit recorded sounds, nor can LMMS record sound!
Sample track block
For sample tracks, the display is a miniature waveform of the sample.
Double-clicking on it will open a File-Open dialog where you can choose a new sample for that element.
LMMS can't edit recorded sounds, nor can LMMS record sound!
 Beat/Bassline track block
For Beat/Bassline tracks, the display is simply a colored block/segment showing that the beat/bassline is active.
Double-clicking on it will open the Beat+Bassline Editor window where you can add, delete, or modify individual notes in the beat.
To create new segments, left-click in the track activity area within the bar where you want the segment to start.
For instrument and sample tracks, this creates a blank area where you can put notes or samples.
For beat/bassline tracks, this creates 1 (or more) bars filled with that particular Beat+Bassline as configured.
To move a segment, drag it by clicking and holding the segment.
As it's dragged, the segment will snap to the start of any bar, but you can free drag (with a 1/64th resolution) by holding down the Ctrl key after you begin dragging (Ctrl+drag before you begin dragging initiates the "copy" procedure).
To copy a segment, hold the Ctrl key down before you begin dragging and then drag the copy to its new location.
You can also right-click on the segment, select copy, left-click to create an empty segment where you want the copy to go, right-click and select paste.
You can't copy segments of one track type to tracks of a different type.
To copy again, the Ctrl key has to be released and repressed before the next drag operation.
To delete a segment, click it using the middle mouse button or right-click on it and select delete.
Double-clicking on a block opens the Piano Roll or Beat+Bassline Editor, so you can edit the segment's contents.
Beat/Bassline track block
For Beat/Bassline tracks, the display is simply a colored block/segment showing that the beat/bassline is active.
Double-clicking on it will open the Beat+Bassline Editor window where you can add, delete, or modify individual notes in the beat.
To create new segments, left-click in the track activity area within the bar where you want the segment to start.
For instrument and sample tracks, this creates a blank area where you can put notes or samples.
For beat/bassline tracks, this creates 1 (or more) bars filled with that particular Beat+Bassline as configured.
To move a segment, drag it by clicking and holding the segment.
As it's dragged, the segment will snap to the start of any bar, but you can free drag (with a 1/64th resolution) by holding down the Ctrl key after you begin dragging (Ctrl+drag before you begin dragging initiates the "copy" procedure).
To copy a segment, hold the Ctrl key down before you begin dragging and then drag the copy to its new location.
You can also right-click on the segment, select copy, left-click to create an empty segment where you want the copy to go, right-click and select paste.
You can't copy segments of one track type to tracks of a different type.
To copy again, the Ctrl key has to be released and repressed before the next drag operation.
To delete a segment, click it using the middle mouse button or right-click on it and select delete.
Double-clicking on a block opens the Piano Roll or Beat+Bassline Editor, so you can edit the segment's contents.
3.7.2 Toolbar
 Song Editor toolbar
The Song Editor window has a toolbar that allows you to control playback of the song, add new tracks, choose edit tools, customize the method of playback, and control the general view of the song.
Song Editor toolbar
The Song Editor window has a toolbar that allows you to control playback of the song, add new tracks, choose edit tools, customize the method of playback, and control the general view of the song.
3.7.2.1 Editing Tools
3.7.2.1.1 Draw Mode Tool
 Draw mode tool icon
Despite their different content, the ways of working with segments are mostly similar.
Most of the work in the Song Editor is done using the Draw mode tool.
Left-click in an empty bar to add a segment
Middle-click on a block to delete it
Ctrl+middle-click is a mute/unmute toggle for that block
Right-click on a segment to get a context menu
Left-drag on a segment to move it (block will snap to bar boundaries)
Ctrl after left-drag begins on a segment to move it freely (won't snap to bar boundaries)
Ctrl before left-drag begins on a segment to copy it
When you hover your mouse over the right end of a segment, the mouse cursor becomes a double-headed arrow so you can drag the end of the segment to make it extend over more or fewer bars (this does not work for instrument tracks)
left-drag: the segment extension/retraction snaps to bar boundaries
Ctrl+left-drag: the segment extension/retraction is free (does not snap to bar boundaries)
Draw mode tool icon
Despite their different content, the ways of working with segments are mostly similar.
Most of the work in the Song Editor is done using the Draw mode tool.
Left-click in an empty bar to add a segment
Middle-click on a block to delete it
Ctrl+middle-click is a mute/unmute toggle for that block
Right-click on a segment to get a context menu
Left-drag on a segment to move it (block will snap to bar boundaries)
Ctrl after left-drag begins on a segment to move it freely (won't snap to bar boundaries)
Ctrl before left-drag begins on a segment to copy it
When you hover your mouse over the right end of a segment, the mouse cursor becomes a double-headed arrow so you can drag the end of the segment to make it extend over more or fewer bars (this does not work for instrument tracks)
left-drag: the segment extension/retraction snaps to bar boundaries
Ctrl+left-drag: the segment extension/retraction is free (does not snap to bar boundaries)
3.7.2.1.2 Edit Mode Tool
 Edit mode tool icon
The Edit mode tool, also known as the selection tool, allows you to drag a rectangular selection box that selects multiple segments.
You can then handle the selection as a group.
Selected segments change their color to distinct them from unselected.
Ctrl+left-click on any segment you want to remove from the selection group
Drag horizontally on any selected segment to move the selection group:
left-drag: movement where segments snap to bar boundaries
Alt+left-drag: free movement (segments don't snap to bar boundaries)
Click on any empty bar to clear the selection from the selected segments
Marked blocks can not only be moved, but can be copied (Ctrl+c) and inserted (Ctrl+v) at the play-head position, anywhere in your project.
You can also delete (DEL) marked blocks.
It is recommended that you use the magnification settings, to find the magnification, that gives you the best view of your project.
Since 1.2, LMMS has a 12.5% magnification, that allows you to see 350 bars of your project!
Edit mode tool icon
The Edit mode tool, also known as the selection tool, allows you to drag a rectangular selection box that selects multiple segments.
You can then handle the selection as a group.
Selected segments change their color to distinct them from unselected.
Ctrl+left-click on any segment you want to remove from the selection group
Drag horizontally on any selected segment to move the selection group:
left-drag: movement where segments snap to bar boundaries
Alt+left-drag: free movement (segments don't snap to bar boundaries)
Click on any empty bar to clear the selection from the selected segments
Marked blocks can not only be moved, but can be copied (Ctrl+c) and inserted (Ctrl+v) at the play-head position, anywhere in your project.
You can also delete (DEL) marked blocks.
It is recommended that you use the magnification settings, to find the magnification, that gives you the best view of your project.
Since 1.2, LMMS has a 12.5% magnification, that allows you to see 350 bars of your project!
3.7.2.2 Changing Structure in a Project
Sometimes whole segment of a project is either needed to be removed, or you need space to insert new blocks. This is where you use INSERT and DELETE. First you move the play-head to the position where you want the change.3.72.2.1 Expanding a Project
Shift+Insert key inserts a new, empty bar to the right of the play-head's current position into all the tracks. You will essentially push everything upwards, and hence have a longer project, as the result!3.7.2.2.2 Condensing a Project
Shift+Delete key moves all one bar to the left of the play-head's current position. You will essentially pull everything downwards, and hence have a shorter project as the result! Both methods are powerful tools for making big changes in your project.3.7.2.3 Navigating
The scroll bars at the right and bottom of the window allow you to move the editors view around, but you can also scroll with your mouse-wheel. Use Shift+mouse wheel to scroll horizontally, Ctrl+mouse wheel to scroll vertically.3.7.2.4 Playback Controls
The Play button starts playback at the current play-head position. The keyboard space bar has the similar functionality, depending on the settings for play-head behavior of the Return mode button (see below). During playback, a Pause button icon represents the Play button icon. It will pause playback and leave the play-head at its current position. The Stop button (or keyboard space bar) stops playback (or a paused playback), and returns the play-head to the location defined by the Return mode button. The Return mode button is a 3-position toggle that controls where the play-head moves when you halt playback using the Stop button. There are 3 modes: Back to Zero (default): the play-head returns to the beginning of the song (bar #1) Back to start: the play-head returns to the position where this playback started Continue: the play-head remains where it was stopped, i.e. it doesn't move The Auto-scroll button is ON by default. During playback, the view in the Song Editor window will automatically scroll horizontally to display the current play-head position. As the play-head moves past the right edge of the window, the window will scroll horizontally so the play-head continues at the left edge. In the performance settings, the option "smooth scrolling" can be enables. With Auto-scroll OFF, the play-head can disappear during playback. Loops in LMMS are understood as 1-n bars! It is the logic of a sequencer that determines that loops are the same as whole bars. The Loop-points button is OFF by default. When turned ON, the loop will appear (bright green) on the timeline. You can set the loop-points as follows: When you click on the time bar for setting right-loop-point use right-click only When you click on the time-bar for setting left-loop-point use Shift+right-click Setting loop-points will by default snap to the bar dividers. You can control that. If you hold AltGr, then you can set your loop exactly as you want. You can even drag them up and down. During Song Editor playback, the play-head will loop continuously between the start and end loop-points. This is useful for testing a particular section of your piece, but only exists in playback mode. It is not a way to repeat a section a certain number of times within your composition - you'll have to use copy/paste for that.3.7.2.5 Adding Tracks
There is no button for adding a new instrument track. You do this by dragging the desired plugin or preset from the Sidebar to an empty area in the Song Editor. Next, click on the instrument track's name to show/hide the Instrument Editor window for that plugin. This window is where you can make changes to the sound of the instrument. To add a new Beat/Bassline track, click the Add beat/bassline button. Right-click on the beat/bassline track's name to rename it. To add a new sample track, click the Add sample-track button.3.7.2.6 Zoom Controls
 Zoom control
You can zoom in to show fewer bars or zoom out to show more bars in the window.
There are several ways to zoom:
Hover your mouse over the zoom number and roll your mouse wheel up/down to zoom in/out
Hover your mouse anywhere else in the Song Editor window and Ctrl+mouse scroll wheel up/down to zoom in/out
Left-click on the zoom number to zoom in by 1 level.
Right-click on the zoom number to zoom out by 1 level.
Use the zoom drop-down arrow and select a zoom level
Zoom control
You can zoom in to show fewer bars or zoom out to show more bars in the window.
There are several ways to zoom:
Hover your mouse over the zoom number and roll your mouse wheel up/down to zoom in/out
Hover your mouse anywhere else in the Song Editor window and Ctrl+mouse scroll wheel up/down to zoom in/out
Left-click on the zoom number to zoom in by 1 level.
Right-click on the zoom number to zoom out by 1 level.
Use the zoom drop-down arrow and select a zoom level
3.7.2.7 Changing Track Height
Anywhere in a track, use Shift+drag to change the height of a track. You can only make it taller than the default height, not shorter.3.7.3 Track Settings Bar
 Track settings bar
The left side of the track, the track settings bar, contains buttons and controls that allow you to work with the tracks as a whole.
The stippled area at the left end of the track is the Grip handle.
In Draw mode, use it to drag a track up or down in the track stacking order.
The track order has no effect on the sounds produced, it just helps you keep things organized.
Ctrl+drag on the grip handle makes a clone of the track that you can place either at the bottom of the track list, in Beat+Bassline Editor, or even in an other opened project, if you have enough RAM for two instances of LMMS.
You use considerable less RAM if you only copy-drag, and do not play any of the projects!
The Track tools icon has a tool-tip that says "Actions for this track".
Click it to see a menu with options:
Clone this track makes an exact copy of the track (instrument settings and segments) and pastes it at the bottom of the track list
Remove this track deletes the track
MIDI: option for instruments to connect a MIDI device
The Mute/unmute toggle looks like a green light that you turn ON and OFF by clicking on it.
Use it to turn off the sounds from this track temporarily.
For example, you may want to hear the track of an accompanying instrument without hearing the lead instrument.
As all knobs, lights and faders in LMMS these can be automated.
The Solo/unsolo toggle is the second light, the one to the right.
It is a red light that you turn on and off by clicking on it.
Use it to turn off temporarily all the other tracks except this track, or add some other tracks to the playback, simply by un-muting any track of your own choice.
That way you can have one solo track plus any number of selected tracks playing together alone.
When you want to have all tracks active again, you simply unsolo the solo track.
That will unmute all tracks in your Song Editor again.
The rest of the track settings bar displays the sound source information.
This varies somewhat between instrument tracks, sample tracks and beat/bassline tracks.
Track settings bar
The left side of the track, the track settings bar, contains buttons and controls that allow you to work with the tracks as a whole.
The stippled area at the left end of the track is the Grip handle.
In Draw mode, use it to drag a track up or down in the track stacking order.
The track order has no effect on the sounds produced, it just helps you keep things organized.
Ctrl+drag on the grip handle makes a clone of the track that you can place either at the bottom of the track list, in Beat+Bassline Editor, or even in an other opened project, if you have enough RAM for two instances of LMMS.
You use considerable less RAM if you only copy-drag, and do not play any of the projects!
The Track tools icon has a tool-tip that says "Actions for this track".
Click it to see a menu with options:
Clone this track makes an exact copy of the track (instrument settings and segments) and pastes it at the bottom of the track list
Remove this track deletes the track
MIDI: option for instruments to connect a MIDI device
The Mute/unmute toggle looks like a green light that you turn ON and OFF by clicking on it.
Use it to turn off the sounds from this track temporarily.
For example, you may want to hear the track of an accompanying instrument without hearing the lead instrument.
As all knobs, lights and faders in LMMS these can be automated.
The Solo/unsolo toggle is the second light, the one to the right.
It is a red light that you turn on and off by clicking on it.
Use it to turn off temporarily all the other tracks except this track, or add some other tracks to the playback, simply by un-muting any track of your own choice.
That way you can have one solo track plus any number of selected tracks playing together alone.
When you want to have all tracks active again, you simply unsolo the solo track.
That will unmute all tracks in your Song Editor again.
The rest of the track settings bar displays the sound source information.
This varies somewhat between instrument tracks, sample tracks and beat/bassline tracks.
 Instrument track bar
Instrument tracks have:
a volume and a pan control (automatable)
a button that displays the instrument's preset name
left-click opens the Instrument Editor
right-click opens a dialog to rename the track
the activity light is a rectangular light located far right in instrument tracks, which lights up whenever the instrument plays a note.
You can click it to preview the sound of the instrument.
Instrument track bar
Instrument tracks have:
a volume and a pan control (automatable)
a button that displays the instrument's preset name
left-click opens the Instrument Editor
right-click opens a dialog to rename the track
the activity light is a rectangular light located far right in instrument tracks, which lights up whenever the instrument plays a note.
You can click it to preview the sound of the instrument.
 Sample track bar
Sample tracks have:
a volume control (automatable)
a button that displays the track name
left-click opens the Effects chain Editor where you can choose effects to add
right-click opens a dialog to rename the track
Sample track bar
Sample tracks have:
a volume control (automatable)
a button that displays the track name
left-click opens the Effects chain Editor where you can choose effects to add
right-click opens a dialog to rename the track
 Beat/Bassline track bar
Beat/Bassline tracks have:
a button that displays the track name
left-click opens the Beat+Bassline Editor, if it's not already open
right-click opens a dialog to rename the track
Beat/Bassline track bar
Beat/Bassline tracks have:
a button that displays the track name
left-click opens the Beat+Bassline Editor, if it's not already open
right-click opens a dialog to rename the track
3.7.4 Track Context Menu
The track context menu appears when you right-click on a segment in the track. The options available vary by the type of track as follows:3.7.4.1 Instrument Track Context Menu
 Instrument track context menu
Open in piano-roll opens the clicked-on pattern in the Piano Roll Editor
Delete deletes the clicked-on segment
Cut removes the clicked-on segment and puts it in the clipboard
Copy makes a copy of the clicked-on segment and puts it in the clipboard
Paste pastes the contents of the clipboard into this segment, overwriting its previous contents.
The segment name is copied and pasted with the contents of the segment which helps you see the original source of this segment (see "Change name" below).
Mute/unmute allows you to turn off the sound of the clicked-on segment.
It does not affect the volume of the other segments in the track.
Clear all notes allows you to erase the contents of the clicked-on segment without deleting the segment itself
Reset name resets the segment name to the track name, and the name is again hidden
Change name allows you to change a segment's name.
Segments within a track can have their own names, and by default the segment name is the same as the track name.
Add steps and Remove steps allow you to add or remove the number of steps in a bar.
This is the same option as in the Beat+Bassline Editor.
Instrument track context menu
Open in piano-roll opens the clicked-on pattern in the Piano Roll Editor
Delete deletes the clicked-on segment
Cut removes the clicked-on segment and puts it in the clipboard
Copy makes a copy of the clicked-on segment and puts it in the clipboard
Paste pastes the contents of the clipboard into this segment, overwriting its previous contents.
The segment name is copied and pasted with the contents of the segment which helps you see the original source of this segment (see "Change name" below).
Mute/unmute allows you to turn off the sound of the clicked-on segment.
It does not affect the volume of the other segments in the track.
Clear all notes allows you to erase the contents of the clicked-on segment without deleting the segment itself
Reset name resets the segment name to the track name, and the name is again hidden
Change name allows you to change a segment's name.
Segments within a track can have their own names, and by default the segment name is the same as the track name.
Add steps and Remove steps allow you to add or remove the number of steps in a bar.
This is the same option as in the Beat+Bassline Editor.
3.7.4.2 Sample Track Context Menu
 Sample track context menu
The actions of each option are essentially the same as those for the instrument track above.
The record function is not yet functional.
Sample track context menu
The actions of each option are essentially the same as those for the instrument track above.
The record function is not yet functional.
3.7.4.3 Beat/Bassline Track Context Menu
 Beat/Bassline track context menu
The actions of each option are essentially the same as those for the instrument track above.
The only addition is:
Change color allows you to change the color of the segments in the BB track.
This helps you to distinguish the function or content of the tracks by their color, and helps you to quickly know which bassline you are dealing with in a complex rhythm sections.
You can use the edit mode tool aka selection tool to select a group of Beat/Bassline segments and color them all at once.
Beat/Bassline track context menu
The actions of each option are essentially the same as those for the instrument track above.
The only addition is:
Change color allows you to change the color of the segments in the BB track.
This helps you to distinguish the function or content of the tracks by their color, and helps you to quickly know which bassline you are dealing with in a complex rhythm sections.
You can use the edit mode tool aka selection tool to select a group of Beat/Bassline segments and color them all at once.
3.7.5 Reusing and Copying Tracks
Sometimes you may like to use notes you have in another project. You can't use the notes in other projects just as a reference, but! You can copy these notes from one project to another! Let's say we have a nice arpeggio, and we'd like to reuse that within a tiny change, in a new project.3.7.5.1 Method 1
If you have decent hardware, with 2+ GB of RAM, you can have two LMMS running simultaneously. Point to the track with the existing arpeggio. On the track button we have a nobbled bar leftmost in this picture:
Beat/Bassline track bar
Hold Ctrl
Point on the nobbled bar
Press and drag the whole track button from the "donor" project to the receiveing project's Song Editor
You now have copied all notes and the preset into the new project.
In our case we would have "both" the arpeggio-notes, "and" all the arpeggio settings in the preset copied to the new project.
If you create a project called something like .my-aprs.mmp, and build all the arps, you can think of, then you can use that project as a template for any project, and that way you have an arpeggio library.
3.7.5.2 Method 2
This is not at all as potent, byt can be used by anyone, despite low-end HW. Open the piano-roll pattern in project 1 Mark all (Ctrl+a) Copy all (Ctrl+c) Create a new project or open an existing project Open a piano-roll in that project Insert the notes from the first project (Ctrl+v) As you can see we only had one instance of LMMS open, and this is a very CPU and RAM friendly way to copy between projects, but we only got notes from one note block, with this simple method. segments 3.7.1 Working with Segments Each track has content in the form of segments or elements , often you will hear other users using the term \"blocks\". For instrument tracks , the display is a miniature piano roll. Double-clicking on it will open the Piano Roll Editor window where you can add, delete, or modify individual notes. For sample tracks , the display is a miniature waveform of the sample. Double-clicking on it will open a File-Open dialog where you can choose a new sample for that element. LMMS can't edit recorded sounds, nor can LMMS record sound! For Beat/Bassline tracks , the display is simply a colored block/segment showing that the beat/bassline is active. Double-clicking on it will open the Beat+Bassline Editor window where you can add, delete, or modify individual notes in the beat. create new segments move a segment , drag it by clicking and holding the segment. As it's dragged, the segment will snap to the start of any bar, but you can free drag (with a 1/64th resolution) by holding down the Ctrl key after copy a segment , hold the Ctrl key down before you begin dragging and then drag the copy to its new location. You can also right-click on the segment, select copy , left-click to create an empty segment where you want the copy to go, right-click and select paste delete a segment , click it using the middle mouse button or right-click on it and select delete . Double-clicking on a block opens the Piano Roll or Beat+Bassline Editor, so you can edit the segment's contents 3.7.2 Toolbar The Song Editor window has a toolbar that allows you to control playback of the song, add new tracks, choose edit tools, customize the method of playback, and control the general view of the song. 3.7.2.1 Editing Tools 3.7.2.1.1 Draw Mode Tool Despite their different content, the ways of working with segments are mostly similar. Most of the work in the Song Editor is done using the Draw mode tool. in an empty bar to on a block to is a mute/unmute on a segment to on a segment to move it after left-drag begins on a segment to move it freely before left-drag begins on a segment to hover your mouse over the right end of a segment , the mouse cursor becomes a double-headed arrow so you can drag the end of the segment to make it extend over more or fewer bars (this does not work for instrument tracks) 3.7.2.1.2 Edit Mode Tool The Edit mode tool, also known as the selection tool, allows you to drag a rectangular selection box that selects multiple segments. You can then handle the selection as a group. Selected segments change their color to distinct them from unselected. on any segment you want to on any selected segment to move the selection group: movement where segments snap free movement (segments don't snap on any empty bar to clear the selection Marked blocks can not only be moved, but can be copied (Ctrl+c) and inserted (Ctrl+v) at the play-head position, anywhere in your project. You can also delete (DEL) marked blocks. It is recommended that you use the magnification settings, to find the magnification, that gives you the best view of your project. Since 1.2, LMMS has a 12.5% magnification, that allows you to see 350 bars of your project! 3.7.2.2 Changing Structure in a Project Sometimes whole segment of a project is either needed to be removed, or you need space to insert new blocks. This is where you use INSERT and DELETE.\nFirst you move the play-head to the position where you want the change. 3.72.2.1 Expanding a Project Shift+Insert key inserts a new, empty bar to the right of the play-head's current position into all the tracks. You will essentially push everything upwards, and hence have a longer project, as the result! 3.7.2.2.2 Condensing a Project Shift+Delete key moves all one bar to the left of the play-head's current position. You will essentially pull everything downwards, and hence have a shorter project as the result! Both methods are powerful tools for making big changes in your project. 3.7.2.3 Navigating The scroll bars at the right and bottom of the window allow you to move the editors view around, but you can also scroll with your mouse-wheel. Use Shift+mouse wheel to scroll horizontally, Ctrl+mouse wheel to scroll vertically. 3.7.2.4 Playback Controls The Play button starts playback at the current play-head position. The keyboard space bar has the similar functionality, depending on the settings for play-head behavior of the Return mode button (see below). During playback, a Pause button icon represents the Play button icon. It will pause playback and leave the play-head at its current position. The Stop button (or keyboard space bar) stops playback (or a paused playback), and returns the play-head to the location defined by the Return mode button. The Return mode button is a 3-position toggle that controls where the play-head moves when you halt playback using the Stop button. There are 3 modes: Back to Zero (default): Back to start: Continue: The Auto-scroll button is ON by default. During playback, the view in the Song Editor window will automatically scroll horizontally to display the current play-head position. As the play-head moves past the right edge of the window, the window will scroll horizontally so the play-head continues at the left edge. In the performance settings, the option \"smooth scrolling\" can be enables. With Auto-scroll OFF, the play-head can disappear during playback. Loops in LMMS are understood as 1-n bars! It is the logic of a sequencer that determines that loops are the same as whole bars. The Loop-points button is OFF by default. When turned ON, the loop will appear (bright green) on the timeline. You can set the loop-points as follows: right-click Setting loop-points will by default snap to the bar dividers. You can control that. If you hold AltGr, then you can set your loop exactly as you want. You can even drag them up and down. During Song Editor playback, the play-head will loop continuously between the start and end loop-points. This is useful for testing a particular section of your piece, but only exists in playback mode. It is not a way to repeat a section a certain number of times within your composition - you'll have to use copy/paste for that. 3.7.2.5 Adding Tracks There is no button for adding a new instrument track. You do this by dragging the desired plugin or preset from the Sidebar to an empty area in the Song Editor. Next, click on the instrument track's name to show/hide the Instrument Editor window for that plugin. This window is where you can make changes to the sound of the instrument. To add a new Beat/Bassline track, click the Add beat/bassline button. Right-click on the beat/bassline track's name to rename it. To add a new sample track, click the Add sample-track button. 3.7.2.6 Zoom Controls You can zoom in to show fewer bars or zoom out to show more bars in the window. There are several ways to zoom: ] ] 3.7.2.7 Changing Track Height Anywhere in a track, use Shift+drag to change the height of a track. You can only make it taller than the default height, not shorter. 3.7.3 Track Settings Bar The left side of the track, the track settings bar, contains buttons and controls that allow you to work with the tracks as a whole. The stippled area at the left end of the track is the Grip handle . In Draw mode, use it to drag a track up or down in the track stacking order. The track order has no effect on the sounds produced, it just helps you keep things organized. Ctrl+drag on the grip handle makes a clone of the track that you can place either at the bottom of the track list, in Beat+Bassline Editor, or even in an other opened project, if you have enough RAM for two instances of LMMS. You use considerable less RAM if you only copy-drag, and do not play any of the projects! The Track tools icon has a tool-tip that says \"Actions for this track\". Click it to see a menu with options: The Mute/unmute toggle looks like a green light that you turn ON and OFF by clicking on it. Use it to turn off the sounds from this track temporarily. For example, you may want to hear the track of an accompanying instrument without hearing the lead instrument. As all knobs, lights and faders in LMMS these can be automated. The Solo/unsolo toggle is the second light, the one to the right. It is a red light that you turn on and off by clicking on it. Use it to turn off temporarily all the other tracks except this track, or add some other tracks to the playback, simply by un-muting any track of your own choice. That way you can have one solo track plus any number of selected tracks playing together alone. When you want to have all tracks active again, you simply unsolo the solo track. That will unmute all tracks in your Song Editor again. The rest of the track settings bar displays the sound source information. This varies somewhat between instrument tracks, sample tracks and beat/bassline tracks. Instrument tracks have: activity light Sample tracks have: Beat/Bassline tracks have: 3.7.4 Track Context Menu The track context menu appears when you right-click on a segment in the track. The options available vary by the type of track as follows: 3.7.4.1 Instrument Track Context Menu and Remove steps 3.7.4.2 Sample Track Context Menu The actions of each option are essentially the same as those for the instrument track above. The record function is not yet functional. 3.7.4.3 Beat/Bassline Track Context Menu The actions of each option are essentially the same as those for the instrument track above. The only addition is: 3.7.5 Reusing and Copying Tracks Sometimes you may like to use notes you have in another project. You can't use the notes in other projects just as a reference , but! You can copy these notes from one project to another! Let's say we have a nice arpeggio, and we'd like to reuse that within a tiny change, in a new project. 3.7.5.1 Method 1 If you have decent hardware, with 2+ GB of RAM, you can have two LMMS running simultaneously. Point to the track with the existing arpeggio. On the track button we have a nobbled bar leftmost in this picture: You now have copied all notes and the preset into the new project. In our case we would have \"both\" the arpeggio-notes, \"and\" all the arpeggio settings in the preset copied to the new project. If you create a project called something like .my-aprs.mmp, and build all the arps, you can think of, then you can use that project as a template for any project, and that way you have an arpeggio library. 3.7.5.2 Method 2 This is not at all as potent, byt can be used by anyone, despite low-end HW.3.8 Beat+Bassline Editor
 Beat+Bassline Editor
The Beat+Bassline Editor is the main window for sequencing rhythms and repetitive musical lines in LMMS.
Beat+Bassline Editor
The Beat+Bassline Editor is the main window for sequencing rhythms and repetitive musical lines in LMMS.
3.8.1 Toolbar
 Beat+Bassline Editor toolbar
Play and Stop buttons allow you to play and stop the currently selected Beat/Bassline (BB) track.
When Play is pressed, it will be replaced with a Pause symbol allowing you to pause the playback rather than stop it entirely.
Stop returns the play-head to the first step in the BB track; Pause allows you to continue from the last played step.
Add steps and Remove steps allow you to add or remove the number of steps in a bar.
The drop-down menu allows you to select the BB track to edit.
It displays the current Beat/Bassline (BB) track being edited.
The Add Beat/Bassline button creates a new Beat/Bassline track in the Song Editor, numbered sequentially from "Beat/Bassline 0".
Right-click on the new BB track's name in the Song Editor and rename it to something useful.
All BB tracks are linked in such a way that they share the same instruments.
If you delete or toggle-mute an instrument in one BB track, the effect will be applied in all BB tracks within this project.
So, if you have multiple BB tracks in your song, remember that all the BB tracks will contain the same instruments.
This means that you'll have to enforce silence on those instruments that you want silenced in a particular BB track.
For example, say you have a first BB track with a kick drum, snare, and HiHat, and a second BB track with just a clap and a shaker.
All 5 instruments will be in both BB tracks.
You'll want the clap and shaker instruments in the first track to be silent, so in the first track, for both the clap and shaker, you can either
Make sure all the steps are turned off (see Context menu clear below)
Context menu mute the track (toggle mute won't work because the instrument will be toggle muted in all other BB tracks)
Also, you'll have to do the same thing to the kick, snare, and HiHat in the second BB track to make sure those 3 are silent.
The Add automation track button adds a new automation track to the current BB track.
Beat+Bassline Editor toolbar
Play and Stop buttons allow you to play and stop the currently selected Beat/Bassline (BB) track.
When Play is pressed, it will be replaced with a Pause symbol allowing you to pause the playback rather than stop it entirely.
Stop returns the play-head to the first step in the BB track; Pause allows you to continue from the last played step.
Add steps and Remove steps allow you to add or remove the number of steps in a bar.
The drop-down menu allows you to select the BB track to edit.
It displays the current Beat/Bassline (BB) track being edited.
The Add Beat/Bassline button creates a new Beat/Bassline track in the Song Editor, numbered sequentially from "Beat/Bassline 0".
Right-click on the new BB track's name in the Song Editor and rename it to something useful.
All BB tracks are linked in such a way that they share the same instruments.
If you delete or toggle-mute an instrument in one BB track, the effect will be applied in all BB tracks within this project.
So, if you have multiple BB tracks in your song, remember that all the BB tracks will contain the same instruments.
This means that you'll have to enforce silence on those instruments that you want silenced in a particular BB track.
For example, say you have a first BB track with a kick drum, snare, and HiHat, and a second BB track with just a clap and a shaker.
All 5 instruments will be in both BB tracks.
You'll want the clap and shaker instruments in the first track to be silent, so in the first track, for both the clap and shaker, you can either
Make sure all the steps are turned off (see Context menu clear below)
Context menu mute the track (toggle mute won't work because the instrument will be toggle muted in all other BB tracks)
Also, you'll have to do the same thing to the kick, snare, and HiHat in the second BB track to make sure those 3 are silent.
The Add automation track button adds a new automation track to the current BB track.
3.8.2 Instrument Track
 Instrument track
Each instrument added to the Beat+Bassline Editor will look like this.
The track settings you recognize from the Song Editor are on the left side and the Step Editor is on the right (the gray boxes).
Instrument track
Each instrument added to the Beat+Bassline Editor will look like this.
The track settings you recognize from the Song Editor are on the left side and the Step Editor is on the right (the gray boxes).
3.8.2.1 Step Editor
By default an instrument track has 16 steps (16 gray boxes), 4 steps to each beat in a 4-beat bar. Each step icon is both an on/off toggle and a volume knob. A left-click on a step toggles it on or off. To change its volume, hover your mouse over step and raise or lower its volume by rolling your mouse scroll wheel up or down. The step is bright green at full volume, gray at zero volume, and an intermediate brightness of green at intermediate volumes. A left-click will still turn the step on or off, and the step remembers its last volume setting. Editing the volume of a step in the Piano Roll (see below) is also reflected in the color brightness of a step. When a step is turned on, the sound from the instrument will play at that step in the bar. The 4 steps in each beat group are shaded alternately light and dark gray to make orientation easier. Right-clicking on a step gives you the context menu for that track. BB track context menu
Open in piano-roll allows you to edit the notes of a segment in the Piano Roll Editor rather than just as steps.
This allows you to place notes with more than 1/16th precision, and to vary the pitch, length, and volume of the notes (steps).
Copy and Paste allow you to copy a set of steps from one track to another by copying the original track's steps, right-clicking on the new track and choosing Paste
Mute/Unmute allows you to context menu mute/unmute the instrument in this BB track only.
Unlike the toggle mute/unmute switch (the light), this method does affect the same instrument in other BB tracks in the same project.
Clear all notes allows you to quickly erase all the steps in this track
Reset name resets the segment name to the track name, and the name is again hidden
Change name allows you to change the name of this track
Add steps and Remove steps allow you to add or remove the number of steps in a bar
The Beat+Bassline Editor is the main window for sequencing rhythms and repetitive musical lines in LMMS.
3.8.1 Toolbar
Play
and
Stop buttons allow you to play and stop the currently selected Beat/Bassline (BB) track.
When
Play is pressed, it will be replaced with a
Pause symbol allowing you to pause the playback rather than stop it entirely.
Stop returns the play-head to the first step in the BB track;
Pause allows you to continue from the last played step.
Add steps and
Remove steps allow you to add or remove the number of steps in a bar.
The drop-down menu allows you to select the BB track to edit.
It displays the current
Beat/Bassline (BB)
track being edited.
The
Add Beat/Bassline
button creates a new Beat/Bassline track in the Song Editor, numbered sequentially from \"Beat/Bassline 0\".
Right-click on the new BB track's name in the Song Editor and rename it to something useful.
If you delete or toggle-mute an instrument in one BB track, the effect will be applied in all BB tracks within this project.
So, if you have multiple BB tracks in your song, remember that all the BB tracks will contain the same instruments.
This means that you'll have to enforce silence on those instruments that you want silenced in a particular BB track.
For example, say you have a first BB track with a kick drum, snare, and HiHat, and a second BB track with just a clap and a shaker.
All 5 instruments will be in both BB tracks.
You'll want the clap and shaker instruments in the first track to be silent, so in the first track, for both the clap and shaker, you can either
Also, you'll have to do the same thing to the kick, snare, and HiHat in the second BB track to make sure those 3 are silent.
The
Add automation track button adds a new automation track to the current BB track.
3.8.2 Instrument Track
Each instrument added to the Beat+Bassline Editor will look like this.
The track settings you recognize from the Song Editor are on the left side and the Step Editor is on the right (the gray boxes).
3.8.2.1 Step Editor
By default an instrument track has 16 steps (16 gray boxes), 4 steps to each beat in a 4-beat bar.
Each step icon is both an on/off toggle and a volume knob.
A left-click on a step toggles it on or off.
To change its volume, hover your mouse over step and raise or lower its volume by rolling your mouse scroll wheel up or down.
The step is bright green at full volume, gray at zero volume, and an intermediate brightness of green at intermediate volumes.
A left-click will still turn the step on or off, and the step remembers its last volume setting.
Editing the volume of a step in the Piano Roll (see below) is also reflected in the color brightness of a step.
When a step is turned on, the sound from the instrument will play at that step in the bar.
The 4 steps in each beat group are shaded alternately light and dark gray to make orientation easier.
Right-clicking on a step gives you the context menu for that track.
and
Paste
and
Remove steps
BB track context menu
Open in piano-roll allows you to edit the notes of a segment in the Piano Roll Editor rather than just as steps.
This allows you to place notes with more than 1/16th precision, and to vary the pitch, length, and volume of the notes (steps).
Copy and Paste allow you to copy a set of steps from one track to another by copying the original track's steps, right-clicking on the new track and choosing Paste
Mute/Unmute allows you to context menu mute/unmute the instrument in this BB track only.
Unlike the toggle mute/unmute switch (the light), this method does affect the same instrument in other BB tracks in the same project.
Clear all notes allows you to quickly erase all the steps in this track
Reset name resets the segment name to the track name, and the name is again hidden
Change name allows you to change the name of this track
Add steps and Remove steps allow you to add or remove the number of steps in a bar
The Beat+Bassline Editor is the main window for sequencing rhythms and repetitive musical lines in LMMS.
3.8.1 Toolbar
Play
and
Stop buttons allow you to play and stop the currently selected Beat/Bassline (BB) track.
When
Play is pressed, it will be replaced with a
Pause symbol allowing you to pause the playback rather than stop it entirely.
Stop returns the play-head to the first step in the BB track;
Pause allows you to continue from the last played step.
Add steps and
Remove steps allow you to add or remove the number of steps in a bar.
The drop-down menu allows you to select the BB track to edit.
It displays the current
Beat/Bassline (BB)
track being edited.
The
Add Beat/Bassline
button creates a new Beat/Bassline track in the Song Editor, numbered sequentially from \"Beat/Bassline 0\".
Right-click on the new BB track's name in the Song Editor and rename it to something useful.
If you delete or toggle-mute an instrument in one BB track, the effect will be applied in all BB tracks within this project.
So, if you have multiple BB tracks in your song, remember that all the BB tracks will contain the same instruments.
This means that you'll have to enforce silence on those instruments that you want silenced in a particular BB track.
For example, say you have a first BB track with a kick drum, snare, and HiHat, and a second BB track with just a clap and a shaker.
All 5 instruments will be in both BB tracks.
You'll want the clap and shaker instruments in the first track to be silent, so in the first track, for both the clap and shaker, you can either
Also, you'll have to do the same thing to the kick, snare, and HiHat in the second BB track to make sure those 3 are silent.
The
Add automation track button adds a new automation track to the current BB track.
3.8.2 Instrument Track
Each instrument added to the Beat+Bassline Editor will look like this.
The track settings you recognize from the Song Editor are on the left side and the Step Editor is on the right (the gray boxes).
3.8.2.1 Step Editor
By default an instrument track has 16 steps (16 gray boxes), 4 steps to each beat in a 4-beat bar.
Each step icon is both an on/off toggle and a volume knob.
A left-click on a step toggles it on or off.
To change its volume, hover your mouse over step and raise or lower its volume by rolling your mouse scroll wheel up or down.
The step is bright green at full volume, gray at zero volume, and an intermediate brightness of green at intermediate volumes.
A left-click will still turn the step on or off, and the step remembers its last volume setting.
Editing the volume of a step in the Piano Roll (see below) is also reflected in the color brightness of a step.
When a step is turned on, the sound from the instrument will play at that step in the bar.
The 4 steps in each beat group are shaded alternately light and dark gray to make orientation easier.
Right-clicking on a step gives you the context menu for that track.
and
Paste
and
Remove steps
3.9 Piano Roll
 Piano Roll Editor
The Piano Roll Editor is the main workspace for composing and editing melodies and harmonies.
It can be accessed through either the right-click context menu on or double-clicking on:
a segment in an instrument track, e.g.
a step in a track in the Beat+Bassline Editor
It can also be accessed using the Show/Hide Piano-Roll buttonin the main toolbar (shortcut F7, or Ctrl+3 in 1.3).
Notice that the Show/Hide Piano-Roll button opens the last edited segment.
If you just started a new session (not to be confused with starting a new project), you must first connect Piano Roll to a segment to be able to use it.
LMMS will not remember the last edited segment from one session to another.
Piano Roll Editor
The Piano Roll Editor is the main workspace for composing and editing melodies and harmonies.
It can be accessed through either the right-click context menu on or double-clicking on:
a segment in an instrument track, e.g.
a step in a track in the Beat+Bassline Editor
It can also be accessed using the Show/Hide Piano-Roll buttonin the main toolbar (shortcut F7, or Ctrl+3 in 1.3).
Notice that the Show/Hide Piano-Roll button opens the last edited segment.
If you just started a new session (not to be confused with starting a new project), you must first connect Piano Roll to a segment to be able to use it.
LMMS will not remember the last edited segment from one session to another.
3.9.1 Toolbar
 Piano Roll toolbar
Many of the tools are similar to those found in the Song Editor, with several important additions listed (listed below).
Piano Roll toolbar
Many of the tools are similar to those found in the Song Editor, with several important additions listed (listed below).
3.9.1.1 Playback and Record
 Playback and record buttons
In addition to the Playback and Stop controls, there are two Record buttons which will record the notes you play on either:
an attached MIDI keyboard
your computer's keyboard
Either Clickto start recording without playing Song Editor/B&B tracks, or Clickto start recording with Song Editor/B&B tracks playing.
Press to stop playback or recording.
The computer keyboard's spacebar can toggle between Playback and Stop in both playback and record modes.
As of 1.3, allows you to record notes one at a time.
After you press stop, you will be able to see all the notes you played in the Piano Roll.
These notes can be edited just like any other notes.
Playback and record buttons
In addition to the Playback and Stop controls, there are two Record buttons which will record the notes you play on either:
an attached MIDI keyboard
your computer's keyboard
Either Clickto start recording without playing Song Editor/B&B tracks, or Clickto start recording with Song Editor/B&B tracks playing.
Press to stop playback or recording.
The computer keyboard's spacebar can toggle between Playback and Stop in both playback and record modes.
As of 1.3, allows you to record notes one at a time.
After you press stop, you will be able to see all the notes you played in the Piano Roll.
These notes can be edited just like any other notes.
3.9.1.2 Editing
 Editing tools
Selected notes can be manipulated together.
Some keyboard shortcuts include:
Moving the selection (left click + drag)
Copying the selection (Shift+left click + drag)
Transposing the selection (Shift/Ctrl + arrow keys).
Shift will move the selection one beat/semitone at a time, while Ctrl will move the selection one octave/measure at a time.
The 4 editing modes (tools) are Draw, Erase, Select, and Detune.
You can draw notes with Left click and erase with Right click.
(These are explained in further detail in the Edit Notes subsection of this Section).
The Select mode tool allows you to select individual notes to create a group or "selection" of notes, which you can manipulate.
Rectangular Selection: use the Select tool to drag a rectangular area around some notes.
When you release the mouse button, the selected notes will turn blue.
Individual Selection: use the Select tool to left-click on a note - it will turn blue
Add to (or remove from) Selection: you can add more notes to the current selection by holding down the Shift key (Shift+drag or Shift+click) and the additional notes will turn blue, too.
If the notes are already selected, it will remove them from the selection.
Clear Selection: left-click on an empty space in the Piano Roll
Editing tools
Selected notes can be manipulated together.
Some keyboard shortcuts include:
Moving the selection (left click + drag)
Copying the selection (Shift+left click + drag)
Transposing the selection (Shift/Ctrl + arrow keys).
Shift will move the selection one beat/semitone at a time, while Ctrl will move the selection one octave/measure at a time.
The 4 editing modes (tools) are Draw, Erase, Select, and Detune.
You can draw notes with Left click and erase with Right click.
(These are explained in further detail in the Edit Notes subsection of this Section).
The Select mode tool allows you to select individual notes to create a group or "selection" of notes, which you can manipulate.
Rectangular Selection: use the Select tool to drag a rectangular area around some notes.
When you release the mouse button, the selected notes will turn blue.
Individual Selection: use the Select tool to left-click on a note - it will turn blue
Add to (or remove from) Selection: you can add more notes to the current selection by holding down the Shift key (Shift+drag or Shift+click) and the additional notes will turn blue, too.
If the notes are already selected, it will remove them from the selection.
Clear Selection: left-click on an empty space in the Piano Roll
 Detuning (Note similarities to Automation Editor)
The Detune mode allows you to edit the frequency profile of an individual note.
When you click on a note, an Automation Editor window opens for that note, and from here you can use your mouse to plot points for a Detune profile graph, this profile will be used to alter the final pitch of the edited note when played.
Notice that in Piano roll, edited notes will have green lines that reveal their Detune profile.
VST instruments cannot have per-note detuning.
You may still detune the instrument as a whole from the Instrument Window's "PITCH" knob.
Detuning (Note similarities to Automation Editor)
The Detune mode allows you to edit the frequency profile of an individual note.
When you click on a note, an Automation Editor window opens for that note, and from here you can use your mouse to plot points for a Detune profile graph, this profile will be used to alter the final pitch of the edited note when played.
Notice that in Piano roll, edited notes will have green lines that reveal their Detune profile.
VST instruments cannot have per-note detuning.
You may still detune the instrument as a whole from the Instrument Window's "PITCH" knob.
3.9.1.3 Clipboard
 Clipboard buttons
The Clipboard buttons allow you to cut, copy, and paste a selection, and the Delete key on the computer keyboard will delete the selected notes.
Click the Copy button (Ctrl+c) to copy the selected note(s) and place them in the clipboard.
Shift+drag on the selected note(s) to duplicate - drag a copy of the selected note(s) away from the original(s).
Clipboard buttons
The Clipboard buttons allow you to cut, copy, and paste a selection, and the Delete key on the computer keyboard will delete the selected notes.
Click the Copy button (Ctrl+c) to copy the selected note(s) and place them in the clipboard.
Shift+drag on the selected note(s) to duplicate - drag a copy of the selected note(s) away from the original(s).
3.9.1.4 Playback Control
 Playback buttons
These work the same as the playback controls in the Song Editor.
To repatriate loops:
Set right loop-point: use right mouse button only
Set left loop-point: use right mouse button + Shift
(1.3 and later) Set both right/left loop-points: use right mouse button near desired loop-point
Hold Ctrl to place loop-points freely.
Playback buttons
These work the same as the playback controls in the Song Editor.
To repatriate loops:
Set right loop-point: use right mouse button only
Set left loop-point: use right mouse button + Shift
(1.3 and later) Set both right/left loop-points: use right mouse button near desired loop-point
Hold Ctrl to place loop-points freely.
3.9.1.5 Zoom
 Zoom control
This works the same as in the Song Editor.
The drop-down menu can be used to set horizontal zoom.
Zoom control
This works the same as in the Song Editor.
The drop-down menu can be used to set horizontal zoom.
 Vertical Zoom Control
As of 1.3, vertical zooming is now avaliable in the Song editor.
Vertical Zoom Control
As of 1.3, vertical zooming is now avaliable in the Song editor.
3.9.1.6 Quantization
 Quantization control
The Quantization can be set using drop-down menu, this allows you to set the minimum resolution for manipulating note length using that fraction of a bar, when using both Draw mode and Record.
For example, if you set the Quantization to 1/1 , you'll only be able to place notes at the start of a whole bar, and you'll only be able to adjust their length in 1-bar increments.
If you set the Quantization to 1/16, you'll only be able to place notes at 1/16 intervals, and you'll only be able to adjust their length in 1/16 intervals.
So on and so forth.
snaps notes to the nearest division (set by Quantization) in the Piano Roll.
Quantization control
The Quantization can be set using drop-down menu, this allows you to set the minimum resolution for manipulating note length using that fraction of a bar, when using both Draw mode and Record.
For example, if you set the Quantization to 1/1 , you'll only be able to place notes at the start of a whole bar, and you'll only be able to adjust their length in 1-bar increments.
If you set the Quantization to 1/16, you'll only be able to place notes at 1/16 intervals, and you'll only be able to adjust their length in 1/16 intervals.
So on and so forth.
snaps notes to the nearest division (set by Quantization) in the Piano Roll.
3.9.1.7 Tools
As of 1.3, Tools are new avaliable in a dropdown menu next to . Tools
Glue (Shift+G): combines two notes if they are right next to each other and on the same pitch.
Tools
Glue (Shift+G): combines two notes if they are right next to each other and on the same pitch.
 Glue Tool
3.9.1.8 Edit Notes
3.9.1.8.1 Draw and Move Notes
Use the Draw mode tool to place notes in the Piano Roll. As you hover your mouse or move a note in the work area, a gray horizontal line will track the vertical position of your mouse. This can help you see the pitch of the note you're placing by allowing you to track back to the Piano Keys. Left-click to place a note, or if a chord is selected: Place the notes of the chord with current note as the root note Shift+left-click to place notes in arpeggio mode (this will only duplicate notes onto themselves if no chord is selected) Hover over the center of a note until a four headed arrow appears then: Drag to move the note(s) either left/right in time or up/down in pitch. The note(s) will snap to the nearest time increment as set in the Quantization drop-down menu. Alt+drag to move the note(s) either left/right in time or up/down in pitch, but without snapping to the nearest time increment. Instead, the note(s) will "free-drag" and snap to the nearest 1/192 time increment (max Quantization in LMMS). Hover over the right end of the note until a two headed arrow appears, then Drag the end of a note to the left/right to change the length of the note(s) in accordance to the current selected quantization. Alt+drag the end of a note to the left/right to change the length of the note(s). The right end of the note(s) will "free-drag" and snap to the nearest 1/192 time increment, i.e. max Quantization Holding down the Ctrl key in Draw mode converts the mouse cursor to the Select mode tool, and it returns to the Draw mode on release.3.9.1.8.2 Erase notes
There are 3 ways to erase notes: Use the Erase mode tool to delete notes: (both left and right-click) Right-click to delete notes in Draw mode To delete multiple notes, use the Select mode tool (or Ctrl+click and drag) and press delete3.9.1.9 Default Note Length
 Note length control
The Default note length setting (in bars) can be set using a drop-down menu.
This sets the default length of notes made when you click in the Piano Roll with the Draw mode tool.
You can choose either between a specified note length, or that the next note will be the same length as the last drawn note.
As soon as you have established a perfect note-length and position, you will normally like to use the setting "last note".
Note length control
The Default note length setting (in bars) can be set using a drop-down menu.
This sets the default length of notes made when you click in the Piano Roll with the Draw mode tool.
You can choose either between a specified note length, or that the next note will be the same length as the last drawn note.
As soon as you have established a perfect note-length and position, you will normally like to use the setting "last note".
3.9.2 Note Volume and Panning
 Individual note velocity
Click the Note Volume/Note Panning button below the piano keys to toggle between the Note Volume and Note Panning editor.
Velocity is shown as a vertical green bar below the note in the Note Volume editor.
You can change the velocity of each note by clicking on the desired value above/below the current value.
The color of the note will brighten with increased velocity and dim with decreased velocity.
If you are using a Velocity-Sensitive Midi keyboard, the velocity of each note will be set automatically when using Record.
Also note that Velocity may affect more than just Volume, depending on the instrument.
Individual note velocity
Click the Note Volume/Note Panning button below the piano keys to toggle between the Note Volume and Note Panning editor.
Velocity is shown as a vertical green bar below the note in the Note Volume editor.
You can change the velocity of each note by clicking on the desired value above/below the current value.
The color of the note will brighten with increased velocity and dim with decreased velocity.
If you are using a Velocity-Sensitive Midi keyboard, the velocity of each note will be set automatically when using Record.
Also note that Velocity may affect more than just Volume, depending on the instrument.
 Individual note panning
Pan is the ratio of the note volume that is transmitted out the right stereo channel versus the left stereo channel.
Pan is shown as a vertical green bar below the note in the Note Pan editor.
You can set the Pan for each note by clicking on the desired value above/below the current value.
The color of the note will darken on one side depending on the strength/direction of the Pan (Right: Bottom will darken, Left: Top will darken).
Individual note panning
Pan is the ratio of the note volume that is transmitted out the right stereo channel versus the left stereo channel.
Pan is shown as a vertical green bar below the note in the Note Pan editor.
You can set the Pan for each note by clicking on the desired value above/below the current value.
The color of the note will darken on one side depending on the strength/direction of the Pan (Right: Bottom will darken, Left: Top will darken).
3.9.3 Piano Keys
 Piano keys
You can vertically scroll the Piano Roll using either the scroll bar on the right side of the window or the scroll wheel on your mouse (Holding Ctrl allows you to scroll horizontally).
Left-click on any piano key (or or press a key on a connected midi controller) to hear the corresponding note.
You will also hear any noteblock that is Left-Clicked from within the Piano Roll.
Your Keyboard can be used to play notes in the Piano Roll.
You can mark all whole notes with their appropriate alphabetic notation (This option is found in the General Settings page as "Enable note labels in Piano roll").
Piano keys
You can vertically scroll the Piano Roll using either the scroll bar on the right side of the window or the scroll wheel on your mouse (Holding Ctrl allows you to scroll horizontally).
Left-click on any piano key (or or press a key on a connected midi controller) to hear the corresponding note.
You will also hear any noteblock that is Left-Clicked from within the Piano Roll.
Your Keyboard can be used to play notes in the Piano Roll.
You can mark all whole notes with their appropriate alphabetic notation (This option is found in the General Settings page as "Enable note labels in Piano roll").
 Piano Keys with note labels enabled
You can also mark individual notes, chords and scales.
All these options are available as items in a context menu, by right-clicking anywhere on the Piano Keys.
The piano key you open the context menu impacts what notes are affected by its options.
From this context menu you are able to:
mark scales, chords, corresponding octave semitones, and semitones.
unmark corresponding octave semitones and semitones, or unmark all notes.
select all corresponding octave semitones.
Piano Keys with note labels enabled
You can also mark individual notes, chords and scales.
All these options are available as items in a context menu, by right-clicking anywhere on the Piano Keys.
The piano key you open the context menu impacts what notes are affected by its options.
From this context menu you are able to:
mark scales, chords, corresponding octave semitones, and semitones.
unmark corresponding octave semitones and semitones, or unmark all notes.
select all corresponding octave semitones.
 C major marked on Piano Roll
To mark/unmark Scales/Chords, you first need to select the type of scale/chord from the two rightmost drop-down menus found in the toolbar.
Chords/Scales are marked from their root notes/1st scale degree, respectively.
The Piano Roll Editor is the main workspace for composing and editing melodies and harmonies.
It can be accessed through either the right-click context menu on or double-clicking on:
It can also be accessed using the
Show/Hide Piano-Roll button
in the main toolbar (shortcut F7, or Ctrl+3 in 1.3).
Show/Hide Piano-Roll button opens the last edited segment.
If you just started a new session (not to be confused with starting a new project), you must first connect Piano Roll to a segment to be able to use it.
LMMS
will not
3.9.1 Toolbar
Many of the tools are similar to those found in the Song Editor, with several important additions listed (listed below).
3.9.1.1 Playback and Record
In addition to the Playback and Stop controls, there are two
Record buttons which will record the notes you play on either:
Either Click
to start recording without playing Song Editor/B\u0026B tracks, or Click
to start recording with Song Editor/B\u0026B tracks playing.\nPress
to stop playback or recording.
The computer keyboard's
spacebar can toggle between Playback and Stop in both playback and record modes.
\nAs of 1.3,
allows you to record notes one at a time.\n\nAfter you press stop, you will be able to see all the notes you played in the Piano Roll.
These notes can be edited just like any other notes.
3.9.1.2 Editing
Selected notes can be manipulated together.
Some keyboard shortcuts include:
The 4 editing modes (tools) are
Draw
,
Erase
,
Select
, and
Detune
.\nYou can draw notes with Left click and erase with Right click.
(These are explained in further detail in the Edit Notes subsection of this Section).
The
Select mode tool allows you to select individual notes to create a group or \"
selection
\" of notes, which you can manipulate.
The
Detune mode allows you to edit the frequency profile of an individual note.
When you click on a note, an Automation Editor window opens for that note, and from here you can use your mouse to plot points for a Detune profile graph, this profile will be used to alter the final pitch of the edited note when played.
\nNotice that in Piano roll, edited notes will have green lines that reveal their Detune profile.
3.9.1.3 Clipboard
The Clipboard buttons allow you to cut, copy, and paste a selection, and the
Delete key on the computer keyboard will delete the selected notes.
Copy button (Ctrl+c) to copy the selected note(s) and place them in the clipboard.
Shift+drag on the selected note(s) to
duplicate
3.9.1.4 Playback Control
These work the same as the playback controls in the Song Editor.
To repatriate loops:
Hold Ctrl to place loop-points freely.
3.9.1.5 Zoom
This works the same as in the Song Editor.
The drop-down menu can be used to set horizontal zoom.
As of 1.3, vertical zooming is now avaliable in the Song editor.\n
3.9.1.6 Quantization
The Quantization can be set using drop-down menu, this allows you to set the minimum resolution for manipulating note length using that fraction of a bar, when using both Draw mode and Record.
\nFor example, if you set the Quantization to 1/1 , you'll only be able to place notes at the start of a whole bar, and you'll only be able to adjust their length in 1-bar increments.
\nIf you set the Quantization to 1/16, you'll only be able to place notes at 1/16 intervals, and you'll only be able to adjust their length in 1/16 intervals.
\nSo on and so forth.\n
snaps notes to the nearest division (set by Quantization) in the Piano Roll.
3.9.1.7 Tools
As of 1.3, Tools are new avaliable in a dropdown menu next to
.
3.9.1.8 Edit Notes
3.9.1.8.1 Draw and Move Notes
Use the Draw mode tool to place notes in the Piano Roll.
As you hover your mouse or move a note in the work area, a gray horizontal line will track the vertical position of your mouse.
This can help you see the pitch of the note you're placing by allowing you to track back to the Piano Keys.
Left-click to place a note, or if a chord is selected:
four headed arrow appears then:
two headed arrow appears, then
3.9.1.8.2 Erase notes
There are 3 ways to erase notes:
Erase mode
Select mode
3.9.1.9 Default Note Length
The
Default note length setting (in bars) can be set using a drop-down menu.
This sets the default length of notes made when you click in the Piano Roll with the Draw mode tool.
\nYou can choose either between a specified note length, or that the next note will be the same length as the last drawn note.
As soon as you have established a perfect note-length and position, you will normally like to use the setting \"last note\".
3.9.2 Note Volume and Panning
Click the
Note Volume/Note Panning button below the piano keys to toggle between the Note Volume and Note Panning editor.
\nVelocity is shown as a vertical green bar below the note in the Note Volume editor.
You can change the velocity of each note by clicking on the desired value above/below the current value.
The color of the note will brighten with increased velocity and dim with decreased velocity.
Record
Pan is the ratio of the note volume that is transmitted out the right stereo channel versus the left stereo channel.
\nPan is shown as a vertical green bar below the note in the Note Pan editor.\nYou can set the Pan for each note by clicking on the desired value above/below the current value.
The color of the note will darken on one side depending on the strength/direction of the Pan (Right: Bottom will darken, Left: Top will darken).
3.9.3 Piano Keys
You can vertically scroll the Piano Roll using either the scroll bar on the right side of the window or the scroll wheel on your mouse (Holding Ctrl allows you to scroll horizontally).
\nLeft-click on any piano key (or or press a key on a connected midi controller) to hear the corresponding note.
You will also hear any noteblock that is Left-Clicked from within the Piano Roll.
You can mark all whole notes with their appropriate alphabetic notation (This option is found in the
General Settings
page as \"
Enable note labels in Piano roll
\").
You can also mark individual notes, chords and scales.
All these options are available as items in a context menu, by right-clicking anywhere on the Piano Keys.
The piano key you open the context menu
impacts what notes are affected by its options
.
From this context menu you are able to:
found in the toolbar.
C major marked on Piano Roll
To mark/unmark Scales/Chords, you first need to select the type of scale/chord from the two rightmost drop-down menus found in the toolbar.
Chords/Scales are marked from their root notes/1st scale degree, respectively.
The Piano Roll Editor is the main workspace for composing and editing melodies and harmonies.
It can be accessed through either the right-click context menu on or double-clicking on:
It can also be accessed using the
Show/Hide Piano-Roll button
in the main toolbar (shortcut F7, or Ctrl+3 in 1.3).
Show/Hide Piano-Roll button opens the last edited segment.
If you just started a new session (not to be confused with starting a new project), you must first connect Piano Roll to a segment to be able to use it.
LMMS
will not
3.9.1 Toolbar
Many of the tools are similar to those found in the Song Editor, with several important additions listed (listed below).
3.9.1.1 Playback and Record
In addition to the Playback and Stop controls, there are two
Record buttons which will record the notes you play on either:
Either Click
to start recording without playing Song Editor/B\u0026B tracks, or Click
to start recording with Song Editor/B\u0026B tracks playing.\nPress
to stop playback or recording.
The computer keyboard's
spacebar can toggle between Playback and Stop in both playback and record modes.
\nAs of 1.3,
allows you to record notes one at a time.\n\nAfter you press stop, you will be able to see all the notes you played in the Piano Roll.
These notes can be edited just like any other notes.
3.9.1.2 Editing
Selected notes can be manipulated together.
Some keyboard shortcuts include:
The 4 editing modes (tools) are
Draw
,
Erase
,
Select
, and
Detune
.\nYou can draw notes with Left click and erase with Right click.
(These are explained in further detail in the Edit Notes subsection of this Section).
The
Select mode tool allows you to select individual notes to create a group or \"
selection
\" of notes, which you can manipulate.
The
Detune mode allows you to edit the frequency profile of an individual note.
When you click on a note, an Automation Editor window opens for that note, and from here you can use your mouse to plot points for a Detune profile graph, this profile will be used to alter the final pitch of the edited note when played.
\nNotice that in Piano roll, edited notes will have green lines that reveal their Detune profile.
3.9.1.3 Clipboard
The Clipboard buttons allow you to cut, copy, and paste a selection, and the
Delete key on the computer keyboard will delete the selected notes.
Copy button (Ctrl+c) to copy the selected note(s) and place them in the clipboard.
Shift+drag on the selected note(s) to
duplicate
3.9.1.4 Playback Control
These work the same as the playback controls in the Song Editor.
To repatriate loops:
Hold Ctrl to place loop-points freely.
3.9.1.5 Zoom
This works the same as in the Song Editor.
The drop-down menu can be used to set horizontal zoom.
As of 1.3, vertical zooming is now avaliable in the Song editor.\n
3.9.1.6 Quantization
The Quantization can be set using drop-down menu, this allows you to set the minimum resolution for manipulating note length using that fraction of a bar, when using both Draw mode and Record.
\nFor example, if you set the Quantization to 1/1 , you'll only be able to place notes at the start of a whole bar, and you'll only be able to adjust their length in 1-bar increments.
\nIf you set the Quantization to 1/16, you'll only be able to place notes at 1/16 intervals, and you'll only be able to adjust their length in 1/16 intervals.
\nSo on and so forth.\n
snaps notes to the nearest division (set by Quantization) in the Piano Roll.
3.9.1.7 Tools
As of 1.3, Tools are new avaliable in a dropdown menu next to
.
3.9.1.8 Edit Notes
3.9.1.8.1 Draw and Move Notes
Use the Draw mode tool to place notes in the Piano Roll.
As you hover your mouse or move a note in the work area, a gray horizontal line will track the vertical position of your mouse.
This can help you see the pitch of the note you're placing by allowing you to track back to the Piano Keys.
Left-click to place a note, or if a chord is selected:
four headed arrow appears then:
two headed arrow appears, then
3.9.1.8.2 Erase notes
There are 3 ways to erase notes:
Erase mode
Select mode
3.9.1.9 Default Note Length
The
Default note length setting (in bars) can be set using a drop-down menu.
This sets the default length of notes made when you click in the Piano Roll with the Draw mode tool.
\nYou can choose either between a specified note length, or that the next note will be the same length as the last drawn note.
As soon as you have established a perfect note-length and position, you will normally like to use the setting \"last note\".
3.9.2 Note Volume and Panning
Click the
Note Volume/Note Panning button below the piano keys to toggle between the Note Volume and Note Panning editor.
\nVelocity is shown as a vertical green bar below the note in the Note Volume editor.
You can change the velocity of each note by clicking on the desired value above/below the current value.
The color of the note will brighten with increased velocity and dim with decreased velocity.
Record
Pan is the ratio of the note volume that is transmitted out the right stereo channel versus the left stereo channel.
\nPan is shown as a vertical green bar below the note in the Note Pan editor.\nYou can set the Pan for each note by clicking on the desired value above/below the current value.
The color of the note will darken on one side depending on the strength/direction of the Pan (Right: Bottom will darken, Left: Top will darken).
3.9.3 Piano Keys
You can vertically scroll the Piano Roll using either the scroll bar on the right side of the window or the scroll wheel on your mouse (Holding Ctrl allows you to scroll horizontally).
\nLeft-click on any piano key (or or press a key on a connected midi controller) to hear the corresponding note.
You will also hear any noteblock that is Left-Clicked from within the Piano Roll.
You can mark all whole notes with their appropriate alphabetic notation (This option is found in the
General Settings
page as \"
Enable note labels in Piano roll
\").
You can also mark individual notes, chords and scales.
All these options are available as items in a context menu, by right-clicking anywhere on the Piano Keys.
The piano key you open the context menu
impacts what notes are affected by its options
.
From this context menu you are able to:
found in the toolbar.
3.10 Automation
 Automation Editor not connected to a segment
The Automation Editor allows you to control the value of any automatable control at any point in time during the song.
This allows you anything from very simple effects like turning up the volume of an instrument at the start of the song, to very complex manipulation of envelopes or instrument filters.
Even the controls in LADSPA effects and VST effects can be automated!
As the Piano Roll, you must connect the Automation Editor to a segment, in this case an Automation segment.
If you open the Automation Editor (shortcur F8), and it looks like the image, close it and double-click on an Automation track segment to connect to.
Automation Editor not connected to a segment
The Automation Editor allows you to control the value of any automatable control at any point in time during the song.
This allows you anything from very simple effects like turning up the volume of an instrument at the start of the song, to very complex manipulation of envelopes or instrument filters.
Even the controls in LADSPA effects and VST effects can be automated!
As the Piano Roll, you must connect the Automation Editor to a segment, in this case an Automation segment.
If you open the Automation Editor (shortcur F8), and it looks like the image, close it and double-click on an Automation track segment to connect to.
What Can Be Automated?
Controls are the knobs, sliders, light switches, digital readouts, etc, that can be found in the LMMS GUI. All controls on default LMMS GUI can be automated, including the following types Light switches: Digital readout (FX numbers, pitch range): Option buttons: Sliders: Knobs: If you're unsure if a control can be automated, right-click on its icon and look for a contex menu item called Edit song-global automation. If it's there, the item probably can be automated. Most ZynAddSubFX controls do not support automation. You can automate any controls on third-party VST instruments by clicking on the "Control VST plugin" icon .Toolbar
 Automation Editor toolbar
The toolbar controls much of the functionality, and is similar in many ways to the toolbars of other windows.
The fundamental tools are similar in behavior to their equivalents in the Piano Roll Editor.
Additional tools are:
The line progression tools
Tension knob
Automation Editor toolbar
The toolbar controls much of the functionality, and is similar in many ways to the toolbars of other windows.
The fundamental tools are similar in behavior to their equivalents in the Piano Roll Editor.
Additional tools are:
The line progression tools
Tension knob
Editing Automation
 Editing automation
The image shows a typical view of the automation window.
The window title Automation Editor-Lead>Volume tells you that you are editing the automation graph of the "Volume" control that belongs to the track named "Lead".
The image does not show this correctly because the automation is not connected to a control.
The main part of the window is a graph of the value of the control over time.
Time is listen along the horizontal axis (at the top of the window) in the units of bars (a.k.a.
the "timeline").
The value of the control is listed along the vertical axis at the left of the window in whatever units the control uses.
Within the graphing area, the mouse cursor is linked to the horizontal and vertical axes by red lines to make it easier to see where you are working in both dimensions.
How you should interpret the bar numbers in the Automation Editor depends on which method you are using to automate a control - Song-global or Automation track.
The blue part of the graph provides an easy way to see the curve of the graph.
The area between the curve and zero is shaded blue.
In the case of a volume control, all the values are zero or greater, so zero is at the bottom of the value scale.
For controls where the value can be negative, for example, a stereo pan control, the "zero line" is in the middle of the graph and blue shading can occur on either side of the zero line.
Editing automation
The image shows a typical view of the automation window.
The window title Automation Editor-Lead>Volume tells you that you are editing the automation graph of the "Volume" control that belongs to the track named "Lead".
The image does not show this correctly because the automation is not connected to a control.
The main part of the window is a graph of the value of the control over time.
Time is listen along the horizontal axis (at the top of the window) in the units of bars (a.k.a.
the "timeline").
The value of the control is listed along the vertical axis at the left of the window in whatever units the control uses.
Within the graphing area, the mouse cursor is linked to the horizontal and vertical axes by red lines to make it easier to see where you are working in both dimensions.
How you should interpret the bar numbers in the Automation Editor depends on which method you are using to automate a control - Song-global or Automation track.
The blue part of the graph provides an easy way to see the curve of the graph.
The area between the curve and zero is shaded blue.
In the case of a volume control, all the values are zero or greater, so zero is at the bottom of the value scale.
For controls where the value can be negative, for example, a stereo pan control, the "zero line" is in the middle of the graph and blue shading can occur on either side of the zero line.
Control Points
The red circle () is the control point. The automation graph must always go through these points. After the last point the automation graph will be a straight line, the value of the last point could last in infinity, but is limited by the length of the segment in the Song Editor.Drawing Control Points
Using the Draw mode tool (pencil - ), you can create new control points simply by clicking on (or near) a vertical line. In all cases, if control point already exists somewhere on that vertical line, it will be removed to where you clicked. If a control point does not exist on that vertical line, it will be created there. You can move an existing point up/down its vertical line by dragging it directly - you are reshaping the graph. You can delete a control point by right-clicking (same as deleting a note in the Piano Roll Editor). The timeline spacing of control points as you draw is set by the Q (quantization) setting (). By default this is set to 1/16 which means 16 control points per bar (or a control point vertical line every 1/16th of a bar). You don't have to have a control point at every point that is possible - a horizontal line only requires 2 control points (one at each end).Working with Selections
Operations such as cut, copy, paste, delete, and move selection operate on 1+ selected control points. The Select mode tool allows you to drag a rectangular area around 1+ points to select them. The vertical orange bar of the point(s) will turn blue. You can also use Ctrl+A which will select all the control points in the Automation Editor. You can the cut, copy, delete, and/or paste the selected points. Use the Delete key on the computer keyboard to delete the selected points. The Paste operation uses both the timeline position (horizontal value) and the control value (vertical value) of the control points when pasting them into a new (or the same) automation track block. Beware the vertical value might not make sense for a different control. After pasting, the pasted points are still selected, which allows you to move them as a group. For example, if you copied the control points from bars 20 to 30 from one automation block and pasted them into a different automation block, the points will occupy bars 20 to 30 in the new block, but, because they are still selected, you can move them to a different location. The Move selection mode tool allow you to move (by dragging) the selected control points and without regard for the Q setting. The selection will move at the maximum Q of 1/192. This is similar to the "free drag" (Alt+drag) of notes in the Piano Roll. Beware while moving a selection that any existing points that the selection passes over will be deleted!Erasing Control Points
The Erase mode tool can delete control points, as can right-clicking on them. The Automation Editor allows you to control the value of any automatable control at any point in time during the song. This allows you anything from very simple effects like turning up the volume of an instrument at the start of the song, to very complex manipulation of envelopes or instrument filters. Even the controls in LADSPA effects and VST effects can be automated! As the Piano Roll, you must connect the Automation Editor to a segment, in this case an Automation segment. If you open the Automation Editor (shortcur F8), and it looks like the image, close it and double-click on an Automation track segment to connect to. What Can Be Automated? Controls are the knobs, sliders, light switches, digital readouts, etc, that can be found in the LMMS GUI. All controls on default LMMS GUI can be automated, including the following types If you're unsure if a control can be automated, right-click on its icon and look for a contex menu item called Edit song-global automation . If it's there, the item probably can be automated. Most ZynAddSubFX controls do not support automation. You can automate any controls on third-party VST instruments by clicking on the \"Control VST plugin\" icon . Toolbar The toolbar controls much of the functionality, and is similar in many ways to the toolbars of other windows. The fundamental tools are similar in behavior to their equivalents in the Piano Roll Editor. Additional tools are: Editing Automation The image shows a typical view of the automation window. The window title Automation Editor-Lead\u003eVolume tells you that you are editing the automation graph of the \"Volume\" control that belongs to the track named \"Lead\". The image does not show this correctly because the automation is not connected to a control. The main part of the window is a graph of the value of the control over time . Time is listen along the horizontal axis (at the top of the window) in the units of bars (a.k.a. the \"timeline\"). The value of the control is listed along the vertical axis at the left of the window in whatever units the control uses. Within the graphing area, the mouse cursor is linked to the horizontal and vertical axes by red lines to make it easier to see where you are working in both dimensions. How you should interpret the bar numbers in the Automation Editor depends on which method you are using to automate a control - Song-global or Automation track. The blue part of the graph provides an easy way to see the curve of the graph. The area between the curve and zero is shaded blue. In the case of a volume control, all the values are zero or greater, so zero is at the bottom of the value scale. For controls where the value can be negative, for example, a stereo pan control, the \"zero line\" is in the middle of the graph and blue shading can occur on either side of the zero line. Control Points The red circle ( ) is the control point . The automation graph must always go through these points. After the last point the automation graph will be a straight line, the value of the last point could last in infinity, but is limited by the length of the segment in the Song Editor. Drawing Control Points Using the Draw mode tool (pencil - ), you can create new control points simply by clicking on (or near) a vertical line. In all cases, if control point already exists somewhere on that vertical line, it will be removed to where you clicked. If a control point does not exist on that vertical line, it will be created there. You can move an existing point up/down its vertical line by dragging it directly - you are reshaping the graph. You can delete a control point by right-clicking (same as deleting a note in the Piano Roll Editor). The timeline spacing of control points as you draw is set by the Q (quantization) setting ( ). By default this is set to 1/16 which means 16 control points per bar (or a control point vertical line every 1/16th of a bar). You don't have to have a control point at every point that is possible - a horizontal line only requires 2 control points (one at each end). Working with Selections Operations such as cut, copy, paste, delete, and move selection operate on 1+ selected control points. The Select mode tool allows you to drag a rectangular area around 1+ points to select them. The vertical orange bar of the point(s) will turn blue. You can also use Ctrl+A which will select all the control points in the Automation Editor. You can the cut, copy, delete, and/or paste the selected points. Use the Delete key on the computer keyboard to delete the selected points. The Paste operation uses both the timeline position (horizontal value) and the control value (vertical value) of the control points when pasting them into a new (or the same) automation track block. Beware the vertical value might not make sense for a different control. After pasting, the pasted points are still selected, which allows you to move them as a group. For example, if you copied the control points from bars 20 to 30 from one automation block and pasted them into a different automation block, the points will occupy bars 20 to 30 in the new block, but, because they are still selected, you can move them to a different location. The Move selection mode tool allow you to move (by dragging) the selected control points and without regard for the Q setting. The selection will move at the maximum Q of 1/192. This is similar to the \"free drag\" (Alt+drag) of notes in the Piano Roll. Beware while moving a selection that any existing points that the selection passes over will be deleted! Erasing Control Points The Erase mode3.11 FX-Mixer
The is the FX-Mixer show/hide toggle button. FX-Mixer
To add an FX-channel, press the + button on the right.
You can delete or move an FX-channel by right-clicking on it and choosing the desired option from the context menu.
You can also rename an FX-channel by double-clicking on its name.
Each FX-channel has separate left and right (stereo) volume indicators located on each side of the fader slider control, but the left and right volume cannot be controlled independently by the fader, it controls both simultaneously.
To change the volume of an FX-channel, drag its fader up and down with the mouse.
You can also add an Amplifier effect to balance channels.
Each FX-channel also has a Mute/Unmute LED toggle switch below its name.
An FX-channel can be selected by clicking on its name.
The name will turn from white to green, and only one FX-channel can be selected at any time.
When an FX-channel is selected, the Effects Chain for that FX-channel will display in the Effects Chain box at the far right end of the window.
When selecting an FX-channel, you can click on "Send" on another channel to send its signal to it.
You can use the knob to control the level of signal that is sent to the channel.
FX-Mixer
To add an FX-channel, press the + button on the right.
You can delete or move an FX-channel by right-clicking on it and choosing the desired option from the context menu.
You can also rename an FX-channel by double-clicking on its name.
Each FX-channel has separate left and right (stereo) volume indicators located on each side of the fader slider control, but the left and right volume cannot be controlled independently by the fader, it controls both simultaneously.
To change the volume of an FX-channel, drag its fader up and down with the mouse.
You can also add an Amplifier effect to balance channels.
Each FX-channel also has a Mute/Unmute LED toggle switch below its name.
An FX-channel can be selected by clicking on its name.
The name will turn from white to green, and only one FX-channel can be selected at any time.
When an FX-channel is selected, the Effects Chain for that FX-channel will display in the Effects Chain box at the far right end of the window.
When selecting an FX-channel, you can click on "Send" on another channel to send its signal to it.
You can use the knob to control the level of signal that is sent to the channel.
3.11.1 Master FX-channel
 Master FX-channel
By default, all instruments have their "FX" initially set to channel zero which is the "Master" channel at the far left end of the FX-Mixer window.
The Master channel controls the overall volume of all the combined instruments and FX-channels.
Also, it ca function as FX-channel zero (FX0) which allows you to apply effects to the master output (i.e.
everything combined).
Master FX-channel
By default, all instruments have their "FX" initially set to channel zero which is the "Master" channel at the far left end of the FX-Mixer window.
The Master channel controls the overall volume of all the combined instruments and FX-channels.
Also, it ca function as FX-channel zero (FX0) which allows you to apply effects to the master output (i.e.
everything combined).
3.11.2 Add Effects to FX-channels
 Effects chain
To add an effect to an FX-channel, select the FX-channel (i.e.
click on its name), then click the Add effect button below the Effects Chain box (see image).
This will open a dialog box where you can select one effect from the list of all available effect plugins.
You can add another effect by clicking the Add effect button again (you can only add one effect at a time).
You will get a "Controls" dialog individualized for the particular effect plugin you just added - here you can edit the effect plugin's configuration.
Notice that the effect plugin has been added as an entry at the bottom of the stack in the Effects Chain box.
Each effect's entry has a standard set of visible controls:
On/Off LED toggle switch (yellow)
Knobs for W/D, Decay, and Gate (these are explained in section Instrument Editor#FX tab)
Controls button that is a show/hide toggle for the effect plugin's configuration dialog
A right-click context menu allow yo to:
remove the effect's entry from the Effects Chain box
move the effect's entry up or down in the stacking order
Also notice that the Effects Chain box itself has an On/Off LED toggle (green) that turns off all the effects on that FX-channel only.
Effects chain
To add an effect to an FX-channel, select the FX-channel (i.e.
click on its name), then click the Add effect button below the Effects Chain box (see image).
This will open a dialog box where you can select one effect from the list of all available effect plugins.
You can add another effect by clicking the Add effect button again (you can only add one effect at a time).
You will get a "Controls" dialog individualized for the particular effect plugin you just added - here you can edit the effect plugin's configuration.
Notice that the effect plugin has been added as an entry at the bottom of the stack in the Effects Chain box.
Each effect's entry has a standard set of visible controls:
On/Off LED toggle switch (yellow)
Knobs for W/D, Decay, and Gate (these are explained in section Instrument Editor#FX tab)
Controls button that is a show/hide toggle for the effect plugin's configuration dialog
A right-click context menu allow yo to:
remove the effect's entry from the Effects Chain box
move the effect's entry up or down in the stacking order
Also notice that the Effects Chain box itself has an On/Off LED toggle (green) that turns off all the effects on that FX-channel only.
3.11.3 Assign Instruments to FX-Channels
 FX-channel assignment
To assign an instrument to an FX-channel, click on its name in either the Song-Editor or Beat+Bassline Editor, depending on where it is located.
In the instrument settings window, set the FX CHNL to the FX-channel you want by:
hovering your mouse over the digital readout number and scrolling the mouse wheel
dragging your mouse vertically on the digital readout number
A double-click on the digital readout number will change the selected FX-channel in the FX-Mixer window to the FX-channel with that number.
The right-click context menu for the digital readout number has Reset, Copy, and Paste followed by a number in parentheses.
The number in parentheses is the number that it will be reset to, or will be copied to the clipboard, or will be pasted, respectively.
Multiple instruments can be assigned to a single FX-channel in order to get the same effect on each instrument (e.g.
an equalizer).
FX-channel assignment
To assign an instrument to an FX-channel, click on its name in either the Song-Editor or Beat+Bassline Editor, depending on where it is located.
In the instrument settings window, set the FX CHNL to the FX-channel you want by:
hovering your mouse over the digital readout number and scrolling the mouse wheel
dragging your mouse vertically on the digital readout number
A double-click on the digital readout number will change the selected FX-channel in the FX-Mixer window to the FX-channel with that number.
The right-click context menu for the digital readout number has Reset, Copy, and Paste followed by a number in parentheses.
The number in parentheses is the number that it will be reset to, or will be copied to the clipboard, or will be pasted, respectively.
Multiple instruments can be assigned to a single FX-channel in order to get the same effect on each instrument (e.g.
an equalizer).
3.11.4 Channel Grouping
 Channel grouping
The interface in LMMS for sending channels may be confusing at first sight.
Select a channel except for the Master channel
The other channels should have a "send" button above them
Click on a send button to send a signal to the channel it is attached to
You can adjust the strength of the signal you are sending with volume knobs below the send buttons
is the FX-Mixer show/hide toggle button.
To add an FX-channel, press the + button on the right.
You can delete or move an FX-channel by right-clicking on it and choosing the desired option from the context menu.
You can also rename an FX-channel by double-clicking on its name.
Each FX-channel has separate left and right (stereo) volume indicators located on each side of the
fader slider control, but the left and right volume cannot be controlled independently by the fader, it controls both simultaneously.
To change the volume of an FX-channel, drag its fader up and down with the mouse.
You can also add an Amplifier effect to balance channels.
Each FX-channel also has a Mute/Unmute LED toggle switch below its name.
An FX-channel can be
selected by clicking on its name.
The name will turn from white to green, and only one FX-channel can be selected at any time.
When an FX-channel is selected, the Effects Chain for that FX-channel will display in the Effects Chain box at the far right end of the window.
When selecting an FX-channel, you can click on \"
Send
\" on another channel to send its signal to it.
You can use the knob to control the level of signal that is sent to the channel.
3.11.1 Master FX-channel
By default, all instruments have their \"
FX
\" initially set to channel zero which is the \"Master\" channel at the far left end of the FX-Mixer window.
The
Master channel controls the overall volume of all the combined instruments and FX-channels.
Also, it ca function as FX-channel zero (FX0) which allows you to apply effects to the master output (i.e.
everything combined).
3.11.2 Add Effects to FX-channels
To add an
effect to an FX-channel, select the FX-channel (i.e.
click on its name), then click the
Add effect button below the
Effects Chain box (see image).
This will open a dialog box where you can select one effect from the list of all available effect plugins.
You can add another effect by clicking the Add effect button again (you can only add one effect at a time).
You will get a \"Controls\" dialog individualized for the particular effect plugin you just added - here you can edit the effect plugin's configuration.
Notice that the effect plugin has been added as an
entry at the bottom of the stack in the Effects Chain box.
Each effect's entry has a standard set of visible controls:
A right-click context menu allow yo to:
Also notice that the Effects Chain box itself has an On/Off LED toggle (green) that turns off all the effects on that FX-channel only.
3.11.3 Assign Instruments to FX-Channels
To assign an instrument to an FX-channel, click on its name in either the
Song-Editor or
Beat+Bassline Editor
, depending on where it is located.
In the instrument settings window, set the
FX CHNL to the FX-channel you want by:
A double-click on the digital readout number will change the selected FX-channel in the FX-Mixer window to the FX-channel with that number.
The right-click context menu for the digital readout number has Reset, Copy, and Paste followed by a number in parentheses.
The number in parentheses is the number that it will be reset to, or will be copied to the clipboard, or will be pasted, respectively.
Multiple instruments can be assigned to a single FX-channel in order to get the same effect on each instrument (e.g.
an equalizer).
3.11.4 Channel Grouping
The interface in LMMS for sending channels may be confusing at first sight.
Channel grouping
The interface in LMMS for sending channels may be confusing at first sight.
Select a channel except for the Master channel
The other channels should have a "send" button above them
Click on a send button to send a signal to the channel it is attached to
You can adjust the strength of the signal you are sending with volume knobs below the send buttons
is the FX-Mixer show/hide toggle button.
To add an FX-channel, press the + button on the right.
You can delete or move an FX-channel by right-clicking on it and choosing the desired option from the context menu.
You can also rename an FX-channel by double-clicking on its name.
Each FX-channel has separate left and right (stereo) volume indicators located on each side of the
fader slider control, but the left and right volume cannot be controlled independently by the fader, it controls both simultaneously.
To change the volume of an FX-channel, drag its fader up and down with the mouse.
You can also add an Amplifier effect to balance channels.
Each FX-channel also has a Mute/Unmute LED toggle switch below its name.
An FX-channel can be
selected by clicking on its name.
The name will turn from white to green, and only one FX-channel can be selected at any time.
When an FX-channel is selected, the Effects Chain for that FX-channel will display in the Effects Chain box at the far right end of the window.
When selecting an FX-channel, you can click on \"
Send
\" on another channel to send its signal to it.
You can use the knob to control the level of signal that is sent to the channel.
3.11.1 Master FX-channel
By default, all instruments have their \"
FX
\" initially set to channel zero which is the \"Master\" channel at the far left end of the FX-Mixer window.
The
Master channel controls the overall volume of all the combined instruments and FX-channels.
Also, it ca function as FX-channel zero (FX0) which allows you to apply effects to the master output (i.e.
everything combined).
3.11.2 Add Effects to FX-channels
To add an
effect to an FX-channel, select the FX-channel (i.e.
click on its name), then click the
Add effect button below the
Effects Chain box (see image).
This will open a dialog box where you can select one effect from the list of all available effect plugins.
You can add another effect by clicking the Add effect button again (you can only add one effect at a time).
You will get a \"Controls\" dialog individualized for the particular effect plugin you just added - here you can edit the effect plugin's configuration.
Notice that the effect plugin has been added as an
entry at the bottom of the stack in the Effects Chain box.
Each effect's entry has a standard set of visible controls:
A right-click context menu allow yo to:
Also notice that the Effects Chain box itself has an On/Off LED toggle (green) that turns off all the effects on that FX-channel only.
3.11.3 Assign Instruments to FX-Channels
To assign an instrument to an FX-channel, click on its name in either the
Song-Editor or
Beat+Bassline Editor
, depending on where it is located.
In the instrument settings window, set the
FX CHNL to the FX-channel you want by:
A double-click on the digital readout number will change the selected FX-channel in the FX-Mixer window to the FX-channel with that number.
The right-click context menu for the digital readout number has Reset, Copy, and Paste followed by a number in parentheses.
The number in parentheses is the number that it will be reset to, or will be copied to the clipboard, or will be pasted, respectively.
Multiple instruments can be assigned to a single FX-channel in order to get the same effect on each instrument (e.g.
an equalizer).
3.11.4 Channel Grouping
The interface in LMMS for sending channels may be confusing at first sight.
3.12 Project Notes
 Project notes window
In LMMS there is a notepad in which you can write useful info.
It can be for yourself regarding the project or for others to see if you share your project.
It includes these tools:
Font type
Font size
Bold
Italic
Underline
Text align
Color
Undo
Redo
Copy
Cut
Paste
In LMMS there is a notepad in which you can write useful info.
It can be for yourself regarding the project or for others to see if you share your project.
It includes these tools:
Project notes window
In LMMS there is a notepad in which you can write useful info.
It can be for yourself regarding the project or for others to see if you share your project.
It includes these tools:
Font type
Font size
Bold
Italic
Underline
Text align
Color
Undo
Redo
Copy
Cut
Paste
In LMMS there is a notepad in which you can write useful info.
It can be for yourself regarding the project or for others to see if you share your project.
It includes these tools:
3.13 Controller Rack
Controllers are used to vary the position of a knob or other control over time using another signal such as an LFO waveform. They differ from automation because automation uses a shape drawn manually and usually the shape is not a repeated pattern. In contrast, LFO controllers use waveforms to yield a regular pattern. Controller rack
The Controller Rack displays all the controllers created within this project.
There are 2 types of controllers:
LFO controller
Peak controller
The right-click context menu allows you only 1 options: "Remove this controller".
You can change the names of the controllers by double-clicking on the current controller name.
Controller rack
The Controller Rack displays all the controllers created within this project.
There are 2 types of controllers:
LFO controller
Peak controller
The right-click context menu allows you only 1 options: "Remove this controller".
You can change the names of the controllers by double-clicking on the current controller name.
3.13.1 LFO Controller
LFO stands for Low Frequency Oscillator. This button is the Controller Rack show/hide toggle button (F11). To add an LFO controller entry to the Controller Rack, click the Add button at the bottom of the window. To edit the settings for a particular LFO controller entry, click the Controls button on the right side of the entry. The LFO controller settings are: 8 waveform option buttons 4 knobs BASE: the center (or zero line) around which the wave oscillates SPD: speed is the rate (frequency) of wave oscillation AMP: amount is the size (amplitude) of the wave PHS: phase offset is where in the waveform the wave starts its first oscillation 3 speed-multiplier option buttons3.13.2 Peak controller
A Peak controller allows you to use the volume peaks from an audio source to automate the values of a control. A Peak controller is similar to Gate, but with greater flexibility. Peak controllers commonly use the output signal of a percussion track to control the volume of a sustained sound on a different track. This results in the sustained sound being chopped up in time with the percussion. In LMMS, when you add a Peak Controller it is visible in the Controller Rack, but it's actually an effect applied to an FX-channel. If you click on the "Controls" button you'll get a window telling you to use the FX-channel's controls (magenta arrow). Therefore, to get to the Peak Controller settings, click the "Controls" button on the Peak controller entry in the Effects chain box (yellow arrow). Beware an FX-channel can have more than one Peak controller entry. The Controller Rack displays all the controllers created within this project. There are 2 types of controllers: The right-click context menu allows you only 1 options: \"Remove this controller\". You can change the names of the controllers by double-clicking on the current controller name. 3.13.1 LFO Controller LFO stands for Low Frequency Oscillator . This button is the Controller Rack show/hide toggle button (F11). To add an LFO controller entry to the Controller Rack, click the Add button at the bottom of the window. To edit the settings for a particular LFO controller entry, click the Controls button on the right side of the entry. The LFO controller settings are: 3.13.2 Peak controller A Peak controller allows you to use the volume peaks from an audio source to automate the values of a control. A Peak controller is similar to Gate, but with greater flexibility. Peak controllers commonly use the output signal of a percussion track to control the volume of a sustained sound on a different track. This results in the sustained sound being chopped up in time with the percussion. In LMMS, when you add a Peak Controller it is visible in the Controller Rack, but it's actually an effect4.1 Safety
As mentioned in General settings, the Backup feature is ON by default. It is highly recommended to keep it that way! You may also like to invoke the Autosave feature. Whereas a .BAK file represents the penultimate version of your work, Autosave will create a copy of the current file state. Autosave will only be invoked when LMMS is idle, so it will not by default happen in replay or during export! You control the interval between each Autosave. Because an autosave results in a tiny drop in performance, you find the settings for using Autosave in Settings > Performance. A choice of 5 - 15 mins is recommended. The default is 5 mins. If LMMS crashes it is very important that you pay attention to the screen next time you open LMMS! You will get 2 options from Autosave: Ignore: anything Autosave has kept will be deleted! Recover: LMMS will load the Autosave version of the last loaded project as a recover project! You need to use File > Save as and rename the recovery file to a name of your own choice! Do that immidiately! Remember to save often! Save your project every time you've created something that sounds great. It's also a good strategy to save different versions of your song, allowing you to revert to a previous version of the project in the event that you've tweaked the production into something you don't like. LMMS provides a special version control option for this in the File menu: Save as new version. Let's say your project was named as "MyProject", the new version will be named "MyProject-01", and the old file will not be altered. When you save a project for the first time, you will be prompted for a folder and project name. You also have to choose if your project should be compressed (mmpz) or uncompressed (mmp). Subsequent saves will overwrite this file, and LMMS will show you a small message at the bottom of the screen. Wait for the message, before you continue your work! Backup feature is ON by default. It is highly recommended to keep it that way! You may also like to invoke the Autosave feature. Whereas a .BAK file represents the penultimate version of your work, Autosave will create a copy of the current file state. Autosave will only be invoked when LMMS is idle , so it will not by default happen in replay or during export! You control the interval between each Autosave. Because an autosave results in a tiny drop in performance, you find the settings for using Autosave in Settings \u003e Performance. A choice of 5 - 15 mins is recommended. The default is 5 mins. If LMMS crashes it is very important that you pay attention to the screen next time you open LMMS! You will get 2 options from Autosave: Remember to save often! Save your project every time you've created something that sounds great. It's also a good strategy to save different versions of your song, allowing you to revert to a previous version of the project in the event that you've tweaked the production into something you don't like. LMMS provides a special version control option for this in the File menu: Save as new version . Let's say your project was named as \"MyProject\", the new version will be named \"MyProject-01\", and the old file will not be altered. When you save a project for the first time, you will be prompted for a folder and project name. You also have to choose if your project should be compressed (mmpz) or uncompressed (mmp). Subsequent saves will overwrite this file, and LMMS will show you a small message at the bottom of the screen.4.2 Jumping Right In
A project is created by adding instruments (sidebar tab 1), samples (sidebar tab 3) and/or presets (sidebar tab 4) to either the Song-Editor or the Beat+Bassline-Editor. Each added element is in LMMS regarded as a Track. In this way you can have instrument tracks based on presets, Beat+Bassline tracks and automation tracks. The Song-Editor is useful for non-repeating sound events, such as melody lines, while the Beat+Bassline-Editor is useful for repeating sequences, like percussion. Events created in the Beat+Bassline-Editor are "continuous", i.e. they can't be expanded (but can be copied, of course). The actual song is always built in the Song-Editor. This is where all the elements (Song-Editor blocks), including events in the Beat+Bassline Editor, come together on the timeline forming the project. When starting a new project in LMMS there are 4 items loaded in the Song Editor by default. The first one, named "Default Preset", is an instance of the TripleOscillator (3-OSC) generator; it's a good example of an instrument container. This TripleOscillator instance's default settings generate sounds using waveforms, default it is simple sine waveform, but that you can change. Let's take a look at this instrument, because it has behavior that is the same for all other instrument containers. When you move your mouse over the instrument containers, they will highlight. This indicates that the instrument can be clicked as if they were buttons! Left-click the 3-OSC. This opens the instrument GUI. The 3-OSC instrument is now chosen, and it is at the same time the focused instrument. Click again, and the GUI will close. All instruments behave like this. When you make changes on the GUI you create a preset. If it sounds less than horrible, you have an instrument-preset :) If you right-click you will have a rename option. Always name your presets! To the left of the instruments there are 2 clickable lights (). When the green light is ON, the track is activated. In its OFF state the track is muted. The other light is red. When it is ON, the track will mute all other tracks and play solo. Next, to the left of these, we have the action-button (). Here you can delete or clone the track and all of its events. To the right of the Instruments, before the knobs, we have a vertical bar. When clicked, it will play the root note of the instrument. We also have a dial for volume and one for balance: Volume and panning
In most great programs, there are always more than one way to do a specific task! This makes various workflows possible.
This is also the case with LMMS.
The volume dial we just looked at, is a good example.
You can adjust volume with several different controls.
In the main component we have the main sound settings, called the "master volume".
Volume and panning
In most great programs, there are always more than one way to do a specific task! This makes various workflows possible.
This is also the case with LMMS.
The volume dial we just looked at, is a good example.
You can adjust volume with several different controls.
In the main component we have the main sound settings, called the "master volume".
 Master volume
You would really never change this setting for creative reasons.
But if the phone rings...
The same goes for master pitch.
Creative changes in volume is best done in other controllers.
The volume dial on your instrument, that is suited for controlling the volume on a saved instrument preset.
The volume sliders in FX-Mixer are suited to set volume in a project.
Remember that everything you like to save for general usage, that must be saved with the preset! This goes for the aforementioned volume, but also for effects added on the FX-Tab.
Amazing FX chains that you build in the FX-Mixer will not be simple to use in a new project! If, however, it is made directly in an instrument preset, then it is natively usable in any project, as a saved instrument preset!
Planning and making good decisions can spare you a lot of fruitless redoing!
I will also recommend you to use the project notes.
Write down your ideas, because it is next to given, that you will not remember where in the project you had that "neat little phrase".
On the right half of the Song Editor, we have the timeline.
Create a track by adding events to this timeline.
The timeline is divided in bar-sized blocks.
Click in one next to 3-OSC.
You get a visually different "box".
If you double-click this box, you open the Piano-Roll Editor.
This is where you compose.
You can also right-click in the box and choose the context menu option Open in Piano-Roll.
We will return to that later.
Below the 3-OSC you have the Sample Track.
It is great for vocals or other larger WAV or OGG files that you want to replay unaltered, but can also be used as an advanced clip looper.
You can add a new sample track with the 6.
button on the Song Editor toolbar ().
Next you have the default Beat+Bassline instance.
Just for illustration, click on one of the boxes in the timeline next to the Beat+Bassline track.
You get a blue block.
Click and drag its right end and it will expand.
This is what I meant by Beat+Bassline events are "continuous".
When you did that with the 3-OSC, the block would not expand.
You can add a new Beat+Bassline with the 5.
button on the Song Editor toolbar ().
Last is an instance of the Automation track.
This can give you advanced variations in real-time, and it is with automation that you can create nice subtle changes in the sound over several bars, known in trance and house music, or rhythmic repeated growls and effects for, say dubstep.
How to do all this and how to use automation tracks is explained in Working with automation.
You can add a new automation track with the 7.
button on the Song Editor toolbar ().
Track
.
In this way you can have instrument tracks based on presets, Beat+Bassline tracks and automation tracks.
The Song-Editor is useful for non-repeating sound events, such as melody lines, while the Beat+Bassline-Editor is useful for repeating sequences, like percussion.
Events created in the Beat+Bassline-Editor are \"continuous\", i.e.
they can't be expanded (but can be copied, of course).
The actual song is always built in the Song-Editor.
This is where all the
elements (Song-Editor blocks), including events in the Beat+Bassline Editor, come together on the timeline forming the project.
When starting a new project in LMMS there are 4 items loaded in the Song Editor by default.
The first one, named \"Default Preset\", is an instance of the TripleOscillator (3-OSC) generator; it's a good example of an instrument container.
This TripleOscillator instance's default settings generate sounds using waveforms, default it is simple sine waveform, but that you can change.\nLet's take a look at this instrument, because it has behavior that is the same for all other instrument containers.
When you move your mouse over the instrument containers, they will highlight.
This indicates that the instrument can be clicked as if they were buttons! Left-click the 3-OSC.
This opens the instrument GUI.
The 3-OSC instrument is now chosen, and it is at the same time the focused instrument.
Click again, and the GUI will close.
All instruments behave like this.
When you make changes on the GUI you create a preset.
If it sounds less than horrible, you have an instrument-preset :) If you right-click you will have a rename option.
Always name your presets! To the left of the instruments there are 2 clickable lights (
).
When the green light is ON, the track is activated.
In its OFF state the track is muted.
The other light is red.
When it is ON, the track will mute all other tracks and play solo.
Next, to the left of these, we have the action-button (
).
Here you can delete or clone the track and all of its events.
To the right of the Instruments, before the knobs, we have a vertical bar.
When clicked, it will play the root note of the instrument.
We also have a dial for volume and one for balance:
In most great programs, there are always more than one way to do a specific task! This makes various workflows possible.
This is also the case with LMMS.
The volume dial we just looked at, is a good example.
You can adjust volume with several different controls.
In the main component we have the main sound settings, called the \"master volume\".
You would really never change this setting for creative reasons.
But if the phone rings...
The same goes for master pitch.
Creative changes in volume is best done in other controllers.\nThe volume dial on your instrument, that is suited for controlling the volume on a saved instrument preset.\nThe volume sliders in FX-Mixer are suited to set volume in a project.
Remember that everything you like to save for general usage, that must be saved with the preset! This goes for the aforementioned volume, but also for effects added on the FX-Tab.
Amazing FX chains that you build in the FX-Mixer will not be simple to use in a new project! If, however, it is made directly in an instrument preset, then it is natively usable in any project, as a saved instrument preset!\nPlanning and making good decisions can spare you a lot of fruitless redoing!\nI will also recommend you to use the project notes.
Write down your ideas, because it is next to given, that you will not remember where in the project you had that \"neat little phrase\".
On the right half of the Song Editor, we have the timeline.
Create a track by adding events to this timeline.
The timeline is divided in bar-sized blocks.
Click in one next to 3-OSC.
You get a visually different \"box\".
If you double-click this box, you open the Piano-Roll Editor.
This is where you compose.
You can also right-click in the box and choose the context menu option
Open in Piano-Roll
.
We will return to that later.
Below the 3-OSC you have the Sample Track.
It is great for vocals or other larger WAV or OGG files that you want to replay unaltered, but can also be used as an advanced clip looper.
You can add a new sample track with the 6.
button on the Song Editor toolbar (
).
Next you have the default Beat+Bassline instance.
Just for illustration, click on one of the boxes in the timeline next to the Beat+Bassline track.
You get a blue block.
Click and drag its right end and it will expand.
This is what I meant by Beat+Bassline events are \"continuous\".
When you did that with the 3-OSC, the block would not expand.
You can add a new Beat+Bassline with the 5.
button on the Song Editor toolbar (
).
Last is an instance of the
Automation track
.
This can give you advanced variations in real-time, and it is with automation that you can create nice subtle changes in the sound over several bars, known in trance and house music, or rhythmic repeated growls and effects for, say dubstep.
How to do all this and how to use automation tracks is explained in Working with automation.
You can add a new automation track with the 7.
button on the Song Editor toolbar (
Master volume
You would really never change this setting for creative reasons.
But if the phone rings...
The same goes for master pitch.
Creative changes in volume is best done in other controllers.
The volume dial on your instrument, that is suited for controlling the volume on a saved instrument preset.
The volume sliders in FX-Mixer are suited to set volume in a project.
Remember that everything you like to save for general usage, that must be saved with the preset! This goes for the aforementioned volume, but also for effects added on the FX-Tab.
Amazing FX chains that you build in the FX-Mixer will not be simple to use in a new project! If, however, it is made directly in an instrument preset, then it is natively usable in any project, as a saved instrument preset!
Planning and making good decisions can spare you a lot of fruitless redoing!
I will also recommend you to use the project notes.
Write down your ideas, because it is next to given, that you will not remember where in the project you had that "neat little phrase".
On the right half of the Song Editor, we have the timeline.
Create a track by adding events to this timeline.
The timeline is divided in bar-sized blocks.
Click in one next to 3-OSC.
You get a visually different "box".
If you double-click this box, you open the Piano-Roll Editor.
This is where you compose.
You can also right-click in the box and choose the context menu option Open in Piano-Roll.
We will return to that later.
Below the 3-OSC you have the Sample Track.
It is great for vocals or other larger WAV or OGG files that you want to replay unaltered, but can also be used as an advanced clip looper.
You can add a new sample track with the 6.
button on the Song Editor toolbar ().
Next you have the default Beat+Bassline instance.
Just for illustration, click on one of the boxes in the timeline next to the Beat+Bassline track.
You get a blue block.
Click and drag its right end and it will expand.
This is what I meant by Beat+Bassline events are "continuous".
When you did that with the 3-OSC, the block would not expand.
You can add a new Beat+Bassline with the 5.
button on the Song Editor toolbar ().
Last is an instance of the Automation track.
This can give you advanced variations in real-time, and it is with automation that you can create nice subtle changes in the sound over several bars, known in trance and house music, or rhythmic repeated growls and effects for, say dubstep.
How to do all this and how to use automation tracks is explained in Working with automation.
You can add a new automation track with the 7.
button on the Song Editor toolbar ().
Track
.
In this way you can have instrument tracks based on presets, Beat+Bassline tracks and automation tracks.
The Song-Editor is useful for non-repeating sound events, such as melody lines, while the Beat+Bassline-Editor is useful for repeating sequences, like percussion.
Events created in the Beat+Bassline-Editor are \"continuous\", i.e.
they can't be expanded (but can be copied, of course).
The actual song is always built in the Song-Editor.
This is where all the
elements (Song-Editor blocks), including events in the Beat+Bassline Editor, come together on the timeline forming the project.
When starting a new project in LMMS there are 4 items loaded in the Song Editor by default.
The first one, named \"Default Preset\", is an instance of the TripleOscillator (3-OSC) generator; it's a good example of an instrument container.
This TripleOscillator instance's default settings generate sounds using waveforms, default it is simple sine waveform, but that you can change.\nLet's take a look at this instrument, because it has behavior that is the same for all other instrument containers.
When you move your mouse over the instrument containers, they will highlight.
This indicates that the instrument can be clicked as if they were buttons! Left-click the 3-OSC.
This opens the instrument GUI.
The 3-OSC instrument is now chosen, and it is at the same time the focused instrument.
Click again, and the GUI will close.
All instruments behave like this.
When you make changes on the GUI you create a preset.
If it sounds less than horrible, you have an instrument-preset :) If you right-click you will have a rename option.
Always name your presets! To the left of the instruments there are 2 clickable lights (
).
When the green light is ON, the track is activated.
In its OFF state the track is muted.
The other light is red.
When it is ON, the track will mute all other tracks and play solo.
Next, to the left of these, we have the action-button (
).
Here you can delete or clone the track and all of its events.
To the right of the Instruments, before the knobs, we have a vertical bar.
When clicked, it will play the root note of the instrument.
We also have a dial for volume and one for balance:
In most great programs, there are always more than one way to do a specific task! This makes various workflows possible.
This is also the case with LMMS.
The volume dial we just looked at, is a good example.
You can adjust volume with several different controls.
In the main component we have the main sound settings, called the \"master volume\".
You would really never change this setting for creative reasons.
But if the phone rings...
The same goes for master pitch.
Creative changes in volume is best done in other controllers.\nThe volume dial on your instrument, that is suited for controlling the volume on a saved instrument preset.\nThe volume sliders in FX-Mixer are suited to set volume in a project.
Remember that everything you like to save for general usage, that must be saved with the preset! This goes for the aforementioned volume, but also for effects added on the FX-Tab.
Amazing FX chains that you build in the FX-Mixer will not be simple to use in a new project! If, however, it is made directly in an instrument preset, then it is natively usable in any project, as a saved instrument preset!\nPlanning and making good decisions can spare you a lot of fruitless redoing!\nI will also recommend you to use the project notes.
Write down your ideas, because it is next to given, that you will not remember where in the project you had that \"neat little phrase\".
On the right half of the Song Editor, we have the timeline.
Create a track by adding events to this timeline.
The timeline is divided in bar-sized blocks.
Click in one next to 3-OSC.
You get a visually different \"box\".
If you double-click this box, you open the Piano-Roll Editor.
This is where you compose.
You can also right-click in the box and choose the context menu option
Open in Piano-Roll
.
We will return to that later.
Below the 3-OSC you have the Sample Track.
It is great for vocals or other larger WAV or OGG files that you want to replay unaltered, but can also be used as an advanced clip looper.
You can add a new sample track with the 6.
button on the Song Editor toolbar (
).
Next you have the default Beat+Bassline instance.
Just for illustration, click on one of the boxes in the timeline next to the Beat+Bassline track.
You get a blue block.
Click and drag its right end and it will expand.
This is what I meant by Beat+Bassline events are \"continuous\".
When you did that with the 3-OSC, the block would not expand.
You can add a new Beat+Bassline with the 5.
button on the Song Editor toolbar (
).
Last is an instance of the
Automation track
.
This can give you advanced variations in real-time, and it is with automation that you can create nice subtle changes in the sound over several bars, known in trance and house music, or rhythmic repeated growls and effects for, say dubstep.
How to do all this and how to use automation tracks is explained in Working with automation.
You can add a new automation track with the 7.
button on the Song Editor toolbar (
4.3 Instruments: Samples & Presets
Now we take a look at those components that create sounds: samples and instrument presets. To insert one of the many factory pre-defined instrument presets into the Beat+Bassline Editor or Song Editor, click the 4. button in the sidebar. It works just like a browser. You can now choose a preset and drag it into the song editor. Everything that you can do in the sidebar browser with presets, you can also do with samples (just click the 3. button in the sidebar). Furthermore, you can click and hold your mouse on the name of a preset or sample. LMMS will then let you listen to that particular instrument, as a kind of sound test. You can then drag the instrument into the editor. If you add VST instruments to your preset collection, you should never use this preview feature on these VST presets! You can also double-click an instrument in the browser. This will place the objects directly into the Beat+Bassline Editor, or you can right-click on the instrument in the browser list tree, and LMMS will open a context menu. Here you have the option to send this instrument into an empty slot in the Song Editor or to replace a current active instrument with this new instrument. The active instrument is the one that is highlighted in the Song Editor, and has its GUI opened, in other words has been mouse-clicked. Always use the send to active instrument option when ever you need to load a VST instrument preset (more on this: How to use VST instrument presets). When you insert an instrument, the instrument's GUI editor window will open. You can also see this GUI by clicking on the instruments grey name button in the Song or Beat+Bassline Editor. When you click the name button, it will change to lightgray. This instrument is now the active instrument. The name button acts as a toggle for the GUI editor window. Instrument GUI's have five tabs: PLUGIN, ENV/LFO, FUNC, FX and MIDI. The PLUGIN tab changes with the type of instrument. All other tabs are standard for every instrument, however the ENV/LFO tab is only available on the kind of instruments that can use this feature. VeSTige, LB302 and ZynAddSubFX plugins do not present this tab. An in-depth explanation of how to use the features on the various tabs can be found in the Working with instruments section. If you want to remove an instrument completely from your song, click on its gray toolkit icon and choose "Remove this track". Instruments are divided into factory provided and user specified. Subfolders in your file system can be used to organize the instruments or samples hierarchichally. Later you may like to create your own instruments from scratch. The sidebar's 1.button opens the instruments plugins. These are empty default preset templates that you can use for your own instruments. Drag them into your project and play around with all the settings on the GUI. Some hints and tips on how to create 3-OSC instruments can be found in Making TripleOscillator patches. You can of course also make changes to the factory-defined instruments and save those as your own. Overwriting existing factory-defined instrument is not recommended. never You can also double-click an instrument in the browser. This will place the objects directly into the Beat+Bassline Editor, or you can right-click on the instrument in the browser list tree, and LMMS will open a context menu. Here you have the option to send this instrument into an empty slot in the Song Editor or to replace a current active instrument with this new instrument. The active instrument is the one that is highlighted in the Song Editor, and has its GUI opened, in other words has been mouse-clicked. Always use the send to active instrument option when ever you need to load a VST instrument preset (more on this: How to use VST instrument presets). When you insert an instrument, the instrument's GUI editor window will open. You can also see this GUI by clicking on the instruments grey name button in the Song or Beat+Bassline Editor. When you click the name button, it will change to lightgray. This instrument is now the active instrument. The name button acts as a toggle for the GUI editor window. Instrument GUI's have five tabs: PLUGIN, ENV/LFO, FUNC, FX and MIDI. The PLUGIN tab changes with the type of instrument. All other tabs are standard for every instrument, however the ENV/LFO tab is only available on the kind of instruments that can use this feature. VeSTige, LB302 and ZynAddSubFX plugins do not present this tab. An in-depth explanation of how to use the features on the various tabs can be found in the Working with instruments section. If you want to remove an instrument completely from your song, click on its gray toolkit icon and choose \"Remove this track\". Instruments are divided into factory provided and user specified. Subfolders in your file system can be used to organize the instruments or samples hierarchichally.4.4 Creating a Track
The standard way to create a track is to add percussion instruments to the Beat+Bassline Editor and instruments for melody tracks into the Song Editor. Then create different percussion loops using the Add bassline button in the Beat+Bassline Editor for each rhythmic element you want - a main bass line, a hihat line, special rhythms and breaks, etc. These are listed in the Song Editor as they're created. To make them play, click on the start bar in the track's timeline to create a new block element (segment). You can also drag in Beat+Bassline blocks to make the pattern go across multiple bars. The same technique can be used for repetitive bass lines, if you create them in the Beat+Bassline Editor. Keyboard as piano
For melody tracks, click in the Song Editor on the bar where you want a new melody segment and then double-click that block element to open the Piano Roll Editor.
Place your notes in the piano roll, by clicking on the notes wanted start "position" or tick, to create a new note, you can then drag the notes right-hand edge to be as long as you want.
You can also drag notes up and down to change their pitch.
Alternatively, you can press the record button in the Piano Roll Editor and play notes in real time, either on the computer keyboard or a MIDI keyboard.
We recommend that you as next read and do the exercises in the section Your First Song with LMMS.
Add bassline button in the Beat+Bassline Editor for each rhythmic element you want - a main bass line, a hihat line, special rhythms and breaks, etc.
These are listed in the Song Editor as they're created.
To make them play, click on the start bar in the track's timeline to create a new
block element (segment).
You can also drag in Beat+Bassline blocks to make the pattern go across multiple bars.
The same technique can be used for repetitive bass lines, if you create them in the Beat+Bassline Editor.
For melody tracks, click in the Song Editor on the bar where you want a new melody segment and then double-click that block element to open the Piano Roll Editor.
Place your notes in the piano roll, by clicking on the notes wanted start \"position\" or
tick
, to create a new note, you can then drag the notes right-hand edge to be as long as you want.
You can also drag notes up and down to change their pitch.
Alternatively, you can press the record button in the Piano Roll Editor and play notes in real time, either on the computer keyboard or a MIDI keyboard.
Keyboard as piano
For melody tracks, click in the Song Editor on the bar where you want a new melody segment and then double-click that block element to open the Piano Roll Editor.
Place your notes in the piano roll, by clicking on the notes wanted start "position" or tick, to create a new note, you can then drag the notes right-hand edge to be as long as you want.
You can also drag notes up and down to change their pitch.
Alternatively, you can press the record button in the Piano Roll Editor and play notes in real time, either on the computer keyboard or a MIDI keyboard.
We recommend that you as next read and do the exercises in the section Your First Song with LMMS.
Add bassline button in the Beat+Bassline Editor for each rhythmic element you want - a main bass line, a hihat line, special rhythms and breaks, etc.
These are listed in the Song Editor as they're created.
To make them play, click on the start bar in the track's timeline to create a new
block element (segment).
You can also drag in Beat+Bassline blocks to make the pattern go across multiple bars.
The same technique can be used for repetitive bass lines, if you create them in the Beat+Bassline Editor.
For melody tracks, click in the Song Editor on the bar where you want a new melody segment and then double-click that block element to open the Piano Roll Editor.
Place your notes in the piano roll, by clicking on the notes wanted start \"position\" or
tick
, to create a new note, you can then drag the notes right-hand edge to be as long as you want.
You can also drag notes up and down to change their pitch.
Alternatively, you can press the record button in the Piano Roll Editor and play notes in real time, either on the computer keyboard or a MIDI keyboard.
4.5 Using MIDI
4.5.1 MIDI Settings
 MIDI settings
You can find the MIDI settings in the Settings window.
ALSA-Sequencer is the recommended setting for Linux.
WinMM MIDI is the default setting for Windows.
Modify the default settings only if necessary.
MIDI settings
You can find the MIDI settings in the Settings window.
ALSA-Sequencer is the recommended setting for Linux.
WinMM MIDI is the default setting for Windows.
Modify the default settings only if necessary.
4.5.2 Quick MIDI Setup
 MIDI quick select
This is a quick way of connecting your Instrument to a MIDI device.
For more advanced settings go to the MIDI tab.
MIDI quick select
This is a quick way of connecting your Instrument to a MIDI device.
For more advanced settings go to the MIDI tab.
4.5.3 The MIDI Tab
 Plugins MIDI
The MIDI tab in the Instrument Editor has some more advanced options.
You can read on how to connect a MIDI device to an instrument in the MIDI tab section.
To connect to a knob, right-click on it, select "Connect to controller", make sure MIDI controller and Auto Detect are lit up, then just move the mod wheel on your MIDI device.
You can find the MIDI settings in the Settings window.
ALSA-Sequencer is the recommended setting for Linux.
WinMM MIDI is the default setting for Windows.
Modify the default settings only if necessary.
4.5.2 Quick MIDI Setup
This is a quick way of connecting your Instrument to a MIDI device.
For more advanced settings go to the MIDI tab.
4.5.3 The MIDI Tab
The MIDI tab in the Instrument Editor has some more advanced options.
You can read on how to connect a MIDI device to an instrument in the MIDI tab section.
Plugins MIDI
The MIDI tab in the Instrument Editor has some more advanced options.
You can read on how to connect a MIDI device to an instrument in the MIDI tab section.
To connect to a knob, right-click on it, select "Connect to controller", make sure MIDI controller and Auto Detect are lit up, then just move the mod wheel on your MIDI device.
You can find the MIDI settings in the Settings window.
ALSA-Sequencer is the recommended setting for Linux.
WinMM MIDI is the default setting for Windows.
Modify the default settings only if necessary.
4.5.2 Quick MIDI Setup
This is a quick way of connecting your Instrument to a MIDI device.
For more advanced settings go to the MIDI tab.
4.5.3 The MIDI Tab
The MIDI tab in the Instrument Editor has some more advanced options.
You can read on how to connect a MIDI device to an instrument in the MIDI tab section.
4.6 Using VSTs
For this section, download and install the VST Synth1. You can find it here. When downloading other VSTs, you should try to download them from their official sites. However in VST Resources you can find several safe sites dedicated to hosting VSTs for download. So why Synth1? It is our proof-of-concept VST. When you download VSTs, unpack them in the folder you have entered as your default VST folder in the preferences of your LMMS installation. Settings
VST-PLUGIN DIRECTORY is where LMMS will look for VSTs.
In Synth1's case, it will need to be installed.
This is not always the case with VSTs, but for the few that ask you to specify the installation folder, be sure to always use the same one.
It is also recommended that you use a sub-folder structure for the various VSTs.
This is especially important for VSTs that have their own banks and/or multiple files they require to run.
Let's load one instance of Synth1.
Normally you will load VSTs into already open projects, and it is important that you always save before loading VSTs.
In LMMS, click on the Instrument plugins button on the left sidebar.
This should open up a list of built in instruments.
Loading from this list opens the instrument in its default state - something that is very important for successfully opening VSTs in LMMS,
Locate VeSTige in the list and drag it into your project
Open the instrument GUI, e.g.
click on the instrument in the Song Editor
To the right of the text "No VST Plugin loaded" there is a folder symbol - click on it
Browse the VST folder
Click on the .dll and wait for LMMS to load the VST
When it loads, the VST's GUI will open.
Be careful when opening/closing VST GUIs as it tends to freeze LMMS, so use "Show/Hide" button whenever you need to hide the GUI.
If you successfully loaded Synth1, you should now be able to use it in your project.
You can also automate the dials and sliders in your VSTs.
Directly below the folder icon there is a wrench icon.
Clicking on it will show the interface for the VST's controllers.
You can Ctrl+drag any of these dials into an automation track or connect them to a controller.
Settings
VST-PLUGIN DIRECTORY is where LMMS will look for VSTs.
In Synth1's case, it will need to be installed.
This is not always the case with VSTs, but for the few that ask you to specify the installation folder, be sure to always use the same one.
It is also recommended that you use a sub-folder structure for the various VSTs.
This is especially important for VSTs that have their own banks and/or multiple files they require to run.
Let's load one instance of Synth1.
Normally you will load VSTs into already open projects, and it is important that you always save before loading VSTs.
In LMMS, click on the Instrument plugins button on the left sidebar.
This should open up a list of built in instruments.
Loading from this list opens the instrument in its default state - something that is very important for successfully opening VSTs in LMMS,
Locate VeSTige in the list and drag it into your project
Open the instrument GUI, e.g.
click on the instrument in the Song Editor
To the right of the text "No VST Plugin loaded" there is a folder symbol - click on it
Browse the VST folder
Click on the .dll and wait for LMMS to load the VST
When it loads, the VST's GUI will open.
Be careful when opening/closing VST GUIs as it tends to freeze LMMS, so use "Show/Hide" button whenever you need to hide the GUI.
If you successfully loaded Synth1, you should now be able to use it in your project.
You can also automate the dials and sliders in your VSTs.
Directly below the folder icon there is a wrench icon.
Clicking on it will show the interface for the VST's controllers.
You can Ctrl+drag any of these dials into an automation track or connect them to a controller.
 Synth1 LMMS dial array
LMMS can save and load VST presets:
Name the instrument
In the VeSTige window, click on the save con
In the save window that opened, create a new folder called "VeSTige" in the presets folder, located in your LMMS installation.
You can then make sub-folders for specific VSTs if you'd like.
This keeps things tidy and structured, but is completely optional.
Loading saved VST presets is just as easy:
Remember to always save the project first!
Load a new VeSTige plugin into the project, from sidebar
Open the VeSTige GUI
Right-click the preset in sidebar.
This will open a menu.
Choose "Send to Active Instrument Track"
Wait for it to load
Synth1 LMMS dial array
LMMS can save and load VST presets:
Name the instrument
In the VeSTige window, click on the save con
In the save window that opened, create a new folder called "VeSTige" in the presets folder, located in your LMMS installation.
You can then make sub-folders for specific VSTs if you'd like.
This keeps things tidy and structured, but is completely optional.
Loading saved VST presets is just as easy:
Remember to always save the project first!
Load a new VeSTige plugin into the project, from sidebar
Open the VeSTige GUI
Right-click the preset in sidebar.
This will open a menu.
Choose "Send to Active Instrument Track"
Wait for it to load
 Bit depth = 3 graph example
 My Presets
For now, let's drag the "Xylophon" preset into the space in the middle of the Song Editor.
When you drop it, a new track will be created with that preset as the instrument.
My Presets
For now, let's drag the "Xylophon" preset into the space in the middle of the Song Editor.
When you drop it, a new track will be created with that preset as the instrument.
 Dragging a preset
 Xylophon dragged
If this were a percussion-type instrument, we might be better off dragging it to the Beat+Bassline Editor instead; you'll see why in a second.
We really want to give this instrument a string of notes (or a Piano Roll) to play, though, so Song Editor it is.
Xylophon dragged
If this were a percussion-type instrument, we might be better off dragging it to the Beat+Bassline Editor instead; you'll see why in a second.
We really want to give this instrument a string of notes (or a Piano Roll) to play, though, so Song Editor it is.
 Piano Roll Editor
 The first note
However, this is too long: we need notes half a bear - a quarter - long.
To change this, we simply move the mouse pointer to the right-hand edge of the note, until the cursor changes into a left-and-right arrow.
Then we hold the mouse button down and drag the end of the note left two "blocks" (each block being 1/16 of a bar).
The first note
However, this is too long: we need notes half a bear - a quarter - long.
To change this, we simply move the mouse pointer to the right-hand edge of the note, until the cursor changes into a left-and-right arrow.
Then we hold the mouse button down and drag the end of the note left two "blocks" (each block being 1/16 of a bar).
 Resizing notes
After this, the new notes we put down will be the same length, because the Piano Roll Editor is by default set to Last Note ().
You can change this in the drop-down.
However most of the time you will work with the "Las Note" setting, but if you suddenly create notes in the length you expected, it's because you accidentally made a change to this drop-down.
Resizing notes
After this, the new notes we put down will be the same length, because the Piano Roll Editor is by default set to Last Note ().
You can change this in the drop-down.
However most of the time you will work with the "Las Note" setting, but if you suddenly create notes in the length you expected, it's because you accidentally made a change to this drop-down.
 Popcorn pattern
To place a note, you need to aim for the line at the start of the bear; LMMS will recognize a small fraction of the area left of the beat line as being closer to that beat than the previous.
You can control this with the "Q setting".
Default Q is correlated to note-length.
That is "Note lock".
But again you can change that "magnetic point" in the Q-drop-down.
If you make a mistake placing a note, you can move it to its correct position by clicking on the middle of the note (where the cursor turns into a four-way cross) and dragging the note to its new position.
LMMS will play the note that you're dragging onto as an aide to correct placement.
You can move notes horizontally (in time) as well as vertically (in pitch).
If you need to delete a note, simply right-click on it.
Popcorn pattern
To place a note, you need to aim for the line at the start of the bear; LMMS will recognize a small fraction of the area left of the beat line as being closer to that beat than the previous.
You can control this with the "Q setting".
Default Q is correlated to note-length.
That is "Note lock".
But again you can change that "magnetic point" in the Q-drop-down.
If you make a mistake placing a note, you can move it to its correct position by clicking on the middle of the note (where the cursor turns into a four-way cross) and dragging the note to its new position.
LMMS will play the note that you're dragging onto as an aide to correct placement.
You can move notes horizontally (in time) as well as vertically (in pitch).
If you need to delete a note, simply right-click on it.
 Notes selected
 Copy-dragging the notes
 Duplicated notes
Alternatively, you can use good old copy and paste.
Again, use Ctrl to select the notes you want, and then press Ctrl+C.
Press Ctrl+V to paste the notes at the beginning, and move them to their new location.
To select all notes you can press Ctrl+A.
We can now press the play button () in the Piano Roll Editor window to play the melody back.
When it gets to the end of the last bar in which there are notes, it will automatically repeat back to the start of the first bar.
Oops!
When we play the melody so far, we realize that the melody actually starts on the wrong beat.
The second A4 note is really supposed to be the start of the bar, and the two notes before it are leading in from the previous bar.
However, we can't go further back than bar 1 in our piano roll.
We need to move all the notes forward.
Press Ctrl+A to select all the notes.
Then you can click and drag to move them all over in order to have the first note start on the right beat (see picture below).
Now we need to avoid another and far more annoying Oops: loosing everything you made! Now you have made something that actually sounds great, it is high time for saving your project!
The first time you save, LMMS will prompt you for a projec6t name.
That's entirely up to you, but LMMS also lets you decide whether your project should be compressed (.mmpz), or kept as uncompressed XML (.mmp).
Make your choice and save your project now!
Observe the message in the bottom of your screen!
Make sure you always see this message, every time you save your project, and if you end your work, and close LMMS, I recommend that you wait about 10 seconds, after you have saved the last time, before you close the program.
You could also take a peek on your disk, and actually make sure that the project has been saved, has a believable size, and a correct time-stamp.
But only when you close LMMS.
Duplicated notes
Alternatively, you can use good old copy and paste.
Again, use Ctrl to select the notes you want, and then press Ctrl+C.
Press Ctrl+V to paste the notes at the beginning, and move them to their new location.
To select all notes you can press Ctrl+A.
We can now press the play button () in the Piano Roll Editor window to play the melody back.
When it gets to the end of the last bar in which there are notes, it will automatically repeat back to the start of the first bar.
Oops!
When we play the melody so far, we realize that the melody actually starts on the wrong beat.
The second A4 note is really supposed to be the start of the bar, and the two notes before it are leading in from the previous bar.
However, we can't go further back than bar 1 in our piano roll.
We need to move all the notes forward.
Press Ctrl+A to select all the notes.
Then you can click and drag to move them all over in order to have the first note start on the right beat (see picture below).
Now we need to avoid another and far more annoying Oops: loosing everything you made! Now you have made something that actually sounds great, it is high time for saving your project!
The first time you save, LMMS will prompt you for a projec6t name.
That's entirely up to you, but LMMS also lets you decide whether your project should be compressed (.mmpz), or kept as uncompressed XML (.mmp).
Make your choice and save your project now!
Observe the message in the bottom of your screen!
Make sure you always see this message, every time you save your project, and if you end your work, and close LMMS, I recommend that you wait about 10 seconds, after you have saved the last time, before you close the program.
You could also take a peek on your disk, and actually make sure that the project has been saved, has a believable size, and a correct time-stamp.
But only when you close LMMS.
 Popcorn melody
 Copying segments
Drop the segment on bar 6.
This is actually one bar too late, as the first three quarters of a bar of this segment are empty, as is the last quarter of the last segment.
Fortunately, segments can overlap and their notes will play simultaneously.
You should avoid having segments overlap as there is no clear display of how many segments overlap in a particular area.
A small segment might completely disappear behind a large one, leaving you confused as to where those extra notes were coming from
Drag the second copy so that it starts at bar 5.
You can now play this using the play button in the Song Editor.
You will hear a short pause as it counts the first three beats of silence, then the melody will start.
It should play smoothly through the two repeats.
The Song Editor should now look like this:
Copying segments
Drop the segment on bar 6.
This is actually one bar too late, as the first three quarters of a bar of this segment are empty, as is the last quarter of the last segment.
Fortunately, segments can overlap and their notes will play simultaneously.
You should avoid having segments overlap as there is no clear display of how many segments overlap in a particular area.
A small segment might completely disappear behind a large one, leaving you confused as to where those extra notes were coming from
Drag the second copy so that it starts at bar 5.
You can now play this using the play button in the Song Editor.
You will hear a short pause as it counts the first three beats of silence, then the melody will start.
It should play smoothly through the two repeats.
The Song Editor should now look like this:
 How the Song Editor should look like
 Melody variation
Due to the way that the segments overlap, you will have to create the new segment in a new bar, e.g.
bar 11, and then move it into position over the previous segment.
Note that there is a slight oddity in the Piano Roll Editor that causes you to start editing at bar 2 when opening occasional new segments.
Check which bar you're writing notes into before getting too far!
Your Song Editor should now look like this:
Melody variation
Due to the way that the segments overlap, you will have to create the new segment in a new bar, e.g.
bar 11, and then move it into position over the previous segment.
Note that there is a slight oddity in the Piano Roll Editor that causes you to start editing at bar 2 when opening occasional new segments.
Check which bar you're writing notes into before getting too far!
Your Song Editor should now look like this:
 Final Song Editor look
 Four on the floor
 Amen break
 Typical breakbeat
 Prodigy - Smack my B**** up
 Prodigy main beat
Note the lowered volumes of the snare drum in the 2 examples above, i.e.
the dimmed lights in some steps.
To change the volume of a step, hover your mouse over it and roll the scroll wheel down to lower volume and up to raise volume.
The brightness of the step will change.
Want to hear how all these patterns sound? Download a demo project here.
There is more to making great percussion.
Here we only looked at simple "notes" added directly in BB Editor.
But you should also read the section Composing Bass Lines and Drum Sequences, where more advanced methods are explained.
You will learn how to alter quantizing and humanize in piano roll.
Prodigy main beat
Note the lowered volumes of the snare drum in the 2 examples above, i.e.
the dimmed lights in some steps.
To change the volume of a step, hover your mouse over it and roll the scroll wheel down to lower volume and up to raise volume.
The brightness of the step will change.
Want to hear how all these patterns sound? Download a demo project here.
There is more to making great percussion.
Here we only looked at simple "notes" added directly in BB Editor.
But you should also read the section Composing Bass Lines and Drum Sequences, where more advanced methods are explained.
You will learn how to alter quantizing and humanize in piano roll.
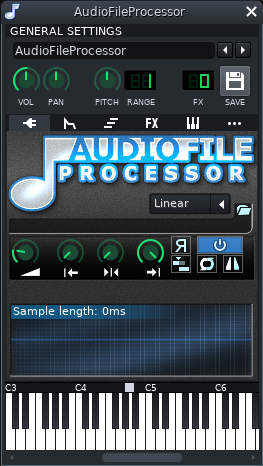 AudioFileProcessor
The amplitude for playback of the wave file, in percentage of the original.
You can go above 100% if your wave file is quiet and you want to make it louder.
If the master volume or the volume of the instrument or track is low enough you won't cause any clipping, because of the way the audio signal is processed in LMMS, naturally, you can also quiet a sound down by using percentages less than 100%.
However, this won't correct clipping that was present in the original file.
The start and end of playback of the sample can be used if you only want to play back a specific part of a sample.
The reversed R controls the direction of playback.
When inactive, the sample is played forward; when active, the sample is played in reverse.
The cyclic arrows control whether the sample is repeated from the beginning once it reaches the end (or vice versa for reversed playback) if the note is still held down and playback has progressed all the way through the file.
The icon with two bars and a marker enables stutter-mode.
In this mode, sample playback is always started from the point where it last ended.
You can reset the position back to the beginning by playing a very low note, one that is below 20hz in frequency.
The folder icon allows you to choose a new file from a file open dialog.
You can also change the current sample by dragging a sample from the Samples section of the Side Bar.
amplitude
start and
end
direction
repeated
new file
AudioFileProcessor
The amplitude for playback of the wave file, in percentage of the original.
You can go above 100% if your wave file is quiet and you want to make it louder.
If the master volume or the volume of the instrument or track is low enough you won't cause any clipping, because of the way the audio signal is processed in LMMS, naturally, you can also quiet a sound down by using percentages less than 100%.
However, this won't correct clipping that was present in the original file.
The start and end of playback of the sample can be used if you only want to play back a specific part of a sample.
The reversed R controls the direction of playback.
When inactive, the sample is played forward; when active, the sample is played in reverse.
The cyclic arrows control whether the sample is repeated from the beginning once it reaches the end (or vice versa for reversed playback) if the note is still held down and playback has progressed all the way through the file.
The icon with two bars and a marker enables stutter-mode.
In this mode, sample playback is always started from the point where it last ended.
You can reset the position back to the beginning by playing a very low note, one that is below 20hz in frequency.
The folder icon allows you to choose a new file from a file open dialog.
You can also change the current sample by dragging a sample from the Samples section of the Side Bar.
amplitude
start and
end
direction
repeated
new file
 BitInvader
Interpolation: Interpolates (smooths) the waveform
Normalize: Normalizes the output signal.
(Removes DC offset)
The Length knob sets the sample lentgh of the waveform in a range from 8 to 128.
Smooth the waveform by clicking on the button labeled S
Draw your own waveform on the wavedisplay
On the right side of the waveform display are pre-configured waveforms:
sine
triangle
saw
square
white-noise
user-defined shape
Length
the waveform by clicking on the button labeled
BitInvader
Interpolation: Interpolates (smooths) the waveform
Normalize: Normalizes the output signal.
(Removes DC offset)
The Length knob sets the sample lentgh of the waveform in a range from 8 to 128.
Smooth the waveform by clicking on the button labeled S
Draw your own waveform on the wavedisplay
On the right side of the waveform display are pre-configured waveforms:
sine
triangle
saw
square
white-noise
user-defined shape
Length
the waveform by clicking on the button labeled
 Freeboy
 Kicker
It works by starting with a triangle wave at a certain frequency and gradually changing it to another frequency.
Start and End knobs control the start and end frequency of the sound.
Note that the knob is not active if the LED is on.
Start from note: When this LED is on, the start tone will be the note selected in the Piano Roll
End to nore: When this LED is on, the end note will be the note selected in the Piano Roll
Frequency slope: Change the steepness of the frequency envelope.
Larger values let you slide more.
Click adds a click/punch to the beginning of the kick sound
Start and End Distortion: Simple distortion envelope
Gain: Additional gain added to the output (makes it louder)
Length: Length of the volume envelope
Envelope Slope: Change the steepness of the volume envelope
Noise: Replaces part or the whole signal with white noise
Kicker was originally meant for drum synthesis.
It is best used in the Beat+Bassline-Editor.
To get sounds which sound like drums you should set "Start knob" to a low frequency and "End knob" even lower.
"Length" should also be quite low.
It works by starting with a triangle wave at a certain frequency and gradually changing it to another frequency.
and
End
and
End Distortion:
Kicker was originally meant for drum synthesis.
It is best used in the Beat+Bassline-Editor.
Kicker
It works by starting with a triangle wave at a certain frequency and gradually changing it to another frequency.
Start and End knobs control the start and end frequency of the sound.
Note that the knob is not active if the LED is on.
Start from note: When this LED is on, the start tone will be the note selected in the Piano Roll
End to nore: When this LED is on, the end note will be the note selected in the Piano Roll
Frequency slope: Change the steepness of the frequency envelope.
Larger values let you slide more.
Click adds a click/punch to the beginning of the kick sound
Start and End Distortion: Simple distortion envelope
Gain: Additional gain added to the output (makes it louder)
Length: Length of the volume envelope
Envelope Slope: Change the steepness of the volume envelope
Noise: Replaces part or the whole signal with white noise
Kicker was originally meant for drum synthesis.
It is best used in the Beat+Bassline-Editor.
To get sounds which sound like drums you should set "Start knob" to a low frequency and "End knob" even lower.
"Length" should also be quite low.
It works by starting with a triangle wave at a certain frequency and gradually changing it to another frequency.
and
End
and
End Distortion:
Kicker was originally meant for drum synthesis.
It is best used in the Beat+Bassline-Editor.
 LB302
LB302
 Mallets
There are three different categories, and the settings are accordingly different depending on the sound you are selecting.
Percussion instruments: Marimba, Vibraphone, Agogo, Wood1, Reso, Wood2, Beats, Two Fixed and Clumps
Tubular bells
Bars: Uniform Bar, Tuned Bar, Glass and Tibetan Bowl
You can change the basic sound by clicking on the name in the box.
Left-click to step forward, right-click to go backward.
You can also click on the arrow and will get a drop-down menu with all included sounds.
Mallets
There are three different categories, and the settings are accordingly different depending on the sound you are selecting.
Percussion instruments: Marimba, Vibraphone, Agogo, Wood1, Reso, Wood2, Beats, Two Fixed and Clumps
Tubular bells
Bars: Uniform Bar, Tuned Bar, Glass and Tibetan Bowl
You can change the basic sound by clicking on the name in the box.
Left-click to step forward, right-click to go backward.
You can also click on the arrow and will get a drop-down menu with all included sounds.
 Monstro
 NEScaline
 OpulenZ
 Organic
Although it has more oscillators than TripleOscillator, it is less flexible because it lacks a lot of its abilities, among them the option to modulate the oscillators with each other.
The phase offsets of each oscillator are randomized whenever a note is played (for both stereo channels separately).
For that reason this instrument sounds slightly different everytime you press a key even when you don't change any settings.
Organic is most useful for creating organ instruments (that's where its name comes from) and pads.
Organic
Although it has more oscillators than TripleOscillator, it is less flexible because it lacks a lot of its abilities, among them the option to modulate the oscillators with each other.
The phase offsets of each oscillator are randomized whenever a note is played (for both stereo channels separately).
For that reason this instrument sounds slightly different everytime you press a key even when you don't change any settings.
Organic is most useful for creating organ instruments (that's where its name comes from) and pads.
 Patman
GUS patches are patches associated with Gravis Ultrasound soundcards.
Their concept is very similar to SoundFont and they can be considered SoundFont predecessors.
Patman is a simple patch loader.
It also allows looping of the patch.
There aren't many patches online, but you can find a pretty good collection here.
GUS patches are patches associated with Gravis Ultrasound soundcards.
Their concept is very similar to SoundFont and they can be considered SoundFont predecessors.
Patman is a simple patch loader.
It also allows looping of the patch.
There aren't many patches online, but you can find a pretty good collection
here
Patman
GUS patches are patches associated with Gravis Ultrasound soundcards.
Their concept is very similar to SoundFont and they can be considered SoundFont predecessors.
Patman is a simple patch loader.
It also allows looping of the patch.
There aren't many patches online, but you can find a pretty good collection here.
GUS patches are patches associated with Gravis Ultrasound soundcards.
Their concept is very similar to SoundFont and they can be considered SoundFont predecessors.
Patman is a simple patch loader.
It also allows looping of the patch.
There aren't many patches online, but you can find a pretty good collection
here
 Sf2 Player
There are no SoundFonts included in LMMS, but you can find a lot of SoundFonts on the internet, see 8.3 SoundFont resources.
A SoundFont bank contains base samples in PCM format (similar to WAV files) that are mapped to sections on a musical keyboard.
This is especially useful for people working with MIDI files, since most SoundFonts contain samples of real instruments.
You can select the default SoundFont that will be used when loading MIDI files in the Settings.
Many SoundFonts have multiple patches which is multiple sounds, often different instruments or different styles of instruments.
To select a patch you can use the patch and bank spinners, or click on the wrench icon to open a window where you can see all banks and patches.
Because the Sf2 Player is a MIDI bases instrument, you can't use ENV/LFO in it.
This tab is intentionally left empty.
You can also apply Reverb and Chorus directly in the plugin.
Some SoundFont files support reverb and chorus.
SF2 player gives four knobs for controlling the effects:
Reverb
The Size knob lets you select the room size for the reverb
The Damp knob controls the damping.
Damping set to 1 will cut the reverb when the note is released.
The Width knob controls the stereo width
The Level knob controls the wet level
Chorus
The Num knob controls the number of instruments you are supposed to hear.
This represents how many signals are being processed.
The Level knob controls the amount of the effect you want.
If it is set to 0 you only hear the original sound.
The Spd knob controls the speed/rate of the LFO
The Depth knob controls the depth of the modulation.
Higher values increase detuning.
There are no SoundFonts included in LMMS, but you can find a lot of SoundFonts on the internet, see 8.3 SoundFont resources.
A SoundFont bank contains base samples in PCM format (similar to WAV files) that are mapped to sections on a musical keyboard.
This is especially useful for people working with MIDI files, since most SoundFonts contain samples of real instruments.
You can select the default SoundFont that will be used when loading MIDI files in the Settings.
Many SoundFonts have multiple patches which is multiple sounds, often different instruments or different styles of instruments.
To select a patch you can use the patch and bank spinners, or click on the wrench icon to open a window where you can see all banks and patches.
Because the Sf2 Player is a MIDI bases instrument, you can't use ENV/LFO in it.
This tab is intentionally left empty.
You can also apply Reverb and Chorus directly in the plugin.
Some SoundFont files support reverb and chorus.
SF2 player gives four knobs for controlling the effects:
Size
Damp
Width
Level
Num
Level
Spd
Depth
Sf2 Player
There are no SoundFonts included in LMMS, but you can find a lot of SoundFonts on the internet, see 8.3 SoundFont resources.
A SoundFont bank contains base samples in PCM format (similar to WAV files) that are mapped to sections on a musical keyboard.
This is especially useful for people working with MIDI files, since most SoundFonts contain samples of real instruments.
You can select the default SoundFont that will be used when loading MIDI files in the Settings.
Many SoundFonts have multiple patches which is multiple sounds, often different instruments or different styles of instruments.
To select a patch you can use the patch and bank spinners, or click on the wrench icon to open a window where you can see all banks and patches.
Because the Sf2 Player is a MIDI bases instrument, you can't use ENV/LFO in it.
This tab is intentionally left empty.
You can also apply Reverb and Chorus directly in the plugin.
Some SoundFont files support reverb and chorus.
SF2 player gives four knobs for controlling the effects:
Reverb
The Size knob lets you select the room size for the reverb
The Damp knob controls the damping.
Damping set to 1 will cut the reverb when the note is released.
The Width knob controls the stereo width
The Level knob controls the wet level
Chorus
The Num knob controls the number of instruments you are supposed to hear.
This represents how many signals are being processed.
The Level knob controls the amount of the effect you want.
If it is set to 0 you only hear the original sound.
The Spd knob controls the speed/rate of the LFO
The Depth knob controls the depth of the modulation.
Higher values increase detuning.
There are no SoundFonts included in LMMS, but you can find a lot of SoundFonts on the internet, see 8.3 SoundFont resources.
A SoundFont bank contains base samples in PCM format (similar to WAV files) that are mapped to sections on a musical keyboard.
This is especially useful for people working with MIDI files, since most SoundFonts contain samples of real instruments.
You can select the default SoundFont that will be used when loading MIDI files in the Settings.
Many SoundFonts have multiple patches which is multiple sounds, often different instruments or different styles of instruments.
To select a patch you can use the patch and bank spinners, or click on the wrench icon to open a window where you can see all banks and patches.
Because the Sf2 Player is a MIDI bases instrument, you can't use ENV/LFO in it.
This tab is intentionally left empty.
You can also apply Reverb and Chorus directly in the plugin.
Some SoundFont files support reverb and chorus.
SF2 player gives four knobs for controlling the effects:
Size
Damp
Width
Level
Num
Level
Spd
Depth
 sfxr
sfxr is a port of the original sfxr tool.
It is used to generate retro video game sounds.
Please note that volume level of the sounds generated by sfxr varies quite a bit, especially with the RAND button.
sfxr
sfxr is a port of the original sfxr tool.
It is used to generate retro video game sounds.
Please note that volume level of the sounds generated by sfxr varies quite a bit, especially with the RAND button.
 Envelope
The top knobs are labeled Env., short for envelope, and are bordered by, and connected with, blue lines.
They decide how the volume of the sound changes over time.
ATT, or attack, determines how long it takes for the sound to reach maximum volume.
HOLD is how long the sound stays at this level.
SUS, short for sustain, is how loud the sound gets at the start.
Finally, DEC, or decay, is how long it takes for the sound to fade out.
Envelope
The top knobs are labeled Env., short for envelope, and are bordered by, and connected with, blue lines.
They decide how the volume of the sound changes over time.
ATT, or attack, determines how long it takes for the sound to reach maximum volume.
HOLD is how long the sound stays at this level.
SUS, short for sustain, is how loud the sound gets at the start.
Finally, DEC, or decay, is how long it takes for the sound to fade out.
 Frequency
Underneath the envelope knobs are the green Freq. knobs, which control the frequency of the sound.
START is the start frequency, and MIN is the minimum frequency.
SLIDE makes the sound change frequency over time, with a positive number making it go up, and a negative number making it go down.
D.SLI., or Delta slide, affects how fast the frequency changes.
Values closer to 1 or -1 make the frequency change faster, while values closer to 0 make it slower.
A negative value reverses the slide, making an upwards slide go downwards and vice versa.
V.DEP., or vibrato depth, changes how much of an effect vibrato has, while V.SPD., or vibrato speed, changes how fast the vibrato is.
Frequency
Underneath the envelope knobs are the green Freq. knobs, which control the frequency of the sound.
START is the start frequency, and MIN is the minimum frequency.
SLIDE makes the sound change frequency over time, with a positive number making it go up, and a negative number making it go down.
D.SLI., or Delta slide, affects how fast the frequency changes.
Values closer to 1 or -1 make the frequency change faster, while values closer to 0 make it slower.
A negative value reverses the slide, making an upwards slide go downwards and vice versa.
V.DEP., or vibrato depth, changes how much of an effect vibrato has, while V.SPD., or vibrato speed, changes how fast the vibrato is.
 Change
In the middle and on the right of the knobs are two red knobs, labelled Change.
C.AMT stands for change amount, when you have positive values, the note will at a point, decided by the C.SPD - change speed or suddenly jump to a higher frequency.
If you set the knob to negative values the new frequency will be lower than the original.
This new frequency will last for as long as the note is held.
Change amount set to 0 doesn't affect the sound.
Change amount set to 0.25 raises the tone with one semitone.
Change amount set to 1 raises the tone with 3 octaves and 4 semitones.
The Change speed takes the note frequency in consideration on it's calculations, a low frequency note plays the original note longer before jumping to the new frequency than a high note does.
Even if change speed is set to 0, the note will jump.
Change
In the middle and on the right of the knobs are two red knobs, labelled Change.
C.AMT stands for change amount, when you have positive values, the note will at a point, decided by the C.SPD - change speed or suddenly jump to a higher frequency.
If you set the knob to negative values the new frequency will be lower than the original.
This new frequency will last for as long as the note is held.
Change amount set to 0 doesn't affect the sound.
Change amount set to 0.25 raises the tone with one semitone.
Change amount set to 1 raises the tone with 3 octaves and 4 semitones.
The Change speed takes the note frequency in consideration on it's calculations, a low frequency note plays the original note longer before jumping to the new frequency than a high note does.
Even if change speed is set to 0, the note will jump.
 Square
In the middle and on the left of the knobs are two orange knobs with options for when a square wave is used, labelled Square.
S.Duty changes the duty cycle, shifting the lowest parts of the square wave up, while S.SPD changes the duty cycle over time in a sweep.
Square
In the middle and on the left of the knobs are two orange knobs with options for when a square wave is used, labelled Square.
S.Duty changes the duty cycle, shifting the lowest parts of the square wave up, while S.SPD changes the duty cycle over time in a sweep.
 Repeat
Under the middle and on the left of the knobs is a section called Repeat, with only one grey knob, R.SPD. or repeat speed.
Setting this knob to anything other than zero will play the sound twice, with a slight delay in between.
The higher the value, the shorter the delay.
Repeat
Under the middle and on the left of the knobs is a section called Repeat, with only one grey knob, R.SPD. or repeat speed.
Setting this knob to anything other than zero will play the sound twice, with a slight delay in between.
The higher the value, the shorter the delay.
 Phaser
Under the middle and to the right is a section labelled Phaser, with two silver knobs.
PH.OFF. or phaser offset, and PH.S. or phaser sweep.
A phaser combines a signal with an offset version of itself, leading to phase cancellation in some frequencies.
In practical terms this leads to a shifting filter effect.
Phaser
Under the middle and to the right is a section labelled Phaser, with two silver knobs.
PH.OFF. or phaser offset, and PH.S. or phaser sweep.
A phaser combines a signal with an offset version of itself, leading to phase cancellation in some frequencies.
In practical terms this leads to a shifting filter effect.
 Filter
All the way at the bottom, there are five purple knobs, labelled Filter.
The ones that start with L are low pass filter settings, and the ones that start with H are high pass filter settings.
LF.C. and HF.C. are low pass cutoff and high pass cutoff, respectively.
On a low pass filter, frequencies below the cutoff are dampened.
LF.S. and HF.S. are low pass sweep and high pass sweep.
Positive values increase the filter cutoff with time (lowering it for low pass and raising it for high pass), and negative values decrease it, with numbers further from zero changing the cutoff more.
Finally, the low pass filter has an additional resonance knob, LF.R., to increase or decrease resonance.
With resonance, frequencies near the cutoff point are boosted.
sfxr is a port of
the original sfxr tool
.
It is used to generate retro video game sounds.
Please note that volume level of the sounds generated by sfxr varies quite a bit, especially with the RAND button.
5.14.1 Generator
The easiest way to use sfxr is with the
generator tab in the top right corner.
In this box are two large text buttons and seven smaller buttons.
5.14.1.1 Text Buttons
The RAND button, short for random, generates a completely random sound effect.
Because of this, it can generate all kinds of sounds, from cool to boring, and even completely silent ones.
To the right of it is the MUTA button, short for mutate.
This is similar to randomizing, but instead tweaks your current sound a bit.
It's useful to generate variations on a sound, or change a sound slightly to (hopefully) make it better.
5.14.1.1 Icons
Underneath the RAND and MUTA buttons are seven icons.
These each represent presets that sfxr uses to generate a specific type of sound.
In order, they are:
These generate a wide variety of sounds, while still managing to be recognizable.
This is where sfxr really shines.
5.14.2 Controls
There are also several controls that can be used to tweak a generated sound, or to create on from scratch.
To the left of the generator tab are the available waveforms (
).
Below this are several knobs for changing other parameters.
5.14.2.1 Envelope
The top knobs are labeled
Env.
, short for envelope, and are bordered by, and connected with, blue lines.
They decide how the volume of the sound changes over time.
ATT
, or attack, determines how long it takes for the sound to reach maximum volume.
HOLD is how long the sound stays at this level.
SUS
, short for sustain, is how loud the sound gets at the start.
Finally,
DEC
, or decay, is how long it takes for the sound to fade out.
5.14.2.2 Frequency
Underneath the envelope knobs are the green
Freq.
knobs, which control the frequency of the sound.
START is the start frequency, and
MIN is the minimum frequency.
SLIDE makes the sound change frequency over time, with a positive number making it go up, and a negative number making it go down.
D.SLI.
, or Delta slide, affects how fast the frequency changes.
Values closer to 1 or -1 make the frequency change faster, while values closer to 0 make it slower.
A negative value reverses the slide, making an upwards slide go downwards and vice versa.
V.DEP.
, or vibrato depth, changes how much of an effect vibrato has, while
V.SPD.
, or vibrato speed, changes how fast the vibrato is.
5.14.2.3 Change
In the middle and on the right of the knobs are two red knobs, labelled
Change
.
C.AMT stands for change amount, when you have positive values, the note will at a point, decided by the
C.SPD - change speed or suddenly jump to a higher frequency.
If you set the knob to negative values the new frequency will be lower than the original.
This new frequency will last for as long as the note is held.
Change amount set to 0 doesn't affect the sound.
Change amount set to 0.25 raises the tone with one semitone.
Change amount set to 1 raises the tone with 3 octaves and 4 semitones.
The Change speed takes the note frequency in consideration on it's calculations, a low frequency note plays the original note longer before jumping to the new frequency than a high note does.
Even if change speed is set to 0, the note will jump.
5.14.2.4 Square
In the middle and on the left of the knobs are two orange knobs with options for when a square wave is used, labelled
Square
.
S.Duty changes the duty cycle, shifting the lowest parts of the square wave up, while
S.SPD changes the duty cycle over time in a sweep.
5.14.2.5 Repeat
Under the middle and on the left of the knobs is a section called
Repeat
, with only one grey knob,
R.SPD.
or repeat speed.
Setting this knob to anything other than zero will play the sound twice, with a slight delay in between.
The higher the value, the shorter the delay.
5.14.2.6 Phaser
Under the middle and to the right is a section labelled
Phaser
, with two silver knobs.
PH.OFF.
or phaser offset, and
PH.S.
or phaser sweep.
A phaser combines a signal with an offset version of itself, leading to phase cancellation in some frequencies.
In practical terms this leads to a shifting filter effect.
5.14.2.7 Filter
All the way at the bottom, there are five purple knobs, labelled
Filter
.
The ones that start with L are low pass filter settings, and the ones that start with H are high pass filter settings.
LF.C.
and
HF.C.
are low pass cutoff and high pass cutoff, respectively.
On a low pass filter, frequencies below the cutoff are dampened.
LF.S.
and
HF.S.
are low pass sweep and high pass sweep.
Positive values increase the filter cutoff with time (lowering it for low pass and raising it for high pass), and negative values decrease it, with numbers further from zero changing the cutoff more.
Finally, the low pass filter has an additional resonance knob,
LF.R.
Filter
All the way at the bottom, there are five purple knobs, labelled Filter.
The ones that start with L are low pass filter settings, and the ones that start with H are high pass filter settings.
LF.C. and HF.C. are low pass cutoff and high pass cutoff, respectively.
On a low pass filter, frequencies below the cutoff are dampened.
LF.S. and HF.S. are low pass sweep and high pass sweep.
Positive values increase the filter cutoff with time (lowering it for low pass and raising it for high pass), and negative values decrease it, with numbers further from zero changing the cutoff more.
Finally, the low pass filter has an additional resonance knob, LF.R., to increase or decrease resonance.
With resonance, frequencies near the cutoff point are boosted.
sfxr is a port of
the original sfxr tool
.
It is used to generate retro video game sounds.
Please note that volume level of the sounds generated by sfxr varies quite a bit, especially with the RAND button.
5.14.1 Generator
The easiest way to use sfxr is with the
generator tab in the top right corner.
In this box are two large text buttons and seven smaller buttons.
5.14.1.1 Text Buttons
The RAND button, short for random, generates a completely random sound effect.
Because of this, it can generate all kinds of sounds, from cool to boring, and even completely silent ones.
To the right of it is the MUTA button, short for mutate.
This is similar to randomizing, but instead tweaks your current sound a bit.
It's useful to generate variations on a sound, or change a sound slightly to (hopefully) make it better.
5.14.1.1 Icons
Underneath the RAND and MUTA buttons are seven icons.
These each represent presets that sfxr uses to generate a specific type of sound.
In order, they are:
These generate a wide variety of sounds, while still managing to be recognizable.
This is where sfxr really shines.
5.14.2 Controls
There are also several controls that can be used to tweak a generated sound, or to create on from scratch.
To the left of the generator tab are the available waveforms (
).
Below this are several knobs for changing other parameters.
5.14.2.1 Envelope
The top knobs are labeled
Env.
, short for envelope, and are bordered by, and connected with, blue lines.
They decide how the volume of the sound changes over time.
ATT
, or attack, determines how long it takes for the sound to reach maximum volume.
HOLD is how long the sound stays at this level.
SUS
, short for sustain, is how loud the sound gets at the start.
Finally,
DEC
, or decay, is how long it takes for the sound to fade out.
5.14.2.2 Frequency
Underneath the envelope knobs are the green
Freq.
knobs, which control the frequency of the sound.
START is the start frequency, and
MIN is the minimum frequency.
SLIDE makes the sound change frequency over time, with a positive number making it go up, and a negative number making it go down.
D.SLI.
, or Delta slide, affects how fast the frequency changes.
Values closer to 1 or -1 make the frequency change faster, while values closer to 0 make it slower.
A negative value reverses the slide, making an upwards slide go downwards and vice versa.
V.DEP.
, or vibrato depth, changes how much of an effect vibrato has, while
V.SPD.
, or vibrato speed, changes how fast the vibrato is.
5.14.2.3 Change
In the middle and on the right of the knobs are two red knobs, labelled
Change
.
C.AMT stands for change amount, when you have positive values, the note will at a point, decided by the
C.SPD - change speed or suddenly jump to a higher frequency.
If you set the knob to negative values the new frequency will be lower than the original.
This new frequency will last for as long as the note is held.
Change amount set to 0 doesn't affect the sound.
Change amount set to 0.25 raises the tone with one semitone.
Change amount set to 1 raises the tone with 3 octaves and 4 semitones.
The Change speed takes the note frequency in consideration on it's calculations, a low frequency note plays the original note longer before jumping to the new frequency than a high note does.
Even if change speed is set to 0, the note will jump.
5.14.2.4 Square
In the middle and on the left of the knobs are two orange knobs with options for when a square wave is used, labelled
Square
.
S.Duty changes the duty cycle, shifting the lowest parts of the square wave up, while
S.SPD changes the duty cycle over time in a sweep.
5.14.2.5 Repeat
Under the middle and on the left of the knobs is a section called
Repeat
, with only one grey knob,
R.SPD.
or repeat speed.
Setting this knob to anything other than zero will play the sound twice, with a slight delay in between.
The higher the value, the shorter the delay.
5.14.2.6 Phaser
Under the middle and to the right is a section labelled
Phaser
, with two silver knobs.
PH.OFF.
or phaser offset, and
PH.S.
or phaser sweep.
A phaser combines a signal with an offset version of itself, leading to phase cancellation in some frequencies.
In practical terms this leads to a shifting filter effect.
5.14.2.7 Filter
All the way at the bottom, there are five purple knobs, labelled
Filter
.
The ones that start with L are low pass filter settings, and the ones that start with H are high pass filter settings.
LF.C.
and
HF.C.
are low pass cutoff and high pass cutoff, respectively.
On a low pass filter, frequencies below the cutoff are dampened.
LF.S.
and
HF.S.
are low pass sweep and high pass sweep.
Positive values increase the filter cutoff with time (lowering it for low pass and raising it for high pass), and negative values decrease it, with numbers further from zero changing the cutoff more.
Finally, the low pass filter has an additional resonance knob,
LF.R.
 SID
SID
 TripleOscillator
 Vibed
Vibed
 Watsyn
 ZynAddSubFX
This article will not cover ZynAddSubFX, not even remotely.
It would without any kind of "story-telling" be easy to write a 500 page book, and still come up short...! If you want to learn the most important features, you should watch the Video resources#ZynAddSubFX, there you can get specific hands-on visualizations of the most important things.
Here, we will only look at the special LMMS controllers and that is an absolute insignificant scratch of the surface, of this amazing synthesizer!
ZynAddSubFX is actually an embedded and fully integrated open source VST.
That is also the reason, that the LMMS ENV/LFO tab is empty.
VSTs can't utilize those.
ZynAddSubFX has been given a special LMMS UI, that gives you access to its seven different internal settings:
PORT: stands for "Portamento".
The setting is OFF when it is below 50%, and ON when over 50%.
You can not alter the slide-duration, for that you need to access the ZynAddSubFX controllers.
FREQ: it is the cutoff frequency of the default Low-pass 1 stages 12dB filter
RES (Resonance): also known as "Q" of the default filter.
Resonance increases the chosen part of the filter cutoff.
Kind of a "hump" in the spectrum.
You hear this as "sharpness" versus "dull" expression of the sound.
Too much resonance causes distortion, and can harm both hearing! and speakers.
The default presets in the ZynAddSubFX folders should only use moderate Q, because the internal ZynAddSubFX Q is quite high! Serious clipping from factory ZynAddSubFX presets will often be solvable, if you moderate the Q, sometimes significantly.
(When you make your own ZynAddSubFX presets, a Q <~ 10 is recommended.)
BW Wave Bandwidth: comes out as detuning of the waveform, and it is a very nice sound, indeed.
Unfortunately, not all ZynAddSubFX factory presets will allow Bandwidth modulation.
There need to be either UNISON or several PARTS of the instrument.
FM GAIN Frequency Modulation intensity: this dial will increase any modulation, that has been built inside the ZynAddSubFX preset.
Not just FM.
By default this dial will not change anything, because no factory presets have any modulation.
RES CF & RES BW Resonance Center Frequency & Resonance Bandwidth: these settings are not working with the default ZynAddSubFX presets.
In order to activate them, a Resonance envelope needs to be made, inside ZynAddSubFX.
How to control FM GAIN, RES CF & RES BW is explained in some of the Video resources.
This article will not cover ZynAddSubFX, not even remotely.
It would without any kind of \"story-telling\" be easy to write a 500 page book, and still come up short...! If you want to learn the most important features, you should watch the Video resources#ZynAddSubFX, there you can get specific hands-on visualizations of the most important things.
Here, we will only look at the special LMMS controllers and that is an absolute insignificant scratch of the surface, of this amazing synthesizer!
ZynAddSubFX is actually an embedded and fully integrated open source VST.
That is also the reason, that the LMMS ENV/LFO tab is empty.
VSTs can't utilize those.
ZynAddSubFX has been given a special LMMS UI, that gives you access to its seven different internal settings:
comes out as detuning of the waveform, and it is a very nice sound, indeed.
Unfortunately, not all ZynAddSubFX factory presets will allow Bandwidth modulation.
There need to be either
UNISON or several
PARTS
these settings are not working with the default ZynAddSubFX presets.
In order to activate them, a
Resonance envelope
ZynAddSubFX
This article will not cover ZynAddSubFX, not even remotely.
It would without any kind of "story-telling" be easy to write a 500 page book, and still come up short...! If you want to learn the most important features, you should watch the Video resources#ZynAddSubFX, there you can get specific hands-on visualizations of the most important things.
Here, we will only look at the special LMMS controllers and that is an absolute insignificant scratch of the surface, of this amazing synthesizer!
ZynAddSubFX is actually an embedded and fully integrated open source VST.
That is also the reason, that the LMMS ENV/LFO tab is empty.
VSTs can't utilize those.
ZynAddSubFX has been given a special LMMS UI, that gives you access to its seven different internal settings:
PORT: stands for "Portamento".
The setting is OFF when it is below 50%, and ON when over 50%.
You can not alter the slide-duration, for that you need to access the ZynAddSubFX controllers.
FREQ: it is the cutoff frequency of the default Low-pass 1 stages 12dB filter
RES (Resonance): also known as "Q" of the default filter.
Resonance increases the chosen part of the filter cutoff.
Kind of a "hump" in the spectrum.
You hear this as "sharpness" versus "dull" expression of the sound.
Too much resonance causes distortion, and can harm both hearing! and speakers.
The default presets in the ZynAddSubFX folders should only use moderate Q, because the internal ZynAddSubFX Q is quite high! Serious clipping from factory ZynAddSubFX presets will often be solvable, if you moderate the Q, sometimes significantly.
(When you make your own ZynAddSubFX presets, a Q <~ 10 is recommended.)
BW Wave Bandwidth: comes out as detuning of the waveform, and it is a very nice sound, indeed.
Unfortunately, not all ZynAddSubFX factory presets will allow Bandwidth modulation.
There need to be either UNISON or several PARTS of the instrument.
FM GAIN Frequency Modulation intensity: this dial will increase any modulation, that has been built inside the ZynAddSubFX preset.
Not just FM.
By default this dial will not change anything, because no factory presets have any modulation.
RES CF & RES BW Resonance Center Frequency & Resonance Bandwidth: these settings are not working with the default ZynAddSubFX presets.
In order to activate them, a Resonance envelope needs to be made, inside ZynAddSubFX.
How to control FM GAIN, RES CF & RES BW is explained in some of the Video resources.
This article will not cover ZynAddSubFX, not even remotely.
It would without any kind of \"story-telling\" be easy to write a 500 page book, and still come up short...! If you want to learn the most important features, you should watch the Video resources#ZynAddSubFX, there you can get specific hands-on visualizations of the most important things.
Here, we will only look at the special LMMS controllers and that is an absolute insignificant scratch of the surface, of this amazing synthesizer!
ZynAddSubFX is actually an embedded and fully integrated open source VST.
That is also the reason, that the LMMS ENV/LFO tab is empty.
VSTs can't utilize those.
ZynAddSubFX has been given a special LMMS UI, that gives you access to its seven different internal settings:
comes out as detuning of the waveform, and it is a very nice sound, indeed.
Unfortunately, not all ZynAddSubFX factory presets will allow Bandwidth modulation.
There need to be either
UNISON or several
PARTS
these settings are not working with the default ZynAddSubFX presets.
In order to activate them, a
Resonance envelope
 VeSTige
 is a VST host that allow the use of external VST plugins.
It is a powerful way to extend the range of sounds you can create beyond the plugins provided by defaul.
Because VeSTige is a MIDI based host, you can't use ENV/LFO in it.
This tab is intentionally left empty.
VeSTige
VeSTige is a VST host that allow the use of external VST plugins.
It is a powerful way to extend the range of sounds you can create beyond the plugins provided by defaul.
Because VeSTige is a MIDI based host, you can't use ENV/LFO in it.
This tab is intentionally left empty.
 Add effect
Double-click to select an effect.
You can enter keywords using the text box at the top.
Keyboarders can use Tab, Up/Down arrow keys, and Enter to select plugins, after typing in keywords.
The menu below can be accessed via the Add Effect button in an Effects Rack (found in the effects tab of instrument windows and the right hand side of the mixer window).
Double-click to select an effect.
You can enter keywords using the text box at the top.
Add effect
Double-click to select an effect.
You can enter keywords using the text box at the top.
Keyboarders can use Tab, Up/Down arrow keys, and Enter to select plugins, after typing in keywords.
The menu below can be accessed via the Add Effect button in an Effects Rack (found in the effects tab of instrument windows and the right hand side of the mixer window).
Double-click to select an effect.
You can enter keywords using the text box at the top.
 Amplifier
A simple amplifier that adjusts volume or panning of the audio without any other change.
Amplifier
A simple amplifier that adjusts volume or panning of the audio without any other change.
 BassBooster
A simple bass-booster plugin.
Essentially functions as a low-shelf filter.
FREQ: adjusts Cutoff Frequency.
GAIN: adjusts overall gain.
RATIO: adjusts amplitude ratio of affected (BassBoosted) to unaffected frequencies, from a range of .1 (1:10) to 10 (10:1).
BassBooster
A simple bass-booster plugin.
Essentially functions as a low-shelf filter.
FREQ: adjusts Cutoff Frequency.
GAIN: adjusts overall gain.
RATIO: adjusts amplitude ratio of affected (BassBoosted) to unaffected frequencies, from a range of .1 (1:10) to 10 (10:1).
 An example of a low-shelf filter using Equalizer.
A simple bass-booster plugin.
Essentially functions as a low-shelf filter.
adjusts amplitude ratio of affected (BassBoosted) to unaffected frequencies, from a range of .1 (1:10)
An example of a low-shelf filter using Equalizer.
A simple bass-booster plugin.
Essentially functions as a low-shelf filter.
adjusts amplitude ratio of affected (BassBoosted) to unaffected frequencies, from a range of .1 (1:10)
 Bitcrush
A Bitcrusher plugin.
It can be used to add distortion to an input.
Bitcrush
A Bitcrusher plugin.
It can be used to add distortion to an input.
 Crossover Equalizer
A basic multiband volume control that uses crossover filters to split the input into 4 bands.
Sliders: adjusts gain of each band.
The buttons below these sliders can be used to mute the bands.
Knobs: adjusts crossover frequency between respective bands (think "cutoff frequency").
A basic multiband volume control that uses
crossover filters to split the input into 4 bands.
Crossover Equalizer
A basic multiband volume control that uses crossover filters to split the input into 4 bands.
Sliders: adjusts gain of each band.
The buttons below these sliders can be used to mute the bands.
Knobs: adjusts crossover frequency between respective bands (think "cutoff frequency").
A basic multiband volume control that uses
crossover filters to split the input into 4 bands.
 Delay
A Delay plugin.
It stores and then repeats the input.
Delay
A Delay plugin.
It stores and then repeats the input.
 Dual Filter
A plugin featuring 2 filters processed in parallel.
Dual Filter
A plugin featuring 2 filters processed in parallel.
 Dynamics Processor
Dynamic Processor allows modification of signal dynamics, including compression, gating, expanding, or any other dynamics modifications.
This plugin is very similar to Waveshaper.
Dynamics Processor
Dynamic Processor allows modification of signal dynamics, including compression, gating, expanding, or any other dynamics modifications.
This plugin is very similar to Waveshaper.
 Equalizer
A simple Parametric Equalizer.
Equalizer
A simple Parametric Equalizer.
 Flanger
A Comb Filter modulated with a LFO.
Flanger
A Comb Filter modulated with a LFO.
 Multitap Echo
A Multi-tap echo delay plugin.
Multitap Echo
A Multi-tap echo delay plugin.
 Peak Controller
This plugin allows you to take the waveform of a signal and use it as a controller.
Peak Controller
This plugin allows you to take the waveform of a signal and use it as a controller.
 ReverbSC
A reverb plugin.
Input: adjusts gain of the input signal.
Output: adjusts gain of the output signal.
Size: adjusts amount of reverberation.
Color: adjusts the cutoff frequency of the lowpass filter (see Filter Types for Filter descriptions).
A
reverb plugin.
adjusts the cutoff frequency of the lowpass filter (see
Filter Types
ReverbSC
A reverb plugin.
Input: adjusts gain of the input signal.
Output: adjusts gain of the output signal.
Size: adjusts amount of reverberation.
Color: adjusts the cutoff frequency of the lowpass filter (see Filter Types for Filter descriptions).
A
reverb plugin.
adjusts the cutoff frequency of the lowpass filter (see
Filter Types
 Spectrum Analyzer
This plugin visualizes the frequencies present in the signal it monitors.
Spectrum Analyzer
This plugin visualizes the frequencies present in the signal it monitors.
 Spectrum Analyzer
 Stereo Matrix
This plugin allows you to reroute the Left and Right channels of an input signal.
This is accomplished by splitting the input into 4 channels whose amplitudes can be adjusted with their respective knobs.
A negative amplitude will invert that channel's waveform.
This plugin allows you to reroute the Left and Right channels of an input signal.\nThis is accomplished by splitting the input into 4 channels whose amplitudes can be adjusted with their respective knobs.
Stereo Matrix
This plugin allows you to reroute the Left and Right channels of an input signal.
This is accomplished by splitting the input into 4 channels whose amplitudes can be adjusted with their respective knobs.
A negative amplitude will invert that channel's waveform.
This plugin allows you to reroute the Left and Right channels of an input signal.\nThis is accomplished by splitting the input into 4 channels whose amplitudes can be adjusted with their respective knobs.
 StereoEnhancer
This plugin adds stereo character to a signal by slightly delaying the right stereo channel.
The WIDE knob adjusts how many samples the Right stereo channel is delayed by.
StereoEnhancer can introduce phase misalignment.
Also note that because StereoEnhancer uses samples instead of milliseconds to determine delay, changing samplerates may change how it sounds.
This plugin adds stereo character to a signal by slightly delaying the right stereo channel.\nThe
WIDE
knob adjusts how many
samples the Right stereo channel is delayed by.
StereoEnhancer
This plugin adds stereo character to a signal by slightly delaying the right stereo channel.
The WIDE knob adjusts how many samples the Right stereo channel is delayed by.
StereoEnhancer can introduce phase misalignment.
Also note that because StereoEnhancer uses samples instead of milliseconds to determine delay, changing samplerates may change how it sounds.
This plugin adds stereo character to a signal by slightly delaying the right stereo channel.\nThe
WIDE
knob adjusts how many
samples the Right stereo channel is delayed by.
 Waveshaper
 can be used for distortion and shaping the waveform of the signal.
This plugin is very similar to Dynamics Processor.
Waveshaper
Waveshaper can be used for distortion and shaping the waveform of the signal.
This plugin is very similar to Dynamics Processor.
 For Popcorn we will use a preset named "SquarePing", and we will use a really cool LMMS feature to help us find this preset: LMMS-token-search!
In the bottom of Sidebar, you have an input-field -This is a token-search field!
Just input a few letters of "SquarePing", and you will see how LMMS browse to all folders with presets that match your token!
We will use "SquarePing" from the Tripple-Oscilator collection
Drag the preset "SquarePing" onto the space in the middle of the Song Editor.
When you drop it, a new track will be created with that preset as the instrument-preset.
For Popcorn we will use a preset named "SquarePing", and we will use a really cool LMMS feature to help us find this preset: LMMS-token-search!
In the bottom of Sidebar, you have an input-field -This is a token-search field!
Just input a few letters of "SquarePing", and you will see how LMMS browse to all folders with presets that match your token!
We will use "SquarePing" from the Tripple-Oscilator collection
Drag the preset "SquarePing" onto the space in the middle of the Song Editor.
When you drop it, a new track will be created with that preset as the instrument-preset.

 ).
Double-click on that and the Piano Roll Editor will appear Alternatively right-click in the segment- Then in context-menu select Open-piano-roll.
Both methods opens piano-roll, and we are ready to compose the melody!
).
Double-click on that and the Piano Roll Editor will appear Alternatively right-click in the segment- Then in context-menu select Open-piano-roll.
Both methods opens piano-roll, and we are ready to compose the melody!

 However, this note is too long: we need notes half a beat - 1/8 - long.
To change this, we simply move the mouse pointer to the right-hand edge of the note, until the cursor changes into a left-and-right arrow.
Then hold the mouse button down, and drag the end of the note left two ticks (each block default being one sixteenth of a bar).
However, this note is too long: we need notes half a beat - 1/8 - long.
To change this, we simply move the mouse pointer to the right-hand edge of the note, until the cursor changes into a left-and-right arrow.
Then hold the mouse button down, and drag the end of the note left two ticks (each block default being one sixteenth of a bar).
 ) -But you can change that in the drop-down.
However most of the time you will work with the Last-Note setting, but if you suddenly cant create notes in the length you expected, its because you accidentally made a change to this drop-down.
) -But you can change that in the drop-down.
However most of the time you will work with the Last-Note setting, but if you suddenly cant create notes in the length you expected, its because you accidentally made a change to this drop-down.
 To place a note, you need to aim for the line at the start of the beat; LMMS will recognise a small fraction of the area left of the beat line as being closer to that beat than the previous.
You can control this with the 'Q-setting'.
Default 'Q' is correlated to note-length.
That is 'Note-snap'.
But again you can change that 'magnetic-point' in the Q-dropdown.
If you make a mistake placing a note, you can move it to its correct position by clicking on the middle of the note (the cursor turns into a four-way cross) and dragging the note to its new position.
LMMS will play the note that you're dragging, as an audible aide to correct placement.
You can move notes horizontally (in time) as well as vertically (in octave-pitch).
If you need to delete a note, simply right-click on it.
To place a note, you need to aim for the line at the start of the beat; LMMS will recognise a small fraction of the area left of the beat line as being closer to that beat than the previous.
You can control this with the 'Q-setting'.
Default 'Q' is correlated to note-length.
That is 'Note-snap'.
But again you can change that 'magnetic-point' in the Q-dropdown.
If you make a mistake placing a note, you can move it to its correct position by clicking on the middle of the note (the cursor turns into a four-way cross) and dragging the note to its new position.
LMMS will play the note that you're dragging, as an audible aide to correct placement.
You can move notes horizontally (in time) as well as vertically (in octave-pitch).
If you need to delete a note, simply right-click on it.

 Alternatively you can use good old copy and paste Ctrl+<a| c| v> short-cuts.
Again, use Ctrl to select the notes you want, and then press Ctrl+C.
Press Ctrl+V to paste the notes.
The notes will be inserted at the play-head position, but as long as they are selected, you can move them.
In LMMS we have lots of smart-move options!
When notes are selected you can smart-move them:
One Q-snap:
Hold shift, tab left/right arrow
One bar
Hold ctrl, tab left/right arrow
One semitone:
Hold shift, tab up/down arrow
One Octave
Hold ctrl, tab up/down arrow
To select all notes in piano-roll, also those not in view, you can press Ctrl+A.
We can now press the play button (
Alternatively you can use good old copy and paste Ctrl+<a| c| v> short-cuts.
Again, use Ctrl to select the notes you want, and then press Ctrl+C.
Press Ctrl+V to paste the notes.
The notes will be inserted at the play-head position, but as long as they are selected, you can move them.
In LMMS we have lots of smart-move options!
When notes are selected you can smart-move them:
One Q-snap:
Hold shift, tab left/right arrow
One bar
Hold ctrl, tab left/right arrow
One semitone:
Hold shift, tab up/down arrow
One Octave
Hold ctrl, tab up/down arrow
To select all notes in piano-roll, also those not in view, you can press Ctrl+A.
We can now press the play button (
 ) in the Piano Roll Editor window to play the current melody.
When it gets to the end of the last bar in which there are notes, it will automatically repeat back to the start of the first bar.
This is fine, but You can now continue adding more notes of the tune.
Here's what your piano roll should look like at the end of this:
) in the Piano Roll Editor window to play the current melody.
When it gets to the end of the last bar in which there are notes, it will automatically repeat back to the start of the first bar.
This is fine, but You can now continue adding more notes of the tune.
Here's what your piano roll should look like at the end of this:
 Lets take a look at our melody in song-editor!
Press F5!
So there we got our segment, coloured, and with the notes we have composed.
Now remember the melody.
The part we have here actually repeats trice more times.
We could go back to piano-roll and make a copy, like we did before, but instead we will copy the segment in song-editor!
Point at it
Press and hold Ctrl
Drag the segment to the right.
You will see that you now have a complete copy of the segment, and you can drop that anywhere.
Do this two more times, so you now have 4 segments in song-editor.
Lets take a look at our melody in song-editor!
Press F5!
So there we got our segment, coloured, and with the notes we have composed.
Now remember the melody.
The part we have here actually repeats trice more times.
We could go back to piano-roll and make a copy, like we did before, but instead we will copy the segment in song-editor!
Point at it
Press and hold Ctrl
Drag the segment to the right.
You will see that you now have a complete copy of the segment, and you can drop that anywhere.
Do this two more times, so you now have 4 segments in song-editor.
 ).
This is your sample collection that comes standard with LMMS.
On the list of folders that appeared, one of them labeled "drums".
Double-clicking the folder will show a list of percussion instruments.
Click on them to hear the different sounds of the instruments.
In the samples select a Kick drum (any will work).
Double-click the sample and it should appear in the Beat + Bassline editor.
Also add a Closed Hihat and a Snare.
You will end up with 3 AFP in the Beat + Bassline editor.
You make drum patterns by clicking the grey squares
(
).
This is your sample collection that comes standard with LMMS.
On the list of folders that appeared, one of them labeled "drums".
Double-clicking the folder will show a list of percussion instruments.
Click on them to hear the different sounds of the instruments.
In the samples select a Kick drum (any will work).
Double-click the sample and it should appear in the Beat + Bassline editor.
Also add a Closed Hihat and a Snare.
You will end up with 3 AFP in the Beat + Bassline editor.
You make drum patterns by clicking the grey squares
(
 ).
You can play your drum pattern by pressing the play button (
).
You can play your drum pattern by pressing the play button (
 [2] Amen Break - This drum solo was originally performed by Gregory Sylvester Coleman, but has been heavily sampled and pitched up for use in jump-up drum and bass and jungle.
 and main beat:
 It is the controller named FX.
Because no FX-channels have been made, we need a new one.
Right-click the controller, and select: Assign-to.
then select new-Mixer-channel.
Two thing happens:
The value in the controller will change, and at the same time a new mixer-channel is created in Mixer, and it is also given the same name, as the assigned preset!
The same assignment can be made from the track-buttons action-button.
Here left-click, and assign the preset.
Take a look at the mixer now.
You can see that all channels has their own dB meter.
Start playing your project.
The first thing you need, is to make sure, that no meter, including master, are (constantly) in the red area.
When a sound-intensity causes the meter to go 'into the red', you will get distortions, and really bad sound, well in fact even risk of damage to speakers, and worse -Your ears!
Often you will hear 'into-the-red, being called 'spiked-out', 'maxed-out' or 'clipping' -Those all mean the same: Excessive volume, that creates artefacts!
I choose the phrase constantly.
I did that because it is acceptable that your meter occasionally touches in the red, but its a fine art to know when touching is more like groping..
If you have clipping, you can deal with it in a lot of different ways.
You can find much more about tools as EQs, limiters, and compressors, in the more specialized chapters of the wiki.
You can also watch the mixing video-tutorials, and learn much more about the power of the LMMS-mixer.
Right now, you can try to just change the volume sliders, and get rid of the red-clippings.
then listen to your track again.
You should be able to hear the difference.
The instruments should be cleaner, and stand better individually in the total mix.
It is the controller named FX.
Because no FX-channels have been made, we need a new one.
Right-click the controller, and select: Assign-to.
then select new-Mixer-channel.
Two thing happens:
The value in the controller will change, and at the same time a new mixer-channel is created in Mixer, and it is also given the same name, as the assigned preset!
The same assignment can be made from the track-buttons action-button.
Here left-click, and assign the preset.
Take a look at the mixer now.
You can see that all channels has their own dB meter.
Start playing your project.
The first thing you need, is to make sure, that no meter, including master, are (constantly) in the red area.
When a sound-intensity causes the meter to go 'into the red', you will get distortions, and really bad sound, well in fact even risk of damage to speakers, and worse -Your ears!
Often you will hear 'into-the-red, being called 'spiked-out', 'maxed-out' or 'clipping' -Those all mean the same: Excessive volume, that creates artefacts!
I choose the phrase constantly.
I did that because it is acceptable that your meter occasionally touches in the red, but its a fine art to know when touching is more like groping..
If you have clipping, you can deal with it in a lot of different ways.
You can find much more about tools as EQs, limiters, and compressors, in the more specialized chapters of the wiki.
You can also watch the mixing video-tutorials, and learn much more about the power of the LMMS-mixer.
Right now, you can try to just change the volume sliders, and get rid of the red-clippings.
then listen to your track again.
You should be able to hear the difference.
The instruments should be cleaner, and stand better individually in the total mix.