Tensorflow.js is a new deep learning library that runs right in your browser. Being a machine learning and Javascript enthusiast, I immediately started working on an object detection library using Tensorflow.js after it was released.
Here, I'll walk through how I got started, and break down the different points of tfjs-yolo-tiny. You can check out the live demo here.
We'll cover pulling the original Tiny YOLO Darknet model, converting it into Keras, converting that into Tensorflow.js, doing some predictions, gotchas while writing in Tensorflow.js, and using webcam/images easily for predictions.

YOLO9000: Better, Faster, Stronger
Yes that's seriously the original paper title. We'll be using Tiny YOLO, a fast object detection model that can run at 200 FPS. We'll use Tiny YOLO instead of the full YOLOv2. Why? First, YOLOv2 runs “only” at 40 fps on a powerful desktop, which most users don't have access to. The model file is also ~5x bigger than Tiny YOLO, which would take forever to load over the web. Lastly, YOLOv2 has a reorg layer that isn't supported as a native Tensorflow.js layer yet. We'll grab the network config (neural network structure) and weights (magic numbers) for Tiny YOLO in the next step.
YAD2K: Yet Another Darknet 2 Keras (Converter)
You might have noticed that YOLO is written in Darknet, and Darknet doesn't sound like Tensorflow. So our first stop is to convert our YOLO model into something more Tensorflow-y, in our case, Keras! Keras is a higher-level, deep learning framework. It's the recommended format for converting your weights into the Tensorflow.js format.
We'll use YAD2K to convert the Darknet model to Keras. Go ahead and follow the instructions here to install YAD2K, I'll wait.
Fine, you can also pretend you did it and use the final weight files I've published, but it won't be as fun!
Now we'll have to fix a bug in YAD2K to load Tiny YOLO without error.
Open up
yad2k.py in your favorite text editor and on line 83, change
buffer=weights_file.read(16) to
buffer=weights_file.read(20). Why?
No idea.
Now run the following command in your terminal. It'll download the Tiny YOLO weights and config as well as output the converted model file to
model_data/yolov2-tiny.h5
wget
https://pjreddie.com/media/files/yolov2-tiny.weights

wget
https://raw.githubusercontent.com/pjreddie/darknet/master/cfg/yolov2-tiny.cfg
./yad2k.py yolov2-tiny.cfg yolov2-tiny.weights model_data/yolov2-tiny.h5
Next we want to ensure that our new model actually works! Fun fact: I forgot to do this and I spent a whole day wondering why Tensorflow.js was b0rk.
./test_yolo.py model_data/yolov2-tiny.h5
The model should output some predictions. If not, feel free to bug me with a comment below!

Tensorflow.js Convertor: Our Last Weight Conversion
This step is simpler, I promise! See the official guide here. Again if this seems like all too much, I've already done all the hard work, so you can skip right ahead :)
We'll want to install the official convertor tool. Run
pip install tensorflowjs in your terminal to install the convertor.
And now to convert our model, again using the terminal!
tensorflowjs_converter --input_format keras \

    model_data/yolov2-tiny.h5 \

    tfjs_model_data
Now we finally have all our model files in
tfjs_model_data! Notice that the folder contains a
model.json as well as a bunch of other shard files.
model.json tells Tensorflow.js what is the structure of the neural net and which shard files correspond to what weights. The shard files contain weights for the model. Make sure that the shard files are located in the same directory of
model.json, or else your model will fail to load properly.
Tensorflow.js Time
Now, the fun part. (Every part is the fun part.) ML and JS code at the same time!
We'll start off by importing some Tensorflow and loading the model.
import * as tf from ‘@tensorflow/tfjs';
const model = await tf.loadModel(url);
Wait but what is `url`? You can either use the hosted model file here or supply the path to the files you converted. Learn more here!
Fantastic, now we can do some real deep learning:
function yolo (input) {

   return model.predict(input);

}
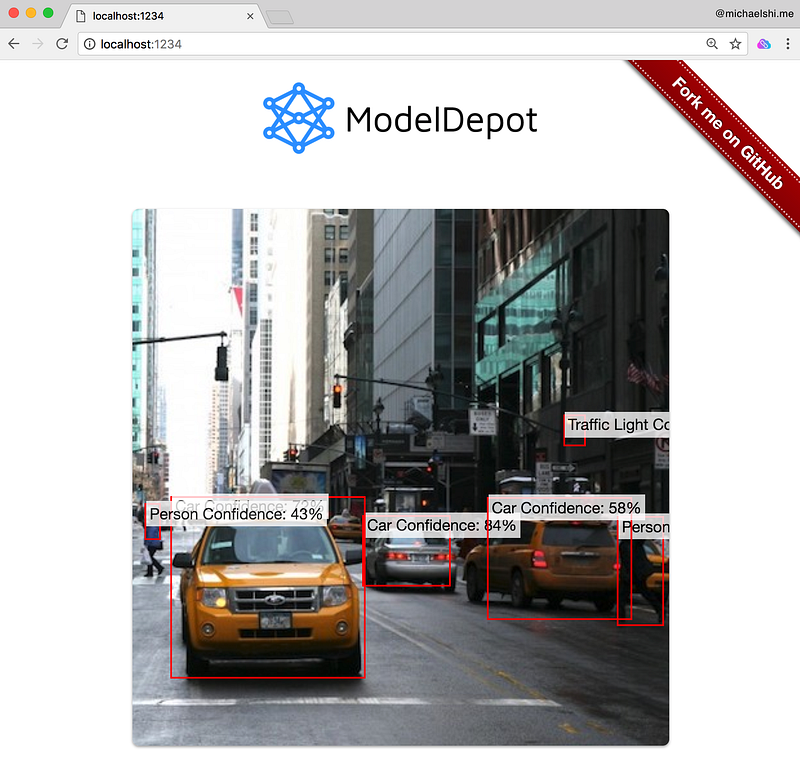
Huh. That seemed quite mundane. Oh wait. We forgot to translate the output into bounding boxes, class labels, and probabilities!
 Original Image
Turning Numbers into Boxes and Numbers
I'm not going to dive too deep into this, as post-processing YOLO can be a couple blog posts of their own. Instead, I'll highlight the challenges I faced when converting the Python version to Javascript.
Certain tensor operations not available
Tensorflow.js is still young, and thus some things weren't available yet such as boolean mask or NMS. You might run into this issue too, but luckily you can work around it by using
const expected_shape = tensor.shape;

const data = await tensor.data(); // Async transfer from GPU to CPU

// Note: data is a flattened TypedArray of the original tensor

//... data manipulation in JS on CPU

tf.tensor1d(data).reshape(expected_shape); // Shape it back into where we were before
Note: Doing this can bottleneck your application, but sometimes it's unavoidable.
You can't use -1 index like Python
In python you can use -1 as “last element”. Unfortunately in Tensorflow.js, if you try this on
tf.slice, it'll silently fail. Instead you must specify the size
explicitly.
You can't use 5d tensors
Beware that Tensorflow.js's WebGL backend can not support 5d tensors. Why use 5 dimensions if I can't even imagine them? Well in YOLO we reshape the output into
[batch_size, xy, wh, box_confidence, box_class_pred]. This is clearly 5d. Luckily to avoid such pain and suffering, I simply dropped the batch_size dimension. An alternative would be to not reshape into a 5d tensor. Something to be wary of.
Otherwise, my experience was fluid. I only had to reimplement two algorithms in CPU (traditional JS) that Tensorflow normally has out of the box.
An NPM Install
Let's drop our deep learning right into an application!
Luckily a poor chap had already written the code so just run an NPM install in your terminal:
npm i tfjs-yolo-tiny
And now we'll wave our Javascript wand around a bit
import yolo, { downloadModel } from ‘tfjs-yolo-tiny';
const model = await downloadModel();

const inputImage = webcam.capture();
const boxes = await yolo(inputImage, model);
Whoa whoa, what is this
webcam.capture() you speak of?
Maybe a bit more than an NPM install…
You might've noticed we haven't touched upon what exactly is being fed in our YOLO. And this is one of the coolest parts of Tensorflow.js.
We can take a video or image from the document (DOM) and turn it into a tensor!
We can write something like this in JavaScript:
/* Pretend we had the following element in index.html. Always use alt tags for accessibility!

<img id=”image” src=”/test_input.jpg” alt=”YOLO Model Test Image”>

*/
const image = document.getElementById(‘image');

const input = tf.fromPixels(image);
BAM! Input now has the image as a tensor! And to swap from image to webcam, you'd just have to point it at the right element. That's pretty ✨ magical to me.
After this, we'd have to do some pre-processing. In this case, cropping it to be square, resizing to 416x416, and then dividing by 255 to get pixel values ranging from 0 to 1. Why? Because the boss said so (we trained YOLO that way).
Final Thoughts
We've walked through how to convert models to Tensorflow.js format. We can load a model and predict with it. We then explored some pain points of writing post-processing code in Tensorflow.js, but we prevailed. We also now know how to grab data via static image or webcam. Now we can convert most ML models from Python to Tensorflow.js and run them in your browser.
Want to see it all in action? Check out the live demo. Want to use it in your app without the fuss? Check out the NPM package.
Feel free to join the conversation over at ModelDepot as well! Or even browse around for the next machine learning model for your project!