Connect To MySQL Database From Command Line Guide
This article describes how to connect to MySQL from the command line using the mysql program. You can use the mysql program as a quick and easy way to access your databases directly. Table of Contents Connect To MySQL Database From Command Line More Information Related ArticlesConnect To MySQL Database From Command Line
To connect to MySQL from the command line, follow these steps: Log in to your A2 Hosting account using SSH. At the command line, type the following command, replacing USERNAME with your username: mysql -u USERNAME -p At the Enter Password prompt, type your password. When you type the correct password, the mysql> prompt appears. To display a list of databases, type the following command at the mysql> prompt: show databases; To access a specific database, type the following command at the mysql> prompt, replacing DBNAME with the database that you want to access: use DBNAME; After you access a database, you can run SQL queries, list tables, and so on. Additionally: To view a list of MySQL commands, type help at the mysql> prompt. To exit the mysql program, type \q at the mysql> prompt.How to connect to MySQL using PHP
This article describes several methods to connect to a MySQL database using PHP: MySQL Improved (mysqli) PHP extension PDO (PHP Data Objects) Legacy MySQL (mysql_) functions Connect to remote MySQL database using PHPThe MySQL databases and users must already exist before you can use these methods. For information about how to manage MySQL databases using cPanel, please see this article.Table of Contents
Method #1: Connect to MySQL using MySQL Improved
Method #2: Connect to MySQL using PHP Data Objects (PDO)
Method #3: Connect to MySQL using legacy PHP functions
Connecting to remote MySQL databases using PHP
More Information
Related Articles
Method #1: Connect to MySQL using MySQL Improved
The MySQL Improved extension uses the mysqli class, which replaces the set of legacy MySQL functions. To connect to MySQL using the MySQL Improved extension, follow these steps: Use the following PHP code to connect to MySQL and select a database. Replace username with your username, password with your password, and dbname with the database name: <?php $mysqli = new mysqli("localhost", "username", "password", "dbname"); ?> After the code connects to MySQL and selects the database, you can run SQL queries and perform other operations. For example, the following PHP code runs a SQL query that extracts the last names from the employees table, and stores the result in the $result variable: <?php $result = $mysqli->query("SELECT lastname FROM employees"); ?>Method #2: Connect to MySQL using PHP Data Objects (PDO)
The MySQL Improved extension can only be used with MySQL databases. PDO, on the other hand, abstracts database access and enables you to create code that can handle different types of databases. To connect to MySQL using PDO, follow these steps: Use the following PHP code to connect to MySQL and select a database. Replace username with your username, password with your password, and dbname with the database name: <?php $myPDO = new PDO('mysql:host=localhost;dbname=dbname', 'username', 'password'); ?> After the code connects to MySQL and selects the database, you can run SQL queries and perform other operations. For example, the following PHP code runs a SQL query that extracts the last names from the employees table, and stores the result in the $result variable: <?php $result = $myPDO->query("SELECT lastname FROM employees"); ?>Method #3: Connect to MySQL using legacy PHP functions
The original PHP MySQL functions (whose names begin with mysql_) are deprecated in PHP 5.5, and will eventually be removed from PHP. Therefore, you should only use these functions when absolutely necessary for backward compatibility. If possible, use the MySQL Improved extension or PDO instead. To connect to MySQL using the legacy PHP MySQL functions, follow these steps: Use the following PHP code to connect to MySQL and select a database. Replace username with your username, password with your password, and dbname with the database name: <?php mysql_connect('localhost','username','password'); mysql_select_db("dbname"); ?> After the code connects to MySQL and selects the database, you can run SQL queries and perform other operations. For example, the following PHP code runs a SQL query that extracts the last names from the employees table, and stores the result in the $result variable: <?php $result = mysql_query('SELECT lastname FROM employees'); ?>Connecting to remote MySQL databases using PHP
The previous examples all assume that the PHP script runs on the same server where the MySQL database is located. But what if you want to use PHP to connect to a MySQL database from a remote location? For example, you may want to connect to your A2 Hosting database from a home computer or from another web server. To do this, you need to do two things: On the A2 Hosting server, enable the connecting IP address for remote access. For information about how to do this, please see this article. If you do not add your IP address to the list of permitted remote access hosts, you receive Access denied messages when you try to access a MySQL database remotely. In your PHP code, change the MySQL connection string to use the A2 Hosting server name instead of localhost. For example, the following PHP code uses mysqli to connect to the A2 Hosting server a2ss25.a2hosting.com: <?php $mysqli = new mysqli("a2ss25.a2hosting.com", "username", "password", "dbname"); ?>Python MySQL Connector | How to Connect to MySQL Using Python
Python provides several ways to connect to a MySQL database and process data. This article describes three methods.The MySQL databases and users must already exist before you can use any of the following methods. For information about how to manage MySQL databases using cPanel, please see this article.
Applications that require Python 3 should use the Python Selector. Please contact support if the Python Selector is not available on your server.
Table of Contents
Python MySQL Connector
Setting up the Python virtual environment and installing a MySQL package
Code sample
More Information
Related Articles
Python MySQL Connector
Before you can access MySQL databases using Python, you must install one (or more) of the following packages in a virtual environment: MySQL-python: This package contains the MySQLdb module, which is written in C. It is one of the most commonly used Python packages for MySQL. mysql-connector-python: This package contains the mysql.connector module, which is written entirely in Python. PyMySQL: This package contains the pymysql module, which is written entirely in Python. It is designed to be a drop-in replacement for the MySQL-python package. All three of these packages use Python's portable SQL database API. This means that if you switch from one module to another, you can reuse almost all of your existing code (the code sample below demonstrates how to do this).Setting up the Python virtual environment and installing a MySQL package
To set up the Python virtual environment and install a MySQL package, follow these steps: Log in to your account using SSH. To create a virtual environment, type the following commands: cd ~ virtualenv -p /usr/bin/python2.7 sqlenv The virtualenv command creates a virtual environment named sqlenv, and subsequent commands in this procedure assume that the environment is named sqlenv. You can use any environment name you want, but make sure you replace all occurrences of sqlenv with your own environment name. To activate the virtual environment, type the following command: source sqlenv/bin/activate The command prompt now starts with (sqlenv) to indicate that you are working in a Python virtual environment. All of the following commands in this procedure assume that you are working within the virtual environment. If you log out of your SSH session (or deactivate the virtual environment by using the deactivate command), make sure you reactivate the virtual environment before following the steps below and running the sample code. Type the command for the package you want to install: To install the MySQL-python package, type the following command: pip install MySQL-python To install the mysql-connector-python package, type the following command: pip install mysql-connector-python To install the pymysql package, type the following command: pip install pymysqlCode sample
After you install a MySQL package in the virtual environment, you are ready to work with actual databases. The following sample Python code demonstrates how to do this, as well as just how easy it is to switch between the different SQL package implementations. In your own code, replace USERNAME with the MySQL database username, PASSWORD with the database user's password, and DBNAME with the database name: #!/usr/bin/python hostname = 'localhost' username = 'USERNAME' password = 'PASSWORD' database = 'DBNAME' # Simple routine to run a query on a database and print the results: def doQuery( conn ) : cur = conn.cursor() cur.execute( "SELECT fname, lname FROM employee" ) for firstname, lastname in cur.fetchall() : print firstname, lastname print "Using MySQLdb…" import MySQLdb myConnection = MySQLdb.connect( host=hostname, user=username, passwd=password, db=database ) doQuery( myConnection ) myConnection.close() print "Using pymysql…" import pymysql myConnection = pymysql.connect( host=hostname, user=username, passwd=password, db=database ) doQuery( myConnection ) myConnection.close() print "Using mysql.connector…" import mysql.connector myConnection = mysql.connector.connect( host=hostname, user=username, passwd=password, db=database ) doQuery( myConnection ) myConnection.close() This example creates a series of Connection objects that opens the same database using different MySQL modules. Because all three MySQL modules use the portable SQL database API interface, they are able to use the code in the doQuery() function without any modifications. When you have a Connection object associated with a database, you can create a Cursor object. The Cursor object enables you to run the execute() method, which in turn enables you to run raw SQL statements (in this case, a SELECT query on a table named employee). As you can see, Python's portable SQL database API makes it very easy to switch between MySQL modules in your code. In the sample above, the only code changes necessary to use a different module are to the import and connect statements.npm MySQL | node.js MySQL Connection Guide
This article demonstrates how to connect to a MySQL database using Node.js.
Node.js must already be installed on your account. For information about how to install Node.js, please see this article.
A MySQL database and user must already exist before you can follow the procedures in this article. For information about how to manage MySQL databases using cPanel, please see this article.
Table of Contents
MySQL Node.js Connection Via npm
Installing the node-mysql package (npm)
Code sample
More Information
Related Articles
 The phpMyAdmin administration page appears in a new window.
In the left pane of the phpMyAdmin page, click the database that you want to export.Click the Export tab.
Under Export method, confirm that Quick is selected.
If you are using an older version of phpMyAdmin that does not have the Quick option, follow these steps instead:
In the Export section, click Select All.
Select the Save as file checkbox, and then click . The export process runs.
Under Format, confirm that SQL is selected.Click .In the Save File dialog box, type the filename and select the directory where you want to save the exported database on your local computer.Click . The export process runs.
The phpMyAdmin administration page appears in a new window.
In the left pane of the phpMyAdmin page, click the database that you want to export.Click the Export tab.
Under Export method, confirm that Quick is selected.
If you are using an older version of phpMyAdmin that does not have the Quick option, follow these steps instead:
In the Export section, click Select All.
Select the Save as file checkbox, and then click . The export process runs.
Under Format, confirm that SQL is selected.Click .In the Save File dialog box, type the filename and select the directory where you want to save the exported database on your local computer.Click . The export process runs.
 Under Create New Database, in the New Database text box, type the name of the database.Click . cPanel creates the database.When the database is created, click .Under Add User to Database, in the User list box, select the user that you want to add.In the Database list box, select the new database.Click .Select the check boxes to grant the user specific privileges, or select the ALL PRIVILEGES check box to grant the user all permissions to the database.Click . cPanel adds the user to the database.
MySQL Node.js Connection Via npm
The node-mysql package enables you to easily connect to a MySQL database using Node.js. Before you can do this, however, you must install the node-mysql package on your account.Installing the node-mysql package (npm)
To install the node-mysql package on your account, follow these steps: Log in to your account using SSH. Type the following commands: cd ~ npm install mysqlCode sample
After you install the node-mysql package, you are ready to work with actual databases. The following sample Node.js code demonstrates how to do this. In your own code, replace dbname with the database name, username with the MySQL database username, and password with the database user's password. Additionally, you should modify the SELECT query to match a table in your own database: var mysql = require('mysql'); var connection = mysql.createConnection({ host : 'localhost', database : 'dbname', user : 'username', password : 'password', }); connection.connect(function(err) { if (err) { console.error('Error connecting: ' + err.stack); return; } console.log('Connected as id ' + connection.threadId); }); connection.query('SELECT * FROM employee', function (error, results, fields) { if (error) throw error; results.forEach(result => { console.log(result); }); }); connection.end(); This example creates a MySQL connection object that connects to the MySQL database. After the database connection is established, you can use the query method to run raw SQL statements (in this case, a SELECT query on a table named employee).More Information
For more information about the node-mysql package, please visit https://github.com/mysqljs/mysql.How to import and export a MySQL database
This article describes how to import MySQL databases and export MySQL databases. You can import and export databases for a variety of scenarios, including: Transferring a MySQL database from one web hosting account or provider to another. Importing a third-party MySQL database. Backing up a MySQL database. Table of Contents How to export MySQL database MySQL Export Database Method #1: Use phpMyAdmin MySQL Export Database Method #2: Use the mysqldump program Creating a new MySQL database and assigning a user How To Import MySQL database MySQL Import Database Method #1: Use phpMyAdmin MySQL Import Database Method #2: Use the mysql program Troubleshooting the MySQL database import More Information Related ArticlesHow to export MySQL database
You can export a MySQL database to a file by using phpMyAdmin or the mysqldump database command line program.MySQL Export Database Method #1: Use phpMyAdmin
You can export a MySQL database using the phpMyAdmin web interface. To do this, follow these steps: Log in to cPanel.If you do not know how to log in to your cPanel account, please see this article. In the DATABASES section of the cPanel home screen, click phpMyAdmin:MySQL Export Database Method #2: Use the mysqldump program
You can export a MySQL database from the command line using the mysqldump database program. To do this, follow these steps: Access the command line on the computer where the database is stored. For example, if the database is on another web hosting account or with another web hosting provider, log in to the account using SSH. If you have physical access to the computer, you can open a DOS or terminal window to access the command line. Type the following command, and then press Enter. Replace username with your username, and dbname with the name of the database that you want to export: mysqldump -u username -p dbname > dbexport.sql This example uses the dbexport.sql filename for the exported database, but you can name the file whatever you want.Type your password at the Enter password prompt.The dbexport.sql file now contains all of the data for the dbname database. If the dbexport.sql file is on a remote computer, download the file to your local computer.Creating a new MySQL database and assigning a user
Before you can import the database, you must create a new database in cPanel and assign a user to it. To do this, follow these steps: Log in to cPanel.If you do not know how to log in to your cPanel account, please see this article. In the DATABASES section of the cPanel home screen, click MySQL® Databases:How To Import MySQL database
After you have created a new database in cPanel, you can import the database's contents by using phpMyAdmin or the mysql command line program.If the exported database file contains any CREATE DATABASE statements, you must remove them or comment them out. Otherwise, the import process will fail.
The phpMyAdmin administration page appears in a new window.
In the left pane of the phpMyAdmin page, click the database that you want to import the data into.Click the Import tab.Under File to Import, click , and then select the dbexport.sql file on your local computer.Click . The import process runs.The database should now contain the data that is in the dbexport.sql file.
 In the Category pane, click Session.In the Host Name (or IP address) text box, type your web site's domain name or IP address.In the Port text box, type 7822.Confirm that the Connection type radio button is set to SSH.
Click :
In the Category pane, click Session.In the Host Name (or IP address) text box, type your web site's domain name or IP address.In the Port text box, type 7822.Confirm that the Connection type radio button is set to SSH.
Click :
 If a PuTTY security alert about the server's host key appears, click .When the login as prompt appears, type your A2 Hosting username, and then type your password.
When the remote server's command line prompt appears, the SSH tunnel is established and you can use your MySQL client applications on the local computer.
If a PuTTY security alert about the server's host key appears, click .When the login as prompt appears, type your A2 Hosting username, and then type your password.
When the remote server's command line prompt appears, the SSH tunnel is established and you can use your MySQL client applications on the local computer.
MySQL Import Database Method #1: Use phpMyAdmin
You can import a MySQL database using the phpMyAdmin web interface. To do this, follow these steps: Log in to cPanel.If you do not know how to log in to your cPanel account, please see this article. In the DATABASES section of the cPanel home screen, click phpMyAdmin:MySQL Import Database Method #2: Use the mysql program
You can import a MySQL database from the command line using the mysql program. To do this, follow these steps: Transfer the dbexport.sql file to your A2 Hosting account using SCP, SFTP, or FTP. Log in to your A2 Hosting account using SSH. Change to the directory where you uploaded the dbexport.sql file. For example, if you uploaded the dbexport.sql file to your home directory, type cd ~. Type the following command, and then press Enter. Replace username with your username and dbname with the name of the database that you want to import the data into: mysql -u username -p dbname < dbexport.sql The dbname database should now contain the data that is in the dbexport.sql file.Troubleshooting the MySQL database import
You may receive one of the following error messages when you try to import a MySQL database using either cPanel or the mysql program: ERROR 1044: Access denied for user 'username1'@'localhost' to database 'username2_database' This error message occurs when the import file contains an SQL statement that attempts to access a database for the wrong username. Note in this example that username2 in username2_database does not match username1 in 'username1'@'localhost'. You must edit the import file and change username2 to your new username1. ERROR 1049: Unknown database 'username_database' This error message occurs when the target database does not exist. Make sure you create the database first as described above, and then try to it import again. ERROR 1064: You have an error in your SQL syntax; check the manual that corresponds to your MySQL server version for the right syntax to use near 'username_database' at line x. This error message occurs when the import file does not contain backup data for a database or there is a MySQL syntax error in the file. Alternatively, the import file may be altered, corrupt, or in an unsupported format. (Import files must contain SQL statements; other file formats such as CSV do not work with the mysql program.) Try exporting the database again, and then try to import it.More Information
For more information about the mysqldump database command line program, please visit http://dev.mysql.com/doc/refman/5.1/en/mysqldump.html. For more information about the mysql command line program, please visit http://dev.mysql.com/doc/refman/5.1/en/mysql.html. For more information about phpMyAdmin, please visit http://www.phpmyadmin.net.How to set up a remote MySQL connection
This article describes how to use a local computer to connect to your MySQL databases stored remotely on A2 Hosting servers. Table of Contents Choose a remote MySQL connection method Method #1: Set up an SSH tunnel Microsoft Windows Mac OS X and Linux Method #2: Set up a direct connection Example ODBC connection Troubleshooting More Information Related ArticlesChoose a remote MySQL connection method
You can use either of the following methods to access your MySQL databases remotely: SSH tunnel: This is the more secure method. You set up an SSH tunnel that forwards a port on your local computer to the remote MySQL server. The MySQL traffic is encrypted by the SSH tunnel. Direct connection: You can set up a direct connection between your local computer and the remote MySQL server. Although it is easier to configure, it is not as secure. After you have set up a remote MySQL connection, you can use a MySQL client application to manage your databases. For more information, please see this article.Method #1: Set up an SSH tunnel
The procedure you follow to set up an SSH tunnel between your local computer and the A2 Hosting server depends on the local computer's operating system.Microsoft Windows
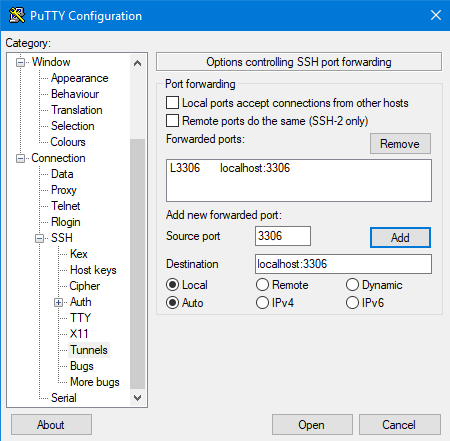
In order to use an SSH tunnel on a computer running Microsoft Windows, you need an SSH client program. A2 Hosting recommends using PuTTY, which you can download here. After you have downloaded the PuTTY executable to your local computer, you can set up an SSH tunnel. To set up an SSH tunnel on a computer running Microsoft Windows: Start PuTTY. In the Category pane, expand Connection, expand SSH, and then click Tunnels. In the Source port text box of the Port Forwarding section, type 3306. This is the local port to forward.In the Destination text box, type localhost:3306. Confirm that the Local and Auto radio buttons are selected. Click :
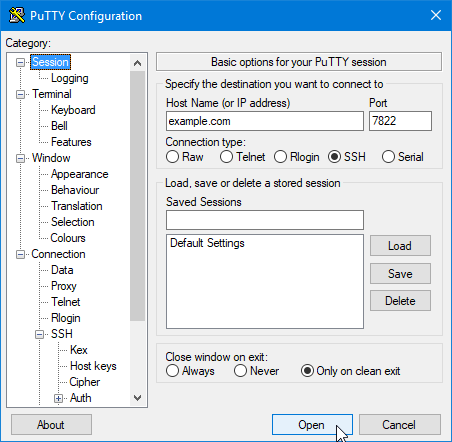
In the Category pane, click Session.In the Host Name (or IP address) text box, type your web site's domain name or IP address.In the Port text box, type 7822.Confirm that the Connection type radio button is set to SSH.
Click :
If a PuTTY security alert about the server's host key appears, click .When the login as prompt appears, type your A2 Hosting username, and then type your password.
When the remote server's command line prompt appears, the SSH tunnel is established and you can use your MySQL client applications on the local computer.
To verify that PuTTY is forwarding ports correctly, you can click the icon in the top-left corner of the PuTTY session window, and then click Event Log. If port forwarding is working correctly, you see a line similar to:
Local port 3306 forwarding to localhost:3306
 Optionally, you can use the Database list box to select an initial database for the connection.To complete the configuration, click .
 To work around this issue, create a tunnel with an alternate local port, and then connect to the remote MySQL server on that port.
If you use Putty to create the tunnel, use an alternate Source port on the Tunnels configuration page. In this example, port 3307 is being used:
To work around this issue, create a tunnel with an alternate local port, and then connect to the remote MySQL server on that port.
If you use Putty to create the tunnel, use an alternate Source port on the Tunnels configuration page. In this example, port 3307 is being used:
 The session configuration does not change.
For Mac OS X or Linux, use the following SSH command to create the tunnel with a local port of 3307. Replace username with your A2 Hosting username, and replace example.com with your site's domain name:
ssh -p 7822 username@example.com -L 3307:localhost:3306
Create the ODBC connection as previously described, but type 3307 in the Port text box (instead of 3306).
The session configuration does not change.
For Mac OS X or Linux, use the following SSH command to create the tunnel with a local port of 3307. Replace username with your A2 Hosting username, and replace example.com with your site's domain name:
ssh -p 7822 username@example.com -L 3307:localhost:3306
Create the ODBC connection as previously described, but type 3307 in the Port text box (instead of 3306).
 You should now be able to connect.
Mac OS X and Linux
To establish an SSH tunnel on a computer running Mac OS X or Linux: Open a terminal window and type the following command at the command line. Replace username with your A2 Hosting username, and replace example.com with your site's domain name: ssh -p 7822 username@example.com -L 3306:localhost:3306 Type your password, and then press Enter. When the remote server's command line prompt appears, the SSH tunnel is established and you can use your MySQL client applications on the local computer.Method #2: Set up a direct connection
To set up a direct connection between your local computer and the MySQL server, you must enable remote MySQL access in cPanel. For information about how to do this, please see this article.Example ODBC connection
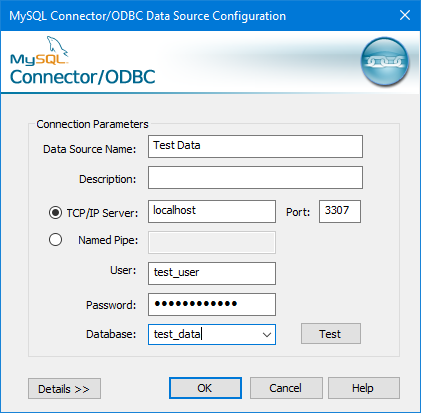
The following procedure demonstrates how to configure a remote ODBC connection: Launch the ODBC Data Source Administrator. Click to add a new data source. In the Create New Data Source dialog box, click the MySQL ODBC driver. Click to start the MySQL Connector/ODBC Data Source Configuration. On the MySQL Connector/ODBC Data Source Configuration dialog box, in the Data Source Name text box, type a descriptive name for the data source. Confirm that TCP/IP Server is selected. Do one of the following: If you are using an SSH tunnel, in the TCP/IP Server text box, type localhost. If you are using a direct connection, in the TCP/IP Server text box, type the domain or IP address of the remote server. In the Port text box, type 3306.In the User text box, type a database username that can connect to the remote database.In the Password text box, type the password for the username. To test the connection, click :
Optionally, you can use the Database list box to select an initial database for the connection.To complete the configuration, click .
Troubleshooting
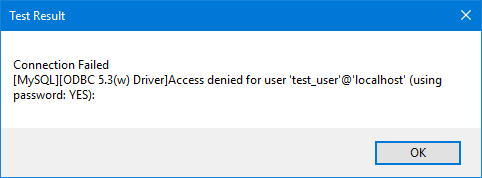
If you are doing development work on the local computer, a local copy of MySQL may already be running on port 3306. In this case, the following connection error appears:
To work around this issue, create a tunnel with an alternate local port, and then connect to the remote MySQL server on that port.
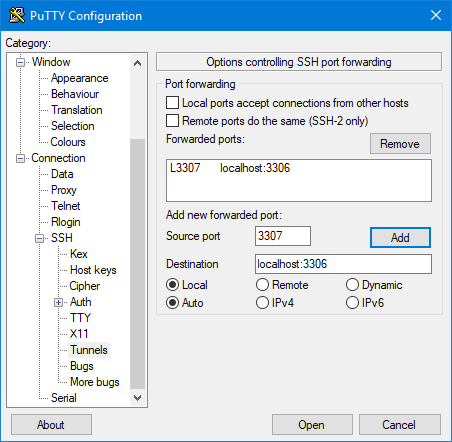
If you use Putty to create the tunnel, use an alternate Source port on the Tunnels configuration page. In this example, port 3307 is being used:
The session configuration does not change.
For Mac OS X or Linux, use the following SSH command to create the tunnel with a local port of 3307. Replace username with your A2 Hosting username, and replace example.com with your site's domain name:
ssh -p 7822 username@example.com -L 3307:localhost:3306
Create the ODBC connection as previously described, but type 3307 in the Port text box (instead of 3306).
You should now be able to connect.
More Information
To view the online documentation for PuTTY, please visit http://the.earth.li/~sgtatham/putty/0.60/htmldoc/index.html.Using MySQL client applications
This article describes how to use MySQL client applications to access and manage your MySQL databases. Table of Contents MySQL client applications MySQL Workbench More Information Related ArticlesMySQL client applications
MySQL provides GUI (graphical user interface) client applications that you can use for database management: MySQL Workbench: This integrated tools environment enables you to manage databases, run queries, and much more. It replaces the older MySQL GUI Tools application bundle, which is no longer actively developed. MySQL Workbench is free to download and use. There are versions for Microsoft Windows, Mac OS X, Linux, and other operating systems.MySQL Workbench
MySQL Workbench enables you to quickly connect to your MySQL databases. To do this, follow these steps: Start MySQL Workbench. From the workspace page, click the + icon next to MySQL Connections. The Setup New Connection dialog appears. In the Connection Name text box, type a name for the connection. In the Connection Method list box, select Standard (TCP/IP). On the Parameters tab, in the Hostname text box, type example.com, where example.com represents your domain name. Confirm that the Port text box is set to 3306. In the Username text box, type one of the following usernames: Your A2 Hosting (cPanel) account username: With this username, you can access all of the MySQL databases on your hosting account. A MySQL database username you created in cPanel: With this username, you can access all of the MySQL databases for which the specified user has been granted privileges. In the Default Schema text box, type the name of the MySQL database that you want to access. Alternatively, you can leave this text box blank to select the database later. Click , and then in the Password text box, type the password for the username you specified in step 7.To have MySQL Workbench remember your password, select the Save password in keychain check box.
Click .
If you receive a connection warning about incompatible or nonstandard server versions, click .If the connection is successful, you receive a Successfully made the MySQL connection message. If you do not receive this message, check the values you specified in steps 4 to 9, and then try again.Click . MySQL Workbench saves the new connection on the workspace page.To open the connection, click it on the workspace page. You can now run queries, create tables, and more.
More Information
To download MySQL Workbench and view the online documentation, please visit http://dev.mysql.com/downloads/tools/workbench.How to Create & Manage MySQL Databases, Tables & Users
This article describes how to do common MySQL database administration tasks from the command line using the mysql program.This article only applies to the products listed in the Article Details sidebar. If your account includes cPanel, you should use it instead to manage MySQL databases and users. For information about how to do this, please see this article.Table of Contents
Create MySQL Databases and Users
Using SQL script files
Delete MySQL Tables and Databases
Delete MySQL Users
More Information
Related Articles
Create MySQL Databases and Users
To create MySQL database and users, follow these steps: At the command line, log in to MySQL as the root user: mysql -u root -p Type the MySQL root password, and then press Enter. To create a database user, type the following command. Replace username with the user you want to create, and replace password with the user's password: GRANT ALL PRIVILEGES ON *.* TO 'username'@'localhost' IDENTIFIED BY 'password'; This command grants the user all permissions. However, you can grant specific permissions to maintain precise control over database access. For example, to explicitly grant the SELECT permission, you would use the following command: GRANT SELECT ON *.* TO 'username'@'localhost'; For more information about setting MySQL database permissions, please visit https://dev.mysql.com/doc/refman/5.5/en/grant.html. Type \q to exit the mysql program. To log in to MySQL as the user you just created, type the following command. Replace username with the name of the user you created in step 3: mysql -u username -p Type the user's password, and then press Enter. To create a database, type the following command. Replace dbname with the name of the database that you want to create: CREATE DATABASE dbname; To work with the new database, type the following command. Replace dbname with the name of the database you created in step 7: USE dbname; You can now work with the database. For example, the following commands demonstrate how to create a basic table named example, and how to insert some data into it: CREATE TABLE example ( id smallint unsigned not null auto_increment, name varchar(20) not null, constraint pk_example primary key (id) ); INSERT INTO example ( id, name ) VALUES ( null, 'Sample data' );Using SQL script files
The previous procedure demonstrates how to create and populate a MySQL database by typing each command interactively with the mysql program. However, you can streamline the process by combining commands into a SQL script file. The following procedure demonstrates how to use a SQL script file to create and populate a database: As in the previous procedure, you should first create a user for the database. To do this, type the following commands: mysql -u root -p GRANT ALL PRIVILEGES ON *.* TO 'username'@'localhost' IDENTIFIED BY 'password'; \q Create a file named example.sql and open it in your preferred text edtior. Copy and paste the following text into the file: CREATE DATABASE dbname; USE dbname; CREATE TABLE tablename ( id smallint unsigned not null auto_increment, name varchar(20) not null, constraint pk_example primary key (id) ); INSERT INTO tablename ( id, name ) VALUES ( null, 'Sample data' ); Replace dbname with the name of the database that you want to create, and tablename with the name of the table that you want to create. You can modify the sample script file to create multiple databases and tables all at once. Additionally, the sample script creates a very simple table. You will likely have additional data requirements for your tables.Save the changes to the example.sql file and exit the text editor. To process the SQL script, type the following command. Replace username with the name of the user you created in step 1: mysql -u username -p < example.sql The mysql program processes the script file statement by statement. When it finishes, the database and table are created, and the table contains the data you specified in the INSERT statements.Delete MySQL Tables and Databases
To delete a table, type the following command from the mysql> prompt. Replace tablename with the name of the table that you want to delete: DROP TABLE tablename; This command assumes that you have already selected a database by using the USE statement. Similarly, to delete an entire database, type the following command from the mysql> prompt. Replace dbname with the name of the database that you want to delete: DROP DATABASE dbname;The mysql program does not ask for confirmation when you use this command. As soon as you press Enter, MySQL deletes the database and all of the data it contains.
Delete MySQL Users
To view a list of all users, type the following command from the mysql> prompt: SELECT user FROM mysql.user GROUP BY user; To delete a specific user, type the following command from the mysql> prompt. Replace username with the name of the user that you want to delete: DELETE FROM mysql.user WHERE user = 'username';More Information
To view the official MySQL documentation, please visit https://dev.mysql.com/doc/refman/5.5/en/index.html.Related Articles
-
Connecting to MySQL from the command line
Learn how to connect to MySQL from the command line using the mysql program with this guide including detailed instructions, code snippets and links to related articles.
Reset MySQL root password
You can reset your MySQL root password if you have forgotten it. This article shows you how to change it. Note that you must have root access to your server to accomplish this.
Change User's MySQL Password | Reset MySQL Root Password Guide
This article describes how to reset MySQL's root password in the event you have forgotten it. You must have root access on the server to reset MySQL's root password.Table of Contents Rest MySQL Root Password Related ArticlesRest MySQL Root Password
To reset the root password for MySQL, follow these steps: Log in to your account using SSH. You must run the commands in the following steps as the root user. Therefore, you can either log in directly as the root user (which is not recommended for security reasons), or use the su or sudo commands to run the commands as the root user. Stop the MySQL server using the appropriate command for your Linux distribution: For CentOS and Fedora, type: service mysqld stop For Debian and Ubuntu, type: service mysql stop Restart the MySQL server with the —skip-grant-tables option. To do this, type the following command: mysqld_safe --skip-grant-tables &Make sure you type the ampersand (&) at the end of the command. This runs the command in the background and allows you to type the commands in the following steps.
Running MySQL with the —skip-grant-tables option enabled is highly insecure, and should only be done for a brief period while you reset the password. The steps below show you how to stop the mysqld_safe server instance safely and start the MySQL server securely after you have reset the root password.
Log into MySQL using the following command:
mysql
At the mysql> prompt, reset the password. To do this, type the following command, replacing NEW-PASSWORD with the new root password:
UPDATE mysql.user SET Password=PASSWORD('NEW-PASSWORD') WHERE User='root';
At the mysql> prompt, type the following commands:
FLUSH PRIVILEGES;
exit;
Stop the MySQL server using the following command. You will be prompted to enter the new MySQL root password before the MySQL server shuts down:
mysqladmin -u root -p shutdown
Start the MySQL server normally. To do this, type the appropriate command for your Linux distribution:
For CentOS and Fedora, type:
service mysqld start
For Debian and Ubuntu, type:
service mysql start
Related Articles
-
Connecting to MySQL from the command line
Learn how to connect to MySQL from the command line using the mysql program with this guide including detailed instructions, code snippets and links to related articles.
MySQL Stored Procedure & MySQL Functions Guide
This article describes how to set up and use MySQL functions and MySQL stored procedure on your A2 Hosting account. You can use stored functions and procedures for a wide range of scenarios. For example, well-designed stored functions and procedures can enhance database security, improve data integrity, and increase performance. Table of Contents MySQL Functions Setting up a test database Creating the stored function Using the stored function MySQL Stored Procedure More Information Related ArticlesMySQL Functions
MySQL stored functions provide a powerful and flexible way to manipulate and process data. You can run the previous SQL command (and the following SQL commands) from the command line using the MySQL tool, or in your web browser using phpMyAdmin.Creating the stored function
We have a database and a table to work with, we are ready to create a stored function. Let's create a function named calcProfit. This function takes two input parameters: the cost and the price of something. It calculates the profit by subtracting the cost from the price, and then returns the value to the calling expression. To create this stored function, run the following MySQL statements: DELIMITER $$ CREATE FUNCTION calcProfit(cost FLOAT, price FLOAT) RETURNS DECIMAL(9,2) BEGIN DECLARE profit DECIMAL(9,2); SET profit = price-cost; RETURN profit; END$$ DELIMITER ; The DELIMITER command at the beginning of these statements prevents MySQL from processing the function definition too soon. The DELIMITER command at the end of these statements returns processing to normal.Using the stored function
You can now use the stored function in a database query. The following SQL statement demonstrates how to do this: SELECT *, calcProfit(prod_cost,prod_price) AS profit FROM products; This SQL statement returns the following results: +---------+--------------+-----------+------------+--------+ | prod_id | prod_name | prod_cost | prod_price | profit | +---------+--------------+-----------+------------+--------+ | 1 | Basic Widget | 5.95 | 8.35 | 2.40 | | 2 | Micro Widget | 0.95 | 1.35 | 0.40 | | 3 | Mega Widget | 99.95 | 140 | 40.05 | +---------+--------------+-----------+------------+--------+ As you can see, the calcProfit function automatically calculates the profit (price minus the cost) for each product in the table.MySQL Stored Procedure
Stored procedures are sometimes confused with stored functions, but they are different in some important ways. Stored procedures, for example, must be invoked with the CALL statement, whereas stored functions can be used directly in SQL expressions. You can define and run stored procedures on any A2 Hosting server that uses MySQL. The following MySQL statements demonstrate how to create a very basic stored procedure named procedureTest. This procedure performs a simple lookup on the products table that we used in the stored function example above. Although this procedure does not have much practical use, it demonstrates the correct syntax and structure for declaring a stored procedure: DELIMITER $$ CREATE PROCEDURE procedureTest() BEGIN SELECT prod_name FROM products; END$$ DELIMITER ; To invoke the stored procedure, use the following MySQL statement: CALL procedureTest() \G If you are using phpMyAdmin, type the previous MySQL statement without the \G option at the end.More Information
For more information about stored procedures and functions in MySQL, please visit http://dev.mysql.com/doc/refman/5.0/en/create-procedure.html.How to create and use MySQL views
This article describes how to create and use MySQL views on your A2 Hosting account. Views do not actually store any data. Instead, they store predefined queries that return a result set. Because MySQL views look and function like regular tables, they are sometimes called virtual tables. Views offer a number of advantages. You can use views to hide table columns from users by granting them access to the view and not to the table itself. This helps enhance database security and integrity. Views can also help you construct simplified, abstracted interfaces to complex databases. Table of Contents Creating and using views Setting up a test database Creating the view Using the view More Information Related ArticlesCreating and using views
You can create and use views on any A2 Hosting server that uses MySQL.Setting up a test database
To demonstrate a basic example using views, let's start by creating a database for testing purposes. In the following SQL statement, replace username with your account username: CREATE DATABASE username_test; You can run the previous SQL command (and the following SQL commands) from the command line using the MySQL tool, or in your web browser using phpMyAdmin. If you are using phpMyAdmin, click the name username_test to select the database. Otherwise, if you are using the mysql command-line program, type the following SQL statement: USE username_test; Next, create a table in the username_test database named products. To do this, run the following SQL statement: CREATE TABLE products (prod_id INT NOT NULL AUTO_INCREMENT, prod_name VARCHAR(20) NOT NULL, prod_cost FLOAT NOT NULL DEFAULT 0.0, prod_price FLOAT NOT NULL DEFAULT 0.0, PRIMARY KEY(prod_id)); The following SQL statement adds some sample data to the products table: INSERT INTO products (prod_name, prod_cost, prod_price) VALUES ('Basic Widget',5.95,8.35),('Micro Widget',0.95,1.35),('Mega Widget',99.95,140.00);Creating the view
Now that we have a database and a table to work with, we are ready to create a simple view. Let's create a view named minimumPriceView. This view returns a data set of all products whose cost is greater than 1.00 (in dollars, Euros, or whatever currency unit we're working with). To create this view, run the following MySQL statement: CREATE VIEW minimumPriceView AS SELECT prod_name FROM products WHERE prod_cost > 1.00; As you can see, the basic syntax to create a view is CREATE VIEW name AS query. Replace name with the name of the view, and replace query with the SQL query that you want to use. If you look at a list of the tables in the database, you will see the minimumPriceView view listed alongside the other tables. Remember, however, that views are virtual tables containing queries. They do not contain any actual data.Using the view
You can now use the minimumPriceView view in a query: SELECT * FROM minimumPriceView; This SQL statement returns the following results: +--------------+ | prod_name | +--------------+ | Basic Widget | | Mega Widget | +--------------+ 2 rows in set (0.00 sec) The minimumPriceView view has done all of the work behind the scenes, pulling out the products whose cost exceeds the value 1.00. Although this is a very simple example of a view, you can use the same techniques in your own databases to build more complex views.Using MySQL triggers
Triggers are predefined rules associated with a table. They can be called ("triggered") before or after a SQL statement inserts, updates, or deletes data from the associated table. You can use triggers in a wide range of scenarios. For example, you could use a trigger to automatically change certain values when a row is updated. Or, you could specify a set of actions to take whenever a row is deleted. The possibilities are almost endless. Table of Contents Creating and using MySQL triggers Setting up a test database Creating the MySQL trigger Using the MySQL trigger More Information Related ArticlesCreating and using MySQL triggers
You can create and use triggers on any A2 Hosting server that uses MySQL.Setting up a test database
To demonstrate a basic example of a trigger in action, let's start by creating a database for testing purposes. In the following SQL statement, replace username with your account username: CREATE DATABASE username_test; You can run the previous SQL command (and the following SQL commands) from the command line using the MySQL tool, or in your web browser using phpMyAdmin. If you are using phpMyAdmin, click the name username_test to select the database. Otherwise, if you are using the mysql command-line program, type the following SQL statement: USE username_test; Next, create a table in the username_test database named products. To do this, run the following SQL statement: CREATE TABLE products (prod_id INT NOT NULL AUTO_INCREMENT, prod_name VARCHAR(20) NOT NULL, prod_cost FLOAT NOT NULL DEFAULT 0.0, prod_price FLOAT NOT NULL DEFAULT 0.0, PRIMARY KEY(prod_id)); The following SQL statement adds some sample data to the products table: INSERT INTO products (prod_name, prod_cost, prod_price) VALUES ('Basic Widget',5.95,8.35),('Micro Widget',0.95,1.35),('Mega Widget',99.95,140.00); Now we're ready to create a trigger for our table!Creating the MySQL trigger
Let's create a trigger named updateProductPrice. This particular trigger is activated whenever the products table is updated. When this event occurs, the trigger checks each row to see if the product cost (prod_cost) value is being changed. If it is, then the trigger automatically sets the item's new price (prod_price) to 1.40 times the item's new cost (in other words, a 40% markup). To create this trigger, run the following MySQL statements: DELIMITER $$ CREATE TRIGGER `updateProductPrice` BEFORE UPDATE ON `products` FOR EACH ROW BEGIN IF NEW.prod_cost <> OLD.prod_cost THEN SET NEW.prod_price = NEW.prod_cost * 1.40; END IF ; END$$ DELIMITER ; The DELIMITER command at the beginning of these statements prevents MySQL from processing the trigger definition too soon. The DELIMITER command at the end of these statements returns processing to normal.Using the MySQL trigger
The updateProductPrice trigger is now ready to be invoked automatically whenever a row in the products table is updated. For example, run the following SQL statement to change the cost of the Basic Widget: UPDATE products SET prod_cost = 7.00 WHERE prod_id = 1; When you run this SQL statement, the trigger activates as well, and automatically updates the Basic Widget's price in proportion to the new cost. To verify this, you can run the following SQL statement: SELECT * FROM products; This statement returns the following results: +---------+--------------+-----------+------------+ | prod_id | prod_name | prod_cost | prod_price | +---------+--------------+-----------+------------+ | 1 | Basic Widget | 7 | 9.8 | | 2 | Micro Widget | 0.95 | 1.35 | | 3 | Mega Widget | 99.95 | 140 | +---------+--------------+-----------+------------+ 3 rows in set (0.00 sec) As you can see, the updateProductPrice trigger has automatically updated the Basic Widget's price (9.80) based on the new cost (7.00). Although this is a simple example of what a trigger can do, you can use the same techniques in your own databases—the possibilities are almost endless.How to create a MySQL installation for local testing
This article describes how to create a MySQL installation that you can use for local testing.The following procedures assume that you have already created a virtual machine running CentOS 7 on your local computer. For information about how to do this, please see this article.
Table of Contents
Installing MySQL
Related Articles
At this point newuser has no permissions to do anything with the databases. In fact, even if newuser tries to login (with the password, password), they will not be able to reach the MySQL shell. Therefore, the first thing to do is to provide the user with access to the information they will need.
![]() Using Microsoft Query to import data
to import external data into Excel with Microsoft Query, follow these basic steps, each of which is described in more detail in the following sections.
Using Microsoft Query to import data
to import external data into Excel with Microsoft Query, follow these basic steps, each of which is described in more detail in the following sections.
![]() , click Excel Options, and then click the Advanced category.
In the Editing options section, select the Extend data range formats and formulas check.
To turn off automatic data range formatting again, clear this check box.
Refreshing external data
When you refresh external data, you run the query to retrieve any new or changed data that matches your specifications.
You can refresh a query in both Microsoft Query and Excel.
Excel provides several options for refreshing queries, including refreshing the data whenever you open the workbook and automatically refreshing it at timed intervals.
You can continue to work in Excel while data is being refreshed, and you can also check the status while the data is being refreshed.
https://support.microsoft.com/en-us/office/refresh-an-external-data-connection-in-excel-1524175f-777a-48fc-8fc7-c8514b984440
For more information, see Refresh an external data connection in Excel.
, click Excel Options, and then click the Advanced category.
In the Editing options section, select the Extend data range formats and formulas check.
To turn off automatic data range formatting again, clear this check box.
Refreshing external data
When you refresh external data, you run the query to retrieve any new or changed data that matches your specifications.
You can refresh a query in both Microsoft Query and Excel.
Excel provides several options for refreshing queries, including refreshing the data whenever you open the workbook and automatically refreshing it at timed intervals.
You can continue to work in Excel while data is being refreshed, and you can also check the status while the data is being refreshed.
https://support.microsoft.com/en-us/office/refresh-an-external-data-connection-in-excel-1524175f-777a-48fc-8fc7-c8514b984440
For more information, see Refresh an external data connection in Excel.
Installing MySQL
A2 Hosting servers actually use MariaDB, an enhanced drop-in replacement for MySQL. For detailed information about compatibility between MariaDB and MySQL, please visit https://mariadb.com/kb/en/library/mariadb-vs-mysql-compatibility. To install MariaDB on your virtual machine, follow these steps: Start the virtual machine, if you haven't already. Log in to the virtual machine as the root user. At the command prompt, type the following command to install MariaDB: yum install mariadb-server At the Is this ok prompt, type y and then press Enter. The installation process begins. After installation completes, type the following command to start MariaDB: systemctl start mariadb To confirm MariaDB is running, type the following command: systemctl status mariadb You should see Active: active (running) in the output. To make MariaDB start automatically on system boot, type the following command: systemctl enable mariadb To secure the installation, type the following command: mysql_secure_installation This program enables you to set the root MySQL password and other security-related settings. To make sure the root password was set correctly, type the following command: mysql -u root -p Type the root password that you set in step 8, and then press Enter. You should see Welcome to the MariaDB monitor in the output.How to Create a New User
Let’s start by making a new user within the MySQL shell:CREATE USER 'newuser'@'localhost' IDENTIFIED BY 'password';
Note: When adding users within the MySQL shell in this tutorial, we will specify the user’s host as localhost and not the server’s IP address.
localhost is a hostname which means “this computer,” and MySQL treats this particular hostname specially: when a user with that host logs into MySQL it will attempt to connect to the local server by using a Unix socket file.
Thus, localhost is typically used when you plan to connect by SSHing into your server or when you’re running the local mysql client to connect to the local MySQL server.At this point newuser has no permissions to do anything with the databases. In fact, even if newuser tries to login (with the password, password), they will not be able to reach the MySQL shell. Therefore, the first thing to do is to provide the user with access to the information they will need.
GRANT ALL PRIVILEGES ON * .
* TO 'newuser'@'localhost';
The asterisks in this command refer to the database and table (respectively) that they can access—this specific command allows to the user to read, edit, execute and perform all tasks across all the databases and tables.
Please note that in this example we are granting newuser full root access to everything in our database.
While this is helpful for explaining some MySQL concepts, it may be impractical for most use cases and could put your database’s security at high risk.
Once you have finalized the permissions that you want to set up for your new users, always be sure to reload all the privileges.
FLUSH PRIVILEGES;
Your changes will now be in effect.
How To Grant Different User Permissions
Here is a short list of other common possible permissions that users can enjoy. ALL PRIVILEGES- as we saw previously, this would allow a MySQL user full access to a designated database (or if no database is selected, global access across the system) CREATE- allows them to create new tables or databases DROP- allows them to them to delete tables or databases DELETE- allows them to delete rows from tables INSERT- allows them to insert rows into tables SELECT- allows them to use theSELECT command to read through databases
UPDATE- allow them to update table rows
GRANT OPTION- allows them to grant or remove other users’ privileges
To provide a specific user with a permission, you can use this framework:
GRANT type_of_permission ON database_name.table_name TO ‘username’@'localhost’;
If you want to give them access to any database or to any table, make sure to put an asterisk (*) in the place of the database name or table name.
Each time you update or change a permission be sure to use the Flush Privileges command.
If you need to revoke a permission, the structure is almost identical to granting it:
REVOKE type_of_permission ON database_name.table_name FROM ‘username’@‘localhost’;
Note that when revoking permissions, the syntax requires that you use FROM, instead of TO as we used when granting permissions.
You can review a user’s current permissions by running the following:
SHOW GRANTS username;
Just as you can delete databases with DROP, you can use DROP to delete a user altogether:
DROP USER ‘username’@‘localhost’;
To test out your new user, log out by typing:
quit
and log back in with this command in terminal:
mysql -u [username] -p
sql2000
启动项目 "C:\Program Files (x86)\Microsoft SQL Server\80\Tools\Binn\sqlmangr.exe" /nUse Microsoft Query to retrieve external data
You can use Microsoft Query to retrieve data from external sources. By using Microsoft Query to retrieve data from your corporate databases and files, you don't have to retype the data that you want to analyze in Excel. You can also refresh your Excel reports and summaries automatically from the original source database whenever the database is updated with new information. Using Microsoft Query, you can connect to external data sources, select data from those external sources, import that data into your worksheet, and refresh the data as needed to keep your worksheet data synchronized with the data in the external sources. Types of databases that you can access You can retrieve data from several types of databases, including Microsoft Office Access, Microsoft SQL Server, and Microsoft SQL Server OLAP Services. You can also retrieve data from Excel workbooks and from text files. Microsoft Office provides drivers that you can use to retrieve data from the following data sources: Microsoft SQL Server Analysis Services (OLAP provider) Microsoft Office Access dBASE Microsoft FoxPro Microsoft Office Excel Oracle Paradox Text file databases You can use also ODBC drivers or data source drivers from other manufacturers to retrieve information from data sources that are not listed here, including other types of OLAP databases. For information about installing an ODBC driver or data source driver that is not listed here, check the documentation for the database, or contact your database vendor. Selecting data from a database You retrieve data from a database by creating a query, which is a question that you ask about data stored in an external database. For example, if your data is stored in an Access database, you might want to know the sales figures for a specific product by region. You can retrieve a part of the data by selecting only the data for the product and region that you want to analyze. With Microsoft Query, you can select the columns of data that you want and import only that data into Excel. Updating your worksheet in one operation Once you have external data in an Excel workbook, whenever your database changes, you can refresh the data to update your analysis — without having to re-create your summary reports and charts. For example, you can create a monthly sales summary and refresh it every month when the new sales figures come in. How Microsoft Query uses data sources After you set up a data source for a particular database, you can use it whenever you want to create a query to select and retrieve data from that database — without having to retype all of the connection information. Microsoft Query uses the data source to connect to the external database and to show you what data is available. After you create your query and return the data to Excel, Microsoft Query provides the Excel workbook with both the query and data source information so that you can reconnect to the database when you want to refresh the data. Using Microsoft Query to import data
to import external data into Excel with Microsoft Query, follow these basic steps, each of which is described in more detail in the following sections.
Using Microsoft Query to import data
to import external data into Excel with Microsoft Query, follow these basic steps, each of which is described in more detail in the following sections.
Connect to a data source
What is a data source? A data source is a stored set of information that allows Excel and Microsoft Query to connect to an external database. When you use Microsoft Query to set up a data source, you give the data source a name, and then supply the name and the location of the database or server, the type of database, and your logon and password information. The information also includes the name of an OBDC driver or a data source driver, which is a program that makes connections to a specific type of database. To set up a data source by using Microsoft Query: On the Data tab, in the Get External Data group, click From Other Sources, and then click From Microsoft Query. Do one of the following: To specify a data source for a database, text file, or Excel workbook, click the Databases tab. To specify an OLAP cube data source, click the OLAP Cubes tab. This tab is available only if you ran Microsoft Query from Excel. Double-click <New Data Source>. -or- Click <New Data Source>, and then click OK. The Create New Data Source dialog box is displayed. In step 1, type a name to identify the data source. In step 2, click a driver for the type of database that you are using as your data source. Notes: If the external database that you want to access is not supported by the ODBC drivers that are installed with Microsoft Query, then you need to obtain and install a Microsoft Office-compatible ODBC driver from a third-party vendor, such as the manufacturer of the database. Contact the database vendor for installation instructions. OLAP databases do not require ODBC drivers. When you install Microsoft Query, drivers are installed for databases that were created by using Microsoft SQL Server Analysis Services. To connect to other OLAP databases, you need to install a data source driver and client software. Click Connect, and then provide the information that is needed to connect to your data source. For databases, Excel workbooks, and text files, the information that you provide depends on the type of data source that you selected. You may be asked to supply a logon name, a password, the version of the database that you are using, the database location, or other information specific to the type of database. Important: Use strong passwords that combine uppercase and lowercase letters, numbers, and symbols. Weak passwords don't mix these elements. Strong password: Y6dh!et5. Weak password: House27. Passwords should be 8 or more characters in length. A pass phrase that uses 14 or more characters is better. It is critical that you remember your password. If you forget your password, Microsoft cannot retrieve it. Store the passwords that you write down in a secure place away from the information that they help protect. After you enter the required information, click OK or Finish to return to the Create New Data Source dialog box. If your database has tables and you want a particular table to display automatically in the Query Wizard, click the box for step 4, and then click the table that you want. If you don't want to type your logon name and password when you use the data source, select the Save my user ID and password in the data source definition check box. The saved password is not encrypted. If the check box is unavailable, see your database administrator to determine whether this option can be made available. Security Note: Avoid saving logon information when connecting to data sources. This information may be stored as plain text, and a malicious user could access the information to compromise the security of the data source. After you complete these steps, the name of your data source appears in the Choose Data Source dialog box.Use the Query Wizard to define a query
Use the Query Wizard for most queries The Query Wizard makes it easy to select and bring together data from different tables and fields in your database. Using the Query Wizard, you can select the tables and fields that you want to include. An inner join (a query operation that specifies that rows from two tables are combined based on identical field values) is created automatically when the wizard recognizes a primary key field in one table and a field with the same name in a second table. You can also use the wizard to sort the result set and to do simple filtering. In the final step of the wizard, you can choose to return the data to Excel, or further refine the query in Microsoft Query. After you create the query, you can run it in either Excel or in Microsoft Query. To start the Query Wizard, perform the following steps. On the Data tab, in the Get External Data group, click From Other Sources, and then click From Microsoft Query. In the Choose Data Source dialog box, make sure that the Use the Query Wizard to create/edit queries check box is selected. Double-click the data source that you want to use. -or- Click the data source that you want to use, and then click OK. Work directly in Microsoft Query for other types of queries If you want to create a more complex query than the Query Wizard allows, you can work directly in Microsoft Query. You can use Microsoft Query to view and to change queries that you start creating in the Query Wizard, or you can create new queries without using the wizard. Work directly in Microsoft Query when you want to create queries that do the following: Select specific data from a field In a large database, you might want to choose some of the data in a field and omit data that you don't need. For example, if you need data for two of the products in a field that contains information for many products, you can use criteria to select data for only the two products that you want. Retrieve data based on different criteria each time you run the query If you need to create the same Excel report or summary for several areas in the same external data — such as a separate sales report for each region — you can create a parameter query. When you run a parameter query, you are prompted for a value to use as the criterion when the query selects records. For example, a parameter query might prompt you to enter a specific region, and you could reuse this query to create each of your regional sales reports. Join data in different ways The inner joins that the Query Wizard creates are the most common type of join used in creating queries. Sometimes, however, you want to use a different type of join. For example, if you have a table of product sales information and a table of customer information, an inner join (the type created by the Query Wizard) will prevent the retrieval of customer records for customers who have not made a purchase. Using Microsoft Query, you can join these tables so that all the customer records are retrieved, along with sales data for those customers who have made purchases. To start Microsoft Query, perform the following steps. On the Data tab, in the Get External Data group, click From Other Sources, and then click From Microsoft Query. In the Choose Data Source dialog box, make sure that the Use the Query Wizard to create/edit queries check box is clear. Double-click the data source that you want to use. -or- Click the data source that you want to use, and then click OK. Reusing and sharing queries In both the Query Wizard and Microsoft Query, you can save your queries as a .dqy file that you can modify, reuse, and share. Excel can open .dqy files directly, which allows you or other users to create additional external data ranges from the same query. To open a saved query from Excel: On the Data tab, in the Get External Data group, click From Other Sources, and then click From Microsoft Query. The Choose Data Source dialog box is displayed. In the Choose Data Source dialog box, click the Queries tab. Double-click the saved query that you want to open. The query is displayed in Microsoft Query. If you want to open a saved query and Microsoft Query is already open, click the Microsoft Query File menu, and then click Open. If you double-click a .dqy file, Excel opens, runs the query, and then inserts the results into a new worksheet. If you want to share an Excel summary or report that is based on external data, you can give other users a workbook that contains an external data range, or you can create a template. A template allows you to save the summary or report without saving the external data so that the file is smaller. The external data is retrieved when a user opens the report template.Work with the data in Excel
After you create a query in either the Query Wizard or Microsoft Query, you can return the data to an Excel worksheet. The data then becomes an external data range or a PivotTable report that you can format and refresh. Formatting retrieved data In Excel, you can use tools, such as charts or automatic subtotals, to present and to summarize the data retrieved by Microsoft Query. You can format the data, and your formatting is retained when you refresh the external data. You can use your own column labels instead of the field names, and add row numbers automatically. Excel can automatically format new data that you type at the end of a range to match the preceding rows. Excel can also automatically copy formulas that have been repeated in the preceding rows and extends them to additional rows. Note: In order to be extended to new rows in the range, the formats and formulas must appear in at least three of the five preceding rows. You can turn on this option (or off again) at any time: Click File > Options > Advanced. In Excel 2007: Click the Microsoft Office Button , click Excel Options, and then click the Advanced category.
In the Editing options section, select the Extend data range formats and formulas check.
To turn off automatic data range formatting again, clear this check box.
Refreshing external data
When you refresh external data, you run the query to retrieve any new or changed data that matches your specifications.
You can refresh a query in both Microsoft Query and Excel.
Excel provides several options for refreshing queries, including refreshing the data whenever you open the workbook and automatically refreshing it at timed intervals.
You can continue to work in Excel while data is being refreshed, and you can also check the status while the data is being refreshed.
https://support.microsoft.com/en-us/office/refresh-an-external-data-connection-in-excel-1524175f-777a-48fc-8fc7-c8514b984440
For more information, see Refresh an external data connection in Excel.
, click Excel Options, and then click the Advanced category.
In the Editing options section, select the Extend data range formats and formulas check.
To turn off automatic data range formatting again, clear this check box.
Refreshing external data
When you refresh external data, you run the query to retrieve any new or changed data that matches your specifications.
You can refresh a query in both Microsoft Query and Excel.
Excel provides several options for refreshing queries, including refreshing the data whenever you open the workbook and automatically refreshing it at timed intervals.
You can continue to work in Excel while data is being refreshed, and you can also check the status while the data is being refreshed.
https://support.microsoft.com/en-us/office/refresh-an-external-data-connection-in-excel-1524175f-777a-48fc-8fc7-c8514b984440
For more information, see Refresh an external data connection in Excel.